Asus TM-551 Bedienungsanleitung
Asus
Computergehäuse
TM-551
Lesen Sie kostenlos die 📖 deutsche Bedienungsanleitung für Asus TM-551 (2 Seiten) in der Kategorie Computergehäuse. Dieser Bedienungsanleitung war für 26 Personen hilfreich und wurde von 2 Benutzern mit durchschnittlich 4.5 Sternen bewertet
Seite 1/2
English
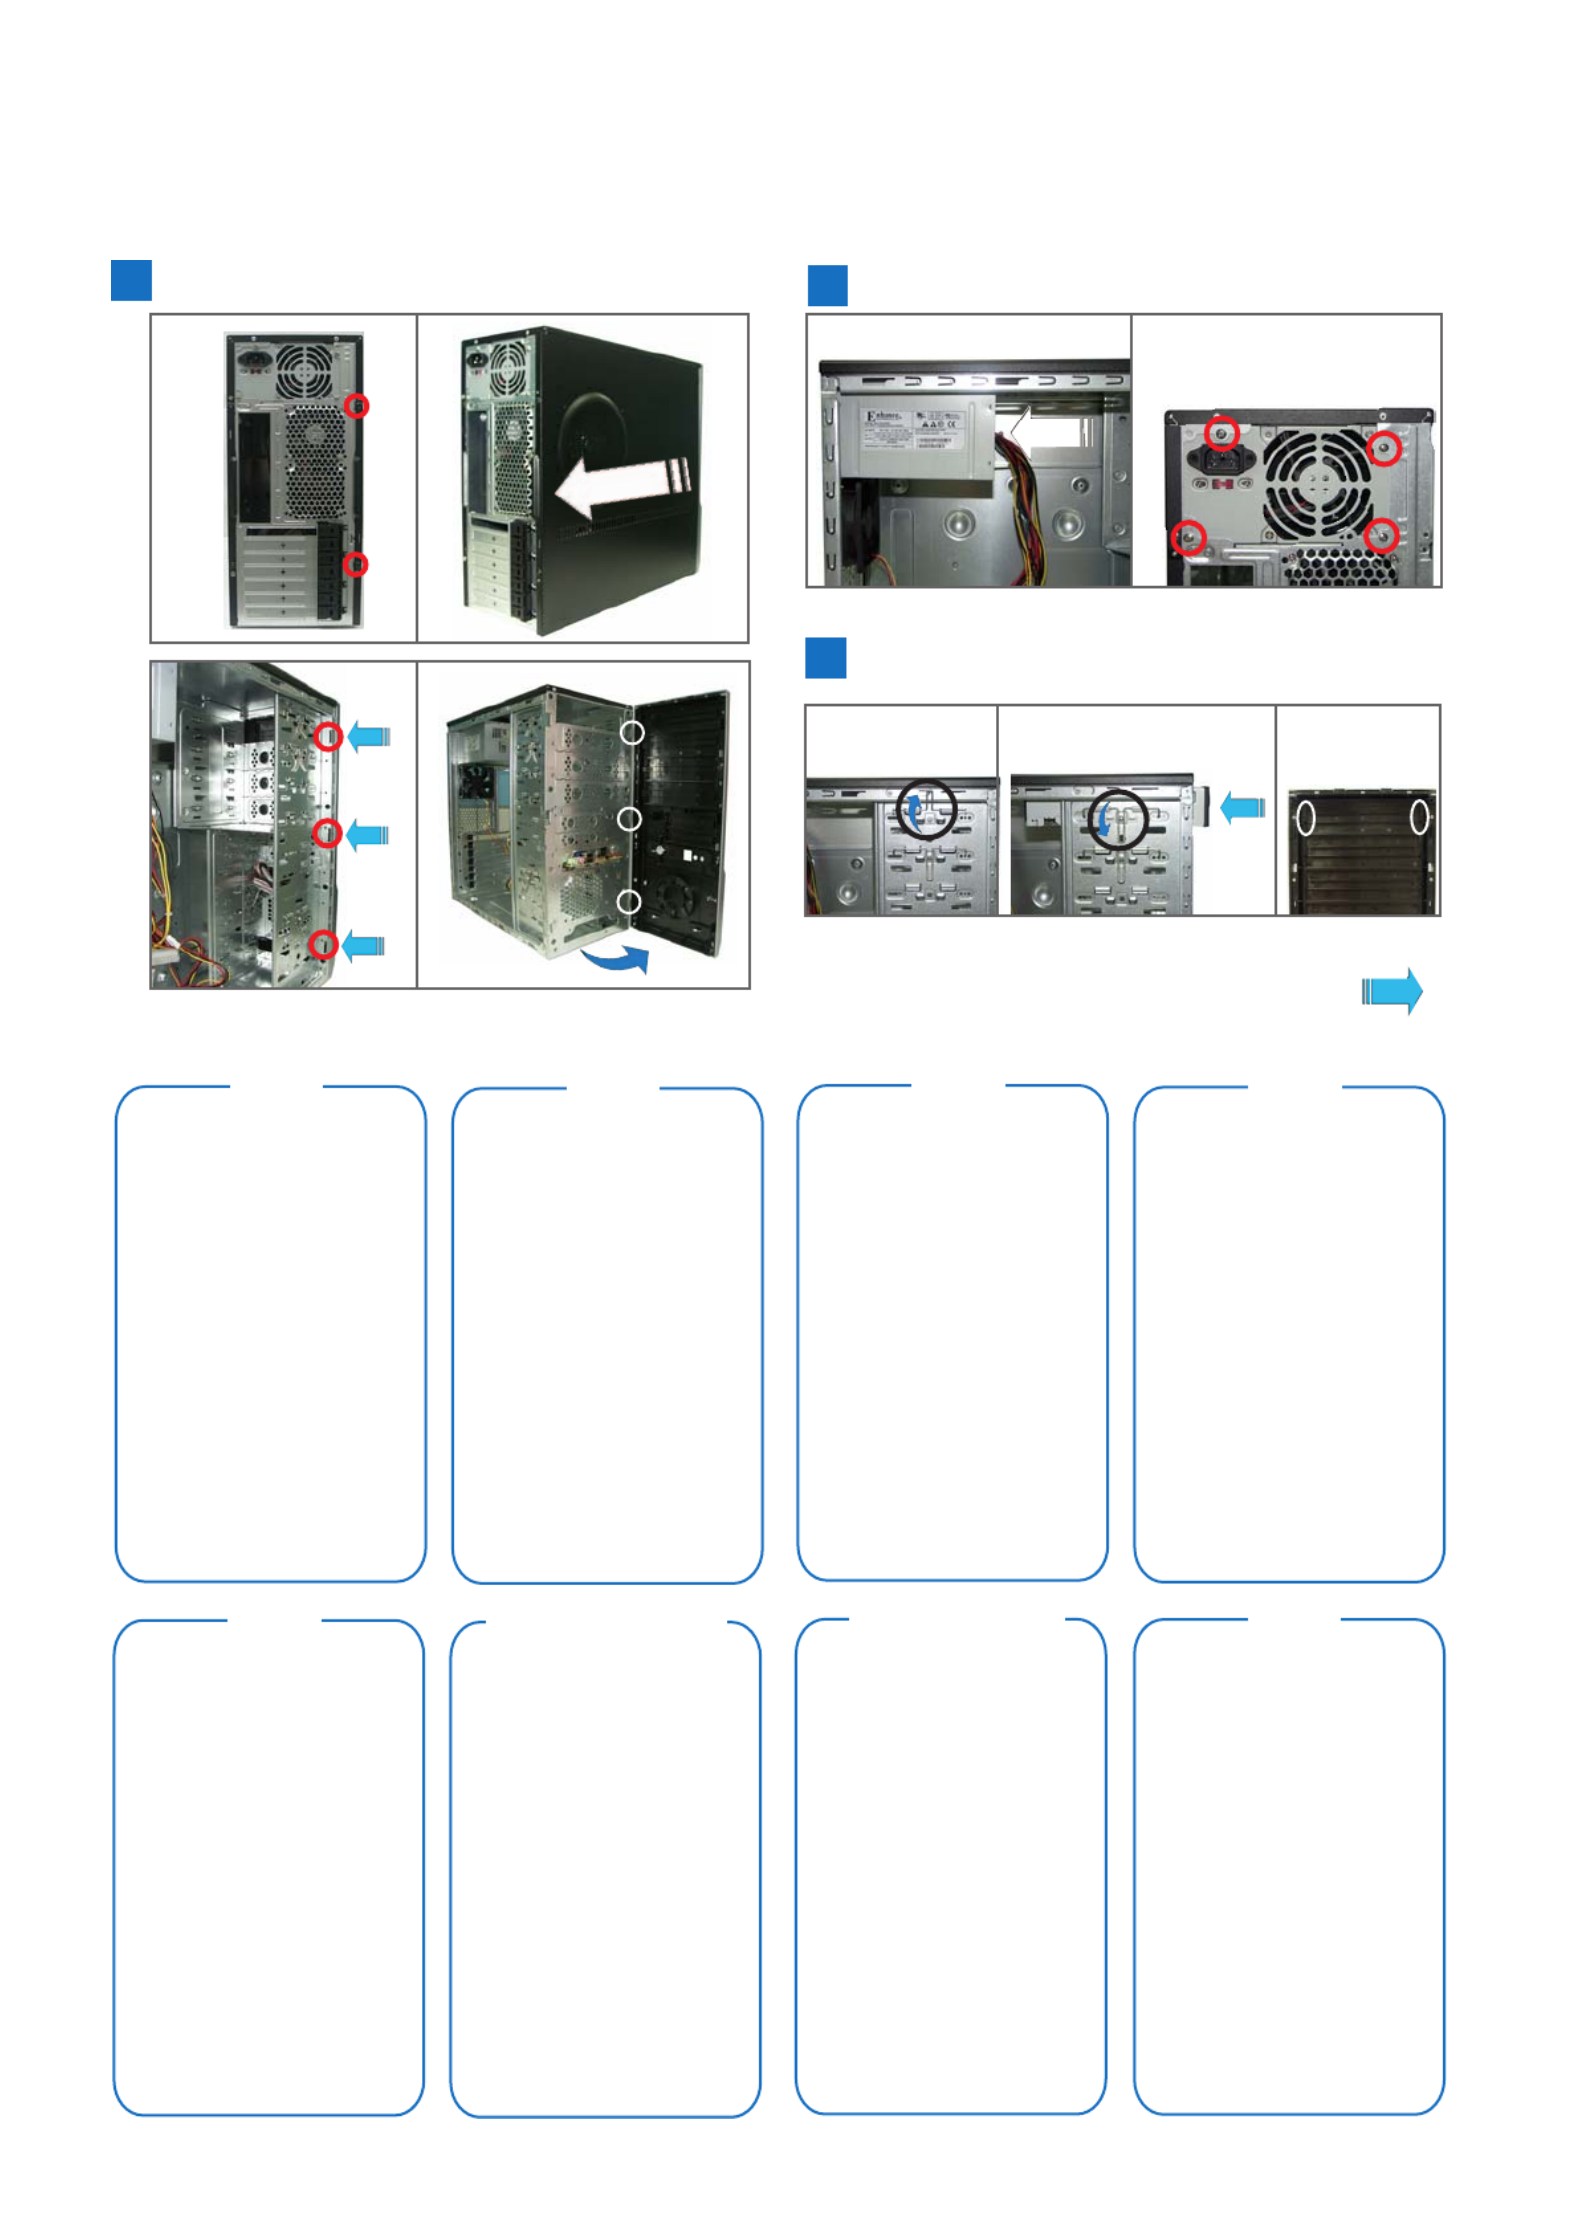
A
1. Remove the screws on the rear panel.
2. Push the side cover towards the rear
panel.
3. Release the side tabs that secure the
front bezel to the chassis.
4. Swing the front bezel in the direction of
the arrow. Unhook the hinge-like tabs.
B
1. Slide the PSU into the slot until it snugly
fits the metal rail.
2. Secure with screws.
C
1. Push the bay lock upward.
2. Insert the ODD into the bay.
3. Align the ODD holes with the bay holes,
then push down the bay lock to secure the
ODD.
4. Release the lock tabs on the front bezel
to disengage the drive cover.
Russian
German
Traditional Chinese
French
Simplified Chinese Arabic
Spanish
C Installing an optical disk drive (ODD)
124
3
B Installing the power supply unit (PSU)
21
Continued at the back
A Removing the side cover and front bezel
1 2
34
E2461
TA-TM5 Series (Screwless Model)

Russian
German
Traditional Chinese
French
Simplified Chinese
Arabic
Spanish
English
D
1. Push the bay lock upward.
2. Insert the HDD into the bay.
3. Align the HDD holes with the bay holes,
then push down the bay lock to secure
the HDD.
E
1. Using a screwdriver, push the knock-down
metal cover in and out of the chassis until
it is removed.
2. Insert the FDD into the bay.
3. Secure the FDD with screws.
4. Release the lock tabs on the front bezel
to disengage the drive cover.
F
1. Remove the metal cover opposite the
slot that you want to use.
2. Align the card connector with the slot,
then press firmly until the card is
completely seated on the slot.
3. Push the expansion card lock on the rear
panel to secure the slot.
G
1. Hook the hinge-like tabs to the holes on
the chassis. Swing the front bezel in the
direction of the arrow and push to secure
the front bezel to the chassis.
2. Push the side cover towards the front
bezel.
3. Drive screws on the rear panel.
G Reinstalling the side cover and front bezel
2 3
1
F Installing an expansion card
21 3
E Installing a floppy disk drive (FDD)
2
4
3
1
D Installing a hard disk drive (HDD)
12
3
TA-TM5 Series (Screwless Model)
continued
Produktspezifikationen
| Marke: | Asus |
| Kategorie: | Computergehäuse |
| Modell: | TM-551 |
Brauchst du Hilfe?
Wenn Sie Hilfe mit Asus TM-551 benötigen, stellen Sie unten eine Frage und andere Benutzer werden Ihnen antworten
Bedienungsanleitung Computergehäuse Asus

5 August 2024
2 August 2024
24 Februar 2024
2 Dezember 2023
13 November 2023
Bedienungsanleitung Computergehäuse
- Computergehäuse 3M
- Computergehäuse Corsair
- Computergehäuse Cougar
- Computergehäuse Gigabyte
- Computergehäuse Sharkoon
- Computergehäuse Zalman
- Computergehäuse Icy Box
- Computergehäuse Dell
- Computergehäuse Enermax
- Computergehäuse Razer
- Computergehäuse Supermicro
- Computergehäuse Genesis
- Computergehäuse Techly
- Computergehäuse Cooler Master
- Computergehäuse HYTE
- Computergehäuse NZXT
- Computergehäuse SilverStone
- Computergehäuse Thermaltake
- Computergehäuse Monoprice
- Computergehäuse Be Quiet!
- Computergehäuse Phanteks
- Computergehäuse Akasa
- Computergehäuse Antec
- Computergehäuse Intel
- Computergehäuse StarTech.com
- Computergehäuse ModeCom
- Computergehäuse KRUX
- Computergehäuse XPG
- Computergehäuse Advantech
- Computergehäuse Gamdias
- Computergehäuse AeroCool
- Computergehäuse Akyga
- Computergehäuse Xigmatek
- Computergehäuse Rosewill
- Computergehäuse Fractal Design
- Computergehäuse Savio
- Computergehäuse Chenbro Micom
- Computergehäuse SilentiumPC
- Computergehäuse IStarUSA
- Computergehäuse Evnbetter
- Computergehäuse 3R System
- Computergehäuse Logic
- Computergehäuse Chieftec
- Computergehäuse CoolerMaster
Neueste Bedienungsanleitung für -Kategorien-

3 Oktober 2024
3 Oktober 2024

3 Oktober 2024
2 Oktober 2024

28 September 2024
22 September 2024
22 September 2024
19 September 2024
18 September 2024
12 September 2024