Alphatronics SLA-22 DW Bedienungsanleitung
Alphatronics
Fernsehen
SLA-22 DW
Lesen Sie kostenlos die 📖 deutsche Bedienungsanleitung für Alphatronics SLA-22 DW (60 Seiten) in der Kategorie Fernsehen. Dieser Bedienungsanleitung war für 25 Personen hilfreich und wurde von 2 Benutzern mit durchschnittlich 4.5 Sternen bewertet
Seite 1/60

www.alphatronics.de
Operating instructions
For all alphatronics TV sets
with webOS Hub operating system (2nd Generation)
991215_ _01/24REF_A

22
CONTENTS
1. Introduction 4 ................................................................................................................................................................................
2. Our quality promise 4 ..................................................................................................................................................................
3. New operating system webOS Hub 5 .......................................................................................................................................
4. Intended use ...............................................................................................................................................................................5
5. General safety instructions 6 ......................................................................................................................................................
5.1 General information 6 ............................................................................................................................................................
5.2 Notes on transport 6 .............................................................................................................................................................
5.3 Notes on installation 7 ...........................................................................................................................................................
5.4 Notes on the power supply 8 ...............................................................................................................................................
6. Scope of delivery 9 .......................................................................................................................................................................
7. Product in detail 10 .......................................................................................................................................................................
7.1 Connection overview 10 .........................................................................................................................................................
7.2 Remote controls 11 .................................................................................................................................................................
7.2.1 Normal version 11 .............................................................................................................................................................
7.2.2 Magic remote control 12 ................................................................................................................................................
7.2.3 Inserting the batteries 14 ..............................................................................................................................................
8. Mounting the TV set 14 ...............................................................................................................................................................
8.1 Wall mounting with VESA mount 14 ..................................................................................................................................
8.2 Mounting the stand 15 .........................................................................................................................................................
9. Commissioning 15 .........................................................................................................................................................................
9.1 Installation wizard 15 ............................................................................................................................................................
9.2 Setting up reception mode .............................................................................................................................................24
9.2.1 Search under Antenna (DVB-T2) 25 .............................................................................................................................
9.2.2 Search under satellite (DVB-S2) 26 .............................................................................................................................
10. Home screen 30 ...........................................................................................................................................................................
10.1 Digital user manual 31 .........................................................................................................................................................
11. Reception 32 ..................................................................................................................................................................................
11.1 Setting up DVB-S2 (satellite) 32 ..........................................................................................................................................
11.1.1 Setup with predened list 33 ........................................................................................................................................
11.1.2 Setup via other providers 34 ........................................................................................................................................
11.2 Setting up DVB-T2 (aerial) ..............................................................................................................................................38

33
ENGLISH
ENGLISH
ENGLISH
ENGLISH
ENGLISH
12. Basic functions (reception) 40 ..................................................................................................................................................
12.1 Switching between reception modes 40 ...........................................................................................................................
12.2 Setting up quick access keys 41 ........................................................................................................................................
12.3 Channel sorting via „ChanSort“ 41 ........................................................................................................................................
12.3.1 Exporting / importing transmitter lists 41 ................................................................................................................
12.3.2 Channel manager (sort channel list) 42 ....................................................................................................................
12.4 HbbTV 43 ................................................................................................................................................................................
12.5 PVR recording & timeshift 43 ............................................................................................................................................
12.6 Displaying the CI+ information 45 ....................................................................................................................................
13. Multimedia function 46 ..............................................................................................................................................................
13.1 Integrated DVD player (depending on model) 46 ............................................................................................................
13.2 Audio output ....................................................................................................................................................................47
13.3 Enjoying TV sound mode together ...................................................................................................................................47
14. Other useful functions 48 ..........................................................................................................................................................
14.1 Connecting the Windows PC (wirelessly) to the TV set 48 ...........................................................................................
14.2 USB camera support 48 ......................................................................................................................................................
14.3 App Store & ThinQ App 48 ..................................................................................................................................................
14.4 Web browser 50 ...................................................................................................................................................................
15. Settings .....................................................................................................................................................................................51
15.1 Quick access to the settings ...........................................................................................................................................51
15.2 Family settings 52 ................................................................................................................................................................
15.3 Resetting the TV set 52 .......................................................................................................................................................
15.4 Changing the country setting and language 52 ..............................................................................................................
16. Technical data 53 .........................................................................................................................................................................
17. Legal information 55 ...................................................................................................................................................................

44
1. INTRODUCTION
Thank you for choosing an alphatronics TV set and for placing your trust in us. Our products are specially developed
for the needs of the mobile world and stand for reliable quality that you can trust.
These operating instructions are intended to help you handle and operate your product. We therefore recommend
that you read the instructions carefully.
Keep the manual for the entire service life of the product and pass it on to subsequent users or owners. Please check
the scope of delivery for completeness and ensure that no faulty or damaged parts are included.
2. OUR QUALITY PROMISE
alphatronics focus is on quality and optimum conditions for the use of our TV sets in vehicles, true to our guiding
principle of „greatness in detail“. To achieve this goal, we attach particular importance to the following parameters:
Made in Germany - All our TVs are assembled, tested and packaged with love on site in Nuremberg (Bavaria).
25 years of experience and innovation - Many years of experience in the mobile world is crucial in the development
and improvement of our TV sets. To communicate our pride in this, our products have been bearing the new „German
Quality - Since 1999“ seal since this year.
Focus on safety - Safety aspects such as voltage stability, reverse polarity protection and special corrosion protec-
tion ensure the longevity of our TV sets.
Thoroughly tested - In addition to the legal requirements, we regularly subject our TV sets to vibration and climate
tests. This ensures awless operation even under extreme conditions, such as at the North Cape in sub-zero tempe-
ratures or in the desert in extreme heat.
Pixel error class 0 - As an optimised image is important to us, every panel is tested and delivered to be 100% pixel er-
ror-free. Should a panel nevertheless have a pixel error, it will be replaced free of charge within the warranty period.
Sophisticated technology - special wide-angle displays, CIS screen technology, external WIFI antennas and ecient
power consumption are particularly important in our development and make all the dierence.
Cooperation - We work closely with our partner LG Electronics Inc. As a reference customer for webOS Hub in the
camping sector, we are actively involved in the further development of the system and are pioneers in the imple-
mentation of new functions.

55
ENGLISH
ENGLISH
ENGLISH
ENGLISH
ENGLISH
3. NEW OPERATING SYSTEM WEBOS HUB
In this TV generation, we are using the latest version of the licensed webOS Hub operating system. This enables us
to further develop our existing technology and functions in terms of intuitive usability. This combines an operating
system that is familiar and appreciated by many from the home sector with the requirements of mobile applications.
An additional advantage of the webOS Hub operating system is the continuous further development and the cons-
tant addition of further functions via OTA updates.
The new generation of the webOS Hub operating system, identied by the abbreviation (DW or W), oers a range
of new functions, such as PVR recording, timeshift, optical sound output and the integration of Apple AirPlay 2.
Thanks to our licences with leading streaming platforms such as Netix, Amazon Prime, YouTube, Disney+ and Apple
TV, we can ensure that you have smooth and direct access to your lms and series on the go. It is important to us
that you can always enjoy a rst-class cinema experience with our TV sets, no matter where you are.
4. INTENDED USE
This TV set is intended exclusively for the reception and playback of picture and sound signals. For this purpose, the
TV set has a built-in triple tuner as well as a WIFI and Bluetooth® interface for playing media content from installed
apps or the Internet.
The TV set must not be operated in rooms with high humidity (e.g. bathroom or sauna). If the TV set is used outdoors,
ensure that it is protected from moisture (rain, dripping and splashing water). Moisture can lead to leakage currents
in the TV set. This can lead to a risk of contact with voltage or re.
If you have moved the TV set from a cold to a warm environment, condensation may occur. Leave the TV set swit-
ched o for approx. one hour.
The guarantee is only granted for use in the specied authorised environment!

66
5. GENERAL SAFETY INSTRUCTIONS
For your own safety and to prevent unnecessary damage to your TV set, please read and observe the following
safety instructions:
5.1 General information
Important safety instructions!
• This product is intended for private, non-commercial use!
• Like all electronic products, this product should not be used by children!
• This product is not intended for use by persons (including children) with reduced physical, sensory or mental
capabilities, or lack of experience and / or knowledge. Unless they are supervised by a person responsible for their
safety or have received instructions from you on how to use the TV set!
• In any of the following cases, unplug the appliance immediately and contact your customer service centre or the
service hotline:
- If the TV set has been subjected to an extremely strong shock!
- If the TV set has been damaged or if foreign objects have got into the TV set!
- If smoke or unusual odours emanate from the TV set!
• Do not disassemble the product into its individual parts. The TV set does not contain any user-serviceable compo-
nents. Improper assembly can lead to electric shocks or malfunctions!
• Never open the TV set! Any attempt at repair by unqualied persons can be dangerous!
• Do not make any changes to the product, as this will invalidate any warranty claims!
• Do not place any objects lled with liquid or naked ames (re) on the TV set!
5.2 Notes on transport
Important safety instructions!
Only touch the TV set by the edges of the housing! The display is made of glass or plastic and can break or be dama-
ged if handled improperly. Damage caused by external inuences is not covered by the guarantee!
• Avoid touching the screen or pressing on the screen or frame with your ngers for long periods of time. This can
lead to temporary distortion eects or damage to the screen.
• Do not apply strong pressure to the device display with your hand or a pointed object such as a nail, pencil or biros.

77
ENGLISH
ENGLISH
ENGLISH
ENGLISH
ENGLISH
• It is recommended that the TV set is moved or transported in its original box or packaging (if it has not been
permanently installed).
5.3 Notes on installation
Important safety instructions!
The ventilation slots on the back of the TV set must always remain unobstructed. Please do not place any foreign
objects such as newspapers, blankets or other textiles on or over the TV set. There should be at least 2 cm of free
space for air circulation on both sides and above the TV set.
If you place or mount the TV set in a cabinet or shelf, make sure that sucient air circulation is also possible there.
As with any electronic device, our product also requires air for cooling during operation. Obstruction of the air
circulation can lead to res or an automatic switch-o (protective switch-o) of the TV set.
• Protect the TV set from dusty environments!
• If the TV set is mounted on the wall, it must not be suspended from the power and signal cables on the back of the
TV set. Otherwise there is a risk of re or electric shock!
• Make sure that children do not hang on to the TV set or climb up it. Otherwise, the TV set may fall over and cause
serious injury!
• If you mount the TV set on the wall, attach a VESA wall bracket (optionally available) to the back of the TV set! If
you want to mount the TV set with a wall bracket, attach it carefully to prevent it from falling down!
• Do not place the TV set on unstable shelves or inclined surfaces! Also avoid locations that vibrate or on which the
product does not have a secure hold! Otherwise, the TV set may fall down or fall over, causing injury or damage
to the TV set!
• The TV set should not protrude forwards, especially when placed in or on furniture!
• Do not touch the ventilation openings when the TV set is running for a long time, as they could become hot!

88
5.4 Notes on the power supply
Important safety instructions!
Incorrect voltages can damage the TV set! This TV set may only be connected to a power supply network with the
voltage specied on the rating plate using the correct 12V/24V device connection cable!
Always lay the power cable in such a way that it cannot be damaged! The power cable must not be kinked, laid over
sharp edges, walked on or exposed to chemicals! A power cable with damaged insulation can lead to electric shocks
and is a re hazard!
Additional information - External 230V power supply unit (optional)
• When using the TV set in conjunction with a 230V power supply unit, ensure that it is always easily accessible. So
that it can be quickly removed from the socket in an emergency!
• Do not touch the mains plug with wet hands! If the contact pins are wet or dusty, dry the mains plug completely
or remove any dust from it. Moisture increases the risk of fatal electric shock!
• The power supply unit must be fully plugged into the socket! There is a risk of re if the power supply unit is not
rmly plugged into the socket!
• Do not touch the end of the mains cable with a conductive object (e.g. a fork) while the mains cable is connected
to the socket!
• Do not allow metal objects such as coins, hairpins, cutlery or wire or ammable objects such as paper or matches
to get into the TV set or power supply unit! Pay particular attention to children. There is a risk of electric shock, re
or injury! If an object gets into the TV set, unplug the power cable and contact customer service!
• The power supply unit must not come into contact with hot objects such as a radiator! In addition, do not place any
heavy objects or the TV set itself on the power cable! Otherwise there is a risk of re and electric shock!
• Do not connect too many electrical appliances to a single socket! Otherwise, overheating can lead to res!
Information- GS certied power supply units
All power supply units sold or supplied by us have GS certication from an external testing organisation (e.g. TÜV
Rheinland, Intertek or SGS) as an additional safety feature. This is intended to emphasise our own standards of
quality and safety over and above the CE approval.
Attention! Laser class 1
The remote control has an infrared diode of laser class 1. Do not look at it with optical devices to avoid eye injuries!
• There should be no objects between the remote control and the IR sensor.
• The signal from the remote control can be disturbed by sunlight or other strong light.

99
ENGLISH
ENGLISH
ENGLISH
ENGLISH
ENGLISH
Important safety instructions!
• Always store batteries in a childproof place! There is a risk of swallowing!
• Never attempt to recharge alkaline batteries!
• Do not short-circuit batteries or throw them into a re!
• Always replace both batteries at the same time! Do not mix old and new batteries or batteries of dierent types!
• Battery acid leaking from a battery can cause skin irritation! In the event of skin contact, rinse with plenty of
water. If the liquid gets into the eyes, rinse thoroughly with water, do not rub and consult a doctor immediately.
6. SCOPE OF DELIVERY
• TV set
• Remote control (Normal or Magic remote control - depending on model)
• 12V connection cable with cigarette lighter
• Mounting screws & other accessories
• Operating instructions
Please note! Please note that additional accessories may be included in the scope of delivery depending on the
dealer or sales area. The description of the scope of delivery listed here always refers to the standard retail version.

1010
7. PRODUCT IN DETAIL
7.1 Connection overview
1 2 3 4 5 6 7 8 9
1 Power connection (input voltage: 10.5 - 30 V DC)
2 RJ45 socket (LAN connection)
3 HDMI™ [Port 2] with CEC and ARC/eARC support
4 HDMI™ [Port 1] with CEC support
5 2x USB 2.0 connection
10 11
10 Cinch sockets (AV input)
11 CI+ slot (additional cards and module required!)
Information - HDMI™ ARC and HDMI™ CEC
ARC - ARC (Audio Return Channel) is a digital channel that televisions use to send audio data to a soundbar or AV
receiver via an HDMI™ cable. It does not matter whether the audio signal comes from the built-in TV tuner, a con-
nected streaming box or the games console.
CEC - Stands for Consumer Electronics Control and enables both the control of several devices connected via HDMI™
with just one remote control and the coupling of certain functions (e.g. switching on all devices together). Depen-
ding on the manufacturer, this function may be known dierently.
6 SPIDF / Toslink connection (digital sound output)
7 3.5 mm jack connection (headphones)
8 F-socket (SAT connection)
9 IEC-socket (aerial / cable connection)

1111
ENGLISH
ENGLISH
ENGLISH
ENGLISH
ENGLISH
7.2 Remote controls
Depending on the model line or the SET purchased, one of the following remote controls is included. The Magic re-
mote control can be retrotted at any time for models supplied with the normal version. Please contact your dealer
or visit our spare parts shop at: www.alphatronics.de
7.2.1 Normal version
1. [POWER] - Switch on/o
2. [TV] - Switch between TV and radio mode
3. [LENS] - Search function
4. [SUBTITLE] - Activate the subtitles
5. [ ] - Open the settings
6. [ ] - Source selection
7. [Keypad] - Digits 0-9
8. [LIST] - Open the programme guide, channels, TV planner
9. [ ] - Opening further functions (actions)
10. [ ] - Volume +/-
11. [ ] - Programme +/-
12. [AD] - Activate / deactivate the audio description
13. [GUIDE] - Opening the programme guide
14. [ ] - Mute
15. [PLAY] - Start playback
16. [ ] - Open the Home menu
17. [PAUSE] - Pause playback
18. [BACK] - Back to the last level
19. [EXIT] - Close menu / window
20. [Navigation button] + [ENTER] - Select and conrm
21. [TEXT] - Opening the teletext
22. [T. OPT] - Further teletext options
23. [MOVIES] - Open the movie library
24. [STOP] - Stopping playback
25. [NETFLIX] + [PRIME VIDEO] - Quick access buttons
26. [COLOUR BUTTONS] - Advanced settings / HbbTV
27. [REC] - Start a recording (PVR)

1212
Information - Audio description
Audio description is a function that enables blind and visually impaired viewers to better understand video content.
With audio description, a narrator describes what can be seen on the screen. This includes important information
about the plot, the characters or the locations. Text overlays are also read aloud. Please note that the availability
and scope of this function may depend on the programme in question.
7.2.2 Magic remote control
1. [POWER] - Switch on/o
2. [ ] - Switching an external set-top box on/o
3. [Keypad] - Digits 0-9
4. [-/LIST] - Open the programme guide, channel, TV planner
5. [ ] - Opening further functions (actions)
6. [ ] - Volume +/-
7. [ ] - Mute
8. [ ] - Control button for voice control
9. [ ] - Programme +/-
10. [ ] - Open the Home menu
11. [ ] - Open the settings
12. [NAVIGATION BUTTONS] - Navigation up/down/left/right
13. [SCROLL / ENTER] - Scroll and conrm the selection
14. [ ] - Back to the last level
15. [GUIDE] - Opening the programme guide
16. [ ] - Source selection
17. [NETFLIX] + [PRIME VIDEO] – Quick access buttons
18. [COLOUR BUTTONS] - Advanced settings / HbbTV
19. [MOVIES] - ÖOpen the movie library
20. [PLAY] - Start playback
21. [PAUSE] - Pause playback
Integrated AirMouse and
voice control

1313
ENGLISH
ENGLISH
ENGLISH
ENGLISH
ENGLISH
Connecting the remote control
The Magic remote control is a remote control with infrared and Bluetooth® interface, so unlike the normal remote
control, it must be programmed on the TV set.
Option 1 - During the initial installation: As mentioned in step 1 of the initial installation (chapter 9.1), point the
remote control with the batteries inserted at the TV set for about 15-20 seconds and press the scroll wheel [ENTER].
The remote control is then automatically registered on the TV set.
Variant 2 - Programming during operation: To programme the Magic Remote Control on your TV set, please point
it at the TV set during operation and for about 20 seconds. After a short time, a press and hold the [GUIDE] button
message will appear on the TV set conrming the registration. This procedure also works if the remote control was
previously programmed on another TV set and you want to reconnect it or connect it in another way.
Activating the Air Mouse
The Magic remote control has an integrated Air Mouse function that displays a digital mouse pointer on the screen
to make it easier to enter text or select certain elements.
Option 1: Point the remote control at the TV set and move it slightly from left to right (shake) until a mouse pointer
appears.
Option 2: Press the on the remote control while pointing it at the TV set.scroll wheel
Note! The mouse pointer disappears automatically if no movement is made or another button on the remote control
is pressed. If the mouse pointer does not react smoothly, you can reset or calibrate it by moving it to all four sides
of the screen edge.
Voice control
The Magic remote control has an integrated microphone with which you can use voice control. To activate the
microphone, press and hold the [ ] button. Then, while holding down the button, you can enter appropriate voice
commands or keywords for your search, such as „What will the weather be like in Nuremberg today“ or „Open the
Friends series on Amazon Prime“.
Tip! Make sure that the correct national language is set to avoid possible errors during speech recognition. The
menu language must match the spoken language. To ensure the best possible voice recognition, please speak slowly
and clearly at an appropriate volume and keep a distance of about 10 cm from the microphone of the Magic remote
control.

1414
7.2.3 Inserting the batteries
To insert the batteries, please open the battery cover on the back of the remote control. Carefully slide the battery
compartment cover downwards. Insert the batteries according to the polarity marked in the battery compartment
and close the battery compartment again.
Standard variant: 2x AAA I Micro I Type LR03
Magic remote control: 2x AA I Mignon I type LR06
Recommendation! We recommend removing the batteries if the product is not to be used for a longer period of time
to prevent acid from leaking in the battery compartment.
8. MOUNTING THE TV SET
8.1 Wall mounting with VESA mount
If you wish to mount the TV set permanently in a vehicle or on a wall, please only use a suitable VESA mount. The
TV set has standardised mounting points on the back in accordance with the following table:
Always use 4 screws with the appropriate thread for mounting. When mounting, ensure that the TV set is securely
attached to the wall bracket. The screw length should be selected depending on the type of wall mounting. Ensure
that you use screws of the correct length. Do not overtighten the screws to avoid damaging the TV set!
Device size VESA standard Screws
19“, 22“, 24“, 27“ 100 x 100 M4
32“ (devices with illuminated logo)
32“ (devices with illuminated logo)
100 x 100
100 x 200
M4
M6
40“ 200 x 200 M6

1515
ENGLISH
ENGLISH
ENGLISH
ENGLISH
ENGLISH
8.2 Mounting the stand
As an alternative to mounting on the wall or in the vehicle, the TV set can also be mounted on a stand. As our TVs
are predominantly permanently mounted in the vehicle, we have decided to remove the stand from the standard
scope of delivery since model year 2024. If you still require the stand, you can order it via your dealer or our spare
parts shop at www.alphatronics.de
When installing the stand, please ensure that the screws are not overtightened! Also make sure that there are no
objects between the two components during assembly to avoid the risk of injury. You will need a Phillips screwdri-
ver to t the screws.
9. COMMISSIONING
Connecting the TV set to the power supply
To operate the TV set for the time, connect it to the power supply in the vehicle. Use either the 12V connection rst
cable supplied or a suitable alternative power cable. Make sure that the on/o switch directly on the TV set is set
to [ON].
9.1 Installation wizard
When the TV set is connected to the mains and switched on for the rst time, the installation wizard starts auto-
matically and guides you through the individual steps of the initial installation. Each step is also explained on the
screen.
Step 1 - Connecting the remote control
Programming the remote control

1616
In this installation section, you must pair the supplied remote control with the TV. To do this, press the correspon-
ding button, depending on the remote control model.
Step 2 - Selecting the language and country
Language selection
Normal version
Magic remote control

1717
ENGLISH
ENGLISH
ENGLISH
ENGLISH
ENGLISH
Selection of language and country
Use the arrow buttons on the remote control to select your desired language and then the country in which the TV
set is to be operated.
Conrm your selection by pressing the button on the remote control. This selection can be adjusted later at [ENTER]
any time in the settings under General > System > Language.
To proceed to the next installation step, select [Next] at the bottom centre of the screen and conrm your selection
again by pressing [ENTER].
In our example here, English and United Kingdom were selected.
Please note! The selection of the country inuences the available app oer. Due to licence restrictions, not all apps
are available in every country!
Message of the audio instructions
Please note! In accordance with a new EU directive, all selection options are also played back acoustically during
this step. Once you have selected your country, you have the option of deactivating this function. This is done to
make setting up the TV set more accessible for people with visual impairments.

1818
Step 3 - Setting up the television
In the next step of the installation, you can select how the TV set should be set up. You can choose between the
options or [Mobile Device] [TV].
Use the navigation buttons on the remote control to select the desired method and conrm your selection with the
[ENTER] button.
Recommendation! By default, we recommend that all customers select the setup option, as this is quicker and [TV]
easier to use. Setup via smartphone is particularly suitable for customers who already own a TV with webOS and
have an LG account and the ThinQ app.
Setup via the television
Setup via the mobile device
In this case, a QR code is displayed on the screen, which you must scan with your smartphone or tablet. This will
allow you to download the LG „ThinQ“ app or it will open automatically after scanning. Then follow the instructions
in the app to continue the setup.

1919
ENGLISH
ENGLISH
ENGLISH
ENGLISH
ENGLISH
Information - Demo mode
The setting shown at the bottom left of the picture can be ignored and is intended exclusively for retail partners who
display the TV set in the shop. It activates a special demo mode that is used exclusively to present the functions of
the TV set.
Step 4 - WIFI connection
A LAN or WIFI connection is required to be able to use all the functions of the TV set, especially in connection with
streaming. This can be congured in the next step. Alternatively, this step can also be skipped and conguration can
be carried out afterwards. As soon as the following window opens, the TV set automatically searches for all available
WIFI networks in the vicinity.
Network search
Select the desired network and conrm your selection by pressing the button.[ENTER]
Input mask for the password

2020
The following input screen appears, in which the WIFI password can be entered. Then conrm the entry by pressing
the button. [ENTER]
Successful connection establishment
Once the network connection has been successfully established, the following window is displayed before the
system automatically proceeds to the next step.
Error in connection setup
If you have entered the password incorrectly or the signal strength is insucient, the window shown above will be
displayed. Enter the password again or check that the external WIFI antenna is properly attached to the TV and that
the network has at least 2 bars of signal strength. You can check this using another device such as a smartphone
or tablet.

2121
ENGLISH
ENGLISH
ENGLISH
ENGLISH
ENGLISH
Step 5 - Conrm the terms and conditions
General terms and conditions divided into groups
In order to use the TV set and its apps in connection with the Internet, you must accept the individual declarations.
As our TV sets are based on LG‘s operating system (webOS Hub), the declarations are concluded with LG Electronics
Inc.
Please note! If you reject these declarations, the TV set cannot be connected to the Internet or cannot be used to
its full extent!
Please read these statements carefully and accept them by ticking the appropriate boxes: > Select all > More > Agree

2222
Step 6 - Analysing the user environment
Analysing connected devices
This step is used to congure other connected peripheral devices (e.g. consoles, smart sticks, etc.). If no other
devices have been connected, you can skip this step by clicking [Next].
If appropriately connected devices are recognised, the TV set automatically checks whether CEC control is possible.
This means that these devices (if supported) can also be controlled using the remote control supplied.
In our case, no other devices have been connected. Click to go to the next step.[Next]
How is the TV set used? With or without a set-top box?
In the next selection point, you can now specify how the TV set is to be used, e.g. only as a TV (as in our example)
or together with a set-top box.
Use the arrow buttons to select the desired setting and conrm your selection with the button.[ENTER]

2323
ENGLISH
ENGLISH
ENGLISH
ENGLISH
ENGLISH
Special feature: Postcode query (United Kingdom)
Enter Broadcast Address Settings
Please note! This query only appears if United Kingdom has been selected as the country, as this is a legal licence
requirement.
Now enter the postcode of your place of residence and conrm your selection with the key and the Next [ENTER]
selection eld.
Setting the installation type
Mounting type
Now select how the TV set is mounted or positioned in the vehicle. The selection adapts the sound prole of the TV
set to the corresponding installation type.
The selection is made using the navigation buttons and the button on the remote control.[ENTER]
2424
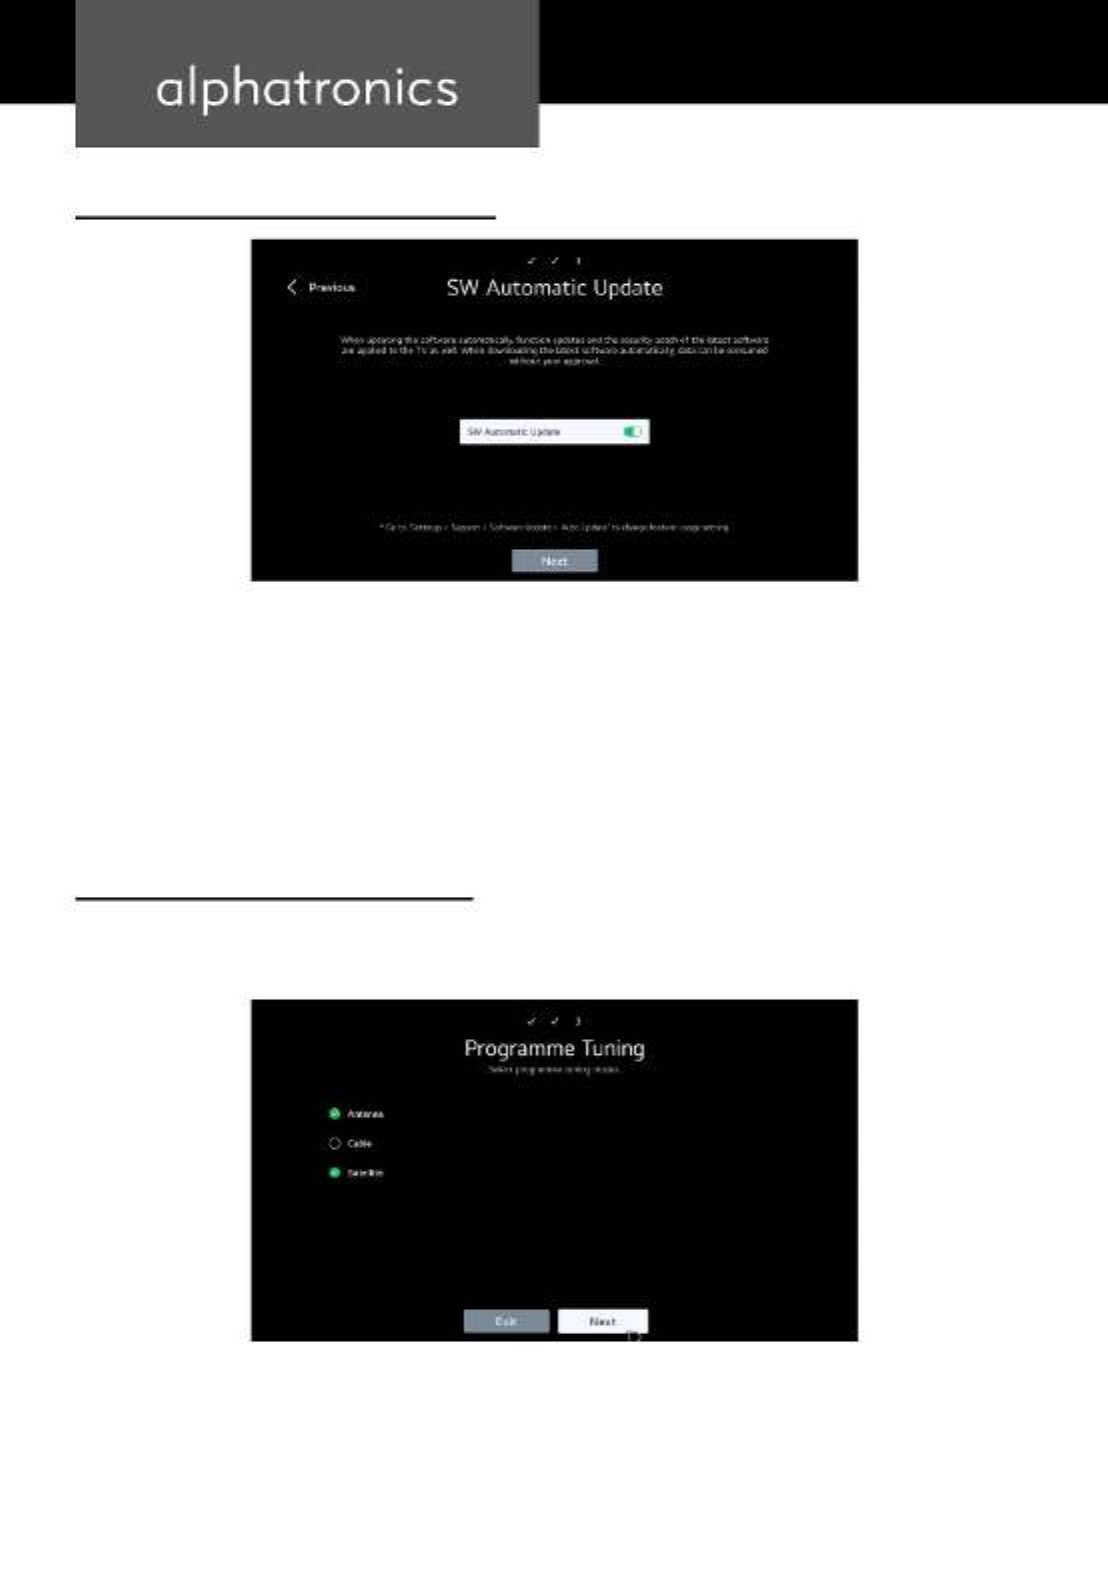
Step 7 - Activating the automatic software update
Allow automatic updates
Professional tip! We recommend always activating this function. This means that the TV set automatically updates
the software as soon as a new version is available. Software updates can add new functions and resolve potential
problems.
9.2 Setting up the reception mode
Step 8 - Channel setting (satellite, aerial, cable)
In this section, you can select the desired reception types to be used later (multiple selection possible). In our
example, the setup for aerial (DVB-T2) and satellite (DVB-S2) is shown.
Selecting the reception types (aerial, cable, satellite)
Select the desired reception types and then press [Next].

2525
ENGLISH
ENGLISH
ENGLISH
ENGLISH
ENGLISH
9.2.1 Search under Antenna (DVB-T2)
DVB-T2 - Search digital channels only
You can now select whether only digital or also analogue channels should be searched for in DVB-T2 reception mode.
Information
This menu item only appears if you have selected Aerial as the reception type. In most cases, it is sucient to search
for digital channels only. In Germany and most other European countries, analogue television has already been
completely switched o.

2626
9.2.2 Search under satellite (DVB-S2)
By entering the country beforehand, the system automatically suggests the most commonly used satellite for the
corresponding country. If you would like to enter a dierent satellite here, please select and then [Other provider]
conrm your selection with [Next].
Search under satellite (DVB-S2) with predened channel list
Note: In the case shown here, the predened channel list „Freesat“ is used for the satellite „Astra 28.2°“.
Selection of the „Freesat“ channel list
Search under Satellite (DVB-S2) via [Other Operators]
Information - Other Operators
The channels are pre-sorted according to ascending frequency of the selected satellite as well as country-unspecic
(freely sortable - search duration: long).
Select the „ Other Operators“ option

2727
ENGLISH
ENGLISH
ENGLISH
ENGLISH
ENGLISH
Selection options under „ Other Operators“
If you have selected the following screen will appear. Here too, the TV set automatically suggests [Other Operators],
the most commonly used satellite in the corresponding country. If you want to change this, you can do so via
[Change Satellite setting]. For further information, please also refer to chapter 11.
Step 9 - Starting the search
Select which channels to search for

2828
Before the search starts, the search run can be restricted:
Skip encrypted channels: Only free-to-air channels are searched for and displayed
Network search: Retrieve the saved or stored transponders
Image search: The TV set searches all receivable transponders / channels (longest search time)
Recommendation! We recommend that you do not select any of the three options so that the channel list contains
all available channels.
The search can now be started via [Next].
Scan in DVB-S2
Please note! Depending on the reception modes, the settings and the corresponding signal strength and quality, the
search may take up to 10 minutes.
Completion of the search in DVB-S2
As soon as the search has been completed, an overview of the channels found and the selection eld appear. [Done]

3030
Step 12 - Installing recommended apps
Download apps that are not installed
In this last step, you can install the displayed apps directly on the TV set. Not all apps are pre-installed on delivery.
Select the desired apps and conrm them with The setup is now complete and the TV set is ready [App Installation].
for use.
10. HOMESCREEN
Overview of the home screen
The [ ] button on the remote control allows you to open the home screen from any screen. The home screen is
the central hub of the operating system and provides an overview of all installed apps, the content store and the
functions of the TV set.
3131
ENGLISH
ENGLISH
ENGLISH
ENGLISH
ENGLISH
The most important functions are listed below:
App bar
Public Value: Selection of the most important country-specic apps
APPS: Access to the content store / download additional apps
Home Dashboard: Overview of all inputs and home IoT devices
Music: Access to Spotify, YouTube, Apple Music, Deezer
Web browser: Web browser with video support
Media Player: Playback of videos and images from media connected via USB
App list: Editing the app arrangement
Settings: Opening the settings layer
TV functions
Edit start page: Edit app order
Programme guide: Display of the programme overview
User manual: Detailed digital operating instructions
Information - Home IoT devices
The term „Internet of Things“ or „IoT“ stands for a networked world of smart devices. These IoT devices behave like
computers and are networked with other devices locally or via the Internet. Based on LG‘s operating system, all
compatible LG products and our televisions are collected and displayed here in the Home Dashboard.
10.1 Digital user manual
In addition to these printed operating instructions, the TV set has comprehensive operating instructions for the
entire operating system under the [User guide] menu item on the home screen. This is particularly helpful if the
printed operating instructions are not available. You can nd specic topics quickly and easily in this manual using
the search function or by sorting alphabetically.

3232
11. RECEPTION
The DVB-T2, DVB-S2 and DVB-C reception sources can either be added during the initial setup of the TV set or set
up later via the settings, for example if the location or reception type changes. This allows you to customise the
reception sources as required. To do this, go to: > Settings > General > Channels > Programme search and settings
Transmitter setting
The options [Auto Tuning] [Manual Tuning] and are available in this menu. In most cases, it is recommended to select
the automatic tuning, unless only certain transponders are to be added or supplemented manually. The automatic
setting normally makes the set-up process much easier and enables the TV set to recognise and set the available
channels and transponders automatically.
11.1 Setting up DVB-S2 (satellite)
Step 1 - Selecting the satellite reception type
Selecting the satellite reception type

3333
ENGLISH
ENGLISH
ENGLISH
ENGLISH
ENGLISH
Step 2 - Transmitter setting
Information:
By entering the country beforehand, the system automatically suggests the most commonly used satellite of the
corresponding country. If you would like to enter a dierent satellite or several satellites here, please select [Other
Operators] [Next].and then conrm your selection with
11.1.1 Setup with predened list
Setup using the example of the „ASTRA 28.2°“ satellite and „Freesat“.
Selection of the „Freesat“ channel list

3434
11.1.2 Setup via other providers
Information - Other Operators
The channels are pre-sorted according to ascending frequency of the selected satellite as well as country-unspecic
(freely sortable - search duration: long).
Selection „Other Operators“
If you have selected the following screen will appear. Here too, the TV set automatically suggests [Other Operators],
the most commonly used satellite in the corresponding country. If you would like to change this, you can do so via
[AA Satellite].
Proposed satellite
Now press [Add Satellite] and select the desired satellite.
Produktspezifikationen
| Marke: | Alphatronics |
| Kategorie: | Fernsehen |
| Modell: | SLA-22 DW |
Brauchst du Hilfe?
Wenn Sie Hilfe mit Alphatronics SLA-22 DW benötigen, stellen Sie unten eine Frage und andere Benutzer werden Ihnen antworten
Bedienungsanleitung Fernsehen Alphatronics

6 September 2024
6 September 2024
6 September 2024
6 September 2024
6 September 2024
1 September 2024
31 August 2024
31 August 2024
31 August 2024
31 August 2024
Bedienungsanleitung Fernsehen
- Fernsehen Samsung
- Fernsehen Infiniton
- Fernsehen Clatronic
- Fernsehen Acer
- Fernsehen Sanyo
- Fernsehen BenQ
- Fernsehen Lexibook
- Fernsehen Manhattan
- Fernsehen Manta
- Fernsehen Medion
- Fernsehen Philips
- Fernsehen Sony
- Fernsehen Sweex
- Fernsehen Tevion
- Fernsehen Zalman
- Fernsehen Panasonic
- Fernsehen LG
- Fernsehen MX Onda
- Fernsehen AEG
- Fernsehen Siemens
- Fernsehen Electrolux
- Fernsehen Küppersbusch
- Fernsehen OK
- Fernsehen Vox
- Fernsehen TechniSat
- Fernsehen XD Enjoy
- Fernsehen Denver
- Fernsehen ECG
- Fernsehen Intenso
- Fernsehen MarQuant
- Fernsehen Bush
- Fernsehen Telefunken
- Fernsehen Thomson
- Fernsehen Trevi
- Fernsehen BEKO
- Fernsehen Blaupunkt
- Fernsehen Grundig
- Fernsehen Schneider
- Fernsehen Sharp
- Fernsehen Aspes
- Fernsehen Brandt
- Fernsehen Daewoo
- Fernsehen Pyle
- Fernsehen Mitsubishi
- Fernsehen Finlux
- Fernsehen Haier
- Fernsehen High One
- Fernsehen Hisense
- Fernsehen Luxor
- Fernsehen NABO
- Fernsehen Nordmende
- Fernsehen Salora
- Fernsehen SEG
- Fernsehen Smart Brand
- Fernsehen Svan
- Fernsehen Techwood
- Fernsehen Vestel
- Fernsehen Philco
- Fernsehen Schaub Lorenz
- Fernsehen Aiwa
- Fernsehen AudioSonic
- Fernsehen Coby
- Fernsehen Bang And Olufsen
- Fernsehen DIFRNCE
- Fernsehen Lenco
- Fernsehen Mpman
- Fernsehen ODYS
- Fernsehen Pioneer
- Fernsehen Polaroid
- Fernsehen Jay-Tech
- Fernsehen JVC
- Fernsehen Krüger And Matz
- Fernsehen Muse
- Fernsehen Nokia
- Fernsehen Optoma
- Fernsehen PEAQ
- Fernsehen Xiaomi
- Fernsehen Abus
- Fernsehen Megasat
- Fernsehen Walker
- Fernsehen Akai
- Fernsehen Arçelik
- Fernsehen Caratec
- Fernsehen Changhong
- Fernsehen Chiq
- Fernsehen Continental Edison
- Fernsehen Dual
- Fernsehen Dyon
- Fernsehen Edenwood
- Fernsehen Ferguson
- Fernsehen Funai
- Fernsehen GoGEN
- Fernsehen Hannspree
- Fernsehen Hitachi
- Fernsehen Horizon
- Fernsehen Hyundai
- Fernsehen JTC
- Fernsehen Kernau
- Fernsehen Loewe
- Fernsehen Metz
- Fernsehen MT Logic
- Fernsehen Orava
- Fernsehen Orion
- Fernsehen Reflexion
- Fernsehen Star-Light
- Fernsehen Strong
- Fernsehen TCL
- Fernsehen Tesla
- Fernsehen Toshiba
- Fernsehen Allview
- Fernsehen Casio
- Fernsehen Sencor
- Fernsehen Icy Box
- Fernsehen Element
- Fernsehen ViewSonic
- Fernsehen Dell
- Fernsehen Lenovo
- Fernsehen Cecotec
- Fernsehen Nikkei
- Fernsehen Xiron
- Fernsehen Opera
- Fernsehen Sagem
- Fernsehen Antarion
- Fernsehen Xoro
- Fernsehen Humax
- Fernsehen Logik
- Fernsehen CGV
- Fernsehen LTC
- Fernsehen Bluesky
- Fernsehen Orima
- Fernsehen Proline
- Fernsehen NEC
- Fernsehen Marantz
- Fernsehen TEAC
- Fernsehen Packard Bell
- Fernsehen Westinghouse
- Fernsehen AOC
- Fernsehen NextBase
- Fernsehen Vivax
- Fernsehen Uniden
- Fernsehen Kogan
- Fernsehen Innoliving
- Fernsehen Magnum
- Fernsehen Smart Tech
- Fernsehen JGC
- Fernsehen Soundmaster
- Fernsehen Sylvania
- Fernsehen Qilive
- Fernsehen Doffler
- Fernsehen NewStar
- Fernsehen Zenith
- Fernsehen Insignia
- Fernsehen Roadstar
- Fernsehen SereneLife
- Fernsehen Woxter
- Fernsehen Sogo
- Fernsehen Peerless-AV
- Fernsehen RCA
- Fernsehen Oppo
- Fernsehen Vivo
- Fernsehen AYA
- Fernsehen Furrion
- Fernsehen Seiki
- Fernsehen Alba
- Fernsehen Aldi
- Fernsehen Daitsu
- Fernsehen Digihome
- Fernsehen E-motion
- Fernsehen Emerson
- Fernsehen GPX
- Fernsehen Graetz
- Fernsehen HKC
- Fernsehen Hoher
- Fernsehen ILive
- Fernsehen Naxa
- Fernsehen Online
- Fernsehen Onn
- Fernsehen Oyster
- Fernsehen Premier
- Fernsehen Reflex
- Fernsehen Rm 2000
- Fernsehen Saba
- Fernsehen Sbr
- Fernsehen Sunny
- Fernsehen Sunstech
- Fernsehen TechLine
- Fernsehen Technika
- Fernsehen Tele 2
- Fernsehen Grunkel
- Fernsehen Tve
- Fernsehen Viewpia
- Fernsehen Vision Plus
- Fernsehen Vizio
- Fernsehen Voxx
- Fernsehen Wharfedale
- Fernsehen Yasin
- Fernsehen Ziggo
- Fernsehen Videocon
- Fernsehen Bauhn
- Fernsehen Planar
- Fernsehen Monster
- Fernsehen Mitsai
- Fernsehen Proscan
- Fernsehen Kunft
- Fernsehen Nevir
- Fernsehen Seura
- Fernsehen EKO
- Fernsehen SunBriteTV
- Fernsehen Kemo
- Fernsehen V7
- Fernsehen Astar
- Fernsehen QBell Technology
- Fernsehen Visco
- Fernsehen Majestic
- Fernsehen DirecTV
- Fernsehen HCI
- Fernsehen Mach Power
- Fernsehen MBM
- Fernsehen Inno-Hit
- Fernsehen Elements
- Fernsehen Palsonic
- Fernsehen Cello
- Fernsehen Pantel
- Fernsehen FFalcon
- Fernsehen Coocaa
- Fernsehen SYLVOX
- Fernsehen ISymphony
- Fernsehen Aristona
- Fernsehen Apex
- Fernsehen Tucson
- Fernsehen Kubo
- Fernsehen Avtex
- Fernsehen NPG
- Fernsehen Telesystem
- Fernsehen ATYME
- Fernsehen Lin
- Fernsehen Tivax
- Fernsehen H&B
- Fernsehen Norcent
- Fernsehen TELE System
- Fernsehen Belson
- Fernsehen Elbe
- Fernsehen Mitzu
- Fernsehen Voxicon
- Fernsehen Aconatic
- Fernsehen Mitchell & Brown
- Fernsehen FOX Electronics
- Fernsehen Mystery
Neueste Bedienungsanleitung für -Kategorien-

16 Oktober 2024

16 Oktober 2024

16 Oktober 2024
15 Oktober 2024

15 Oktober 2024

15 Oktober 2024
15 Oktober 2024

15 Oktober 2024
15 Oktober 2024
15 Oktober 2024