Yamaha Electone ELA-1 Bedienungsanleitung
Lesen Sie kostenlos die 📖 deutsche Bedienungsanleitung für Yamaha Electone ELA-1 (120 Seiten) in der Kategorie Klaviatur. Dieser Bedienungsanleitung war für 21 Personen hilfreich und wurde von 2 Benutzern mit durchschnittlich 4.5 Sternen bewertet
Seite 1/120
EN
ELA-1
Owner’s Manual
Thank you for purchasing this Yamaha Electone.
This instrument has a wide selection of Voices and versatile
functions which gives you the potential of highly entertaining
performance. We recommend that you read this manual carefully
so that you can fully take advantage of the advanced and
convenient functions of the instrument. We also recommend that
you keep this manual in a safe and handy place for future
reference.
Before using the instrument, be sure to read “PRECAUTIONS”
on pages 2 – 3.
For information on assembling the instrument, refer to the
instructions on pages 106 – 110.

ELA-1 Owner’s Manual
2
PRECAUTIONS
PLEASE READ CAREFULLY BEFORE PROCEEDING
Please keep this manual in a safe and handy place for future reference.
WARNING
• This AC adaptor is designed for use with only Yamaha electronic
instruments. Do not use for any other purpose.
• Indoor use only. Do not use in any wet environments.
CAUTION
• When setting up, make sure that the AC outlet is easily accessible. If
some trouble or malfunction occurs, immediately turn off the power
switch of the instrument and disconnect the AC adaptor from the
outlet. When the AC adaptor is connected to the AC outlet, keep in
mind that electricity is flowing at the minimum level, even if the power
switch is turned off. When you are not using the instrument for a long
time, make sure to unplug the power cord from the wall AC outlet.
WARNING
Always follow the basic precautions listed below to avoid the possibility of serious injury or even death from electrical
shock, short-circuiting, damages, fire or other hazards. These precautions include, but are not limited to, the
following:
• Do not place the power cord near heat sources such as heaters or
radiators. Also, do not excessively bend or otherwise damage the cord,
or place heavy objects on it.
• Only use the voltage specified as correct for the instrument. The
required voltage is printed on the name plate of the instrument.
• Use the specified adaptor (page 113) only. Using the wrong adaptor
can result in damage to the instrument or overheating.
• Use only the supplied power cord/plug.
• Check the electric plug periodically and remove any dirt or dust which
may have accumulated on it.
• This instrument contains no user-serviceable parts. Do not open the
instrument or attempt to disassemble or modify the internal
components in any way. If it should appear to be malfunctioning,
discontinue use immediately and have it inspected by qualified
Yamaha service personnel.
• Do not expose the instrument to rain, use it near water or in damp or
wet conditions, or place on it any containers (such as vases, bottles or
glasses) containing liquids which might spill into any openings. If any
liquid such as water seeps into the instrument, turn off the power
immediately and unplug the power cord from the AC outlet. Then have
the instrument inspected by qualified Yamaha service personnel.
• Never insert or remove an electric plug with wet hands.
• Do not put burning items, such as candles, on the unit. A burning item
may fall over and cause a fire.
For the AC adaptor
For the instrument
Power supply/AC adaptor
Do not open
Water warning
Fire warning
DMI-7 1/2

ELA-1 Owner’s Manual 3
•Do not place the bench in an unstable position where it might
accidentally fall over.
•Do not play carelessly with or stand on the bench. Using it as a tool or
stepladder or for any other purpose might result in accident or injury.
•Only one person should sit on the bench at a time, in order to prevent
the possibility of accident or injury.
• Keep special watch over any small children so that they don’t fall off
the rear of the bench. Since the bench does not have a backrest,
unsupervised use may result in accident or injury.
• When one of the following problems occur, immediately turn off the
power switch and disconnect the electric plug from the outlet. Then
have the device inspected by Yamaha service personnel.
- The power cord or plug becomes frayed or damaged.
- It emits unusual smells or smoke.
- Some object has been dropped into the instrument.
- There is a sudden loss of sound during use of the instrument.
- If any cracks or breakages exist on the instrument.
CAUTION
Always follow the basic precautions listed below to avoid the possibility of physical injury to you or others, or damage
to the instrument or other property. These precautions include, but are not limited to, the following:
• Do not connect the instrument to an electrical outlet using a multiple-
connector. Doing so can result in lower sound quality, or possibly
cause overheating in the outlet.
• When removing the electric plug from the instrument or an outlet,
always hold the plug itself and not the cord. Pulling by the cord can
damage it.
• Remove the electric plug from the outlet when the instrument is not to
be used for extended periods of time, or during electrical storms.
• Assemble the stand and bench in the proper sequence by following the
assembly instructions in this manual (page 106). Also, make sure to
tighten the bolts regularly. Failure to do so might result in damage to
the instrument or even injury.
• Do not place the instrument in an unstable position where it might
accidentally fall over.
• When transporting or moving the instrument, always use two or more
people. Attempting to lift the instrument by yourself may damage your
back, result in other injury, or cause damage to the instrument itself.
• Before moving the instrument, remove all connected cables, to prevent
damage to the cables or injury to anyone who might trip over them.
• Do not move the stand when the Main unit is placed on it. Doing so
could cause the Main unit to drop off from the stand, resulting in
damage to the instrument or other property, and possibly causing
injury to you or others.
• When setting up the product, make sure that the AC outlet you are
using is easily accessible. If some trouble or malfunction occurs,
immediately turn off the power switch and disconnect the plug from the
outlet. Even when the power switch is turned off, electricity is still
flowing to the product at the minimum level. When you are not using
the product for a long time, make sure to unplug the power cord from
the wall AC outlet.
• Use only the provided stand. Failure to do so could cause damage to
the internal components or result in the instrument falling over.
• Before connecting the instrument to other electronic components, turn
off the power for all components. Before turning the power on or off for
all components, set all volume levels to minimum.
• Be sure to set the volumes of all components at their minimum levels
and gradually raise the volume controls while playing the instrument to
set the desired listening level.
• Do not insert a finger or hand in any gaps on the instrument.
• Never insert or drop paper, metallic, or other objects into the gaps on
the panel or keyboard. This could cause physical injury to you or
others, damage to the instrument or other property, or operational
failure.
• Do not rest your weight on, or place heavy objects on the instrument,
and do not use excessive force on the buttons, switches or connectors.
• Do not use the instrument/device or headphones for a long period of
time at a high or uncomfortable volume level, since this can cause
permanent hearing loss. If you experience any hearing loss or ringing
in the ears, consult a physician.
• Do not place your hand between moving parts. Otherwise, your hand
could be pinched between the parts, possibly resulting in injury.
Always turn the power off when the instrument is not in use.
Even when the [ ] (Standby/On) switch is in standby status (display is off), electricity is still flowing to the instrument at the minimum level.
When you are not using the instrument for a long time, make sure you unplug the power cord from the wall AC outlet.
Using the bench If you notice any abnormality
Power supply/AC adaptor
Assembly
Location
Connections
Handling
Using the bench
Yamaha cannot be held responsible for damage caused by improper use or modifications to the instrument, or data that is lost or destroyed.
DMI-7 2/2

ELA-1 Owner’s Manual
4
NOTICE
To avoid the possibility of malfunction/ damage to the
product, damage to data, or damage to other property,
follow the notices below.
Handling
• Do not use the instrument in the vicinity of a TV, radio,
stereo equipment, mobile phone, or other electric devices.
Otherwise, the instrument, TV, or radio may generate
noise.
• When you use the instrument along with an app on your
smart device such as a smartphone or tablet, we
recommend that you enable “Airplane Mode” on that
device in order to avoid noise caused by communication.
• Do not expose the instrument to excessive dust or
vibrations, or extreme cold or heat (such as in direct
sunlight, near a heater, or in a car during the day) to
prevent the possibility of panel disfiguration, damage to
the internal components or unstable operation. (Verified
operating temperature range: 5° – 40°C, or 41° – 104°F.)
• Do not place vinyl, plastic or rubber objects on the
instrument, since this might discolor the panel or
keyboard.
Maintenance
• When cleaning the instrument, use a soft cloth. Do not use
paint thinners, solvents, alcohol, cleaning fluids, or
chemical-impregnated wiping cloths.
• When cleaning the bench, use a soft and dry cloth (or, if
necessary, one that is slightly damp). Do not use paint
thinners, solvents, alcohol, cleaning fluids, or chemical-
impregnated wiping cloths.
Saving data
• Edited Song/Style/Multi Pad/Voice/MIDI setup data, etc.
are lost when you turn off the power to the instrument. This
also occurs when the power is turned off by the Auto
Power Off function (page 14). Save the data to the
instrument, or to USB flash drive (page 26).
• You can back up the data and settings of this instrument to
the USB flash drive as a backup file (page 32), as well as
restore a backup file to the instrument. To protect against
data loss due to some failure, an operation mistake, etc.,
save your important data to a USB flash drive.
• To protect against data loss through USB flash drive
damage, we recommend that you save your important
data onto spare USB flash drive or an external device such
as a computer as backup data.
Information
About copyrights
• Copying of the commercially available musical data
including but not limited to MIDI data and/or audio data is
strictly prohibited except for your personal use.
• This product incorporates and bundles contents in which
Yamaha owns copyrights or with respect to which Yamaha
has license to use others’ copyrights. Due to copyright
laws and other relevant laws, you are NOT allowed to
distribute media in which these contents are saved or
recorded and remain virtually the same or very similar to
those in the product.
* The contents described above include a computer
program, Accompaniment Style data, MIDI data, WAVE
data, voice recording data, a score, score data, etc.
* You are allowed to distribute medium in which your
performance or music production using these contents is
recorded, and the permission of Yamaha Corporation is
not required in such cases.
About functions/data bundled with the
instrument
• Some of the preset songs have been edited for length or
arrangement, and may not be exactly the same as the
original.
• This device is capable of using various types/formats of
music data by optimizing them to the proper format music
data for use with the device in advance. As a result, this
device may not play them back precisely as their
producers or composers originally intended.
• The bitmap fonts used in this instrument have been
provided by and are the property of Ricoh Co., Ltd.
About this manual
• The illustrations and LCD screens as shown in this manual
are for instructional purposes only, and may appear
somewhat different from those on your instrument.
• Windows is a registered trademark of Microsoft ®
Corporation in the United States and other countries.
• Electone is a trademark of Yamaha Corporation.
• The company names and product names in this manual
are the trademarks or registered trademarks of their
respective companies.
The model number, serial number, power requirements, etc., may be found
on or near the name plate, which is at the bottom of the unit. You should note
this serial number in the space provided below and retain this manual as a
permanent record of your purchase to aid identification in the event of theft.
Model No.
Serial No.
(bottom_en_01)

ELA-1 Owner’s Manual 5
About the Manuals
This instrument has the following documents and instructional materials.
Included Documents
Owner’s Manual (this book)
Explains the basic operations and functions of this instrument. Please read this manual first.
Online Materials (Downloadable from the web)
Reference Manual
Explains advanced features of the instrument, not explained in the Owner’s Manual. For example,
you can learn how to create original Styles, Songs or Multi Pads, or find detailed explanations of
specific parameters.
Each chapter in the Reference Manual corresponds to the relevant chapters in the Owner’s Manual.
Data List
Contains various important preset content lists such as Voices, Styles, Effects, as well as MIDI-
related information.
Smart Device Connection Manual
Explains how to connect the instrument to a smart device such as smartphone or tablet, etc.
Computer-related Operations
Includes instructions on connecting this instrument to a computer, and operations related to
transferring files and MIDI data.
To obtain these manuals, access the Yamaha Downloads, enter the model name for searching the desired
files.
Components and Accessories
Main unit
Stand (page 106)
Bench (page 110)
Accessories
• Owner’s Manual (this book)
• Online Member Product Registration
• Music rest (page 109)
Pedal unit (page 108) with corresponding Owner’s Manual (Separately packaged.)
Yamaha Downloads
https://download.yamaha.com/

ELA-1 Owner’s Manual 7
Contents
4 Multi Pads – Adding Musical Phrases to Your Performance – 59
Playing the Multi Pads........................................................................................................................................................ 59
Using Chord Match ............................................................................................................................................................ 60
Using the Multi Pad Synchro Start Function....................................................................................................................... 61
5 Songs – Playing, Practicing and Recording Songs – 62
Playback of Songs ............................................................................................................................................................. 62
Displaying Music Notation (Score)..................................................................................................................................... 65
Displaying Lyrics................................................................................................................................................................ 66
Turning Each Part (Channel) of the Song On/Off............................................................................................................... 67
One-handed Practice with the Guide Function.................................................................................................................. 68
Repeat Playback ................................................................................................................................................................ 69
Recording Your Performance............................................................................................................................................. 71
6 USB Audio Player/Recorder – Recording and Playing Audio Files – 76
Playing Back Audio Files (USB Audio Player).................................................................................................................... 76
Recording Your Performance as Audio (USB Audio Recorder) ........................................................................................ 79
7 Microphone – Sing Along with Song Playback or Your Own Performance – 81
Connecting a Microphone.................................................................................................................................................. 81
8 Registration Memory/Playlist – Saving and Recalling Custom Panel Setups – 83
Saving and Recalling Panel Setups with Registration Memory ......................................................................................... 84
Using Playlists to Manage a Large Repertoire of Panel Setups ........................................................................................86
9 Mixer – Editing the Volume and Tonal Balance – 91
Basic Procedure.................................................................................................................................................................91
10 Connections – Using Your Instrument with Other Devices – 94
Connecting USB Devices ([USB TO DEVICE] terminal) .................................................................................................... 94
Connecting to a Computer ([USB TO HOST] terminal)...................................................................................................... 96
Connecting to a Smart Device ([USB TO HOST] terminal/[AUX IN] jack) ......................................................................... 97
Listening to Audio Playback by an External Device through the Instrument’s Speaker
([AUX IN] jack/[USB TO HOST] terminal) .......................................................................................................................... 98
Connecting an External Stereo System (AUX OUT [R]/[L/L+R] jacks) .............................................................................. 99
Connecting a Microphone ([MIC] jack).............................................................................................................................. 99
11 Menu – Making Global Settings and Using Advanced Features – 100
Basic Procedure...............................................................................................................................................................100
Function List ..................................................................................................................................................................... 101
Troubleshooting 103
Assembly 106
Stand Assembly ............................................................................................................................................................... 106
Placing the Pedal Unit...................................................................................................................................................... 108
Installing and Connecting the Main Unit.......................................................................................................................... 108
Using the Bench............................................................................................................................................................... 110
Specifications 111
Index 114

ELA-1 Owner’s Manual
8
Welcome to the world of the Electone!
This instrument features various realistic instrumental Voices from all over
the world, including piano, organ, guitar, strings, brass, wind instruments
and more. You can play each of the Upper Keyboard, Lower Keyboard,
and Pedalboard in different Voices to layer them.
Super Articulation Voices (page 37)
Super Articulation Voices realistically recreate characteristic instrument
sounds, such as the sound of finger slides on guitar and the breath
noises of saxophone, simply by how you play or by pressing a
Footswitch.
Organ Flutes (page 38)
You can create your original organ sounds by adjusting the footage lever, just like on traditional organs.
This instrument provides you with a wide variety of rhythm patterns or
accompaniment Styles that matches the various music genres. Simply
playing chords automatically triggers and controls the auto
accompaniment backing, and puts an entire backing band behind you!
You can change arrangements on the fly, instantly selecting different
rhythm variations and breaks in real time—including Intro, Ending, and
Fill-in—during your performance.
Unison & Accent (page 50)
With the Unison function, you can play a melody, and have it reproduced in unison (i.e., the same melody is
played by multiple instruments) or tutti (i.e., all parts are played at the same time)—expressively enhancing
your performance. With the Accent function, accents such as crash cymbals are automatically generated in the
Style playback according to your playing strength.
By connecting a microphone, you can hear your vocals through the built-
in speakers, and can also record them with high sound quality. Moreover,
since the lyrics (page 66) or music scores (page 65) of the Song are
shown on the display, you can easily enjoy singing along with your
keyboard performance or Song playback.
Extraordinarily expressive and realistic Voices page 34
Play with a backing band accompaniment page 44
Sing along with Song playback or your own performance
page 81
ELA-1 Owner’s Manual 9
Welcome to the world of the Electone!
Various functions can be assigned to each of the Expression Pedal,
Second Expression Pedal and two Footswitches, and this feature lets you
control your performance in real-time by using your foot without
interruption. For example, you can change the volume balance among
the parts, pitch, EQ, etc., and can also add short phrases by using the
Multi Pad function—allowing you to easily add variations to your
performance to match the atmosphere or the mood.
Audio files (WAV format) saved to a USB flash drive can be played back
on the instrument. You can also record your performance as audio files
(WAV format) to a USB flash drive—making it easy to edit your
recordings on a computer, and burn your own CDs. Moreover, the
compatible smart device app (page 97) allows you to record audio and
video of your performances and share them over the Internet.
The Registration Memory function allows you to save the panel
settings such as Voices for each keyboard part, Styles, effects, etc.
all together, and call them up instantly during your performance. The
panel settings can be called up by simply pressing the panel button
or by using the Footswitch (if the Registration Sequence is pre-
programmed).
Each of the REGISTRATION MEMORY [1] – [8] buttons contains the
basic settings by default. Moreover, the preset Playlist provides the
links to call up Registration Memory settings in various music genres.
Try it out!
These are just a few of the many functions that enhance your musical enjoyment and
expand your creative and performance possibilities. Try them out and enjoy your ELA-1!
Want to learn more about the ELA-1’s features?
Press the [7] or [8] button to start the demonstration.
To stop the demonstration, press the [EXIT] button.
*The functions of the bottom area of the Main display can be changed as desired
(page 17).
Versatile real-time controllers — Live Expression Control
page 57
Audio playing and recording page 76
Saving and recalling your favorite settings page 83

ELA-1 Owner’s Manual
10
Panel Controls
Top Panel
1VOICE buttons ......................................page 34
For playing with various sounds on each keyboard
part (Upper Keyboard Voice, Lower Keyboard Voice,
Lead Voice and Pedal Voice).
2STYLE buttons .....................................page 44
For playing back a rhythm pattern or adding auto
accompaniment to your keyboard performance.
3[METRONOME] button.........................page 31
Turns the metronome on or off.
4TEMPO [+]/[-] buttons ..........................page 31
Controls the tempo for Style, Song and Metronome
playback.
5Style control buttons ...........................page 46
For controlling Style playback.
6SONG CONTROL buttons....................page 64
For controlling Song playback.
7[PLAYLIST] button ...............................page 86
Calls up the display for managing your repertoire.
8[VOICE EFFECT] button.......................page 42
Calls up the display which indicates the current effect
settings for each Voice part.
9[USB AUDIO] button .............................page 76
Calls up the display for playing back audio files and
recording your performance in audio format.
)[MENU] button ....................................page 100
Calls up the display for making advanced settings
and creating your original Styles, Multi Pads and
Songs.
![MIXER/EQ] button ...............................page 91
Calls up the display for adjusting the volume and tonal
balance.
@[SONG FUNCTION] button...................page 62
Calls up the operation window for selecting Songs
etc.
1
5
6
7
8
9
3
4
2
!
@
A
)

ELA-1 Owner’s Manual 11
Panel Controls
#LCD and related controls ....................page 19
Indicates the current panel settings and allows you to
select or change the settings.
$REGISTRATION MEMORY buttons .....page 84
For registering and recalling panel setups.
%[MASTER VOLUME] dial ......................page 14
Adjusts the overall volume.
^[ ](Standby/On) switch ......................page 13P
Turns on the instrument’s power or sets to standby.
&[USB TO DEVICE] terminal ..................page 94
For connecting a USB flash drive or USB wireless LAN
adaptor. Before using this terminal, be sure to read the
precautions on page 94.
% ^ &
$
A
#
Panel Setup (Panel Settings)
By using the controls on the panel, you can make
various settings as described here. These settings of
the instrument are together referred to as “panel
setup” or “panel settings” in this manual.
Bass reflex ports
The ports (holes) on the front side of this instrument
are for bass reflex sounds. Do not insert any objects
(such as a coin, pen, card, handkerchief, etc.) into
them.
CAUTION
Do not insert your fingers or hands into the ports
when carrying this instrument to prevent injury.
A

ELA-1 Owner’s Manual 13
Starting Up
Starting Up
Connect the plugs of the AC adaptor in the order shown in the illustration.
1Turn down the [MASTER VOLUME] dial to the minimum position.
2Press the [ ] (Standby/On) switch to turn the power on.P
After a while, the Main display appears.
Power Supply
WARNING
Use the specified AC adaptor (page 113) only. Using the wrong AC adaptor can result in damage to the instrument or
overheating.
CAUTION
When setting up the product, make sure that the AC outlet you are using is easily accessible. If some trouble or
malfunction occurs, immediately turn the power off and disconnect the plug from the outlet.
NOTE
When disconnecting the power cord, first turn off the power, and then follow this procedure in reverse order.
Turning the Power On/Off
NOTICE
Until the Main display appears, never attempt any other operations, such as pressing the keys, buttons or pedals. Doing so
may cause the instrument to malfunction.
2
1
3
DC IN jack
(on the rear panel)
AC adaptor
AC Outlet
Power cord
The shape of the plug
and outlet differs
depending on the locale.
1 2

ELA-1 Owner’s Manual 15
Starting Up
Intelligent Acoustic Control (IAC)
IAC is an auto-tone control function that performs adjustments depending on the overall volume of the instrument.
Even when the volume is low, it permits both low sounds and high sounds to be clearly heard. IAC affects only the
sound output of the instrument speakers. You can turn the IAC function on or off, although the default setting for
this function is on. This can be set on the “ ” tab in the “ ” display called up via the [MENU] Configuration Utility
button (page 100).
Connect a pair of headphones to the [PHONES] jack on the front side of the instrument.
You can make settings of the language shown on the display and the Auto Power Off function. You can also
check the firmware version of this instrument on the same setting display below.
1Call up the operation display.
1-1 Press the [MENU] button to call up the “ ” display.Menu
1-2 Move the cursor to “ ” by using the Cursor buttons [System U D L R][ ][ ][ ], and then press the [ENTER]
button.
Using the Headphones
CAUTION
Do not listen with the headphones at high volume for long periods of time. Doing so may cause hearing loss.
Making Basic Settings
Standard stereo phone plug
1-1
1-2
ELA-1 Owner’s Manual
16
2Press the TAB [ ] button to select the “ ” tab, and then use the Cursor buttons lCommon
[ ][ ] to move the cursor to the desired item.L R
3Use the [ ]/[ ] buttons to select the value.u d
4If desired, press one of the [7]/[8] (Owner Name) buttons to input your name which
appears in the opening display (called up when the power is turned on).
For instructions on entering characters, refer to page 30.
To return to the previous display, press the [EXIT] button.
Language English ChineseDetermines the language (“ ” or “ ”) used in the display for messages.
Auto Power
Off
Determines the amount of time that elapses before the power is automatically turned off by
the Auto Power Off function (page 14). To disable Auto Power Off, select “ ” here.Disabled
NOTICE
Any data which is not saved via the Save operation will be lost if the power automatically turns
off. Make sure to save your data before this happens.
Disabling Auto Power Off (simple method)
Turn the power on while holding down the lowest key on the Lower Keyboard. A message
appears briefly, then the instrument starts up with the Auto Power Off function disabled.
2
2
34
+

ELA-1 Owner’s Manual 17
Basic Operations
Basic Operations
The Main display appears when the power is turned on, and can be quickly called up by pressing the
[MENU] and [EXIT] buttons simultaneously. This display provides comprehensive at-a-glance information on
the current settings.
1Voice area
Indicates the currently selected Voice names for each of the keyboard parts, Upper Keyboard Voice, Lead
Voice, Lower Keyboard Voice and Pedal Voice (page 34). On/off status and volume for each Voice are
indicated at the right. For the Lead Voice and Pedal Voice, the assigned keyboard parts to play these Voices
are indicated here.
2Style area
Indicates the currently selected Style name (page 44). When the [ACMP] button is turned on, the detected
chord during your keyboard performance will be displayed. When the Song containing the chord data is played
back, the current chord name will be displayed.
3 Tempo area
Indicates the current tempo in Style or Song playback.
4Beat/Bar
Displays the current position (beat/bar) in Style playback or Song playback.
5Audio file area
Indicates the elapsed playback time of the current Audio file (page 76). During audio recording, the “REC” icon
flashes here.
6Quick Access area
Allows you to access various functions quickly. You can switch the Quick Access area among the following four
types by using the [ ]/[ ] buttons on the Main display.u d
• Regist Sequence
For confirming the currently selected Registration Bank name (page 84), and for using the Registration
Sequence function (see the Reference Manual on the website, Chapter 8).
Main Display Configuration
1
4
2
6
5
3

ELA-1 Owner’s Manual
18
• Shortcuts
For registering your desired functions as shortcuts to call them up instantly (page 24).
• Live Exp. Control
For confirming or assigning the functions for each of the Expression Pedals and Footswitches (page 58).
• Multi Pad
For using the Multi Pad function (page 59).

ELA-1 Owner’s Manual 19
Basic Operations
The items shown in the LCD can be selected or changed by the controls around the display.
Cursor buttons [ ][ ][ ][ ] and [ENTER] buttonU D L R
The Cursor buttons are used to move the on-display cursor. There are two types of display. One is the type
in which the item is selected (and called up) only by moving the cursor, and the other is the type in which
you need to press the [ENTER] button after moving the cursor to actually call up the item.
Example 1
Example 2
Display-based Controls
[1] - [8] buttons (page 21)
Data dial (page 21)
[ ]/[ ] buttons (page 20)u d
[EXIT] button (page 22)
TAB [ ][ ] buttons (page 22)l r
[ENTER] button (see below)
Cursor buttons
[ ][ ][ ][ ] (see below)U D L R
In the File Selection
display (page 25), use the
Cursor buttons to select
and call up the file.
In the Menu display (page 100) and other setting
displays, use the Cursor buttons to move the cursor,
and then press the [ENTER] button to actually select
the item.

ELA-1 Owner’s Manual
20
[ ]/[ ] buttonsu d
The [ ]/[ ] buttons are used to change or adjust the value of the selected parameter. Move the cursor to u d
the desired parameter by using the Cursor buttons [ ][ ][ ][ ], and then use the [ ]/[ ] buttons to U D L R u d
change the value. Depending on the selected parameter, pressing the [ENTER] button can call up the list of
the values.
Changing parameter values
Selecting a value from the list (if the list exists)
The [ ]/[ ] buttons can also be used in the following ways.u d
• Switching the menu of the Quick Access area on the Main display (page 17)
• Selecting the next higher or lower folder in the File Selection displays (page 25)
2Change the value by using
the [ ]/[ ] buttons.u d 1Move the cursor to the
desired parameter by
using the Cursor
buttons.
Select the value from
the list by using the
[ ]/[ ] buttons.u d
Call up the list by pressing the
[ENTER] button.
NOTE
To reset the selected parameter value to its default, press both the [ ] and [ ] buttons simultaneously.u d
ELA-1 Owner’s Manual 21
Basic Operations
Data dial
Depending on the selected display, the Data dial can be used in the following two ways.
Changing parameter values
You can conveniently use the Data dial to change the value of parameters you selected with the Cursor
buttons.
This convenient technique also works well with pop-up parameters such as Tempo and Transpose. Simply
press the appropriate button (ex., TEMPO [+]), and then rotate the Data dial to set the value.
Selecting content files (Voice, Style, Song, and so on)
On the File Selection displays (page 25), rotate the Data dial to move the cursor, and then press the
[ENTER] button to actually select and call up the file.
[1] – [8] buttons
The [1] – [8] buttons are used to make selections for functions shown directly above them. You can operate
the function or call up the window for the function assigned to the [1] – [8] buttons by pressing these
buttons.
2Rotate the Data dial to
change the value.
1Select the desired parameter
with the Cursor buttons.
NOTE
In most procedures when selecting the file or item described throughout this manual, the Cursor buttons [ ][ ][ ][ ] are used, though the U D L R
Data dial may also conveniently be used.
ELA-1 Owner’s Manual
22
TAB [ ][ ] buttonsl r
These buttons are used mainly to change the pages of displays that have “tabs” at the top.
[EXIT] button
Pressing the [EXIT] button returns to the previously indicated display. Pressing the [EXIT] button
repeatedly returns to the default Main display (page 17).
Instruction Conventions in this Manual
Throughout this manual, instructions with multiple steps are given in convenient shorthand, with arrows
indicating the proper sequence.
Example:
[MENU] Cursor buttons [ ][ ][ ][ ] , [ENTER] TAB [ ][ ] U D L R System l r Backup/Restore
The example above describes a three-step operation:
1) Press the [MENU] button.
2) Move the cursor to “ ” by using the Cursor buttons [ ][ ][ ][ ], and then press the System U D L R
[ENTER] button.
3) Use the TAB [ ][ ] buttons to select the “ ” tab. l r Backup/Restore

ELA-1 Owner’s Manual 23
Basic Operations
A message (information or confirmation dialog) sometimes appears on the display to facilitate operation.
When the message appears, press one of the [1] – [8] buttons corresponding to the message.
With the convenient Direct Access function, you can instantly call up the desired display.
While holding down the [MENU] button, press the button (or move the Second Expression Pedal or
Footswitches) corresponding to the desired display. For example, pressing the [MENU] button and the
[MEMORY] button simultaneously calls up the display in which the Registration Memory information
(page 84) can be confirmed.
For the applicable displays, refer to the “Direct Access Chart” in the Data List on the website.
Messages Shown in the Display
Calling Up the Desired Display Instantly — Direct Access
+

ELA-1 Owner’s Manual
24
You can replace the four shortcuts in the Quick Access area at the bottom of the Main display with your
desired functions from the Menu (page 101). This allows you to quickly call up often-used functions from the
Main display.
1On the Main display, use the [ ]/[ ] buttons to call up u d
“ ” in the Quick Access area.Shortcuts
2Press and hold one of the [1] – [8] buttons, which corresponds to
the function to be replaced.
The function list equivalent to the functions in the Menu (page 101) appears.
3Use the [ ]/[ ] buttons to select the desired function.u d
The function list is closed automatically, and the selected function appears above
the button you pressed in step 2, allowing you to call up the function instantly.
Customizing the Shortcuts on the Main Display
NOTE
The Main display can be called
up by pressing the [MENU] and
[EXIT] buttons simultaneously.
2
1
3
ELA-1 Owner’s Manual 25
Basic Operations
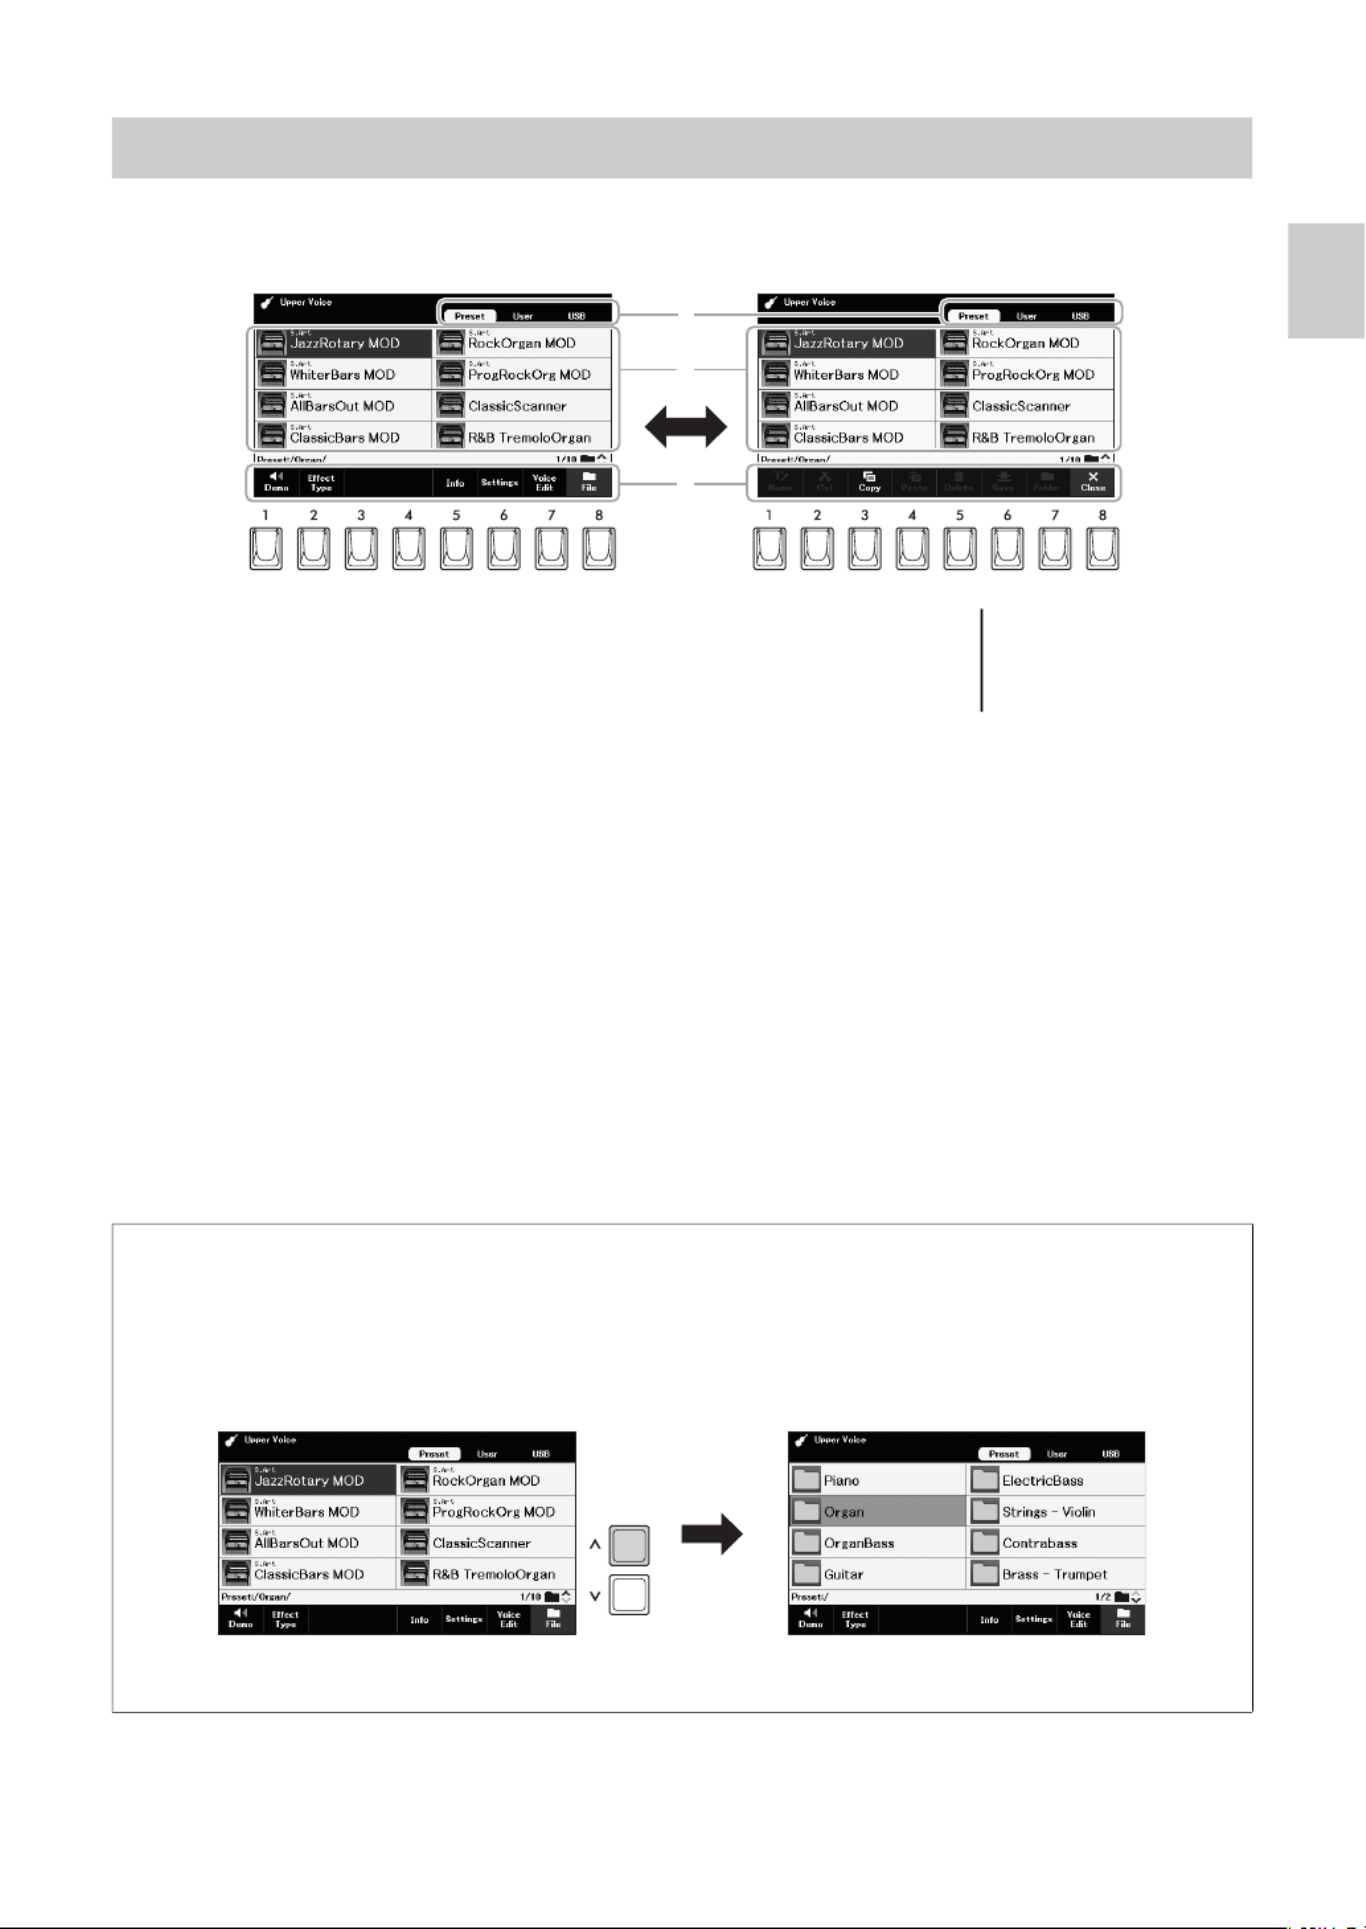
The File Selection display is for selecting Voices, Styles, Songs, Multi Pads and other data (files). The File
Selection display appears when you press one of the Voice or Style category buttons, etc.
1Location (drive) of data
• .... Location where pre-programmed (preset) data is stored.Preset
• ....... Location where recorded or edited data is saved. Installed Expansion User
Pack data (page 43) are also saved here in the “Expansion” folder.
• ........ Location where data saved on the USB flash drive is shown. The USB
recorded or edited data can also be saved here. This appears only
when a USB flash drive is connected to the [USB TO DEVICE]
terminal.
2Selectable data (files)
The files that can be selected on this display are shown. If two or more pages
exist, you can call up another page by holding one of the Cursor buttons ([ ] or R
[ ] to the next page, and [ ] or [ ] to the previous one) continuously. The D L U
current page number and total pages are indicated at the right bottom corner.
3File Close/
At the bottom of the File Selection display, you can toggle the indication between
“ ” and “ ” by pressing the [8] button. Pressing the [8] button when “ ” File Close File
is shown calls up the File Management menu (page 26), while pressing the [8]
button when “Close” is shown closes the File Management menu and calls up the
function names related to the current file (Voice, Style, Song, Multi Pads, etc.).
File Selection Display Configuration
1
2
3
NOTE
Before using a USB flash drive,
be sure to read “Connecting
USB Devices” on page 94.
Calling up a higher or lower level folder
When files are in a folder, a folder icon is shown at the right corner, allowing you to call up the higher or
lower level folder by using the [ ]/[ ] buttons.u d
Example of the Preset Voice Selection display
The Preset Voices are categorized and contained in appropriate folders.
This display shows the Voices in a folder. The next highest level (folder) is shown. Each folder
contains appropriately categorized Voices.

ELA-1 Owner’s Manual
26
You can save, name, copy, move, delete files, and you can create folders to
manage the files with the buttons located lower area in the File Selection display.
For information on the File Selection display, refer to page 25.
Saving a File
You can save your original data (such as Songs you’ve recorded) as a file to the instrument or USB flash
drive.
1In the File Selection display, use the TAB [ ][ ] buttons to l r
select the tab (“ ” or “ ”) to which you want to save the User USB
data.
If you want to save the data within an existing folder, also select the folder here.
2Make sure that “ ” is shown at the bottom of the display.Save
If it is not shown, press the [8] ( ) button to call it up.File
3Press the [6] ( ) button.Save
The Character Entry window is called up.
4Enter the file name (page 30).
Pressing the [ENTER] button in the Character Entry window saves the file, and
the file will be automatically located at the appropriate position among the files in
alphabetical order in the File Selection display.
File Management
NOTE
Before using a USB flash drive,
be sure to read “Connecting
USB Devices” on page 94.
Restrictions for protected files
Protected files, such as most commercially available data, are copy protected to prevent illegal copying
or accidental erasure. If you select such a file in the USB flash drive, an indication appears above the file
name, and you can call up the relevant explanation by pressing the [4] ( ) button.Security
NOTE
Files cannot be saved to the
“ ” tab or the Preset
“ ” folder (page 43) Expansion
in the “ ” tab.User
3
NOTE
• To cancel the Save
operation, press the [EXIT]
button in the Character Entry
window.
• In the “ ” tab, the User
maximum total number of
files which can be stored
differs depending on the file
size and the length of the file
names.

ELA-1 Owner’s Manual 27
Basic Operations
Creating a New Folder
You can create folders to make it easier to find your original data.
1In the File Selection display, use the TAB [ ][ ] buttons to l r
select the tab (“ ” or “ ”) to which you want to create a User USB
new folder.
If you want to create a new folder within an existing folder, select the desired
folder here.
2Make sure that “ ” is shown at the bottom of the display.Folder
If it is not shown, press the [8] ( ) button to call it up.File
3Press the [7] (Folder) button.
The Character Entry window is called up.
4Enter the name of the new folder (page 30).
The created folder will be automatically located at the appropriate position
among the folders in alphabetical order.
Renaming a File/Folder
You can rename files/folders.
1In the File Selection display, use the TAB [ ][ ] buttons to l r
select the tab (“ ” or “ ”) which contains the desired file/User USB
folder.
2Make sure that “ ” is shown at the bottom of the display.Name
If it is not shown, press the [8] ( ) button to call it up.File
3Press the [1] ( ) button.Name
The window for the Rename operation appears at the bottom of the display.
NOTE
• A new folder cannot be made
in the “ ” tab or the Preset
“ ” folder (page 43) Expansion
in the “ ” tab.User
• The maximum number of
files/folders which can be
saved in a folder is 500.
• In the “ ” tab, no more User
than three folder levels can
be created. The maximum
total number of files/folders
which can be saved differs
depending on the file size
and the length of the file/
folder names.
3
NOTICE
Do not use “ ” for Expansion
the folder name. Otherwise,
all data contained in the
“ ” folder will be Expansion
lost when an Expansion
Pack (page 43) is installed.
NOTE
To cancel creating a new
folder, press the [EXIT] button
in the Character Entry window.
NOTE
Files and folders in the
“ ” tab or the Preset
“ ” folder (page 43) Expansion
in the “ ” tab cannot be User
renamed.

ELA-1 Owner’s Manual
28
4Move the cursor to the desired file/folder by using the Cursor
buttons [ ][ ][ ][ ], and then press the [ENTER] button.U D L R
5Press the [8] ( ) button to confirm the file/folder selection.OK
The Character Entry window is called up.
6Enter the name of the selected file or folder (page 30).
The renamed file/folder appears on the display at the appropriate position among
the files in alphabetical order.
Copying or Moving Files
You can copy or cut files and paste them to another location (folder). You can also copy folders (but not
move them) by using the same procedure.
1In the File Selection display, use the TAB [ ][ ] buttons to l r
select the tab (“ ” or “ ”) which contains the desired file/User USB
folder.
2Make sure that “ ” and “ ” is shown at the bottom of the Copy Cut
display.
If they are not shown, press the [8] (File) button to call them up.
3Press the [3] ( ) button to copy or [2] ( ) to move.Copy Cut
The window for the Copy/Cut operation appears at the bottom of the display.
4Move the cursor to the desired file/folder by using the Cursor
buttons [ ][ ][ ][ ], and then press the [ENTER] button.U D L R
Pressing the [ENTER] button selects (highlights) the file/folder. To cancel the
selection, press the [ENTER] button again.
Press the [8] ( ) button to select all files/folders indicated on the current display All
including the other pages. To cancel the selection, press the [8] ( ) button All Off
again.
5Press the [7] ( ) button to confirm the file/folder selection.OK
6Select the destination tab (“ ” or “ ”) to paste the file/User USB
folder, by using the TAB [ ][ ] buttons.l r
If necessary, move the cursor to the destination folder by using the Cursor
buttons [ ][ ][ ][ ], and then press the [ENTER] button.U D L R
7Press the [4] ( ) button to paste the file/folder selected in Paste
step 4.
The pasted file/folder appears on the display at the appropriate position among
the files in alphabetical order.
NOTE
To cancel the Rename
operations, press the [EXIT]
button in the Character Entry
window.
NOTICE
Do not use “ ” for Expansion
the folder name. Otherwise,
all data contained in the
“ ” folder will be Expansion
lost when an Expansion
Pack (page 43) is installed.
NOTE
• Files in the “Preset” tab
cannot be moved. They can
only be copied to the “ ” User
tab.
• Files in the “ ” Expansion
folder (page 43) in the “ ” User
tab cannot be copied/moved.
• Preset Songs copied to the
User drive are indicated by
“Prot.” above the Song names
on the Song Selection display.
These cannot be copied or
moved to USB flash drives.
NOTE
To cancel the Copy/Move
operation, press the [6]
( ) button.Cancel

ELA-1 Owner’s Manual 29
Basic Operations
Deleting Files/Folders
You can delete individual or multiple files/folders.
1In the File Selection display, use the TAB [ ][ ] buttons to l r
select the tab (“ ” or “ ”) which contains the desired file/User USB
folder.
2Make sure that “ ” is shown at the bottom of the display.Delete
If it is not shown, press the [8] ( ) button to call it up.File
3Press the [5] ( ) button.Delete
The window for the Delete operation appears at the bottom of the display.
4Move the cursor to the desired file/folder by using the Cursor
buttons [ ][ ][ ][ ], and then press the [ENTER] button.U D L R
Pressing the [ENTER] button selects (highlights) the file/folder. To cancel the
selection, press the [ENTER] button again.
Press the [8] ( ) button to select all files/folders indicated on the current display All
including the other pages. To cancel the selection, press the [8] ( ) button All Off
again.
5Press the [7] ( ) button to confirm the file/folder selection.OK
6Follow the on-display instructions.
• ........ Deletes the file/folderYes
• .. Deletes all selected files/foldersYes All
• ......... Leaves the file/folder as is without deletingNo
• .. Cancels the Delete operationCancel
NOTE
Files and folders in the
“ ” tab or the Preset
“ ” folder (page 43) Expansion
in the “ ” tab cannot be User
deleted.
NOTE
To cancel the Delete operation,
press the [6] ( ) button.Cancel
ELA-1 Owner’s Manual
30
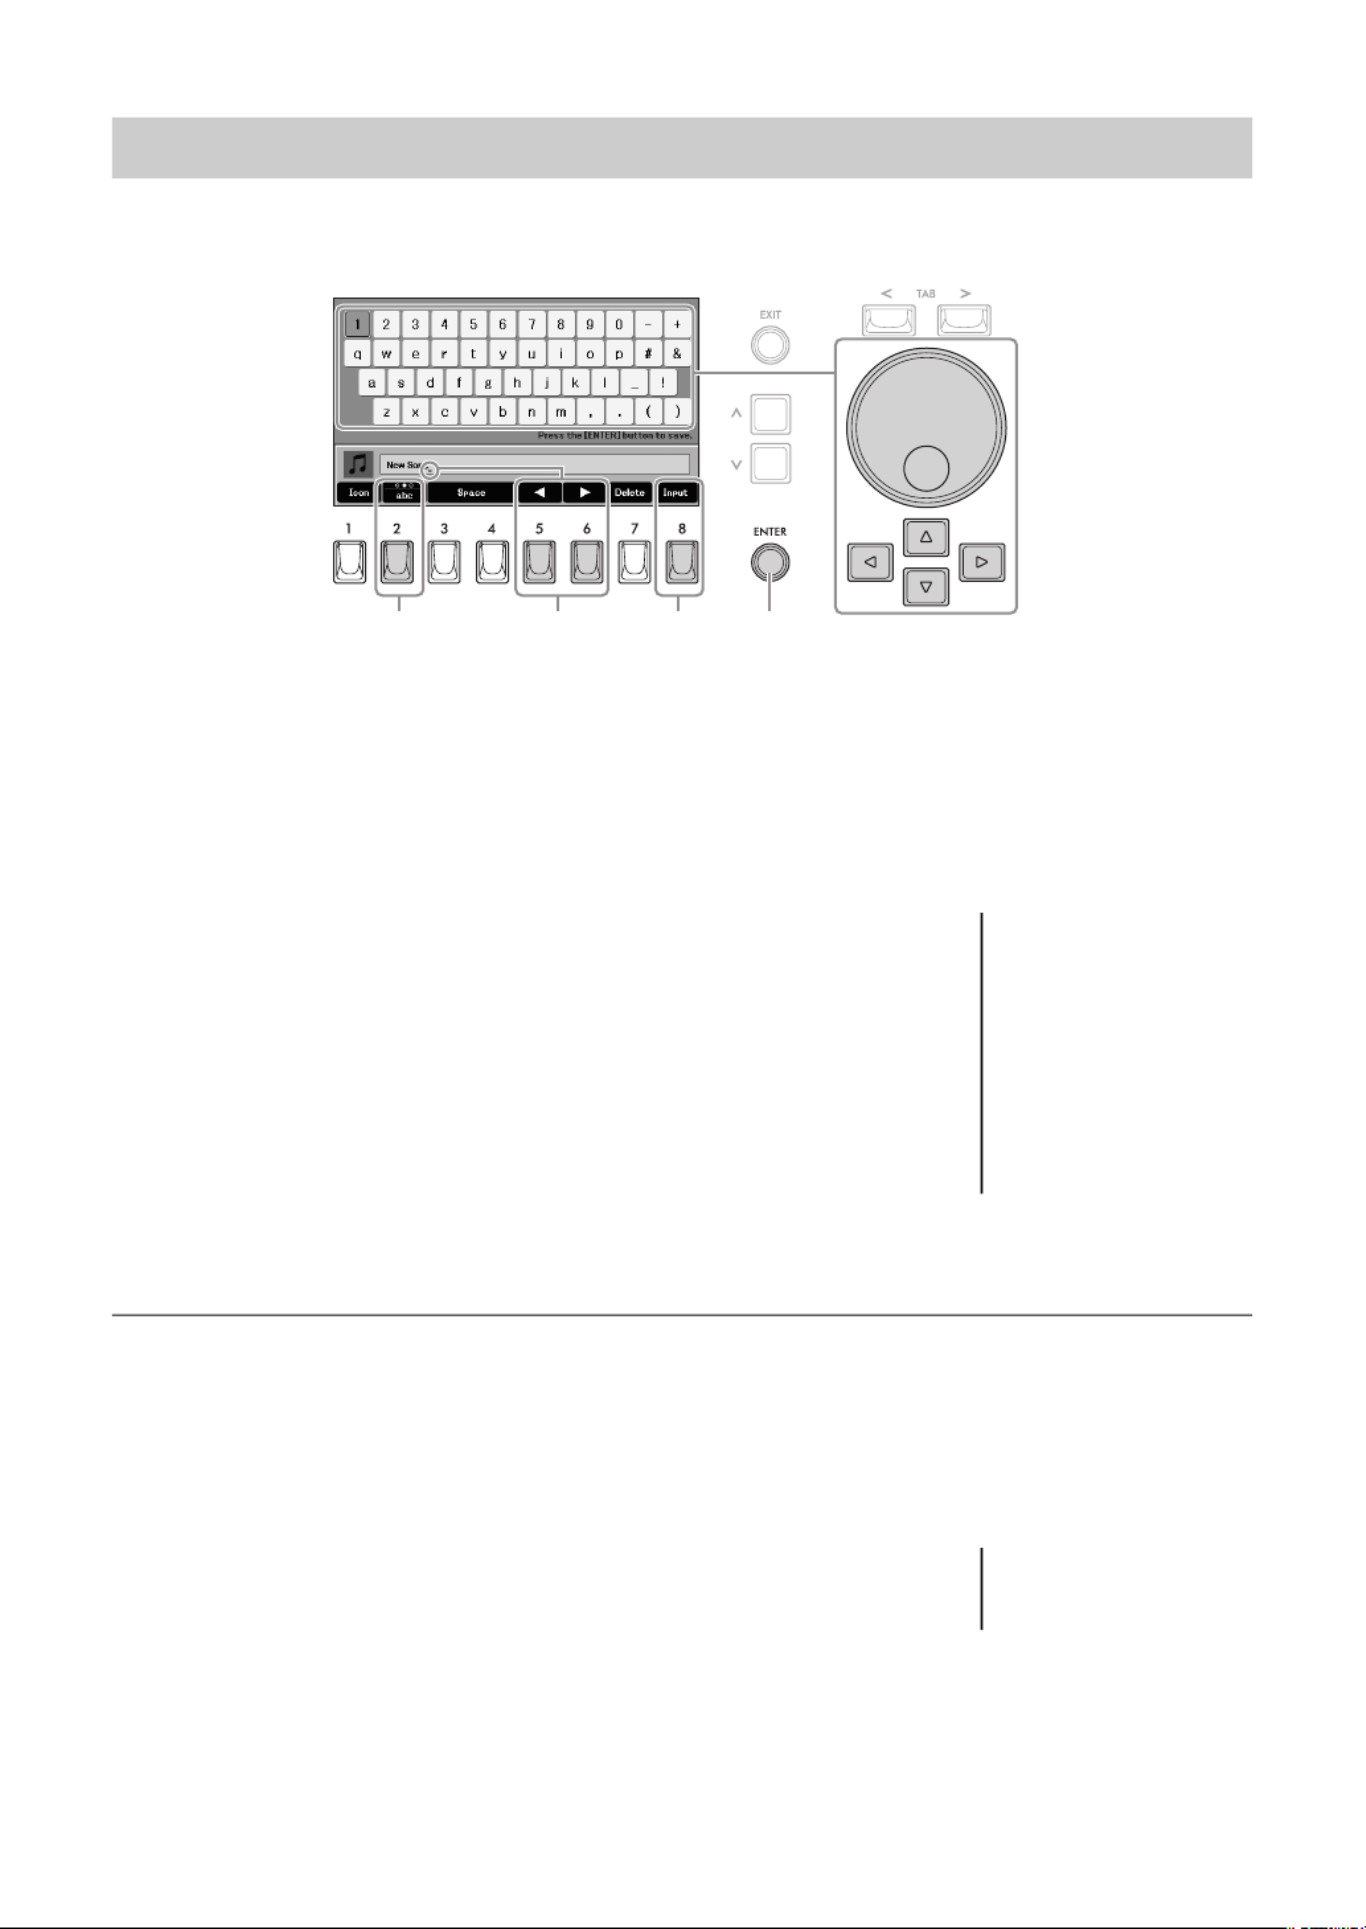
This section covers how to enter characters for naming your files/folders, etc. This Character Entry window
allows you to input only single-byte characters, regardless of the language setting (page 15).
1Select the type of character by pressing the [2] button.
• .........Capital letters, numbers, marksABC
• ........... Lowercase letters, numbers, marksabc
• .... Symbols, marksSymbol
2Use the [5]/[6] buttons to move the underline in the Entry box to
the desired position.
3Enter the characters.
3-1 Move the cursor to the character you wish to enter by using the Cursor
buttons [ ][ ][ ][ ] or the Data dial.U D L R
3-2 Press the [8] ( ) button to actually enter the character.Input
For more information on entering characters, refer to “Other character-entry
operations” below.
4Press the [ENTER] button to save the file/folder with the new
name and return to the previous display.
Other character-entry operations
Deleting characters
Move the underline in the Entry box to the character you wish to delete by using the [5]/[6] buttons, and then
press the [7] ( ) button. To delete all characters at once, press and hold the [7] ( ) button.Delete Delete
Entering spaces
Press one of the [3]/[4] ( ) buttons.Space
Selecting custom icons for files (shown at left of file name)
1. Press the [1] ( ) button to call up the “ ” display. Icon Icon Select
2. Move the cursor to the desired icon by using the Cursor buttons
[ ][ ][ ][ ] or Data dial.U D L R
The display includes several pages. Use the TAB [ ][ ] buttons to select the l r
desired pages.
3. Press the [8] ( ) button to apply the selected icon.OK
Entering Characters
1 2
3-2
3-1
4
NOTE
• The following marks cannot
be entered for a file/folder
name.
\ / : * ? " < > |
• File names can contain up to
41 characters and folder
names can contain up to
50 characters.
• To cancel the character-
entering operation, press the
[EXIT] button.
NOTE
To cancel the operation, press
the [7] ( ) button.Cancel

ELA-1 Owner’s Manual 31
Basic Operations
The [METRONOME] button lets you start or stop the metronome. The metronome provides a click sound,
giving you an accurate tempo guide when you practice, or letting you hear and check how a specific tempo
sounds.
Adjusting the Tempo
The TEMPO [+] and [-] buttons let you change the playback tempo of the metronome, Style or Song.
Pressing either button calls up the Tempo pop-up display. Press the TEMPO [+] or [-] button to increase or
decrease the tempo over a range of 5 – 500 beats per minute. Holding down either button can change the
value continuously.
To reset the tempo to the default value, press both TEMPO [+] and [-] buttons simultaneously.
While the Tempo pop-up display is shown, the Data dial or the [ ]/[ ] buttons can also be used to adjust u d
the tempo.
Changing the Metronome Settings
You can also change the time signature, volume and sound of the metronome: [MENU] Cursor buttons
[ ][ ][ ][ ] , [ENTER].U D L R Metronome
For more information, refer to the Reference Manual on the website, Chapter 1.
Using the Metronome

ELA-1 Owner’s Manual
32
You can back up all data saved in the User drive (except protected files and
Expansion Pack data) and all settings of the instrument to a USB flash drive as a
single file (extension: .bup). The backup file can be restored to the instrument
again, allowing you to recall the panel settings and performance data you
created previously.
For information on the settings that can be backed up, refer to the “Backup/
Restore” column of the “Parameter Chart” in the Data List on the website.
1Connect a USB flash drive to the [USB TO DEVICE] terminal for
the backup destination.
2Call up the operation display.
[MENU] Cursor buttons [ ][ ][ ][ ] , [ENTER] TAB [ ][ ] U D L R System l r
Backup/Restore
3Use the [5]/[6] ( ) buttons to save the data to the USB flash Backup
drive.
When confirmation messages appear, follow the on-display instructions.
Restoring the Backup File
To do this, use the [7]/[8] ( ) buttons in the “ ” tab (see Restore Backup/Restore
above). When confirmation messages appear, follow the on-display instructions.
When the operation is completed, the instrument will be restarted automatically.
Data Backup
NOTICE
Completing the backup/
restore operation may take a
few minutes. Do not turn off
the power during backup or
restoring. Otherwise, data
may be lost or damaged.
NOTE
• Before using a USB flash
drive, be sure to read
“Connecting USB Devices”
on page 94.
• You can also back up files in
the User drive such as Voice,
Song and Registration
Memory by copying them
individually to a USB flash
drive as desired. For
instructions, refer to page 28.
• You can also back up System
settings, MIDI settings and
User Effect settings
individually via [MENU]
Cursor buttons [ ][ ][ ][ ] U D L R
System TAB [ ][ ] l r
Setup Files. For details, refer
to the Reference Manual on
the website, Chapter 11.
NOTICE
If any of the files (such as
Songs or Styles) in the User
drive of the instrument have
the same name with the data
contained in the backup file,
the data are overwritten by
restoring the backup file.
Move or copy the files in the
User drive of the instrument
to USB flash drive before
restoring (page 28).

ELA-1 Owner’s Manual 33
Basic Operations
Resetting to the Factory-programmed Settings
While holding the right-most key on the Upper Keyboard, turn the power on. This
resets the settings of the entire instrument (referred to as the System Setup
parameters) to their factory default settings. Refer to the “Parameter Chart” in
the Data List on the website for details about which parameters belong to
System Setup.
You can also reset specified settings to the factory default value or delete all
files/folders in the User drive. Call up the operation display: [MENU] Cursor
buttons [ ][ ][ ][ ] U D L R System, [ENTER] TAB [ ] rReset. For details, refer to
the Reference Manual on the website, Chapter 11.
NOTE
The recorded Songs
(page 71), Expansion Packs
(page 43), and other files
saved to this instrument are not
reset by this operation.
+

ELA-1 Owner’s Manual 35
Voices – Playing the Keyboard with Various Sounds –
1
1Turn on the [ON/OFF] button for the desired part.
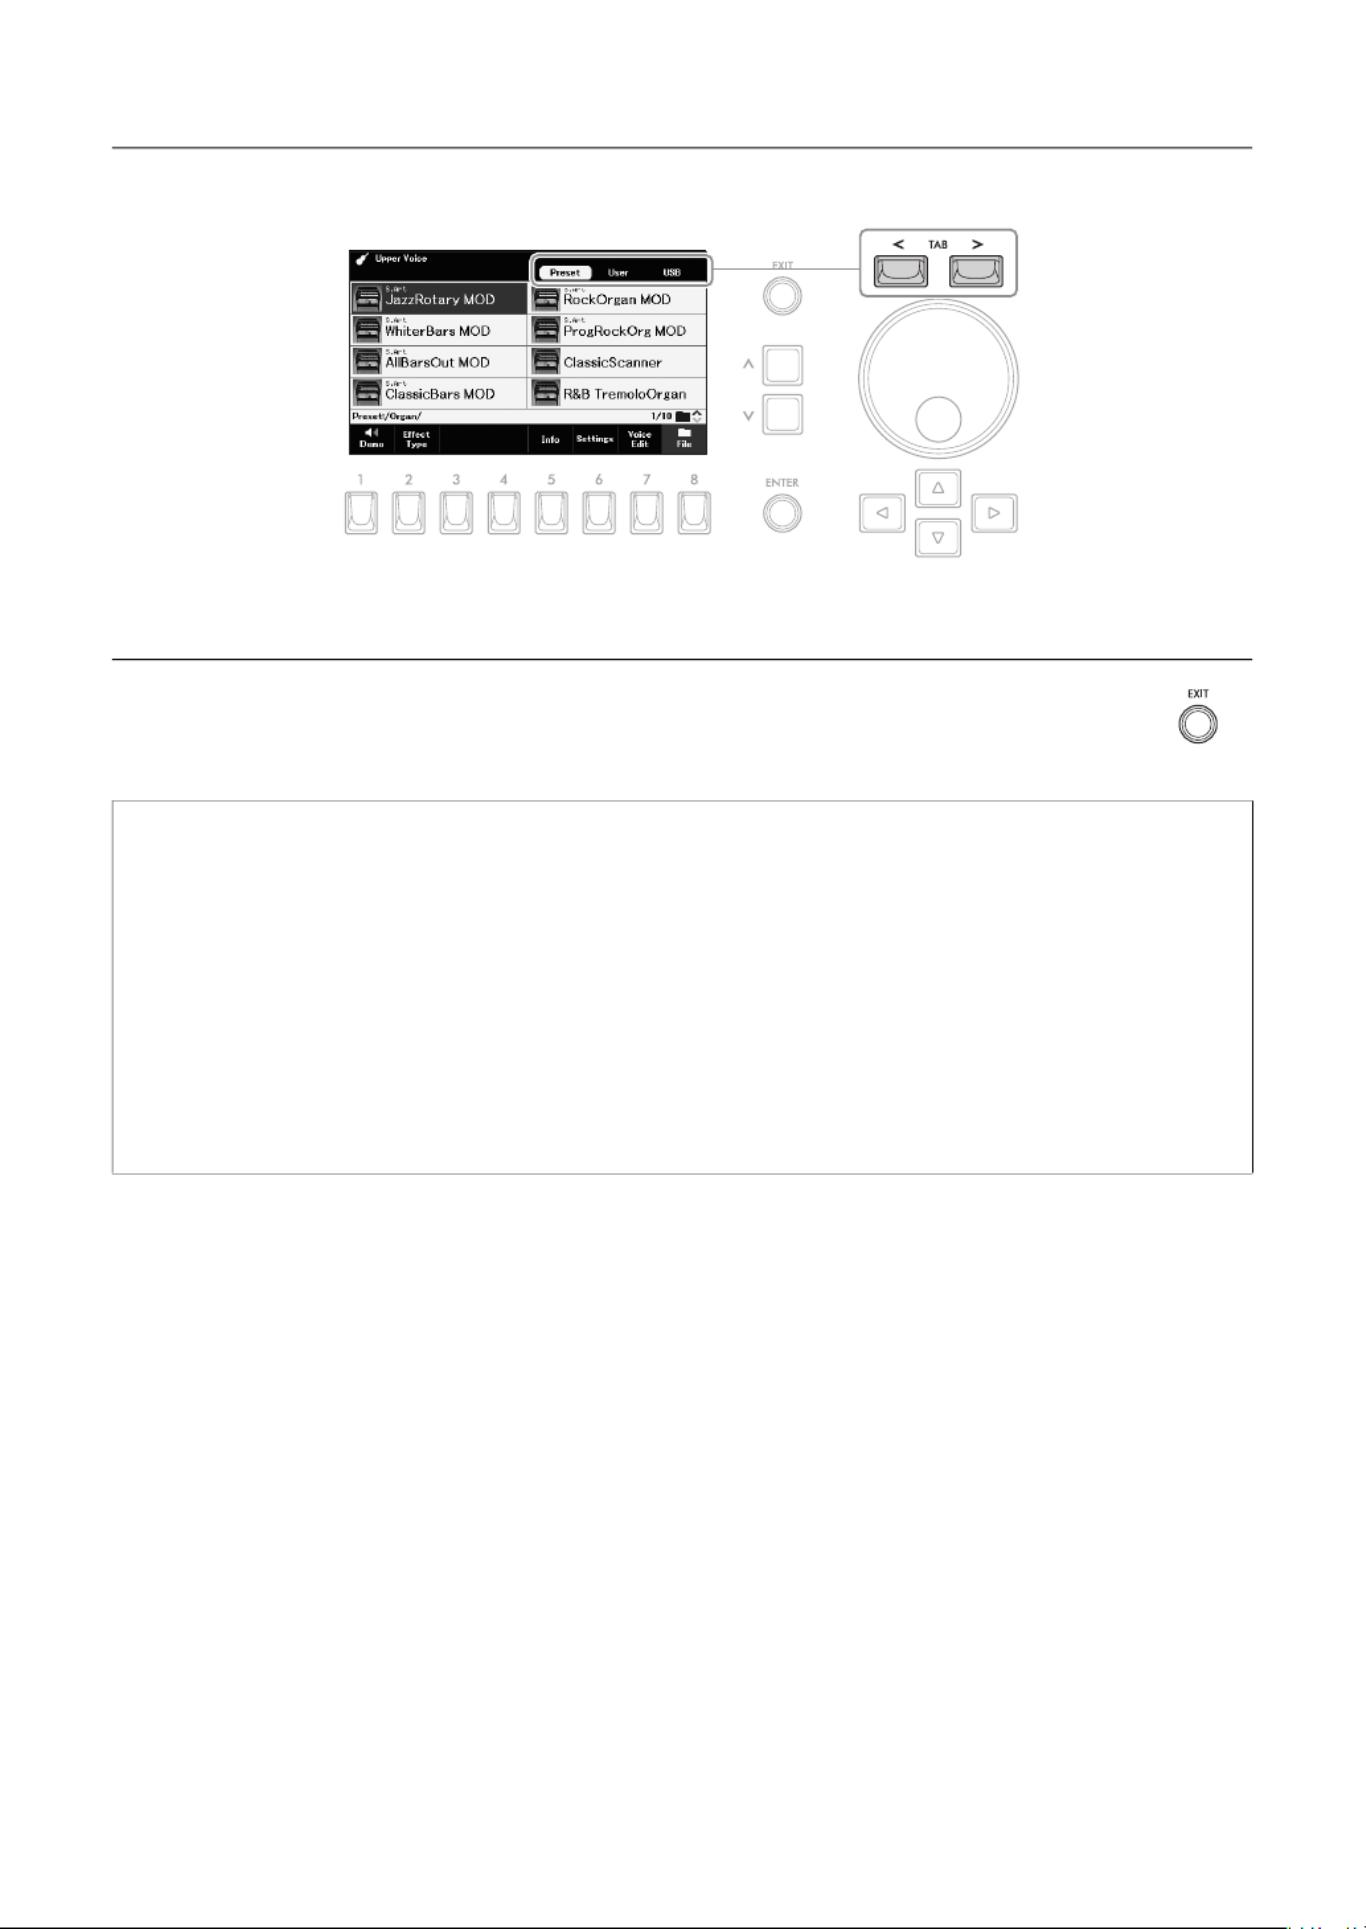
2Press one of the Voice category buttons or the [USER] button of
the desired part to call up the Voice Selection display.
The preset Voices are categorized and contained in appropriate folders. Voice
category buttons correspond to the categories of the preset Voices, however
some preset Voices (such as Contrabass for the Upper Keyboard Voice) do not
have any category buttons. For the preset Voices with no category buttons, the
[USER] button can be used.
When you select a preset Voice by using the [USER] button, you need to select
the “ ” tab by pressing the [ ] button, and then press the [ ] button to call Preset l u
up the Voice category folders. After that, move the cursor to the desired category
by using the Cursor buttons [ ][ ][ ][ ], and then press the [ ] button.U D L R d
3Use the Cursor buttons [ ][ ][ ][ ] to select the desired U D L R
Voice.
If two or more pages exist, you can call up other pages successively by holding
one of the Cursor buttons ([ ] or [ ] to the next pages, and [ ] or [ ] to the R D L U
previous pages). Pressing the same category button repeatedly also selects
successive pages.
Playing Preset Voices
Lights up when
the part is on.
NOTE
• For a list of preset Voices,
refer to the Data List on the
website.
• The [USER] button can also
be used to select the Voices
in the User drive, such as
Expansion Voices (page 43),
or Voices created with the
Voice Edit function (refer to
the Reference Manual on the
website).
• Pressing only the category
button switches the category
and changes the Voice to the
last selected one in that
category. On the other hand,
pressing the category button
while holding down the
[MENU] button allows you to
call up the Voice Selection
display without changing the
current Voice.
NOTE
The Voice characteristics are
indicated above the Preset
Voice name. For details, see
page 36.
NOTE
If “ ” is not shown, press Demo
the [8] ( ) button to call it Close
up.
To listen to the Demo phrases for each Voice
Press the [1] ( ) button to start the Demo for the selected Voice. To stop Demo
the demo, press the [1] button again.

ELA-1 Owner’s Manual
36
4Play the keyboard or Pedalboard to hear the Voice for the desired
part.
5Select Voices for the other parts by repeating steps 1 to 4.
You can confirm the Voice name for each part and its volume on the Main display
called up by pressing the [EXIT] button.
6Play the keyboard and Pedalboard by combining the Voices
selected for each part.
If necessary, adjust the volume of the desired part by using the VOLUME
buttons.
Holding the Lower Keyboard Voice (Lower Voice Hold)
By turning on the Lower Voice Hold function, the Lower Keyboard Voice is maintained (held) even when the
keys are released. Non-decaying Voices such as strings are held continuously, while decay-type Voices
such as piano decay more slowly (as if the sustain pedal has been pressed).
This function can be used, for example, for more natural performance when you play along with Style
playback (page 44) since the sound of the chord matching Style playback is maintained.
1Call up the operation display.
[MENU] Cursor buttons [ ][ ][ ][ ] , [ENTER]U D L R Keyboard
2Press one of the [3]/[4] ( ) buttons to turn on/off the Lower Voice Hold Lower Voice Hold
function.
If a Style or Song is played back, the Lower Keyboard Voice which is sounding stops when Style or Song
playback stops.
NOTE
If you change the Voice while
pressing keys, the Voice of the
previously played note is
maintained and the changed
Voice will sound from the next
played note.
NOTE
You can save the Voice
selection, on/off setting and
Volume setting for each part to
Registration Memory (page 85)
for future recall.
Voice Types (Characteristics)
There are various Voice types, and some types as described below
require special performance considerations. These particular types
have an indication above the Voice name on the Voice Selection display or the Main display. For more
explanations, refer to the Reference Manual on the website.
• (Super Articulation)S.Art
Super Articulation Voices recreate special note-transition techniques characteristically used in acoustic
instrument performance, such as staccato, legato and slur. For details, see page 37.
•Organ Flutes
Organ Flutes Voices let you recreate a variety of vintage organ sounds by adjusting the flute footage levels and
the percussive sounds, just like on conventional organs. For details, see page 38.
• Drums
Drum Voices let you play various drums and percussion instruments which are assigned to each key. For
details on the Key assignments, refer to the “Drum/Key Assignment List” in the Data List on the website.

ELA-1 Owner’s Manual 37
Voices – Playing the Keyboard with Various Sounds –
1
The Super Articulation Voices enable you to create subtle, very realistic musical expressions, simply by how
you play or by pressing a Footswitch. “ ” is shown above the Voice name of Super Articulation Voices on S.Art
the Voice Selection display or the Main display.
For performance instructions, you can call up the Information window of the
selected Super Articulation Voice by pressing the [5] ( ) button on the Voice Info
Selection display.
Adding Articulation Effects by Playing the Keyboard
Example: “ ” VoiceSaxophone
If you play a C note and then an adjacent D in a very legato way, you will hear
the note change seamlessly, as though a saxophone player played it in a single
breath.
Example: “ ” VoiceConcertGuitar
If you play a C note and then the E just above in a very legato but firm way, the
pitch slides up from C to E.
Adding Articulation Effects by Using a Footswitch
You can add articulation effects by using a Footswitch, if you assign the
articulation function to the Footswitch beforehand. Pressing the Footswitch
triggers different playing effects, separate from your keyboard playing. For
example, pressing the Footswitch while playing a saxophone Voice can produce
breath noises or key noises, while doing the same for a guitar Voice can
produce fret noises or body-tapping sounds. You can effectively intersperse
these into the notes as you play.
To apply articulation effects by using the Footswitches, assign “ ” or Articulation1
“ ” to either Footswitch via [MENU] Articulation2 Cursor buttons
[ ][ ][ ][ ] U D L R Live Expression Control, [ENTER]. For details, refer to page 58.
Playing Super Articulation Voices
Super Articulation Voice
NOTE
If “ ” is not shown, press the Info
[8] ( ) button to call it up.Close
NOTE
• S.Art Voices are compatible
with other models which
have those types of Voices
installed; however, some
Song or Style data you’ve
created on the instrument
using these Voices may not
sound properly when played
back on other instruments.
• S.Art Voices sound differently
depending on the keyboard
range, velocity, touch, etc.
Hence, if you turn on a
Keyboard Harmony effect, or
change the Voice Settings,
unexpected or undesired
sounds may result.

ELA-1 Owner’s Manual
38
Just as on a traditional organ, you can create your own sound by increasing and decreasing the levels of the
flute footages.
1Press the [ORGAN] button (UPPER or LOWER KEYBOARD VOICE) to call up the “ ” Organ
folder in the Voice Selection display.
2Use the Cursor buttons [ ][ ][ ][ ] to select an Organ Flutes Voice, indicated by U D L R
“ ” above the Voice name.Organ Flutes
3Press the [7] ( ) button to call up the “ Voice Edit Voice Edit”
display.
4Press the TAB [ ] button to select the “ ” tab.lVolume
5Adjust the footage settings which determine the basic sound of
the Organ Flutes.
5-1 Use the Cursor buttons [ ][ ][ ][ ] to move the cursor to the desired U D L R
footage number displayed above each footage lever.
5-2 Use the [ ]/[ ] buttons to adjust the value.u d
Creating Original Organ Flutes Voices
3
Organ Flutes Voice
NOTE
If “ ” is not shown, Voice Edit
press the [8] ( ) button to Close
call it up.
54
NOTE
The term “footage” is a
reference to the sound
generation of traditional pipe
organs, in which the sound is
produced by pipes of different
lengths (in feet). The longer the
pipe, the lower the pitch
becomes.

ELA-1 Owner’s Manual 39
Voices – Playing the Keyboard with Various Sounds –
1
6Make desired settings such as Rotary Speaker and Vibrato.
7Adjust other parameters as desired.
7-1 Use the Cursor buttons [ ][ ][ ][ ] to move the cursor to “U D L R Volume” or “ .”Response
7-2 Use the [ ]/[ ] buttons to adjust the value.u d
8Save the edited Organ Voice.
8-1 Press the TAB [ ] button to call up the “rEffect/EQ” page.
8-2 Press the [8] button to save the Organ Flutes Voice to the User drive. For
instructions on saving, refer to page 26.
1Rotary SP
Speed
Use the [1]/[2] buttons to switch the Rotary Speaker speed between “ ” and Slow
“ .” This parameter is effective when the “Fast DSP Type Effect/EQ” name in the “ ”
tab contains “ ” or “ ” and the DSP is turned on. For details, refer to the Rotary Rot
Reference Manual on the website.
2Wave Use the [3]/[4] buttons to selects the type of organ tone generation to be
simulated. “ ” produces a clean, clear sound. “ ” produces a gritty, Sine Vintage
slightly distorted sound.
3Vibrato Use the [5]/[6] buttons to turns the vibrato on or off.
Move the cursor to “ ” or “ ” by using the Cursor buttons Depth Speed
[ ][ ][ ][ ], and then use the [ ]/[ ] buttons to adjust the vibrato depth or U D L R u d
speed.
4Attack Use the [7]/[8] buttons to switch attack modes between “ ” and “ ”.First Each
Move the cursor to “ ” by using the Cursor buttons [ ][ ][ ][ ], and Length U D L R
then use the [ ]/[ ] buttons to adjust the attack length of the sound. The attack u d
length produces a longer or shorter decay immediately after the initial attack. The
longer the value, the longer the decay time.
7
1 2 3 4
Volume Adjusts the overall volume of the Organ Flutes.
Response Adjusts the response time of both the Attack and Release portions of the sound. The higher
the value, the slower it becomes.
NOTE
For details on the “Effect/EQ”
page, refer to the Reference
Manual on the website.

ELA-1 Owner’s Manual
40
You can adjust the pitch of the entire instrument or individual parts.
1Call up the operation display.
[MENU] Cursor buttons [ ][ ][ ][ ] , [ENTER] TAB [ ] U D L R Transpose/Tune l Tune
2Use the Cursor buttons [ ][ ][ ][ ] to move the cursor to the desired parameter, and U D L R
then set the value by using the [ ]/[ ] buttons.u d
To reset the current value to its default, press the [ ] and [ ] buttons simultaneously.u d
Changing the Pitch-related Settings (Master Tune, Transpose)
Master
Tune
Fine-tunes the pitch of the entire sound (with the exception of the Drum Voices, audio
playback and microphone sound) in 0.2 Hz steps. By default, the pitch is set to 440.0 Hz
according to equal temperament.
Transpose Transposes the pitch between -12 and 12 in semitone steps.
Master Transposes the pitch of the entire sound (with the exception of the Drum
Voices, audio playback and microphone sound).
Keyboard Transposes the pitch of the keyboard played Voices, including the chords
played for triggering Style playback or the Chord Match function (page 60)
of Multi Pad.
Song Transposes only the pitch of Song playback.
Adjust the pitch of each keyboard part
You can also make detailed pitch settings (octave and tune) for each of the keyboard parts in the display
called up via the Voice Selection display [6] ( ) Settings TAB [ ] .l Tune
For more information, refer to the Reference Manual on the website.
ELA-1 Owner’s Manual 41
Voices – Playing the Keyboard with Various Sounds –
1
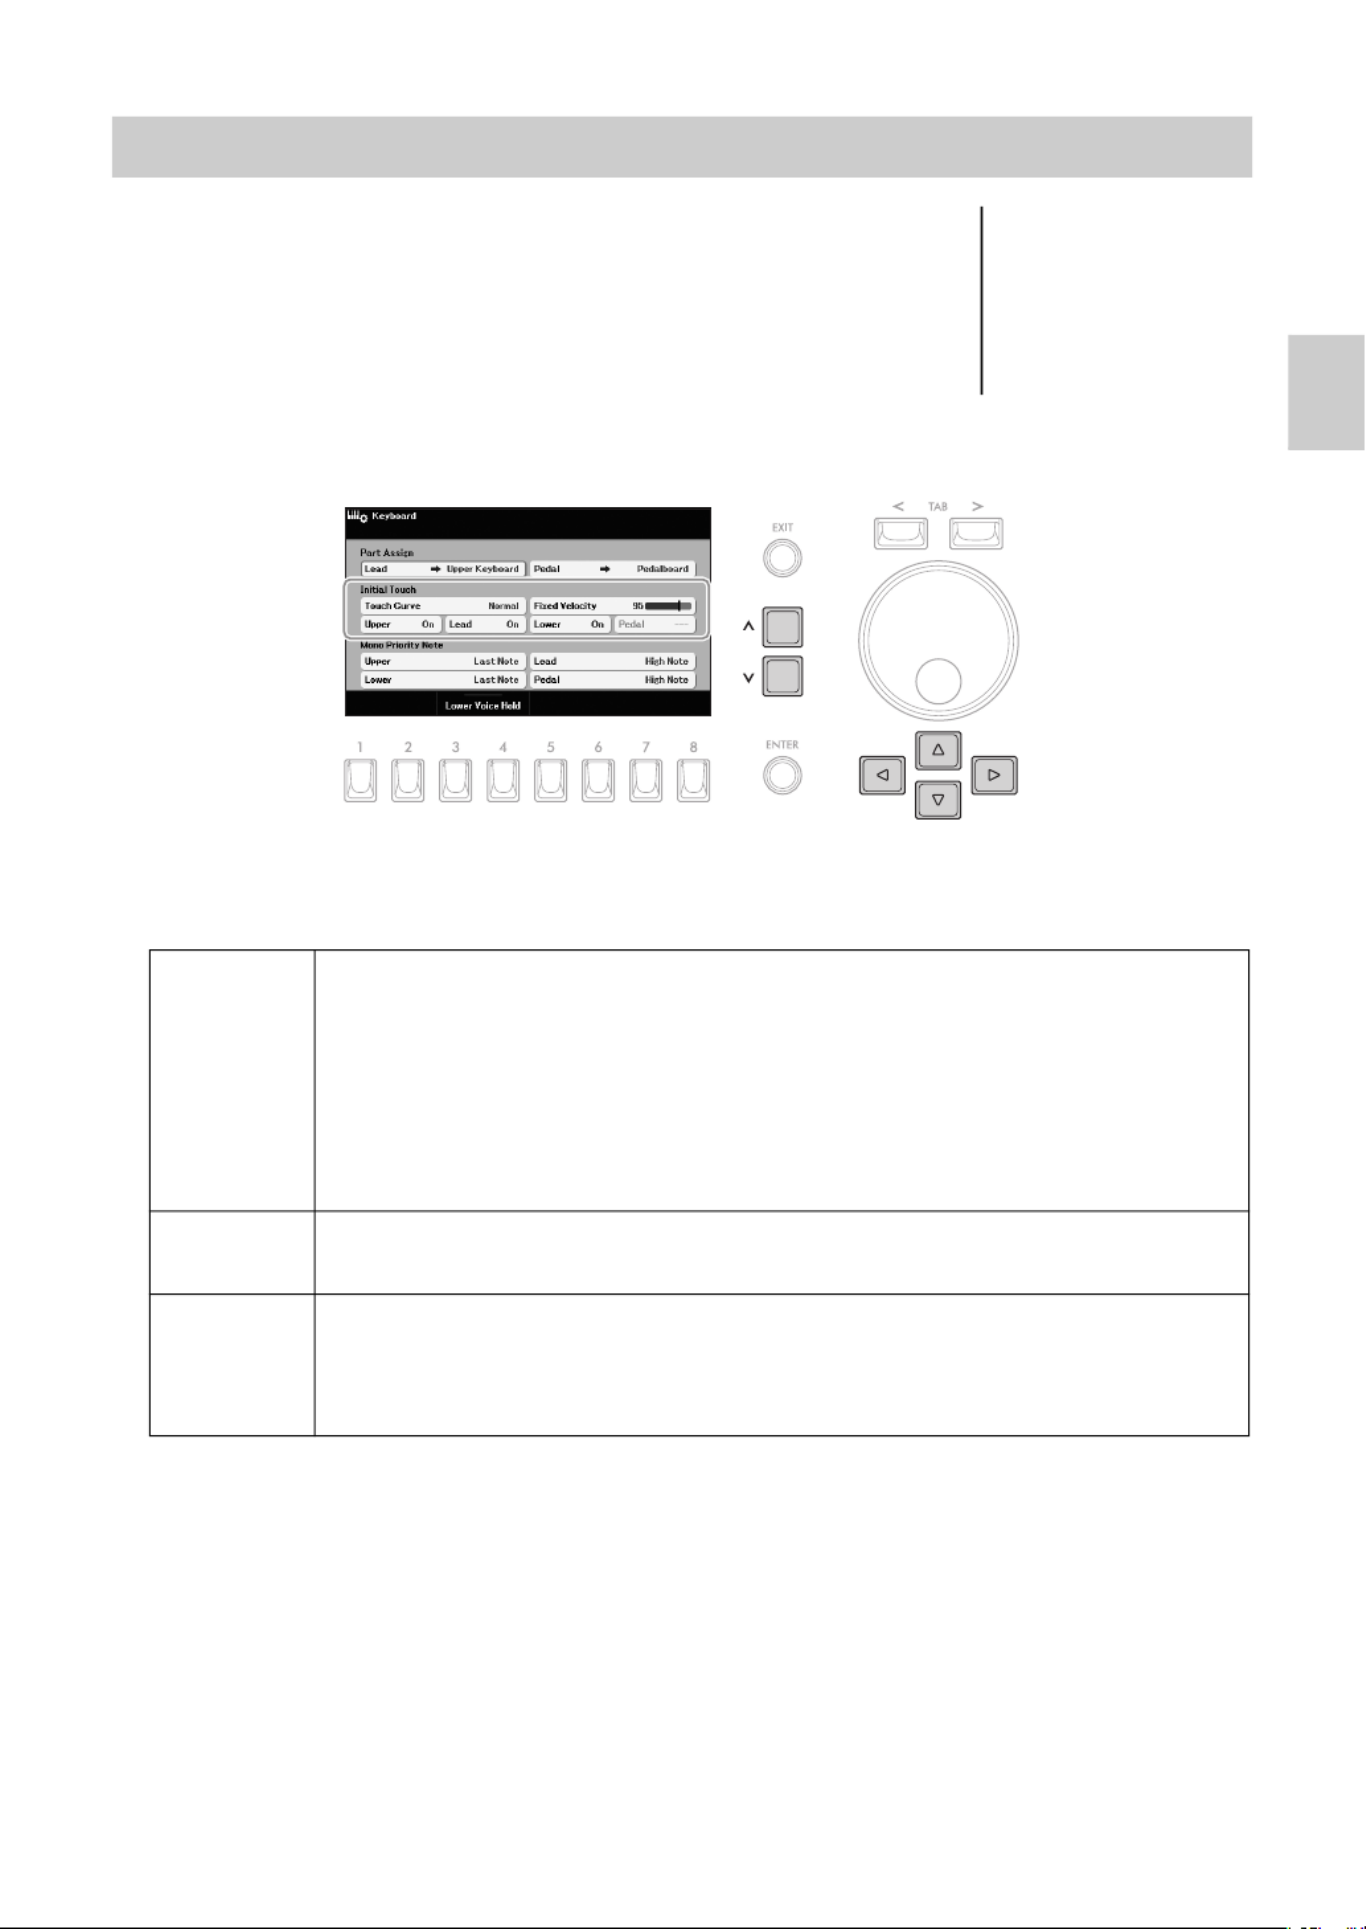
The instrument has a touch response function (Initial Touch) that lets you control
the volume of notes according to how strongly or softly you play the keys. You
can set Initial Touch on or off for each keyboard part assigned to the Upper or
Lower Keyboard.
1Call up the operation display.
[MENU] Cursor buttons [ ][ ][ ][ ] , [ENTER]U D L R Keyboard
2Make settings.
2-1 Use the Cursor buttons [ ][ ][ ][ ] to move the cursor to one of the “U D L R Initial Touch” parameters.
2-2 Use the [ ]/[ ] buttons to change the settings or to adjust the value.u d
Setting the Touch Response of the Keyboard (Initial Touch)
NOTE
Some Voices are purposely
designed without Initial Touch,
in order to emulate the true
characteristics of the actual
instrument (for example,
conventional organs, which
have no touch response).
Touch
Curve
Determines how the sound responds to your playing strength.
• : Standard Touch Response.Normal
• : Produces high volume with moderate playing strength.Soft1
• : Produces relatively high volume even with light playing strength. Best for players Soft2
with a light touch.
• : Requires moderately strong playing for high volume.Hard1
• : Requires strong playing to produce high volume. Best for players with a heavy Hard2
touch.
Fixed
Velocity
Determines the velocity level when “ ” for any part is set to “ ”. In other Initial Touch Off
words, the volume is fixed to this level regardless of your playing strength.
Upper,
Lead,
Lower,
Pedal
Set Initial Touch on or off for each keyboard part assigned to the Upper Keyboard, Lower
Keyboard and Pedalboard. Initial Touch for “ ” or “Lead Pedal” cannot be set when
“ ” is assigned to that part via “ ” located at the upper part of this Pedalboard Part Assign
display. For details about part assignment, refer to the Reference Manual on the website.

ELA-1 Owner’s Manual
42
Pressing the [VOICE EFFECT] button calls up the “ ” display which provides at-a-glance Voice Effect
information of the current settings of the each Voice part.
Current settings of the each keyboard part
For details on the “ ” display, refer to the Reference Manual on the website.Voice Edit
Settings that can be made by using the [1] – [8] buttons
Applying Voice Effects
Mono/Poly Indicates the Voice is played monophonically or polyphonically. This can be set via the
Voice Selection display [7] ( ) Voice Edit TAB [ ][ ] l r Common2.
Current Voice Indicates the Voice selected by using the Voice category buttons or the [USER] button.
Sustain level Indicates the Sustain level (how long the sound sustains) when “ ” is turned on Sustain
by using the [1] – [4] buttons. This can be set via the Voice Selection display
[7] ( ) Voice Edit TAB [ ] .l Common1
DSP type Indicates the DSP type applied when the “ ” is turned on by using the [5] – [8] DSP
buttons below. This can be set via the Voice Selection display [2] ( ).Effect Type
Mono/Poly
Current Voice
DSP type
Sustain level
[1] Sustain Upper When this is turned on, all notes played on the keyboard have a longer
sustain. Turning this to off immediately stops (damps) any sustained
notes.
[2] Lead
[3] Lower
[4] Pedal
[5] DSP Upper Turns the DSP (Digital Signal Processor) effect on or off for each
keyboard part. With the DSP effects, you can add ambience and depth
to your music in a variety of ways — such as adding reverb that makes
you sound like you are playing in a concert hall — as well as other
dynamic enhancements.
[6] Lead
[7] Lower
[8] Pedal
ELA-1 Owner’s Manual 43
Voices – Playing the Keyboard with Various Sounds –
1
By installing Expansion Packs, you can add a variety of optional Voices and Styles to the “ ” folder Expansion
in the User drive. The installed Voices and Styles can be selected via the [USER] button in the Voice
category buttons (page 34) or Style category buttons (page 44), allowing you to expand your music
performance and creation possibilities. You can purchase high quality Expansion Pack data created by
Yamaha, or create your own original Expansion Pack data by using the “Yamaha Expansion Manager”
software on your computer. For instructions on how to install the Expansion Packs, refer to the Reference
Manual on the website.
For more information about Expansion Packs, access the following website:
https://www.yamaha.com/2/electone/
To obtain the “ ” software and its manuals, access the Yamaha Downloads Yamaha Expansion Manager
website:
https://download.yamaha.com/
Adding New Contents — Expansion Packs
Advanced Features
Refer to the Reference Manual on the website, Chapter 1.
Metronome settings [MENU] Cursor buttons [ ][ ][ ][ ] , [ENTER]UDL R Metronome
Keyboard part-related
settings
[MENU] Cursor buttons [ ][ ][ ][ ] , [ENTER]UDL R Keyboard
Applying Harmony/Arpeggio [MENU] Cursor buttons [ ][ ][ ][ ] , [ENTER]UDL R Harmony/Arpeggio
Voice Selection display [6] ( ) Settings TAB [ ] r Arpeggio
Pitch-related settings
• Scale Tuning [MENU] Cursor buttons [ ][ ][ ][ ] , [ENTER] U D L R Transpose/Tune TAB
[ ] r Scale Tune
• Pitch settings for each
keyboard part
Voice Selection display [6] ( ) Settings TAB [ ] l Tune
Editing Voices Voice Selection display [7] ( )Voice Edit
Disabling automatic
selection of Voice Sets
(effects, etc.)
Voice Selection display [6] ( ) TAB [ ][ ] ( )Settings l r Voice Set Filter
Installing Expansion Pack
data
[MENU] Cursor buttons [ ][ ][ ][ ] UDL R Expansion, [ENTER] [ ] u Pack
Installation, [ENTER]

ELA-1 Owner’s Manual 45
Styles – Playing Rhythm and Accompaniment –
2
3Press the [ACMP] button to turn on the Auto Accompaniment.
The Lower Keyboard is enabled for use as the chord section, and chords played
in this section are automatically detected and used to generate fully automatic
accompaniment with the selected Style. The Pedal Voice does not sound while
the [ACMP] button is on.
4Press the [SYNC START] button to enable synchronized start.
5As soon as you play a chord on the Lower Keyboard, the
selected Style starts.
Try playing chords on the Lower Keyboard and play a melody on the Upper
Keyboard.
6Press the [START] button to stop Style playback.
You can also stop playback by pressing the ENDING/rit. [1] – [3] buttons
(page 46).
NOTE
• By changing the Chord
Fingering type (page 49),
you can specify the chords
by using the Pedalboard and
Upper Keyboard, as well as
the Lower Keyboard.
• If you turn on the Manual
Bass function (page 48), you
can use the Pedalboard to
play the bass part of the
Style (even when the [ACMP]
button is on).
NOTE
The chord specified in the
chord section is shown on the
Main display (page 17).
NOTE
You can adjust the volume for
Style playback by using the
STYLE VOLUME buttons, just
like the VOICE VOLUME
buttons (page 34).
Chord section
(Lower Keyboard)
Style Characteristics
The Style types and their defining characteristics are indicated above
the Style name on the Style Selection display or the Main display.
• : see page 53Adaptive
• : see page 50Unison
• : The DJ Styles contain their own special chord progressions, so you can add chord changes to your DJ
performance simply by changing the root key. The Multi Pad (page 59) data in the “ ” folder are DJ Phrase
specially created for these Styles.
For other types, refer to the Reference Manual on the website.
Style file compatibility
This instrument uses the SFF GE file format (page 113). This instrument can play back existing SFF files, but
they will be saved in the SFF GE format when the file is saved (or pasted) in this instrument. Please keep in
mind that the saved file can only be played back on instruments that are compatible with the SFF GE format.

ELA-1 Owner’s Manual
46
A Style consists of rhythm and accompaniment (chords, etc.) parts. The buttons for Style playback are
covered here.
To Start/Stop Playing
[START] button
Starts playback of the current Style. When the [ACMP] button is turned off, only
the rhythm part of the Style is played back. Pressing this button again stops
playback.
[ACMP] button
Turns the Auto Accompaniment on/off. If you turn on the [ACMP] button, both the
rhythm part and auto accompaniment can be played back according to the
detected chords during Style playback. The Pedalboard does not sound while
the [ACMP] button is on.
[SYNC START] button
This puts the Style playback in standby. The Style starts playing back when you
press any key on the keyboard (when the [ACMP] button is off) or you play a
chord in the chord section (when the [ACMP] button is on). While a Style is
playing back, pressing this button stops the Style and puts playback in standby.
[SYNC STOP] button
Make sure that the [ACMP] button is on, and then press the [SYNC STOP]
button and play the keyboard. You can start and stop the Style anytime you want
by simply playing or releasing the keys in the chord section.
INTRO [1] – [3] buttons
The instrument features three different Intro sections that let you add an
introduction at the beginning of Style playback. After pressing one of the INTRO
[1] – [3] buttons, start playback of the Style. When the Intro finishes playing,
Style playback automatically shifts to the Main section.
ENDING/rit. [1] – [3] buttons
The instrument features three different Ending sections to add an ending before
stopping Style playback. When you press one of the ENDING/rit. [1] – [3]
buttons while Style is playing back, the Style will automatically stop after the
ending is played. You can have the ending gradually slow down (ritardando) by
pressing the same ENDING/rit. button once again, while the ending is playing.
Operating Style Playback
NOTE
When the Chord Fingering type
(page 49) is set to “AI Full
Keyboard,” Sync Stop is
disabled.
NOTE
The INTRO [1] section consists
of only the Rhythm part while
INTRO [2] and [3] consist of all
the parts as well as the
Rhythm part. When you play
INTRO [2] or [3], in order to
have the complete Intro section
sound properly, you need to
play chords in the chord
section with the [ACMP] button
turned on.
NOTE
If you press the ENDING/rit. [1]
button when the Style is
playing, a fill-in automatically
plays before the ENDING/rit.
[1].

ELA-1 Owner’s Manual 47
Styles – Playing Rhythm and Accompaniment –
2
Changing Pattern Variation (Sections) During Style Playback
Each Style features four different Main sections, four Fill-in sections and a Break section. By using these
sections effectively, you can easily make your performance sound more dynamic and professional. The
section can be freely changed while the Style is playing back.
MAIN VARIATION [A] – [D] buttons
Press one of the MAIN VARIATION [A] – [D] buttons to select the desired Main
section (the button lights). Each contains an accompaniment pattern of a few
measures and it plays indefinitely. Pressing the selected MAIN VARIATION
button again maintains the same section, but plays an appropriate fill-in pattern
to spice up the rhythm and break the repetition.
[BREAK] button
This lets you add dynamic breaks in the rhythm of the accompaniment. Press
the [BREAK] button during Style playback. When the one-measure Break
pattern finishes playing, the Style playback automatically shifts to the Main
section.
NOTE
For “Adaptive” Styles, Main
Variations change
automatically depending on
how dynamically you play. For
details, refer to page 53.
Press the selected Main section (lit)
again.
The fill-in of the selected Main section
plays (flashes).
Automatically Changing One Touch Settings with the Main Sections (OTS Link)
One Touch Setting (OTS) is a convenient feature that automatically calls up the most appropriate
panel settings (Voices or effects, etc.) for the currently selected Style. When the [OTS LINK] button
is turned on, pressing a different MAIN VARIATION button (A − D) automatically calls up a One
Touch Setting appropriate for the selected Main section.
NOTE
• You can call up the information window to confirm which Voices are prepared for each Main section (A − D) of the current Style by
pressing the [5] ( ) button. If “ ” is not shown, press the [8] ( ) button to call it up. Gray color for a Voice name indicates that Info Info Close
the corresponding part is currently turned off.
• When using the Adaptive Style function (page 53), the OTS is not called up when the Main sections are changed automatically, even if
the [OTS LINK] button is turned on.
• When you change the Voice after the OTS is called up, or when the Main section is changed without pressing any MAIN VARIATION
buttons (such as when using the Adaptive Style function), you can recall the previous OTS by turning the [OTS LINK] button off and
turning it on again.
Adding a Fill-in when changing the Main section
By default, the Auto Fill-in function is turned on and pressing any of the MAIN VARIATION [A] − [D] buttons as
you play automatically plays a fill-in section. This function can be turned on or off from the display called up via
the Style Selection display [6] ( ) Settings TAB [ ] .l Settings
About the lamp status of the section buttons (INTRO/MAIN VARIATION/BREAK/ENDING)
• The section is currently selected.Lit:
• The section will be played next, following the currently selected section.Flashing:
* The MAIN VARIATION [A] – [D] buttons also flash during fill-in playback.
• Off: The section is not currently selected.

ELA-1 Owner’s Manual
48
Adjusting the Volume Balance
You can adjust the volume balance among the keyboard parts (Upper Keyboard Voice, Lower Keyboard
Voice, Pedal Voice, Lead Voice), the Style, the Multi Pad, the Song, the USB Audio Player, the microphone
sound, and the sound input from the external devices. These can be adjusted in the “ ” tab on Volume/Pan
the “ ” display. For details, refer to page 91.Mixer
Adjusting the Tempo
The TEMPO [+] and [-] buttons (page 31) let you change the playback tempo of Style, Song and
Metronome.
When the Manual Bass function is turned on, the bass part of the Style is muted allowing you to play that
part with the Pedal Voice.
1Call up the operation display.
[MENU] Cursor buttons [ ][ ][ ][ ] , [ENTER]U D L R Chord Fingering
2Turn on the Manual Bass function.
2-1 Use the Cursor buttons [ ][ ] to move the cursor to “ .”U D Manual Bass
2-2 Use the [ ]/[ ] buttons to select “ .”u d On
3Play back the Style with the Auto Accompaniment (page 44) while playing the bass part
by using the Pedalboard.
Playing the Bass part of the Style with the Pedalboard (Manual
Bass)

ELA-1 Owner’s Manual 49
Styles – Playing Rhythm and Accompaniment –
2
The Chord Fingering type determines how the chords are detected when you play along with Style playback
with the [ACMP] button turned on. By default, Chord Fingering type is set to “ ,” but you can Multi Finger
change it.
1Call up the operation display.
[MENU] Cursor buttons [ ][ ][ ][ ] , [ENTER]U D L R Chord Fingering
2Select the Fingering type.
2-1 Use the Cursor buttons [ ][ ] to move the cursor to “ .”U D Fingering Type
2-2 Use the [ ]/[ ] buttons to select the type.u d
Setting the Chord Fingering Type
Multi
Finger
Detects chords played on the Lower Keyboard in either of two ways below.
Single Finger
This method lets you easily play chords on the Lower Keyboard using only one, two or three
fingers.
Fingered
This lets you specify the chord by pressing the notes that comprise a chord on the Lower
Keyboard when the [ACMP] button is turned on. Fingered recognizes the various chord
types which are listed on the Reference Manual on the website and can be looked up using
the Chord Tutor function called up via [MENU] Cursor buttons [ ][ ][ ][ ] U D L R Chord
Tutor, [ENTER]. For details about Chord Tutor, refer to the Reference Manual on the website.
AI
Fingered
Basically, this is the same as Fingered, with the exception that less than three notes can be
played to indicate the chords (based on the previously played chord, etc.).
Fingered
On Bass
Accepts the same fingerings as Fingered; however, the lowest note played on the
Pedalboard is used as the bass note, allowing you to play “on bass” chords. (In the Fingered
type, the root of the chord is always used as the bass note.)
Major chord
Press the root key only.
Minor chord
Simultaneously press the
root key and a black key
to its left.
Seventh chord
Simultaneously press the
root key and a white key
to its left.
Minor seventh chord
Simultaneously press the
root key and both a white
and black key to its left.
Produktspezifikationen
| Marke: | Yamaha |
| Kategorie: | Klaviatur |
| Modell: | Electone ELA-1 |
Brauchst du Hilfe?
Wenn Sie Hilfe mit Yamaha Electone ELA-1 benötigen, stellen Sie unten eine Frage und andere Benutzer werden Ihnen antworten
Bedienungsanleitung Klaviatur Yamaha

12 Mai 2024
24 April 2024
18 April 2024
15 April 2024
7 April 2024
28 März 2024
25 März 2024
8 März 2024
3 März 2024
2 März 2024
Bedienungsanleitung Klaviatur
- Klaviatur Acer
- Klaviatur Asus
- Klaviatur Gembird
- Klaviatur HyperX
- Klaviatur Logitech
- Klaviatur Manhattan
- Klaviatur Microsoft
- Klaviatur Nedis
- Klaviatur Rapoo
- Klaviatur Roccat
- Klaviatur SilverCrest
- Klaviatur SteelSeries
- Klaviatur Trust
- Klaviatur Panasonic
- Klaviatur Roland
- Klaviatur TechniSat
- Klaviatur Renkforce
- Klaviatur Technics
- Klaviatur Vivanco
- Klaviatur Akai
- Klaviatur Casio
- Klaviatur Cherry
- Klaviatur Dell
- Klaviatur Razer
- Klaviatur Zebra
- Klaviatur Black Box
- Klaviatur Logik
- Klaviatur Genesis
- Klaviatur Cooler Master
- Klaviatur Thomann
- Klaviatur Fujitsu
- Klaviatur Alesis
- Klaviatur Ketron
- Klaviatur Brydge
- Klaviatur Penclic
- Klaviatur Kawai
- Klaviatur Korg
- Klaviatur BlueBuilt
- Klaviatur Intellijel
- Klaviatur Native Instruments
- Klaviatur Keith MCmillen
- Klaviatur Radial Engineering
- Klaviatur Ducky
- Klaviatur Tiptop Audio
- Klaviatur Sven
- Klaviatur PreSonus
- Klaviatur Moog
- Klaviatur IK Multimedia
- Klaviatur X9 Performance
- Klaviatur 4ms
- Klaviatur Hammond
- Klaviatur ID-Tech
- Klaviatur M-Audio
- Klaviatur Medeli
- Klaviatur Zagg
- Klaviatur Millenium
- Klaviatur Erica Synths
- Klaviatur Laney
- Klaviatur Gamdias
- Klaviatur ASM
- Klaviatur Adesso
- Klaviatur Nord
- Klaviatur Pelco
- Klaviatur Kurzweil
- Klaviatur Patriot
- Klaviatur Gravity
- Klaviatur CM Storm
- Klaviatur Nektar
- Klaviatur Perixx
- Klaviatur V3 Sound
- Klaviatur Dexibell
- Klaviatur Keychron
- Klaviatur DNA
- Klaviatur Polyend
Neueste Bedienungsanleitung für -Kategorien-

24 November 2024
25 Juni 2024
20 Juni 2024
18 Juni 2024
18 Juni 2024
18 Juni 2024
17 Juni 2024
17 Juni 2024
17 Juni 2024