ViewSonic VA2433-h Bedienungsanleitung
Lesen Sie kostenlos die 📖 deutsche Bedienungsanleitung für ViewSonic VA2433-h (46 Seiten) in der Kategorie Monitor. Dieser Bedienungsanleitung war für 5 Personen hilfreich und wurde von 2 Benutzern mit durchschnittlich 4.5 Sternen bewertet
Seite 1/46

IMPORTANT: Please read this User Guide to obtain important information on installing and using your product in
a safe manner, as well as registering your product for future service. Warranty information contained in this User
Guide will describe your limited coverage from ViewSonic® Corporation, which is also found on our web site at
http://www.viewsonic.com in English, or in specific languages using the Regional selection box in the upper right
corner of our website.
VA2433-h
Display
User Guide
Model No. VS19417
P/N: VA2433-H

2
Thank you for choosing ViewSonic®
As a world-leading provider of visual solutions, ViewSonic® is dedicated to exceeding
the world’s expectations for technological evolution, innovation, and simplicity.
At ViewSonic®, we believe that our products have the potential to make a positive
impact in the world, and we are confident that the ViewSonic® product you have
chosen will serve you well.
Once again, thank you for choosing ViewSonic®!

3
Safety Precauons
• Read these instructions completely before using the equipment.
• Keep these instructions in a safe place.
• Heed all warnings and follow all instructions.
• Sit at least 18” / 45 cm from the monitor.
• When installing the monitor, please leave 4” / 10 cm of open space around the
monitor for ventilation safety purposes.
• Always handle the display with care when moving it.
• Always use cabinets or stands or installation methods recommended by the
manufacturer of the monitor set.
• Always use furniture that can safely support the monitor.
• Always ensure the monitor is not overhanging the edge of the supporting
furniture.
• Do not place the monitor where children are likely to be present.
• Always educate children about the dangers of climbing on furniture to reach the
monitor or related equipment.
• Always route and manage cords and cables connected to your monitor so they
cannot be tripped over, pulled, or grabbed.
• Exercise caution when removing the rear cover of the monitor. This monitor
contains high-voltage parts.
• Do not use this equipment near water. To reduce the risk of fire or electric
shock, do not expose the monitor to rain or moisture.
• Avoid exposing the monitor to direct sunlight or other sources of sustained heat.
Do not install near any heat sources such as radiators, heat registers, stoves, or
other devices (including amplifiers) that may increase the temperature of the
monitor to dangerous levels.
• Clean with a soft, dry cloth. If further cleaning is required, see the
“Maintenance” section in this guide for further instructions.
• Avoid touching the screen. Skin oils are difficult to remove.
• Do not touch, rub, or apply pressure to the monitor screen, as it may
permanently damage the screen.
• Do not place the monitor in an unstable location.
• Do not place the monitor on tall furniture (for example, cupboards or bookcases)
without anchoring both the furniture and the monitor to a suitable support.
• Do not place the monitor on cloth or other materials that may be located
between the product and supporting furniture.

4
• Place the monitor in a well-ventilated area. Do not place anything on the display
that prevents heat dissipation.
• Do not place heavy objects on the display, video cable, or power cord.
• Do not place items that might tempt children to climb, such as toys and remote
controls, on the top of the monitor or furniture on which the product is placed.
• If smoke appears, an abnormal noise, or a strange odor is present, immediately
switch the display off and contact your dealer or ViewSonic. It is dangerous to
continue using the display.
• Do not attempt to circumvent the safety provisions of the polarized or
grounding-type plug. A polarized plug has two blades with one wider than the
other. A grounding type plug has two blades and a third grounding prong. The
wide blade and the third prong are provided for your safety. If the plug does not
fit into your outlet, obtain an adaptor and do not attempt to force the plug into
the outlet.
• Please confirm the distribution system installed in the building. The system
should provide a circuit breaker rated at 120/240V, 20A.
• When connecting to a power outlet, DO NOT remove the grounding prong.
Please ensure grounding prongs are NEVER REMOVED.
• Protect the power cord from being treaded upon or pinched, particularly at the
plug, and at the point where it emerges from the equipment. Be sure that the
power outlet is located near the equipment so that it is easily accessible.
• Only use attachments/accessories specified by the manufacturer.
• Use only with the cart, stand, tripod, bracket, or table specified by the
manufacturer, or sold with the equipment. When a cart is used, use with caution
when moving the cart/equipment combination to avoid injury from tipping over.
• Unplug this equipment when it will be unused for long periods of time.
• Refer all servicing to qualified service personnel. Service will be required when
the unit has been damaged in any way, such as: if the power-supply cord or
plug is damaged, if liquid is spilled onto or objects fall into the unit, if the unit
is exposed to rain or moisture, or if the unit does not operate normally or has
been dropped.
• Excessive sound volume from ear-/headphones may cause hearing damage/
hearing loss.
• Adjustment of the volume control as well as the equalizer may increase the ear-/
headphones output voltage and therefore, the sound volume level.
• The factors influencing the ear-/headphones output other than those specified
by the manufacturer (e.g. operating system, equalizer software, firmware,
driver) may increase the ear-/headphone output voltage and therefore, the
sound volume level.

5
• Fastening the monitor to a wall or fixed object using cordage or other restraining
devices can help support the weight of the monitor in order to prevent the
monitor from falling over.
or VESA wall mounting hole
NOTE:
• Restraining device/cordage should be able to withstand 100N force.
• Make sure the cordage is straightened, and any slack is removed. The back
of the device shall face the wall to ensure the device cannot tilt under
external force.
• Make sure the monitor does not tilt under external force at any height and
rotation angle of the device.
• If the existing monitor is going to be retained and relocated, the same
considerations as above should be applied.

7
Appendix 26 ...................................................................
Specifications 26 ........................................................................................................
Glossary 28 ................................................................................................................
Troubleshooting 32 ...................................................................................................
Maintenance.........................................................................................................34
General Precautions 34 ..............................................................................................
Cleaning the Screen 34 ...............................................................................................
Cleaning the Case 34 ..................................................................................................
Regulatory and Service Information 35 ..........................
Compliance Information 35 .......................................................................................
Declaration of RoHS2 Compliance......................................................................... 36
Indian Restriction of Hazardous Substances 37 .........................................................
Product Disposal at End of Product Life 37 ................................................................
Copyright Information 38 ..........................................................................................
Customer Service 39 ..................................................................................................
Limited Warranty 40 ..................................................................................................
Mexico Limited Warranty 43 ......................................................................................

8
Introducon
Package Contents
• Monitor
• Power cord
• Video cable
• Quick start guide
NOTE: The power cord and video cables included in your package may vary
depending on your country. Please contact your local reseller for more
informaon.

9
Product Overview
Front and Rear View
Joy Key
I/O Ports
HDMI
1 2 43
1. HDMI 2. VGA 3. Audio Out 4. AC IN
NOTE: For more informaon about the Joy Key and its funcons, refer to “Hot
Keys” on page 18.

10
Inial Setup
Installing the Stand
1
2
3
NOTE: Always place the device on a at, stable surface. Failure to do so may
cause the device to fall and damage the device and/or result in personal
injury.

11
Wall Mounng
NOTE: Only use UL Cered wall mount kits.
75 mm
75 mm
Refer to the table below for the standard dimensions for wall mount kits.
Maximum
Loading Hole paern
(W x H) Interface Pad
(W x H x D) Pad Hole Screw Specicaon
& Quanty
14 kg 75 x 75 mm 115 x 115 x 2.6 mm Ø 5 mm M4 x 6 mm
4 pieces
NOTE: Wall mount kits are sold separately. To obtain a wall mounng kit,
contact ViewSonic® or your local dealer.
1. Turn o the device and disconnect all cables.
2. Place the device on a at, stable surface with the screen facing down.
3. Remove the monitor stand.
1 2
4. Aach the mounng bracket to the VESA mounng holes at the rear of the
device. Then secure it with four (4) screws (M4 x 10 mm).
5. Follow the instrucons that come with the wall mounng kit to mount the
monitor onto the wall.

12
Using the Security Slot
To help prevent the device from being stolen, use a security slot locking device to
secure the device to a xed object.
Addionally, fastening the monitor to a wall or xed object using a security cable
can help support the weight of the monitor in order to prevent the monitor from
falling over.
Below is an example of seng up a security slot locking device on a table.

1313
Making Connecons
This secon guides you on how to connect the monitor with other equipment.
Connecng to Power
1. Connect the power cord to the AC IN jack at the rear of the device.
2. Plug in the power cord to a power outlet.
1 2

14
Connecng External Devices
HDMI
VGA
HDMI

1515
Using the Monitor
Adjusng the Viewing Angle
Tilt Angle Adjustment
Tilt the monitor forwards or backwards to the desired viewing angle (-5˚ to 20˚).
NOTE: When adjusng, support the stand rmly with one hand while lng the
monitor forwards or backwards with the other hand.

16
Turning the Device On/O
1. Plug the power cord into a power outlet.
2. Press the Power buon to turn on the monitor.
3. To turn the monitor o, press the buon again.Power
NOTE: The monitor will sll consume some power as long as the power cord
is connected to the power outlet. If the monitor is not being used for a
long period of me, please disconnect the power plug from the power
outlet.
Using the Joy Key
Use the Joy Key to access the Quick Menu, acvate Hot Keys, navigate the On-
Screen Display (OSD) Menu, and change the sengs.
Joy Key

17
Quick Menu
Press the Joy Key to acvate the Quick Menu.
View Mode
Standard
FPS
RTS
MOBA
Movie
Web
Text
MAC
Mono
NOTE: Follow the key guide that appears on the screen to select the opon or
make adjustments.
Menu Descripon
ViewMode Select one of the preset color sengs.
Volume Adjust the level, or mute the volume.
Contrast/Brightness Adjust the contrast or brightness level.
Input Select Select the input source.
Exit Exit the Quick Menu.
18
Hot Keys
When the On-Screen Display (OSD) Menu is o, you can quickly access special
funcons by using the Joy Key.
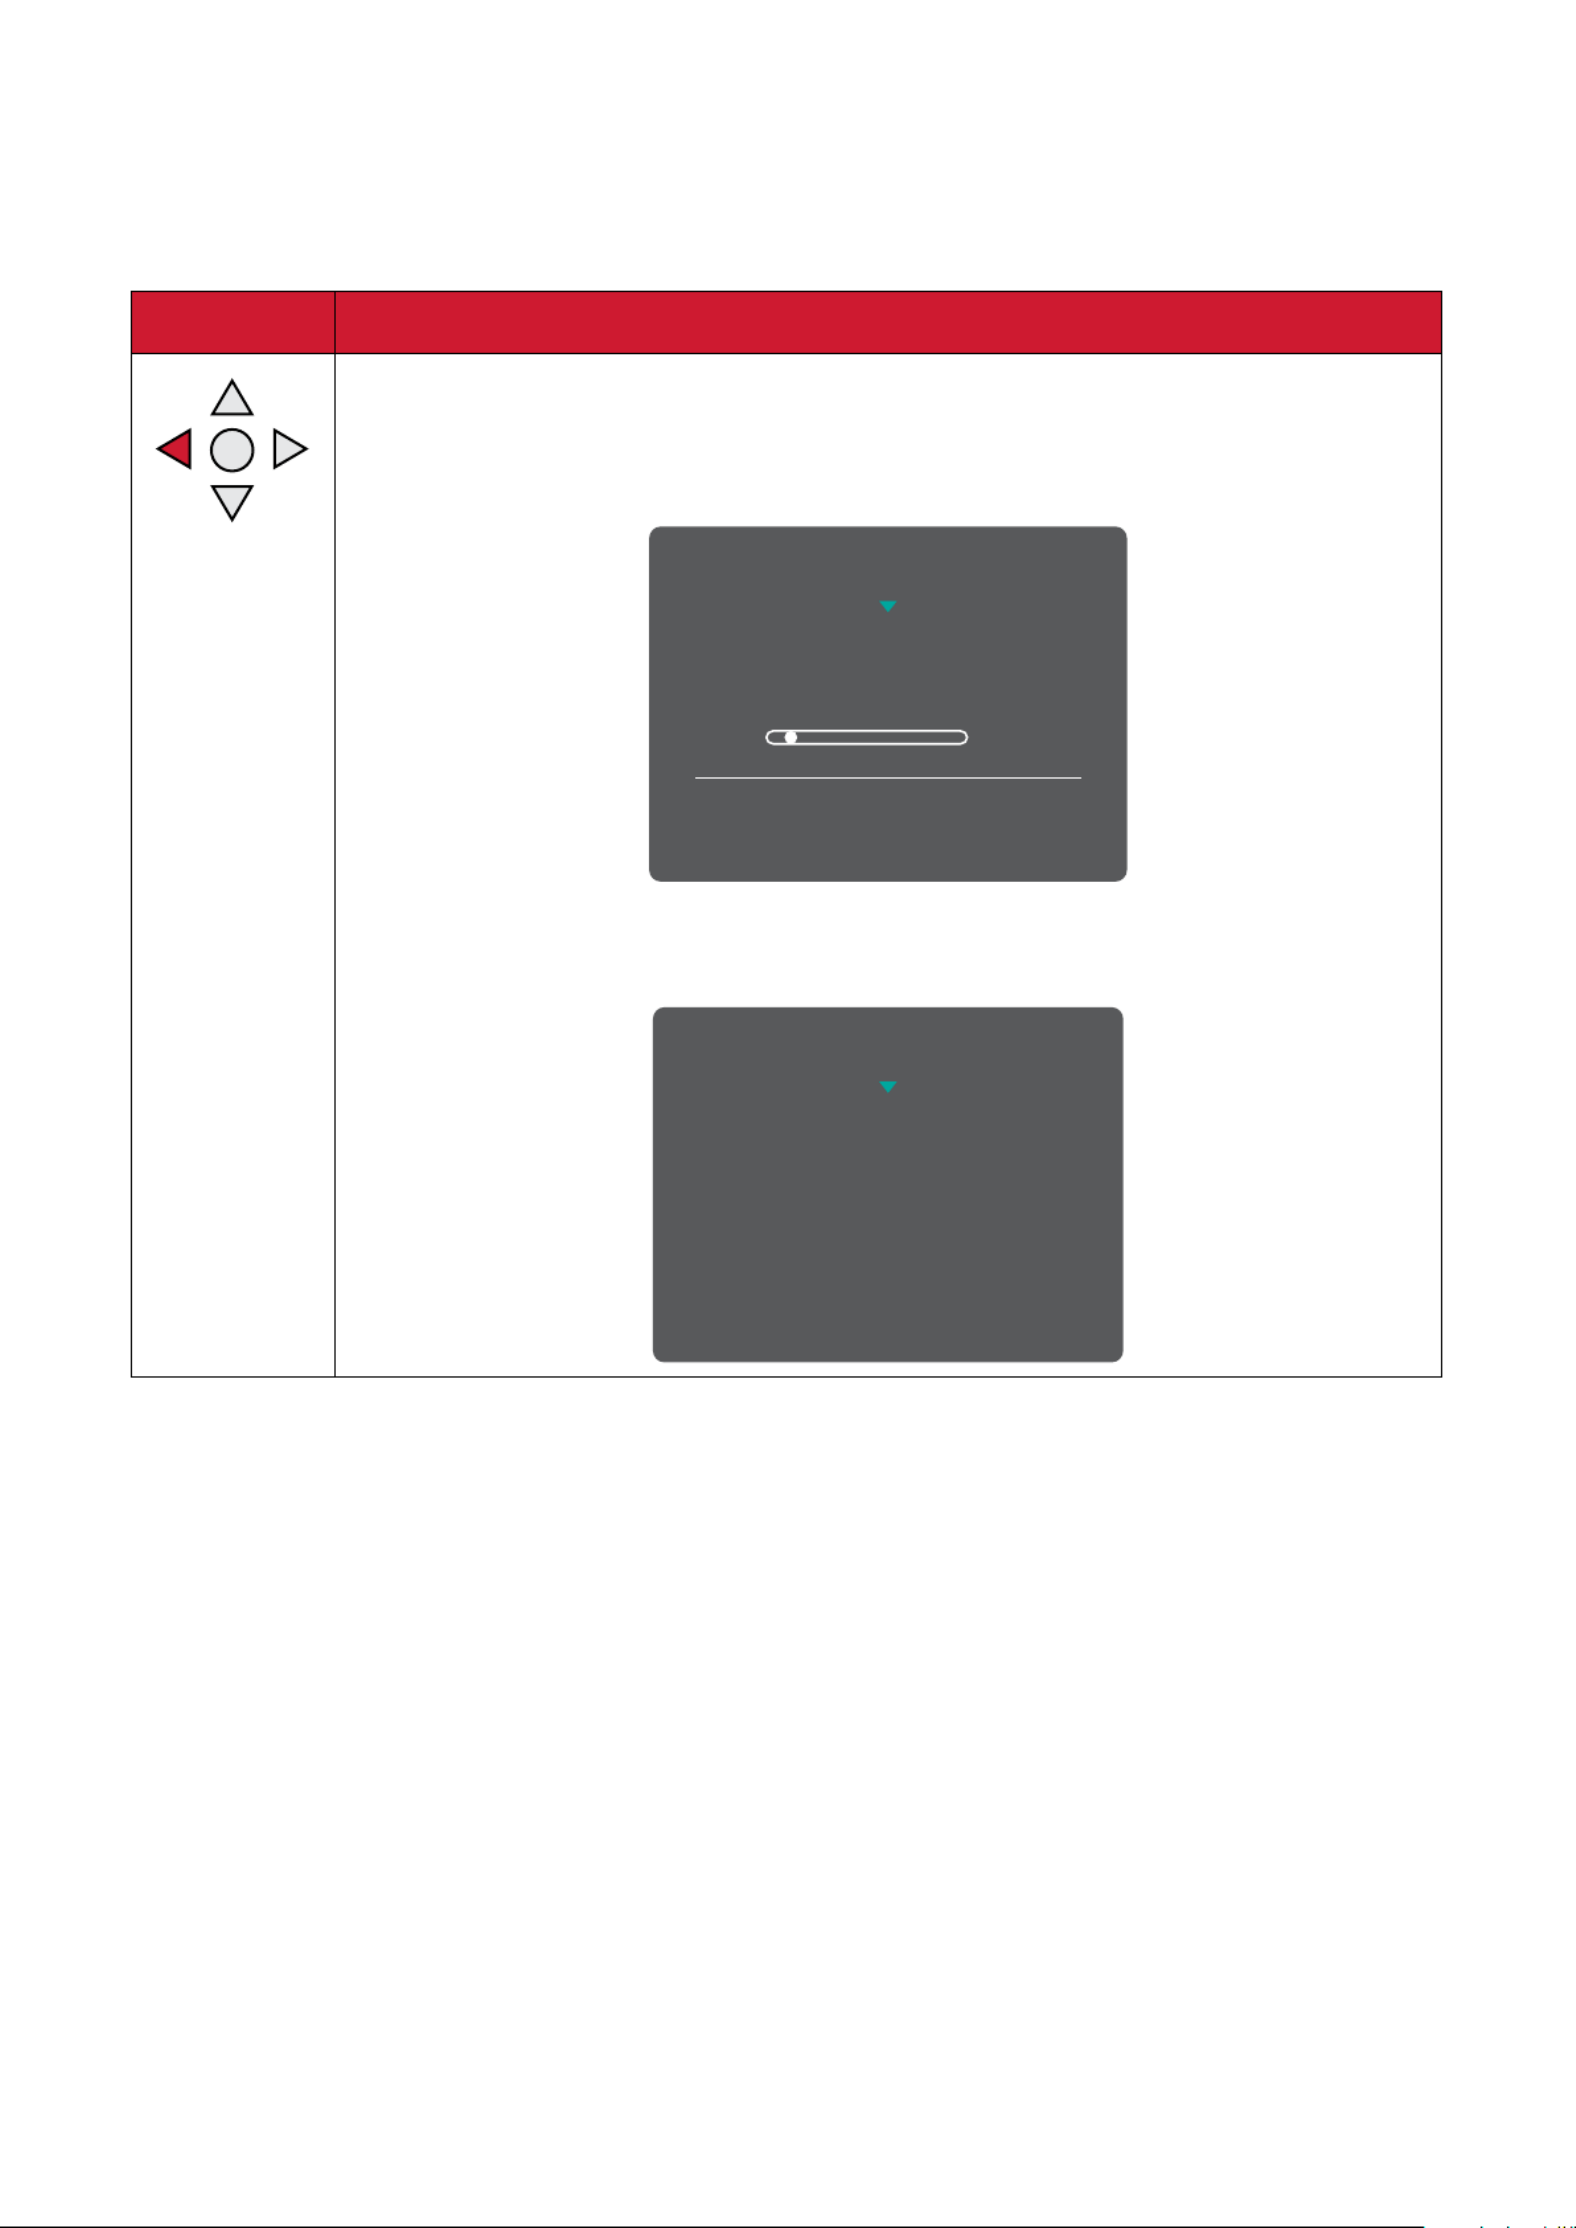
Key Descripon
Press and hold the key to lock/unlock the OSD Menu.
When the menu appears on the screen, connue holding the key
for 10 seconds to lock/unlock the OSD Menu.
1
OSD Lock/Unlock
Locking OSD
Press and hold for 10s to lock OSD
If the OSD Menu is locked, the below message will appear on the
screen:
OSD Lock/Unlock
OSD Locked

19
Key Descripon
Press and hold the key to lock/unlock the button.Power
When the menu appears on the screen, continue holding the key
for 10 seconds to lock/unlock the button.Power
3
Power Lock/Unlock
Locking Power Button
Press and hold for 10s
to lock power
If the button is locked, the below message will appear on Power
the screen:
Power Lock/Unlock
Power Button Locked

20
Conguring the Sengs
General Operaons
1. Move the Joy Key [ [ [ [ ] key to display the On-Screen Display (OSD) t]/u]/p]/q
Menu.
1920 x 1080 @ 60Hz
75%
Setup Menu Color Adjust ViewMode Manual Image
Adjust
Input
Select
Audio Adjust
D-SUB
HDMI
2. Move the Joy Key [ ] or [ ] to select the main menu. Then move the Joy Key t u
[ ] to enter the selected menu.q
1920 x 1080 @ 60Hz
75%
Setup Menu
Color Adjust ViewMode Manual Image
Adjust
Input
Select
Audio Adjust
Contrast/Brightness
Color Temperature
Color Space
Color Range
Contrast
Brightness

21
3. Move the Joy Key [ ] or [ ] to select the desired menu opon. Then move the p q
Joy Key [ ] to enter the sub-menu.u
1920 x 1080 @ 60Hz
75%
Setup Menu Color Adjust ViewMode Manual Image
Adjust
Input
Select
Audio Adjust
Contrast/Brightness
Color Temperature
Color Space
Color Range
sRGB
Bluish
Cool
Native
Warm
User Color
4. Move the Joy Key [ ] or [ ] to adjust/select the seng. Then press the Joy Key p q
to conrm. Or move the Joy Key [ ] or [ ] to make adjustments.t u
1920 x 1080 @ 60Hz
75%
Setup Menu
Color Adjust ViewMode Manual Image
Adjust
Input
Select
Audio Adjust
Contrast/Brightness
Color Temperature
Color Space
Color Range
sRGB
Bluish
Cool
Native
Warm
User Color
NOTE: Follow the key guide to select the opon or make adjustments.

22
On-Screen Display (OSD) Menu Tree
Main Menu Sub-menu Menu Opon
Input Select D-SUB
HDMI
Audio Adjust
Volume (-/+, 0~100)
Mute On
O
ViewMode
Standard
Game
Movie
Web
Text
MAC
Mono
Color Adjust
Contrast/Brightness Contrast (-/+, 0~100)
Brightness (-/+, 0~100)
Color Temperature
sRGB
Bluish
Cool
Nave
Warm
User Color
Red (-/+, 0~100)
Green (-/+, 0~100)
Blue (-/+, 0~100)

23
Main Menu Sub-menu Menu Opon
Color Adjust
Color Space
(for HDMI only)
Auto
RGB
YUV
Color Range
(for HDMI only)
Auto
Full Range
Limited Range
Manual
Image Adjust
Auto Image Adjust
(for D-SUB only)
Horizontal Size
(for D-SUB only) (-/+, 0~100)
H./V. Posion
(for D-SUB only)
Horizontal Posion (-/+, 0~100)
Vercal Posion (-/+, 0~100)
Fine Tune
(for D-SUB only) (-/+, 0~100)
Sharpness (-/+,
0/25/50/75/100)
Blue Light Filter (-/+, 0~100)
Aspect Rao
4:3
5:4
16:9
16:10
Overscan
(for HDMI only)
On
O
Black Stabilizaon
(-/+, 0/10/20/30/4
0/50/60/70/80/90
/100)
Advanced DCR (-/+,
0/25/50/75/100)
Response Time
Standard
Advanced
Ultra Fast

24
Main Menu Sub-menu Menu Opon
Setup Menu
Language
English
Français
Deutsch
Español
Italiano
Suomi
Svenska
Русский
Türkçe
Česká
Tiếng Việt
日本語
한국어
繁體中文
简体中文
Variable Refresh
Rate / AMD
FreeSync
(for HDMI only)
On
O
Informaon
OSD Timeout (-/+, 5/15/30/60)

25
Main Menu Sub-menu Menu Opon
Setup Menu
OSD Background On
O
Power Indicator On
O
Auto Power O On
O
Sleep
(for HDMI only)
30 minutes
45 minutes
60 minutes
120 minutes
O
ECO Mode
Standard
Opmize
Conserve
Auto Detect On
O
DDC/CI On
O
Memory Recall

26
Appendix
Specicaons
Item Category Specicaons
LCD
Type VA, Color a-Si TFT Acve Matrix 1920 x 1080 LCD;
0.27156 (H)mm x 0.27156 (V)mm pixel pitch
Display Size 60 cm, 23.6” viewable
Color Filter RGB vercal stripe
Glass Surface Anti-Glare (Haze 25%), Hard coating (3H)
Input Signal Video Sync
Analog
D-SUB: f
h24-86 kHz, fv:48-75 Hz
TMDS digital (100 Ω)
HDMI (1.4): fh24-86 kHz, fv:48-75 Hz
Compability PC up to 1920 x 1080
Macintosh up to 1920 x 1080
Resoluon1
Recommended 1920 x 1080 @ 60Hz
Supported
• 1920 x 1080 @ 50, 60, 75Hz
• 1680 x 1050 @ 60Hz
• 1600 x 1200 @ 60Hz
• 1600 x 900 @ 60Hz
• 1440 x 900 @ 60, 75Hz
• 1440 x 576 @ 50Hz
• 1400 x 1050 @ 60, 75Hz
• 1366 x 768 @ 60Hz
• 1360 x 768 @ 60Hz
• 1280 x 1024 @ 50, 60, 75Hz
• 1280 x 960 @ 50, 60, 75Hz
• 1280 x 800 @ 60, 75Hz
• 1280 x 768 @ 50, 60, 75Hz
• 1280 x 720 @ 50, 60Hz
• 1152 x 900 @ 66Hz
• 1152 x 870 @ 75Hz
• 1152 x 864 @ 60, 75Hz
• 1024 x 768 @ 50, 60, 70, 72, 75Hz
• 1024 x 600 @ 60Hz
• 848 x 480 @ 60Hz
• 832 x 624 @ 75Hz
• 800 x 600 @ 56, 60, 72, 75Hz
• 720 x 576 @ 50Hz
• 720 x 480 @ 60Hz
• 720 x 400 @ 70Hz
• 640 x 480 @ 50, 60, 67, 73, 75Hz
• 640 x 400 @ 60, 70Hz
• 640 x 350 @ 70Hz
Power2Input Voltage AC 100-240V, 50/60Hz (auto switch)
Display Area Full Scan (H x V) 521.4 x 293.3 mm (20 ¹⁷/₃₂” x 11 ³⁵/₆₄”)

27
Item Category Specicaons
Operang
condions
Temperature 0° C to 40° C (32° F to 104° F)
Humidity 10% to 90% (non-condensing)
Altude 16,000 feet (5 km)
Storage
condions
Temperature -20° C to 60° C (-4° F to 140° F)
Humidity 5% to 90% (non-condensing)
Altude 40,000 feet (12.1 km)
Dimensions Physical
(W x H x D)
540.5 x 404.9 x 176.9 mm
(21 ⁹/₃₂” x 15 ¹⁵/₁₆” x 6 ³¹/₃₂”)
Wall Mount Dimensions 75 x 75 mm
Weight Physical 2.9 kg (6.4 lbs)
Power saving
modes
On
320W (Typical) without audio
20W (Typical) with 50% audio
O ≤ 0.3W
1 Do not set the graphics card in your computer to exceed these ming modes; doing so may result in permanent damage to the display.
2 Please use the power cord from ViewSonic® or an authorized source only.
3 The test condion follows EEI standards.

30
MManual Image Adjust
Displays the “Manual Image Adjust” menu. You can manually set a variety of
image quality adjustments.
Memory Recall
Returns the adjustments back to factory sengs if the display is operang in
a factory preset ming mode listed in the “Specicaons” of this manual.
NOTE: (Excepon) This control does not aect changes made in the
“Language Select” or “Power Lock” seng.
OOverscan
Refers to a cropped image on your monitor’s screen. A seng on your
monitor zooms in on movie content, so that you cannot see the outermost
edges of the lm.
RRecall
Resets the ViewMode monitor sengs.
Resoluon Noce
The noce tells users that the current viewing resoluon is not the correct
nave resoluon. This noce will appear in the display sengs window
when seng up the display resoluon.
Response Time
Adjusts the response me, creang smooth images without streaking,
blurring, or ghosng. A low response me is perfect for the most graphic-
intense gaming, and provides amazing visual quality while watching sports
or acon movies.
SSetup Menu
Adjusts On-Screen Display (OSD) Menu sengs. Many of these sengs can
acvate on-screen display nocaons so users do not have to reopen the
menu.
Sharpness
Adjusts the picture quality of the monitor.

31
VViewMode
ViewSonic’s unique ViewMode feature oers “Game”, “Movie”, “Web”,
“Text”, “MAC”, and “Mono” presets. These presets are specically designed
to deliver an opmized viewing experience for dierent screen applicaons.

32
Troubleshoong
This secon describes some common problems that you may experience when
using the monitor.
Problem or Issue Possible Soluons
No power
• Make sure you have turned on the monitor by
pressing the buon.Power
• Make sure the power cord is properly and securely
connected to the monitor and power outlet.
• Plug another electrical device into the power outlet
to verify that the outlet is supplying power.
Power is On, but no
image appears on
screen
• Make sure the video cable connecng the monitor
to the computer is properly and securely connected.
• Adjust the brightness and contrast sengs.
• Make sure the correct input source is selected.
Wrong or abnormal
colors
• If any colors (red, green, or blue) are missing,
check the video cable to make sure it is properly
and securely connected. Loose or broken pins
in the cable connector could cause an improper
connecon.
• Connect the monitor to another computer.
Screen image is too
light or dark
• Adjust brightness and contrast sengs via the OSD
Menu.
• Reset the monitor to factory sengs.
Screen image cuts in
and out
• Make sure the correct input source is selected.
• Check for bent or broken pins in the video cable
connector.
• Make sure the video cable connecng the monitor
to the computer is properly and securely connected.
Screen image is
blurred
• Adjust the resoluon to the correct Aspect Rao.
• Reset the monitor to factory sengs.
The screen isn’t
centered correctly
• Adjust the horizontal and vercal controls via the
OSD Menu.
• Check the Aspect Rao.
• Reset the monitor to factory sengs.
The screen appears
yellow
• Make sure the “Blue Light Filter” is O.

33
Problem or Issue Possible Soluons
The OSD Menu
does not appear
on the screen/the
OSD controls are
inaccessible
• Check whether the OSD Menu is locked.
• Turn o the monitor, unplug the power cord, plug it
back in, and then turn on the monitor.
• Reset the monitor to factory sengs.
Control panel keys do
not work
• Press only one key at a me.
• Restart the computer.
Some menus aren’t
selectable in the OSD
• Adjust the ViewMode or the input source.
• Reset the monitor to factory sengs.
No audio output
• If using ear-/headphones, ensure the mini stereo
jack is connected.
• Make sure the volume is not muted, nor set to 0.
• Check the Audio Input seng.
The monitor will not
adjust
• Make sure there are no obstrucons near or on the
monitor, and that there is adequate spacing.
• For more informaon, see “Adjusng the Viewing
Angle”.
USB devices connected
to the monitor do not
work
• Make sure the USB cable is connected properly.
• Try changing to another USB port (if applicable).
• Some USB devices require a higher electric current;
connect the device directly to the computer.
The external device
is connected, but no
image appears on the
screen
• Make sure the Power is On
• Adjust brightness and contrast via the OSD Menu.
• Check the connecng cable and make sure it is
properly and securely connected. Loose or broken
pins in the cable connector could cause an improper
connecon.

34
Maintenance
General Precauons
• Make sure the monitor is turned o and the power cable is unplugged from the
power outlet.
• Never spray or pour any liquid directly onto the screen or case.
• Handle the monitor with care, as a darker-colored monitor, if scued, may show
marks more clearly than a lighter-colored monitor.
Cleaning the Screen
• Wipe the screen with a clean, so, lint-free cloth. This removes dust and other
parcles.
• If the screen is sll not clean, apply a small amount of non-ammonia, non-
alcohol based glass cleaner onto a clean, so, lint-free cloth; then wipe the
screen.
Cleaning the Case
• Use a so, dry cloth.
• If the case is sll not clean, apply a small amount of non-ammonia, non-alcohol
based, mild non-abrasive detergent onto a clean, so, lint-free cloth, then wipe
the surface.
Disclaimer
• ViewSonic® does not recommend the use of any ammonia or alcohol-based
cleaners on the display screen or case. Some chemical cleaners have been
reported to damage the screen and/or case of the monitor.
• ViewSonic® will not be liable for damage resulng from use of any ammonia or
alcohol-based cleaners.

35
Regulatory and Service Informaon
Compliance Informaon
This secon addresses all connected requirements and statements regarding
regulaons. Conrmed corresponding applicaons shall refer to nameplate labels
and relevant markings on the unit.
The following informaon is only for EU-member states:
The mark shown to the right is in compliance with the Waste Electrical
and Electronic Equipment Directive 2012/19/EU (WEEE). The mark
indicates the requirement NOT to dispose of the equipment as unsorted
municipal waste, but use the return and collection systems according to
local law.

36
Declaraon of RoHS2 Compliance
This product has been designed and manufactured in compliance with Direcve
2011/65/EU of the European Parliament and the Council on restricon of the use
of certain hazardous substances in electrical and electronic equipment (RoHS2
Direcve) and is deemed to comply with the maximum concentraon values issued
by the European Technical Adaptaon Commiee (TAC) as shown below:
Substance Proposed Maximum
Concentraon Actual Concentraon
Lead (Pb) 0.1% < 0.1%
Mercury (Hg) 0.1% < 0.1%
Cadmium (Cd) 0.01% < 0.01%
Hexavalent Chromium (Cr6⁺) 0.1% < 0.1%
Polybrominated biphenyls (PBB) 0.1% < 0.1%
Polybrominated diphenyl ethers
(PBDE) 0.1% < 0.1%
Bis (2-ethylhexyl) phthalate
(DEHP) 0.1% < 0.1%
Butyl benzyl phthalate (BBP) 0.1% < 0.1%
Dibutyl phthalate (DBP) 0.1% < 0.1%
Diisobutyl phthalate (DIBP) 0.1% < 0.1%
Certain components of products as stated above are exempted under the Annex
III of the RoHS2 Direcves as noted below. Examples of exempted components
are:
• Copper alloy containing up to 4% lead by weight.
• Lead in high melng temperature type solders (i.e. lead-based alloys containing
85% by weight or more lead).
• Electrical and electronic components containing lead in a glass or ceramic other
than dielectric ceramic in capacitors, e.g. piezoelectronic devices, or in a glass or
ceramic matrix compound.
• Lead in dielectric ceramic in capacitors for a rated voltage of 125V AC or 250V DC
or higher.

37
Indian Restricon of Hazardous Substances
Restricon on Hazardous Substances statement (India). This product complies
with the “India E-waste Rule 2011” and prohibits use of lead, mercury, hexavalent
chromium, polybrominated biphenyls or polybrominated diphenyl ethers in
concentraons exceeding 0.1 weight % and 0.01 weight % for cadmium, except for
the exempons set in Schedule 2 of the Rule.
Product Disposal at End of Product Life
ViewSonic® respects the environment and is commied to working and living
green. Thank you for being part of Smarter, Greener Compung. Please visit the
ViewSonic® website to learn more.
USA & Canada:
hps://www.viewsonic.com/us/company/green/go-green-with-viewsonic/#recycle-
program
Europe:
hps://www.viewsoniceurope.com/eu/support/call-desk/
Taiwan:
hps://recycle.epa.gov.tw/
Produktspezifikationen
| Marke: | ViewSonic |
| Kategorie: | Monitor |
| Modell: | VA2433-h |
Brauchst du Hilfe?
Wenn Sie Hilfe mit ViewSonic VA2433-h benötigen, stellen Sie unten eine Frage und andere Benutzer werden Ihnen antworten
Bedienungsanleitung Monitor ViewSonic

10 Oktober 2024
7 Oktober 2024
3 Oktober 2024
30 September 2024
29 September 2024
27 September 2024
27 September 2024
23 September 2024
22 September 2024
21 September 2024
Bedienungsanleitung Monitor
- Monitor Samsung
- Monitor Da-Lite
- Monitor 3M
- Monitor Acer
- Monitor Apple
- Monitor Approx
- Monitor Asus
- Monitor Sanyo
- Monitor BenQ
- Monitor Corsair
- Monitor Gigabyte
- Monitor HP
- Monitor HyperX
- Monitor KeepOut
- Monitor Mad Catz
- Monitor Medion
- Monitor Philips
- Monitor SilverCrest
- Monitor Sony
- Monitor Zalman
- Monitor Panasonic
- Monitor LG
- Monitor Bosch
- Monitor Canon
- Monitor Yamaha
- Monitor Yealink
- Monitor Velleman
- Monitor Neumann
- Monitor CSL
- Monitor Denver
- Monitor EMOS
- Monitor König
- Monitor MarQuant
- Monitor Renkforce
- Monitor Thomson
- Monitor Blaupunkt
- Monitor Schneider
- Monitor Sharp
- Monitor Daewoo
- Monitor Triton
- Monitor Pyle
- Monitor Mitsubishi
- Monitor Haier
- Monitor Hisense
- Monitor Salora
- Monitor ARCHOS
- Monitor Caliber
- Monitor ODYS
- Monitor Pioneer
- Monitor Jay-Tech
- Monitor JBL
- Monitor JVC
- Monitor Optoma
- Monitor PEAQ
- Monitor Shure
- Monitor Stairville
- Monitor Abus
- Monitor Continental Edison
- Monitor Hannspree
- Monitor Hitachi
- Monitor Hyundai
- Monitor Orion
- Monitor TCL
- Monitor Tesla
- Monitor Toshiba
- Monitor Olympus
- Monitor Garmin
- Monitor Citizen
- Monitor Omron
- Monitor Element
- Monitor Plantronics
- Monitor Epson
- Monitor IHealth
- Monitor Waeco
- Monitor Dell
- Monitor LC-Power
- Monitor Lenovo
- Monitor MSI
- Monitor Tripp Lite
- Monitor LightZone
- Monitor Adam
- Monitor Burg Wächter
- Monitor Marshall
- Monitor Razer
- Monitor Samson
- Monitor Honeywell
- Monitor ELO
- Monitor Marshall Electronics
- Monitor Ricoh
- Monitor Simrad
- Monitor Globaltronics
- Monitor Terra
- Monitor Xoro
- Monitor Smart
- Monitor Alpine
- Monitor Viessmann
- Monitor Brandson
- Monitor Cooler Master
- Monitor NZXT
- Monitor Faytech
- Monitor Behringer
- Monitor Mackie
- Monitor ESI
- Monitor Eurolite
- Monitor Barco
- Monitor InFocus
- Monitor Kindermann
- Monitor NEC
- Monitor Hercules
- Monitor Monoprice
- Monitor Monacor
- Monitor Belinea
- Monitor Fujitsu
- Monitor Huawei
- Monitor Alesis
- Monitor Maxdata
- Monitor Packard Bell
- Monitor JUNG
- Monitor Westinghouse
- Monitor AOC
- Monitor AG Neovo
- Monitor Eizo
- Monitor Iiyama
- Monitor Kogan
- Monitor Skytronic
- Monitor Xerox
- Monitor NewStar
- Monitor Insignia
- Monitor Swissonic
- Monitor Ring
- Monitor Vitek
- Monitor DataVideo
- Monitor RCF
- Monitor Prestigio
- Monitor APC
- Monitor Cisco
- Monitor Danfoss
- Monitor Yorkville
- Monitor Allen & Heath
- Monitor Deltaco
- Monitor Boss
- Monitor IFM
- Monitor Godox
- Monitor Genelec
- Monitor Vivitek
- Monitor Kramer
- Monitor Peerless-AV
- Monitor Wortmann AG
- Monitor ARRI
- Monitor Asrock
- Monitor CTOUCH
- Monitor AJA
- Monitor Hikvision
- Monitor Promethean
- Monitor Newline
- Monitor Blue Sky
- Monitor Jensen
- Monitor Fostex
- Monitor PreSonus
- Monitor ART
- Monitor Seiki
- Monitor Oecolux
- Monitor IK Multimedia
- Monitor Vorago
- Monitor Midas
- Monitor Baaske Medical
- Monitor Ikan
- Monitor Krom
- Monitor ProXtend
- Monitor Avantone Pro
- Monitor Emachines
- Monitor EverFocus
- Monitor Focal
- Monitor Ganz
- Monitor GeoVision
- Monitor HKC
- Monitor Ibm
- Monitor Interlogix
- Monitor Joy-it
- Monitor LaCie
- Monitor Legamaster
- Monitor M-Audio
- Monitor Maxell
- Monitor MicroTouch
- Monitor Mirai
- Monitor ONYX
- Monitor Peerless
- Monitor Provision ISR
- Monitor Soundstream
- Monitor Sunny
- Monitor Sunstech
- Monitor Tannoy
- Monitor AMX
- Monitor Wyse - Dell
- Monitor ACTi
- Monitor Vimar
- Monitor Alienware
- Monitor AVer
- Monitor PeakTech
- Monitor Ozone
- Monitor ITek
- Monitor Bauhn
- Monitor TV One
- Monitor RGBlink
- Monitor QSC
- Monitor Planar
- Monitor Mitsai
- Monitor Bematech
- Monitor Dahua Technology
- Monitor Posiflex
- Monitor Speco Technologies
- Monitor Christie
- Monitor Atlantis Land
- Monitor Palmer
- Monitor Hanwha
- Monitor Allsee
- Monitor Prowise
- Monitor SPL
- Monitor Advantech
- Monitor Aputure
- Monitor Avocor
- Monitor Lilliput
- Monitor Chauvet
- Monitor EKO
- Monitor IOIO
- Monitor Neets
- Monitor Crestron
- Monitor I3-Technologies
- Monitor Antelope Audio
- Monitor Pelco
- Monitor Dynaudio
- Monitor Extron
- Monitor V7
- Monitor Atlona
- Monitor Game Factor
- Monitor Iadea
- Monitor Elite Screens
- Monitor Night Owl
- Monitor Sonifex
- Monitor Kali Audio
- Monitor Alogic
- Monitor SMART Technologies
- Monitor SWIT
- Monitor Atomos
- Monitor DoubleSight
- Monitor Varad
- Monitor Syscom
- Monitor KRK
- Monitor Chimei
- Monitor HEDD
- Monitor EC Line
- Monitor BOOX
- Monitor Akuvox
- Monitor Nixeus
- Monitor Desview
- Monitor Enttec
- Monitor Drawmer
- Monitor Feelworld
- Monitor Yiynova
- Monitor Positivo
- Monitor Ernitec
- Monitor AORUS
- Monitor Aopen
- Monitor Ikegami
- Monitor Elvid
- Monitor American Dynamics
- Monitor Fluid
- Monitor TVLogic
- Monitor Gamber-Johnson
- Monitor CTL
- Monitor Raysgem
- Monitor Viotek
- Monitor Datacolor
- Monitor ANDYCINE
- Monitor Wohler
- Monitor Eve Audio
- Monitor Colormetrics
- Monitor Qian
- Monitor Neat
- Monitor Planet Audio
- Monitor Mimo Monitors
- Monitor IStarUSA
- Monitor Innocn
- Monitor AMCV
- Monitor GVision
- Monitor OSEE
- Monitor Freedom Scientific
- Monitor UPERFECT
- Monitor SmallHD
- Monitor Monkey Banana
- Monitor Kubo
- Monitor POSline
- Monitor HoverCam
- Monitor IBoardTouch
- Monitor COMMBOX
- Monitor Postium
- Monitor HELGI
- Monitor ProDVX
- Monitor Blue Sea
- Monitor GeChic
- Monitor ADS-TEC
- Monitor Transvideo
- Monitor Shimbol
- Monitor Portkeys
- Monitor AIS
- Monitor Vidi-Touch
- Monitor KTC
- Monitor CoolerMaster
- Monitor Mobile Pixels
- Monitor Voxicon
- Monitor Mybeo
- Monitor Bearware
- Monitor DTEN
- Monitor Cocopar
- Monitor Titan Army
Neueste Bedienungsanleitung für -Kategorien-

3 Dezember 2024
3 Dezember 2024
2 Dezember 2024
1 Dezember 2024
1 Dezember 2024
1 Dezember 2024

30 November 2024
30 November 2024
30 November 2024
29 November 2024