Traveler DC-5900 Bedienungsanleitung
Traveler
Digitalkamera
DC-5900
Lesen Sie kostenlos die 📖 deutsche Bedienungsanleitung für Traveler DC-5900 (41 Seiten) in der Kategorie Digitalkamera. Dieser Bedienungsanleitung war für 14 Personen hilfreich und wurde von 2 Benutzern mit durchschnittlich 4.5 Sternen bewertet
Seite 1/41
EN-1
FCC STATEMENT
This device complies with Part 15 of the FCC Rules. Operation is subject to the
following two conditions:
(1) This device may not cause harmful interference, and
(2) This device must accept any interference received, including interference that may
cause undesired operation.
Note:
This equipment has been tested and found to comply with the limits for Class B digital
devices, pursuant to Part 15 of the FCC rules. These limits are designed to provide
reasonable protection against harmful interference in a residential installation.This
equipment generates uses and can radiate radio frequency energy and, if not installed
and used in accordance with the instructions, may cause harmful interference to radio
communications. However, there is no guarantee that interference will not occur in a
particular installation. If this equipment does cause harmful interference to radio or
television reception, which can be determined by turning the equipment off and on, the
user is encouraged to try to correct the interference by one or more of the following
measures:
Reorient or relocate the receiving antenna.
Increase the separation between the equipment and receiver.
Connect the equipment into an outlet on a circuit different from that to which the
receiver is connected.
Consult the dealer or an experienced radio/TV technician for help.
Use of shielded cable is required to comply with Class B limits in Subpart B of Part 15
of the FCC rules.
Do not make any changes or modifications to the equipment unless otherwise
specified in the manual. If such changes or modifications should be made, you could
be required to stop operation of the equipment.
Notice
If static electricity or electromagnetism causes data transfer to discontinue midway
(fail), restart the application or disconnect and connect the communication cable
(USB, etc.) again.
EN-2
READ THIS FIRST
Trademark Information
Microsoft
®
and Windows
®
are U.S. registered trademarks of Microsoft Corporation.
Pentium® is a registered trademark of Intel Corporation.
Macintosh is a trademark of Apple Computer, Inc.
SD™ is a trademark.
Other names and products may be trademarks or registered trademarks of their
respective owners.
Product Information
Product design and specifications are subject to change without notice. This
includes primary product specifications, software, software drivers, and user’s
manual. This User Manual is a general reference guide for the product.
The product and accessories that come with your camera may be different from
those described in this manual. This is due to the fact that different retailers often
specify slightly different product inclusions and accessories to suit their market
requirements, customer demographics, and geographical preferences. Products
very often vary between retailers especially with accessories such as batteries,
chargers, memory cards, cables, pouches, and language support. Occasionally a
retailer will specify a unique product color, appearance, and internal memory
capacity. Contact your dealer for precise product definition and included
accessories.
The illustrations in this manual are for the purpose of explanation and may differ
from the actual design of your camera.
The manufacturer assumes no liability for any errors or discrepancies in this user
manual.

EN-3
SAFETY INSTRUCTIONS
Read and understand all Warnings and Cautions before using this product.
Warnings
If foreign objects or water have entered the camera, turn the power off
and remove the batteries.
Continued use might cause fire or electric shock. Consult the store of
purchase.
If the camera has fallen or its case has been damaged, turn the power
off and remove the batteries.
Continued use might cause fire or electric shock. Consult the store of
purchase.
Do not disassemble, change or repair the camera.
This might cause fire or electric shock. For repair or internal inspection, ask
the store of purchase.
Do not use the camera in areas near water.
This might cause fire or electric shock. Take special care during rain, snow,
on the beach, or near the shore.
Do not place the camera on inclined or unstable surfaces.
This might cause the camera to fall or tilt over, causing damage.
Keep the batteries out of the reach of children.
Swallowing the batteries might cause poisoning. If the batteries are accidentally
swallowed, immediately consult a physician.
Do not use the camera while you are walking, driving or riding a
motorcycle.
This might cause you to fall over or result in traffic accident.

EN-4
Cautions
Load the batteries paying careful attention to the polarity (+ or –) of the
terminals.
Loading the batteries with their polarities inverted might cause fire and
injury, or damage to the surrounding areas due to the battery rupturing or
leaking.
Do not fire the flash close to anyone’s eyes.
This might cause damage to the person’s eyesight.
Do not subject the LCD monitor to impact.
This might damage the glass on the screen or cause the internal fluid to
leak. If the internal fluid enters your eyes or comes into contact with your
body or clothes, rinse with fresh water. If the internal fluid has entered your
eyes, consult a physician to receive treatment.
A camera is a precision instrument. Do not drop it, strike it or use
excessive force when handling the camera.
This might cause damage to the camera.
Do not use the camera in humid, steamy, smoky, or dusty places.
This might cause fire or electric shock.
Do not remove the batteries immediately after long period of
continuous use.
The batteries become hot during use. Touching a hot battery might cause
burns.
Do not wrap the camera or place it in cloth or blankets.
This might cause heat to build up and deform the case, resulting in fire. Use
the camera in a well-ventilated place.
Do not leave the camera in places where the temperature may rise
significantly, such as inside a car.
This might adversely affect the case or the parts inside, resulting in fire.
Before you move the camera, disconnect cords and cables.
Failure to do this might damage cords and cables, resulting in fire and
electric shock.
EN-5
Notes on Battery Usage
When you use the batteries, carefully read and strictly observe the Safety
Instructions and the notes described below:
Use only the specified batteries.
Avoid extremely cold environments as low temperatures can shorten the battery life and reduce
camera performance. Therefore Ni-MH rechargeable batteries are highly recommended.
When you are using new rechargeable batteries or rechargeable batteries that have not
been used for an extended period of time (the batteries that passed the expiry date are
exception), it may affect the number of images that can be captured. Therefore, to
maximize their performance and lifetime, we recommend that you fully charge the
batteries and discharge them for at least one complete cycle before use.
The batteries may feel warm after a long period of continuous use of the camera or the
flash. This is normal and not a malfunction.
The camera may feel warm after a long period of continuous use. This is normal and not
a malfunction.
If the batteries are not to be used for a long period of time, remove them from the camera
to prevent leakage or corrosion and store them after no battery power is left. Stored for a
long time in a fully charged condition, their performance may be impaired.
Always keep the battery terminals clean.
There is a risk of explosion if the batteries are replaced by an incorrect type.
Dispose of used batteries according to the recycle instructions.
We recommend charging the rechargeable batteries for 8 hours before the camera’s first
use.
Never use batteries of different types (together) or mix old and new batteries.
Never use manganese batteries.
CONTENTS
EN-6
INTRODUCTION .................................................................. 8
Overview ......................................................................................................................8
Package Contents ........................................................................................................8
GETTING TO KNOW YOUR CAMERA ............................... 9
Front View ....................................................................................................................9
Rear View...................................................................................................................10
LCD Monitor Display ..................................................................................................11
GETTING STARTED .......................................................... 13
Preparation.................................................................................................................13
Initial Settings .............................................................................................................14
CAPTURE MODE............................................................... 16
Capturing Images.......................................................................................................16
Zoom Function ...........................................................................................................17
Setting the Scene Mode.............................................................................................18
Exposure Compensation/Backlight Correction...........................................................20
VIDEO MODE ..................................................................... 21
Recording Video Clips................................................................................................21
Playing Back Video Clips ...........................................................................................21
PLAYBACK MODE ............................................................ 22
Playing Back Still Images...........................................................................................22
Thumbnail Display......................................................................................................23
Slideshow Display ......................................................................................................23
Protecting Images ......................................................................................................24
DPOF Settings ...........................................................................................................25
Erasing Images ..........................................................................................................26
MENU OPTIONS ................................................................ 27
Capture Menu.............................................................................................................27
Video Menu ................................................................................................................29
Playback Menu...........................................................................................................30
Setup Menu................................................................................................................31
TRANSFERRING FILES TO YOUR COMPUTER ............. 33
Downloading Your Files .............................................................................................33
EDITING SOFTWARE INSTALLATION ............................ 34
USING THE CAMERA AS A PC CAMERA ....................... 35
Run your application software (i.e. Yahoo Messenger)..............................................35
EN-7
SPECIFICATIONS.............................................................. 36
APPENDIX.......................................................................... 37
Possible Number of Shots..........................................................................................37
Troubleshooting..........................................................................................................38
Connecting to a PictBridge Compliant Printer............................................................39

EN-9
GETTING TO KNOW YOUR CAMERA
Front View
1. Shutter button
2. Self-timer LED
3. Power button
4. Flash
5. Lens
6. USB connector
7. Microphone
1
2
3
4
5
6
7
EN-10
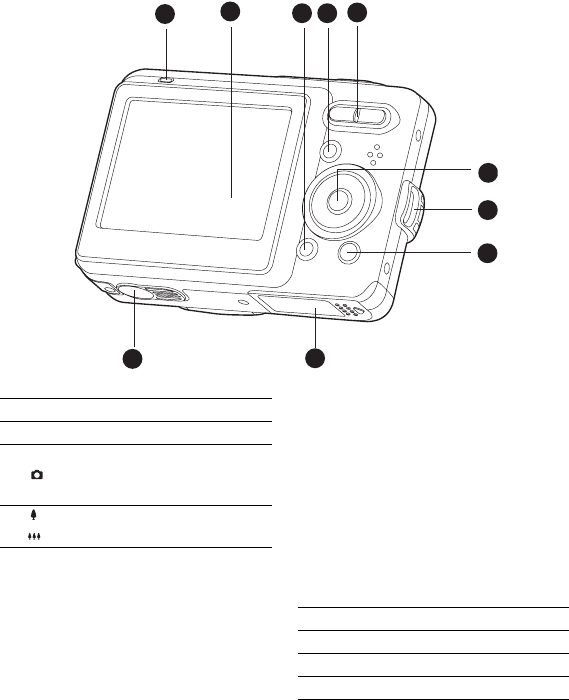
Rear View
125
4
6
8
10 9
7
3
1. Status LED
2. LCD monitor
3. MENU Menu button
4. MODE Mode button
Capture mode
S Video mode
5. Zoom in button
Zoom out button
6. 5-way control button
SCN/SET Scene/Set button
S
Up button
m Focus button
X Right button
X Flash button
T
Down button
% Self-timer button
F Delete button
W Left button
[
Backlight / Exposure compensation
button
7. Strap holder
8. x Playback button
9. Battery / Memory card cover
10.Tripod socket

EN-11
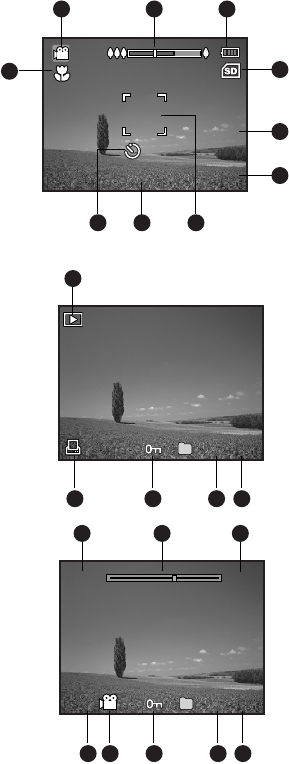
LCD Monitor Display
5
321 4
6
7
8
10 9
5M
00154
2007/05/01
2007/05/01
10s
00154
10s
11
12
13
14
15
16
17
ISO
100
5M
ISO
100
Capture Mode
1. Mode indication
2. Flash mode
[
Z
] Auto Flash
[
Y
] Red-eye Reduction
[
X
] Forced Flash
[
W
] Flash Off
3. Zoom status
4. Battery condition
[]
100% battery power
[]
75% battery power
[]
50% battery powe
r
[]
Less than 20% battery power
[]
Less than 5% battery power
5. Storage media
[
}
]
Internal memory (no card)
[
{
] SD/SDHC memory card
6. Image size resolution
[
5
M
] 5M (2560 x 1920 pixels)
[
3
M
] 3M (2048 x 1536 pixels)
[
1.2
M
] 1.2M (1280 x 960 pixels)
[
0.3
M
]
0.3M (640 x 480 pixels)
7. Image quality
[] Fine
[] Normal
[ ] Economy
8. Available number of shots
9. Main focus area
10.Date and time
11. Self-timer icon
[
%
10s
] 10 sec.
[
%
2s
] 2 sec.
12. ISO
13.
[
]
]
Backlight correction
[
[
]
Exposure compensation
14. Slow shutter warning
* Poor lighting conditions.
Images will be vulnerable to vibration.
15. Metering
[
o
] Average
[
q
] Spot
16. W.Balance
[
Blank
] Auto
[
f
] Incand.
[
h
] Fl1
[
i
] Fl2
[
c
] Daylight
[
d
] Cloudy
17.Focus setting
[
Blank
]
Auto Focus
[
m
] Macro
[ ] Infinity
EN-12
Video mode [S]
1. Mode icon
2. Zoom status
3. Battery condition
4. Storage media
5. Video resolution
6. Available recording time/Elapsed time
7. Main focus area
8. Date and time
9. Self-timer icon
10.Focus setting
Playback mode [x] - Still image playback
1. Mode icon
2. File number
3. Folder number
4. Protect icon
5. DPOF icon
Playback mode
[
x
]
- Video playback
1. Total recorded time
2. Video status bar
3. Elapsed time
4. File number
5. Folder number
6. Protect icon
7. Mode icon
8. Play mode
4
21 3
5
6
8 7
VGA
03:50
03:50
2007/05/01
2007/05/01
10s
10s
9
10
VGA
1
1
100-0001
100-0001
2345
1
100-0001
100-0001
Total Play
00:51 00:25
Total Play
00:51 00:25
X
X
4
31 2
5678

EN-13
GETTING STARTED
Preparation
1. Attach the camera strap.
2. Open the battery/memory card cover.
3. Load the supplied batteries with correct
orientation as shown.
4. Insert an SD/SDHC memory card (Optional).
The camera has 32MB internal memory
(28MB available for image storage), but
you can load an SD/SDHC memory card to
expand the camera’s memory capacity.
Be sure to format the memory card with
this camera before its initial usage.
5. Close the battery/memory card cover and
make sure it is locked securely.
To prevent valuable data from being accidentally erased from an
SD/
SDHC memory card
, you can slide the write protect tab (on the side of
the
SD/SDHC
memory card) to “LOCK”.
To save, edit, or erase data on an SD/SDHC memory card, you must
unlock the card
.
To prevent damaging of an SD/SDHC memory card, be sure to turn off
the power when inserting or removing the SD/SDHC memory card. If
inserting or removing the SD/SDHC memory card with the power on, the camera will automatically turn off.
Be careful not to drop the batteries when opening or closing the battery cover.
Due to the characteristics of AA alkaline battery, camera performance may deteriorate. AA alkaline battery
is not recommended except in emergencies and checking the camera’s functionality.

EN-14
Initial Settings
Setting the Date and Time
The date/time needs to be set if and when:
Camera is turned on for the first time.
Camera is turned on after leaving the camera without the battery for an extended
period of time.
Follow these steps to set the correct date and time:
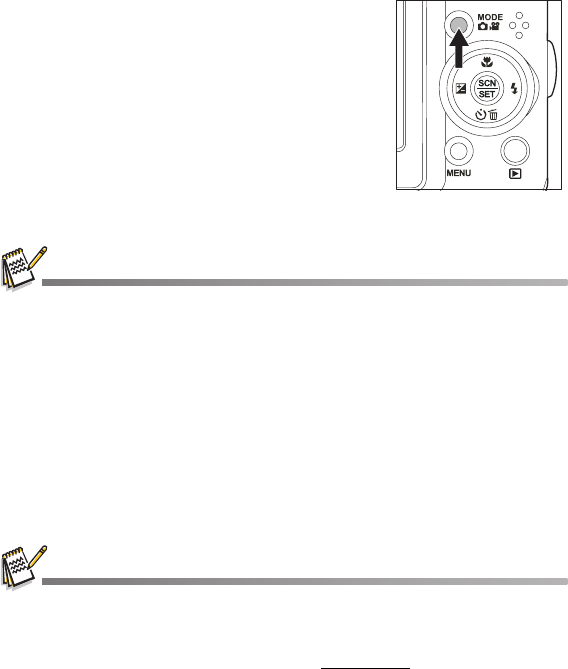
1. Press the Power button to turn the power on.
2. Press the MODE button to set the camera
mode to [ ] / [S].
In the [ ] Capture mode, the LCD
monitor display is followed by the scene
mode setting.
3. Press the MENU button
4. Select [Setup] with the f button.
5. Select [Date/Time] with the c / d buttons,
and press the SET button.
Select the item’s field with the e / f
buttons and adjust the value for the date
and time with the c / d buttons.
The time is displayed in 24-hour format.
After confirming all settings are correct,
press the SET button.
6. To exit from the [Setup] menu, press the
MENU button.
Date/Time
Date/Time
00 : 00
2007 / 05 / 01
00 : 00
2007 / 05 / 01
EN-15
Choosing the Language
Specify in which language menus and messages are to be displayed on the LCD monitor.
1. Set the camera mode to [ ] / [S].
You may set the language from the playback mode.
2. Press the MENU button.
3. Select [Setup] menu with the f button.
4. Select [Language] with the c / d buttons, and
press the SET button.
The Language setting screen will be
displayed.
5. Select the displayed language with the c / d
buttons, and press the SET button.
The setting will be stored.
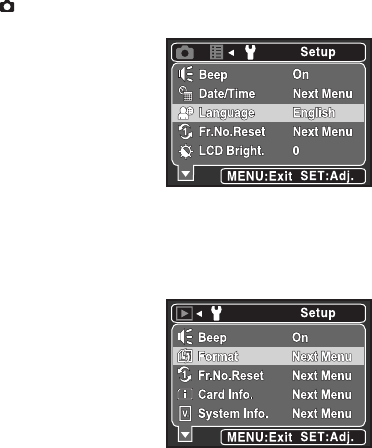
Formatting the Memory Card or Internal Memory
This utility formats the internal memory (or memory card) and erases all stored images
and data.
1. Press the x button.
2. Press the MENU button
3. Select [Setup] menu with the f button.
4. Select [Format] with the c / d buttons, and
press the SET button.
5. Select [Execute] with the c / d buttons, and
press the SET button.
To cancel formatting, select [Cancel] and
press the SET button.

EN-16
CAPTURE MODE
Capturing Images
Your camera is equipped with a 2.36" full color LTPS-TFT LCD monitor to help you
compose images, playback recorded images/video clips or adjust menu settings.
1. Press the Power button to turn the power on.
The status LED lights green and the camera is initiated.
2. Set the camera mode to [ ].
3. Compose your image in the LCD monitor.
Pressing the button zooms in on the subject, and enlarges the subject on the
LCD monitor.
Pressing the button provides a wider angle image.
4. Press the shutter button.
Pressing the shutter button down halfway
automatically focuses and adjusts the
exposure, and pressing the shutter button
down fully captures the images.
The focus area frame turns green when
the camera is in focus and the exposure is
calculated.
When the focus or exposure is not
suitable, the frame of the focus area turns
red.
If the photographic preview is set to [On],
the captured image will be displayed while
the image is being recorded onto the SD/
SDHC memory card or internal memory.
1
2

EN-17
Zoom Function
Using a combination of 3 times optical zoom and 4 times digital zoom permits zoom
photography at up to 12 times magnification. While the digital zoom can be a useful
feature, the more an image is enlarged (zoomed), the more pixelated (grainier) the
image will appear.
1. Set the camera mode to [ ].
2. To enable the digital zoom:
a. Press the MENU button.
b. Select [Function] with the f button.
c. Select [Digital Zoom] with the c / d buttons, and press the SET button.
d. Select [On] with the c / d buttons again, and press the SET button.
e. Press the MENU button to exit from the menu screen.
f. To activate the digital zoom, press and hold the button completely until the
image on the LCD monitor expands.
3. Press the shutter button to capture a “zoomed” image.
The digital zoom can not be used in the video mode.
The zoom setting is automatically cancelled by either turning the camera off or the activation of
the Auto Off function.
Optical zoom 1x to 3x Digital zoom 1x to 4x

EN-18
Setting the Scene Mode
By simply selecting one of the following 17 modes, you can capture the image with the
most appropriate settings.
1. Set the camera mode to [ ].
2. Press the SCN button.
3. Select the desired scene mode with the e/f buttons, and press the SET button.
4. Compose the image and press the shutter button.
The table below will help you choose the appropriate scene mode:
Scene mode Description
P Program AE Select this mode to capture images without having to set special
functions or manual adjustments.
However, this useful mode also allows you to make changes on the
camera settings to suit the photographic condition.
Portrait Man Select this mode when you want to capture an image that makes a
man stand out against a defocused (blurred) background.
Portrait Lady Select this mode when you want to capture an image that makes a
lady stand out against a defocused (blurred) background.
l Landscape Select this mode to capture an image with infinity focus, hard
sharpness and high saturation.
l Sports Select this mode when you want to capture fast-moving subjects.
g
Night Portrait
Select this mode when you want to capture people with an evening
or night scene background.
h Night Scene Select this mode when you want to capture dark scenes such as
night views.
c Candlelight Select this mode when you want to capture photos of candlelit
scene, without spoiling the ambience.
SportsSports 05/1705/17

EN-19
d Fireworks Select this mode when you want to capture fireworks clearly with
optimal exposure. The shutter speed becomes slower, so using a
tripod is recommended.
| Text Select this mode when you want to capture an image that contains
black and white subjects like printed documents.
e Sunset Select this mode when you want to capture a sunset. This mode
helps keep the deep hues in the scene.
m Sunrise Select this mode when you want to capture a sunrise. This mode
helps keep the deep hues in the scene.
k
Splash Water
Select this mode when you want to capture photos of splashing
water.
e Flow Water Select this mode when you want to capture the soft flowing water.
_ Snow Select this mode when you want to capture clear snow scenes
without darkened subjects and bluish tint.
Beach Select this mode when you want to capture bright beach scenes and
sunlit water surfaces.
a Pets Select this mode when you want to capture your pets. Shoot from
their eye level.
Scene mode Description
EN-20
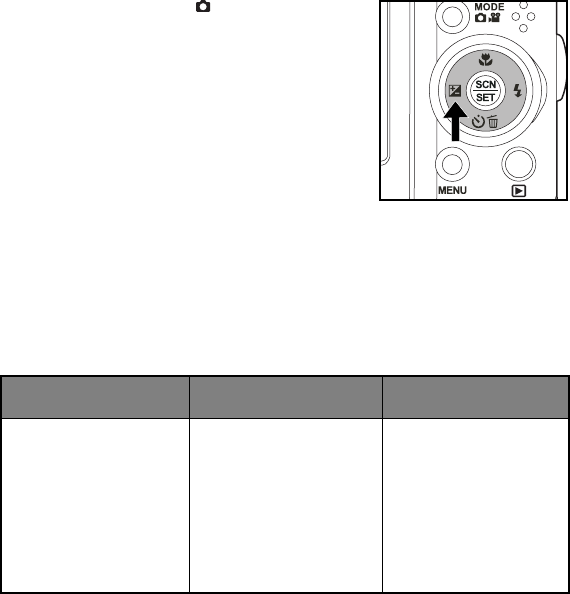
Exposure Compensation/Backlight Correction
Images can be captured with the overall scene intentionally made brighter or darker.
These settings are used when a suitable brightness (exposure) cannot otherwise be
obtained in circumstances where the difference in brightness between the subject and
the background (the contrast) is large, or when the subject that you wish to capture is
very small within the scene. Exposure can be set in 1/3 EV units.
1. Set the camera mode to [ ].
2. Press the
[
button.
Each press of the
[
button displays the
setting in the order of [
]
] Backlight Correction
and [
[
] Exposure Compensation.
3. Set the exposure value with the c / d
buttons.
Press the c button to increase the value.
Press the d button to decrease the value.
The setting range of the exposure
compensation is as follows:-2.0, -1.7, -1.3,
-1.0, -0.7, -0.3, 0.0, 0.3, 0.7, 1.0, 1.3, 1.7,
2.0.
Press the
[
button to confirm the setting.
The larger the value, the brighter the image. The smaller the value, the darker
the image. The set value is displayed on the screen.
Effective Subjects and Set Values
+(positive)
compensation -(negative) compensation Backlight correction
(+1.3 EV, fixed)
* Printed matter with black
text on whitish paper.
* Backlighting.
* Bright scenes or strong
reflected light such as ski
slopes.
* When the sky accounts
for a large area on the
screen.
* People illuminated by a
spotlight, in particular,
against dark background.
* Printed matter with white
text on blackish paper.
* Weak reflecting bodies
such as evergreen trees
or darkish leaves
* When the background is
bright and the subject is
dark.
* When subjects (people)
have a light source such
as the sun to their backs.
EN-21
VIDEO MODE
Recording Video Clips
This mode allows you to record video clips at a resolution of 320 x 240 / 640 x 480 pixels.
1. Set the camera mode to [w].
2. Compose the image.
3. Press the shutter button.
The recording of the video clip will start.
Pressing the shutter button one more time will end the
recording of the video clip.
The recording time depends on the storage size and
the subject of the image to be recorded.
Audio can be recorded during video recording. If
[Audio] is set to [On], you can record video clips with
audio. If [Audio] is set to [Off], you can record video
clips without audio.
Zoom function can be used during video recording. If
[Optical Zoom] is set to [On], you can use optical zoom
during recording. If [Optical Zoom] is set to [Off], you cannot use zoom function during
recording.
When recording a video clip, the flash cannot be used.
If the write speed of your SD/SDHC memory card is not fast enough for recording video clips in
the currently selected size, and then the video recording will stop. In this case, select a video
size lower than the current one.
Playing Back Video Clips
You can play back recorded video clips on the camera.
1. Press the x button.
The last image appears on the screen.
2. Select the desired video clip with the e / f buttons.
3. Press the SET button.
A press of the
f
/
e
buttons during playback allows fast forward play / fast reverse play.
To stop video playback, press the d button.
This stops playback and returns to the start of the video clip.
To pause video playback, press the SET button.
This pauses video playback.
To cancel pause, press the SET button again.
Video clips cannot be displayed rotated or enlarged.
This camera does not have a built-in speaker so that you can not play back sound with the
camera. To play the video clip back on your computer, you may use either Windows Media
Player or Apple “Quick Time Player”.
Quick Time basic player is available free of charge, compatible with Mac and Windows-computers
and can be downloaded from the Apple web site at www.apple.com. For help using Quick Time
Player usage, please refer to the Quick Time on-line help for more information.

EN-22
PLAYBACK MODE
Playing Back Still Images
You can play back the still images on the LCD monitor.
1. Press the x button.
The last image appears on the screen.
2. The images can be displayed in reverse or
forward sequence with the e / f buttons.
To view the previous image, press the e
button.
To view the next image, press the f button.
Pressing the button enlarges the image.
To return to normal magnification, press the
button.
An [S] icon is displayed with the video data.

EN-23
Thumbnail Display
This function allows you to view 9 thumbnail images on the LCD monitor at the same
time, which can let you quickly search for the image that you want.
1. Press the x button.
The last image appears on the screen.
2. Press the button.
The images are displayed in the thumbnail
display.
Images that have been selected with the e
/ f / c / d buttons will be indicated by a
yellow frame.
When there are ten or more images, scroll
the screen with the c / d buttons.
3. Press the e / f / c / d buttons to select the image to be displayed at regular size.
4. Press the SET button.
The selected image is displayed at its regular size.
In the 9-thumbnail mode, an [z], [S], [P] icon may be displayed in a thumbnail.
Slideshow Display
The slideshow function enables you to playback your still images automatically in
order one image at a time.
1. Press the x button..
2. Press the MENU button.
3. Select [Slide Show] and press the SET button.
4. Select the desired interval time with the c / d
buttons, and press the SET button.
The slideshow starts.
5. To stop the slide show during playback, press
the SET button.
The image is displayed on screen when
you press the SET button.
The Auto Off function does not operate during slide show.
All still images in the folder are automatically played back.
Video files are displayed first frame image, and they are not played back.

EN-26
Erasing Images
Erasing single image / Erasing all images
1. Press the x button.
The last image will be displayed on the
screen.
2. Select the image you want to erase with the e
/ f buttons.
3. Press the F button.
The deletion menu will be displayed.
4. Select [Single] or [All] with the c / d buttons,
and press the SET button.
[Single]: Erases the selected image or the
last image.
[All]: Erases all of the images except for
the protected images.
5. Select [Execute] with the c / d buttons, and
press the SET button.
To not erase, select [Cancel], and press
the SET button.
Deleting an image will not affect sequential image numbering. For example, if you delete image
number 240, the next captured image will be numbered 241 even though 240 no longer exists.
In other words, an image-number is retired when an image is deleted and will not be reused or
reassigned to another subsequently captured image.
Delete
Delete
Delete

EN-27
MENU OPTIONS
Capture Menu
This menu is for the basic settings to be used when capturing still images.
1. Set the camera mode to [ ].
2. Press the MENU button, and select the [Capture] / [Function] menu with the e / f
button.
3. Select the desired option item with the c / d buttons, and press the SET button to
enter its respective menu.
4. Select the desired setting with the c / d buttons, and press the SET button.
5. To exit from the menu, press the MENU button.
Size
This sets the size of the image that will be captured.
* [5M] 5M (2560 x 1920 pixels)
* [3M] 3M (2048 x 1536 pixels)
* [1.2M] 1.2M (1280 x 960 pixels)
* [0.3M] 0.3M (640 x 480 pixels)
Quality
This sets the quality (compression) at which the image is captured.
* [ ] Fine
* [ ] Normal
* [ ] Economy
Color
This sets the color of the image that will be captured.
* Normal / Vivid / Sepia / B&W / Blue / Red / Green
EN-28
W. Balance
This sets the white balance for a variety of lighting conditions and permits images to
be captured that approach the conditions that are seen by the human eye.
* [ Blank ] Auto
* [ f ] Incand.
* [ h ] Fl1
* [ i ] Fl2
* [ c ] Daylight
* [ d ] Cloudy
ISO
This sets the sensitivity for capturing images. When the sensitivity is raised (and the
ISO figure is increased), photography will become possible even in dark locations, but
the more pixelated (grainier) the image will appear.
* Auto / 50 / 100 / 200
Metering
This sets the metering method for calculating the exposure.
* [ o ] Average: The entire area of the screen is measured, and the exposure is
calculated.
* [ q ] Spot: A very small portion of the center of the screen is measured, and the
exposure is calculated.
Sharpness
This sets the sharpness of the image that will be captured.
* Hard / Normal / Soft
Saturation
This sets the saturation of the image that will be captured.
* High / Normal / Low
Date Print
The date of recording can be printed directly on the still images. This function must be
activated before the image is captured.
* On / Off
Preview
This sets whether or not to display the captured image on the screen immediately after
the image is captured.
* On / Off
Digital Zoom
This sets whether or not to use digital zoom at the time of photography.
* On / Off

EN-29
Video Menu
This menu is for the basic settings to be used when recording video clips.
1. Set the camera mode to [ w ].
2. Press the MENU button.
3. Select the desired option item with the c / d buttons, and press the SET button to
enter its respective menu.
4. Select the desired setting with the c / d buttons, and press the SET button.
5. To exit from the menu, press the MENU button.
Size
This sets the size of the video clip that will be captured.
* [VGA] 640 x 480
* [QVGA] 320 x 240
Color
This sets the color of the video clip that will be captured.
* Normal / Vivid / Sepia / B&W / Blue / Red / Green
640x480
640x480

EN-30
Playback Menu
In the [x] mode, choose which settings are to be used for playback.
1. Press the x button.
2. Press the MENU button.
3. Select the desired option item with the c / d buttons, and press the SET button to
enter its respective menu.
4. Select the desired setting with the c / d buttons, and press the SET button.
5. To exit from the menu, press the MENU button.
Slide Show
Refer to section in this manual titled “Slideshow Display” for further details.
DPOF
Refer to section in this manual titled “DPOF Settings” for further details.
Protect
Refer to section in this manual titled “Protecting Images” for further details.
LCD Bright.
Select a brightness level for the LCD monitor.
The LCD becomes brighter with the c button and darker with the d button. The adjust-
ment range is from -5 to 5.
Copy to Card
Allows you to copy your files from the camera’s internal memory to an SD/SDHC
memory card. Of course, you can only do this if you have a memory card installed and
some files in internal memory.
* Cancel / Execute

EN-31
Setup Menu
Set your camera’s operating environment.
1. Set the camera mode to [ ] / [S] / [x].
2. Press the MENU button.
3. Select the [Setup] menu with the
f
button.
4. Select the desired option item with the c / d buttons, and press the SET button to
enter its respective menu.
5. Select the desired setting with the c / d buttons, and press the SET button.
6. To exit from the menu, press the MENU button.
Beep
This sets whether or not to mute the camera sound each time you press the camera's
buttons.
* On / Off
Date/Time
Refer to section in this manual titled “Setting the Date and Time” for further details.
Language
Refer to section in this manual titled “Choosing the Language” for further details.
Fr. No. Reset
This creates a new folder. The captured images are recorded to the newly created
folder from number 0001.
* Cancel / Execute
LCD Bright.
Refer to section in this manual titled “LCD Bright.” in Playback Menu for further details.
Auto Off
If no operation is performed for a specific period of time, the power to the camera is
automatically turned off. This feature is useful for reducing battery usage.
* 1 Min. / 2 Min. / 3 Min. /Off
EN-32
Audio
This sets whether or not to record audio at the time of video recording.
* On / Off
Optical Zoom
This sets whether or not to activate zoom function at the time of video recording.
* On / Off
AE Flicker
This camera supports different lighting frequencies: 50 Hz and 60 Hz. When photo-
graphing under fluorescent lighting, select the correct frequency setting depending in
your local area's voltage. This function is only effective if you set the White Balance to
Fluorescent setting.
* 50Hz / 60Hz
Sys. Reset
This returns all basic settings to the camera’s default settings. The time setting will not
be reset.
* Cancel / Execute
Format
Refer to section in this manual titled “Formatting the Memory Card or Internal Mem-
ory” for further details.
Card Info.
This displays the free capacity of the internal memory or the memory card.
System Info.
This displays the firmware version of the camera.

EN-33
TRANSFERRING FILES TO YOUR
COMPUTER
System Requirement
Downloading Your Files
1. Connect one end of the USB cable to an
available USB port on your computer.
2. Connect the other end of the USB cable to the
USB terminal on the camera.
3. Turn on your camera.
4. Select [PC] using the
c
/
d
buttons, and press
the
SET
button.
5. From the Windows desktop, double click on
“My Computer”.
6. Look for a new “removable disk” icon.
This “removable disk” is actually the memory (or memory card) in your camera.
Typically, the camera will be assigned drive letter “e” or higher.
7. Double click on the removable disk and locate the DCIM folder.
8. Double click on the DCIM folder to open it to find more folders.
Your recorded images and video clips will be inside these folders.
9. Copy & Paste or Drag-N-Drop image and video files to a folder on your computer.
Mac users: Double-click the “untitled” or “unlabeled” disk drive icon on your desktop.
iPhoto may automatically launch.
Formatting the internal memory or SD/SDHC memory card by computer (via USB connection)
as NTFS file system, the stored data will be automatically deleted by the camera.
Do not format the internal memory or SD/SDHC memory card as NTFS file system.
Windows Macintosh
Pentium 166 MHz or higher
Windows 2000/XP/Vista
128MB RAM
128MB hard disk space
CD-ROM drive
Available USB port
PowerPC G3/G4/G5
OS 9.0 or later
128MB RAM
128MB hard disk space
CD-ROM drive
Available USB port

EN-35
USING THE CAMERA AS A PC CAMERA
Your camera can act as a PC camera, which allows you to videoconference with busi-
ness associates, or have a real-time conversation with friends or family. To use the
camera for videoconferencing, your computer system must include the items as
below:
Microphone
Sound card
Speakers or headphones
Network or Internet connection
Video conferencing (or video editing) software is not included with the camera.
This mode is not supported on the Mac.
Run your application software (i.e. Yahoo Messenger)
Yahoo Messenger is a free application available at www.yahoo.com. You can use your
camera as a web cam allowing others to see you online.
1. After installing the PC Cam driver in your Windows operating system, restart your
computer.
2. Connect one end of the USB cable to the USB terminal of the camera.
3. Connect the other end of the USB cable to an available USB port on your
computer.
4. Turn on your camera.
5. Select [PC Camera] with the c / d buttons and press the SET button.
6. Position the camera steadily on top of your computer monitor or use a tripod.
7. Run your application software (i.e. Yahoo Messenger).
Simply follow the instructions in Yahoo Messenger to start your camera.
The video resolution for videoconferencing applications is generally 320 x 240.
For more information about the operation of videoconference application software, refer to its
respective help documentation.

EN-36
SPECIFICATIONS
* Design and specifications are subject to change without notice.
Item Description
Image sensor 1/2.5” CMOS sensor (5.0 megapixels)
Image resolution <Still image>
2560 x 1920, 2048 x 1536, 1280 x 960, 640 x 480
<Video clip>
640 x 480 (24 fps), 320 x 240 (30 fps)
LCD monitor 2.36” full color LTPS-TFT LCD (115K pixels)
Recording media 32MB internal memory (28MB available for image storage)
Supports SD/SDHC memory card (up to 4GB) (optional)
File format JPEG, DCF, EXIF 2.2, DPOF, AVI
Lens 3x optical zoom lens
Aperture range: 2.8 (W) - 4.8 (T)
Focal length: 6.1mm - 18.3mm
(equivalent to 36mm - 108mm on a 35mm camera)
Focus Range Auto Focus
0.4m to infinity
Macro
Normal: 0.3m to infinity
Wide: 0.05m to infinity
Tele: 0.35m to infinity
Shutter speed 1/2 - 1/1000 sec.
Digital zoom 4x (Capture mode)
1-4x in 0.5x increment (Playback mode)
Flash effective
range
0.5m - 2.7m (Wide)
0.5m - 2.1m (Tele)
Terminal USB 1.1
Power supply 2 x AA size batteries
Dimensions Approx. 89.5 x 61 x 27mm (without protruding parts)
Weight Approx. 134g (without batteries and memory card)
Produktspezifikationen
| Marke: | Traveler |
| Kategorie: | Digitalkamera |
| Modell: | DC-5900 |
Brauchst du Hilfe?
Wenn Sie Hilfe mit Traveler DC-5900 benötigen, stellen Sie unten eine Frage und andere Benutzer werden Ihnen antworten
Bedienungsanleitung Digitalkamera Traveler

23 August 2024
18 August 2024
16 August 2024
16 August 2024
16 August 2024
15 August 2024
12 August 2024
10 August 2024
9 August 2024
Bedienungsanleitung Digitalkamera
- Digitalkamera Samsung
- Digitalkamera BenQ
- Digitalkamera Gembird
- Digitalkamera Genius
- Digitalkamera HP
- Digitalkamera Lexibook
- Digitalkamera Medion
- Digitalkamera Sony
- Digitalkamera Tevion
- Digitalkamera Trust
- Digitalkamera Panasonic
- Digitalkamera Bosch
- Digitalkamera Canon
- Digitalkamera Powerfix
- Digitalkamera Maginon
- Digitalkamera Technaxx
- Digitalkamera Denver
- Digitalkamera Renkforce
- Digitalkamera GE
- Digitalkamera Aiptek
- Digitalkamera Ingo
- Digitalkamera ODYS
- Digitalkamera Polaroid
- Digitalkamera JVC
- Digitalkamera Motorola
- Digitalkamera Xiaomi
- Digitalkamera Toshiba
- Digitalkamera Olympus
- Digitalkamera GOCLEVER
- Digitalkamera Lamax
- Digitalkamera Bushnell
- Digitalkamera Casio
- Digitalkamera A-rival
- Digitalkamera Epson
- Digitalkamera Fujifilm
- Digitalkamera MINOX
- Digitalkamera Nikon
- Digitalkamera Ricoh
- Digitalkamera Sigma
- Digitalkamera Targa
- Digitalkamera BML
- Digitalkamera Guardo
- Digitalkamera EnVivo
- Digitalkamera Vtech
- Digitalkamera Kodak
- Digitalkamera Agfa
- Digitalkamera Easypix
- Digitalkamera Leica
- Digitalkamera Minolta
- Digitalkamera Nytech
- Digitalkamera Pentax
- Digitalkamera Praktica
- Digitalkamera Revue
- Digitalkamera Rollei
- Digitalkamera SeaLife
- Digitalkamera Geonaute
- Digitalkamera Duramaxx
- Digitalkamera Fuji
- Digitalkamera Konica
- Digitalkamera Umax
- Digitalkamera Jobo
- Digitalkamera Somikon
- Digitalkamera TomTom
- Digitalkamera Kyocera
- Digitalkamera AEE
- Digitalkamera GoPro
- Digitalkamera Quintezz
- Digitalkamera ION
- Digitalkamera Pulsar
- Digitalkamera DNT
- Digitalkamera RadioShack
- Digitalkamera FLIR
- Digitalkamera Oregon Scientific
- Digitalkamera General Electric
- Digitalkamera Insta360
- Digitalkamera Digital Blue
- Digitalkamera Drift
- Digitalkamera Ematic
- Digitalkamera Guide
- Digitalkamera Kompernass - Lidl
- Digitalkamera Konig Electronic
- Digitalkamera Liquid Image
- Digitalkamera Magpix
- Digitalkamera Mustek
- Digitalkamera Plawa
- Digitalkamera Qware
- Digitalkamera Red
- Digitalkamera Sakar
- Digitalkamera Sipix
- Digitalkamera Spypoint
- Digitalkamera Storex
- Digitalkamera Veho
- Digitalkamera Vivitar
- Digitalkamera Voigtlaender
- Digitalkamera Wanscam
- Digitalkamera WASPcam
- Digitalkamera Yakumo
- Digitalkamera AgfaPhoto
- Digitalkamera Beha-Amprobe
- Digitalkamera Argus
- Digitalkamera BlackVue
- Digitalkamera Brinno
- Digitalkamera Apeman
- Digitalkamera Bolyguard
Neueste Bedienungsanleitung für -Kategorien-

23 September 2024
23 September 2024
22 September 2024
19 September 2024
18 September 2024
17 September 2024
17 September 2024

17 September 2024
17 September 2024
27 August 2024