Techno Line WS 7208 Bedienungsanleitung
Techno Line Wetterstation WS 7208
Lies die bedienungsanleitung für Techno Line WS 7208 (10 Seiten) kostenlos online; sie gehört zur Kategorie Wetterstation. Dieses Handbuch wurde von 40 Personen als hilfreich bewertet und erhielt im Schnitt 4.5 Sterne aus 4 Bewertungen. Hast du eine Frage zu Techno Line WS 7208 oder möchtest du andere Nutzer dieses Produkts befragen? Stelle eine Frage
Seite 1/10
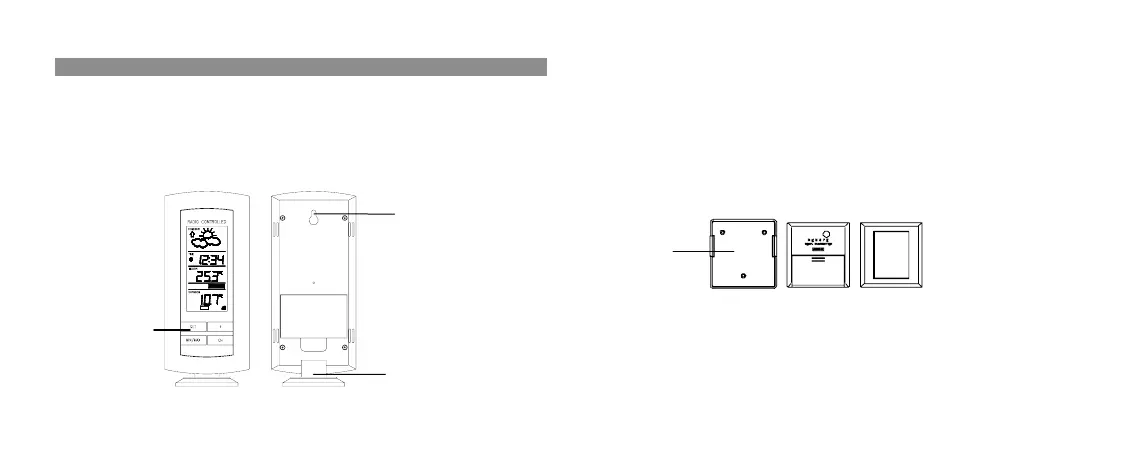
Holder
Detachable
stand
Weather Station
INTRODUCTION:
Congratulations on purchasing this innovative 433MHz Weather Station which displays the
weather forecast, time, indoor temperature, and up to three outdoor temperature readings.
To enjoy the full benefits of this innovative product, please read this operating manual.
Weather Station:
FEATURES:
DCF radio-controlled time reception
LCD clock in 24 hour time display
Indoor and outdoor temperature reading in degree Celsius (°C)
Indoor and outdoor temperature with Minimum and Maximum records
Weather tendency indicator and weather icons
Can receive up to three Outdoor transmitters
Table standing or wall mountable (detachable table stand)
Temperature Transmitter:
Function Keys
Hanging
hole
Produktspezifikationen
| Marke: | Techno Line |
| Kategorie: | Wetterstation |
| Modell: | WS 7208 |
| Produktfarbe: | Schwarz, Silber |
| Wandmontage: | Ja |
| Anzahl der unterstützten Sensoren (max.): | 3 |
| Min/Max Temperaturspeicher: | Ja |
| DCF Radiouhr: | Ja |
Brauchst du Hilfe?
Wenn Sie Hilfe mit Techno Line WS 7208 benötigen, stellen Sie unten eine Frage und andere Benutzer werden Ihnen antworten
Bedienungsanleitung Wetterstation Techno Line

23 März 2026
9 März 2026
12 Oktober 2025
15 September 2025
18 August 2025
17 August 2025
17 August 2025
17 August 2025
17 August 2025
17 August 2025
Bedienungsanleitung Wetterstation
Neueste Bedienungsanleitung für -Kategorien-
28 März 2026
16 März 2026
15 März 2026
14 März 2026
12 März 2026
28 Februar 2026
18 Februar 2026
10 Februar 2026
3 Februar 2026
2 Februar 2026