Sony MHC-GNZ55D Bedienungsanleitung
Sony
Hi-Fi-Anlage
MHC-GNZ55D
Lesen Sie kostenlos die 📖 deutsche Bedienungsanleitung für Sony MHC-GNZ55D (108 Seiten) in der Kategorie Hi-Fi-Anlage. Dieser Bedienungsanleitung war für 7 Personen hilfreich und wurde von 2 Benutzern mit durchschnittlich 4.5 Sternen bewertet
Seite 1/108
©2006 Sony Corporation
2-669-601-14(1)
Mini Hi-Fi
Component
System
Operating Instructions
MHC-GN999D
MHC-GN999DS
MHC-GNZ88D
MHC-GNZ77D
MHC-GNZ55D

2GB
To reduce the risk of fire or electric
shock, do not expose this apparatus to
rain or moisture.
To prevent fire, do not cover the ventilation of the
apparatus with newspapers, table-cloths, curtains, etc.
And don’t place lighted candles on the apparatus.
To prevent fire or shock hazard, do not place objects
filled with liquids, such as vases, on the apparatus.
To avoid electrical shock, do not open the cabinet.
Refer servicing to qualified personnel only.
This appliance is
classified as a CLASS 1
LASER product. This
label is located on the
rear exterior.
Don’t throw away the battery with
general house waste, dispose of it
correctly as chemical waste.
Note on power cord plug shapes
(Saudi Arabian model only)
For AC 220 V wall sockets
1Make the appropriate voltage setting on the
system (only for models with a voltage
selector).
2Make sure that the 13 A 3-pin plug (Type
BF) is securely attached to the power cord.
(The 13 A 3-pin plug is attached when
shipped from the factory.)
For AC 127 V wall sockets
1Make the appropriate voltage setting on the
system (only for models with a voltage
selector).
2Remove the 13 A 3-pin plug using a
screwdriver.
3Attach the supplied parallel blade plug
(Type A).
WARNING
Do not install the appliance in a confined space,
such as a bookcase or built-in cabinet.

3GB
About this manual ...................................5
Playable discs ..........................................6
Guide to the Control Menu display.........9
Getting Started
Hooking up the system..........................12
Positioning the speakers........................18
Setting the clock....................................18
Performing QUICK SETUP .................19
Using the THEATRE SYNC
function...........................................20
Changing the format of the video
signal from COMPONENT
VIDEO OUT jacks .........................21
(Except for MHC-GNZ55D)
Disc – Playback
Loading a disc .......................................23
Playing a disc ........................................23
— Normal Play
Resuming playback from the point you
stopped the disc ..............................25
— Resume Play
Creating your own program ..................26
— Program Play
Playing in random order........................28
— Shuffle Play
Playing repeatedly.................................29
— Repeat Play
Playing DVD VIDEOs using the
menu ...............................................30
Selecting “ORIGINAL” or
“PLAY LIST” on a DVD-R/
DVD-RW in VR mode ...................31
Playing VIDEO CDs with PBC
functions (Version 2.0) ...................31
— PBC Playback
About MP3 audio tracks and
JPEG image files ............................32
Playing DATA CDs or DATA DVDs
with MP3 audio tracks and
JPEG image files ............................33
Playing MP3 audio tracks and
JPEG image files as a slide show
with sound.......................................36
Enjoying DivX® video files ................. 38
(MHC-GN999D/MHC-GN999DS/
MHC-GNZ88D/MHC-GNZ77D*
only)
* Russian model only
Using the on-screen display to search
for a title/chapter/scene/track/
index/album/file ............................. 40
Searching by scene ............................... 41
— Picture Navigation
Disc – Various Functions
Selecting the audio format.................... 43
Changing the angles.............................. 44
Displaying the subtitles ........................ 44
Adjusting the delay between the
picture and sound ........................... 45
— A/V SYNC
Restricting playback of the disc............ 45
— CUSTOM PARENTAL
CONTROL, PARENTAL
CONTROL
Using the DVD Setup Menu................. 49
Tuner
Presetting radio stations........................ 57
Listening to the radio ............................ 59
Tape – Playback
Loading a tape ...................................... 60
Playing a tape........................................ 60
Tape – Recording
Recording your favorite disc onto
a tape .............................................. 61
— CD Synchro Recording
Recording onto a tape manually ........... 62
— Manual Recording
Table of Contents
continued

4GB
Sound Adjustment
Adjusting the sound ..............................63
Selecting the preset effect ..................... 63
Adjusting and storing the graphic
equalizer.......................................... 64
Selecting the sound field.......................65
Using the subwoofer .............................67
(MHC-GN999D/MHC-GN999DS
only)
Singing along: Karaoke......................... 67
Mixing and recording onto a tape .........72
Timer
Falling asleep to music.......................... 74
— Sleep Timer
Waking up to music ..............................74
— Play Timer
Timer recording radio programs ........... 75
Display
Turning off the display..........................76
— Power Saving Mode
Changing the power illuminator ...........77
Viewing information about the disc
in the front panel display ................ 77
Viewing information about the disc
on the TV screen.............................78
Checking the date information of
JPEG image files ............................ 80
Optional Components
Hooking up optional components .........81
Listening to audio from a connected
component ......................................84
(Except for MHC-GNZ55D)
Enjoying the multi channel sound
with the optional amplifier .............84
(MHC-GNZ77D/
MHC-GNZ55D only)
Troubleshooting
Problems and remedies......................... 85
Self-diagnosis Function ........................ 90
Messages............................................... 91
Additional Information
Precautions ........................................... 92
Specifications ....................................... 93
DVD setup menu item list .................... 97
Language code list................................ 99
Glossary .............................................. 100
List of button locations and reference
pages............................................. 104
5GB
• The instructions in this manual are for models
MHC-GN999D, MHC-GN999DS,
MHC-GNZ88D, MHC-GNZ77D and
MHC-GNZ55D. In this manual, the
MHC-GN999D is used for illustration
purposes unless stated otherwise.
The MHC-GN999D/MHC-GN999DS
consists of:
– Tuner/DVD player/Stereo cassette
deck/Amplifier (unit)
HCD-GN999D
– Speaker System
• Front speakers SS-GN999D/
SS-GN999S
• Surround speakers SS-RSX999D
• Center speaker SS-CT999D
• Subwoofer SS-WGV999D
The MHC-GNZ88D consists of:
– Tuner/DVD player/Stereo cassette
deck/Amplifier (unit)
HCD-GNZ88D
– Speaker System
• Front speakers SS-GNZ88D
• Surround speakers SS-RS8D
• Center speaker SS-CT8D
The MHC-GNZ77D consists of:
– Tuner/DVD player/Stereo cassette
deck/Amplifier (unit)
HCD-GNZ77D
– Speaker System
• Front speakers SS-GNZ77D
The MHC-GNZ55D consists of:
– Tuner/DVD player/Stereo cassette
deck/Amplifier (unit)
HCD-GNZ55D
– Speaker System
• Front speakers SS-GNZ55D
• The instructions in this manual describe the
controls on the remote. You can also use the
controls on the unit if they have the same or
similar names as those on the remote.
• The English on-screen display is used for
illustration purposes only.
• The on-screen display may be different
depending on the model and area.
• The Control Menu items may be different
depending on the disc, area and/or model.
• The Setup Menu items may be different
depending on the model and area.
• The following symbols are used in this
manual.
1) Latin American models only.
2) MP3 (MPEG 1 Audio Layer 3) is a standard
format defined by ISO/MPEG which compresses
audio data.
3) DivX® is a video file compression technology,
developed by DivX, Inc.
4) DivX, DivX Certified, and associated logos are
trademarks of DivX, Inc. and are used under
license.
5) MHC-GN999D/MHC-GN999DS/
MHC-GNZ88D/MHC-GNZ77D* only.
* Russian model only.
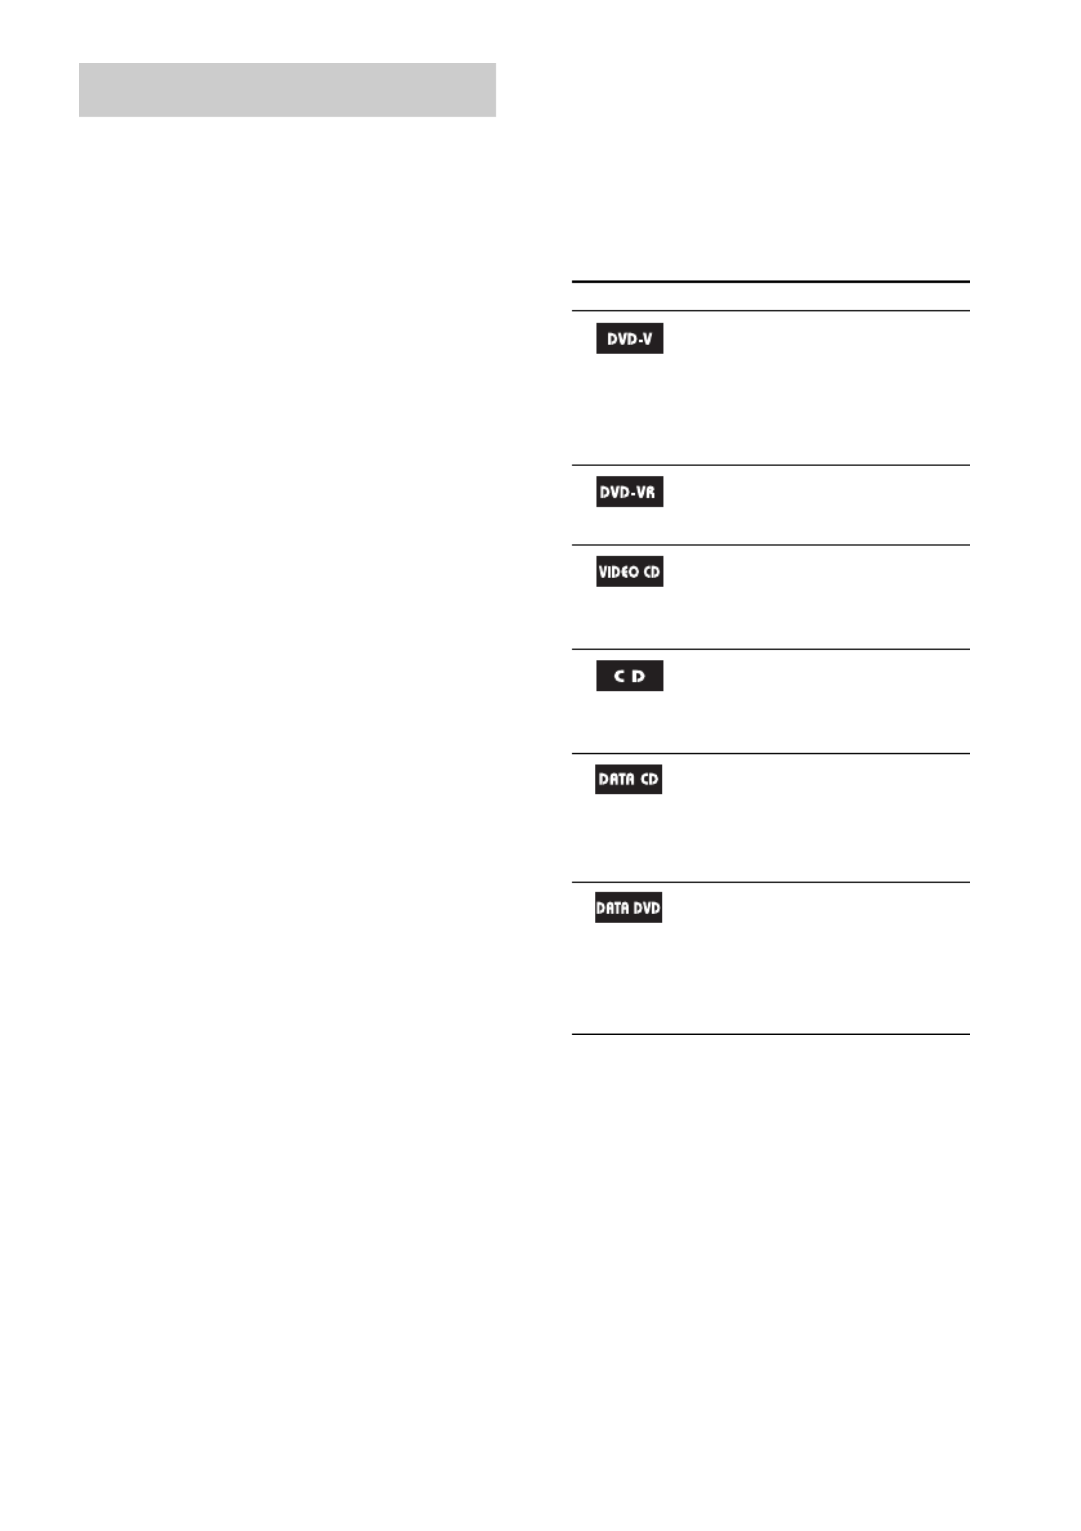
About this manual
Symbol Meaning
Functions available for DVD
VIDEOs (including DVD-Rs/
DVD-RWs/DVD+Rs/
DVD+RWs in DVD VIDEO
format and DVD-Rs/DVD-RWs
in video mode).
Functions available for DVD-Rs/
DVD-RWs in VR (Video
Recording) mode.
Functions available for VIDEO
CDs (including Super VCDs and
CD-Rs/CD-RWs in VIDEO CD
or Super VCD format).
Functions available for AUDIO
CDs (including CD-Rs/CD-RWs
in AUDIO CD format and CD
Graphics1)).
Functions available for DATA
CDs (CD-ROMs/CD-Rs/
CD-RWs) containing MP32)
audio tracks, JPEG image files or
DivX3)4)5) video files.
Functions available for DATA
DVDs (DVD-ROMs/DVD-Rs/
DVD-RWs/DVD+Rs/
DVD+RWs) containing MP32)
audio tracks, JPEG image files or
DivX3)4)5) video files.

6GB
You can play back the following discs on this
system. Other discs cannot be played back.
List of playable discs
“DVD+RW”, “DVD-RW”, “DVD+R”,
“DVD VIDEO”, and the “CD” logos are
trademarks.
Notes on discs
The system can play back the following discs:
• CD-ROMs/CD-Rs/CD-RWs recorded in the
following formats:
– VIDEO CD format
– AUDIO CD format
– CD Graphics7)
– DATA CD format which contains MP3
audio tracks1), JPEG image files2) and
DivX video files3)8) of format conforming
to ISO 96604) Level 1, Level 2 or Joliet in
expansion format
• DVD-ROMs/DVD-Rs/DVD-RWs/DVD+Rs/
DVD+RWs recorded in the following
formats:
– DVD VIDEO format
– DATA DVD format which contains MP3
audio tracks1), JPEG image files2) and
DivX video files3)8) of format conforming
to UDF (Universal Disk Format)
– VR (Video Recording) format (DVD-Rs/
DVD-RWs only)
The system cannot play back the following
discs:
• CD-ROMs recorded in PHOTO CD format
• Data part of CD-Extras5)
• Data part of Mixed CDs6)
• Super Audio CDs
• DVD Audio discs
• DVD-RAMs
• A DVD VIDEO with a different region code.
• A disc that has a non-standard shape (e.g.,
heart, square, star).
• A disc that has the adhesive cellophane tape
or a sticker still left on it.
1) MP3 audio tracks must be in MPEG 1 Audio Layer
3 format with the extension “.MP3”. The system
does not support MP3PRO format.
2) JPEG image files must be in JPEG format with the
extension “.JPG” or “.JPEG”.
3) DivX video files must be recorded in DivX format
with the extension “.AVI” or “.DIVX”.
Playable discs
Format of discs Disc logo
DVD VIDEO
DVD-RW/
DVD-R
DVD+RW/
DVD+R/
DVD+R DL
VIDEO CD
AUDIO CD
CD Graphics
(CDG)
(Latin American
models only)
CD-R/CD-RW
7GB
4) ISO 9660 format: A logical format of files and
folders on CD-ROMs, defined by ISO (International
Organization for Standardization).
5) CD-Extra: This format records audio (AUDIO CD
data) on the tracks in session 1 and data on the tracks
in session 2.
6) Mixed CD: This format records data on the first
track and audio (AUDIO CD data) on the second and
subsequent tracks of a session.
7) Latin American models only.
8) MHC-GN999D/MHC-GN999DS/
MHC-GNZ88D/MHC-GNZ77D* only.
* Russian model only.
Region code of DVD VIDEOs
you can play back on this
system
Your system has a region code printed on the
back of the unit and will only play back DVD
VIDEOs labeled with identical region code.
DVD VIDEOs labeled will also be played
back on this system.
If you try to play back any other region code
DVD VIDEO, the message “Playback
prohibited by area limitations.” will appear on
the TV screen. Depending on the DVD VIDEO,
no region code indication may be labeled even
though playing the DVD VIDEO is prohibited
by area restrictions.
Example:
Note on DualDiscs
A DualDisc is a two sided disc product which
mates DVD recorded material on one side with
digital audio material on the other side.
However, since the audio material side does not
conform to Compact Disc (CD) standard,
playback on this product is not guaranteed.
Notes on CD-R/CD-RW/DVD-R/
DVD-RW/DVD+R/DVD+RW
• In some cases, CD-Rs/CD-RWs/DVD-Rs/
DVD-RWs/DVD+Rs/DVD+RWs cannot be
played back on this system due to the
recording quality or physical condition of the
disc, or the characteristics of the recording
device and authoring software. The disc will
not be played back if it has not been correctly
finalized. For details, see the operation
instructions for the recording device.
• Note that some playback functions may not
work with some DVD+RWs/DVD+Rs, even
if they have been correctly finalized. In this
case, view the disc by normal playback.
• A disc created in Packet Write format cannot
be played back.
Note on playback operations
of DVD VIDEOs and VIDEO
CDs
Some playback operations of DVD VIDEOs and
VIDEO CDs may be intentionally set by
software producers. Since this system play back
DVD VIDEOs and VIDEO CDs according to
the disc contents the software producers
designed, some playback features may not be
available. Also, refer to the instructions supplied
with the DVD VIDEOs or VIDEO CDs.
ALL
DVD DECK RECEIVER
HCD-GN999D
MODEL NO.
SERIAL NO.
AC:120V/220-2 40V 50/60Hz 160W
Region code
continued
9GB
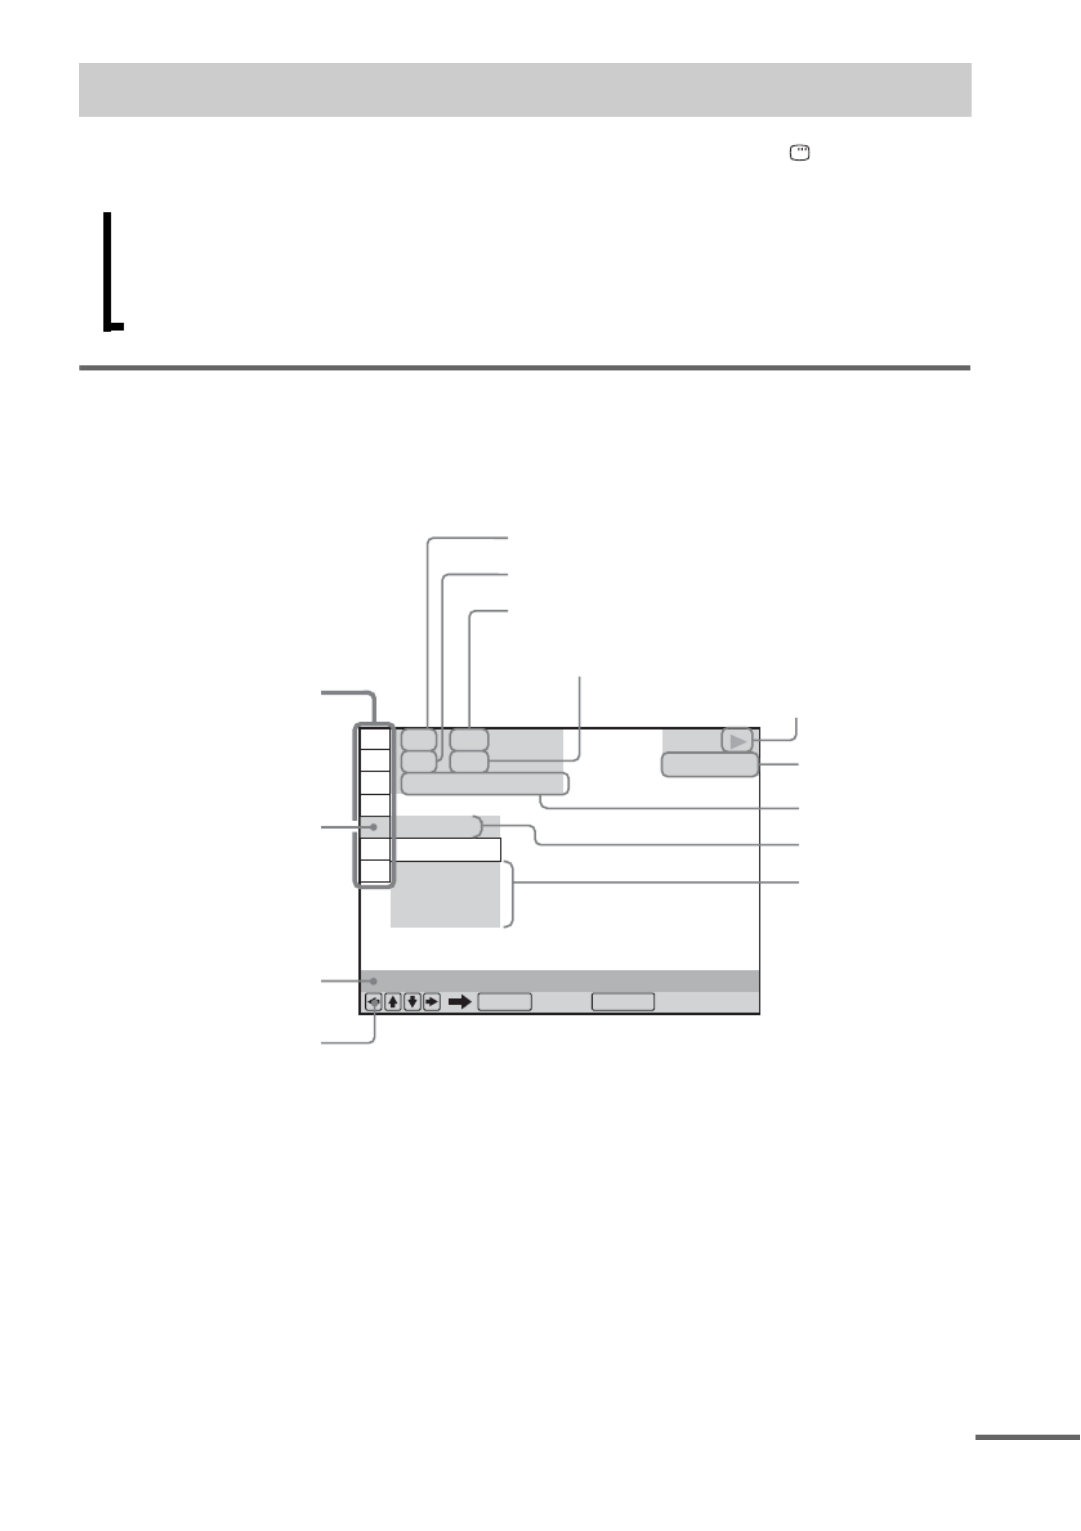
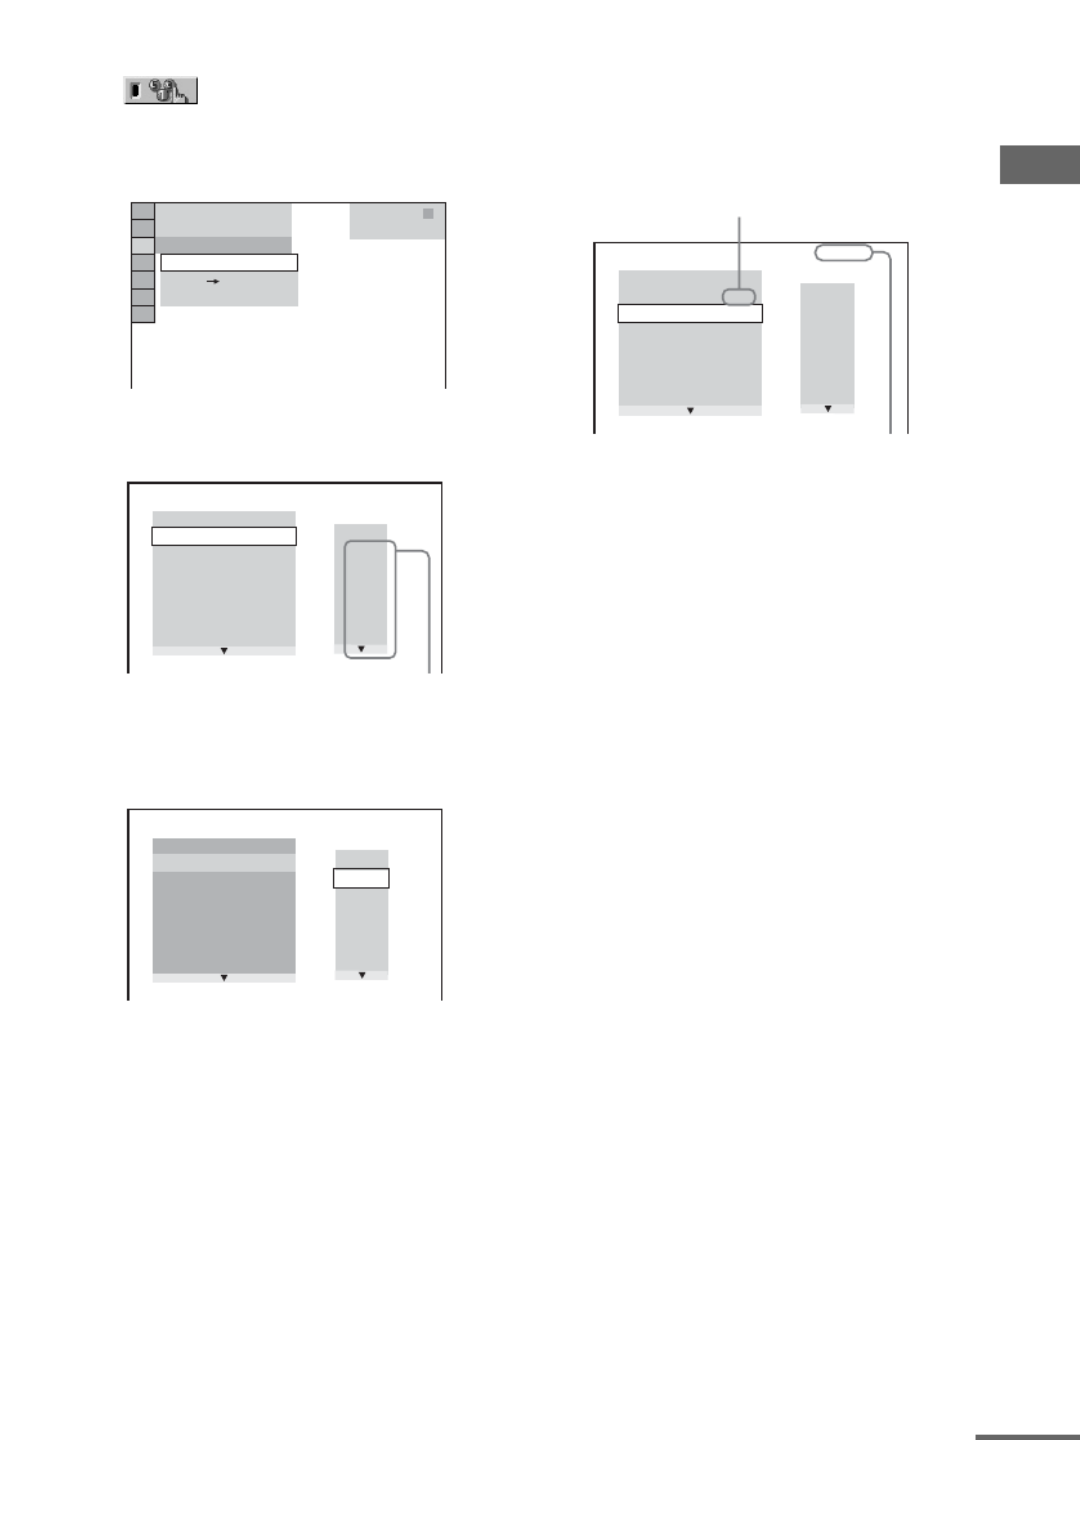
Use the Control Menu to select a function and to view related information. Press DISPLAY
repeatedly to turn on, turn off or change the Control Menu display as follows:
,Control Menu display 1
m
Control Menu display 2 (appears for certain discs only)
m
Control Menu display off
Control Menu display
The Control Menu display 1 and 2 will show different items depending on the disc type.
Example: Control Menu display 1 when playing a DVD VIDEO
Guide to the Control Menu display
OFF
T
1 : 3 2 : 5 5
1 8 ( 3 4 )
1 2 ( 2 7 )
DVD VIDEO
Q it:u
REPEAT
ENTER DISPLAY
DISC
TITLE
CHAPTER
OFF
Currently playing title number
Currently playing chapter number
Total number of titles
Total number of chapters
Control Menu items
Selected item
Function name of
selected Control
Menu item
Operation message
Playback status (N
Playback, X Pause,
x Stop,etc.)
Type of disc being
played back
Elapsed playing
time
Current setting
Options
continued

10GB
List of Control Menu items
Item Item Name, Function, Relevant Disc Type
TITLE/SCENE/TRACK (page 40)
Selects the title, scene, or track to be played back.
CHAPTER/INDEX (page 40)
Selects the chapter or index to be played back.
TRACK (page 40)
Selects the track to be played back.
ORIGINAL/PLAY LIST3) (page 31)
Selects the playback sequence either according to the originally recorded sequence or to the
playlist created on the disc.
TIME/TEXT (pages 41, 77, 78)
Checks the elapsed playing time and the remaining time.
Inputs the time code to search for a particular point in DVD VIDEO and DVD-Rs/DVD-RWs in
VR mode.
Displays the text information on the CD-TEXT discs, DVD-TEXT discs and MP3 audio tracks.
PROGRAM2) (page 26)
Plays back the track in the order you want.
SHUFFLE2) (page 28)
Plays back the track in random order.
REPEAT2) (page 29)
Plays back all discs repeatedly, the entire disc repeatedly or one title/chapter/track/album/file
repeatedly.
A/V SYNC
2) (page 45)
Sets the delay time between the sound and picture.
PARENTAL CONTROL (page 45)
Set to prohibit playback on this system.
SETUP
• “QUICK” Setup (page 19)
Selects the language of the on-screen display you want, the aspect ratio of the TV, and the
distance for the speakers.
• “CUSTOM” Setup (page 49)
In addition to the “QUICK” Setup setting, you can adjust other settings.
• “RESET” (page 90)
Returns the settings in “SETUP” to the default setting.

11GB
1) This function is only available during karaoke mode.
2) The icon indicator lights up in green when you select any item except “OFF”.
3) The icon indicator lights up in green when you select “PLAY LIST”.
Item Item Name, Function, Relevant Disc Type
ALBUM (page 40)
Selects the album to be played back.
FILE (page 40)
Selects the JPEG image file or DivX video file to be played back.
DATE (page 80)
Displays the date when the picture was taken by a digital camera.
INTERVAL (page 37)
Specifies the duration for which the slides are displayed on the
TV screen.
EFFECT (page 37)
Selects the transition effect to be used for changing slides during a
slide show.
MODE (MP3, JPEG) (page 36)
Selects the data type: MP3 audio track (AUDIO), JPEG image file (IMAGE) or both
(AUTO) to be played back.
KEY CONTROL1) (page 69)
Changes the key to suit your vocal range.
SCORE MODE1) (page 72)
Selects the difficulty level for scoring mode.
KARAOKE PON1)2) (page 68)
Enjoys karaoke with a stereo-recorded disc, even if it is a non-karaoke disc, by reducing the
sound of the vocals.
VOCAL1)2) (page 69)
Turns on or off the guide vocal for Dolby Digital Karaoke Format disc (DVD VIDEO only).
Turns on or off the vocal (VIDEO CD, AUDIO CD only).
VOCAL SELECT1) (page 70)
Selects the guide vocal recorded on the Dolby Digital Karaoke Format disc (DVD VIDEO only).
Selects the vocal type (VIDEO CD, AUDIO CD only).
GUIDE MELODY1)2) (page 71)
Turns on or off the guide melody for Dolby Digital Karaoke Format disc.

12GB
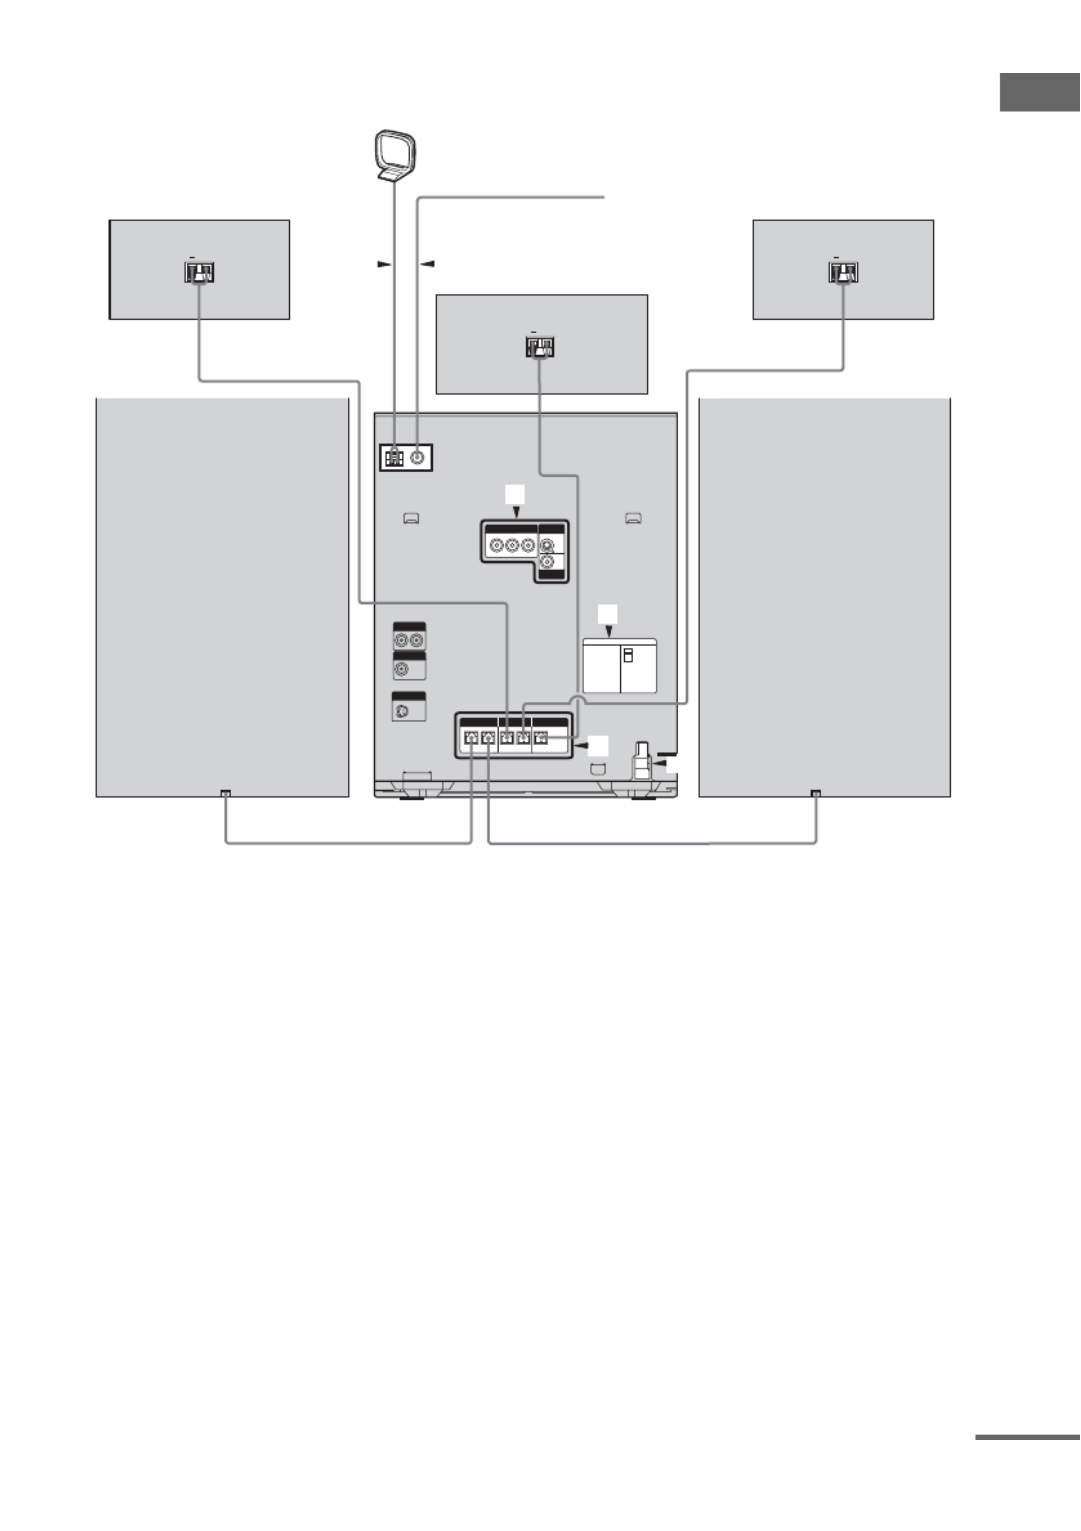
Refer to the illustration that follows (page 12, 13 or 14) and do the procedures 1 to 6 (pages 15
and 16) to hook up your system using the supplied cords and accessories.
Getting Started
Hooking up the system
2
5
1
4
33
++
AM loop antenna
FM lead antenna
Surround speaker (Right) Surround speaker (Left)
Front speaker
(Right)
Front speaker
(Left)
Center speaker
For MHC-GN999D/MHC-GN999DS
UnitSubwoofer
Getting Started
13GB
For MHC-GNZ88D
5
1
4
2
33
+ +
+
AM loop antenna
FM lead antenna
Surround speaker (Right) Surround speaker (Left)
Front speaker
(Right)
Front speaker
(Left)
Center speaker
Unit
continued

14GB
For MHC-GNZ77D
For MHC-GNZ55D
2
5
1
4
33
AM loop antenna
FM lead antenna
Front speaker
(Right)
Front speaker
(Left)
Unit
2
5
1
4
3
3
AM loop antenna
FM lead antenna
Front speaker
(Right)
Front speaker
(Left)
Unit

Getting Started
15GB
1Connect the speakers.
Connect the speaker cords of the speakers
to the terminals on the unit as shown below.
Front speakers
* For MHC-GN999D/MHC-GN999DS/
MHC-GNZ88D: Red
For MHC-GNZ77D/MHC-GNZ55D: White
Center speaker
(MHC-GN999D/MHC-GN999DS/
MHC-GNZ88D only)
Example:
Surround speakers
(MHC-GN999D/MHC-GN999DS/
MHC-GNZ88D only)
Example:
Tip
(MHC-GN999D/MHC-GN999DS only)
Connect the speaker cords to the terminals on the
surround speakers.
(MHC-GNZ88D only)
Connect the speaker cords to the terminals on the
center and surround speakers.
Subwoofer
(MHC-GN999D/MHC-GN999DS only)
(MHC-GNZ88D/MHC-GNZ77D only)
If you have an optional subwoofer, see
“Hooking up optional components” on
page 81.
2Connect the video input jack of your
TV to the VIDEO OUT jack with the
supplied video cord.
Example:
When using a TV
Turn on the TV and select the video input so
that you can view the pictures from this
system.
RL
FRONT
SPEAKER
White
*
CENTER
SPEAKER
Green
RL
SURROUND
SPEAKER
Blue
Grey
Black (#) Red (3)
Black (#)Red (3)
SUB
WOOFER
Purple
S VIDEO OUT
VIDEO OUT
COMPO E T N N VIDEO OUT
continued

16GB
When connecting a video deck
Connect the video deck to the TV using a
video cord (not supplied). However, do not
connect this unit to the TV through the
video deck. Otherwise, you may experience
video leakage when watching video images
from this system. Connect this unit directly
to the TV as shown below.
Tip
(Except for MHC-GNZ55D)
For higher quality video images:
– Use the optional component video cords to
connect the COMPONENT VIDEO input jacks
on your TV to the COMPONENT VIDEO OUT
jacks of this unit. If your TV is compatible with
progressive format file signals, use this
connection and set to progressive format
(page 21).
– You can use an optional S video cord to connect
the S VIDEO input jack on your TV to the S
VIDEO OUT jack of this unit.
3 Connect the FM and AM antennas.
Set up the AM loop antenna, then connect
it.
4 For models equipped with a voltage
selector, set VOLTAGE SELECTOR to
the position of your local power line
voltage.
Depending on the model, the VOLTAGE
SELECTOR may differ.
* Saudi Arabian model : 120 - 127V
5 Connect the power cord to a wall
outlet.
The demonstration appears in the display.
When you press ?/1, the system turns on
and the demonstration automatically ends.
If the supplied adaptor on the plug does not
fit your wall outlet, detach it from the plug
(only for models equipped with an adaptor).
For Saudi Arabian model, see “Note on
power cord plug shapes” on page 2.
6 (Except for Latin American and
Russian models)
Set the color system to PAL or NTSC
depending on the color system of your
TV.
The default setting for color system is
different depending on the area.
Each time you perform the procedure
below, the color system changes as follows:
NTSC y PAL
Use the buttons on the unit for the
operation.
1Press ?/1 to turn off the system.
2Press ?/1 while holding down . X
The system turns on automatically and
the color system is changed.
“COLOR NTSC” or “COLOR PAL”
appears in the display.
Do not connect
directly
TV
Unit
Video deck
AM
Extend the FM lead
antenna horizontally
AM loop antenna
220V
120V *
240V
VOLTAGE SELECTOR
Getting Started
17GB
Notes
• Keep the speaker cords away from the antennas to
prevent noise.
• Be sure to match the color of the speaker terminals on
the unit and the connectors.
• Be sure to connect the speakers securely and
correctly. When connecting speaker cords, insert the
connector straight into the terminals.
• You cannot set the color system in the Power Saving
Mode (see “Turning off the display” on page 76).
• When you play back a VIDEO CD recorded in a
different color system from the one you set to the
system, the picture image may be distorted.
To connect optional components
See “Hooking up optional components” on
page 81.
Using the remote
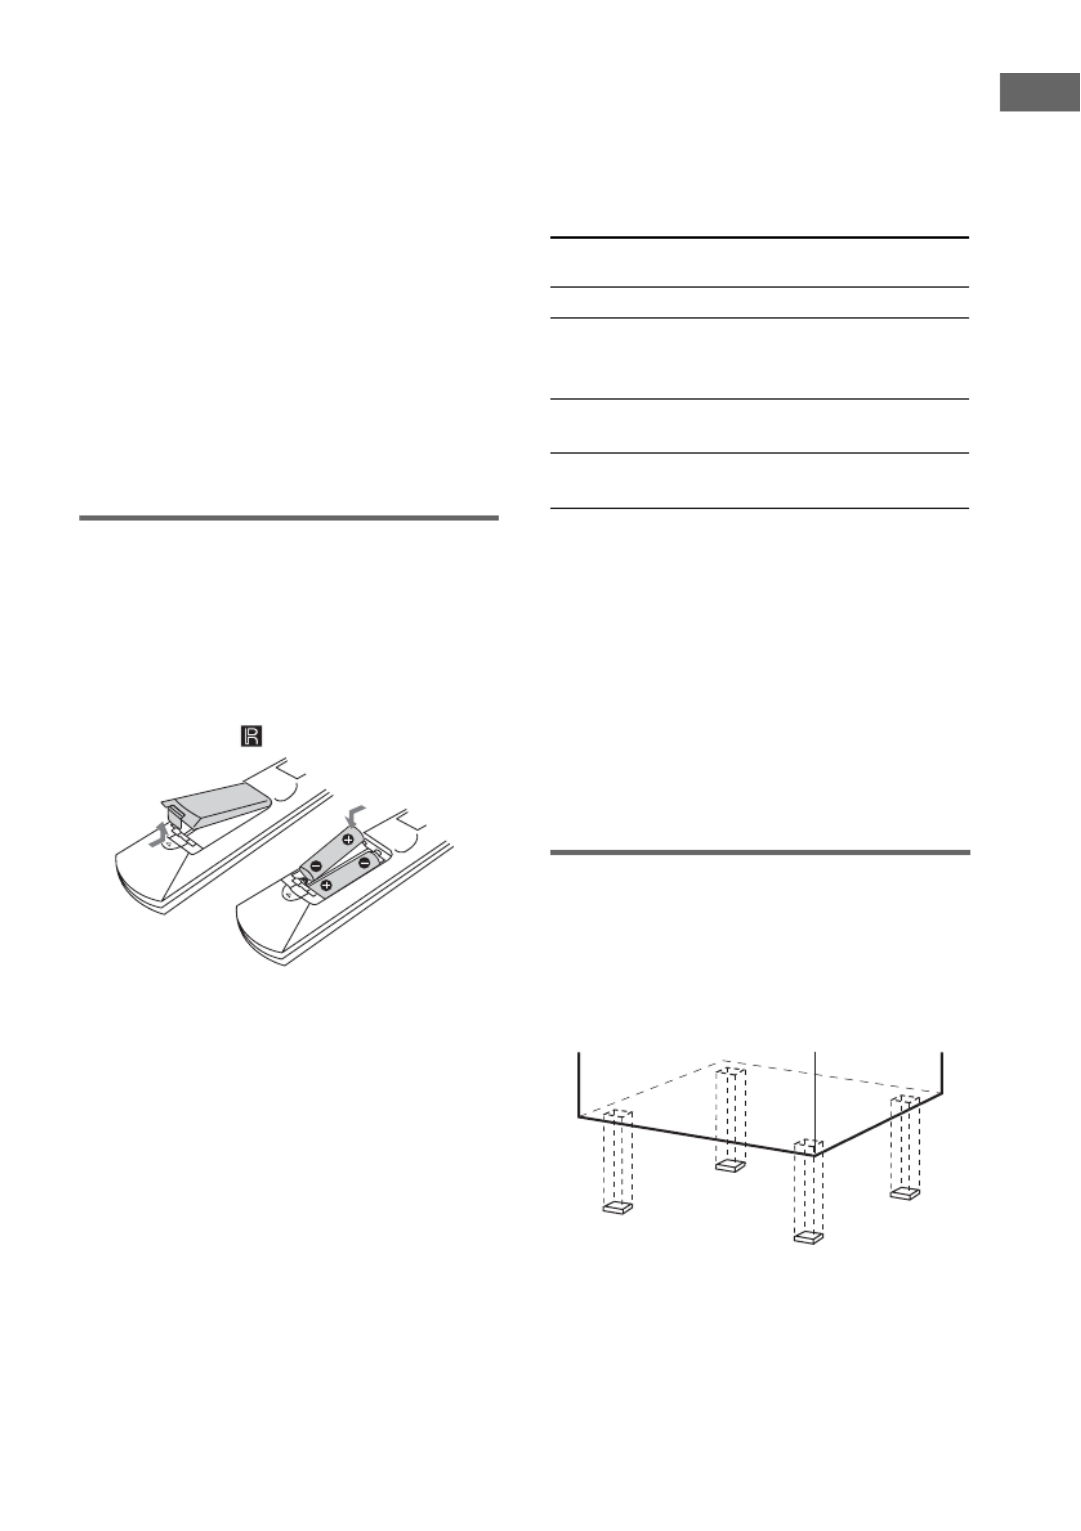
Inserting two R6 (size AA)
batteries into the remote
Be sure to match the e and E ends on the
batteries to the markings inside the
compartment. When using the remote, point it to
the remote sensor on the unit.
Operating a Sony TV with the
remote
You can use the following buttons to operate a
Sony TV. These buttons have been marked in
orange. To use these buttons, hold down TV
before pressing the button you want.
* For double digit number, hold down TV and press
-/--, then press the number. (For example, hold down
TV, press -/--, then 2 and 5 for entering 25.)
Note
If you do not use the remote for a long period of time,
remove the batteries to avoid possible damage from
battery leakage and corrosion.
Tip
With normal use, the batteries should last for about six
months. When the remote no longer operates the
system, replace both batteries with new ones.
Attaching the speaker pads
Attach the supplied speaker pads to the bottom
corner of the speakers to stabilize the speakers
and to prevent them from slipping.
Example of MHC-GN999D front speaker
To Hold down TV and
press
Turn the TV on or off TV ?/1
Switch the TV’s input
source between the TV
and other input sources
TV/VIDEO
Select the TV channels TV CH +/– or numeric
buttons*
Adjust the volume of the
TV speaker(s)
TV VOL +/–
18GB
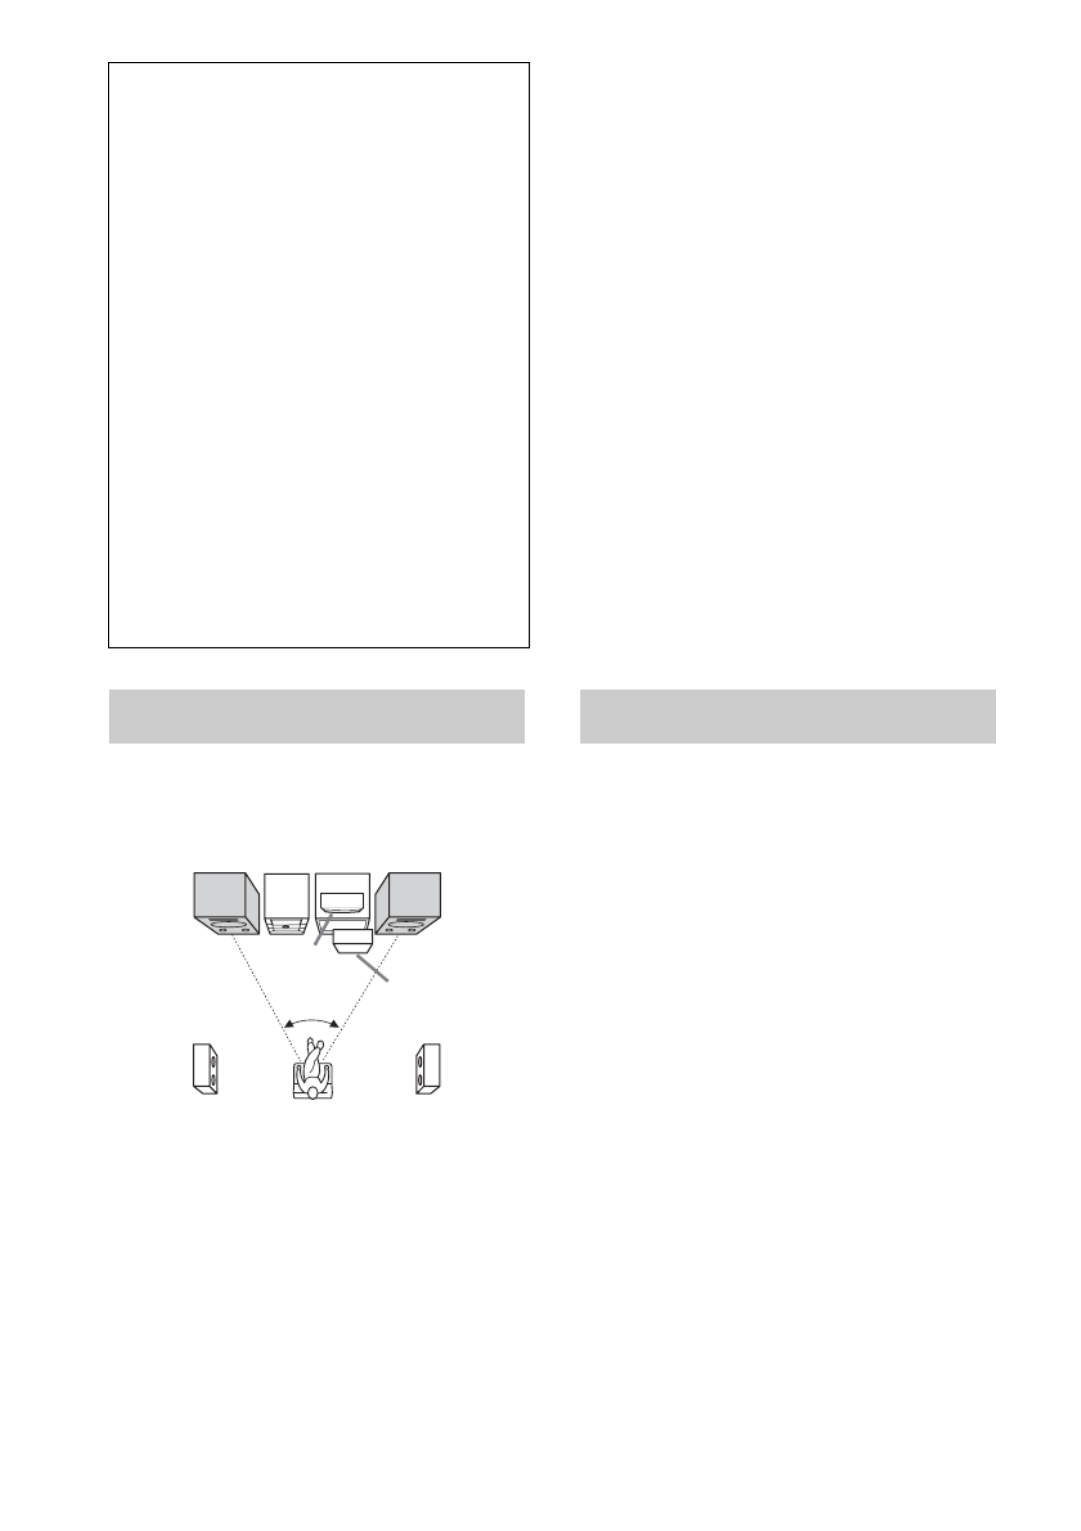
Place the front speakers at an angle of 45
degrees from your listening position.
1) MHC-GN999D/MHC-GN999DS/
MHC-GNZ88D only.
2) Supplied for MHC-GN999D/MHC-GN999DS only.
Notes
• Do not place the surround speakers on top of a TV.
This may cause distortion of the colors in the TV
screen.
• If you place the center speaker on the unit, be sure to
place it at the front side of the unit.
• Place the subwoofer on solid floor where resonance
is unlikely to occur so that a better bass reproduction
could be obtained.
• Always place the subwoofer vertically, keeping it a
few centimeters away from the wall.
• If the subwoofer is placed in the center of a room, the
bass could be extremely weakened. This is due to the
influence of the standing wave of the room. If this
happens, move the subwoofer away from the center
of the room or eliminate the cause of the standing
wave, by placing a bookshelf against the wall, etc.
Speaker settings
To enjoy DVD VIDEOs and other discs with
multi-channel sound and Dolby surround
effects, you need to adjust the speaker settings.
For details, see “Setting the speakers” on
page 53.
1Press ?/1 to turn on the system.
2Press TIMER MENU.
The hour indication flashes in the display.
3Press V v or repeatedly to set the
hour.
4Press ENTER.
The minute indication flashes in the
display.
5Press V v or repeatedly to set the
minute.
6Press ENTER.
The clock starts functioning.
To adjust the clock
1Press TIMER MENU.
“PLAY SET” flashes in the display.
2Press V v or repeatedly to select “CLOCK
SET”, then press ENTER.
The hour indication flashes in the display.
3Do the same procedures as step 3 to 6
above.
When carrying the unit
Do the following procedure to protect the disc
mechanism.
Use the buttons on the unit for the operation.
1Press ?/1 to turn on the system.
2Press DVD.
3Press Z OPEN/CLOSE to open the disc
tray and remove the disc. If there are
more than one disc in the disc tray, press
DISC SKIP/EX-CHANGE to remove the
discs.
4Press Z OPEN/CLOSE again to close
the disc tray. Wait until “DV ND O DISC”
appears in the display.
5Hold down DVD and then press ?/1 until
“STANDBY” appears in the display.
Then, “MECHA LOCK” appears in the
display.
6Unplug the AC power cord.
Positioning the speakers
Front
speaker
(Right)
Surround
speaker 1)
(Left)
Surround
speaker 1)
(Right)
Front
speaker
(Left)
Unit TV
45°
Center
speaker 1)
Subwoofer 2)
Listener
Setting the clock
Getting Started
19GB
Notes
• The clock settings are canceled when you disconnect
the power cord or if a power failure occurs.
• You cannot set the clock in Power Saving Mode
(page 76).
Before using the system, you can make the
minimum basic adjustments (LANGUAGE
SETUP, SCREEN SETUP, SPEAKER
SETUP*) in QUICK SETUP. After performing
QUICK SETUP, the system is ready for
playback. To perform further speakers settings,
see “Setting the speakers” on page 53.
* Except for MHC-GNZ77D/MHC-GNZ55D.
Note
When there is a disc in the unit or the disc tray is
opened, the guide message does not appear on the
TV screen. To perform QUICK SETUP, press Z
OPEN/CLOSE on the unit to remove the disc and press
again to close the disc tray.
1Turn on your TV and select the video
input.
2Press ?/1 to turn on the system.
Note
Make sure that the headphone or microphone is
not connected. Otherwise, you cannot perform
SPEAKER SETUP.
3Press FUNCTION +/– repeatedly to
select “DVD” (or press DVD on the
unit).
The guide message appears at the bottom of
the TV screen.
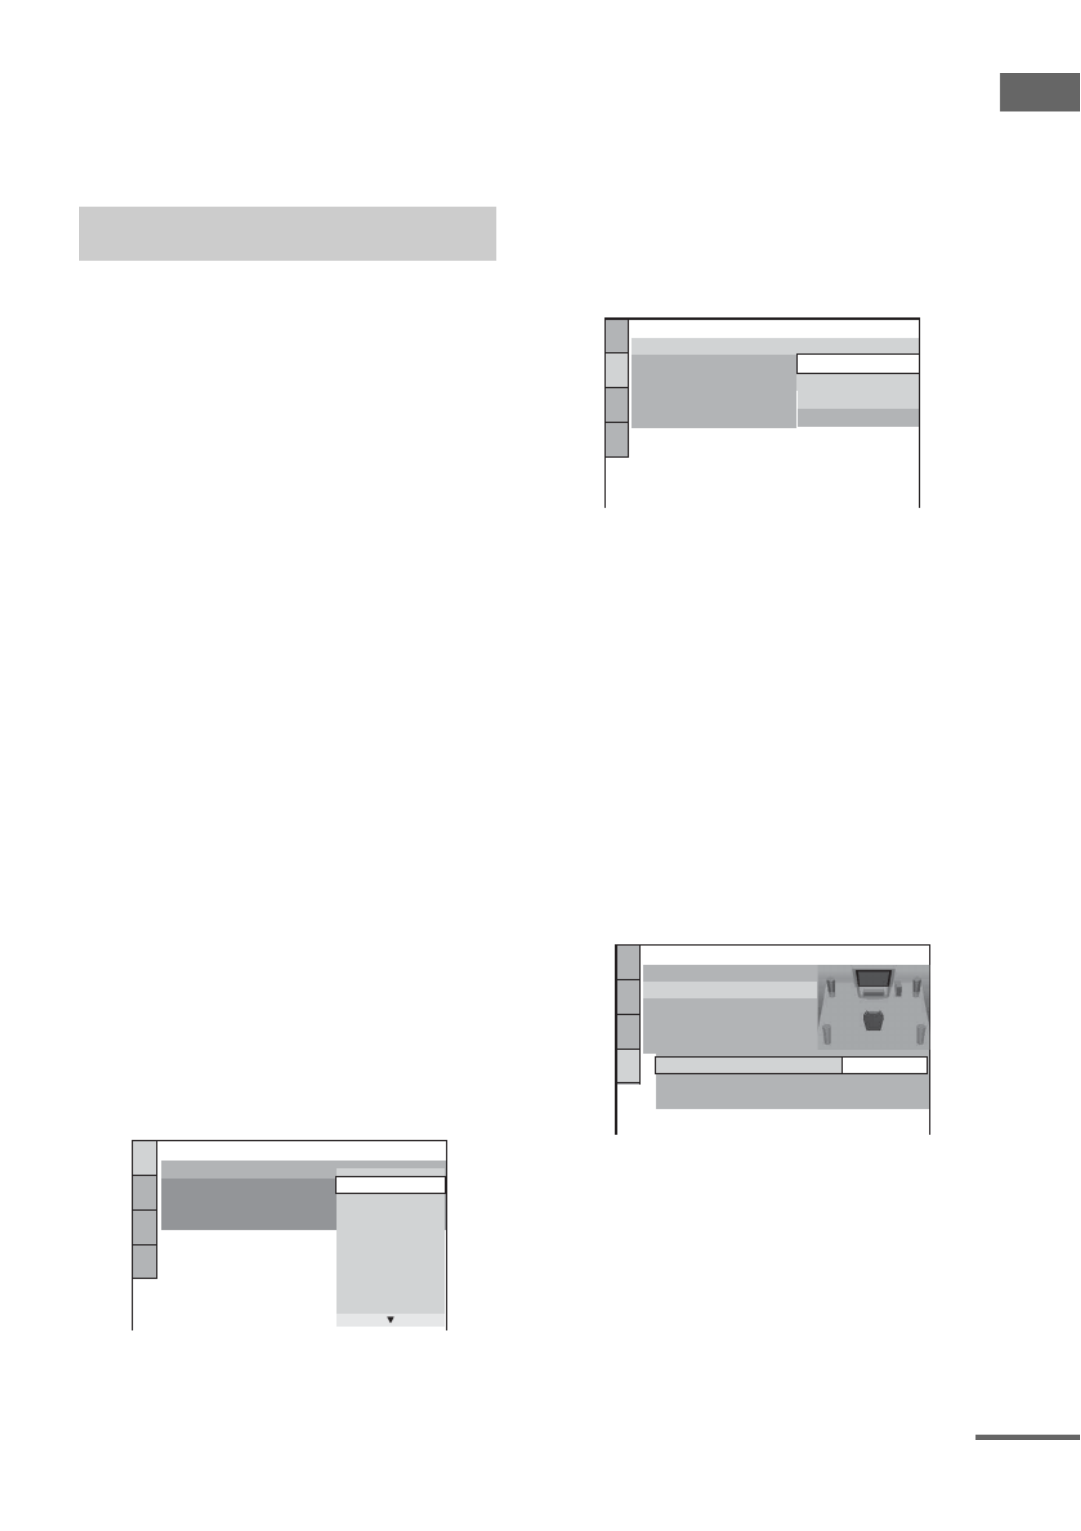
4Press ENTER.
The “LANGUAGE SETUP” display
appears on the TV screen.
5Press V v or repeatedly to select a
language, then press ENTER.
Tips
• The selected language is for “OSD”, “MENU”
and “SUBTITLE ”.
• The selectable language is different depending
on the area.
The setting is selected and the “SCREEN
SETUP” display appears on the TV screen.
6Press V v or repeatedly to select the
setting that matches your TV type.
x If you have a 4:3 standard TV
Select 4:3 LETTER BOX or 4:3 PAN
SCAN (page 51)
x If you have a wide-screen TV or a 4:3
standard TV with wide-screen mode
Select 16:9 (page 51)
7Press ENTER.
x For MHC-GN999D/MHC-GN999DS/
MHC-GNZ88D
The setting is selected and the “SPEAKER
SETUP” display appears on the TV screen.
x For MHC-GNZ77D/MHC-GNZ55D
The setting is selected and “QUICK
SETUP is complete.” appears on the
TV screen.
Performing QUICK SETUP
LANGUAGE SETUP
OSD:
MENU:
AUDIO:
SUBTITLE:
ENGLISH
FRANÇAIS
ENGLISH
DEUTSCH
ITALIANO
ESPAÑOL
NEDERLANDS
DANSK
SVENSKA
SCREE SETUPN
TV TYPE:
COLOR SYSTEM ( IDEO CD):V
SCREEN SAVER:
16:9
4:3 LETTER BOX
BACKGROUND: 4:3 PAN SCAN
16:9
4:3 OUTPUT: FULL
SPEAKER SETUP
TEST TONE:
LEVEL(FRONT):
LEVEL(SURROUND):
OFF
CENTER:
3.0m
3.0m
SURROUND:
DISTANCE:
SIZE:
FRONT: * 3.0m
continued

20GB
8(MHC-GN999D/MHC-GN999DS/
MHC-GNZ88D only)
Press V v or repeatedly to select the
front speaker distance from your
listening position, then press ENTER.
You can set from 1.0 to 7.0 meters.
Repeat this step to adjust the center and
surround speaker distance. The center and
surround speaker distance you can set vary
depending on the front speaker distance
setting.
The setting is selected and “QUICK
SETUP is complete.” appears on the
TV screen.
To quit QUICK SETUP
Press DISPLAY.
To change the settings of QUICK
SETUP
1Press DISPLAY when playback is
stopped.
The Control Menu appears on the TV
screen.
2Press V or v repeatedly to select
(SETUP), then press ENTER.
3Press V or v repeatedly to select “QUICK”,
then press ENTER.
The “LANGUAGE SETUP” display appears
on the TV screen.
4Do the same procedures as steps 5 to 8 of
“Performing QUICK SETUP”.
Notes
• The guide message appears at the bottom of
the TV screen when you turn on the system
for the first time or after performing “RESET” (see
“To return the DVD setup to the default settings*,
perform reset as follows:” on page 90).
• If you do not want to perform QUICK SETUP, press
CLEAR in step 3. The guide message will disappear
from the TV screen.
• If you want to change each setting individually, see
“Using the DVD Setup Menu” on page 49.
THEATRE SYNC allows you to turn on your
Sony TV and this system, changes the system’s
function to “DVD” and then switches the TV’s
input source you have set with just one button.
Preparing for the THEATRE
SYNC function
Register the TV’s input source connected to this
system.
Hold down SLEEP and press numeric
buttons, CLEAR or ALBUM +/– to select the
TV’s input source connected to this
system.
For details, refer to the following table.
The selected TV’s input source is memorized
into the remote.
Using the THEATRE SYNC
function
Hold down SLEEP
and press
To select the following
TV’s input source
0 No input source
(Default)
1 VIDEO 1
2 VIDEO 2
3 VIDEO 3
4 VIDEO 4
5 VIDEO 5
6 VIDEO 6
7 VIDEO 7
8 VIDEO 8
9 COMPONENT 1
CLEAR COMPONENT 2
ALBUM – COMPONENT 3
ALBUM + COMPONENT 4

Getting Started
21GB
Operating the THEATRE SYNC
function
Point the remote to the direction of the TV
and this unit, then press THEATRE SYNC.
If this function does not work, change the
transmission time. The transmission time varies
depending on the TV.
To change the transmission time
Hold down > and press numeric buttons
to change the transmission time.
For details, refer to the following table.
The transmission time from the remote is
selected.
Notes
• This function is only available for Sony TV series.
• If distance between the TV and this unit is too far,
this function may not work. Install the unit near the
TV.
• Keep the remote pointed in the direction of the TV
until the TV is turned on and the input source is
changed correctly.
(Except for MHC-GNZ55D)
Progressive scan is the method for displaying
the TV images which reduces flickering and
sharpens the image. To use this method, you
need to connect to a TV that can accept
progressive signals (page 81).
You can output video signals from
COMPONENT VIDEO OUT jacks in
INTERLACE or PROGRESSIVE format.
Use the buttons on the unit for the operation.
1Press DVD.
2Hold down DVD and press DISPLAY
repeatedly.
The display changes cyclically as follows:
P AUTO t t P VIDEO INTERLACE
x P AUTO (PROGRESSIVE AUTO)
Select this when your TV accepts progressive
signals and the TV is connected to the
COMPONENT VIDEO OUT jacks. The system
automatically detects the software type and
selects the appropriate conversion method.
x P VIDEO (PROGRESSIVE VIDEO)
Select this when your TV accepts progressive
signals and the TV is connected to the
COMPONENT VIDEO OUT jacks.
The system fixes the conversion method to
PROGRESSIVE VIDEO for video-based
software.
Select this if the image is not clear when you
select “P AUTO”.
x INTERLACE
Select this when your TV does not accept
progressive signals or your TV is connected to
the VIDEO OUT or S VIDEO OUT jack.
Hold down >
and press
To select the following
transmission time
1 0.5 (Default)
2 1
3 1.5
4 2
5 2.5
6 3
7 3.5
8 4
Changing the format of
the video signal from
COMPONENT VIDEO OUT
jacks
continued

Disc – Playback
23GB
Use the buttons on the unit for the operation.
1Press Z OPEN/CLOSE.
The disc tray slides out.
2Load a disc with the label side facing
up on the disc tray.
To load additional discs, press
DISC SKIP/EX-CHANGE to rotate the
disc tray.
3Press Z OPEN/CLOSE to close the disc
tray.
Notes
• Do not forcibly push the disc tray to close it as this
may cause a malfunction. Press Z OPEN/CLOSE to
close the disc tray.
• When you eject a disc, handle the disc by its edge. Do
not touch the surface of the disc.
• Do not use a disc with tape, seals or paste on it as this
may cause malfunction.
Before playing a DVD VIDEO, a DVD-R/
DVD-RW in VR mode, a VIDEO CD, a CD
Graphics1), JPEG image files or DivX video
files2), turn on your TV and select the video
input.
Depending on the DVD VIDEO or VIDEO CD,
some operations may be different or restricted.
Refer to the operating instructions supplied with
the disc.
1) .Latin American models only
2) MHC-GN999D/MHC-GN999DS/MHC-GNZ88D/
MHC-GNZ77D* only.
* Russian model only.
When playing a DVD VIDEO or DVD-R/
DVD-RW in VR mode:
When playing a VIDEO CD (with PBC
function is not activated):
Disc – Playback
Loading a disc
When you play
back an 8 cm
disc such as a
CD single,
place it on the
inner circle of
the tray
Playing a disc
— Normal Play
GROOVE
DVD
DISC
TITLE
A B
Elapsed
playing time
Disc tray
number
Disc presence
indicator
Disc playing
indicator
Title number
GROOVE
A B
VCD
DISC
Elapsed
playing time
Disc tray
number Track number
Disc presence
indicator
Disc playing
indicator
continued

24GB
When playing an AUDIO CD:
When playing a CD Graphics (Latin
American models only):
When playing an MP3 audio track:
When playing a DivX video file (on a DATA
DVD)1):
1) MHC-GN999D/MHC-GN999DS/MHC-GNZ88D/
MHC-GNZ77D* only).
* Russian model only.
1Press FUNCTION +/– repeatedly to
select “DVD” (or press DVD on the
unit).
2Press H (or nN on the unit).
3Press VOLUME +/– (or turn MASTER
VOLUME on the unit) to adjust the
volume.
The volume level appears on the TV screen.
Note
Depending on the system status, the volume level may
not appear on the TV screen.
Other operations
GROOVE
A B
CD
DISC
Elapsed
playing time
Disc tray
number Track number
Disc playing
indicator
Disc presence
indicator
GROOVE
A B
CDG
DISC
Elapsed
playing time
Disc tray
number Track number
Disc playing
indicator
Disc presence
indicator
GROOVE
A B
CD
DISC
MP3
Elapsed
playing time
Disc tray
number
Track
number
Disc presence
indicator
Disc playing
indicator
GROOVE
A B
DISC
DVD
Disc tray
number
Disc presence
indicator
Disc playing
indicator
Elapsed
playing time
To Do this
Stop playback Press x.
Pause playback Press X. Press X again or H (or
nN on the unit) to resume
playback.
Select a track1),
chapter or video
file
• Press . or > repeatedly
during playback, or
• Turn .OPERATION DIAL
> on the unit clockwise or
counterclockwise repeatedly
during playback, or
• Press the numeric buttons when
the Control Menu is turned off,
then press ENTER.2)
Select an album3) Press ALBUM +/– repeatedly
during playback or when playback
is paused.
Locate a point
quickly in fast
forward or fast
reverse (Lock
Search)4)5)
Press m or M during
playback. Each time you press
m M or , the playback speed
changes cyclically as follows:
Playback direction6)
x2B7)ttt 1M 2M
3M8)
Opposite direction6)
x2b9) t 1m t 2m t
3m8)
To return to normal playback,
press H (or nN on the unit).

Disc – Playback
25GB
1) You cannot select an audio track during Lock
Search operation of MP3 audio tracks.
2) DVD VIDEO, VIDEO CD, AUDIO CD and DivX
video files only.
3) MP3 audio tracks, JPEG image files and DivX
video files only.
4) Except for JPEG image files and CD Graphics.
5) Depending on the disc, the actual speed may differ.
6)
The “x2B b”/“x2 ” playback speed is about twice
the normal speed.
The “3M m”/“3 ” playback speed is faster than
“2 ”/“2M m” and the “2M”/“2m” playback
speed is faster than “1M”/“1 ”.m
7) DVD VIDEO and AUDIO CD only.
8) DVD VIDEO, DVD-R/DVD-RW in VR mode,
DivX video files and VIDEO CD only.
9) DVD VIDEO only.
10) The “2 ”/“2 ” playback speed is slower than
“1 ”/“1 ”.
11) DVD VIDEO and DVD-R/DVD-RW in VR mode
only.
12) You cannot perform this operation when Repeat
Play is activated.
Notes
• You cannot search for a still picture on a DVD-R/
DVD-RW in VR mode.
• (Latin American models only)
When playing CD Graphics, the picture may not
appear smoothly.
Tips
• The Instant Replay function is useful when you want
to review a scene or dialogue that you missed.
• The Instant Advance function is useful when you
want to pass over a scene that you do not want to
watch.
• You may not be able to use the Instant Replay or
Instant Advance function with some scenes.
• If you press DVD on the unit while the system is
turned off, the system turns on automatically and
“DVD” is selected as the function except during
Power Saving Mode.
This system memorizes the point where you
stopped the disc so you can resume playback
from that point. Resume Play is not canceled
when you turn off the system except for MP3
audio tracks, JPEG image files and DivX video
files.
Watch frame by
frame (Slow-
motion Play)8)
Press SLOW or SLOW
(or or on the unit) when
playback is paused. Each time you
press SLOW or SLOW
(or or on the unit), the
playback speed changes as
follows:
Playback direction10)
2 y 1
Opposite direction10)11)
2 y 1
To return to normal playback,
press H (or nN on the unit).
Play one frame at
a time (Freeze
Frame)8)
Press STEP C to go to the next
frame when playback is paused.
Press c STEP 11) to go to the
preceding frame when playback is
paused.
To return to normal playback,
press H (or nN on the unit).
Replay the
previous scene
(Instant
Replay)11)12)
Press REPLAY during
playback.
Briefly fast
forward the
current scene
(Instant
Advance)11)12)
Press ADVANCE during
playback.
Select a disc
during playback
or when playback
is stopped
Press DISC SKIP on the remote
(or one of the DISC 1 ~ 3 buttons
on the unit).
Switch to DVD
function from
another source
and start
playback
automatically
Press one of the DISC 1 ~ 3
buttons on the unit (Automatic
Source Selection).
Exchange other
discs after disc
detection
Press DISC SKIP/EX-CHANGE
on the unit.
Remove the disc Press Z OPEN/CLOSE on the
unit.
To Do this
Resuming playback from
the point you stopped the
disc
— Resume Play
continued

26GB
1While playing a disc, press x to stop
playback.
“RESUME” appears in the display. If
“RESUME” does not appear, Resume Play
is not available.
2Press H (or nN on the unit).
The system starts playback from the point
you stopped the disc in step 1.
Notes
• You cannot perform Resume Play during Shuffle
Play or Program Play.
• This function may not work properly with some
discs.
• Depending on where you stopped the disc, the
system may not resume playback from the exact
same point.
• Resume Play is canceled when you
– press x when playback is stopped.
– open the disc tray.
– change the function.
– change the settings in the Control Menu.
• If “MULTI-DISC RESUME” is set to “ON”,
Resume Play is not canceled for DVD VIDEO and
VIDEO CD when you open the disc tray or change
the function.
• (Latin American models only)
When using the Resume Play function on CD
Graphics, playback starts from the beginning of the
track.
Tip
To play back from the beginning of the disc, press x
twice, then press H (or nN on the unit).
Resuming playback of the
disc that has been played
back
— Multi-Disc Resume
This system can store the point where you
stopped the playback of the disc for up to 40
discs and resumes playback when you insert the
same disc again. If you store a playback resume
point for the 41st disc, the playback resume
point for the first disc will be deleted.
To activate this function, set “MULTI-DISC
RESUME” in “CUSTOM SETUP” to “ON”.
For details, see “MULTI-DISC RESUME” on
page 53.
Note
If “MULTI-DISC RESUME” in “CUSTOM SETUP”
is set to “ON” (page 53) and you play back a recorded
disc such as DVD-R, the system may play back other
recorded disc from the same playback resume point.
To start playback from the beginning of the disc, press
x H twice and then press (or nN on the unit).
You can make a program of up to 99 steps in the
order you want them to be played back.
You can only program the tracks from the
current disc.
1Press DISPLAY when playback is
stopped.
The Control Menu appears on the TV
screen.
Creating your own
program
— Program Play
Disc – Playback
27GB
2Press V v or repeatedly to select
(PROGRAM), then press
ENTER.
The options for “PROGRAM” appear on
the TV screen.
3Press V v or repeatedly to select
“SET t”, then press ENTER.
4Press b.
The cursor moves to the track row “T”
(in this case, “01”).
5Select the track you want to program.
For example, select track “02”.
Press V v or repeatedly to select “02”
under “T”, then press ENTER.
6To program other tracks, repeat steps
4 to 5.
7Press H (or nN on the unit).
Program Play starts.
When the Program Play ends, you can
restart the same program by pressing H
(or nN on the unit).
To cancel Program Play
Press CLEAR or select “OFF” in step 3. To play
back the same program again, select “ON” in
step 3 and press ENTER.
To change a programmed step
1Follow steps 1 to 3 of “Creating your own
program”.
2Press V v or repeatedly to select the
programmed step number you want to
change. Then, press b.
3Follow step 5 of “Creating your own
program” to program a new track.
To delete a programmed step
1Follow steps 1 to 3 of “Creating your own
program”.
2Press V v or repeatedly to select the
programmed step number you want to
delete. Then, press CLEAR.
The selected step is deleted. The following steps
are shifted up.
PLAY
6 ( 14)
T
2 : 5 0
OFF
SET
ON
OFF
CD
0 : 00 : 00
T
– –
01
02
03
04
05
06
PROGRAM
1. TRACK
ALL CLEAR
2. TRACK – –
– –
3. TRACK – –
4. TRACK – –
5. TRACK – –
6. TRACK – –
7. TRACK – –
Tracks number
PROGRAM
1. TRACK
ALL CLEAR
2. TRACK – –
– –
3. TRACK – –
4. TRACK – –
5. TRACK – –
6. TRACK – –
7. TRACK – –
0 : 00 : 00
T
– –
02
03
04
05
06
01
1. TRACK 0 2
ALL CLEAR
2. TRACK – –
3. TRACK – –
4. TRACK – –
5. TRACK – –
6. TRACK – –
7. TRACK – –
0:15:30
T
– –
01
02
03
04
05
06
PROGRAM
Selected track
Total time of the programmed tracks
continued

28GB
To delete all of the programmed
steps in the program list
1Follow steps 1 to 3 of “Creating your own
program”.
2Press V to select “ALL CLEAR”.
3Press ENTER.
To turn off the Control Menu
Press DISPLAY repeatedly until the Control
Menu disappears from the TV screen.
Notes
• When Program Play is activated, the “REPEAT”
setting is automatically changed to “ON” if the
current setting is “ALL DISCS”, “ONE DISC” or
“TRACK”.
• You cannot perform Program Play during playback
with PBC function of VIDEO CDs.
Tip
The Program Play is canceled and the program list is
cleared when
– you open the disc tray.
– you press DISC SKIP (or one of the DISC 1 ~ 3
buttons on the unit) to select another disc.
– you turn off the system.
– you change the function.
– you perform CD Synchro Recording.
You can play back the tracks on the current disc
in random order. Each time you perform Shuffle
Play, the playing order may differs.
1Press DISPLAY during playback.
The Control Menu appears on the TV
screen.
2Press V v or repeatedly to select
(SHUFFLE), then press
ENTER.
The options for “SHUFFLE” appear on the
TV screen.
3Press V v or repeatedly to select the
setting you want.
x When playing a VIDEO CD or AUDIO
CD
• TRACK: all tracks on the current disc is
played back randomly.
x When Program Play is activated
(see “Creating your own program”
on page 26)
• ON: all tracks in the program list is played
back randomly.
x When playing a DATA CD (except for
DivX video files) or DATA DVD
(except for DivX video files)
• ON: all MP3 audio tracks in the selected
album on the current disc is played back
randomly.
When no album is selected, the first album
is played back randomly.
4Press ENTER
Shuffle Play starts.
“SHUF” lights up in the display.
To cancel Shuffle Play
Press CLEAR or select “OFF” in step 3.
To turn off the Control Menu
Press DISPLAY repeatedly until the Control
Menu disappears from the TV screen.
Playing in random order
— Shuffle Play
PLAY
6 ( 14)
T
2 : 5 0
OFF
TRACK
OFF
CD

Disc – Playback
29GB
Notes
• Shuffle Play is only available for the tracks on the
current disc.
• You cannot perform Shuffle Play during playback
with PBC function of VIDEO CDs.
• Shuffle Play is canceled when
– you open the disc tray.
– you press DISC SKIP (or one of the DISC 1 ~ 3
buttons on the unit) to select another disc.
– you turn off the system.
– you change the function.
– you perform Track/Index Search.
– you perform CD Synchro Recording.
• The same song may be played back repeatedly for
MP3 audio tracks.
Tip
You can also change the Shuffle Play setting when
playback is stopped.
You can play back all the titles, tracks, files or a
single title, chapter, track or file on a disc
repeatedly.
You can also select Shuffle Play or Program
Play when Repeat Play is activated.
1Press DISPLAY during playback.
The Control Menu appears on the TV
screen.
2Press V v or repeatedly to select
(REPEAT), then press ENTER.
The options for “REPEAT” appear on the
TV screen.
3Press V v or repeatedly to select the
setting you want.
The default setting is underlined.
x When playing a DVD VIDEO or
DVD-R/DVD-RW in VR mode
• OFF: does not play back repeatedly.
• ALL DISCS: repeats all the titles on all the
discs.
• ONE DISC: repeats all the titles on the
current disc.
• TITLE: repeats the current title.
• CHAPTER: repeats the current chapter.
x When playing a VIDEO CD or AUDIO
CD
• OFF: does not play back repeatedly.
• ALL DISCS: repeats all the tracks on all
the discs.
• ONE DISC: repeats all the tracks on the
current disc.
• TRACK: repeats the current track.
x When playing a DATA CD or DATA
DVD
• OFF: does not play back repeatedly.
• ALL DISCS: repeats all the tracks or files
on all the discs.
• ONE DISC: repeats all the albums on the
current disc.
• ALBUM: repeats the current album.
• TRACK1): repeats the current track.
• FILE2): repeats the current file.
1) MP3 audio tracks only.
2) DivX video files only.
x When Program Play or Shuffle Play
is activated
• OFF: does not play back repeatedly.
• ON: repeats the Program Play or Shuffle
Play.
4Press ENTER.
Repeat Play starts.
Playing repeatedly
— Repeat Play
PLAY
6 ( 14)
T
2 : 5 0
OFF
TRACK
ALL DISCS
ONE DISC
OFF
CD
continued

30GB
To cancel Repeat Play
Press CLEAR or select “OFF” in step 3.
To turn off the Control Menu
Press DISPLAY repeatedly until the Control
Menu disappears from the TV screen.
Notes
• You can also change the Repeat Play setting by
pressing REPEAT repeatedly.
• “REP” lights up in the display when Repeat Play is
set to “ALL DISCS”, “ONE DISC”, “ALBUM” or
“ON”.
• “REP1” lights up in the display when Repeat Play is
set to “ TITLE”, “CHAPTER”, “TRACK” or
“FILE”.
• Depending on the DVD VIDEO, you cannot perform
Repeat Play.
• You cannot perform Repeat Play during playback
with PBC function of VIDEO CDs.
• When playing a DATA CD or DATA DVD which
contains MP3 audio tracks and JPEG image files, the
audio sound will not match the image if their playing
time are different.
• You cannot select “TRACK” when “MODE (MP3,
JPEG)” is set to “IMAGE (JPEG)” (page 36).
• Repeat Play is canceled when
– you open the disc tray.
– you press DISC SKIP (or one of the DISC 1 ~ 3
buttons on the unit) to select another disc (unless
Repeat Play is set to “ALL DISCS”).
– you turn off the system.
– you change the function (unless Repeat Play is set
to “ALL DISCS”).
– you perform CD Synchro Recording.
Tip
You can also change the Repeat Play setting when
playback is stopped.
Some DVD VIDEOs have menus to help you
enjoy the DVD VIDEOs. You can play back
DVD VIDEOs using these menus on the TV
screen.
Using TOP MENU
A DVD VIDEO contains a lot of sections of
picture or music feature called “title”. When you
play back a DVD VIDEO which contains
several titles, you can select the title you want
using TOP MENU.
Using MENU
Some DVD VIDEOs allow you to select the disc
contents using a menu. When you play back
these DVD VIDEOs, you can select items such
as the language for the subtitles and the language
for the sound using MENU.
1Press TOP MENU or MENU.
The menu appears on the TV screen. The
contents of the menu vary depending on the
disc.
2Press V v/ / /B b or the numeric buttons
to select the title or item you want to
play back.
3Press ENTER.
Playing DVD VIDEOs using
the menu

Disc – Playback
31GB
You can play back DVD-Rs/DVD-RWs in VR
mode either according to the originally recorded
sequence or to the playlist created on the disc.
This function is only available for DVD-Rs/
DVD-RWs in VR mode with a playlist created.
1Press DISPLAY when playback is
stopped.
The Control Menu appears on the TV
screen.
2Press V v or repeatedly to select
(ORIGINAL/PLAY LIST), then
press ENTER.
The options for “ORIGINAL/PLAY LIST”
appear on the TV screen.
3Press V v or repeatedly to select the
setting you want.
• PLAY LIST: play back according to the
playlist created on the disc.
• ORIGINAL: play back according to the
originally recorded sequence.
4Press ENTER.
— PBC Playback
You can use the PBC (Playback Control) menus
on your TV screen to enjoy the disc’s interactive
software. The menu format and structure may
differ depending on each disc.
1Press H (or nN on the unit) to start
playing a VIDEO CD with PBC
functions (Version 2.0).
The PBC menu appears on the TV screen.
2Press the numeric buttons to select the
item number you want.
3Press ENTER.
4Continue playback according to the
instructions on the menus to enjoy
interactive playback.
Refer to the operating instructions supplied
with the VIDEO CD, as the operating
procedure may differ depending on the
VIDEO CD.
To return to the previous menu
Press O RETURN.
Notes
• Depending on the VIDEO CD, the menu may not
appear in step 1.
• Depending on the VIDEO CD, “Press ENTER” in
step 3 may appear as “Press SELECT” in the
operating instructions supplied with the disc. In this
case, press H (or nN on the unit).
• PBC Playback is canceled when Shuffle Play,
Program Play or Repeat Play is activated.
Selecting “ORIGINAL” or
“PLAY LIST” on a DVD-R/
DVD-RW in VR mode
3 ( 2 8 )
1 ( 4 4 )
DVD-VR
T
1 : 3 0 : 5 0
PLAY LIST
PLAY LIST
ORIGINAL
Playing VIDEO CDs with
PBC functions (Version
2.0)
continued
32GB
To cancel playback with PBC
functions
1Press . or > repeatedly (or turn
. > OPERATION DIAL on the unit
clockwise or counterclockwise
repeatedly) or press the numeric
buttons to select a track when
playback is stopped.
2Press H (or nN on the unit) or
ENTER.
“Play without PBC.” appears on the TV
screen and playback starts from the selected
track. Still images, such as the menu
screens, will not be shown.
To return to PBC playback, press x twice, then
press H (or nN on the unit).
MP3 is an audio compression technology that
satisfies the ISO/MPEG regulations. JPEG is an
image compression technology.
For details on MP3 audio tracks or JPEG image
files that the system can play back, see “Notes
on discs” (page 6) and “Notes on Multi Session
disc” (page 8).
Playback order of MP3 audio
tracks or JPEG image files
The playback order of MP3 audio tracks or
JPEG image files recorded on a DATA CD or
DATA DVD is as follows:
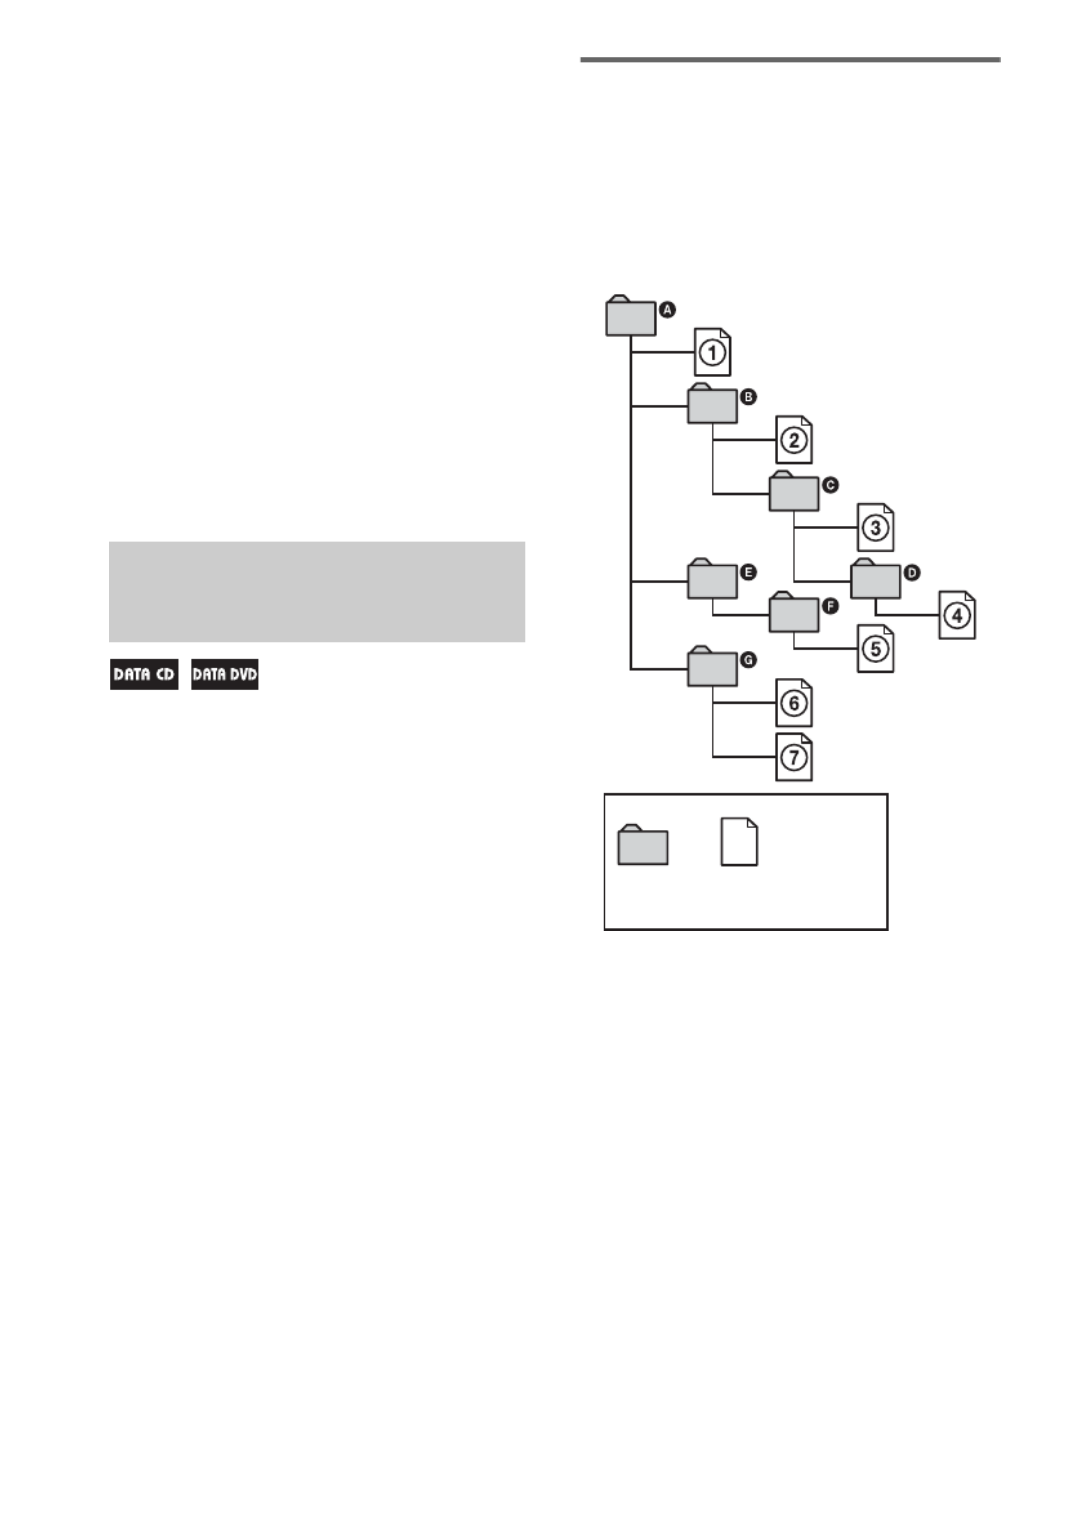
x Structure of disc contents
When you insert a DATA CD or DATA DVD
and press H (or nN on the unit), the tracks
(or files) are played back sequentially, from 1
through 7. The files or tracks of the sub-albums
in the selected album take priority over the next
album in the same tree. (Example: C contains
D so 4 5 is played back before .)
When you press MENU and the list of album
names appears (page 34), the album names are
arranged in the following order:
A B C D F G t t t t t. Albums
that do not contain tracks (or files) (such as
album E) do not appear in the list.
About MP3 audio tracks
and JPEG image files
ROOT
Tree 1 Tree 2 Tree 3 Tree 4 Tree 5
Album MP3 audio tracks or
JPEG image files

Disc – Playback
33GB
Notes
• Depending on the software you use to create the
DATA CD or DATA DVD, the playback order may
differ from the illustration above.
• The playback order above may not be applicable if
there are more than 200 albums and 300 tracks/files
in each album.
• The system can recognize up to 200 albums
including albums that do not contain MP3 audio
tracks and JPEG image files. The system will not
play back any albums beyond the 200th album.
• The maximum number of MP3 audio tracks or JPEG
image files on an album which this system can
recognize is:
– 600 when “MODE (MP3, JPEG)” is set to
“AUDIO (MP3)” or “IMAGE (JPEG)”.
– 300 when “MODE (MP3, JPEG)” is set to
“AUTO”.
• The system may take a longer time to start playback,
when the tracks or files in another album has just
been played back.
• An album that does not contain an MP3 audio track
or JPEG image file is skipped.
• The system will play back any data with the
extension “.MP3”, “.JPG” or “.JPEG” even if they
are not in MP3 or JPEG format. Playing this data
may generate a loud noise which could damage your
speaker system.
• Depending on the encoding/writing software,
recording device, or the recording media used to
record an MP3 audio track, you may encounter
problems such as cannot play back, sound
interruptions and noise.
• The following discs take a longer time to start
playback:
– a disc recorded with complicated tree structure.
– a disc recorded in Multi Session.
– a disc to which data can be added (non finalized
disc).
• When playing a DATA CD or DATA DVD
containing both MP3 audio tracks and JPEG image
files, select “MODE (MP3, JPEG)” from the Control
Menu after the disc’s TOC reading is complete. If
you want to play back
– both MP3 audio tracks and JPEG image files, set
“MODE (MP3, JPEG)” to “AUTO”.
– MP3 audio tracks only, set “MODE (MP3, JPEG)”
to “AUDIO (MP3)”.
– JPEG image files only, set “MODE (MP3, JPEG)”
to “IMAGE (JPEG)”.
• The system can play back to a depth of 8 folders only.
Tips
• If you add numbers (01, 02, 03, etc.) to the front of
the track or file names when you store the tracks
or files in a disc, the tracks and files will be played
back in that order.
• Since a disc with many trees takes a longer time to
start playback, it is recommended that you create
albums with no more than two trees.
Playing an album of MP3 audio
tracks or an MP3 audio track
1Load a DATA CD or DATA DVD with
MP3 audio tracks on the disc tray.
The list of albums appears on the TV
screen.
2Press V v or repeatedly to select the
album you want.
x If you want to play back the album
Press H (or nN on the unit).
The system starts playback from the first
track of the selected album.
Playing DATA CDs or
DATA DVDs with MP3
audio tracks and JPEG
image files
3 ( 3 0 )
R O C K B E S T H I T
K A R A O K E
M Y F A V O U R I T E S O N G
R & B
J A Z Z
C L A S S I C
S A L S A O F C U B A
B O S S A N O V A
continued

Disc – Playback
35GB
2Press V v or repeatedly to select the
album you want.
x If you want to play back the album
Press H (or nN on the unit).
The system starts a slide show from the first
image file of the selected album.
x If you want to play back a JPEG
image file
1 Press PICTURE NAVI.
Thumbnail picture for the first 16 JPEG
image files in the selected album is
displayed on the TV screen.
If there are more than 16 image files
The scroll bar appears at the right.
Press v repeatedly until the bottom row
of the thumbnail picture, then press v.
The next 16 image files display on the
TV screen.
To return to previous 16 thumbnail
picture
Press V repeatedly until the top row of
the thumbnail picture, then press V.
2 Press VvBb/ / / to select the image you
want to view, then press H (or nN
on the unit).
The slide show starts from the selected
image file.
To display the next or previous
page of album list
Press B or b repeatedly when the album list is
displayed.
To display the next or previous
JPEG image file
Press B or b repeatedly during the slide show.
To play back the next album of
JPEG image files
You can select the next album by pressing b
repeatedly until the last file of the current album,
then press b once. The first file of the next
album is selected. However, you cannot select
the previous album by pressing B repeatedly.
To select the previous album, select the album
from the album list.
To turn on or off the display of
album list
Press MENU repeatedly.
To rotate a JPEG image file
When a JPEG image file is displayed on the TV
screen, you can rotate the image by 90 degrees.
Press V v or repeatedly while viewing an
image. Each time you press V, the image rotates
counterclockwise by 90 degrees and vice versa.
Example: When you press V once
Press CLEAR to return to the original view.
To stop playback
Press x.
1 2 3 4
5 6 7 8
13 14 15 16
9 10 11 12
Rotating direction
continued

36GB
Notes
• The PICTURE NAVI button does not work when
“MODE (MP3, JPEG)” is set to “AUDIO (MP3)”.
• When you press B b or to select the next or
previous image, the image will return to its original
view even if you have rotated the image previously.
• The slide show pauses when you press V v or .
• You can view the disc information while playing
JPEG image files (page 77).
• You can select Repeat Play while playing JPEG
image files (page 29).
Tip
You can also change the slide show speed
(page 37)
and eff
ect
(page 37) while playing JPEG image files.
You can play back a slide show with sound by
first placing both JPEG image files and MP3
audio tracks in the same album on a DATA CD
or DATA DVD.
1Load a DATA CD or DATA DVD on the
disc tray.
The list of albums appears on the TV
screen.
2Press DISPLAY.
The Control Menu appears on the TV
screen.
3Press V v or repeatedly to select
(MODE (MP3, JPEG)), then
press ENTER.
The options for “MODE (MP3, JPEG)”
appear on the TV screen.
The default setting is underlined.
• AUTO: play back both JPEG image files
and MP3 audio tracks in the same album
as a slide show with sound.
• AUDIO (MP3): play back MP3 audio
tracks continuously.
• IMAGE (JPEG): play back JPEG image
files as a slide show.
4Press V v or repeatedly to select
“AUTO”, then press ENTER.
5Press MENU.
The list of albums appears on the TV
screen.
6Press V v or repeatedly to select
the album you want, then press H
(or nN on the unit).
The slide show with sound starts from the
selected album.
To stop playback
Press x.
To turn on or off the display of
album list
Press MENU repeatedly.
To cancel slide show with sound
Select “AUDIO (MP3)” or “IMAGE (JPEG)” in
step 4.
Playing MP3 audio tracks
and JPEG image files as a
slide show with sound
DATA CD
MP3
(
2 7 )
IMAGE (JPEG)
AUDIO (MP3)
AUTO
AUTO

Disc – Playback
37GB
Notes
• In some cases, you cannot change the “MODE (MP3,
JPEG)” setting when “MODE (MP3, JPEG)” has
been set to
– “IMAGE (JPEG)” and the selected disc only
contains MP3 audio tracks.
– “AUDIO (MP3)” and the selected disc only
contains JPEG image files.
• You cannot play back JPEG image files and MP3
audio tracks at the same time if they are not contained
in the same album.
• When the playback duration of the JPEG image files
is longer than the MP3 audio tracks, the slide show
continues without sound.
• When the playback duration of MP3 audio tracks is
longer than the JPEG image files, the MP3 audio
tracks are played back without the slide show.
• If there are no MP3 audio tracks in the DATA CD or
DATA DVD and “MODE (MP3, JPEG)” is set to
“AUDIO (MP3)”, “No audio data” appears on the TV
screen and the disc cannot be played back.
• If there are no JPEG image files in the DATA CD or
DATA DVD and “MODE (MP3, JPEG)” is set to
“IMAGE (JPEG)”, “No image data” appears on the
TV screen and the disc cannot be played back.
• If you play back MP3 audio tracks and JPEG image
files with large data size at the same time, the sound
may skip. It is recommended that you reduce the data
size by creating the MP3 audio tracks with a bit rate
of 128 kpbs or lower. If the skipping sound still
occurs, reduce the data size of JPEG image files by
creating the JPEG image files in smaller size or lower
resolution.
Tips
• You can also change the slide show speed
(page 37)
and effect
(page 37)
while playing JPEG image files.
• If you want to play back a slide show to the same
audio track, set the track to Repeat Play (page 29).
Specifying the slide show
speed
(JPEG image files only)
When you play back JPEG image files as slide
show, you can specify the duration for an image
to appear on the TV screen.
1Press DISPLAY repeatedly until the
Control Menu for JPEG image files
appears on the TV screen.
2Press V v or repeatedly to select
(INTERVAL), then press
ENTER.
The options for “INTERVAL” appear on
the TV screen.
3Press V v or repeatedly to select the
setting you want.
The default setting is underlined.
• NORMAL: Sets the duration to about 6 to
9 seconds (Images that are 4,000,000
pixels or more will lengthen the duration).
• FAST: Sets the duration shorter than
NORMAL.
• SLOW 1: Sets the duration longer than
NORMAL.
• SLOW 2: Sets the duration longer than
SLOW 1.
4Press ENTER.
The selected setting takes effect.
Note
Some JPEG image files (especially progressive JPEG
image files or JPEG image files with 3,000,000 pixels
or more) may take a longer time to display than others,
which may make the duration seems longer that the
option you selected.
Selecting a transition effect
for image files in the slide
show
(JPEG image files only)
When you play back JPEG image files, you can
select the transition effect to be used when
viewing the slide show.
1Press DISPLAY repeatedly until the
Control Menu for JPEG image files
appears on the TV screen.
10 / 29 / 2 004
1(
NORMAL
DATA CD
JPEG
NORMAL
FAST
SLOW 1
SLOW 2
4)
3 ( 12)
continued

38GB
2Press V v or repeatedly to select
(EFFECT), then press ENTER.
The options for “EFFECT” appear on the
TV screen.
3Press V v or repeatedly to select the
setting you want.
The default setting is underlined.
• MODE 1: The image sweeps in from top
to bottom of the screen.
• MODE 2: The image sweeps in from left
to right of the screen.
• MODE 3: The image stretches out from
the center of the screen.
• MODE 4: The image changes with
MODE 1, MODE 2, MODE 3 and other
transition effects randomly.
• MODE 5: The next image slides over the
current image.
• OFF: Turns off this function.
4Press ENTER.
The selected setting takes effect.
(MHC-GN999D/MHC-GN999DS/
MHC-GNZ88D/MHC-GNZ77D* only)
* Russian model only.
DivX® is a video file compression technology,
developed by DivX, Inc. This product is an
official DivX® Certified product.
For details on DivX video files that the system
can play back, see “Notes on discs” (page 6) and
“Notes on Multi Session disc” (page 8).
Notes
• The system may not play back a DivX video file
when the file has been combined from two or more
DivX video files.
• The system cannot play back a DivX video file size
of more than 720 (width) x 576 (height)/2GB.
• Depending on the DivX video file, the picture may be
unclear or the sound may skip.
• The system cannot play back some DivX video files
that are longer than 3 hours.
Playing an album of DivX
video files or a DivX video file
1Load a DATA CD or DATA DVD with
DivX video files on the disc tray.
The list of the albums appears on the TV
screen.
2Press V v or repeatedly to select the
album you want.
x If you want to play back the album
Press H (or nN on the unit).
The system starts playback the first DivX
video file of the selected album.
1 0 / 2 3 / 2 0 0 4
1(
MODE 1
DATA CD
JPEG
MODE 1
MODE 2
MODE 3
MODE 4
MODE 5
OFF
4)
3 ( 12)
Enjoying DivX
®
video files
S U M M E R 2 0 0 3
3 ( 3 )
N E W Y E A R ’ S D A Y
M Y FA V O U R I T E S

Disc – Playback
39GB
x If you want to play back a DivX video
file
1 Press ENTER.
The list of files of the selected album
appears on the TV screen.
2 Press V v or repeatedly to select the file
you want, then press ENTER.
The system starts playback from the
selected file.
To stop playback
Press x.
To display the next or previous
page of file list or album list
Press B or b repeatedly when the file list or
album list is displayed.
To play back the next or previous
DivX video file
Press . or > repeatedly (or turn .
OPERATION DIAL > on the unit clockwise
or counterclockwise repeatedly) during
playback.
To play back the next album of
DivX video files
You can select the next album by pressing >
repeatedly (or turning . OPERATION
DIAL > on the unit clockwise repeatedly)
until the last file of the current album, then press
> . once (or turn OPERATION DIAL
> on the unit clockwise). The first file of the
next album is selected. However, you cannot
select the previous album by pressing .
repeatedly (or turning . OPERATION
DIAL > on the unit counterclockwise
repeatedly). To select the previous album, select
the album from the album list.
To return to the album list display
when the file list is displayed
Press O RETURN.
To turn on or off the display of
album list or file list
Press MENU repeatedly.
Notes
• Depending on the DivX video file, the picture may
pause or be unclear. In this case, it is recommended
that you create the file at a lower bit rate. If the sound
is still noisy, MP3 is the recommended audio format.
Note that, this system does not conform to WMA
(Windows Media Audio) format.
• Due to the compression technology used for DivX
video files, it may take some time after you press H
(or nN on the unit) for the picture to appear.
• Depending on the DivX video file, the sound may not
match the pictures on the TV screen.
Tips
• You can view the disc information while playing a
DivX video file (page 77).
• If the number of viewing times has been preset, you
can play back the DivX video files as many times as
the preset number. The following occurrences are
counted:
– when the system is turned off.
– when another DivX video file is played back.
M Y FA V O U R I T E S
1 ( 2 )
H AW A I I 2 0 0 4
VENUS

40GB
.
You can use the Control Menu on the TV screen
to search the following items.
As titles, tracks, albums, chapters, indexes,
scenes and files are assigned unique numbers on
the disc, you can select the item you want by
entering its number.
You can also search for a particular point using
the time code (Time Search) (DVD VIDEO and
DVD-R/DVD-RW in VR mode only).
1Press DISPLAY. (When playing a
DATA CD or DATA DVD with JPEG
image files, press DISPLAY twice.)
The Control Menu appears on the TV
screen.
2Press V v or repeatedly to select the
search item.
x When playing a DVD VIDEO or
DVD-R/DVD-RW in VR mode
TITLE
CHAPTER
x When playing a VIDEO CD (with PBC
function is not activated)
TRACK
INDEX
x When playing a VIDEO CD or Super
VCD (with PBC function is activated)
SCENE
x When playing an AUDIO CD
TRACK
x When playing a DATA CD or DATA
DVD (MP3 audio track)
ALBUM
TRACK
x When playing a DATA CD or DATA
DVD (JPEG image file)
ALBUM
FILE
x When playing a DATA CD or DATA
DVD (DivX video file)
ALBUM
FILE
Example: when you select
(CHAPTER)
“** (**)” is selected (** refers to a
number). The number in parentheses
indicates the total number of titles,
chapters, tracks, indexes, scenes, albums or
files.
3Press ENTER.
“** (**)” change to “– – (**)”.
Using the on-screen
display to search for a
title/chapter/scene/track/
index/album/file
For You can search
DVD VIDEO Title or chapter
DVD-R/DVD-RW
in VR mode
Title or chapter
VIDEO CD Track, scene or index
MP3 audio tracks Track or album
JPEG image files Album or file
DivX video files Album or file
D D IDEOV V
1 8 (
3 4 )
1 2 (
2 7 )
T
1 : 3 2 : 5 5
Selected row
D D IDEOV V
( 3 4 )
1 2 ( 2 7 )
T
1 : 3 2 : 5 5

Disc – Playback
41GB
4Press V v or repeatedly or the numeric
buttons to select the title, chapter,
track, index, scene, album or file
number you want to search.
If you make a mistake, press CLEAR to
cancel the number, then select another
number.
5Press ENTER.
The system starts playback from the
selected title, chapter, track, index, scene,
album or file.
To turn off the Control Menu
Press DISPLAY repeatedly until the Control
Menu disappears from the TV screen.
To search for a particular
point using the time code
— Time Search
1Press DISPLAY.
The Control Menu appears on the TV
screen.
2Press V v or repeatedly to select
(TIME/TEXT).
“T **:**:**” (elapsed playing time of the
current title) is selected.
3Press ENTER.
“T **:**:**” changes to “T--:--:--”.
4Input the time code using the numeric
buttons, then press ENTER.
For example, to find the scene at 2 hours, 10
minutes, and 20 seconds after the
beginning, enter “2:10:20”.
If you make a mistake, press CLEAR to
cancel the number, then select another
number.
Note
Depending on the disc, you cannot perform Time
Search.
Tips
• When the Control Menu display is turned off, you
can search for a chapter (DVD VIDEO and DVD-R/
DVD-RW in VR mode), track (AUDIO CD and
VIDEO CD) or file1) (DivX video files in DATA CD
and DATA DVD) by pressing the numeric buttons
and ENTER.
• You can change the display to show elapsed playing
time or remaining time. For details, see “Checking
the elapsed playing time, remaining time and titles”
on page 77.
1) MHC-GN999D/MHC-GN999DS/MHC-GNZ88D/
MHC-GNZ77D* only.
* Russian model only.
You can view the first scene of each chapter
(DVD VIDEO), each title (DVD VIDEO) or
each track (VIDEO CD and Super VCD) so that
you can find the chapter, title or track you want
quickly.
1For DVD VIDEO, press PICTURE NAVI
repeatedly to select “CHAPTER
VIEWER” or “TITLE VIEWER”.
For VIDEO CD and Super VCD, press
PICTURE NAVI to select “TRACK
VIEWER”.
• CHAPTER VIEWER (DVD VIDEO
only): displays the first scene of each
chapter.
• TITLE VIEWER (DVD VIDEO only):
displays the first scene of each title.
• TRACK VIEWER (VIDEO CD and
Super VCD only): displays the first scene
of each track.
Searching by scene
— Picture Navigation
continued

42GB
2Press ENTER.
The first scene of the first 9 chapters, titles
or tracks appears on the TV screen as
follows:
If there are more than 9 chapters, titles
or tracks
“V” appears at the bottom right of the
screen.
Press v repeatedly to select a scene at the
bottom row, then press v.
The next 9 chapters, titles or tracks display
on the TV screen.
To return to previous scene
Press V repeatedly to select a scene at the
top row, then press V.
3Press V v B b/ / / to select a chapter,
title or track, then press ENTER.
The system starts playback from the
selected scene.
To cancel searching
Press DISPLAY.O RETURN or
Notes
• Depending on the disc, you may not be able to select
some items.
• During Picture Navigation, “VIEWER” appears in
the display.
1
4
7
2
5
8
3
6
9
Disc – Various Functions
43GB
When playing a DVD VIDEO or a DivX video
file recorded in multiple audio formats, you can
select the audio format you want. If the DVD
VIDEO is recorded with multilingual tracks,
you can also change the language.
When playing a VIDEO CD, AUDIO CD or
MP3 audio tracks, you can select the sound from
the right or left channel and listen to the sound
of the selected channel through both the right
and left speakers. For example, when playing a
track with the vocals on the right channel and the
instruments on the left channel, you can hear the
instruments from both speakers by selecting the
left channel.
Press AUDIO repeatedly during playback to
select the audio format you want.
The default setting is underlined.
x When playing a DVD VIDEO
Depending on the DVD VIDEO, the option of
language and audio format varies.
When a 4-digit number is displayed, they
represent a language code (see “Language code
list” on page 99). When the same language is
displayed two or more times, the DVD VIDEO
is recorded in multiple audio formats.
x When playing a DVD-R/DVD-RW in VR
mode
The number of audio tracks recorded on a disc
are displayed.
Example:
• 1: MAIN: the main sound of the audio track 1.
• 1: SUB: the sub sound of the audio track 1.
• 1: MAIN+SUB: the main and sub sound of
the audio track 1.
• 2: MAIN: the main sound of the audio track 2.
• 2: SUB: the sub sound of the audio track 2.
• 2: MAIN+SUB: the main and sub sound of
the audio track 2.
x When playing a DivX video file
The options for audio format differ depending
on the DivX video files.
x When playing a VIDEO CD, AUDIO CD, or
MP3 audio track
• STEREO: the stereo sound.
• 1/L: the sound of the left channel (monaural).
• 2/R: the sound of the right channel
(monaural).
x When playing a Super VCD
• 1: STEREO: the stereo sound of the audio
track 1.
• 1: 1/L: the sound of the left channel of the
audio track 1 (monaural).
• 1: 2/R: the sound of the right channel of the
audio track 1 (monaural).
• 2: STEREO: the stereo sound of the audio
track 2.
• 2: 1/L: the sound of the left channel of the
audio track 2 (monaural).
• 2: 2/R: the sound of the right channel of the
audio track 2 (monaural).
Notes
• While playing a DVD-R/DVD-RW in VR mode on
which only one audio stream is recorded, “2: MAIN”,
“2: SUB” and “2: MAIN+SUB” do not appear.
• While playing a Super VCD on which the audio track
2 is not recorded, no sound will come out when you
select “2: STEREO”, “2: 1/L”, or “2: 2/R”.
• You cannot change the sound for DVD VIDEOs or
DivX video files that are not recorded in multiple
audio format.
• When you play back DVD VIDEOs, the sound may
change automatically.
Displaying the audio
information of the disc
(DVD VIDEO and DivX video files only)
When you press AUDIO repeatedly during
playback, the format of the current audio signal
is displayed on the TV screen.
x When playing a DVD VIDEO
For example, in Dolby Digital format, multiple
signals ranging from monaural to 5.1 channel
signals can be recorded on a DVD VIDEO.
Disc – Various Functions
Selecting the audio format
continued
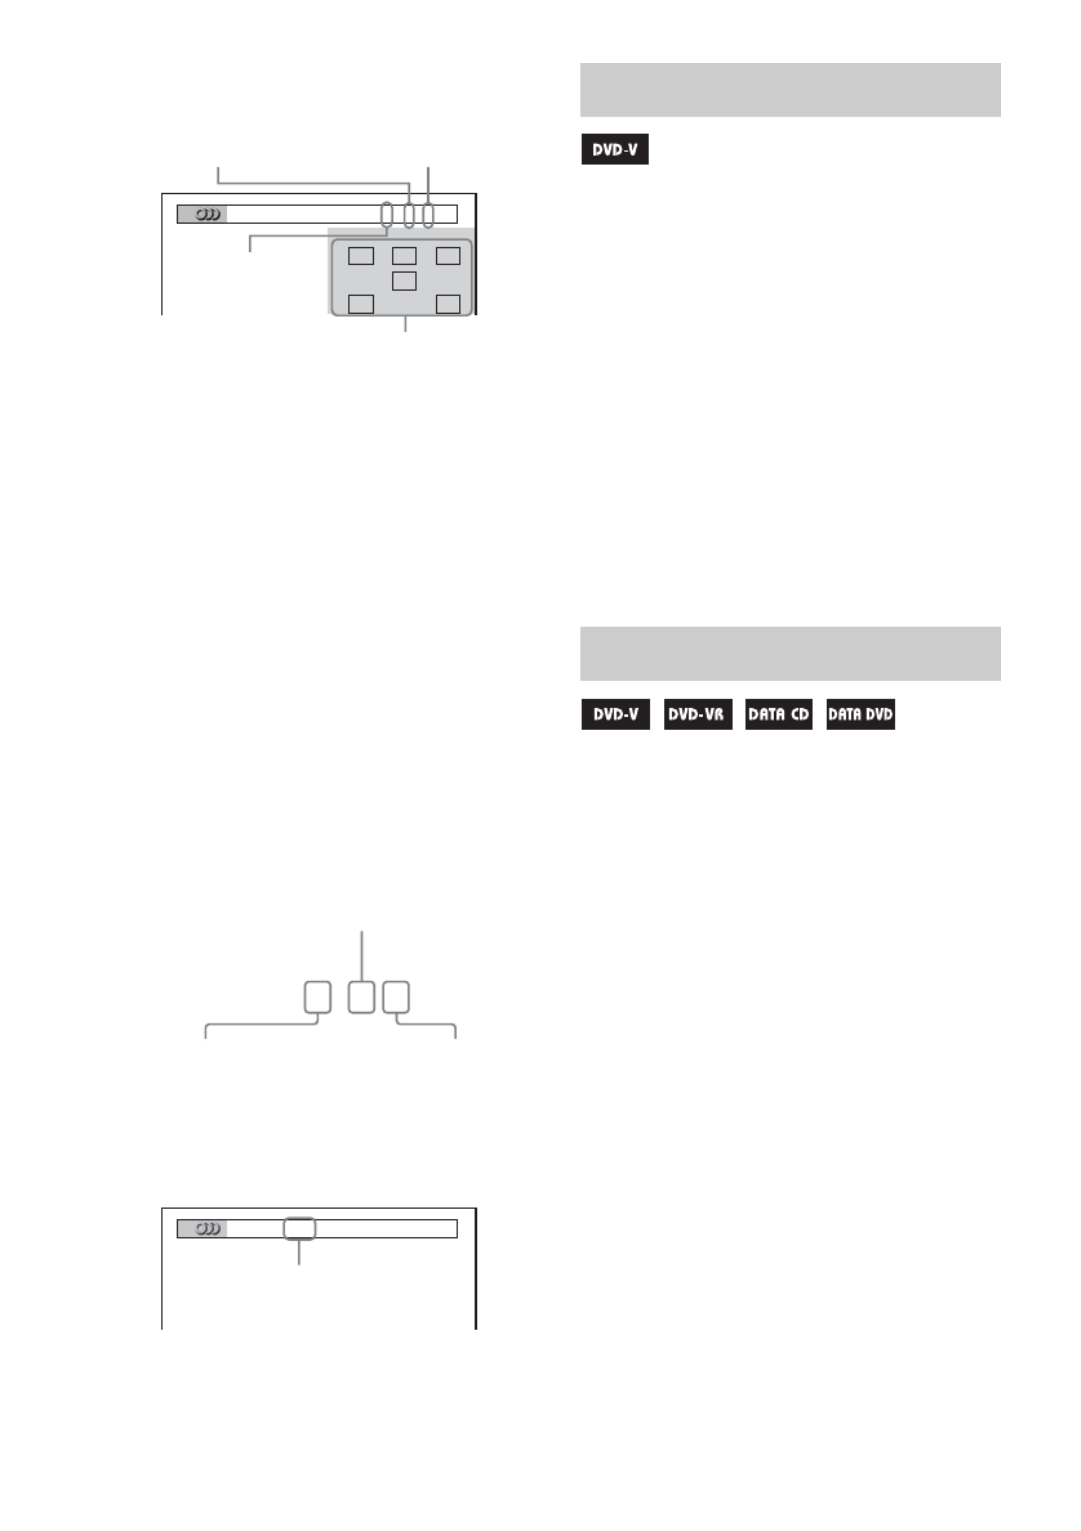
44GB
Depending on the DVD VIDEO, the number of
recorded channels may differ.
* This information appears for MHC-GN999D/
MHC-GN999DS/MHC-GNZ88D only.
The symbols shown on the TV screen represent
the audio channels which are output from
different speakers.
• L: Front Left
• R: Front Right
• C: Center
• LS: Surround Left
• RS: Surround Right
• S: Surround signal which is produced from
Dolby Surround Sound processing or
monaural surround audio signal.
• LFE: Low Frequency Effect
Example:
For Dolby Digital 5.1 channel:
x When playing a DivX video file
Example:
MP3 audio track
You can change the viewing angle while playing
a DVD VIDEO on which various angles (multi-
angles) for a scene are recorded.
For example, while playing a scene of a train in
motion, you can display the view from the front
of the train, the left window of the train, or from
the right window without having the train’s
movement interrupted.
Press ANGLE repeatedly during playback.
Each time you press ANGLE, the angle changes.
Note
Depending on the DVD VIDEO, you may not be able
to change the angle, even if multi-angles are recorded
on the DVD VIDEO.
You can turn the subtitles on or off while
playing a DVD VIDEO, DVD-R/DVD-RW in
VR mode or DivX video files on which subtitles
are recorded.
You can also change the language of the
subtitles with DVD VIDEO, DVD-R/DVD-RW
in VR mode or DivX video files on which
multilingual subtitles are recorded. For example,
you can select the language you want and turn
the subtitles on for better understanding.
Press SUBTITLE repeatedly during
playback.
Each time you press SUBTITLE, the subtitle
language changes or turns off.
Notes
• Depending on the DVD VIDEO, you may not be able
to change the subtitles even if multilingual subtitles
are recorded on the DVD VIDEO. You also may not
be able to turn the subtitles off.
• You can change the subtitles if the DivX video file
has an “.AVI” or “.DivX” extension and contains
subtitle information within the same file.
L RC
LFE
LS RS
1:
ENGLISH DOLBY DIGITAL
3 / 2 .1
Surround
(Left/Right)
Front (Left/
Right) + Center
The audio format
of current track*
LFE (Low
Frequency Effect)
DOLBY DIGITAL
3 / 2
.
1
2 Surround components
2 Front components +
1 Center component
1 LFE (Low Frequency
Effect) component
1:
MP3 128k
Bit rate
Changing the angles
Displaying the subtitles

Disc – Various Functions
45GB
When the sound does not synchronize with the
pictures on the screen, you can adjust the delay
between the picture and sound.
A/V SYNC does not work for MP3 audio tracks
and JPEG image files in DATA CD or DATA
DVD.
1Press DISPLAY when playback is
stopped.
The Control Menu appears on the TV
screen.
2Press V v or repeatedly to select
(A/V SYNC), then press
ENTER.
The options for “A/V SYNC” appear on the
TV screen.
3Press V v or repeatedly to select the
setting you want.
The default setting is underlined.
• OFF: does not adjust.
• ON: adjusts the difference between
picture and sound.
4Press ENTER.
Note
Depending on the input stream, this function may not
be effective.
You can set 2 kinds of playback restrictions for
the disc you want.
• Custom Parental Control
You can set playback restrictions so that the
system will not play back inappropriate discs.
• Parental Control
You can limit the playback of some DVD
VIDEOs according to a predetermined level
such as the age of the users. When a limited
scene is played back, that scene may be
skipped or replaced with different scenes.
The same password is used for both Custom
Parental Control and Parental Control.
Preventing playback of
specific discs
— CUSTOM PARENTAL CONTROL
You can set the same Custom Parental Control
password for up to 40 discs. When you set the
41st-disc, the playback restriction for the first
disc is canceled.
1Insert the disc you want to set the
playback restriction.
If the disc is playing, press x to stop
playback.
2Press DISPLAY when playback is
stopped.
The Control Menu appears on the TV
screen.
Adjusting the delay
between the picture and
sound
— A/V SYNC
3 ( 2 8 )
1 ( 4 4 )
DV VD- R
T
1 : 3 0 : 5 0
OFF
OFF
ON
Restricting playback of
the disc
— CUSTOM PARENTAL CONTROL,
PARENTAL CONTROL
continued

46GB
3Press V v or repeatedly to select
(PARENTAL CONTROL), then
press ENTER.
The options for “PARENTAL CONTROL”
appear on the TV screen.
4Press V v or repeatedly to select
“ON t”, then press ENTER.
x If you have not entered a password
The display for registering a new password
appears on the TV screen.
Enter a 4-digit password using the numeric
buttons, then press ENTER.
The display for confirming the password
appears on the TV screen.
x When you have already registered a
password
The display for entering the password
appears on the TV screen.
5Enter or re-enter your 4-digit password
using the numeric buttons, then press
ENTER.
“Custom parental control is set.” appears on
the TV screen and the screen returns to the
Control Menu.
If you make a mistake entering
your password
Press B repeatedly to delete the number you
have entered, then re-enter your password again.
To turn off the Custom Parental
Control function
1Follow steps 1 through 3 of “Preventing
playback of specific discs” (page 45).
2Press V v or repeatedly to select “OFF t”,
then press ENTER.
3Enter your 4-digit password using the
numeric buttons, then press ENTER.
To play back a disc for which
Custom Parental Control is set
1Insert the disc for which Custom Parental
Control is set.
The “CUSTOM PARENTAL CONTROL”
display appears on the TV screen.
2Enter your 4-digit password using the
numeric buttons, then press ENTER.
The system is ready for playback.
Tip
If you forget your password, enter the 6-digit number
“199703” using the numeric buttons when the
“CUSTOM PARENTAL CONTROL” display prompt
you for password, then press ENTER. The display will
prompt you to enter a new 4-digit password.
OFF
PASS ORDW
PLAYER
ON
DVD VIDEO
T
1 : 3 2 : 5 5
1 8 ( 3 4 )
1 2 ( 2 7 )
PARE TAL CO TROLN N
Enter a new 4-di it password, g
then press
.
ENTER
PARE TAL CO TROLN N
Enter password, then press
.
ENTER
CUSTOM PARE TAL CO TROLN N
Custom parental control is already
set. To play, enter your password
and press
.
E TERN
Produktspezifikationen
| Marke: | Sony |
| Kategorie: | Hi-Fi-Anlage |
| Modell: | MHC-GNZ55D |
Brauchst du Hilfe?
Wenn Sie Hilfe mit Sony MHC-GNZ55D benötigen, stellen Sie unten eine Frage und andere Benutzer werden Ihnen antworten
Bedienungsanleitung Hi-Fi-Anlage Sony

30 September 2024
13 September 2024
3 September 2024
2 September 2024
31 August 2024
30 August 2024
30 August 2024
30 August 2024
30 August 2024
21 August 2024
Bedienungsanleitung Hi-Fi-Anlage
- Hi-Fi-Anlage Samsung
- Hi-Fi-Anlage Clatronic
- Hi-Fi-Anlage Tristar
- Hi-Fi-Anlage Asus
- Hi-Fi-Anlage Belkin
- Hi-Fi-Anlage Exibel
- Hi-Fi-Anlage Gembird
- Hi-Fi-Anlage Hama
- Hi-Fi-Anlage Audio-Technica
- Hi-Fi-Anlage Logitech
- Hi-Fi-Anlage Manhattan
- Hi-Fi-Anlage Medion
- Hi-Fi-Anlage Nacon
- Hi-Fi-Anlage Nedis
- Hi-Fi-Anlage NGS
- Hi-Fi-Anlage Philips
- Hi-Fi-Anlage Sharkoon
- Hi-Fi-Anlage SilverCrest
- Hi-Fi-Anlage SteelSeries
- Hi-Fi-Anlage Tevion
- Hi-Fi-Anlage Watson
- Hi-Fi-Anlage Panasonic
- Hi-Fi-Anlage LG
- Hi-Fi-Anlage Roland
- Hi-Fi-Anlage Adler
- Hi-Fi-Anlage Camry
- Hi-Fi-Anlage AEG
- Hi-Fi-Anlage OK
- Hi-Fi-Anlage TechniSat
- Hi-Fi-Anlage Yamaha
- Hi-Fi-Anlage Velleman
- Hi-Fi-Anlage CSL
- Hi-Fi-Anlage Maginon
- Hi-Fi-Anlage Netgear
- Hi-Fi-Anlage Technaxx
- Hi-Fi-Anlage ADE
- Hi-Fi-Anlage Denver
- Hi-Fi-Anlage ECG
- Hi-Fi-Anlage König
- Hi-Fi-Anlage MarQuant
- Hi-Fi-Anlage Bush
- Hi-Fi-Anlage Telefunken
- Hi-Fi-Anlage Thomson
- Hi-Fi-Anlage Trevi
- Hi-Fi-Anlage Blaupunkt
- Hi-Fi-Anlage Grundig
- Hi-Fi-Anlage Kenwood
- Hi-Fi-Anlage Schneider
- Hi-Fi-Anlage Sharp
- Hi-Fi-Anlage Autotek
- Hi-Fi-Anlage Pyle
- Hi-Fi-Anlage Lynx
- Hi-Fi-Anlage Salora
- Hi-Fi-Anlage Aiwa
- Hi-Fi-Anlage AKG
- Hi-Fi-Anlage AudioSonic
- Hi-Fi-Anlage Auna
- Hi-Fi-Anlage CMX
- Hi-Fi-Anlage Coby
- Hi-Fi-Anlage Bang And Olufsen
- Hi-Fi-Anlage Bose
- Hi-Fi-Anlage Bowers And Wilkins
- Hi-Fi-Anlage Caliber
- Hi-Fi-Anlage Lenco
- Hi-Fi-Anlage Denon
- Hi-Fi-Anlage Mpman
- Hi-Fi-Anlage Pioneer
- Hi-Fi-Anlage Geemarc
- Hi-Fi-Anlage Jabra
- Hi-Fi-Anlage JBL
- Hi-Fi-Anlage JVC
- Hi-Fi-Anlage KEF
- Hi-Fi-Anlage Klipsch
- Hi-Fi-Anlage Krüger And Matz
- Hi-Fi-Anlage Motorola
- Hi-Fi-Anlage Muse
- Hi-Fi-Anlage Nokia
- Hi-Fi-Anlage Onkyo
- Hi-Fi-Anlage PEAQ
- Hi-Fi-Anlage Sennheiser
- Hi-Fi-Anlage Shure
- Hi-Fi-Anlage Technics
- Hi-Fi-Anlage TERRIS
- Hi-Fi-Anlage Teufel
- Hi-Fi-Anlage BeamZ
- Hi-Fi-Anlage Akai
- Hi-Fi-Anlage Continental Edison
- Hi-Fi-Anlage Dual
- Hi-Fi-Anlage Ferguson
- Hi-Fi-Anlage GoGEN
- Hi-Fi-Anlage Hitachi
- Hi-Fi-Anlage Hyundai
- Hi-Fi-Anlage Loewe
- Hi-Fi-Anlage Reflexion
- Hi-Fi-Anlage Imperial
- Hi-Fi-Anlage Kärcher
- Hi-Fi-Anlage E-Bench
- Hi-Fi-Anlage Olympus
- Hi-Fi-Anlage Tascam
- Hi-Fi-Anlage Zoom
- Hi-Fi-Anlage Garmin
- Hi-Fi-Anlage Homedics
- Hi-Fi-Anlage Elta
- Hi-Fi-Anlage Sencor
- Hi-Fi-Anlage Bigben
- Hi-Fi-Anlage Iqua
- Hi-Fi-Anlage Plantronics
- Hi-Fi-Anlage Sony Ericsson
- Hi-Fi-Anlage Fenton
- Hi-Fi-Anlage OneConcept
- Hi-Fi-Anlage TOA
- Hi-Fi-Anlage Rotel
- Hi-Fi-Anlage Superior
- Hi-Fi-Anlage Tripp Lite
- Hi-Fi-Anlage Audio Pro
- Hi-Fi-Anlage AudioAffairs
- Hi-Fi-Anlage Canton
- Hi-Fi-Anlage Dali
- Hi-Fi-Anlage Gemini
- Hi-Fi-Anlage Harman Kardon
- Hi-Fi-Anlage Magnat
- Hi-Fi-Anlage Marmitek
- Hi-Fi-Anlage Marshall
- Hi-Fi-Anlage Nikkei
- Hi-Fi-Anlage Power Dynamics
- Hi-Fi-Anlage Razer
- Hi-Fi-Anlage Samson
- Hi-Fi-Anlage Scosche
- Hi-Fi-Anlage Skytec
- Hi-Fi-Anlage Vonyx
- Hi-Fi-Anlage Peavey
- Hi-Fi-Anlage Sagem
- Hi-Fi-Anlage Lowrance
- Hi-Fi-Anlage Xoro
- Hi-Fi-Anlage EnVivo
- Hi-Fi-Anlage HK Audio
- Hi-Fi-Anlage Honor
- Hi-Fi-Anlage Midland
- Hi-Fi-Anlage Swissvoice
- Hi-Fi-Anlage Vtech
- Hi-Fi-Anlage Alpine
- Hi-Fi-Anlage NAD
- Hi-Fi-Anlage Logik
- Hi-Fi-Anlage Fender
- Hi-Fi-Anlage Ebode
- Hi-Fi-Anlage TCM
- Hi-Fi-Anlage Brandson
- Hi-Fi-Anlage Vision
- Hi-Fi-Anlage Behringer
- Hi-Fi-Anlage Mackie
- Hi-Fi-Anlage Omnitronic
- Hi-Fi-Anlage ESI
- Hi-Fi-Anlage MB Quart
- Hi-Fi-Anlage Marantz
- Hi-Fi-Anlage Hercules
- Hi-Fi-Anlage Arcam
- Hi-Fi-Anlage Cambridge
- Hi-Fi-Anlage Crown
- Hi-Fi-Anlage Lexicon
- Hi-Fi-Anlage Luxman
- Hi-Fi-Anlage Monacor
- Hi-Fi-Anlage Rockford Fosgate
- Hi-Fi-Anlage TEAC
- Hi-Fi-Anlage Huawei
- Hi-Fi-Anlage Alesis
- Hi-Fi-Anlage AOC
- Hi-Fi-Anlage Aplic
- Hi-Fi-Anlage Titanwolf
- Hi-Fi-Anlage Pure
- Hi-Fi-Anlage Sangean
- Hi-Fi-Anlage Massive
- Hi-Fi-Anlage NextBase
- Hi-Fi-Anlage Vivax
- Hi-Fi-Anlage Revox
- Hi-Fi-Anlage Jamo
- Hi-Fi-Anlage Albrecht
- Hi-Fi-Anlage Clarion
- Hi-Fi-Anlage Mac Audio
- Hi-Fi-Anlage Humantechnik
- Hi-Fi-Anlage Energy Sistem
- Hi-Fi-Anlage Magnum
- Hi-Fi-Anlage Scott
- Hi-Fi-Anlage Korg
- Hi-Fi-Anlage Audizio
- Hi-Fi-Anlage Soundmaster
- Hi-Fi-Anlage ESX
- Hi-Fi-Anlage TC Helicon
- Hi-Fi-Anlage Altec Lansing
- Hi-Fi-Anlage Sonoro
- Hi-Fi-Anlage Franklin
- Hi-Fi-Anlage AVID
- Hi-Fi-Anlage Cobra
- Hi-Fi-Anlage Sanus
- Hi-Fi-Anlage Block
- Hi-Fi-Anlage ION
- Hi-Fi-Anlage Rega
- Hi-Fi-Anlage SPC
- Hi-Fi-Anlage Roadstar
- Hi-Fi-Anlage Crosley
- Hi-Fi-Anlage Audison
- Hi-Fi-Anlage DataVideo
- Hi-Fi-Anlage RCF
- Hi-Fi-Anlage Electro-Voice
- Hi-Fi-Anlage Cyrus
- Hi-Fi-Anlage Starkey
- Hi-Fi-Anlage Defender
- Hi-Fi-Anlage Sonos
- Hi-Fi-Anlage MIPRO
- Hi-Fi-Anlage Motu
- Hi-Fi-Anlage FiiO
- Hi-Fi-Anlage Boss
- Hi-Fi-Anlage American Audio
- Hi-Fi-Anlage Anthem
- Hi-Fi-Anlage Alto
- Hi-Fi-Anlage Chord
- Hi-Fi-Anlage Saramonic
- Hi-Fi-Anlage Kramer
- Hi-Fi-Anlage Tivoli Audio
- Hi-Fi-Anlage Pro-Ject
- Hi-Fi-Anlage Arturia
- Hi-Fi-Anlage Galaxy Audio
- Hi-Fi-Anlage RCA
- Hi-Fi-Anlage Ibiza Sound
- Hi-Fi-Anlage Kicker
- Hi-Fi-Anlage Oppo
- Hi-Fi-Anlage DBX
- Hi-Fi-Anlage McIntosh
- Hi-Fi-Anlage Sonance
- Hi-Fi-Anlage Jensen
- Hi-Fi-Anlage Anchor Audio
- Hi-Fi-Anlage DPA
- Hi-Fi-Anlage House Of Marley
- Hi-Fi-Anlage ELAC
- Hi-Fi-Anlage Sven
- Hi-Fi-Anlage JL Audio
- Hi-Fi-Anlage Pyle Pro
- Hi-Fi-Anlage PreSonus
- Hi-Fi-Anlage Qtx
- Hi-Fi-Anlage ART
- Hi-Fi-Anlage Senal
- Hi-Fi-Anlage Oregon Scientific
- Hi-Fi-Anlage General Electric
- Hi-Fi-Anlage Rode
- Hi-Fi-Anlage LD Systems
- Hi-Fi-Anlage IK Multimedia
- Hi-Fi-Anlage Audiolab
- Hi-Fi-Anlage Victrola
- Hi-Fi-Anlage Cardo
- Hi-Fi-Anlage Alba
- Hi-Fi-Anlage Bluesound
- Hi-Fi-Anlage Solid State Logic
- Hi-Fi-Anlage Apogee
- Hi-Fi-Anlage Ruark Audio
- Hi-Fi-Anlage Shokz
- Hi-Fi-Anlage RME
- Hi-Fi-Anlage Avante
- Hi-Fi-Anlage DAP
- Hi-Fi-Anlage DAP Audio
- Hi-Fi-Anlage Devialet
- Hi-Fi-Anlage Duronic
- Hi-Fi-Anlage Ematic
- Hi-Fi-Anlage Focal
- Hi-Fi-Anlage Focusrite
- Hi-Fi-Anlage Geneva
- Hi-Fi-Anlage GPX
- Hi-Fi-Anlage Griffin
- Hi-Fi-Anlage Icon
- Hi-Fi-Anlage IDance
- Hi-Fi-Anlage ILive
- Hi-Fi-Anlage Iluv
- Hi-Fi-Anlage Infinity
- Hi-Fi-Anlage JB Systems
- Hi-Fi-Anlage Karcher Audio
- Hi-Fi-Anlage Laser
- Hi-Fi-Anlage M-Audio
- Hi-Fi-Anlage Mission
- Hi-Fi-Anlage Monitor Audio
- Hi-Fi-Anlage Mtx Audio
- Hi-Fi-Anlage Naxa
- Hi-Fi-Anlage Numan
- Hi-Fi-Anlage Orbitsound
- Hi-Fi-Anlage Paradigm
- Hi-Fi-Anlage Quantis
- Hi-Fi-Anlage Revo
- Hi-Fi-Anlage Sitecom
- Hi-Fi-Anlage Soundstream
- Hi-Fi-Anlage Steinberg
- Hi-Fi-Anlage Steren
- Hi-Fi-Anlage Stereoboomm
- Hi-Fi-Anlage Sunstech
- Hi-Fi-Anlage Tannoy
- Hi-Fi-Anlage Terratec
- Hi-Fi-Anlage Universal Remote Control
- Hi-Fi-Anlage Vizio
- Hi-Fi-Anlage Wolfgang
- Hi-Fi-Anlage Zvox
- Hi-Fi-Anlage Universal Audio
- Hi-Fi-Anlage WAGAN
- Hi-Fi-Anlage Vimar
- Hi-Fi-Anlage Adastra
- Hi-Fi-Anlage Siig
- Hi-Fi-Anlage Best Buy
- Hi-Fi-Anlage Electro Harmonix
- Hi-Fi-Anlage Rane
- Hi-Fi-Anlage ClearOne
- Hi-Fi-Anlage AudioControl
- Hi-Fi-Anlage MXL
- Hi-Fi-Anlage Irradio
- Hi-Fi-Anlage TV One
- Hi-Fi-Anlage RGBlink
- Hi-Fi-Anlage Dexim
- Hi-Fi-Anlage Smart-AVI
- Hi-Fi-Anlage Monster
- Hi-Fi-Anlage Hollyland
- Hi-Fi-Anlage Kunft
- Hi-Fi-Anlage PAC
- Hi-Fi-Anlage Sound Devices
- Hi-Fi-Anlage Speco Technologies
- Hi-Fi-Anlage Nevir
- Hi-Fi-Anlage IFi Audio
- Hi-Fi-Anlage Polsen
- Hi-Fi-Anlage Fluance
- Hi-Fi-Anlage Russound
- Hi-Fi-Anlage Vocopro
- Hi-Fi-Anlage Comica
- Hi-Fi-Anlage Astell&Kern
- Hi-Fi-Anlage Atlas Sound
- Hi-Fi-Anlage TC Electronic
- Hi-Fi-Anlage Teradek
- Hi-Fi-Anlage Audient
- Hi-Fi-Anlage Konig & Meyer
- Hi-Fi-Anlage Argon
- Hi-Fi-Anlage ATen
- Hi-Fi-Anlage Werma
- Hi-Fi-Anlage Morel
- Hi-Fi-Anlage SVS
- Hi-Fi-Anlage KanexPro
- Hi-Fi-Anlage Altra
- Hi-Fi-Anlage SPL
- Hi-Fi-Anlage Parasound
- Hi-Fi-Anlage Brigmton
- Hi-Fi-Anlage Walrus Audio
- Hi-Fi-Anlage Music Hall
- Hi-Fi-Anlage OSD Audio
- Hi-Fi-Anlage Audioengine
- Hi-Fi-Anlage Vexus
- Hi-Fi-Anlage On-Q
- Hi-Fi-Anlage DreamGEAR
- Hi-Fi-Anlage Crestron
- Hi-Fi-Anlage HiFi ROSE
- Hi-Fi-Anlage PowerBass
- Hi-Fi-Anlage Glide Gear
- Hi-Fi-Anlage Antelope Audio
- Hi-Fi-Anlage The Box
- Hi-Fi-Anlage Metric Halo
- Hi-Fi-Anlage Kiloview
- Hi-Fi-Anlage Dynaudio
- Hi-Fi-Anlage Extron
- Hi-Fi-Anlage Vantage Point
- Hi-Fi-Anlage Atlona
- Hi-Fi-Anlage Promate
- Hi-Fi-Anlage Esoteric
- Hi-Fi-Anlage Xantech
- Hi-Fi-Anlage Bigben Interactive
- Hi-Fi-Anlage SSV Works
- Hi-Fi-Anlage Rolls
- Hi-Fi-Anlage Sonifex
- Hi-Fi-Anlage Leviton
- Hi-Fi-Anlage Nxg
- Hi-Fi-Anlage WyreStorm
- Hi-Fi-Anlage ANT
- Hi-Fi-Anlage SWIT
- Hi-Fi-Anlage Mark Levinson
- Hi-Fi-Anlage CAD Audio
- Hi-Fi-Anlage Key Digital
- Hi-Fi-Anlage Vankyo
- Hi-Fi-Anlage JK Audio
- Hi-Fi-Anlage Majestic
- Hi-Fi-Anlage BSS Audio
- Hi-Fi-Anlage Hosa
- Hi-Fi-Anlage AmpliVox
- Hi-Fi-Anlage Memphis Audio
- Hi-Fi-Anlage Andover
- Hi-Fi-Anlage Aquatic AV
- Hi-Fi-Anlage Eissound
- Hi-Fi-Anlage Goodis
- Hi-Fi-Anlage NUVO
- Hi-Fi-Anlage Audiofrog
- Hi-Fi-Anlage Crystal Video
- Hi-Fi-Anlage Fluid
- Hi-Fi-Anlage Musical Fidelity
- Hi-Fi-Anlage Nuheara
- Hi-Fi-Anlage Primare
- Hi-Fi-Anlage S.M.S.L
- Hi-Fi-Anlage Z CAM
- Hi-Fi-Anlage Roon
- Hi-Fi-Anlage Roxx
- Hi-Fi-Anlage CE Labs
- Hi-Fi-Anlage Planet Audio
- Hi-Fi-Anlage Lotronic
- Hi-Fi-Anlage Acoustic Solutions
- Hi-Fi-Anlage Accsoon
- Hi-Fi-Anlage Antelope
- Hi-Fi-Anlage MoFi
- Hi-Fi-Anlage Prism Sound
- Hi-Fi-Anlage Bluetrek
- Hi-Fi-Anlage Auto-T
- Hi-Fi-Anlage SoundCast
- Hi-Fi-Anlage Boytone
- Hi-Fi-Anlage Maretron
- Hi-Fi-Anlage Xact
- Hi-Fi-Anlage IFi
- Hi-Fi-Anlage Voco
- Hi-Fi-Anlage Linear
- Hi-Fi-Anlage Juke Audio
- Hi-Fi-Anlage DiGiGrid
- Hi-Fi-Anlage CLXmusic
- Hi-Fi-Anlage Auvi
- Hi-Fi-Anlage Technical Pro
- Hi-Fi-Anlage Switchcraft
- Hi-Fi-Anlage Digigram
- Hi-Fi-Anlage Liam&Daan
Neueste Bedienungsanleitung für -Kategorien-

30 November 2024
24 November 2024
16 Oktober 2024

14 Oktober 2024

7 Oktober 2024

7 Oktober 2024
7 Oktober 2024

5 Oktober 2024

5 Oktober 2024
5 Oktober 2024