Sharp LD-26SH1U Bedienungsanleitung
Lesen Sie kostenlos die 📖 deutsche Bedienungsanleitung für Sharp LD-26SH1U (73 Seiten) in der Kategorie Fernsehen. Dieser Bedienungsanleitung war für 8 Personen hilfreich und wurde von 2 Benutzern mit durchschnittlich 4.5 Sternen bewertet
Seite 1/73
26" LCD COLOR TV
TV LCD A COLOR DE 26"
LD-26SH1U
OPERATION MANUAL
MANUAL DE FUNCIONAMIENTO
EnglishEspañol
English ...... E1
Español ..... S1

E1
EnglishDeutschFrançaisItalianoEspañolEnglish
ENGLISH
IMPORTANT INFORMATION
IMPORTANT:
To aid in reporting in case of loss or theft, please
record the TV's model and serial numbers in the
space provided. The numbers are located on the
rear of the TV.
WARNING: TO REDUCE THE RISK OF FIRE OR ELECTRIC SHOCK, DO
NOT EXPOSE THIS PRODUCT TO RAIN OR MOISTURE.
CAUTION
RISK OF ELECTRIC SHOCK.
DO NOT OPEN.
CAUTION: TO REDUCE THE RISK OF ELECTRIC SHOCK,
DO NOT REMOVE COVER (OR BACK).
NO USER-SERVICEABLE PARTS INSIDE.
REFER SERVICING TO QUALIFIED SERVICE
PERSONNEL.
The lightning flash with
arrowhead symbol, within an
equilateral triangle, is intended
to alert the user to the presence
of uninsulated "dangerous
voltage" within the product's
enclosure that may be of
sufficient magnitude to
constitute a risk of electric
shock to persons.
The exclamation point within a
triangle is intended to alert the
user to the presence of
important operating and
maintenance (servicing)
instructions in the literature
accompanying the product.
U.S.A. ONLY
Model No.:
Serial No.:
CAUTION:
DO NOT PLACE THIS PRODUCT ON AN UNSTABLE CART, STAND, TRIPOD,
BRACKET, OR TABLE. THE PRODUCT MAY FALL CAUSING SERIOUS PERSONAL
INJURY AND SERIOUS DAMAGE TO THE PRODUCT. USE ONLY WITH A CART,
STAND, TRIPOD, BRACKET, OR TABLE RECOMMENDED BY THE MANUFACTURER
OR SOLD WITH THE PRODUCT. FOLLOW THE MANUFACTURER'S INSTRUCTIONS
WHEN INSTALLING THE PRODUCT AND USE MOUNTING ACCESSORIES
RECOMMENDED BY THE MANUFACTURER. A PRODUCT AND CART COMBINATION
SHOULD BE MOVED WITH CARE. QUICK STOPS, EXCESSIVE FORCE, AND UNEVEN
SURFACES MAY CAUSE THE PRODUCT AND CART COMBINATION TO OVERTURN.
CAUTION:
This product satisfies FCC regulations when shielded cables and connectors are used to connect
the unit to other equipment. To prevent electromagnetic interference with electric appliances such as
radios and televisions, use shielded cables and connectors for connections.

E2
FCC Statement
WARNING – FCC Regulations state that any unauthorized changes or modifications to this
equipment not expressly approved by the manufacturer could void the user's authority to operate this
equipment.
Note: This equipment has been tested and found to comply with the limits for a Class B digital device,
pursuant to Part 15 of the FCC Rules.
These limits are designed to provide reasonable protection against harmful interference in a residential
installation. This equipment generates, uses and can radiate radio frequency energy and, if not
installed and used in accordance with the instructions, may cause harmful interference to radio
communications. However, there is no guarantee that interference will not occur in a particular
installation. If this equipment does cause harmful interference to radio or television reception, which
can be determined by turning the equipment off and on, the user is encouraged to try to correct the
interference by one or more of the following measures:
- Reorient or relocate the receiving antenna.
- Increase the separation between the equipment and receiver.
- Connect the equipment into an outlet on a circuit different from that to which the receiver is
connected.
- Consult the dealer or an experienced radio/TV technician for help.
Declaration of Conformity
SHARP 26" LCD color TV LD-26SH1U
This device complies with part 15 of the FCC rules. Operation is subject to the following conditions:
(1) this device may not cause harmful interference, and (2) this device must accept any interference
received, including interference that may cause undesired operation.
Responsible Party: SHARP ELECTRONICS CORPORATION
Sharp Plaza, Mahwah, New Jersey 07430-2135
TEL: 1-800-BE-SHARP
For Business Customers: URL http://www. sharpusa. com
"Note to CATV system installer: This reminder is provided to call the CATV system installer's attention
to Article 820-40 of the National Electrical Code that provides guidelines for proper grounding and, in
particular, specifies that the cable ground shall be connected to the grounding system of the building,
as close to the point of cable entry as practical."
This product utilizes tin-lead solder, and fluorescent lamp containing a small amount of mercury.
Disposal of these materials may be regulated due to environmental considerations. For disposal or
recycling information, please contact your local authorities or the Electronic Industries Alliance:
www.eia.org
IMPORTANT INFORMATION
U.S.A. ONLY
U.S.A. ONLY

E7
EnglishDeutschFrançaisItalianoEspañolEnglish
- If an outside antenna is connected to the equipment, be sure the antenna system is grounded so
as to provide some protection against voltage surges and built-up static charges.
Article 810 of the National Electrical Code, ANSI/NFPA 70, provides information with regard to
proper grounding of the mast and supporting structure, grounding of the lead-in wire to an
antenna discharge unit, size of grounding conductors, location of antenna-discharge unit,
connection to grounding electrodes, and requirements for the grounding electrode.
- For added protection for this equipment during a lightning
storm, or when it is left unattended and unused for long periods
of time, unplug it from the wall outlet and disconnect the
antenna. This will prevent damage to the equipment due to
lightning and power-line surges.
- An outside antenna system should not be located in the
vicinity of overhead power lines or other electric light or
power circuits, or where it can fall into such power lines or
circuits. When installing an outside antenna system,
extreme care should be taken to keep from touching such
power lines or circuits as contact with them might be fatal.
EXAMPLE OF ANTENNA GROUNDING AS PER
NATIONAL ELECTRICAL CODE, ANSI/NFPA 70
POWER SERVICE GROUNDING
ELECTRODE SYSTEM
(NEC ART 250, PART H)
GROUND
CLAMP
ELECTRIC
SERVICE
EQUIPMENT
ANTENNA
LEAD IN
WIRE
ANTENNA
DISCHARGE UNIT
(NEC SECTION 810-20)
GROUNDING CONDUCTORS
(NEC SECTION 810-21)
GROUND CLAMPS
NEC-NATIONAL ELECTRICAL CODE
- To prevent fire, never place any type of candle or flames on the top or near the TV set.
- To prevent fire or shock hazard, do not expose this product to dripping or splashing. No objects
filled with liquids, such as vases, should be placed on the product.
- To prevent fire or shock hazard, do not place the AC power cord under the TV set or other heavy
items.
Tips and safety instructions

E8
Tips and safety instructions
Power cord
- Do not damage the power cord, place heavy
objects on it, stretch it, or over bend it. Also, do
not add extension cords. Damage to the cord
may result in fire or electric shock.
- Use only the power cord supplied with the TV.
- Insert the power plug directly into the AC outlet.
Adding an extension cord may lead to fire as a
result of overheating.
- Do not remove or insert the power plug with wet
hands. Doing so could result in electric shock.
- Unplug the power cord if it is not used for a long
time.
- Do not attempt to repair the power cord if it is
broken or malfunctioning. Refer the servicing to
the service representative.
Manual scope
- In this manual, Microsoft Windows XP will be
referred to as "Windows XP", Microsoft Windows
Millennium as "Windows Me", Microsoft
Windows 2000 as "Windows 2000", Microsoft
Windows 98 as "Windows 98", and Microsoft
Windows 95 as "Windows 95". When there is no
need to distinguish between programs, the term
"Windows" will be used.
- Microsoft and Windows are registered
trademarks of Microsoft Corporation.
- Macintosh is a registered trademark of Apple
Computer, Inc.
- HDMI, the HDMI logo and High-Definition
Multimedia Interface are trademarks or
registered trademarks of HDMI Licensing LLC.
- All other brand and product names are
trademarks or registered trademarks of their
respective holders.
- Actual screens and buttons may differ from those
as shown in this manual.
- The TFT color LCD panel used in this TV is made
with the application of high precision technology.
However, there may be minute points on the
screen where pixels never light or are
permanently lit. Also, if the screen is viewed from
an acute angle, there may be uneven colors or
brightness. Please note that these are not
malfunctions but common phenomena of LCDs
and will not affect the performance of the TV.
- Do not display a still picture for a long period, as
this could cause a residual image.
- If the brightness is adjusted to the minimum
setting, it may be difficult to see the screen.
- The quality of the video signal may influence the
quality of the display. We recommend using an
equipment able to emit high quality video signals.
- Never rub or tap the TV with hard objects.
- Please understand that Sharp Corporation bears
no responsibility for errors made during use by
the customer or a third party, nor for any other
malfunctions or damage to this product arising
during use, except where indemnity liability is
recognized under law.
- This TV and its accessories may be upgraded
without advance notice.
Location
- Do not use the TV where ventilation is poor,
where there is a lot of dust, where humidity is
high, or where the TV may come into contact
with oil or steam, as this could lead to fire.
- Ensure that the TV does not come into contact
with water or other fluids. Ensure that no objects
such as paper clips or pins enter the TV as this
could lead to fire or electric shock.
- Do not place the TV on top of unstable objects or
in unsafe places. Do not allow the TV to come
into contact with strong shocks or vibrations.
Causing the TV to fall or topple over may
damage it.
- Do not use in places where the TV will be
subject to direct sunlight, near heating
equipment or anywhere else where there is
likelihood of high temperature, as this may lead
to generation of excessive heat and outbreak of
fire.

E9
EnglishDeutschFrançaisItalianoEspañolEnglish
Product and accessory checklist
Please check that the following items are included
in the package.
- 26" LCD color TV (1)
- Power cord (1)
- PC analog signal cable (1)
(model name: 0LTLS20276002)
- PC audio cable (1)
(model name: 0LTLS05247001)
- Remote control (1)
- " "AAA size (UM/SUM-4) dry battery (2)
- Cable clamp (1)
- CD-ROM (Utility Disk for Windows/Macintosh) (1)
- Operation manual (1)
Notes:
- The commercially available antenna cable is
required.
- The digital signal cable (DVI-D – DVI-D) is to be
purchased separately.
(model name: NL-C04J)
- You are advised to retain the carton in case the
TV needs to be transported.
- Sharp Corporation holds authorship rights to the
Utility program. Do not reproduce it without
permission.
- The shape of the supplied accessories may not
be exactly the same as shown in this manual.

E10
Product description
Front view
VOL/
BRIGHT
CH
BRIGHT
MODE
MENUINPUT
ENTER/
1
2
5
3
4
6 7 8 9 10
Opening/closing the front cover
To open the cover, press .
To close the cover, press until it clicks.
Main unit
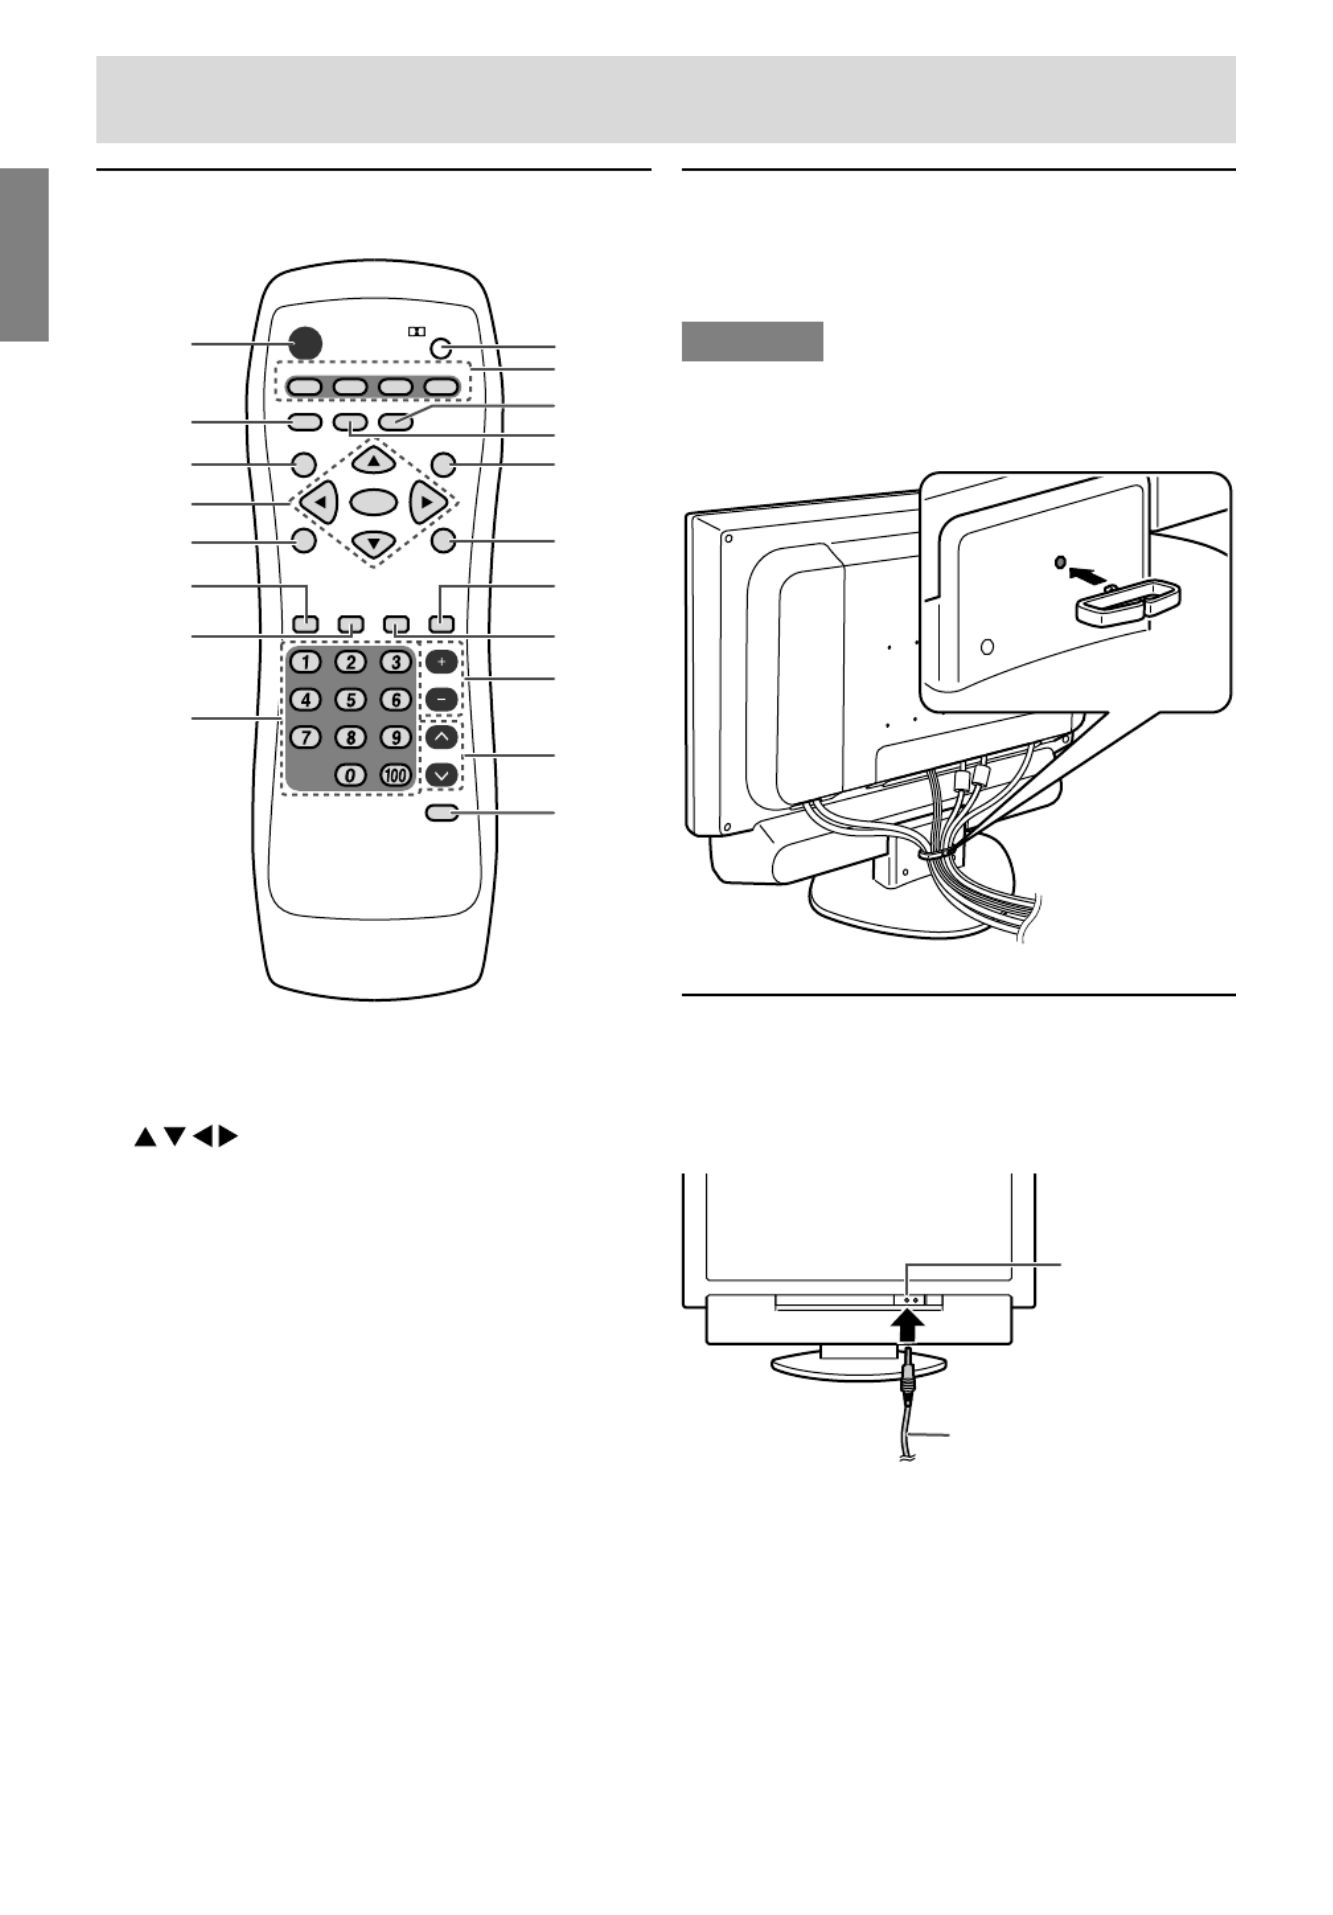
Removing/replacing the terminal cover
Removing the cover Replacing the cover
1
1
2
2
- Be careful not to pinch the cables.
1.
Speakers
2.
Headphone terminal
3.
Remote sensor window
4.
POWER button
5.
Power LED
Green: in use
Red: in standby mode
Orange: in power-saving mode
(only for PC mode)
Off: power off
6.
S-video input terminal
7.
Video input terminal
8.
Audio input terminal - Left
9.
Audio input terminal - Right
10.
Control buttons
AV-IN 3

E11
EnglishDeutschFrançaisItalianoEspañolEnglish
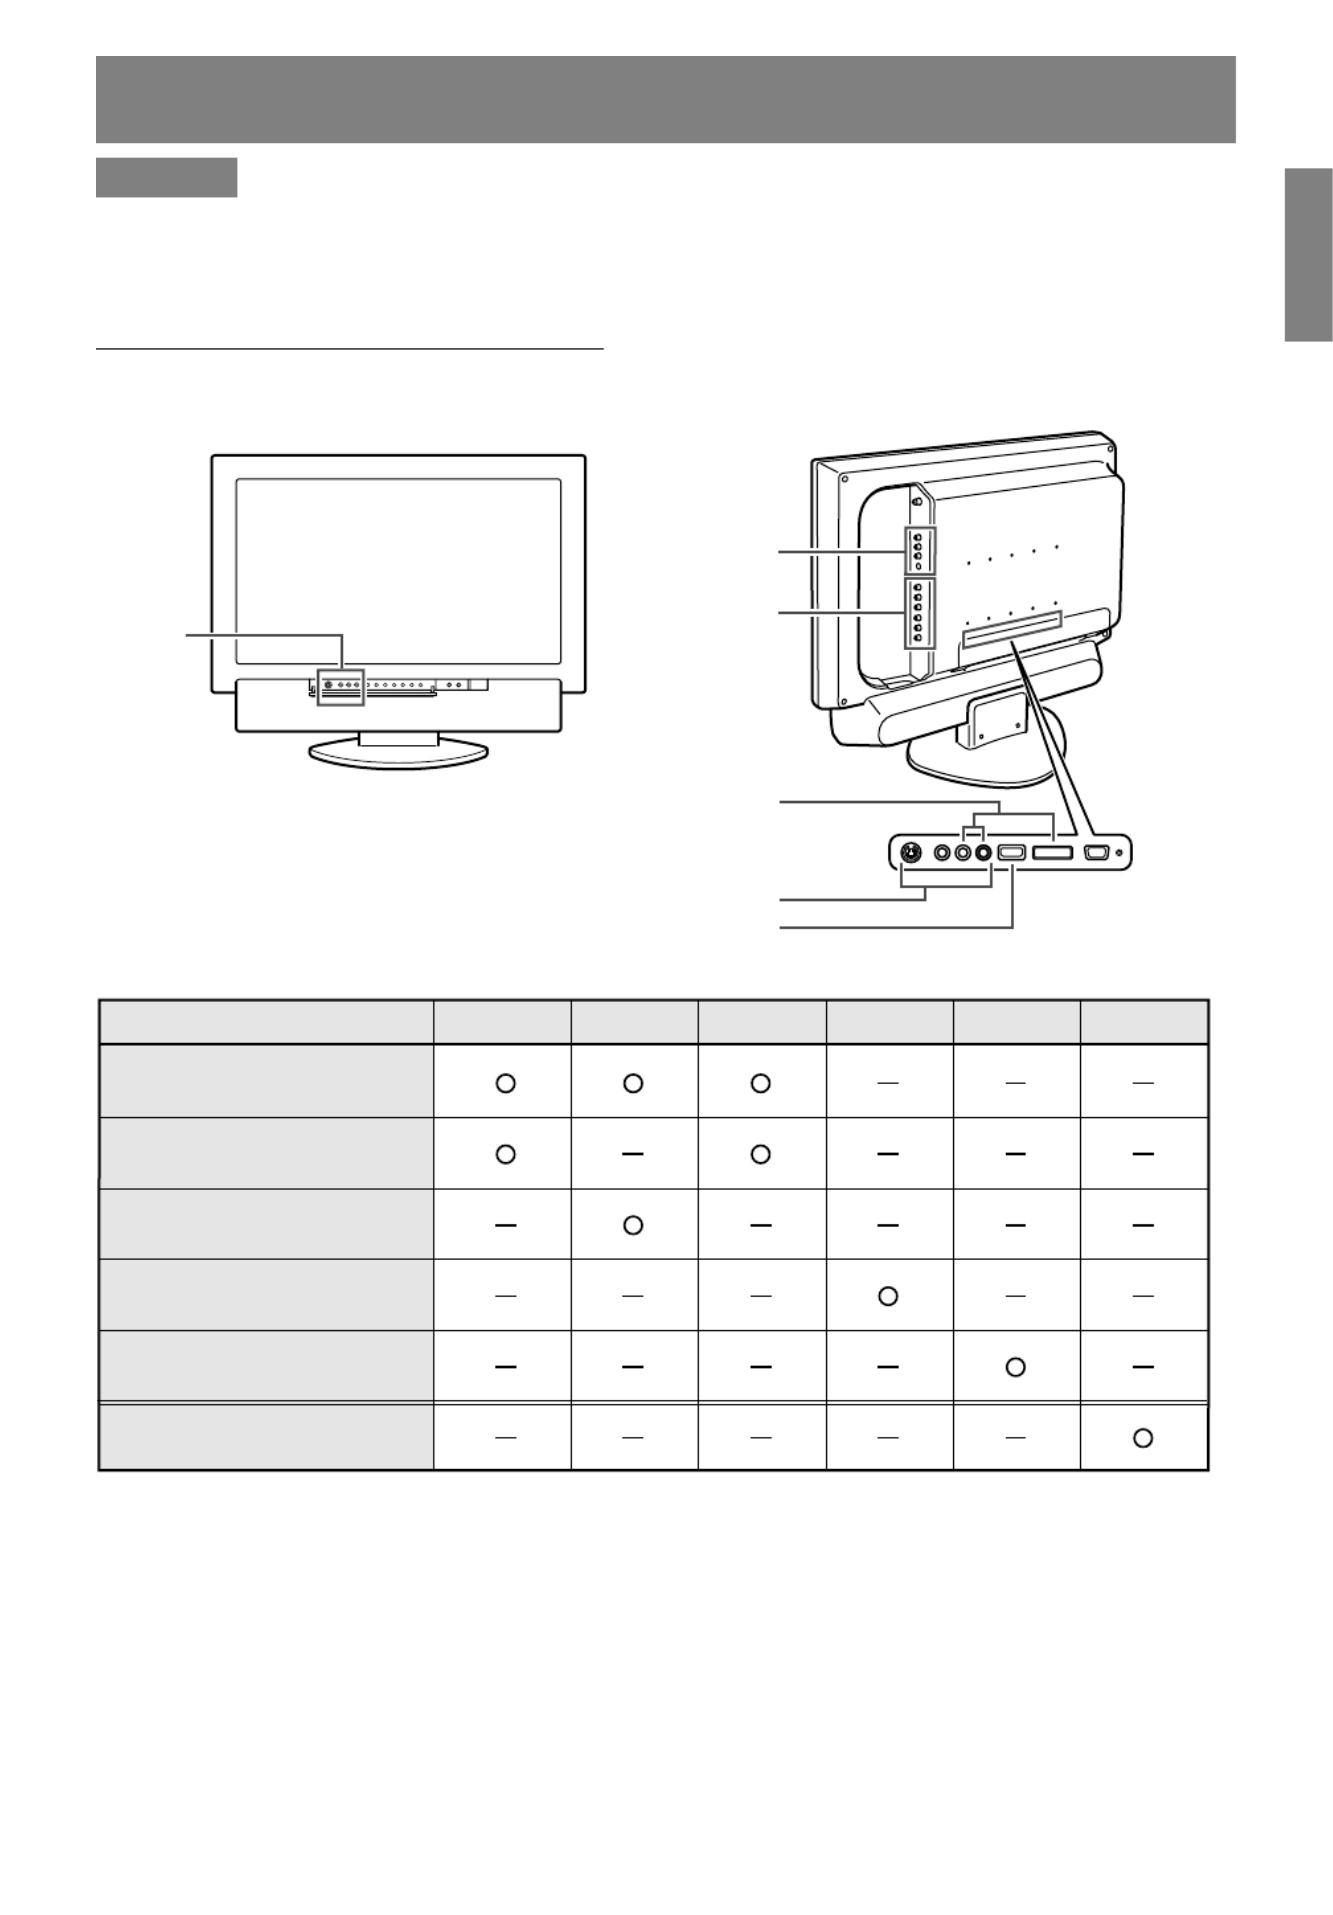
Product description
Main unit
Rear view/right view
A
C
B
B
2
3
4
5
171614 1513121110
6
7
8
9
19
1
18
1. Antenna input terminal
2. Video input terminal
3. Audio input terminal - Left
4. Audio input terminal - Right
5. S-video input terminal
6. Video input terminal
7. Audio input terminal - Left
8. Audio input terminal - Right
9. Component input terminals
10. S-video output terminal
11. Video output terminal
12. Audio output terminal - Left
(Available as an audio input
terminal for DVI mode)
13. Audio output terminal - Right
(Available as an audio input
terminal for DVI mode)
14. HDMI input terminal
15. DVI input terminal
(DVI-D 24 pin)
(Available as a digital RGB input terminal for
PC mode)
16. PC analog RGB input terminal
(Mini D-sub 15 pin)
17. PC audio input terminal
18. Power input terminal
19. Lug-hole for cable clamp
(See next page.)
A Ventilation openings
B Exhaust openings
Never block these openings as this may lead to
overheating inside the TV and result in
malfunction.
C Security lock anchor
By connecting a security lock (commercially
available) to the security lock anchor, the TV is
fixed so that it cannot be transported. The security
slot works in conjunction with Kensington Micro
Saver Security Systems.
AV-IN 1
AV-IN 2
AV-OUT
E12
Cable clamp
Use the supplied cable clamp to secure the cables
connected to the terminals.
CAUTION!
- When adjusting the viewing angle, cables may
be pulled. Therefore, ensure that the cables
have sufficient slack.
Using headphones
(commercially available)
You can connect headphones with a mini stereo
jack ( 3.5 mm) to the TV.
Notes:
- When headphones are connected:
- No sound can be heard from the TV speakers.
In addition, when "AV-OUT(AUDIO)" is set to
"VARIABLE1" or "VARIABLE2" in the MODE
SELECT(2) menu, no sound via the audio
output terminals can be heard either.
- The Virtual Dolby Surround function (see page
E34) cannot be used.
- The AUDIO ADJUST menu (see pages E46
and E55) cannot be adjusted.
Product description
Remote control
POWER
Virtual
PC HDMI/DVIAVTV
SLEEP
ENTER
MENU
BRIGHT
DISPLAY
CC MTS MUTE
VOL
CH
FLASHBACK
FREEZE
VIEW MODE
MULTI
BRIGHT
MODE
3
4
5
6
2
1
7
8
10
9
11
12
13
14
15
16
17
18
19
1. POWER button
2. FREEZE button
3. SLEEP button
4. buttons and ENTER button
5. BRIGHT MODE button
6. DISPLAY button
7. CC (Closed Caption) button
8. Channel buttons
9. Dolby Virtual button
10. Input buttons (PC, TV, AV, and HDMI/DVI)
11. VIEW MODE button
12. MULTI button
13. MENU button
14. BRIGHT button
15. MUTE button
16. MTS (Multi ch TV Sound) button
17. VOL buttons
18. CH (channel) buttons
19. FLASHBACK button
Headphone
terminal
Headphones

E14
Remote control
Using the remote control
Use the remote control by pointing it towards the
remote sensor window on the TV. Objects between
the remote control and sensor window may
prevent proper operation.
5 m (16' 4")
Cautions regarding use of remote control
- Do not expose the remote control to shock.
In addition, do not expose the remote control to
liquid, and do not place in an area with high
humidity.
- Do not install or place the remote control under
direct sunlight. The heat may deform the unit.
- The remote control may not work properly if the
remote sensor window of the TV is under direct
sunlight or strong lighting, or a fluorescent light
is near the TV. In such case, change the angle or
place of the lighting or TV, or operate the remote
control closer to the remote sensor window.
- Do not use the remote control simultaneously
with remote controls of other equipment.
Batteries for the remote control
Before using the TV for the first time, install two
("AAA" size, UM/SUM-4) batteries (supplied).
When the operable distance becomes shorter,
replace the batteries immediately with new ("AAA"
size, UM/SUM-4) batteries.
1.Open the battery cover.
Slide the cover while pressing the ( ) part.
2. Insert two ("AAA" size, UM/SUM-4) batteries.
Position the positive and negative ends of the
batteries as indicated in the compartment.
+
+
-
-
3.Close the battery cover.
Engage the claw on the cover into the battery
housing and slide shut.
CAUTION!
Improper use of batteries can result in chemical
leakage and/or explosion. Be sure to follow the
instructions below.
- Place batteries with their terminals
corresponding to the (+) and (–) indications.
- Different types of batteries have different
characteristics. Do not mix batteries of different
types.
- Do not mix old and new batteries. Mixing old
and new batteries can shorten the life of new
battery and/or cause the old battery to leak
chemicals.
- Remove batteries when they become weak.
Chemicals that leak from batteries can cause a
rash. If chemical leakage is found, wipe with a
cloth.
- The batteries supplied with the TV may have a
shorter life expectancy due to storage
conditions.
- If the remote control will not be used for an
extended period of time, remove the batteries
from the remote control.
Remote sensor window
30°
(up/down/left/right)
30°

E15
EnglishDeutschFrançaisItalianoEspañolEnglish
PC
TV
AV
PCTV
AV
PC
TV
TV preparation steps
Use the following steps to connect and set up your TV.
PC
TV
AV
...Required when using the TV as a television
...Required when using the TV as an AV monitor
...Required when using the TV as a computer monitor
Connecting the TV to a computer (See pages E25 and E26.)
- If your computer has an analog RGB output terminal, see Analog connection
on page E25.
- If your computer has a digital RGB output terminal, see Digital connection on
page E26. (When using the TV with a digital connection, the separately-sold
digital signal cable is required.)
Connecting the TV to a home antenna terminal
(See pages E17 and E18.)
- The commercially available antenna cable is required.
Connecting the TV to AV equipment (See pages E19 through E24.)
- Follow these steps to connect the TV to AV equipment and enjoy watching
DVDs or playing games.
Connecting the TV to a power source (See page E27.)
Adjusting the computer display automatically (See page E31.)
- Required when using the TV with an analog connection.
(Not required when using the TV with a digital connection.)
Setting TV channels (See pages E28 through E30.)

E16
Basic adjustment screen operation
The explanations in this manual use primarily the remote control.
(Operations requiring the use of control buttons on the TV are specifically identified using the words
"on the TV".)
The following table shows the remote control buttons and their corresponding control buttons on the TV.
Refer to this table when using control buttons on the TV.
(For information on each control button's position on the TV, refer to page E10.)
Remote control buttons Function Corresponding control buttons on the TV
MENU Displays the MENU screen. MENU*
Exits the MENU screen. INPUT
Selects an item by moving MENU*
the cursor up/down.
Adjusts the value. VOL/BRIGHT< >
ENTER Confirms the currently ENTER/BRIGHT MODE
selected item.
* On the adjustment screen, moves down the cursor to select an item. If the cursor reaches the bottom
item, it returns to the top item.
E17
EnglishDeutschFrançaisItalianoEspañolEnglish
Connecting the
TV
to a home antenna terminal
CAUTION!
- When connecting, ensure that the TV is switched off.
The antenna requirements for good color television reception are more important than those for black &
white television reception. For this reason, a good quality outdoor antenna is strongly recommended.
The following is a brief explanation of the type of connections that are provided with the various antenna
systems. (See page E10 for information on removing/replacing the terminal cover.)
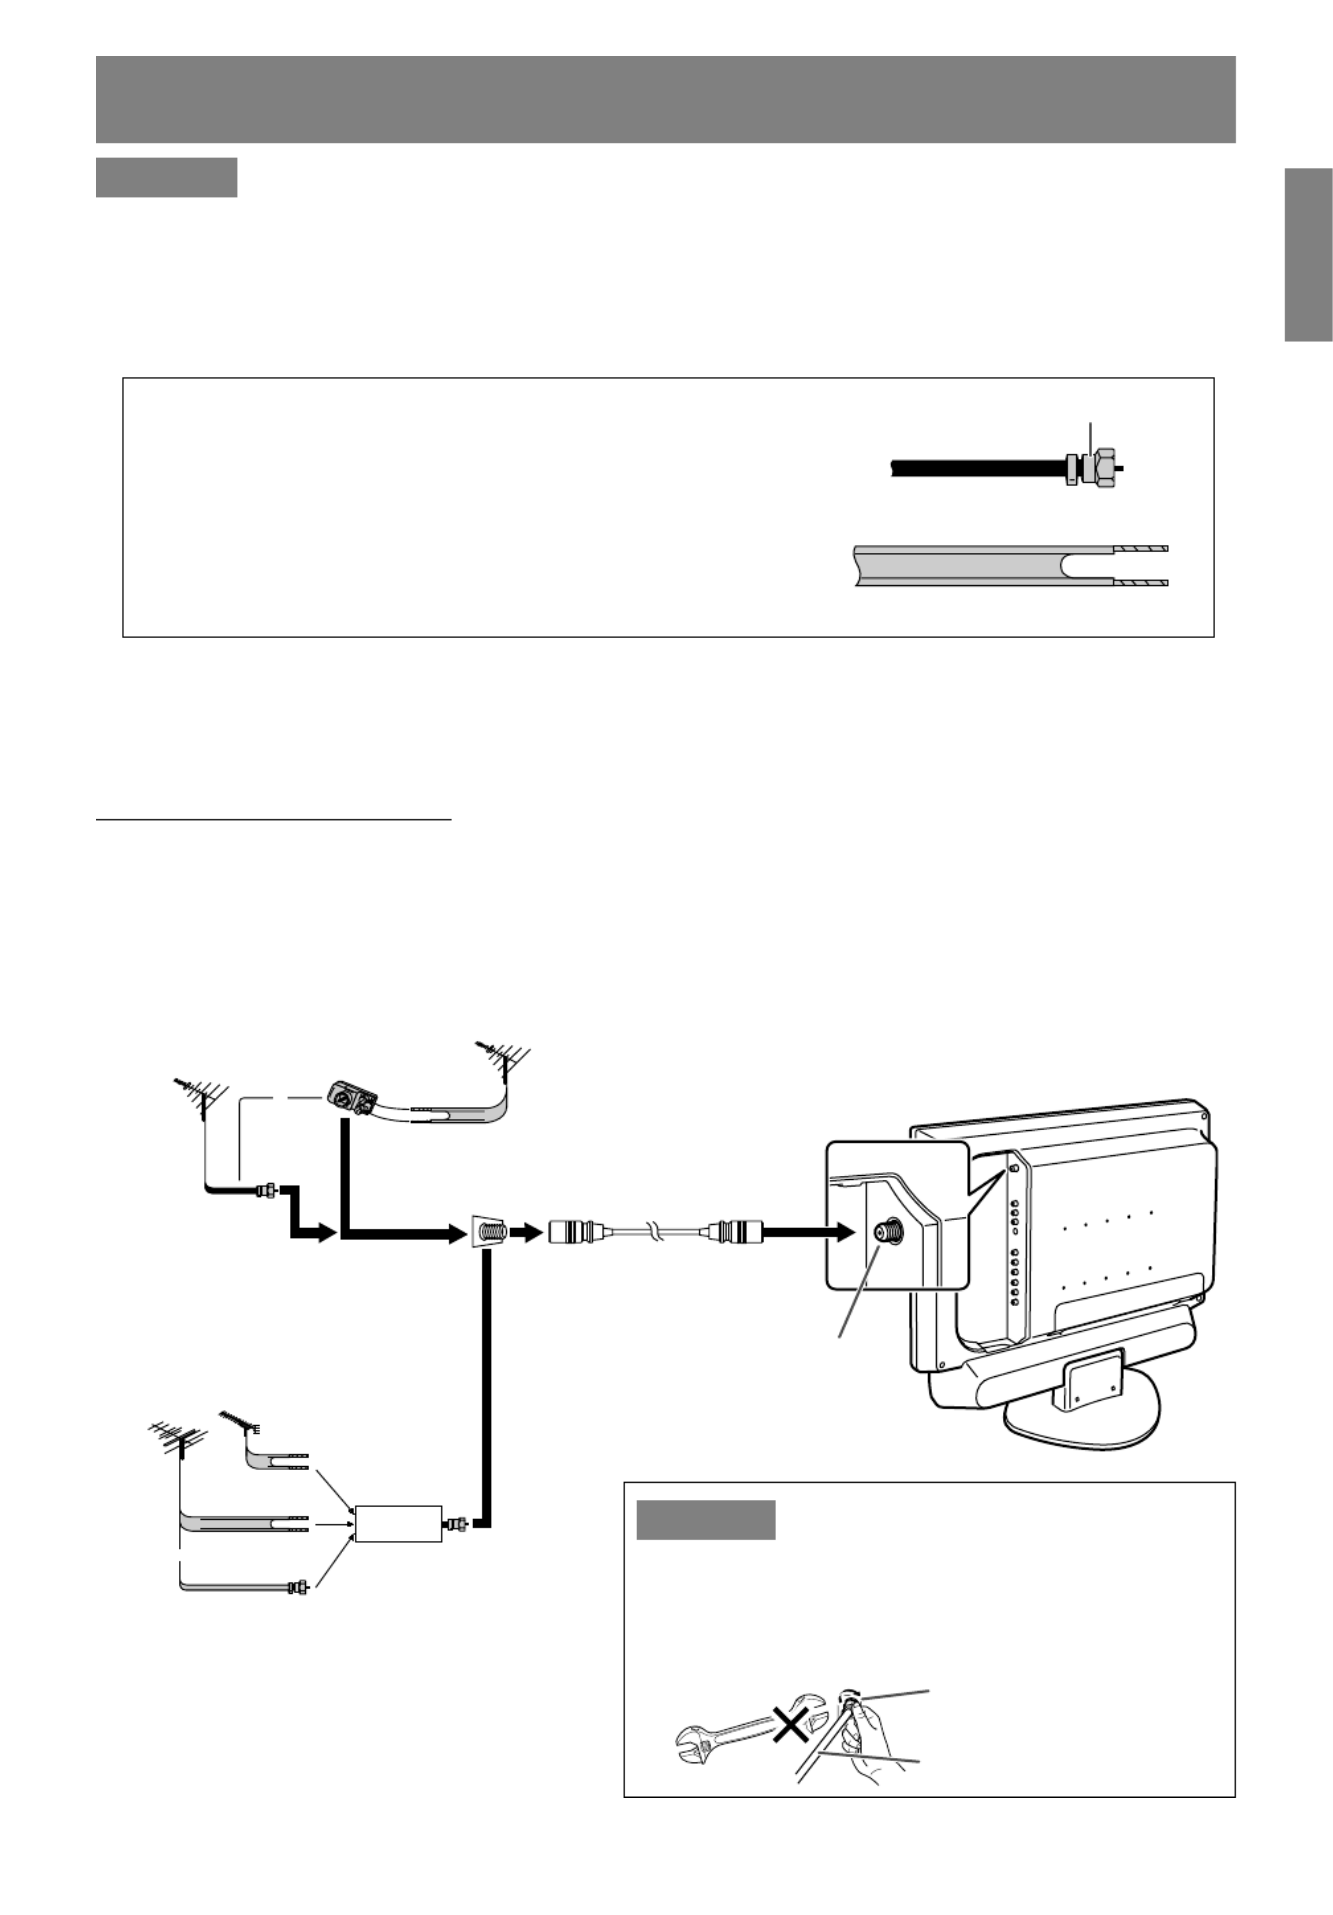
1. A 75-ohm system is generally a round cable with F-type
connector that can easily be attached to a terminal without
tools (commercially available).
2. A 300-ohm system is a flat "twin-lead" cable that can be
attached to a 75-ohm terminal through a 300-75-ohm
adapter (commercially available).
F-type connector
75-ohm coaxial cable (round)
300-ohm twin-lead cable (flat)
Notes:
- The 75-ohm coaxial cable is recommended.
- TV memory for channels is empty at shipment. To receive channels, use the CHANNEL SETTING
menu. (See pages E28 through E30.)
Outdoor antenna connection
- Use one of the following two diagrams if you connect an outdoor antenna.
A: Using a VHF/UHF combination outdoor antenna.
B: Using separate VHF and/or UHF outdoor antennas.
- Connect the outdoor antenna cable lead-in to the antenna input terminal (ANT) on the right side of the
TV.
CAUTION!
- When connecting the coaxial cable to the TV, do not
tighten F-type connector with tools. If tools are
used, it may cause damage to your TV. (The
breaking of internal circuit, etc.)
F-type connector
75-ohm coaxial cable
A. Combination VHF/UHF Antenna
B. Separate VHF and/or
UHF Antennas
Antenna cable
(commercially available)
Antenna input terminal (ANT)
or
VHF/UHF
antenna
300-ohm
twin-lead
75-ohm
coaxial cable
VHF/UHF
antenna
300/75-ohm
adapter
(commercially available)
or
75-ohm
coaxial cable
300-ohm
twin-lead
300-ohm
twin-lead
Combiner
(commercially
available)
OUTIN
VHF
antenna
UHF
antenna
Home Antenna
terminal (75-ohm)

E18
Connecting the TV to a home antenna terminal
Cable TV (CATV) connection
- A 75-ohm coaxial cable connector is built into the set for easy hookup. When connecting the 75-ohm
coaxial cable to the set, screw the 75-ohm cable to the antenna input terminal (ANT).
- Some cable TV companies offer "premium pay channels". Since the signals of these premium pay
channels are scrambled, a cable TV converter/descrambler is generally provided to the subscriber by
the cable TV company. This converter/descrambler is necessary for normal viewing of the scrambled
channels. (Set your TV to channel 3 or 4, typically one of these channels is used. If this is unknown,
consult your cable TV company.) For more specific instructions on installing cable TV, consult your
cable TV company. One possible method of utilizing the converter/descrambler provided by your cable
TV company is explained below.
Please note: An RF switch provided with two inputs (A and B) is required (commercially available).
"A" position on the RF switch (commercially available): You can view all unscrambled channels by
using the TV's channel buttons.
"B" position on the RF switch (commercially available): You can view the scrambled channels via the
converter/descrambler by using the converter's
channel keys.
Note:
- Consult your SHARP Dealer or Service Center for the type of splitter, RF switch, or combiner that might
be required.
Cable TV converter/
descrambler
(commercially
available)
Two-set
signal
splitter
(commercially
available)
Cable TV Line
RF switch (commercially available)
OUT IN
E19
EnglishDeutschFrançaisItalianoEspañolEnglish
Connecting the TV to AV equipment
CAUTION!
- Ensure that the TV and all the equipment you are connecting to it are switched off before you begin.
See page E10 for information on removing/replacing the terminal cover.
Examples of equipment you can connect
AV-IN 3
AV-IN 1
AV-IN 2
AV-OUT
DVI-D IN
HDMI IN
AV equipment with
video output terminals
AV equipment with
S-video output terminals
AV equipment with
component output terminals
AV equipment with
HDMI output terminals
AV equipment with
DVI output terminals
AV equipment with
input terminals
AV-IN 1 AV-IN 2 AV-IN 3 HDMI IN DVI-D IN AV-OUT
Front of the TV Right side of the TV

E20
AV equipment with video output terminals
AV-IN 3
AV-IN 1
AV-IN 2
VIDEO
AUDIO-L
AUDIO-R
VIDEO
AUDIO-L
AUDIO-R
VIDEO
AUDIO-L
AUDIO-R
VIDEO
AUDIO-L AUDIO-R
Notes:
- When using the video input terminal of AV-IN 1 or AV-IN 3, do not connect the cable to the S-video
input terminal of the same group.
- When using the video input terminal of AV-IN 2, do not connect the cable to the component input
terminals of AV-IN 2.
Connecting the TV to AV equipment
RCA pin cable (commercially available)
Front of the TV
(Yellow)
(White)
(Red)
Right side of the TV
Output terminals of
AV equipment
(Yellow)
(White)
(Red)
(Yellow)
(White)
(Red)
(Yellow)
(White)
(Red)
RCA pin cable (commercially available)
Output terminals of
AV equipment
E22
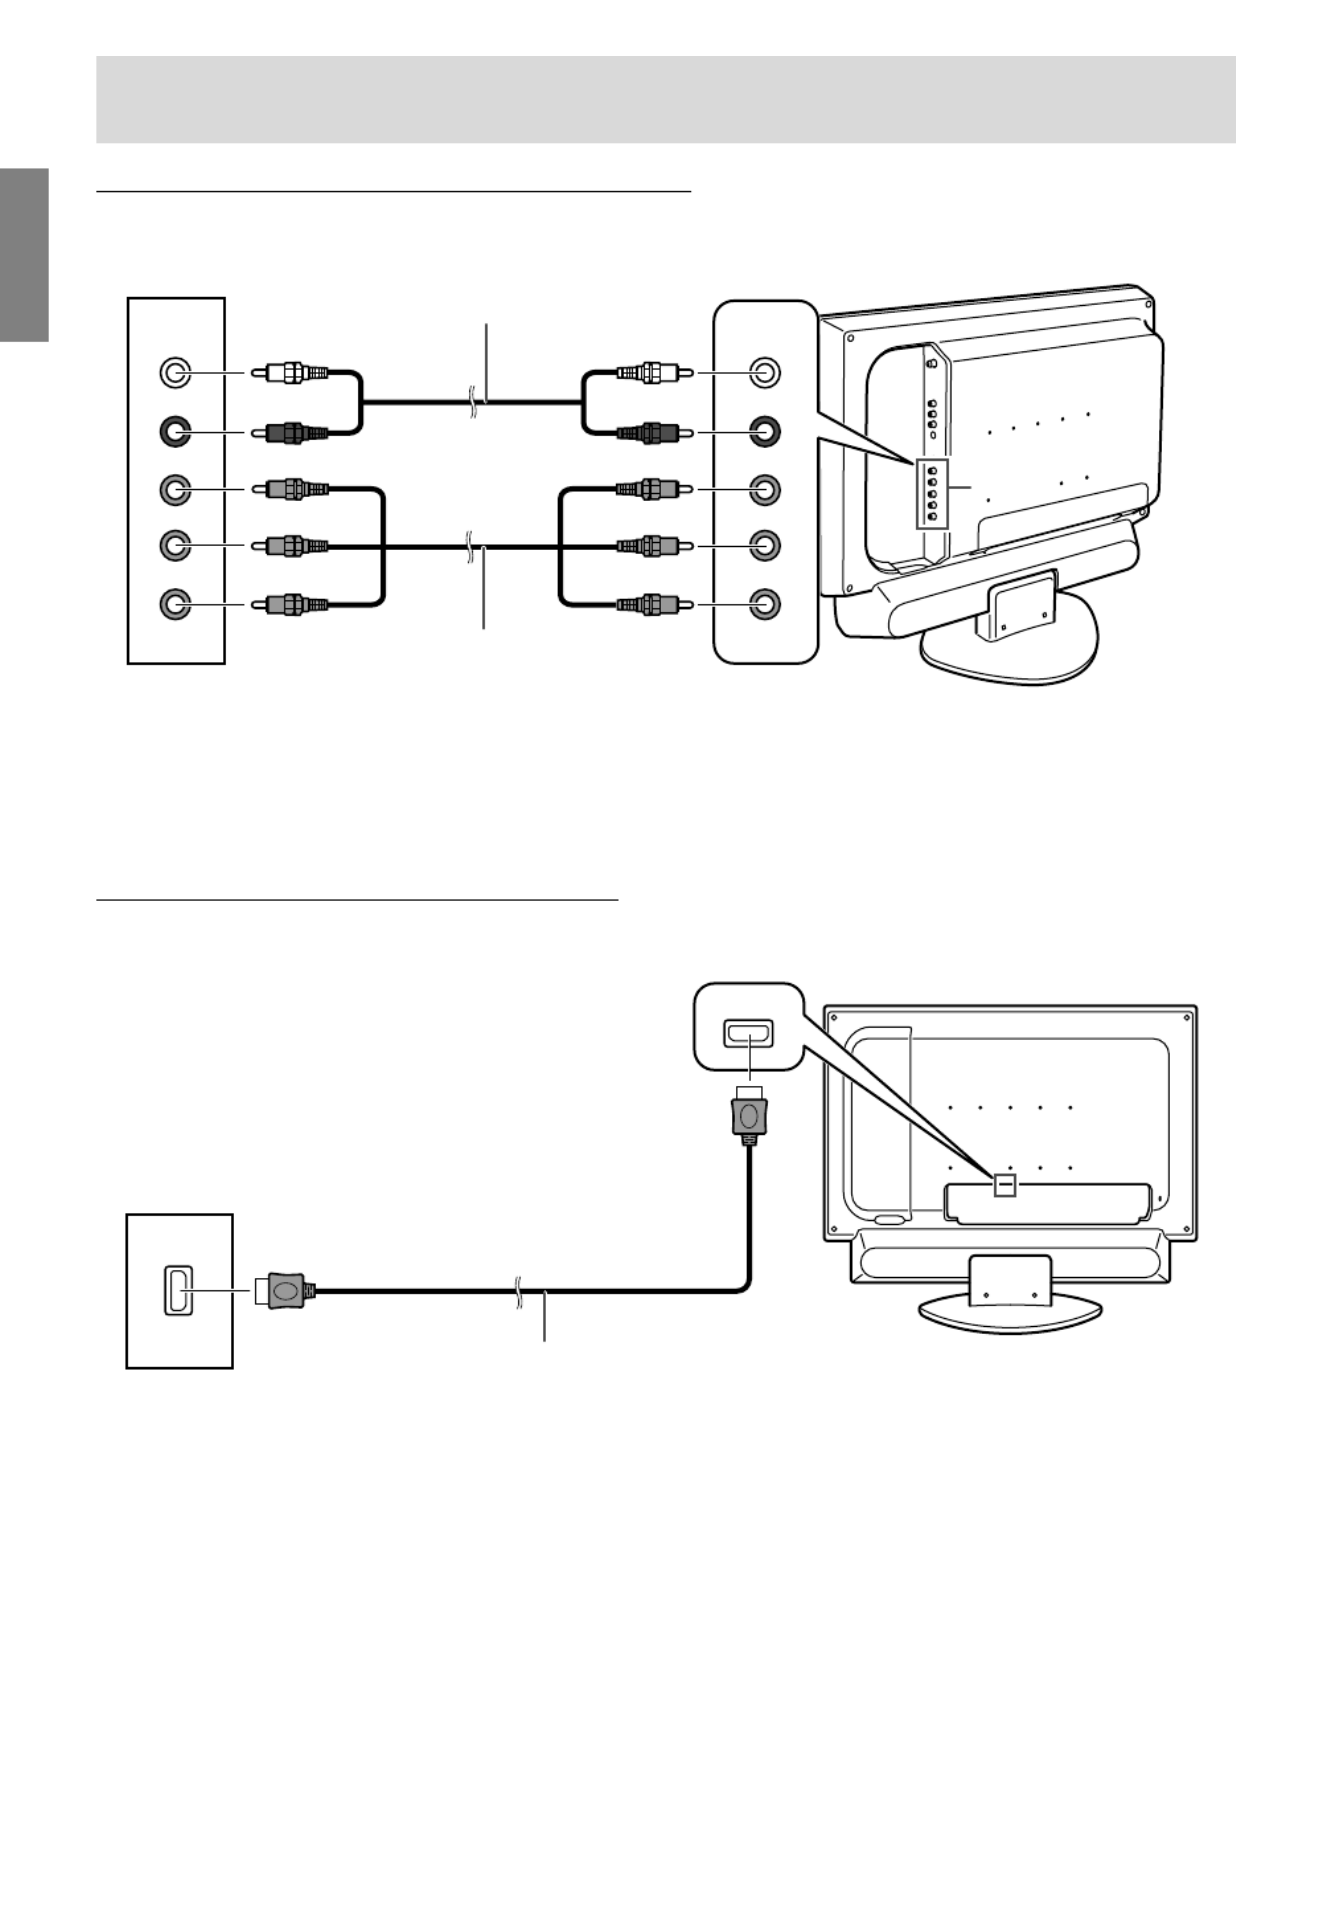
AV equipment with component output terminals
AUDIO-L
AUDIO-R
Y
Pb
Pr
AUDIO-L
AUDIO-R
Y
Pb
Pr
AV-IN 2
Note:
- When using the component input terminals, do not connect the cable to the video input terminal of
AV-IN 2.
AV equipment with HDMI output terminals
HDMI IN
HDMI
Note:
- If necessary, you can make adjustments for HDMI setup using the HDMI SETUP menu (HDMI mode).
(See pages E45 and E49 for information on using the menus.)
Rear of the TV
HDMI cable (commercially available)
Output terminals of
AV equipment
Connecting the TV to AV equipment
(White) (White)
(Red) (Red)
RCA pin cable (commercially available)
Component video cable
(commercially available)
(Green) (Green)
(Red) (Red)
(Blue) (Blue)
Right side of the TV
Output terminals of
AV equipment

E23
EnglishDeutschFrançaisItalianoEspañolEnglish
AV equipment with DVI output terminals
AUDIO-L
AUDIO-R
DIGITAL
AUDIO-L AUDIO-R
HDMI DIGITAL
DVI-D IN
Notes:
- Make sure that the connected equipment is switched off.
- Use the audio output terminals of AV-OUT as the audio input terminals for DVI.
- After making the connection, follow the procedure below.
1. Press the POWER button to turn on the TV. (See page E32.)
2. Press the HDMI/DVI button once or twice to select DVI mode. (See page E32.)
If the message asking you to change the "DVI SELECT" setting appears, press the button to select
"AV". Go to step 3 after the message disappears.
3. Turn on power to the connected equipment.
4. Press the MENU button to display the MENU screen.
(See pages E45 and E48 for information on using the menus.)
5. Select the MODE SELECT menu.
6. Be sure to set "DVI SELECT" to "AV". (The factory setting is "AV".)
7. Be sure to set "AV-OUT(AUDIO)" to "DVI AUDIO-IN". (The factory setting is "DVI AUDIO-IN".)
8. Press the MENU button to exit the screen.
- If the message described in step 2 appears during the operation, follow the instructions in the
message for the proper setting and then turn off/on the power to the connected equipment.
- If the image does not appear properly, turn off power to the connected AV equipment. Again, set
"DVI SELECT" to "AV" following steps 1 through 8 above.
Connecting the TV to AV equipment
Rear of the TV
(White) (Red)
(White)
(Red)
RCA pin cable
(commercially available)
Digital signal cable
(separately sold, NL-C04J)
Output terminals of
AV equipment

E29
EnglishDeutschFrançaisItalianoEspañolEnglish
Setting TV channels
Selecting broadcast (AIR) or cable
TV (CABLE) for channel setting
It is necessary to set the receiving mode to "AIR" or
"CABLE" channels to receive locally broadcast TV
programs.
1.Display the CHANNEL SETTING menu. (See
page E28.)
2.Press the buttons to select "AIR/CABLE",
and press the ENTER button.
3.Press the buttons to select the desired
mode ("AIR" or "CABLE"), and press the ENTER
button.
If you select "CABLE":
(1) Press the buttons to select "CABLE
MODE", and press the ENTER button.
(2) Press the buttons to select the desired
mode ("STD", "HRC", or "IRC").
4.Press the MENU button to exit the screen.
Saving broadcast TV channels in the
memory (CHANNEL SEARCH)
"CHANNEL SEARCH" allows you to search
through available channels ("AIR" or "CABLE") in
your area.
The tuner saves them to TV memory automatically.
1.Display the CHANNEL SETTING menu. (See
page E28.)
2.Press the buttons to select "CHANNEL
SEARCH", and press the ENTER button.
CHANNEL SEARCH
<
TV/AV
>
AIR 2
3.Press the ENTER button.
The tuner will search through all available
channels in your area and save them to the TV
memory.
Note:
- To interrupt Channel Search, press the MENU
button. Channel Search will stop at the current
channel and will not save any higher
channels.
4.When Channel Search completes,
the CHANNEL SEARCH screen becomes off
and TV screen becomes minimum channel of TV
memory.
If TV memory is empty, TV channel will be CH 2
(AIR and CABLE: STD) or CH 1 (CABLE: HRC
and IRC).
Notes:
- Searching channels are:
AIR channels:
VHF: 2 through 13
UHF: 14 through 69
CABLE channels:
1 (HRC and IRC mode only)
2 through 125 (STD, HRC, and IRC)
- During Channel Search, the TV will change
channels automatically.
- When Channel Search completes, all channels,
which were set previously, will be erased.
- If you search for channels but cannot receive
any, TV memory becomes empty.

E30
Setting TV channels
Adding weak or additional channels
or erasing unwanted channels from
TV memory (CHANNEL MEMORY)
Using "CHANNEL MEMORY", you can add
channels that could not be saved by "CHANNEL
SEARCH" because the signal was too weak.
1.Display the CHANNEL SETTING menu. (See
page E28.)
2.Press the buttons to select "CHANNEL
MEMORY", and press the ENTER button.
CHANNEL MEMORY
<
TV/AV
>
AIR 2
3.Press the CH buttons or the buttons to
select each desired channel to add or erase.
You can also use the channel buttons.
4.Press the button to add the channel to the TV
memory.
To erase the channel from the TV memory, press
the button.
5.Press the MENU button to exit the screen.

E31
EnglishDeutschFrançaisItalianoEspañolEnglish
Adjusting the computer display automatically
(for analog signals)
When using the TV as a computer display for the
first time or after having changed the system
settings during use, perform an automatic screen
adjustment. "CLOCK", "PHASE", "H-POS", and
"V-POS" will be set to their optimum states.
Note:
- When using the TV with a digital connection,
automatic screen adjustment is unnecessary.
POWER
Virtual
PC AVTV
SLEEP
ENTER
MENU
BRIGHT
FREEZE
VIEW MODE
MULTI
BRIGHT
MODE
HDMI/DVI
1.Press the POWER button on the TV to turn on the
TV.
When the power LED lights red, press the
POWER button on the remote control.
2.Press the PC button to select the PC (analog)
mode.
"PC" and "ANALOG" will appear in the upper-
right corner of the screen.
If "PC" and "DIGITAL" appear, press the PC
button again.
3.Turn on the computer, and then display an
image that makes the entire screen display light
colors (such as a light desktop background).
If you are using Windows, use the adjustment
pattern on the supplied CD-ROM (see page
E53).
4.Press the MENU button to display the MENU
screen.
The cursor is positioned at "ADJUSTMENT".
MENU
<
PC
>
ADJUSTMENT
>>
GAIN CONTROL
>>
AUDIO ADJUST
>>
COLOR CONTROL
>>
MODE SELECT1
>>
MODE SELECT2
>>
MULTI SCREEN
>>
5.Press the ENTER button.
The ADJUSTMENT menu will be displayed.
ADJUSTMENT
<
PC
>
RETURN
AUTO
CLOCK [ 127 ]
>>
PHASE [ 0 ]
>>
H-POS [ 200 ]
>>
V-POS [ 50 ]
>>
RESET
6.Press the ENTER button to auto-adjust the
settings.
The screen will go dark and "ADJUSTING" will
be displayed. After a few seconds, the
ADJUSTMENT menu will return.
7.Press the MENU button to exit the screen.
Notes:
- If you want to select a screen resolution of 1360
x 768, 1280 x 768, or 1024 x 768 when using the
TV with an analog connection, specify the
horizontal resolution for a 768-line screen in the
MODE SELECT1 menu (PC mode). (See pages
E52 and E56 for information on using the
menus.)
- If you want to select a screen resolution of 640 x
480 or 848 x 480 when using the TV with an
analog connection, specify the horizontal
resolution for a 480-line screen in the MODE
SELECT1 menu (PC mode). (See pages E52
and E56 for information on using the menus.)
- It may not be possible to achieve correct
adjustment with the first automatic adjustment.
In such a case, try repeating the automatic
adjustment 2 or 3 times.
- If necessary due to any of the following, manual
adjustments can be performed after the
automatic adjustment. (See page E52.)
- When further fine adjustment is needed.
- When the computer's video input signals are
Composite Sync or Sync on Green. (Automatic
adjustments may not be possible.)
- When "OUT OF ADJUST" is displayed. (When
the screen displays an entirely dark image, the
automatic screen adjustment may be disabled.
When making an automatic adjustment, be
sure to either use the adjustment pattern or try
displaying an image that makes the entire
screen very bright.)
- Automatic adjustment may not be achieved
correctly depending on what is displayed on the
screen - moving pictures or the MS-DOS prompt
etc.

E32
Common operations
Turning power on/off
POWER
Virtual
PC TV
SLEEP
ENTER
MENU
BRIGHT
FREEZE
VIEW MODE
MULTI
BRIGHT
MODE
AV HDMI/DVI
Turning power on
When the power LED is off:
1.Press the POWER button on the TV.
2.Turn on power to the connected equipment.
After a while the power LED will light green, and
then the display mode will be displayed for
several seconds.
When the power LED is lit red (standby):
1.Press the POWER button on the remote control.
2.Turn on power to the connected equipment.
The power LED will light green, and then the
display mode will be displayed for several
seconds.
Turning off power
1.Turn off power to the connected equipment.
2.Press the POWER button on the remote control.
The power LED will light red (standby).
3.Press the POWER button on the TV.
The power LED will go out.
Notes:
- Always wait at least 5 seconds between
switching power off/on. Rapid switching may
damage the TV or cause it to malfunction.
- After switching power on, it may take a little
while before the screen displays an image.
- Do not turn off the power immediately after
changing various settings on the screen. The
changed values may not have been saved in the
memory yet.
Switching display modes (INPUT)
POWER
Virtual
PC TV
SLEEP
ENTER
MENU
BRIGHT
FREEZE
VIEW MODE
MULTI
BRIGHT
MODE
AV HDMI/DVI
1.Press the PC, TV, AV, or HDMI/DVI button.
The TV will switch to the display mode for the
button you pressed.
Notes:
- Each time you press the AV button, the input
changes in the order of AV1 AV2 AV3
AV1... .
- Each time you press the HDMI/DVI button, the
input toggles between HDMI and DVI.
- Each time you press the PC button, the input
toggles between analog and digital.
10
STEREO
Display modes
Number TV mode
Displays the TV's image.
The number is the
channel being received.
AV1 AV1 mode
Displays the image from
AV2 AV2 mode
the equipment connected
AV3 AV3 mode
to the respective AV input
terminals.
HDMI HDMI mode
Displays the image from
DVI DVI mode
the equipment connected
to the HDMI or DVI input
terminal.
PC PC mode
Displays the computer's
(analog/digital) image.

E38
Setting the Closed Caption (CLOSED CAPTION)
This TV is equipped with an internal Closed Caption decoder. "Closed Caption" is a system which allows
conversations, narration, and sound effects in TV programs and home videos to be viewed as captions
on the TV screen.
- Not all programs and videos will offer Closed Captioning.
- The Closed Caption broadcasts can be viewed in 2 modes: Caption (CAPTION) and Text (TEXT).
For each mode, two channels are available: CH1 and CH2.
The CAPTION mode shows subscripts of dialogs and commentaries of TV dramas and news programs
while allowing a clear view of the picture.
The TEXT mode displays various information over the picture (such as TV program schedules and
weather forecasts, etc.) that is independent of the TV programs.
Perform this procedure using the CC button or the CLOSED CAPTION menu.
Here we will describe the procedure using the CC button.
(See pages E45 and E49 for information on using the menus.)
POWER
PC TV
FREEZE
VIEW MODE
SLEEP
ENTER
MENU
BRIGHT
MODE
BRIGHT
DISPLAY
CC MTS MUTE
VOL
Virtual
MULTI
AV
HDMI/DVI
Notes:
- If a broadcast has Closed Caption and the MUTE button is pressed, the TV enters the Caption mode
automatically. Pressing the MUTE button again will return the TV to its previous condition.
- Closed Caption may malfunction (white blocks, strange characters, etc.) if signal conditions are poor
or if there are problems at the broadcast source.
- If no text broadcast is being received while viewing in the Text mode, the screen may become dark and
blank for some programs. Should this occur, switch the Closed Caption mode to "OFF".
Watching TV
1. Press the CC button to display the CC/TEXT
screen.
CC/TEXT : OFF
2. Press the CC button to change the setting.
The setting changes in the following order:
OFF CC1 CC2 TEXT1 TEXT2 OFF...
CC1 Caption mode for CH1 data
CC2 Caption mode for CH2 data
TEXT1 Text mode for CH1 data
TEXT2 Text mode for CH2 data

E41
EnglishDeutschFrançaisItalianoEspañolEnglish
Watching TV
Setting V-chip for MPAA rating
POWER
PC TV
FREEZE
VIEW MODE
SLEEP
ENTER
MENU
BRIGHT
MODE
BRIGHT
DISPLAY
CC MTS MUTE
VOL
CH
FLASHBACK
Virtual
MULTI
AV
HDMI/DVI
1. Press the TV button to select TV mode.
2. Press the MENU button to display the MENU
screen.
MENU
<
TV/AV
>
VIDEO ADJUST
>>
AUDIO ADJUST
>>
CHANNEL SETTING
>>
SCREEN ADJUST
>>
MODE SELECT
>>
CLOSED CAPTION
>>
V-CHIP BLOCK
>>
HDMI SETUP
>>
3. Press the buttons to select "V-CHIP
BLOCK", and press the ENTER button.
"INPUT SECRET NO." screen will be displayed.
4. Input the 4-digit secret number using the
channel buttons (0-9).
Note:
- When you input the secret number for the first
time, press the ENTER button to register it.
Otherwise, continue to the next step.
The V-CHIP BLOCK menu will be displayed.
V-CHIP BLOCK
<
TV/AV
>
RETURN
MPAA
>>
TV GUIDELINES
>>
STATUS [
OFF ]
RESET
5. Press the buttons to select "MPAA", and
press the ENTER button.
6. Press the buttons to select, for example,
"PG", and press the ENTER button.
7. Press the buttons to select "BLOCK".
If you set "PG" to "BLOCK", then "PG-13", "R",
"NC-17", and "X" are automatically blocked.
8. Press the MENU button to exit the screen.
Notes:
- Set ratings are blocked only when you activate
V-chip Block (see page E42).
- If you set "G" to "BLOCK", all ratings are
automatically blocked.
- If you set "X" to "BLOCK", then "G", "PG",
"PG-13", "R", and "NC-17" are not blocked.
Setting V-chip for TV Parental Guidelines
(TV GUIDELINES)
1. Repeat steps 1 to 4 of "Setting V-chip for MPAA
rating" on the left column.
(The V-CHIP BLOCK menu will be displayed.)
2. Press the buttons to select "TV
GUIDELINES", and press the ENTER button.
3. Press the buttons to select, for example,
"TV-Y7", and press the ENTER button.
4. Press the buttons to select "BLOCK".
TV GUIDELINES
<
TV/AV
>
RETURN
TV-Y [
-----
]
TV-Y7 [
BLOCK ]
TV-G [
BLOCK ]
TV-PG [
BLOCK ]
TV-14 [
BLOCK ]
TV-MA [
BLOCK ]
BLOCK CONTENT
>>
If you set "TV-Y7" to "BLOCK", then "TV-G",
"TV-PG", "TV-14", and "TV-MA" are automatically
blocked. In addition, "D", "L", "S", "V", and "FV" in
CONTENT are automatically blocked.
5. Press the MENU button to exit the screen.

E43
EnglishDeutschFrançaisItalianoEspañolEnglish
Enjoying DVDs, games, and other equipment
You can enjoy additional pieces of AV equipment
connected to your TV such as VCRs, DVD players,
and game systems.
(See pages E19 through E24.)
Equipment connected to AV-IN 1 Display mode "AV1"
Equipment connected to AV-IN 2 Display mode "AV2"
Equipment connected to AV-IN 3 Display mode "AV3"
Equipment connected to HDMI Display mode
"HDMI"
Equipment connected to DVI-D Display mode
"DVI"
Note:
- This manual refers to AV1 mode, AV2 mode, AV3
mode, HDMI mode, and DVI mode as "AV mode".
POWER
PC TV
FREEZE
VIEW MODE
SLEEP
ENTER
MENU
BRIGHT
MODE
BRIGHT
DISPLAY
CC MTS MUTE
VOL
CH
FLASHBACK
Virtual
MULTI
AV
HDMI/DVI
1. Press the AV button to select the AV1, AV2, or
AV3 mode, or press the HDMI/DVI button to
select the HDMI or DVI mode.
Notes:
- Each time you press the AV button, the mode
changes in the order of AV1 AV2 AV3
AV1... .
- Each time you press the HDMI/DVI button, the
mode toggles between HDMI and DVI.
AV1
VIDEO
2. Turn on the connected AV equipment, and then
play a tape, DVD, or game.
3. Adjust the volume.
See page E34 for more information.
Notes:
- Sometimes no image will be displayed during
fast searching of video.
- The display may flicker during slow playback of
video depending on the VCR or videotape you
are using.
- You cannot play shooting games that use gun
controllers with this TV.

E47
EnglishDeutschFrançaisItalianoEspañolEnglish
Using the menus in TV/AV mode
SCREEN ADJUST menu (See page E45 for information on using the menus.)
The SCREEN ADJUST menu cannot be adjusted while an image is paused. (See page E44.)
The SCREEN ADJUST menu cannot be adjusted when video signals of 1080i or 720p are input externally.
Item
VIEW MODE
POSITION
RESET
Description
Selects the screen size.
- NORMAL ........ Displays 4:3 aspect ratio TV images normally.
- WIDE ..............Expands 4:3 images horizontally to fill the entire
screen (16:9).
- ZOOM1 ...........Expands the image to fill the screen (16:9) with wide
black bands across the top and bottom such as letterbox
format movies.
- ZOOM2 ...........Can be used when "ZOOM1" cuts off captions or telops at
the top or bottom of the screen.
- FULL...............Returns images horizontally reduced from 16:9 to 4:3
back to 16:9 so they fill the entire screen.
You can also set this item directly using the remote control, instead of the
adjustment screen. (See page E63.)
- Depending on the type of data received or the video software used,
screen edges may be slightly cut off or the image may have a black
border.
Adjusts the position of the image.
- V-POSITION ... Adjusts the image's vertical position.
- H-POSITION... Adjusts the image's horizontal position.
- RESET............Resets the image's position to the TV's original factory
setting.
Resets adjustment values for this menu to their original factory settings.
Produktspezifikationen
| Marke: | Sharp |
| Kategorie: | Fernsehen |
| Modell: | LD-26SH1U |
Brauchst du Hilfe?
Wenn Sie Hilfe mit Sharp LD-26SH1U benötigen, stellen Sie unten eine Frage und andere Benutzer werden Ihnen antworten
Bedienungsanleitung Fernsehen Sharp

15 Oktober 2024
13 Oktober 2024
13 Oktober 2024
12 Oktober 2024
12 Oktober 2024
2 Oktober 2024
30 September 2024
23 September 2024
22 September 2024
22 September 2024
Bedienungsanleitung Fernsehen
- Fernsehen Samsung
- Fernsehen Infiniton
- Fernsehen Clatronic
- Fernsehen Acer
- Fernsehen Sanyo
- Fernsehen BenQ
- Fernsehen Lexibook
- Fernsehen Manhattan
- Fernsehen Manta
- Fernsehen Medion
- Fernsehen Philips
- Fernsehen Sony
- Fernsehen Sweex
- Fernsehen Tevion
- Fernsehen Zalman
- Fernsehen Panasonic
- Fernsehen LG
- Fernsehen MX Onda
- Fernsehen AEG
- Fernsehen Siemens
- Fernsehen Electrolux
- Fernsehen Küppersbusch
- Fernsehen OK
- Fernsehen Vox
- Fernsehen TechniSat
- Fernsehen XD Enjoy
- Fernsehen Denver
- Fernsehen ECG
- Fernsehen Intenso
- Fernsehen MarQuant
- Fernsehen Bush
- Fernsehen Telefunken
- Fernsehen Thomson
- Fernsehen Trevi
- Fernsehen BEKO
- Fernsehen Blaupunkt
- Fernsehen Grundig
- Fernsehen Schneider
- Fernsehen Aspes
- Fernsehen Brandt
- Fernsehen Daewoo
- Fernsehen Pyle
- Fernsehen Mitsubishi
- Fernsehen Finlux
- Fernsehen Haier
- Fernsehen High One
- Fernsehen Hisense
- Fernsehen Luxor
- Fernsehen NABO
- Fernsehen Nordmende
- Fernsehen Salora
- Fernsehen SEG
- Fernsehen Smart Brand
- Fernsehen Svan
- Fernsehen Techwood
- Fernsehen Vestel
- Fernsehen Philco
- Fernsehen Schaub Lorenz
- Fernsehen Aiwa
- Fernsehen Alphatronics
- Fernsehen AudioSonic
- Fernsehen Coby
- Fernsehen Bang And Olufsen
- Fernsehen DIFRNCE
- Fernsehen Lenco
- Fernsehen Mpman
- Fernsehen ODYS
- Fernsehen Pioneer
- Fernsehen Polaroid
- Fernsehen Jay-Tech
- Fernsehen JVC
- Fernsehen Krüger And Matz
- Fernsehen Muse
- Fernsehen Nokia
- Fernsehen Optoma
- Fernsehen PEAQ
- Fernsehen Xiaomi
- Fernsehen Abus
- Fernsehen Megasat
- Fernsehen Walker
- Fernsehen Akai
- Fernsehen Arçelik
- Fernsehen Caratec
- Fernsehen Changhong
- Fernsehen Chiq
- Fernsehen Continental Edison
- Fernsehen Dual
- Fernsehen Dyon
- Fernsehen Edenwood
- Fernsehen Ferguson
- Fernsehen Funai
- Fernsehen GoGEN
- Fernsehen Hannspree
- Fernsehen Hitachi
- Fernsehen Horizon
- Fernsehen Hyundai
- Fernsehen JTC
- Fernsehen Kernau
- Fernsehen Loewe
- Fernsehen Metz
- Fernsehen MT Logic
- Fernsehen Orava
- Fernsehen Orion
- Fernsehen Reflexion
- Fernsehen Star-Light
- Fernsehen Strong
- Fernsehen TCL
- Fernsehen Tesla
- Fernsehen Toshiba
- Fernsehen Allview
- Fernsehen Casio
- Fernsehen Sencor
- Fernsehen Icy Box
- Fernsehen Element
- Fernsehen ViewSonic
- Fernsehen Dell
- Fernsehen Lenovo
- Fernsehen Cecotec
- Fernsehen Nikkei
- Fernsehen Xiron
- Fernsehen Opera
- Fernsehen Sagem
- Fernsehen Antarion
- Fernsehen Xoro
- Fernsehen Humax
- Fernsehen Logik
- Fernsehen CGV
- Fernsehen LTC
- Fernsehen Bluesky
- Fernsehen Orima
- Fernsehen Proline
- Fernsehen NEC
- Fernsehen Marantz
- Fernsehen TEAC
- Fernsehen Packard Bell
- Fernsehen Westinghouse
- Fernsehen AOC
- Fernsehen NextBase
- Fernsehen Vivax
- Fernsehen Uniden
- Fernsehen Kogan
- Fernsehen Innoliving
- Fernsehen Magnum
- Fernsehen Smart Tech
- Fernsehen JGC
- Fernsehen Soundmaster
- Fernsehen Sylvania
- Fernsehen Qilive
- Fernsehen Doffler
- Fernsehen NewStar
- Fernsehen Zenith
- Fernsehen Insignia
- Fernsehen Roadstar
- Fernsehen SereneLife
- Fernsehen Woxter
- Fernsehen Sogo
- Fernsehen Peerless-AV
- Fernsehen RCA
- Fernsehen Oppo
- Fernsehen Vivo
- Fernsehen AYA
- Fernsehen Furrion
- Fernsehen Seiki
- Fernsehen Alba
- Fernsehen Aldi
- Fernsehen Daitsu
- Fernsehen Digihome
- Fernsehen E-motion
- Fernsehen Emerson
- Fernsehen GPX
- Fernsehen Graetz
- Fernsehen HKC
- Fernsehen Hoher
- Fernsehen ILive
- Fernsehen Naxa
- Fernsehen Online
- Fernsehen Onn
- Fernsehen Oyster
- Fernsehen Premier
- Fernsehen Reflex
- Fernsehen Rm 2000
- Fernsehen Saba
- Fernsehen Sbr
- Fernsehen Sunny
- Fernsehen Sunstech
- Fernsehen TechLine
- Fernsehen Technika
- Fernsehen Tele 2
- Fernsehen Grunkel
- Fernsehen Tve
- Fernsehen Viewpia
- Fernsehen Vision Plus
- Fernsehen Vizio
- Fernsehen Voxx
- Fernsehen Wharfedale
- Fernsehen Yasin
- Fernsehen Ziggo
- Fernsehen Videocon
- Fernsehen Bauhn
- Fernsehen Planar
- Fernsehen Monster
- Fernsehen Mitsai
- Fernsehen Proscan
- Fernsehen Kunft
- Fernsehen Nevir
- Fernsehen Seura
- Fernsehen EKO
- Fernsehen SunBriteTV
- Fernsehen Kemo
- Fernsehen V7
- Fernsehen Astar
- Fernsehen QBell Technology
- Fernsehen Visco
- Fernsehen Majestic
- Fernsehen DirecTV
- Fernsehen HCI
- Fernsehen Mach Power
- Fernsehen MBM
- Fernsehen Inno-Hit
- Fernsehen Elements
- Fernsehen Palsonic
- Fernsehen Cello
- Fernsehen Pantel
- Fernsehen FFalcon
- Fernsehen Coocaa
- Fernsehen SYLVOX
- Fernsehen ISymphony
- Fernsehen Aristona
- Fernsehen Apex
- Fernsehen Tucson
- Fernsehen Kubo
- Fernsehen Avtex
- Fernsehen NPG
- Fernsehen Telesystem
- Fernsehen ATYME
- Fernsehen Lin
- Fernsehen Tivax
- Fernsehen H&B
- Fernsehen Norcent
- Fernsehen TELE System
- Fernsehen Belson
- Fernsehen Elbe
- Fernsehen Mitzu
- Fernsehen Voxicon
- Fernsehen Aconatic
- Fernsehen Mitchell & Brown
- Fernsehen FOX Electronics
- Fernsehen Mystery
Neueste Bedienungsanleitung für -Kategorien-

16 Oktober 2024

16 Oktober 2024

16 Oktober 2024

15 Oktober 2024

15 Oktober 2024
15 Oktober 2024

15 Oktober 2024
15 Oktober 2024
15 Oktober 2024
15 Oktober 2024