Samsung UN49KU650 Bedienungsanleitung
Lesen Sie kostenlos die 📖 deutsche Bedienungsanleitung für Samsung UN49KU650 (105 Seiten) in der Kategorie Fernsehen. Dieser Bedienungsanleitung war für 12 Personen hilfreich und wurde von 2 Benutzern mit durchschnittlich 4.5 Sternen bewertet
Seite 1/105

E-MANUAL
Thank you for purchasing this Samsung product.
To receive more complete service, please register your
product at
www.samsung.com/register
Model______________ Serial No.______________

Contents
Quick Guides
Connecting the to the TVSamsung Smart Remote
Using Smart Hub
2 Using Smart Hub
Using Voice Interaction
3 Setting up Voice Interaction
3 Running Voice Interaction
Connections
Connecting an Antenna
Connecting to the Internet
4 Connecting to your Internet network
Troubleshooting Internet Connectivity Issues
6 Troubleshooting wired Internet connectivity issues
7 Troubleshooting wireless Internet connectivity issues
Connecting Video Devices
8 Connecting with an HDMI cable
8 Connecting with a component cable (only for models with
COMPONENT IN / AV IN)
9 Connecting with a composite cable (only for models with
COMPONENT IN / AV IN)
Audio Input and Output Connections
10 Connecting with an HDMI (ARC) cable
10 Connecting with a digital audio (optical) cable
11 Connecting through wireless network
11 Connecting Bluetooth Devices
Connecting a Computer
12 Connecting through the HDMI port ― Screen sharing
12 Connecting through the Smart View app ― Content sharing
Connecting a Mobile Device
13 Using Smart View (Screen Mirroring) or contents sharing
13 Connecting mobile devices without a wireless router (Wi-Fi
Direct)
13 Connecting a mobile device via the Smart View App
Switching between external devices connected to the TV
14 Changing the input signal
14 Editing external devices
14 Using additional functions
Connection Notes
15 Connection notes for HDMI
16 Connection notes for audio devices
16 Connection notes for computers
16 Connection notes for mobile devices
Remote Control and Peripherals
About the Samsung Smart Remote (Voice Interaction version)
About the Samsung Smart Remote (No Voice Interaction)
Connecting to the Samsung Smart Remote
Controlling External Devices with the Samsung Smart Remote
- Using the Universal Remote
Controlling the TV with a Keyboard or Gamepad
22 Connecting a USB keyboard
22 Connecting a Bluetooth keyboard and gamepad
22 Using the keyboard
Entering Text using the On-Screen QWERTY Keyboard
23 Using additional functions

Smart Features
Smart Hub
24 Displaying the Home Screen
26 Launching Smart Hub automatically
26 Testing Smart Hub connections
26 Resetting Smart Hub
Using a Samsung account
26 Creating a Samsung account
27 Signing in to a Samsung account
Using the GAMES Service
28 Installing and running a game
29 Managing purchased or installed games
30 Rating games
Using the APPS Service
31 Installing and running an app
31 Managing purchased or installed apps
33 Rating apps
33 Using other app features and functions
Using the e-Manual
33 Launching the e-Manual
33 Using the buttons in the e-Manual
Using the Web Browser
Playing pictures/video/music
35 Playing media content
35 Functions on the media content list screen
Using Voice Interaction
36 Setting up Voice Interaction
36 Running Voice Interaction
TV Viewing
Viewing Broadcast Information at a Glance
37 Using the guide
38 Changing the broadcast signal
38 Checking digital channel signal info and strength
Recording Programs
38 Recording programs
39 Managing the schedule recording list
39 Viewing recorded programs
Setting Up a Schedule Viewing
40 Setting up a schedule viewing for a channel
40 Editing a schedule viewing
Using Timeshift
Using the Channel List
Editing channels
42 Re-registering and deleting a channel
42 Editing registered channels
42 Using Program Rating Lock
Creating a Personal Favorites List
43 Registering channels as favorites
43 Viewing and selecting channels on Favorites lists only
Editing a Favorites List
44 Removing channels from a favorites list
44 Rearranging a favorites list
44 Renaming a favorites list
Making Sports Programs More Realistic with Sports Mode
44 Extracting highlights automatically
45 Viewing a game recorded in sports mode
TV-Viewing Support Functions
45 Scanning for available channels
46 Configuring advanced broadcasting settings
46 Selecting the broadcast audio language
46 Fine-tuning analog broadcasts

Picture and Sound
Adjusting the Picture Quality
47 Choosing a picture mode
47 Configuring advanced picture settings
Picture Support Functions
49 Viewing a picture-in-picture (PIP)
49 Viewing a HDR mode
50 Changing the picture size
Adjusting the Sound Quality
51 Choosing a sound mode
51 Configuring advanced sound settings
Using the Sound Support Functions
52 Selecting speakers
52 Listening to the TV through Bluetooth devices
53 Listening to the TV through a Multiroom speaker
System and Support
Setting the Time and Using the Timer
54 Setting the current time
55 Using the timers
Using the Screen Burn Protection and Energy Saving Functions
56 Preventing screen burn
56 Reducing the energy consumption of the TV
Using Anynet+ (HDMI-CEC)
57 Connecting an external device through Anynet+ and using
their menus
Updating the TV’s Software
58 Updating the TV’s software to the latest version
58 Updating the TV automatically
Protecting the TV from Hacking and Malicious Code
59 Checking the TV and connected storage for malicious code
59 Scanning for viruses in real time
59 Viewing scan results
Using Other Functions
60 Running the accessibility functions
60 Enabling voice guides for the visually impaired
60 Enabling audio for the video description function
61 Showing captions
61 Adjusting the menu transparency
61 White text on black background (high contrast)
62 Enlarging the font (for the visually impaired)
62 Learning about the remote control (for the visually impaired)
62 Listening to the TV through Bluetooth devices (for the hearing
impaired)
62 Configuring advanced system settings
64 Enabling game mode
64 Restoring the TV to the factory settings

Troubleshooting
Getting Support
65 Getting support through Remote Management
65 Finding the contact information for service
66 Requesting service
Diagnosing TV operational issues
There Is a Problem with the Picture
66 Testing the picture
I Can't Hear the Sound Clearly
68 Testing the sound
There Is a Problem with the Broadcast
My Computer Won't Connect
The TV Won't Connect to the Internet
The Schedule Recording/Timeshift Function Isn't Working
Anynet+ (HDMI-CEC) Isn't Working
I Have Trouble Launching/Using Apps
My File Won't Play
I Want to Reset the TV
Other Issues
Precautions and Notes
Before Using the Recording and Timeshift Functions
75 Before using the recording and schedule recording functions
76 Before using the timeshift function
Supported Resolutions for UHD Input Signals
77 If HDMI UHD Color is set to Off
77 If HDMI UHD Color is set to On
Read Before Using Voice Interaction
78 Precautions for voice interaction
78 Requirements for using voice interaction
Read Before Using Apps
Read Before Using the Internet
Read Before Playing Photo, Video, or Music Files
81 Limitations on use of photo, video, and music files
82 Supported external subtitles
82 Supported internal subtitles
83 Supported image formats and resolutions
83 Supported music formats and codecs
84 Supported video codecs
Read After Installing the TV
86 Picture sizes and input signals
87 Installing an anti-theft lock
87 Read before setting up a wireless Internet connection
Read Before Connecting a Computer (Supported Resolutions)
88 IBM
88 MAC
89 VESA DMT

Supported Resolutions for Video Signals
90 CEA-861
Read Before Using Bluetooth Devices
91 Restrictions on using Bluetooth
Blocking programs based on their TV Rating
93 Blocking movies base on their Movie Rating (MPAA)
93 Blocking programs based on their Canadian English Rating
94 Blocking programs based on their Canadian French Rating
94 Blocking Programs based on their Downloadable U.S. Rating
Buttons and Functions
95 Buttons and functions available while playing multimedia
content
97 Buttons and functions available while using sports mode
98 Buttons and functions available while recording a program or
Timeshift
License

Connecting the Samsung Smart Remote to the TV
Connect the to your TV to operate the TV.Samsung Smart Remote
When you turn on the TV for the first time, the Samsung Smart Remote pairs to the TV automatically. If the
Samsung Smart Remote does not pair to the TV automatically, point it at the remote control sensor of the
TV, and then press and hold the Return and Play/pause buttons simultaneously for 3 seconds or more.
"The images, buttons, and functions of the Samsung Smart Remote may differ by model.
"For more information, refer to "About the Samsung Smart Remote (Voice Interaction version)."
"Availability depends on the specific model.

Using Smart Hub
Connect to Smart Hub for apps, games, movies, and more.
Using Smart Hub
Enjoy the multiple functions provided by simultaneously on a single screen.Smart Hub
Source
Source
When you press the button on your remote control, you can use the following functions and features.
● Settings
When the focus is moved, a quick settings appears on the top of the menu. You can quickly set
frequently used functions.
● Source
You can select an external device connected to the TV.
"For more information, refer to "Switching between external devices connected to the TV."
● Search
You can search data for channels, programs, movie titles, and apps from Smart Hub.
"The image on your TV may differ from the image above depending on your model and geographical area.
"For more information, refer to "Smart Hub."

Connecting an Antenna
You can connect an antenna cable to your TV.
"An antenna connection is not necessary if you connect a cable or satellite box.
ANT IN
Connecting to the Internet
You can get access to the Internet through your TV.
Connecting to your Internet network
Settings Network Open Network Settings Try Now
Connect to an available network.
Establishing a wired Internet connection
LAN
"If you connect a LAN cable, the TV automatically accesses the Internet.
"Use a CAT 7 (*STP type) cable for the connection.
* Shielded Twist Pair
"The TV will not be able to connect to the Internet if your network speed is below 10 Mbps.

Establishing a wireless Internet connection
Settings Network Open Network Settings Wireless
Make sure that you have the wireless router's SSID (name) and password settings before attempting to
connect, and then follow the directions on the screen.
Network Settings
Wireless Connection
Select your wireless network.
Refresh
"The image on your TV may differ from the image above depending on your model and geographical area.
"If there is no wireless router found, select at the bottom of the list and enter the network name Add Network
(SSID).
"If a wireless router has a WPS or PBC button, select at the bottom of the list and click the button. Use WPS
Then the TV is automatically connected.
Checking the Internet connection status
Settings Network Network Status Try Now
View the current network and Internet status.
Changing the name of the TV on a network
Settings Network Device Name Try Now
You can change the name of the TV on the network. Select User Input at the bottom of the list and change
the name.

Troubleshooting Internet Connectivity Issues
If your TV won't connect to the Internet, try the solutions below.
Troubleshooting wired Internet connectivity issues Try Now
After reading the following content, troubleshoot the wired Internet connection issue. If the problem
persists, contact your Internet Service Provider.
No network cable found
Make sure that the LAN cable is plugged in on both ends. If it is plugged in, make sure that the router is
turned on. If the router is on, try turning it off and then on.
IP auto setting failed
1.
Configure the settings in IP Settings.
2.
Make sure that the DHCP server is enabled on the router, and then reset the router.
Unable to connect to the network
1.
Check all IP Settings.
2.
After checking t he DHCP server status (must be active) on the router, remove the LAN cable and
connect it again.
Connected to a local network, but not to the Internet
1.
Make sure that the Internet LAN cable is connected to the router's external LAN port.
2.
Check the DNS values in IP Settings.
Network setup is complete, but unable to connect to the Internet
If the problem persists, contact your Internet Service Provider.

Troubleshooting wireless Internet connectivity issues
After reading the following content, troubleshoot the wireless Internet connection issue. If the problem
persists, contact your Internet Service Provider.
Wireless network connection failed
If a selected wireless router is not found, go to , and then select the correct router.Open Network Settings
Unable to connect to a wireless router
1.
Check if the router is turned on. If it is, turn it off and then on.
2.
Enter the correct password if required.
IP auto setting failed
1.
Configure the settings in IP Settings.
2.
Make sure that the DHCP server is enabled on the router. Then, unplug the router and plug it back in.
3.
Enter the correct password if required.
Unable to connect to the network
1.
Check all IP Settings.
2.
Enter the correct password if required.
Connected to a local network, but not to the Internet
1.
Make sure that the Internet LAN cable is connected to the router's external LAN port.
2.
Check the DNS values in IP Settings.
Network setup is complete, but unable to connect to the Internet
If the problem persists, contact your Internet Service Provider.

Connecting Video Devices
Make the correct video connections between your TV and your external devices.
Connecting with an HDMI cable
HDMI IN
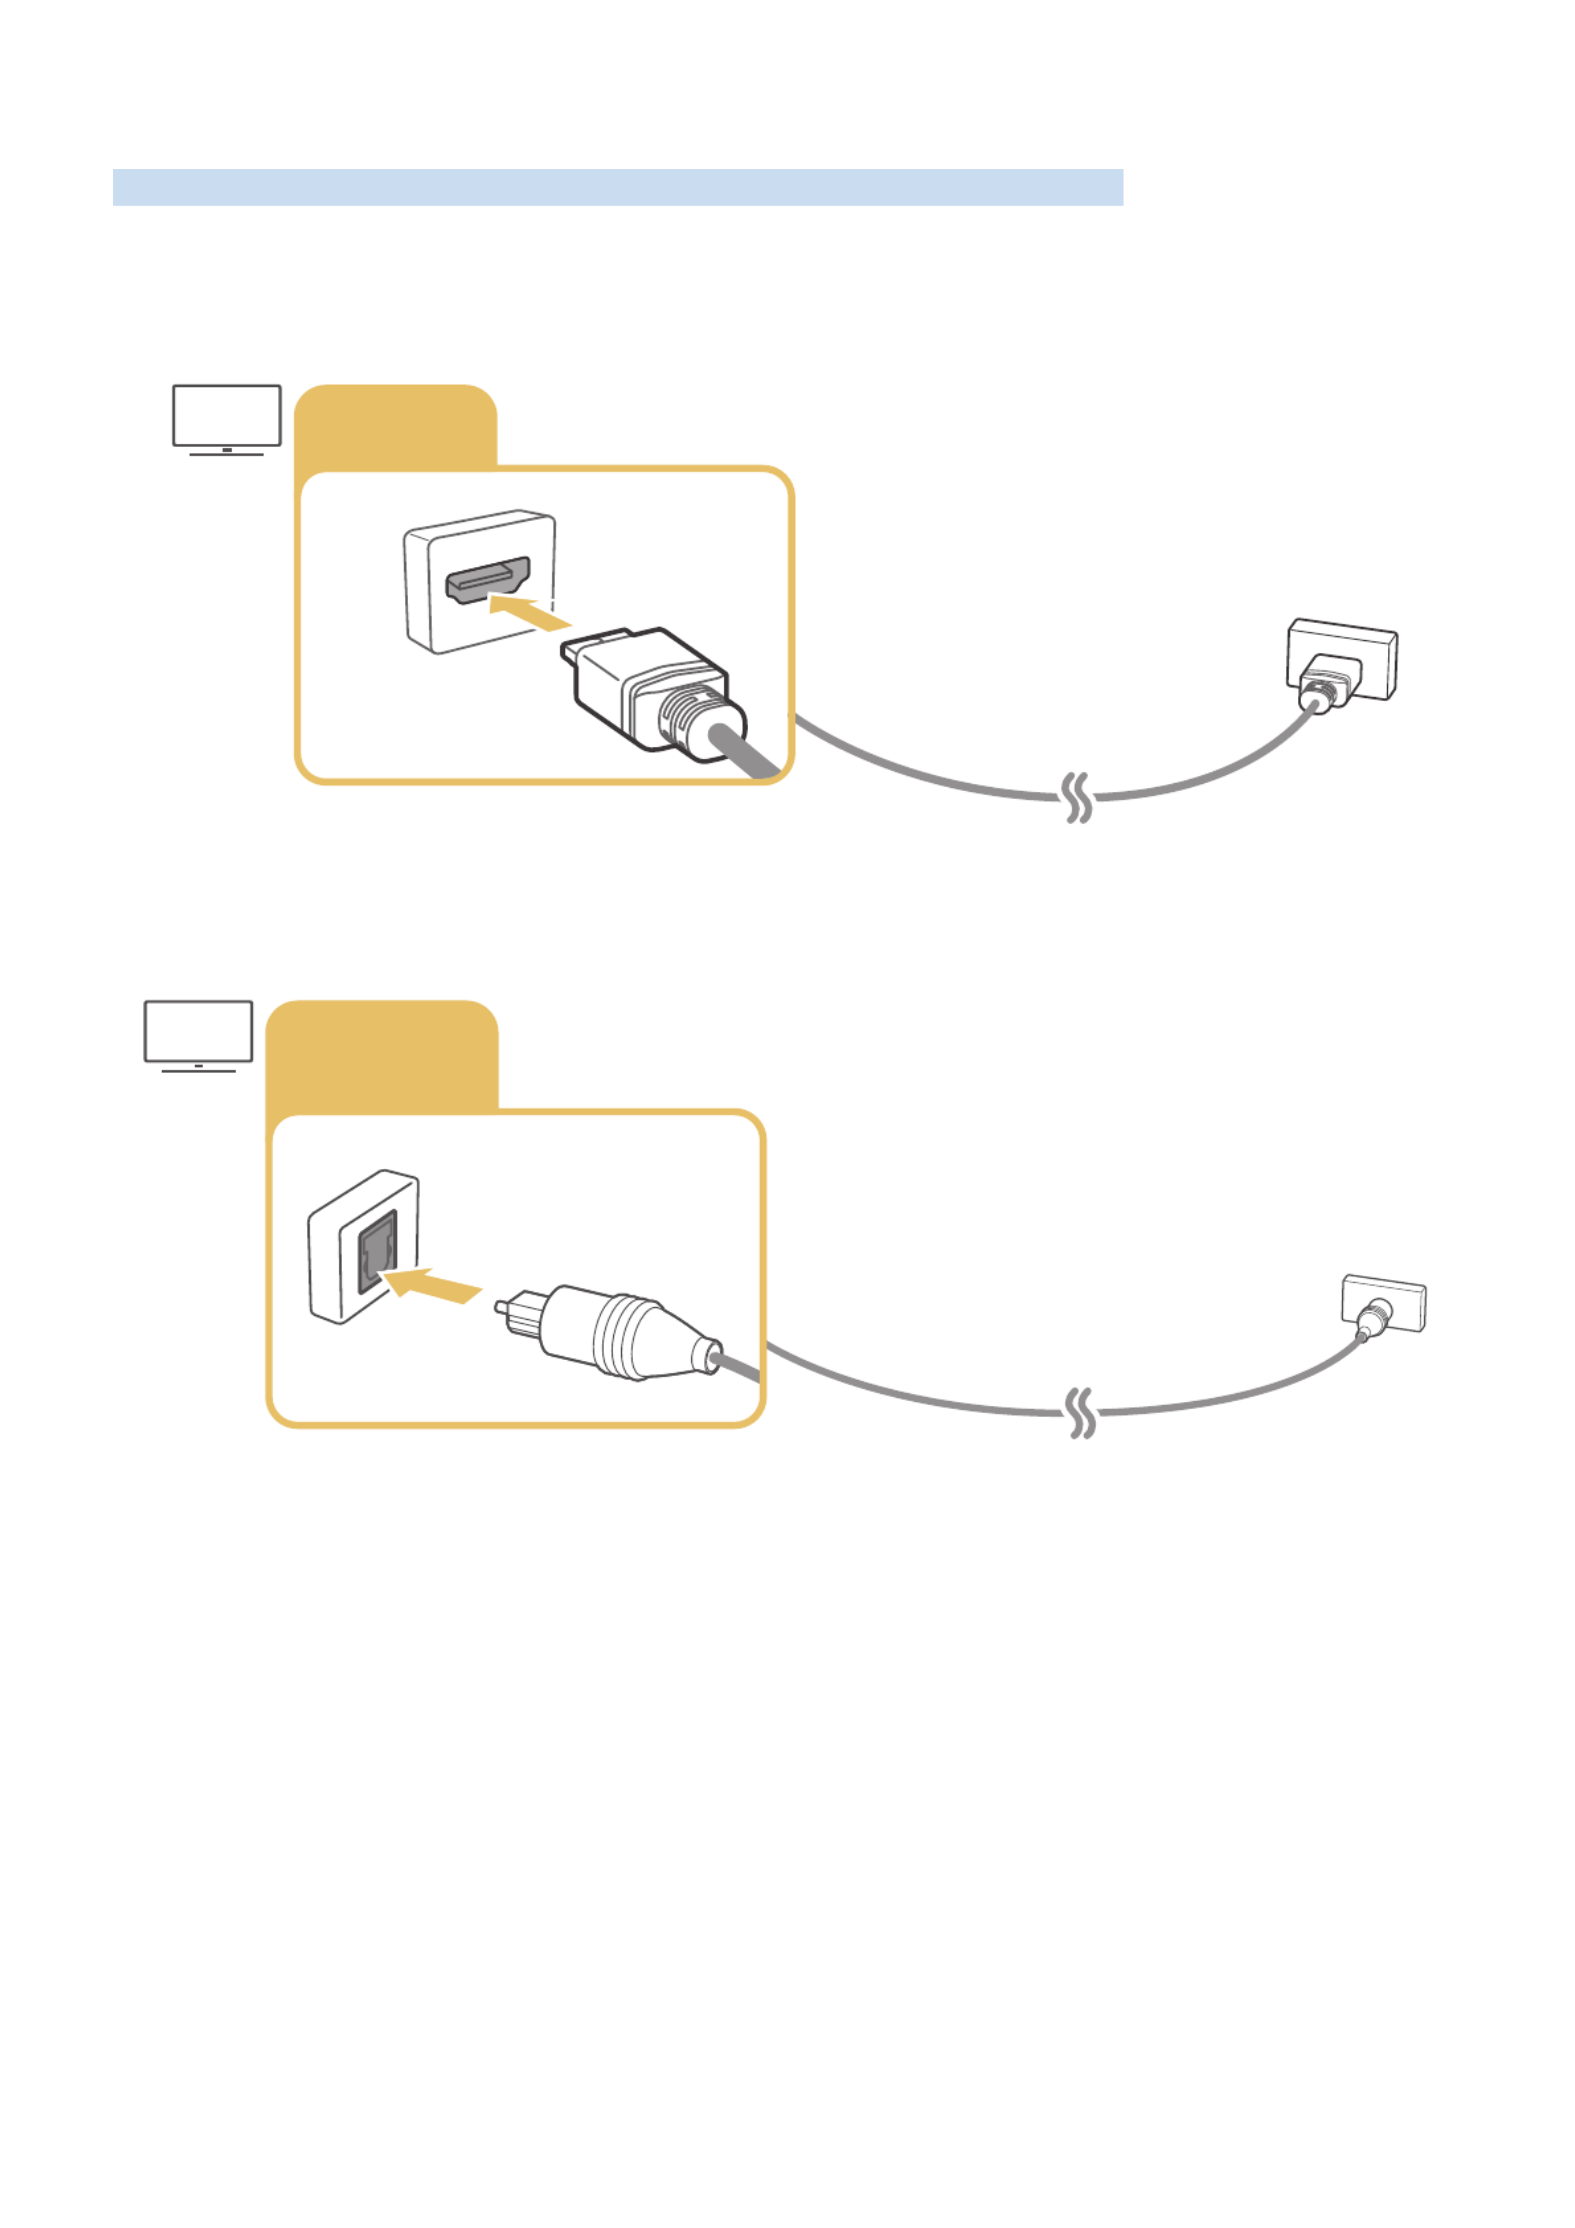
Connecting with a component cable (only for models with COMPONENT IN /
AV IN)
After referencing the figure below, connect the Component IN on the TV to the Component OUT of the
external device by using the provided adapter and component cable. Make sure to connect the same color
connectors together. (blue to blue, yellow to yellow, etc.)
COMPONENT IN / AV IN
COMPONENT IN
COMPONENT IN Adapter
AV IN Adapter
AV IN
"To use component equipment, connect both a component cable (blue) and an AV cable (yellow).

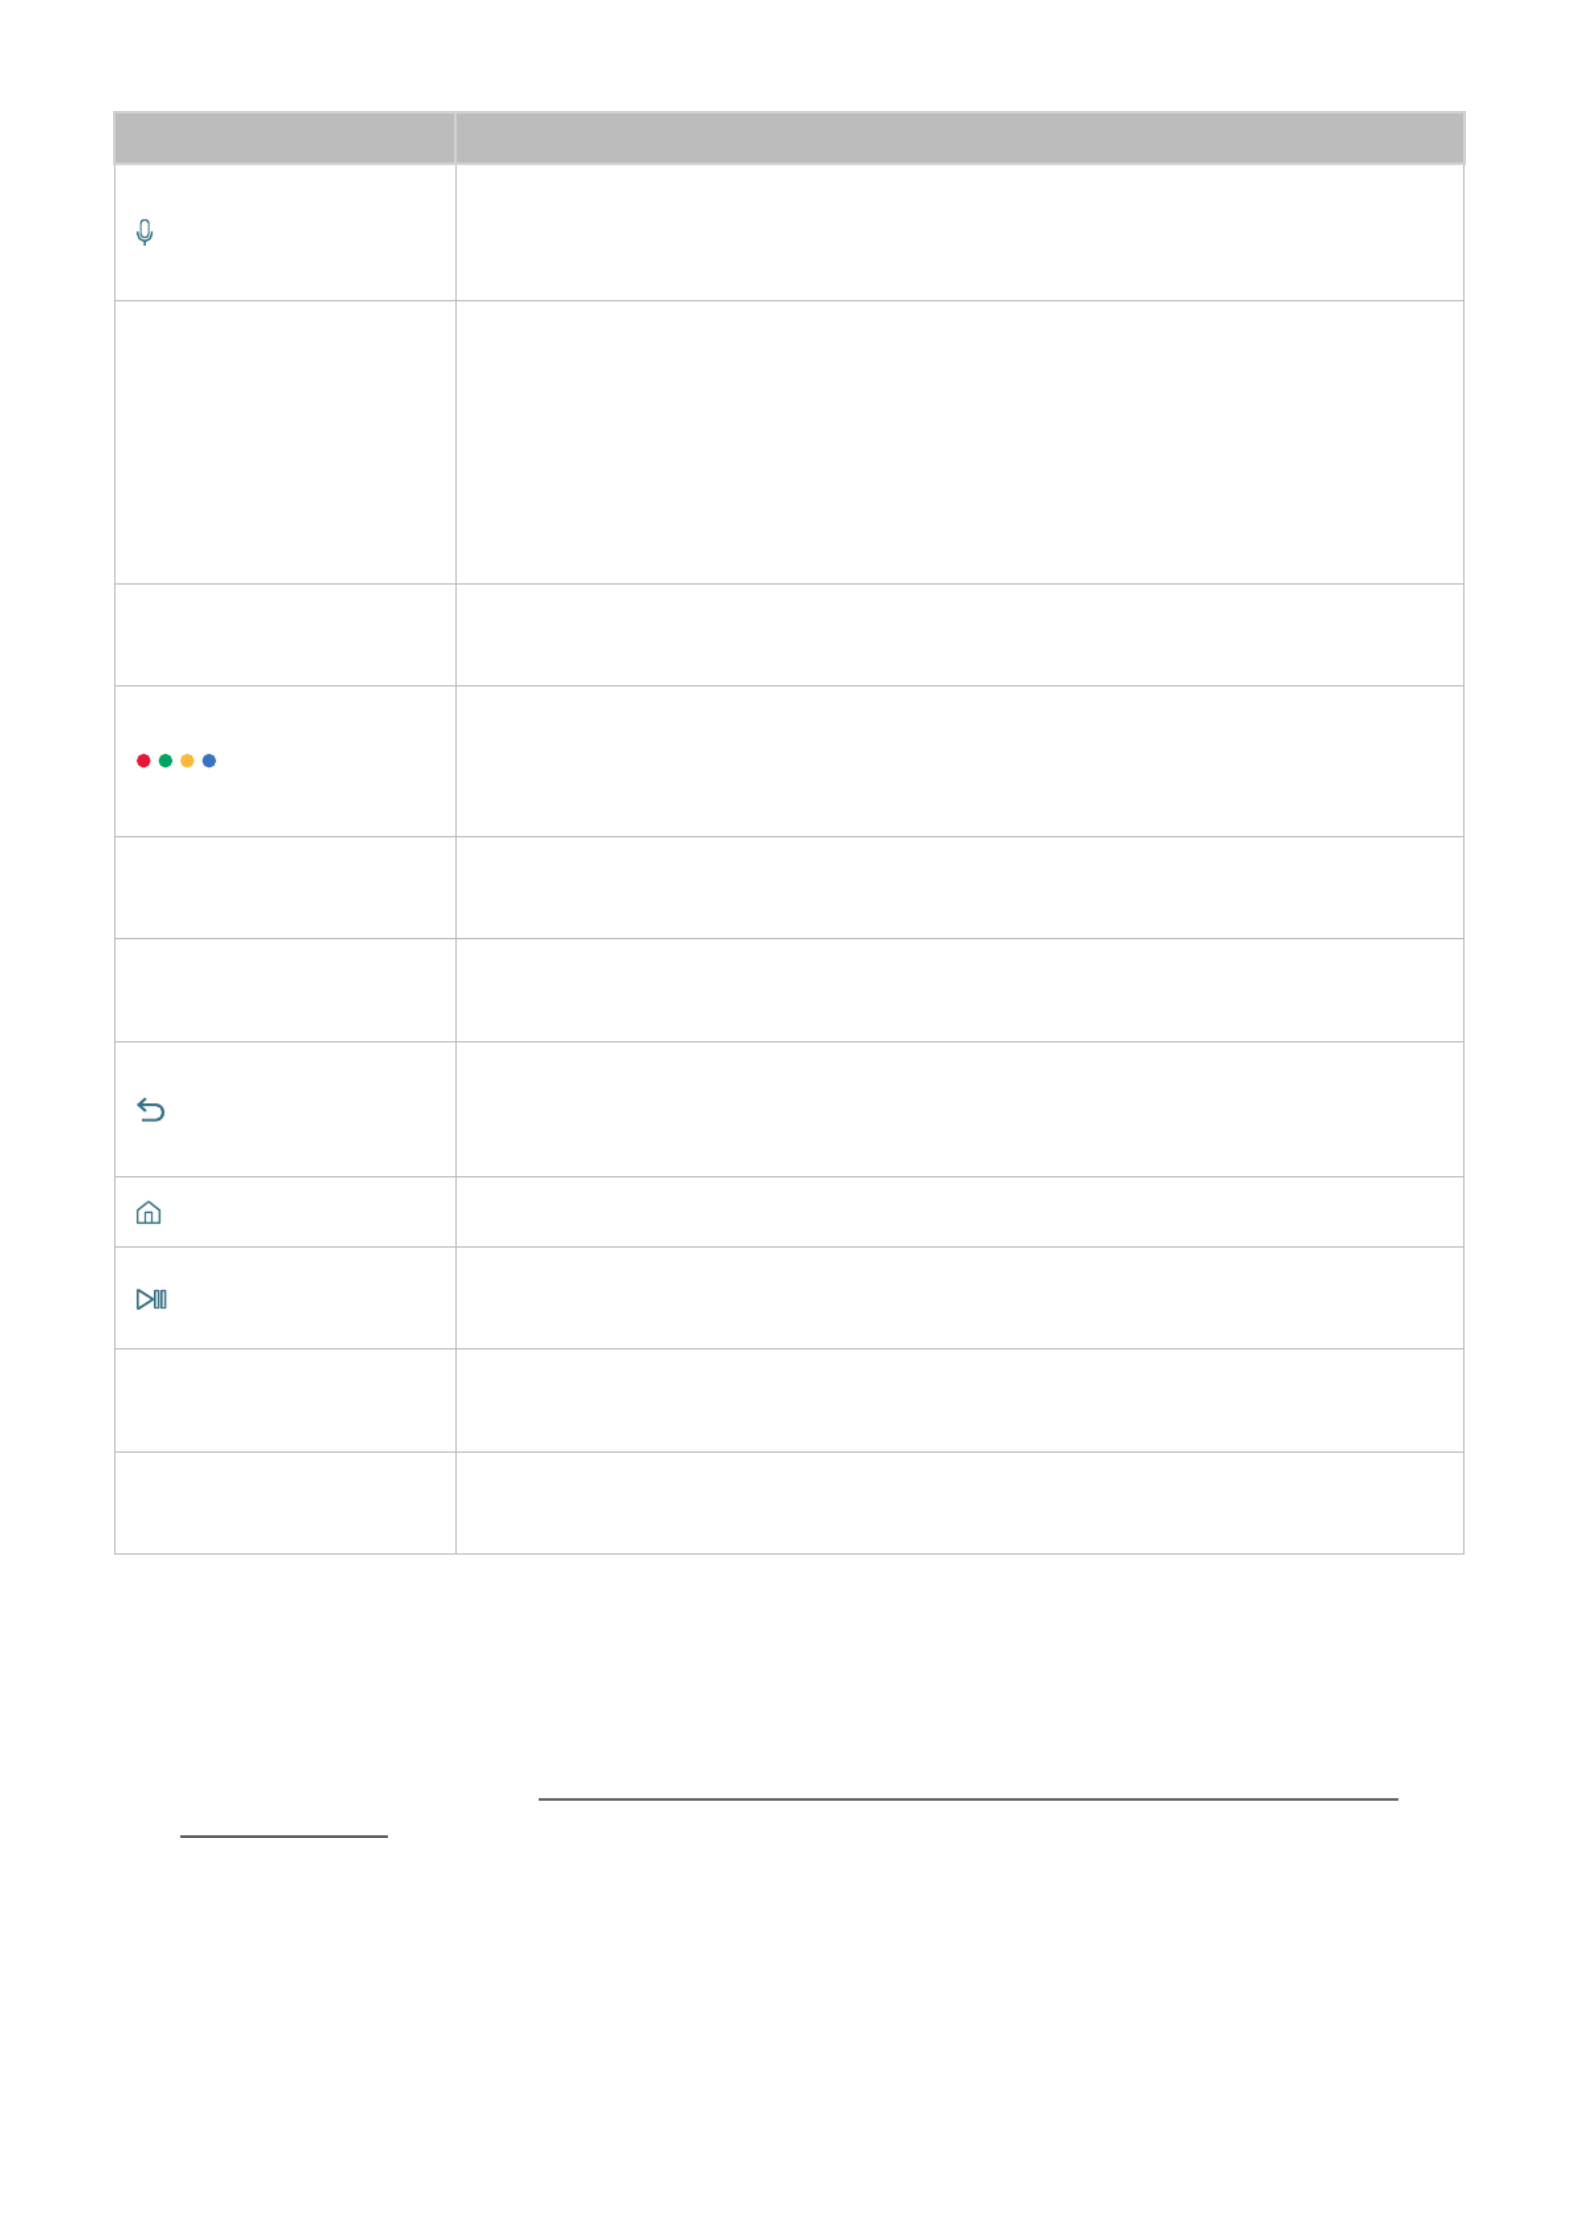
Connecting with a composite cable (only for models with COMPONENT IN / AV
IN)
After referencing the figure below, connect the AV IN on the TV to the AV OUT of the external device by
using the provided adapter and composite cable. When connecting the cables, be sure to match the colors
between the cables and ports.
AV IN / COMPONENT IN
COMPONENT IN
COMPONENT IN Adapter
AV IN Adapter
AV IN
"Connect AV (composite) equipment to AV In only. Do not connect to Component In.
Audio Input and Output Connections
Make the correct audio connections between your TV and your external devices.
Connecting with an HDMI (ARC) cable
HDMI IN
(ARC)
Connecting with a digital audio (optical) cable
DIGITAL
AUDIO OUT
(OPTICAL)

Connecting through wireless network
You can connect the TV to a Samsung wireless audio device through wireless network. At this time,
two devices must be connected on the same network. For more information, refer to Wireless Speaker
Manager Settings Sound Expert Settings Wireless Speaker Manager ( ).
Connecting Bluetooth Devices
You can connect the TV or audio devices via Bluetooth. For more information, refer to the Connection
Guide Source Connection Guide ( ).
"This function is not available on certain models in specific geographical areas.

Connecting a Computer
Use the TV as a computer monitor or connect the TV to a computer via your network and access the
computer's content.
Connecting through the HDMI port ― Screen sharing
HDMI IN
(DVI)
HDMI
DVI
HDMI IN
(DVI)
"When your PC is connected, select PC for the Device Icon. For more information about the port settings, refer to
"Editing external devices."
Connecting through the Smart View app ― Content sharing
When the TV is connected through the Smart View program on your PC, you can easily play content for
photos, videos, and audios through the TV. For more information, refer to the Connection Guide (
Source Connection Guide ).

Connecting a Mobile Device
View a mobile device's screen by connecting the mobile device to your TV or network.
Using Smart View (Screen Mirroring) or contents sharing
You can play media content saved on your mobile device on the TV's screen and share contents by
connecting with the mirroring function.
1.
Launch the Smart View (Screen Mirroring) function on your mobile device. The mobile device
searches for available devices to connect to.
2.
Select the TV from the list. The TV connects to the mobile device.
"If your mobile device does not find your TV, turn the TV and the mobile device off and then on and try
again.
"If there are multiple TVs, you can easily select any of different TV names in Settings Network
Device Name.
Connecting mobile devices without a wireless router (Wi-Fi Direct)
Settings Network Expert Settings Wi-Fi Direct
"To use Wi-Fi Direct, the Wi-Fi Direct function in the mobile device must be active.
Connecting a mobile device via the Smart View App
When you install the Smart View App on your mobile device, you can play the mobile device's multimedia
content on your TV or control the TV using the mobile device. You can download the app from Google Play
Store, Samsung Apps, or the App Store.
"To use the Smart View function, the mobile device must support the mirroring function such as AllShare Cast
and Smart View. To check whether your mobile device supports the mirroring function, please visit the mobile
device manufacturer's website.

Connection Notes
When connecting an external device, note the following:
"The number of connectors and their names and locations may differ with the model.
"Refer to the external device's operating manual when connecting it to the TV. The number of external device
connectors and their names and locations may differ with the manufacturer.
Connection notes for HDMI
●The following types of HDMI cables are recommended:
–High-Speed HDMI Cable
–High-Speed HDMI Cable with Ethernet
●Use an HDMI cable with a thickness of 0.66 inches (17 mm) or less.
●Using a non-certified HDMI cable may result in a blank screen or a connection error.
●Some HDMI cables and devices may not be compatible with the TV due to different HDMI
specifications.
●This TV does not support HDMI Ethernet Channel. Ethernet is a Local Area Network (LAN) built with
coaxial cables standardized by the IEEE.
●Use a cable shorter than 10 feet (3m) to get the best UHD viewing quality.
●Many computer graphics adaptors do not have HDMI ports, but have DVI ports instead. When the PC
that does not support HDMI video out, connect your PC with the HDMI-DVI cable.
"For more information, refer to "Connecting a Computer."

Connection notes for audio devices
●For better audio quality, it is a good idea to use an AV receiver.
●Connecting a device using an optical cable does not automatically turn off the TV speakers. To turn
off the TV speakers, set Select Speaker Settings Sound Select Speaker ( ) to Audio Out/
Optical.
●An unusual noise coming from a connected audio device while you are using it may indicate a
problem with the audio device itself. If this occurs, ask for assistance from the audio device's
manufacturer.
●Digital audio is only available with 5.1-channel broadcasts.
Connection notes for computers
●For the resolutions supported by the TV, refer to "Read Before Connecting a Computer (Supported
Resolutions)."
●As long as file sharing is activated, unauthorized access may occur. When you do not need to access
data, disable file sharing.
●Your PC and Smart TV must be connected to each other on the same network.
●When sharing content with other network-based devices such as those in an IP (Internet Protocol)
storage system, sharing may not be supported due to the network’s configuration, quality, or
functionality, for example, if the network has an NAS (Network-Attached Storage) device.
Connection notes for mobile devices
●To use the Smart View function, the mobile device must support a mirroring function such as
AllShare Cast or Smart View. To check whether your mobile device supports the mirroring function,
please visit the mobile device manufacturer's website.
●To use , the mobile device must support the Wi-Fi Direct function. Please check if your Wi-Fi Direct
mobile device supports Wi-Fi Direct.
●The mobile device and your Smart TV must be connected to each other on the same network.
●The video or audio may stop intermittently, depending on network conditions.
●When sharing content with other network-based devices such as those in an IP (Internet Protocol)
storage system, sharing may not be supported due to the network’s configuration, quality, or
functionality, for example, if the network has an NAS (Network-Attached Storage) device.

About the Samsung Smart Remote (Voice Interaction version)
Voice Interaction is available for Samsung Smart Remotes that have a microphone. However, this function
may not be supported depending on the model or geographical region.
Directional pad (up/down/left/right)
Select
Button Description
(Voice recognition)
Runs Voice Interaction. Press the button, say a voice command, and then release
the button to run Voice Interaction. When pressed once, the guide to Voice
Interaction appears.
123 (Number pad)
When pressed, a number strip appears on the screen.
Select numbers and then select to enter a numeric value. Use to change the Done
channel, enter a PIN, enter a ZIP code, etc.
If the Color Button appears with a number strip on the screen, select the Color
Button and then select a specific color by using the directional pad (up/down/
left/right). Use this to access additional options that are specific according to the
feature in use.
EXTRA While watching content, press to display extra information from the content
provider.
Use these colored buttons to access additional options that are specific according
to the feature in use.
"These buttons are not available in the U.S.A. and Canada.
Directional pad (up/
down/left/right) Moves the focus and changes the values seen on the TV's menu.
Select Selects or runs a focused item. When pressed while you are watching content,
detailed program information appears.
(Return)
Press to return to the previous menu. When pressed for 1 second or more, the
running function is terminated. When pressed while you are watching a program,
the previous channel appears.
(Smart hub) Press to return to the Home Screen.
(Play/pause) When pressed, the playback controls appear. Using these controls, you can control
the media content that is playing.
VOL (Volume) Move the button up or down to adjust the volume. To mute the sound, press the
button. When pressed for 1 second or more, the Accessibility Shortcuts appears.
CH (Channel) Move the button up or down to change the channel. To see the screen, press Guide
the button.
"Use the Samsung Smart Remote less than 20 feet from the TV. The usable distance may vary with the wireless
environmental conditions.
"The images, buttons, and functions of the Samsung Smart Remote may differ with the model.
"To use the Samsung Smart Remote through the external device, it is required to configure its settings.
For more information, refer to "Controlling External Devices with the Samsung Smart Remote - Using the
Universal Remote."
Produktspezifikationen
| Marke: | Samsung |
| Kategorie: | Fernsehen |
| Modell: | UN49KU650 |
Brauchst du Hilfe?
Wenn Sie Hilfe mit Samsung UN49KU650 benötigen, stellen Sie unten eine Frage und andere Benutzer werden Ihnen antworten
Bedienungsanleitung Fernsehen Samsung

16 Oktober 2024
13 Oktober 2024
13 Oktober 2024
12 Oktober 2024
11 Oktober 2024
9 Oktober 2024
8 Oktober 2024
4 Oktober 2024
4 Oktober 2024
3 Oktober 2024
Bedienungsanleitung Fernsehen
- Fernsehen Infiniton
- Fernsehen Clatronic
- Fernsehen Acer
- Fernsehen Sanyo
- Fernsehen BenQ
- Fernsehen Lexibook
- Fernsehen Manhattan
- Fernsehen Manta
- Fernsehen Medion
- Fernsehen Philips
- Fernsehen Sony
- Fernsehen Sweex
- Fernsehen Tevion
- Fernsehen Zalman
- Fernsehen Panasonic
- Fernsehen LG
- Fernsehen MX Onda
- Fernsehen AEG
- Fernsehen Siemens
- Fernsehen Electrolux
- Fernsehen Küppersbusch
- Fernsehen OK
- Fernsehen Vox
- Fernsehen TechniSat
- Fernsehen XD Enjoy
- Fernsehen Denver
- Fernsehen ECG
- Fernsehen Intenso
- Fernsehen MarQuant
- Fernsehen Bush
- Fernsehen Telefunken
- Fernsehen Thomson
- Fernsehen Trevi
- Fernsehen BEKO
- Fernsehen Blaupunkt
- Fernsehen Grundig
- Fernsehen Schneider
- Fernsehen Sharp
- Fernsehen Aspes
- Fernsehen Brandt
- Fernsehen Daewoo
- Fernsehen Pyle
- Fernsehen Mitsubishi
- Fernsehen Finlux
- Fernsehen Haier
- Fernsehen High One
- Fernsehen Hisense
- Fernsehen Luxor
- Fernsehen NABO
- Fernsehen Nordmende
- Fernsehen Salora
- Fernsehen SEG
- Fernsehen Smart Brand
- Fernsehen Svan
- Fernsehen Techwood
- Fernsehen Vestel
- Fernsehen Philco
- Fernsehen Schaub Lorenz
- Fernsehen Aiwa
- Fernsehen Alphatronics
- Fernsehen AudioSonic
- Fernsehen Coby
- Fernsehen Bang And Olufsen
- Fernsehen DIFRNCE
- Fernsehen Lenco
- Fernsehen Mpman
- Fernsehen ODYS
- Fernsehen Pioneer
- Fernsehen Polaroid
- Fernsehen Jay-Tech
- Fernsehen JVC
- Fernsehen Krüger And Matz
- Fernsehen Muse
- Fernsehen Nokia
- Fernsehen Optoma
- Fernsehen PEAQ
- Fernsehen Xiaomi
- Fernsehen Abus
- Fernsehen Megasat
- Fernsehen Walker
- Fernsehen Akai
- Fernsehen Arçelik
- Fernsehen Caratec
- Fernsehen Changhong
- Fernsehen Chiq
- Fernsehen Continental Edison
- Fernsehen Dual
- Fernsehen Dyon
- Fernsehen Edenwood
- Fernsehen Ferguson
- Fernsehen Funai
- Fernsehen GoGEN
- Fernsehen Hannspree
- Fernsehen Hitachi
- Fernsehen Horizon
- Fernsehen Hyundai
- Fernsehen JTC
- Fernsehen Kernau
- Fernsehen Loewe
- Fernsehen Metz
- Fernsehen MT Logic
- Fernsehen Orava
- Fernsehen Orion
- Fernsehen Reflexion
- Fernsehen Star-Light
- Fernsehen Strong
- Fernsehen TCL
- Fernsehen Tesla
- Fernsehen Toshiba
- Fernsehen Allview
- Fernsehen Casio
- Fernsehen Sencor
- Fernsehen Icy Box
- Fernsehen Element
- Fernsehen ViewSonic
- Fernsehen Dell
- Fernsehen Lenovo
- Fernsehen Cecotec
- Fernsehen Nikkei
- Fernsehen Xiron
- Fernsehen Opera
- Fernsehen Sagem
- Fernsehen Antarion
- Fernsehen Xoro
- Fernsehen Humax
- Fernsehen Logik
- Fernsehen CGV
- Fernsehen LTC
- Fernsehen Bluesky
- Fernsehen Orima
- Fernsehen Proline
- Fernsehen NEC
- Fernsehen Marantz
- Fernsehen TEAC
- Fernsehen Packard Bell
- Fernsehen Westinghouse
- Fernsehen AOC
- Fernsehen NextBase
- Fernsehen Vivax
- Fernsehen Uniden
- Fernsehen Kogan
- Fernsehen Innoliving
- Fernsehen Magnum
- Fernsehen Smart Tech
- Fernsehen JGC
- Fernsehen Soundmaster
- Fernsehen Sylvania
- Fernsehen Qilive
- Fernsehen Doffler
- Fernsehen NewStar
- Fernsehen Zenith
- Fernsehen Insignia
- Fernsehen Roadstar
- Fernsehen SereneLife
- Fernsehen Woxter
- Fernsehen Sogo
- Fernsehen Peerless-AV
- Fernsehen RCA
- Fernsehen Oppo
- Fernsehen Vivo
- Fernsehen AYA
- Fernsehen Furrion
- Fernsehen Seiki
- Fernsehen Alba
- Fernsehen Aldi
- Fernsehen Daitsu
- Fernsehen Digihome
- Fernsehen E-motion
- Fernsehen Emerson
- Fernsehen GPX
- Fernsehen Graetz
- Fernsehen HKC
- Fernsehen Hoher
- Fernsehen ILive
- Fernsehen Naxa
- Fernsehen Online
- Fernsehen Onn
- Fernsehen Oyster
- Fernsehen Premier
- Fernsehen Reflex
- Fernsehen Rm 2000
- Fernsehen Saba
- Fernsehen Sbr
- Fernsehen Sunny
- Fernsehen Sunstech
- Fernsehen TechLine
- Fernsehen Technika
- Fernsehen Tele 2
- Fernsehen Grunkel
- Fernsehen Tve
- Fernsehen Viewpia
- Fernsehen Vision Plus
- Fernsehen Vizio
- Fernsehen Voxx
- Fernsehen Wharfedale
- Fernsehen Yasin
- Fernsehen Ziggo
- Fernsehen Videocon
- Fernsehen Bauhn
- Fernsehen Planar
- Fernsehen Monster
- Fernsehen Mitsai
- Fernsehen Proscan
- Fernsehen Kunft
- Fernsehen Nevir
- Fernsehen Seura
- Fernsehen EKO
- Fernsehen SunBriteTV
- Fernsehen Kemo
- Fernsehen V7
- Fernsehen Astar
- Fernsehen QBell Technology
- Fernsehen Visco
- Fernsehen Majestic
- Fernsehen DirecTV
- Fernsehen HCI
- Fernsehen Mach Power
- Fernsehen MBM
- Fernsehen Inno-Hit
- Fernsehen Elements
- Fernsehen Palsonic
- Fernsehen Cello
- Fernsehen Pantel
- Fernsehen FFalcon
- Fernsehen Coocaa
- Fernsehen SYLVOX
- Fernsehen ISymphony
- Fernsehen Aristona
- Fernsehen Apex
- Fernsehen Tucson
- Fernsehen Kubo
- Fernsehen Avtex
- Fernsehen NPG
- Fernsehen Telesystem
- Fernsehen ATYME
- Fernsehen Lin
- Fernsehen Tivax
- Fernsehen H&B
- Fernsehen Norcent
- Fernsehen TELE System
- Fernsehen Belson
- Fernsehen Elbe
- Fernsehen Mitzu
- Fernsehen Voxicon
- Fernsehen Aconatic
- Fernsehen Mitchell & Brown
- Fernsehen FOX Electronics
- Fernsehen Mystery
Neueste Bedienungsanleitung für -Kategorien-

16 Oktober 2024

16 Oktober 2024

15 Oktober 2024

15 Oktober 2024

15 Oktober 2024
15 Oktober 2024

15 Oktober 2024
15 Oktober 2024
15 Oktober 2024
15 Oktober 2024