Samsung LE 22C330 Bedienungsanleitung
Samsung
LCD fernseher
LE 22C330
Lesen Sie kostenlos die 📖 deutsche Bedienungsanleitung für Samsung LE 22C330 (133 Seiten) in der Kategorie LCD fernseher. Dieser Bedienungsanleitung war für 11 Personen hilfreich und wurde von 2 Benutzern mit durchschnittlich 4.5 Sternen bewertet
Seite 1/133

© 2010 Samsung Electronics Co., Ltd. All rights reserved.
LCD TV user manual
LCD TV
user manual
imagine the possibilities
Thank you for purchasing this Samsung product.
To receive more complete service, please register
your product at
www.samsung.com/register
Model _____________ Serial No. _____________
Contact SAMSUNG WORLDWIDE
If you have any questions or comments relating to Samsung products, please contact the SAMSUNG customer care centre.
Country Customer Care Centre Web Site
ARMENIA 0-800-05-555 -
AUSTRIA 0810 - SAMSUNG (7267864, € 0.07/min) www.samsung.com/at
AZERBAIJAN 088-55-55-555 -
BELARUS 810-800-500-55-500 -
BELGIUM 02-201-24-18 www.samsung.com/be (Dutch)
www.samsung.com/be_fr (French)
CZECH 800 - SAMSUNG (800-726786) www.samsung.com/cz
DENMARK
800-7267 www.samsung.com
FINLAND
FRANCE www.samsung.com/fr
GERMANY 01805 - SAMSUNG(726-7864 € 0,14/Min) www.samsung.com/de
8-800-555-555 -
HUNGARY 06-80-SAMSUNG(726-7864) www.samsung.com/hu
EIRE 0818 717100 www.samsung.com/ie
ITALIA 800-SAMSUNG(726-7864) www.samsung.com/it
KAZAKHSTAN 8-10-800-500-55-500 -
KYRGYZSTAN 00-800-500-55-500 www.samsung.com
LATVIA 8000-7267 www.samsung.com
LITHUANIA 8-800-77777 www.samsung.com
LUXEMBURG www.samsung.com/lu
00-800-500-55-500 -
NETHERLANDS www.samsung.com/nl
815-56 480 www.samsung.com/no
0 801 1SAMSUNG(172678)
www.samsung.com/pl
80820-SAMSUNG(726-7864) www.samsung.com/pt
RUSSIA 8-800-555-55-55 www.samsung.com
0800-SAMSUNG(726-7864)
www.samsung.com/es
0771 726 7864 (SAMSUNG) www.samsung.com/se
0848 - SAMSUNG(7267864, CHF 0.08/min) www.samsung.com/ch
www.samsung.com/ch_fr/(French)
TADJIKISTAN 8-10-800-500-55-500 www.samsung.com
U.K 0845 SAMSUNG (7267864)
UKRAINE 0-800-502-000 www.samsung.ua
www.samsung.com/ua_ru
UZBEKISTAN 8-10-800-500-55-500 www.samsung.com
BN68-02589F
BN68-02589F_Eng_Cover.indd 1 2010-3-19 15:35:34

2
English
Figures and illustrations in this User Manual are provided for reference only and may differ from actual product appearance.
Product design and specifications may be changed without notice.
Digital TV notice
1. Functionalities related to Digital TV (DVB) are only available in countries/areas where DVB-T (MPEG2 and MPEG4 AVC) digital terrestrial signals are
broadcasted or where you are able to access to a compatible DVB-C (MPEG2 and MPEG4 AAC) cable-TV service. Please check with your local
dealer the possibility to receive DVB-T or DVB-C signal.
2. DVB-T is the DVB European consortium standard for the broadcast transmission of digital terrestrial television and DVB-C is that for the broadcast
transmission of digital TV over cable. However, some differentiated features like EPG (Electric Programme Guide), VOD (Video On Demand) and so
on, are not included in this specification. So, they cannot be workable at this moment.
3. Although this TV set meets the latest DVB-T and DVB-C standards, as of [August, 2008], the compatibility with future DVB-T digital terrestrial and
DVB-C digital cable broadcasts cannot be guaranteed.
4. Depending on the countries/areas where this TV set is used some cable-TV providers may charge an additional fee for such a service and you may
be required to agree to terms and conditions of their business.
5. Some Digital TV functions might be unavailable in some countries or regions and DVB-C might not work correctly with some cable service providers.
6. For more information, please contact your local Samsung customer care centre.
The reception quality of TV may be affected due to differences in broadcasting method between the countries. Please check the TV performance in
✎
the local SAMSUNG Authorized Dealer, or the Samsung Call Centre whether it can be improved by reconfiguring TV setting or not.
Still image warning
Avoid displaying still images (like jpeg picture files) or still image element (like TV programme logo, panorama or 4:3 image format, stock or news bar at
screen bottom etc.) on the screen. Constant displaying of still picture can cause ghosting of LCD screen, which will affect image quality. To reduce risk of
this effect, please follow below recommendations:
Avoid displaying the same TV channel for long periods.•
Always try do display any image on full screen, use TV set picture format menu for best possible match.•
Reduce brightness and contrast values to minimum required to achieve desired picture quality, exceeded values may speed up the burnout process.•
Frequently use all TV features designed to reduce image retention and screen burnout, refer to proper user manual section for details.•
Securing the Installation Space
Keep the required distances between the product and other objects (e.g. walls) to ensure proper ventilation.
Failing to do so may result in fire or a problem with the product due to an increase in the internal temperature of the product.
When using a stand or wall-mount, use parts provided by Samsung Electronics only.
✎
If you use parts provided by another manufacturer, it may result in a problem with the produ ct or an injury due to the product falling.
x
The appearance may differ depending on the product.
✎
Installation with a stand. Installation with a wall-mount.
10 cm
10 cm
10 cm 10 cm
10 cm
10 cm
10 cm
Correct Disposal of This Product (Waste Electrical & Electronic Equipment)
(Applicable in the European Union and other European countries with separate collection systems)
This marking on the product, accessories or literature indicates that the product and its electronic accessories (e.g. charger,
headset, USB cable) should not be disposed of with other household waste at the end of their working life. To prevent possible
harm to the environment or human health from uncontrolled waste disposal, please separate these items from other types of waste
and recycle them responsibly to promote the sustainable reuse of material resources. Household users should contact either the
retailer where they purchased this product, or their local government office, for details of where and how they can take these items
for environmentally safe recycling. Business users should contact their supplier and check the terms and conditions of the purchase
contract. This product and its electronic accessories should not be mixed with other commercial wastes for disposal.
Correct disposal of batteries in this product
(Applicable in the European Union and other European countries with separate battery return systems)
This marking on the battery, manual or packaging indicates that the batteries in this product should not be disposed of with other
household waste at the end of their working life. Where marked, the chemical symbols Hg, Cd or Pb indicate that the battery
contains mercury, cadmium or lead above the reference levels in EC Directive 2006/66. If batteries are not properly disposed of,
these substances can cause harm to human health or the environment. To protect natural resources and to promote material
reuse, please separate batteries from other types of waste and recycle them through your local, free battery return system.
BN68-02589F_Eng.indb 2 2010-3-18 19:07:30

3
English
Contents
Getting Started
4
4 Accessories
4 Viewing the Control Panel
5 Viewing the Remote Control
6 Connecting to an Antenna
6 Plug & Play (Initial Setup)
Connections
7
7 Connecting to an AV Device
8 Connecting to an Audio Device
8 Connecting to a PC
10 Changing the Input Source
Basic Features
10
10 How to Navigate Menus
11 Using the INFO button (Now & Next guide)
11 Planning Your Viewing
12 Channel Menu
14 Picture Menu
17 Sound Menu
19 Setup Menu
21 Support Menu
Advanced Features
22
22 Media Play
Other Information
26
26 Analogue Channel Teletext Feature
27 Installing the Wall Mount
28 Anti-Theft Kensington Lock
28 Securing the TV to the Wall
29 Troubleshooting
32 Specifications
33 Index
Check the Symbol!
t
This function can be used by
pressing the TOOLS button on
the remote control.
Note One-Touch Button
P
POWER
BN68-02589F_Eng.indb 3 2010-3-18 19:07:31
4
English
Getting Started
Accessories
Please make sure the following items are included with your LCD TV. If any items are missing, contact your dealer.
✎
The items’ colours and shapes may vary depending on the models.
✎
Remote Control & Batteries (AAA x 2) y
Owner’s Instructions y
Cleaning Cloth y
Warranty Card / Safety Guide (Not available in some locations) y
See separate guide for installing the stand.
1 EA
(M4 X L16)
Stand (1EA) yStand Screws (3EA) y
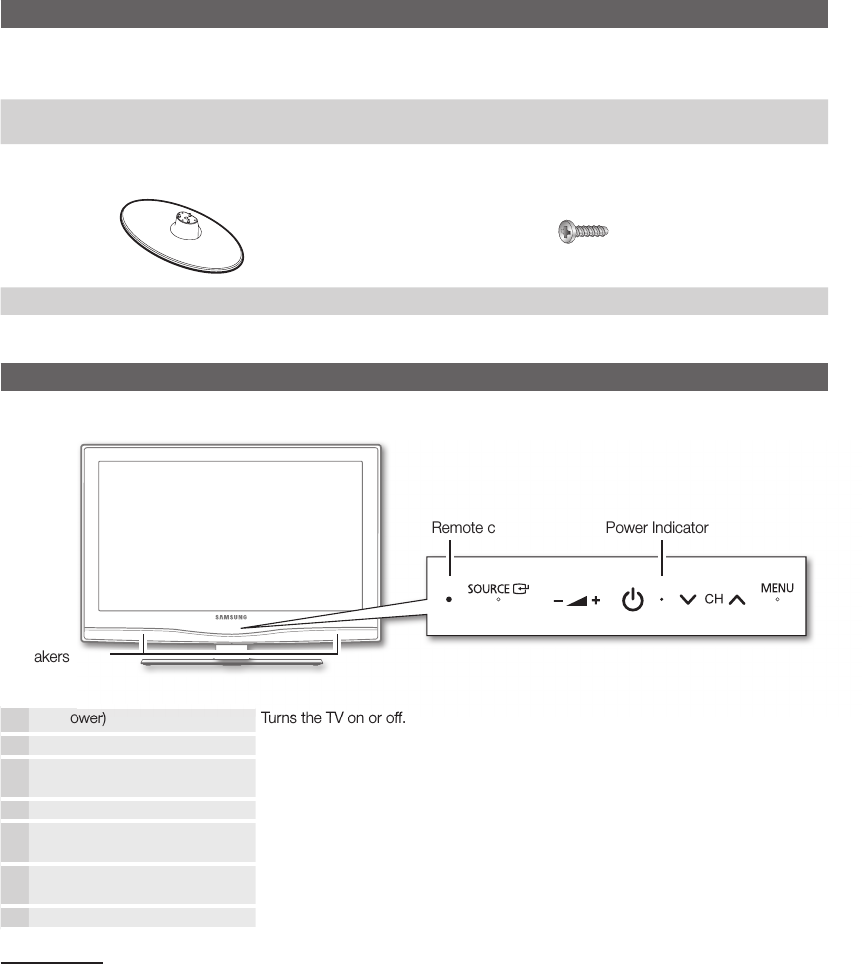
Viewing the Control Panel
The product colour and shape may vary depending on the model.
✎
P
(Power) Turns the TV on or off.
Power Indicator Blinks and turns off when the power is on and lights up in standby mode.
SOURCE
E
Toggles between all the available input sources. In the on-screen menu, use this
button as you would use the ENTER
E
button on the remote control.
MENU Displays an on-screen menu, the OSD (on screen display), of your TV’s features.
Y
Adjusts the volume. In the OSD, use the
Y
buttons as you would use the
and buttons on the remote control.
z
Changes the channels. In the OSD, use the
z
buttons as you would use the
and buttons on the remote control.
Remote control sensor Aim the remote control towards this spot on the TV.
Standby mode
Do not leave your TV in standby mode for long periods of time (when you are away on a holiday, for example). A small amount
of electric power is still consumed even when the power button is turned off. It is best to unplug the power code.
Display the main on-screen menu.
(P. 10)
(Power)
Turns
the TV on
or
off.
Speakers
Power IndicatorRemote control sensor
BN68-02589F_Eng.indb 4 2010-3-18 19:07:32
5
01 Getting Started
English
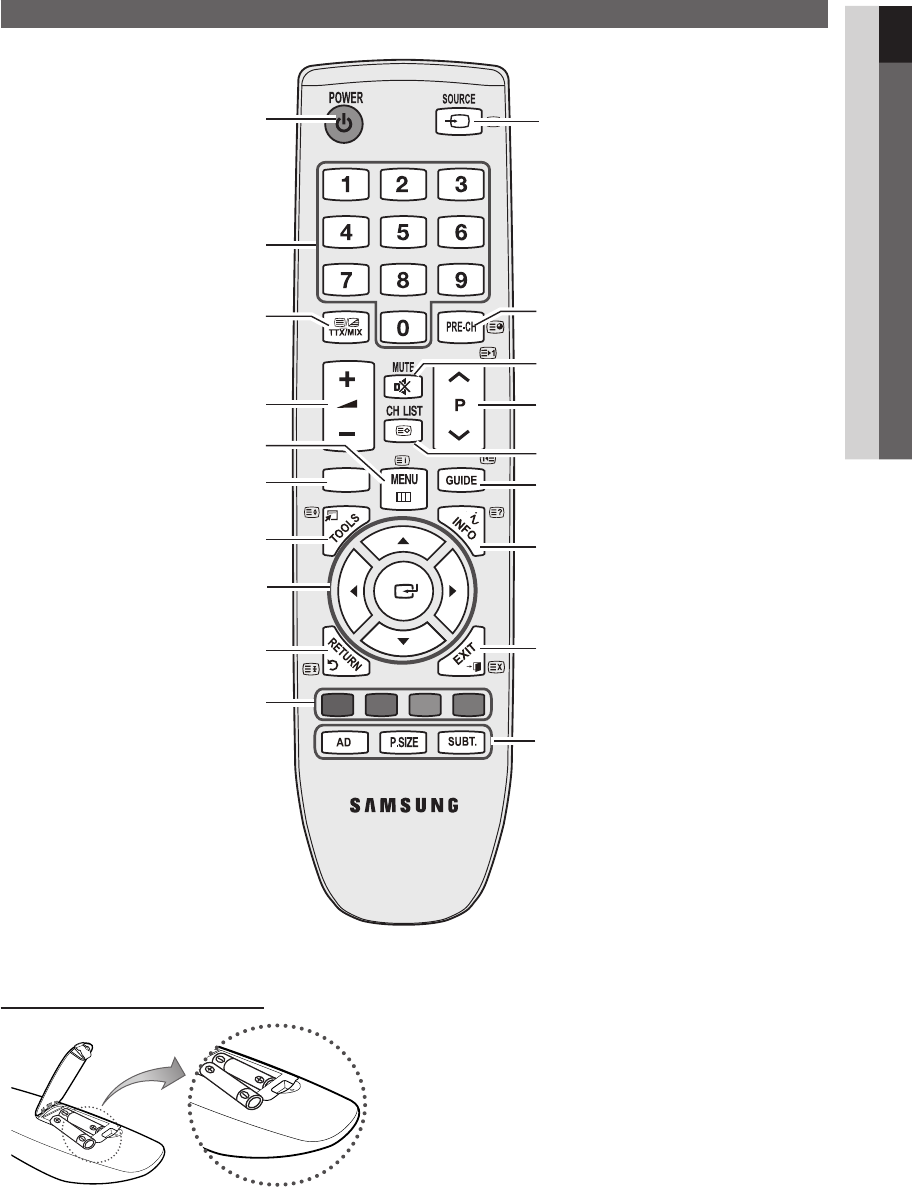
Viewing the Remote Control
Installing batteries (Battery size: AAA)
NOTE
✎
Use the remote control within 23 feet from the TV.
x
Bright light may affect the performance of the remote
x
control. Avoid using nearby special fluorescent light or neon
signs.
The colour and shape may vary depending on the model.
x
MEDIA.P
ABCD
Display and select the available video
sources. (P. 10)
Turn the TV on and off. (P. 6)
Change the channel.
Display the EPG (Electronic Programme
Guide). (P. 11)
Display Channel Lists on the
screen. (P. 14)
Change channels.
Quickly select frequently used
functions. Display information on the
TV screen.
Display the main on-screen menu.
(P. 10)
Adjust the volume.
Return to the previous channel.
Buttons in the Channel Manager,
Media Play menu, etc.
AD: Audio Description selection. (Not
available in some locations) (P. 18)
P.SIZE: Choose the picture size. (P. 16)
SUBT.: Digital subtitle display (P. 20)
Cut off the sound temporarily.
Return to the previous menu. (P. 10)
Select on-screen menu items and
change menu values.
Exit the menu. (P. 10)
Alternately select Teletext,
Double or MiX.
View the Media play.
BN68-02589F_Eng.indb 5 2010-3-18 19:07:33

7
English
02 Connections
Connections
Connecting to an AV Device
Using an HDMI / DVI Cable: HD connection (up to 1080p)
Available devices: DVD, Blu-ray player, HD cable box, HD STB (Set-Top-Box) satellite receiver, cable box, satellite receiver (STB)
HDMI (DVI) IN / PC/DVI AUDIO IN
✎
When using an HDMI/DVI cable connection, you must use the
HDMI (DVI) IN jack. For the DVI cable
connection, use a DVI to HDMI cable or DVI-HDMI (DVI to HDMI) adapter for video connection and the PC/DVI
AUDIO IN jacks for audio.
If an external device such as a DVD / Blu-ray player / cable box /
STB satellite receiver supporting a HDMI
versions older than 1.3 is connected, the TV may operate abnormally (e.g. no screen display / no sound /
annoying flicker / abnormal colour).
If there is no sound after connecting an HDMI cable, check the HDMI version of the external device. If you
suspect the version is older than 1.3, contact the provider of the device to confirm the HDMI version and
request an upgrade.
It is recommended you purchase an HDMI-certified cable. Otherwise, the screen may appear blank or a
connection error may occur.
Using a Component (up to 1080p) or Audio/Video (480i only) Cable and Using a Scart Cable
Available devices: VCR, DVD, Blu-ray player, cable box, STB satellite receiver
In
✎
Ext. mode, DTV Out supports MPEG SD Video and Audio only.
To obtain the best picture quality, the Component connection is recommended over the A/V connection.
✎
R-AUDIO-L PRPBY
AUDIO OUT
R-AUDIO-L PRPBY
DVI OUT
R-AUDIO-L PRPBY
HDMI OUT
Y
WR
R
GB W R
WRG
RB
W R
RW
WY
W
Y
R-AUDIO-L PRPBY
COMPONENT OUT
R-AUDIO-L PRPBY
AUDIO OUT
R-AUDIO-L PRPBY
EXT
R-AUDIO-L PRPBY
AUDIO OUT
R-AUDIO-L PRPBY
VIDEO OUT
W W BG
RR
W
Y
Yellow Red White
W W BG
RR
W
Y
Red Blue Green
W W BG
RR
W
Y
Red White
DVD
Blu-ray player DVDVCR
BN68-02589F_Eng(1-25).indd 7 2010-3-26 14:07:25

8
English
Connections
Connecting to an Audio Device
Using an Optical or Audio Cable Connection
Available devices: digital audio system, amplifi er, DVD home theatre
DIGITAL AUDIO OUT (OPTICAL)
✎
When a digital audio system is connected to the
x
DIGITAL AUDIO OUT (OPTICAL) jack, decrease the volume
of both the TV and the system.
5.1 CH (channel) audio is available when the TV is connected to an external device supporting 5.1 CH.
x
When the receiver (home theatre) is set to on, you can hear sound output from the TV’s
x
optical jack. When the
TV is receiving a DTV signal, the TV will send 5.1 CH sound to the home theatre receiver. When the source is
a digital component such as a DVD / Blu-ray player / cable box / STB (Set-Top-Box) satellite receiver and is
connected to the TV via HDMI, only 2 CH audio will be heard from the home theatre receiver. If you want to
hear 5.1 CH audio, connect the digital audio out jack from your DVD / Blu-ray player / cable box / STB satellite
receiver directly to an amplifier or home theatre.
Connecting to a PC
Using an HDMI/DVI Cable / a D-sub Cable
R-AUDIO-L PRPBY
OPTICAL
R-AUDIO-L PRPBY
AUDIO OUT
R-AUDIO-L PRPBY
AUDIO OUT
R-AUDIO-L PRPBY
DVI OUT
R-AUDIO-L PRPBY
PC OUT
Digital Audio
System
BN68-02589F_Eng.indb 8 2010-3-18 19:07:43
9
English
02 Connections
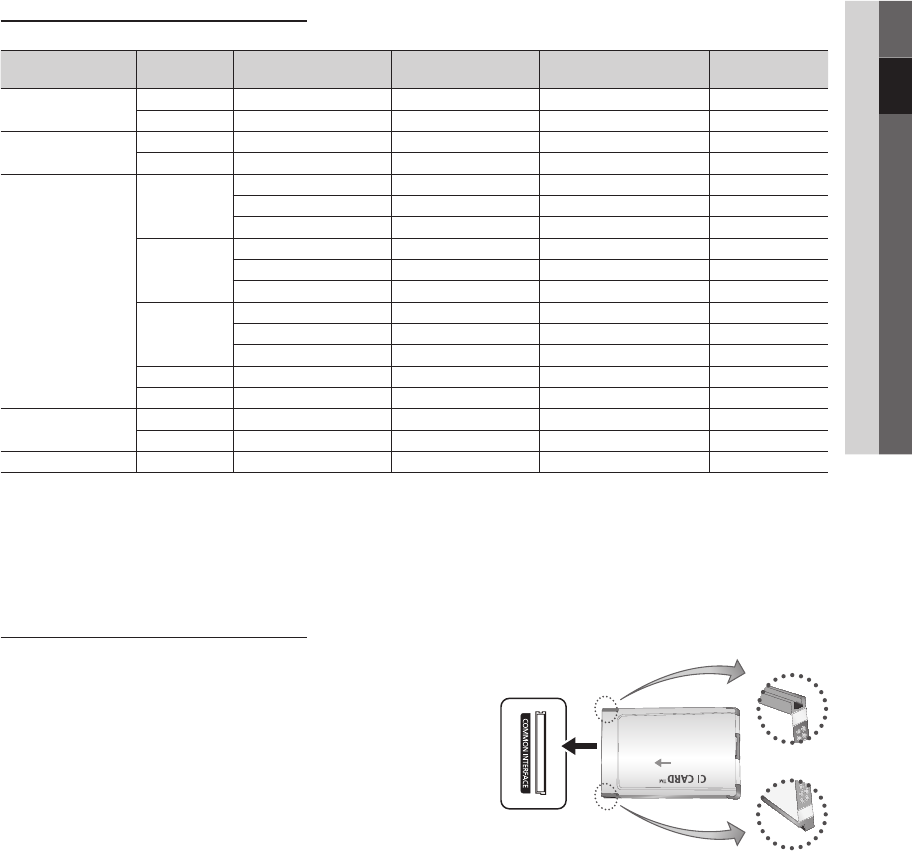
Display Modes (D-Sub and HDMI/DVI Input)
Optimal resolution is 1360 X 768 @ 60 Hz.1920X1080@60Hz.
Mode Resolution Horizontal Frequency
(KHz) Vertical Frequency (Hz) Pixel Clock Frequency
(MHz)
Sync Polarity
(H / V)
IBM 640 x 350 31.469 70.086 25.175 +/-
720 x 400 31.469 70.087 28.322 -/+
MAC 640 x 480 35.000 66.667 30.240 -/-
832 x 624 49.726 74.551 57.284 -/-
VESA DMT
640 x 480
31.469 59.940 25.175 -/-
37.861 72.809 31.500 -/-
37.500 75.000 31.500 -/-
800 x 600
37.879 60.317 40.000 +/+
48.077 72.188 50.000 +/+
46.875 75.000 49.500 +/+
1024 x 768
48.363 60.004 65.000 -/-
56.476 70.069 75.000 -/-
60.023 75.029 78.750 +/+
1280 x 720 45.000 60.000 74.250 +/+
1360 x 768 47.712 60.015 85.500 +/+
VESA GTF 720 x 576 35.910 59.950 32.750 -/+
1280 x 720 56.456 74.777 97.750 -/-
VESA GTF 1280 x 720 52.500 70.000 89.040 +/+
NOTE
✎
For HDMI/DVI cable connection, you must use the
x
HDMI (DVI) IN jack.
The interlace mode is not supported.
x
The set might operate abnormally if a non-standard video format is selected.
x
Separate and Composite modes are supported. SOG(Sync On Green) is not supported.
x
CONNECTIONS COMMON INTERFACE Slot
To watch paid channels, the “CI or CI+ CARD” must be inserted.
If you don’t insert the “CI or CI+ CARD,” some channels will y
display the message “Scrambled Signal”.
The pairing information containing a telephone number, the “CI or y
CI+ CARD” ID the Host ID and other information will be displayed
in about 2~3 minutes. If an error message is displayed, please
contact your service provider.
When the configuration of channel information has finished, the y
message “Updating Completed” is displayed, indicating the
channel list is updated.
NOTE
✎
You must obtain a “CI or CI+ CARD” from a local cable service provider.
x
When removing the “CI or CI+ CARD”, carefully pull it out with your hands since dropping the “CI or CI+ CARD” may
x
cause damage to it.
Insert the “CI or CI+ CARD” in the direction marked on the card.
x
The location of the
x
COMMON INTERFACE slot may be different depending on the model.
“CI or CI+ CARD” is not supported in some countries and regions; check with your authorized dealer.
x
If you have any problems, please contact a service provider.
x
BN68-02589F_Eng.indb 9 2010-3-18 19:07:45

10
English
Connections
Changing the Input Source
Source List
Use to select TV or other external input
sources such as DVD / Blu-ray players /
cable box / STB satellite receiver connected
to the TV.
TV / Ext. / AV / Component / PC / ■
HDMI/DVI / USB
In the
✎
Source List, connected
inputs will be highlighted.
Ext.
✎
and PC always stay activated.
Edit Name
VCR / DVD / Cable STB / Satellite STB / PVR STB / ■
AV Receiver / Game / Camcorder / PC / DVI PC / DVI
Devices / TV / IPTV / Blu-ray / HD DVD / DMA: Name
the device connected to the input jacks to make your
input source selection easier.
When connecting an HDMI/DVI cable to the
✎
HDMI
(DVI) IN port, you should set the port to
HDMI/DVI mode under Edit Name.
Basic Features
How to Navigate Menus
Before using the TV, follow the steps below to learn how to
navigate the menu and select and adjust different functions.
1 MENU button: Displays the main on-screen menu.
2 ENTER
E
/ Direction button: Move the cursor and
select an item. Confi rm the setting.
3 RETURN button: Returns to the previous menu.
4 EXIT button: Exits the on-screen menu.
How to Operate the OSD (On Screen Display)
The access step may differ depending on the selected menu.
1MENU
m
The main menu options appears on
the screen:
Picture, Sound, Channel, Setup,
Input, Application, Support.
2▲ / ▼Select an icon with the ▲ or ▼
button.
3ENTER
E
Press ENTER
E
to access the
sub-menu.
4▲ / ▼Select the desired submenu with
the ▲ or ▼ button.
5◄ / ►
Adjust the value of an item with the
◄ or ► button. The adjustment in
the OSD may differ depending on
the selected menu.
6ENTER
E
Press ENTER
E
to complete the
confi guration.
7EXIT
e
Press EXIT.
P
POWER
MEDIA.P
FAV . CH
P . MODE
DUAL
MTS
MEDIA
.
P
A
B
C
D
4
1
2
3
BN68-02589F_Eng(1-25).indd 10 2010-3-22 19:21:12

11
English
03 Basic Features
Using the INFO button (Now & Next guide)
The display identifies the current channel
and the status of certain audio-video
settings.
The Now & Next guide shows daily TV
programme information for each channel
according to the broadcasting time.
Scroll y, to view information for a
desired programme while watching the
current channel.
Scroll y, to view information for other channels. If you
want to move to the currently selected channel, press
the ENTER
E
button.
Planning Your Viewing
Guide
The EPG (Electronic Programme Guide)
information is provided by broadcasters.
Using programme schedules provided
by broadcasters, you can specify
programmes you want to watch in
advance so that the channel automatically
changes to the selected programme
channel at the specified time. Programme
entries may appear blank or out of date
depending on a channel status.
Using Channel View
Using Scheduled View
1
Red (View Mode): View the list of programmes that
are playing now or coming up.
2
Yellow (+24 hours): Viewing the list of programmes to
be broadcasted after 24 hours.
3
Blue (Ch.Mode): Select the type of channels you want
to display on the Channel View window.
The Ch. Mode differs according to the antenna –
source.
4 Information: Displays details of the selected
programme.
5 (Page): Moves to the previous / next page.
6 ENTER
E
button
When selecting the current programme, you can –
watch the selected programme.
When selecting the future programme, you can –
reserve to watch the selected programme. To cancel
the schedule, press the ENTER
E
button again and
select Cancel Schedules.
P
POWER
MEDIA.P
FAV . CH
P . MODE
DUAL
MTS
P
POWER
MEDIA.P
FAV . CH
P . MODE
DUAL
MTS
DTV Air
15
abc1
18:00 ~ 6:00
Unclassified
No Detaild Information
E
' Information
DTV Air 800 five
Family Affairs
18:00 - 18:30
Drama
Tanya confesses all to a stunned Babs. Conrad is anxious to hear...
18:30
19:15
Today
Today
)
Family Affairs
)
Dark Angel
800
800
five
five
800 five
View Mode
Information
E
Cancel
2:10 Tue 1 Jun
Guide
Scheduled View
1 4 6
DTV Air 800 five
Home and Away
18:00 - 18:30
Drama
Dani is devastated when scott makes clear his views on marriage...
27
28
800
24
16
6
Discovery
DiscoveryH&L
five
price-drop.tv
QVC
R4DTT
American Chopper
Programmes resume at 06:00
Home and...
No Information
QVC Selection
No Information
Tine Team
Fiv...
Today 18:00 - 19:00 19:00 - 20:00
)
Family Affairs
)
Dark Angel
800 five
View Mode
+24 Hours Ch. Mode
Information
k
E
2:10 Tue 1 Jun
Guide
Channel View - TV
1 2 3 4 5 6
18:11 Thu 6 Jan
BN68-02589F_Eng.indb 11 2010-3-18 19:07:48

13
English
03 Basic Features
Auto Store
Scans for a channel automatically and stores in the TV.
Automatically allocated programme numbers may not
✎
correspond to actual or desired programme numbers. If
a channel is locked using the Child Lock function, the
PIN input window appears.
Antenna Source (Air / Cable) ■: Select the antenna
source to memorise.
Channel Source (Digital & Analogue / Digital / ■
Analogue): Select the channel source to memorise.
When selecting Cable Digital & Analogue or Digital:
Provide a value to scan for cable channels.
Search Mode (Full / Network / Quick): Scans for all
channels with active broadcast stations and stores them
in the TV.
If you set
✎
Quick, you can set up Network,
Network ID, Frequency, Modulation, Symbol
Rate manually by press the button on the remote
control.
Network (Auto / Manual): Selects the Network ID
setting mode among Auto or Manual.
Network ID: When Network is Manual, you can set up
Network ID using the numeric buttons.
Frequency: Displays the frequency for the channel.
(differs in each country)
Modulation: Displays available modulation values.
Symbol Rate: Displays available symbol rates.
Manual Store
Scans for a channel manually and stores in the TV.
If a channel is locked using the
✎
Child Lock function,
the PIN input window appears.
Digital Channel (Channel, Frequency, Bandwidth) ■:
When scanning has finished, channels are updated in
the channel list.
When selecting
✎
Antenna Air: Channel, Frequency,
Bandwidth
When selecting
✎
Antenna Cable: Frequency,
Modulation, Symbol Rate
Analogue Channel (Programme, Colour System, ■
Sound System, Channel, Search): If there is abnormal
sound or no sound, reselect the sound standard
required.
Channel mode
✎
P
x
(programme mode): When tuning is complete,
the broadcasting stations in your area have been
assigned to position numbers from P0 to P99. You
can select a channel by entering the position number
in this mode.
C
x
(aerial channel mode) / S (cable channel mode):
These two modes allow you to select a channel
by entering the assigned number for each aerial
broadcasting station or cable channel.
Editing channels ¦
Channel Manager Option Menu
(in Channel Manager)
1. Select a channel and press the TOOLS button.
2. Edit the channel name or number using the Edit
Channel Name or Edit Channel Number menu.
Edit Channel Name ■ (analogue channels only): Assign
your own channel name.
Edit Channel Number ■ (digital channels only): Edit the
number by pressing the number buttons desired.
Other Features ¦
Cable Search Option
(depending on the country)
Sets additional search options such as the frequency and
symbol rate for a cable network search.
Freq.Start / Freq.Stop ■: Set the start or stop frequency
(differs in each country)
Modulation ■: Displays available modulation values.
Symbol Rate ■: Displays available symbol rates.
BN68-02589F_Eng.indb 13 2010-3-18 19:07:51

17
English
03 Basic Features
Setting up the TV with Your PC ¦
Set the input source to PC.
Auto Adjustment
t
Adjust frequency values/positions and fine tune the settings
automatically.
Not available when connecting through HDMI/DVI
✎
cable.
Screen
Coarse / Fine ■: Removes or reduces picture noise. If the
noise is not removed by Fine-tuning alone, then adjust
the frequency as best as possible (Coarse) and Fine-
tune again. After the noise has been reduced, readjust
the picture so that it is aligned to the centre of screen.
Position ■: Adjust the PC screen position with direction
button ( / / / ).
Image Reset ■: Resets the image to default settings.
Using Your TV as a Computer (PC) Display
Setting Up Your PC Software (Based on Windows XP)
Depending on the version of Windows and the video card,
the actual screens on your PC may differ in which case the
same basic set-up information will almost always be applied.
(If not, contact your computer manufacturer or Samsung
Dealer.)
1. Click on “Control Panel” on the Windows start menu.
2. Click on “Appearance and Themes” in the “Control
Panel” window and a display dialog-box will appear.
3. Click on “Display” and a display dialog box will appear.
4. Navigate to the “Settings” tab on the display dialog-box.
The correct size setting (resolution) [Optimum: 1360 X y
768 pixels]
If a vertical-frequency option exists on your display y
settings dialog box, the correct value is “60” or “60 Hz”.
Otherwise, just click “OK” and exit the dialog box.
Sound Menu
Changing the Preset Sound Mode ¦
Mode
t
Standard ■: Selects the normal sound mode.
Music ■: Emphasizes music over voices.
Movie ■: Provides the best sound for movies.
Clear Voice ■: Emphasizes voices over other sounds.
Amplify ■: Increase the intensity of high-frequency sound
to allow a better listening experience for the hearing
impaired.
Adjusting sound settings ¦
Equalizer
Adjusts the sound mode.
Balance L/R ■: Adjusts the balance between the right and
left speaker.
100Hz / 300Hz / 1KHz / 3KHz / 10KHz ■ (Bandwidth
Adjustment): Adjusts the level of specific bandwidth
frequencies.
Reset ■: Resets the equalizer to its default settings.
Sound Systems, Etc. ¦
Virtual Surround (Off / On)
This function provides a virtual 5.1 channel surround sound
experience through a pair of speakers or headphones using
HRTF (Head Related Transfer Function) technology.
If
✎
Speaker Select is set to External Speaker, Virtual
Surround is disabled.
Dialog Clarity (Off / On)
This function allows you to increase the intensity of a voice
over background music or sound effects so that dialog can
be heard more clearly when viewing a show.
Audio Language
(digital channels only)
Change the default value for audio languages.
The available language may differ depending on the
✎
broadcast.
Audio Format (MPEG / Dolby Digital 5.1)
(digital channels only)
When sound is emitted from both the main speaker and the
audio receiver, a sound echo may occur due to the decoding
speed difference between the main speaker and the audio
receiver. In this case, use the TV Speaker function.
Audio Format
✎
option may differ depending on the
broadcast. 5.1ch Dolby digital sound is only available
when connecting an external speaker through an
optical cable.
BN68-02589F_Eng.indb 17 2010-3-18 19:07:52
18
English
Basic Features
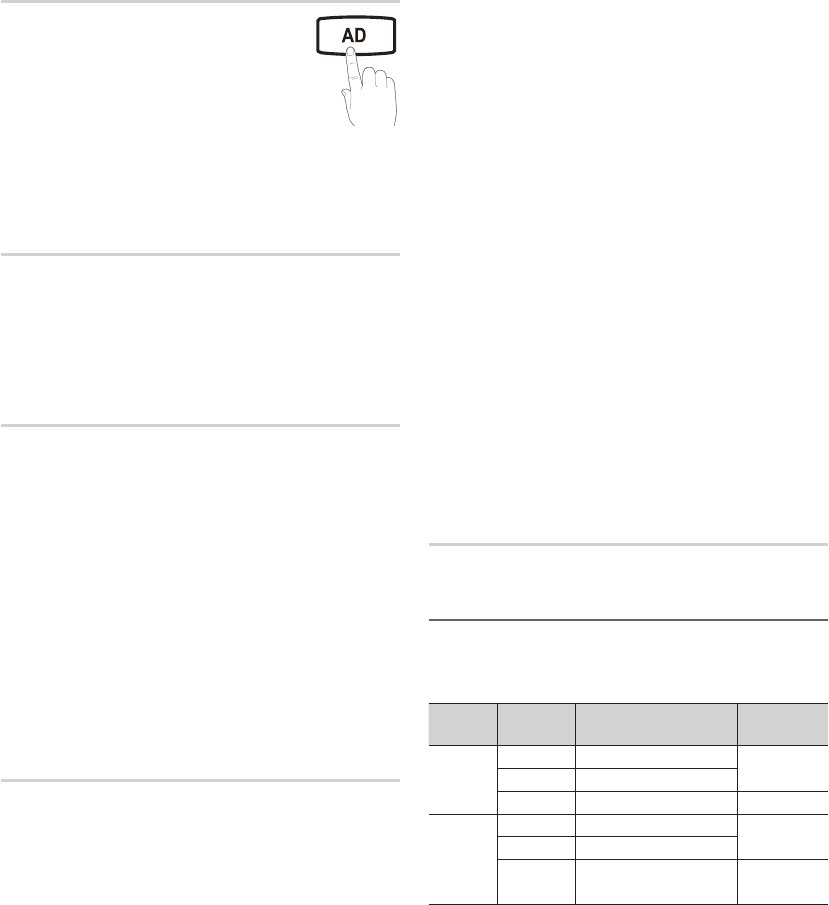
Audio Description
(not available in all locations)
(digital channels only)
This function handles the Audio Stream
for the AD (Audio Description) which is
sent along with the Main audio from the
broadcaster.
Audio Description (Off / On) ■: Turn the audio description
function on or off.
Volume ■: Adjust the audio description volume.
Auto Volume (Off / Normal / Night)
To equalize the volume level on each channel, set to Normal.
Night ■: This mode provides an improved sound
experience compared to Normal mode, making almost
no noise. It is useful at night.
Speaker Select (External speaker / TV
speaker)
A sound echo may occur due to a difference in decoding
speed between the main speaker and the audio receiver. In
this case, set the TV to External Speaker.
When
✎
Speaker Select is set to External Speaker, the
volume and MUTE buttons will not operate and the
sound settings will be limited.
When
✎
Speaker Select is set to External Speaker, you
should use these settings.
TV Speaker: Off , External
x
Speaker: On
When
✎
Speaker Select is set to TV Speaker, you
should use these settings.
TV
x
Speaker: On , External Speaker: On
If there is no video signal, both speakers will be mute.
✎
Additional Setting
(digital channels only)
DTV Audio Level (MPEG / HE-AAC) ■: This function
allows you to reduce the disparity of a voice signal
(which is one of the signals received during a digital TV
broadcast) to a desired level.
According to the type of broadcast signal,
✎
MPEG
/ HE-AAC can be adjusted between -10dB and
0dB.
To increase or decrease the volume, adjust
✎
between the range 0 and -10 respectively.
SPDIF Output ■: SPDIF (Sony Philips Digital InterFace)
is used to provide digital sound, reducing interference
going to speakers and various digital devices such as a
DVD player.
Audio Format: During the reception of a digital TV
broadcast, you can select the Digital Audio output
(SPDIF) format from the options PCM, Dolby Digital or
DTS.
By connecting to 5.1ch speakers in a Dolby
✎
Digital setup, maximize your interactive 3D sound
experience.
Audio Delay: Correct audio-video mismatch, when
watching TV or video, and listening to digital audio
output using an external device such as an AV receiver.
Dolby Digital Comp (Line / RF) ■: This function minimizes
signal disparity between a dolby digital signal and a
voice signal (i.e. MPEG Audio, HE-AAC, ATV Sound).
Select
✎
Line to obtain dynamic sound, and RF
to reduce the difference between loud and soft
sounds at night time.
Line: Set the output level for signals greater or less than
-31dB (reference) to either -20dB or -31dB.
RF: Set the output level for signals greater or less than
-20dB (reference) to either -10dB or -20dB.
Sound Reset (OK / Cancel)
Reset all sound settings to the factory defaults.
Selecting the Sound Mode ¦
When you set to Dual l ll, the current sound mode is
displayed on the screen.
t
Audio
Type Dual l ll Default
A2
Stereo
Mono MONO Automatic
change
Stereo Stereo mono
Dual Dual l Dual ll Dual l
NICAM
Stereo
Mono Mono Automatic
change
Stereo Mono stereo
Dual Mono Dual l
Dual ll Dual l
If the stereo signal is weak and an automatic switching,
✎
occurs, then switch to the mono.
Only activated in stereo sound signal.
✎
Only available when the
✎
Input source is set to TV.
P
POWER
MEDIA.P
FAV . CH
P . MODE
DUAL
MTS
BN68-02589F_Eng.indb 18 2010-3-18 19:07:53

24
English
Advanced Features
Photos
Viewing a Photo (or Slide Show)
1. Press the ◄ or ► button to select Photos, then press the
ENTER
E
button in the Media Play menu.
2. Press the ◄/►/▲/▼ button to select the desired photo in the file list.
3. Press the ENTER
E
button.
While a photo list is displayed, press the –ENTER
E
button on the
remote control to start slide show.
All files in the file list section will be displayed in the slide show. –
During the slide show, files are displayed in order from currently –
being shown.
Music files can be automatically played during the Slide Show if the
✎
Background Music is set to On.
The
✎
BGM Mode cannot be changed until the BGM has finished
loading.
Playing the multiple files ¦
Playing the selected music/photo files
1. Press the Yellow button in the file list to select the desired file.
2. Repeat the above operation to select multiple files.
NOTE
✎
The
xc
mark appears to the left of the selected files.
To cancel a selection, press the yellow button again.
x
To deselect all selected files, press the
x
TOOLS button and
select Deselect All.
3. Press the TOOLS button and select Play Selected Contents.
Playing the music/photo file group
1. While a file list is displayed, move to the any file in desired group.
2. Press the TOOLS button and select Play Current Group.
Normal Image1024.jpg 1024x768 2010/2/1 3/15
Devicename E Pause L Previous/Next T Tools R Return
Devicename
A
Change Device
C
Select
D
Sorting
T Tools
c
c
c
Music 01 2010
no singer other
Music 02 2010
no singer other
Music 03 2010
no singer other
Music 04 2010
no singer other
Music 05 2010
no singer other
Music 06 2010
no singer other
Music 07 2010
no singer other
Music 08 2010
no singer other
Music /Music 01.mp3 1/2
BN68-02589F_Eng(26-).indd 24 2010-3-23 14:44:20
Produktspezifikationen
| Marke: | Samsung |
| Kategorie: | LCD fernseher |
| Modell: | LE 22C330 |
Brauchst du Hilfe?
Wenn Sie Hilfe mit Samsung LE 22C330 benötigen, stellen Sie unten eine Frage und andere Benutzer werden Ihnen antworten
Bedienungsanleitung LCD fernseher Samsung

16 Oktober 2024
11 Juli 2024
10 Juli 2024
9 Juli 2024
7 Juli 2024
7 Juli 2024
7 Juli 2024
7 Juli 2024
7 Juli 2024
7 Juli 2024
Bedienungsanleitung LCD fernseher
- LCD fernseher Acer
- LCD fernseher Sanyo
- LCD fernseher HP
- LCD fernseher Manta
- LCD fernseher Medion
- LCD fernseher Philips
- LCD fernseher SilverCrest
- LCD fernseher Sony
- LCD fernseher Tevion
- LCD fernseher Panasonic
- LCD fernseher LG
- LCD fernseher AEG
- LCD fernseher MarQuant
- LCD fernseher Bush
- LCD fernseher Telefunken
- LCD fernseher BEKO
- LCD fernseher Blaupunkt
- LCD fernseher Grundig
- LCD fernseher Sharp
- LCD fernseher Baier
- LCD fernseher Daewoo
- LCD fernseher Finlux
- LCD fernseher Hisense
- LCD fernseher Luxor
- LCD fernseher Nordmende
- LCD fernseher Salora
- LCD fernseher SEG
- LCD fernseher Techwood
- LCD fernseher Vestel
- LCD fernseher Schaub Lorenz
- LCD fernseher Telestar
- LCD fernseher Curtis
- LCD fernseher DIFRNCE
- LCD fernseher Lenco
- LCD fernseher JVC
- LCD fernseher TERRIS
- LCD fernseher Walker
- LCD fernseher Akai
- LCD fernseher Alden
- LCD fernseher Continental Edison
- LCD fernseher Dyon
- LCD fernseher Funai
- LCD fernseher Hannspree
- LCD fernseher Hitachi
- LCD fernseher JTC
- LCD fernseher Loewe
- LCD fernseher Orion
- LCD fernseher TCL
- LCD fernseher Toshiba
- LCD fernseher Xiron
- LCD fernseher Opera
- LCD fernseher Sagem
- LCD fernseher Antarion
- LCD fernseher TechnoStar
- LCD fernseher Teleco
- LCD fernseher Agfa
- LCD fernseher Logik
- LCD fernseher Marantz
- LCD fernseher Sansui
- LCD fernseher AOC
- LCD fernseher Bluetech
- LCD fernseher Fujitsu-Siemens
- LCD fernseher Sylvania
- LCD fernseher Insignia
- LCD fernseher Tokaï
- LCD fernseher Vivo
- LCD fernseher D.BOSS
- LCD fernseher Diboss
- LCD fernseher Digihome
- LCD fernseher Dynex
- LCD fernseher HKC
- LCD fernseher Mirai
- LCD fernseher Nutech
- LCD fernseher Onn
- LCD fernseher Prosonic
- LCD fernseher Qmedia
- LCD fernseher Refexion
- LCD fernseher Saba
- LCD fernseher Swisstec
- LCD fernseher Tatung
- LCD fernseher TechLine
- LCD fernseher Technika
- LCD fernseher Teletech
- LCD fernseher Tesco
- LCD fernseher Umc
- LCD fernseher Viewpia
- LCD fernseher VISIONQUEST
- LCD fernseher Vizio
- LCD fernseher Wharfedale
- LCD fernseher Nevir
- LCD fernseher Regal
- LCD fernseher Palsonic
- LCD fernseher Akira
- LCD fernseher Ambiance
- LCD fernseher Sulpice
- LCD fernseher Tucson
- LCD fernseher PAVV
- LCD fernseher Avtex
Neueste Bedienungsanleitung für -Kategorien-

16 Oktober 2024
16 Oktober 2024
15 Oktober 2024
14 Oktober 2024
14 Oktober 2024
14 Oktober 2024
14 Oktober 2024
14 Oktober 2024
13 Oktober 2024
13 Oktober 2024