Philips Multimedia Remote Control Bedienungsanleitung
Philips
Fernbedienung
Multimedia Remote Control
Lesen Sie kostenlos die 📖 deutsche Bedienungsanleitung für Philips Multimedia Remote Control (144 Seiten) in der Kategorie Fernbedienung. Dieser Bedienungsanleitung war für 48 Personen hilfreich und wurde von 2 Benutzern mit durchschnittlich 4.5 Sternen bewertet
Seite 1/144

SRM 5100
Register your product and get support at
www.philips.com/welcome
User Manual 4
Manuel d’utilisation 14
Bedienungsanleitung 24
Gebruiksaanwijzing 34
Använderhandbok 44
Brukerhåndbok 54
Käyttöohje 64
Manuale d'uso 74
Guía de usuario 84
Manual do utilizador 94
Руководство по
эксплуатации 104
Kullanım kılavuzu 114
TR
RU
PR
ES
IT
SU
NO
SV
NL
DE
FR
EN
Quick, Clean & Easy Setup
www.philips.com/urc
SRM5100_Def 31-05-2007 16:43 Pagina 1

Your Remote Control
Congratulations on your purchase and welcome to Philips!
To fully benefit from the support that Philips offers, register your product at
www.philips.com/welcome
SRM5100_Def 31-05-2007 16:43 Pagina 2

1
*
4
7
6
8
0
@
$
%
^
(
™
£
9
5
¡
)
!
&
2
3
3
1 2
#
SRM5100_Def 31-05-2007 16:43 Pagina 3

Contents
1. Introduction . . . . . . . . . . . . . . . . . . . . . . . . . . . . . . . . . . . . . . . . . . . . . . . . 4
2. Installing the remote control . . . . . . . . . . . . . . . . . . . . . . . . . . . . . 4-7
Connecting the receiver (for PC only) . . . . . . . . . . . . . . . . . . . . . . . . . . . . 4
Inserting the batteries in the remote control . . . . . . . . . . . . . . . . . . . . . . 4
Testing the remote control . . . . . . . . . . . . . . . . . . . . . . . . . . . . . . . . . . . . . . 5
Setting the remote control . . . . . . . . . . . . . . . . . . . . . . . . . . . . . . . . . . . . 5-7
3. Keys and functions . . . . . . . . . . . . . . . . . . . . . . . . . . . . . . . . . . . . . . . . 8-9
4. Extra possibilities . . . . . . . . . . . . . . . . . . . . . . . . . . . . . . . . . . . . . . . . 9-10
Learn a key . . . . . . . . . . . . . . . . . . . . . . . . . . . . . . . . . . . . . . . . . . . . . . . . . . . 9
Adding a function to the remote control . . . . . . . . . . . . . . . . . . . . . . . . 10
Assigning the volume control to another mode . . . . . . . . . . . . . . . . 10-11
Restoring the original functions of your remote control . . . . . . . . . . . . 11
5. Troubleshooting . . . . . . . . . . . . . . . . . . . . . . . . . . . . . . . . . . . . . . . . 12-13
6. Need help? . . . . . . . . . . . . . . . . . . . . . . . . . . . . . . . . . . . . . . . . . . . . . . . . 13
Code list of all brands / equipment . . . . . . . . . . . . . . . . . . . . . . . . 124-137
Information to the consumer . . . . . . . . . . . . . . . . . . . . . . . . . . . . . . . . . 139
1. Introduction
Congratulations on your purchase of the Philips SRM 5100 universal remote
control. After installing the remote control you can operate a maximum of
4 different devices with it: Windows Vista™based PC,TV (TV, LCD TV, plasma
TV, projector, HD TV), STB (Set Top Box, satellite or cable decoder, digital
terrestrial receiver / decoder) and AMP (amplifier, receiver, Home Theatre
System).You can find information about how to prepare this remote control
for use in the chapter ‘Installing the remote control’.
2. Installing the remote control
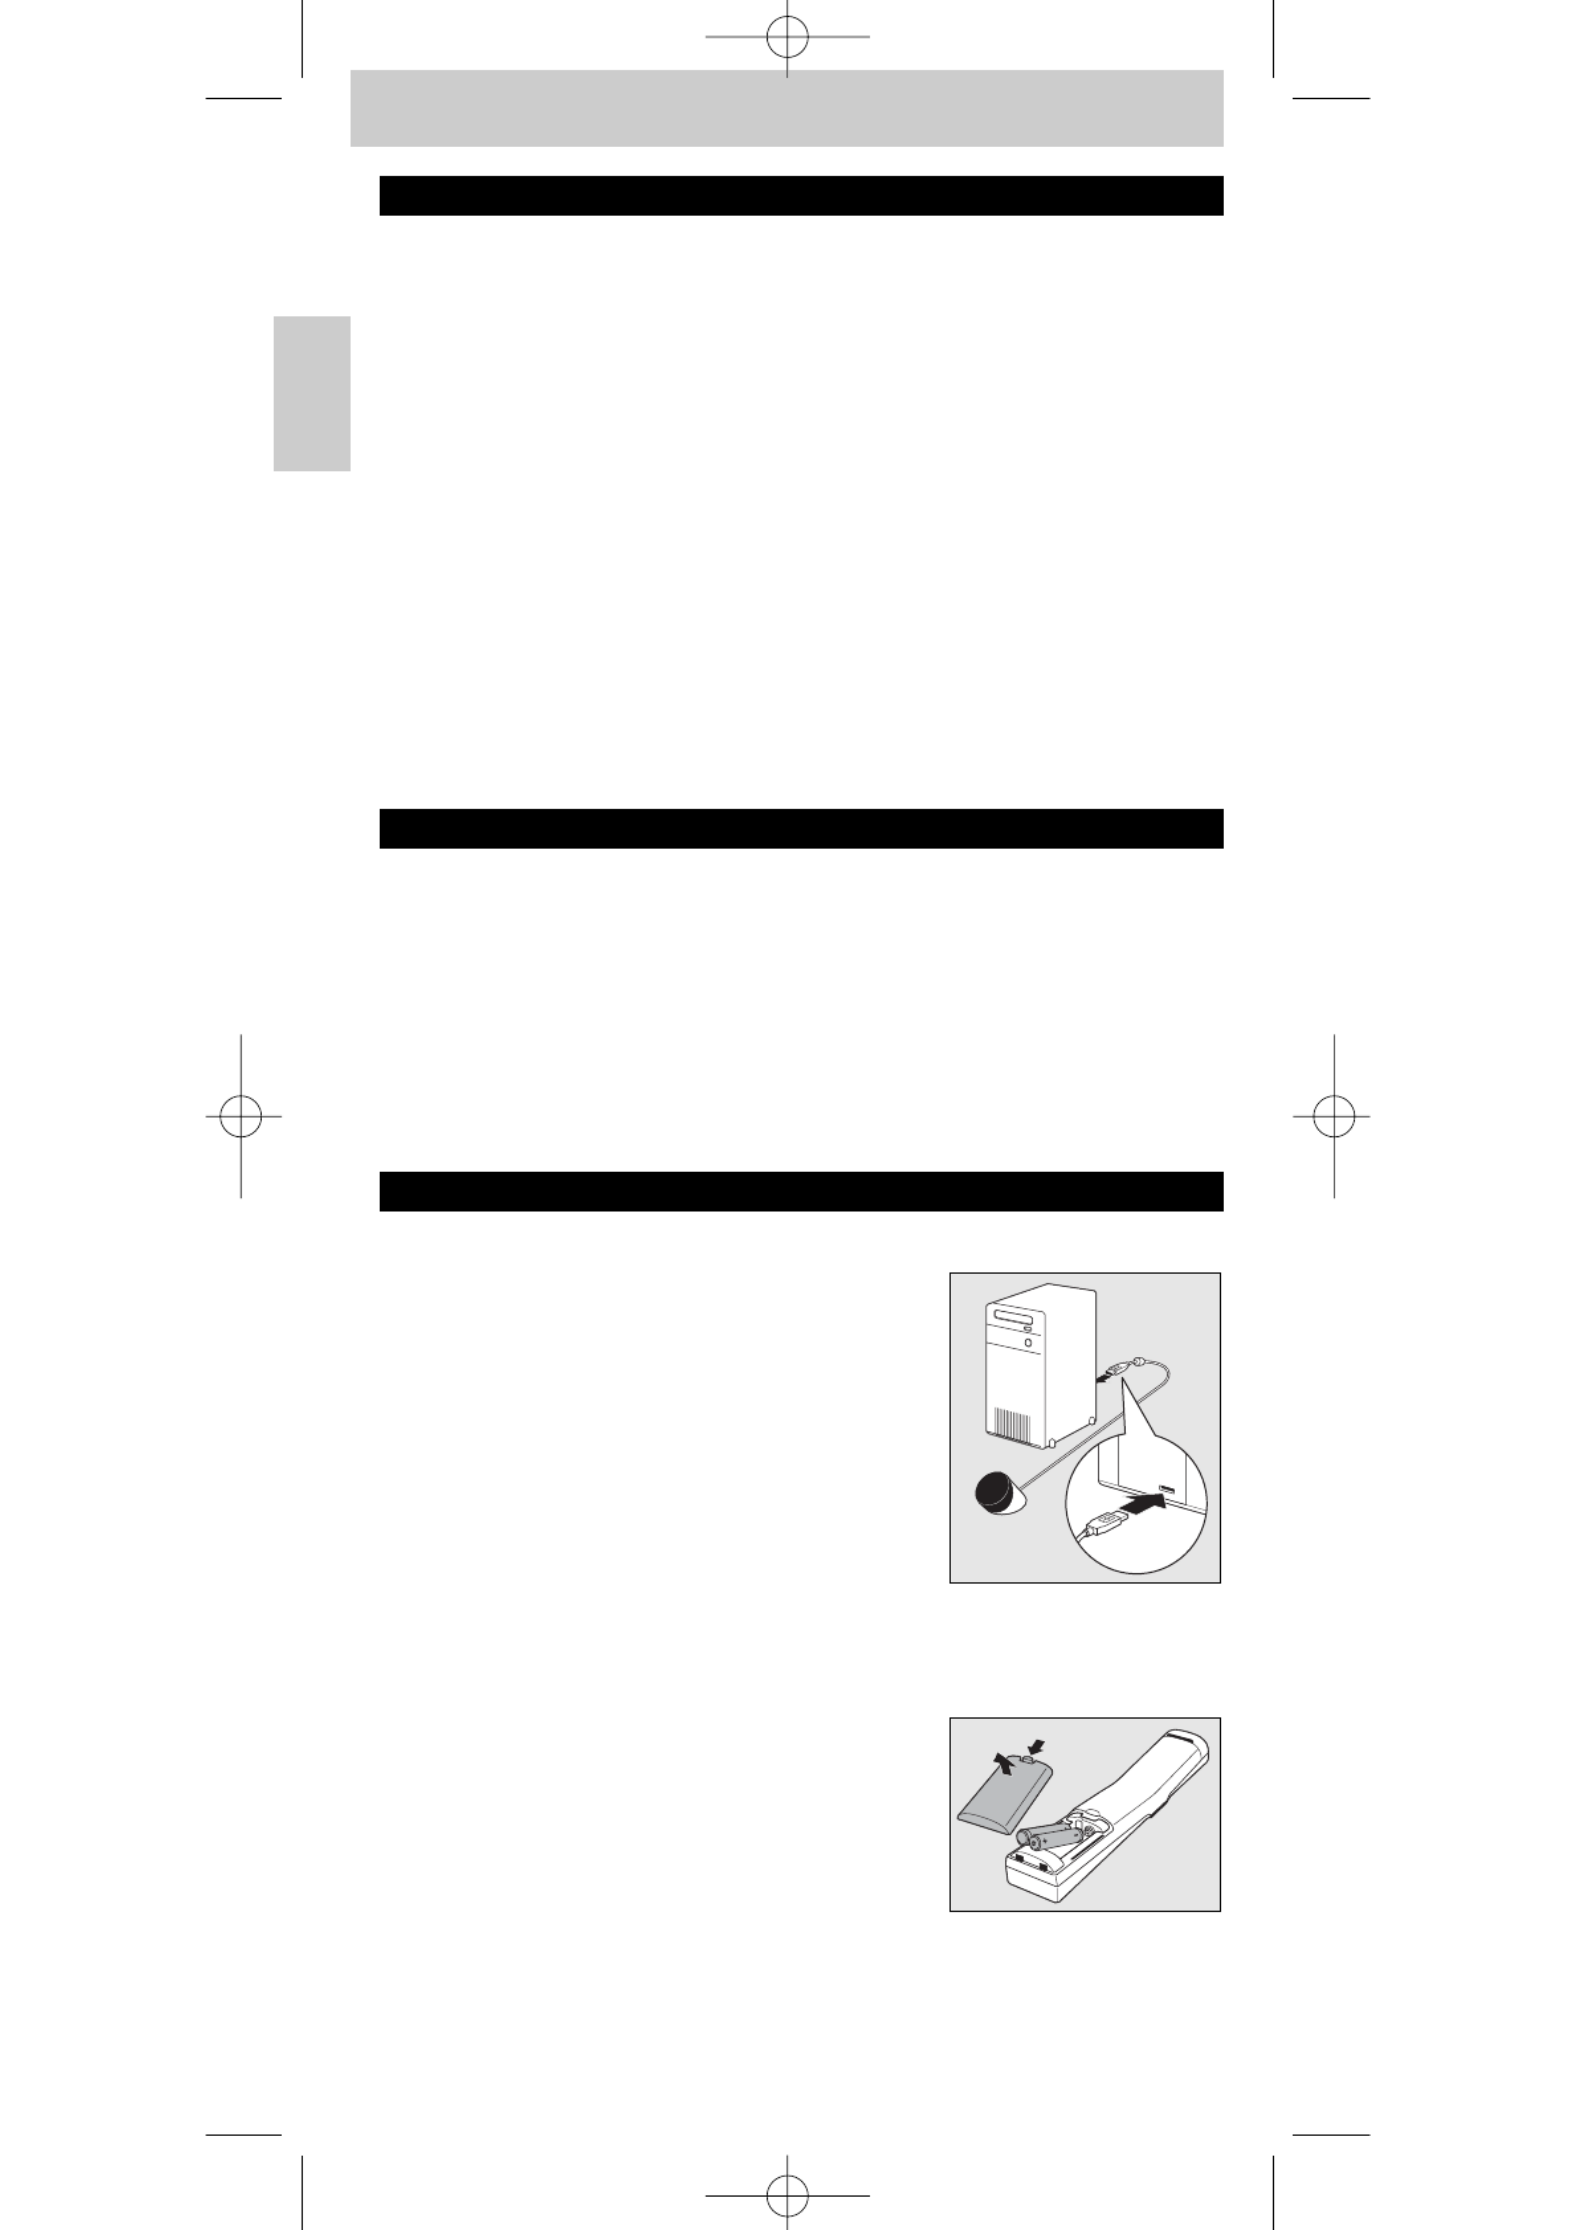
Connecting the receiver (for PC only)
•Plug the receiver USB connector into one
of the PC’s / laptop’s USB ports.
– A green LED lights up, indicating that the
receiver is deriving its power from the PC /
laptop.
– A red LED lights up.The PC / laptop is now
looking for the driver. As soon as the driver is
found the red LED goes out.The receiver is
now ready for use.
Inserting the batteries in the remote control
1Press the cover inwards and slide it in
the direction of the arrow.
2Place two AAA type batteries into the battery
compartment as shown.
3Slide the cover back and click it firmly into
place.
Note: If, after every key press, all indicator LEDs (PC, TV, STB and AMP) light up
and then go out one after another, the remote control is indicating that its
batteries are running low. Replace the batteries.
4
Instructions for use
English
SRM5100_Def 31-05-2007 16:43 Pagina 4

Instructions for use
English
5
Testing the remote control
The remote control has been programmed to operate all Windows Vista
™
based PCs and most Philips devices (TV, STB and AMP).
Because the SRM 5100 may use different signals for each brand and even for
different models of the same brand, it is advisable to test whether your
device responds to the SRM 5100.
PC
There is no need to select PC mode first; the remote control is set to PC
mode by default. Make sure your PC runs on Windows Vista
™.
1Turn on your PC.
2Aim the remote control at the receiver and check if the PC reacts on
the remote control commands.
•If the PC does not respond to key commands, check that the batteries are
properly inserted and the USB connector is properly plugged into the PC /
laptop USB port. See ‘Setting the remote control’.
Other devices (TV, STB and AMP)
The example below (TV - TV, LCD TV, plasma TV, projector, HD TV) instructs
you how to do this.You can repeat the same steps for other devices
(STB and AMP) which you want to operate using the SRM 5100.
Example of TV:
1Turn your TV on manually or use the original remote control.
Tune to channel 1.
2Press the key to select TV.MODE
Press the key until the TV LED lights up.
– The LED lights up for 10 seconds and then
goes out.
•If the LED does not light up, check whether the
batteries are properly inserted.
See ‘Setting the remote control’.
3Check whether all keys are working.
For an overview of the keys and their
functions see ‘3. Keys and functions’.
– If the TV responds as it should to all of the
key commands the SRM 5100 is ready TV.
• If the device does not respond at all or not to all of the key
commands, follow the instructions under ‘Setting the remote
control’, or for online setup go to: www.philips.com/urc
Setting the remote control
There is no need to set up the remote control for use with your Windows
Vista™based PC. For operating other devices set up is only necessary if the
device (TV, STB and AMP) does not respond to the SRM 5100.
If that is the case, the SRM 5100 does not recognize the brand and / or
model of your device and you need to program the remote control to do so.
The example below (TV - TV, LCD TV, plasma TV, projector, HD TV) instructs
you how to do this.You can repeat the same steps for other devices
(STB and AMP) which you want to operate using the SRM 5100.
SRM5100_Def 31-05-2007 16:43 Pagina 5

Note:The third mode (STB) can be used either for operating your Set Top Box,
satellite or cable decoder or digital terrestrial receiver / decoder.
The fourth mode (AMP) can be used either for operating your amplifier,
receiver or Home Theatre System.
Automatically setting the remote control
The remote control will now automatically search for the right code for your
device.
Example of TV (TV, LCD TV, plasma TV, projector, HD TV):
1Make sure the TV is switched on and select a channel using the original
remote control or the keys on the TV (for example channel 1).
The SRM 5100 emits the ‘switch TV to standby’ signal for all models of
TV that are stored in the memory.
2Press the key to select TV.MODE
Press the key until the TV LED lights up.
– The LED lights up for 10 seconds and then
goes out.
3Then keep keys 1 and 3 pressed
simultaneously for three seconds until the TV
LED flashes twice and then remains lit.
4Press the SRM 5100 Standby (y) key.
– The TV LED goes out and the SRM 5100 now
starts emitting all known ‘switch TV to standby’
signals, one by one.
Each time a code is sent, the TV LED lights up.
5When your TV switches to standby,
immediately press the SRM 5100 Standby (y)
key to stop the auto-search.
– The TV LED blinks twice and then goes out.The SRM 5100 has now
found a code that works on your TV.
6Check if you can operate all functions on your TV with the SRM 5100.
• If this is not the case, you can redo the automatic setting.
The SRM 5100 will then search for a code that works better.
– After the SRM 5100 has run through all the known codes, the search
will stop automatically and the TV LED will stop flashing.
– Automatic programming of a TV takes a maximum of 5 minutes.
For STB and AMP this time is 2 minutes.
6
Instructions for use
English
SRM5100_Def 31-05-2007 16:43 Pagina 6

3. Keys and functions
The illustrations on page 3 gives an overview of all keys and their functions.
Remote control
1y
y
y
yy Standby.......................switches PC,TV, STB and AMP on or off.
2MODE ...............................selects PC,TV, STB or AMP mode.
3Indicator LEDs..........indicate selected mode.
4Multimedia keys
;...............................................pause (PC, STB, AMP)
0.............................................record (PC, STB, AMP)
5............................................rewind (PC, STB, AMP)
2..............................................play (PC, STB, AMP)
¡.............................................previous track (PC, STB, AMP)
™.............................................next track (PC, STB, AMP)
5™.......................................opens Windows®Media Center start menu.
Microsoft, Windows, Windows Logo, and Windows
Vista are either registered trademarks or
trademarks of Microsoft Corporation in the
United States and/or other countries.
6...........................................- jumps back one position in the user interface
(PC, Media Center).
- jumps back one level in the menu or turns off
the menu (TV, STB, AMP).
7Cursor keys..................cursor up, down, left, right in a menu.
8OK.........................................confirms your selection.
9..........................................mutes the TV or AMP sound.
0-+........................................adjusts the TV or AMP volume.
!..........................................- displays the Guide in Windows®Media Center.
- displays Electronic Program Guide (TV, STB).
- selects FM radio (AMP).
@............................................- displays the Recorded TV page in Windows®
Media Center.
- selects AM radio (AMP).
#Digit keys........................- direct choice of channels and other functions
(TV, STB, AMP).
- text entry (PC, Media Center).
$............................................- text entry (PC, Media Center).
- selects between one- and two-figure channel
numbers (TV, STB).
%CLEAR ............................deletes text during text entry (PC, Media Center).
^Red, green,
yellow, blue keys.......- red, green, yellow and blue teletext keys
(PC, Media Center,TV, STB).
- red: switches surround mode on / off (AMP).
- green: selects surround modes (AMP).
- yellow: switches DSP (Digital Signal Processor)
on / off (AMP).
- blue: selects DSP (Digital Signal Processor)
modes (AMP).
&.........................................switches teletext on / off.
*ENTER ............................confirms menu selection.
(............................................- text entry (PC, Media Center).
- switches between external (audio / video) inputs
of your equipment (TV, STB).
- source selection (AMP).
8
Instructions for use
English
SRM5100_Def 31-05-2007 16:43 Pagina 8

)...........................................- turns the menu on and off (TV, STB, AMP).
- opens DVD menu (PC, Media Center).
¡...........................................shows live TV on the currently selected channel.
™-+.......................................- selects a previous or next channel (PC, Media
Center,TV, STB).
- selects a previous or next preset channel (AMP).
£i ..............................................- displays on-screen channel information (TV, STB,
AMP).
- provides information for the focus point.
An icon indicates your position in the menu
(PC, Media Center).
Receiver
1Green LED ..................lights up when the receiver is deriving its power
from the PC / laptop.
2USB connector.........connects to the USB por t of your Windows Vista
™
based PC / laptop.
3Red LED ........................- lights up when the PC / laptop starts looking for
the driver.The LED goes out as soon as the
driver is found.
- lights up when the receiver receives a signal from
the remote control.
If the device does not respond at all, or not to all of the key
commands, follow the instructions under ‘Setting the remote control’.
It is possible that you must enter another code for the device.
4. Extra possibilities
Learn a key
If you miss certain functions from your original remote control on the
SRM 5100, the SRM 5100 can learn these functions from the original remote
control.You can store a function under any of the available keys of the
SRM 5100, except ™and MODE. Please, note that any function already
stored under a key will be deleted.
Microsoft,Windows, Windows Logo, and Windows Vista are either registered
trademarks or trademarks of Microsoft Corporation in the United States
and/or other countries.
Example of TV (TV, LCD TV, plasma TV, projector, HD TV):
Make sure you have the original TV remote control at hand.
1Place both remote controls on a flat surface
(like a coffee table) and aim them head-to-
head with about 5 - 10 cm in between.
2Press the key to select TV.MODE
Press the key until the TV LED lights up.
– The LED lights up for 10 seconds and then
goes out.
9
Instructions for use
English
SRM5100_Def 31-05-2007 16:43 Pagina 9
Sommaire
1. Introduction . . . . . . . . . . . . . . . . . . . . . . . . . . . . . . . . . . . . . . . . . . . . . . . 14
2. Installation de la télécommande . . . . . . . . . . . . . . . . . . . . . . . . 14-17
Connexion du récepteur (seulement pour les PC) . . . . . . . . . . . . . . . . . 14
Inserting the batteries in the remote control . . . . . . . . . . . . . . . . . . . . . . 14
Essai de la télécommande . . . . . . . . . . . . . . . . . . . . . . . . . . . . . . . . . . . . . 15
Configuration de la télécommande . . . . . . . . . . . . . . . . . . . . . . . . . . . 15-16
3. Touches et fonctions . . . . . . . . . . . . . . . . . . . . . . . . . . . . . . . . . . . . 18-19
4. Autres possibilités . . . . . . . . . . . . . . . . . . . . . . . . . . . . . . . . . . . . . . 19-21
Apprentissage d’une touche . . . . . . . . . . . . . . . . . . . . . . . . . . . . . . . . . 19-20
Ajout d‘une function à la télécommande . . . . . . . . . . . . . . . . . . . . . . . . . 20
Attribution du contrôle du volume à un autre mode . . . . . . . . . . . 20-21
Restauration des fonctions d‘origine de la télécommande . . . . . . . 21-22
5. Dépannage . . . . . . . . . . . . . . . . . . . . . . . . . . . . . . . . . . . . . . . . . . . . . 22-23
6. Besoin d’aide ? . . . . . . . . . . . . . . . . . . . . . . . . . . . . . . . . . . . . . . . . . . . . . 23
Liste des codes de tous les appareils/marques . . . . . . . . . . . . . . . 124-137
Informations pour le consommateur . . . . . . . . . . . . . . . . . . . . . . . . . . . 139
1. Introduction
Félicitations pour votre achat d’une télécommande universelle Philips
SRM 5100. Après avoir installé la télécommande, vous pouvez l’utiliser pour
commander jusqu’à 4 appareils différents : PC équipé de Windows Vista
™,TV
(TV,TV à écran LCD,TV à écran plasma, projecteur, HDTV), STB (décodeur,
satellite ou câble, récepteur terrestre numérique/ décodeur) et AMP
(amplificateur, récepteur, système de cinéma à domicile).
Vous trouverez les informations sur la préparation de la télécommande dans
le chapitre ‘Installation de la télécommande’.
2. Installation de la télécommande
Connexion du récepteur (seulement pour les PC)
• Branchez le connecteur USB du
récepteur dans l’un des ports USB du PC /
ordinateur portable.
– Un voyant vert s’allume, indiquant que le
récepteur dérive son alimentation du PC /
ordinateur portable.
– Un voyant rouge s’allume. Le PC / ordinateur
portable recherche maintenant le pilote. Dès
que le pilote est trouvé, le voyant rouge
s’éteint. Le récepteur est maintenant prêt à
être utilisé.
Insertion des piles dans la télécommande
1Appuyez sur le couvercle et faites-le coulisser
dans la direction de la flèche.
2Placez deux piles AAA dans le compartiment
des piles, de la façon indiquée.
3Remettez le couvercle en place et emboîtez-
le.
Remarque : Si, après chaque pression sur une touche, tous les voyants (PC,TV, STB
et AMP) s'allument puis s'éteignent l'un après l'autre, c'est que la
télécommande indique que les piles sont faibles. Remplacez les piles.
14
Mode d'emploi
Français
SRM5100_Def 31-05-2007 16:43 Pagina 14

Si c’est le cas, la SRM 5100 ne reconnaît pas la marque et/ou le modèle de
votre appareil.Vous devrez alors la programmer.
L'exemple ci-dessous ( - TV, LCD TV,TV à écran plasma, projecteur,TV
HDTV) vous explique comment procéder.Vous pouvez répéter les mêmes
étapes pour d’autres périphériques (STB et AMP) que vous souhaitez
commander à l’aide de la SRM 5100.
Remarque : Le troisième mode (STB) peut être utilisé pour faire fonctionner votre
décodeur, satellite ou câble ou votre récepteur/décodeur terrestre
numérique. Le quatrième mode (AMP) peut être utilisé pour faire
fonctionner votre amplificateur, votre récepteur ou votre système de
cinéma à domicile.
Réglage automatique de la télécommande
La télécommande va maintenant rechercher automatiquement le code de
votre appareil.
Exemple de téléviseur (TV,TV à écran LCD,TV à écran plasma, projecteur,
HDTV) :
1Vérifiez que le téléviseur est sous tension et sélectionnez une chaîne en
utilisant la télécommande d’origine ou les touches situées sur le
téléviseur (par exemple la chaîne 1).
La SRM 5100 émet le signal ‘mise en veille du téléviseur' pour tous les
modèles de téléviseur mémorisés.
2Appuyez sur la touche MODE pour
sélectionner TV.
Tenez la touche enfoncée jusqu’à ce le voyant
TV s’allume.
– Les voyants s'allument 10 secondes puis
s'éteignent.
3Ensuite, tenez les touches 1 et 3 enfoncées
simultanément pendant trois secondes,
jusqu’à ce que le voyant TV clignote deux fois
avant de rester allumé.
4Appuyez sur la touche veille (y) de la
– SRM 5100.
– Le voyant TV s'éteint et la SRM 5100
commence alors à émettre tous les signaux
connus de‘mise en veille du téléviseur', un par
un. Chaque fois qu’un code est envoyé, le
voyant TV s’allume.
5Quand votre téléviseur se met en veille, appuyez sur laimmédiatement
touche veille ( ) de la SRM 5100 pour arrêter la recherchey
automatique.
– Le voyant TV s'allume 2 fois puis s'éteint. La SRM 5100 vient de trouver
un code correspondant à votre téléviseur.
6Vérifiez si vous pouvez utiliser toutes les fonctions de votre téléviseur
avec la SRM 5100.
• Si ce n'est pas le cas, vous pouvez recommencer le réglage
automatique.
La SRM 5100 recherchera alors un meilleur code.
16
Mode d'emploi
Français
SRM5100_Def 31-05-2007 16:43 Pagina 16
Produktspezifikationen
| Marke: | Philips |
| Kategorie: | Fernbedienung |
| Modell: | Multimedia Remote Control |
| Verpackungsbreite: | 162 mm |
| Verpackungshöhe: | 38 mm |
| Zertifizierung: | CE Mark |
| Verpackungsgewicht: | 0.36 kg |
| Anzahl unterstützter Akkus/Batterien: | 2 |
| Länge des Versandkartons: | 346 mm |
| Breite des Versandkartons: | 120 mm |
| Knopfanzahl: | 45 |
| Batterie Lebensdauer: | 1 Jahr(e) |
| Maximale Reichweite: | 7 m |
| Hauptkarton GTIN (EAN/UPC): | 87 10895 90768 2 |
| Verpackungslänge: | 338 mm |
| Menge äußerer Karton: | 6 Stück(e) |
| Trägerfrequenzbereich: | 28 - 70 kHz |
| 12NC: | 908210005056 |
| EAN/UPC/GTIN: | 87 10895 90767 5 |
| Lernfähige IR-Codes: | Ja |
| LED-Übertragung: | 1 |
| Übertragungswinkel: | 90 ° |
| Lernfähiger Frequenzbereich: | 30 - 60 kHz |
Brauchst du Hilfe?
Wenn Sie Hilfe mit Philips Multimedia Remote Control benötigen, stellen Sie unten eine Frage und andere Benutzer werden Ihnen antworten
Bedienungsanleitung Fernbedienung Philips

17 September 2024
3 September 2024
31 August 2024
30 August 2024
30 August 2024
23 August 2024
20 August 2024
15 August 2024
26 Juli 2024
19 Juli 2024
Bedienungsanleitung Fernbedienung
- Fernbedienung Samsung
- Fernbedienung Exibel
- Fernbedienung Genius
- Fernbedienung Hama
- Fernbedienung Kensington
- Fernbedienung LogiLink
- Fernbedienung Logitech
- Fernbedienung Medion
- Fernbedienung Nedis
- Fernbedienung SilverCrest
- Fernbedienung Sony
- Fernbedienung Sweex
- Fernbedienung T'nB
- Fernbedienung Targus
- Fernbedienung Tevion
- Fernbedienung Trust
- Fernbedienung Watson
- Fernbedienung Zalman
- Fernbedienung Panasonic
- Fernbedienung Tchibo
- Fernbedienung Brennenstuhl
- Fernbedienung Clas Ohlson
- Fernbedienung Cotech
- Fernbedienung REV
- Fernbedienung LG
- Fernbedienung Parkside
- Fernbedienung AEG
- Fernbedienung Ardes
- Fernbedienung Gaggenau
- Fernbedienung Miele
- Fernbedienung Canon
- Fernbedienung Velleman
- Fernbedienung Neumann
- Fernbedienung CSL
- Fernbedienung Devolo
- Fernbedienung Schwaiger
- Fernbedienung Technaxx
- Fernbedienung König
- Fernbedienung Telefunken
- Fernbedienung Thomson
- Fernbedienung Grundig
- Fernbedienung Hema
- Fernbedienung Kenwood
- Fernbedienung Mitsubishi
- Fernbedienung Bang And Olufsen
- Fernbedienung Bose
- Fernbedienung Pioneer
- Fernbedienung Geemarc
- Fernbedienung Heitech
- Fernbedienung JVC
- Fernbedienung Meliconi
- Fernbedienung Motorola
- Fernbedienung One For All
- Fernbedienung Onkyo
- Fernbedienung Technics
- Fernbedienung TERRIS
- Fernbedienung Vivanco
- Fernbedienung Xiaomi
- Fernbedienung Abus
- Fernbedienung EZVIZ
- Fernbedienung Olympia
- Fernbedienung Smartwares
- Fernbedienung Yale
- Fernbedienung Continental Edison
- Fernbedienung Dual
- Fernbedienung Ferguson
- Fernbedienung Hannspree
- Fernbedienung Loewe
- Fernbedienung Metz
- Fernbedienung Strong
- Fernbedienung Toshiba
- Fernbedienung Steinel
- Fernbedienung Tascam
- Fernbedienung Garmin
- Fernbedienung Nexa
- Fernbedienung Lifetec
- Fernbedienung Lindy
- Fernbedienung Rotel
- Fernbedienung Waeco
- Fernbedienung Tripp Lite
- Fernbedienung Ansmann
- Fernbedienung American DJ
- Fernbedienung Harman Kardon
- Fernbedienung Marmitek
- Fernbedienung Naim
- Fernbedienung Scosche
- Fernbedienung Honeywell
- Fernbedienung Genaray
- Fernbedienung Nikon
- Fernbedienung RADEMACHER
- Fernbedienung Wacom
- Fernbedienung DJI
- Fernbedienung Reely
- Fernbedienung Edision
- Fernbedienung Humax
- Fernbedienung Kathrein
- Fernbedienung Metronic
- Fernbedienung Skymaster
- Fernbedienung Smart
- Fernbedienung Doro
- Fernbedienung Alpine
- Fernbedienung NAD
- Fernbedienung Adj
- Fernbedienung CGV
- Fernbedienung CME
- Fernbedienung Ebode
- Fernbedienung Ruwido
- Fernbedienung TCM
- Fernbedienung Vogel's
- Fernbedienung Zapman
- Fernbedienung Tado
- Fernbedienung Grohe
- Fernbedienung SilverStone
- Fernbedienung Vision
- Fernbedienung Xavax
- Fernbedienung Hager
- Fernbedienung MB Quart
- Fernbedienung NEC
- Fernbedienung Marantz
- Fernbedienung Arcam
- Fernbedienung Ecler
- Fernbedienung Monacor
- Fernbedienung Rockford Fosgate
- Fernbedienung Milwaukee
- Fernbedienung Chamberlain
- Fernbedienung Packard Bell
- Fernbedienung JUNG
- Fernbedienung Hunter
- Fernbedienung Aplic
- Fernbedienung Iiyama
- Fernbedienung Innr
- Fernbedienung Ranex
- Fernbedienung Ei Electronics
- Fernbedienung FireAngel
- Fernbedienung Omega
- Fernbedienung Optex
- Fernbedienung Revox
- Fernbedienung Absima
- Fernbedienung Clarion
- Fernbedienung Energy Sistem
- Fernbedienung Audiovox
- Fernbedienung TomTom
- Fernbedienung HQ
- Fernbedienung Amazon
- Fernbedienung Insignia
- Fernbedienung Busch-Jaeger
- Fernbedienung Reflecta
- Fernbedienung DataVideo
- Fernbedienung RCF
- Fernbedienung Manfrotto
- Fernbedienung RadioShack
- Fernbedienung Cisco
- Fernbedienung Danfoss
- Fernbedienung Delta Dore
- Fernbedienung Fantini Cosmi
- Fernbedienung EVE
- Fernbedienung Projecta
- Fernbedienung Sonos
- Fernbedienung Intertechno
- Fernbedienung Autel
- Fernbedienung Engel Axil
- Fernbedienung BENNING
- Fernbedienung Pro-Ject
- Fernbedienung Aeon Labs
- Fernbedienung Vaddio
- Fernbedienung RCA
- Fernbedienung Kicker
- Fernbedienung AV:link
- Fernbedienung Hikvision
- Fernbedienung Jensen
- Fernbedienung JL Audio
- Fernbedienung Hähnel
- Fernbedienung PDP
- Fernbedienung Viper
- Fernbedienung Homematic IP
- Fernbedienung EQ3
- Fernbedienung Asustor
- Fernbedienung Electia
- Fernbedienung Somfy
- Fernbedienung Nanlite
- Fernbedienung Emtec
- Fernbedienung Entone
- Fernbedienung ESYLUX
- Fernbedienung Exxter
- Fernbedienung Furman
- Fernbedienung Fusion
- Fernbedienung Glashart Media
- Fernbedienung Hartig Helling
- Fernbedienung Infinity
- Fernbedienung Jasco
- Fernbedienung Jolly
- Fernbedienung KlikaanKlikuit
- Fernbedienung KPN
- Fernbedienung Logic3
- Fernbedienung Maximex
- Fernbedienung Medion MD6461
- Fernbedienung Minix
- Fernbedienung Multibox
- Fernbedienung Neewer
- Fernbedienung Nemef
- Fernbedienung Niko
- Fernbedienung OEM
- Fernbedienung Online
- Fernbedienung Pixel
- Fernbedienung Prolectrix
- Fernbedienung Provision
- Fernbedienung Provision ISR
- Fernbedienung Q-Sonic
- Fernbedienung Remotec
- Fernbedienung Revo
- Fernbedienung Samlex
- Fernbedienung Schaudt
- Fernbedienung Spektrum
- Fernbedienung Steren
- Fernbedienung Sunwave
- Fernbedienung Technika
- Fernbedienung Tevion (Medion)
- Fernbedienung Tihao
- Fernbedienung Amino
- Fernbedienung AT-T
- Fernbedienung AMX
- Fernbedienung TV Vlaanderen
- Fernbedienung Uni-T
- Fernbedienung Unitron
- Fernbedienung Universal Electronics
- Fernbedienung Universal Remote Control
- Fernbedienung UPC
- Fernbedienung VDO Dayton
- Fernbedienung Verizon
- Fernbedienung Vizio
- Fernbedienung Voxx
- Fernbedienung Walkera
- Fernbedienung Ziggo
- Fernbedienung SpeakerCraft
- Fernbedienung Aston
- Fernbedienung Chief
- Fernbedienung Vimar
- Fernbedienung PeakTech
- Fernbedienung Siig
- Fernbedienung Antec
- Fernbedienung Sonoff
- Fernbedienung AudioControl
- Fernbedienung RGBlink
- Fernbedienung Iogear
- Fernbedienung APart
- Fernbedienung Fortin
- Fernbedienung Simplify
- Fernbedienung Profoto
- Fernbedienung Metra
- Fernbedienung Gefen
- Fernbedienung Russound
- Fernbedienung Mosconi
- Fernbedienung Vello
- Fernbedienung Pentatech
- Fernbedienung ProMaster
- Fernbedienung Tiq
- Fernbedienung Magnus
- Fernbedienung H-Tronic
- Fernbedienung Bang Olufsen
- Fernbedienung SVS
- Fernbedienung Axis
- Fernbedienung Natec
- Fernbedienung Wet Sounds
- Fernbedienung Aputure
- Fernbedienung Libec
- Fernbedienung Chauvet
- Fernbedienung Malmbergs
- Fernbedienung Arctic Cooling
- Fernbedienung Fibaro
- Fernbedienung Roswell
- Fernbedienung Wentronic
- Fernbedienung Match
- Fernbedienung Neets
- Fernbedienung Thumbs Up
- Fernbedienung Insteon
- Fernbedienung Crestron
- Fernbedienung PowerBass
- Fernbedienung Antelope Audio
- Fernbedienung ORNO
- Fernbedienung Extron
- Fernbedienung Bazooka
- Fernbedienung Valueline
- Fernbedienung Bravo
- Fernbedienung Elite Screens
- Fernbedienung Artsound
- Fernbedienung Bigben Interactive
- Fernbedienung Syrp
- Fernbedienung Satechi
- Fernbedienung DSC
- Fernbedienung Memphis Audio
- Fernbedienung Televes
- Fernbedienung Vakoss
- Fernbedienung Beoplay
- Fernbedienung Swiss Sense
- Fernbedienung Audiofrog
- Fernbedienung Hegel
- Fernbedienung GBS Elettronica
- Fernbedienung Gewiss
- Fernbedienung Lutron
- Fernbedienung C2G
- Fernbedienung Control4
- Fernbedienung Xit
- Fernbedienung Msonic
- Fernbedienung ETiger
- Fernbedienung TELE System
- Fernbedienung Multibrackets
- Fernbedienung Nanoleaf
- Fernbedienung Elbe
- Fernbedienung MIOPS
- Fernbedienung Compustar
- Fernbedienung Ridem
Neueste Bedienungsanleitung für -Kategorien-

26 August 2023

30 November 2024
30 November 2024
30 November 2024
25 November 2024
25 November 2024
8 Oktober 2024
8 Oktober 2024

5 Oktober 2024
5 Oktober 2024