Pelco NET5501-I Bedienungsanleitung
Pelco
Überwachungskamera
NET5501-I
Lesen Sie kostenlos die 📖 deutsche Bedienungsanleitung für Pelco NET5501-I (51 Seiten) in der Kategorie Überwachungskamera. Dieser Bedienungsanleitung war für 22 Personen hilfreich und wurde von 2 Benutzern mit durchschnittlich 4.5 Sternen bewertet
Seite 1/51

NET5501-I
VIDEO ENCODER
Installation/Operation Manual
C5650M-B (05/15)

Copyright
All rights reserved. No part of this manual may be reproduced, distributed, or transmitted without the prior written permission of the
manufacturer.

Content
Overview
4
4 Important Safety Instructions
5 Caution
6 Important Notices
8 Network Topology Statement
8 Legal Notice (Audio Notice)
8 Introduction
9 Package Contents
10 Front Panel Description
11 Rear Panel Description
installatiOn
12
12 Wall Bracket Installation
13 Factory Default
14 Connecting to an External Device
web viewer
18
18 What is the Web Viewer?
21 Live
23 System Setting
26 Network Setting
29 Camera Configuration
31 A/V Streams Setting
32 User Setting
34 Events Setting
35 Help
appendix
36
36 Product Specification
38 Troubleshooting (FAQ)
38 Pelco Troubleshooting Contact Information
39 Product Overview
40 Open Source License Report on the Product
English | 5
Overview
CautIOn
This symbol indicates that there are important operating and maintenance instructions in the literature
accompanying this unit.
WarnInG : This product is sensitive to Electrostatic Discharge (ESD). To avoid ESD damage to this product,
use ESD safe practices during installation. Before touching, adjusting or handling this product, correctly attach
an ESD wrist strap to your wrist and appropriately discharge your body and tools. For more information about
ESD control and safe handling practices of electronics, please refer to ANSI/ESD S20.20-1999 or contact the
Electrostatic Discharge Association (www.esda.org).

Overview
6 | Overview
IMPORTANT NOTICES
REGULATORY NOTICES
This device complies with Part 15 of the FCC Rules. Operation is subject to the following two conditions: (1) this device may not
cause harmful interference, and (2) this device must accept any interference received, including interference that may cause
undesired operation.
RADIO AND TELEVISION INTERFERENCE
This equipment has been tested and found to comply with the limits of a Class A digital device, pursuant to Part 15 of the FCC
rules. These limits are designed to provide reasonable protection against harmful interference when the equipment is operated in a
commercial environment. This equipment generates, uses, and can radiate radio frequency energy and, if not installed and used in
accordance with the instruction manual, may cause harmful interference to radio communications. Operation of this equipment in
a residential area is likely to cause harmful interference in which case the user will be required to correct the interference at his own
expense.
Changes and Modifications not expressly approved by the manufacturer or registrant of this equipment can void your authority to
operate this equipment under Federal Communications Commission’s rules.
CAN ICES-3(A)/NMB-3(A)
LEGAL NOTICE [Audio Notice]
SOME PELCO EQUIPMENT CONTAINS, AND THE SOFTWARE ENABLES, AUDIO/VISUAL AND RECORDING CAPABILITIES,
THE IMPROPER USE OF WHICH MAY SUBJECT YOU TO CIVIL AND CRIMINAL PENALTIES. APPLICABLE LAWS REGARDING
THE USE OF SUCH CAPABILITIES VARY BETWEEN JURISDICTIONS AND MAY REQUIRE, AMONG OTHER THINGS, EXPRESS
WRITTEN CONSENT FROM RECORDED SUBJECTS. YOU ARE SOLELY RESPONSIBLE FOR INSURING STRICT COMPLIANCE
WITH SUCH LAWS AND FOR STRICT ADHERENCE TO ANY/ALL RIGHTS OF PRIVACY AND PERSONALTY. USE OF THIS
EQUIPMENT AND/OR SOFTWARE FOR ILLEGAL SURVEILLANCE OR MONITORING SHALL BE DEEMED UNAUTHORIZED USE
IN VIOLATION OF THE END USER SOFTWARE AGREEMENT AND RESULT IN THE IMMEDIATE TERMINATION OF YOUR LICENSE
RIGHTS THEREUNDER.
VIDEO QUALITY CAUTION
FRAME RATE NOTICE REGARDING USER SELECTED OPTIONS
Pelco systems are capable of providing high quality video for both live viewing and playback. However, the systems can be used
in lower quality modes, which can degrade picture quality, to allow for a slower rate of data transfer and to reduce the amount of
video data stored. The picture quality can be degraded by either lowering the resolution, reducing the picture rate, or both. A picture
degraded by having a reduced resolution may result in an image that is less clear or even indiscernible. A picture degraded by
reducing the picture rate has fewer frames per second, which can result in images that appear to jump or move more quickly than
normal during playback. Lower frame rates may result in a key event not being recorded by the system.
Judgment as to the suitability of the products for users' purposes is solely the users' responsibility. Users shall determine the
suitability of the products for their own intended application, picture rate and picture quality. In the event users intend to use the
video for evidentiary purposes in a judicial proceeding or otherwise, users should consult with their attorney regarding any particular
requirements for such use.

English | 7
Overview
OPEN SOURCE SOFTWARE
This product includes certain open source or other software originated from third parties that is subject to the GNU General Public
License (GPL), GNU Library/Lesser General Public License (LGPL) and different and/or additional copyright licenses, disclaimers,
and notices.
The exact terms of GPL, LGPL, and some other licenses are provided to you with this product. Please refer to the exact terms of the
GPL and LGPL at http://www.fsf.org (Free Software Foundation) or http://www.opensource.org (Open Source Initiative) regarding
your rights under said license. You may obtain a complete corresponding machine-readable copy of the source code of such
software under the GPL or LGPL by sending your request to digitalsupport@pelco.com; the subject line should read Source Code
Request. You will then receive an email with a link for you to download the source code.
This offer is valid for a period of three (3) years from the date of the distribution of this product by Pelco.
CCC POWER CORD STATEMENT
Models shipped to China do not include power cords.
Note : A CCC approved power cord must be used to power the equipment when used in China.
Korean Class A EMC
이 기기는 업무용 (A급) 전자파 적합기기로서 판매자 또는 사용자는 이 점을 주의하시길 바라며, 가정 외의 지역에서 사용하는 것을
목적으로 합니다.
This is a Class A product. In a domestic environment this product may cause radio interference in which case the user may be
required to take adequate measures.
ESD WARNING
WARNING: This product is sensitive to Electrostatic Discharge (ESD). To avoid ESD damage to this
product, use ESD safe practices during installation. Before touching, adjusting or handling this product,
correctly attach an ESD wrist strap to your wrist and appropriately discharge your body and tools. For
more information about ESD control and safe handling practices of electronics, please refer to ANSI/
ESD S20.20-1999 or contact the Electrostatic Discharge Association (www.esda.org).
Warranty
For information about Pelco’s product warranty and thereto related information, refer to www.pelco.com/warranty.

Overview
8 | Overview
netWOrK tOpOLOGy StateMent
IMpOrtant nOte. pLeaSe reaD. The network implementation is shown as a general representation only and is not intended
to show a detailed network topology. Your actual network will differ, requiring changes or perhaps additional network equipment to
accommodate the system as illustrated. Please contact your local Pelco representative to discuss your specific requirements.
LeGaL nOtICe (auDIO nOtICe)
J
Improper use of audio/visual recording equipment may subject you to civil and criminal penalties. Applicable laws regarding the use of such
capabilities vary between jurisdictions and may require, among other things, express written consent from the recorded subjects. You are solely
responsible for insuring strict compliance with such laws and for strict adherence to any/all right of privacy and personalty.
IntrODuCtIOn
The NET5501-I video encoder is a network-based channel encoder with a built-in, Web-based viewer for live streaming to a standard
Web browser (Microsoft® Internet Explorer®, Chrome®, Safari® or Mozilla® Firefox®). The encoder is built upon open standards
and is part of an Endura® system for recording, managing, administering, and viewing video streams.
The encoder supports H.264 and MJPEG compression. It can generate two independently configurable H.264 streams, each up to
D1 resolution (720 x 480 for NTSC, 720 x 576 for PAL) and 30/25 images per second (ips) in addition to an MJPEG stream for Web
viewing.
The NET5501-I can be configured for one video channel. When an alarm event is triggered, the unit can send a message to an
operator.
The unit also supports motion detection for the video channel. You can configure one motion zone, with its own independent
sensitivity and threshold settings. When the NET5501-I detects activity in any of these areas, it can trigger an alarm event.
The NET5501-I supports control of remote peripherals such as pan/tilt/zoom (PTZ) cameras by way of D-Protocol, P-Protocol, and
Coaxitron® protocols.
featureS
~Open standards-based architecture
~H.264 baseline, main, or high profile compression
~Dual-stream at up to D1, 30/25 images per second (ips) per stream
~Integrated D-Protocol, P-Protocol, and Coaxitron protocols
~Support for multicast transmissions

Overview
10 | Overview
FRONT PANEL DESCRIPTION
No. Name Description
a
RX+/RX- RS-422 RX Data line
J
Disabled in RS-485 mode.
TX+/TX- RS-422/RS-485 Data line
b
Video input BNC terminal.
c
Top Panel Indicators
Displays power On/Off status.
It glows blue when the unit has power.
Displays network status (connection and speed).
Off : The unit is not connected to the network.
Solid amber : The unit is connected to the network using the 100 Mbps standard.
Solid red : The unit is connected to the network using the 10 Mbps standard.
Solid green : The unit is connected to the network using the 1 Gbps standard.
A blinking light indicates network activity corresponding to the speed based on the color.
Displays camera connection status.
Not Lit : A camera has not been connected yet.
Green : Camera video is present at the video in connector.
Red : Video is no longer present, the camera is not functioning properly.
Displays unit status.
Green : The unit is functioning normally.
Red : The unit is in an error condition.
PTZ Pin Assignments
Label LabelLead Lead
RX- TX-RS-422 Data RX- RS-422 Data TX-
RX+ TX+RS-422 Data RX+ RS-422 Data TX+
a b c

English | 11
Overview
REAR PANEL DESCRIPTION
No. Name Description
a
Press this switch to reset device to the factory default.
If you perform the factory reset, all your settings to device will be lost. For more information, please see Factory
Default (Page 13).
b
PoE Connects to the network and supplies power through Ethernet cable.
POE
a b

English | 13
Installation
faCtOry DefauLt
1.
Press and hold the Reset switch with a pointed object such as a paper clip before powering on.
2.
Power on.
3.
Release the Reset switch when the power LED
[
]
on the top panel is turned on. (about 8 seconds).
4.
When the encoder reset is completed, the system will restart by the factory default.
POE

Installation
14 | Installation
CONNECTING TO AN EXTERNAL DEVICE
Connecting the Video
Connect the [
] port of the encoder to the video output port of the camera.
Connecting the terminal block
The terminal block has tension clamps instead of screw terminals. Use a small screwdriver to open the clamp for a particular lead.
Camera

English | 15
Installation
Connecting the rS-422/rS-485 Device
Connect the external device to the [rS-422/rS-485 Data line] ports.
You can connect and control PTZ camera that supports RS-422/RS-485 communication.

Installation
16 | Installation
Network Connection
PC Connection in the Local Network
You can connect the encoder to a PC in the same network and control or manipulate it on the PC monitor.
1.
Connect the network port in the rear panel to the router or hub.
2.
Connect the local PC to the router or hub.
3.
Enter the address in the address bar (web browser) of the local PC or of the dedicated software program in the
format of “http://IP address:web service port”.
(Ex : http://192.168.0.23:80) From the Network Setup screen, you can change the port number.
If you do not know the camera's IP address, you can locate it using the Pelco Device Utility Software.
4.
Provide the ID and password before logging in. Then, you can view the monitoring screen.
Access ID (factory default) : admin, P/W : admin.
J
For security purposes, change the password right after you purchase the product.
POE
Local PC Local PC
Broadband
router
Camera
POE
4WANRESETPWR 3 2 1
Local PC Local PC
Broadband
router
English | 17
Installation
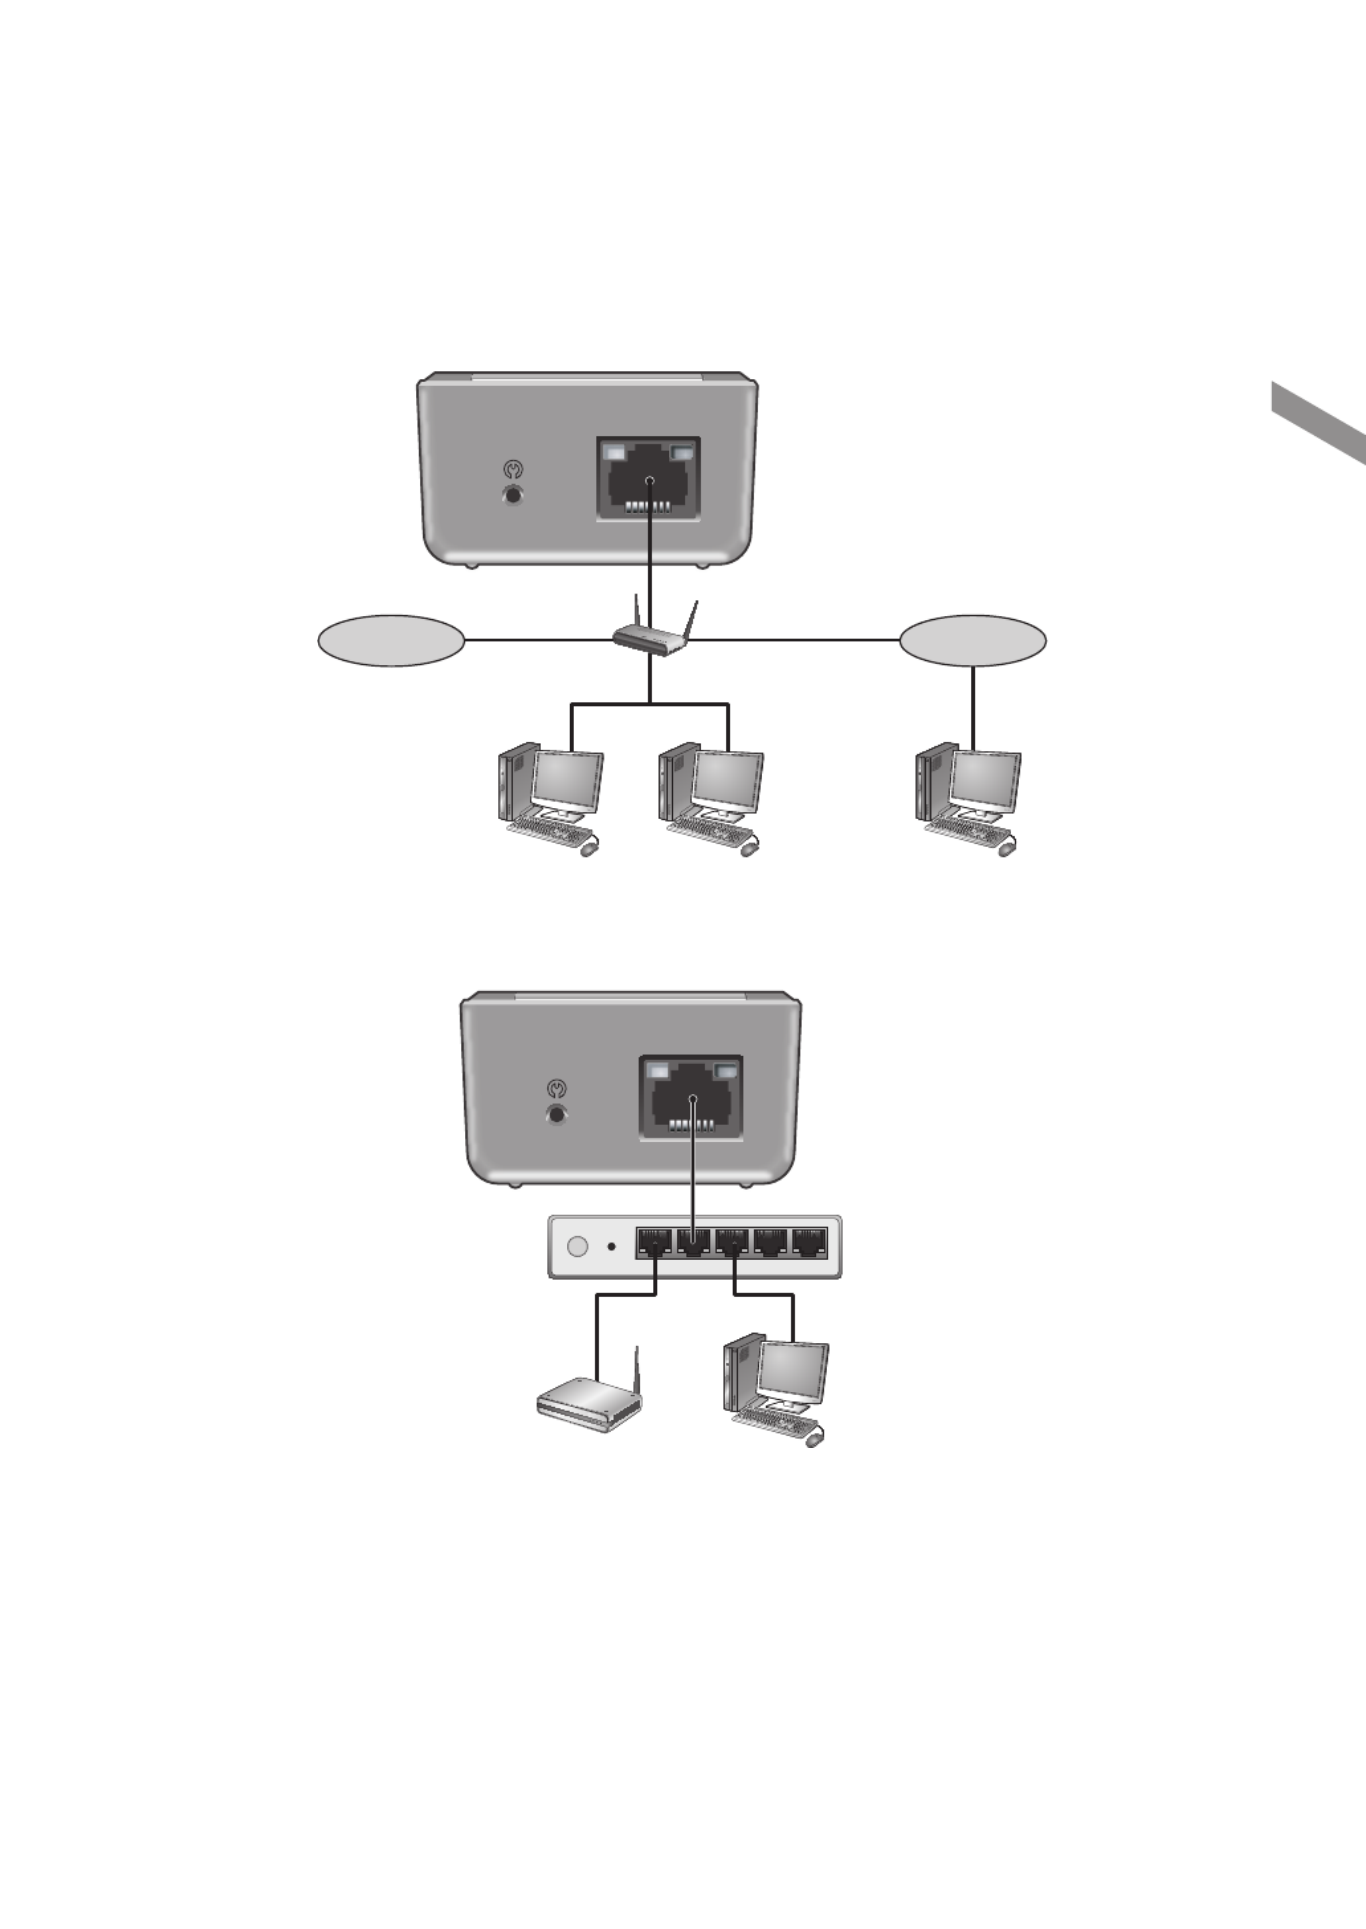
PC Connection From a Remote Network
You can connect the encoder to a PC or mobile device in the same remote network and control or manipulate it on the monitor of the
PC or mobile device
1.
Connect the network port in the rear panel to the router.
2.
Connect the [NETWORK] port of the router directly to the fixed IP LAN cable, or connect it to the ADSL modem.
POE
Local PC Local PC Local PC
Broadband
router
Internet Internet
4WANRESETPWR 3 2 1
POE
ADSL modem Local PC
Broadband
router

18 | Web Viewer
Web Viewer
WHAT IS THE WEB VIEWER?
Minimum PC Requirement
CPU P4 3.0 or Higher
RAM 512MB or Higher
VGA
GeForce MS 400, Radeon 7500 or higher
GeForce 8 series or higher
VGA MEMORY 64MB
MONITOR 1280 X 1024
BROWSER Internet Explorer, Firefox, Chrome, Safari
IE VERSION IE8.0 or higher
NETWORK 10/100 Bps
Accessing the Encoder and Attached Cameras
The first time you access the camera, the live video page appears. By default, you are viewing the video as a public user and only
have access to the single stream live view.
If, for security purposes, users should not be allowed to view video without first logging on to the camera, change the permissions
for public users.

English | 19
Web Viewer
Pelco Media Player Installation
To view videos after accessing the Web viewer, the Pelco Media Player plug-in must be installed. Install Pelco Media Player from the
CD included with the player.
The Pelco Media Player 1.9.5 or higher is required for multiple channels.
1.
Run InstallPelcoMediaPlayer.msi.
2.
Click the [Next>] button to start installation.
3.
Click the [Close] button.
Pelco Media Player Installation is complete.

Web Viewer
20 | Web Viewer
Logging In
Entering the IP address of the camera as a URL into the web browser will immediately bring up the Live Mode screen if the encoder
is not setup to require authentication (Open Authentication option).
If the camera is setup to require authentication, then the user will be prompted for a Username and Password before being able to
see the live video feed.
1.
Click <Login> on the live screen.
2.
Enter your < > and <Username Password>.
Default username : admin, Password : admin
3.
Click the <Login> button.
The Open Authentication option is configured on the Settings >
Users > General Settings screen.
Change Your Password
Please change the password for your security.
1.
Click <admin> from the live screen.
2.
Enter your new password.
3.
Click the <Save> button.
English | 21
Web Viewer
LIVE
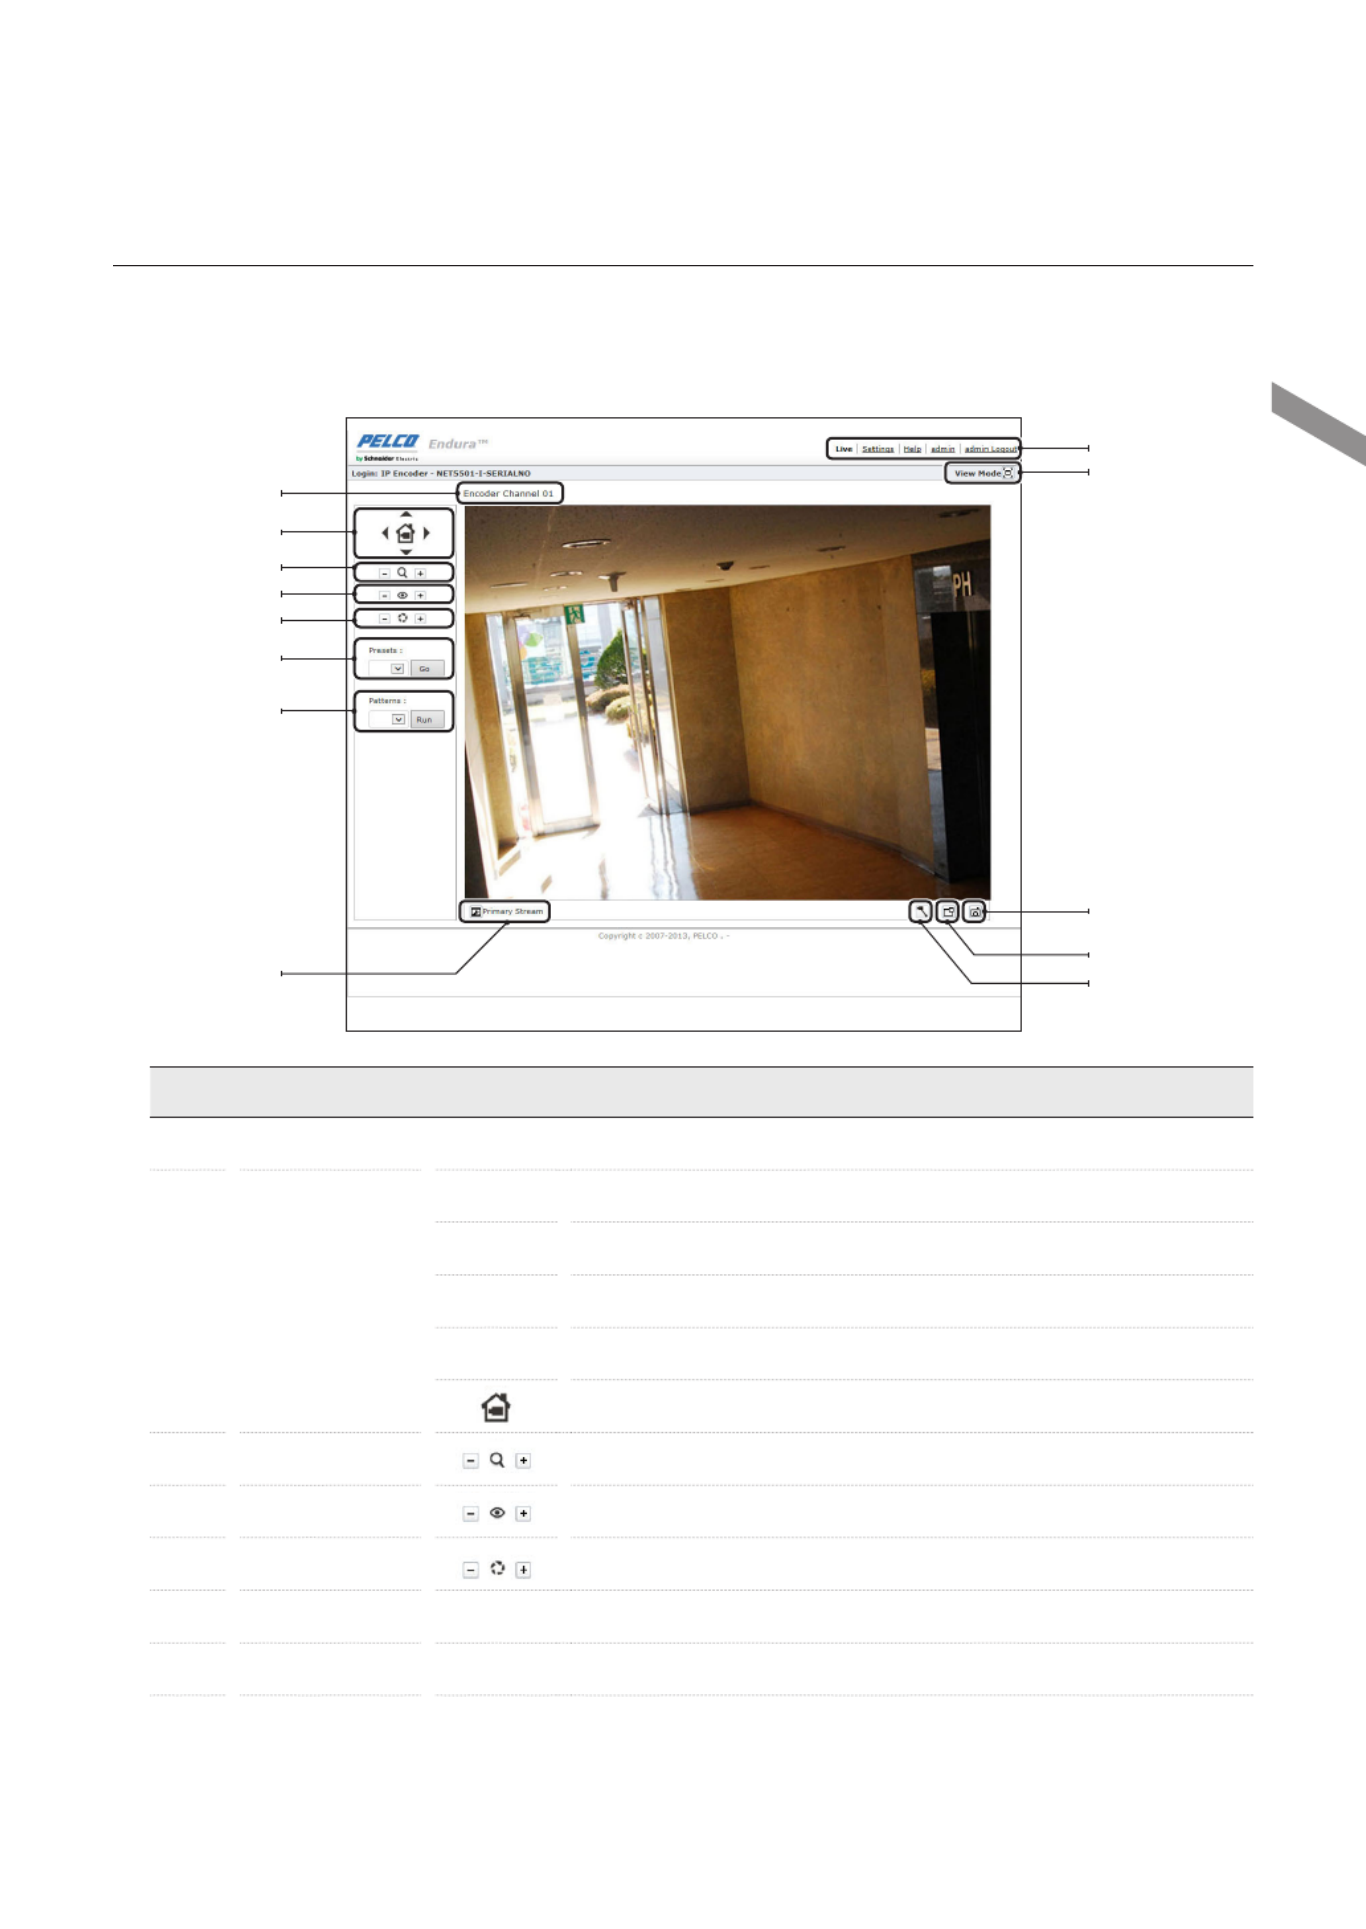
Live Screen Overview
Live Mode Screen Components
No. Name Description
a
Channel Name Displays the name assigned to the channel selected.
b
Multi-Function Image
Button
$
Tilt Up
%
Tilt Down
+
Pan Right
_
Pan Left
Home Preset
c
Control the Zoom Activates Zoom in (-) / Zoom out (+) features.
d
Control the Focus Activates Near (-) / Far (+) features.
e
Control the Iris Adjusts the camera brightness.
f
Move to Presets Moves to the preset selected.
g
Pattern Activates the pattern selected.
h
k
j
i
l
m
a
f
g
b
c
d
e

Web Viewer
22 | Web Viewer
No. Name Description
h
Stream Selection
Selects the viewable video stream that displays in live view (Primary, Secondary, QuickView) and selects unicast
or multicast and throttle settings.
It will not be presented to users who are designated as Viewers.
i
View the Selected Tab Composed of Live, Settings, Help, and Logout settings menus.
j
Maximize Viewing
Area
Scales the image to the full size of the browser. To resize the video pane to normal view, click the Show Toolbar
button in the upper-right corner of the window.
k
Take a Snapshot Captures the image displayed in the video pane and saves it as a JPEG file.
l
Open Stream in New
Window
Opens the video in a scalable, independent window. Opening the video in a separate window allows you to view
the video while other applications are running. This window can be minimized, maximized, or closed using the title
bar buttons of the active window. The window can also be resized by dragging a corner of the window.
m
Pan/Tilt/Zoom
Control the encoder and the pan (left/right) and tilt (up/down) of the connected camera by dragging the mouse.
Also, zoom using the scroll wheel on the mouse.
These icons are always available when using the Pelco Media Player. If you are using QuickTime®, PTZ
overlay is only available with PMP player.
Selecting a Stream
1.
Click < > from the live screen.
Move to the Stream settings screen.
2.
Select one of the following streams.
~
Primary STREAM : To select this stream, click the
button next to Primary Stream.
~
Secondary STREAM : To select this stream, click the
button next to Secondary Stream.
~
QuickView STREAM : To select this stream, click the
button next to QuickView Stream.
If the secondary stream has not been configured,
only Primary Stream, and QuickView Stream are
available.
3.
Select the transmission.
~
Unicast : A unicast transmission sends a separate
video stream to each user that is requesting data. Although multiple users might request the same data from the encoder
at the same time, duplicate video streams are transmitted to each user. Every unicast user that connects to the encoder
consumes additional processing power, which limits the number of simultaneous users who can access the camera.
~
Multicast : A multicast transmission sends data to multiple users at the same time using one transmission stream. Each
multicast user that connects to the camera consumes no additional processing power; therefore, multicast video streams
can be sent to an unlimited number of simultaneous users. The multicast transmission setting is available in the primary and
secondary stream display settings.
4.
Select the Player.
5.
Click the <Select> button.

English | 23
Web Viewer
SYSTEM SETTING
General Settings
Modify the system default settings of the encoder.
General Settings
~
Device Name : Set the name to use for the encoder.
The device name must be at least two (2) characters
and no more than 63 characters.
Time Settings
~
Time Server : Set the time to apply to the encoder.
-
None : Specify no time setting for the encoder.
-
DHCP : Specify the time from the DHCP server.
-
Manual : Select whether the encoder is to be set to
the domain of the IP address or NTP server.
~
Time Zone : Set the time zone relative to standard time
(GMT).
~
Current Date : Display the date and time set.
Channel Names
One input field for the channel on the encoder to allow specification of channel / camera name.
Generate System Log
It will create a system log file that can be used by Pelco Product Support for troubleshooting.
The System Log file will be automatically downloaded using the web browser.
The user will not be prompted for a file name. The downloaded file will be a tar compressed file with a file extension of .tgz.
The file name will be comprised of the characters “_log” appended to the encoder serial number.
Reboot Encoder
Restart the encoder.
Restore All Encoder Defaults
All settings will be restored to the factory default settings.
Web Viewer
24 | Web Viewer
Analog Input
You can set the type of the encoder analog video output.
Analog Video Input Standard
Set the video output type.
~
Auto : Automatic conversion according to the video
input type connected.
~
NTSC : Select to force the video mode if the transfer
method supports NTSC.
~
PAL : Select to force the video mode if the transfer
method supports PAL.
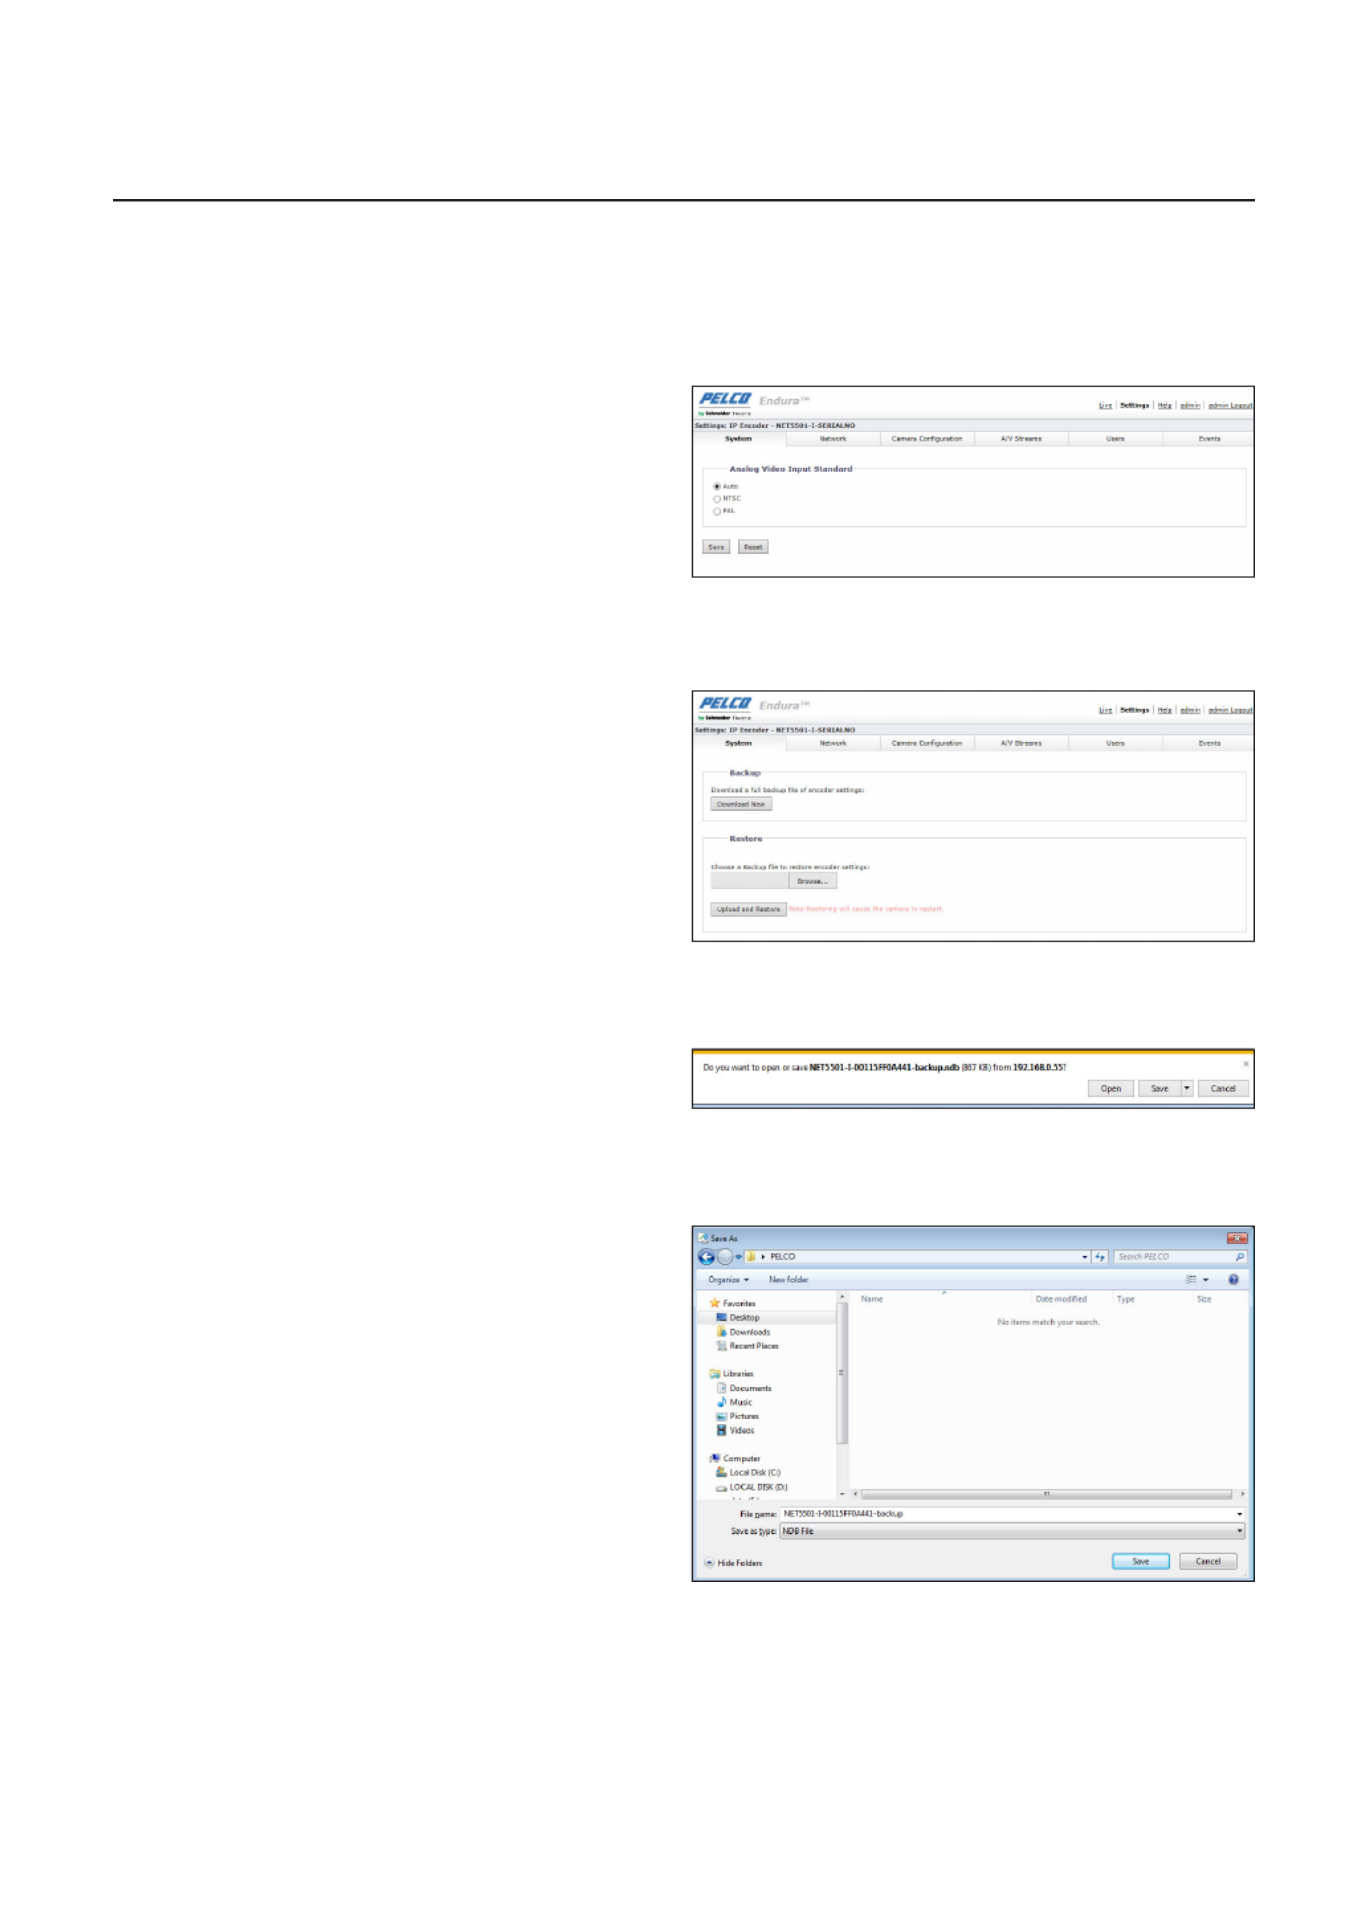
Backup & Restore
You can backup or restore settings. The system will restart
automatically after backup or restoration.
Backup Current Settings
1.
Click the [Download Now] button.
The File path setting window will appear.
2.
Select the backup path, enter a name, and then click the
[ Save] button.
Information about the current settings will be saved in “.ndb”
file format in the designated location.
English | 25
Web Viewer
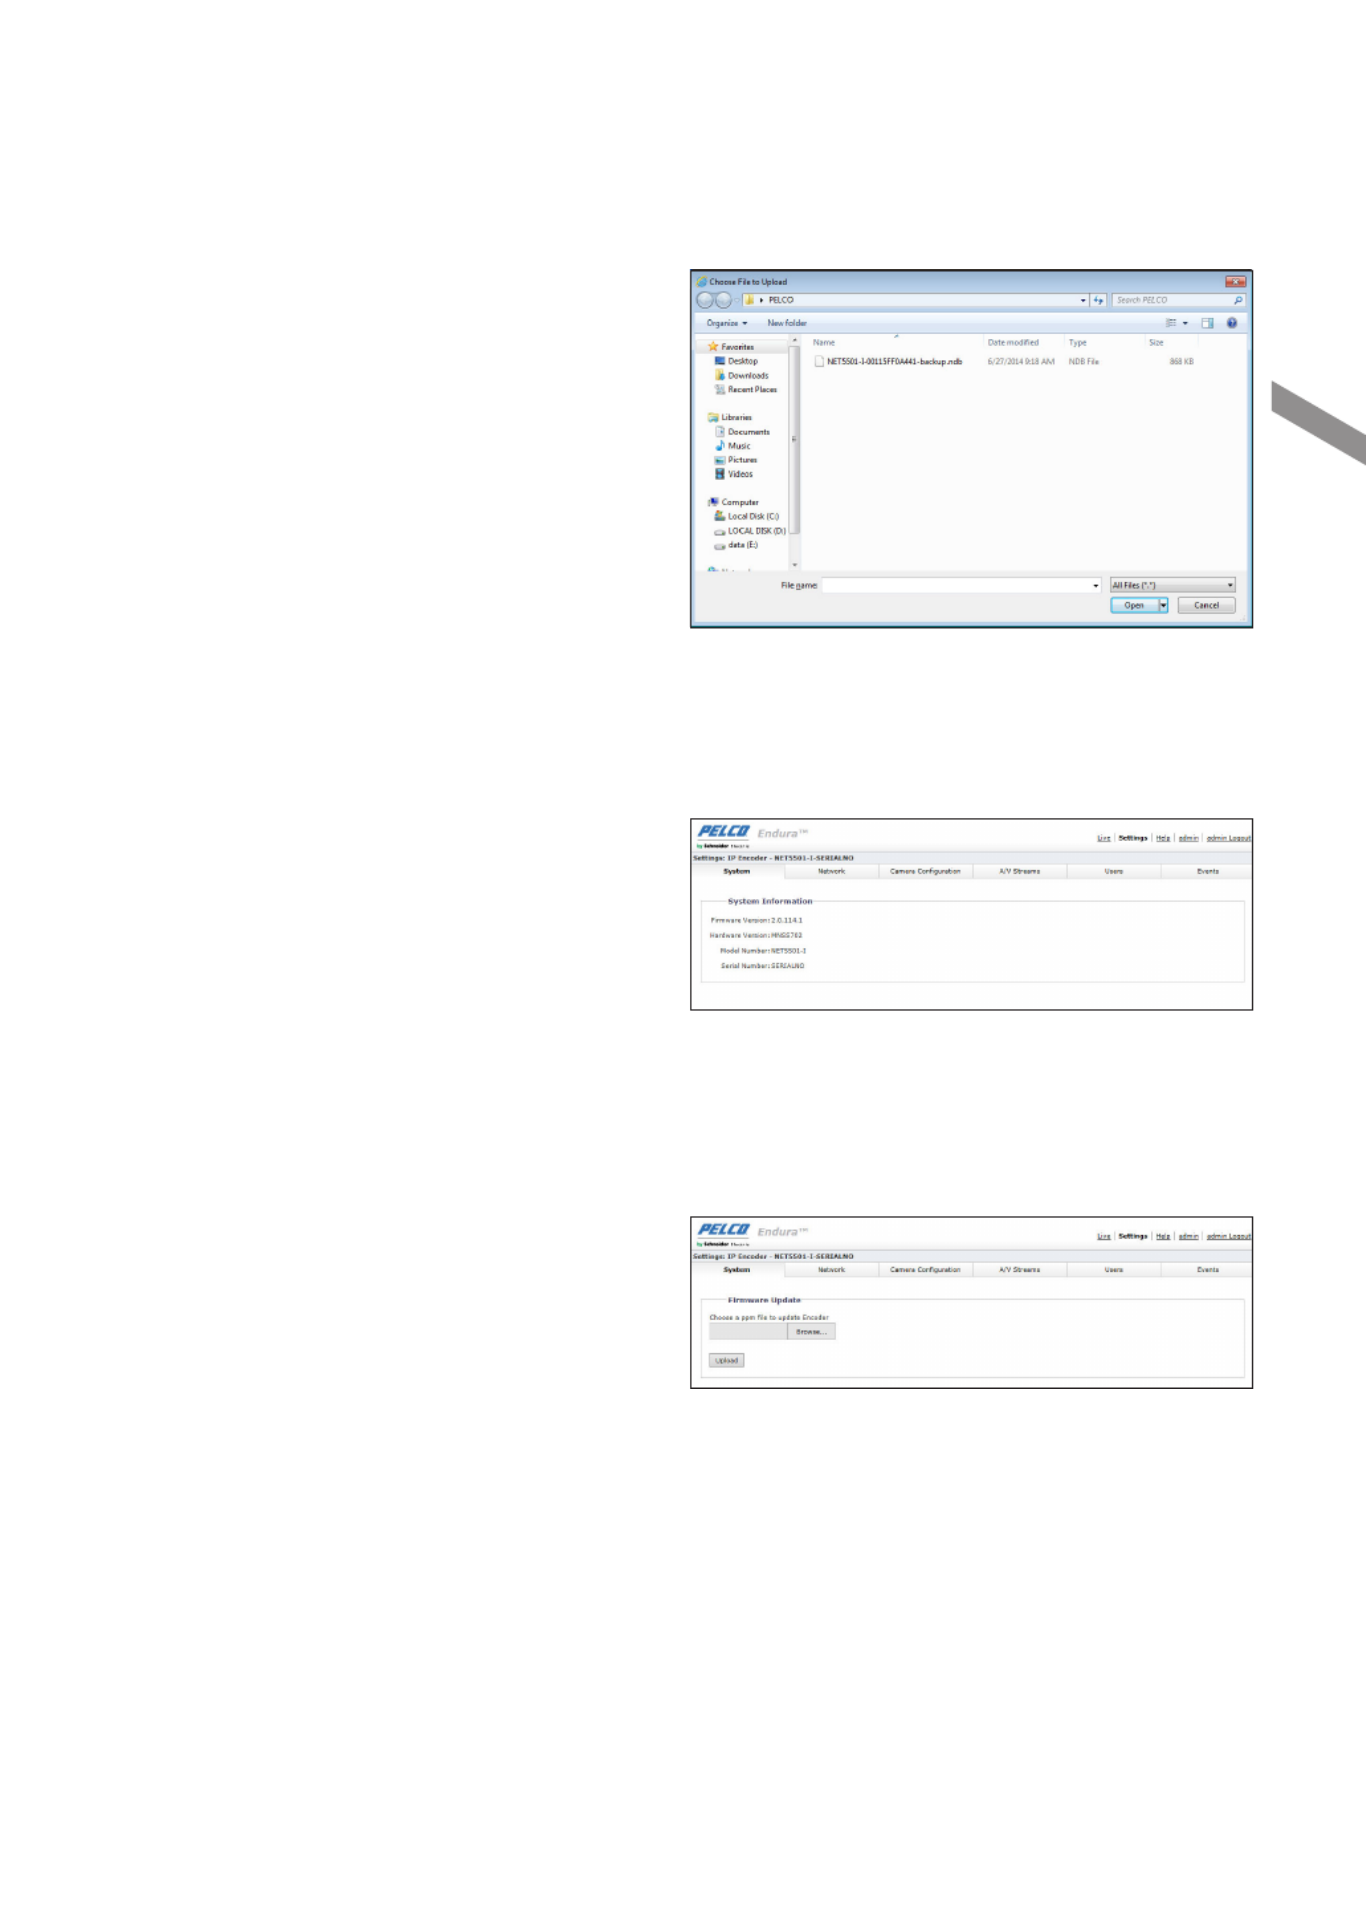
Restore Backup Settings
1.
Click the [ ] button to restore backup settings.Browse...
2.
Select the desired backup file and click the [Open] button.
3.
Click the [Upload and Restore] button.
Information
Check the encoder’s system information.
Firmware
You can upgrade the encoder’s firmware.

Web Viewer
26 | Web Viewer
NETWORK SETTING
General
Modify the network default settings of the encoder.
System Settings
Set the system hostname and port.
~
Hardware Address : Presents the MAC Address of the
encoder device.
~
Hostname : A user-friendly name into the Hostname
box (1 to 21 characters) using alphanumeric characters
should be specified.
A user-friendly name makes it easier to recognize the
device on the network. Numeric-only names are not
allowed.
~
HTTP Port : The HTTP port used to access the
encoder from a web browser. Default value is 80 (TCP).
~
HTTPS Port : Security enhanced version of the web
communication protocol, HTTP.
Used to set HTTPS mode in SSL; the default value is
443 (TCP).
~
RTSP Port : Port number used to support remote connection to the encoder from the client software.
IPv4 Settings
Set the IPv4 of the encoder.
~
IP Address : Displays the currently set IP address.
~
Subnet Mask : Displays the IP address set for the <Subnet Mask>.
~
Gateway : Displays the IP address set for the <Gateway>.
~
Primary DNS/Secondary DNS : Sets a valid IP address for the DNS server.
Settable when DHCP is not selected.

English | 27
Web Viewer
SSL
You can either select the security access method for the encoder or install an accreditation certificate.
SSL Configuration
Select a security access method.
Certificate
Install an accreditation certificate.
To Install an Accreditation Certificate
1.
Click <Install New Certificate>.
2.
Select a certificate to install.
3.
Click <Next>.
4.
Select the accreditation certificate and key file to install.
5.
Click the <Generate Certificate> button.
To delete the accreditation certificate installed, select the
certificate and click <Delete Certificate>.
SSH
The SSH settings page enables or disables SSH access to the camera. SSH is a user-enabled protocol that allows Pelco Product
Support to log onto and service the camera for advanced troubleshooting purposes. From the SSH settings page, users with the
appropriate permissions can enable or disable SSH access to the camera.
SSH Settings
Set SSH accessibility on the encoder.
~
Username : This attribute has a fixed value of “root”
and cannot be changed.
~
Password : SSH Password must be between 4 and 64
characters.
~
Re-type Password : Enter your password again.

Web Viewer
28 | Web Viewer
802.1x
When connected to a network, select 802.1x protocol to install the certificate.
802.1x Port Security
~
Protocol : Specify the 802.1x protocol.
~
Username : Enter the client certificate ID.
~
Password : Enter the certificate key password. If the
key file used is not encrypted, you don’t need to enter
it.
SNMP
The system or network manager can use the SNMP protocol to monitor network equipment or operate environment settings and
other tasks remotely.
SNMP Configuration
~
SNMP v2c : Use SNMP version 2.
~
SNMP V3 : Use SNMP version 3.

English | 29
Web Viewer
CAMERA CONFIGURATION
Choose number 1 to the number of channels on the encoder.
General
Setup the camera connected to the encoder.
Digital Processing
Adjust each camera channel video input.
~
Saturation Adjust : Adjust video saturation.
~
Contrast Adjust : Adjust video contrast.
~
Brightness Adjust : Adjust video brightness.
~
Hue Adjust : Adjust video tint.
Click <Restore Settings to Defaults> to restore
the factory settings.
Live Preview
Check videos of the selected video channel.
OSD
Use the arrow keys on your keyboard to navigate through the menus
then press the Enter key to make your selection.
Produktspezifikationen
| Marke: | Pelco |
| Kategorie: | Überwachungskamera |
| Modell: | NET5501-I |
Brauchst du Hilfe?
Wenn Sie Hilfe mit Pelco NET5501-I benötigen, stellen Sie unten eine Frage und andere Benutzer werden Ihnen antworten
Bedienungsanleitung Überwachungskamera Pelco

21 August 2024
Pelco GFC Professional Multi IMD2007-1ES Bedienungsanleitung
21 August 2024
21 August 2024
21 August 2024
21 August 2024
21 August 2024
21 August 2024
21 August 2024
21 August 2024
Bedienungsanleitung Überwachungskamera
- Überwachungskamera Samsung
- Überwachungskamera Approx
- Überwachungskamera Belkin
- Überwachungskamera Sanyo
- Überwachungskamera Exibel
- Überwachungskamera Gembird
- Überwachungskamera Genius
- Überwachungskamera Hama
- Überwachungskamera LogiLink
- Überwachungskamera Logitech
- Überwachungskamera Manhattan
- Überwachungskamera Nedis
- Überwachungskamera Niceboy
- Überwachungskamera Philips
- Überwachungskamera Sony
- Überwachungskamera Trust
- Überwachungskamera Panasonic
- Überwachungskamera Clas Ohlson
- Überwachungskamera Profile
- Überwachungskamera ZyXEL
- Überwachungskamera Bosch
- Überwachungskamera Laserliner
- Überwachungskamera Buffalo
- Überwachungskamera Canon
- Überwachungskamera Velleman
- Überwachungskamera Powerfix
- Überwachungskamera Eminent
- Überwachungskamera Linksys
- Überwachungskamera Maginon
- Überwachungskamera Netgear
- Überwachungskamera Technaxx
- Überwachungskamera Alecto
- Überwachungskamera Denver
- Überwachungskamera EMOS
- Überwachungskamera Gira
- Überwachungskamera König
- Überwachungskamera MarQuant
- Überwachungskamera Renkforce
- Überwachungskamera Thomson
- Überwachungskamera Trevi
- Überwachungskamera Blaupunkt
- Überwachungskamera Schneider
- Überwachungskamera Trebs
- Überwachungskamera Pyle
- Überwachungskamera Topcom
- Überwachungskamera Pioneer
- Überwachungskamera JVC
- Überwachungskamera Motorola
- Überwachungskamera Xiaomi
- Überwachungskamera Abus
- Überwachungskamera Avidsen
- Überwachungskamera Elro
- Überwachungskamera EZVIZ
- Überwachungskamera Imou
- Überwachungskamera INSTAR
- Überwachungskamera Megasat
- Überwachungskamera Olympia
- Überwachungskamera Smartwares
- Überwachungskamera Switel
- Überwachungskamera Yale
- Überwachungskamera Ferguson
- Überwachungskamera Orion
- Überwachungskamera Gigaset
- Überwachungskamera Strong
- Überwachungskamera Toshiba
- Überwachungskamera Garmin
- Überwachungskamera Perel
- Überwachungskamera Netis
- Überwachungskamera Lindy
- Überwachungskamera Fenton
- Überwachungskamera Waeco
- Überwachungskamera Acme
- Überwachungskamera Burg Wächter
- Überwachungskamera Marmitek
- Überwachungskamera Marshall
- Überwachungskamera Honeywell
- Überwachungskamera B/R/K
- Überwachungskamera Marshall Electronics
- Überwachungskamera TRENDnet
- Überwachungskamera Targa
- Überwachungskamera First Alert
- Überwachungskamera AVerMedia
- Überwachungskamera Zebra
- Überwachungskamera TP-Link
- Überwachungskamera Flamingo
- Überwachungskamera Kodak
- Überwachungskamera Rollei
- Überwachungskamera IGet
- Überwachungskamera Adj
- Überwachungskamera Netatmo
- Überwachungskamera Duramaxx
- Überwachungskamera Ebode
- Überwachungskamera Xavax
- Überwachungskamera InFocus
- Überwachungskamera Overmax
- Überwachungskamera Monoprice
- Überwachungskamera Monacor
- Überwachungskamera JUNG
- Überwachungskamera Ednet
- Überwachungskamera AG Neovo
- Überwachungskamera Nest
- Überwachungskamera Edimax
- Überwachungskamera V-TAC
- Überwachungskamera Aritech
- Überwachungskamera Uniden
- Überwachungskamera Kogan
- Überwachungskamera Genie
- Überwachungskamera M-e
- Überwachungskamera Elmo
- Überwachungskamera Lumens
- Überwachungskamera Jablocom
- Überwachungskamera Conceptronic
- Überwachungskamera D-Link
- Überwachungskamera Eufy
- Überwachungskamera Stabo
- Überwachungskamera Friedland
- Überwachungskamera EVOLVEO
- Überwachungskamera SPC
- Überwachungskamera August
- Überwachungskamera Ring
- Überwachungskamera Digitus
- Überwachungskamera SereneLife
- Überwachungskamera Swann
- Überwachungskamera Vitek
- Überwachungskamera DataVideo
- Überwachungskamera LevelOne
- Überwachungskamera Aida
- Überwachungskamera APC
- Überwachungskamera Beafon
- Überwachungskamera Chuango
- Überwachungskamera Cisco
- Überwachungskamera Grandstream
- Überwachungskamera Delta Dore
- Überwachungskamera EVE
- Überwachungskamera Defender
- Überwachungskamera Tenda
- Überwachungskamera Swisstone
- Überwachungskamera Foscam
- Überwachungskamera Ubiquiti Networks
- Überwachungskamera Kramer
- Überwachungskamera Vaddio
- Überwachungskamera Intellinet
- Überwachungskamera Reolink
- Überwachungskamera Swan
- Überwachungskamera Hikvision
- Überwachungskamera FLIR
- Überwachungskamera Furrion
- Überwachungskamera Arlo
- Überwachungskamera Nexxt
- Überwachungskamera Planet
- Überwachungskamera EnGenius
- Überwachungskamera Dörr
- Überwachungskamera Lorex
- Überwachungskamera Ikan
- Überwachungskamera Comtrend
- Überwachungskamera Somfy
- Überwachungskamera Dahua
- Überwachungskamera Dedicated Micros
- Überwachungskamera DIO
- Überwachungskamera EasyN
- Überwachungskamera Escam
- Überwachungskamera EverFocus
- Überwachungskamera Ganz
- Überwachungskamera GeoVision
- Überwachungskamera Hombli
- Überwachungskamera Home Protector
- Überwachungskamera Iiquu
- Überwachungskamera Indexa
- Überwachungskamera Interlogix
- Überwachungskamera KlikaanKlikuit
- Überwachungskamera Kompernass
- Überwachungskamera Mr Safe
- Überwachungskamera Naxa
- Überwachungskamera Nordval
- Überwachungskamera Notifier
- Überwachungskamera Oplink
- Überwachungskamera Provision ISR
- Überwachungskamera Quantum
- Überwachungskamera Raymarine
- Überwachungskamera Revo
- Überwachungskamera SAB
- Überwachungskamera Satel
- Überwachungskamera SecurityMan
- Überwachungskamera Sinji
- Überwachungskamera SMC
- Überwachungskamera Sonic Alert
- Überwachungskamera Sricam
- Überwachungskamera Steren
- Überwachungskamera Storage Options
- Überwachungskamera Tenvis
- Überwachungskamera Hive
- Überwachungskamera Ubiquiti
- Überwachungskamera Vivotek
- Überwachungskamera Woonveilig
- Überwachungskamera Y-cam
- Überwachungskamera ACTi
- Überwachungskamera AVer
- Überwachungskamera Epcom
- Überwachungskamera ZKTeco
- Überwachungskamera AirLive
- Überwachungskamera Mobotix
- Überwachungskamera Dahua Technology
- Überwachungskamera Speco Technologies
- Überwachungskamera 3xLOGIC
- Überwachungskamera Atlantis Land
- Überwachungskamera CRUX
- Überwachungskamera Pentatech
- Überwachungskamera Summer Infant
- Überwachungskamera Illustra
- Überwachungskamera Surveon
- Überwachungskamera Avigilon
- Überwachungskamera Brilliant
- Überwachungskamera Hanwha
- Überwachungskamera Lanberg
- Überwachungskamera Verint
- Überwachungskamera Axis
- Überwachungskamera EtiamPro
- Überwachungskamera MEE Audio
- Überwachungskamera Advantech
- Überwachungskamera Chacon
- Überwachungskamera Alula
- Überwachungskamera EKO
- Überwachungskamera IOIO
- Überwachungskamera KJB Security Products
- Überwachungskamera BZBGear
- Überwachungskamera Adesso
- Überwachungskamera Brickcom
- Überwachungskamera Insteon
- Überwachungskamera Aigis
- Überwachungskamera ORNO
- Überwachungskamera Atlona
- Überwachungskamera Linear PRO Access
- Überwachungskamera Laxihub
- Überwachungskamera Valueline
- Überwachungskamera Aqara
- Überwachungskamera Tecno
- Überwachungskamera Lutec
- Überwachungskamera Brinno
- Überwachungskamera Night Owl
- Überwachungskamera WyreStorm
- Überwachungskamera Exacq
- Überwachungskamera Equip
- Überwachungskamera AVMATRIX
- Überwachungskamera UniView
- Überwachungskamera Alfatron
- Überwachungskamera Syscom
- Überwachungskamera BLOW
- Überwachungskamera Videotec
- Überwachungskamera DSC
- Überwachungskamera AViPAS
- Überwachungskamera Milestone Systems
- Überwachungskamera Inkovideo
- Überwachungskamera Hamlet
- Überwachungskamera Mobi
- Überwachungskamera Infortrend
- Überwachungskamera VideoComm
- Überwachungskamera Kguard
- Überwachungskamera Boyo
- Überwachungskamera HiLook
- Überwachungskamera Mach Power
- Überwachungskamera Canyon
- Überwachungskamera Digital Watchdog
- Überwachungskamera Ernitec
- Überwachungskamera Ikegami
- Überwachungskamera Gewiss
- Überwachungskamera Weldex
- Überwachungskamera Costar
- Überwachungskamera Sentry360
- Überwachungskamera ALC
- Überwachungskamera Spyclops
- Überwachungskamera Compro
- Überwachungskamera IDIS
- Überwachungskamera I3International
- Überwachungskamera B & S Technology
- Überwachungskamera Qian
- Überwachungskamera Accsoon
- Überwachungskamera Control4
- Überwachungskamera Petcube
- Überwachungskamera Apeman
- Überwachungskamera ATN
- Überwachungskamera IC Intracom
- Überwachungskamera POSline
- Überwachungskamera Watec
- Überwachungskamera ETiger
- Überwachungskamera Videcon
- Überwachungskamera BirdDog
- Überwachungskamera Topica
- Überwachungskamera Rostra
- Überwachungskamera Caddx
- Überwachungskamera Whistler
- Überwachungskamera ClearView
- Überwachungskamera Beseye
- Überwachungskamera IMILAB
- Überwachungskamera CNB Technology
- Überwachungskamera Tapo
- Überwachungskamera Securetech
- Überwachungskamera NetMedia
- Überwachungskamera Nivian
- Überwachungskamera Guardzilla
- Überwachungskamera Blink
- Überwachungskamera Zavio
- Überwachungskamera Campark
- Überwachungskamera IPX
- Überwachungskamera Annke
- Überwachungskamera AVTech
- Überwachungskamera Vimtag
- Überwachungskamera Security Labs
- Überwachungskamera Seneca
- Überwachungskamera Vosker
- Überwachungskamera Owltron
- Überwachungskamera Enabot
- Überwachungskamera Luis Energy
- Überwachungskamera Sir Gawain
- Überwachungskamera VisorTech
- Überwachungskamera Milesight
- Überwachungskamera GVI Security
- Überwachungskamera Conbrov
- Überwachungskamera HuddleCamHD
- Überwachungskamera Setti+
- Überwachungskamera BIRDFY
- Überwachungskamera I-PRO
- Überwachungskamera DVDO
- Überwachungskamera TCP
Neueste Bedienungsanleitung für -Kategorien-
15 Oktober 2024

15 Oktober 2024
14 Oktober 2024
14 Oktober 2024

13 Oktober 2024
13 Oktober 2024
13 Oktober 2024
11 Oktober 2024
11 Oktober 2024
11 Oktober 2024