Panasonic TC-15DT2 Bedienungsanleitung
Lesen Sie kostenlos die 📖 deutsche Bedienungsanleitung für Panasonic TC-15DT2 (72 Seiten) in der Kategorie Fernsehen. Dieser Bedienungsanleitung war für 14 Personen hilfreich und wurde von 2 Benutzern mit durchschnittlich 4.5 Sternen bewertet
Seite 1/72

Combination 15.2˝ LCD
TV/DVD Player
Operating Instructions
TC-15DT2
Model No.
TQBC0256
Before connecting, operating or adjusting this product, please read these instructions completely. Please keep this
manual for future reference.
G
-P OW ER
A
SPE CT
R
-S TA
NDBY
ON
PO
W
ER
IN P
UTVO LU M
ECH
A
NNEL
TC-15 DT
2
G-POWER
POWER
OPEN
/CLOSE DISP AL Y
TO P
M EN
U
ANGLE
D
VD
M
E
NU
ENTER
TV
MENU
RETURN
SKIP SL OW
/SEAR CH
STOP PAUSE P LAY
ASPE CT TV/VIDE O MUTE
SLEE P CH VOL
SURROUND
CANCEL
REPE AT MODE A -B REP EAT PLAY MODE
R-TUNE
ASPECT
R-STANDBY
ON
POWER
INPUT VO LUME CHANNEL
TH-15DT1
This manual is divided into two parts, the “Install and TV Adjusts” and “DVD Operation Guide” :
Install and TV Adjusts: Details on installation of the unit and adjustments to achieve optimum quality of the TV.
DVD Operation Guide: Details on operating instructions for playing disks such as DVDs and CDs.
For assistance, please call : 1-800-211-PANA (7262)
or send e-mail to : consumerproducts@panasonic.com
or visit us at www.panasonic.com (U.S.A)
For assistance, please call : 787-750-4300
(Puerto Rico)

2
Important Safety Instructions for LCD TV
1) Read these instructions and apply them with your LCD TV.
2) Keep these instructions.
3) Heed all warnings.
4) Follow all instructions.
5) Do not use this apparatus near water. For example: Avoid placing it near a bathtub, washbowl, kitchen sink, or laundry
tub, in a wet basement, or near a swimming pool, etc.
6) Clean only with dry cloth. Unplug this LCD V from the wall outlet before cleaning. Do not use liquid or aerosol cleaners.
7) Do not block any ventilation openings. Install in accordance with the manufacturer's instructions.
Slots and openings in the cabinet and the back or bottom are provided for ventilation, and to insure reliable operation
of the LCD TV and to protect it from overheating. These openings must not be blocked or covered. There should be at
least 10 cm of space from these openings. The openings should never be blocked by placing the LCD TV on a bed,
sofa, rug or other similar surface. This LCD TV should not be placed in a built-in installation such as a bookcase unless
proper ventilation is provided.
8) Do not install near any heat sources such as radiators, heat registers, stoves, or other apparatus (including amplifiers)
that produce heat.
9) Protect the power cord from being walked on or pinched particularly at plugs, convenience receptacles, and the point
where they exit from the apparatus.
10) Only use attachments/accessories specified by the manufacturer. Otherwise if may cause hazards.
11) Use only with the cart, stand, tripod, bracket, or table specified by the manufacturer, or sold with the
apparatus. When a cart is used, use caution when moving the cart/apparatus combination to avoid injure
from tip-over.
12) Unplug this apparatus during lightning storms or when unused for long periods of time. This will prevent damage to the
receiver due to lightning and power-line surges.
13) Refer all servicing to qualified service personnel. Servicing is required when the apparatus has been damaged in any
way, such as power-supply cord or plug is damaged, liquid has been spilled or objects have fallen into the apparatus,
the apparatus has been exposed to rain or moisture, does not operate normally, or has been dropped.
Upon completion of any service or repairs to this LCD TV, ask the service technician to perform routine safety checks
to determine that the television is in safe operating condition.
14) Operate only from the type of power source indicated on the marking label. If you are not sure of the type of power
supplied to your home consult your television dealer or local power company.
15) Follow all warnings and instructions marked on the LCD TV.
16) Never push objects of any kind into this LCD TV through cabinet slots as they may touch dangerous voltage points or
short out parts that could result in a fire or electric shock. Never spill liquid of any kind on the LCD TV.
Note to CATV System Installer: This reminder is provided to direct the CATV system installer’s attention to Article
820–40 of the NEC that provides guidelines for proper grounding and, in particular, specifies that the cable ground shall be
connected to the grounding system of the building, as close to the point of cable entry as practical.
Important Safety Instructions
The lightning flash with
arrow-head within a triangle
is intended to tell the user
that parts inside the product
are a risk of electric shock to
persons.
The exclamation point within
a triangle is intended to tell
the user that important
operating and servicing
instructions are in the papers
with the appliance.
WARNING
RISK OF ELECTRIC SHOCK
DO NOT OPEN

3
17) If an outside antenna is connected to the television
equipment, be sure the antenna system is grounded
so as to provide some protection against voltage surges
and built up static charges. In the U.S.
Selection 810-21 of the National Electrical Code
provides information with respect to proper grounding
of the mast and supporting structure, grounding of the
lead-in wire to an antenna discharge unit, size of
grounding conductors, location of antenna discharge
unit, connection to grounding electrodes, and
requirements for the grounding electrode.
18) An outside antenna system should not be located in the
vicinity of overhead power lines or other electric light or
power circuits, or where it can fall into such power lines or
circuits. When installing an outside antenna system
extreme care should be taken to keep from touching
such power lines or circuits as contact with them
might be fatal.
19) Unplug this LCD TV from the wall outlet, and refer servicing to qualified service personnel under the following conditions:
a. When the power cord or plug is damaged or frayed.
b. If liquid has been spilled into the LCD TV.
c. If the LCD TV ha been exposed to rain or water.
d. If the LCD TV does not operate normally by following the operating instructions.
Adjust only those controls that are covered by the operating instructions as improper adjustment of other controls may
result in damage and will often require extensive work by a qualified technician to restore the LCD TV to normal operation.
e. If the LCD TV has been dropped or the cabinet has been damaged.
f. When the LCD TV exhibits a distinct change in performance - this indicates a need for service.
20) When replacement parts are required, be sure the service technician to use replacement parts specified by the manufacture that
have the same characteristics as the original part. Unauthorized substitutions may result in fire, electric shock, or other hazards.
21) WARNING: TO REDUCE THE RISK OF FIRE OR ELECTRIC SHOCK, DO NOT EXPOSE THIS APPARATUS TO
RAIN OR MOISTURE.
22) CAUTION: TO PREVENT ELECTRIC SHOCK DO NOT USE THIS PLUG WITH A RECEPTACLE OR OTHER OUTLET
UNLESS THE BLADES CAN BE FULLY INSERTED TO PREVENT BLADE EXPOSURE.
23) CAUTION: USE WITH OTHER STAND IS CABABLE OF RESULTING IN INSTABILITY CAUSING POSSIBLE INJURY.
24) CAUTION: DANGER OF EXPLOSION IF BATTERY IS INCORRECTLY REPLACED. REPLACE ONLY WITH THE
SAME OR EQUIVALENT TYPE.
NOTE: • This equipment is designed to operate in the U.S.A. and other countries where the broadcasting system and
AC house current is exactly the same as in the U.S.A.
• The marking or retained image on the LCD panel resulting from fixed image use is not an operating defect and as such
is not covered by Warranty. This product is not designed to display fixed image patterns for extended periods of time.
Important Information Regarding Use of Video Games, Computers, Caption or Other Fixed Image Displays.
The extended use of fixed image program material can cause a permanent "shadow image" on the LCD panel.
This background image is viewable on normal programs in the form of a stationary fixed image. This type of irreversible
LCD panel deterioration can be limited by observing the following steps:
A. Reduce the brightness/contrast setting to a minimum viewing level.
B. Do not display the fixed image for extended periods of time.
C. Turn the power off when not in actual use.
Important Safety Instructions
GROUND
CLAMP
EXAMPLE OF ANTENNA GROUNDING AS
PER (NEC) NATIONAL ELECTRICAL CODE ANTENNA
LEAD-IN WIRE
ANTENNA
DISCHARGE UNIT
(NEC SECTION 810-20)
GROUNDING CONDUCTORS
(NEC SECTION 810-21)
GROUND CLAMPS
POWER SERVICE GROUNDING
ELECTRODE SYSTEM
(NEC ART 250, PART H)
ELECTRIC
SERVICE
EQUIPMENT

4
Dear Panasonic Customer
Welcome to the Panasonic family of customers.
We hope that you will have many years of enjoyment from your new 15.2
″
LCD TV
with built in DVD player.
To obtain maximum benefit from your set, please read these Instructions before making
any adjustments, and retain them for future reference.
Retain your purchase receipt also, and note down the model number and serial number
of your set in the space provided on the rear cover of these instructions.
For assistance, please call : 1-800-211-PANA (7262)
or send e-mail to : consumerproducts@panasonic.com
or visit us at www.panasonic.com (U.S.A)
For assistance, please call : 787-750-4300
(Puerto Rico)
CAUTION:
COMBINATION 15.2 LCD TV/DVD PLAYER IS A CLASS 1 LASER″
PRODUCT. HOWEVER THIS COMBINATION 15.2 LCD TV/DVD PLAYER″
USES A VISIBLE LASER BEAM WHICH COULD CAUSE HAZARDOUS
RADIATION EXPOSURE IF DIRECTED. BE SURE TO OPERATE THE
COMBINATION 15.2 LCD TV/DVD PLAYER CORRECTLY AS INSTRUCTED.″
WHEN THIS COMBINATION 15.2 LCD TV/DVD PLAYER IS PLUGGED TO THE WALL OUTLET, DO NOT PLACE″
YOUR EYES CLOSE TO THE OPENING OF THE DISC TRAY AND OTHER OPENINGS TO LOOK INTO THE
INSIDE OF THIS PLAYER.
USE OF CONTROLS OR ADJUSTMENTS OR PERFORMANCE OF PROCEDURES OTHER THAN THOSE
SPECIFIED HEREIN MAY RESULT IN HAZARDOUS RADIATION EXPOSURE.
DO NOT OPEN COVERS AND DO NOT REPAIR YOURSELF. REFER SERVICING TO QUALIFIED PERSONNEL.
CLASS 1
LASER PRODUCT
Federal Communication Commission Information
This equipment has been tested and found to comply with the limits for a TV Broadcast Receiver, pursuant to Part 15
of the FCC Rules. These limits are designed to provide reasonable protection against harmful interference in a
residential installation. This equipment generates, uses and can radiate radio frequency energy and, if not installed
and used in accordance with the instructions, may cause harmful interference to radio communications. If this
equipment does cause or receive interference, which can be determined by turning equipment off and on, the user is
encouraged to try to correct the interference by one of the following measures:
Reorient or relocate the TV antenna.
Increase the separation between TV and other equipment.
Connect TV into separate outlet from other equipment.
Consult the dealer or an experienced radio/TV technician for help.
FCC Caution: Any changes or modifications not expressly approved by the party responsible for compliance could
void the user’s authority to operate this equipment.

5
Table of Contents
Install and TV Adjusts (start from the next page)
Important Safety Instructions ......................................2
Federal Communication Commission Information .......4
Installation .....................................................................6
Disc handling ...............................................................6
Maintenance ................................................................7
SUPPLIED ACCESSORIES ........................................7
Remote control battery installation...............................7
Connecting the Antenna Cable to the RF In Terminal .....
8
Antenna / Cable Connection ........................................8
How to connect the input terminals ............................10
How to connect the AV OUT Terminals ......................10
How to connect the 5.1ch SURROUND AUDIO OUT Terminals ....
11
Connecting Headphones / Earphones .......................12
Connecting OPTICAL audio cable .............................12
Power ON / OFF ...........................................................13
How to Turn the Power On .........................................13
Location of Controls ................................................... 14
Flow Chart of TV menu ............................................... 16
Tuning channels (Automatic channel programming).......
18
Tuning channels (Manual channel programming) .......19
Playing a VCR or other peripheral equipment ..........20
Setting condition to be displayed .............................. 21
Stoppage of the Tray action (Child lock)..................... 22
ASPECT Controls........................................................ 23
Adjusting screen position and size ........................... 24
Picture Adjustments ................................................... 25
Audio Adjustments ..................................................... 27
Selecting STEREO/SAP/MONO .................................. 28
Closed Captions .......................................................... 29
Lock Feature................................................................ 30
Customizing the VIDEO INPUT labels ....................... 33
Adjusting unnatural video images (3D Y/C FILTER) ....
34
Automatically changing screen size for VIDEO INPUT modes ....
35
When the top and bottom of the screen noise (IMAGE ADJ.)
.... 35
Natural Color ............................................................... 36
Noisy Picture ...............................................................36
Features of DVD on this Product ............................... 38
Enjoying digital audio output from the digital audio
output connector ........................................................ 39
Location of Controls for DVD Operation ................... 40
Basic play .................................................................... 42
Recalling/clearing a marker .......................................42
Stopping play ............................................................. 43
Skipping chapters or tracks ....................................... 44
Still picture (Pause) .....................................................44
Rapid advance (Rapid reverse) ................................... 44
Frame advance (Frame reverse) [DVD/Video CD] ....... 45
Slow-motion play [DVD/Video CD].............................. 45
Cancelling playback control [Video CD] ....................45
General information about GUI screens ...................46
Common procedures .................................................46
Detailed descriptions of each GUl icon ....................47
Screen for disc information (For DVD) .......................47
Screen for disc information (For Video CD/CD) .........48
Screen for player information ..................................... 49
Shuttle screen ............................................................49
Repeat play .................................................................. 50
Repeat viewing (Listening)......................................... 50
Repeating sections between two specific points ( A-B repeat ).....
51
Storing markers in memory to be viewed (listened to) again
... 51
Storing a marker in the memory ................................51
Recalling / clearing a marker .....................................51
Program play [ Video CD / CD ] ...................................52
Random play [ Video CD / CD ] ................................... 53
Changing audio soundtrack language [ DVD ] ......... 54
Changing subtitle language [ DVD ]........................... 55
Viewing from another angle [ DVD ] ........................... 55
Initial settings .............................................................. 56
Common procedures .................................................56
Selecting disc language [DVD]................................... 57
Selecting rating level [DVD]........................................57
Selecting On-Screen Display menu language ...........59
Selecting On-Screen Display Messages ....................59
Selecting TV screen Aspect .......................................60
Selecting digital output ...............................................61
Speaker setting ..........................................................62
Other settings............................................................. 66
Language code list .....................................................66
How images appear on your TV (aspect ratios of the screen) .....
67
Troubleshooting ..........................................................68
Maintenance ................................................................69
Specifications .............................................................. 70
DVD Operation Guide

7
Installation
Check the accessories before installations.
•
Operating Instruction book
(TQBC0256) • Remote Control Transmitter
(TNQE262) • Battery for the Remote Control
Transmitter
(2 × AAA size)
POWE R
OPEN
CLOSE D ISPALY
TO
P M
EN
U
ANGLE
DV
D
M
EN U
ENTE R
TV
MEN U
RET URN
SKIP
SLOW/ SEARC H
STOP PAUSE PLAY
ASPECTTV/V IDEO M UTE
SLEEP CH VOL
SURROUND
CAN CEL
REPEAT MOD E A-B REPEAT P LAY MO DE
R-TU NE
• AC Adaptor & AC Cord
AC Adaptor: (N0JEHK000001)
AC Cord: (K2CA2EA00005)
• Warranty Card
• Service Center List
Precaution on battery use
Incorrect installation can cause battery leakage and corrosion that will
damage the remote control transmitter.
Observe the following precautions:
1. Batteries should always be replaced as a pair. Always use new
batteries when replacing the old set.
2. Do not combine a used battery with a new one.
3. Do not mix battery types (example: Zinc Carbon with “ ” “ ”Alkaline ).
4. Do not attempt to charge, short-circuit, disassemble, heat or burn used batteries.
5. Battery replacement is necessary when remote control acts
sporadically or stops operating this unit.
Helpful Hint:
For frequent remote control
users, replace old battery with
Alkaline batteries for longer life.
Remote control battery installation
Requires two AAA batteries.
1. Turn the transmitter face down.
Remove top cover by pressing
down on marking and sliding
cover off in the direction indicated.
2. Install the batteries as shown in
the battery compartment. (Polarity
+ or must match the markings in–
the compartment).
3. Replace the cover and slide in
reverse until the lock snaps.
SUPPLIED ACCESSORIES
Two AAA size
10
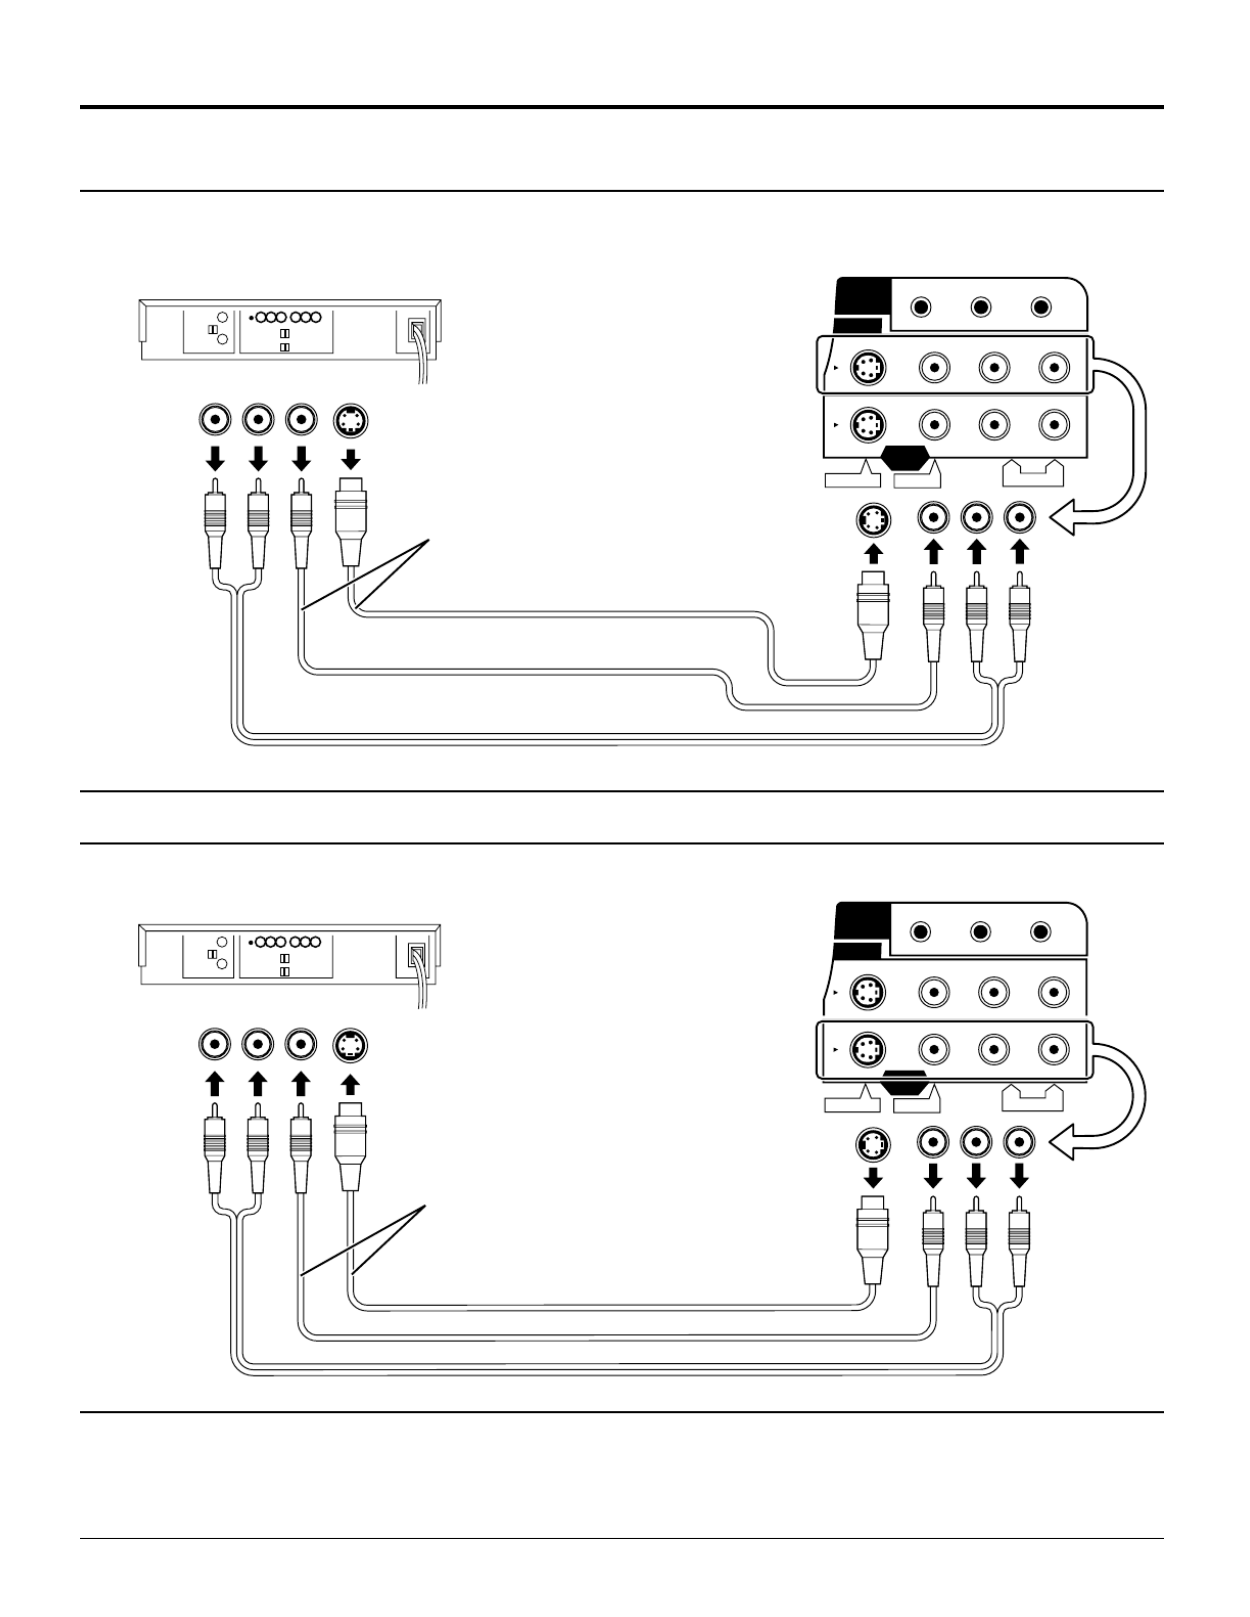
Notes:
(1) When a monaural VCR is used, connect the monaural audio cable to the AUDIO-L (Left) terminal.
(2) When connecting video cables, priority is given to the S-Video cable when the S-Video input terminal and the
video input terminal are connected at the same time.
How to connect the input terminals
Installation
Audio
OUT
Video
OUT
S-Video
OUT
R L
(Super-VHS VCR)
L R
AUDIOS-VIDEO VIDEO
FRONT L/R SURROUND L/R
CENTER/SUBWOOFER
5 . 1
ch
SURROUND
AUDIO OUT
VIDEO IN
MONITOR
OUT
S-VIDEO cable
VIDEO
AUDIO
Connects VCRs and other peripheral equipment
Connect the S-VIDEO or
VIDEO Terminal.
Audio
INPUT
Video
IN S-Video
IN
R L
Recording Equipment
(VCR)
L R
AUDIOS-VIDEO VIDEO
FRONT L/R SURROUND L/R
CENTER/SUBWOOFER
5 . 1
ch
SURROUND
AUDIO OUT
VIDEO IN
MONITOR
OUT
How to connect the AV OUT Terminals
Connect the S-VIDEO or
VIDEO Terminal.

11
Installation
How to connect the 5.1ch SURROUND AUDIO OUT Terminals
Notes:
• After connection is made, set the “7 Speaker Setting”
(such as Yes/No and Large/Small) according to your
speaker system. (Refer to “DVD Operating Guide”)
• Turn Virtual Surround Sound (VSS) or Headphone
VSS off if you are using more than just the two front
speakers (see page 28). Sound will only come from
the front speakers if VSS or Headphone VSS is
turned on.
For your reference:
• This player can play CDs recorded in dts. When the
player is connected to an AV amplifier with 5.1ch
AUDIO OUT connectors, you can enjoy multi-
channel audio of CDs recorded in dts as well as
DVDs.
L R
AUDIO
S-VIDEO VIDEO
FRONT L/R SURROUND L/R
CENTER/SUBWOOFER
5.1
ch
SURROUND
AUDIO OUT
VIDEO IN
MONITOR
OUT
FRONT L/R
SURROUND L/R
CENTER/SUBWOOFER
Direction of
signal flow
To audio input connectors (SUBWOOFER)
To audio input connectors (CENTER)
To audio input connectors (FRONT L.R)
To audio input connectors (SURROUND L.R)
Audio cables
Center speaker
Front speaker
(right)
Front speaker
(left)
AV Amplifier with 5.1ch
input connectors
Subwoofer
Surround speaker
(right)
Surround speaker
(left)
Center speaker
Front
left
speaker
Subwoofer
Rear left
surround
speaker
Front
right
speaker
Rear right
surround
speaker
12
Installation
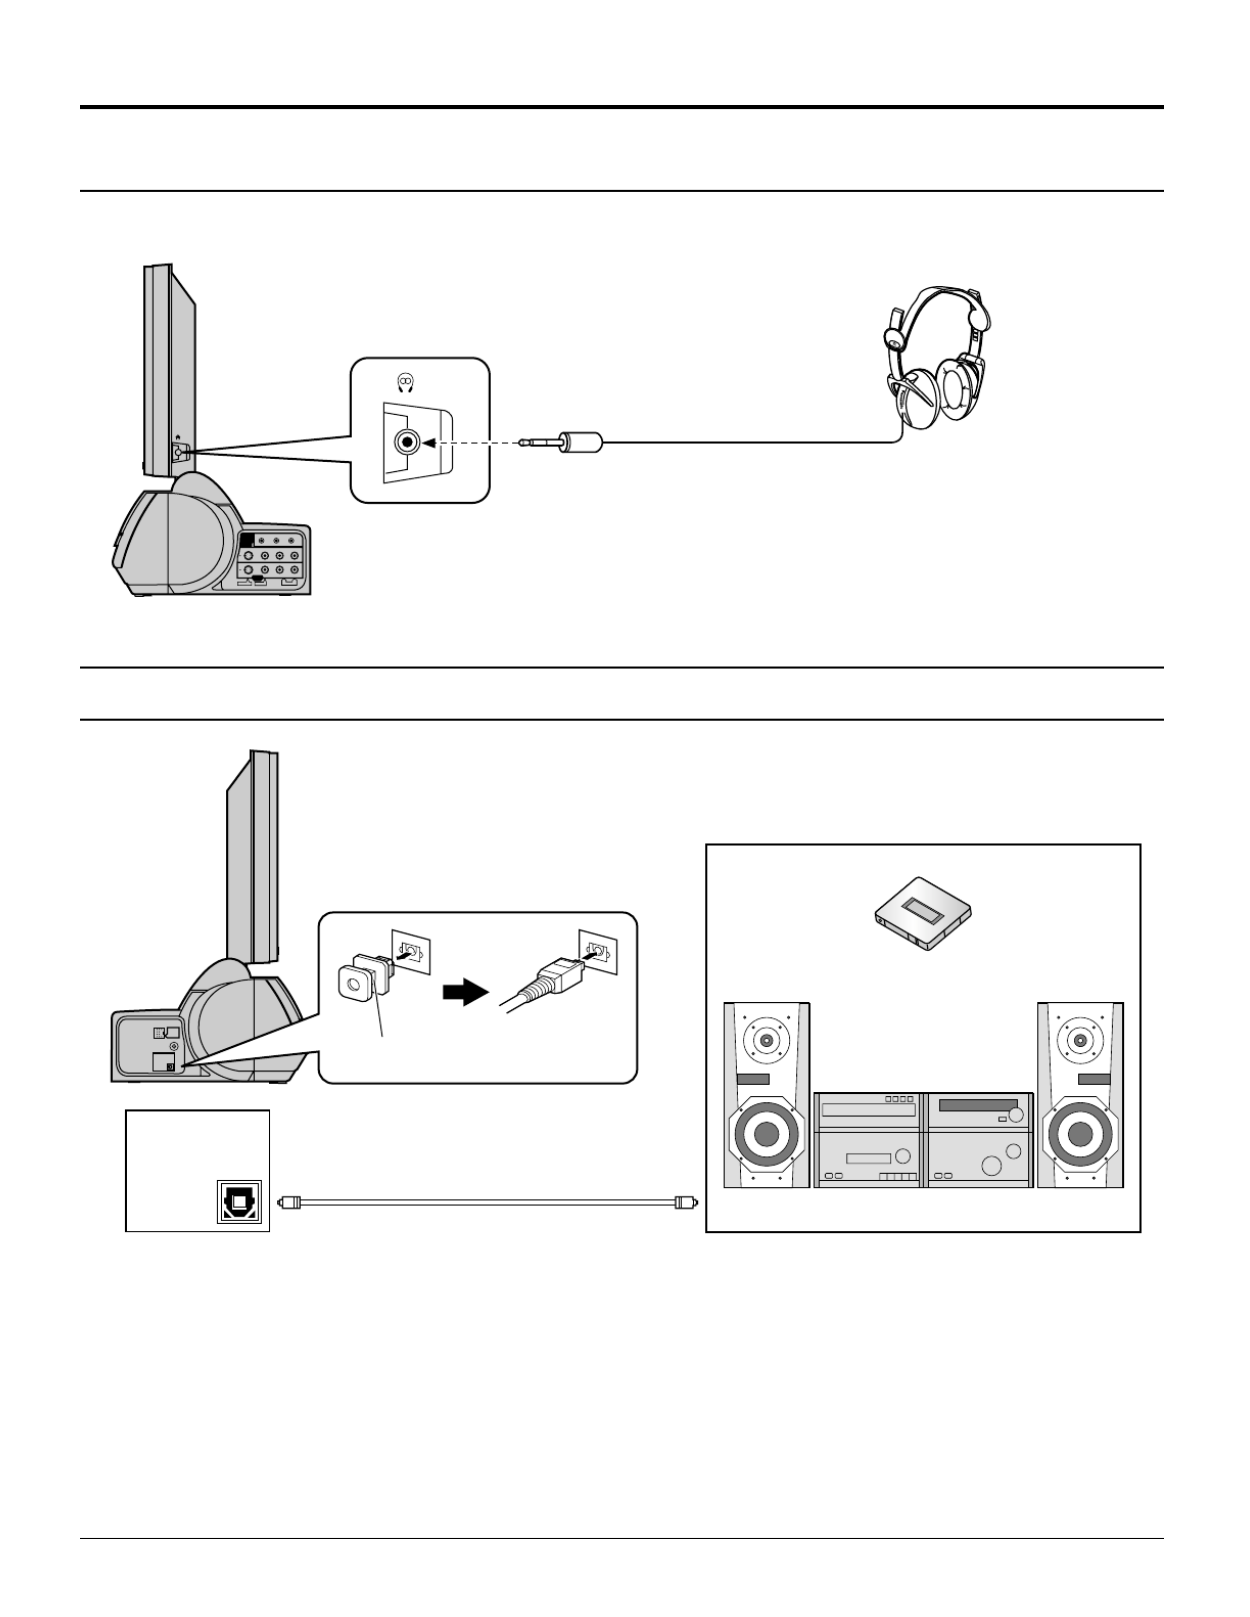
Connecting Headphones / Earphones
Connect headphones / earphones as follows.
(Optional)
L R
AUDIOS-VIDEO VIDEO
FRONT L/R SURROUND L/R
CENTER/SUBWOOFER
5. 1
ch
SURROUND
AUDIO OUT
VIDEO IN
MONITOR
OUT
(M3 plug)
Connecting OPTICAL audio cable
Note:
When connecting the optical digital audio cable
• Remove the dust protection cap from the digital audio output connector and connect the cable firmly so that the
configurations of both the cable and the connector match.
• Keep the dust protection cap and reattach when not using the connector.
DC IN
15V
ANT
Dust protection cap
MD player recorder
Audio system equipped with optical audio connector.
DVD
DIGITAL
AUDIO OUT
(PCM
/BITSTREAM)
OPTICAL
DVD
DIGITAL
AUDIO OUT
(PCM
/BITSTREAM)
OPTICAL
Refer to OPTICAL output for details on DVD Operating Guide.

13
Power ON / OFF
Connecting the Plug to the Wall Outlet
Push the POWER switch on the TV to turn the set on.
POWER-ON: Green
Example: The screen below is displayed for a while
after the TV is turned on. (setting condition
is an example.)
Press the POWER button on the remote
control to turn the TV off: Red (standby)
Press the POWER button on the remote
control to turn the TV on: Green
Turn the power to the TV set off by
pressing the POWER switch on the TV
when the TV is on or in standby mode.
How to Turn the Power On
ASPECT
R-STAND BY
G-POWE R ON
POWER
TV/VIDEO
VOLUME CHANNEL
TC-15DT2
R-STANDBY
G-POWER ON
POWER
TC-15DT2
DISPLAY
TOP MENU
ANGLE
DVD
MENU
RETURN
SKIP
STOP PAUSE PLAY
TV
MENU
ENTER
SLOW/SEARCH
OPEN
CLOSE
POWER
POWER
CH 6
STEREO
SAP
MONO
NORMAL
DC IN
15V
ANT
2
23
1
DVD
DIGITAL
AUDIO OUT
(PCM
/BITSTREAM)
OPTICAL
DC IN
15V
ANT
DVD
DIGITAL
AUDIO OUT
(PCM
/BITSTREAM)
OPTICAL
Remove the DC plug
Remove the plug while pushing look lever .
14
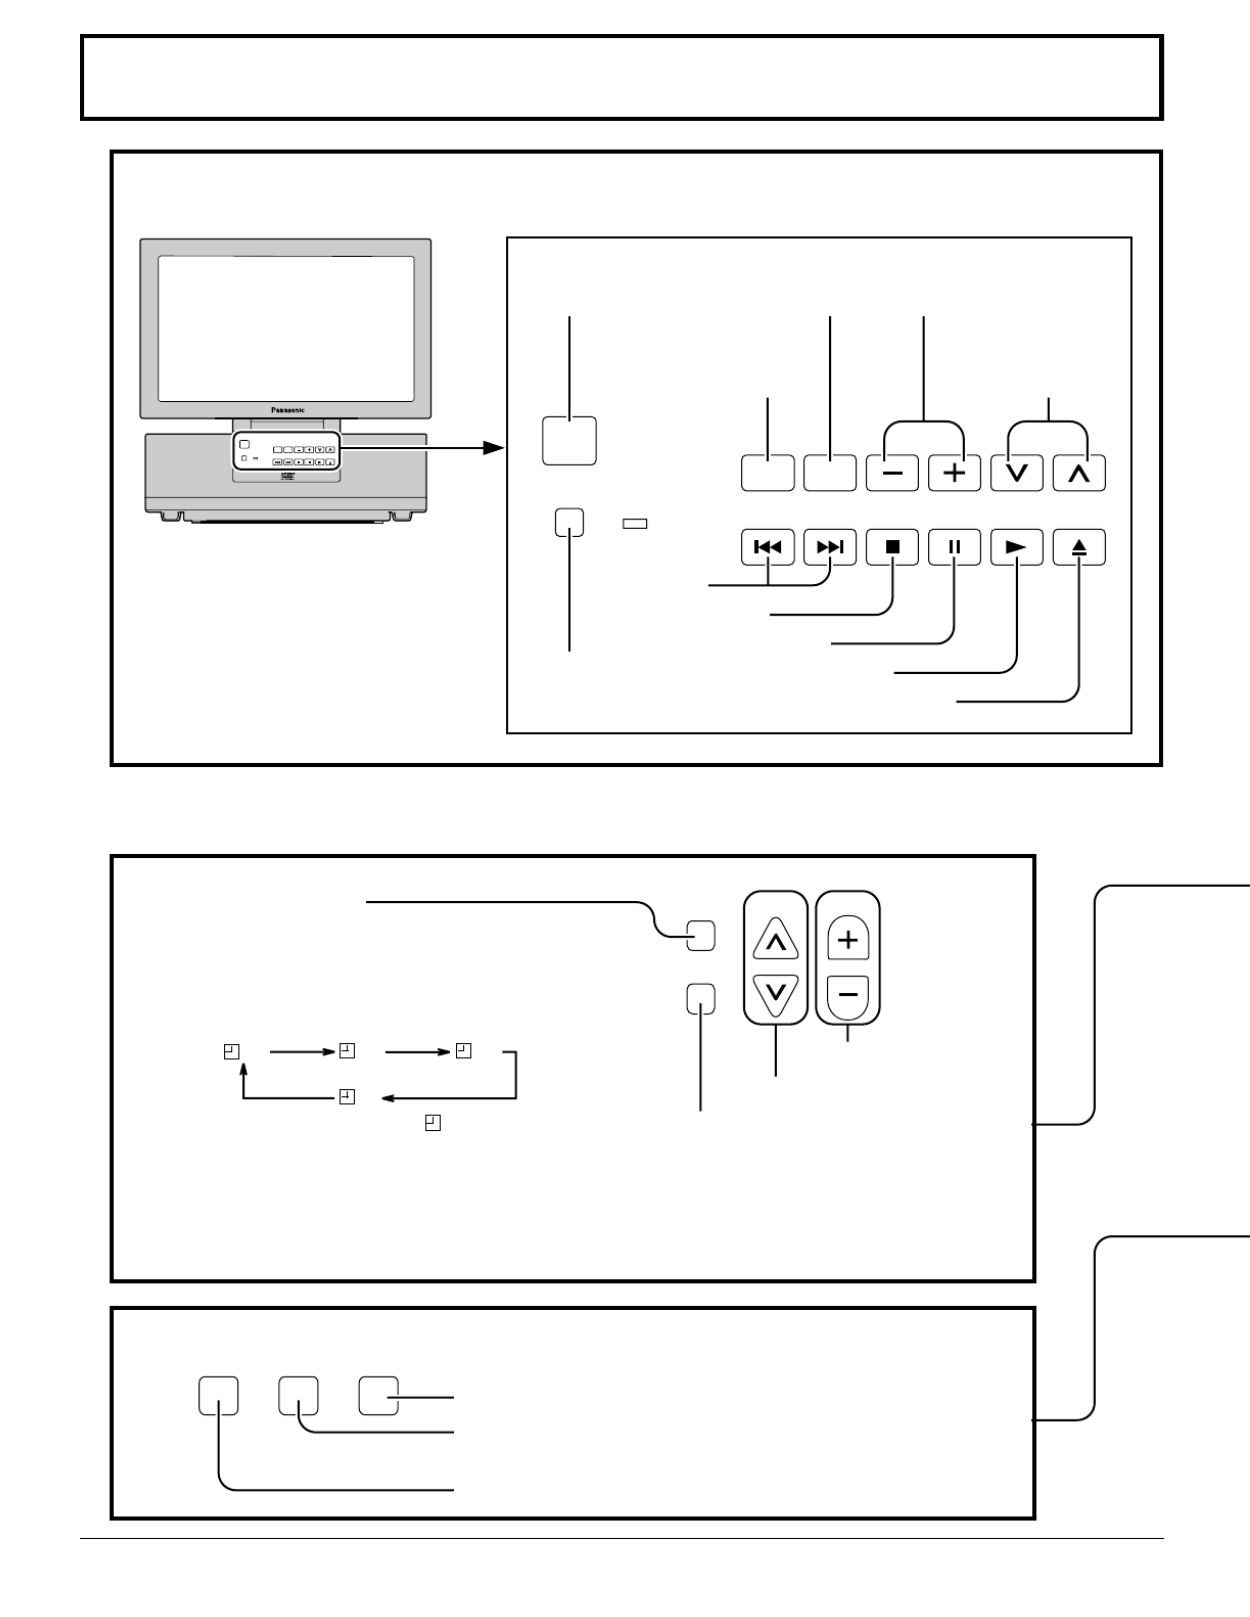
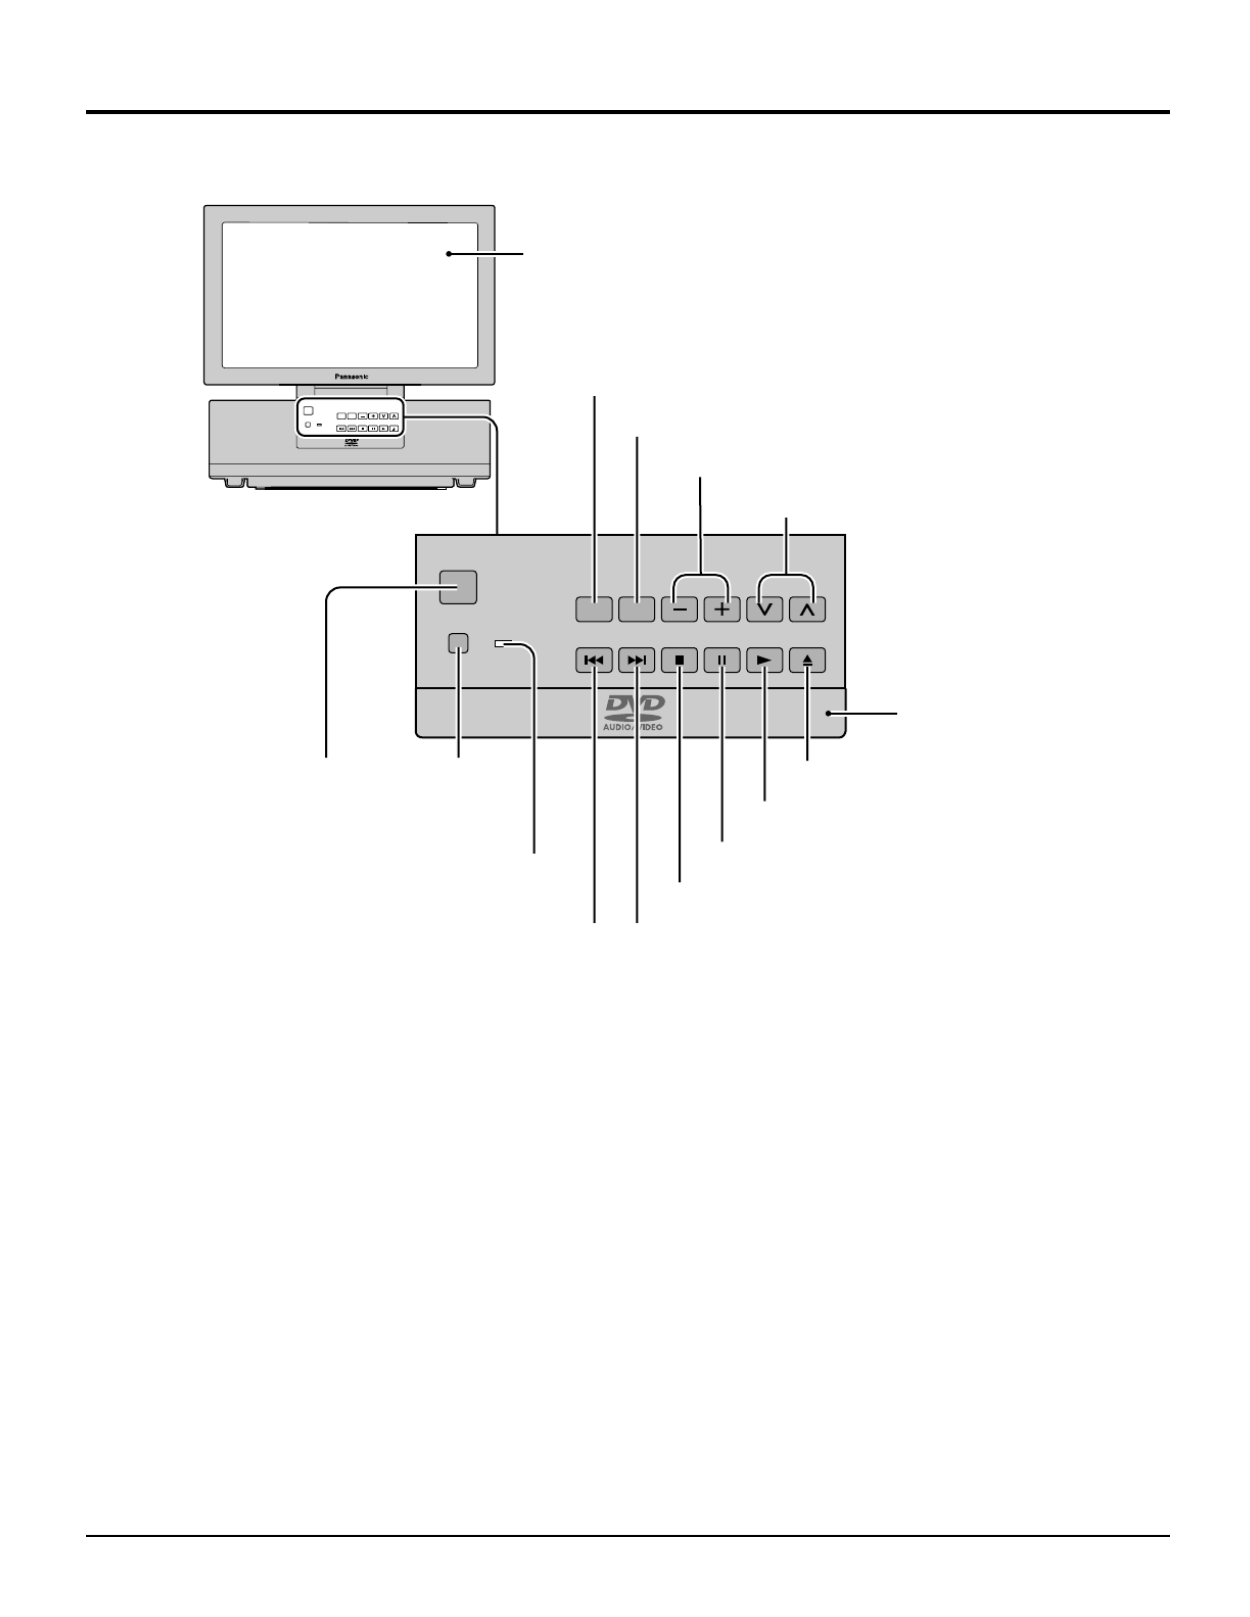
Location of Controls
REPEAT MODE A-B REPEAT PLAY MODE
PLAY MODE button (See page 42)
A-B REPEAT button (See page 51)
Repeating selections between two specific points.
REPEAT button (See page 50)
Controls on the TV
Volume up(+) / down(–)
buttons
Program number
selection buttons
ASPECT
R-STANDBY
G-POWER ON
POWER
TV/VIDEO
VOLUME CHANNEL
ASPECT
R-STANDBY
G-POWER ON
POWER
TV/VIDEO
VOLUME CHANN EL
TC-15DT2
Input mode selection
buttons (see page 20)
ASPECT mode
selection button
(see page 23)
SKIP buttons
STOP button
PAUSE button
PLAY button
OPEN/CLOSE button
POWER
switch
Remote control
sensor
SLEEP timer button
The LCD TV may be preset to switch to stand-
by after a fixed period. The setting changes to
30 minutes, 60 minutes, 90 minutes and 0
minutes (off timer cancelled) each time the
button is pressed.
When three minutes remain, “
3
” will flash.
The off timer is cancelled if the main power turn off.
Starting three minutes before the power is
automatically turned off, the remaining time,
3 2 1 will blink on the screen.→ →
SLEEP CH VOL
SURROUND
Volume Up or Down
Channel Up or Down
SURROUND button
The benefits of surround are
enormous. You can be completely
enveloped in sound, just as if you
were at a concert hall or cinema.
(See page 28)
30 60
0
90
Valid during DVD mode

15
DISPLAY
TOP MENU
ANGLE
DVD
MENU
ENTER
TV
MENU
RETURN
SKIP
SLOW/SEARCH
STOP PAUSE PLAY
ASPECT TV/VIDEO MUTE
SLEEP CH VOL
SURROUND
CANCEL
REPEAT MODE A-B REPEAT PLAY MODE
R-TUNE
OPEN
CLOSE
POWER
Location of Controls
OPEN CLOSE button
Press to open or close DVD tray.
R-TUNE button
Switches to previously view to channel or video mode.
Direct program number selection buttons
DISPLAY button
Press the DISPLAY button to display the current system status.
Refer to “DVD Operation Guide” when using the DVD.
To disk operation use. (Refer to “DVD Operation Guide”)
ASPECT TV/VIDEO MUTE
MUTE button
Press to mute the sound.
Press again to reactivate sound. Sound is
also reactivated when power is turned off
or volume level is changed.
TV/VIDEO button
This input mode changes each time this button is pressed
(see page 20).
ASPECT button
Change of screen size
(see page 23).
NORMAL JUST
FULL ZOOM
Stand-by (ON/OFF) button
The television receiver must first be plugged into the wall outlet and turn on at the power switch (see page 20).
Use with DVD operation. (Refer to “DVD Operation Guide”)
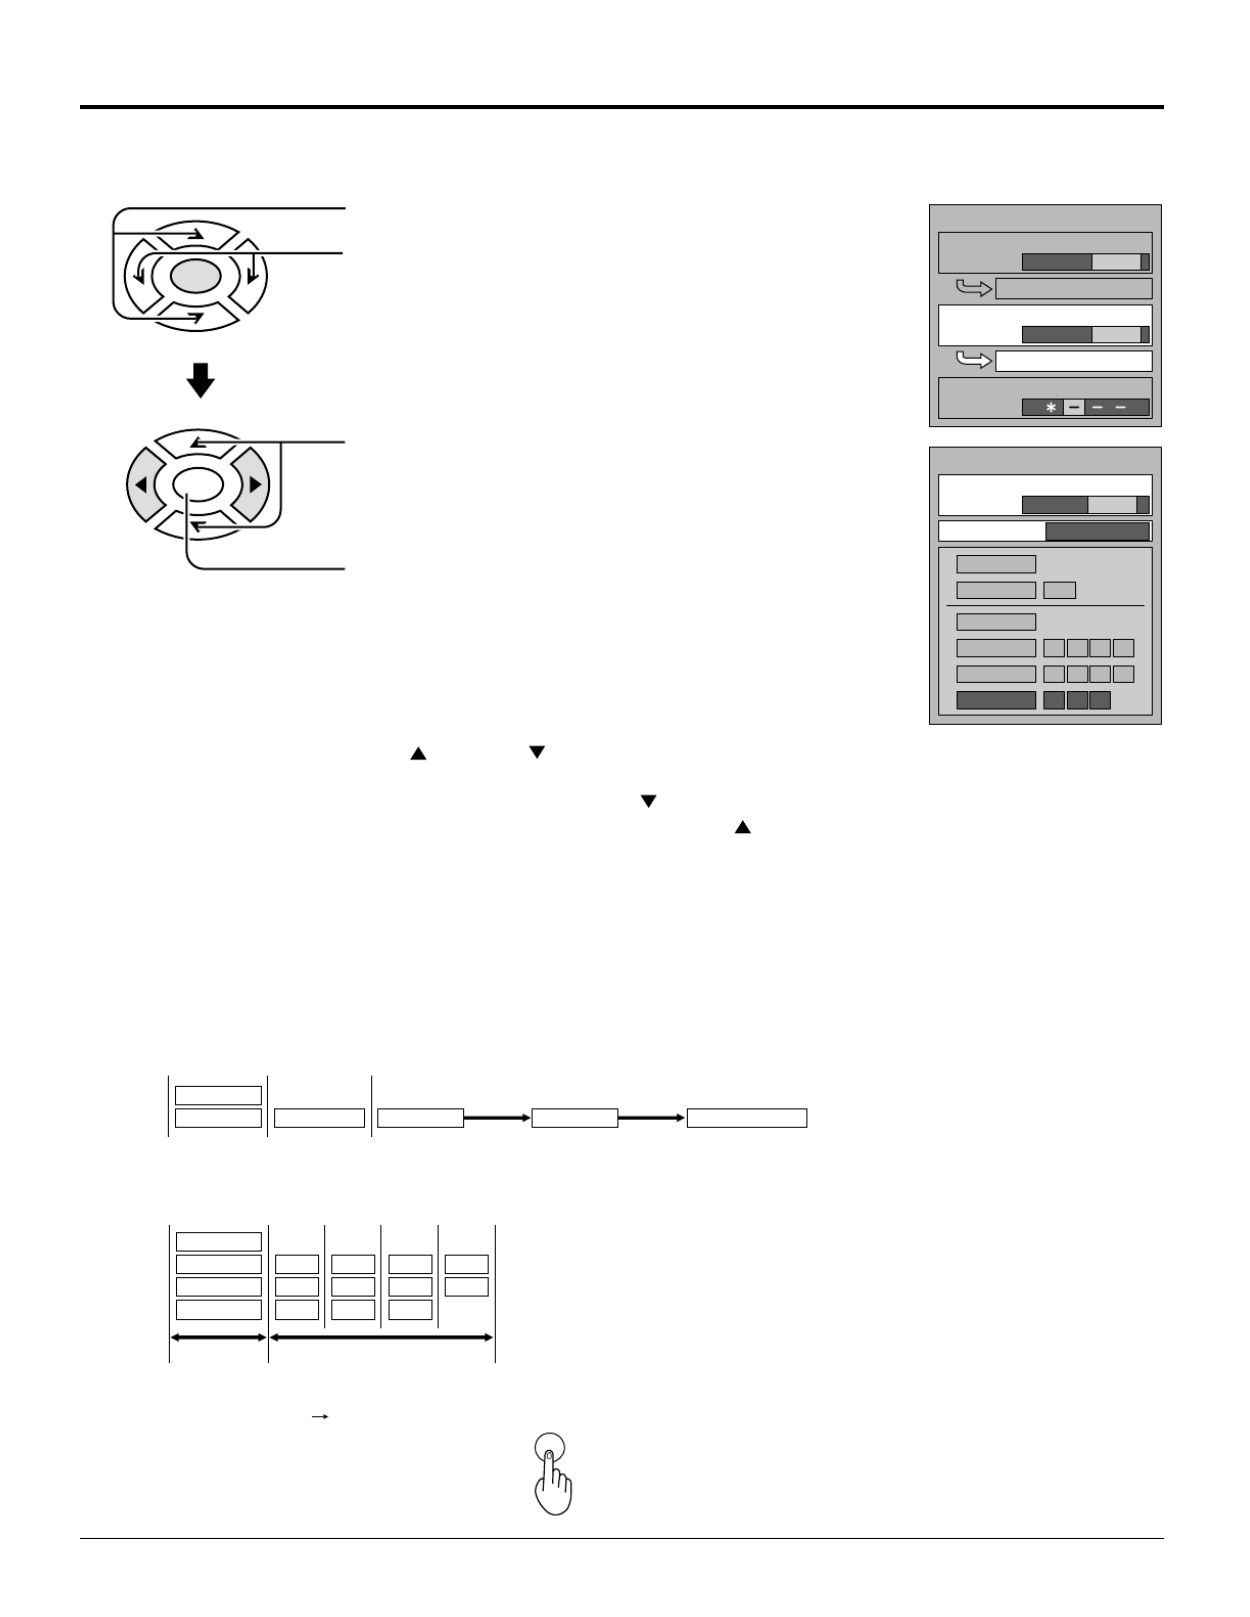
ENTER
TV
MENU
RETURN
Moves cursor to the
left during menu
mode.
Moves cursor upward during menu mode.
Moves cursor to the
right during menu
mode.
Moves cursor
downward during
menu mode.
Press to return to
before menu
screen.
Press the Menu
button to display
the Menu screen.
MENU
ADJUST
PICTURE
AUDIO
PICTURE ADJUST
POSITION / SIZE
AUDIO ADJUST
SET UP
R-TUNE

17
Flow Chart of TV menu
TO POSITION/SIZE
POSITION / SIZE
NORMAL
SIZE
RETURN
NORMALIZE
1
(See page 24)
TO AUDIO ADJUST
menu
AUDIO ADJUST
NORMAL
0
0
0
AUTO
ON
MODE
BASS
TREBLE
BALANCE
SURROUND
STEREO SAP MONO
(See page 27)
TO LOCK
selection screen
TO PICTURE ADJUST
menu
+ 5
0
0
0
0
0
PICTURE ADJUST
NORMAL
PIC MODE
BACK LIGHT
PICTURE
BRIGHTNESS
COLOR
TINT
SHARPNESS
AI PICTURE
OFF ON
STANDARD
(See page 25)
TO PROGRAM CHANNELS
adjust screen
TO DVD SET UP
PROGRAM CHANNELS
MODE
AUTO PROGRAM
MANUAL PROGRAM
TV CABLE
(See page 19)
1 Disc Languages
2 Ratings Level 8
3 Menu Language English
4 On-Screen Messages
5 TV Aspect 16:9
6 Digital Audio Output
7 Speaker Setting
9 Other Settings
0 Exit
CHANGE SETTING
LOCK
MOTION PICT.
OFF ON
CHANGE SETTING
TV PARENTAL
OFF ON
ENTER CODE FIRST
(See page 30)
TO VIDEO INPUT LABEL
selection screen
INPUT LABEL
VIDEO VIDEO
(See page 33)
TO OTHER ADJUST
screen
OTHER ADJUST
NATURL CLR
VIDEO NR
3D Y/C
ID-1
IMAGE ADJ.
CHILD LOCK
1 2
OFF ON
OFF ON
OFF ON
OFF ON
OFF ON
TO CLOSED CAPTION
selection screen
CLOSED CAPTION
MODE
C1
(See page 29)
(Refer to “DVD Operation
Guide”)
Notes:
• Items displayed in light blue cannot be adjusted.
• Display color changes according to input settings. (Press the TV/VIDEO button to switch inputs.)
ENTER
1
2
Press to select each item.
Press to each screen is displayed.
(See page 34-36)

18
Press to select PROGRAM CHANNEL.
Press to display the PROGRAM CH.
Tuning channels (Automatic channel programming)
Automatically searches and adds receivable channels in the installed area and/or CATV
signals to the program.
1
2Press to select MODE.
Press to select TV or CABLE.
Notes:
• When buttons are pressed with AUTO PROGRAM running, the TV set will return to normal viewing. (Channel
searched up to this point are added.)
• After AUTO PROGRAM is finished, the lowest channel number added will be received.
• When there are no receivable channels, channel 69 is displayed (channel 125 for cable TV).
3Press to select AUTO PROGRAM.
Press to display the confirmation screen.
4Press to select YES.
Press to run AUTO PROGRAM
Press the TV MENU button to display the MENU screen and select SETUP.
ENTER
ENTER
ENTER
ENTER
5
Channels will automatically advance until all channels have been scanned. Channel numbers with a video
signal present will turn light blue. Which indicates it has been stored in the Channel Scan Memory.
Press the TV MENU button to exit the set up menu.
MENU
ADJUST SET UP
PROGRAM CH
DVD SET UP
LOCK
CLOSED CAPTION
INPUT LABEL
OTHER ADJUST
PROGRAM CHANNELS
MODE
AUTO PROGRAM
MANUAL PROGRAM
TV CABLE
AUTO PROGRAM
Activate"AUTO PROGRAM?"
YES NO
AUTO PROGRAM
In "AUTO PROGRAM"
STOP
CHANNEL 59
MENU

19
Tuning channels (Manual channel programming)
Use this setting when changing setting of receiving channels or changing the channel display.
Turn the TV on and select the broadcast channel. Follow the steps on the previous page to display the PROGRAM
CHANNEL screen.
Press to select MODE.
Press to select TV or CABLE.
1
2
Press to select MANUAL PROGRAM.
Press to display the MANUAL PROGRAM screen.
Selecting the PROGRAM CHANNELS menu.
Adding or deleting channels
Press to select channel ( or number keys ).
4
5Press to add channels to memory ( blue ).
Press to select channel.
Press to delete channels from memory ( yellow ).
Press to select PROGRAM CH.
Press to display the PROGRAM CH.
Press the TV MENU button to display the MENU screen and select SETUP.
ENTER
ENTER
3
ENTER
6
7
Repeat steps 4 and 5 to continue adding or deleting channels.
Press the TV MENU button to exit the set up menu.
ENTER
MENU
ADJUST SET UP
PROGRAM CH
DVD SET UP
LOCK
CLOSED CAPTION
INPUT LABEL
OTHER ADJUST
PROGRAM CHANNELS
MODE
AUTO PROGRAM
MANUAL PROGRAM
CABLETV
MANUAL PROGRAM
ENTER CHANNEL
121
RETURN
DELETE
CH SELECT
ADD
MANUAL PROGRAM
ENTER CHANNEL
121
RETURN
DELETE
CH SELECT
ADD
ENTER

20
Playing a VCR or other peripheral equipment
2
3
The input mode changes each time this
button is pressed.
Operate the connected equipment.
Confirming connections
Confirm that the TV is in standby mode.
VCR
Laser Disk Player
DVD player
• When playing
a video
• When playing
a DVD
Turning the power on and switching input modes
This equipment can also be
connected to the rear
terminals. See Connections
for details.
Note:
When the remote control is unavailable, input modes can also be switched
on the TV set using the TV/VIDEO button.
TV
VIDEO
DVD/CD
Video camera
DISPLAY
TOP MENU
ANGLE
DVD
M
ENU
RETURN
SKIP
STOP PAUSE PLAY
ASPECT MUTE
SLEEP CH VOL
SURROUND
CANCEL
REPEAT MODE A-B REPEAT PLAY MODE
R-TUNE
TV
MENU
ENTER
TV/VIDEO
SLOW/SEARCH
OPEN
CLOSE
POWER
L R
AUDIOS-VIDEO VIDEO
FRONT L/R SURROUND L/R
CENTER/SUBWOOFER
5. 1
ch
SURROUND
AUDIO OUT
VIDEO IN
MONITOR
OUT
L R
AUDIOS-VIDEO VIDEO
VIDEO IN
MONITOR
OUT
Turn the TV on.
1
POWER
TV/VIDEO
To S-video output
or video output
To audio output

21
Setting condition to be displayed
Press this button to display channel number, off-timer remaining
time, screen modes, and other settings. Display fades away
into after about 3 seconds. Press this button again to delete
channel number display.
DISPLAY (On-screen display)
TOP MENU
ANGLE
DVD
MENU
RETURN
SKIP
STOP PAUSE PLAY
TV
MENU
ENTER
DISPLAY
SLOW/SEARCH
OPEN
CLOSE
POWER
DISPALY
The GUI menu bar for DVD operation is displayed by pressing
the DISPLAY button when the above screen is displayed.
1
1
1
11 1
1
1
11 1
1
1
11
ENG
ENG
ENG
ENG
ENG
ON
ON
ON
ON
ON
1
1
1
11
ENG
ENG
ENG
ENG
ENG
LPCM
LPCM
LPCM
LPCM
LPCM
48k 16b
48k 16b
48k 16b
48k 16b
48k 16b
1:56:37
1:56:37
1:56:37
1:56:37
1:56:37
1
1
1
11
2
2
2
22 dB
dB
dB
dB
dB
0
0
0
00
OFF
OFF
OFF
OFF
OFF
OFF
OFF
OFF
OFF
OFF
∗ ∗ ∗ ∗ ∗
∗ ∗ ∗ ∗ ∗
∗ ∗ ∗ ∗ ∗
∗ ∗ ∗ ∗ ∗
∗ ∗ ∗ ∗ ∗
•
•
•
•• •
•
•
••
–
–
–
––100
100
100
100
100
+100
+100
+100
+100
+100
DISPLAY
DISPLAY
DISPLAY
DISPLAY
Press to GUI screen
The GUI screen changes
everytime the DISPLAY
button is pressed.
(Refer to “DVD Operation
Guide”)
channel number or Video
Input Selected
multiplex sound
SLEEP timer status
Full Information
CH 6
STEREO
SAP
MONO
90
NORMAL

22
Stoppage of the Tray action (Child lock)
DISPLAY
TOP MENU
ANGLE
DVD
MENU
RETURN
SKIP
STOP PAUSE PLAY
ASPECT TV/VIDEO MUTE
SLEEP CH VOL
SURROUND
CANCEL
REPEAT MODE A-B REPEAT PLAY MODE
R-TUNE
TV
MENU
ENTER
SLOW/SEARCH
OPEN
CLOSE
POWER
The DVD tray on the front can be locked to prevent young children slamming
their fingers and to prevent debris from entering.
1Press the TV MENU button to display the MENU screen and select
SETUP.
2
ENTER
Press to select OTHER ADJUST.
Press to display the OTHER ADJUST
screen.
MENU
ADJUST SET UP
PROGRAM CH
DVD SET UP
LOCK
CLOSED CAPTION
INPUT LABEL
OTHER ADJUST
3Press to select CHILD LOCK.
Press to set.
ENTER
OTHER ADJUST
OFF ON
OFF ON
OFF ON
OFF ON
OFF ONNATURAL CLR
VIDEO NR
3D Y/C
ID-1
IMAGE ADJ.
CHILD LOCK
1 2
To end adjustment.
TV
MENU
Note:
The settings are memorized even after
power is turned OFF.
When the open close button is pressed when CHILD LOCK is ON, the
below message is displayed and the tray will not open.
OPEN
CLOSE
CHILD LOCK ON

25
Picture Adjustments
Press the TV MENU button to display the MENU screen and select ADJUST.
1
2
Press to select to PICTURE ADJUST.
Press to display the PICTURE ADJUST screen.
NORMAL is displayed at default.
Press to select the menu to adjust.
Select the desired level by looking at the
picture behind the menu.
ENTER
MENU
ADJUST
PICTURE
AUDIO
SET UP
PICTURE ADJUST
POSITION / SIZE
AUDIO ADJUST
ENTER
+ 5
0
0
0
0
0
PICTURE ADJUST
NORMAL
PIC MODE
BACK LIGHT
PICTURE
BRIGHTNESS
COLOR
TINT
SHARPNESS
AI PICTURE
OFF ON
STANDARD
+ 5
0
0
0
0
0
PICTURE ADJUST
NORMAL
PIC MODE
BACK LIGHT
PICTURE
BRIGHTNESS
COLOR
TINT
SHARPNESS
AI PICTURE
OFF ON
STANDARD
See next page
Press the left or right button to switch between modes.
STANDARD
Displays unaltered image.
CINEMA
Ideal for movies.
DYNAMIC
Displays a clear screen with contrast of light
and dark.
STANDARD CINEMA DYNAMIC
STANDARD
CINEMA
DYNAMIC

26
BACKLIGHT
Illuminance of the back light is adjusted.
PICTURE
Selects proper brightness and density for the room.
BRIGHTNESS
Adjusts for easier viewing of dark pictures such as night
scenes and hair.
COLOR
Adjusts slightly to a lighter color.
TINT
Adjust for nice skin color.
SHARPNESS
Displays a sharp image.
AI PICTURE
Displays black and white colors clearer when turned ON.
Note:
There is little change when PICTURE is increased with a bright picture or reduced with a dark picture.
Picture Adjustments
+ 5
0
0
0
0
0
PICTURE ADJUST
NORMAL
PIC MODE
BACK LIGHT
PICTURE
BRIGHTNESS
COLOR
TINT
SHARPNESS
AI PICTURE
OFF ON
STANDARD
ENTER
• To adjust each item, Press the up and down button and make
adjustments using the left and right buttons.
Select NORMALIZE with the up and down
buttons.
Press ACTION.
Press TV MENU button.
ENTER
• To return to normal viewing
• To reset to standard setting,
TV
MENU

27
AUDIO ADJUST
NORMAL
0
0
0
AUTO
ON
MODE
BASS
TREBLE
BALANCE
SURROUND
STEREO SAP MONO
Audio Adjustments
Press the TV MENU button to display the MENU screen and select ADJUST.
1
2
Press to select to AUDIO ADJUST.
Press to display the AUDIO ADJUST screen.
Auto
Automatically adjusts quiet
sound and loud sound for
ease of listening.
STANDARD
Emits the original sound.
DYNAMIC
Gives contrast to sound.
MUSIC 1
For programs consisting
mainly of music. Enhances
high sounds (around 4 kHz).
MUSIC 2
Enhances high sounds even
more. (Recommended for
those who have slight
hearing deficiencies.)
Press to select the menu to adjust each item.
Select the desired level by listening to the
sound.
ENTER
ENTER
MENU
ADJUST
PICTURE
AUDIO
SET UP
PICTURE ADJUST
POSITION / SIZE
AUDIO ADJUST
AUTO
STANDARD
DYNAMIC
MUSIC 1
MUSIC 2
BASS
Adjusts low sounds
TREBLE
Adjusts high sounds
BALANCE
Adjust left and right
volumes
SURROUND
To enjoy a concert hall
effect, turn SURROUND
to ON. During stereo
sound or soft playing:
Note:
When VSS* is enabled
during DVD mode,
selections will rotate as
follows:
Selecting STEREO/
SAP/MONO.
(See next page)
OFF VSS1 VSS2
Note:
* Virtual Surround Sound (VSS) (See page 11, 28)
TV
MENU
Press TV MENU button.
• To end adjustments
ENTER
To reset to standard setting,
select NORMALIZE with the up and down buttons and press ENTER.
To adjust settings individually , press the AV up and down button to select the
desired menu and adjust using the left and right buttons.

28
Selecting STEREO/SAP/MONO
Press to select STEREO/SAP/MONO.
ENTER
AUDIO ADJUST
NORMAL
MODE
BASS
TREBLE
BALANCE
SURROUND
STEREO SAP MONO
AUTO
ON
0
0
0
STEREO SAP MONO
Press to select STEREO/SAP/MONO.
Red display : With signal
White display : No signal
: MONO
ENTER
Press to end.
TV
MENU
Press the TV MENU button to display the MENU screen and select AUDIO ADJUST screen.
Notes:
• The surround settings are memorized separately for each SOUND mode (AUTO, STANDARD).
• Even from the MENU screen the surround setting is possible.
Helpful Hints:
• STEREO - Two channel Audio reception.
• SAP - Second Audio Programming (typically
used for bilingual audio).
• MONO - Use when stereo signal is weak.
TV/VIDEO MUTE
SLEEP CH VOL
ASPECT
SURROUND
SURROUND
SURROUND Button
The benefits of surround are enormous. You can be completely
enveloped in sound, just as if you were at a concert hall or
cinema.
The surround setting switches on and off each time the
SURROUND button is pressed.
TV/VIDEO mode :
SURROUND Control
SURROUND OFF
SURROUND ON
SURROUND OFF

29
Closed Captions
This unit has a built in decoder that provides a visual depiction of the audio portion of a television
program in the form of written words across the screen (white or colored letters on a black
background). It allows the viewer to read the dialogue of a television program or other information.
1Press the TV MENU button to display the MENU screen and select SETUP.
MENU
ADJUST SET UP
PROGRAM CH
DVD SET UP
LOCK
CLOSED CAPTION
INPUT LABEL
OTHER ADJUST
2 CC Mode
Activates the On-Screen Closed Caption feature. When activated this feature will remain on until OFF is selected in this menu.
CLOSED CAPTION
MODE
C1
OFF C1 C2
Press to select CLOSED CAPTION.
Press to display the CLOSED CAPTION screen.
ENTER
Press to select CC MODE.
Press to select from the following:
ENTER
• -CAPTION OFF
• CAPTION C1 -
• CAPTION C2 -
Recommended mode when Closed Caption is not being used.
For video related information that can be displayed (up to 4 lines of script strategically placed on
the television screen so that it does not obstruct relevant parts of the picture).
Another mode used for video related information.
TV
MENU
Press TV MENU button.
• To end adjustments
Surround effects can be turned ON and OFF during TV/VIDEO
mode but also switches as follows when DVDs with VSS signals
are played:
When DVDs with VSS signals are played and Headphone VSS
is selected for VSS of the GUI screen (see page 49), SURROUND
display switches as follows:
SURROUND OFF
SURROUND VSS 1
SURROUND VSS 2
DVD mode :
SURROUND OFF
SURROUND HPVSS 1
SURROUND HPVSS 2
Note:
See pages 46 to 49 for details on GUI.

30
Press the TV MENU button to display the MENU screen and select SETUP.
Lock Feature
In the United States, the V-CHIP consists of two rating systems, which are MPAA (MOTION
PICTURE) and TV PARENTAL GUIDELINES. Its function is to block programs by the rating
data in the XDS data packets sent from broadcasting stations. The user can select which
rating programs should be blocked by the LOCK MENU options.
Note:
Use a code that is easy to remember or record it in a safe place.
Note: The V-CHIP. used in this unit model, is capable of selecting the U.S. ratings that are
indicated in this manual.
1
Input code
Enter any 4-digit number as a password.
These numbers will be needed when
deactivating the LOCK function.
Press to select LOCK.
Press to display the LOCK screen.
DISPLAY
TOP MENU
ANGLE
DVD
M
ENU
SKIP
STOP PAUSE PLAY
ASPECT TV/VIDEO MUTE
SLEEP CH VOL
SURROUND
CANCEL
REPEAT MODE A-B REPEAT PLAY MODE
R-TUNE
TV
MENU
ENTER
RETURN
SLOW/SEARCH
OPEN
CLOSE
POWER
ENTER
MENU
ADJUST SET UP
PROGRAM CH
DVD SET UP
LOCK
CLOSED CAPTION
INPUT LABEL
OTHER ADJUST
CHANGE SETTING
LOCK
MOTION PICT.
OFF ON
CHANGE SETTING
TV PARENTAL
OFF ON
ENTER CODE FIRST
32
Locking and unlocking
• When a title field is selected, all ratings below this rating are selected.
• When options within an option field are selected, ratings below this rating within the same field are selected.
• Ratings displayed in green are unlocked and those displayed in red are blocked programs.
1. Ratings for children: These ratings are divided into ranks as follows.
2. Ratings for teenagers: These ratings are the same as the matrix system. This system is described in the
below diagram. Ratings for all ages are on top and ratings for adults are on the bottom.
TV-Y TV-YTV-Y7 TV-Y7 TV-Y7-FVFV
TV-G
TV-PG
TV-14
TV-MA
V
V
V
S
S
S
L
L
L
D
D
Lock Feature
Press to select TV PARENTAL.
Press to select ON or OFF.
Changing setting
Press to select CHANGING SETTING
(the menu following TV PARENTAL).
Press to display the TV PARENTAL GUIDE screen.
Setting the TV PARENTAL PROGRAMS screen
VIEW NR PROGRAMS?
NO : Cannot view programs with NR signals.
YES : Can view programs with NR signal.
SETTINGBASIC : The up and down buttons change the selected title.
DETAILED : The cursor selecting the title can be moved to select options
displayed on the right. The down buttons moves the cursor
to the right if options are available. The up buttons moves
the cursor to the left and if there are no options to the left, the
cursor will move up.
TV PARENTAL GUIDE
CHANGE SETTING
LOCK
MOTION PICT.
OFF ON
CHANGE SETTING
TV PARENTAL
OFF ON
ENTER CODE FIRST
VIEW NR PROGRAMS?
TV PARENTAL GUIDE
NO YES
TV—G
TV—PG
TV—14
TV—MA
V
V
V
D
D
L
L
L
S
S
S
TV—Y
TV—Y7 FV
SETTING DETAILED
ENTER
ENTER
TV
MENU
Press TV MENU button.
• To end adjustments

36
Natural Color
Note:
Not available for COMPONENT VIDEO.
Press the MENU button to display the MENU screen and select SETUP.
1
Press to end.
Noisy Picture
Reduces roughness of pictures.
1Press the TV MENU button to display the MENU screen and select SETUP. Reduces roughness of pictures.
2
OTHER ADJUST
OFF ON
OFF ON
OFF ON
OFF ON
OFF ON
NATURL CLR
VIDEO NR
3D Y/C
ID-1
IMAGE ADJ.
CHILD LOCK
1 2
TV
MENU
Press to exit menu.
MENU
ADJUST SET UP
PROGRAM CH
DVD SET UP
LOCK
CLOSED CAPTION
INPUT LABEL
OTHER ADJUST
MENU
ADJUST SET UP
PROGRAM CH
DVD SET UP
LOCK
CLOSED CAPTION
INPUT LABEL
OTHER ADJUST
OTHER ADJUST
OFF ON
OFF ON
OFF ON
OFF ON
OFF ON
NATURL CLR
VIDEO NR
3D Y/C
ID-1
IMAGE ADJ.
CHILD LOCK
1 2
ENTER
Press to select OTHER ADJUST.
Press to display the OTHER ADJUST
screen.
2
ENTER
Press to select OTHER ADJUST.
Press to display the OTHER ADJUST
screen.
3Press to select VIDEO NR.
Press to set.
ENTER
3Press to select NATURL CLR.
Press to turn NATURL CLR ON.
ENTER
TV
MENU

DVD Operation Guide

38
High picture quality
• 10 bit video D/A converter
Reproduces fine images faithfully.
• An array of picture quality modes yielded by digital
processing
Signal deterioration is kept to minimum by processing the data
digitally.
This feature can be used to tailor picture quality for DVD
playback.
High sound quality
• 96 kHz/24 bit audio D/A converter
This player enables 96 kHz/24 bit linear PCM signals, the
highest specifications in DVD standards, to be reproduced
faithfully. To support 96 kHz sampling/24 bit sound, the shaping
noise of this multilevel digital sigma type D/A converter is kept
flat up to 44 kHz, thus preventing the audio signals from being
affected in any way. This means sound is reproduced faithfully.
• Advanced Dolby Digital/dts (digital theater systems) 5.1ch
surround decoder (See pages 11 and 62.)
The advanced Dolby Digital /dts 5.1ch surround decoder
incorporated in this player comes with speaker mode settings
which support the low-range reproduction capability of the
speakers, speaker level settings, delay time adjustment*, audio
dynamic range suppression, and other features.
* Delay time adjustment is effective only for Dolby Digital DVDs
(center and surround channels).
• Dolby Digital/dts (digital theater systems) digital output
(See page 11.)
By connecting a Dolby Digital/dts decoder or an amplifier
incorporating a Dolby Digital/dts decoder, you can enjoy high
quality digital surround sound from Dolby Digital/dts discs.
Advanced Virtual Surround Sound (VSS) function
(See pa e 28-29.)g
Even when two front speakers are being used, simply press the
VSS (Virtual Surround Sound) button during playback of a Dolby
Digital DVD (2 channel or over) to provide a rear surround effect.
This effect also works while listening with headphones. (This
does not work with Karaoke DVDs. The effect depends on the
kind of DVD used.)
Marker function (See pa e 51.)g
This player can store a maximum of 5 positions in memory for
convenient access.
Dialogue Enhancer (See pa es 43 and 49.)g
During playback of Dolby Digital/dts DVDs (2 channel or over)
with the dialogue contained in the center channel, this function
will boost the sound level of the center channel so that it is easier
to hear the dialogue on movie software.
Graphical User Interface (GUl) screen (See pa e 46.)g
By simply pressing the DISPLAY button on the remote control,
information on the DVD/Video CD/CD player and disc can be
displayed on the TV screen for easy identification. The player’s
operations and settings can be easily accessed by operating
the joystick on the remote control while monitoring the TV screen.
The color and position of the GUl screen can be changed.
Versatile DVD features
• Multi-audio function (See page 54.)
The audio soundtrack can be heard in up to 8 languages.
(The number of languages depends on the software.)
• Multi-subtitle function (See page 55.)
Subtitles may be displayed in one of 32 languages.
(The number of languages depends on the software.)
• Multi-angle function (See page 55.)
This function allows you to choose the camera angle of scenes
shot from different angles. (Limited to DVDs recorded with
multiple camera angles.)
• Parental lock function (See page 57.)
This function can prevent playback of DVD software which may
be unsuitable for some audiences (especially for children).
(Limited to DVDs encoded with specific rating level.)
Disc formats supported by this player
The player can playback discs bearing any of the following marks:
Discs which cannot be play yed with this pla er
• DVD with Region No. other than “4” or “ALL”
• DVD-ROM • CDV • CVD
• DVD-R/DVD-RAM • CD-G • SVCD
• CD-ROM • CD-RW • Divx Video Disc
• VSD • DVD + RW etc.
• Do not try to play Photo CD or CD-R.
(Data on the disc may be damaged.)
Region Management Information
This player is designed to respond to the Region Management
Information recorded on DVDs. The region number of this player
is “1”. If the region number described on the DVD does not
correspond to the region number of this player, this player cannot
play this disc. This player will play DVDs made for “ ” regions.ALL
This player will play DVDs marked with labels containing the
region number “1” or “ALL”:
Example:
or
Features of DVD on this Product
1ALL
DVD
[8 cm disc/
12 cm disc]
NTSC
CD
[8 cm disc/
12 cm disc]
Video CD
[8 cm disc/
12 cm disc]
NTSC

39
Note
• Some dts decoders which do not support DVD-dts interface
may not work properly with the DVD/Video CD/CD player.
For your reference:
• Dolby Digital is a digital sound compression technique
developed by the Dolby Laboratories, Inc. Supporting 5.1-
channel surround sound, as well as stereo (2-channel) sound,
this technique enables a large quantity of sound data to be
efficiently recorded on a disc.
• The digital theater systems (dts) is a 5.1-channel surround
sound system, which is widely used in movie theatres around
the world. It allows the bit rate to be increased in order to provide
good sound quality without excessively compressing the data.
• Linear PCM is a signal recording format used in a CD. While a
CD is recorded in 44.1 kHz/16 bit, a DVD is recorded in 48
kHz/16 bit up to 96 kHz/24 bit.
• If you have a Dolby Pro Logic Surround decoder, you will obtain
the full benefit of Pro Logic from the same DVD movies that
provide full 5.1-channel Dolby Digital soundtracks, as well as
from titles with the Dolby Surround mark.
• The digital audio output connector (optical) converts electrical
signals into optical signals and transfers them to an amplifier.
These optical signals are immune from electrical interference,
and they also have minimal effect on other equipment.
Caution for the optional/coaxial digital audio
output connector:
• Do not connect to the digital audio input of an amplifier
that does not have Dolby Digital/dts/MPEG audio
decoder.
• If such an amplifier should be connected to the player
with “Bitstream” selected at the “2 Dolby digital”, “3 DTS
Digital Surround” (see page 61), any attempt to play DVDs
(or CDs recorded in dts) may cause such a high level of
noise that it may be harmful to your ears and damage
your speakers.
• Video CDs and CDs can be played as they would normally
be played.
Manufactured under license from Dolby Laboratories.
“Dolby”, “Pro Logic” and the double-D symbol are
trademarks of Dolby Laboratories. Confidential
Unpublished Works. © 1992-1997 Dolby Laboratories, Inc.
All rights reserved.
Manufactured under license from Digital Theater Systems,
Inc. “DTS” and “DTS Digital Surround” are trademarks of
Digital Theater Systems, Inc. © 1996 Digital Theater
Systems, Inc. All rights reserved.
Enjoying digital audio output from the
digital audio output connector
Note when connecting the optical digital audio cable
• Remove the dust protection cap from the optical digital audio
output connector and connect the cable firmly so that the
configurations of both the cable and the connector match.
• Keep the dust protection cap and reattach when not using the
connector.
Optical/coaxial digital audio output connector
Disc
DVD
Video
CD
CD
*1
The type of audio output from the connector can be selected
by “7 Digital Audio Output” of the initial settings.
(See page 61.)
*2
Compressed sound converted to PCM will be output.
*3
The settings and connections necessary to enjoy CDs recorded
in dts are the same as for DVDs recorded in dts.
DC IN
15V
(PCM
/BITSTREAM)
OPTICAL
ANT Dust protection cap
Sound
recording
format
Dolby Digital
Linear PCM
(48/96 kHz
16/20/24 bit)
dts
MPEG audio
MPEG 1
Linear PCM
dts*3
Optical/coaxial digital audio
output from connector
Dolby Digital bitstream (1–
5.1ch) or PCM (2ch) (48 kHz/
16 bit)*1 *2
Linear PCM (2ch) (48 kHz
sampling/16 bit only) or no
output*1
PCM (2ch) (48 kHz/16 bit)*2 or
dts bitstream (1–5.1ch)*1
PCM (2ch) (48 kHz/16 bit)*2 or
MPEG audio bitstream (1–
7.1ch)*1
PCM (44.1 kHz sampling)*2
Linear PCM (44.1 kHz
sampling)
PCM (2ch) (44.1 kHz/16 bit)*2
or dts bitstream (1–5.1ch)*1
Location of Controls for DVD Operation

40
DISPLAY
TOP MENU
ANGLE
DVD
MENU
ENTER
TV
MENU
RETURN
SKIP
STOP PAUSE PLAY
ASPECT TV/VIDEO MUTE
SLEEP CH VOL
SURROUND
CANCEL
REPEAT MODE A-B REPEAT PLAY MODE
R-TUNE
SLOW/SEARCH
OPEN
CLOSE
POWER
Switches angles when scenes taken from
several angles are being played back.
Searches the beginning of a
scene or song.
Stops operation of disk.
Pauses movies and music or
forwards frames.
Selects groups.
Opens and closes disk tray on
the set.
Displays disk information and
settings when pressed during
playback.
Displays the menu for DVDs
with several menus.
Used to make selections,
SELECT Key adjustments
and settings.
For fast forwarding or slow
playback.
Plays the disk or turns the
vocals ON and OFF for
Karaoke.
Used to select menus, songs,
set time and input passwords.
Selects still pictures and
playback modes.
Displays the menu for disks
with several titles recorded.
Turns the power ON and OFF
when the power on the TV set
is ON.
Location of Controls for DVD Operation
41
ASPECT
R-STANDBY
G-POWER ON
POWER
TV/VIDEO
VOLUME CHANNEL
TH-15DT1
ASPECT
R-STANDBY
G-POWER ON
POWER
TV/VIDEO
VOLUME CHANNEL
Disk tray
Functions of front operation panel
LCD display
(15 inch wide-screen)
TV/VIDEO button
ASPECT button
VOLUME up/down button
Selects channels in sequenc
Turns power ON and OFF.
(The remote control can be
operated when this is ON)
Remote control
sensor
Power OFF with remote control: Red
Power ON with remote control: Green
Rewinds DVD disks and skips
scenes during playback. Fast forwards DVD disks and skips
scenes during playback.
Stops operation of disk.
Pauses or stops playback of DVD disks.
Opens and closes disk tray.
Plays DVD disks.

42
DISPLAY
ANGLE
PAUSE
ASPECT TV/VIDEO MUTE
SLEEP CH VOL
TV
MENU
ENTER
RETURN
PLAY
DVD
MEN
U
TOP MENU
STOP
SKIP
SLOW/SEARCH
OPEN
CLOSE
POWER
Basic play
Before enjoying DVD/Video CD/CD
The On-Screen menu language of your player has been
factory preset to English.
You can change the menu language to French, Spanish.
Refer to Selecting On-Screen Display menu language“ ” on
page 59.
In the explanations given below it is assumed that English
has been selected as the menu language.
PLAY
OPEN
CLOSE
POWER
ASPECT
R-STANDBY
G-POWER ON
POWER
TV/VIDEO
VOLUME CHANNEL
POWER
STOP PLAY OPEN
CLOSE
4Press PLAY to displayed as follows.
R e a d i n gC l o s e
O p e n
1
2
3
Press POWER to switch on the power.
(See page 20.)
Recalling/clearing a marker
Press OPEN CLOSE to
open the disc tray.
The disc tray is automatically closed and play begins.
• When the disc tray is closed by pressing OPEN CLOSE, press
PLAY to start play.
• When a menu screen appears on the TV monitor
In the case of many movie DVDs,
an interactive DVD or Video CD
with playback control, a menu
screen appears on the TV monitor.
Perform step 5 to start play.
Place the disc on the disc tray with the
label side to be played facing upwards.
(If the disc has a label)
Hold the disc without touching either of its surfaces, position
it with the label side to be played facing upward, align it with
the guides, and place it in position.
a 8 cm disc 12 cm discb
Lovers Birds
Dogs Castles
T I T L E M E N U
(Example of DVD)

43
Press SELECT ( , , , ) button to select
the item and press ENTER.
5
What is playback control?
If a Video CD has “ ”playback control written on its disc or
jacket, it means that particular scenes or information can
be selected for viewing interactively with the TV monitor
using the menu screen.
While watching movies
• Raising dialogue volume
The volume for the dialogue can be raised by displaying the
GUl screen (for player information) and setting Dialogue“
Enhancer” to “ON”. (See page 49.)
This setting takes effect only for discs which are recorded with
Dolby Digital/dts (2 channel or over) and with the
dialogue contained in the center channel.
When the menu continues onto another screen
After step 4 on page 42, press SKIP ( ).
• To return to the previous menu screen
Press SKIP ( )
• Due to the design of some software titles, SKIP ( , )
may not always work. For operation, refer also to the jacket of
the disc concerned.
Stopping play and returning to the menu screen
Press DVD MENU or TOP MENU.
Play is suspended, and the menu screen is displayed.
• The buttons may not work depending on the disc used.
After operation
When the player is not in use, remove the disc and press POWER
to set the player to the standby mode.
Note
• The disc continues to rotate while the menu is displayed even
after the player has finished playing a particular item. When
no further selections are to be played, be sure to press STOP
to clear the menu display.
For your reference:
• When appears on the TV monitor when a button is pressed,
the operation is prohibited by the player or disc.
Stopping play
Press STOP during play.
RESUME function
The player records the point where STOP was pressed during play.
• Press PLAY again, and play will resume from this point.
• When the tray is opened or STOP is pressed again, the
RESUME function will be cleared.
This feature remains active if the player is set to the standby
mode and then turned back ON.
Chapter review function (DVD only)
When PLAY is pressed while
RESUME function the message
shown on the right is briefly displayed.
If PLAY is pressed again while the above message is displayed
on the screen, the first few seconds of each chapter from the
beginning of the title up to the point where operation was stopped
will be played. This makes it possible to review previous chapters.
Normal playback will commence from the point where operation
was stopped.
Note
• Cancelling the RESUME function will also clear the chapter
review function.
• The chapter review function may not work with some DVDs.
Press PLAY to Chapter Review
Play of the selected item now begins.
(Example )
Lovers Birds of the world
Dogs Castles
T I T L E M E N U B i r d s

44
ASPECT
R-STANDBY
G-POWER ON
POWER
TV/VIDEO
VOLUME CHANNEL
Press SKIP ( , ) during play.
With the remote control
On the TV SET
For your reference:
•A chapter (DVD) or a track (Video CD/CD) is skipped each
time the button is pressed.
•When SKIP ( ) is pressed once midway through a chapter/
track, play returns to the start of that chapter/track. When it is
pressed again, a chapter/track is skipped each time the button
is pressed.
•When SKIP ( , ) is pressed during menu play of Video
CDs with playback control, a menu screen may sometimes be
recalled.
SKIP
Reverse Forward Reverse Forward
Skipping chapters or tracks
Still picture (Pause)
Press PAUSE ( ) during play.
•DVD/Video CD: The player will be placed in the still picture
mode.
•CD: The player will be placed in the pause mode.
•Normal play is resumed when PLAY is pressed.
(Example)
For your reference:
• When SLOW/SEARCH ( , ) is used during menu play of
Video CDs with playback control, a menu screen may
sometimes be recalled.
• For DVDs and Video CDs, audio will be heard during scanning
(forward direction only) at the initial scan speed. (See page
64.) For CDs, audio will be heard during scanning at every
scan speed (1 to 5). (For dts CDs, audio will not be heard at
any speed.)
Rapid advance (Rapid reverse)
Press SLOW/SEARCH ( , ) during play.
SLOW/SEARCH
Reverse Forward
• The speed of advance (reverse) is relatively slow at first. When
the button is pressed again, the speed increases up to 5 steps.
• Normal play is resumed when PLAY is pressed.
DISPLAY
ANGLE
ASPECT TV/VIDEO MUTE
SLEEP CH VOL
SURROUND
REPEAT MODE A-B REPEAT PLAY MODE
R-TUNE
TV
MENU
PLAY
DVD
M
ENU
TOP MENU
STOP
SKIP
ENTER
RETURN
PAUSE
CANCEL
SLOW/SEARCH
OPEN
CLOSE
POWER
PLAY
SELECT
SKIP
STOP
PAUSE
Numeric
buttons
DVD MENU
SLOW/SEARCH
TOP MENU

45
Frame advance (Frame reverse)
[DVD/Video CD]
Press SELECT ( , ) in the still picture mode.
(See page 44.)
: Reverse
: Forward
• The disc is advanced (reversed) by one frame each time the
SELECT ( ) is pressed. ,
• When the SELECT ( ) is kept pressed, consecutive ,
frame advance (reverse) works.
• Normal play is resumed when PLAY is pressed.
Note
• For Video CDs, frame reverse is not possible.
For your reference:
• Pressing PAUSE also activates frame advance.
• Whether the pictures are advanced by a or “ ”Frame “ ”Field is
automatic. (See page 64.)
(Example)
Slow-motion play [DVD/ Video CD]
Press SLOW/SEARCH ( , ) in the still
picture mode. (See page 44.)
Reverse Forward
• The speed of slow-motion is slow at first. When the button is
pressed again, the speed increases up to 5 steps.
• Normal play is resumed when PLAY is pressed.
SLOW/SEARCH
Note
• For Video CDs, slow-motion playback in reverse direction is
not possible.
Cancelling playback control
[Video CD]
1. Press STOP after the menu screen appears (after step 4 on
page 42).
2. Press the numeric buttons to select a track.
(Play begins.)
• Refer to the jacket etc. of the disc concerned for the track
numbers.
• Press “ ”1 to start play from the beginning of the disc.
To return to menu play
Press STOP to stop playback and press DVD MENU.
Perform step 5 on page 43.
Some movie discs may have two or more titles. If the disc has a
title menu recorded on it, the TITLE button can be used to select
the movie title. (The details of operation depend on the disc used.)
Press TOP MENU during
play.
A list of the titles on the disc is now
displayed.
• Pressing TITLE again resumes play from the scene when
TITLE was first pressed.
1
Using a TOP MENU [DVD]
2Press SELECT ( , , , ) button to select
the item and press ENTER or PLAY.
Lovers Birds
Dogs Castles
T I T L E M E N U
(Example)
The selected title now starts playing.
(Example )
Lovers Birds of the world
Dogs Castles
T I T L E M E N U B i r d s
Some DVDs have unique menus. These menus can be for
language selection, audio output selection and/or subtitle
language selection, etc. Although the DVD menu’s contents and
operation differ from disc to disc, the following explains basic
operation when this feature is used.
Using a DVD menu [DVD]
2Press SELECT ( , , , ) button and press
ENTER, or press the numeric buttons, to
select the item.
The selected title now starts playing.
3. ANGLE
1. SUBTITLE
2. AUDIO
DV D M E N U
(Example)
Press DVD MENU during
play.
The DVD menu available on the
disc is now displayed.
• Pressing MENU again resumes play from the scene when
MENU was first pressed.
1
3. ANGLE
1. SUBTITLE
2. AUDIO
DV D M E N U
(Example)
When the menu continues onto another screen
Repeat step 2.

46
This player features GUI (Graphical User Interface) screens
providing various functions. A “banner” will be displayed on the
TV when DISPLAY button on the remote control is pressed.
Operating the SELECT/ENTER button on the remote control will
show disc information (title/chapter/track number, elapsed playing
time, audio/subtitle language, and angle) and player information
(repeat play, play mode, marker, picture mode, Virtual Surround
Sound, master volume, etc.). Some icons allow the settings to
be changed.
Common procedures
1
2Press the SELECT ( , ) button to select
the item.
• The currently selected item is indicated by the yellow frame
on the GUI screen.
3
Press DISPLAY during play or in the stop
mode.
Each time this button is pressed, the TV monitor changes
as shown below.
GUI screen for selecting disc information
GUI screen for selecting player information
Shuttle screen
GUI screen is cleared
• Some functions cannot be accessed from the stop mode.
Press the SELECT ( , ) button to select
the setting.
• For some functions, the setting will be registered
immediately; for others, ENTER or PLAY must be pressed.
• When numbers are displayed (e.g. title No.), the numeric
buttons are also effective for setting instead of the SELECT
( , ) button. When numbers are entered with numeric
buttons, press ENTER to register the setting.
Press RETURN to clear the GUI screen.
General information about GUI
screens
ANGLE
SKIP
STOP PAUSE
ASPECT TV/VIDEO MUTE
SLEEP CH VOL
SURROUND
REPEAT MODE A-B REPEAT PLAY MODE
TV
MENU
ENTER
RETURN
PLAY
DVD
ME
NU
TOP
MENU
DISPLAY
CANCEL
SLOW/SEARCH
OPEN
CLOSE
POWER
SELECT
RETURN
DISPLAY
PLAY
Numeric
buttons
CANCEL
–
–
–
–– 50
50
50
50
50
+ 50
+ 50
+ 50
+ 50
+ 50
1
1
1
11
dB
dB
dB
dB
dB
0
0
0
00
OFF
OFF
OFF
OFF
OFF
PRG
PRG
PRG
PRG
PRG
∗ ∗ ∗ ∗ ∗
∗ ∗ ∗ ∗ ∗
∗ ∗ ∗ ∗ ∗
∗ ∗ ∗ ∗ ∗
∗ ∗ ∗ ∗ ∗
•
•
•
••
•
•
•
••
3:37
3:37
3:37
3:37
3:37
(Screen is cleared)
CD
Video CD
–
–
–
–– 40
40
40
40
40
+ 40
+ 40
+ 40
+ 40
+ 40
PBC
PBC
PBC
PBC
PBC
OFF
OFF
OFF
OFF
OFF
1
1
1
11
dB
dB
dB
dB
dB
0
0
0
00
OFF
OFF
OFF
OFF
OFF
PRG
PRG
PRG
PRG
PRG
∗ ∗ ∗ ∗ ∗
∗ ∗ ∗ ∗ ∗
∗ ∗ ∗ ∗ ∗
∗ ∗ ∗ ∗ ∗
∗ ∗ ∗ ∗ ∗
•
•
•
••
•
•
•
••
3:37
3:37
3:37
3:37
3:37
L R
L R
L R
L R
L R
(Screen is cleared) Examples of GUI screens
See , and for detailed illustration.
The screens depend on the disc contents.
For your reference:
• The GUI screens may not be displayed when playing some
kinds of DVD software.
• The color (blue, violet or green) of the GUI screen can be
changed. (See page 59.)
1
1
1
11 1
1
1
11 1
1
1
11
ENG
ENG
ENG
ENG
ENG
ON
ON
ON
ON
ON
1
1
1
11
ENG
ENG
ENG
ENG
ENG
LPCM
LPCM
LPCM
LPCM
LPCM
48k 16b
48k 16b
48k 16b
48k 16b
48k 16b
1:56:37
1:56:37
1:56:37
1:56:37
1:56:37
1
1
1
11
2
2
2
22 dB
dB
dB
dB
dB
0
0
0
00
OFF
OFF
OFF
OFF
OFF
OFF
OFF
OFF
OFF
OFF
∗ ∗ ∗ ∗ ∗
∗ ∗ ∗ ∗ ∗
∗ ∗ ∗ ∗ ∗
∗ ∗ ∗ ∗ ∗
∗ ∗ ∗ ∗ ∗
•
•
•
••
•
•
•
••
Player information
Disc information
Shuffle screen
(Screen is cleared)
–
–
–
––100
100
100
100
100
+100
+100
+100
+100
+100
DVD

47
1
1
1
11 1
1
1
11 1
1
1
11
ENG
ENG
ENG
ENGENG
LPCM
LPCM
LPCM
LPCM
LPCM
48k 16b
48k 16b
48k 16b
48k 16b
48k 16b
1:56:37
1:56:37
1:56:37
1:56:37
1:56:37
ON
ON
ON
ONON
1
1
1
11
ENG
ENG
ENG
ENG ENG
1
1
1
11
Screen for disc information (For DVD)
Detailed descriptions of each GUl icon
Title No.
Change the chapter No. with the SELECT ( , ) button or the numeric buttons and
press ENTER.
Chapter No.
Change the title No. with time SELECT ( , ) button or the numeric buttons and press ENTER.
Change the time with the numeric buttons and press ENTER.
Example: To specify “1 hour 56 min. 37 sec.” “ ”, enter 15637 .
(This function does not work with some discs.)
Elapsed playing time
(hour: minute: second)
Change the No. with the SELECT ( , ) button or the numeric
buttons.
Angle No.
(See page 55.)
Audio soundtrack
language No.
(See page 54.)
Audio soundtrack
language
A u d i o
attribute
LPCM
Digital
DTS
MPEG
Vocal
Vocal
Change the No. with the SELECT
( , ) button or the numeric buttons.
ENG: English POR: Portuguese
FRA: French RUS: Russian
DEU: German JPN: Japanese
ITA: Italian CHI: Chinese
ESP: Spanish KOR: Korean
NLD: Dutch MAL: Malay
SVE: Swedish VIE: Vietnamese
NOR: Norwegian THA: Thai
DAN: Danish
*
: Other
96k
or
48k
1ch 3/2.1ch*–
1ch 3/2.1ch*–
1ch 3/2.1ch*–
--- (OFF)
ON
--- (OFF)
V1 + V2
V1
V2
16b
20b
24b
Linear PCM
( k“ ” stands for kHz
and “d” stands of bit.)
Dolby Digital
dts
MPEG audio
DVD Karaoke
(Solo)
DVD Karaoke
(Duet)
Subtitle language No.
(See page 55,56.)
Sub language
Subtitle on/off
Change the No. with the SELECT
( , ) button or the numeric buttons.
ENG: English POR: Portuguese
FRA: French RUS: Russian
DEU: German JPN: Japanese
ITA: Italian CHI: Chinese
ESP: Spanish KOR: Korean
NLD: Dutch MAL: Malay
SVE: Swedish VIE: Vietnamese
NOR: Norwegian THA: Thai
DAN: Danish
*
: Other
Select ON OFF“ ” or “ ” with the
SELECT ( , ) button.
OFF Subtitles cleared.
ON Subtitles displayed.
• The GUI screen display indicates the number of channels
recorded on the disc.
Example:
3/2.1ch
0: No low frequency effect (for subwoofer)
1: Low frequency effect (for subwoofer)
0: No Surround
1: Mono Surround
2: Stereo Surround (left/right)
0: Center
1: Front left + Front right
2: Front left + Front right + Center
For your reference
• “
, ” around the icon means that the item can be changed with the SELECT (
, ) button.
2
2
2
22

48
PBC
PBC
PBC
PBC
PBC
OFF
OFF
OFF
OFF
OFF
1
1
1
11 L R
L R
L R
L R
L R
3:37
3:37
3:37
3:37
3:37
Screen for disc information (For Video CD/CD)
Detailed descriptions of each GUl icon
Note
• Track No. and the elapsed playing time are not displayed during menu play of Video CDs with playback control.
• It is not possible to turn playback control ON or OFF using the GUI screen.
For your reference
• “
, ” around the icon means that the item can be changed with the SELECT (
, ) button.
Change the mode with SELECT ( , ) button.
Audio mode
(Video CD only)
(See page 54.)
Change the Track No. with the SELECT ( , ) button
or the numeric buttons and press ENTER.
Track No.
Display is changed with the SELECT ( , ) button.
Elapsed playing time Remaining time of the track
Remaining time of the disc
This function works with the following discs.
• CDs
• Video CDs with playback control when menu play is cancelled
(Press STOP while the menu screen is displayed.)
• Video CDs which do not support playback control (Ver 1.1)
Elapsed playing time
(minute: second)
OFF Menu play is off.
ON Menu play is on.
Playback controls
(Video CD only)
(See page 43.)
LR
L
R
Left channel sound is output from the speaker (L),
and right channel sound from the speaker (R).
Left channel sound only is output.
Right channel sound only is output.
2
2
2
22
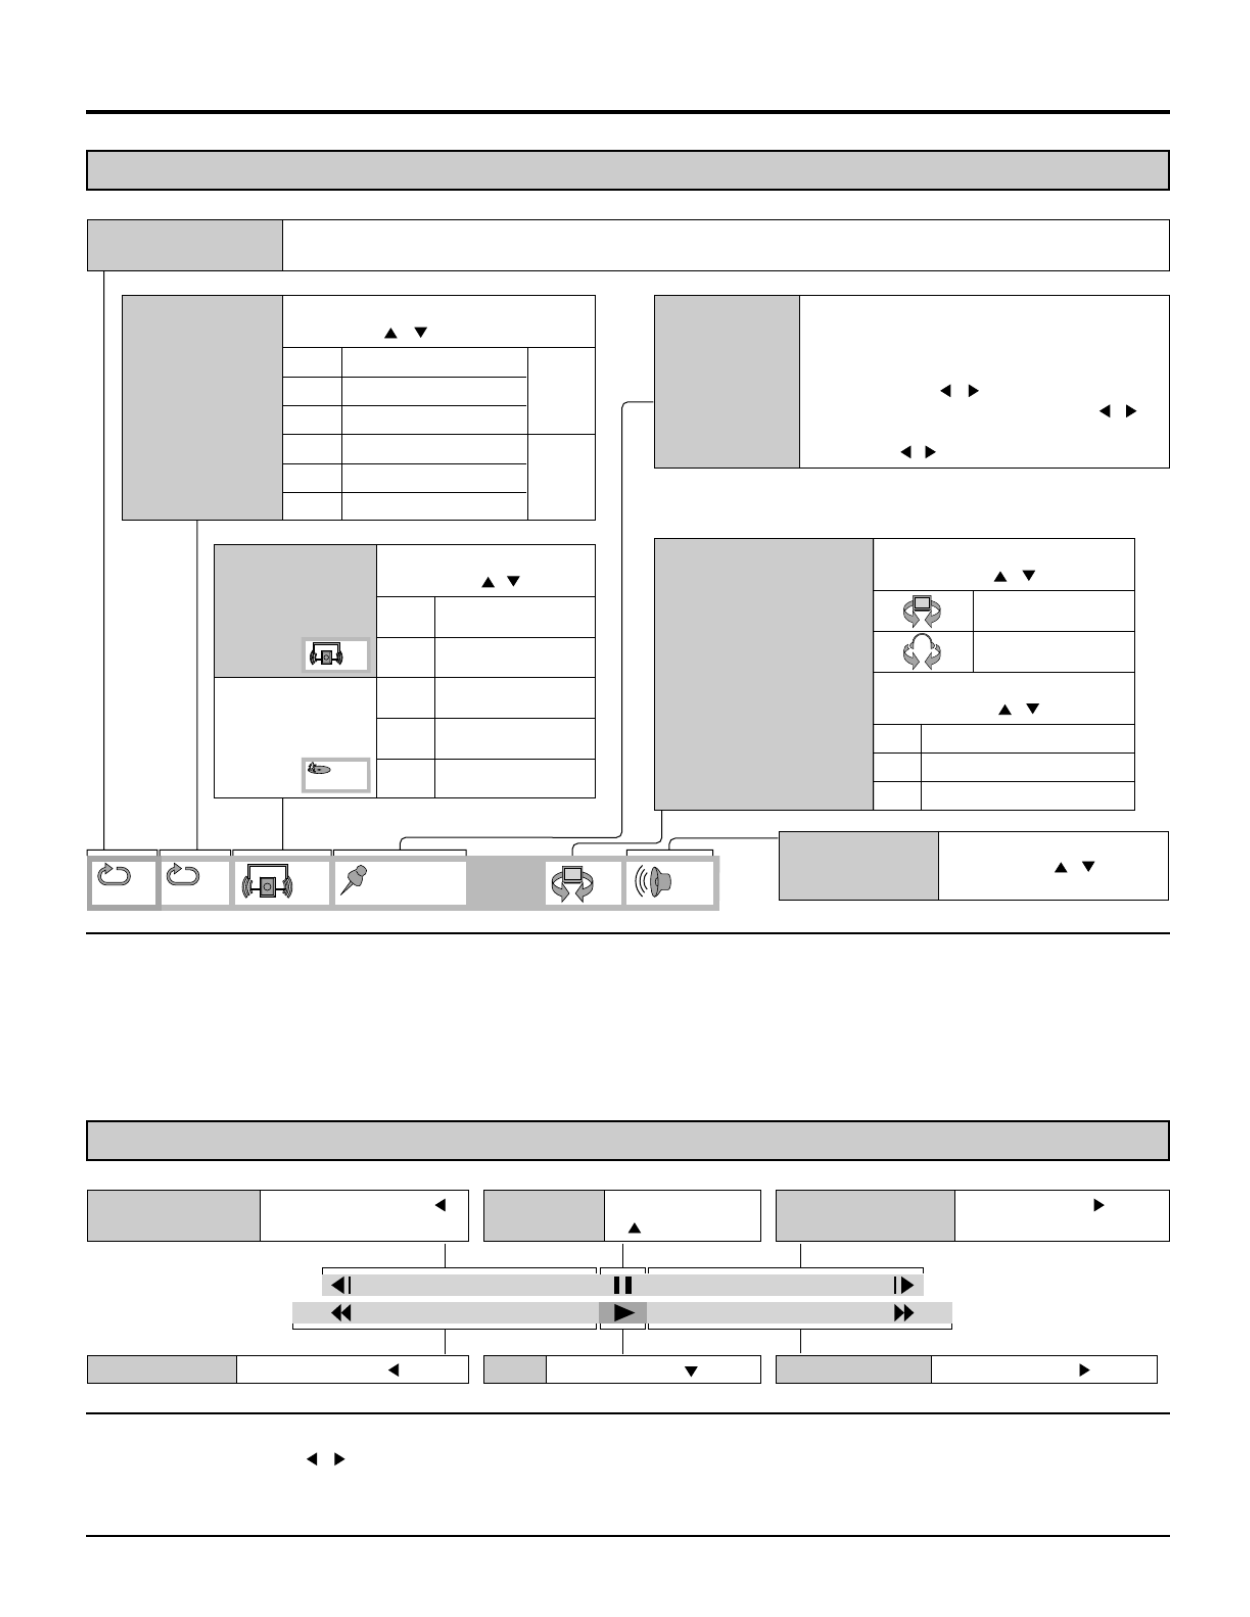
49
2
dB
0
OFF OFF
∗ ∗ ∗ ∗ ∗
∗ ∗ ∗ ∗ ∗
∗ ∗ ∗ ∗ ∗
∗ ∗ ∗ ∗ ∗
∗ ∗ ∗ ∗ ∗
• •
Screen for player information
For your reference
• Each time the SELECT ( , ) button is pressed, the speed of rapid reverse/advance and slow-motion play increases up to 5 steps.
• The figures appearing at both ends of the shuttle screen stand for the maximum speeds of rapid reverse and rapid advance.
(DVD: +100/-100, Video CD: +40/-40, CD: +50/-50)
Press ENTER during to store location A and press ENTER again to store location B. Repeat play between
the two locations starts. Press ENTER again to return to normal play.
A-B repeat play
(See page 51.)
Select the mode during play with
the SELECT ( , ) button.
• DVD
Dialogue
Enhancer
(See page 43.) OFF
ON
PRG
RND
---
Normal volume
Louder volume
Program play
Random play
Normal play
• Video CD/CD
Play mode
(See pages 52
and 53.)
OFF
---
---
---
---
---
Select the mode during play with the
SELECT ( , ) button.
Repeat play
(See page 50.)
OFF
C
T
OFF
T
A
Normal play
Chapter repeat play
Title repeat play
Normal play
Track repeat play
Disc repeat play
Video
CD/
CD
DVD
Press ENTER during play and press ENTER
again at the preferred point to store a marker.
(Marker no. replaces “∗”.)
• To recall a marker, select the marker no. with
the SELECT ( , ) button and enter the
selection with the SELECT button ( , ).
•
To clear a marker, select the marker no. with the
SELECT ( , ) button and press CANCEL.
Marker
(See page 51.)
Adjust the master volume with
the SELECT ( , ) button.
0 to 127 dB or – – ∞
Master volume
Select the mode during play with
the SELECT ( , ) button.
Virtual Surround Sound
(Dolby Digital DVD only)
(See page 28.) Select the mode during play with
the SELECT ( , ) button.
OFF
1
2
VSS Off
VSS natural effect
VSS emphasized effect
VSS
Headphone VSS
Note
• Repeat play and marker functions do not work with an interactive DVD or during menu play of a Video CD with playback control.
• A-B repeat play does not work with an interactive DVD.
• It is not possible to change the play mode using the GUI screen.
• The master volume can be set and stored separately for DVD, Video CD and CD.
Shuttle screen
–
–
–
––100
100
100
100
100
+100
+100
+100
+100
+100
Press the SELECT ( ) button.
(DVD/Video CD only)
Slow-motion play
(Forward)
Press the SELECT ( )
button. (DVD only)
Slow-motion play
(Backward)
Press the SELECT
( ) button.
Still/Pause
Press the SELECT ( ) button.
Play
Press the SELECT ( ) button.
Rapid reverse
Press the SELECT ( ) button.
Repaid advance

50
DISPLAY
ANGLE
PAUSE
ASPECT TV/VIDEO MUTE
SLEEP CH VOL
SURROUND
CANCEL
REPEAT MODE A-B REPEAT PLAY MODE
R-TUNE
TV
MENU
ENTER
RETURN
PLAY
DVD
MENU
TOP MENU
STOP
SKIP
SLOW/SEARCH
OPEN
CLOSE
POWER
SELECT
CANCEL
REPEAT
MODE A-B
REPEAT
• DVD
Normal play
Repeat of chapter being played
Repeat of title being played
Cancel repeat mode
(Normal play)
OFF
OFF
OFF
OFF
OFF
C
C
C
CC
T
T
T
TT
• Video CD / CD
Normal play
Repeat of track being played
Repeat of entire disc contents
Cancel repeat mode
(Normal play)
OFF
OFF
OFF
OFF
OFF
T
T
T
TT
A
A
A
AA
Note
• Repeat play may not work correctly with some DVDs.
• Repeat play does not work with an interactive DVD or during
menu play of a Video CD with playback control.
Press REPEAT MODE during play.
Each time this button is pressed, the TV monitor changes as
shown below and the disc will repeat a chapter or title (DVD) or
a track (Video CD/CD)
To return to normal play
Press REPEAT MODE until “
OFF
” is displayed.
Repeat play
Repeat viewing (Listening)
Produktspezifikationen
| Marke: | Panasonic |
| Kategorie: | Fernsehen |
| Modell: | TC-15DT2 |
Brauchst du Hilfe?
Wenn Sie Hilfe mit Panasonic TC-15DT2 benötigen, stellen Sie unten eine Frage und andere Benutzer werden Ihnen antworten
Bedienungsanleitung Fernsehen Panasonic

2 Oktober 2024
27 September 2024
27 September 2024
22 September 2024
21 September 2024
21 September 2024
19 September 2024
17 September 2024
17 September 2024
16 September 2024
Bedienungsanleitung Fernsehen
- Fernsehen Samsung
- Fernsehen Infiniton
- Fernsehen Clatronic
- Fernsehen Acer
- Fernsehen Sanyo
- Fernsehen BenQ
- Fernsehen Lexibook
- Fernsehen Manhattan
- Fernsehen Manta
- Fernsehen Medion
- Fernsehen Philips
- Fernsehen Sony
- Fernsehen Sweex
- Fernsehen Tevion
- Fernsehen Zalman
- Fernsehen LG
- Fernsehen MX Onda
- Fernsehen AEG
- Fernsehen Siemens
- Fernsehen Electrolux
- Fernsehen Küppersbusch
- Fernsehen OK
- Fernsehen Vox
- Fernsehen TechniSat
- Fernsehen XD Enjoy
- Fernsehen Denver
- Fernsehen ECG
- Fernsehen Intenso
- Fernsehen MarQuant
- Fernsehen Bush
- Fernsehen Telefunken
- Fernsehen Thomson
- Fernsehen Trevi
- Fernsehen BEKO
- Fernsehen Blaupunkt
- Fernsehen Grundig
- Fernsehen Schneider
- Fernsehen Sharp
- Fernsehen Aspes
- Fernsehen Brandt
- Fernsehen Daewoo
- Fernsehen Pyle
- Fernsehen Mitsubishi
- Fernsehen Finlux
- Fernsehen Haier
- Fernsehen High One
- Fernsehen Hisense
- Fernsehen Luxor
- Fernsehen NABO
- Fernsehen Nordmende
- Fernsehen Salora
- Fernsehen SEG
- Fernsehen Smart Brand
- Fernsehen Svan
- Fernsehen Techwood
- Fernsehen Vestel
- Fernsehen Philco
- Fernsehen Schaub Lorenz
- Fernsehen Aiwa
- Fernsehen Alphatronics
- Fernsehen AudioSonic
- Fernsehen Coby
- Fernsehen Bang And Olufsen
- Fernsehen DIFRNCE
- Fernsehen Lenco
- Fernsehen Mpman
- Fernsehen ODYS
- Fernsehen Pioneer
- Fernsehen Polaroid
- Fernsehen Jay-Tech
- Fernsehen JVC
- Fernsehen Krüger And Matz
- Fernsehen Muse
- Fernsehen Nokia
- Fernsehen Optoma
- Fernsehen PEAQ
- Fernsehen Xiaomi
- Fernsehen Abus
- Fernsehen Megasat
- Fernsehen Walker
- Fernsehen Akai
- Fernsehen Arçelik
- Fernsehen Caratec
- Fernsehen Changhong
- Fernsehen Chiq
- Fernsehen Continental Edison
- Fernsehen Dual
- Fernsehen Dyon
- Fernsehen Edenwood
- Fernsehen Ferguson
- Fernsehen Funai
- Fernsehen GoGEN
- Fernsehen Hannspree
- Fernsehen Hitachi
- Fernsehen Horizon
- Fernsehen Hyundai
- Fernsehen JTC
- Fernsehen Kernau
- Fernsehen Loewe
- Fernsehen Metz
- Fernsehen MT Logic
- Fernsehen Orava
- Fernsehen Orion
- Fernsehen Reflexion
- Fernsehen Star-Light
- Fernsehen Strong
- Fernsehen TCL
- Fernsehen Tesla
- Fernsehen Toshiba
- Fernsehen Allview
- Fernsehen Casio
- Fernsehen Sencor
- Fernsehen Icy Box
- Fernsehen Element
- Fernsehen ViewSonic
- Fernsehen Dell
- Fernsehen Lenovo
- Fernsehen Cecotec
- Fernsehen Nikkei
- Fernsehen Xiron
- Fernsehen Opera
- Fernsehen Sagem
- Fernsehen Antarion
- Fernsehen Xoro
- Fernsehen Humax
- Fernsehen Logik
- Fernsehen CGV
- Fernsehen LTC
- Fernsehen Bluesky
- Fernsehen Orima
- Fernsehen Proline
- Fernsehen NEC
- Fernsehen Marantz
- Fernsehen TEAC
- Fernsehen Packard Bell
- Fernsehen Westinghouse
- Fernsehen AOC
- Fernsehen NextBase
- Fernsehen Vivax
- Fernsehen Uniden
- Fernsehen Kogan
- Fernsehen Innoliving
- Fernsehen Magnum
- Fernsehen Smart Tech
- Fernsehen JGC
- Fernsehen Soundmaster
- Fernsehen Sylvania
- Fernsehen Qilive
- Fernsehen Doffler
- Fernsehen NewStar
- Fernsehen Zenith
- Fernsehen Insignia
- Fernsehen Roadstar
- Fernsehen SereneLife
- Fernsehen Woxter
- Fernsehen Sogo
- Fernsehen Peerless-AV
- Fernsehen RCA
- Fernsehen Oppo
- Fernsehen Vivo
- Fernsehen AYA
- Fernsehen Furrion
- Fernsehen Seiki
- Fernsehen Alba
- Fernsehen Aldi
- Fernsehen Daitsu
- Fernsehen Digihome
- Fernsehen E-motion
- Fernsehen Emerson
- Fernsehen GPX
- Fernsehen Graetz
- Fernsehen HKC
- Fernsehen Hoher
- Fernsehen ILive
- Fernsehen Naxa
- Fernsehen Online
- Fernsehen Onn
- Fernsehen Oyster
- Fernsehen Premier
- Fernsehen Reflex
- Fernsehen Rm 2000
- Fernsehen Saba
- Fernsehen Sbr
- Fernsehen Sunny
- Fernsehen Sunstech
- Fernsehen TechLine
- Fernsehen Technika
- Fernsehen Tele 2
- Fernsehen Grunkel
- Fernsehen Tve
- Fernsehen Viewpia
- Fernsehen Vision Plus
- Fernsehen Vizio
- Fernsehen Voxx
- Fernsehen Wharfedale
- Fernsehen Yasin
- Fernsehen Ziggo
- Fernsehen Videocon
- Fernsehen Bauhn
- Fernsehen Planar
- Fernsehen Monster
- Fernsehen Mitsai
- Fernsehen Proscan
- Fernsehen Kunft
- Fernsehen Nevir
- Fernsehen Seura
- Fernsehen EKO
- Fernsehen SunBriteTV
- Fernsehen Kemo
- Fernsehen V7
- Fernsehen Astar
- Fernsehen QBell Technology
- Fernsehen Visco
- Fernsehen Majestic
- Fernsehen DirecTV
- Fernsehen HCI
- Fernsehen Mach Power
- Fernsehen MBM
- Fernsehen Inno-Hit
- Fernsehen Elements
- Fernsehen Palsonic
- Fernsehen Cello
- Fernsehen Pantel
- Fernsehen FFalcon
- Fernsehen Coocaa
- Fernsehen SYLVOX
- Fernsehen ISymphony
- Fernsehen Aristona
- Fernsehen Apex
- Fernsehen Tucson
- Fernsehen Kubo
- Fernsehen Avtex
- Fernsehen NPG
- Fernsehen Telesystem
- Fernsehen ATYME
- Fernsehen Lin
- Fernsehen Tivax
- Fernsehen H&B
- Fernsehen Norcent
- Fernsehen TELE System
- Fernsehen Belson
- Fernsehen Elbe
- Fernsehen Mitzu
- Fernsehen Voxicon
- Fernsehen Aconatic
- Fernsehen Mitchell & Brown
- Fernsehen FOX Electronics
- Fernsehen Mystery
Neueste Bedienungsanleitung für -Kategorien-

16 Oktober 2024

16 Oktober 2024

16 Oktober 2024

15 Oktober 2024

15 Oktober 2024

15 Oktober 2024
15 Oktober 2024

15 Oktober 2024
15 Oktober 2024
15 Oktober 2024