Olympus Camedia AZ-1 Bedienungsanleitung
Olympus
Digitalkamera
Camedia AZ-1
Lesen Sie kostenlos die 📖 deutsche Bedienungsanleitung für Olympus Camedia AZ-1 (212 Seiten) in der Kategorie Digitalkamera. Dieser Bedienungsanleitung war für 8 Personen hilfreich und wurde von 2 Benutzern mit durchschnittlich 4.5 Sternen bewertet
Seite 1/212

DIGITAL CAMERA
AZ-1
REFERENCE MANUAL
●Thank you for purchasing an Olympus digital camera. Before you start to use your
new camera, please read these instructions carefully to enjoy optimum
performance and a longer service life. Keep this manual in a safe place for future
reference.
●We recommend that you take test shots to get accustomed to your camera before
taking important photographs.
●The screen and camera illustrations shown in this manual were produced during
the development stages and may differ from the actual product.
00AZ-1ENP1 04.3.25 2:21 PM Page 1

2
For customers in North and South America
For customers in Europe
“CE” mark indicates that this product complies with the European requirements for
safety, health, environment and customer protection.
“CE” mark cameras are intended for sales in Europe.
Trademarks
•IBM is a registered trademark of International Business Machines Corporation.
•Microsoft and Windows are registered trademarks of Microsoft Corporation.
•Macintosh is a trademark of Apple Computer Inc.
•All other company and product names are registered trademarks and/or trademarks of their
respective owners.
•The standards for camera file systems referred to in this manual are the “Design Rule for Camera
File System/DCF” standards stipulated by the Japan Electronics and Information Technology
Industries Association (JEITA).
For customers in USA
Declaration of Conformity
Model Number : AZ-1
Trade Name : OLYMPUS
Responsible Party : Olympus America Inc.
Address : 2 Corporate Center Drive, Melville, New York
11747-3157 U.S.A.
Telephone Number : 1-631-844-5000
Tested To Comply With FCC Standards
FOR HOME OR OFFICE USE
This device complies with Part 15 of the FCC rules. Operation is subject
to the following two conditions:
(1) This device may not cause harmful interference.
(2) This device must accept any interference received, including
interference that may cause undesired operation.
For customers in Canada
This Class B digital apparatus meets all requirements of the Canadian
Interference-Causing Equipment Regulations.
00AZ-1ENP1 04.3.25 2:21 PM Page 2

3
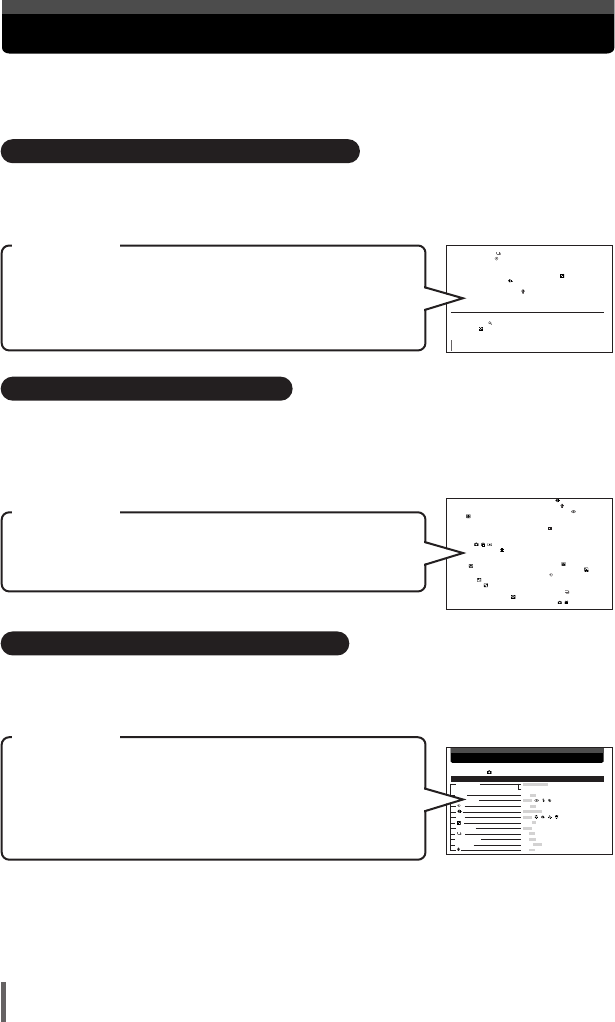
You can choose from more than 20 different types
of scene shooting modes, making it
easy to set the appropriate shooting
mode for a variety of shooting
situations.
Once you’ve selected the shooting
mode, just press the shutter
button to take the picture. ~ P. 34
You can take sequential shots
(~ P. 61), or record movies with
sound (~ P. 36).
The pictures you
take are recorded
and stored on
xD-Picture Card.
When the camera is connected
to a PC or printer...
You can transfer the images to
the PC. ~ P. 171
You can print out stored pictures
directly with a PictBridge-
compatible printer without
using the PC. ~ P. 146
You can create photo
albums from the pictures
recorded on the xD-Picture
Card. ~ P. 104
When the camera is in the
cradle ........
Pictures can be played back
on a TV with the AV cable.
~ P. 87
The battery can be
recharged with the AC
adapter. ~ P. 27
What you can do with this camera
00AZ-1ENP1 04.3.25 2:21 PM Page 3
How to use this manual
4
This manual includes a table of contents, index and menu list to help you
easily locate the information you need.
Searching from the table of contents ~P. 7
All the chapter and section titles are included in the table of contents so that you can
quickly find the chapters you want to read (e.g., the introductory chapter, shooting
basics, etc.)
When you want to play back the images you have just taken.
Search for the page number for “Viewing still images........72”
from the chapter “5 Playback”.
For example
8
DIGITAL ZOOM
Using
the
digital
zoom .
.
.
.
.
.
.
.
.
.
.
.
.
.
.
.
.
.
.
.
.
.
.
.
.
.
.
.
.
60
Sequential shooting . . . . . . . . . . . . . . . . . . . . . . . . . . . . . . . . . . . . . . . . . . . . 61
Self-timer shooting . . . . . . . . . . . . . . . . . . . . . . . . . . . . . . . . . . . . . . . . . . . . 62
AF MODE — Changing the focus range . . . . . . . . . . . . . . . . . . . . . . . . . . . . . . . 63
METERING — Changing the metering area . . . . . . . . . . . . . . . . . . . . . . . . . . . . 64
Varying the image brightness (Exposure Compensation) . . . . . . . . . . . . . . . 65
Selecting the record mode . . . . . . . . . . . . . . . . . . . . . . . . . . . . . . . . . . . . . . 66
WB — Adjusting the color tone . . . . . . . . . . . . . . . . . . . . . . . . . . . . . . . . . . . . . . 68
Recording sound with still pictures . . . . . . . . . . . . . . . . . . . . . . . . . . . . . . . . . 69
RESET — Restoring the factory default settings. . . . . . . . . . . . . . . . . . . . . . . . . 71
5 Playback 72
Viewing still images . . . . . . . . . . . . . . . . . . . . . . . . . . . . . . . . . . . . . . . . . . . . . . . . . 72
Close-up playback . . . . . . . . . . . . . . . . . . . . . . . . . . . . . . . . . . . . . . . . . . . . . . . . 73
Index display . . . . . . . . . . . . . . . . . . . . . . . . . . . . . . . . . . . . . . . . . . . . . . . . . . . . 75
Searching from the index ~P. 208
Terms used in this manual (such as the names of functions and parts) are listed in
alphabetical order. When you come across a term that you are not familiar with or
about which you want to learn more, you can search the index to find the relevant
page.
If you want to know more about the term “Light metering”
Search for the page number for “METERING.......64”.
For example Lens........................................................19, 31
M
MACRO ..................................................48
Memory gauge..............................................23
MENU/OK button....................................18, 42
METERING ..................................................64
Microphone ......................................19, 69, 99
Mode switch ( // ) ..........................30
Monitor brightness adjustment ............125
Monitor......................................18, 20, 30, 125
MOVIE PLAYBACK......................................88
MUSEUM ..............................................49
N
NIGHT SCENE ........................................5
NIGHT+PORTRAIT ................................46
NTSC..........................................................202
Number of frames in an index display ..126
Number of storable still pictures ............31, 67
R
ecor
d
mo
d
e ........................................
66
Recording sound ..............................69, 99
Red-eye reduction flash ........................58
Remaining movie recording time ................36
RESET..........................................................71
Resizing ................................................97
Resolution ....................................................67
S
SCENE SELECT ..........................................43
SCREEN ....................................................120
SEL. ALBUM ..............................................108
SELF PORTRAIT ..................................47
SELF PORTRAIT+SELF TIMER ............50
Self-timer ................................................62
Self-timer lamp ......................................19, 62
SEPIA ..........................................................97
Sequential shooting ..............................61
SETUP........................................................114
Shooting mode ..........................20, 31
Searching from the list of menus ~P. 204
The camera's menus are listed in a tree structure. When you come across a menu
whose name is unfamiliar on the menu screen, you can find the relevant pages for this
menu function in the menu list.
When you want to know how to make settings for WB in the
menu screen
Search for the page number for “WB P. 68” by following the
operating procedures of the menus.
For example
Menu directory
Shooting menu ( mode)
Function Setting Ref. page
SCENE SELECT PROGRAM AUTO P. 42
SCENE
RESET YES, NO P. 71
FLASH MODE*1 AUTO , , , P. 58
*1 ON, OFF P. 62
SUPER HIGH*1 , HIGH*1, BASIC, E-MAIL P. 66
WB*2 AUTO , , , , P. 68
*2 +2.0 - 0.0 - –2.0 P. 65
METERING*2 AUTO , SPOT P. 64
*1 ON, OFF P. 61
DIGITAL ZOOM*1 ON, OFF P. 60
AF MODE*1 AUTO, SPOT P. 63
ON OFF P 69
* For information on how to read the instructions in this manual, refer to “How to read the
instruction pages” (P. 6)
V
V
V
00AZ-1ENP1 04.3.25 2:21 PM Page 4

5
Composition of the manual
Downloading images to
a computer
Printing pictures
Basic and advanced
shooting
Introduction to the
camera’s functions
1
Getting started P. 24
2
Shooting P. 31
3
Using the situation-related shooting modes P. 42
Playing back and
organizing images
4
Using the advanced shooting functions P. 55
Settings that make the
camera easier to operate
7
Using your camera effectively P. 114
8
Making print reservations and printing P. 131
at photo labs
9
Printing on a PictBridge-compatible printer P. 146
(direct printing)
10
Transferring images to a computer P. 171
5
Playback P. 72
6
Registering images in albums P. 104
Contents . . . . . . . . 7
Safety precautions . . . . . . . 12
Names of parts . . . . . . . 18
Using the provided
accessories
11
Accessories P. 190
Troubleshooting and
other information
12
Miscellaneous P. 192
Specifications . . . . . . 201
Glossary . . . . . . 202
Menu directory . . . . . . 204
Index . . . . . . 208
00AZ-1ENP1 04.3.25 2:21 PM Page 5

How to read the instruction pages
6
This sample page is only for your reference. It may differ from the actual page in this
manual.
The gray part on the right
shows tips for operating
procedures.
Indications used in this manual
Important information on factors which may lead to a malfunction or
operational problems. Also warns of operations that should be
absolutely avoided.
Useful information and hints that will help you get the most out of
your camera.
~
This shows the buttons
corresponding to the function.
152
9
Printing on a PictBridge-compatible printer
(direct printing)
PRINT — Printing selected pictures
Select the print paper items to set.
SIZE : Selects the paper size.
BORDERLESS : Selects the frame
setting on the paper.
Set SIZE. Set BORDERLESS. If neither screen is displayed, each
setting is set to STANDARD.
PRINTPAPER
END
SIZE
BORDERLESS
STANDARD
ANDARD
STANDARD
ANDARD
CANCEL SELECT
GO
BACK
OK
PRINTPAPER
END
SIZE
BORDERLESS
STANDARD
ANDARD
STANDARD
ANDARD
CANCEL SELECT
GO
BACK
OK
PRINTP
PRINTP
APER
APER
END
SIZE
BORDERLESS
STANDARD
CANCEL SELECT
GO
BACK
OK
PRINTP
PRINTP
APER
APER
END
SIZE
BORDERLESS
STANDARD
CANCEL SELECT
GO
BACK
OK
Select END.
BORDERLESS setting
ON : The picture is printed filling
the entire page.
OFF : The picture is printed inside a
blank frame.
Rotate to
select
MENU/OK
Press to confirm
Rotate to
select
MENU/OK
Press to confirm
Rotate to
select
MENU/OK
Press to confirm
Control dial
BACK/NEXT
button
MENU/OK button
Zoom button (W)
00AZ-1ENP1 04.3.25 2:21 PM Page 6

7
Contents
What you can do with this camera . . . . . . . . . . . . . . . . . . . . . . . . . . . . . . . . . . . . . . . 3
How to use this manual . . . . . . . . . . . . . . . . . . . . . . . . . . . . . . . . . . . . . . . . . . . . . . . 4
Composition of the manual. . . . . . . . . . . . . . . . . . . . . . . . . . . . . . . . . . . . . . . . . . . . . 5
How to read the instruction pages . . . . . . . . . . . . . . . . . . . . . . . . . . . . . . . . . . . . . . . 6
Safety precautions . . . . . . . . . . . . . . . . . . . . . . . . . . . . . . . . . . . . . . . . . . . . . . . . . . 12
General precautions . . . . . . . . . . . . . . . . . . . . . . . . . . . . . . . . . . . . . . . . . . . . . . 12
Handling the camera . . . . . . . . . . . . . . . . . . . . . . . . . . . . . . . . . . . . . . . . . . . . . . 14
Caution for usage environment . . . . . . . . . . . . . . . . . . . . . . . . . . . . . . . . . . . . . . 15
Battery handling precautions. . . . . . . . . . . . . . . . . . . . . . . . . . . . . . . . . . . . . . . . 16
LCD monitor . . . . . . . . . . . . . . . . . . . . . . . . . . . . . . . . . . . . . . . . . . . . . . . . . . . . 17
Names of parts . . . . . . . . . . . . . . . . . . . . . . . . . . . . . . . . . . . . . . . . . . . . . . . . . . . . . 18
Monitor indications… . . . . . . . . . . . . . . . . . . . . . . . . . . . . . . . . . . . . . . . . . . . . . . . . 20
1 Getting started 24
Attaching the lens cap and strap . . . . . . . . . . . . . . . . . . . . . . . . . . . . . . . . . . . . . . . 24
Loading the battery. . . . . . . . . . . . . . . . . . . . . . . . . . . . . . . . . . . . . . . . . . . . . . . . . . 25
Unloading the battery . . . . . . . . . . . . . . . . . . . . . . . . . . . . . . . . . . . . . . . . . . . . . 26
Charging the battery. . . . . . . . . . . . . . . . . . . . . . . . . . . . . . . . . . . . . . . . . . . . . . . . . 27
Inserting the card . . . . . . . . . . . . . . . . . . . . . . . . . . . . . . . . . . . . . . . . . . . . . . . . . . . 28
Removing the card . . . . . . . . . . . . . . . . . . . . . . . . . . . . . . . . . . . . . . . . . . . . . . . 29
Power on/off . . . . . . . . . . . . . . . . . . . . . . . . . . . . . . . . . . . . . . . . . . . . . . . . . . . . . . . 30
2 Shooting 31
Taking still pictures . . . . . . . . . . . . . . . . . . . . . . . . . . . . . . . . . . . . . . . . . . . . . . . . . . 31
Specifying the type of scene . . . . . . . . . . . . . . . . . . . . . . . . . . . . . . . . . . . . . . . . 34
Movie recording . . . . . . . . . . . . . . . . . . . . . . . . . . . . . . . . . . . . . . . . . . . . . . . . . 36
If correct focus cannot be obtained . . . . . . . . . . . . . . . . . . . . . . . . . . . . . . . . . . . . . 38
Subjects that are difficult to focus on. . . . . . . . . . . . . . . . . . . . . . . . . . . . . . . . . . 38
Determine the position of the subject after focusing (Focus Lock) . . . . . . . . . . . 39
Zoom . . . . . . . . . . . . . . . . . . . . . . . . . . . . . . . . . . . . . . . . . . . . . . . . . . . . . . . . . . . . 41
3 Using the situation-related shooting modes 42
LANDSCAPE . . . . . . . . . . . . . . . . . . . . . . . . . . . . . . . . . . . . . . . . . . . . . . . . . 45
LANDSCAPE+PORTRAIT. . . . . . . . . . . . . . . . . . . . . . . . . . . . . . . . . . . . . . . 45
NIGHT SCENE . . . . . . . . . . . . . . . . . . . . . . . . . . . . . . . . . . . . . . . . . . . . . . . 45
NIGHT+PORTRAIT . . . . . . . . . . . . . . . . . . . . . . . . . . . . . . . . . . . . . . . . . . . . 46
INDOOR . . . . . . . . . . . . . . . . . . . . . . . . . . . . . . . . . . . . . . . . . . . . . . . . . . . . 46
FIREWORKS . . . . . . . . . . . . . . . . . . . . . . . . . . . . . . . . . . . . . . . . . . . . . . . . . 46
00AZ-1ENP1 04.3.25 2:21 PM Page 7

8
Contents
SUNSET . . . . . . . . . . . . . . . . . . . . . . . . . . . . . . . . . . . . . . . . . . . . . . . . . . . . 47
PORTRAIT. . . . . . . . . . . . . . . . . . . . . . . . . . . . . . . . . . . . . . . . . . . . . . . . . . . 47
SELF PORTRAIT (Shooting yourself while holding the camera). . . . . . . . . . 47
MACRO (Close-up shooting) . . . . . . . . . . . . . . . . . . . . . . . . . . . . . . . . . . . . . 48
SUPER MACRO (Closer shot than MACRO) . . . . . . . . . . . . . . . . . . . . . . . . 48
CUISINE . . . . . . . . . . . . . . . . . . . . . . . . . . . . . . . . . . . . . . . . . . . . . . . . . . . . 48
DOCUMENTS . . . . . . . . . . . . . . . . . . . . . . . . . . . . . . . . . . . . . . . . . . . . . . . . 49
MUSEUM (No beep sound & no flash) . . . . . . . . . . . . . . . . . . . . . . . . . . . . . 49
SPORT (Capturing a fast-moving subject). . . . . . . . . . . . . . . . . . . . . . . . . . . 49
BEACH & SNOW (Shooting seascapes
or snow-capped mountain landscapes ) . . . . . . . . . . . . . . . . . . . . . . . . . . . . . . 50
SELF PORTRAIT+SELF TIMER (Shooting yourself and
background) . . . . . . . . . . . . . . . . . . . . . . . . . . . . . . . . . . . . . . . . . . . . . . . . . . . 50
CANDLE . . . . . . . . . . . . . . . . . . . . . . . . . . . . . . . . . . . . . . . . . . . . . . . . . . . . 50
AVAILABLE LIGHT PORTRAIT (Shooting in low light conditions
without a flash) . . . . . . . . . . . . . . . . . . . . . . . . . . . . . . . . . . . . . . . . . . . . . . . . . 51
BEHIND GLASS (Shooting a subject through glass). . . . . . . . . . . . . . . . . . . 51
2 IN 1 (Storing two successive shots as a single picture) . . . . . . . . . . . . . . . 52
PANORAMA . . . . . . . . . . . . . . . . . . . . . . . . . . . . . . . . . . . . . . . . . . . . . . . . . 53
4 Using the advanced shooting functions 55
Selecting functions from the shooting menu. . . . . . . . . . . . . . . . . . . . . . . . . . . . . . . 55
Flash . . . . . . . . . . . . . . . . . . . . . . . . . . . . . . . . . . . . . . . . . . . . . . . . . . . . . . . . 58
DIGITAL ZOOM — Using the digital zoom . . . . . . . . . . . . . . . . . . . . . . . . . . . . . 60
Sequential shooting . . . . . . . . . . . . . . . . . . . . . . . . . . . . . . . . . . . . . . . . . . . . 61
Self-timer shooting . . . . . . . . . . . . . . . . . . . . . . . . . . . . . . . . . . . . . . . . . . . . 62
AF MODE — Changing the focus range . . . . . . . . . . . . . . . . . . . . . . . . . . . . . . . 63
METERING — Changing the metering area . . . . . . . . . . . . . . . . . . . . . . . . . . . . 64
Varying the image brightness (Exposure Compensation) . . . . . . . . . . . . . . . 65
Selecting the record mode . . . . . . . . . . . . . . . . . . . . . . . . . . . . . . . . . . . . . . 66
WB — Adjusting the color tone . . . . . . . . . . . . . . . . . . . . . . . . . . . . . . . . . . . . . . 68
Recording sound with still pictures . . . . . . . . . . . . . . . . . . . . . . . . . . . . . . . . . 69
RESET — Restoring the factory default settings. . . . . . . . . . . . . . . . . . . . . . . . . 71
5 Playback 72
Viewing still images . . . . . . . . . . . . . . . . . . . . . . . . . . . . . . . . . . . . . . . . . . . . . . . . . 72
Close-up playback . . . . . . . . . . . . . . . . . . . . . . . . . . . . . . . . . . . . . . . . . . . . . . . . 73
Index display . . . . . . . . . . . . . . . . . . . . . . . . . . . . . . . . . . . . . . . . . . . . . . . . . . . . 75
00AZ-1ENP1 04.3.25 2:21 PM Page 8
9
Contents
Selecting functions from the playback menu . . . . . . . . . . . . . . . . . . . . . . . . . . . . . . 78
Slideshow (sequential auto playback) . . . . . . . . . . . . . . . . . . . . . . . . . . . . . 82
Rotating images . . . . . . . . . . . . . . . . . . . . . . . . . . . . . . . . . . . . . . . . . . . . . . . 86
Playback on TV . . . . . . . . . . . . . . . . . . . . . . . . . . . . . . . . . . . . . . . . . . . . . . . . . . 87
MOVIE PLAYBACK — Viewing movies. . . . . . . . . . . . . . . . . . . . . . . . . . . . . . . . 88
Protecting images (preventing accidental erasure) . . . . . . . . . . . . . . . . . . . 92
ERASE/ ALL ERASE — Erasing images . . . . . . . . . . . . . . . . . . . . . . . . . 93
BLACK & WHITE/SEPIA/ — Editing still images . . . . . . . . . . . . . . . . . . . . . . 97
Adding sound to recorded images . . . . . . . . . . . . . . . . . . . . . . . . . . . . . . . . . 99
INDEX — Making movie index . . . . . . . . . . . . . . . . . . . . . . . . . . . . . . . . . . . . . 101
FORMAT — Formatting the card . . . . . . . . . . . . . . . . . . . . . . . . . . . . . . . . . 103
6 Registering images in albums 104
ALBUM ENTRY — Registering images you shot . . . . . . . . . . . . . . . . . . . . . . . . . . 104
SEL. ALBUM — Viewing images in an album . . . . . . . . . . . . . . . . . . . . . . . . . . . . 108
Slideshow (sequential auto playback of images in an album) . . . . . . . . . . . . . 109
REARRANGE — Arranging the order of images in an album . . . . . . . . . . . . . . . . 110
UNDO ENTRY — Removing images from an album . . . . . . . . . . . . . . . . . . . . . . . 111
UNDO ALL — Removing all the images registered in the album . . . . . . . . . . . . . . 113
7 Using your camera effectively 114
Selecting functions from the SETUP menu . . . . . . . . . . . . . . . . . . . . . . . . . . . . . . 114
REC VIEW — Checking the picture immediately after shooting . . . . . . . . . . . . 117
INFO — Displaying shooting information on the monitor . . . . . . . . . . . . . . . . . 118
Changing the display language . . . . . . . . . . . . . . . . . . . . . . . . . . . . . . . . . 119
SCREEN — Setting the startup screen. . . . . . . . . . . . . . . . . . . . . . . . . . . . . . . 120
SHUTTER SOUND — Setting the shutter sound . . . . . . . . . . . . . . . . . . . . . . . 121
VOLUME — Selecting the playback volume . . . . . . . . . . . . . . . . . . . . . . . . . . . 122
BEEP — Setting the button operation sound . . . . . . . . . . . . . . . . . . . . . . . . . . 123
Setting the warning tone . . . . . . . . . . . . . . . . . . . . . . . . . . . . . . . . . . . . . . . 124
Adjusting the monitor brightness . . . . . . . . . . . . . . . . . . . . . . . . . . . . . . . . . 125
Selecting the number of images . . . . . . . . . . . . . . . . . . . . . . . . . . . . . . . . . 126
Setting the date and time . . . . . . . . . . . . . . . . . . . . . . . . . . . . . . . . . . . . . . . 127
VIDEO OUT — Selecting the video signal type . . . . . . . . . . . . . . . . . . . . . . . . 129
PIXEL MAPPING — Checking the image processing functions . . . . . . . . . . . . 130
00AZ-1ENP1 04.3.25 2:21 PM Page 9

10
Contents
8 Making print reservations and printing at photo labs 131
How to print pictures. . . . . . . . . . . . . . . . . . . . . . . . . . . . . . . . . . . . . . . . . . . . . . . . 131
Selecting the print reservation mode . . . . . . . . . . . . . . . . . . . . . . . . . . . . . . . . 133
Single-frame reservation . . . . . . . . . . . . . . . . . . . . . . . . . . . . . . . . . . . . . . . . . . 136
All-frame reservation . . . . . . . . . . . . . . . . . . . . . . . . . . . . . . . . . . . . . . . . . . . . . 140
Resetting print reservation . . . . . . . . . . . . . . . . . . . . . . . . . . . . . . . . . . . . . . . . . . . 142
9 Printing on a PictBridge-compatible printer
(direct printing) 146
Direct printing . . . . . . . . . . . . . . . . . . . . . . . . . . . . . . . . . . . . . . . . . . . . . . . . . . . . . 146
Connecting the camera to a printer . . . . . . . . . . . . . . . . . . . . . . . . . . . . . . . . . . . . 147
Selecting the print mode. . . . . . . . . . . . . . . . . . . . . . . . . . . . . . . . . . . . . . . . . . . . . 150
PRINT — Printing selected pictures. . . . . . . . . . . . . . . . . . . . . . . . . . . . . . . . . . . . 152
MULTI PRINT — Printing multiple pictures on one page . . . . . . . . . . . . . . . . . . . . 157
ALL PRINT — Printing all the pictures stored in the card/album . . . . . . . . . . . . . . 162
ALL INDEX — Printing an index of all the pictures stored in the card . . . . . . . . . . 165
PRINT ORDER — Printing with print reservation. . . . . . . . . . . . . . . . . . . . . . . . . . 167
Exiting direct printing . . . . . . . . . . . . . . . . . . . . . . . . . . . . . . . . . . . . . . . . . . . . . . . 169
If an error code is displayed . . . . . . . . . . . . . . . . . . . . . . . . . . . . . . . . . . . . . . . . . . 170
10 Transferring images to a computer 171
Flowchart . . . . . . . . . . . . . . . . . . . . . . . . . . . . . . . . . . . . . . . . . . . . . . . . . . . . . . . . 171
Identifying the OS . . . . . . . . . . . . . . . . . . . . . . . . . . . . . . . . . . . . . . . . . . . . . . . . . . 174
Installing the USB driver for Windows 98 (When using Windows 98/98 SE) . . 176
Connecting the camera to the computer . . . . . . . . . . . . . . . . . . . . . . . . . . . . . . . . 178
Downloading images to your computer . . . . . . . . . . . . . . . . . . . . . . . . . . . . . . . . . 181
Disconnecting the camera from your computer . . . . . . . . . . . . . . . . . . . . . . . . . . . 187
What you can do with the CAMEDIA Master software . . . . . . . . . . . . . . . . . . . . . . 189
00AZ-1ENP1 04.3.25 2:21 PM Page 10

11
Contents
11 Accessories 190
AC adapter . . . . . . . . . . . . . . . . . . . . . . . . . . . . . . . . . . . . . . . . . . . . . . . . . . . . . . . 190
Card . . . . . . . . . . . . . . . . . . . . . . . . . . . . . . . . . . . . . . . . . . . . . . . . . . . . . . . . . . . . 191
12 Miscellaneous 192
Error codes . . . . . . . . . . . . . . . . . . . . . . . . . . . . . . . . . . . . . . . . . . . . . . . . . . . . . . . 192
Troubleshooting . . . . . . . . . . . . . . . . . . . . . . . . . . . . . . . . . . . . . . . . . . . . . . . . . . . 194
Camera maintenance . . . . . . . . . . . . . . . . . . . . . . . . . . . . . . . . . . . . . . . . . . . . . . . 200
Specifications . . . . . . . . . . . . . . . . . . . . . . . . . . . . . . . . . . . . . . . . . . . . . . . . . . . . . 201
Glossary . . . . . . . . . . . . . . . . . . . . . . . . . . . . . . . . . . . . . . . . . . . . . . . . . . . . . . . . . 202
Menu directory . . . . . . . . . . . . . . . . . . . . . . . . . . . . . . . . . . . . . . . . . . . . . . . . . . . . 204
Index. . . . . . . . . . . . . . . . . . . . . . . . . . . . . . . . . . . . . . . . . . . . . . . . . . . . . . . . . . . . 208
00AZ-1ENP1 04.3.25 2:21 PM Page 11

Safety precautions
12
CAUTION: TO REDUCE THE RISK OF ELECTRICAL SHOCK, DO NOT
REMOVE COVER (OR BACK). NO USER-SERVICEABLE PARTS INSIDE.
REFER SERVICING TO QUALIFIED OLYMPUS SERVICE PERSONNEL.
RISK OF ELECTRIC SHOCK
DO NOT OPEN
CAUTION
Lightning flash with an arrowhead,
enclosed in a triangle, alerts you to the
presence of uninsulated voltage points
inside the product which could cause a
serious electrical shock.
WARNING!
TO AVOID THE RISK OF FIRE OR ELECTRICAL SHOCK, NEVER EXPOSE THIS PRODUCT TO
WATER OR OPERATE IN A HIGH HUMIDITY ENVIRONMENT.
An exclamation mark enclosed in a triangle
alerts you to important operating and
maintenance instructions in the
documentation provided with the product.
Read All Instructions — Before you use the product, read all operating instructions. For more
information on accessories such as the lithium ion battery, refer to the manuals provided with
those products.
Save These Instructions — Save all safety and operating instructions for future reference.
Heed Warnings — Read carefully and follow all warning labels on the product and those
described in the instructions.
Follow Instructions — Follow all instructions provided with this product.
Cleaning — Always unplug this product from the wall outlet before cleaning. Use only a damp
cloth for cleaning. Never use any type of liquid or aerosol cleaner, or any type of organic solvent
to clean this product.
Attachments — For your safety, and to avoid damaging the product, use only accessories
recommended by Olympus.
Water and Moisture — Never use this product around water (near a bathtub, kitchen sink, laundry
tub, wet basement, swimming pool or in the rain).
Location — To avoid damage to the product and prevent personal injury, never place this product
on an unstable stand, tripod, bracket, table or cart. Mount only on a stable tripod, stand, or
bracket. Follow the instructions that describe how to safely mount the product, and use only the
mounting devices recommended by the manufacturer.
Power Sources — Connect this product only to the power source described on the product label.
If you are not sure about the type of power supply in your home, consult your local power
company.
Refer to instruction pages for information on using the product with a battery.
Grounding, Polarization — If this product is used with a specified AC adapter, the adapter may
be equipped with a polarized alternating current line plug (a plug with one blade wider than the
other). This safety feature allows the plug to fit into the power outlet only one way. If you cannot
insert the plug into the wall outlet, pull it out, reverse it, and then reinsert it. If the plug still fails to
fit, contact an electrician and have the receptacle replaced.
General precautions
00AZ-1ENP1 04.3.25 2:21 PM Page 12

13
Safety precautions
Protecting the Power Cord — The power supply cord should be placed so it will not be walked
on. Never put a heavy object on the power cord or wrap it around the leg of a table or chair.
Keep the area around the power cord connection points, at the power outlet, and at the product
connection, free of all AC adapter or accessory power cords.
Lightning — If a lightning storm occurs while using a specified AC adapter, remove it from the wall
outlet immediately. To avoid damage from unexpected power surges, always unplug the AC
adapter from the power outlet and disconnect it from the camera when the camera is not in use.
Overloading — Never overload wall outlets, extension cords, power strips, or other power
connection points with too many plugs.
Foreign Objects, Liquid Spillage — To avoid personal injury caused by fire or electrical shock
from contact with internal high voltage points, never insert a metal object into the product. Avoid
using the product where there is a danger of spillage.
Heat — Never use or store this product near any heat source such as a radiator, heat register,
stove, or any type of equipment or appliance that generates heat, including stereo amplifiers.
Servicing — Refer all servicing to qualified personnel. Attempting to remove the covers or
disassemble the product, could expose you to dangerous high voltage points.
Damage Requiring Service — If you notice any of the conditions described below while using a
specified AC adapter, unplug it from the wall outlet and refer servicing to qualified service
personnel:
a) Liquid has been spilled onto the product or some other object has fallen into the product.
b) The product has been exposed to water.
c) The product does not operate normally despite following operating instructions. Adjust only
the controls described in the operating instructions as improper adjustment of other controls
could damage the product and require extensive repair work by a qualified technician.
d) The product has been dropped or damaged in any way.
e) The product exhibits a distinct change in performance.
Replacement Parts — When replacement parts are required, make sure that the service center
uses only parts with the same characteristics as the originals, as recommended by the
manufacturer. Unauthorized substitution of parts could result in fire, electrical shock, or create
other hazards.
Safety Check — Upon completion of servicing or repairs, ask the service technician to perform
safety checks to determine that the product is in good working order.
00AZ-1ENP1 04.3.25 2:21 PM Page 13

15
Safety precautions
CAUTION
Stop using the camera immediately if you notice any unusual odors, noise, or smoke
around it.
●If you notice any unusual odors, noise, or smoke around the camera during operation, switch it
off immediately —and disconnect a specified AC adapter (if attached). Allow the camera to sit
idle for a few minutes to cool. Take the camera outdoors, away from flammable objects, and
carefully remove the battery. Never remove the battery with bare hands, which may cause a fire
or burn your hands. Contact the nearest Olympus service center immediately.
Do not use the camera with wet hands.
●To avoid dangerous electrical shock, never hold or operate the camera with wet hands. Also, do
not connect or disconnect the power plug with wet hands.
Do not leave the camera in places where it may be subject to extremely high
temperatures.
●Doing so may cause parts to deteriorate and, in some circumstances, cause the camera to catch
fire. Do not use the cradle or AC adapter if it is covered (such as a blanket). This could cause
overheating, resulting in fire.
Be careful with the strap.
●Be careful with the strap when you carry the camera. It could easily catch on stray objects —and
cause serious damage.
Use only the AC adapter specified by Olympus.
●Never use any AC adapter except one specified by Olympus. Using a different AC adapter may
damage the camera or power source, or result in accidents or fire. Ensure the adapter used is
designed for your region or country. For more information, contact the nearest Olympus service
center or the store of purchase. Olympus makes no representations or warranties regarding any
damages caused by AC adapters not recommended by Olympus.
Do not damage the power-supply cord.
●Never pull or modify the power-supply cord. Make sure only the plug is securely held during
insertion and removal from the outlet.
Stop using the camera immediately, and contact the nearest Olympus service center or the store
of purchase if:
– The power-supply cord becomes hot, or it gives off smoke or unusual odors.
– The power-supply cord is cut or damaged, or the plug has a faulty contact.
●To protect the high-precision technology contained in this product, never leave the camera in the
places listed below, no matter if in use or storage:
– Places where temperatures and/or humidity are high or go through extreme changes.
Direct sunlight, beaches, locked cars, or near other heat sources (stove, radiator, etc.) or
humidifiers.
– In sandy or dusty environments.
– Near flammable items or explosives.
– In wet places, such as bathrooms or in the rain.
– In places prone to strong vibrations.
●Never drop the camera or subject it to severe shocks or vibrations.
●When mounted on a tripod, adjust the position of the camera with the tripod head. Do not twist
the camera.
●Do not touch electric contacts on cameras.
●Do not leave the camera pointed directly at the sun. This may cause lens damage, color failure,
ghosting on the CCD, or may possibly cause fires.
●Condensation may form inside the camera when there is a sudden extreme change in
temperature (such as when moving from indoors to outdoors). Acclimatize the camera to the
temperature (e.g. by putting the camera into the plastic bag) before use.
Caution for usage environment
00AZ-1ENP1 04.3.25 2:21 PM Page 15

16
Safety precautions
Follow these important guidelines to prevent the battery from leaking, overheating,
burning, exploding, or causing electrical shocks or burns.
Battery handling precautions
DANGER
●This camera uses an lithium ion battery specified by Olympus. Do not use any other type of
battery. Using any other type of battery could result in battery leakage or overheating, posing a
risk of fire or explosion. For safe and proper use, read the battery’s instruction manual carefully
before using it.
●Never heat or incinerate the battery.
●Take precautions when carrying or storing the battery to prevent it from coming into contact with
any metal objects such as jewelry, pins, fasteners, etc.
●Never store the battery where it will be exposed to direct sunlight, or subjected to high
temperatures in a hot vehicle, near a heat source, etc.
●To prevent causing battery leaks or damaging its terminals, carefully follow all instructions
regarding the use of the battery. Never attempt to disassemble the battery or modify it in any
way, by soldering, etc.
●If battery fluid gets into your eyes, flush your eyes immediately with clear, cold running water and
seek medical attention immediately.
●Always store the battery out of the reach of small children. If a child accidentally swallows the
battery, seek medical attention immediately.
WARNING
●Keep the battery dry at all times. Never allow it to come into contact with fresh or salt water.
●If the rechargeable battery has not been recharged within the specified time, stop charging it and
do not use it.
●Do not use the battery if it is cracked or broken.
●If the battery leaks, becomes discolored or deformed, or becomes abnormal in any other way
during operation, stop using the camera and consult your dealer or an authorized Olympus
service center. Continued use may result in fire or electric shock.
●If the battery leaks fluid onto your clothing or skin, remove the clothing and flush the affected
area with clean, running cold water immediately. If the fluid burns your skin, seek medical
attention immediately.
●Never attempt to modify the battery compartment on the camera, never insert anything (other
than the specified battery) into the compartment.
●Never subject the battery to strong shocks or continuous vibration.
CAUTION
●If the battery’s +/– terminals get wet or greasy, camera contact failure may result. Wipe the
battery well with the dry cloth before use.
●Always charge a battery when using it for the first time, or if it has not been used for a long
period.
●The battery may become hot during prolonged use. To avoid minor burns, do not remove it
immediately after using the camera.
●When operating the camera with battery power at low temperatures, try to keep the camera and
spare the battery as warm as possible. The battery which run down at low temperatures may be
restored after it is warmed at room temperature.
●The number of pictures you can take may vary depending on the shooting conditions or battery.
●Before going on a long trip, and especially before traveling abroad, purchase extra batteries.
A recommended battery may be difficult to obtain while traveling.
00AZ-1ENP1 04.3.25 2:21 PM Page 16

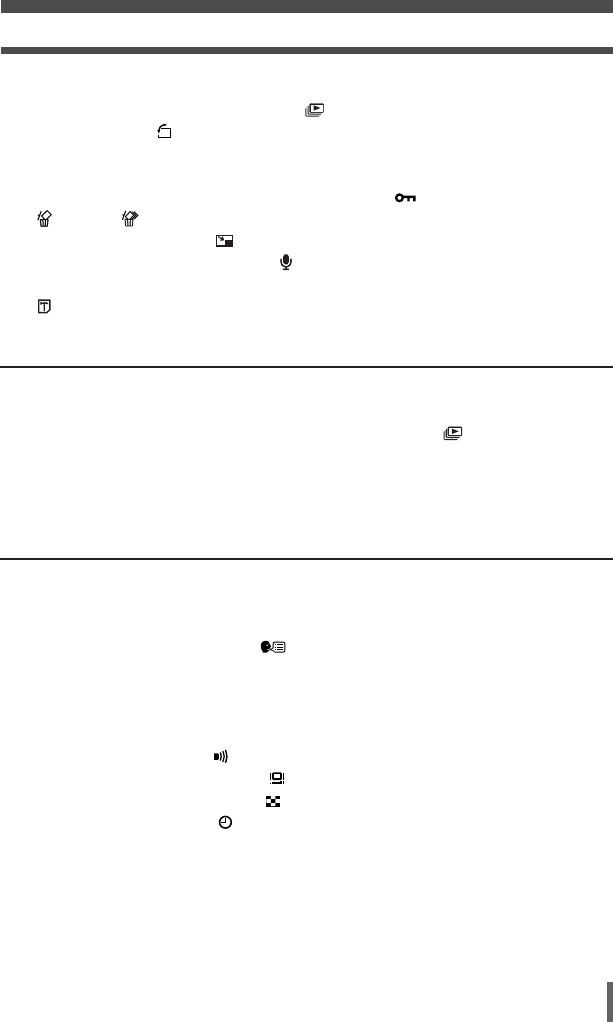
18
Names of parts
Zoom button
(W /T )
~ P. 41
MENU/OK button
~ P. 42
Speaker
BACK/NEXT
button ~ P. 42
Shutter button ~ P. 32
Monitor ~ P. 20, 125 Control dial ~ P. 42
Mode switch ( )
~ P. 30
POWER switch ~ P. 30
Cradle connector
Battery/Card compartment
cover ~ P. 25
Tripod socket
00AZ-1ENP1 04.3.25 2:21 PM Page 18
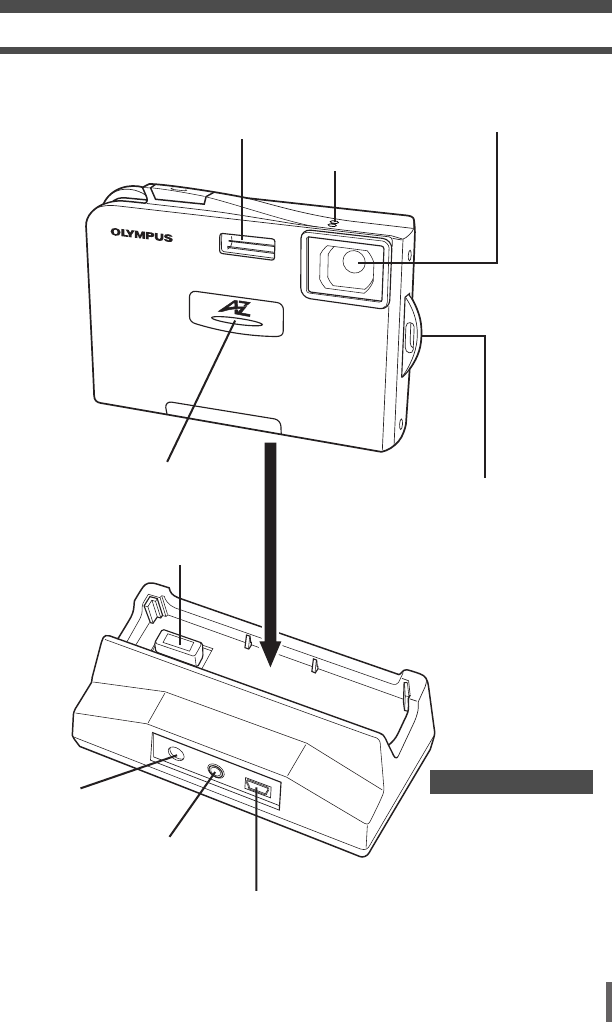
19
Names of parts
Lens
A/V OUT jack
~ P. 87
Connector end
DC-IN jack
~ P. 27
USB connector ~ P. 147, 178
Strap eyelet ~ P. 24
Flash ~ P. 58
Microphone ~ P. 69, 99
Self-timer lamp
~ P. 62
Cradle (provided)
00AZ-1ENP1 04.3.25 2:21 PM Page 19

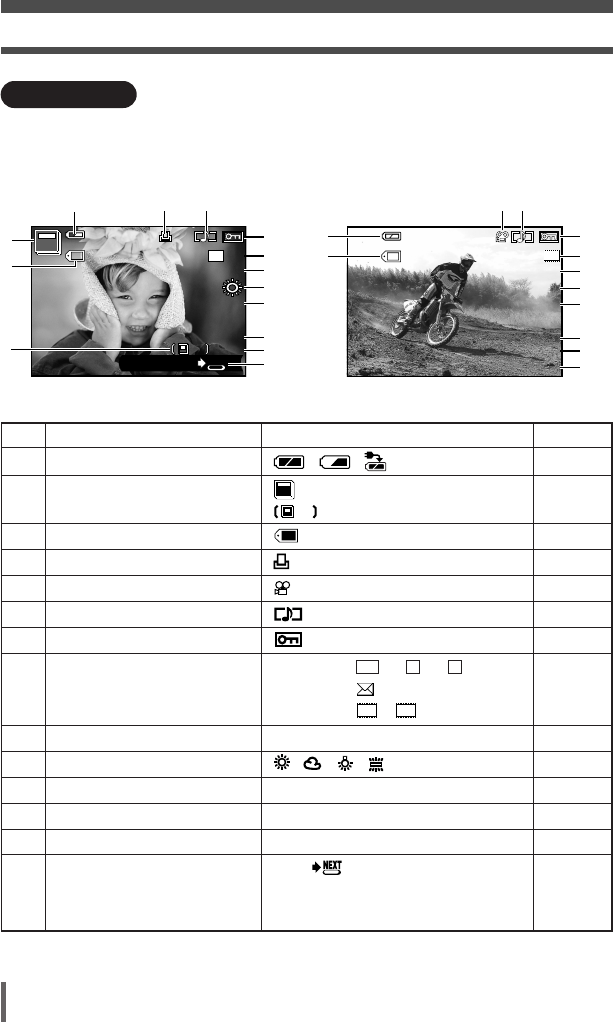
20
Monitor indications
Still picture Movie
W
T
P
2.0
4
5
321
7
8
9
10
14
16
17
18
11
12
13
6
15
SH
3
M
2.0
4
5
6
3
8
9
10 16
15
18
12
13
S
Items Indications Ref. page
1Camera movement warning P. 59
2Flash stand-by/ (Lit) P. 59
Flash charging mark (Blinks)
3Battery check , P. 23
4Shooting modes , , , , , , , P. 42
, , , , , , ,
, , , , , , ,
, ,
5Green lamp P. 32
6Flash mode ,, P. 58
7Self-timer P. 62
8White balance , , , P. 68
9Exposure compensation –2.0 to +2.0 P. 65
10 Metering mode P. 64
11 Sequential shooting mode P. 61
12 Sound record P. 69
13 Record mode Still image : SH 3M, H 2M, B 1M, P. 66
VGA
Movie : ,
E
S
Shooting mode (Screen illustrations below are samples for monitor indications. For details, refer to
respective reference pages.)
00AZ-1ENP1 04.3.25 2:22 PM Page 20

21
Monitor indications
Items Indications Ref. page
14 Zoom P. 41, 60
15 AF target mark [ ] P. 31
16 Card access mark P. 32
17 Memory gauge , , , P. 23
18 Number of storable still pictures 6 P. 67
Remaining movie recording time 05:00 P. 36
00AZ-1ENP1 04.3.25 2:22 PM Page 21
22
Monitor indications
Still image Movie
x 10
SIZE :2048x1536
100–0010
’04.01.01.00:00
10
0.0
10
2
14
7
6
8
9
10
11
12
13
14
3M
FILEFILE
NEXT
SH
10
3
2
JUMP
WB AUTO
1
3
5
7
6
8
9
10
11
12
13
14
’04.01.01.00:00
00:00/56:34
25
0.0
S
SIZE :320x240
100–0025
FILEFILE
Items Indications Ref. page
1Battery check , , P. 23, 27
2Album (Displaying only images in albums) P. 108
(Displaying all images) P. 118
3File number 100-0010 P. 118
4Print reservation, Number of prints X 10 P. 139
5Movie P. 88
6Sound record P. 69
7Protect P. 92
8Record mode Still image : SH 3M, H 2M, B 1M, P. 66
VGA
Movie : ,
9Resolution 2048x1536, 1600x1200 etc. P. 67
10 White balance , , , P. 68
11 Exposure compensation –2.0 to +2.0 P. 65
12 Date/time '04.05.17 15:30 P. 127
13 Frame number 10 P. 110
14 Operation guide JUMP P. 72
Elapsed playback time/Overall 00:00/56:34 P. 88
recording time (movie)
E
S
FILE
10
10
Playback mode
You can select how much information to display on the monitor. Screens when INFO is
set to ON are shown below.
~“INFO — Displaying shooting information on the monitor” (P. 118)
(Screen illustrations below are samples for monitor indications. For details, refer to
respective reference pages.)
00AZ-1ENP1 04.3.25 2:22 PM Page 22
23
Monitor indications
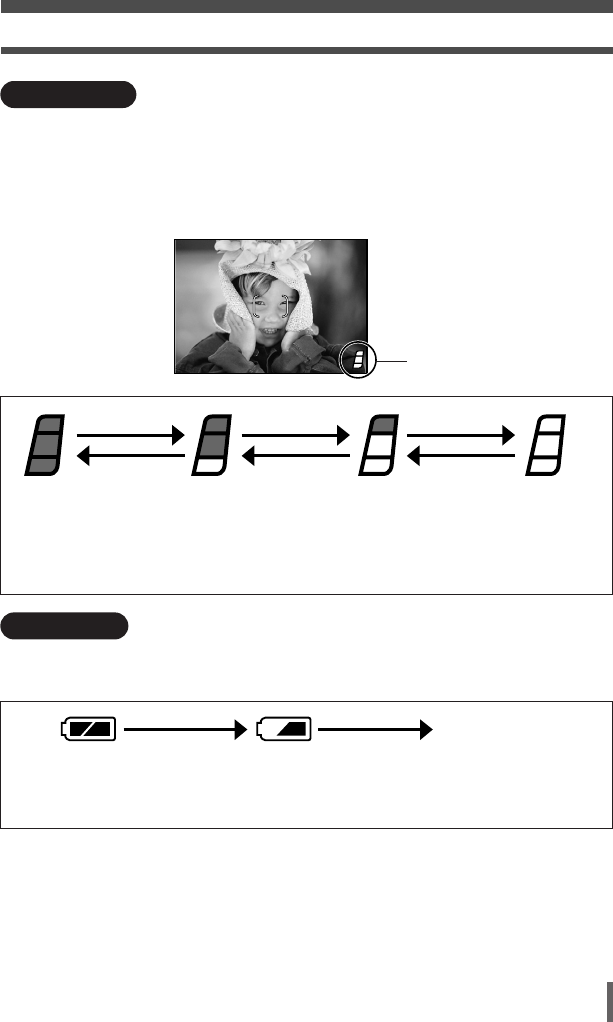
Before
shooting
(Gauge is off)
One picture is taken
(Lit)
No more pictures can
be taken (Fully lit).
Wait until the gauge
returns to the status on
the left to take the next
shot.
Battery check
If the remaining battery power is low, the battery check indication changes as follows
when the camera is turned on or while the camera is in use.
Lights (green)
Remaining power
level: High*
Lights (red)
Remaining power level: Low.
Charge the battery.
* Your digital camera's power consumption varies greatly depending on usage and operating
conditions. Under some operating conditions, the camera may turn off without warning that
battery power is low. If this occurs, re-charge the battery.
Shooting ShootingShooting
Wait
BATTERY EMPTY
is displayed.
Remaining power level:
Exhausted.
Charge the battery.
Memory gauge
Wait
Wait
Memory gauge
The memory gauge lights up when the camera is storing a still picture you have just
taken on the card. The memory gauge indication changes as shown below depending
on the shooting status.
If the memory gauge is fully lit, wait a few seconds until it goes off to take the next
shot.
00AZ-1ENP1 04.3.25 2:22 PM Page 23

1
Getting started
24
Attaching the lens cap and strap
1Getting started
●Do not pull on the strap too hard when it is attached to the camera as this could
break the strap.
●Be careful with the strap when carrying the camera, as the strap can easily
catch on stray objects, causing serious damage.
●Attach the strap correctly as shown above so that the camera does not fall off.
Olympus is not responsible for any damages incurred when the strap is attached
incorrectly and the camera comes off.
Strap precautions
Strap eyelet
Thread the short end of the strap
through the strap eyelet.
Pull on the strap to make sure it
is fastened securely.
Thread the lens cap string through
the lens cap.
Attach the lens cap to
the camera as illustrated.
01AZ-1ENP24 04.3.25 2:24 PM Page 24

1
Getting started
26
Loading the battery
●The factory default date/time settings are restored if the camera is left with no
battery for about 1 day. Be sure to check the date/time settings of the camera
after changing the battery. ~P. 127
●Your digital camera’s power consumption varies greatly depending on usage
and operating conditions. If you use a depleted battery, the camera may power
off without displaying the battery check indication (~P. 23).
Battery precautions
Unloading the battery
Release the latch 34. With the
battery held down, tilt the
camera carefully so that the
battery does not drop from the
camera. Remove the battery 5.
5
6
7
1
3
2
4
Open the battery/card
compartment cover.
Make sure that the monitor is
turned off.
Closing the battery/card
compartment cover locks
the latch.
01AZ-1ENP24 04.3.25 2:24 PM Page 26
27
1
Getting started
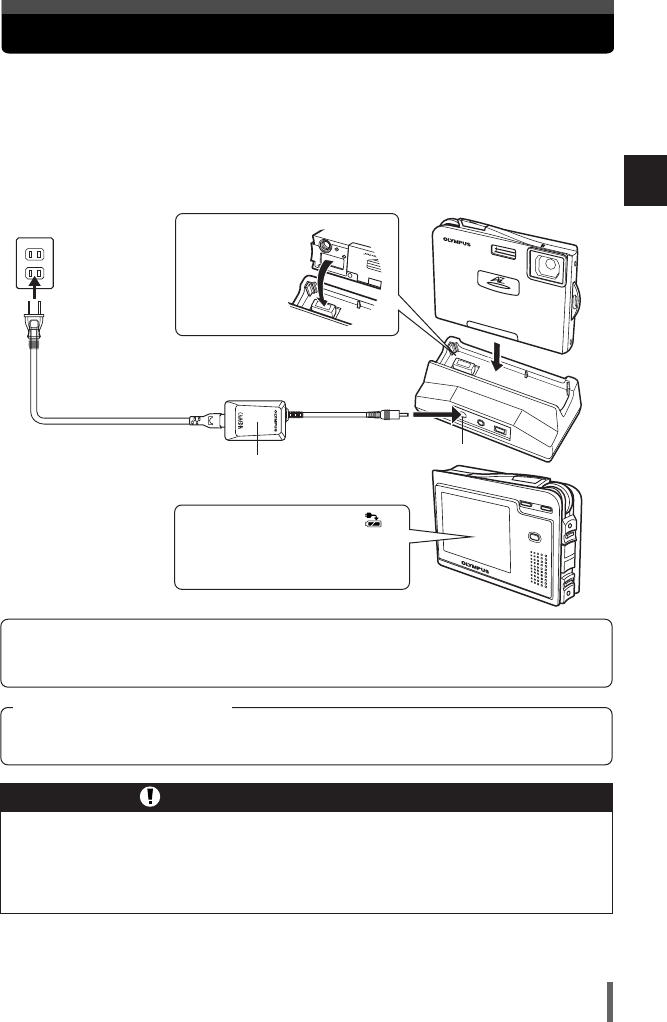
Charging the battery
Align the cradle
connector with
the connector
end on the
cradle.
This camera uses an Olympus lithium-ion battery (LI-20B). Do not use any other type
of battery.
The battery is not fully charged when purchased. Before use, be sure to charge the
battery with the provided cradle and AC adapter.
Charging is performed with the battery loaded in the camera.
The battery check indication
blinks on the monitor while the
battery is charging. Battery
charging takes about 2 hours.
●The camera can also use an optional charger (LI-20C). Do not use any other
type of battery charger than the specified charger.
●Before charging the battery, be sure to read “Safety precautions” (~P. 12)
and “Accessories — AC adapter” (~P. 190).
Precautions on charging the battery
DC-IN jack
To the AC wall outlet
AC plug
AC adapter (provided)
We recommend that you use the AC adapter for any tasks of extended duration such as
downloading images to the PC, printing out images, etc. ~“Accessories — AC adapter”
(P. 190)
Cradle (provided)
When you use the AC adapter overseas, a multiplug is required to allow the plug to fit into local
power outlets. For details on multiplugs, consult a travel agency.
Using the AC adapter overseas
01AZ-1ENP24 04.3.25 2:24 PM Page 27

28
1
Getting started
Inserting the card
“Card” in this manual refers to the xD-Picture Card. The camera uses the card to
record pictures.
Compatible xD-Picture Card: 16 - 512 MB
Index area
Write the card's contents here.
Contact area
The area that touches the camera’s electric
contact points. The camera reads the card here.
Contact area
Make sure that the monitor is turned
off.
Insert the card, making sure that the
card is oriented as shown in the
illustration.
Monitor
1
2
•Insert the card while keeping it
straight.
•When the card is inserted all the
way, it stops with a click.
•Inserting the card the wrong way
or at an angle could damage the
contact area or cause the card to
jam.
•If the card is not inserted all the
way, data may not be written to the
card.
Notch
01AZ-1ENP24 04.3.25 2:24 PM Page 28

1
Getting started
29
Inserting the card
Removing the card
Be sure to read “Accessories — Card” (~P. 191).
Card precaution
1
2
Make sure that the camera is turned off.
Push the card all the way to unlock it,
then let it return slowly.
Hold the card straight and pull it out.
The card may eject forcefully if you
take your finger off it immediately
after pushing it or if you flick it with
your fingers.
01AZ-1ENP24 04.3.25 2:24 PM Page 29

30
1
Getting started
Power on/off
Now, you are ready for shooting. Let's take some pictures. ~P. 3 1
Monitor
Power on T Turns on the monitor.
Power off T Turns off the monitor.
1
Lens cap
Remove this when taking
pictures.
When the camera is
turned on, the camera’s
front lamp lights for a
moment.
Mode switch
: Select this for still pictures
shooting.
: Select this for movie
shooting.
: Select this for playback.
2
POWER switch
Turns the camera on and off.
* Check the date/time settings when the
camera is turned on.
~“Setting the date and time” (P. 127)
3
The camera automatically turns off to save power if it is not operated for about 10
minutes. When the AC adapter is used, the camera does not switch off automatically.
01AZ-1ENP24 04.3.25 2:24 PM Page 30

32
Taking still pictures
2
Shooting
Adjust the focus.
Press the shutter button gently (halfway).
Release the shutter.
Press the shutter button all the way (fully).
•When the focus and exposure are
locked, the green lamp lights
steadily.
•The (flash stand-by) mark
lights when the flash fires.
•When a picture is taken, a shutter
sound is output.
•The (card access) mark blinks
and the camera starts recording
the picture.
•Press the shutter button gently. If it
is pressed hard, the camera may
move and pictures may come out
blurred.
To check the picture immediately
after shooting:
~“REC VIEW — Checking the
picture immediately after shooting”
(P. 117)
P
SH
3
M
Green lamp ~P. 38
Flash stand-by/Flash
charging mark ~P. 59
P
SH
3
M
Card access mark ~P. 33
02AZ-1ENP31 04.3.25 2:25 PM Page 32

33
Taking still pictures
2
Shooting
●The camera automatically turns off after 10 minutes if it is not operated. Press
the POWER switch to turn on the camera.
●Never remove the battery, card or AC adapter while the mark is blinking.
Doing so could destroy stored pictures and prevent storage of pictures you have
just taken.
●When taking pictures against strong backlight, the area of the picture in shadow
may appear colored.
●When you point the lens toward a bright object, vertical lines (smears) may
appear on the monitor. However, this does not affect the actual recorded
pictures.
Notes on shooting
TYou are too close to the subject. Take the picture at least 50 cm (19.7") away
from the subject, or try macro shooting (~P. 48) or super macro shooting
(~P. 48).
TThe subject is out of focus. Depending on the subject, focus may not be possible.
~“If correct focus cannot be obtained” (P. 38)
If the green lamp blinks when the shutter button is pressed halfway
02AZ-1ENP31 04.3.25 2:25 PM Page 33

34
Taking still pictures
2
Shooting
Specifying the type of scene
You can capture a high-quality picture in any shooting situation by choosing one of the
various shooting modes provided with this camera.
LANDSCAPE ~P. 45 LANDSCAPE+PORTRAIT
~P. 45
NIGHT SCENE ~P. 45
NIGHT+PORTRAIT
~P. 46
INDOOR ~P. 46 FIREWORKS ~P. 46
SUNSET ~P. 47 PORTRAIT ~P. 47 SELF PORTRAIT ~P. 47
MACRO ~P. 48 SUPER MACRO ~P. 48 CUISINE ~P. 48
02AZ-1ENP31 04.3.25 2:25 PM Page 34

35
Taking still pictures
2
Shooting
DOCUMENTS ~P. 49 MUSEUM ~P. 49 SPORT ~P. 49
BEACH & SNOW ~P. 50 SELF PORTRAIT+
SELF TIMER ~P. 50
CANDLE ~P. 50
AVAILABLE LIGHT
PORTRAIT ~P. 51
BEHIND GLASS ~P. 51 2 IN 1 ~P. 52
PANORAMA ~P. 53
02AZ-1ENP31 04.3.25 2:25 PM Page 35
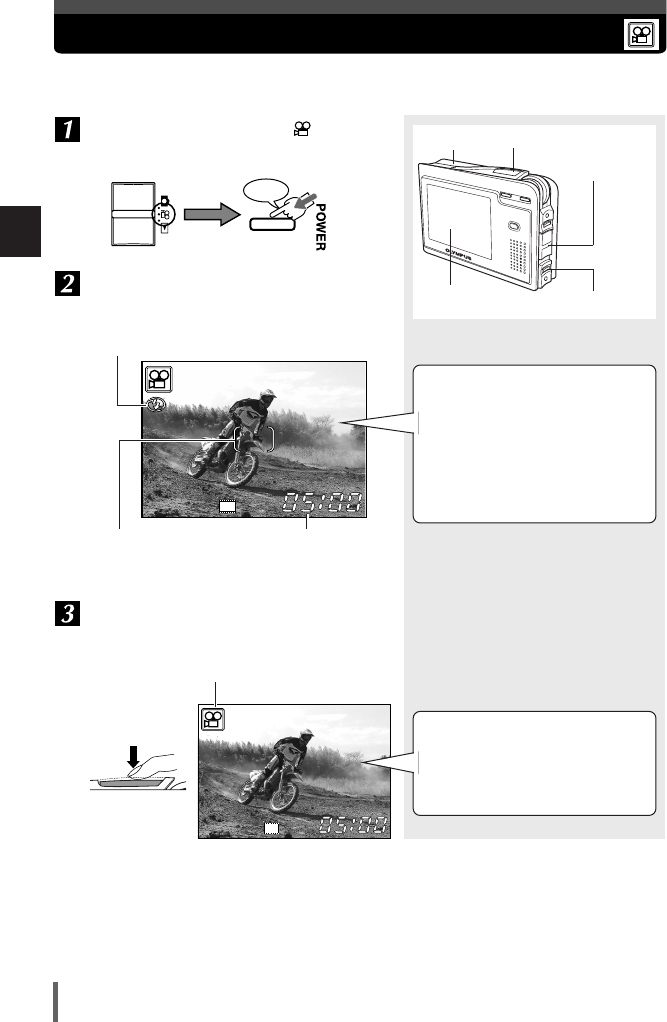
Movie recording
36
2
Shooting
Turn on the camera in the mode.
~P. 30
Compose your shot while viewing the
monitor.
Start recording.
Press the shutter button fully.
You can record movies and sound simultaneously.
Press
Mode switch
Shutter button
POWER switch
Monitor
AF target mark
~P. 39
Remaining movie
recording time
(hour: min. : sec.)
Flash cannot be used.
S
Microphone
•The subject can be magnified
using the zoom button.
~“Zoom” (P. 41)
•The remaining recording time
depends on the selected record
mode, free space available on the
card, etc. ~“Selecting the
record mode” (P. 66)
S
Displayed in red during recording
Focus and optical zoom are
locked during movie recording, but
digital zoom can be used.
~“DIGITAL ZOOM — Using the
digital zoom” (P. 60)
02AZ-1ENP31 04.3.25 2:25 PM Page 36

If correct focus cannot be obtained
38
2
Shooting
Subjects that are difficult to focus on
Under the following conditions, auto focus may not work properly.
The green lamp blinks:
The subject cannot be
brought into focus.
Subjects with low contrast Subjects in excessively bright
light in the center of the frame
Subjects with no vertical lines
The green lamp lights,
but the subject cannot
be brought into focus.
Subjects with different
distances
Fast-moving subjects The subject you are focusing
on is not in the center of the
frame.
If this happens, focus on a high-contrast object the same distance away as the
intended subject, recompose your shot and then take the picture. If the subject has no
vertical lines, hold the camera vertically and adjust the focus, then return the camera to
the horizontal position to take the picture.
“Determine the position of the subject after focusing (Focus Lock)” ~P. 39
02AZ-1ENP31 04.3.25 2:25 PM Page 38

Mode switch
Shutter button
POWER switch
39
If correct focus cannot be obtained
2
Shooting
Turn on the power in the mode.
Position the AF target mark on the
subject you want to focus on.
Press
Monitor
P
SH
3
M
Determine the position of the subject after focusing (Focus Lock)
When the subject you want to focus on is not in the center of the frame and you cannot
position the AF target mark on it, you can focus the camera on another point at roughly
the same distance (focus lock) and take the picture as explained below.
AF target mark
02AZ-1ENP31 04.3.25 2:26 PM Page 39

3
Using the situation-related shooting modes
42
3 Using the situation-related shooting modes
Turn on the camera in the mode.
Display the menu.
In addition to the basic shooting mode (Program Auto), more than 20 different
shooting modes are available to suit a wide range of shooting situations. The camera
automatically optimizes the settings for the shooting conditions and provides the
effects you want.
Press
SCENE SELECT
FLASH MODE
OFF
AUTO
RESET
PP
SH
3M
EXIT SELECT
GO
BACK
OK
Mode switch
Control dial
POWER switch
BACK/NEXT
button
A white frame shows the currently
selected item.
MENU/OK button
MENU/OK
Press
The operation guide is displayed.
EXIT
BACK
BACK/NEXT
Press
Returns to the previous menu screen.
(Exits the step menu screen.)
SELECT
Rotate to select
Selects the item.
GO
OK
MENU/OK
Press to confirm
Confirms your selection.
03AZ-1ENP42 04.3.25 3:17 PM Page 42

3
Using the situation-related shooting modes
43
Make sure SCENE SELECT is selected,
and confirm it.
Select SCENE.
PROGRAM AUTO
SCENE
SCENE SELECT
P
EXIT SELECT
GO
BACK
OK
To return to the basic shooting
mode (Program Auto), select
PROGRAM AUTO.
PROGRAM AUTO
SCENE
SCENE SELECT
P
EXIT SELECT
GO
BACK
OK
Rotate to
select
MENU/OK
Press
MENU/OK
Press
PROGRAM AUTO shooting
The camera automatically optimizes
settings to match the shooting
conditions. This is the basic
shooting mode suited for any
shooting situation.
03AZ-1ENP42 04.3.25 3:17 PM Page 43

3
Using the situation-related shooting modes
45
LANDSCAPE
Suitable for shooting landscapes and other
outdoor scenes.
LANDSCAPE+PORTRAIT
Suitable for shooting both main subject and
background.
NIGHT SCENE
Suitable for shooting images of outdoor
scenes in the evening or at night.
Usually a street at night makes a dark
image with only the sparkle of lights such as
street lamps due to the lack of brightness.
This mode allows you to capture the true
appearance of the street.
•Since the shutter speed is slow, be sure to
stabilize the camera by using a tripod.
03AZ-1ENP42 04.3.25 3:17 PM Page 45

3
Using the situation-related shooting modes
47
SUNSET
Suitable for taking sunset pictures.
Vivid red and yellow color reproduction.
•The flash cannot be used.
PORTRAIT
Suitable for shooting a portrait-style image
of a person.
SELF PORTRAIT
Allows you to take a picture of yourself while
holding the camera. The focus is locked on
you (shooter).
•Zoom position is fixed at W.
03AZ-1ENP42 04.3.25 3:17 PM Page 47

3
Using the situation-related shooting modes
49
DOCUMENTS
Suitable for shooting documents, etc.
Increases contrast between letters and
background.
•The flash cannot be used.
MUSEUM
For shooting with no beep sound and flash.
Useful in art gallery, museum, etc.
•SUPER HIGH and HIGH cannot be selected.
~"Selecting the record mode" (P. 66)
SPORT
Suitable for capturing fast-moving action
without blurring.
03AZ-1ENP42 04.3.25 3:17 PM Page 49

3
Using the situation-related shooting modes
50
BEACH & SNOW
Suitable for shooting snow-capped
mountain landscapes, white sand beaches,
seascapes, etc.
SELF PORTRAIT+SELF TIMER
Useful when shooting pictures while
traveling. Use the self-timer to take a picture
of yourself and the background.
•AF MODE cannot be set to SPOT.
~“AF MODE — Changing the focus range”
(P. 63)
CANDLE
Suitable for shooting under candlelight.
Warm colors are reproduced.
•The flash cannot be used.
•SUPER HIGH and HIGH cannot be selected.
~“Selecting the record mode” (P. 66)
03AZ-1ENP42 04.3.25 3:17 PM Page 50
3
Using the situation-related shooting modes
52
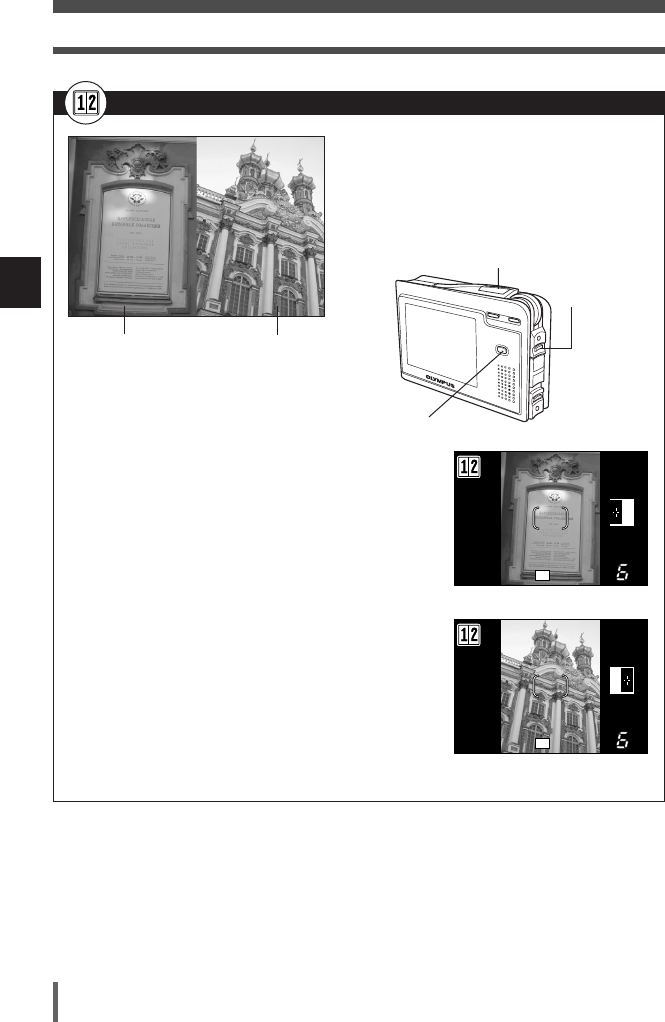
2 IN 1
Allows you to combine two pictures taken in
succession and store them as a single
picture.
•Sequential shooting is not possible.
•Self-timer shooting and sound recording are not
available.
1Select 2 IN 1. ~P. 42
2Take the first shot.
•The subject will be on the left in the combined
image.
•To cancel the first shot, press BACK/NEXT.
3Take the second shot in succession.
•The pictures are combined and stored as a single
picture.
•The subject will be on the right in the combined
image.
•To exit the 2-IN-1 shooting mode, press MENU/OK
and select another situation-related shooting mode
in the menu. ~P. 42
First shot Second shot
BACK/NEXT
button
SH
3
M
1st
SH
3
M
2nd
Shutter button
MENU/OK button
03AZ-1ENP42 04.3.25 3:17 PM Page 52
3
Using the situation-related shooting modes
53
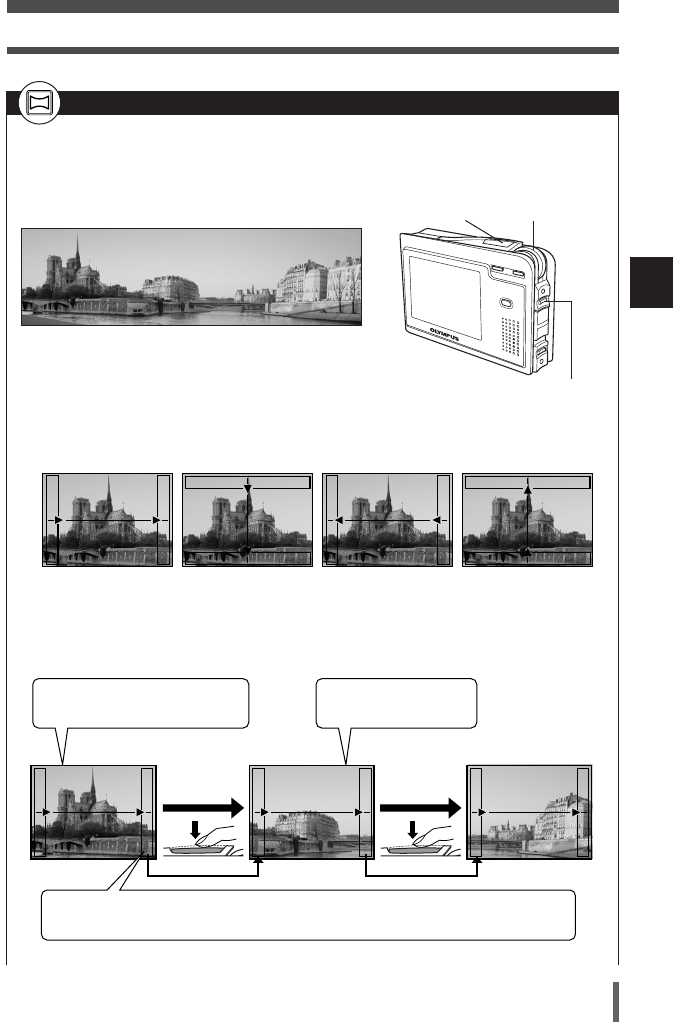
PANORAMA
You can take advantage of panorama shooting when you use an Olympus
xD-Picture Card. Pictures with overlapping edges can be connected to form
a single panoramic image with CAMEDIA Master software (included on the
provided CD-ROM).
1Select PANORAMA. ~P. 4 2
2Use the control dial to select the direction you
want the images connected.
•Frames and arrows appear in the corresponding direction.
3Make sure that the edges of images overlap, then take your pictures.
•Panorama shooting is possible for up to 10 pictures.
First shot Second shot Third shot
Focus, exposure and white balance
are set by the first shot.
Keeping the area in the frame at the edge of the screen in mind, position the camera so that
the same area appears in the frame for the next image.
Zooming is not possible
after the first shot.
Example: When connecting images from left to right.
BACK/NEXT button
Control dial
Left to Right Top to Bottom Right to Left Bottom to Top
Shutter button
03AZ-1ENP42 04.3.25 3:17 PM Page 53

3
Using the situation-related shooting modes
54
4Press BACK/NEXT to finish panorama shooting.
•The camera is ready to take another set of panorama shots.
•To exit the PANORAMA shooting mode, press MENU/OK and select another situation-
related shooting mode in the menu. ~P. 42
•Panorama shooting is possible only when using the Olympus CAMEDIA-brand card.
•If SUPER HIGH or HIGH is selected, there may be cases where there is not enough
memory to process the images on your computer. It is recommended to use BASIC or E-
MAIL for panorama shooting. ~“Selecting the record mode” (P. 66).
•The following functions are not available during panorama shooting: flash shooting,
sequential shooting, self-timer shooting, sound recording
03AZ-1ENP42 04.3.25 3:18 PM Page 54
57
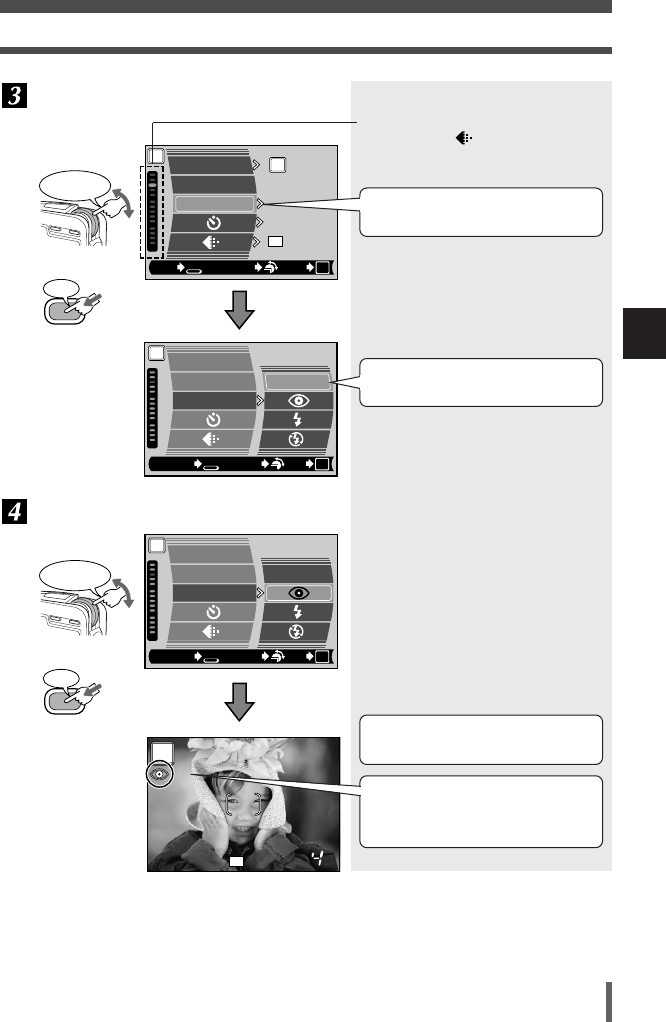
Selecting functions from the shooting menu
4
Using the advanced shooting functions
SCENE SELECT
FLASH MODE
OFF
AUTO
RESET
PP
SH
3M
EXIT SELECT
GO
BACK
OK
P
AUTO
SCENE SELECT
FLASH MODE
RESET
CANCEL SELECT
GO
BACK
OK
Rotate to
select
MENU/OK
Press
Indicates that there are more menu
items following .
A white frame shows the currently
selected item.
The options for the selected item are
displayed.
Select the item.
Select the option and confirm it.
P
AUTO
SCENE SELECT
FLASH MODE
RESET
CANCEL SELECT
GO
BACK
OK
P
P
SH
3
M
Rotate to
select
The menu screen disappears and
the shooting screen appears.
The icon corresponding to the setting
is displayed. (The red-eye reduction
icon is displayed here.)
MENU/OK
Press
04AZ-1ENP55 04.3.25 2:27 PM Page 57

●When using a situation-related shooting mode (~P. 45), the flash may not be
used.
●The flash cannot be used during movie recording. ~P. 36
●When there is a likelihood that camera movement will occur in the flash off
mode, the (camera movement warning) mark blinks. Use the flash.
Red-eye reduction flash ()
●The red-eye reduction flash cannot be used during sequential shooting.
~P. 61
●After the pre-flash, it takes approximately 1 second before the shutter is
released. Hold the camera firmly after the pre-flash to prevent camera
movement.
●Effectiveness may be limited if the subject is not looking directly at the pre-
flashes, or if the shooting range is too far. Individual physical characteristics may
also limit effectiveness.
Fill-in flash ()
●Fill-in flash may not have the desired effect under excessively bright light.
Flash off ()
●Since a slow shutter speed is automatically selected in low-light situations when
in the flash off mode, the use of a tripod is recommended to prevent your
pictures from being blurred by camera movement.
59
Selecting functions from the shooting menu
4
Using the advanced shooting functions
Select FLASH MODE in the menu, then
select the flash mode. ~P. 55
Press the shutter button halfway.
Press the shutter
button all the way
down (fully) to take
the picture.
Flash working range
W (max.) : Approx. 0.3 m - 3.6 m
(1.0 ft - 11.8 ft)
T (max.) : Approx. 0.3 m - 2.0 m
(1.0 ft - 6.6 ft)
Shutter button Control dial
P
P
SH
3
M
The icon of the
selected flash mode
The (flash stand-by) mark lights
when the flash is ready to fire. If the
mark is blinking, the flash is charging.
Wait until charging is complete.
Half press
Full press
Notes on flash
BACK/NEXT
button
MENU/OK button
04AZ-1ENP55 04.3.25 2:27 PM Page 59

61
Selecting functions from the shooting menu
4
Using the advanced shooting functions
Sequential shooting
You can shoot pictures sequentially. In the SUPER HIGH record mode, approximately 3
frames can be shot in sequence.
Select in the menu, then select ON.
~P. 55
Take pictures.
ON
OFF
WB
METERING
P
CANCEL SELECT
GO
BACK
OK
DIGITAL ZOOM
The camera takes pictures in
sequence while the shutter button is
being pressed down. Releasing the
shutter button stops sequential
shooting.
Focus and exposure are locked
at the first shot.
White balance is adjusted for each shot.
Rotate to
select
MENU/OK
Press to confirm
●Sequential shooting is not possible depending on which situation-related shooting
mode is selected.
●Sound recording is not available during sequential shooting.
Notes on sequential shooting
Shutter button Control dial
BACK/NEXT
button
MENU/OK button
04AZ-1ENP55 04.3.25 2:28 PM Page 61
Produktspezifikationen
| Marke: | Olympus |
| Kategorie: | Digitalkamera |
| Modell: | Camedia AZ-1 |
Brauchst du Hilfe?
Wenn Sie Hilfe mit Olympus Camedia AZ-1 benötigen, stellen Sie unten eine Frage und andere Benutzer werden Ihnen antworten
Bedienungsanleitung Digitalkamera Olympus

6 Juli 2024
6 Juli 2024
6 Juli 2024
6 Juli 2024
6 Juli 2024
6 Juli 2024
6 Juli 2024
Bedienungsanleitung Digitalkamera
- Digitalkamera Samsung
- Digitalkamera BenQ
- Digitalkamera Gembird
- Digitalkamera Genius
- Digitalkamera HP
- Digitalkamera Lexibook
- Digitalkamera Medion
- Digitalkamera Sony
- Digitalkamera Tevion
- Digitalkamera Trust
- Digitalkamera Panasonic
- Digitalkamera Bosch
- Digitalkamera Canon
- Digitalkamera Powerfix
- Digitalkamera Maginon
- Digitalkamera Technaxx
- Digitalkamera Denver
- Digitalkamera Renkforce
- Digitalkamera GE
- Digitalkamera Aiptek
- Digitalkamera Ingo
- Digitalkamera ODYS
- Digitalkamera Polaroid
- Digitalkamera JVC
- Digitalkamera Motorola
- Digitalkamera Xiaomi
- Digitalkamera Toshiba
- Digitalkamera GOCLEVER
- Digitalkamera Lamax
- Digitalkamera Bushnell
- Digitalkamera Casio
- Digitalkamera A-rival
- Digitalkamera Epson
- Digitalkamera Fujifilm
- Digitalkamera MINOX
- Digitalkamera Nikon
- Digitalkamera Ricoh
- Digitalkamera Sigma
- Digitalkamera Targa
- Digitalkamera BML
- Digitalkamera Guardo
- Digitalkamera EnVivo
- Digitalkamera Vtech
- Digitalkamera Kodak
- Digitalkamera Agfa
- Digitalkamera Easypix
- Digitalkamera Leica
- Digitalkamera Minolta
- Digitalkamera Nytech
- Digitalkamera Pentax
- Digitalkamera Praktica
- Digitalkamera Revue
- Digitalkamera Rollei
- Digitalkamera SeaLife
- Digitalkamera Traveler
- Digitalkamera Geonaute
- Digitalkamera Duramaxx
- Digitalkamera Fuji
- Digitalkamera Konica
- Digitalkamera Umax
- Digitalkamera Jobo
- Digitalkamera Somikon
- Digitalkamera TomTom
- Digitalkamera Kyocera
- Digitalkamera AEE
- Digitalkamera GoPro
- Digitalkamera Quintezz
- Digitalkamera ION
- Digitalkamera Pulsar
- Digitalkamera DNT
- Digitalkamera RadioShack
- Digitalkamera FLIR
- Digitalkamera Oregon Scientific
- Digitalkamera General Electric
- Digitalkamera Insta360
- Digitalkamera Digital Blue
- Digitalkamera Drift
- Digitalkamera Ematic
- Digitalkamera Guide
- Digitalkamera Kompernass - Lidl
- Digitalkamera Konig Electronic
- Digitalkamera Liquid Image
- Digitalkamera Magpix
- Digitalkamera Mustek
- Digitalkamera Plawa
- Digitalkamera Qware
- Digitalkamera Red
- Digitalkamera Sakar
- Digitalkamera Sipix
- Digitalkamera Spypoint
- Digitalkamera Storex
- Digitalkamera Veho
- Digitalkamera Vivitar
- Digitalkamera Voigtlaender
- Digitalkamera Wanscam
- Digitalkamera WASPcam
- Digitalkamera Yakumo
- Digitalkamera AgfaPhoto
- Digitalkamera Beha-Amprobe
- Digitalkamera Argus
- Digitalkamera BlackVue
- Digitalkamera Brinno
- Digitalkamera Apeman
- Digitalkamera Bolyguard
Neueste Bedienungsanleitung für -Kategorien-

23 September 2024
23 September 2024

22 September 2024
19 September 2024
18 September 2024
17 September 2024
17 September 2024

17 September 2024
17 September 2024
27 August 2024