Nokia 6019i Bedienungsanleitung
Nokia
Smartphone
6019i
Lesen Sie kostenlos die 📖 deutsche Bedienungsanleitung für Nokia 6019i (241 Seiten) in der Kategorie Smartphone. Dieser Bedienungsanleitung war für 6 Personen hilfreich und wurde von 2 Benutzern mit durchschnittlich 4.5 Sternen bewertet
Seite 1/241

User Guide

1 Copyright © Nokia 2004
Nokia 6012, Nokia 6015, Nokia
6015i, and Nokia 6019i User Guide
931169X26
Issue 1

2 Copyright © Nokia 2004
Part No. 9311692, Issue No. 1
Copyright ©2004 Nokia. All rights reserved.
Nokia, Nokia Connecting People, Nokia 6012, Nokia 6015, Nokia 6015i, Nokia 6019i, Xpress-on, Pop-
Port, and the Nokia Original Enhancements logos are trademarks or registered trademarks of Nokia
Corporation. Other company and product names mentioned herein may be trademarks or trade
names of their respective owners.
Printed in Canada 7/2004
US Patent No 5818437 and other pending patents. T9 text input software Copyright ©1999-2004.
Tegic Communications, Inc. All rights reserved.
Includes RSA BSAFE cryptographic or security protocol software from
RSA Security.
Java is a trademark of Sun Microsystems, Inc.
The information contained in this user guide was written for the Nokia 6012, Nokia 6015, Nokia
6015i, Nokia 6019i products. Nokia operates a policy of ongoing development. Nokia reserves the
right to make changes to any of the products described in this document without prior notice.
UNDER NO CIRCUMSTANCES SHALL NOKIA BE RESPONSIBLE FOR ANY LOSS OF DATA OR INCOME
OR ANY SPECIAL, INCIDENTAL, AND CONSEQUENTIAL OR INDIRECT DAMAGES HOWSOEVER
CAUSED.
THE CONTENTS OF THIS DOCUMENT ARE PROVIDED “AS IS.” EXCEPT AS REQUIRED BY APPLICABLE
LAW, NO WARRANTIES OF ANY KIND, EITHER EXPRESS OR IMPLIED, INCLUDING, BUT NOT LIMITED
TO, THE IMPLIED WARRANTIES OF MERCHANTABILITY AND FITNESS FOR A PARTICULAR PURPOSE,
ARE MADE IN RELATION TO THE ACCURACY AND RELIABILITY OR CONTENTS OF THIS DOCUMENT.
NOKIA RESERVES THE RIGHT TO REVISE THIS DOCUMENT OR WITHDRAW IT AT ANY TIME WITHOUT
PRIOR NOTICE.
Export Controls
This device may contain commodities, technology or software subject to export laws and regulations
from the US and other countries. Diversion contrary to law is prohibited.
FCC/Industry Canada Notice
Your phone may cause TV or radio interference (for example, when using a telephone in close
proximity to receiving equipment). The FCC or Industry Canada can require you to stop using your
telephone if such interference cannot be eliminated. If you require assistance, contact your local
service facility. This device complies with part 15 of the FCC rules. Operation is subject to the
condition that this device does not cause harmful interference.

3 Copyright © Nokia 2004
Table of Contents
Table of Contents
For your safety........................................................................................................................ 4
1. Phone at a glance ........................................................................................................... 9
2. Set up your phone........................................................................................................ 13
3. Text entry ....................................................................................................................... 22
4. Contacts list ................................................................................................................. 25
5. Messages (Menu 1) ..................................................................................................... 32
6. Call log (Menu 2) ......................................................................................................... 43
7. Profiles (Menu 3).......................................................................................................... 48
8. Settings (Menu 4) ........................................................................................................ 50
9. Gallery (Menu 5) .......................................................................................................... 69
10. Games (Menu 6)........................................................................................................... 70
11. Voice (Menu 7) ............................................................................................................. 71
12. Minibrowser (Menu 8)................................................................................................ 75
13. Organiser (Menu 9)...................................................................................................... 77
14. Applications (Menu 10).............................................................................................. 86
15. PC Connectivity............................................................................................................ 87
16. Enhancements.............................................................................................................. 88
17. Reference information ............................................................................................... 90
Care and maintenance ...................................................................................................... 91
Additional safety information......................................................................................... 92
Nokia One-Year Limited Warranty............................................................................... 113

4 Copyright © Nokia 2004
For your safety
Read these simple guidelines. Not following them may be dangerous or illegal. Read the
complete user guide for further information.
SWITCH ON SAFELY
Do not switch the phone on when wireless phone use is prohibited or when it
may cause interference or danger.
ROAD SAFETY COMES FIRST
Obey all local laws. Always keep your hands free to operate the vehicle while
driving. Your first consideration while driving should be road safety.
INTERFERENCE
All wireless phones may be susceptible to interference, which could affect
performance.
SWITCH OFF IN HOSPITALS
Follow any restrictions. Switch the phone off near medical equipment.
SWITCH OFF IN AIRCRAFT
Follow any restrictions. Wireless devices can cause interference in aircraft.
SWITCH OFF WHEN REFUELING
Don't use the phone at a refuelling point. Don't use near fuel or chemicals.
SWITCH OFF NEAR BLASTING
Follow any restrictions. Don’t use the phone where blasting is in progress.
USE SENSIBLY
Use only in the normal position as explained in the product documentation.
Don't touch the antenna unnecessarily.
QUALIFIED SERVICE
Only qualified personnel may install or repair this product.
ENHANCEMENTS AND BATTERIES
Use only approved enhancements and batteries. Do not connect
incompatible products.

5 Copyright © Nokia 2004
For your safety
WATER-RESISTANCE
Your phone is not water-resistant. Keep it dry.
BACKUP COPIES
Remember to make back-up copies or keep a written record of all important
information stored in your phone.
CONNECTING TO OTHER DEVICES
When connecting to any other device, read its user guide for detailed safety
instructions. Do not connect incompatible products.
EMERGENCY CALLS
Ensure the phone is switched on and in service. Press the End key as many
times as needed to clear the display and return to the main screen. Enter the
emergency number, then press the Talk key. Give your location. Do not end
the call until given permission to do so.

6 Copyright © Nokia 2004
Welcome
Congratulations on your purchase of the Nokia 6012, Nokia 6015, Nokia 6015i, or Nokia
6019i mobile phone. Your phone provides many functions which are practical for daily
use, such as a hands-free loudspeaker, alarm clock, calculator, calendar, and more. Your
phone can also connect to a PC, laptop, or other device using a data cable. To
personalize your phone, you can set your favorite ring tones or select an Xpress-on
TM
color cover.
■About your device
The Nokia 6012 wireless phone described in this guide is approved for use on the CDMA
800 and AMPS networks. The Nokia 6015, Nokia 6015i, and Nokia 6019i wireless
phones described in this guide are approved for use on the CDMA 800, CDMA 1900,
and AMPS networks.
Contact your service provider for more information about networks.
When using the features in this device, obey all laws and respect privacy and legitimate
rights of others.
Warning: To use any features in this device, other than the alarm clock, the
phone must be switched on. Do not switch the device on when wireless phone
use may cause interference or danger.
■Network services
To use the phone you must have service from a wireless service provider. Many of the
features in this device depend on features in the wireless network to function. These
network services may not be available on all networks or you may have to make specific
arrangements with your service provider before you can utilize network services. Your
service provider may need to give you additional instructions for their use and explain
what charges will apply. Some networks may have limitations that affect how you can
use network services. For instance, some networks may not support all
language-dependent characters and services.
Your service provider may have requested that certain features be disabled or not
activated in your device. If so, they will not appear in your device menu. Contact your
service provider for more information.

7 Copyright © Nokia 2004
Welcome
■Shared memory
The following features in this device may share memory: contacts, text messages,
images, and tones in gallery, calendar notes, games, and applications. Use of one or
more of these features may reduce the memory available for the remaining features
sharing memory. Your phone may display a message that the memory is full when
you try to use a shared memory feature. In this case, delete some of the information
or entries stored in the shared memory features before continuing. Some of the
features, such as images, tones in gallery, text messages, and applications may have
a certain memory specially allotted to them in addition to the memory shared with
other features.
■Get help
Find your phone label
If you need help, Nokia Customer Care is available
for assistance. Before calling, we recommend that
you write down the following information and
have it available:
• Electronic serial number (ESN)
• Your zip code
The ESN is found on the type label, which is
located beneath the battery on the back of the phone. See Remove the back cover, 14
and Remove the battery, 14 for more information.

8 Copyright © Nokia 2004
Contact Nokia
Please have your product with you when contacting either of the numbers below:
Nokia Customer Care Center, USA
Nokia Inc.
7725 Woodland Center Boulevard, Suite #150
Tampa, Florida 33614
Tel: 1-888-NOKIA-2U (1-888-665-4228)
Fax: 1-813-249-9619
TTY/TDD users: 1-800-24-NOKIA (1-800-246-6542)
Customer Care Center, Canada
Nokia Products Ltd.
601 Westney Road South
Ajax, Ontario L1S 4N7
Tel: 1-888-22-NOKIA (1-888-226-6542)
Fax: 1-905-427-1070
Updates
From time to time, Nokia updates this guide to reflect changes. The latest version
may be available at www.nokia.com. An interactive tutorial for this product may
be available at the web site www.nokiahowto.com.
Accessibility solutions
Nokia is committed to making mobile phones easy to use for all individuals,
including those with disabilities. For more information visit the web site at
www.nokiaaccessibility.com.

9 Copyright © Nokia 2004
Phone at a glance
1. Phone at a glance
■The start screen
The start screen is home base and indicates that your phone is in idle mode.
Signal strength (1)—A higher bar indicates a stronger network signal.
Battery level (2)—A higher bar indicates more charge in the battery.
Menu (3)—Press the Left selection key to select this option.
Contacts (4)—Press the Right selection key to select this option.
■Quick keys
At the start screen, the Four-way scroll key takes you to frequently accessed menus:
Scroll up key—Go to the contacts list.
Scroll right key—View the calendar. This key can be set to perform different functions
depending on your carrier.
Scroll down key—Go to the contacts list.
Scroll left key—Quickly create a text message.

10 Copyright © Nokia 2004
■Indicators and icons
Depending on your wireless service provider and the model number of your phone, some
or all of the following indicators and icons may appear on the start screen:
Icon Indicates...
You have new text or picture messages. See Text
messages, 32.
You have new voice messages. See Voice messages, 38.
Your phone keypad is locked. See Keyguard, 21.
Your phone is set to the silent profile. See Profiles (Menu
3), 48.
The alarm clock is set to on. See Alarm clock, 77.
The countdown timer is running. See Countdown timer, 83.
The stopwatch timer is running in the background. See
Stopwatch, 84.
Integrated hands-free is active. See Using the loudspeaker, 20.
The timed profile is selected. See Profiles (Menu 3), 48.
or An enhancement is connected to the phone. See Enhancement
settings, 60.
or Voice privacy encryption is active (or is not active) in the net-
work. See Voice privacy, 65
or Location info sharing is set to Emergency or On. See Location
info sharing, 50.
You are in a digital network. See Network services, 6.
You are in an analogue network. See Network services, 6.
You are in a 1XRTT network. See Network services, 6.
You are roaming outside your home network. See Roaming
options, 65.

11 Copyright © Nokia 2004
Phone at a glance
■Get the most out of this guide
The following sections illustrate the various components of your phone. Familiarize
yourself with these sections to help you understand the instructions that follow.
This guide uses certain terms for the steps that you are asked to perform.
• Press means to press and release a key quickly. For example, press 7 means press the
key on the keypad that is labeled with the number 7 and the letters “pqrs”.
• Press and hold means to press and hold a key for 2–3 seconds; then release the key.
• Selection keys are used to select a menu option. To select an option, press the
selection key below the menu item on the phone screen.
• Scroll keys are used to move up, down, left, or right in the menus.
• Talk and End keys: Press the Talk key to place a call or to answer an incoming call.
Press the End key to end a call or press and hold to return to the start screen.
■Phone menus
Phone features are grouped according to function and are accessed through the main
menus. Each main menu contains submenus and lists from which you can select or view
items and customize your phone features. You can access these menus and submenus
by using the scroll method or by using a shortcut.
Note: Some features may not be available, depending on your network. For
more information, contact your wireless provider.
The scroll method
1. At the start screen, select Menu, and scroll up and down through the
main menus using the Four-way scroll key.
As you scroll through the menus, the menu number appears in the
upper right corner of the display. Below the number is a scroll bar
with a tab that moves up or down on the right side of the display screen as you scroll
through the menus, providing a visual representation of your current position in the
menu structure.

12 Copyright © Nokia 2004
2. When you arrive at a menu, press Select (the Left selection key) to enter submenus
or, when the browser appears on display, press Connect to enter that menu.
• Press Back (the Right selection key) to return to the previous menu.
• Press Back or the End key from any submenu or press Exit from the main menu
level to return to the start screen.
Shortcuts
You can go directly to almost any menu or submenu, as well as activate most features
by using a shortcut.
At the start screen, select Menu; then within 3 seconds, press the key or keys associated
with the menu function you would like to view or activate.
For example, to select the Meeting profile, select Menu
3-3-1 from the start screen
(Menu > 3 > 3 > 1 Profiles Meeting Activate). After a brief pause, the Meeting profile is
activated.
In-phone help
Many features have brief descriptions (help text) which can be viewed on the display.
To view these descriptions, scroll to a feature, and wait for about 10 seconds. Press
More, when necessary, to view all of the description, or press Back to exit.
In order to view the descriptions, you must first activate help text.
At the start screen, select Menu > > Settings Phone settings > Help text activation >
On or Off.

15 Copyright © Nokia 2004
Set up your phone
Charge the battery
1. Plug the charger into a standard ac outlet.
2. Insert the charger output plug into the
round jack at the bottom end of the phone.
After a few seconds, the battery indicator in
the display starts to scroll from bottom to
top. If the battery is completely discharged,
it may take a few minutes before the
charging indicator appears on the display or
before any calls can be made.
■Turn your phone on or off
1. To turn your phone on or off, press and hold the
Power key on top of the phone for at least 3 seconds.
2. Enter the lock code - see Security settings, 62 if
necessary and press OK.
■Connect the headset
A compatible headset, such as HS-5, may be purchased
with your phone or separately as an enhancement. (See
Enhancements, 88 for information.)
1. Plug the headset connector into the
Pop-Port™ connector at the bottom end
of your phone. The icon appears on
the start screen.
2. Position the headset on your ear.
With the headset connected, you can
make, answer, and end calls as usual.
• Use the keypad to enter numbers.
• Press the Talk key to place a call.
• Press the End key to end a call.

16 Copyright © Nokia 2004
You can also plug a compatible headset into the 2.5mm headset jack on the side of your
phone to allow hands-free operation. (See Enhancements, 88 for information.)
■Change the Xpress-on™ covers
Note: Before removing the cover, always switch off the power, and disconnect
the charger and any other device. Avoid touching electronic components while
changing the covers. Always store and use the device with the covers attached.
Remove the back cover
With the back of the phone facing you, push
down on the back cover release button, and slide
the back cover toward the bottom of the phone.
Remove the battery
After you have removed the back cover, insert
your finger into the finger grip, and lift the
battery from its compartment.
Remove the front cover
Gently pull the bottom of the front cover away from
the rest of the phone.
Install the keymat and front cover
1. Remove the keymat from the old front cover.

17 Copyright © Nokia 2004
Set up your phone
2. Place the keymat into the new front cover.
3. Press the front cover and keymat against the
phone, and snap the front cover into place.
Warning: Always replace the front cover
before replacing the battery and the back cover. Replacing the back cover first
may cause damage to your phone.
Replace the battery
1. Position the battery so the positive and
negative indicators on the battery match up
with the positive and negative indicators on
the phone.
The battery label should be facing away from
the phone.
2. Insert the battery, gold-colored contact end first, into the battery slot.
3. Push down on the other end of the battery to snap the battery into place.
Replace the back cover
1. Verify that the front cover and battery have
already been replaced.
2. Slide the back cover toward the top of the
phone until the back cover is securely in
place.

18 Copyright © Nokia 2004
■Make a call
Note: Before making or receiving a call, fully extend the retractable antenna.
Using the keypad
1. Enter the phone number (including the area code), and press the Talk key. (To delete
a character to the left of the cursor, press Clear.)
2. Press the End key to end the call, or End call to cancel the call attempt.
Using the contacts list
1. At the start screen, scroll up or down to the entry you wish to view.
2. Press the Talk key to make the call, or press Details to view details of the entry.
Using the last dialed number
1. At the start screen, press the Talk key to display the last 20 numbers dialed.
2. Scroll to the number (or name) you wish to redial, and press the Talk key.
Conference calling
Conference calling is a network service that allows you to take part in a conference call
with two other participants.
1. Make a call to the first participant.
2. With the first participant on the line, select Options > New call.
3. Enter the phone number of the second participant, or press Search to retrieve a
number from the contacts list.
4. Press Flash.
The first participant is put on hold.
5. When the second participant picks up, press the Talk key to connect the calls.
6. To end the conference call, press Options > End all calls, or press the End key.

19 Copyright © Nokia 2004
Set up your phone
■Answer calls
Answer or silence/reject an incoming call
1. Press the Talk key or Answer to answer the call.
2. Press the End key or Silence/Reject (carrier dependent) to mute the ringing tone;
then press Answer to answer the call, or do nothing, and the call is eventually
diverted to voicemail.
Answer or silence/reject an incoming call
Note: Silence/Reject is a carrier dependent feature.
1. Press the Talk or Answer key to answer the call.
2. To mute the ringing tone, press Silence. If you don’t answer the call, the call is
eventually diverted to voicemail.
3. To dismiss and divert the call to voicemail (a carrier dependent feature), press
Dismiss after you have muted the ringing tone or press the End key at any time.
Answer a call with the keypad locked
To answer a call with the keypad locked, simply press the Talk key. During the call, all
features function as normal. When you end or silence/reject the call, the keypad
automatically relocks. See Keyguard, 21 for details.
When the keypad is locked, calls still may be possible to the official emergency number
programmed into your phone.
Adjust the earpiece volume
While in a call, scroll right or left to adjust the volume of the earpiece.
When adjusting the volume, a bar chart appears in the display indicating the volume
level.

20 Copyright © Nokia 2004
Using the loudspeaker
You can use your phone as a loudspeaker during a call. Do not hold the phone to your
ear during the loudspeaker operation. While in a call:
• To activate the loudspeaker, press Loudsp.
• To deactivate the loudspeaker during a call, press Handset.
The loudspeaker is deactivated automatically when a call (or a call attempt) ends or
when certain enhancements are connected.
Options during a call
Many of the options that you can use during a call, are network services. Check with
your wireless service provider for more information.
1. Press Options during a call to display the following options:
Mute/Unmute—Silence your end of the call.
Loudspeaker/Handset—Activate or deactivate the loudspeaker while in a call.
New call—Initiate a conference call. See Conference calling, 18 for information.
Save—Save the number you keyed in during a call.
Add to name—Save the number you keyed in during a call to a contact already in the
contacts list.
End all calls—Disconnect from all active calls.
Touch tones—Enter the numbers, and press Tones to send the numbers as tones.
Contacts—View the contacts list.
Menu—View the phone menu.
2. Scroll to an option, and press Select to activate the option or enter its submenu.

21 Copyright © Nokia 2004
Set up your phone
■Keyguard
With keyguard, you can lock the keypad to prevent keys from being pressed accidentally.
Remember to lock your phone keypad to prevent accidental calls. If the keypad is locked,
it unlocks when you receive a call. After the call, the lock automatically reactivates.
When the keyguard is on, calls still may be possible to the official emergency number
programmed into your phone. Key in the emergency number, and press the Talk key. See
Automatic keyguard, 55.
Lock the keypad
Select Menu; then press * within 2 seconds.
Unlock the keypad
Select Unlock; then press * within two seconds.

22 Copyright © Nokia 2004
3. Text entry
You can use two methods for entering text and numbers:
• Standard mode is the only way to enter text into the contacts list and to rename
caller groups.
• Predictive text input is a quick and easy method for writing messages or creating a
calendar note.
■Standard mode
Text (Abc)
• Press Clear to backspace the cursor and delete a character.
• Press and hold Clear to backspace continuously and delete characters.
• Press a key once to insert the first letter on the key, twice for the second letter, etc. If
you pause briefly, the last letter in the display is accepted, and your phone awaits
the next entry.
• Press 0 to enter a space, thereby accepting a completed word.
• Press 1 as many times as necessary to scroll through a list of commonly used
characters.
• Press * to display a complete list of special characters.
• Press # to switch predictive text on or off and to use predictive text in various
modes. As you press #, the following icons (not the descriptions) appear in the upper
left of the display screen:
Uppercase text: standard mode is on.
Lowercase text: standard mode is on.
Sentence case text: standard mode is on.
23 Copyright © Nokia 2004
Text entry
Numbers (123)
To switch to 123 mode from Abc mode, press and hold # at any text entry screen until
the icon in the upper left corner of the display switches from Abc to 123 (or vice versa).
Note: In text modes (Abc, abc, ABC and predictive text), you can also enter the
number by holding the number key down.
Punctuation and special characters
While at any text entry screen, press * to display special characters (press and hold * if
predictive text is on). Press * again to cycle through all available characters. You can
navigate through the list of special characters by using the Four-way scroll key. Once a
character is highlighted, press Use to insert the character into your message.
■Predictive text input
Predictive text input allows you to write messages quickly using your keypad and the
built-in dictionary. It is much faster than the standard mode method, because for each
letter, you only press the corresponding key on your keypad once.
Activate/deactivate
At any text entry screen, press and hold Options. Predictive text is turned on and off,
depending on its previous mode.
OR
1. At any text entry screen, select Options > Predictive text.
2. Scroll to the language of your choice, and press Select.
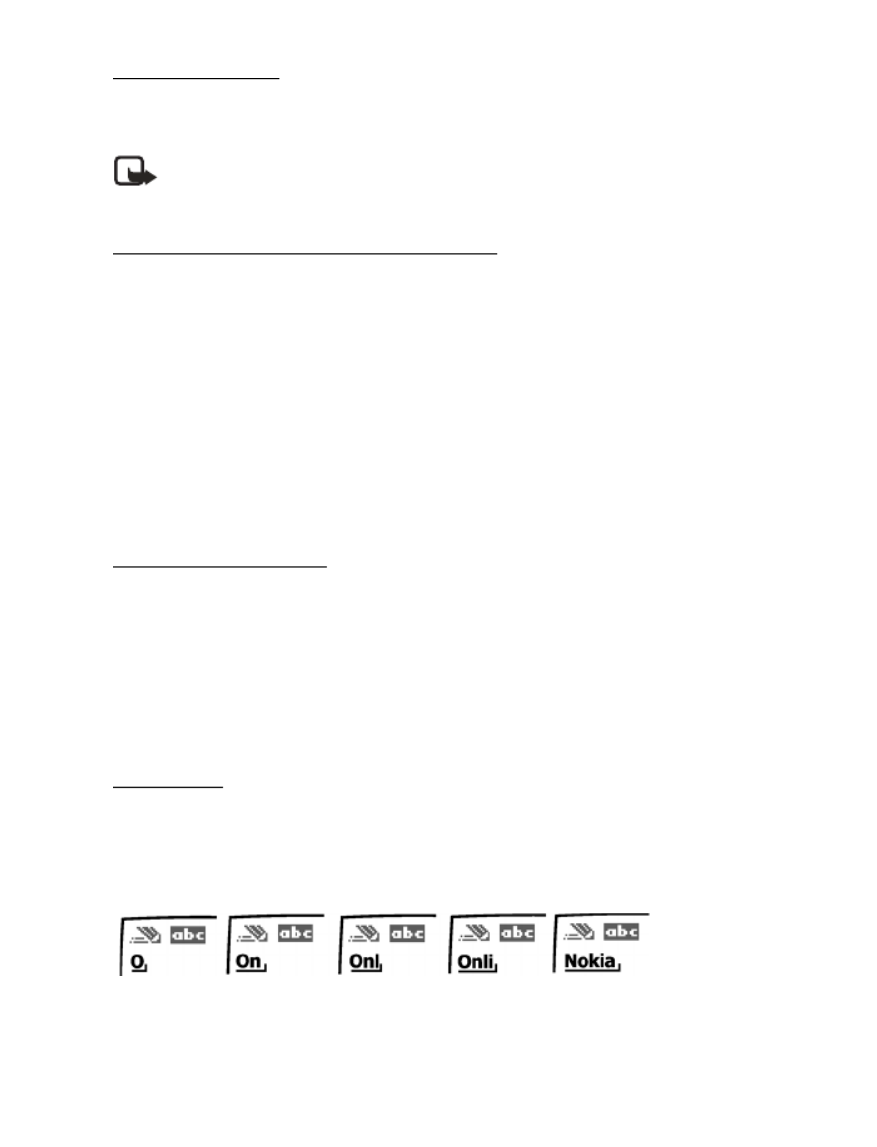
Text entry
The illustration below simulates your display each time a key is pressed. For example, to
write Nokia with predictive text on and with the English dictionary selected, press each
of the following keys once:
6 6 5 4 2
•Press 0 to enter a space, and begin writing the next word.

29 Copyright © Nokia 2004
Contacts list
View name—View the name of the contact.
Delete—Delete the entire contact entry from your contacts list.
E-mail address entry
1. Highlight the e-mail address entry you would like to send or update and press
Options.
2. Select one of the following options, and press OK.
Send e-mail—Send an e-mail.
Edit detail—Edit existing details of e-mail.
Delete detail—Delete existing e-mail.
View—View the details of the e-mail contact.
Change type—Change the e-mail type to General, Mobile, Home, Office, or Fax or the
detail type to Web address, Postal addr, or Note
Add detail—Add an address or note to the entry.
Add number—Add a number to the entry.
Caller groups—Add the e-mail to an existing caller group.
Custom tone—Add a custom ring tone to the contact.
Send bus. card—Send the contact a business card.
Edit name—Edit the name of the contact.
View name—View the name of the contact.
Delete—Delete the entire e-mail entry from your contacts list.
Edit Web address
1. Highlight the web address entry you would like to edit and press Options.
2. Select the option you wish to perform (Web address, Postal addr., or Note), and
press OK.

30 Copyright © Nokia 2004
■Delete contacts list entries
1. At the start screen, select Contacts > Delete.
2. To delete individual entries, select One by one and press Select.
3. Scroll to the entry you wish to delete, and select Delete > OK to confirm.
4. To delete the entire contents of your contacts list, select Delete all > OK.
5. Select OK OK to confirm or Back to return to Contacts. If , enter the security code,
and press OK. See Security code, 64 for more information.
■View the contacts list
1. At the start screen, select Contacts. The following options are displayed:
Search—Find a name or select from a list.
Add new—Add a contact to your contacts list.
Edit name—Edit an existing name.
Delete—Delete a name and its associated numbers.
Add number—Add a number to an existing name.
Settings—Change the contacts list view, check the memory status of your phone.
Speed dialling—View or modify the list of speed dialing numbers.
Voice tags—Attach, listen to, or modify a voice tag to a contact in the
contacts list.
My number—View your own phone number.
Caller groups—View and edit the properties for any of the caller groups, including
Family, VIP, Friends, Business, or Other.
2. Scroll to an item, and press Select to activate the feature or enter its submenu.
Fast search for a name
1. At the start screen, scroll down to display the contents of your contacts list.
2. Press the key which corresponds to the first letter of the name for which you are
performing a search.
3. Scroll up and down to select a contact, and press to view the details.Details

38 Copyright © Nokia 2004
View a picture message
When you receive a picture message, the message icon ( ) appears in the display.
1. Press Show to view the picture message, or press Exit to move it to your inbox.
2. If you have more than one picture message, scroll to the message of your choice, and
press Select to view the message.
When you have unopened picture messages in your inbox, is shown in the
upper left corner of the start screen as a reminder.
3. Scroll to view the whole picture if necessary.
4. Once you are finished, press Back to move the picture message to the Inbox or press
Options for other choices such as Reply or Forward.
If you would like to save the picture to your Templates folder for later use, press Options
> Save picture > Select. You can enter a title for the picture, and press OK.
If your templates folder is full of pictures, scroll to the picture you would like to replace
and press Select.
■ Voice messages
If you subscribe to voice mail, your wireless provider will furnish you with a voice
mailbox number. You need to save this number to your phone to use voice mail. When
you receive a voice message, your phone lets you know by beeping, displaying a
message, or both. If you receive more than one message, your phone shows the number
of messages received.
Save voice mailbox number
Your wireless provider may have already saved your voice mailbox number to your
phone. If so, the number will appear in the display in step 1. Press OK to leave the
number unchanged.
1. In the standby mode, select Menu > Messages > Voice messages > Voice mailbox
number.
2. If the number entry window is empty, enter the voice mailbox area code and
number.
3. Press OK.

40 Copyright © Nokia 2004
Insert dialing codes
Press * repeatedly to cycle through dialing codes. Once the desired code appears in the
display, pause briefly and the code is inserted into the dialing string.
The following dialing codes are available:
*—Bypasses a set of instructions.
+ —International prefix.
p—Pauses for 2.5 seconds before sending any numbers that follow.
w—Waits for you to press the Talk key before sending the numbers or codes that follow.
Setup voice mail with dialing codes
1. At the start screen, select Contacts > Speed dialling.
2. Scroll to an (empty) speed dialing slot and press Assign.
3. Enter your voice mailbox number, including the area code.
4. Refer to dialing codes and enter any codes as necessary using the information that
you wrote down from Write down voice mailbox number and process, 39.
For example, if you pause for 5 seconds after connecting to voice mail, enter p twice
after the voice mailbox number, for example, 2145551212pp.
5. Enter any remaining pauses or other information that allows you to listen to your
messages, and press OK.
6. Enter a name (such as Voice Mail), and press OK.
To dial and listen to your voice mail, press and hold the assigned speed dialing key at the
start screen.
■ Minibrowser messages
Minibrowser messaging is a network service. See Network services, 6 for more
information.
If your wireless service provider supports this feature, you can use the Minibrowser to
check for e-mail messages. At the start screen, select Menu > Messages > Minibrowser
messages > Connect.
See Minibrowser (Menu 8), 75 for more information on using the Minibrowser in your
phone to access web pages.

42 Copyright © Nokia 2004
■ Delete messages
If your message memory is full, Message overwriting setting is off and you have more
messages waiting at the network, appears on the start No space for new messages
screen. You can do the following:
• Read some of the unread messages, and delete them individually.
• Delete messages from some of your folders.
A single message
To delete a single message, you need to open it first.
1. At the start screen, select Menu > Messages > Text messages.
2. Scroll to the folder containing the message you wish to delete, and press Select.
3. Scroll to the message you wish to delete, and press Select.
4. Select Options > Delete.
5. Press OK to delete the message or Back to exit.
All messages in a folder
1. At the start screen, select Menu > Messages > > Text messages Delete messages.
2. Scroll to the folder containing the messages you wish to delete, and press Select:
All—Deletes all messages in all of the folders.
All read—Deletes any messages which have been read in all of the folders.
All unread—Deletes any messages which have not been read in all of the folders.
Inbox—Deletes all messages from the Inbox folder.
Sent items—Deletes all messages from the Sent items folder.
Archive—Deletes all messages from the Archive folder and all user created folders.
User defined folders—All user defined folders that the user has added under My
folders are displayed at the end of the predefined folders.
3. Press OK to empty the folder.
Produktspezifikationen
| Marke: | Nokia |
| Kategorie: | Smartphone |
| Modell: | 6019i |
Brauchst du Hilfe?
Wenn Sie Hilfe mit Nokia 6019i benötigen, stellen Sie unten eine Frage und andere Benutzer werden Ihnen antworten
Bedienungsanleitung Smartphone Nokia

9 Oktober 2024
13 September 2024
9 September 2024
5 September 2024
4 September 2024
25 August 2024
24 August 2024
22 August 2024
20 August 2024
18 August 2024
Bedienungsanleitung Smartphone
- Smartphone Samsung
- Smartphone Infiniton
- Smartphone Acer
- Smartphone Apple
- Smartphone Asus
- Smartphone Sanyo
- Smartphone BenQ
- Smartphone Gigabyte
- Smartphone HP
- Smartphone Lexibook
- Smartphone Manta
- Smartphone Medion
- Smartphone Microsoft
- Smartphone Nedis
- Smartphone NGS
- Smartphone Philips
- Smartphone SilverCrest
- Smartphone Sony
- Smartphone Panasonic
- Smartphone LG
- Smartphone AEG
- Smartphone Siemens
- Smartphone OK
- Smartphone CSL
- Smartphone Alecto
- Smartphone Denver
- Smartphone Bush
- Smartphone Telefunken
- Smartphone Thomson
- Smartphone Trevi
- Smartphone Blaupunkt
- Smartphone Sharp
- Smartphone Mitsubishi
- Smartphone Haier
- Smartphone Hisense
- Smartphone Nordmende
- Smartphone Vestel
- Smartphone Aiwa
- Smartphone ARCHOS
- Smartphone Mpman
- Smartphone Geemarc
- Smartphone Polaroid
- Smartphone TrekStor
- Smartphone Krüger And Matz
- Smartphone Motorola
- Smartphone Umidigi
- Smartphone Xiaomi
- Smartphone Olympia
- Smartphone Switel
- Smartphone Fero
- Smartphone Hannspree
- Smartphone Hyundai
- Smartphone ITT
- Smartphone Gigaset
- Smartphone TCL
- Smartphone Tesla
- Smartphone Toshiba
- Smartphone Allview
- Smartphone Cubot
- Smartphone GOCLEVER
- Smartphone Mio
- Smartphone Fysic
- Smartphone Sencor
- Smartphone Sony Ericsson
- Smartphone Estar
- Smartphone Dell
- Smartphone Lenovo
- Smartphone Razer
- Smartphone Honeywell
- Smartphone Lava
- Smartphone Sagem
- Smartphone TELME
- Smartphone Intermec
- Smartphone TP-Link
- Smartphone Honor
- Smartphone Midland
- Smartphone Alcatel
- Smartphone Amplicomms
- Smartphone Audioline
- Smartphone Binatone
- Smartphone Brondi
- Smartphone Doro
- Smartphone Emporia
- Smartphone Profoon
- Smartphone Swissvoice
- Smartphone Tiptel
- Smartphone Kodak
- Smartphone Hammer
- Smartphone Facom
- Smartphone Easypix
- Smartphone IGet
- Smartphone Wiko
- Smartphone XD
- Smartphone InFocus
- Smartphone NEC
- Smartphone Overmax
- Smartphone Huawei
- Smartphone Aplic
- Smartphone Alcatel-Lucent
- Smartphone Vivax
- Smartphone Intex
- Smartphone Albrecht
- Smartphone Kogan
- Smartphone Energy Sistem
- Smartphone Kurio
- Smartphone Plum
- Smartphone RugGear
- Smartphone Ulefone
- Smartphone NGM
- Smartphone T-Mobile
- Smartphone Kyocera
- Smartphone EVOLVEO
- Smartphone Amazon
- Smartphone Mustang
- Smartphone Vodafone
- Smartphone Yota
- Smartphone SPC
- Smartphone HTC
- Smartphone Billow
- Smartphone Prestigio
- Smartphone Aligator
- Smartphone AT Telecom
- Smartphone Auro
- Smartphone Avus
- Smartphone Beafon
- Smartphone BlackBerry
- Smartphone Bq
- Smartphone Crosscall
- Smartphone Cyrus
- Smartphone Echo
- Smartphone Fairphone
- Smartphone General Mobile
- Smartphone Kazam
- Smartphone Konrow
- Smartphone Mediacom
- Smartphone Meizu
- Smartphone Mobistel
- Smartphone MTT
- Smartphone Nubia
- Smartphone Phicomm
- Smartphone Sonim
- Smartphone Wileyfox
- Smartphone Yezz
- Smartphone ZTE
- Smartphone Swisstone
- Smartphone RCA
- Smartphone OnePlus
- Smartphone Pantech
- Smartphone Oppo
- Smartphone Vivo
- Smartphone CAT
- Smartphone Aspera
- Smartphone TAG Heuer
- Smartphone AT&T
- Smartphone Realme
- Smartphone Infinix
- Smartphone Google
- Smartphone Alba
- Smartphone Danew
- Smartphone Doogee
- Smartphone Ecom
- Smartphone Energizer
- Smartphone Garmin-Asus
- Smartphone Gionee
- Smartphone GreatCall
- Smartphone Handheld
- Smartphone HomTom
- Smartphone Itel
- Smartphone Klipad
- Smartphone KPN
- Smartphone Leagoo
- Smartphone Leotec
- Smartphone Logicom
- Smartphone Lumigon
- Smartphone Maxcom
- Smartphone Maxx
- Smartphone Media-tech
- Smartphone Micromax
- Smartphone Neffos
- Smartphone NTech
- Smartphone NUU Mobile
- Smartphone O2
- Smartphone Oukitel
- Smartphone PENTAGRAM
- Smartphone Senifone
- Smartphone Spice
- Smartphone STK
- Smartphone Storex
- Smartphone Sunny
- Smartphone Sunstech
- Smartphone Tecdesk
- Smartphone Telstra
- Smartphone UMi
- Smartphone UTStarcom
- Smartphone Wolder
- Smartphone Wolfgang
- Smartphone Xtreamer
- Smartphone Zipy
- Smartphone Best Buy
- Smartphone Benefon
- Smartphone Primux
- Smartphone Keneksi
- Smartphone M3 Mobile
- Smartphone Coolpad
- Smartphone TIM
- Smartphone MyPhone
- Smartphone Freeman
- Smartphone Nevir
- Smartphone BLU
- Smartphone CRUX
- Smartphone Amplicom
- Smartphone NGM-Mobile
- Smartphone JCB
- Smartphone THL
- Smartphone Brigmton
- Smartphone Lark
- Smartphone Posh Mobile
- Smartphone ToughGear
- Smartphone ORA
- Smartphone GSmart
- Smartphone Tremay
- Smartphone Bea-fon
- Smartphone ITTM
- Smartphone Pharos
- Smartphone Karbonn
- Smartphone Tecno
- Smartphone Piranha
- Smartphone Growing
- Smartphone Majestic
- Smartphone Unnecto
- Smartphone Verykool
- Smartphone Bluebird
- Smartphone Nothing
- Smartphone Saiet
- Smartphone Syco
- Smartphone AQISTON
- Smartphone Androidtech
- Smartphone Casper
- Smartphone BGH
- Smartphone Olitech
- Smartphone Mobiola
- Smartphone LeEco
- Smartphone Jitterbug
- Smartphone Custom
- Smartphone POCO
- Smartphone HMD
- Smartphone Opis
Neueste Bedienungsanleitung für -Kategorien-

15 Oktober 2024

14 Oktober 2024

12 Oktober 2024
10 Oktober 2024

9 Oktober 2024

9 Oktober 2024
8 Oktober 2024
8 Oktober 2024

7 Oktober 2024

5 Oktober 2024