Neff T48PT00X0 Bedienungsanleitung
Lesen Sie kostenlos die 📖 deutsche Bedienungsanleitung für Neff T48PT00X0 (28 Seiten) in der Kategorie Ofen. Dieser Bedienungsanleitung war für 5 Personen hilfreich und wurde von 2 Benutzern mit durchschnittlich 4.5 Sternen bewertet
Seite 1/28

[en] INSTRUCTION MANUAL
HOB
T48.T0...

2Ø = cm
: :
: :
: :
: :
: :
,(&
:[

en
3
Table of contents
[ en ] I NSTRUCTI ON MANUAL
8Intended use . . . . . . . . . . . . . . . . . . . . . . . . . . . . . 4
(Important safety information . . . . . . . . . . . . . . . 5
]Causes of damage . . . . . . . . . . . . . . . . . . . . . . . . 6
Overview . . . . . . . . . . . . . . . . . . . . . . . . . . . . . . . . . . . 6
7Environmental protection . . . . . . . . . . . . . . . . . . 7
Energy-saving advice . . . . . . . . . . . . . . . . . . . . . . . . . . 7
Environmentally-friendly disposal . . . . . . . . . . . . . . . . . 7
fInduction cooking . . . . . . . . . . . . . . . . . . . . . . . . 7
Advantages of induction cooking . . . . . . . . . . . . . . . . . 7
Cookware. . . . . . . . . . . . . . . . . . . . . . . . . . . . . . . . . . . 7
*Getting to know your appliance . . . . . . . . . . . . . 9
The control panel . . . . . . . . . . . . . . . . . . . . . . . . . . . . . 9
The hotplates . . . . . . . . . . . . . . . . . . . . . . . . . . . . . . . 10
Residual heat indicator. . . . . . . . . . . . . . . . . . . . . . . . 10
jTwist-Pad with Twist knob . . . . . . . . . . . . . . . . 11
Remove the twist knob. . . . . . . . . . . . . . . . . . . . . . . . 11
Storing the twist knob. . . . . . . . . . . . . . . . . . . . . . . . . 11
Operating the hob without the twist knob. . . . . . . . . . 11
1Operating the appliance . . . . . . . . . . . . . . . . . . 12
Switching the hob on and off . . . . . . . . . . . . . . . . . . . 12
Setting a hotplate . . . . . . . . . . . . . . . . . . . . . . . . . . . . 12
Chef's recommendations . . . . . . . . . . . . . . . . . . . . . . 12
OTime-setting options . . . . . . . . . . . . . . . . . . . . . 15
Programming the cooking time . . . . . . . . . . . . . . . . . 15
The kitchen timer . . . . . . . . . . . . . . . . . . . . . . . . . . . . 15
Stopwatch function. . . . . . . . . . . . . . . . . . . . . . . . . . . 16
vPowerBoost function. . . . . . . . . . . . . . . . . . . . . 16
Activating . . . . . . . . . . . . . . . . . . . . . . . . . . . . . . . . . . 16
Deactivating . . . . . . . . . . . . . . . . . . . . . . . . . . . . . . . . 16
xShortBoost function . . . . . . . . . . . . . . . . . . . . . 17
Recommendations for use . . . . . . . . . . . . . . . . . . . . . 17
Activating . . . . . . . . . . . . . . . . . . . . . . . . . . . . . . . . . . 17
Deactivating . . . . . . . . . . . . . . . . . . . . . . . . . . . . . . . . 17
zKeep warm function. . . . . . . . . . . . . . . . . . . . . . 17
Activation . . . . . . . . . . . . . . . . . . . . . . . . . . . . . . . . . . 17
Deactivation . . . . . . . . . . . . . . . . . . . . . . . . . . . . . . . . 17
AChildproof lock. . . . . . . . . . . . . . . . . . . . . . . . . . 18
Activating and deactivating the childproof lock . . . . . 18
Childproof lock. . . . . . . . . . . . . . . . . . . . . . . . . . . . . . 18
kWipe protection . . . . . . . . . . . . . . . . . . . . . . . . . 18
bAutomatic safety cut-out. . . . . . . . . . . . . . . . . . 18
QBasic settings. . . . . . . . . . . . . . . . . . . . . . . . . . . 19
To access the basic settings: . . . . . . . . . . . . . . . . . . .20
[Energy consumption indicator . . . . . . . . . . . . . 21
tCookware check. . . . . . . . . . . . . . . . . . . . . . . . . 21
hPower manager . . . . . . . . . . . . . . . . . . . . . . . . . 22
DCleaning . . . . . . . . . . . . . . . . . . . . . . . . . . . . . . . 22
Hob. . . . . . . . . . . . . . . . . . . . . . . . . . . . . . . . . . . . . . .22
Hob surround . . . . . . . . . . . . . . . . . . . . . . . . . . . . . . .22
Twist knob . . . . . . . . . . . . . . . . . . . . . . . . . . . . . . . . .22
{Frequently Asked Questions (FAQ) . . . . . . . . . 23
3Trouble shooting . . . . . . . . . . . . . . . . . . . . . . . . 24
4Customer service. . . . . . . . . . . . . . . . . . . . . . . . 25
E number and FD number . . . . . . . . . . . . . . . . . . . . .25
ETest dishes . . . . . . . . . . . . . . . . . . . . . . . . . . . . . 26
Produktinfo
Additional information on products, accessories,
replacement parts and services can be found at
www.neff-international.com and in the online shop
www.neff-eshop.com

en Intended use
4
8Intended use
I nt e nd ed us e
Read these instructions carefully. Please keep
the instruction and installation manual, as well
as the appliance certificate, in a safe place for
later use or for subsequent owners.
Check the appliance after removing it from the
packaging. If it has suffered any damage in
transport, do not connect the appliance,
contact the Technical Assistance Service and
provide written notification of the damage
caused, otherwise you will lose your right to
any type of compensation.
Only a licensed professional may connect
appliances without plugs. Damage caused by
incorrect connection is not covered under
warranty.
This appliance must be installed according to
the installation instructions included.
This appliance is intended for private domestic
use and the household environment only. The
appliance must only be used for the
preparation of food and beverages. The
cooking process must be supervised. A short
cooking process must be supervised without
interruption. Only use the appliance in
enclosed spaces.
This appliance is intended for use up to a
maximum height of 4000 metres above sea
level.
Do not use covers. These can cause
accidents, for example due to overheating,
catching fire or materials shattering.
Only use safety devices or child protection
grilles approved by ourselves. Unsuitable
safety devices or child protection grilles may
result in accidents.
This appliance is not intended for operation
with an external clock timer or a remote
control.
This appliance may be used by children over
the age of 8 years old and by persons with
reduced physical, sensory or mental
capabilities or by persons with a lack of
experience or knowledge if they are
supervised or are instructed by a person
responsible for their safety how to use the
appliance safely and have understood the
associated hazards.
Children must not play with, on, or around the
appliance. Children must not clean the
appliance or carry out general maintenance
unless they are at least 15 years old and are
being supervised.
Keep children below the age of 8 years old at
a safe distance from the appliance and power
cable.
If you wear an active implantable medical
device (e.g. a pacemaker or defibrillator),
check with your doctor that it complies with
Council Directive 90/385/EEC of 20th June
1990, DIN EN 45502-2-1 and DIN EN 45502-
2-2, and that it has been chosen, implanted
and programmed in accordance with VDE-AR-
E 2750-10. If these conditions are satisfied,
and if, in addition, non-metal cooking utensils
and cookware with non-metal handles are
used, it is safe to use this induction hob as
intended.

Important safety information en
5
(Important safety
information
I mp or t a nt sa f et y i nf o r mat i o n
:Warning – Risk of fire!
■Hot oil and fat can ignite very quickly. Never
leave hot fat or oil unattended. Never use
water to put out burning oil or fat. Switch off
the hotplate. Extinguish flames carefully
using a lid, fire blanket or something similar.
Risk of fire!
■The hotplates become very hot. Never
place combustible items on the hob. Never
place objects on the hob.
Risk of fire!
■The appliance gets hot. Do not keep
combustible objects or aerosol cans in
drawers directly underneath the hob.
Risk of fire!
■The hob switches off automatically and can
no longer be operated. It may switch on
unintentionally at a later point. Switch off the
circuit breaker in the fuse box. Contact the
after-sales service.
Risk of burns!
■Do not use hob covers here.They can
cause accidents, for example due to
overheating, catching fire or materials
shattering.
:Warning – Risk of burns!
■The hotplates and surrounding area
(particularly the hob surround, if fitted)
become very hot. Never touch the hot
surfaces. Keep children at a safe distance.
Risk of burns!
■The hotplate heats up but the display does
not work. Switch off the circuit breaker in
the fuse box. Contact the after-sales
service.
Risk of burns!
■Metal objects on the hob quickly become
very hot. Never place metal objects (such
as knives, forks, spoons and lids) on the
hob.
Risk of fire!!
■After each use, always turn off the hob at
the main switch. Do not wait until the hob
turns off automatically after the pan is
removed.
:Warning – Risk of electric shock!
■Incorrect repairs are dangerous. Repairs
may only be carried out and damaged
power cables replaced by one of our
trained after-sales technicians. If the
appliance is defective, unplug the appliance
from the mains or switch off the circuit
breaker in the fuse box. Contact the after-
sales service.
Risk of electric shock!
■Do not use any high-pressure cleaners or
steam cleaners, which can result in an
electric shock.
Risk of electric shock!
■A defective appliance may cause electric
shock. Never switch on a defective
appliance. Unplug the appliance from the
mains or switch off the circuit breaker in the
fuse box. Contact the after-sales service.
Risk of electric shock!
■Cracks or fractures in the glass ceramic
may cause electric shocks. Switch off the
circuit breaker in the fuse box. Contact the
after-sales service.
:Warning – Hazard due to magnetism!
The removable control element is magnetic.
Magnets may affect electronic implants, e.g.
heart pacemakers or insulin pumps. Thus, for
persons with electronic implants: avoid
carrying the control element in clothing
pockets; keep a minimum distance of 10 cm
to heart pacemaker or device.
:Warning – Risk of fault!
A fan is located on the underside of this hob. If
a drawer is located on the underside of the
hob, do not store any small or sharp objects,
paper or tea towels in it. These may be sucked
in and damage the fan or impair the cooling.
There must be a clearance of at least 2 cm
between the contents of the drawer and the
fan entry point.
:Warning – Risk of injury!
■When cooking in a bain marie, the hob and
cooking container could shatter due to
overheating. The cooking container in the
bain marie must not directly touch the
bottom of the water-filled pot. Only use heat-
resistant cookware.
Risk of injury!
■Saucepans may suddenly jump due to
liquid between the pan base and the
hotplate. Always keep the hotplate and
saucepan bases dry.

en Causes of damage
6
]Causes of damage
Ca use s of d amag e
Caution!
■Rough pan bases may scratch the hob.
■Avoid leaving empty pots and pans on the hotplate.
Doing so may cause damage.
■Do not place hot pans on the control panel, the
indicator area, or the hob frame. Doing so may
cause damage.
■Hard or pointed objects dropped on the hob may
damage it.
■Aluminium foil and plastic containers will melt if
placed on the hotplate while it is hot. The use of
laminated sheeting is not recommended on the hob.
Overview
You will find the most frequently caused damage in the
following table:
Damage Cause Measure
Stains Boiled over food. Remove boiled over food immediately with a glass scraper.
Unsuitable cleaning agent. Only use cleaning agents that are suitable for this type of hob.
Scratches Salt, sugar and sand. Do not use the hob as a work surface or storage space.
Cookware with rough bases scratch the hob. Check the cookware.
Discolouration Unsuitable cleaning agent. Only use cleaning agents that are suitable for this type of hob.
Pan abrasion. Lift pots and pans when moving them.
Chips Sugar, food with a high sugar content. Remove boiled over food immediately with a glass scraper.

Environmental protection en
7
7Environmental protection
En v i r o n men t a l pr ot e c t i on
In this section, you can find information about saving
energy and disposing of the appliance.
Energy-saving advice
■Always use the correct lid for each pan. Cooking
without a lid uses a lot more energy. Use a glass lid
to provide visibility and avoid having to lift the lid.
■Use pans with flat bases. Bases that are not flat use
a lot more energy.
■The diameter of the pan base must match the size of
the hotplate. Please note: pan manufacturers usually
provide the diameter for the top of the pan, which is
usually larger than the diameter of the pan base.
■Use a small pan for small amounts of food. A large
pan which is not full uses a lot of energy.
■Use little water when cooking. This saves energy and
preserves all the vitamins and minerals in
vegetables.
■Select the lowest power level to maintain cooking. If
the power level is too high, energy is wasted.
Environmentally-friendly disposal
Dispose of packaging in an environmentally-friendly
manner.
fInduction cooking
I nduc t i on c ook i n g
Advantages of induction cooking
Induction cooking is very different from traditional
cooking methods, as heat builds up directly in the item
of cookware. This offers numerous advantages:
■Saves time when boiling and frying.
■Saves energy.
■Easier to care for and clean. Spilled food does not
burn on as quickly.
■Heat control and safety – the hob increases or
decreases the heat supply as soon as the user
changes the setting. The induction hotplate stops the
heat supply as soon as the cookware is removed
from the hotplate, without having to switch it off first.
Cookware
Only use ferromagnetic cookware for induction cooking,
such as:
■Cookware made from enamelled steel
■Cookware made from cast iron
■Special induction-compatible cookware made from
stainless steel.
To check whether your cookware is suitable for
induction cooking, refer to the section on
~ "Cookware check".
To achieve a good cooking result, the ferromagnetic
area on the base of the pan should match the size of
the hotplate. If a hotplate does not detect an item of
cookware, try placing it on another hotplate with a
smaller diameter.
Some induction cookware does not have a fully
ferromagnetic base:
■If the base of the cookware is only partially
ferromagnetic, only the area that is ferromagnetic will
heat up. This may mean that heat will not be
distributed evenly. The non-ferromagnetic area may
not heat up to a sufficient temperature for cooking.
This appliance is labelled in accordance with
European Directive 2012/19/EU concerning
used electrical and electronic appliances
(waste electrical and electronic equipment -
WEEE). The guideline determines the
framework for the return and recycling of used
appliances as applicable throughout the EU.
FP FPFP

en Induction cooking
8
■The ferromagnetic area will also be reduced if the
material from which the base of the cookware is
made contains aluminium, for example. This may
mean that the cookware will not become sufficiently
hot or even that it will not be detected.
Unsuitable pans
Never use diffuser hobs or pans made from:
■common thin steel
■glass
■earthenware
■copper
■aluminium
Properties of the base of the cookware
The material(s) from which the base of the cookware is
made can affect the cooking result. Using pots and
pans made from materials that distribute heat evenly
through them, such as stainless-steel pans with a three-
layer base, saves time and energy.
Use cookware with a flat base; if the base of the
cookware is uneven, this may impair the heat supply.
Absence of pan or unsuitable size
If no pan is placed on the selected hotplate, or if it is
made of unsuitable material or is not the correct size,
the power level displayed on the hotplate indicator will
flash. Place a suitable pan on the hotplate to stop the
flashing. If this takes more than 90 seconds, the
hotplate will switch off automatically.
Empty pans or those with a thin base
Do not heat empty pans, nor use pans with a thin base.
The hob is equipped with an internal safety system.
However, an empty pan may heat up so quickly that the
"automatic switch off" function may not have time to
react and the pan may reach very high temperatures.
The base of the pan could melt and damage the glass
on the hob. In this case, do not touch the pan and
switch the hotplate off. If it fails to work after it has
cooled down, please contact the Technical Assistance
Service.
Pan detection
Each hotplate has a lower limit for pan detection. This
depends on the diameter of the ferromagnetic area of
the cookware and the material from which its base is
made. For this reason, you should always use the
hotplate that best matches the diameter of the base of
the pan.

Getting to know your appliance en
9
*Getting to know your
appliance
Get t i ng t o k now y o ur app l i an ce
You can find information on the dimensions and power
of the hotplates in~ Page 2
Note: . Depending on the appliance model, individual
details and colours may differ.
The control panel
Touch controls
Touching a symbol activates the associated function.
Notes
■Always keep the control panel clean and dry.
Moisture reduces its effectiveness.
■Do not place any cookware near the indicators or
sensors. The electronics could overheat.
Controls
#Main switch
–Keep-warm function
˜PowerBoost and ShortBoost functions
œStopwatch function
xSetting the cooking time
.Kitchen timer and childproof lock
Indicators
‹Operating status
‚ Š-Heat settings
• œ/Residual heat
‹‹‹ Timer function
zLocking the control panel for cleaning
˜PowerBoost and ShortBoost functions
õPowerBoost function
wShortBoost function
–Keep-warm function
‚Childproof lock
xSetting the cooking time
öTime display

en Getting to know your appliance
10
The hotplates
Residual heat indicator
The hob has a residual heat indicator for each hotplate.
This indicates that a hotplate is still hot. Do not touch a
hotplate while the residual heat indicator is lit up.
The following indicators are shown depending on the
amount of residual heat:
■Display •: High temperature
■Display œ: Low temperature
If you remove the cookware from the hotplate during
cooking, the residual heat indicator and the selected
heat setting will flash alternately.
When the hotplate is switched off, the residual heat
indicator will light up. Even after the hob has been
switched off, the residual heat indicator will stay lit for as
long as the hotplate is still warm.
Hotplates
$Simple hotplate Use cookware that is a suitable size
îExtended cooking zone The hotplate switches on automatically when you use cookware with a base that covers the outer edge of
the zone.
qWarming zone To activate: Touch the twist knob for the warming zone. The symbol appears in the display.‚
To deactivate: Touch the twist knob for the warming zone. The symbol appears in the display.*‹
* The residual heat indicator lights up.
Only use cookware that is suitable for induction cooking – see section ~ "Induction cooking"
en Operating the appliance
12
1Operating the appliance
Ope r at i ng t he appl i a nc e
This chapter explains how to set a hotplate. The table
shows heat settings and cooking times for various
meals.
Switching the hob on and off
The main switch is used to switch the hob on and off.
To switch on: Touch the symbol. The display above #
the main switch lights up. The hob is ready to use.
To switch off: Touch the # symbol until the display
above the main switch goes out. All hotplates are
switched off. The residual heat indicator remains lit until
the hotplates have cooled down sufficiently.
Notes
■The hob switches off automatically if all hotplates
have been switched off for more than 15 seconds.
■The selected settings are stored for four seconds
after the hob has been switched off. If the hob is
switched on again within this time, the previous
settings are applied.
Setting a hotplate
Set the required heat setting using the twist knob.
Heat setting 1 = lowest setting.
Heat setting 9 = highest setting.
Every heat setting has an intermediate setting. This is
marked with a dot.
Notes
■To protect the fragile parts of your appliance from
overheating and electrical overloading, the hob may
temporarily reduce the power.
■In order to prevent the appliance from producing
excess noise, the hob may temporarily reduce the
power.
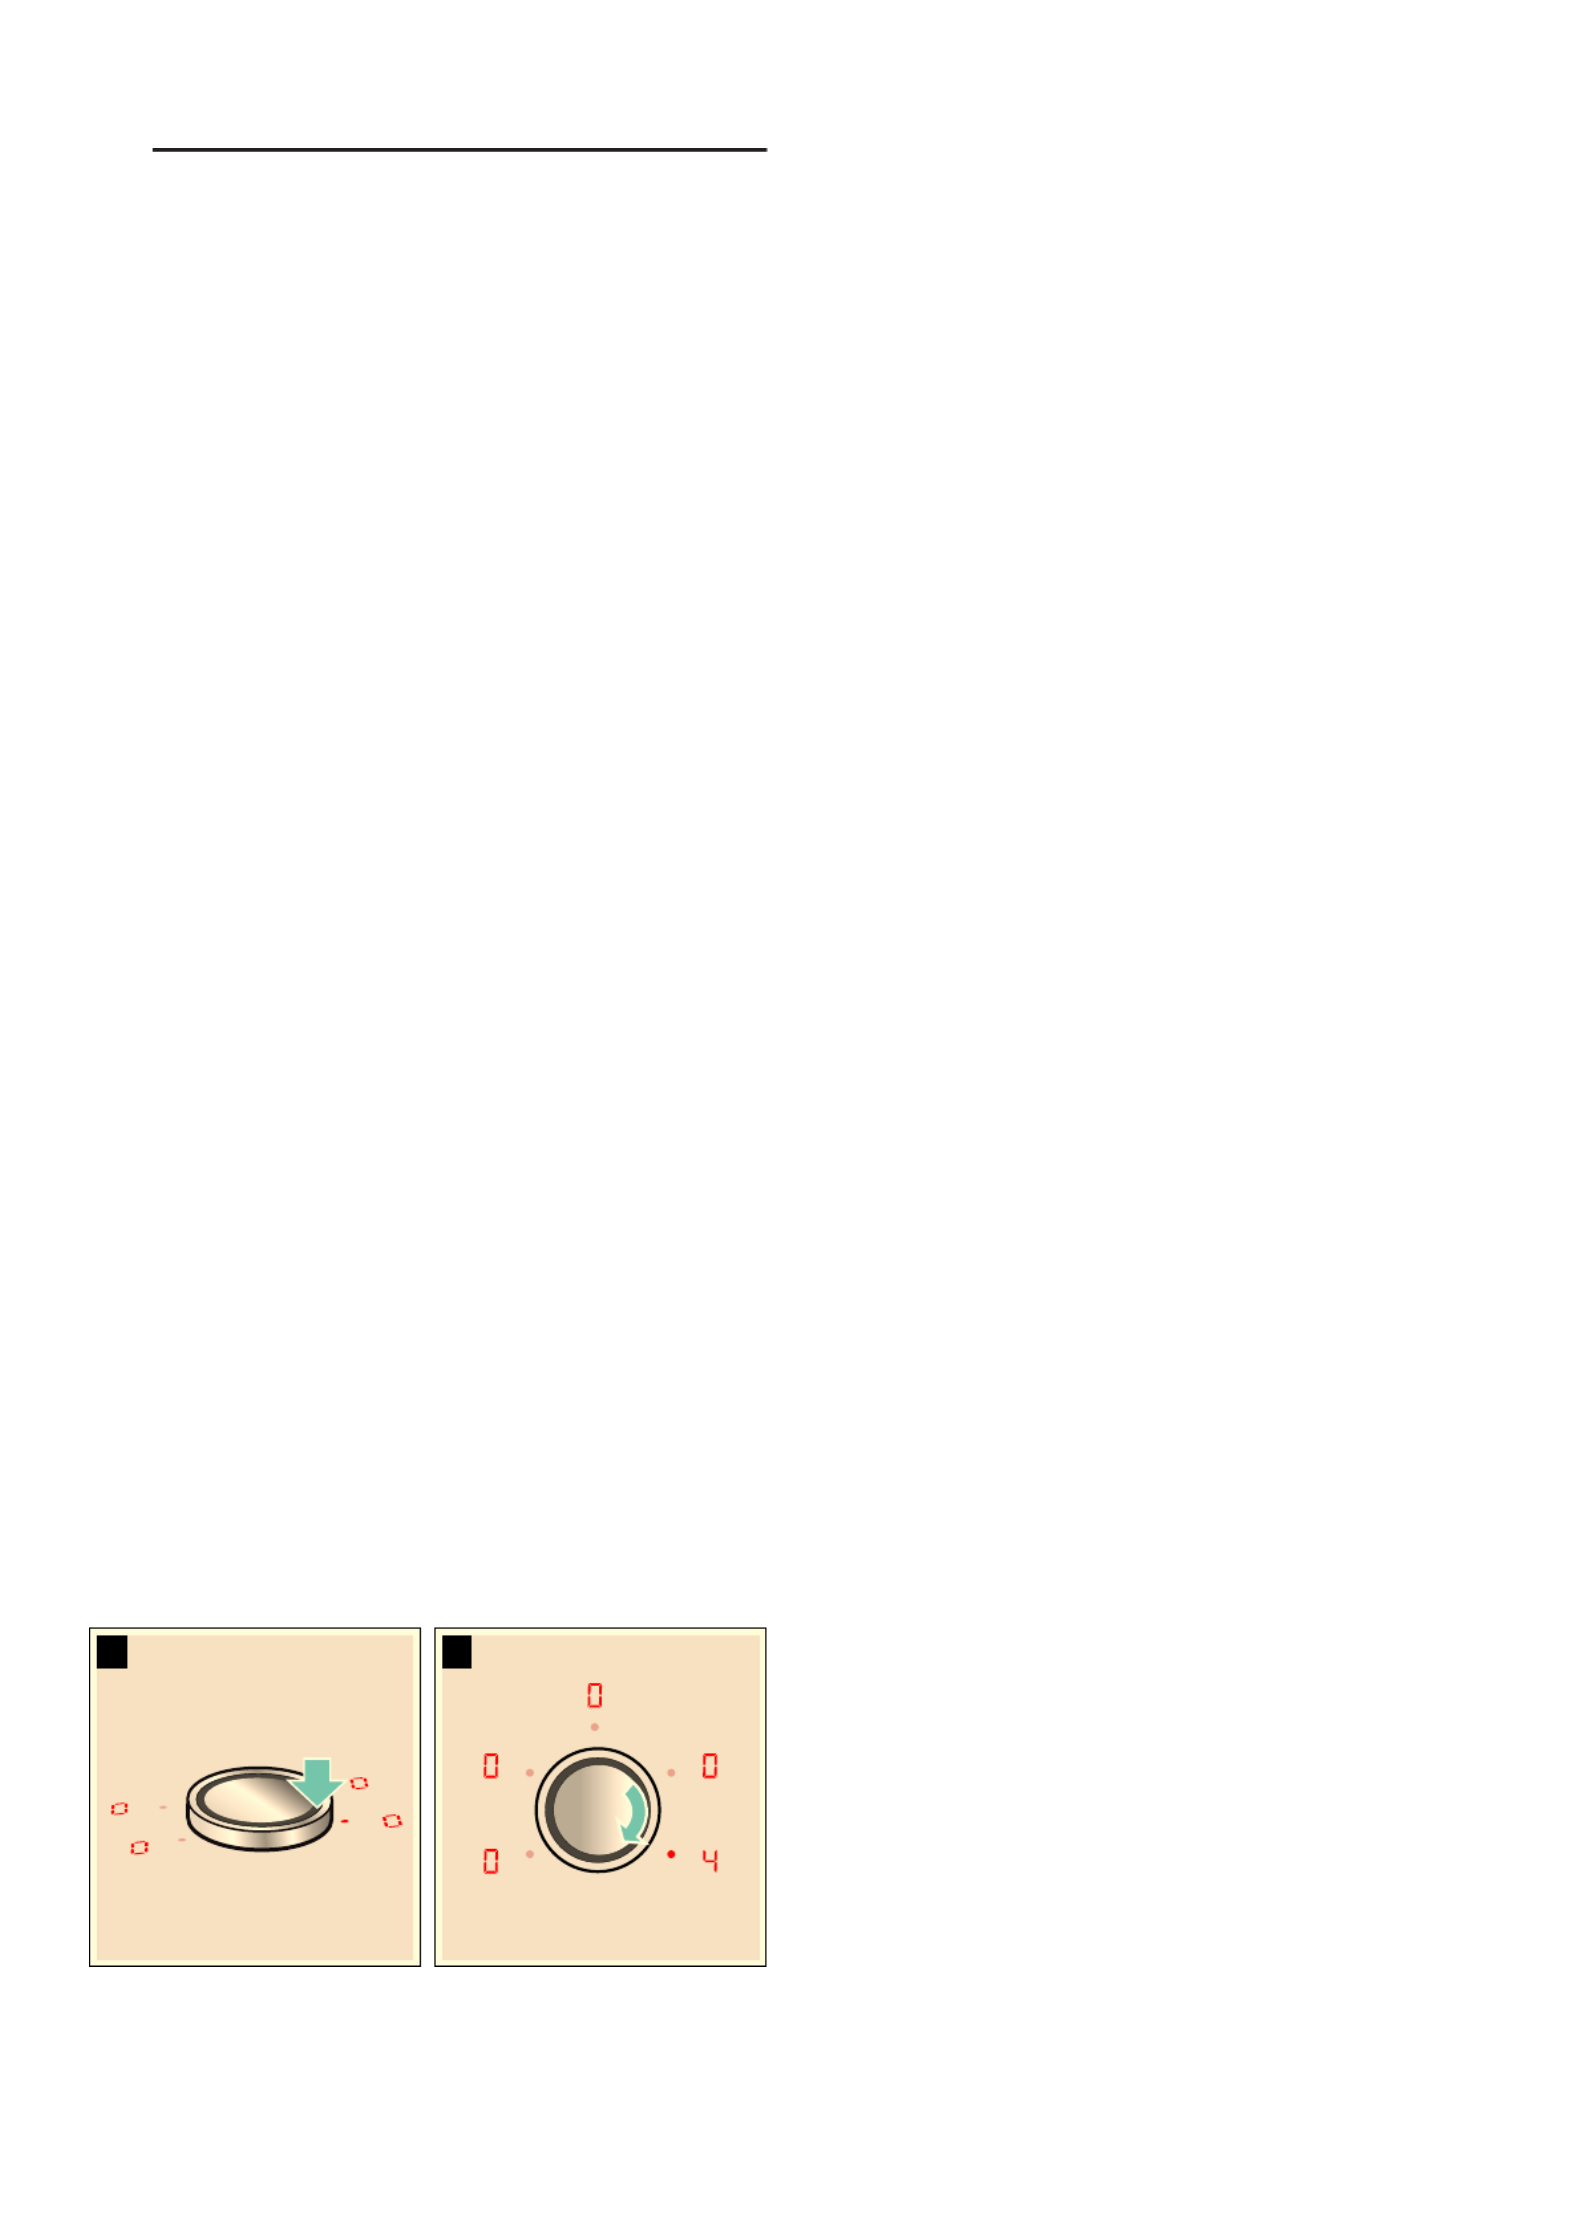
Selecting a hotplate and heat setting
The hob must be switched on.
1. Select the hotplate. To do this, touch the twist knob
in the appropriate area for the required hotplate.
2. Turn the twist knob until the required heat setting
appears in the heat setting display.
The heat setting is set.
Changing the heat setting
Select the hotplate and change the heat setting using
the twist knob.
Switching off the hotplate
Select the hotplate and turn the twist knob until ‹
appears. The hotplate switches itself off and the
residual heat indicator lights up.
Notes
■If no pan has been placed on the hotplate, the
selected power level flashes. After a certain time has
elapsed, the hotplate switches off.
■If a pan has been placed on the hotplate before
switching on the hob, it will be detected within
20 seconds of pressing the main switch and the
hotplate will be selected automatically. Once
detected, select the power level within the next
20 seconds or the hotplate will switch off.
If more than one pan is placed on the hob, only one
will be detected when switching it on.
Chef's recommendations
Recommendations
■When heating up puree, cream soups and thick
sauces, stir occasionally.
■Set heat setting 8 to 9 for preheating.
■When cooking with the lid on, turn the heat setting
down as soon as steam escapes between the lid
and the cookware. Steam does not need to escape
for a good cooking result.
■After cooking, keep the lid on the cookware until you
serve the food.
■To cook with the pressure cooker, observe the
manufacturer's instructions.
■Do not cook food for too long, otherwise the
nutrients will be lost. The kitchen clock can be used
to set the optimum cooking time.
■For a more healthy cooking result, smoking oil
should be avoided.
■To brown food, fry small portions in succession.
■Cookware may reach high temperatures while the
food is cooking. We recommend that you use oven
gloves.
■You can find recommendations for energy-efficient
cooking in section ~ "Environmental protection"

Operating the appliance en
13
Cooking table
The table shows which heat setting is suitable for each
type of food. The cooking time may vary depending on
the type, weight, thickness and quality of the food.
Heat setting Cooking time
(mins)
Melting
Chocolate coating 1 - 1. -
Butter, honey, gelatine 1 - 2 -
Heating and keeping warm
Stew, e.g. lentil stew 1. - 2 -
Milk* 1. - 2. -
Heating sausages in water* 3 - 4 -
Defrosting and heating
Spinach, frozen 3 - 4 15 - 25
Goulash, frozen 3 - 4 35 - 55
Poaching, simmering
Potato dumplings* 4. - 5. 20 - 30
Fish* 4 - 5 10 - 15
White sauces, e.g. Béchamel sauce 1 - 2 3 - 6
Whisked sauces, e.g. sauce béarnaise, hollandaise 3 - 4 8 - 12
Boiling, steaming, braising
Rice (with double the volume of water) 2. - 3. 15 - 30
Rice pudding*** 2 - 3 30 - 40
Unpeeled boiled potatoes 4. - 5. 25 - 35
Boiled potatoes 4. - 5. 15 - 30
Pasta, noodles* 6 - 7 6 - 10
Stew 3. - 4. 120 - 180
Soups 3. - 4. 15 - 60
Vegetables 2. - 3. 10 - 20
Vegetables, frozen 3. - 4. 7 - 20
Cooking in a pressure cooker 4. - 5. -
Braising
Roulades 4 - 5 50 - 65
Pot roast 4 - 5 60 - 100
Goulash*** 3 - 4 50 - 60
* Without lid
** Turn several times
*** Preheat to heat setting 8 - 8.

en Operating the appliance
14
Roasting/frying with little oil*
Escalope, plain or breaded 6 - 7 6 - 10
Escalope, frozen 6 - 7 6 - 12
Chop, plain or breaded** 6 - 7 8 - 12
Steak (3 cm thick) 7 - 8 8 - 12
Poultry breast (2 cm thick)** 5 - 6 10 - 20
Poultry breast, frozen** 5 - 6 10 - 30
Rissoles (3 cm thick)** 4. - 5. 20 - 30
Hamburgers (2 cm thick)** 6 - 7 10 - 20
Fish and fish fillet, plain 5 - 6 8 - 20
Fish and fish fillet, breaded 6 - 7 8 - 20
Fish, breaded and frozen, e.g. fish fingers 6 - 7 8 - 15
Scampi, prawns 7 - 8 4 - 10
Sautéeing fresh vegetables and mushrooms 7 - 8 10 - 20
Stir-fry, vegetables, meat cut in Asian-style strips 7 - 8 15 - 20
Frozen dishes, e.g. roasted dishes 6 - 7 6 - 10
Pancakes (baked in succession) 6. - 7. -
Omelette (cooked in succession) 3. - 4. 3 - 10
Fried eggs 5 - 6 3 - 6
Deep-fat frying* (150-200 g per portion in 1-2 l oil, deep-fat fried in portions)
Frozen products, e.g. chips, chicken nuggets 8 - 9 -
Croquettes, frozen 7 - 8 -
Meat, e.g. chicken portions 6 - 7 -
Fish, breaded or in beer batter 6 - 7 -
Vegetables, mushrooms, breaded or battered, tempura 6 - 7 -
Small baked items, e.g. doughnuts, fruit in batter 4 - 5 -
Heat setting Cooking time
(mins)
* Without lid
** Turn several times
*** Preheat to heat setting 8 - 8.

Time-setting options en
15
OTime-setting options
Ti me - s e t t i ng op t i ons
Your hob has three timer functions:
■Programming the cooking time
■Kitchen timer
■Stopwatch function
Programming the cooking time
The hotplate automatically switches off after the time
that is set has elapsed.
Setting procedure:
1. Select the hotplate and the required heat setting.
2. Touch the symbol. The x x display for the
hotplate lights up. lights up on the timer display.‹‹
3. Use the twist knob to select the required cooking
time.
The cooking time begins to elapse.
Note: The same cooking time can be set automatically
for all hotplates. The set time for each of the hotplates
counts down independently.
You can find information on automatically programming
the cooking time in section ~ "Basic settings"
Changing or deleting the time
Select the hotplate and then touch the x symbol.
Change the cooking time using the twist knob or on the
control panel or set ‹‹ to delete the programmed
cooking time.
When the time has elapsed
The hotplate switches off. An audible signal sounds, ‹
appears in the hotplate display and ‹‹ appears in the
timer display for one minute. The hotplate indicator x
flashes.Touch any symbol; the indicators go out and the
audible signal ceases.
Notes
■If a cooking time was programmed for several
hotplates, the cooking time which ends first appears
in the timer display. The display for the hotplate x
lights up.
■Select the relevant hotplate to call up the remaining
cooking time for a hotplate. The cooking time is
displayed for 10 seconds.
■You can set a cooking time of up to 99 minutes.
The kitchen timer
You can use the kitchen timer to set a time of up to 99
minutes.
This functions independently from the hotplates and
from other settings. This function does not automatically
switch off a hotplate.
How to activate the function
1. Touch the . symbol: ‹‹ and the b indicator appear
in the timer display.
2. Use the twist knob to select the required time.
3. Touch the symbol again to confirm the selected .
time.
The time begins to elapse.
Changing or deleting the time
Touch the symbol and use the twist knob to change .
the time or set it to .‹‹
When the time has elapsed
An audible signal sounds for one minute and the ‹‹
symbol flashes in the timer display. Touch the .
symbol again: The displays go out and the audible
signal ceases.
Produktspezifikationen
| Marke: | Neff |
| Kategorie: | Ofen |
| Modell: | T48PT00X0 |
Brauchst du Hilfe?
Wenn Sie Hilfe mit Neff T48PT00X0 benötigen, stellen Sie unten eine Frage und andere Benutzer werden Ihnen antworten
Bedienungsanleitung Ofen Neff

8 Oktober 2024
4 Oktober 2024
3 Oktober 2024
3 Oktober 2024
2 Oktober 2024
2 Oktober 2024
30 September 2024
29 September 2024
29 September 2024
29 September 2024
Bedienungsanleitung Ofen
- Ofen Aduro
- Ofen Samsung
- Ofen AFK
- Ofen Infiniton
- Ofen Clatronic
- Ofen Domo
- Ofen Emerio
- Ofen G3 Ferrari
- Ofen Coline
- Ofen Ernesto
- Ofen Tristar
- Ofen Basetech
- Ofen Sanyo
- Ofen Manta
- Ofen Medion
- Ofen Nedis
- Ofen Philips
- Ofen Sandstrøm
- Ofen SilverCrest
- Ofen Hanseatic
- Ofen Sunbeam
- Ofen Panasonic
- Ofen Clas Ohlson
- Ofen Quigg
- Ofen LG
- Ofen Adler
- Ofen Beper
- Ofen Bestron
- Ofen Camry
- Ofen Guzzanti
- Ofen MX Onda
- Ofen Princess
- Ofen Royal Catering
- Ofen Trisa
- Ofen Bosch
- Ofen AEG
- Ofen Ambiano
- Ofen Ardes
- Ofen Asko
- Ofen Siemens
- Ofen ATAG
- Ofen Bauknecht
- Ofen Bifinett
- Ofen Buffalo
- Ofen Caso
- Ofen Concept
- Ofen Electrolux
- Ofen Ellrona
- Ofen Fagor
- Ofen Fulgor
- Ofen Gaggenau
- Ofen Gorenje
- Ofen Jata
- Ofen Klarstein
- Ofen Koenic
- Ofen Küppersbusch
- Ofen Miele
- Ofen Proficook
- Ofen Rommelsbacher
- Ofen Severin
- Ofen Teka
- Ofen Unold
- Ofen Whirlpool
- Ofen Bomann
- Ofen Essentiel B
- Ofen First Austria
- Ofen Gastroback
- Ofen H.Koenig
- Ofen Hendi
- Ofen Korona
- Ofen Listo
- Ofen Melissa
- Ofen OK
- Ofen Russell Hobbs
- Ofen Steba
- Ofen Taurus
- Ofen Tefal
- Ofen Vox
- Ofen IKEA
- Ofen Conrad
- Ofen Day
- Ofen ECG
- Ofen König
- Ofen Mesko
- Ofen Bush
- Ofen Telefunken
- Ofen Thomson
- Ofen Black And Decker
- Ofen Trotec
- Ofen Mestic
- Ofen Amica
- Ofen BEKO
- Ofen Blaupunkt
- Ofen Blokker
- Ofen Boretti
- Ofen Bourgini
- Ofen Cosori
- Ofen Cuisinart
- Ofen Eldom
- Ofen Eta
- Ofen Fritel
- Ofen Grundig
- Ofen Heinner
- Ofen Home Electric
- Ofen Hotpoint
- Ofen Inventum
- Ofen Kenwood
- Ofen KitchenAid
- Ofen Koenig
- Ofen Krups
- Ofen Micromaxx
- Ofen Moulinex
- Ofen Primo
- Ofen Sage
- Ofen Schneider
- Ofen SEB
- Ofen Sharp
- Ofen Smeg
- Ofen Solac
- Ofen Tomado
- Ofen Trebs
- Ofen Waring Commercial
- Ofen Wilfa
- Ofen Witt
- Ofen WMF
- Ofen Coleman
- Ofen Dometic
- Ofen Outwell
- Ofen Alpina
- Ofen Ardo
- Ofen Ariston
- Ofen Aspes
- Ofen Atlantic
- Ofen Balay
- Ofen Blomberg
- Ofen Scandomestic
- Ofen Bompani
- Ofen Brandt
- Ofen Candy
- Ofen Castor
- Ofen Comfee
- Ofen Constructa
- Ofen Corberó
- Ofen Einhell
- Ofen Curtiss
- Ofen Daewoo
- Ofen Edesa
- Ofen Elektra Bregenz
- Ofen ELIN
- Ofen Eudora
- Ofen Eurotech
- Ofen Everglades
- Ofen Exquisit
- Ofen Mitsubishi
- Ofen Finlux
- Ofen GE
- Ofen Haier
- Ofen High One
- Ofen Hisense
- Ofen Hoover
- Ofen Arthur Martin
- Ofen Hotpoint-Ariston
- Ofen Iberna
- Ofen Ignis
- Ofen Bartscher
- Ofen Indesit
- Ofen Juno
- Ofen Baumatic
- Ofen Kelvinator
- Ofen Bertazzoni
- Ofen Luxor
- Ofen Lynx
- Ofen Maytag
- Ofen Midea
- Ofen Caple
- Ofen Montiss
- Ofen Nordmende
- Ofen EAS Electric
- Ofen PKM
- Ofen Privileg
- Ofen Progress
- Ofen Rex
- Ofen Rommer
- Ofen ETNA
- Ofen Scholtès
- Ofen Frigidaire
- Ofen Svan
- Ofen Techwood
- Ofen Thor
- Ofen V-ZUG
- Ofen Vestel
- Ofen Vestfrost
- Ofen Junker
- Ofen Zanker
- Ofen Kaiser
- Ofen Zanussi
- Ofen Zanussi-Electrolux
- Ofen KKT Kolbe
- Ofen Zerowatt
- Ofen Leonard
- Ofen M-System
- Ofen MACH
- Ofen Monogram
- Ofen Oranier
- Ofen Pelgrim
- Ofen Philco
- Ofen Respekta
- Ofen Rosières
- Ofen Therma
- Ofen Thermador
- Ofen Valberg
- Ofen Viva
- Ofen Eurom
- Ofen Altus
- Ofen Arçelik
- Ofen Continental Edison
- Ofen Hitachi
- Ofen Hyundai
- Ofen Kernau
- Ofen Orava
- Ofen Tesla
- Ofen Livoo
- Ofen Imperial
- Ofen DCG
- Ofen Liebherr
- Ofen Güde
- Ofen Elica
- Ofen Bimar
- Ofen Beem
- Ofen Dualit
- Ofen Morphy Richards
- Ofen Rowenta
- Ofen Sencor
- Ofen DeLonghi
- Ofen Biltema
- Ofen Element
- Ofen Eico
- Ofen Ariete
- Ofen Efbe-Schott
- Ofen Fakir
- Ofen Franke
- Ofen Kalorik
- Ofen Optimum
- Ofen Saro
- Ofen Scarlett
- Ofen Ufesa
- Ofen Tripp Lite
- Ofen Anslut
- Ofen Cecotec
- Ofen Zephir
- Ofen Husqvarna
- Ofen Wolkenstein
- Ofen Gemini
- Ofen Termozeta
- Ofen Frilec
- Ofen ICES
- Ofen Qlima
- Ofen Duux
- Ofen Honeywell
- Ofen Suntec
- Ofen Zibro
- Ofen Foster
- Ofen Opera
- Ofen Brother
- Ofen Atlas
- Ofen Matsui
- Ofen Silverline
- Ofen Cramer
- Ofen Binatone
- Ofen Frifri
- Ofen Novy
- Ofen Airforce
- Ofen Airlux
- Ofen ALNO
- Ofen Cata
- Ofen Crissair
- Ofen Cylinda
- Ofen De Dietrich
- Ofen Dominox
- Ofen Elba
- Ofen Falcon
- Ofen Falmec
- Ofen Faure
- Ofen Freggia
- Ofen Hansa
- Ofen Leisure
- Ofen Lofra
- Ofen MPM
- Ofen Nodor
- Ofen Prima
- Ofen Sauter
- Ofen Stoves
- Ofen Thermex
- Ofen UPO
- Ofen Zigmund And Shtain
- Ofen Friac
- Ofen Thomas
- Ofen ROWI
- Ofen Imetec
- Ofen Logik
- Ofen Team
- Ofen Venga
- Ofen GYS
- Ofen Veripart
- Ofen Bizerba
- Ofen Thetford
- Ofen Dacor
- Ofen Stiebel Eltron
- Ofen Truma
- Ofen Champion
- Ofen Premium
- Ofen Campart
- Ofen Campingaz
- Ofen Americana
- Ofen Bluesky
- Ofen Heller
- Ofen Orima
- Ofen Proline
- Ofen Dimplex
- Ofen Faber
- Ofen Kayoba
- Ofen Matrix
- Ofen Cambridge
- Ofen Mora
- Ofen Westinghouse
- Ofen Eccotemp
- Ofen Wolf
- Ofen Amana
- Ofen Arthur Martin-Electrolux
- Ofen Euromaid
- Ofen Galanz
- Ofen Gram
- Ofen Merrychef
- Ofen Tesy
- Ofen Tepro
- Ofen NextBase
- Ofen Vivax
- Ofen EWT
- Ofen Omega
- Ofen Profilo
- Ofen Sauber
- Ofen Zelmer
- Ofen Kleenmaid
- Ofen Lamona
- Ofen Limit
- Ofen Meireles
- Ofen Tricity Bendix
- Ofen Vitrokitchen
- Ofen White And Brown
- Ofen Jamie Oliver
- Ofen Breville
- Ofen George Foreman
- Ofen Esperanza
- Ofen Kogan
- Ofen Innoliving
- Ofen Navitel
- Ofen Rösle
- Ofen Benavent
- Ofen Edy
- Ofen Hoover-Helkama
- Ofen Milectric
- Ofen New Pol
- Ofen BORA
- Ofen Master Kitchen
- Ofen Zenith
- Ofen Insignia
- Ofen Alpatec
- Ofen Cosmo
- Ofen Olimpia Splendid
- Ofen Crosley
- Ofen Xblitz
- Ofen AKO
- Ofen Aurora
- Ofen Beha
- Ofen Danby
- Ofen Krefft
- Ofen Viking
- Ofen Acec
- Ofen Vedette
- Ofen Sogo
- Ofen Tracer
- Ofen Alde
- Ofen Ariston Thermo
- Ofen Mellerware
- Ofen La Nordica
- Ofen Proctor Silex
- Ofen Zibro Kamin
- Ofen Gourmetmaxx
- Ofen Signature
- Ofen Ninja
- Ofen Wamsler
- Ofen RCA
- Ofen Bellini
- Ofen Swan
- Ofen Soler & Palau
- Ofen AYA
- Ofen Mill
- Ofen Harvia
- Ofen Fisher & Paykel
- Ofen Esatto
- Ofen Drew & Cole
- Ofen Hamilton Beach
- Ofen Orbegozo
- Ofen Napoleon
- Ofen Ilve
- Ofen Furrion
- Ofen Izzy
- Ofen CaterChef
- Ofen Unox
- Ofen CDA
- Ofen General Electric
- Ofen Schock
- Ofen Flavel
- Ofen Saturn
- Ofen Char-Broil
- Ofen Cadac
- Ofen Outdoorchef
- Ofen Eurochef
- Ofen Berg
- Ofen Defy
- Ofen Duronic
- Ofen Edilkamin
- Ofen Eltac
- Ofen Emax
- Ofen Firefriend
- Ofen Fratelli Onofri
- Ofen Fuave
- Ofen ILive
- Ofen Jocel
- Ofen Justus
- Ofen Kenmore
- Ofen La Germania
- Ofen Lacanche
- Ofen Landmann
- Ofen Luxell
- Ofen Magic Chef
- Ofen Marynen
- Ofen Mistral
- Ofen Nobo
- Ofen OBU
- Ofen Oster
- Ofen Premier
- Ofen Rangemaster
- Ofen Rival
- Ofen Roadeyes
- Ofen Ronco
- Ofen Salton
- Ofen Scancool
- Ofen Sirius
- Ofen Solitaire
- Ofen SPT
- Ofen Steelmatic
- Ofen Sunpentown
- Ofen Technika
- Ofen Tecnolux
- Ofen Grunkel
- Ofen Tower
- Ofen Turbotronic
- Ofen Vornado
- Ofen Weasy
- Ofen WLA
- Ofen WestBend
- Ofen BLANCO
- Ofen Parmco
- Ofen Bella
- Ofen Instant
- Ofen Hatco
- Ofen Cadel
- Ofen Melchioni
- Ofen Barbecook
- Ofen Aroma
- Ofen Avanti
- Ofen Kunft
- Ofen Cola
- Ofen Kucht
- Ofen Roller Grill
- Ofen Becken
- Ofen Wells
- Ofen Nevir
- Ofen JennAir
- Ofen Rinnai
- Ofen Winia
- Ofen BlueStar
- Ofen Romo
- Ofen Girmi
- Ofen Chefman
- Ofen Blaze
- Ofen Ravanson
- Ofen Fulgor Milano
- Ofen Godrej
- Ofen German Pool
- Ofen Dash
- Ofen Traeger
- Ofen PowerXL
- Ofen Flama
- Ofen Axis
- Ofen Mibrasa
- Ofen ZLine
- Ofen Malmbergs
- Ofen K&H
- Ofen Creda
- Ofen Arctic Cooling
- Ofen Emeril Lagasse
- Ofen Zavor
- Ofen Barazza
- Ofen Artusi
- Ofen MSR
- Ofen Vulcan
- Ofen Glem Gas
- Ofen Nemco
- Ofen Nesco
- Ofen Nutrichef
- Ofen Cuckoo
- Ofen Sôlt
- Ofen Panadero
- Ofen Blodgett
- Ofen Riviera & Bar
- Ofen Pit Boss
- Ofen Chef
- Ofen APW Wyott
- Ofen Khind
- Ofen TurboChef
- Ofen Hestan
- Ofen Koblenz
- Ofen Alto-Shaam
- Ofen Promis
- Ofen Hiberg
- Ofen Spring USA
- Ofen Cecilware
- Ofen Gasmate
- Ofen Companion
- Ofen LERAN
- Ofen Buschbeck
- Ofen Belling
- Ofen Cookology
- Ofen Summit
- Ofen Forge Adour
- Ofen Brastemp
- Ofen ARC
- Ofen Electric Co
- Ofen Consul
- Ofen Haeger
- Ofen Linarie
- Ofen BAXTER
- Ofen BioChef
- Ofen YUNA
- Ofen Mabe
- Ofen Coyote
- Ofen Lafe
- Ofen Atosa
- Ofen Fiap
- Ofen Esmaltec
- Ofen NU-VU
- Ofen Heathus
- Ofen Everdure
- Ofen DPM
- Ofen Euro Appliances
- Ofen Emilia
- Ofen Petromax
- Ofen Robinhood
- Ofen InAlto
- Ofen ARDA
- Ofen Backyard Pro
- Ofen Capital
- Ofen Apelson
- Ofen TZS First Austria
- Ofen PITT
- Ofen Electroline
- Ofen XO
- Ofen Germanica
- Ofen Café
- Ofen Porter & Charles
- Ofen Ribimex
- Ofen Aga
- Ofen John Lewis
- Ofen Končar
- Ofen Parkinson Cowan
- Ofen Alhafidh
- Ofen Caloric
- Ofen Thermocool
- Ofen Kubo
- Ofen Montpellier
- Ofen StGeorge
- Ofen Jenn-Air
- Ofen New World
- Ofen White-Westinghouse
- Ofen Kitchensmith
- Ofen Brixton
- Ofen Comelec
- Ofen Belion
- Ofen Thermomate
- Ofen Tisira
- Ofen Verona
- Ofen Simfer
- Ofen VENINI
- Ofen Adora
- Ofen Triomph
- Ofen KB Elements
- Ofen Pando
- Ofen Wiggo
- Ofen Nestor Martin-Electrolux
- Ofen Kluge
- Ofen Imarflex
- Ofen Mayer
- Ofen Acros
- Ofen HomeCraft
- Ofen La Cornue
- Ofen Goldbrunn
Neueste Bedienungsanleitung für -Kategorien-

2 Dezember 2024
2 Dezember 2024
2 Dezember 2024
29 November 2024
29 November 2024
29 November 2024
29 November 2024
29 November 2024
29 November 2024
29 November 2024