Magellan RoadMate 5320-LM Bedienungsanleitung
Lesen Sie kostenlos die 📖 deutsche Bedienungsanleitung für Magellan RoadMate 5320-LM (36 Seiten) in der Kategorie Navigator. Dieser Bedienungsanleitung war für 25 Personen hilfreich und wurde von 2 Benutzern mit durchschnittlich 4.5 Sternen bewertet
Seite 1/36

User Manual
Magellan RoadMate®

IMPORTANT SAFETY WARNINGS
Keep the Magellan RoadMate receiver safe
from extreme temperature conditions. For
example, do not leave it exposed to direct
sunlight for an extended period of time.
Take care when mounting the Magellan
RoadMate receiver in your vehicle, whether
using the windshield mount or other mounts,
that it does not obstruct the driver’s view of
the road, interfere with the operation of the
vehicle’s safety devices such as air bags, or
present a hazard to occupants of the vehicle
should the receiver be dislodged while driving.
It is your responsibility to assess the risks
associated with damage to your vehicle or
vehicle occupants as the result of your choices
in mounting the Magellan RoadMate receiver.
Temperature
The maximum operating temperature is 140°F
(60°C).
Battery
The battery in the Magellan RoadMate receiver
is rechargeable and should not be removed. In
the event that it should need to be replaced,
please contact Magellan Technical Support.
Charging the Magellan RoadMate
An optional AC adapter is available as an
accessory for your Magellan RoadMate. Use
of another type of AC adapter can result in
malfunction and/or possible fire hazard due to
battery overheating.
Only use the car charger approved for/supplied
with your Magellan RoadMate receiver. Use of
another type of car charger will result in fire or
electric shock.
For safety reasons, the battery in your
Magellan RoadMate receiver will stop charging
when the ambient temperature is less than
32°F (0°C) or more than 113°F (45°C).
It will take approximately 4 hours of charging
the Magellan RoadMate receiver through
the vehicle power adapter or optional AC
adapter to obtain a full battery charge. It is
The Magellan RoadMate receiver is a vehicle-
navigation aid designed to assist you in arriving
at your selected destinations. When using
the Magellan RoadMate receiver, these safety
rules must be followed to prevent accidents
that can result in injury or death to yourself or
others:
Please check the applicable regulations in your
state regarding windshield mounting. Certain
states prohibit the mounting of any items on
your windshield. Go to www.magellanGPS.com
for alternative mounting solutions.
When driving, the need to view the display is
minimal. Voice prompts will guide you to your
destination. The driver should enter data or
program the Magellan RoadMate receiver only
when the vehicle is stationary. Only a vehicle
passenger should enter data or program the
Magellan RoadMate receiver while the vehicle
is moving. Do not become distracted by the
receiver while driving, and always be fully
aware of all driving conditions.
It is your responsibility to comply with all
traffic laws and to use the Magellan RoadMate
and mounting options in such a manner that
the user is in compliance with applicable laws.
Roads, points of interest (POIs), business
and service locations may change over
time. As a result the database may contain
inaccuracy. Also, the database does not
include, analyse, process, consider, or
reflect any of the following: legal restrictions
(such as vehicle type, weight, height, width,
load and speed restrictions); road slope or
gradient; bridge height, width, weight or other
limits; population density; neighborhood
quality or safety; availability or proximity of
police, emergency rescue, medical or other
assistance; construction work zones or
hazards; road or lane closures; road, traffic or
traffic facilities’ safety or condition; weather
conditions; pavement characteristics or
conditions; special events; traffic congestion. It
is your responsibility to disregard any unsafe,
hazardous or illegal route suggestions.

recommended that you charge the battery
initially for at least 2 hours.
Use only the charger approved for your
Magellan RoadMate receiver.
Estimated usage of the Magellan RoadMate on
battery power is approximately 2 hours.
Federal Communication Commission
Interference Statement
This equipment has been tested and found
to comply with the limits for class B digital
devices, in accordance with part 15 of the
FCC Rules. These limits are designed to
provide reasonable protection against harmful
interference in a residential installation.
This equipment generates, uses and can
radiate radio frequency energy and, if not
installed and used in accordance with the
instructions, may cause harmful interference
to radio communications. However, there is
no guarantee that interference will not occur
in a particular installation. If this equipment
does cause harmful interference to radio or
television reception, which can be determined
by turning the equipment off and on, the user
is encouraged to try to correct the interference
by one of the following measures:
Reorient or relocate the receiving antenna.
Increase the separation between the
equipment and receiver.
Connect the equipment into an outlet on a
circuit different from that to which the receiver
is connected.
Consult the dealer or an experienced radio/TV
technician for help.
This device complies with Part 15 of the FCC
Rules. Operation is subject to the following
two conditions: (1) This device may not cause
harmful interference, and (2) this device must
accept any interference received, including
interference that may cause undesired
operation.
FCC Caution:
Any changes or modifications not
expressly approved by the party responsible for
compliance could void the user’s authority to
operate this equipment.
IMPORTANT NOTE:
FCC Radiation Exposure Statement:
This equipment complies with FCC radiation
exposure limits set forth for an uncontrolled
environment. End users must follow the
specific operating instructions for satisfying
RF exposure compliance.
This transmitter must not be co-located
or operating in conjunction with any other
antenna or transmitter.
In order to maintain compliance with FCC
regulations, shielded cables must be used with
this equipment. Operation with non-approved
equipment or unshielded cables is likely to
result in interference to radio and TV reception.
The user is cautioned that changes and
modifications made to the equipment without
the approval of manufacturer could void the
user’s authority to operate this equipment.
The Magellan RoadMate receiver must be
installed and operated at a distance no closer
then 8 inches (20 cm) from the user.
This Class B digital apparatus meets all
requirements of the Canadian Interference-
Causing Equipment Regulations.
IC statement
Operation is subject to the following two
conditions:
1. This device may not cause interference
and
2. This device must accept any interference,
including interference that may cause
undesired operation of the device.

ii
Avoiding a Maneuver ............................................................................................. 10
Changing Route Options 11 ........................................................................................
Volume 11 .........................................................................................................................
Changing the Volume from the Map Screen 11 ..........................................................
OneTouch Menu 12 ..................................................................................
Accessing the OneTouch Menu 12 ..............................................................................
The Home Button 12 .........................................................................................................
Saving an Address to a OneTouch Icon 12 ..................................................................
Changing the Address or Search of a OneTouch Icon 12 ...........................................
Saving a POI Search Criteria to a OneTouch Icon 13 ..................................................
Setting a Route to a OneTouch Icon 13 .......................................................................
Selecting a Destination 14 .......................................................................
Creating a Destination to an Address 14 ....................................................................
Tips on Entering Addresses Quickly 15 ............................................................................
Intersections 15 ................................................................................................................
Creating a Destination to an Intersection 15 .............................................................
City Centers 16 .................................................................................................................
Creating a Destination to a City Center 16 .................................................................
Previous Destinations 16 ..................................................................................................
Routing to a Previous Destination 16 .........................................................................
Clearing the list of Previous Destinations 16 .............................................................
Address Book 16 ...............................................................................................................
Saving a Destination to Your Address Book 16 ..........................................................
Accessing an Address in Your Address Book 17 ........................................................
Routing to an Address in Your Address Book 17 ........................................................
Points of Interest (POI) 18 .......................................................................
Creating a Route to a POI by Category 18 ..................................................................
Creating a Route to a POI by Name 18 .......................................................................
Creating a Route to a Highway Exit POI 19 ................................................................
Traveling on a Route 20 ...........................................................................
Map Screen 20 ..................................................................................................................
Maneuver List 20 ..............................................................................................................
Accessing the Maneuver List 20 ................................................................................
Excluding a Maneuver 20 ...........................................................................................
Types of Routes 20 ............................................................................................................
Changing the Routing Method 20 ...............................................................................
To Change the Default Routing Method 21 ................................................................
Special Routing Functions 21 ...........................................................................................
Cancelling a Route 21 ................................................................................................

1
Magellan RoadMate GPS Receiver
The Magellan® RoadMate® receiver is a
vehicle navigation product that utilizes GPS
signals from satellites to calculate your
precise location and compute navigational
information that can be used to guide you to
your destination. Knowing its position and
movement, it can then overlay this information
on detailed maps to provide a visual
representation of your location.
With the Magellan RoadMate receiver you can:
Save searches and addresses under the
OneTouch™ menu for fast, convenient access
to favorite destinations.
Store your home address and quickly get
routing details to your home.
Enter and save addresses in your address
book that can be accessed at any time and get
routing information to that address.
Route to an address that you enter using the
QuickSpell™ and Smart City search for easy,
errorless address entry.
Route to any point of interest (POI) that has
been preloaded into your Magellan RoadMate
receiver.
Create a route with multiple destinations.
Handy for business people who need routing
information to many destinations.
View POIs that are near exits ahead of you on
the highway. The Highway Exit POIs function
provides you with a list of gas stations,
restaurants, hotels and auto repair shops
located nearby exits you are approaching while
travelling on the interstate.
Customize your Magellan RoadMate receiver
to meet your needs using the Settings menu.
Receive traffic information so as to avoid
delays in your travel.
The user interface for the Magellan RoadMate
receiver is easy and simple to follow once you
understand the basics. You may never need
to refer to this manual, but if you do, we have
tried to present it in a form that makes it easy
for you to access the function you are trying to
use and follow the steps provided.
The Magellan RoadMate receiver has a built-in
battery so, in most cases, you will be able to
follow these instructions while reading them
on your computer screen without plugging
the Magellan RoadMate receiver to the AC
power using an optional AC power adapter. You
should note that while indoors you may not
get strong enough satellite signals to compute
your location, so your location information
may not be updated. However, the power of
the GPS chipset installed in the Magellan
RoadMate receiver will pick up satellite signals
in some very demanding locations. You may
find that the Magellan RoadMate receiver is
computing a position, even indoors. Even with
the improved GPS chipset, the receiver may
not be able to always compute a fix indoors.
This is especially important to note if you are in
a garage or other overhanging structure. If you
find you are not getting strong enough satellite
signals while in a garage or other structure,
move to a location where there is a clear view
of the sky and you should immediately see an
improvement in signal strength.
The Magellan RoadMate receiver includes
Voice Alerts (Text-to-Speech) for driving
instructions.

2
Magellan RoadMate
(A) Power Switch
(B) micro SD card slot. (not available on all receivers) The microSD card is available for
accessing optional map regions. Check the Magellan store at www.magellangps.com for
additional map regions that may be available for your receiver.
(C) AV In. (not available on all receivers) Connect audio/visual display from optional Magellan
Backup Camera
(D) USB Connection. Power input from vehicle power adapter cable or optional AC power
adapter. Also used for connecting your receiver to a personal computer for updating maps
and software using the Magellan Content Manager application.
Reset
The reset button is located on the back of the
receiver in the lower right corner. If you have
problems with your receiver or in the unlikely
event that it locks up, use a paperclip and gently
insert it into the reset hole to press the reset
button with the receiver turned on. The receiver
should restart with the factory defaults loaded.
A
B
C
D
Reset
3
Fundamentals 2
Powering on the Magellan RoadMate receiver
The Power On/Off switch is located on the top
of the Magellan RoadMate receiver.
Turning the Magellan RoadMate receiver On
1. Press the power switch.
2. After the initial splash screen the
Warnings screen is displayed. Read and
tap .
Turning the Magellan RoadMate receiver Off
1. Press the power switch. The receiver will
automatically power off in 15 seconds.
[Cancel] cancels the power off sequence
and returns to last viewed screen.
[Power Down Now] turns the receiver off
immediately, bypassing the 15 second
delay.
Note: Anytime the power cable is disconnected
from the receiver or if power is turned off at
the 12v power receptacle, the receiver will
begin the power off sequence.
Vehicle Profile
The first time you power on the device you will
be given the opportunity to enter the Vehicle
Profile. Note that you can change this at any
time by accessing the vehicle profile icon from
the Main Menu.
The Vehicle Profile Menu provides access to
the six different vehicle details that are used
by the Magellan RoadMate. If you are going to
enter your vehicle information please note that
you must enter the height, width and length as
a minimum.
If you are not going to use the Vehicle Profile,
uncheck the Set Vehicle Profile box to
continue.
Bluetooth®
Pairing Bluetooth
The instructions shown here are for pairing a
phone for normal use.
1. The first time you use Bluetooth in your
Magellan RoadMate receiver, the receiver
will automatically ask you if you want to
pair a phone.
2. After selecting Yes the receiver is in
pairing mode. Follow the instructions in
your phone manual to set it in pairing
mode.
3. After the phone has searched for new
devices, select “Magellan Roadmate”
from the list.
4. Your phone will ask for a passcode.
5. Enter ‘1234’.Tap Yes on the Magellan
RoadMate.
6. A screen will confirm the successful
pairing.
Battery Levels
The Magellan RoadMate receiver has an
internal battery that is charging whenever
the receiver is connected to external power.
Note: The battery can only be serviced by
authorized Magellan repair facilities.
Viewing the Battery Level Indicator
1. While viewing the Map screen, tap on the
Menu button in the right corner.

5
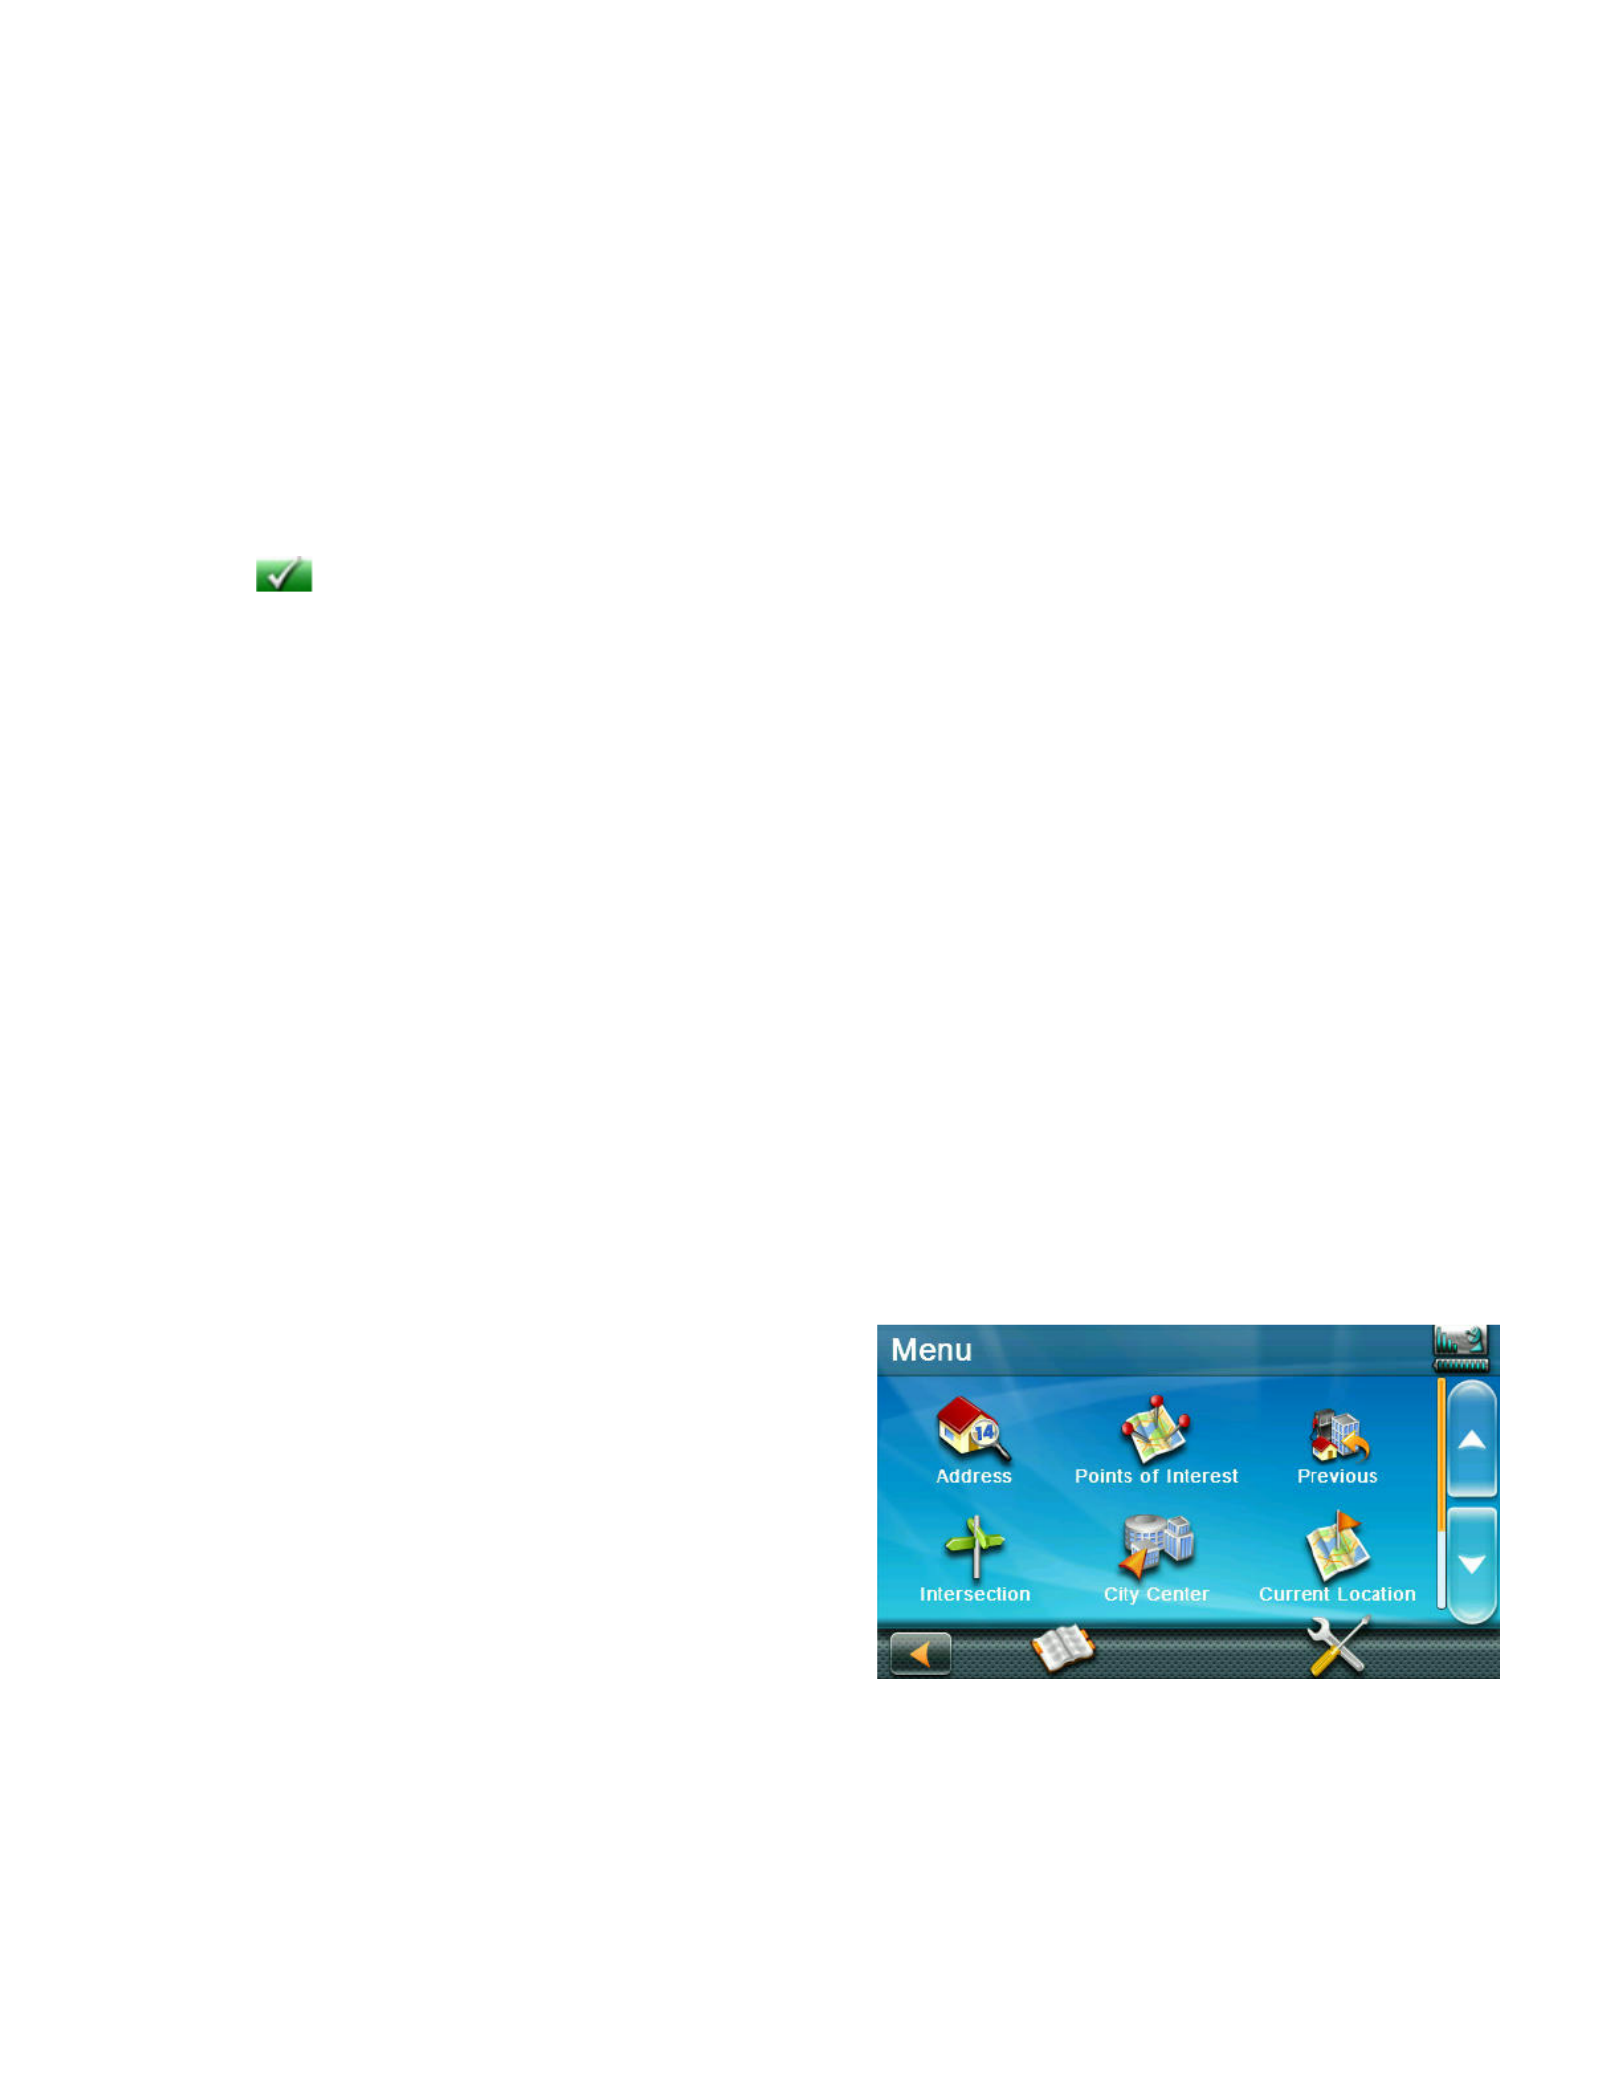
Main Menu
The Main Menu screen is the center for all
available functions of the Magellan RoadMate
receiver. The Main Menu contains large, easy
to access icons for all the major functions.
Accessing the Main Menu
1. From the Map screen tap Menu.
Functions Available from the Main Menu
Address Enter an address as
a destination for you
route.
Points of
Interest
Select a Point of
Interest (POI) from
the list of preloaded
locations as a
destination.
Previous List of the most resent
destinations that you
have gone to before
allowing you to quickly
select one to route to
again.
Intersection Create a route to the
intersection of two
streets.
City Center Create a route to the
geographical center of
a city.
Current
Location
Displays information
about your position
including the street
name, names of streets
forward and behind you
as well as the Lat/Long
information for your
position.
Back Access the Map screen.
Address Book Access the Address
Book where you can
save addresses and
destinations to have
available when needed.
Settings Displays the Settings
menu. This menu can
be used to access
functions used to
customize the Magellan
RoadMate receiver to
your personal needs.
Satellite
Status
Graphic display of the
strength of satellite
signals being received.
Battery Level Graphic display of the
current battery level.
Keypad
The keypad is the most common method for
entering data into the Magellan RoadMate
receiver. Understanding the keypad while
entering an address is an important part of
using your Magellan RoadMate receiver.
Keypad Overview
Backspace Moves the cursor one
position backwards,
deletes the preceding
character.
Shift Shifts between
uppercase and
lowercase characters.
Space Inserts a space at the
cursor position.
Numeric Displays a numeric
keypad.
Symbols Displays available
symbols.

6
Previous Previous destination
list (Enter City only)
When entering a
city, the previous
destinations list
displays a list of cities
previously entered.
Tap on a city from the
displayed list to accept
that city.
Zip Code (Enter City only)
Displays a numeric
keypad to quickly enter
a city when the zip code
is known.
List (Enter City only) While
entering a city, press
the List button to
bring up a list of cities
beginning with the
characters you have
entered.
Accept (Entering City) Accepts
the suggested city that
is displayed in the data
field. (Entering street)
Brings up a list of
streets beginning with
the characters entered.
Selecting From List
When a list of items found in the database are
displayed, use the arrows on the right to move
the list up and down and tap on the desired
item in the list to continue.
Selecting QWERTY or ABC Keyboard
1. Access the Main Menu.
2. Tap the Settings icon .
3. Tap Keyboard.
4. Select QWERTY or ABC.
Notes on Entering Data
If you are having trouble getting the results you
expected, here are a few useful tips.
• Check for apostrophes and hyphens. If you
do not see the POI or street name you are
looking for in the list, check to see if the
name has an apostrophe or hyphen.
• The more characters you enter, the smaller
the list of possible options is from which to
choose.
• When entering a street or city name it is
not necessary to use accented letters. You
can enter city and streets names using
only standard characters.
QuickSpell
Another feature the Magellan RoadMate
receiver uses to make entering cities
and streets easier is a feature known as
QuickSpell. As letters are entered for a city
or street the Quickspell feature checks the
database for cities or streets that begin with
the letters entered. Any letters that could
not be used to spell a city or street name are
greyed out. This provides quick and error-free
city and street name entry.
Smart City Search
The Magellan RoadMate receiver utilizes a
feature known as “Smart City Search”. Smart
City Search attempts to predict the city you are
looking for. This prediction is based upon two
factors; your position and cities you’ve gone to
before.
Whenever entering or searching on an address
the first screen displayed is the Enter City
Name keyboard.
As letters are entered, Quickspell checks the
database for cities beginning with the letters
entered. Keys that don’t spell a city in the
database are greyed out and Smart City Search
displays a suggested city in the text field.

7
If the city is correct, tap the button to
continue.
The button can be tapped to display
the list of cities that begin with the letters
entered.
Quickspell and Smart City Search makes
entering an address quick and easy with little
chance for errors.

8
Map Screen 3
The most commonly used screen is the Map
screen. Whether you are following a route or
just traveling around a city, the chances are
that the Map screen will be displayed. The Map
screen can be displayed in two unique modes:
normal and routing.
In normal mode, your position is shown on the
map along with the time. As you travel, your
position will be updated, giving you a clear view
of your position and surrounding streets.
(A) Current location.
(B) Information display. Displays speed, time
of day, elevation, compass direction. Tap on the
information field to change.
(C) Zoom Out/In.
(D) Access Main Menu.
(E) Access Highway POIs (displayed only while
on a highway).
(F) Access volume controls.
(G) Access Bluetooth functions.
(H) Access OneTouch Menu. OneTouch Menu
gives you instant access to your saved search
criteria and favorite destinations.
In routing mode additional information is
displayed providing detailed information about
the route you have selected.
(A) Turn instructions for next maneuver. Tap to
display the maneuver list (available only when
routing). Distance and road name for the next
maneuver. Tap to repeat last voice instruction.
(B) Speed limit
(C) Information display. Displays speed, time
of day, elevation, compass direction. While
routing it also can also display distance to
destination, estimated time of arrival (ETA),
and time remaining. Tap on the information
field to change.
(D) Zoom in and zoom out controls to change
the map scale.
(E) Access Main Menu.
(F) Access the list of nearest Highway Exit
POIs (available only when driving on a highway/
freeway/interstate).
(G) Access volume controls.
(H) Access Bluetooth functions.
(I) Access OneTouch Menu. OneTouch Menu
gives you instant access to your saved search
criteria and favorite destinations.
A
BC
D
E
F
G
A
B
C
D
E
F
G
H
H
I

9
Setting the Map Options
How your map is displayed can be customized
in Settings to your preferences.
1. From the Map screen, tap the MENU
button.
2. Tap the Settings Icon.
3. Tap Map button.
4. Use the Map Options screen to customize
what and how your map is to be displayed.
Setting the Map Modes (2D or 3D)
The map is normally displayed in 3D mode
(perspective view) but you can set the map to
2D mode (top down view) if so desired.
1. From the Map screen, tap anywhere on
the map. Additional controls appear.
2. Tap 2D to switch the map to 2D mode
from 3D mode, or tap 3D to switch the
map to 3D mode from 2D mode.
3. Tap .
3D Landmarks
3D Landmarks offer an extra layer of
visualization for architectural landmarks.
Setting Zoom Levels
Select the zoom level that best suits your
needs. Note that zoom levels are limited in 3D
mode. As you zoom out in 3D, the display will
switch to 2D at higher zoom levels.
1. Tap the ‘+’ or ‘-’ zoom level buttons at
the bottom of the Map screen to set the
desired zoom level.
Panning on the Map
1. While viewing the Map screen, slide your
finger or a stylus across the map.
2. The map screen changes to Pan mode.
3. When finished, tap and the map
returns to your current position.
Routing to a Panned Position
1. Pan the map until the location you wish to
route to is displayed.
2. Tap on the map at the point you want to go
to. A red push pin will be displayed along
with information about the point chosen
at the top of the screen.
3. Tap the GO button in the top left corner.
4. If an active route already exists, you will
need to define what to do with this new

10
route point:
Replace Destination:
the next destination
is cleared and replaced with the one
selected from the Pan screen.
Go There Now:
the selected location is
inserted in the route as an intermediate
destination before the next destination.
Add To Trip:
the selected destination is
added to the end of the current trip.
5. Tap the large GO button on the right to
begin navigating and return to the Map
screen.
Note: if the panned position does not
match an existing street address (i.e. the
destination is not along a road or street
that is stored in the map database), the
guidance will stop on the road that is
closest to your destination. A dashed
line to your final destination will then be
displayed on the map.
Current Location Screen
The Current Location screen displays the
approximate address of your current position,
the next and previous intersections, your
latitude, longitude, heading and elevation.
Accessing the Current Location Screen
1. From the Map screen tap on the current
position icon.
Saving Your Current Location to Your Address
Book
1. From the Map screen tap on the current
position icon.
2. Tap Save.
3. Edit information:
(optional) If you want to save this location
to the OneTouch menu as well as the
address book, check the Add to OneTouch
box.
4. Tap the Name field and use the keypad to
enter a name for the Address Book entry.
(optional) Tap List Categories to select a
category for this address. New categories
can be added from the Select Category
from List screen by tapping the +Add
button.
5. When the details for this address are
acceptable, tap .
6. If you have selected to save this point to
the OneTouch menu, you need to select a
button for the entry.
Maneuver List (Itinerary)
This screen is accessed from the Map screen
and is available only when routing.
Each line in the Maneuver List provides details
about the maneuvers in the order that they are
to be made, with the next maneuver at the top.
Accessing the Maneuver List
1. When actively on a route, tap the
maneuver icon in the top left corner of the
Map screen.
Avoiding a Maneuver
This is used to modify the route to possibly
avoid routing on a particular street.
1. Access the Maneuver List.
2. Tap the Avoid icon for the maneuver

11
you want to avoid.
3. Tap Yes to confirm.
4. The Magellan RoadMate receiver
recalculates the route and the Map screen
is displayed.
Changing Route Options
The options for how a route is computed can
be changed to Fastest Time, Shortest Distance,
Mostly Freeways, Least Use of Freeways.
1. Access the Maneuver List.
2. Tap on Route Options.
3. The four types of routes are displayed
with the computed time.
4. Tap on the desired route option.
5. The GO screen is displayed. Tap GO to
begin routing.
Volume
The volume can be adjusted or muted from the
Map screen. (The volume can also be adjusted
from Settings > Sound.)
Changing the Volume from the Map Screen
1. Tap the speaker icon . Additional controls
appear.
2. Tap on the Speaker button to mute the
volume, or tap the ‘+’ or ‘-’ icons to
change the volume levels.
3. Tap .
When muted the speaker icon on the Map
screen will appear with a red diagonal
line through it. Tap on the speaker icon
again ut unmute the volume.
12
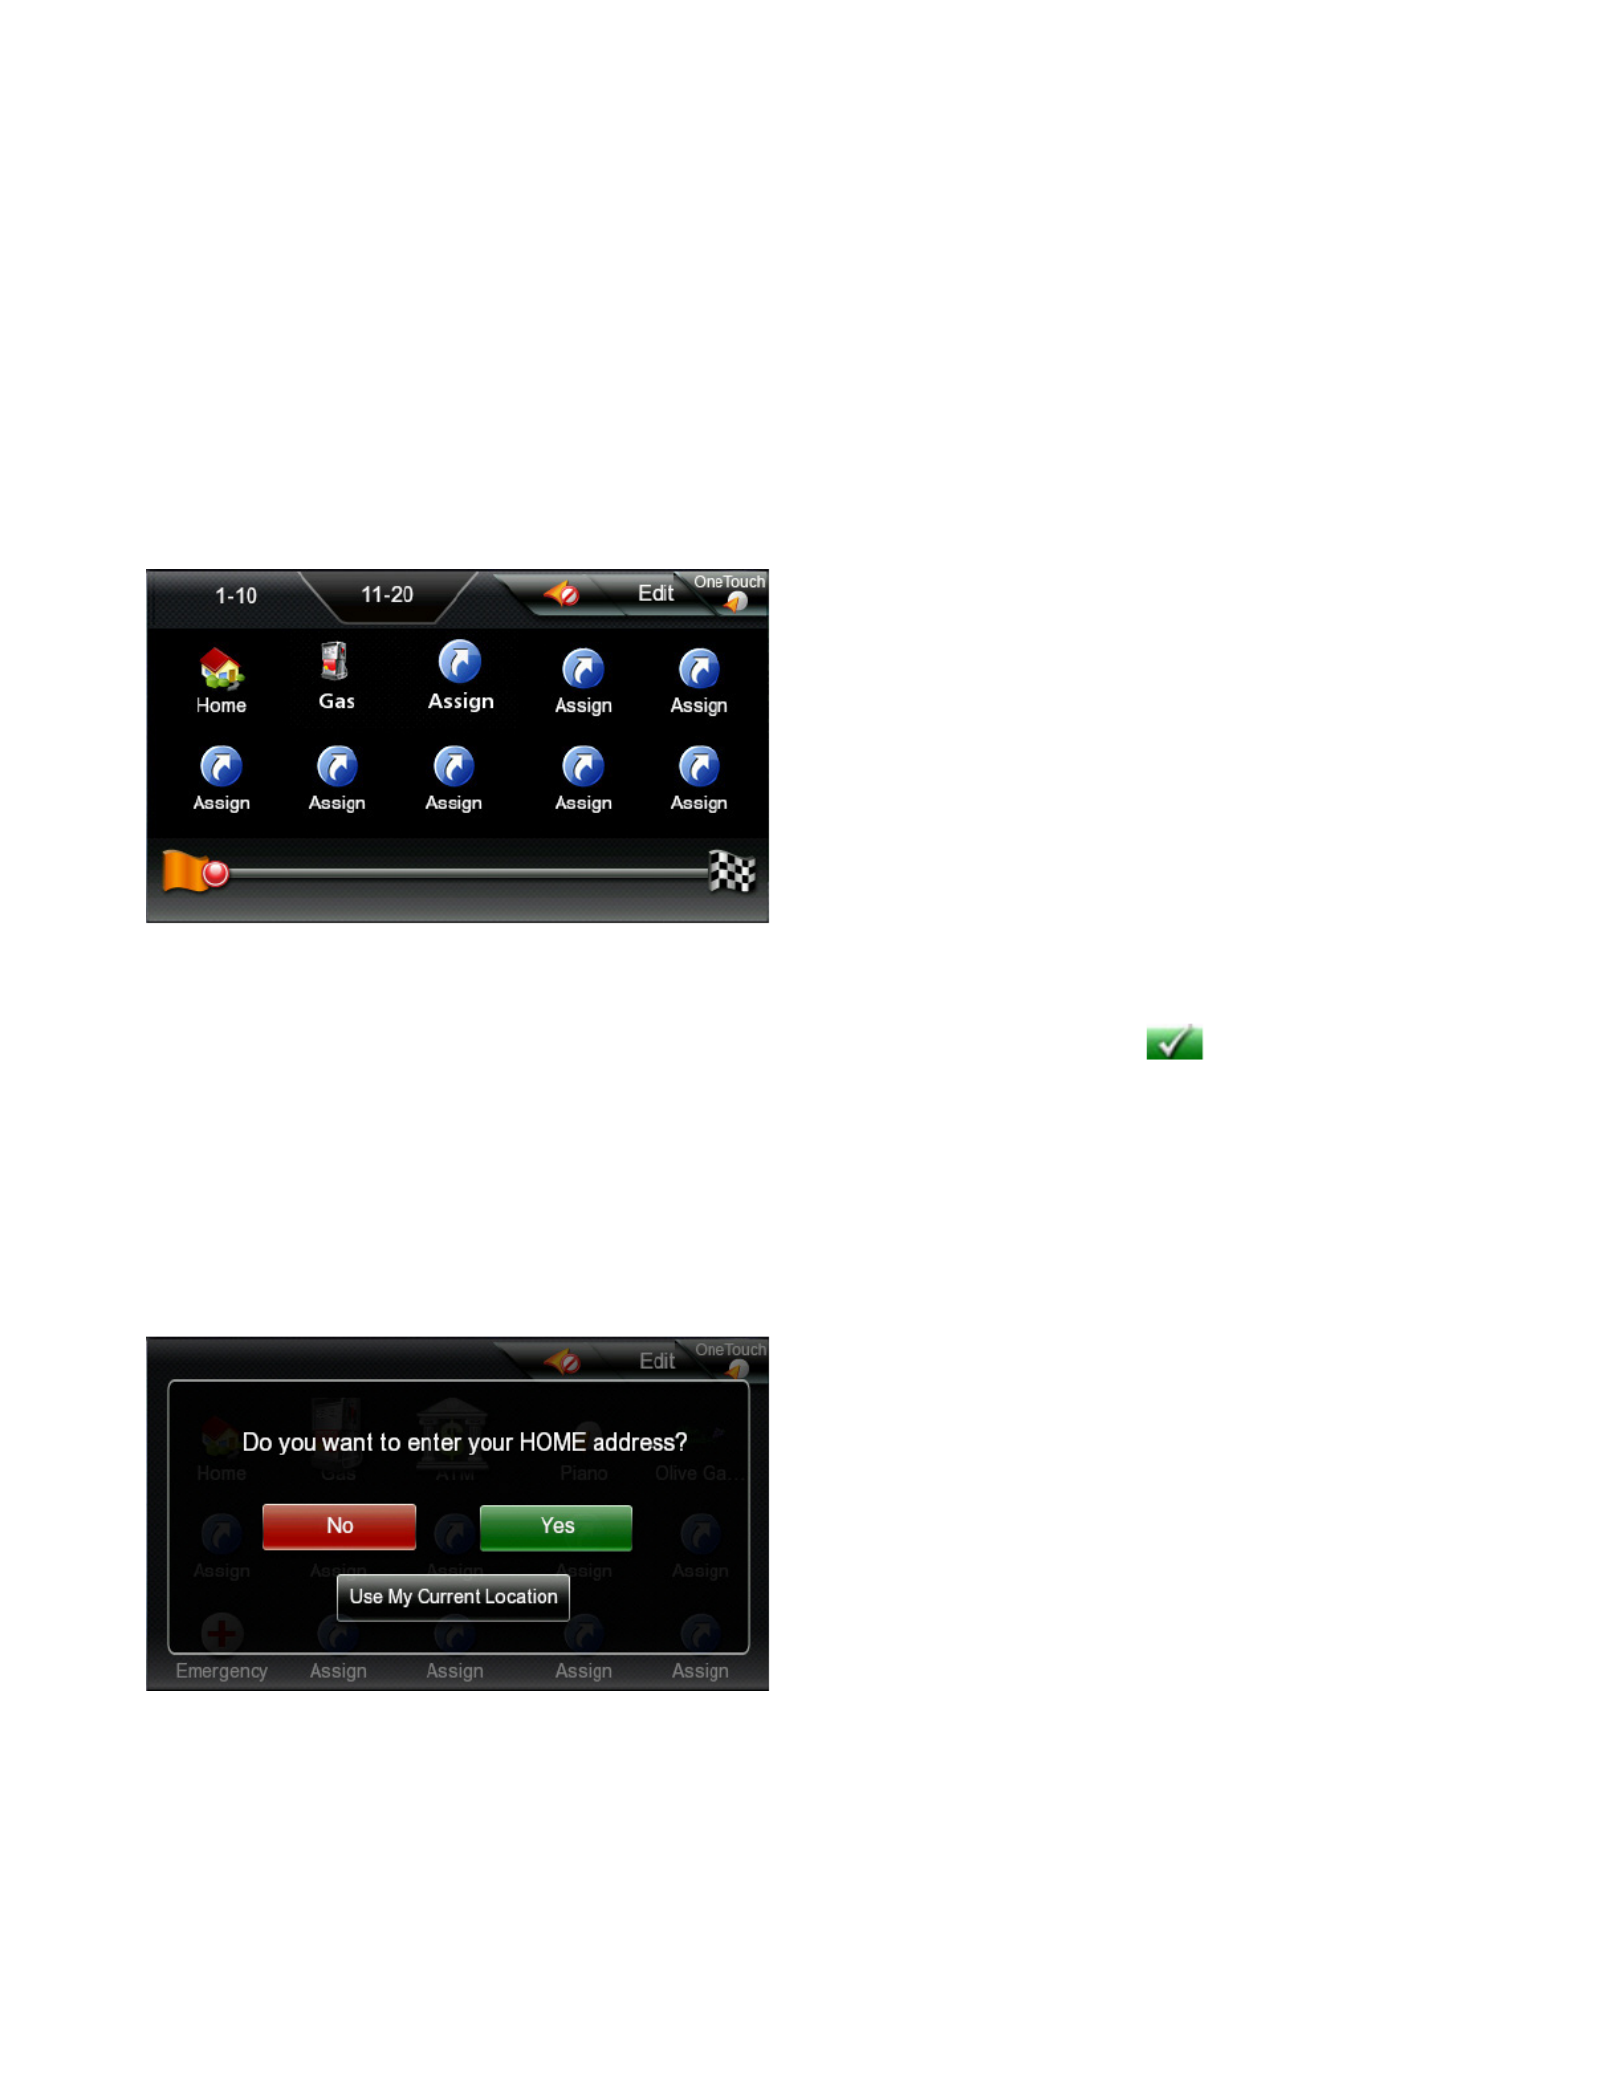
OneTouch Menu 4
The OneTouch™ menu provides quick access to
your home address, emergency services, gas
stations and addresses or searches you have
stored to the OneTouch menu.
Accessing the OneTouch Menu
1. From the Map screen, tap the OneTouch
icon in the upper right corner.
The Home Button
Tap the Home icon.
If you have a Home Address saved, the receiver
will begin giving you navigation information to
arrive at your home.
If you do not have a Home Address saved you
will be prompted to enter one.
If you select Yes, you will need to enter your
home address using the Enter Address
keyboard.
To use your current location for Home, just
press the Use My Current Location button.
Note: If you need to edit or delete the Home
address you selected here you can do this by
going to the Address Book (found in the Main
menu) and edit the entry labeled “Home”.
Saving an Address to a OneTouch Icon
1. Tap the Edit button in the top right corner
of the Map screen. The OneTouch menu
appears.
2. Tap one of the Assign icons.
3. Tap Location.
4. Using the keypad, enter the address (city,
street and number) for the OneTouch
icon.
5. When the address is complete you are
prompted to enter a name for the button.
6. Using the keypad, enter a name for the
button and tap .
7. Verify that the address has been added
by going to the Map screen and accessing
the OneTouch menu.
Changing the Address or Search of a One-
Touch Icon
1. Tap the Edit button in the top right corner
of the Map screen. The OneTouch menu
appears.
2. Tap the Edit button.
3. Tap on the OneTouch button you want to
edit.
4. Tap on the Re-assign button.
5. Tap Yes to confirm.
6. Follow the instructions for assigning a
OneTouch button.

13
Saving a POI Search Criteria to a OneTouch
Icon
Besides frequently visited destinations,
you can also save POI search criteria to a
OneTouch button. For example you may
frequently search for coffee shops near your
location or gas stations along your route. You
can save these searches for later use.
1. Tap the OneTouch button in the top right
corner of the Map screen.
2. Tap one of the Assign buttons.
3. Tap Search.
4. Tap one of the POI categories in the list.
5. If the next screen contains a list of
subcategories, tap one of the POI
subcategories in the list to further narrow
the search, or tap “All Subcategories” to
select all the subcategories or continue
defining your search criteria.
6. Using the keypad, enter a name for the
button and tap .
Setting a Route to a OneTouch Icon
With the OneTouch menu set up you can now
go to a saved address or search.
1. Tap the OneTouch button in the top right
corner of the Map screen.
2. Tap one of the assigned OneTouch
buttons.
3. If the assigned button is for a search,
the list of POIs is displayed. Tap on the
desired POI.
The “Preview” icon at the bottom of the
display allows you to step through the
available POIs while viewing their location
on the map.
4. The “Near...” button allows you to select
how the list is sorted (nearest your
current position, nearest a city you define
or near an address you enter).
5. Whether the destination was chosen from
a list of POIs or by an address, the GO
screen is displayed Tap on the Go button
to begin the route.

14
Selecting a Destination 5
Creating a Destination to an Address
When creating an address, the first step is to
enter the city.
The city can be specified by entering the name
of the city, entering the ZIP code for the city or
by selecting a previously used city.
1. From the Main Menu tap the Address
icon.
2. Enter City:
You have three ways to do this:
To select the city from the list of previous
cities, tap the Previous button.
To enter a new city: use the keyboard
to enter the first few characters of any
significant word in the city name. If the
city you are entering appears in the top
field you can tap on the city name or .
At any time you can tap on the List button
to bring up a list of cities that begin with
the characters you entered. Tap to select
the city from the list.
To enter a ZIP code: if needed, tap the
Zip Code button to switch to the numeric
keyboard. Enter the ZIP code. Tap to
bring up a list of cities with the zip code
entered.
3. Enter Street name:
With the city selected, the keyboard will
be displayed prompting you for the street
name.
Use the keyboard to enter the street
name. It is not necessary to enter
accented characters. Enter the first few
characters of any significant word in
the street name and tap the or continue
entering characters until the list of
streets is displayed.
4. Tap on the street name from the list.
5. Enter Street number:
Use the keyboard to enter the street
number for the address. The range of
acceptable street numbers is displayed
before you start typing. Tap the when the
street number is complete.
15
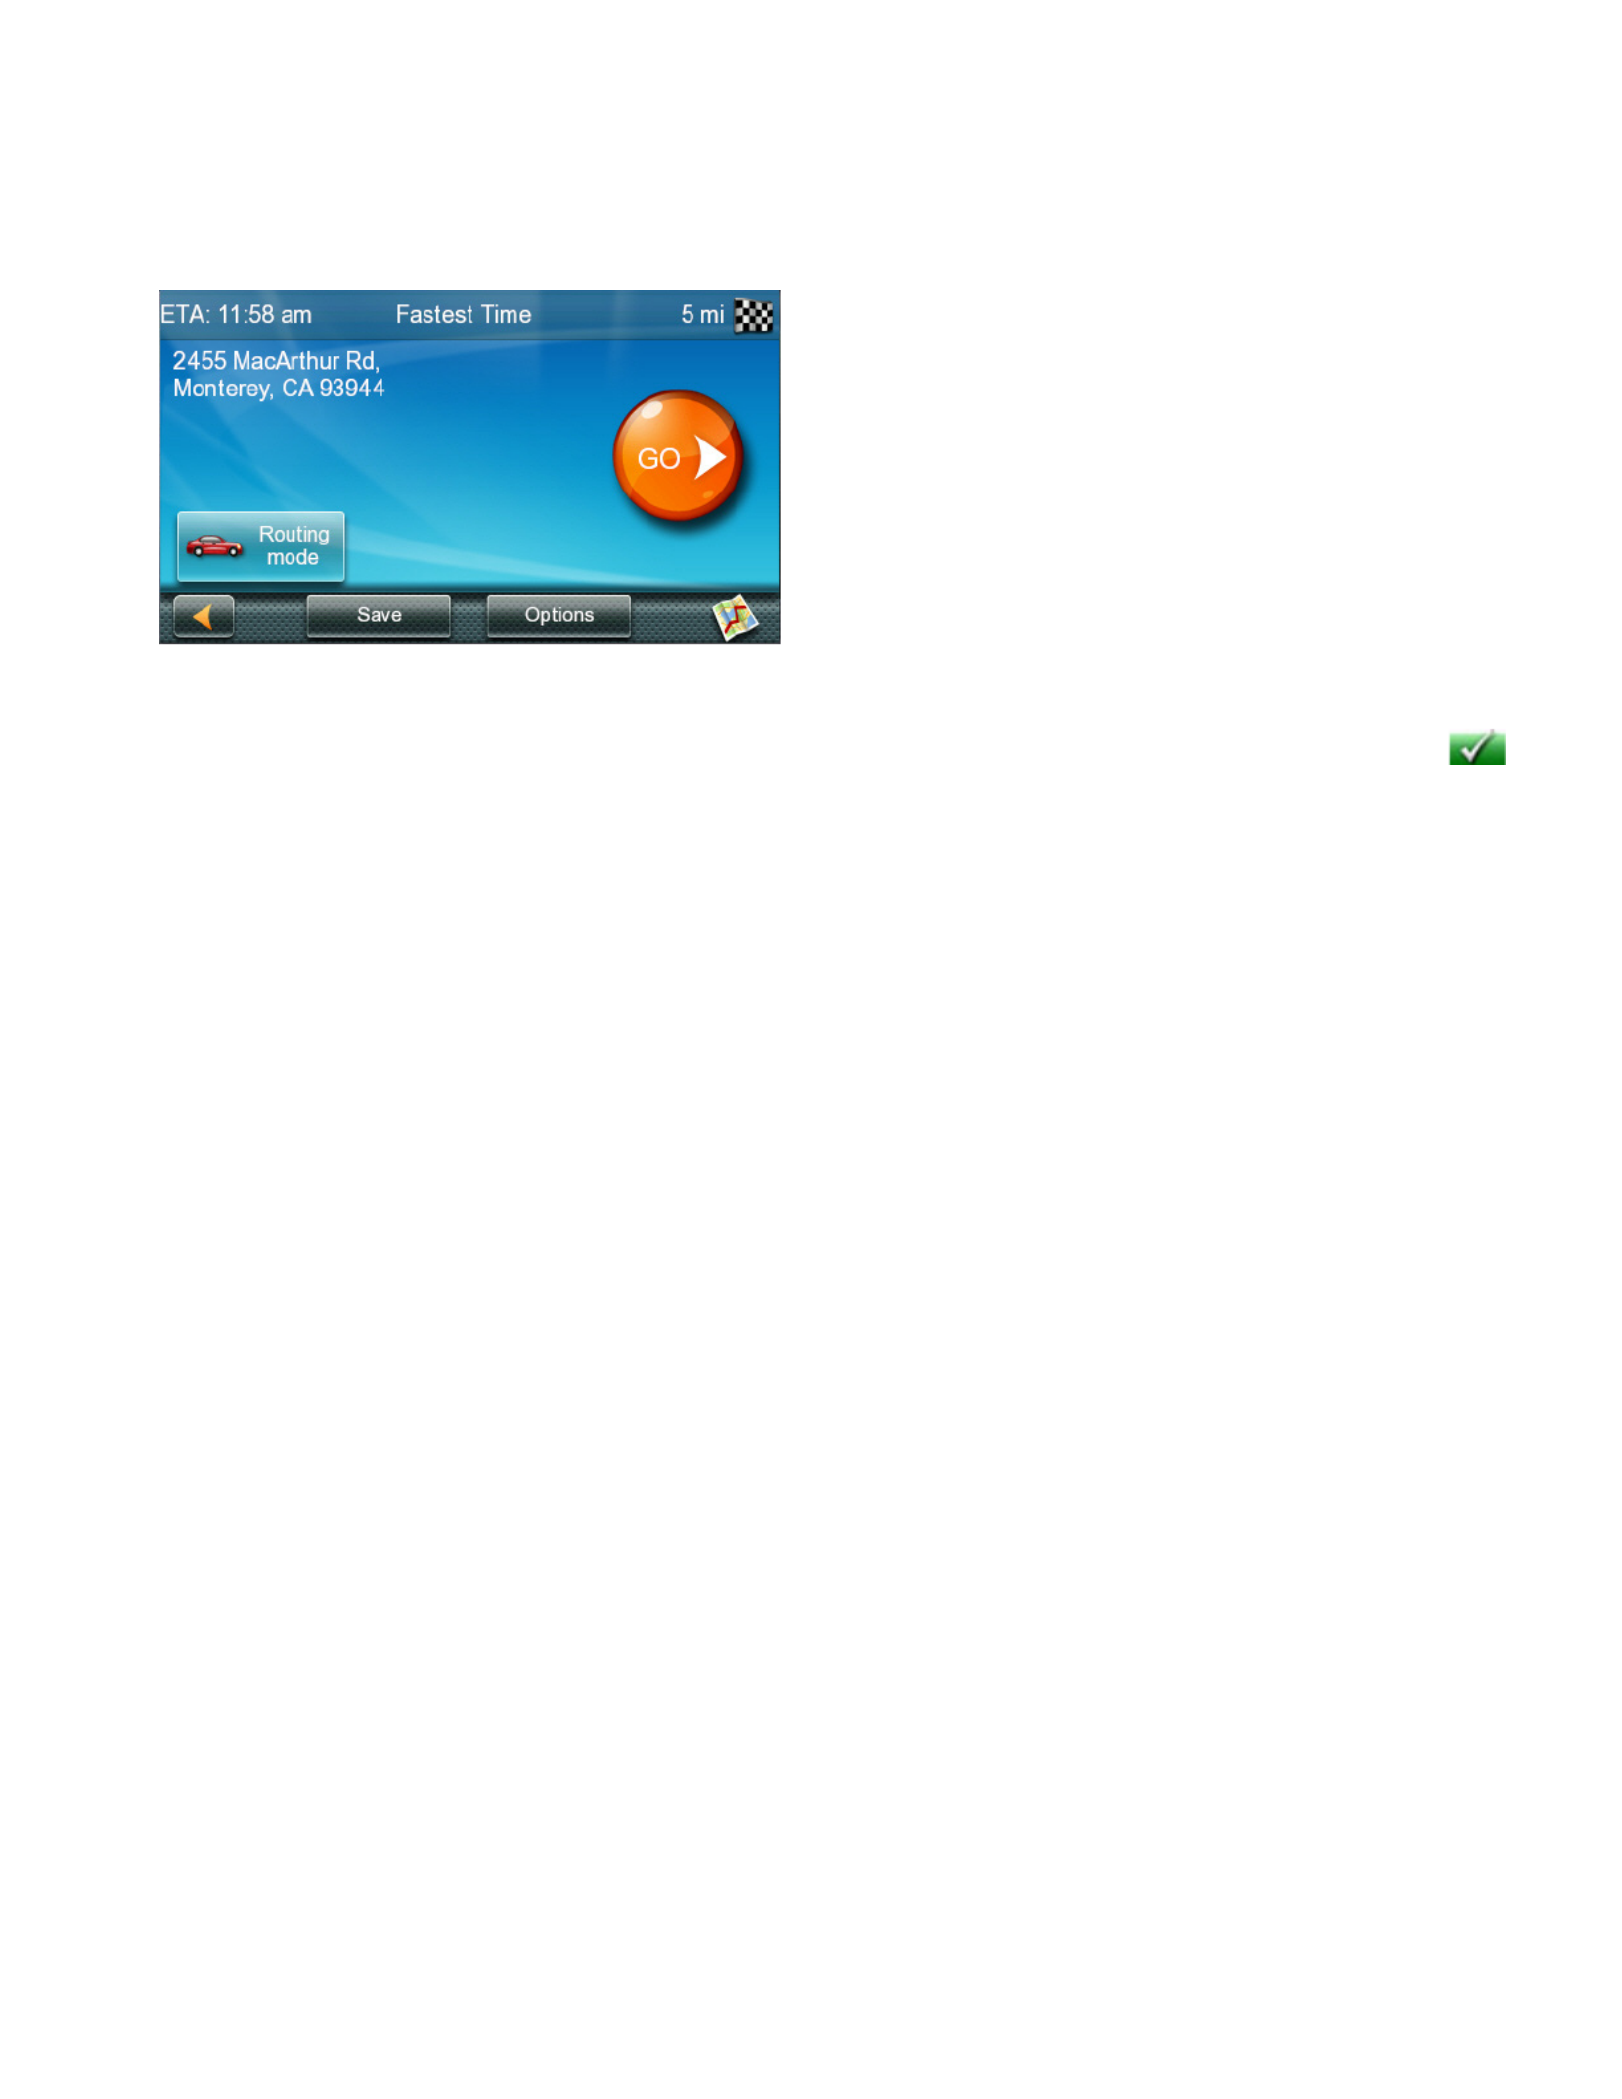
6. The GO screen appears with the address
of the selected location, the estimated
time of arrival (ETA), the distance to
travel, and the routing method (e.g.
Fastest Time).
(optional) Tap Options if you want to
change the routing method.
(optional) Tap on to preview the route.
7. Tap the large GO button on the right
to return to the Map screen and begin
routing.
Tip: If you know that you will use a
destination later, before tapping the
orange button you can tap Save to save it
in your Address Book or in the OneTouch
menu.
Tips on Entering Addresses Quickly
• When you are entering the name of a
city or a street, Magellan software only
displays those characters that appear
in possible search results. The other
characters are grayed out.
• When entering city names or street names,
tap the List button after a couple of letters;
Magellan software lists the items that
contain the specified characters.
• You can also search by ZIP codes. This
narrows the number of matching cities to
normally less then four.
Intersections
Creating a Destination to an Intersection
When the street number is not known, an
intersecting street can pinpoint the location.
1. From the Main Menu, tap the Intersection
icon.
2. Enter City:
You have three ways to do this:
To select the city from the list of previous
cities, tap the Previous button.
To enter a new city: use the keyboard
to enter the first few characters of any
significant word in the city name. If the
city you are entering appears in the top
field you can tap on the city name or .
At any time you can tap on the List button
to bring up a list of cities that begin with
the characters you entered. Tap to select
the city from the list.
To enter a ZIP code: if needed, tap the
Zip Code button to switch to the numeric
keyboard. Enter the ZIP code. Tap to
bring up a list of cities with the zip code
entered.
3. Enter Street name:
With the city selected, the keyboard will
be displayed prompting you for the street
name.
Use the keyboard to enter the street
name. It is not necessary to enter
accented characters. Enter the first few
characters of any significant word in
the street name and tap the or continue
entering characters until the list of
streets is displayed.
Tap on the street name from the list.
4. Enter the second street:
Enter the name of the second street as
you did the first street.
5. A screen appears with the address of the
selected location, the estimated time of
arrival (ETA), the distance to travel, and
the routing method (e.g. Fastest Time).

16
(optional) Tap Options if you want to
change the routing method.
6. Tap the large GO button on the right
to return to the Map screen and begin
routing.
City Centers
Creating a Destination to a City Center
City Center allows you to select any city on
the map as your destination. This option is
particularly useful when you want to go to
a city without having any specific address
to select. (A route to a city center uses
the geographical center of the city as the
destination point.)
1. From the Main Menu, tap the City Center
icon.
2. Enter City:
To select the city from the list of previous
cities, tap the Previous button.
To enter a new city: use the keyboard
to enter the first few characters of any
significant word in the city name. If the
city you are entering appears in the top
field you can tap on the city name or .
At any time you can tap on the List button
to bring up a list of cities that begin with
the characters you entered. Tap to select
the city from the list.
To enter a ZIP code: if needed, tap the
Zip Code button to switch to the numeric
keyboard. Enter the ZIP code. Tap to
bring up a list of cities with the zip code
entered.
3. A screen appears with the address of the
selected location, the estimated time of
arrival (ETA), the distance to travel, and
the routing method (e.g. Fastest Time).
(optional) Tap Options if you want to
change the routing method.
4. Tap the large GO button on the right
to return to the Map screen and start
navigating.
Previous Destinations
Routing to a Previous Destination
1. From the Main Menu, tap the Previous
icon.
2. Select the destination from the list of
previous destinations.
3. A screen appears with the address of the
selected location, the estimated time of
arrival (ETA), the distance to travel, and
the routing method (e.g. Fastest).
(optional) Tap Options if you want to
change the routing method.
4. Tap the large GO button on the right
to return to the Map screen and start
navigating.
Clearing the list of Previous Destinations
1. Access the list of Previous Destinations as
described above.
2. Tap Delete All to clear the list.
3. To confirm the deletion, tap Yes.
Address Book
Saving a Destination to Your Address Book
Whenever you create a destination you can
save the destination to your address book
before beginning the route.
1. On the Go screen, tap Save.
2. The Edit Information screen is displayed.
If you want to save this location to the
OneTouch menu, select Add to OneTouch.
Edit information:
Tap the Name field and use the keyboard
Produktspezifikationen
| Marke: | Magellan |
| Kategorie: | Navigator |
| Modell: | RoadMate 5320-LM |
Brauchst du Hilfe?
Wenn Sie Hilfe mit Magellan RoadMate 5320-LM benötigen, stellen Sie unten eine Frage und andere Benutzer werden Ihnen antworten
Bedienungsanleitung Navigator Magellan

1 Oktober 2024
1 Oktober 2024
1 Oktober 2024
1 Oktober 2024
1 Oktober 2024
1 Oktober 2024
1 Oktober 2024
22 August 2024
22 August 2024
21 August 2024
Bedienungsanleitung Navigator
- Navigator Humminbird
- Navigator Clatronic
- Navigator Acer
- Navigator Asus
- Navigator Sanyo
- Navigator Medion
- Navigator Philips
- Navigator SilverCrest
- Navigator Sony
- Navigator Conrad
- Navigator MarQuant
- Navigator Thomson
- Navigator Blaupunkt
- Navigator Grundig
- Navigator Kenwood
- Navigator Pyle
- Navigator ARCHOS
- Navigator Caliber
- Navigator Pioneer
- Navigator JVC
- Navigator Motorola
- Navigator Nokia
- Navigator Dual
- Navigator Hitachi
- Navigator Skoda
- Navigator Garmin
- Navigator GOCLEVER
- Navigator Mio
- Navigator Bushnell
- Navigator Teasi
- Navigator Harman Kardon
- Navigator Scosche
- Navigator Furuno
- Navigator Lowrance
- Navigator Simrad
- Navigator BMW
- Navigator Honda
- Navigator Parrot
- Navigator Zebra
- Navigator Audi
- Navigator Midland
- Navigator Binatone
- Navigator Hagenuk
- Navigator Alpine
- Navigator Volkswagen
- Navigator Volvo
- Navigator Toyota
- Navigator Kia
- Navigator Overmax
- Navigator Kalkhoff
- Navigator Airis
- Navigator Packard Bell
- Navigator XZENT
- Navigator Uniden
- Navigator Clarion
- Navigator Sylvania
- Navigator Audiovox
- Navigator Becker
- Navigator CarTrek
- Navigator ESX
- Navigator Falk
- Navigator NAVIGON
- Navigator Navitel
- Navigator Navman
- Navigator TomTom
- Navigator ViaMichelin
- Navigator Zenec
- Navigator Cobra
- Navigator VDO
- Navigator Insignia
- Navigator Celestron
- Navigator Autovision
- Navigator Prestigio
- Navigator Boss
- Navigator Mazda
- Navigator Jensen
- Navigator Alfa Romeo
- Navigator GlobalSat
- Navigator Danew
- Navigator Dynavin
- Navigator Eagle
- Navigator Eclipse
- Navigator Igo
- Navigator Kapsys
- Navigator Lanzar
- Navigator Nav N Go
- Navigator Raymarine
- Navigator Route 66
- Navigator Seecode
- Navigator Soundstream
- Navigator Sungoo
- Navigator Sygic
- Navigator VDO Dayton
- Navigator Chrysler
- Navigator Rosen
- Navigator ModeCom
- Navigator Amparos
- Navigator Lark
- Navigator Pharos
- Navigator V7
- Navigator Izzo Golf
- Navigator Cheetah
- Navigator Dashmate
- Navigator Planet Audio
- Navigator Voice Caddie
- Navigator Coyote Systems
- Navigator Rand McNally
- Navigator Whistler
- Navigator Cydle
- Navigator LXNAV
- Navigator SkyCaddie
- Navigator TELE System
- Navigator Zoleo
Neueste Bedienungsanleitung für -Kategorien-

14 Oktober 2024

14 Oktober 2024
14 Oktober 2024
12 Oktober 2024
12 Oktober 2024

9 Oktober 2024
9 Oktober 2024
8 Oktober 2024

8 Oktober 2024
7 Oktober 2024