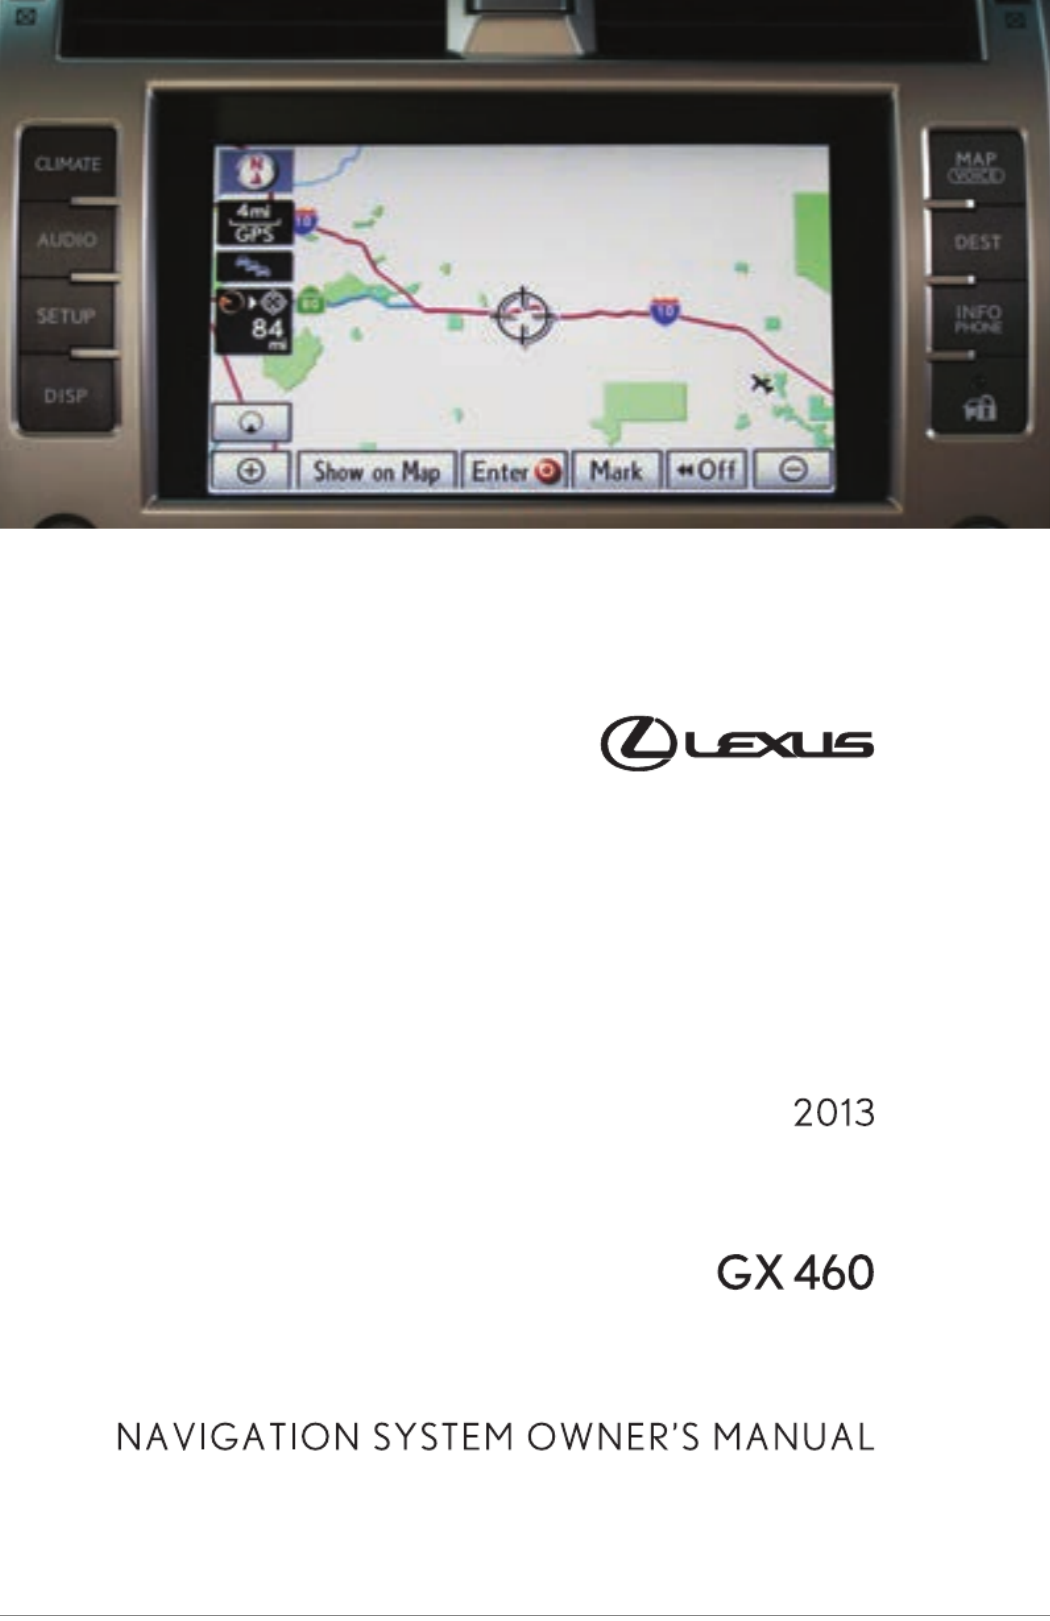
Lexus GX 460 (2013) Bedienungsanleitung
Lesen Sie kostenlos die 📖 deutsche Bedienungsanleitung für Lexus GX 460 (2013) (168 Seiten) in der Kategorie Auto. Dieser Bedienungsanleitung war für 15 Personen hilfreich und wurde von 2 Benutzern mit durchschnittlich 4.5 Sternen bewertet
Seite 1/168

1
Introduction
This manual explains the operation of the Naviga tion System.
Please read this manual carefully to ensure proper use. Keep this
manual in your vehicle at all times.
The Navigation Syst em is one of the most technologically advanced
vehicle accessories ever developed . The system receives satellite sig-
nals from the Global Positioning System (GPS) operated by the U.S.
Departmen t o f Defense. Using these signals and other vehicle sen-
sors, the system indicate s your present position and assists in locat ing
a desired destination.
The navigation system is designed to select e fficient rout es from your
present starting location to your destination . The system is also designed
to direct you to a destination th at is unfamiliar to you in an efficient manner.
The system uses DENSO maps. The calculated ro utes may not be the
shortest nor the least traffic conge sted. Your own personal local knowl-
edge or “short cut” ma y at times be faster than th e calculated routes.
The navigation system’s database includes Point of Int erest categories to
allow you to e asily select destination s such as restaurants and hotels. If
a destinat ion is not in the database, you can enter the street address or
a major intersection close to it and the system will guide you there.
The system will pro vide bot h a visual map and audio instructions. The au-
dio instructio ns will announce the distance remaining and the direction to
turn in approa ching an int ersection. These voice instructions will help you
keep your eyes on the road and are t imed to provide enoug h time to allow
you to ma neuver, change lane s or slow down.

2
Please be aware that all current vehicle navigation systems have
certain limitations that may affect their ability to perform properly.
The a ccuracy of the vehicle’s position depends on the satellite con-
dition, road c onfiguration, vehicle condition or other circumstan-
ces. For more information on the limitations of the system, refer to
pages 406 through 407.

3
For sa fety reasons, this manual indicates
items requiring particular attention with the
following marks.
CAUTION
This is a warning against anything
which may cause injury to people if
the warning is ignored. You are in-
formed about what you must or must
not do in order to reduce the risk of
injury to yourself and others.
NOTICE
This is a warning against anything
which may cause damage to the ve-
hicle or i ts equipment if the warning
is ignored. You are informed about
what you must or must not do in or-
der to avoid or reduce the risk of dam-
age to your vehicle and its equip-
ment.
INFORMATION
This provides additional information.
To use this system in the safest possible
manner, follow all the safety tips shown be-
low.
This syste m is intende d to assist in reach-
ing the destination and, if used properly,
can do so. The driver is solely responsible
for the safe operation of your vehicle and
the safety o f your passengers.
Do not use any feature of this system to the
extent it becomes a distraction and pre-
vents safe driving. The first priority while
driving should always be the safe o pera-
tion of the vehicle. While driving, be sure
to obse rve all traffic regulations.
Prior to the actual use of this system, learn
how to use it and become thoroughly famil-
iar with it. Read the entire Navigation Sys-
tem Owner’s Manual to make sure you un-
derstand the system. Do not allow other
people to use this system until they have
read and understood the instructions in
this manual.
For your safety, some functio ns may be-
come inoperable when driving. Un avail-
able screen buttons are dimmed. Only
when the veh icle is not moving, can the
destination and route se lection be done.
Important information about
this manual Safety Instruction

4
CAUTION
-For safety, the driver should not
operate the navigation system
while he/she is driving.
Insufficient attention to the road
and traffic may cause an a ccident.
-While driving, be sure to obey the
traffic regulations and maintain
awareness of the road c onditions .
If a traffic sign on the road has
been changed, route guidance
may not hav e the updated
information such as the direction
of a one way stree t.
While driving, listen to t he voice instruc-
tions as much as possible and glance at
the screen briefly and only when it is safe.
However, do not totally rely on voice gu id-
ance. Use it just for reference. If the sys-
tem cannot determine the current vehicle
position correctly, there is a possibility of
incorrect, late, or non voice guidance.−
The data in the system ma y occasio nally
be incomplete. Road co nditions, including
driving restrictions (no left turns, stree t clo-
sures, etc.) frequently change. Therefore,
before following any instruction from the
system, look to see whether the instruction
can be done safely and legally.
This system cannot warn about such
things as th e safety of an area, condition of
streets, and availability of emergency ser-
vices. If unsure about the safety of an
area, do not drive into it. Under no cir-
cumstances is this system a substitute
for the driv er’s personal judgement.
Use this system only in locations where it
is legal to do so. Some states/provinces
may have laws prohibiting the use of video
and naviga tion screens next to the driver.

5
Table of Contents
Quick guide —
— Overv iew buttons and guidance scr een 10. . . . . . . . . . .
— Registe ring home 12. . . . . . . . . . . . . . . . . . . . . . . . . . . . . . . .
— Registe ring preset des ti nations 14. . . . . . . . . . . . . . . . . . .
— Operation flow: guiding the route 16. . . . . . . . . . . . . . . . .
— Setting home as the destination 17. . . . . . . . . . . . . . . . . .
Navigation system function index 18. . . . . . . . . . . . . . . . . . .
Quick reference (“D estination” screen) 20. . . . . . . . . . . . . .
Quick reference (“Setup” screen) 22. . . . . . . . . . . . . . . . . . .
Quick reference (“Information” screen) 23. . . . . . . . . . . . . .
1 Navigation System: Basic Functions
¢ ²Basic information before operation
Initialscreen 26..............................................
Touch screen operation 27. . . . . . . . . . . . . . . . . . . . . . . . . . . . . . . . . . . .
Inputting letters and numbers/List screen operation 28. . . . . . . . . . . .
Screenadjustment 31........................................
Helpicon 33.................................................
Map screen operation 33.....................................
Current p osition display 33. . . . . . . . . . . . . . . . . . . . . . . . . . . . . . . . .
Screen scroll operation 34. . . . . . . . . . . . . . . . . . . . . . . . . . . . . . . . . .
Switching the screens 39. . . . . . . . . . . . . . . . . . . . . . . . . . . . . . . . . . .
Mapscale 42.............................................
Footprintmap 42.........................................
Orientation of the map 43. . . . . . . . . . . . . . . . . . . . . . . . . . . . . . . . . . .
Standard map icons 44. . . . . . . . . . . . . . . . . . . . . . . . . . . . . . . . . . . . .
Voice command system 44...................................
Natural speech information 47. . . . . . . . . . . . . . . . . . . . . . . . . . . . . . .
Commandlist 49..........................................
Quick
Guide
1
2
3
4
5
6
7
8
9
10
11
12
Index

6
2 Navigation Syste m: Destination Search
Destination search 62.......................................
Selecting the search area 62. . . . . . . . . . . . . . . . . . . . . . . . . . . . . . . .
Destinatio n search by Home 64. . . . . . . . . . . . . . . . . . . . . . . . . . . . .
Destinatio n search by Preset d estinations 64. . . . . . . . . . . . . . . . . .
Destinatio n search by “Address” 65. . . . . . . . . . . . . . . . . . . . . . . . . .
Destinatio n search by “Point of Interest” 69. . . . . . . . . . . . . . . . . . .
Destination search by “Destination Assist” 76. . . . . . . . . . . . . . . . .
Destination search by “Previous Destinations” 76. . . . . . . . . . . . . .
Destinatio n search by “Address Book” 77. . . . . . . . . . . . . . . . . . . . .
Destinatio n search by “Emergency” 77. . . . . . . . . . . . . . . . . . . . . . .
Destination search by “Intersection & Freeway” 78. . . . . . . . . . . . .
Destinatio n search by “Map” 81. . . . . . . . . . . . . . . . . . . . . . . . . . . . .
Destination search by “Coordinates” 82. . . . . . . . . . . . . . . . . . . . . . .
Deletin g set destina tions 82. . . . . . . . . . . . . . . . . . . . . . . . . . . . . . . . .
Starting route guida nce 83. . . . . . . . . . . . . . . . . . . . . . . . . . . . . . . . . . . .
3 Naviga ti o n System: R o u te Guidanc e
Route g uidance screen 88. . . . . . . . . . . . . . . . . . . . . . . . . . . . . . . . . . . . .
Typical voice guida nce prompts 91. . . . . . . . . . . . . . . . . . . . . . . . . . . . .
Distance an d time to destination 93. . . . . . . . . . . . . . . . . . . . . . . . . . . . .
Setting and deleting destinations 94..........................
Adding destinations 94. . . . . . . . . . . . . . . . . . . . . . . . . . . . . . . . . . . . .
Reordering d estinations 94. . . . . . . . . . . . . . . . . . . . . . . . . . . . . . . . .
Deleting destinatio ns 95. . . . . . . . . . . . . . . . . . . . . . . . . . . . . . . . . . . .
Setting route 96.............................................
Detoursetting 96..........................................
Routeoverview 97.........................................
Routepreference 99.......................................
Pausing and resuming guidance 101. . . . . . . . . . . . . . . . . . . . . . . . .
Show on map 102...........................................
Display POI icons 102.....................................
Routetrace 106...........................................
: Point of Interest

7
4 Navigation System: Memory Points
Navigation settings 110......................................
Setting up the “Home” 111. . . . . . . . . . . . . . . . . . . . . . . . . . . . . . . . . .
Setting up the “Preset Destinations” 113. . . . . . . . . . . . . . . . . . . . . .
Setting up the “Address Book” 116. . . . . . . . . . . . . . . . . . . . . . . . . . .
Setting up the “Areas to Avoid” 122. . . . . . . . . . . . . . . . . . . . . . . . . .
Deleting previou s destinations 127. . . . . . . . . . . . . . . . . . . . . . . . . . .
5 Telephone and Information
Telephone (Hands fre e system for cellular phone)−130. . . . . . . . .
Enter a Bluetooth phone 134X...............................
Call on the Blueto oth phone 139X............................
Receive on the Bluetooth phone 146X........................
Talk on the Bluetooth phone 146X...........................
Fuel consumption 149.......................................
Pastrecord 149...........................................
Consumption 150..........................................
Calendar 151................................................
6 Lexus Enform with Safety Connect
Lexus Enform with Safety Connect Overview 154−. . . . . . . . . . . . . . . .
Destination Assist 157. . . . . . . . . . . . . . . . . . . . . . . . . . . . . . . . . . . . . . . .
eDestination 160.............................................
XM Sports and Stocks 163X...................................
XM NavWeather
Z
168........................
XM NavTraffic 173X..........................................
LexusInsider 175............................................

8
7 Audio/video System
Quickreference 184..........................................
Using your audio/vide o system 187...........................
Somebasics 187..........................................
Radiooperation 196.......................................
Radio opera tion (XM Satellite Radio broadcast) 20 0X. . . . . . . . . . .
CD changer opera tion 206. . . . . . . . . . . . . . . . . . . . . . . . . . . . . . . . . .
DVD changer operation 220. . . . . . . . . . . . . . . . . . . . . . . . . . . . . . . . .
Bluetooth audio ope ra tion 245X.............................
USB memory/iPod operation 253. . . . . . . . . . . . . . . . . . . . . . . . . . . .
Audio/video remote controls (steering switches) 261. . . . . . . . . . . . . .
Rear seat entertainment system features 263. . . . . . . . . . . . . . . . . .
Usingtheradio 269........................................
Using the DVD changer 270. . . . . . . . . . . . . . . . . . . . . . . . . . . . . . . .
Playing an audio CD/CD text 270. . . . . . . . . . . . . . . . . . . . . . . . . . . .
Playing MP3/WMA discs 271. . . . . . . . . . . . . . . . . . . . . . . . . . . . . . . .
Playing DVD video/audio 271. . . . . . . . . . . . . . . . . . . . . . . . . . . . . . .
Using the video mode 284. . . . . . . . . . . . . . . . . . . . . . . . . . . . . . . . . .
Changin g o ther settings 285. . . . . . . . . . . . . . . . . . . . . . . . . . . . . . . .
Audio/vid eo system operating hints 287. . . . . . . . . . . . . . . . . . . . . . . . .
8 Air Conditioning
Automatic air conditioning controls 296. . . . . . . . . . . . . . . . . . . . . . . . .
9 Wide View Front & Side Monitor
Wide view front & side monitor 314. . . . . . . . . . . . . . . . . . . . . . . . . . . . .
10 Intuitive Parking Assist
Intuitive parking assist 322. . . . . . . . . . . . . . . . . . . . . . . . . . . . . . . . . . . .

9
11 Setup
Generalsettings 330..........................................
Clocksettings 335............................................
Voicesettings 337............................................
Navigation set tings 340. . . . . . . . . . . . . . . . . . . . . . . . . . . . . . . . . . . . . . .
Detailed navig ation settings 340. . . . . . . . . . . . . . . . . . . . . . . . . . . . . . . .
Telephone settings 349......................................
Volumesetting 350........................................
Managephone 351........................................
Phonebook 359...........................................
Setting the phonebook 360. . . . . . . . . . . . . . . . . . . . . . . . . . . . . . . . .
Speed dials setting 368. . . . . . . . . . . . . . . . . . . . . . . . . . . . . . . . . . . .
Delet ing call history 375. . . . . . . . . . . . . . . . . . . . . . . . . . . . . . . . . . . .
Setting the voice tag 376. . . . . . . . . . . . . . . . . . . . . . . . . . . . . . . . . . .
Bluetooth 380X............................................
Details 385...............................................
Audio settings 388..........................................
Select portable playe r 388. . . . . . . . . . . . . . . . . . . . . . . . . . . . . . . . . .
Setting Bluetooth audio 390X...............................
Vehicle settings 395.........................................
Maintenance 395..........................................
Vehicle customization 400. . . . . . . . . . . . . . . . . . . . . . . . . . . . . . . . . .
Intuitive parking assist setting 401. . . . . . . . . . . . . . . . . . . . . . . . . . .
Othersettings 403............................................
12 Appendix
Limitations of the navigation system 406. . . . . . . . . . . . . . . . . . . . . . . . .
Map database information and updates 408. . . . . . . . . . . . . . . . . . . . . .
Index 419.............................................
10
No. Name Function Page
1
North up or−
heading up−
symbol
This symbol in dicates a map view with
north up or heading up. Touching this− −
symbol changes the map orientation.
43
2 Scale indicator This figure indicates the map scale. 42
3“MAP/VOICE”
button
Pu sh this button to repe at a guidance
voice, cancel the map scroll, start g uid-
ance and display the current position.
33
4 “DEST” button Push this button to display the “Destina-
tion” screen.
12, 14, 16, 17,
20, 62
5“INFO/PHONE”
button
Push this button to display the “Informa-
tion” screen.
23, 134, 149,
151, 163, 169,
176, 417
6 Zoom out button Touch this button to reduce the map
scale. 42
Quic
k
guide
—
— Overview buttons and guidance screen

11
No. Name Function Page
7“ Off”**
Touch this button to obtain a broader
view. Some of the buttons on the
screen are n ot displayed. The y are dis-
pla yed ag ain by touching .“On ”
346
8“Mark”
Touch this button to register the current
position o r the cursor position as an ad-
dress book entry.
35
9 “Route” Touch this button to change the route. 94, 96
10 “Show on Map”
Touch this button to b rowse informatio n
about guidance route, to set the Points
of Interest to be displayed on the
screen, or to record the route.
102, 173
11 Zoom in button Touch this button to magnify the map
scale. 42
12 Foot print map
button
Touch this button to display the foot print
map and th e building information. 42
13
Screen
configuration
button
Touch this button to cha nge the screen
mode. 39
14 “DISP” button Push this button to display t he “Display”
(quality con trol) screen. 31
15 “SETUP” button
Push this button to display th e “Setup”
screen.
You can change the la nguage from this
screen. (Se e “ Selecting a language”-
on page 331.)
22, 110, 179,
330, 335, 337,
340, 349, 388,
395, 403
16
Distance and
time to
destination
Displays t he distance, the estimated
tra vel time to the destination, and the
estimated arrival time at the destination.
93
17 XM indicatorX This mark is displayed when XM infor-X
mation is received. 173
18
“GPS” mark
(Global
Positioning
System)
Whenever the vehicle is rece iving sig-
na ls from the GPS, this mark is dis-
played.
406

12
U0006LI
U0043LC
1Push the “DEST” button.
2 Touch “Go Home”.
If h ome h as not b een registered, you can
register it by touching .“Go Home”
3Touch “Yes”.
4There are 4 different methods to
search your home.
See “Destination search” on page 62.
—
Registering home

13
U0005LC
U0006LC
5Touch “Enter”.
The “Edit Home” screen is displayed.
6Touch “OK”.
Registration of home is complete.
You can also register home by pushing the
“SETUP” button. (See “(a) Registering
home” on page 111.)
You can chan ge the na me, locatio n, phone
number and icon. (See “(b) Editing home”
on page 112.)
14
U0007LI
U0045LC
U0002LI
1Push the “DEST” button.
2Touch one of the preset destina-
tion buttons.
You can set a preset destinatio n t o any pre-
se t de stination button that has not yet been
set.
3Touch “Yes”.
4There are 4 different methods to
search preset destinations.
See “Destination search” on page 62.
—
Registering preset destinations

15
U0010LC
U0011LC
5Touch “Enter”.
The “Edit Preset Destinat ion” screen is
displayed.
6Touch “OK”.
Registration of p reset destinations is com-
plete.
You can also register preset destinations
by pushing the button.“SETUP”
(See “(a) Registering preset destinations”
on page 114.)
You can change the name, location, phone
number and ico n. (See “(b) Ed iting preset
destinations” on page 115.)
The re gistered points can be used on the
“Destination” screen. (See “— Destin ation
search by Preset destinations” on page
64.)

16
U0013LC
U0014LC
1Push the “DEST” button.
2There are 11 different methods
to sea r ch destinations.
See “Destination search” on page 62.
3 Touch “Go to ”.
The navigation system performs a search
for the route.
4Touch “OK”, and start driving.
Routes othe r than the one recommended
can also be selected. (See “Starting route
guidance” on page 83.)
5Guidance to the destination is
given via voice and on the guid-
ance screen.
—
Operation flow: guiding the route

17
U0006LI
U0016LCa
U0017LCa
1Push the “DEST” button.
2 Touch “Go Home”.
“Go Home” can be used if your home has
been registered. (To register “Home”, see
“(a) Registering home” on page 111.)
3Touch “Go to ”.
The navigation system performs a search
for the route.
4Touch “OK”, and start driving.
Routes othe r than the one recommended
can also be sele cted. (See “Starting route
guidance” on page 83.)
5Guidance to the destination is
given via voice and on the guid-
ance screen.
—
Setting home as the destination

18
[ \Map
Displaying maps Page
Viewing the map screen 10
Displaying the current vehicle position 33
Viewing the curren t position vicinity map 34
Chang ing the scale 42
Chang ing the map orientation 43
Displaying Point of Interest 102
Displaying the estimated travel/arrival time to th e destina tion 93
Selecting the du al map screen 39
Viewing foot print map 42
Deleting map screen buttons 346
Searching destination Page
Searching the destination
(by h ome, Point of Interest, phone #, etc.) 62
Cha nging the selected search area 62
Operating the map location of the selected destina tion 83
[ \Route guidance
Before starting route guidance Page
Setting the dest ination 83
Viewing alternative routes 83
Starting route guidance 83
Before starting or during route guidance Page
Viewing the route 83
Adding destination s 94
Chang ing the rout e 96
Displaying the estimated travel/arrival time to th e destina tion 93
Navigatio n system function inde
x

19
During route guidance Page
Pausing route guida nce 101
Adjusting route guidance volume 338
Deleting the destinatio n 82, 95
Displaying the entire rou te map 97
[ \Useful functions
Address book Page
Re gistering your own address book entries 116
Marking icons on the map 118
Information Page
Displaying vehicle maintenance 395
Displaying the calendar 151
Hands free system (for cellular phone) Page−
Initiating BluetoothX134
Making a call on the Bluetooth phoneX139
Receiving a call on the Bluetooth phoneX146
Voice command system Page
Operating the system with your voice 44

20
The “Destination” screen allows you to search for a destination. To display the “Destina-
tion” screen, push the button.“DEST”
1“Address”
A house n umber and the street address
can be input by using the input keys.
65.................................
2 “Poi nt of Interest”
Select one of the many Points of Interest
that have already been store d in the sys-
tem’s database. 69. . . . . . . . . . . . . . . . . .
3 “Destination Assist”
Provides you with live assistance finding
destinations via the Lexus Enform re-
sponse center. 76, 157. . . . . . . . . . . . . . .
4 “Previous Destinations”
A destination can be selected from any of
the last 100 previously set destinations
and from the previous starting point.
76.................................
5 “Del. Dest.”
Set destinations can be deleted. 82. . . .
6“?”
Function help for the “Destination” screen
can be viewed on this screen. 33. . . . . .
Quic
k
reference (“Destination” s cree n)

21
7 “Address Book”
The desired location can be selected from
a registered entry in t he “Ad dress book”.
(To register address book entries, see “(a)
Registering add re ss book entries” on page
117.) 77............................
8“Emergency”
One of the four categories of eme rgency
service points that are already stored in the
system’s database can be se lected.
77.................................
9 “Intersection & Freeway”
The names of two intersect ing streets or a
freeway (int erstate) entran ce or exit can be
entered. This is helpful if only the general
vicinity, not the specific address, is known.
78.................................
10 “Map”
A destinatio n can be selected simply by
touching the location on the displayed
map. 81...........................
11 “Coordinates”
A d estination can be set using latitudes
and longitudes as coordinates. 82. . . . .
12 Preset destina tion buttons
One of 5 pre set destination points can be
selected by touching the screen directly. If
a preset destination point has no t been
registered, a message will be displaye d
and the setting screen will automatically
appear. To use this function, it is neces-
sary to set the “Preset Destin ation”. (To
register a “Preset Destination”, se e “(a)
Registering preset destinations” on page
114.) 64............................
13 “Go Home”
A p ersonal home address can be selecte d
without entering the address each time. If
“Home” has not b een registered , a mes-
sage will be displayed and the se tting
screen will automatically appear. To use
this function, it is necessary to set a
“Home” address. (To registe r “Home”, see
“(a) Registering home” on page 111 .)
64.................................

22
The items sh own on the “Setup” scree n can be set. To display the “Setup” screen, push
the button.“SETUP”
1“General”
Settings are available for language selec-
tion, operation sounds, automat ic screen
change, etc. 330. . . . . . . . . . . . . . . . . . . .
2“Clock”
Used for changing settings for time zones,
daylight saving time, etc. 335. . . . . . . . .
3“Voice”
Voice guidance can be set. 3 37. . . . . . .
4“Navi.”
Settings are available for average cruising
speed, displayed screen contents, POI
icon categories, etc. 340. . . . . . . . . . . . .
5“Other”
Se ttings are available for Lexus Insider,
XM Sports and Stocks. 403X. . . . . . . . .
6“Vehicle”
Settings are available for vehicle informa-
tio n such as maintenance information.
395................................
7“Audio”
Settings are available for portable audio
devices, Blueto oth audio devices, etc.X
388................................
8“Phone”
Bluetooth phones and phone numbersX
can be registered, and the receiver volume
can be adjusted. 349. . . . . . . . . . . . . . . .
Quic
k
reference (“Setup” screen)

23
This screen can be used to display the calendar and information on operatio n of the
hands free phone, etc. To display the “Information” scree n, push th e−“INFO/PHONE”
button.
1“Phone”
To view han ds free phone information.
134................................
2 “Fuel Consumption”
Fuel consumption is displayed.
149................................
3 “Map Data”
Displays information regarding the map
data disc version or coverage area.
417................................
4“Calendar”
To view calendar. 151. . . . . . . . . . . . . . .
5 “XM NavWeather”
To display t he “XM NavWeather” screen.
168................................
6 “XM Stocks”
To display the “XM Stocks” screen.
163................................
7 “XM Sports”
To display the “XM Sports” screen.
163................................
8 “LEXUS Insider”
To display the “LEXUS Insider” screen.
175................................
Quic
k
reference (“Information” screen)

24

SECTION 1
NAVIGATION SYSTEM: BASIC FUNCTIONS
25
NAVIGATION SYSTEM:
BASIC FUNCTIONS
Basic inf ormation before operation
-Initial screen 26. . . . . . . . . . . . . . . . . . . . . . . . . . . . . . . . . . . . . . . . . . .
-Touch screen operation 27. . . . . . . . . . . . . . . . . . . . . . . . . . . . . . . . . .
-Inputting letters and numbers/List screen operation 28. . . . . . . . . .
-Screen adjustment 31. . . . . . . . . . . . . . . . . . . . . . . . . . . . . . . . . . . . . .
-Help icon 33. . . . . . . . . . . . . . . . . . . . . . . . . . . . . . . . . . . . . . . . . . . . . .
-
Map screen operation
33. . . . . . . . . . Current position display 33. . . . . . . . . . . . . . . . . . . . . . . . . . . . . . .
Screen scr oll operation 34. . . . . . . . . . . . . . . . . . . . . . . . . . . . . . . .
Switc hing the screens 39. . . . . . . . . . . . . . . . . . . . . . . . . . . . . . . . .
Map scale 42. . . . . . . . . . . . . . . . . . . . . . . . . . . . . . . . . . . . . . . . . . .
Foot print map 42. . . . . . . . . . . . . . . . . . . . . . . . . . . . . . . . . . . . . . .
Orientation of the map 43. . . . . . . . . . . . . . . . . . . . . . . . . . . . . . . . .
Standard map icons 44. . . . . . . . . . . . . . . . . . . . . . . . . . . . . . . . . . .
-
Voice command system
44. . . . . . . . . . Natural speech information 47. . . . . . . . . . . . . . . . . . . . . . . . . . . . .
Command list 49. . . . . . . . . . . . . . . . . . . . . . . . . . . . . . . . . . . . . . . .

NAVIGATION SYSTEM: BASIC FUNCTIONS
26
When the “ENGINE START STOP” switch
is in ACCESSORY or IGNITION ON
mode, the in itial screen will be displayed
and the system will begin operatin g.
CAUTION
When the vehicle is stopped with the
engine running, always a pply the
parking brake for safety.
After a few seconds, the “CAUTION”
screen will be displayed .
A fter about 5 seconds, the “CAUTION”
screen automatically switches to the map
screen. When touching or“Show Map”
pushing the button, the“MAP/VOICE”
map screen is displayed.
While the “CAUTION” screen is displayed,
the or butto n cannot be“DEST” “SETUP”
operated. An d if the button on“Calendar”
the “Information” screen is touched, the
screen will change b ack to the “CAUTION”
screen. In about 5 seconds, or when the
“MAP/VOICE” button is pushed or the
“Show Map” is touched, the “CAUTION”
screen will change to the map screen.
Initial screen

NAVIGATION SYSTEM: BASIC FUNCTIONS
27
- Maintenance information
This system informs about when to repla ce
certain parts or components and shows
dealer information (if registered) on the
screen.
When the vehicle reaches a previously set
driving distance or date specified f or a
scheduled maintenance check, the “Infor-
mation” screen will be displayed when the
naviga tion system is in operation.
To disable this screen, touch “Do Not
Display This Message Again”. This
screen goes off if the scr een is not op-
erated for several seconds.
To prevent this information screen from be-
ing displayed again, touch “Do Not
Display This Messa ge Aga in”.
To register “Maintenance inf ormation”, see
“—Maintenance” on page 395.
This system is operated mainly by the
touch screen butt ons on the screen.
NOTICE
-To prevent damaging the screen,
lightly touch the screen buttons
with your finger.
-Do not use objects other than your
finger to touch the screen.
-Wipe off fingerprints using a glass
cleaning cloth. Do not use chemi-
cal cle aners to clean the screen, as
they may dama ge the touch
screen.
INFORMATION
-If the system does not respond to
a touch on a touch screen button,
move the finger away from the
screen and then touch it again.
-Dimmed touch screen buttons
cannot be operated.
-The displayed image may become
darker and moving images m ay be
slightly distorted when the display
is cold.
-Under extremely cold conditions,
the map m ay not be displayed and
the data input by a user may be de-
leted. Also, the touch s creen but-
tons may be harder than usual to
depress.
-When you look at the screen
through polarized material such as
polarized sunglasses, the screen
may be dark and hard to see. If so,
look at the screen from different
angles, adjust the scree n settings
on the “Display” screen, or take off
your sunglass es.
Touch screen operation

NAVIGATION SYSTEM: BASIC FUNCTIONS
28
When searchin g for an address or a name,
or entering, letters and numbers can be in-
put via the screen.
INFORMATION
Keyboa rd layout can be changed.
(See page 332.)
-To input letters and numbers
To display the alp habet keys, touch
“A Z”−.
Enter letters by touching the keys directly.
:Touching this button erases one
letter. By holding this button, let-
ters will continue to be erased.
On certain letter entry screens, letters can
be entered in upper or lower case.
:To enter in lower case.
:To enter in upper case.
Inputting letters and
numbers/List screen
operation

NAVIGATION SYSTEM: BASIC FUNCTIONS
29
- To input symbols
To display symbol keys, touch .“Other”
Enter symbols by touching the symbol
keys directly.
:Touching this button erases one
letter. By hold ing this button, let-
ters will continue to be erased .
-To display the list
To search for an address o r a name, touch
“OK”. Matching items from the database
are listed even if th e entered address or
name is incomplete.
If the numb er o f matches is five or le ss, the
list is displayed with out tou ching .“OK”
INFORMATION
The number of m atching items is
shown to the right si de of the screen.
If the number of matching items is
more than 999, the system displays
“ ” on the screen.

NAVIGATION SYSTEM: BASIC FUNCTIONS
30
- List screen operation
When a list is displayed, use the appropri-
ate butt on to scroll through the list.
To shift to the next or previous
page.
Touch or to scroll through
the displayed list.
This expresses a displayed screen
position.
If a ppears to the right o f the
item name, the complete name is
too lo ng for the display. Touch
to scroll to the end of the name.
Touch to scroll to the beginning
of the name.
- Sorting
The order of a list displayed on the screen
can be rearranged .
1. Touch “Sort”.
2. Touc h the desired sorting criter ia.
Sorting criteria a re as f ollows:
“Distance”: To sort in the order of dis-
tance from your current location.
“Date”: To sort in the order of the date.
“Category”: To sort in the order of the
category.
“Icon”: To sort in the order of the icons.
“Name”: To sort in order by name.

NAVIGATION SYSTEM: BASIC FUNCTIONS
31
You can adjust the contrast, brightne ss,
color and t one of the screen. You can also
turn the display off, and ch ange the screen
t o either day or night mode.
-Contrast, brightness, color and tone
adjustment
The contrast, brightne ss, color and tone of
the screen can be adjusted depending on
the b rightness of your surroundings. You
can also turn the display off.
1. Push the “DISP” button.
Contrast and brightness adjustment
2. Touch the desired button to adjust
contrast and brightness.
“Contrast” “ +”: Strengthens the contrast
of the screen.
“Contrast” “ –”: Weakens the contrast of
the screen.
“Brightness” “ ”:+Brightens the screen.
“Brightness” “ ”:–Darkens the screen.
3. After adjusting the screen, touch
“OK”.
If your vehicle is equipped with the rear
seat entertainment system, the rear
screen turns on or off when is“Rear”
touched.
The screen goes off when is“Screen Off”
touched. To turn the display scree n back
on, push the button again.“DISP”
INFORMATION
When you do not touch any button on
the “Display” sc r een for 20 s econds,
the previous screen will be displa yed.
Screen adjustment

NAVIGATION SYSTEM: BASIC FUNCTIONS
32
Color and tone adjustment
1. Touch the desired button to adjust
color and tone.
You can adjust the color and the tone while
the DVD video , DVD audio and video CD
are being played.
“Color” “R”: Strengthens the red color of
the screen.
“Color” “G”: Strengthens the green col-
or of the scree n.
“Tone” “ +”: Strengthens the tone of the
screen.
“Tone” “ –”: Weakens the tone of the
screen.
2. After adjusting the scr een touch
“OK”.
If your vehicle is e quipped with the rear
seat entertainment system, the rear
screen turns on or off when is“Rear”
touched.
The screen goes off when is“Screen Off”
touched. To tu rn the display screen back
on, push the button again.“DISP”
INFORMATION
When y ou do not touch any button on
the “Display” screen for 20 seconds,
the previous screen will be displayed.
-Changing between day mode and
night mode
Depending on the positio n of the headlight
switch, the screen changes to day mode or
night mode.
To display the screen i n day mode even
with the headlight switch on, touch
“Day Mode” on the adjustment screen
for brightness and contrast control.
If the screen is set in day mode with the
headlight switch turned on, this condition is
memorized in the system even with the en-
gine is turne d off.
In the following conditions, the displays
condition is not changed to night mode
even if head light switch is turned on.
-The instrument panel light control
switch is ad justed full bright ness.
-The vehicle is in a bright area such as
daytime.

NAVIGATION SYSTEM: BASIC FUNCTIONS
33
When appea rs on t he screen, an ex-
plana tion of the function can be displayed.
1. Touch .
2. Touch the button of the desired
function.
When starting the navigation syste m, the
current position is displayed first.
This screen displays the current vehicle
position and a map of the surrounding local
area.
The current vehicle position mark ( 1 ) ap-
pears in the center or bottom center of the
map screen.
A street name will appear on the bottom of
the screen, depending on the scale o f the
map ( 2).
You can return to this map screen that
shows your current position at any time
from any screen by p ushing the “MAP/
VOICE” button.
While driving, the current vehicle position
mark is fixed on the screen and the map
moves.
The current position is automatically set as
the vehicle receives signals f ro m the GPS
(Glo bal P ositioning Syste m). If the current
position is not correct, it is automatically
corrected after the ve hicle receives sig-
nals from the G PS.
INFORMATION
-After the battery disconnection, or
on a ne w vehicle, the current posi-
tion may not be correct. As soon
as the system re ceives signals
from the GPS, the corre ct current
position is displayed.
-To correct the current position
manually, see page 346.
Help icon
Map screen operation —
— Current position di splay

NAVIGATION SYSTEM: BASIC FUNCTIONS
34
When any point on the map is touched,
that point moves to the center of the screen
and is shown by the cursor mark ( 1).
Use the scroll featu re to move the desired
point to the center of t he screen for looking
at a point on the map that is different f ro m
the current position of the vehicle.
If the fing er is cont inuously held on the
screen, the map will continue scrolling in
that direction until the finger is removed.
A street name, city name, etc. of the
touched point will be shown, depending on
the scale of the map ( 2 ). Distance from
the cu rrent position to will also be
shown ( 3).
After the screen is scrolled, the map re-
mains centered at the se lected location
unt il another function is activated. Th e cur-
rent vehicle position mark will continue to
move alon g your actual route and may
move off the screen. When the “MAP/
VOICE” button is pushed, the current ve-
hicle position mark returns to the center of
the screen and the map moves as the ve-
hicle pro ceeds along the desig nated route.
INFORMATION
When the scroll feature is used, the
current vehicle posi tion mark may
disappear from the screen. Move the
map with a scroll again or push the
“MAP/VOICE” button to return to the
current vehicle position map location
display.
-To set the cursor position as a des-
tination
A specific point on the map ca n be set as
a destination using the scroll fun ction.
Touch “Enter ”.
The screen chan ges and displa ys the map
location of the selected destination and the
route preference. (See “Starting route
guidance” on page 83.)
— Screen scroll operation

NAVIGATION SYSTEM: BASIC FUNCTIONS
35
- To register the cursor position as an
address book e ntry
Address book entry registration enables
easy access to a specific point.
Touch “Mark”.
When you touch , the following“Mark”
scre en appears for a few seconds, and
the n the map screen return s.
The registered point is shown by on the
map.
To change the icon o r name, etc., see “(b)
Editing address book entries” on pa ge 118.
Up to 100 address book entries can be reg-
istered. If there is an attempt to re gister
more than 100 address book entries, an
error message will ap pear.

NAVIGATION SYSTEM: BASIC FUNCTIONS
36
- To se e informa tion about the icon
where the cursor is set
To display information about an icon, set
the cursor on it.
POI INFORMATION
When the cu rsor is set on a POI icon, the
name and are disp layed at t he top“Info.”
of the screen.
Touch “Info.”.
Information such as the na me , address,
and phone number are displayed.
If “Enter ”is touched, the position of the
cursor is set as a destination.
If there is already a set destination, “Go to
” “Add to Route”and are displayed.
“Go to ”: To delete the existing destina-
tions and set a new one.
“Add to Route”: To add a destination.
To register this POI as an address book
entry, touch . (See page 117.)“Mark”
If is touched, the registered tele -
phone number can be called.

NAVIGATION SYSTEM: BASIC FUNCTIONS
37
INFORMATION
The desired Point of Intere st can be
displayed on the map scre en. (See
“ — Display POI ic ons” on page 102.)
ADDRESS BOOK ENTRY
INFORMATION
When the cursor is set on an address bo ok
entry icon, the name and are dis-“Info.”
played at the top of th e screen.
Touch “Info.”.

NAVIGATION SYSTEM: BASIC FUNCTIONS
38
Information such as the name, address,
and phone number are displayed.
If “Enter ”is touched, the position of the
cursor is set a s a destinat ion.
If there is already a set destination, “Go to
” “Add to Route”and are displayed.
“Go to ”: To delete the existing destina-
tions and set a ne w one.
“Add to Route”: To add a destination.
To edit an addre ss book entry, t ouch
“Edit”. (See “(b) Editing address book en-
tries” on page 118.)
To delete an address book entry, touch
“Delete”.
If is touched, the registered tele-
phone number can be called.
DESTINATION INFORMATION
When the cursor is se t on a destination
icon, th e name and are displayed“Info.”
on the top of the scre en.
Touch “I nfo.”.
In formation such a s the name, address,
and phone number are displayed.
To delete a destinatio n, touch .“Delete”
If is touched, the registered tele-
phone number can be called.

NAVIGATION SYSTEM: BASIC FUNCTIONS
39
XM NavTraffic TEXT INFORMATIONX
When you touch the XM NavTraffic iconX
on the map , the XM NavTraffic info. barX
will a ppear on the upper part of the screen .
Touch “Info.”.
Traffic information is displayed on the
screen.
Touch “Detail” to display detailed traffic
event inf ormation.
A ny one of the scree n configurations ca n
be selected.
1. Touch this button to di splay the fol-
lowing scre en.
2. To select the desired screen config-
uration, touch one of the following but-
tons.
— Switching the screens

NAVIGATION SYSTEM: BASIC FUNCTIONS
40
Depending on the conditions, certain
screen configuration buttons cannot be
selected.
:
To display the single map scree n.
(See page 40.)
:
To display the dual map screen.
(See page 41.)
:
To display the compass mode
screen. (See page 41.)
:
To display the freeway screen.
(See page 88.)
:
To display the turn list screen.
(See page 90.)
:
To display the arrow screen. (See
page 90.)
:
To display the intersection guid-
ance screen or the guidance
screen on the freeway. (See page
89.)
-Screen configurations
SINGLE MAP
This is a regular map screen.
While on a d ifferent screen, touching
will display the sing le
map screen.
The screen sho ws the single map.

NAVIGATION SYSTEM: BASIC FUNCTIONS
41
DUAL MAP
A map can be displayed split in two.
While on a different screen, touching
will display the dual map
screen.
The screen shows the dual map. The map
on the left is the main map.
The right side map can be edited by tou-
ching any specific point on the right side
map.
This screen ca n perform the following pro-
cedures:
1. Changing the map scale
2. Displaying the POI icon
3. Show XM NavTraff ic Info . (See pageX
173.)
4. Changing the orientation of the map
Touch “OK” when you complete edi-
ting.
The screen returns to the dua l map screen.
COMPASS MODE
Current ve hicle position is indicated with a
compass.
While on a different scre en, touching
will display the compass
mode screen.
Information about t he destination and cur-
rent position, as well as a compass, is dis-
played on the scre en.
The destination mark is displaye d in the di-
rection of the destination. When driving re-
fer to the longitude and latitude coordi-
nate s, and the compass, to make sure that
your vehicle is headed in the direction of
the destinatio n.
INFORMATION
When the vehicle travels out of the
coverage area, the guidance screen
changes to the compass mode
screen.
NAVIGATION SYSTEM: BASIC FUNCTIONS
42
Touch or to change the scale
of the map display. The scale bar and indi-
cator at the bo ttom of the scre en indicates
the map scale menu. The scale range is
150 feet (50 m) to 250 miles (400 km).
Touch or until the scale bar
changes normally. By continuing to touch
the button, the scale bar changes smooth-
ly.
The scale of the map display can be
changed by touching the scale bar directly.
It is not available while driving .
The map scale is displayed under the
north up symbol or heading up symbol at− −
the top left of the scree n.
INFORMATION
When the map scale is at the ma xi-
mum range of 250 mil es (4 00 km),
is not shown. When the map
scale i s at the minimum range of 150
feet (50 m), is not shown. I n
areas where the foot print map is
available the map scale changes from
to when at the minimum
range.
For the area which is cove red by the foot
print map (Some areas in the following
cities: Detroit, Chicago, N.Y., L.A), you can
switch to the foo t print map on a scale of 75
feet (25 m).
-To switch to the foot print map
changes int o when t he map
is scaled down to 150 feet (50 m).
To display the foot print map, touch
.
To d elete the foot print map display, touch
.
INFORMATION
-If the map or the current position is
moved to the area which is not cov-
ered by the foot print map, the
screen scale automatically
changes to 1 50 feet (50 m).
-On the foot print map, a one way
street is display ed by .
-It is not possible to perform scroll-
ing on the foot print map while driv-
ing.
Building f ootprints in the database were
created and provided by MAPMASTER.
— Map scale — Foot print map

NAVIGATION SYSTEM: BASIC FUNCTIONS
43
- To dis play building information
Information is available only for buildings
for which information is re corded on t he
map data .
Touch “Info.” whil e the foot print map is
displayed.
Details of POIs in some buildings may be
displayed.
For de tailed POI information, touch the
building name. You can see details of the
selected POIs.
The orientation of the map can be ch anged
from North up to Heading up by touching− −
the orien tation symbol at the top left of t he
screen.
Touch or .
North up screen−
Heading up screen−
North up symbol−
Regardless of the direction of vehicle trav-
el, North is always up.
Heading up symbol−
The direction of vehicle travel is always up.
A red arrow indicates North.
— Orientation of the map

NAVIGATION SYSTEM: BASIC FUNCTIONS
44
Icon
Name
I
con
N
ame
Island
Park
Industry
Business facility
Airport
Military
University
Hospital
Stadium
Shopp ing mall
Golf
The vo ice command system enables you
to operate the navigation system, audio/
vid eo system, air conditioning system and
hands free system by giving a command.−
1. Push the talk switch.
After a beep sounds, the “Voice Menu”
screen is displayed.
INFORMATION
-Voice guidance for the voice com-
mand system can be ski pped by
pushing the talk switch.
-The voice recognition prompt can
be se t to on or off when “Voice
Prompts (on/off)” is touched.
This setting can also be changed
on the “Voice Settings” screen.
(See page 337.)
-When “Voice Prompts (on/off)” is
touched, voice recognition will be
temporarily suspended.
Push the talk switch again.
-Voice guidance can be canceled by
setting voice prompts to off.
Use this setting when you want to
say a comm and immediately after
pushing the talk switch.
— Standard map icons
V
oice command system —

NAVIGATION SYSTEM: BASIC FUNCTIONS
45
2. After a beep s ounds , say the com-
mand of your choice.
Voice commands are marked with .
Some commonly used commands a re dis-
played on the screen. Speak the co m-
mands as displayed on the screen.
If you want to check the all command list,
say to display the com-“Command list”
mand list screen. (See “— Command list”
on pa ge 49.)
3. Following voice guidance, s ay the
command displayed on the screen.
If a desired outco me is not shown, or if no
choices are available, say or“Go back”
touch to return to the previou s“Go Back”
screen.
To cancel voice command recognition, say
“Cancel”,touch , or push and“Cancel”
hold the talk switch.
If the navigation system does not respond
or the confirmation screen does not disap-
pear, please push the talk switch an d try
again.
If a voice command canno t be recognized
within 6 second s, the voice guidance sys-
tem will say “Pardon?” (“Command not
recognize d.” will be displayed on the
screen ) and voice command reception will
restart.
If a voice command canno t be recognized
two co nsecutive times, the voice guidance
system will say “Pause d. To restart voice
recognition, push the talk switch.”, then be
suspended.

NAVIGATION SYSTEM: BASIC FUNCTIONS
46
Microphone
It is unnecessary to speak directly into
the microphone when giving a com-
mand.
INFORMATION
-Wait for the confirmation beep be-
fore speaking a command.
-Voice commands may not be rec-
ognized if :
-Spoken too quickly
-Spoken at a low or high volume
-The windows or moon roof are
open
-Passengers are talking while
voice commands are spoken
-The air conditioning speed is set
high
-Turning the air conditioning
vents towards the mi crophone
-In the following conditions, the
system may not recognize the
command properly and using voice
commands may not be pos sible.
-The command is not correct or
clear.
Note that certain words , accents,
or speech patterns may be diffi-
cult for the system to rec ognize.
-There are some noises such as
wind noise, e tc.

NAVIGATION SYSTEM: BASIC FUNCTIONS
47
- Voice command example: Search-
ing for a route to your home.
1. Push the tal k switch.
2. Say .“Go home”
I f a home address is not registered, the
voice guidance system will say “Your
home is not set” and you will be prompted
to enter a home address. (See page 111.)
When the voice command is recognized,
a map of the area around your home is d is-
played.
3. Touch “E nter ” or say , and“Enter”
the system starts searching for a route
to your home.
To return t o th e “Voice Menu” screen, say
“Go back” or touch .“Go Back”
Touch or say , and th e“Cancel” “Cancel”
voice co mmand system will be canceled.
Due to natural language speech recogni-
tion technology, this system enables rec-
ognition of a command when spoken natu-
rally. However, the syste m cannot
recognize every variation of each com-
mand. In some situa tions, it is possible to
omit the command for the procedure and
directly sta te the desired operatio n.
-Voice recognition top screen ex-
pression examples
Command Expression examples
Go Home Take me home.
Let’s go home.
Destination I’d like to set a des-
tination.
Phone I’d like to make a call.
I need to use the
phone.
Bring up the phone
menu.
Audio Audio menu, please.
Information Let me see the infor-
mation menu.
Give us the informa-
tion menu, please.
Command List Show me the voice
command list.
— Natural speech
information (Engli sh only)

NAVIGATION SYSTEM: BASIC FUNCTIONS
48
- Expression examples for each func-
tion
In some situations, I t is possib le to omit a
command for each procedure and to say
the desired operation directly.
EXPRESSIO N EXAMPLES WITH THE
“Destination” SCREEN
Normal command recognition —
Destination Poin t of Interest >Near>
Here Gas> > The gas stations near the cur-
rent location will be listed.
Natural spe ech recognition —
Destination>What gas stations are
nearby?>The gas stations near the cur-
rent location will be listed.
INFORMATION
Natural speech example:
“Where’s the ne arest Mexican restau-
rant?”
“Where is the close st ATM?”
EXPRESSIO N EXAMPLES WITH THE
“Phone Menu” SCREEN (when making
a call using a phonebook)
Normal command recognition —
Phone Dial by Name Bob mobile> > > > The
ph one number will be displayed.
Natural spe ech recognition —
Phone> TheCall to Bob on his mobile.>
ph one number will be displayed.
INFORMATION
Natural speech example:
“Get me Rob Brown on the phone.”
“Please place a call to John on his
mobile.”
EXPRESSIO N EXAMPLES WITH THE
“Phone Menu” SCREEN (when making
a c all by saying a phone number)
Normal command recognition —
Phone Dial by Number 123 456 789> > −−>
The phone numbe r will be displayed.
Natural spe ech recognition —
Phone> TheCall to 123 456 789.− − >
ph one number will be displayed.
INFORMATION
The a bove mentioned c omm and for
making a call can also be recognized
on the voice re cognition top screen.
Natural speech example:
“I’d like to place a call to
123 456 789.”− −
“I want to buzz 123 456 789, please.”− −

NAVIGATION SYSTEM: BASIC FUNCTIONS
49
EXPRESSIO N EXAMPLES WITH THE
“Information Menu” SCREEN
Normal command recognitio n —
Information XM Nav Weather Los An-> >
geles, California> The weather informa-
tion will be displayed.
Natural speech recognition —
Information>Give me a weather report
for Los Angeles, California.>The
weather in formation will be disp layed.
INFORMATION
Natural speech example:
“How about Detroit, Michi gan?”
EXPRESSIO N EXAMPLES WITH THE
“Audio Menu” SCREEN (when the au-
dio sourc e is in satellite radio mode)
Normal co mmand recognition —
Audio Select Channel Number 90> > > The
channel will be changed to the one se-
lected.
Natural speech recognition —
Audio>Play channel ninety, please>The
channel will be changed to the one se-
lected.
INFORMATION
Natural speech example:
“Swi tch the channel to XM one s even-
ty five.”
VOICE RECOGNITION TOP SCREEN
EXPRESSION EXAMPLES
Normal co mmand recognition —
Command List Dual Map> > The map will
be displayed in dual map mode.
Natural speech recognition —
Switch to dual map mode.>The map will
be displayed in dual map mode.
The system has a voice recognition com-
mand list. You can operate the voice
recognition system by saying any com-
mand from the displayed command list.
1. Push the talk switch.
2. Say .“Command list”
3. Say the command of your c hoice to
ope r ate the system.
To confirm commands on the screen,
touch or to scroll throu gh the
command list. This funct ion is available
only when the vehicle is not moving.
INFORMATION
When the “Voice Menu” s creen is dis-
played, all the commands i n the voice
recognition command list can be rec-
ognized.
— Command list

NAVIGATION SYSTEM: BASIC FUNCTIONS
50
- Voice command exam ple: Changing
map scree n
1. Push the talk switch.
2. Say .“Command list”
3. Say .“Dual map”
To confirm commands on the screen,
touch or to scroll through the
command list. This function is available
only when the vehicle is not moving.
When or is touched, push t he
talk switch again and say the command.
The screen shows the dual map.
-Voice command example: Changing
map scale
1. Push the talk switch.
2. Say .“Command list”
3. Say or .“Zoom in” “Zoom out”
To confirm commands on the screen,
touch or to scroll through the
command list. This function is available
only when the vehicle is not moving.
When or is touched, push t he
talk switch again and say the command.
The scale of the map display is changed.

NAVIGATION SYSTEM: BASIC FUNCTIONS
51
COMMAND LIS T
Change map mode
Command Action
Map Shows cu rrent position map.
Dual map Changes map to dual mode.
Single map Changes map to single mode.
Compass mode Ch anges map to compass mode.
Change map scale
Command Action
Zoo m in Zoom in.
Zoo m out Zoo m out.
Right ma p zo om in Zooms right map in.
Right ma p zo om out Zooms right map out.
Change map orient ation
Command Action
North up Changes map b earing to north up .
Heading up Changes map bearing to heading up.
Map direction Changes map b earing to ano ther direc-
tion.
Righ t map no rth up Changes right map bearing to north up.
Right map heading up Change s right map bea ring to heading
up.
Right map direction Changes right map bearing to another
direction.
Change guidance mode
Command Action
Arrow mode Chan ges guida nce screen to arrow
mode.
Turn list mo de Changes guidance screen to turn list
mode.

NAVIGATION SYSTEM: BASIC FUNCTIONS
52
Change guidance mode
Command Action
Freeway mode Change s gu idance screen to freeway
mode.
Intersection mode Changes guida nce screen to Int ersec-
tion mode.
Set a destination
Command Action
Previous start point Calculates ro ute to previous start point.
Save a point on the map
Command Action
Mark this point Marks the point on the map.
Change rout e
Command Action
Quick route Changes route to quick rou te.
Short route Changes route to short route.
Alternate route Chang es route to alternat e route.
Detour Calculates detour route.
Detour entire route Calculates detour entire route.
Review ro ute
Command Action
Route overview Shows entire route.
Next destination map Shows position of next destination.
First destination map Shows position of first destination.
Second destination map Sho ws positio n o f second destination.
Third destination map Shows position of third destination.
Fourth destination map Shows position of fo urth destination.
Fifth destination map Shows position of fifth destination.
Final destinat ion map Shows position of final destination.

NAVIGATION SYSTEM: BASIC FUNCTIONS
53
Delete destination
Command Action
Delete next destination Deletes position of next destination.
Delete final destination Deletes position of final destination.
Delete all destinations Delet es position of all destinat ion.
Guidance options
Command Action
Pause guidance Pauses the guidance.
Resume guidance Resumes the guidance.
Repeat guidance Repeat voice guidance.
Louder Turns volume up 1 level.
Softer Turns volume down 1 level.
Traffic information
Command Action
Traffic information Displays traffic information.
Show POI ico ns
Command Action
SHOW GAS Displays GAS STATION icons.
SHOW PARKI NG Displays PARKING icons.
SHOW SERVICE AND MAINTENANCE Displays SERVI CE & MAINTENANCE
icons.
SHOW DEALERSHIPS Displays DEALERS HIP icons.
SHOW LEXUS Displays LEXUS DEALERSHIP icons.
SHOW TOYOTA Displays TOYOTA DEALERS HIP icons.
SHOW PARTS STORES Displays PARTS STORE icons.
SHOW ROADSIDE ASSISTANCE Displays ROADSIDE ASSISTANCE
icons.
SHOW AUTOMOBILE CLUBS Displays AUTOMOBILE CLUB icons.
SHOW CAR RENTAL AGENCIES Displays CAR RENTAL AGENCY ico ns.
SHOW CAR WASHES Displays CAR WASH icons.
SHOW OTHER AUTOMOTIVE Displays OTHER AUTOMOTIVE
STORE ico ns.
SHOW DINING Displays DINING icons.

NAVIGATION SYSTEM: BASIC FUNCTIONS
54
Show POI icons
Command Action
SHOW A MERICAN DINING Displays AMERICAN RESTAURANT
icons.
SHOW BAKERIES AND DELIS Displays BAKERY & DELI icons.
SHOW BARBECUE AND GRILL DI-
NING
Displays BARBECUE & GRILL RES-
TAURANT icons.
SHOW CAJUN AND CARIBBE AN DIN-
ING
Displays CAJUN & CARIBBEAN RE S-
TAURANT icons.
SHOW CHINESE DINING Displays CHINESE RESTAURANT
icons.
SHOW COFFEE HOUSES Displays COFFEE HOUSE icons.
SHOW FAST FOOD Displays FAST FOOD icons.
SHOW FRENCH DINING Displays FRENCH RESTAURANT ico ns.
SHOW GREEK DINING Displays GREEK RESTAURANT ico ns.
SHOW INDIAN DINING Displays I NDIAN RESTAURANT icons.
SHOW ICE CREAM AND CANDY Displays ICE CREAM & CANDY icons.
SHOW ITALI AN DINING Displays ITALIAN RES TAURANT icons.
SHOW JAPANESE DINING Displays JAPANES E RESTAURANT
icons.
SHOW KOREAN DINING Displays KOREAN RESTAURANT
icons.
SHOW LATIN AND SOUTH AMERICAN
DINING
Displays L ATIN & S OUTH AMERICAN
RESTAURANT icons.
SHOW MIDDLE E ASTERN DINING Displays MIDDLE EASTERN RES-
TA URANT icons.
SHOW MEXICAN DINING Displays MEXICAN RESTAURANT
icons.
SHOW PIZZA Displays PIZZERIA ico ns.
SHOW SEAFOOD DINING Displays SEAFOOD RESTAURANT
icons.
SHOW SPANISH DINING Displays SPANIS H RESTAURANT
icons.
SHOW STEAK HOUSES Displays STEAK HOUSE icons.
SHOW THAI DINING Displays THAI RE STAURANT icons.

NAVIGATION SYSTEM: BASIC FUNCTIONS
55
Show POI icons
Command Action
SHOW VIETNAMESE DINING Displays VIETNAMESE RESTAURANT
icons.
SHOW OTHER DINING Displays OTHER RESTAURANT icons.
SHOW GROCERIES Displays GROCERY STORE icons.
SHOW SHOPPING MALLS Displays SHOPPING MALL icons.
SHOW CONVE NIENCE STORES Displays CONV ENIENCE S TORE icons.
SHOW HOME IMPROVEMENT Displays HOME IMPROVEMENT icons.
SHOW OFFICE AND ELECTRONICS Displays OFFICE & ELECTRONICS
icons.
SHOW RETAIL AND DEPARTMENT
STORES
Displays RETAIL & DEPARTMENT
STORE ico ns.
SHOW DEPARTMENT STORES Displays DEPARTMENT STORE icons.
SHOW BOOK STORES Displays BOOK STORE icons.
SHOW CLOTHING AND SHOE
STORES
Displays CLOTHING & SHOES STORE
icons.
SHOW HOB BY AND CRAFTS Displays HOBBY & CRAFT icons.
S HOW JEWELRY Displays JEWELRY icons.
SHOW SPORTING EQUIPMENT Displays SP ORTING EQUIPMENT
icons.
SHOW RECREATIONAL VEHICLES Displays RECREATIONAL VEHICLE
icons.
SHOW OTHER RETAIL STORES Displa ys OTHER RETAIL STORE icons.
SHOW POLICE STATIONS Displays POL ICE STATION icons.
SHOW FIRE STATIONS Displays FIRE STATION icon s.
SHOW HOSPITALS Displays HOSPITA L icons.
SHOW PHARMACIES Displays PHARMACY icons.
SHOW OTHER MEDICAL FACILITIE S Displays OTHER MEDICAL FACILITY
icons.
SHOW HOTELS Displays HOTEL icons.
SHOW REST AREAS Displays REST AREA icons.
SHOW AIRPORTS Displays AIRPORT icons.
SHOW BUS STATIONS Displays BUS STATION icons.

NAVIGATION SYSTEM: BASIC FUNCTIONS
56
Show POI icons
Command Action
SHOW TRAIN STATIONS Displays TRAIN STATION icons.
SHOW PORTS AND FERRIES Displays PORT & FERRY icons.
S HOW TAX IS AND SHUTTLE S Displays TAXI & SHUTTLE icon s.
SHOW FULL SERVICE BANKS Displays FULL SERVICE B ANKS icons.−
SHOW ATMS Displays ATM icons.
SHOW ATTRACTIONS Displays ATTRACTIONS icons.
SHOW ENTERTAINMENT Displays E NTERTAINMENT icons.
SHOW TOURIST INFORMATIO N Displays TOURIST INFORMATION
icons.
SHOW PARKS AND B EACHES Displays PARK & BEACH icons.
SHOW SPORTS AND FITNESS Displays SPORTS & FITNESS icons.
SHOW BO WLING CENTERS Displays BOWLING icons.
SHOW GOLF COURSES Displays GOLF COURSE icons.
SHOW HORSE RACING Displays HORS E RACING icons.
SHOW HEALTH AND FITNESS CLUBS Displays HEALTH & FITNES S CLUB
icons.
SHOW MARINA S Displays MARINA icons.
SHOW MOTOR SPORTS Displays MOTOR SPORTS icons.
SHOW SKI RESORTS Displays SKI RESORT icons.
SHOW SPORTS COMPLEXES Displays S PORTS COMPLEX icons.
SHOW NIGHTLIFE Displays NIGHTLIFE icons.
SHOW PERFORMING ARTS Displays PERFORMING ART ico ns.
SHOW CITY CENTERS Displays CITY CENTER icons.
SHOW GOVERNMENT Displays GOVERNMENT icons.
SHOW SCHOOLS Displays SCHOOL icons.
SHOW DRY CLEANERS Displays DRY CLEANING icons.
SHOW FLORISTS Displays FLORIST icons.
SHOW LIBRARIES Displays LIBRARY icons.
SHOW PERSONAL GROOMING Displays PERSONAL GROOMING
icons.

NAVIGATION SYSTEM: BASIC FUNCTIONS
57
Show POI icons
Command Action
SHOW SHIPPING AND COPIES Displays SHIPPING & COPY icons.
SHOW POST OFFICES Displays POST OFFICE icons.
SHOW OTHER SERVICES Displays OTHER SERVICE icons.
Delete POI icons
Command Action
Clear all icon s Deletes all POI icons.
Select audio mode
Command Action
Radio Selects audio mode to radio.
AM Selects audio mode to AM.
FM Selects audio mode t o FM.
FM1 Selects audio mode to FM1.
FM2 Selects audio mode to FM2.
Satellite radio Selects audio mode to satellite radio.
Satellite radio 1 Selects audio mode to satellite radio 1.
Satellite radio 2 Selects audio mode to satellite radio 2.
Satellite radio 3 Selects audio mode to satellite radio 3.
CD Selects audio mode to CD.
DVD Selects audio mode to DVD.
CD changer Selects audio mode to CD changer.
DVD changer Selects audio mode to DVD changer.
Auxiliary Select s audio mode to auxiliary.
Blu etooth audio Selects audio mode to Bluetooth audio.X
iPod Selects audio mode to iPod.
USB audio Sele cts audio mode to USB audio.
Audio On/Off
Command Action
Aud io on / Audio off Turns audio system on and off.

NAVIGATION SYSTEM: BASIC FUNCTIONS
58
Radio operation
Command Action
Seek up Seeks up for a radio station.
Seek down Seeks down for a radio station.
Type up Seeks up for program type.
Type down Seeks down for program type.
Disc operation
Command Action
Track up Tracks up for a track number.
Track down Tracks down for a track number.
Previous track Selects previous track.
Disc up Disc up.
Disc down Disc down.
Climate co mmand
Command Action
Automatic climate control Turns air conditioner on and off.
Raise temperature Turns temperature up.
Lower temperature Turns temperature d own.
?? d egrees (?? is 65 to 85) Selects temperature from 65 to 80 de-
grees.
Phone
Command Action
Dial by number Calls by phone number.
Dial by name Calls by giving a voice tag in the
phonebook.
Select pho ne Selects phone.

NAVIGATION SYSTEM: BASIC FUNCTIONS
59
INFORMATION
-The function that cannot be used
according to the vehic le is pro-
vided.
-Voice recognition language can be
changed. (See “ Selecting a lan--
guage” on page 331.)

NAVIGATION SYSTEM: BASIC FUNCTIONS
60

SECTION 2
NAVIGATION SYSTEM: DESTINATION SEARCH
61
NAVIGATION SYSTEM:
DESTINATION SEARCH
-
Destination search
62.......... Select ing the search area 62. . . . . . . . . . . . . . . . . . . . . . . . . . . . . .
Destination search by Home 64. . . . . . . . . . . . . . . . . . . . . . . . . . .
Destination search by Preset destinations 64. . . . . . . . . . . . . . . .
Destination search by “Address” 65. . . . . . . . . . . . . . . . . . . . . . . .
Destination search by “Point of Interest” 69. . . . . . . . . . . . . . . . .
Destination search by “Dest ination Assist” 76. . . . . . . . . . . . . . . .
Destination search by “Prev ious Destinations” 76. . . . . . . . . . . .
Destination search by “Address Book” 77. . . . . . . . . . . . . . . . . . .
Destination search by “Emergency” 77. . . . . . . . . . . . . . . . . . . . .
Destination search by “Intersection & Freeway” 78. . . . . . . . . . .
Destination search by “Map” 81. . . . . . . . . . . . . . . . . . . . . . . . . . .
Destination search by “Coordinates” 82. . . . . . . . . . . . . . . . . . . . .
Deleting set destinations 82. . . . . . . . . . . . . . . . . . . . . . . . . . . . . . .
-Starting route guidance 83. . . . . . . . . . . . . . . . . . . . . . . . . . . . . . . . . .

NAVIGATION SYSTEM: DESTINATION SEARCH
62
Push the “DEST” button.
You can use one of 11 different methods to
search your destinatio n. (See pages 64
through 82. )
INFORMATION
When searching the des tination, the
response to the scre en button m ay be
slow.
Change the selected region in order to set
a destination from a differe nt region by us-
ing “Address”, “Point of Interest” or “Inter-
section & Freeway”.
1. Touch “Search Area” to displ ay a
map of the United States and Canada
divided into 15 regions. (For map data-
base information and updates, see “Map
da tabase information and updates” on
page 408.)
2 . Touch one of “US1” through “CAN”
to select a region to search.
3. Touch “OK” and the previous
screen returns.
Destination search — — Selecting the search area

NAVIGATION SYSTEM: DESTINATION SEARCH
63
U.S.A.
Button States included in the search
region
“US1”
Idaho
Oregon
Washington
“US2” California
Nevada
“US3”
Arizona
Colorado
Montana
New Me xico
Utah
Wyoming
“US4”
Iowa
Kansas
Minnesota
Missouri
North Dakota
Nebraska
South Dakota
“US5” Oklahoma
Texas
“US6”
Illinois
Indiana
Kentucky
Michigan
Ohio
Wisconsin
“US7”
Arkansas
Alabama
Louisiana
Mississippi
Tennessee
“US8”
Connecticut
Massachusetts
Maine
New Hampshire
New Jersey
New York
Rhode Island
Vermont
“US9”
Washington, D.C.
Delaware
Maryland
New Jersey
Pennsylvania
Virginia
West Virginia
“US10”
Florida
Georgia
North Carolina
South Carolina
“HI” Hawaii
“AK” Alaska
“PR” Puerto Rico
“VI” US Virgin Islands
Canada
Button Provinces and region s in-
cluded in the search region
“CAN” All provinces a nd regions in
Canada inclu ded in this button.

NAVIGATION SYSTEM: DESTINATION SEARCH
64
1. Push the “DEST” button.
2. Touch “Go Home”.
The screen chang es a nd displays the ma p
location for home and the route p re fer-
ence. (See “Starting route guid ance” on
page 83.)
If home has not been registered, a mes-
sage will be displa yed and the setting
screen will automatically appear.
To use this function, it is necessary to set
a “Home” address. (To register “Home”,
see page 111.)
INFORMATION
Guidance starts from the current ve-
hicle position to your home if “OK” is
touched even while driving.
1. Push the “DEST” button.
2. Touch a ny of the preset destination
buttons on the “Destination” screen.
The screen cha nges and d isplays the map
loca tion of the preset destination point and
the ro ute preference. (See “Starting route
guidance” on page 83.)
If a preset destination point has not b een
registered, a message will be displayed
and the setting screen will auto ma tically
appear.
To use this function, it is necessary to set
“Preset Destinations”. (To register “Preset
Destinatio ns”, see page 11 3.)
INFORMATION
Guidance starts from the current ve-
hicle position to the preset destina-
tion point if “Go to ” is touched
even while dri ving.
— Destination search by
Home
— Destination search by
Preset destinations

NAVIGATION SYSTEM: DESTINATION SEARCH
65
There are 2 ways to search a destination
by address.
(a) Search by city
(b) Search b y street address
1. Push the “DEST” button.
2. Touch “Addres s” on the “Destina-
tion” screen.
3. Touch the button for the desired
method.
(a) Selecting a city to search
1. Push the “DEST” button.
2. Touch “Addres s” on the “Destina-
tion” screen.
3. Touch “City”.
4. Input a city name.
5. Touch the button of the desired city
name from the display ed list.
— Destination search by
“Address”

NAVIGATION SYSTEM: DESTINATION SEARCH
66
6. Input the street name and touch
“OK”.
7. When the desired street name is
found, touch the corresponding but-
ton.
The screen chang es a nd displays the ma p
location of the selecte d destination a nd the
ro ute preference. (See “Starting route
guidance” on page 83.)
8. Input a house number.
If the same address exists in more than
one city, the current scree n changes to the
ad dress list screen.

NAVIGATION SYSTEM: DESTINATION SEARCH
67
SELECTING FROM THE LAST 5 CITIES
1. Touch “Last 5 Cities”.
2. Touch the button of the desired city
name.
If the navigation system has never been
used, this function will not be available.
The current screen chang es to the screen
for inputting a street name. (See “(a) Se-
lecting a city to search” on page 65.)
(b) Search by street address
1. Push the “DEST” button.
2. Touch “Address” on the “Destina-
tion” screen.
3. Touch “Street Address”.
4 . Touch number s directly on the
screen to input a house number.
After in putting a house number, touch
“OK” to display the screen for inputting a
street name.
5. Input the street name and touch
“OK”.

NAVIGATION SYSTEM: DESTINATION SEARCH
68
6. When the desired street name is
found, touch the corresponding but-
ton.
The screen chang es a nd displays the ma p
location of the selecte d destination a nd the
ro ute preference. (See “Starting route
guidance” on page 83.)
If the same address exists in more than
one city, the cu rrent screen changes input-
ting the city name or to the address list
screen.
7. Input a city name .
8. Touch the button of the desired city
name from the displayed list.
INFORMATION
You can search for a street name us-
ing just the body.
Example : S WESTERN AVE
You can input “S WESTERN AVE”,
“WESTERN AVE” or “WESTERN”

NAVIGATION SYSTEM: DESTINATION SEARCH
69
There are 4 ways to search by Points of In-
terest.
(a) S earch by name
(b) S earch by category
(c) Search by phone #
(d) S earch by eDestin ation
1. Push the “DEST” button.
2. Touch “Points of Inter est” on the
“Destination” screen.
3. Touch the button for the desired
method.
(a) Search by “Name”
1. Push the “DEST” button.
2. Touch “Point of Interest” on the
“Destination” screen.
3. Touch “Name” on the “Point of In-
terest” s creen.
4. Input the name of the Point of I nter-
est.
5. Touch the button of the desired des-
tination.
The screen changes an d displays the map
location of the selecte d destination and the
rou te preference. (See “Starting route
guidance” on page 83.)
When inputtin g the name of a specific
Point of Interest, and there are two or more
site s with the same name, the list screen
is displayed.
INFORMATION
To search for a facility name using
multiple search words, put a space
between each word.
— Destination search by
“Poi nt of Interest”

NAVIGATION SYSTEM: DESTINATION SEARCH
70
Touch the button of the desired des-
tination.
If the same name exists in more than one
city, a search can be performed more easi-
ly with and . (Se e ““City” “Category” -
Selecting a city to search” on p age 70 and
“ Selecting from the cate gories” on page-
71.)
INFORMATION
The desired Point of Interes t can be
displayed on the map screen. (See
“ — Display POI icons” on page 102.)
-Selecting a city to search
1. Touch “City”.
2. Input the city name.
3. Touch the button of the desired ci ty
name from the displayed list.
INFORMATION
To c ancel the city setting, touch “Any
City”.

NAVIGATION SYSTEM: DESTINATION SEARCH
71
- Selecting from the categori es
Touch “Category”.
If the desired POI category is on the
screen, touch the na me to display a de-
tailed list of the POI category.
If the desired PO I category is not o n the
screen, touch to list“List All Categories”
all P OI ca tegories.
When the de sired category is touched , the
POI name list screen is displayed.
(b) Search by “Cate gory”
The destination can be set by touching the
search po int and the P OI ca tegory.
1. Push the “DEST” button.
2. Touch “Point of Intere st” on the
“Destination” screen.
3. Touch “Category” on the “Poi nt of
Interest” screen.
Set the search point by the following
method:
1. Set the search point from near the ve-
hicle’s current position
2. Set the search point from along the
chosen route
3. Set the search point from near a city
center
4. Set the search point from near a des-
tination
It is po ssible to display the names of POIs
located within approximate ly 2 00 miles
(320 km) from the selected search point.

NAVIGATION SYSTEM: DESTINATION SEARCH
72
SETTING THE SEARCH POINT FROM
NEAR HERE
Touch “Near Here”.
The search point is set at the current posi-
tion, and the “POI Categ ory” screen will be
displayed. (See page 74.)
SETTING THE SE ARCH POINT FROM
ALONG MY ROUTE
Touch “Along My Route”.
The search poin t is set and the “POI Cate-
gory” screen will be displayed. (See page
74.)
SETTING THE SE ARCH POINT FROM
NEAR CITY CENTER
1. Touch “Near City Ce nter”.
2. Input the city center name.
3. Touch the button of the desired city
center name.
The search poin t is set and the “POI Cate-
gory” screen will be displayed. (See page
74.)

NAVIGATION SYSTEM: DESTINATION SEARCH
73
SELECTING FROM THE LAST 5 CITIES
1. Touch “Near City Center”.
2. Touch “Last 5 Cities”.
3. Touch the button of the desired city
center name.
The search point is set and the “POI Cate-
gory” screen will be displayed . (See page
74.)
SETTING THE SEARCH POINT FROM
NEAR A DESTINATION
1. Touch “Near a Destination”.
2. Touch the button of the desired des-
tination.
The search point is set and the “POI Ca te-
gory” screen will be displayed . (See page
74.)

NAVIGATION SYSTEM: DESTINATION SEARCH
74
- To search POIs near the search
point
When the search point is set, the “PO I
Catego ry” screen will be displayed.
Touch the des ired POI category.
If the desired POI category is not on t he
screen, touch to list“List All Categories”
all POI categories.
Touch the desired POI c ategory from
the list.
By touch ing t he bu tton of the desired item,
the screen changes and displays the map
location of the selected destination and the
route preference. (See “Starting route
guidance” on page 83.)
(c) Search by “Phone #”
1. Push the “DEST” button.
2. Touch “Point of Interest” on the
“Destination” screen.
3. Touch “Phone #” on the “Point of In-
terest” screen.
4. Input a telephone number.
5. After inputting a telephone numbe r,
touch “OK”.
The screen changes and displays t he map
location of the selected destination and the
route preference. (See “Starting route
guidance” on page 83.)
If there is more than one site with the same
numbe r, the following screen will be dis-
played.

NAVIGATION SYSTEM: DESTINATION SEARCH
75
INFORMATION
-If there is no match for the tele-
phone number inputted, a list of
identical numbers with different
area codes will be displayed.
-To set an address book entry as a
destination using the phone num-
ber, the number must already be
registered. (See page 121.)
(d) Search by “eDestination”
1. Push the “DEST” button.
2. Touch “Point of Interest” on the
“Destination” sc r een.
3. Touch “eDestination” on the “Point
of Interest” scree n.
U2002LS
With the eDestination feature, you can go
online, via the Lexus. com owner’s Web
site, t o select and organize destina tions of
your choice and the n wirelessly send them
to your vehicle’s n avigation system. You
can store up to 200 locations online to ac-
cess and update at any time. Your loca-
tions can be organized into up to 20 fold-
ers. (See “eDestination” on page 160.)

NAVIGATION SYSTEM: DESTINATION SEARCH
76
1. Push the “DEST” button.
2. Touch “Destination Assist” on the
“Destination” scr een.
3. Touch “Call Dest. Assist” on the
“Destination Assist” scr een.
U2003LS
Destination Assist provides you with live
assistance for finding destinations via th e
Lexus Enform response center. You can
request either a specific business,
address, or ask for he lp locat ing your
desired destin ation by category, such as
restaurants, ga s stations, shopping
centers or other points of interest (POI).
After you tell the agent your choice of
destin ation, its coord inates are sent
wirelessly to your vehicle’s navigation
system. (See “Destination Assist” on page
157.)
1. Push the “DEST” button.
2. Touch “Previous Destinations” on
the “Destination” screen.
The previous starting point and up to 100
previously set destinations are displayed
on the screen.
3. Touch the button of the desired des-
tination.
“Delete”: To delete the previous destina-
tion. (To delete previous destinations, see
page 127.)
The screen changes an d disp lays the map
location of th e selected destination and the
route preference. (See “Starting route
guidance” on page 83.)
INFORMATION
The list of previous destinations can
also be deleted by touching “Delete
Previous Dest.” on the “Navigation
Settings” screen w hen the vehicl e is
stopped. (See “ — Deleting pre vious
destinations” on page 127.)
— Destination search by
“Destination Assist”
— Destination search by
“Previous Destinations”

NAVIGATION SYSTEM: DESTINATION SEARCH
77
1. Push the “DEST” button.
2. Touch “Address Book” on the “Des-
tination” screen.
A list of registered address book entries is
displayed.
3. Touch the button of the desired ad-
dress book entry.
“Options”: To register or edit address
book. (See pa ge 116 .)
The scree n changes and disp lays the map
location of th e selected destination and th e
route preference. (See “Starting route
guidance” on page 83.)
1. Push the “DEST” button.
2. Touch “Emergency” on the second
page of the “Destination” screen.
The display changes to a screen to select
p olice stations, deale rs, hospitals or fire
stations. While driving, only nearby p olice
stations, dealers, hospitals, or fire stations
are shown. The current position is sho wn
with an address, and the latitud e a nd the
longitude at th e top of the screen.
3 . Touch the desired emergency cate-
gory.
The selected emergency category list is
displayed.
— Destination search by
“Address Book”
— Destination search by
“Emergency”

NAVIGATION SYSTEM: DESTINATION SEARCH
78
4. Touch the button of the desire d des-
tination.
The screen ch anges and displays the map
location o f the selected destination and t he
route preference. (See “Starting route
guidance” on page 83.)
INFORMATION
The navigation system does not
guide in areas where route guidance
is unavailable . (See pa ge 407.)
There are 2 ways to search.
(a) Search by intersection
(b) Search by Freeway Entrance/Exit
1. Push the “DEST” button.
2. Touch “Intersection & Freeway” on
the second page of the “Destination”
screen.
3. Touch the button for the desired
method.
— Destination search by
“Intersection & Freeway”

NAVIGATION SYSTEM: DESTINATION SEARCH
79
(a) Search by “Intersection”
1. Push the “DEST” button.
2. Touch “Intersection & Freewa y” on
the second page of the “Destination”
screen.
3. Touch “Intersection” on the “Inter-
section & Freeway” screen.
4. Input the name of the first intersect-
ing street which are located near the
destination to be set.
5. Touch “OK”.
6. Touch the button of the desir ed
item.
7. Input the name of the second inter-
secting street.
8. Touch the button of the desir ed
item.
After inputting the two intersecting st re ets,
the screen changes and displays the map
loca tion o f the selected destination a nd the
route preference. (See “Starting route
guidance” on page 83.)

NAVIGATION SYSTEM: DESTINATION SEARCH
80
If the same two streets cross at more than
one intersection, t he screen change s and
displays the menu to select the city name
where the street s intersect . Select the city,
and the map location of the selected des-
tination and the route preference. (See
“Starting route guidance” on page 83.)
(b) S earch by “Freeway Entranc e/
Exit”
1. Push the “DEST” button.
2. Touch “I ntersection & Free way” on
the second page of the “Destination”
screen.
3. Touch “Freeway Entrance/Exit” on
the “Intersection & Freeway” s creen.
4. To input a freeway name.
Be sure to use the complete name of the
freeway or h ighway, including the hyphen,
when ent ering the destination. Freeways
and interstates use an “I” (I 405). US high-−
ways use the state de signation before the
number (CA 118).−
5. Select the desired freeway by touch-
ing the button.

NAVIGATION SYSTEM: DESTINATION SEARCH
81
6. Either a freeway “Entrance” or
“Exit” can be selected.
7. Input a freeway entrance or exit
name.
8. Touch “OK”.
9. Touch the button of the desired en-
trance or exit name.
The screen chang es a nd displays the ma p
location of the selecte d destination a nd the
rou te preference. (See “Starting route
guidance” on page 83.)
1. Push the “DES T” button.
2. Touch “Map” on the second page of
the “Destination” screen.
The screen cha nges and d isplays the map
location that was previously displayed just
before the destination input operation and
the route p re ference. (See “Sta rting route
guidance” on page 83.)
INFORMATION
Guidance starts if “O K” is touched
even while driving. However, the cur-
sor cannot be moved.
— Destination search by
“Map”

NAVIGATION SYSTEM: DESTINATION SEARCH
82
1. Push the “DEST” button.
2. Touch “Coordinates” on the second
page of the “Destination” screen.
3. Input the latitude and the longitude.
4. When the input is finished, touch
“OK”.
By touch ing the button of the desired point,
the screen changes and displays the map
location of the selected destination and the
rou te preference. (See “Starting route
guidance” on page 83.)
A set destination can be deleted.
1. Push the “DEST” button.
2. Touch “Del. Dest.” on the “Destina -
tion” screen.
When more th an one destina tion is set, a
list will be displaye d o n the screen.
3. Touch the destination for deletion.
“Select All”: To select all destinations on
the list.
“Unselect All”: To unselect all of the se-
lected destinations.
4. Touch “Dele te”.
— Destination search by
“Coordinates” — Deleting set destinations

NAVIGATION SYSTEM: DESTINATION SEARCH
83
A message appears to confirm the request
to delete.
5 . To delete the destination(s), touch
“Yes”.
If “Yes” is touched, the data cannot be re-
covered.
If is touched, the pre vious screen will“No”
return.
The system searches for the guidance
route again, an d displays the en tire route.
INFORMATION
S et destinations can also be deleted
by touching “Route”. (See “ — Delet-
ing destinations” on page 95 .)
After inputting the destination, the screen
changes and displays the map location of
the sele cted destination and the route pref-
erence.
1. Scroll the map to the desired point.
“Adjust Location”: To adjust the position
in smaller increments.
When an arrow fac ing the desired point
is touched, the map scrolls in that di-
rection.
The scroll stops when the selection of the
arrow is released.
2. Touch “Go to ”.
The system starts route search and dis-
plays recommended routes.
If there is already a set destination, “Go to
” “Add to Route”and are displayed.
“Go to ”: To delete the existing destina-
tions and set a new one.
“Add to Route”: To add a destination.
“Info.”: If this button is displayed on the
top of the screen, touch it to view items
such as name, a ddress, and phone num-
ber.
Starting route guidance

NAVIGATION SYSTEM: DESTINATION SEARCH
84
1 Current position
2 Destination point
3 Type of the route and the distance
4 Distance of the entire route
3. To sta r t guidance, touch “O K”.
“Turn List”: The following screen displays
the list of the roads up to the destination.
“3 Routes”: To select the desired route
from 3 possible routes. (See page 85.)
“Edit Route”: To change the route. (See
page 86.)
INFORMATION
-Guidance can be paused or re-
sumed. (See “— Pausing and re-
suming guidance” on page 101.)
-If “OK” is touched until a beep
sounds, demo mode will star t.
Push the “MAP/VOICE” button to
finish Demo mode.
-The route for returning may not be
the same as that for going.
-The route guidance to the destina-
tion may not be the shortest route
nor a route without traffic conges-
tion.
-Route guidance may not be avail-
able if there is no road data for the
specified location.
-When setting the destination on a
map with a scale larger than 0.5
miles (800 m ), the map scale
changes to 0.5 miles (800 m) auto-
maticall y. Set the destination
again.
-If a destination is entered, the road
nearest to the point you selected is
set as the destination.
CAUTION
Be sure to obey traffic regulations
and keep road conditions in mind
while driving. If a traffic sign on the
road has been changed, the route
guidance may not indicate such
changed information.

NAVIGATION SYSTEM: DESTINATION SEARCH
85
3 ROUTES SELECTION
1. To sel ect the desired route from 3
routes, touch “3 Routes”.
2. Touch “Quick ”, “Alt.” or “Short” to
select the desired route.
“Quick”: Recommended route.
This route is indicated by an orange line.
“Alt.”: Alternative route.
This route is indicated by a purple line.
“Short”: A route by which you can reach
the destination in the shortest distance.
This route is indicated by a green line.
“Info.”: To display the following informa-
tion about each of the 3 routes.
1 Time necessary for the entire trip
2 Distance of the entire trip
3 Toll road
4Freeway
5Ferry

NAVIGATION SYSTEM: DESTINATION SEARCH
86
- Edit route
You can again designate the conditions of
the route to the destination.
Touch “Edit Route”.
“Add”: To add destinations. (See page
94.)
“Delete”: To delete destinations. (See
page 95.)
“Reorder”: To reorder destinations. (See
page 94.)
“Preferences”: A number of choices are
provided on the conditions which the sys-
tem uses to determine the route to the des-
tination. (See page 99.)
INFORMATION
-Even if the “Freeways” indicator is
dimmed, the route cannot avoid in-
cluding a freeway in some cases.
-If the calculated route includes a
trip by ferry, the route guidance
shows a sea route. After you travel
by ferry, the current vehicle posi-
tion may be incorrect. Upon re cep-
tion of GPS signals, it is automati-
cally c orr ected.

SECTION 3
NAVIGATION SYSTEM: ROUTE GUIDANCE
87
NAVIGATION SYSTEM:
ROUTE GUIDANCE
-Route guidance screen 88. . . . . . . . . . . . . . . . . . . . . . . . . . . . . . . . . .
-Typical voice guidance prompts 91. . . . . . . . . . . . . . . . . . . . . . . . . . .
-Distance and time to destination 93. . . . . . . . . . . . . . . . . . . . . . . . . .
-
Setting and deleting destinations
94.......... Adding destinations 94. . . . . . . . . . . . . . . . . . . . . . . . . . . . . . . . . . .
Reordering destinations 94. . . . . . . . . . . . . . . . . . . . . . . . . . . . . . .
Deleting destinations 95. . . . . . . . . . . . . . . . . . . . . . . . . . . . . . . . . .
-
Setting route
96.......... Detour s etting 96. . . . . . . . . . . . . . . . . . . . . . . . . . . . . . . . . . . . . . . .
Route overview 97. . . . . . . . . . . . . . . . . . . . . . . . . . . . . . . . . . . . . .
Route preference 99. . . . . . . . . . . . . . . . . . . . . . . . . . . . . . . . . . . . .
Pausing and resuming guidance 101. . . . . . . . . . . . . . . . . . . . . . .
-
Show on map
102.......... Display POI i cons 102. . . . . . . . . . . . . . . . . . . . . . . . . . . . . . . . . . .
Route trace 106. . . . . . . . . . . . . . . . . . . . . . . . . . . . . . . . . . . . . . . . .
: Point of Interest
NAVIGATION SYSTEM: ROUTE GUIDANCE
88
During route guidance, various types of
guidance screens can be displayed de-
pending on conditions.
-Screen layout
1 Distance to the next turn and the
arrow indicating turning direction
2 Current street name
3 Distance and travel/arri val time to
the destination
4 Current position
5 Guidance route
INFORMATION
-If the vehicle goes off the guidance
route, the route i s searched again.
-For some areas, the roads have not
be en completely digitized in our
database. For this reason, the
route guidanc e may select r oad
that should not be tra veled on.
-When you arrive at your destina-
tion, the destination name will be
displayed on the top of the screen.
Touching “Off” clears the display.
-During freeway driving
During freeway d riving , the freeway exit in-
formation screen will be displayed.
This screen displays the distance to the
next junction and exit, or POIs in the vicin-
ity of the freeway exit.
1 Current position
2 Points of Interest that are close to
a freeway exit
3 E xit number and junction name
4 Distance from the current position
to the exit or junction
5 Current street name
“Map”: To display the selected map of the
exit vicinity.
:To scroll for farther junctions or exits.
:To scroll for closer junctions or exits.
:To scroll for the closest 3 junctions or
exits.
Route guidance screen

NAVIGATION SYSTEM: ROUTE GUIDANCE
89
- When approac hing a freeway exit or
junction
When the vehicle a pproaches an exit or
junction, the guidance screen for the free-
way will be displayed.
1 Next street name
2 Distance from the current position
to the exit or junction
3 Current position
“Off”: The guidance screen on freeway
disappears and the map screen a ppears.
Whe n touch ing or push-
ing the button, the guid-“MAP/VOICE”
ance screen on freeway reappears.
-When approaching an intersection
When the vehicle approaches an intersec-
tion, the intersection guidance screen will
be displayed.
1 Next street name
2 Distance to the intersection
3 Current position
“Off”: The intersection guidance screen
disappears and the map screen a ppears.
Whe n touch ing or push-
ing the button, the inter-“MAP/VOICE”
section guidance screen reappears.

NAVIGATION SYSTEM: ROUTE GUIDANCE
90
- Other screens
TURN LIST SCREEN
On th is screen, the list o f turn s on the guid-
ance route can be viewed.
Touching during guid-
ance displays th e turn list.
1 Next street name or destination
name
2 Turn di rection
3 Distance between turns
4 Current stre et name
ARROW SCREE N
On this screen, information about next
turns on the guidance route can be viewed.
Touching during guid-
ance displays the arrow screen.
1 Exit number, street name contain-
ing number or next street name
2 Turn di rection
3 Distance to the next turn
4 Current stre et name

NAVIGATION SYSTEM: ROUTE GUIDANCE
91
The voice guidance provides various mes-
sages as you approach an intersection, or
other point where you need to maneuver
the vehicle.
4.7
miles
0.5 miles
1 “Proceed about 5 miles to Main
street.”
2 “In half of a mile, right turn onto
Main street.”
3 “Right turn.”
4 (Beep sound only)
INFORMATION
-The street names may not be pro-
nounced correctly or clearly due to
text to speech function.− −
-On freeways, interstates or other
highways with higher speed limits,
the voic e guidanc e will be made at
earlier points than on city stre ets in
order to allow time to maneuver.
4.2 miles
0.5 miles
1 “Proceed about 4 miles to the
traffic circle.”
2 “In half of a mile, traffic circle
ahead, and t hen 3rd exit ahead
onto Main street.”
3 “The 3rd exit ahead.”
4 “The e xit ahead.”
5 (Beep sound only)
Typical voice guidance
prompts

NAVIGATION SYSTEM: ROUTE GUIDANCE
92
One−way road
One−way road
: The system ind icates a U turn if the dis-−
tance between two one way roads (of op-−
posite d irections) is less than 50 feet (15
m) in residential areas or 164 feet (50 m)
in non residentia l areas.−
1 “In half of a mile, make a legal
U turn.”−
2 “Make a legal U turn ahead.”−
3 (Beep sound only)
The system annou nces t he approach to
the final destination.
1 “Your destination is ahead.”
2 “You have arrived at your des-
tination. The route guidance is
now finished.”
INFORMATION
-If the system cannot determine the
current vehicle pos ition correctly
(in cases of poor GPS signal recep-
tion), the voice guidance may be
made early or delayed.
-If you did not hear the voice guid-
ance command, push the “MAP/
VOICE” button to hear it a gain.
-To adjust the voice guidance vol-
ume, see “ -Voice volume” on
page 338.

NAVIGATION SYSTEM: ROUTE GUIDANCE
93
When the vehicle is on th e guid ance route,
the distance and the estimated travel/arriv-
al time to the destination are displayed.
When th e ve hicle is not on the g uidance
route, t he distance and the direction of the
destination are displayed.
When driving on the guidance route and
more than one destination is se t, the dis-
tance and the estimated travel/arrival time
from the current position to each destina-
tion are displayed.
1. Touch this button to display the fol-
lowing screen.
2. Touch the number button to dis play
the desired destination.
The distance, the estimated travel time
and the estimated arrival time from the cur-
rent p osition to the selected destination
are displayed.
Estimated travel time is dis-
played.
Estimated arrival time is dis-
played.
To switch to estimated arrival
time.
To switch to estimated travel
time.
Displayed while driving off the
guidance route. The destina-
tion direction is indicated by
an arrow.
INFORMATION
When the vehicle is on the guidance
route, the distance measured along
the route is display ed. Travel time
and arriva l time is ca lculated based
on the set v ehicle speed information.
(See page 342.) However, when the
vehicle is not on the guidance route,
the di stance is the linear distance be-
tween the current position and the
destination.
Distance and time to
destination

NAVIGATION SYSTEM: ROUTE GUIDANCE
94
You can a dd dest inations and search
again for the routes.
1. Touch “Route”.
2. Touch “Add”.
3. Input an additional destination in
the same way as the destination
search. (See “Destination search” on
page 62.)
4. Touch the desired “Add Destination
Here” to determine the arrival order of
the addi tional destination.
When more than one destination is set,
you can change the arrival o rder of the
destinations.
1. Touch “Route”.
2. Touch “Reorder”.
3. Touch the desired destination and
touch “Move Up” or “Move Down” to
change the a r rival order.
4. Touch “OK”.
5. After selecting the destinations,
touch “OK”.
The system sea rch es for the guidance
route again, and d isplays the entire route.
Setting and deleting
destinations —
— Adding destinations — Reordering destinations

NAVIGATION SYSTEM: ROUTE GUIDANCE
95
A set destination can be deleted.
1. Touch “Route”.
2. Touch “Delete”.
When mo re than o ne d estination is set, a
list will be displayed on the scree n.
3. Touch the destination for deletion.
“Select All”: To select all destinations on
the list.
“Unselect All”: To unselect all of the se-
lected destina tions.
A message a ppears to confirm the request
to delete.
4 . To delete the destination(s), touch
“Yes”.
If “Yes” is touched, the data cannot be re-
covered.
If is touched, the pre vious screen will“No”
return.
The system searches for the guidance
route again, and disp lays th e entire route.
— Deleting destinations

NAVIGATION SYSTEM: ROUTE GUIDANCE
96
While th e route guidance is operat ing, you
ca n chan ge the route to detour around a
section of the route where a delay is
caused by road repairs, or an accident,
etc.
1. Touch “Route”.
2. Touch “Detour”.
3. Touch the button below to select the
desired detour distance.
“1 mi le (km )”, “3 miles (km)” or “5 m iles
(km)”: Touch one of these buttons to start
the detour process. After detouring, the
system re turns to the original guidance
route.
“Whole Route”: By touching this button,
the system will calculate an entire new
route to t he destination.
“Around Traffic”: If you touch this button,
the system will search for the route based
on the traffic congestion information re-
ceived from XM NavTraffic. For details,X
see “XM NavTraffic” on pa ge 173.X
Setting route —
— Detour setting

NAVIGATION SYSTEM: ROUTE GUIDANCE
97
This picture shows an example of how the
system would guide around a d elay
caused by a traffic jam.
1 This position indicates the locat ion of
a tra ffic jam caused by ro ad repairs or
an accident.
2 This route indicates the det our sug-
gested by the system.
INFORMATION
-When your vehicle is on a freeway,
the detour distance selections are
5, 15, and 25 miles (km).
-The system may not be able to cal-
cula te a detour route depending on
the selected distance and sur-
rounding road conditions.
1. Touch “Route”.
2. Touch “Overview”.
Th e entire route from the current position
to the destination is displayed.
“OK”: To start guidance.
“Turn List”: The following screen displays
the list of the ro ads up to the d estination.
“Preview”: To preview the route.
— Route overview

NAVIGATION SYSTEM: ROUTE GUIDANCE
98
You can scroll t hrough the list of roads by
touching or . However, not all
road names in the route may appear on the
list. If a road changes its name withou t re-
quiring a turn (such as on a street that runs
through two or more cities), the n ame
change will not appear on the list. The
street names will be displayed in order
from the starting point, along with the dis-
tance to the next turn.
Th ese marks indicate the
direction in which you should
turn at an intersection.
Touch “Map” on the “Turn List” screen.
The point which you choose is displayed
on th e map screen.
-Route preview
1. Touch “Route”.
2. Touch “Overview ”.
3. Touch “Preview”.

NAVIGATION SYSTEM: ROUTE GUIDANCE
99
:To indicate the next destination.
:To preview the route to the next
destination.
:To preview the route to the next
destination in fast forward mode.−
:To stop the preview.
:To review the route to the previous
destination or starting point.
:To review the route to the previous
destin ation or sta rting point in
fast forward mode .−
:To indicate the previous destina-
tion or starting point.
-To select route type
You can designate the route conditions of
the route to the destination.
1. Touch “Route”.
2. Touch “Preferences”.
3. Touch “Quick”, “Short” or “Alter-
nate” a nd touch “OK”.
— Route preference

NAVIGATION SYSTEM: ROUTE GUIDANCE
100
The entire route from the starting point to
the destination is displayed.
“OK”: To start guidance.
“Edit Route”: To change a route. (See
page 86.)
-To select route features
A numb er of choices are provided on the
conditions which the syste m uses to deter-
mine the route to the destina tion.
1. Touch “Route”.
2. Touch “Preferences” to change the
conditions that determine the route to
the destination.
3. Select the desired route preference
by touching the button.
When searching fo r a route, the system will
avoid routes when the indicator is off.
4. After choosing the desired route
preference , touch “OK”.

NAVIGATION SYSTEM: ROUTE GUIDANCE
101
- Starting route from adjacent road
You can start the route guidance from the
adjacent road.
(ex. When route guidance is set on the
freeway, but the vehicle is driven parallel
a long the freeway.)
1. Touch “Route”.
2. Touch “Preferences”.
3. Touch “Start from Adjacent Road”.
When there is no adjacent road, this button
will not be displayed.
-To pause guidance
1. Touch “Route”.
2. Touch “Pa use Guidance”.
Th e screen will return t o the current posi-
tion map without route guidance.
INFORMATION
Without route guidance, “Pause
Guidance” cannot be used.
— Pausing and resuming
guidance

NAVIGATION SYSTEM: ROUTE GUIDANCE
102
- To resume gui dance
1. Touch “Route”.
2. Touch “Resume Guidance”.
The screen will change to th e current posi-
tion map with route guidance.
Points of Interest such as gas stations and
restaurants can be displayed on th e map
screen. You can also set their location as
a destination and use them for route guid-
ance.
1. Touch “Show on Map”.
2. Touch “Select POI ” to display a par-
ticular type of Point of Interest on the
screen.
When the Points of Interest to be displayed
on the map screen have already been set,
“Change POI” is displayed.
A screen with a limited choice of Points of
Interest will be displayed. (To change the
displayed POI, see page 345.)
Show on map —
— Display POI icons

NAVIGATION SYSTEM: ROUTE GUIDANCE
103
- S electing POIs to be displayed
Up to 5 categories of icons can be dis-
played on the screen.
Touch the desired Point of Interest
category to display POI location sym-
bols on the map screen.
By touching the desired POI category and
then touchin g , the selected POI“OK”
icons are displayed on the map screen.
To turn off the Points of Intere st icons on
th e map screen, tou ch .“Clear”
“Other POIs”: If the desired Point of Inter-
est can not be found on the limited choice
screen, touch this button.
“Find Local POI”: When searching for the
nearest Point of Interest, touch this button.
Then choose one of the categories. The
system will list the points within 20 0 miles
(320 km). (See p age 104.)
Touch “Other POIs” on the “Select POI
Icons” screen.
When a Point of Interest category is se-
lected from either the limited list or the
complete list, the screen will display sym-
bols of those lo cations on the map screen.
Touch the desired POI categories.
The selected category icon appears on the
top left of the screen.
By touching the desired POI category and
then touchin g , the selected POI“OK”
icons are to uching on the map screen.
If the desired P OI category is not on the
screen, touch to list“List All Categories”
all POI categories.

NAVIGATION SYSTEM: ROUTE GUIDANCE
104
Touch the des ired POI categorie s from
the list.
The selected category icon appears o n the
top left of the screen.
By touching the desired POI category and
then touchin g , the selected POI“OK”
icons are displaye d on the map screen.
To return to the POI category selection
screen, touch .“More”
-To display the local POI list
Points of Interest that are within 200 miles
(320 km) o f the current position will be
listed from amon g the select ed categories.
1. Touch “Find Local POI” on the “Se-
lect POI Icons” screen.
2. Touch the button of the desired
Point of Interest.
The selected Points of Interest are dis-
played on the map screen.
“Near...”: To search for Points of Interest
near the curren t position or along the
route.

NAVIGATION SYSTEM: ROUTE GUIDANCE
105
“Near Here” : “Near Here”When is
touched, the list of Points of Interest near
the current position will be disp layed.
“Along My Route” : “Along MyWhen
Route” is touched, the list of Points of In-
terest along the rou te will be displayed.
-To set a POI as a destination
You can select one of the Point s of Interest
ico ns on the ma p screen as a destination
a nd use it f or route g uidance.
1. Directly touch the Point of Interest
icon that you want to set as a destina-
tion.
The map will shift so that the icon is cen-
t ered on the screen and overlap s with the
cursor . At this time, the distance from
the current position is displayed on the
screen. The distance shown is measured
as a straight line from the current veh icle
position to the PO I.
2. When the desired Point of Interes t
overlaps with the cursor, touch “Enter
”.
The screen changes an d displays the map
location of the selected destina tion and
ro ute preference. (Se e “Starting route
guidance” on page 83.)

NAVIGATION SYSTEM: ROUTE GUIDANCE
106
- To hide POI icons
1. Touch “Show on Map”.
2. Touch “POI Icons”.
The “POI Icons” indicator is dimmed.
The map screen will be displayed with the
POI icons hidden.
To display the POI icons ag ain, touch “POI
Icons” on the “Show on Map” screen.
It is possible to store the traveled route up
to 124 miles (200 km) and retrace the route
on the display.
INFORMATION
This feature is available on the map
with more detailed map scale than 30
miles (50 km).
— Route trace

NAVIGATION SYSTEM: ROUTE GUIDANCE
107
- To start rec ording the route trace
1. Touch “Show on Map”.
2. Touch “Route Tra ce”.
“Route Trace” indicator is highlighted.
-To stop recording the route trace
1. Touch “Show on Map”.
2. Touch “Route Trace”. The following
screen will b e displayed.
Touching “Yes” stops recording and the
route trace remains displayed on the
screen.
Touching stops recording and the“No”
route t ra ce is erased.

NAVIGATION SYSTEM: ROUTE GUIDANCE
108

SECTION 4
NAVIGATION SYSTEM: MEMORY POINTS
109
NAVIGATION SYSTEM: MEMORY POINTS
-
Navigation settings
110. . . . . . . . . . Setting up the “Home” 111. . . . . . . . . . . . . . . . . . . . . . . . . . . . . . . .
Setting up the “Preset Destinations” 113. . . . . . . . . . . . . . . . . . . .
Setting up the “Address Book” 116. . . . . . . . . . . . . . . . . . . . . . . . .
Setting up the “Areas to Avoid” 122. . . . . . . . . . . . . . . . . . . . . . . .
Deleting previous destinations 127. . . . . . . . . . . . . . . . . . . . . . . . .

NAVIGATION SYSTEM: MEMORY POINTS
110
P oints or areas on the map can be regis-
tered.
The registered points can be used on the
“Destinatio n” screen. (See “— Dest ination
search by Home” on page 64, “— Destin a-
tion search by Preset destinations” on
p age 64 and “— Destination search b y
“Address Book”” on page 77.)
Registered areas are avoided at the time
of route search.
1. Push the “SETUP” button.
2. Touch “Navi.”.
On this screen, the following operations
can b e performed .
No. Function
1 Sets home
(See p age 111.)
2 Sets pres et destinations
(See p age 113 .)
3 Sets address book
(See p age 116 .)
4 Sets area to avoid
(See p age 122.)
5 Deletes previous destinations
(See p age 127.)
6 Detailed navigation settings
(See p age 340.)
Navigation settings —

NAVIGATION SYSTEM: MEMORY POINTS
111
If home ha s been registered, that informa-
tion can be recalled by using “Go Home”
on the “Destination ” screen. (See “— Des-
tination search by Home” on page 64.)
1. Push the “SETUP” button.
2. Touc h “Navi.” on the “Setup”
screen.
3. Touch “Home”.
-Registering home (See page 111.)
-Editing home (See page 112.)
-Deleting home (See page 113.)
(a) Registering home
1. Push the “SETUP” button.
2. Touc h “Navi.” on the “Setup”
screen.
3. Touch “Home” on the “Navigation
S ettings” screen.
4. Touch “Set Home”.
5. Enter the location in the same way
as for a destination search. (See “Des-
tination search” o n page 62.)
— Setting up the “Home”

NAVIGATION SYSTEM: MEMORY POINTS
112
When registration of home is completed,
the “Edit Home” scre en will be displayed.
6. Touch “OK”.
To edit registered information, see “(b)
Editing home” o n page 112.
(b) Editing home
1. Push the “SETUP” button.
2. Touch “Navi.” on the “Setup”
screen.
3. Touch “Home” on the “Navigation
S ettings” screen.
4. Touch “Edit”.
5. Touch “Edit” for the item you want
to change.
“Name”: To edit home name. The n ames
can be displayed on the map. (See page
120.)
“Location”: To edit location info rmation.
(See page 121.)
“Phone #”: To edit telephone numbers.
(See page 121.)
“Icon”: To select icons to be displayed on
the map. (See page 119.)
6. Touch “OK”.

NAVIGATION SYSTEM: MEMORY POINTS
113
(c) Deleting home
1. Push the “SETUP” button.
2. Touc h “Navi.” on the “Setup”
screen.
3. Touch “Home” on the “Navigation
S ettings” scree n.
4. Touch “Delete”.
5. To delete home, touch “Yes”. To
cance l the deletion, touch “No”.
If preset dest ination has been registered,
that informatio n can be recalled by using
“Preset Destination” on the “Destina-
t ion” screen. (See “— De stination search
by Preset destin ations” on page 64.)
1. Push the “SETUP” button.
2. Touc h “Navi.” on the “Setup”
screen.
3. Touch “Preset Destinations”.
-Registering preset destination (See
page 114 .)
-Editing preset destination (See
page 115 .)
-Deleting preset destination (See
page 116 .)
— Setting up the “Preset
Destinations”

NAVIGATION SYSTEM: MEMORY POINTS
114
(a) Registering preset destinations
1. P ush the “SE TUP” button.
2. Touc h “Navi.” on the “Setup”
screen.
3. Touch “Preset Destinations” on the
“Navigation Settings” screen.
4. Touch “Set”.
5. Enter the location in the same way
as for a destination search. (See “Des-
tination search” on page 62.)
6. Touch a position for this preset des-
tination.
When re gistration of preset destination is
complet ed, the “Edit Preset Destination”
screen will be displayed.
7. Touch “OK”.
To edit registere d information, see “(b)
Editing preset destinations” on page 11 5.

NAVIGATION SYSTEM: MEMORY POINTS
115
(b) Editing preset de stinations
1. Push the “SETUP” button.
2. Touc h “Navi.” on the “Setup”
screen.
3. Touch “Preset Destinations” on the
“Navigation Settings” screen.
4. Touch “Edit”.
5. Touch the button of the desired pre-
set destination.
6. Touch “Edit” for the item you want
to change.
“Name”: To edit preset destination name s.
The names can be displayed on the map.
(See page 120.)
“Location”: To edit location information.
(See page 121.)
“Phone #”: To edit t elephone numbers.
(See page 121.)
“Icon”: To select icons to be displayed on
the map. (See page 119.)
7. Touch “OK”.
Produktspezifikationen
| Marke: | Lexus |
| Kategorie: | Auto |
| Modell: | GX 460 (2013) |
Brauchst du Hilfe?
Wenn Sie Hilfe mit Lexus GX 460 (2013) benötigen, stellen Sie unten eine Frage und andere Benutzer werden Ihnen antworten
Bedienungsanleitung Auto Lexus

9 Oktober 2024
5 September 2024
31 August 2024
24 August 2024
23 August 2024
20 August 2024
12 August 2024
11 August 2024
4 August 2024
2 August 2024
Bedienungsanleitung Auto
- Auto Mitsubishi
- Auto Cadillac
- Auto Pioneer
- Auto Hyundai
- Auto Tesla
- Auto Citroën
- Auto Skoda
- Auto Chevrolet
- Auto Jaguar
- Auto Peugeot
- Auto Mercedes-Benz
- Auto Acme
- Auto BMW
- Auto Honda
- Auto Infiniti
- Auto Audi
- Auto Jeep
- Auto Smart
- Auto Ford
- Auto Volkswagen
- Auto Volvo
- Auto Toyota
- Auto Genesis
- Auto Kia
- Auto Porsche
- Auto Opel
- Auto Nissan
- Auto Suzuki
- Auto Seat
- Auto Subaru
- Auto RAM
- Auto Mini
- Auto Land Rover
- Auto Mazda
- Auto Dacia
- Auto Vauxhall
- Auto Buick
- Auto Renault
- Auto Fiat
- Auto Alfa Romeo
- Auto MG
- Auto Saturn
- Auto Dodge
- Auto DS
- Auto Lancia
- Auto Maserati
- Auto Mercury
- Auto POLARIS
- Auto Polestar
- Auto Saab
- Auto Sharper Image
- Auto GEM
- Auto Chrysler
- Auto Pontiac
- Auto Lincoln
- Auto Rover
- Auto Tata
- Auto Acura
- Auto GMC
- Auto Mahindra
- Auto Scion
- Auto Lada
- Auto VDL
- Auto Abarth
- Auto Chery
Neueste Bedienungsanleitung für -Kategorien-

3 Dezember 2024

30 November 2024
30 November 2024

16 Oktober 2024

16 Oktober 2024

16 Oktober 2024

15 Oktober 2024

15 Oktober 2024

15 Oktober 2024
15 Oktober 2024