Lexmark B2546dw Bedienungsanleitung
Lesen Sie kostenlos die 📖 deutsche Bedienungsanleitung für Lexmark B2546dw (150 Seiten) in der Kategorie Drucker. Dieser Bedienungsanleitung war für 13 Personen hilfreich und wurde von 2 Benutzern mit durchschnittlich 4.5 Sternen bewertet
Seite 1/150

B2546, B2650, M1246, MS521,
MS621 Printers
User's Guide
September 2018 www.lexmark.com
Machine type(s):
4600
Models:
630, 638, 690, 830, 838

Contents
Safety information........................................................................................ 5
Conventions.......................................................................................................................................................... 5
Product statements............................................................................................................................................. 5
Learning about the printer...........................................................................8
Finding information about the printer.............................................................................................................8
Selecting a location for the printer..................................................................................................................9
Printer configurations......................................................................................................................................... 11
Attaching cables.................................................................................................................................................. 11
Using the control panel.................................................................................................................................... 12
Understanding the status of the power button and indicator light....................................................... 13
Loading paper and specialty media..........................................................14
Setting the size and type of the specialty media.......................................................................................14
Configuring Universal paper settings........................................................................................................... 14
Loading trays....................................................................................................................................................... 14
Loading the multipurpose feeder.................................................................................................................. 16
Linking trays......................................................................................................................................................... 17
Paper support.............................................................................................. 18
Supported paper sizes........................ ................................ ................. ................................. ............................18
Supported paper types........................................................... ................................. .........................................19
Supported paper weights............................................................................................................................... 20
Printing......................................................................................................... 21
Printing from a computer..................................................................................................................................21
Printing from a mobile device......................................................................................................................... 21
Printing from a flash drive............................................................................................................................... 22
Supported flash drives and file types............... ............................................................................. .............. 23
Printing a font sample list................................................................................................................................ 24
Printing a directory list..................................................................................................................................... 24
Understanding the printer menus............................................................25
Menu map........................................................................................................................................................... 25
Device.................................................................................................................................................................. 26
Contents 2

Print....................................................................................................................................................................... 33
Paper.....................................................................................................................................................................40
Network/Ports.....................................................................................................................................................42
USB Drive............................................................................................................................................................ 55
Security................................................................................................................................................................ 56
Reports.................................................................................................................................................................60
Help........................................................................................................................................................................61
Troubleshooting..................................................................................................................................................61
Printing the Menu Settings Page....................................................................................................................61
Securing the printer................................................................................... 62
Locating the security slot................................................................................................................................ 62
Erasing printer memory................................................................................................................................... 62
Restoring factory default settings................................................................................................................. 63
Statement of Volatility...................................................................................................................................... 63
Maintaining the printer.............................................................................. 64
Networking..........................................................................................................................................................64
Cleaning the printer..........................................................................................................................................66
Ordering parts and supplies...........................................................................................................................66
Replacing parts and supplies......................................................................................................................... 70
Moving the printer.............................................................................................................................................80
Saving energy and paper.................................................................................................................................81
Recycling............................................................................................................................................................. 82
Clearing jams.............................................................................................. 84
Avoiding jams..................................................................................................................................................... 84
Identifying jam locations..................................................................................................................................85
Paper jam in door A.......................................................................................................................................... 86
Paper jam in the rear door.............................................................................................................................. 89
Paper jam in the standard bin........................................................................................................................90
Paper jam in the duplex unit............................................................................................................................91
Paper jam in trays..............................................................................................................................................92
Paper jam in the multipurpose feeder......................................................................................................... 92
Troubleshooting..........................................................................................94
Network connection problems...................................................................................................................... 94
Contents 3

Issues with supplies..........................................................................................................................................96
Paper feed problems........................................................................................................................................ 97
Printing problems............................................................................................................................................ 100
Contacting customer support....................................................................................................................... 127
Upgrading and migrating.........................................................................128
Hardware........................................................................................................................................................... 128
Software............................................................................................................................................................. 133
Firmware.............................................................................................................................................................134
Notices........................................................................................................136
Index............................................................................................................147
Contents 4

Safety information
Conventions
Note: A note identifies information that could help you.
Warning: A warning identifies something that could damage the product hardware or software.
CAUTION: A caution indicates a potentially hazardous situation that could injure you.
Dierent types of caution statements include:
CAUTION—POTENTIAL INJURY: Indicates a risk of injury.
CAUTION—SHOCK HAZARD: Indicates a risk of electrical shock.
CAUTION—HOT SURFACE: Indicates a risk of burn if touched.
CAUTION—TIPPING HAZARD: Indicates a crush hazard.
CAUTION—PINCH HAZARD: Indicates a risk of being caught between moving parts.
Product statements
CAUTION—POTENTIAL INJURY: To avoid the risk of fire or electrical shock, connect the power cord to
an appropriately rated and properly grounded electrical outlet that is near the product and easily
accessible.
CAUTION—POTENTIAL INJURY: To avoid the risk of fire or electrical shock, use only the power cord
provided with this product or the manufacturer's authorized replacement.
CAUTION—POTENTIAL INJURY: Do not use this product with extension cords, multioutlet power strips,
multioutlet extenders, or UPS devices. The power capacity of these types of accessories can be easily
overloaded by a laser printer and may result in a risk of fire, property damage, or poor printer
performance.
CAUTION—POTENTIAL INJURY: Only a Lexmark Inline Surge Protector that is properly connected
between the printer and the power cord provided with the printer may be used with this product. The
use of non-Lexmark surge protection devices may result in a risk of fire, property damage, or poor
printer performance.
CAUTION—SHOCK HAZARD: To avoid the risk of electrical shock, do not place or use this product near
water or wet locations.
CAUTION—SHOCK HAZARD: To avoid the risk of electrical shock, do not set up this product or make
any electrical or cabling connections, such as the power cord, fax feature, or telephone, during a
lightning storm.
CAUTION—POTENTIAL INJURY: Do not cut, twist, bind, crush, or place heavy objects on the power
cord. Do not subject the power cord to abrasion or stress. Do not pinch the power cord between objects
such as furniture and walls. If any of these things happen, a risk of fire or electrical shock results. Inspect
the power cord regularly for signs of such problems. Remove the power cord from the electrical outlet
before inspecting it.
Safety information 5

CAUTION—POTENTIAL INJURY: This product uses a laser. Use of controls or adjustments or
performance of procedures other than those specified in the User’s Guide may result in hazardous
radiation exposure.
CAUTION—POTENTIAL INJURY: The lithium battery in this product is not intended to be replaced.
There is a danger of explosion if a lithium battery is incorrectly replaced. Do not recharge, disassemble,
or incinerate a lithium battery. Discard used lithium batteries according to the manufacturer's instructions
and local regulations.
This product is designed, tested, and approved to meet strict global safety standards with the use of specific
manufacturer's components. The safety features of some parts may not always be obvious. The manufacturer
is not responsible for the use of other replacement parts.
Refer service or repairs, other than those described in the user documentation, to a service representative.
This product uses a printing process that heats the print media, and the heat may cause the media to release
emissions. You must understand the section in your operating instructions that discusses the guidelines for
selecting print media to avoid the possibility of harmful emissions.
This product may produce small amounts of ozone during normal operation, and may be equipped with a filter
designed to limit ozone concentrations to levels well below the recommended exposure limits. To avoid high
ozone concentration levels during extensive usage, install this product in a well-ventilated area and replace
the ozone and exhaust filters if instructed to do so in the product maintenance instructions. If there are no
references to filters in the product maintenance instructions, then there are no filters requiring replacement for
this product.
SAVE THESE INSTRUCTIONS.
Safety information 7

Learning about the printer
Finding information about the printer
What are you looking for? Find it here
Initial setup instructions:
•Connecting the printer
•Installing the printer software
See the setup documentation that came with the
printer or go to http://support.lexmark.com.
More setup and instructions for using the printer:
•Selecting and storing paper and specialty media
•Loading paper
•Configuring printer settings
•Viewing and printing documents and photos
•Setting up and using the printer software
•Configuring the printer on a network
•Caring for and maintaining the printer
•Troubleshooting and solving problems
Information Center—Go to
http://infoserve.lexmark.com.
Help Menu Pages—Access the guides on the
printer firmware or go to
http://support.lexmark.com.
Touch Screen Guide—Go to
http://support.lexmark.com.
Product videos—Go to
http://infoserve.lexmark.com/idv/.
Information on setting up and configuring the accessibility
features of your printer
Lexmark Accessibility Guide—Go to
http://support.lexmark.com.
Help using the printer software Help for Microsoft® Windows® or Macintosh
operating systems—Open a printer software
program or application, and then click Help.
Click
?
to view context‑sensitive information.
Notes:
•Help is automatically installed with the printer
software.
•Depending on the operating system, the
printer software is located in the printer
program folder or on the desktop.
Learning about the printer 8

•Make sure that airflow in the room meets the latest revision of the ASHRAE 62 standard or the CEN Technical
Committee 156 standard.
•Provide a flat, sturdy, and stable surface.
•Keep the printer:
–Clean, dry, and free of dust
–Away from stray staples and paper clips
–Away from the direct airflow of air conditioners, heaters, or ventilators
–Free from direct sunlight and humidity extremes
•Observe the recommended temperatures and avoid fluctuations.
Ambient temperature 10 to 32°C (50 to 90°F)
Storage temperature 0 to 40°C (32 to 104°F)
•Allow the following recommended amount of space around the printer for proper ventilation:
1Top 305 mm (12 in.)
2Rear 100 mm (3.94 in.)
3Right side 110 mm (4.33 in.)
4Front 305 mm (12 in.)
Note: The minimum space needed in front of the printer is 76 mm (3 in.).
5Left side 65 mm (2.56 in.)
Learning about the printer 10

Printer configurations
CAUTION—TIPPING HAZARD: Installing one or more options on your printer or MFP may require a
caster base, furniture, or other feature to prevent instability causing possible injury. For more information
on supported configurations, see www.lexmark.com/multifunctionprinters.
CAUTION—TIPPING HAZARD: To reduce the risk of equipment instability, load each tray separately.
Keep all other trays closed until needed.
You can configure your printer by adding optional 250‑ or 550‑sheet trays. For more information, see “Installing
optional trays” on page 132.
1Control panel
2Standard bin
3Controller board access cover
4Standard 250‑ ‑ or 550 sheet tray
Note: The standard tray may vary depending on your printer model.
5Optional 250‑ or 550‑sheet tray
6Multipurpose feeder
7Door A
Attaching cables
CAUTION—SHOCK HAZARD: To avoid the risk of electrical shock, do not set up this product or make
any electrical or cabling connections, such as the power cord, fax feature, or telephone, during a
lightning storm.
Learning about the printer 11
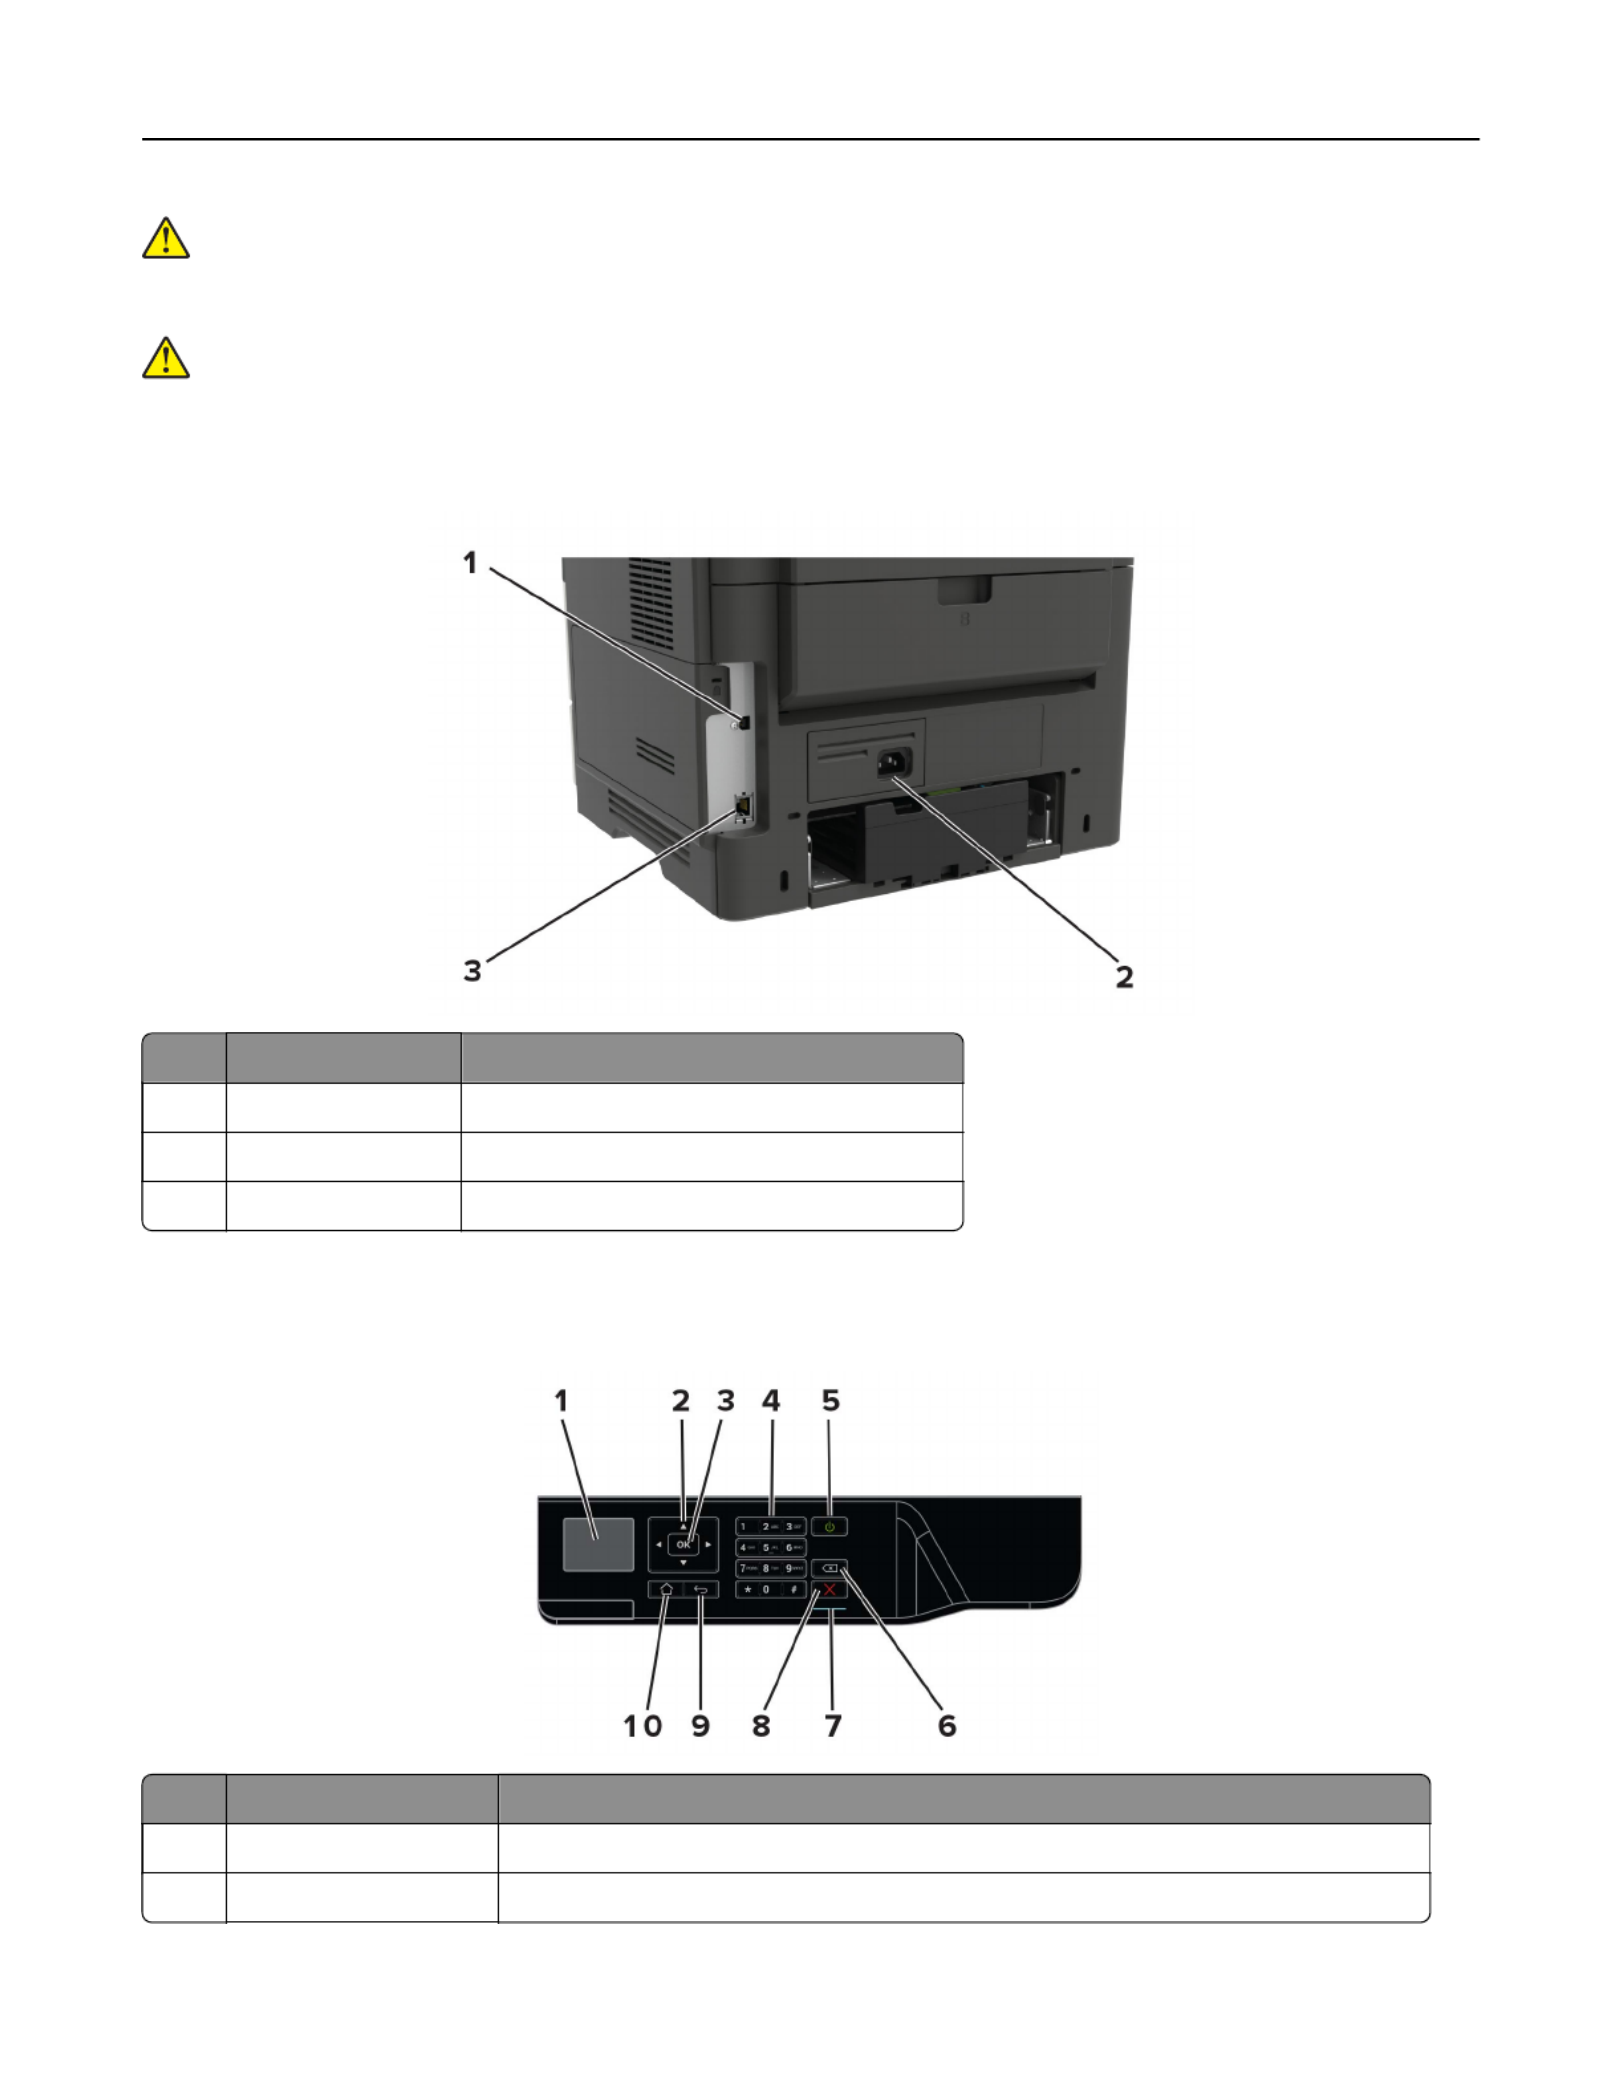
CAUTION—POTENTIAL INJURY: To avoid the risk of fire or electrical shock, connect the power cord to
an appropriately rated and properly grounded electrical outlet that is near the product and easily
accessible.
CAUTION—POTENTIAL INJURY: To avoid the risk of fire or electrical shock, use only the power cord
provided with this product or the manufacturer's authorized replacement.
Warning—Potential Damage: To avoid loss of data or printer malfunction, do not touch the USB cable, any
wireless network adapter, or the printer in the areas shown while actively printing.
Use the To
1USB printer port Connect the printer to a computer.
2Power cord socket Connect the printer to an electrical outlet.
3Ethernet port Connect the printer to a network.
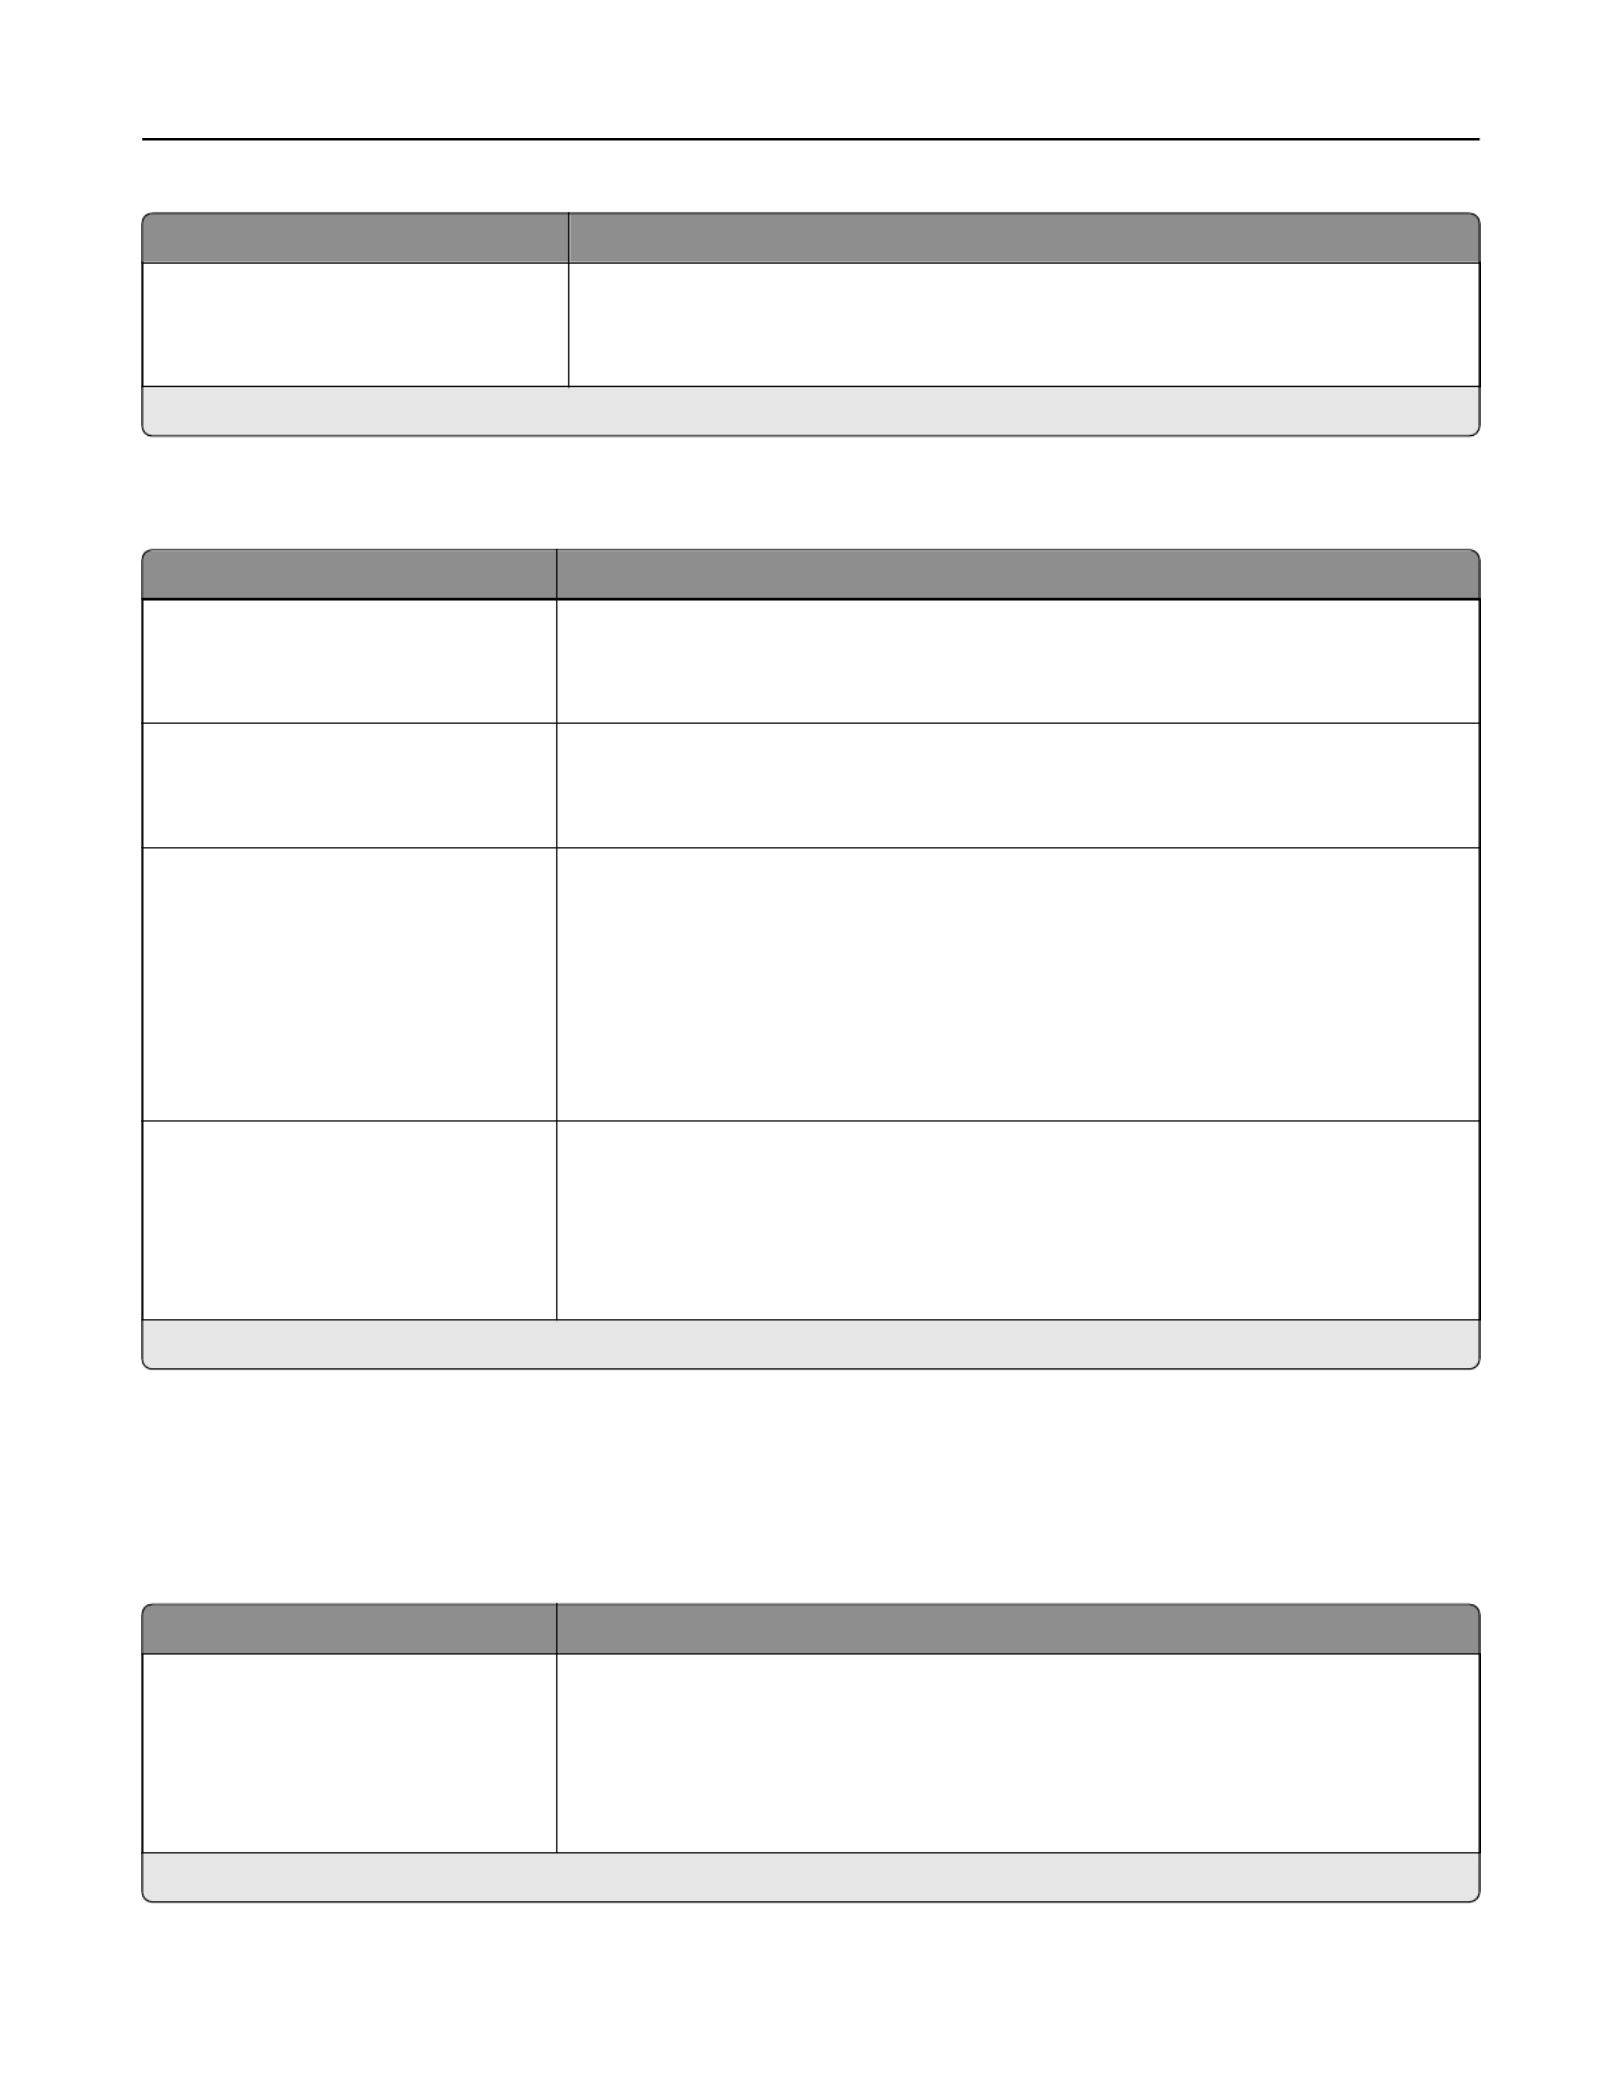
Using the control panel
Use the To
1Display View printing options, printer status, and error messages.
2Arrow buttons Scroll through menus or move between screens and menu options.
Learning about the printer 12

Use the To
3Select button •Select menu options.
•Save the setting.
4Numeric keypad Enter numbers or symbols in an input field.
5Power button Turn on or turn o the printer.
Note: To turn o the printer, press and hold the power button for five seconds.
6Backspace button Move the cursor backward and delete a character in an input field.
7Indicator light Check the printer status.
8Stop or Cancel button Stop the current printer task.
9Back button Return to the previous screen.
10 Home button Go to the home screen.
Understanding the status of the power button and
indicator light
Indicator light Printer status
O The printer is o or in Hibernate mode.
Blue The printer is ready or processing data.
Red The printer requires user intervention.
Power button light Printer status
O The printer is o, ready, or processing data.
Solid amber The printer is in Sleep mode.
Blinking amber The printer is in Hibernate mode.
Learning about the printer 13

Loading paper and specialty media
Setting the size and type of the specialty media
1From the control panel, navigate to:
> Settings > > > > Paper > Tray Configuration > Paper Size/Type >
2Select a paper source, and then configure the size and type of the specialty media.
Configuring Universal paper settings
1From the control panel, navigate to:
> Settings > > > Paper > Media Configuration > > Universal Setup >
2Select Portrait Width or Portrait Height, and then press .
3Adjust the settings, and then press .
Loading trays
CAUTION—TIPPING HAZARD: To reduce the risk of equipment instability, load each tray separately.
Keep all other trays closed until needed.
1Remove the tray.
Note: To avoid paper jams, do not remove trays while the printer is busy.
Loading paper and specialty media 14

2Adjust the paper guides to match the size of the paper that you are loading.
3Flex, fan, and align the paper edges before loading.
4Load the paper stack with the printable side facedown, and then make sure that the side guides fit snugly
against the paper.
Notes:
•Load letterhead facedown with the top edge of the sheet toward the front of the tray for one‑sided
printing.
•Load letterhead faceup with the bottom edge of the sheet toward the front of the tray for two‑sided
printing.
•Do not slide paper into the tray.
•To avoid paper jams, make sure that the stack height is below the maximum paper fill indicator.
5Insert the tray.
If necessary, set the paper size and paper type from the control panel to match the paper loaded.
Loading paper and specialty media 15

Loading the multipurpose feeder
1Open the multipurpose feeder.
2Adjust the guide to match the size of the paper that you are loading.
3Flex, fan, and align the paper edges before loading.
4Load paper with the printable side faceup.
Notes:
•Load letterhead faceup with the top edge of the sheet toward the front of the tray for one‑sided
printing.
•Load letterhead facedown with the bottom edge of the sheet toward the front of the tray for
two‑sided printing.
•Load envelopes with the flap facedown on the left side.
Loading paper and specialty media 16

•Load European envelopes with the flap facedown and entering the printer first.
Warning—Potential Damage: Do not use envelopes with stamps, clasps, snaps, windows, coated linings,
or self‑stick adhesives.
5From the control panel, set the paper size and paper type to match the paper loaded.
Linking trays
1Open a web browser, and then type the printer IP address in the address field.
Notes:
•View the printer IP address on the printer home screen. The IP address appears as four sets of
numbers separated by periods, such as 123.123.123.123.
•If you are using a proxy server, then temporarily disable it to load the web page correctly.
2Click Settings > Paper > Tray Configuration.
3Set the same paper size and paper type for the trays that you are linking.
4Save the settings.
5Click Settings > Device > Maintenance > > Configuration Menu Tray Configuration.
6Set Tray Linking to Automatic.
7Save the settings.
To unlink trays, make sure that no trays have the same paper size and paper type settings.
Warning—Potential Damage: The temperature of the fuser varies according to the specified paper type. To
avoid printing issues, match the paper type setting in the printer with the paper loaded in the tray.
Loading paper and specialty media 17

Paper type Tray Multipurpose feeder Two‑
‑
‑
‑‑sided printing
Rough envelope X X
1 One‑sided paper labels desi It is recommended to printgned for laser printers are supported for occasional use.
20 or fewer pages of paper labels per month. Vinyl, pharmacy, and two‑sided labels are not supported.
2 Bond and Heavy Paper are supported in two‑sided printing up to 90‑g/m 2 (24‑lb) paper weight.
Supported paper weights
Tray Multipurpose feeder Two‑
‑
‑
‑‑sided printing
Paper weight 60–120 g/m2 (16–32 lb) 60–216 g/m2 (16–58 lb) 60–90 g/m2 (16–24 lb)
Paper support 20

Printing
Printing from a computer
Note: For labels, card stock, and envelopes, set the paper size and type in the printer before printing the
document.
1From the document that you are trying to print, open the Print dialog.
2If necessary, adjust the settings.
3Print the document.
Printing from a mobile device
Printing from a mobile device using Lexmark Mobile Print
LexmarkTM Mobile Print allows you to send documents and images directly to a supported Lexmark printer.
1Open the document, and then send or share the document to Lexmark Mobile Print.
Note: Some third‑party applications may not support the send or share feature. For more information, see
the documentation that came with the application.
2Select a printer.
3Print the document.
Printing from a mobile device using Google Cloud Print
Google Cloud PrintTM is a mobile printing service that allows enabled applications on mobile devices to print
to any Google Cloud Print‑ready printer.
1From the home screen of your mobile device, launch an enabled application.
2Tap Print, and then select a printer.
3Print the document.
Printing from a mobile device using Mopria Print Service
Mopria® Print Service is a mobile printing solution for mobile devices running on Android
TM version 4.4 or later.
It allows you to print directly to any Mopria certified printer.‑
Note: Before printing, make sure that the Mopria Print Service is enabled.
1From the home screen of your mobile device, launch a compatible application.
2Tap Print, and then select the printer.
3Send the print job.
Printing 21

Printing from a mobile device using AirPrint
AirPrint is a mobile printing solution that allows you to print directly from Apple devices to an AirPrint‑certified
printer.
Note: This application is supported only in some Apple devices.
1From the home screen of your mobile device, launch a compatible application.
2Select an item to print, and then tap the share icon.
3Tap Print, and then select the printer.
4Send the print job.
Printing from a flash drive
This feature is available only in some printer models.
1Insert the flash drive.
Notes:
•If you insert the flash drive when an error message appears, then the printer ignores the flash drive.
•If you insert the flash drive while the printer is processing other print jobs, then Busy appears on the
display.
2Select the document that you want to print.
If necessary, configure other print settings.
3Print the document.
To print another document, select USB Drive.
Warning—Potential Damage: To avoid loss of data or printer malfunction, do not touch the flash drive or
the printer in the area shown while actively printing, reading, or writing from the memory device.
Printing 22

Supported flash drives and file types
Flash drives
•Lexar JumpDrive S70 (16GB and 32GB)
•SanDisk Cruzer (16GB and 32GB)
•PNY Attache (16GB and 32GB)
Notes:
–The printer supports high‑speed USB flash drives with full‑speed standard.
–USB flash drives must support the File Allocation Table (FAT) system.
File types
Documents
•PDF (version 1.7 or earlier)
•XPS
Images
•.dcx
•.gif
•.JPEG or .jpg
•.bmp
•.pcx
•.TIFF or .tif
•.png
Printing 23

Printing a font sample list
1From the control panel, navigate to:
> Settings > > > > > Reports > Print Print Fonts
2Select PCL Fonts or PostScript Fonts, and then press .
Printing a directory list
1From the control panel, navigate to:
> Settings > > Reports > > Print >
2Select Print Directory, and then press .
Printing 24

Understanding the printer menus
Menu map
Device •Preferences
•Remote Operator Panel
•Notifications
•Power Management
•Information Sent to Lexmark
•Restore Factory Defaults
•Maintenance
•About This Printer
Print •Layout
•Setup
•Quality
•Job Accounting
•XPS
•PDF
•PostScript
•PCL
•HTML
•Image
Paper • •Tray Configuration Media Configuration
Network/Ports •Network Overview
•Wireless
•Ethernet
•TCP/IP
•SNMP
•IPSec
•802.1x
•LPD Configuration
•HTTP/FTP Settings
•ThinPrint
•USB
•Google Cloud Print
•Wi‑
‑
‑
‑‑Fi Direct
Reports •Menu Settings Page
•Device
•Print
•Network
Security •Security Audit Log
•Login Restrictions
•Confidential Print Setup
•Solutions LDAP Settings
•Mobile Services Management
•Miscellaneous
Help •Print All Guides
•Mono Quality Guide
•Connection Guide
•Information Guide
•Media Guide
•Moving Guide
•Print Quality Guide
•Supplies Guide
Troubleshooting •Print Quality Test Pages
Understanding the printer menus 25

Device
Preferences
Menu item Description
Display Language
[List of languages]
Set the language of the text that appears on the display.
Country/Region
[List of countries or regions]
Identify the country or region where the printer is configured
to operate.
Run initial setup
No
Ye s *
Run the setup wizard.
Displayed information
Display Text 1 [IP Address*]
Display Text 2 [Date/Time*]
Custom Text 1
Custom Text 2
Specify the information to appear on the home screen.
Date and Time
Configure
Current Date and Time
Manually Set Date and Time
Date Format [MM‑ ‑DD YYYY*]
Time Format [12 hour A.M./P.M.*]
Time Zone [GMT*]
Configure the printer date and time.
Date and Time
Network Time Protocol
Enable NTP [On*]
NTP Server
Configure the settings for Network Time Protocol (NTP).
Paper Sizes
U.S.*
Metric
Specify the unit of measurement for paper sizes.
Note: The country or region selected in the initial setup
wizard determines the initial paper size setting.
Flash Drive Access
Enabled*
Disabled
Enable access to the flash drive.
Screen Timeout
5–300 (60*)
Set the idle time in seconds before the display shows the home
screen, or before the printer logs o a user account
automatically.
Note: An asterisk (*) next to a value indicates the factory default setting.
Understanding the printer menus 26

Remote Operator Panel
Menu item Description
External VNC Connection
Don’t Allow*
Allow
Connect an external Virtual Network Computing (VNC) client
to the remote control panel.
Authentication Type
None*
Standard Authentication
Set the authentication type when accessing the VNC client
server.
VNC Password Specify the password to connect to the VNC client server.
Note: This menu item appears only if Authentication Type is
set to Standard Authentication.
Note: An asterisk (*) next to a value indicates the factory default setting.
Notifications
Menu item Description
Supplies
Show Supply Estimates
Show estimates*
Do not show estimates
Show the estimated supply status information.
Supplies
Display Estimates
Pages*
Percent
Determine the unit that the printer uses to estimate supply
usage and trigger custom notifications when user intervention
is required.
Note: This menu item appears only in the Embedded Web
Server.
Supplies
Cartridge Alarm
O
Single*
Continuous
Set the number of times that the alarm sounds when the toner
cartridge is low.
Supplies
Custom Supply Notifications
Configure notification settings when the printer requires user
intervention.
Note: This menu item appears only in the Embedded Web
Server.
Error Prevention
Jam Assist
O
On*
Set the printer to check for jammed paper automatically.
Note: An asterisk (*) next to a value indicates the factory default setting.
Understanding the printer menus 27

Menu item Description
Error Prevention
Auto Continue
Disabled
5–255 (5*)
Let the printer continue processing or printing a job
automatically after clearing certain attendance conditions.
Error Prevention
Auto Reboot
Auto Reboot
Reboot always*
Reboot never
Reboot when idle
Set the printer to restart when an error occurs.
Error Prevention
Auto Reboot
Max Auto Reboots
1–20 (2*)
Set the number of automatic reboots that the printer can
perform.
Error Prevention
Auto Reboot
Auto Reboot Window
1–525600 (720*)
Set the number of seconds before the printer performs an
automatic reboot.
Error Prevention
Auto Reboot
Auto Reboot Counter
Show a read‑only information of the reboot counter.
Error Prevention
Display Short Paper Error
Auto‑clear*
On
Set the printer to show a message when a short paper error
occurs.
Note: Short paper refers to the size of the paper loaded.
Error Prevention
Page Protect
O*
On
Set the printer to process the entire page into the memory
before printing it.
Jam Content Recovery
Jam Recovery
O
On
Auto*
Set the printer to reprint jammed pages.
Note: An asterisk (*) next to a value indicates the factory default setting.
Understanding the printer menus 28

Menu item Description
Device Operations
Panel Menus
Enable*
Disable
Enable access to the control panel menus.
Note: This menu item appears only in the Embedded Web
Server.
Device Operations
Safe Mode
O*
On
Set the printer to operate in a special mode, in which it attempts
to continue oering as much functionality as possible, despite
known issues.
For example, when set to On, and the duplex motor is
nonfunctional, the printer performs one‑sided printing of the
documents even if the job is two‑sided printing.
Device Operations
Clear Custom Status
Erase user‑defined strings for the Default or Alternate custom
messages.
Device Operations
Clear all remotely‑installed messages
Erase messages that were remotely installed.
Device Operations
Automatically Display Error Screens
On*
O
Show existing error messages on the display after the printer
remains inactive on the home screen for a length of time equal
to the Screen Timeout setting.
Device Operations
Enable Optional Parallel Port
O*
On
Enable an optional parallel port.
Note: When set to On, the printer restarts.
Note: An asterisk (*) next to a value indicates the factory default setting.
Out of Service Erase
Menu item Description
Out of Service Erase
Printer Memory Last Sanitized
Show information on when the printer memory was last
sanitized.
Out of Service Erase
Sanitize all information on nonvolatile memory
Clear all settings and applications that are stored in the printer
memory.
Out of Service Erase
Erase all printer and network settings
Clear all settings and applications that are stored in the printer
and network.
Visible Home Screen Icons
Menu Description
Change Language
Bookmarks
Held Jobs
USB
Specify which icons to show on the home screen.
Note: USB appears only in the 4702P printer model.
Understanding the printer menus 32

Menu item Description
Resource Save
O*
On
Set the printer to handle temporary downloads when it receives a job that
requires more than the available memory.
Notes:
•O sets the printer to retain downloads only until memory is needed.
Downloads are deleted to process print jobs.
•When set to On and the printer runs out of memory, a Memory
Full [38] appears on the display but downloads are not deleted.
Print All Order
Alphabetical*
Oldest First
Newest First
Specify the order in which held and confidential jobs are printed when Print
All is selected.
Note: An asterisk (*) next to a value indicates the factory default setting.
Quality
Menu item Description
Print Resolution
600 dpi*
1200 Image Q
2400 Image Q
1200 dpi
300 dpi
Set the resolution for the text and images on the printed output.
Note: Resolution is determined in dots per inch or image quality.
Pixel Boost
O*
Fonts
Horizontally
Vertically
Both directions
Enable more pixels to print in clusters for clarity, in order to enhance text and
images.
Toner Darkness
1–10 (8*)
Determine the lightness or darkness of text images.
Halftone
Normal*
Detail
Enhance the printed output to have smoother lines with sharper edges.
Brightness
‑6 to 6 (0*)
Adjust the brightness of the printed output.
Contrast
0 to 5 (0*)
Adjust the contrast of the printed output.
Gray Correction
O
Auto*
Adjust the contrast enhancement applied to images.
Note: An asterisk (*) next to a value indicates the factory default setting.
Understanding the printer menus 35
Menu item Description
Backgrounds
Do Not Print
Print*
Print background information or graphics for HTML documents.
Note: An asterisk (*) next to a value indicates the factory default setting.
Image
Menu item Description
Auto Fit
O
On*
Select the best available paper size and orientation setting for an image.
Note: When set to On, this menu item overrides the scaling and orientation
settings for the image.
Invert
O*
On
Invert bitonal monochrome images.
Note: This menu item does not apply to GIF or JPEG image formats.
Scaling
Best Fit*
Anchor Top Left
Anchor Center
Fit Height/Width
Fit Height
Fit Width
Adjust the image to fit the printable area.
Note: When Auto Fit is set to On, Scaling is automatically set to Best Fit.
Orientation
Portrait*
Landscape
Reverse Portrait
Reverse Landscape
Specify the orientation of text and graphics on the page.
Note: An asterisk (*) next to a value indicates the factory default setting.
Paper
Tray Configuration
Menu item Description
Default Source
Tray [x] (1*)
MP Feeder
Manual Paper
Manual Envelope
Set the paper source for all print jobs.
Note: For MP Feeder to appear, set Configure MP to Cassette from the Paper
menu.
Note: An asterisk (*) next to a value indicates the factory default setting.
Understanding the printer menus 40
Produktspezifikationen
| Marke: | Lexmark |
| Kategorie: | Drucker |
| Modell: | B2546dw |
| Bildschirmdiagonale: | 2.4 Zoll |
| Farbdisplay: | Ja |
| Marktpositionierung: | Business |
| Prozessortaktfrequenz: | 1000 MHz |
| WLAN: | Nein |
| Breite: | 399 mm |
| Tiefe: | 374 mm |
| Gewicht: | 14100 g |
| Produktfarbe: | Black,White |
| Höhe: | 260 mm |
| Eingebautes Display: | Ja |
| Anzahl USB 2.0 Anschlüsse: | 1 |
| Betriebstemperatur: | 16 - 32 °C |
| Relative Luftfeuchtigkeit in Betrieb: | 8 - 80 % |
| Verpackungsbreite: | 430 mm |
| Verpackungstiefe: | 470 mm |
| Verpackungshöhe: | 376 mm |
| Paketgewicht: | 15990 g |
| Unterstützte Sicherheitsalgorithmen: | LEAP,MD5,MSCHAPv2,PEAP,SNMPv3,SSL/TLS,TTLS |
| Eingebauter Ethernet-Anschluss: | Ja |
| Display: | LCD |
| Ursprungsland: | China |
| Farbe: | Nein |
| Stromverbrauch (Standby): | 1.9 W |
| Ethernet LAN Datentransferraten: | 10,100,1000 Mbit/s |
| Unterstützt Windows-Betriebssysteme: | Windows 10,Windows 7,Windows 8,Windows 8.1 |
| Stromverbrauch (PowerSave): | 0.1 W |
| Unterstützt Mac-Betriebssysteme: | Mac OS X 10.10 Yosemite,Mac OS X 10.11 El Capitan,Mac OS X 10.12 Sierra,Mac OS X 10.6 Snow Leopard,Mac OS X 10.7 Lion,Mac OS X 10.8 Mountain Lion,Mac OS X 10.9 Mavericks |
| USB-Anschlusstyp: | USB Typ-B |
| Management-Protokolle: | DHCP, APIPA (AutoIP), mDNS, IGMP, WINS, DDNS, SNMPv3, SNMPv1, SNMPv2c, Telnet, NTP, ICMP, HTTP, DNS, ARP, HTTPs (SSL/ TLS), Finger |
| RAM-Speicher: | 512 MB |
| RAM-Speicher maximal: | - MB |
| Maximale Auflösung: | 1200 x 1200 DPI |
| Nachhaltigkeitszertifikate: | ENERGY STAR |
| Verkabelungstechnologie: | 10/100/1000Base-T(X) |
| Unterstützte Linux-Betriebssysteme: | Ja |
| Eingebauter Prozessor: | Ja |
| Netzwerkfähig: | Ja |
| Standard-Schnittstellen: | Ethernet,USB 2.0 |
| Druckgeschwindigkeit (Schwarz, normale Qualität, A4/US Letter): | 44 Seiten pro Minute |
| Drucktechnologie: | Laser |
| Doppelseitiger Druck: | Ja |
| Gesamte Ausgabekapazität: | 150 Blätter |
| Gesamte Papierkapazität: | 350 Blätter |
| Schalldruckpegel (Druck): | 56 dB |
| Medientypen für das Papierfach: | Card stock,Envelopes,Labels,Plain paper,Transparencies |
| ISO-A-Formate (A0...A9): | A4,A5,A6 |
| Maximale Papiergröße der ISO A-Serie: | A4 |
| Höhe bei Betrieb: | 0 - 5000 m |
| Durchschnittlicher Stromverbrauch beim Drucken: | 620 W |
| Druck der ersten Seite (Schwarz, normal): | 6 s |
| Maximale monatliche Auslastung: | 120000 Seiten pro Monat |
| Zahl der Druckpatronen: | 1 |
| Seitenbeschreibungssprachen: | Microsoft XPS,PCL 5e,PCL 6,PDF 1.7,PPDS,PostScript 3 |
| Empfohlene monatliche Auslastung: | 2000 - 15000 Seiten pro Monat |
| Eingabekapazität Multifunktionsfach: | 100 Blätter |
| Gesamtzahl der Papierzuführungen: | 2 |
| Mehrzweckfach: | Ja |
| Energy Star Typischer Stromverbrauch (TEC): | 1.8 kWh/Woche |
| Unterstützte Server-Betriebssysteme: | Windows 2000 Server,Windows Server 2008 |
| Nicht-ISO Druckmedienformate: | Folio (media size),Legal (media size) |
| Mediengewichte für das Papierfach: | 60 - 120 g/m² |
| Max. Mediengewicht Universalzufuhr: | 60 - 216 g/m² |
| Unterstützte Netzprotokolle (IPv4): | IPv4 TCP / IP, AppleTalk, TCP, UDP |
| Unterstützte Netzprotokolle (IPv6): | IPv6 TCP / IP, AppleTalk, TCP, UDP |
| Patrone(n) enthalten: | Ja |
| Patronenreichweite Lieferumfang (schwarz): | 3000 Seiten |
| Schallleistungspegel (Standby): | 14 dB |
| JIS B-Seriengröße (B0...B9): | B5 |
| Umschlaggrößen: | 7 3/4,9,10 |
| Optionale Konnektivität: | Wireless LAN |
| Duplex Druckmodus: | Auto |
| Schalldruckpegel (Duplexdruck): | 55 dB |
| Durchschnittliche Patronenergiebigkeit (schwarz): | 3000 Seiten |
Brauchst du Hilfe?
Wenn Sie Hilfe mit Lexmark B2546dw benötigen, stellen Sie unten eine Frage und andere Benutzer werden Ihnen antworten
Bedienungsanleitung Drucker Lexmark

13 Oktober 2024
11 Oktober 2024
16 September 2024
16 September 2024
16 September 2024
14 September 2024
14 September 2024
9 September 2024
3 September 2024
3 September 2024
Bedienungsanleitung Drucker
- Drucker Samsung
- Drucker Approx
- Drucker HP
- Drucker Sony
- Drucker Panasonic
- Drucker LG
- Drucker Roland
- Drucker Canon
- Drucker Velleman
- Drucker CSL
- Drucker Renkforce
- Drucker Thomson
- Drucker Sharp
- Drucker Mitsubishi
- Drucker Nilox
- Drucker Polaroid
- Drucker Xiaomi
- Drucker Olympia
- Drucker Seiko
- Drucker Toshiba
- Drucker Olympus
- Drucker Citizen
- Drucker Olivetti
- Drucker Epson
- Drucker Dell
- Drucker Lenovo
- Drucker MSI
- Drucker Honeywell
- Drucker OKI
- Drucker Brother
- Drucker Sagem
- Drucker Fujifilm
- Drucker Ricoh
- Drucker Datamax-O'neil
- Drucker Dymo
- Drucker Intermec
- Drucker Primera
- Drucker TSC
- Drucker Zebra
- Drucker Triumph-Adler
- Drucker Kodak
- Drucker Konica-Minolta
- Drucker Minolta
- Drucker TOMY
- Drucker Frama
- Drucker NEC
- Drucker Ultimaker
- Drucker Fujitsu
- Drucker Huawei
- Drucker Testo
- Drucker Kogan
- Drucker Royal Sovereign
- Drucker D-Link
- Drucker Kyocera
- Drucker Star
- Drucker Xerox
- Drucker Digitus
- Drucker Bixolon
- Drucker Epson 7620
- Drucker Fichero
- Drucker GG Image
- Drucker Ibm
- Drucker Oce
- Drucker Paxar
- Drucker Toshiba TEC
- Drucker ZKTeco
- Drucker StarTech.com
- Drucker Bematech
- Drucker Pantum
- Drucker HiTi
- Drucker Panduit
- Drucker Posiflex
- Drucker Vupoint Solutions
- Drucker Brady
- Drucker Star Micronics
- Drucker Metapace
- Drucker DNP
- Drucker Godex
- Drucker Phoenix Contact
- Drucker Elite Screens
- Drucker Equip
- Drucker Argox
- Drucker Dascom
- Drucker EC Line
- Drucker Orient Technologies
- Drucker Evolis
- Drucker Fargo
- Drucker Microboards
- Drucker Builder
- Drucker DTRONIC
- Drucker Colop
- Drucker Raspberry Pi
- Drucker IDP
- Drucker Tally Dascom
- Drucker Custom
- Drucker Nisca
Neueste Bedienungsanleitung für -Kategorien-

16 Oktober 2024

15 Oktober 2024

15 Oktober 2024

15 Oktober 2024

14 Oktober 2024

14 Oktober 2024

14 Oktober 2024

13 Oktober 2024
13 Oktober 2024
13 Oktober 2024