Lenovo IdeaPad S340-14API Bedienungsanleitung
Lesen Sie kostenlos die 📖 deutsche Bedienungsanleitung für Lenovo IdeaPad S340-14API (70 Seiten) in der Kategorie Laptop. Dieser Bedienungsanleitung war für 30 Personen hilfreich und wurde von 2 Benutzern mit durchschnittlich 4.5 Sternen bewertet
Seite 1/70

Lenovo IdeaPad S340 Series
User Guide

Read this first
Before using this documentation and the product it supports, ensure that you read and understand the
following:
• Appendix A “Important safety information” on page 33
• Safety and Warranty Guide
• Setup Guide
First Edition (December 2018)
© Copyright Lenovo 2018.
LIMITED AND RESTRICTED RIGHTS NOTICE: If data or software is delivered pursuant to a General Services
Administration “GSA” contract, use, reproduction, or disclosure is subject to restrictions set forth in Contract No. GS-
35F-05925.

Contents
About this documentation . . . . . . . . iii
Chapter 1. Meet your computer . . . . . 1
Front . . . . . . . . . . . . . . . . . . . . 1
Base . . . . . . . . . . . . . . . . . . . . 3
Left . . . . . . . . . . . . . . . . . . . . 5
Right . . . . . . . . . . . . . . . . . . . . 6
Bottom . . . . . . . . . . . . . . . . . . . 7
Features and specifications . . . . . . . . . . . 8
Chapter 2. Get started with your
computer . . . . . . . . . . . . . . . . 11
Get started with Windows 10 . . . . . . . . . 11
Windows account . . . . . . . . . . . . 11
Windows user interface . . . . . . . . . . 12
Windows label . . . . . . . . . . . . . 13
Connect to networks . . . . . . . . . . . . . 13
Connect to wired networks . . . . . . . . 13
Connect to Wi-Fi networks. . . . . . . . . 13
Use Lenovo Vantage . . . . . . . . . . . . . 13
Interact with your computer . . . . . . . . . . 14
Hotkeys . . . . . . . . . . . . . . . . 14
Use the multi-touch screen . . . . . . . . 15
Use multimedia . . . . . . . . . . . . . . . 17
Use audio . . . . . . . . . . . . . . . 17
Use the camera . . . . . . . . . . . . . 17
Connect to an external display . . . . . . . 17
Chapter 3. Explore your computer . . 19
Manage power . . . . . . . . . . . . . . . 19
Check the battery status . . . . . . . . . 19
Charge the battery . . . . . . . . . . . . 19
Check the battery temperature . . . . . . . 19
Maximize the battery life . . . . . . . . . 19
Set power button behaviors . . . . . . . . 19
Set the power plan . . . . . . . . . . . . 20
Transfer data . . . . . . . . . . . . . . . . 20
Connect a Bluetooth-enabled device. . . . . 20
Airplane mode . . . . . . . . . . . . . . . 20
Chapter 4. Secure your computer
and information . . . . . . . . . . . . 21
Use passwords . . . . . . . . . . . . . . . 21
Password types . . . . . . . . . . . . . 21
Set administrator password . . . . . . . . 21
Change or remove administrator password . . 21
Set user password . . . . . . . . . . . . 22
Enable power-on password . . . . . . . . 22
Set hard disk password . . . . . . . . . . 22
Change or remove hard disk password . . . . 23
Use the fingerprint reader . . . . . . . . . . . 23
Use firewalls and antivirus programs. . . . . . . 23
Chapter 5. Configure advanced
settings. . . . . . . . . . . . . . . . . 25
UEFI/BIOS . . . . . . . . . . . . . . . . . 25
What is UEFI/BIOS setup utility . . . . . . . 25
Start the UEFI/BIOS setup utility . . . . . . 25
Navigate in the BIOS interface . . . . . . . 25
Change the startup sequence . . . . . . . 25
Set the system date and time. . . . . . . . 26
Change hotkey mode . . . . . . . . . . . 26
Enable/Disable always-on . . . . . . . . . 26
Update UEFI/BIOS . . . . . . . . . . . . 26
Recovery information . . . . . . . . . . . . 27
Reset your computer . . . . . . . . . . . 27
Use advanced options . . . . . . . . . . 27
Windows automatic recovery. . . . . . . . 27
Create and use a recovery USB device . . . . 27
Chapter 6. Help and support . . . . . 29
Frequently asked questions . . . . . . . . . . 29
Self-help resources . . . . . . . . . . . . . 30
Call Lenovo . . . . . . . . . . . . . . . . 31
Before you contact Lenovo . . . . . . . . 31
Lenovo Customer Support Center . . . . . . 31
Purchase additional services. . . . . . . . . . 32
Appendix A. Important safety
information . . . . . . . . . . . . . . . 33
Appendix B. Accessibility and
ergonomic information . . . . . . . . 47
Appendix C. Compliance
information . . . . . . . . . . . . . . . 51
Appendix D. Notices and
trademarks. . . . . . . . . . . . . . . 63
© Copyright Lenovo 2018 i

ii Lenovo IdeaPad S340 Series User Guide

Chapter 1. Meet your computer
Front
3
4
1
2
Figure 1. Lenovo IdeaPad S340-14 series – front view
4
3
1
2
Figure 2. Lenovo IdeaPad S340-15 series – front view
© Copyright Lenovo 2018 1

1. Camera
Take pictures or record videos by clicking Camera from the Start menu. The indicator
next to the camera is on when the camera is in use.
If you use other apps that support photographing, video chatting, and video
conference, the camera starts automatically when you enable the camera-required
feature from the app.
2. Privacy Shutter
Move this shutter to cover or uncover the camera lens.
Note: It is designed to protect your privacy. If you see a red dot, the lens is covered.
3. Screen
Display text, graphics, and videos.
Selected models support multi-touch function. See “Use the multi-touch screen” on
page 15.
4. Microphones Capture or record sound and voice.
2Lenovo IdeaPad S340 Series User Guide
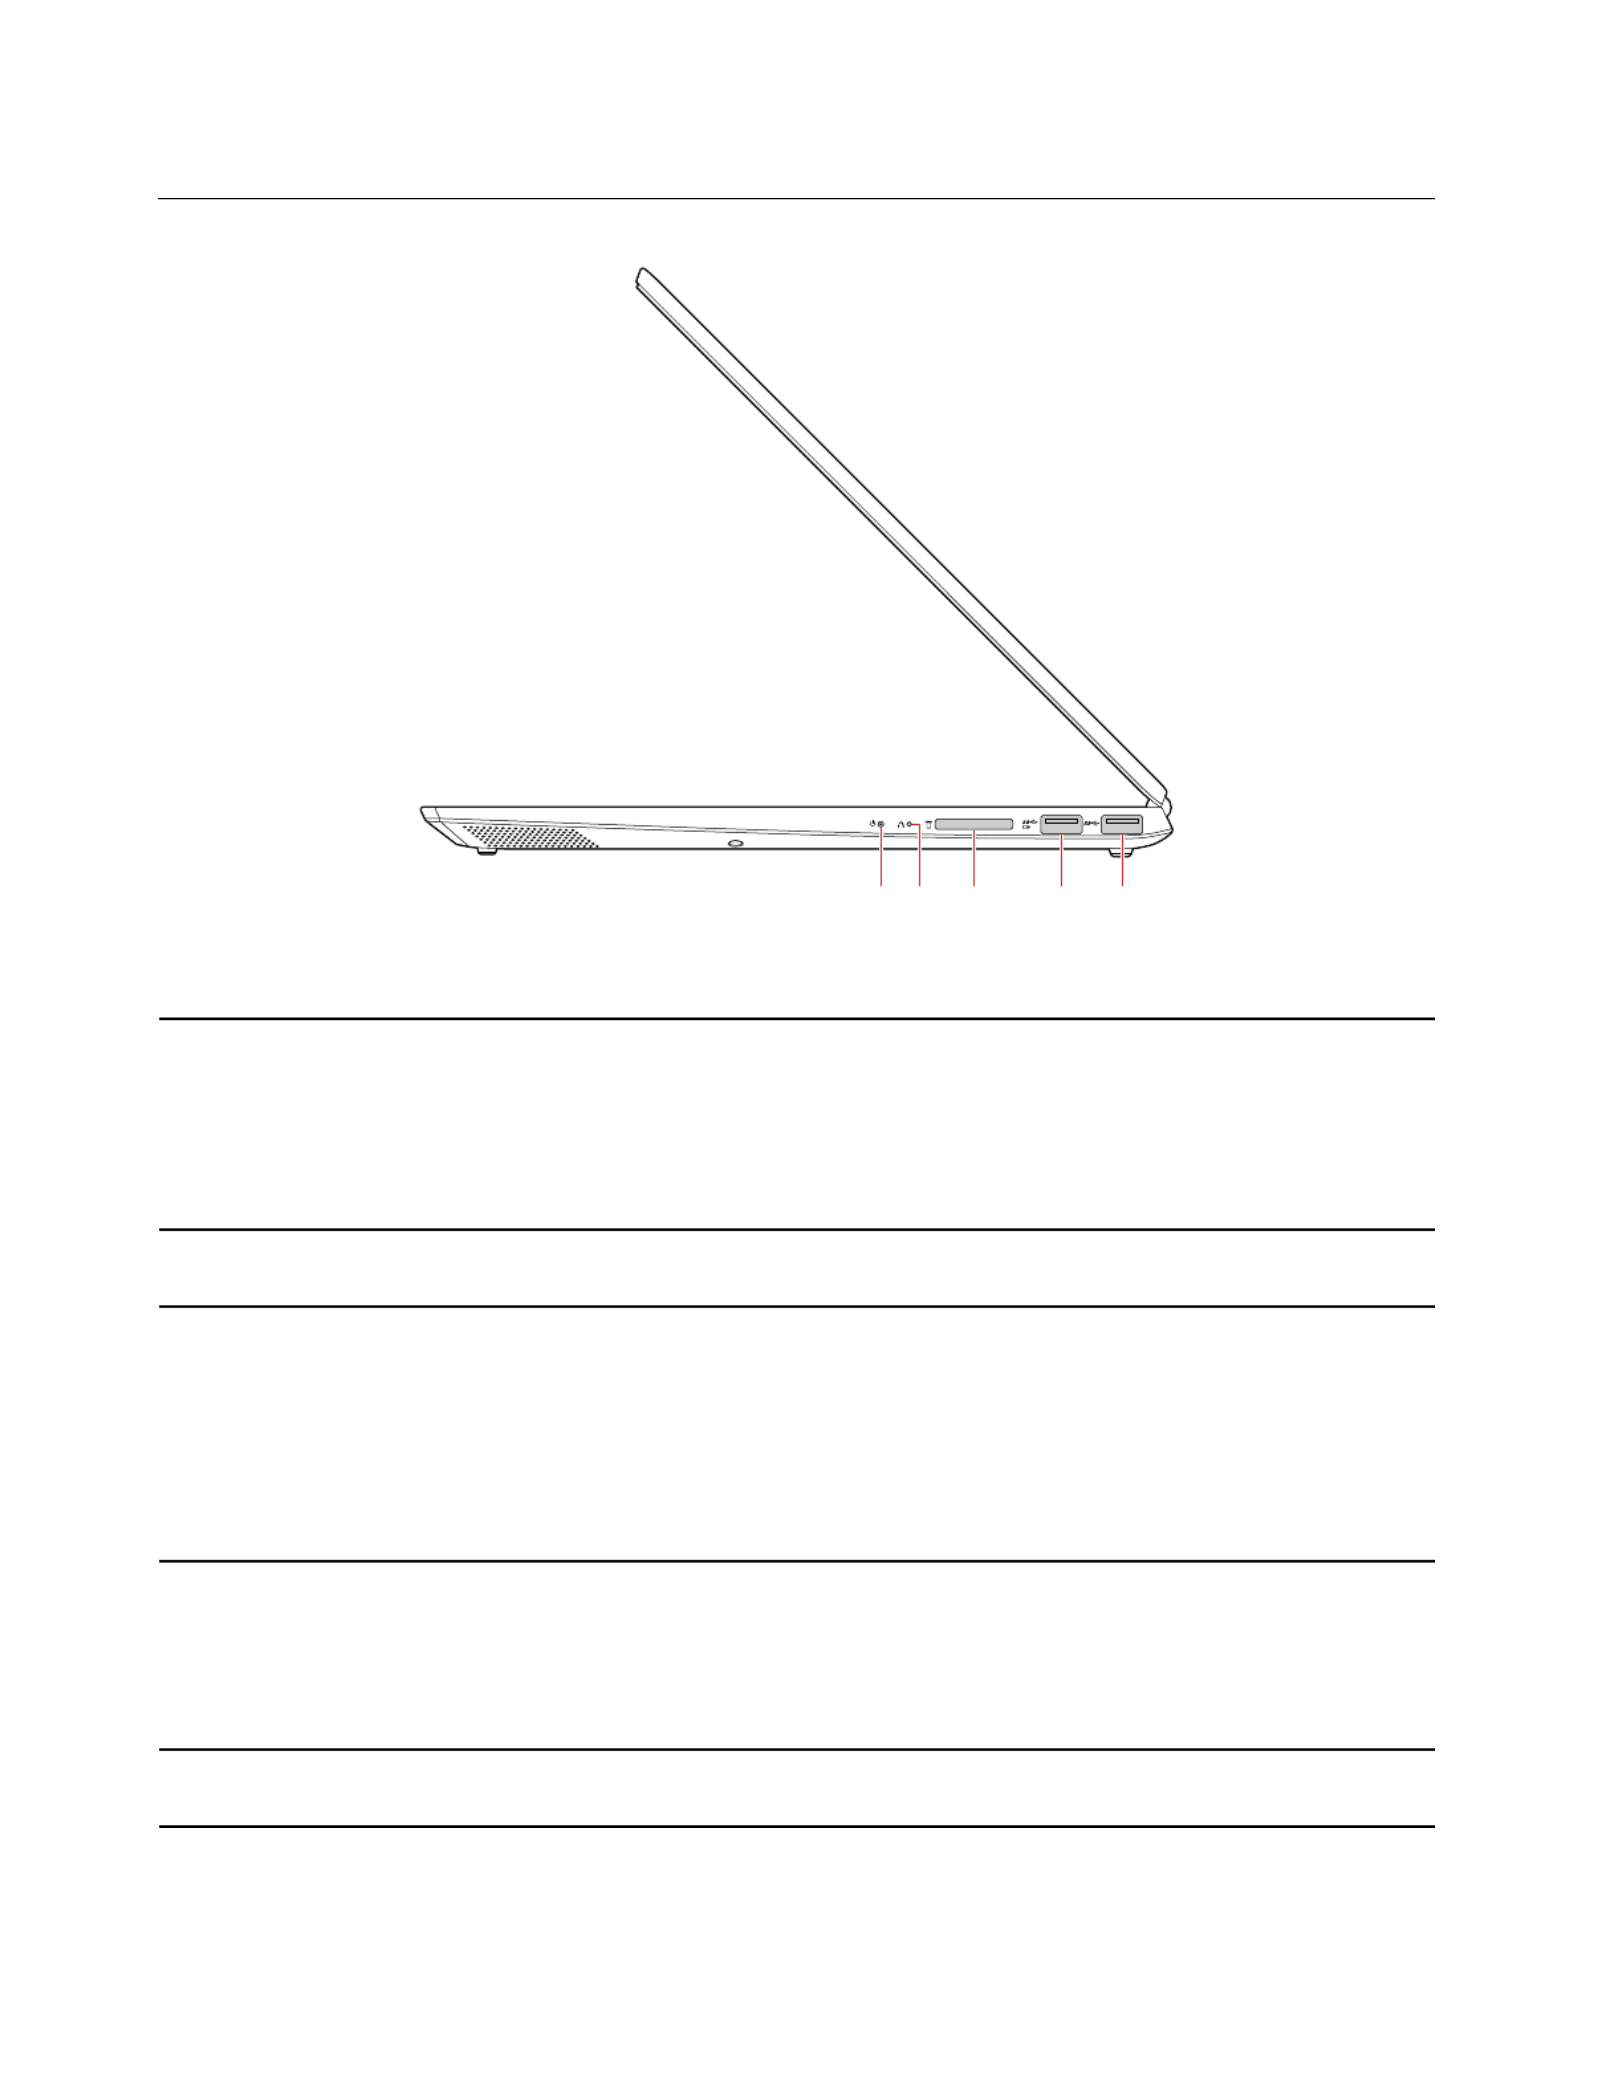
Right
2 3 41 5
Figure 6. Lenovo IdeaPad S340-14/15 series – right view
1. Power indicator
The indicator shows the system status of your computer.
• The computer is on.White:
• Slow blinking white: The computer is in sleep mode.
• Amber: The battery is low.
• The computer is off or in hibernation mode.Off:
2. Novo button When the computer is off, press this button to start the System Recovery or the BIOS
setup utility, or to enter the boot menu.
3. SD-card slot
Supported cards:
• Secure Digital (SD) card
• Secure Digital eXtended-Capacity (SDXC) USH-1 card
• Secure Digital High-Capacity (SDHC) USH-1 card
Note: Your computer does not support the content protection for recordable media
(CPRM) feature for the SD card.
4. Always On USB 3.0
connector
• Connect USB-compatible devices, such as a USB keyboard, USB mouse, USB
storage device, or USB printer.
• Charge USB-compatible devices when your computer is off, in sleep mode, or in
hibernation mode. To enable the Always On USB feature on your computer, see
“Enable/Disable always-on” on page 26.
5. USB 3.0 connector Connect USB-compatible devices, such as a USB keyboard, USB mouse, USB
storage device, or USB printer.
6Lenovo IdeaPad S340 Series User Guide

Chapter 2. Get started with your computer
Get started with Windows 10
Learn the basics of Windows 10 and start working with it right away. For more information about Windows
10, see the Windows help information.
Windows account
To use the Windows operating system, a user account is required. It can either be a Windows user account,
or a Microsoft account.
Windows user account
When you start Windows for the first time, you are prompted to create a Windows user account. This first
account you created is of the “Administrator” type. With an Administrator account, you can create additional
user accounts or change account types by doing the following:
1. Open the Start menu and select Settings ➙ Accounts ➙ Family & other users.
2. Follow the on-screen instructions.
Microsoft account
You can also sign in to the Windows operating system with a Microsoft account.
To create a Microsoft account, go to the Microsoft sign-up page at https://signup.live.com/ and follow the on-
screen instructions.
With a Microsoft account, you can:
• Enjoy one-time signing in if you are using other Microsoft services, such as OneDrive, Skype, and Outlook.
com.
• Sync personalized settings across other Windows-based devices.
© Copyright Lenovo 2018 11

Hotkey Function
Mute/Unmute the computer.
If you mute the computer and turn off your computer, the speakers remain muted when
you turn on your computer.
/
Decrease/Increase system volume.
Enable/Disable the microphones.
Refresh the current window.
Enable/Disable the touchpad.
Turn on/off airplane mode.
Enable/Disable the integrated camera.
Lock/Unlock the screen.
Switch display devices.
/
Decrease/Increase the screen brightness.
Hotkey mode
Some hotkeys share keys with functions keys (F1 to F12). The hotkey mode is a UEFI/BIOS setting that
changes how hotkeys (or function keys) are used.
Hotkey mode setting How to use hotkeys How to use function keys
Disabled Hold down the Fn key and press one
of the hotkeys.
Press the function keys directly.
Enabled Press the hotkeys directly. Hold down the Fn key and press one
of the function keys.
Note: Hotkeys that do not share keys with function keys are not affected by the hotkey mode setting. They
should always be used with the Fn key.
Use the multi-touch screen
If your computer display supports the multi-touch function, you can navigate the screen with simple touch
gestures.
Note: Some gestures might not be available depending on the app you use.
Chapter 2 Get started with your computer.15

Use multimedia
Use your computer for business or entertainment with the built-in components (camera, speakers, and audio
features) or connected external devices (an external projector, monitor, and HDTV).
Use audio
To enhance your listening experience, connect speakers, headphones, or a headset with a 3.5-mm (0.14-
inch), 4-pole plug to the audio connector.
Change the sound settings
1. Go to Control Panel and view by category.
2. Click Hardware and Sound ➙ Sound.
3. Change the settings as you prefer.
Use the camera
You can use the built-in camera to take photos or record videos. The indicator next to the camera turns on
when the camera is activated.
To take photos or record a video:
1. Open the Start menu and click Camera.
2. To take a photo, click the camera icon. If you want to record video, click the video icon to switch to
video mode.
If you use other programs that provide features such as photographing, video capturing, and video
conference, the camera starts automatically when you enable the camera-required feature.
To configure the camera settings, open the Start menu and then click Lenovo Vantage ➙ Hardware
Settings ➙ Audio/Visual. Locate the Camera section and then follow the on-screen instructions to
configure the camera settings.
Connect to an external display
Connect your computer to a projector or a monitor to give presentations or expand your workspace.
Connect a wired display
1. Connect the external display to an appropriate video connector on your computer, such as the HDMI
connector or Mini DisplayPort connector.
2. Connect the external display to an electrical outlet.
3. Turn on the external display.
If your computer cannot detect the external display, right-click a blank area on the desktop, and then click
Display settings ➙ Detect.
Supported resolution
Your computer supports the following video resolution, if the external display also supports that resolution.
Chapter 2 Get started with your computer.17

Note: If you start the setup utility using the user password, you cannot set hard disk password.
Step 3. Follow on-screen instructions to set both the master and the user passwords.
Note: The master and user hard disk passwords must be set at the same time.
Step 4. Select Exit ➙ Exit Saving Changes.
If the hard disk password is set, you must enter the correct password to start the operating system.
Change or remove hard disk password
Step 1. Start the UEFI/BIOS setup utility.
Step 2. Select Security.
Step 3. Change or remove the hard disk password.
To change or remove master password, select Change Master Password and press Enter.
Note: If you remove the master hard disk password, the user hard disk password is also removed.
To change user password, select Change User Password and press Enter.
Note: The user hard disk password cannot be removed separately.
Step 4. Select Exit ➙ Exit Saving Changes.
Use the fingerprint reader
If your computer includes a fingerprint reader, you can use it to enroll your fingerprints. After enrollment, you
can swipe or tap your finger on the fingerprint reader to sign in to Windows.
Enroll your fingerprints
Open the Start menu and then click Settings ➙ Accounts ➙ Sign-in options. Then, follow the on-screen
instructions to finish the enrollment.
During the enrollment, the fingerprints are associated with the Windows password automatically. It is
recommended that you enroll more than one fingerprint in case of any injuries to your fingers.
Maintain the fingerprint reader
To ensure that the fingerprint reader works correctly, do not:
• Scratch the surface of the reader with anything hard.
• Use or touch the reader with a wet, dirty, wrinkled, or injured finger.
Use firewalls and antivirus programs
Your computer might be preinstalled with a firewall program. The firewall protects against computer Internet
security threats, unauthorized access, intrusions, and Internet attacks. It also protects your privacy.
A full version of antivirus program is provided with a free 30-day subscription. After 30 days, you must renew
the license to continue receiving the antivirus program updates.
For more information, see the help system of the program.
Chapter 4 Secure your computer and information.23

Call Lenovo
If you have tried to correct the problem yourself and still need help, you can call Lenovo Customer Support
Center.
Before you contact Lenovo
Prepare the following before you contact Lenovo:
1. Record the problem symptoms and details:
• What is the problem? Is it continuous or intermittent?
• Any error message or error code?
• What operating system are you using? Which version?
• Which software applications were running at the time of the problem?
• Can the problem be reproduced? If so, how?
2. Record the system information:
• Product name
• Machine type and serial number
The following illustration shows where to find the machine type and serial number of your computer.
Lenovo Customer Support Center
During the warranty period, you can call Lenovo Customer Support Center for help.
Telephone numbers
For a list of the Lenovo Support phone numbers for your country or region:
• Go to https://pcsupport.lenovo.com/supportphonelist for the latest phone numbers.
• Refer to the Safety and Warranty Guide that comes with your computer.
Note: Phone numbers are subject to change without notice. If the number for your country or region is not
provided, contact your Lenovo reseller or Lenovo marketing representative.
Services available during the warranty period
• Problem determination - Trained personnel are available to assist you with determining if you have a
hardware problem and deciding what action is necessary to fix the problem.
• Lenovo hardware repair - If the problem is determined to be caused by Lenovo hardware under warranty,
trained service personnel are available to provide the applicable level of service.
Chapter 6 Help and support.31
Produktspezifikationen
| Marke: | Lenovo |
| Kategorie: | Laptop |
| Modell: | IdeaPad S340-14API |
Brauchst du Hilfe?
Wenn Sie Hilfe mit Lenovo IdeaPad S340-14API benötigen, stellen Sie unten eine Frage und andere Benutzer werden Ihnen antworten
Bedienungsanleitung Laptop Lenovo

14 Oktober 2024
13 Oktober 2024
10 Oktober 2024
9 Oktober 2024
8 Oktober 2024
4 Oktober 2024
4 Oktober 2024
4 Oktober 2024
3 Oktober 2024
24 September 2024
Bedienungsanleitung Laptop
- Laptop Samsung
- Laptop Acer
- Laptop Apple
- Laptop Asus
- Laptop Gigabyte
- Laptop HP
- Laptop Lexibook
- Laptop Medion
- Laptop Microsoft
- Laptop SilverCrest
- Laptop Sony
- Laptop Panasonic
- Laptop LG
- Laptop Denver
- Laptop Thomson
- Laptop BEKO
- Laptop Schneider
- Laptop Pyle
- Laptop Haier
- Laptop Coby
- Laptop Mpman
- Laptop ODYS
- Laptop Jay-Tech
- Laptop PEAQ
- Laptop Xiaomi
- Laptop Hannspree
- Laptop Hyundai
- Laptop Toshiba
- Laptop GOCLEVER
- Laptop Prixton
- Laptop ViewSonic
- Laptop Dell
- Laptop MSI
- Laptop Tripp Lite
- Laptop Razer
- Laptop Targa
- Laptop Zebra
- Laptop Honor
- Laptop ADATA
- Laptop NEC
- Laptop Hercules
- Laptop Fellowes
- Laptop Airis
- Laptop Fujitsu
- Laptop Huawei
- Laptop Maxdata
- Laptop Packard Bell
- Laptop Aplic
- Laptop Kogan
- Laptop Sylvania
- Laptop SPC
- Laptop Asrock
- Laptop ECS
- Laptop Hähnel
- Laptop Oregon Scientific
- Laptop Emachines
- Laptop Ematic
- Laptop Evga
- Laptop Ibm
- Laptop Micromax
- Laptop Olidata
- Laptop Vizio
- Laptop Alienware
- Laptop Siig
- Laptop Inovia
- Laptop Getac
- Laptop XPG
- Laptop Atdec
- Laptop Vulcan
- Laptop System76
- Laptop Averatec
- Laptop Hamilton Buhl
- Laptop AORUS
- Laptop CTL
- Laptop Humanscale
- Laptop Compaq
- Laptop General Dynamics Itronix
- Laptop Everex
- Laptop Dynabook
- Laptop TechBite
- Laptop Schenker
Neueste Bedienungsanleitung für -Kategorien-

1 Dezember 2024
1 Dezember 2024
1 Dezember 2024
1 Dezember 2024

30 November 2024

16 Oktober 2024
16 Oktober 2024

15 Oktober 2024

13 Oktober 2024

10 Oktober 2024