Kramer VS-44UHDA Bedienungsanleitung
Lesen Sie kostenlos die 📖 deutsche Bedienungsanleitung für Kramer VS-44UHDA (4 Seiten) in der Kategorie Schalter. Dieser Bedienungsanleitung war für 28 Personen hilfreich und wurde von 2 Benutzern mit durchschnittlich 4.5 Sternen bewertet
Seite 1/4

VS-44UHDA Quick Start
P/N:
2900- 301227QS
Rev:
3
Scan for full manual
VS-44UHDA Quick Start Guide
This guide helps you install and use your VS-44UHDA for the first time.
Go to www.kramerav.com/downloads/VS-44UHDA to download the latest user manual and check if
firmware upgrades are available.
Step 1: Check what’s in the box
VS-44UHDA 4x4 UHD Matrix Switcher
1 Quick start guide
1 Set of rack ears
1 Power cord
4 Rubber feet
Step 2: Get to know your -44UHDA VS
#
Feature
Function
1
IN (PATTERN)
SELECTOR Buttons
Press to select the input (1 to 4) to switch after selecting an output (also used for storing
machine setups in the STO-RCL modes and for selecting a pattern in the Pattern mode).
2
OUT (MUTE)
SELECTOR Buttons
Press to select an output (1 to 4) to which the input is routed. Also used for storing machine
presets.
3
MUTE/PATTERN Button
Press to view the current pattern status and select the output/s to which a pattern is routed.
Press to mute audio or video on a selected output when D-AUDIO/A-AUDIO, and/or VIDEO
buttons are pressed (lit).
4
ALL Button
Press to perform an action on all outputs (for example setting Mute mode, Pattern mode and so
on).
For switching, press ALL and then a specific IN button to route the selected input to all outputs.
For example, press ALL and then IN 2 to route input 2 to all the outputs.
5
STO and RCL Buttons
Press STO to store the current switching setting to a preset button.
Press RCL to recall the switching setting from a preset button.
6
A-AUDIO Button
Press to enable analog audio routing. When pressed together with VIDEO, the analog audio is
routed together with the video signal.
7
D-AUDIO Button
Press to enable digital audio routing. When pressed together with VIDEO, the digital audio is
routed together with the video signal.
8
VIDEO Button
Press to select video inputs. When pressed together with D-AUDIO/A-AUDIO, video is switched
together with audio.
9
LOCK Button
Press and hold to toggle locking/releasing of the front panel buttons.
Press to save the following setups: HDCP (On/Off), ARC, Fast Switch and Switch mode.
10
EDID Button
Press to capture the EDID.
11
OUTPUT/INPUT
7-segment LED Display
Displays the selected inputs switched to the outputs (marked above each input).
#
Feature
Function
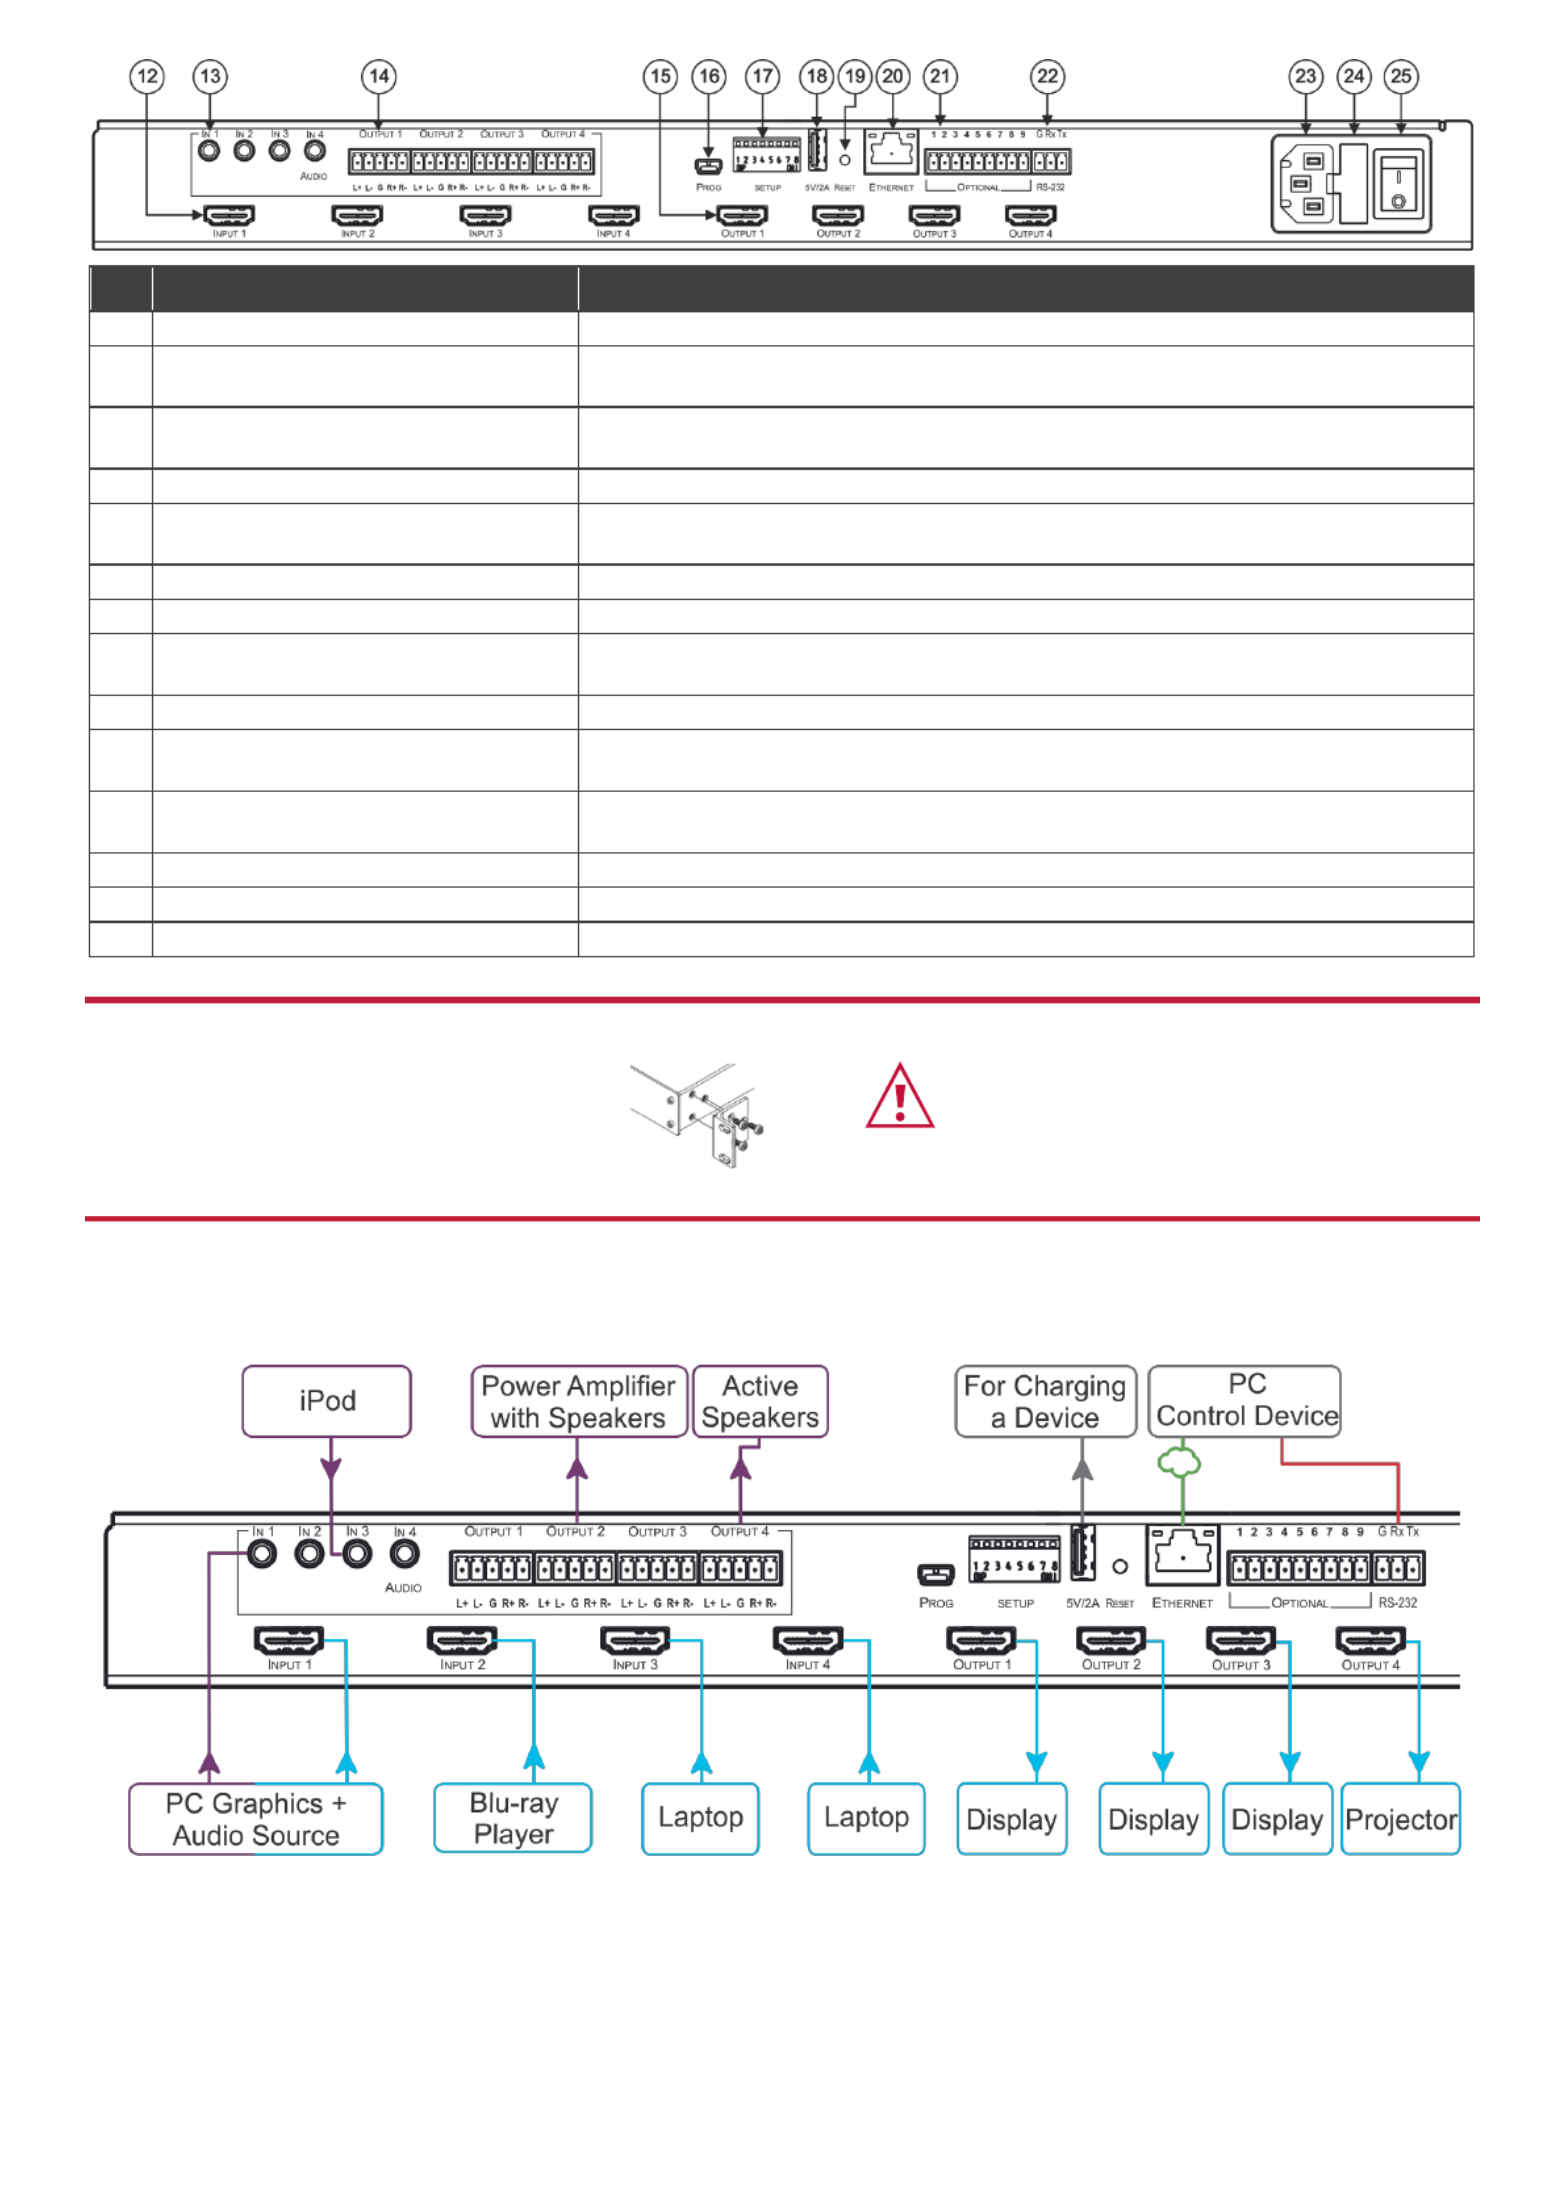
12
INPUT HDMI Connector
Connect to HDMI source (from 1 to 4).
13
AUDIO IN on 3.5 Mini Jack
Connectors
Connect to unbalanced stereo analog audio sources (from 1 to 4).
14
AUDIO OUTPUT on 5-pin Terminal
Block Connectors
Connect to balanced stereo analog audio acceptor (see pinout below), from 1 to 4.
15
OUTPUT HDMI Connectors
Connect to HDMI acceptors (from 1 to 4).
16
PROG Mini USB Port
Use for firmware upgrade or communication (connecting to a PC or a serial
controller).
17
SETUP DIP-Switches
N/A
18
5V/2A USB Port
Use to charge a device.
19
RESET Button
Press and hold while powering the device to reset IP settings to factory default
values.
20
ETHERNET RJ-45 Port
Connect to your LAN.
21
OPTIONAL Terminal Block
Connectors
N/A
22
RS-232 3-pin Terminal Block
Connectors
Connect to a PC or a serial controller.
23
Mains Power Connector
Connect to the mains power.
24
Mains Power Fuse
Fuse for protecting the device.
25
Mains Power Switch
Switch for turning the device on or off.
Step 3: Install the -44UHDA VS
To rack mount the machine, attach both rack ears
(by removing the screws from each side of the
machine and replacing those screws through the
rack ears) or place the machine on a table.
• Ensure that the environment (e.g., maximum ambient temperature &
air flow) is compatible for the device.
• Avoid uneven mechanical loading.
• Appropriate consideration of equipment nameplate ratings should be
used for avoiding overloading of the circuits.
• Reliable earthing of rack-mounted equipment should be maintained.
Step 4: Connect the inputs and outputs
Always switch OFF the power on each device before connecting it to your VS-44UHDA. For best results, we recommend that
you always use Kramer high-performance cables to connect AV equipment to the VS-44UHDA.

Connecting the audio output
Wiring the RJ 45 Connectors
To a balanced
stereo audio
acceptor:
This section defines the TP pinout, using
a straight pin- -pin cable with RJ 45 to
connectors.
EIA /TIA 568B
PIN
Wire Color
1
Orange / White
2
Orange
3
Green / White
To an unbalanced
stereo audio
acceptor:
For HDBT cables, it is recommended
that the cable ground shielding be
connected/soldered to the connector
shield.
4
Blue
5
Blue / White
6
Green
7
Brown / White
8
Brown
For optimum range and performance use the recommended Kramer cables available at www.kramerav.com/product/VS-44UHDA.
Using third-party cables may cause damage!
Step 5: Connect the power
Connect the power cord to and plug it into the mains electricity. VS-44UHDA
Safety Instructions (See for updated safety information)www.kramerav.com
Caution:
• For products with relay terminals and GPI\O ports, please refer to the permitted rating for an external connection, located next to the terminal or in the User Manual.
• There are no operator serviceable parts inside the unit.
Warning:
• Use only the power cord that is supplied with the unit.
• Disconnect the power and unplug the unit from the wall before installing.
• Do not open the unit. High voltages can cause electrical shock! Servicing by qualified personnel only.
• To ensure continuous risk protection, replace fuses only according to the rating specified on the product label which located on the bottom of the unit.
Step 6: Operate the -44UHDA VS
Via the front panel buttons:
The 7-segment display shows the status of the during normal operation and displays the device information. VS-44UHDA
Use the front panel buttons as follows:
• To switch an input to an output, press an output button and then an input button to switch to that output.
• Press to route a selected input to all the outputs. ALL
Web pages:
RS-232 and Ethernet:
RS-232/Ethernet
Baud Rate:
115,200
Parity:
None
Data Bits:
8
Command Format:
ASCII Protocol
3000
Stop Bits:
1
Example (Route input 1 to output 1):
#VID1> 1<cr>
Ethernet Parameters
IP Address:
192.168.1.39
Default TCP Port #:
5000
Subnet mask:
255.255.0.0
Default UDP Port #:
50000
Default gateway:
192.168.0.1
Full Factory Reset
OSD:
Front panel buttons: power off the device, press and hold the
LOCK, EDID and STO buttons simultaneously for 3 seconds
while powering the device, and then release.
Protocol 3000:
“ ” command.#factory
Web Pages:
In the Device Settings page, click Reset.
Produktspezifikationen
| Marke: | Kramer |
| Kategorie: | Schalter |
| Modell: | VS-44UHDA |
| Upgradefähige Firmware: | Ja |
| Breite: | 436 mm |
| Tiefe: | 183 mm |
| Gewicht: | 1900 g |
| Mitgelieferte Kabel: | AC |
| Produkttyp: | AV-Matrix-Umschalter |
| Steuerung: | Tasten |
| Höhe: | 43.6 mm |
| AC Eingangsspannung: | 100-240 V |
| AC Eingangsfrequenz: | 50 - 60 Hz |
| Eingebautes Display: | Ja |
| Betriebstemperatur: | 0 - 40 °C |
| Relative Luftfeuchtigkeit in Betrieb: | 10 - 90 % |
| Verpackungsbreite: | 550 mm |
| Verpackungstiefe: | 276 mm |
| Verpackungshöhe: | 107 mm |
| Paketgewicht: | 2900 g |
| Anzahl Ethernet-LAN-Anschlüsse (RJ-45): | 1 |
| Warentarifnummer (HS): | 85299097 |
| Temperaturbereich bei Lagerung: | -40 - 70 °C |
| RS-232 port: | 1 |
| HDCP: | Ja |
| Maximale Auflösung: | 3840 x 2160 Pixel |
| Gehäusefarbe: | Schwarz |
| Rackmontageset: | Ja |
| Datenübertragungsrate: | 8.91 Gbit/s |
| HDCP-Version: | 1.4 |
| Anzahl HDMI-Ausgangsschnittstellen: | 4 |
| Anzahl HDMI-Eingangsschnittstellen: | 4 |
| EDID-Management: | Ja |
Brauchst du Hilfe?
Wenn Sie Hilfe mit Kramer VS-44UHDA benötigen, stellen Sie unten eine Frage und andere Benutzer werden Ihnen antworten
Bedienungsanleitung Schalter Kramer

26 November 2024
26 November 2024
26 November 2024
26 November 2024
26 November 2024
26 November 2024
26 November 2024
26 November 2024
26 November 2024
26 November 2024
Bedienungsanleitung Schalter
- Schalter Asus
- Schalter Basetech
- Schalter Belkin
- Schalter Hama
- Schalter HP
- Schalter Manhattan
- Schalter Nedis
- Schalter SilverCrest
- Schalter Brennenstuhl
- Schalter Cotech
- Schalter Profile
- Schalter Quigg
- Schalter ZyXEL
- Schalter Bosch
- Schalter Buffalo
- Schalter TechniSat
- Schalter Yamaha
- Schalter Velleman
- Schalter Powerfix
- Schalter Linksys
- Schalter Netgear
- Schalter Schwaiger
- Schalter Alecto
- Schalter EMOS
- Schalter Gira
- Schalter Renkforce
- Schalter Trotec
- Schalter Schneider
- Schalter Worx
- Schalter Pyle
- Schalter Kaiser
- Schalter Jabra
- Schalter One For All
- Schalter Sennheiser
- Schalter Abus
- Schalter Elro
- Schalter Perel
- Schalter Wago
- Schalter Nexa
- Schalter Tork
- Schalter GEV
- Schalter Goobay
- Schalter Lindy
- Schalter Tripp Lite
- Schalter Ansmann
- Schalter Marmitek
- Schalter Honeywell
- Schalter TRENDnet
- Schalter Globaltronics
- Schalter TP-Link
- Schalter Kathrein
- Schalter Flamingo
- Schalter Black Box
- Schalter Techly
- Schalter Theben
- Schalter GAO
- Schalter Kopp
- Schalter Hager
- Schalter Monoprice
- Schalter Monacor
- Schalter Toolcraft
- Schalter Chamberlain
- Schalter Huawei
- Schalter JUNG
- Schalter Ei Electronics
- Schalter Edimax
- Schalter Totolink
- Schalter D-Link
- Schalter QNAP
- Schalter Digitus
- Schalter DataVideo
- Schalter Lancom
- Schalter LevelOne
- Schalter APC
- Schalter Grandstream
- Schalter Grässlin
- Schalter EVE
- Schalter Comet
- Schalter Elektrobock
- Schalter Tenda
- Schalter CyberPower
- Schalter IFM
- Schalter Intertechno
- Schalter Ubiquiti Networks
- Schalter Unify
- Schalter Intellinet
- Schalter AV:link
- Schalter Hikvision
- Schalter Vemer
- Schalter Planet
- Schalter EnGenius
- Schalter Finder
- Schalter Mikrotik
- Schalter Shimano
- Schalter Homematic IP
- Schalter Heidemann
- Schalter Berker
- Schalter Emerson
- Schalter Intermatic
- Schalter Inverto
- Schalter Mercury
- Schalter Merlin Gerin
- Schalter Paladin
- Schalter Suevia
- Schalter AMX
- Schalter Triax
- Schalter Ubiquiti
- Schalter UPM
- Schalter Adder
- Schalter Vimar
- Schalter Siig
- Schalter Iogear
- Schalter StarTech.com
- Schalter Smart-AVI
- Schalter Shelly
- Schalter Dahua Technology
- Schalter PAC
- Schalter Gefen
- Schalter Avocent
- Schalter Legrand
- Schalter Eltako
- Schalter CYP
- Schalter H-Tronic
- Schalter ATen
- Schalter Noble
- Schalter SmartAVI
- Schalter Rule
- Schalter Kraus & Naimer
- Schalter Chacon
- Schalter Phoenix Contact
- Schalter OSD Audio
- Schalter BZBGear
- Schalter Crestron
- Schalter ORNO
- Schalter Atlona
- Schalter Krone
- Schalter Lightware
- Schalter Roline
- Schalter Wallair
- Schalter Adviti
- Schalter MFA
- Schalter Matrox
- Schalter Blustream
- Schalter Vivolink
- Schalter IB Connect
- Schalter Ernitec
- Schalter Raritan
- Schalter Seuthe
- Schalter Gigahertz Solutions
- Schalter ConnectPro
- Schalter SEADA
- Schalter IPGARD
- Schalter Doepke
- Schalter Micro Connect
- Schalter Epiphan
- Schalter Baco
- Schalter Pizzato Elettrica
- Schalter Upvel
Neueste Bedienungsanleitung für -Kategorien-
3 Dezember 2024
2 Dezember 2024
2 Dezember 2024
2 Dezember 2024
2 Dezember 2024
2 Dezember 2024
2 Dezember 2024
2 Dezember 2024
2 Dezember 2024
2 Dezember 2024