JVC KD-DV7407EE Bedienungsanleitung
Lesen Sie kostenlos die 📖 deutsche Bedienungsanleitung für JVC KD-DV7407EE (195 Seiten) in der Kategorie Autoradio. Dieser Bedienungsanleitung war für 10 Personen hilfreich und wurde von 2 Benutzern mit durchschnittlich 4.5 Sternen bewertet
Seite 1/195

ENGLISHРУCCKИЙУКРАЇНА
DVD/CD RECEIVER
ПРИЕМНИК ДЛЯ ВОСПРОИЗВЕДЕНИЯ ДИСКОВ DVD И КОМПАКТ-ДИСКОВ
ПРИЙМАЧ З ПРОГРАВАЧЕМ DVD/CD-ДИСКІВ
KD-DV7408/KD-DV7407
For installation and connections, refer to the separate manual.
Указания по установке и выполнению соединений приводятся в отдельной инструкции.
Вказівки по встановленню та виконанню підключень наведені у окремій інструкції.
INSTRUCTIONS
ИНСТРУКЦИИ ПО ЭКСПЛУАТАЦИИ
ІНСТРУКЦІЇ
GET0535-001A
[EE]
For canceling the display demonstration, see page 7.
Информацию об отмене демонстрации функций дисплея см. на стр. 7.
Інформацію щодо відміни демонстрації функцій дисплею див. на стор. 7.

ENGLISH
2
Thank you for purchasing a JVC product.
Please read all instructions carefully before operation, to ensure your complete understanding and to obtain the best
possible performance from the unit.
IMPORTANT FOR LASER PRODUCTS
1. CLASS 1 LASER PRODUCT
2. Do not open the top cover. There are no user serviceable parts inside the unit; leave all servicing to CAUTION:
qualified service personnel.
3. Visible and/or invisible class 1M laser radiation when open. Do not view directly with optical CAUTION:
instruments.
4. REPRODUCTION OF LABEL: CAUTION LABEL, PLACED OUTSIDE THE UNIT.
[European Union only]
Caution on volume setting:
Digital devices (CD/USB) produce very little noise
compared with other sources. Lower the volume before
playing these digital sources to avoid damaging the
speakers by sudden increase of the output level.
Caution for DualDisc playback
The Non-DVD side of a “DualDisc” does not comply with
the “Compact Disc Digital Audio” standard. Therefore,
the use of Non-DVD side of a DualDisc on this product
may not be recommended.
Caution:
If the temperature inside the car is below 0°C, the
movement of animation and text scroll will be halted
on the display to prevent the display from being
blurred. appears on the display.
When the temperature increases, and the operating
temperature is resumed, these functions will start
working again.
Indication language:
In this manual, English indications are used
for purposes of explanation. You can select
the indication language on the monitor on the
“LANGUAGE” setting (see page 47).

ENGLISH
3
How to reset your unit
• Your preset adjustments will also be erased (except the
registered Bluetooth device, see pages 28 and 29).
How to forcibly eject a disc
“Please Eject” appears on the display.
• Be careful not to drop the disc when it ejects.
• If this does not work, reset your unit.
WARNINGS:
(To prevent accidents and damage)
• DO NOT install any unit or wire any cable in
a location where;
– it may obstruct the steering wheel and
gearshift lever operations.
– it may obstruct the operation of safety
devices such as air bags.
– it may obstruct visibility.
• DO NOT operate the unit while driving.
• If you need to operate the unit while
driving, be sure to look around carefully.
• The driver must not watch the monitor
while driving.
If the parking brake is not engaged,
“DRIVER MUST NOT WATCH THE MONITOR
WHILE DRIVING.” appears on the monitor,
and no playback picture will be shown.
– This warning appears only when the
parking brake lead is connected to the
parking brake system built in the car
(refer to the Installation/Connection
Manual).
For safety...
• Do not raise the volume level too much, as this will
block outside sounds, making driving dangerous.
• Stop the car before performing any complicated
operations.
Temperature inside the car...
If you have parked the car for a long time in hot or cold
weather, wait until the temperature in the car becomes
normal before operating the unit.

ENGLISH
6
Disc type Recording format, file type, etc Playable
DVD DVD Video (Region Code: 5) *
1
DVD Audio
DVD-ROM
DVD Recordable/Rewritable
(DVD-R/-RW *2, +R/+RW *3)
• DVD Video: UDF bridge
• DVD-VR
• DivX/MPEG-1/MPEG-2/MP3/
WMA/WAV: ISO 9660 level 1,
level 2, Romeo, Joliet
DVD Video
DVD-VR
DivX/MPEG1/MPEG2
MP3/WMA/WAV
AAC
JPEG/MPEG4
DVD+VR
DVD-RAM
Dual Disc DVD side
Non-DVD side
CD/VCD Audio CD/CD Text (CD-DA)/DTS-CD *
4
VCD (Video CD)
SVCD (Super Video CD)
CD-ROM
CD-I (CD-I Ready)
CD Recordable/Rewritable
(CD-R/-RW)
• ISO 9660 level 1, level 2, Romeo,
Joliet
CD-DA
DivX/MPEG1/MPEG2
MP3/WMA/WAV
AAC
JPEG/MPEG4
*1 If you insert a DVD Video disc of an incorrect Region Code, “REGION CODE ERROR” appears on the monitor.
*2 DVD-R recorded in multi-border format is also playable (except for dual layer discs). DVD-RW dual layer discs are not
playable.
*3 It is possible to play back finalized +R/+RW (Video format only) discs. +RW double layer discs are not playable.
*4 To reproduce DTS sound, use the DIGITAL OUT terminal (see also pages 48 and 57).
Playable disc type

ENGLISH
7INTRODUCTIONS
Preparation
Cancel the display demonstration and set the clock
• See also pages 42 and 43.
1Turn on the power.
2Enter the PSM settings.
3Cancel the display demonstrations
Select “Demo,” then “Off.”
Set the clock
Select “Clock Hr” (hour), then adjust the hour.
Select “Clock Min” (minute), then adjust the minute.
Select “24H/12H,” then “24Hours” or “12Hours.”
4Finish the procedure.
Changing the display information and pattern
• When the power is turned off: Check the current clock time
Ex.: When tuner is selected as the source
Source operation display Audio level meter display
(see “LevelMeter” on page 42)

ENGLISH
8
Basic operations
Using the control panel
9 • Volume control [Turn].
• Select the source [Press] *
1.
TUNER DISC = *2 =USB *2 (or
USB- iPod )*2= CD-CH *
2/iPod *2 (or ) EXT IN
= BT-PHONE *
2 =BT-AUDIO *2
=LINE IN
= = AV IN (back to the beginning)
p • Select/adjust the sound mode.
• Enter the PSM settings [Hold].
q • TUNER: Select preset station.
• DISC/USB/CD-CH: Select chapter/title/
program/folder/track/disc (for CD changer).
• BT-PHONE: Dial preset phone number *
3.
w • Enter functions mode.
• BT-PHONE: Activate Voice Dialing [Hold].
e Change the display information and pattern.
r • TUNER: Select the bands.
• DISC/USB/USB-iPod: Start/pause playback.
• BT-AUDIO: Start/pause playback.
*1 Holding SOURCE will enter Bluetooth menu if a
Bluetooth phone is connected.
*2 You cannot select these sources if they are not ready
or not connected.
*3 For storing preset phone number, see page 32.
1 • TUNER: Select preset station.
• Select title/program/DISC/USB/CD-CH:
playlist/folder.
• USB-iPod: Enter the main menu [Hold].
• iPod: Enter the main menu/Pause playback/
Confirm selection.
• BT-PHONE/BT-AUDIO: Select a registered
device.
2 • Turn on the power.
• Turn off the power [Hold].
• Attenuate the sound (if the power is on).
3 Display window
4 USB (Universal Serial Bus) input jack
5 • Activate/deactivate TA Standby Reception.
• Enter programme type searching mode [Hold].
6 Flip down the control panel.
• To eject the disc, flip down the control panel
then press on the unit.0
7 AV-IN (video) input jack
8 • TUNER: Search for station.
• DISC/USB/USB-iPod/CD-CH/iPod: Select
chapter/track.
• BT-AUDIO: Reverse skip/forward skip.

ENGLISH
9OPERATIONS
Continued on the next page
Installing the battery
Insert the batteries into the remote controller by
matching the polarity (+ and –) correctly.
Caution:
Battery shall not be exposed to excessive heat such as
sunshine, fire, or the like.
If the effectiveness of the remote controller
decreases, replace both batteries.
Before using the remote controller:
• Aim the remote controller directly at the remote
sensor on the unit.
• DO NOT expose the remote sensor to bright light
(direct sunlight or artificial lighting).
Using the remote controller (RM-RK252)
R03/LR03/AAA
Remote sensor
IMPORTANT:
If Dual Zone is activated (see page 27), the remote
controller only functions for operating the DVD/CD
player.
1*1 button
• Turns the power on if pressed briefly or
attenuates the sound when the power is on.
• Turns the power off if pressed and held.

ENGLISH
10
2 5 ∞/ buttons
• TUNER: Selects the preset stations.
• DISC:
– DVD-Video: Selects the title.
– DVD-VR: Selects the program/playlist.
– DivX/MPEG Video/MP3/WMA/WAV: Selects
the folders if included.
• USB:
– DivX/MPEG Video/MP3/WMA/WAV: Selects
the folders if included.
• CD-CH: Selects the folders if included.
• iPod:
– 5 : Enters the main menu (then 5 / ∞ /
4 ¢ / work as menu
selecting buttons.)
5 : Returns to the previous menu.
∞ : Confirms the selection.
– ∞ : Pauses or resumes playback.
4 ¢ / buttons
• TUNER:
– Searches for stations automatically if pressed
briefly.
– Searches for stations manually if pressed and
held.
• DISC/USB/USB-iPod/CD-CH:
– Reverse skip/forward skip if pressed briefly.
– Reverse search/forward search if pressed and
held.
• BT-AUDIO: Reverse skip/forward skip if pressed
briefly.
• iPod:
– Reverse skip/forward skip if pressed briefly.
– Reverse search/forward search if pressed and
held.
In menu selecting mode:
– Selects an item if pressed briefly. (Then, press
∞ to confirm the selection.)
– Skips 10 items at a time if pressed and held.
3 (volume) VOL + / – buttons
• Adjusts the volume level.
(volume) 2nd VOL buttons
• Adjust the volume level through the 2nd AUDIO
OUT plug when pressed with SHIFT button (see
page 27).
4 *2 ASPECT button
• Not applicable for this unit.
5*1 PHONE button
• Answer incoming calls.
• Enters “Redial” menu when a Bluetooth phone
is connected [Hold].
6 *2 SETUP button
• Enters disc setup menu (during stop).
7 *2 (menu) TOP M button
• DVD-Video/DivX: Shows the disc menu.
• DVD-VR: Shows the Original Program screen.
• VCD: Resumes PBC playback.
• USB-iPod: Enters the search mode menu (see
page 36).
8 *2 (on-screen display) OSD button
• Shows the on-screen bar.
9 SHIFT button
• Functions with other buttons.
p (display) DISP button
• Changes the display information.
q 1 ¡ / buttons
• DVD-Video: Slow motion playback (during
pause).
• DVD-VR/VCD: Forward slow motion playback
(during pause).
• DISC/USB/USB-iPod: Reverse search/forward
search.
w*1 SOURCE button
• Selects the source.

ENGLISH
11OPERATIONS
e 3 8 (play) / (pause) button
• DISC/USB/USB-iPod/BT-AUDIO: Starts/
pauses playback.
r (end call) button
• Ends the call.
BAND / 7 (stop) buttons
• TUNER: Selects the bands.
• DISC/USB/USB-iPod/BT-AUDIO: Stops
playback.
t *2 RETURN button
• VCD: Returns to the PBC menu.
• USB-iPod: Returns to Control Screen.
y *2 MENU button
• DVD-Video/DivX: Shows the disc menu.
• DVD-VR: Shows the Playlist screen.
• VCD: Resumes PBC playback.
• USB-iPod: Enters the search mode menu (see
page 36).
u *2 % / fi buttons
• DVD-Video: Makes selection/settings.
• CD-CH: Changes discs in the magazine.
@ # / buttons
• DVD-Video: Makes selection/settings.
• DivX/MPEG Video: Skips back or forward by
about five minutes.
(enter) ENT button
• Confirms selection.
i *2 DUAL button
• Activates or deactivates Dual Zone.
o SURROUND button
• Not applicable for this unit.
DIRECT button
• DISC/USB: Enters direct search mode for
chapter/title/program/playlist/folder/track
when pressed with SHIFT button (see page 20
for details).
(clear) CLR button
• DISC/USB: Erases the misentry when pressed
with SHIFT button.
*1 When Dual Zone is activated, these buttons cannot be
used.
*2 Functions as number buttons/* (asterisk)/# (hash)
when pressed with SHIFT button.
– Tuner: Selects the preset stations (1 – 6).
– DISC: Enters chapter/title/program/playlist/folder/
track number after entering search mode by
pressing SHIFT and DIRECT (see page 20 for details).

ENGLISH
13OPERATIONS
Listening to the preset station on
the Preset Station List
1 Display the Preset Station List, then select
the preset station you want to listen to.
2 Change to the selected station.
The following features are available only for FM
Radio Data System stations.
Searching for FM Radio Data
System programme — PTY Search
You can tune in to a station broadcasting your favorite
programme by searching for a PTY code.
• When appears on the display, you can
move back to the previous display by pressing
number button 3.
• When appears on the display, /
you can move to the other lists by pressing number
button 5 or 6 repeatedly.
1
2 Select “Search.”
The six preset PTY codes appears on the display.
3
Using the Preset Station list
• When is shown on the display, you can
move back to the previous screen by pressing number
button 3.
1 Follow steps 1 and 2 of “Using the number
buttons” on page 12.
• By holding / , the Preset Station List will 5 ∞
also appear (go to step ).4
2
3 Display the Preset Station List.
4 Select the preset number you want to store
into.
• You can move to the lists of the other FM bands
by pressing number button 5 ( ) or
6 ( ) repeatedly.
5 Store the station.
Preset number flashes for a while.
Continued on the next page

ENGLISH
15OPERATIONS
PTY Standby Reception
1
2
3 Select a PTY code.
4 Exit from the setting.
either lights up or flashes on the display.
• If lights up, the unit temporarily will switch
to your favorite PTY programme from any source
other than AM.
• If flashes, PTY Standby reception is not yet
activated. Tune in to another station providing
the Radio Data System signals.
To deactivate PTY Standby Reception, select “Off”
in step . goes off.2
• The unit will not switch to Traffic Announcement or
PTY programme when a call connection is established
through the “BT-PHONE.”
Available PTY codes
News, Affairs, Info, Sport, Educate, Drama, Culture,
Science, Varied, Pop M (music), Rock M (music),
Easy M (music), Light M (music), Classics, Other
M (music), Weather, Finance, Children, Social,
Religion, Phone In, Travel, Leisure, Jazz, Country,
Nation M (music), Oldies, Folk M (music), Document
Tracing the same programme—
Network-Tracking Reception
When driving in an area where FM reception is not
sufficient enough, this unit automatically tunes in to
another FM Radio Data System station of the same
network, possibly broadcasting the same programme
with stronger signals (see the illustration below).
Programme A broadcasting on different frequency
areas (01 – 05)
When shipped from the factory, Network-Tracking
Reception is activated.
To change the Network-Tracking Reception
setting, see “AF-Regn’l” on page 44.
Automatic station selection—
Programme Search
Usually when you press the number buttons, the preset
station is tuned in.
If the signals from the FM Radio Data System preset
station are not sufficient for good reception, this
unit, using the AF data, tunes in to another frequency
broadcasting the same programme as the original
preset station is broadcasting.
• The unit takes some time to tune in to another
station using programme search.
• See also page 44.

ENGLISH
16
To stop play and eject the disc
• Press SOURCE to listen to another playback source.
Prohibiting disc ejection
To cancel the prohibition, repeat the same
procedure.
Disc operations
Before performing any operations...
Turn on the monitor to watch the playback picture. If you turn on the monitor, you can also control playback of other
discs by referring to the monitor screen. (See pages 22 – 25.)
The disc type is automatically detected, and playback starts automatically (for DVD: automatic start depends on its
internal program).
If the current disc does not have any disc menu, all tracks will be played repeatedly until you change the source or
eject the disc.
If “ ” appears on the monitor when pressing a button, the unit cannot accept the operation you have tried to
do.
• In some cases, without showing “ ,” operations will not be accepted.
1Open the control panel.
Make sure to detach the USB device before opening the control
panel, as it might block the opening mechanism.
• To detach the USB device, see page 26.
2
Insert the disc.
Playback starts automatically.
3Start playback if necessary.

ENGLISH
17OPERATIONS
Operations using the control panel
Pressing (or holding) the following buttons allows you to...
Disc type
(Number buttons) *3
[Press] Select chapter
[Hold] Reverse/fast-forward
chapter *1
Select title During stop: Locate title
During play/pause: Locate
chapter
[Press] Select chapter
[Hold] Reverse/fast-forward
chapter *1
Select program number/
playlist number
During stop: Locate program
During play/pause: Locate
chapter
[Press] Select track
[Hold] Reverse/fast-forward track *
2
Select folder Locate particular folder directly
[Press] Select track
[Hold] Reverse/fast-forward track *
1—Locate particular track directly
(PBC not in use)
[Press] Select track
[Hold] Reverse/fast-forward track *
1
Select folder Locate particular folder directly
[Press] Select track
[Hold] Reverse/fast-forward track *
1—Locate particular track directly
*1 Search speed:
*2 Search speed:
*3 Press to select number 1 to 6; hold to select number 7 to 12.
Continued on the next page

ENGLISH
18
After pressing M MODE, press the following buttons to...
Disc type
Skip 10 chapters (during
play or pause)
Repeat Chapter:
Repeat current chapter
Repeat Title:
Repeat current title
—
Skip 10 chapters (during
play or pause)
Repeat Chapter:
Repeat current chapter
Repeat Program:
Repeat current program (not
available for Playlist Playback)
—
Skip 10 tracks (within the
same folder)
Repeat Track:
Repeat current track
Repeat Folder:
Repeat current folder
Random Folder:
Randomly play all tracks of
current folder, then tracks of
next folders
Random All:
Randomly play all tracks
Skip 10 tracks (PBC not in
use)
Repeat Track:
Repeat current track (PBC not in
use)
Random All:
Randomly play all tracks (PBC
not in use)
Skip 10 tracks (within the
same folder)
Repeat Track:
Repeat current track
Repeat Folder:
Repeat current folder
Random Folder:
Randomly play all tracks of
current folder, then tracks of
next folders
Random All:
Randomly play all tracks
Skip 10 tracks :Repeat Track
Repeat current track
Random All:
Randomly play all tracks
• You can also cancel the playback mode by selecting “ ” or press number button 4 ( Off ).

ENGLISH
19OPERATIONS
Selecting a folder/track on the list
(only for MP3/WMA/WAV file)
• When is shown on the display, you can
move back to the previous screen by pressing number
button 3.
1
2 Select “LIST.”
3 Select the list type.
4 Select an item.
• You can move to the other lists by pressing
number button 5 ( ) or 6 ( )
repeatedly.
5 Change to the selected item.
A If File List is selected
The list disappears and playback
starts.
If Folder List is selectedB
• If the current folder is selected, File List
appears, then repeat steps and to 4 5 A
start playback.
• If another folder is selected, playback starts
from the 1st file of the selected folder.
Ex.: When “File” is selected in step 3

ENGLISH
21OPERATIONS
Stop play Stop play Stop play
Start play/Pause (if pressed during
play)
Start play/Pause (if pressed during
play)
Start play/Pause (if pressed during
play)
Reverse/forward track search *
1
• Forward slow motion *
2 during
pause. (No sound can be heard.)
* Reverse slow motion does not work.
Reverse/forward track search *
1Reverse/forward track search *
1
[Press] Select track (during play or
pause)
[Hold] Reverse/fast-forward track
search *
3 (No sound can be
heard.)
[Press] Select track (during play or
pause)
[Hold] Reverse/fast-forward track
search *
3
[Press] Select track (during play or
pause)
[Hold] Reverse/fast-forward track
search *
3
—
Select folder
—
———
Continued on the next page
• For DivX/MPEG Video/MP3/WMA/WAV, track is searched within the same folder.
• To erase a misentry, press CLR (clear) while holding SHIFT.
• To return to the previous screen, press RETURN.
*
1 Search speed:
*
2 Slow motion speed:
*
3 Search speed:
*
4 Search speed:
*
5 Search speed:

ENGLISH
22
Operations using the
on-screen bar
(DVD/DVD-VR/DivX/MPEG Video/VCD)
These operations are possible on the monitor using
remote controller.
1 Show the on-screen bar (see page 23).
2 Select an item.
3 Make a selection.
If pop-up menu appears...
• To cancel pop-up menu, press RETURN.
• For entering time/numbers, see the following
Entering time/numbers
Press to change the number, then press t% / @ / #
move to the next entry.
• Each time you press , the number increases/% /
decreases by one value.
• After entering the numbers, press ENT (enter).
• It is not required to enter the zero and tailing zer
(the last two digits in the example below).
Ex.: Time search
DVD: _:_ _:_ _ (Ex.: 1:02:00)
Press once, then twice to go to the third entry, % #
twice, then press ENT (enter).
To remove the on-screen bar
(twice)
Using menu driven features... (DVD-Video/
DVD-VR)
1 Press TOP M/MENU to enter the menu screen.
2 Press % @ # / / * / * to select an item you want
to start play.
3 Press ENT (enter) to confirm.
* Not applicable for DVD-VR.
Canceling the PBC playback... (VCD)
1 During stop, press DIRECT while holding SHIFT.
2 Hold SHIFT, then press the number buttons (0 – 9)
to enter the desired number.
3 Press ENT (enter) to confirm.
• To resume PBC, press TOP M/MENU.

ENGLISH
23OPERATIONS
Information
Operation
On-screen bar
Ex.: DVD-Video
1 Disc type
2 • DVD-Video/DTS-CD: Audio signal format type
and channel
• VCD: PBC
3 Playback mode *
1
DVD-Video: : Title repeatT. RPT
C. RPT: Chapter repeat
DVD-VR: : Chapter repeatC. RPT
PG. RPT: Program repeat
DivX/MPEG Video: : Track repeatT. RPT
F. RPT: Folder repeat
F. RND: Folder random
A. RND: All random
VCD *
2: : Track repeatT. RPT
A. RND: All random
4 Playback information
Current title/chapter
Current program/chapter
Current playlist/chapter
Current track
Current folder/track
5 Time indication
Elapsed playing time of the disc
(For DVD-Video, elapsed playing
time of the current title/program/
playlist.)
DVD-Video/DVD-VR: Remaining
title/program/playlist time
VCD: Remaining disc time
Elapsed playing time of the current
chapter/track *
3
Remaining time of the current
chapter/track *
3
6 Playback status
Play
Forward/reverse search
Forward/reverse slow-motion
Pause
Stop
7 Operation icons
Change time indication (see )5
Time Search (Enter the elapsed playing
time of the current title/program/
playlist or of the disc.)
Title Search (by its number)
Chapter Search (by its number)
Track Search (by its number)
Change the audio language or audio
channel
Change or turn off the subtitle
language
Change the view angle
Repeat play *
1
Random play *
1
*1 For repeat play/random play, see also page 18.
*2 While PBC is not in use.
*3 Not applicable for DVD-VR.

ENGLISH
24
7 Track information
8 Track list with the current track selected
To select a playback mode
1 While control screen is displayed...
Playback mode selection screen appears on the
folder list section of the control screen.
2 Select a playback mode.
3 Select an item.
REPEAT:
RANDOM:
Mode Playback functions
F. RPT
(folder repeat):
Repeat current folder
T. RPT
(track repeat):
Repeat current track
A. RND
(all random):
Randomly play all tracks
F. RND
(folder random):
Randomly play all tracks of
current folder, then tracks of
next folders
4 Confirm the selection.
* Not selectable for CD.
Operations using the control
screen
(DivX/MPEG Video/MP3/WMA/WAV/CD)
These operations are possible on the monitor using the
remote controller.
1 Show the control screen.
DivX/MPEG Video: Press 7 during play.
MP3/WMA/WAV/CD: Automatically appear during
play.
2 Select “Folder” column or “Track” column
(except for CD).
3 Select a folder or track.
4 Start playback.
DivX/MPEG Video: Press ENT (enter) or / .3 8
MP3/WMA/WAV/CD: Playback starts automatically.
Control screen
1 Current folder number/total folder number
2 Folder list with the current folder selected
3 Selected playback mode
4 Elapsed playing time of the current track
5 Operation mode icon ( 378¡1, , , , )
6 Current track number/total number of tracks in the
current folder (total number of tracks on the disc)
Ex.: MP3/WMA/WAV disc
ENGLISH
25OPERATIONS
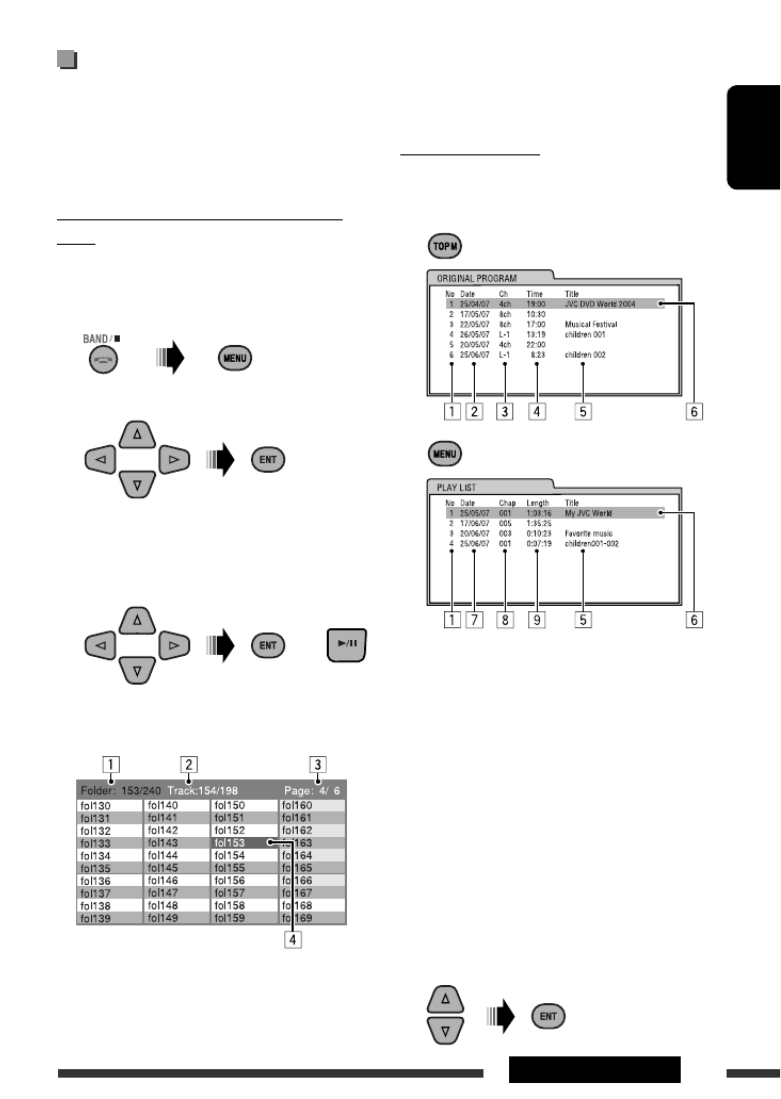
3 Current page/total number of the pages included
in the list
4 Current folder/track (highlighted bar)
List screen (DVD-VR)
You can use ORIGINAL PROGRAM or PLAY LIST
anytime while playing DVD-VR with its data record
1 Select a list screen.
Program/playlist number1
Recording date2
Recording source (TV station, the input 3
terminal of the recording equipment, etc.)
Start time of recording4
Title of the program/playlist 5*
Current selection (highlighted bar)6
Creating date of playlist7
Number of chapters8
Playback time9
* The title of the original program or playlist ma
not be displayed depending on the recording
equipment.
2 Select an item from the list.
Operations using the list
screen
(DVD-VR/DivX/MPEG Video/MP3/WMA/WAV)
These operations are possible on the monitor using the
remote controller.
List screen (DivX/MPEG Video/MP3/WMA/
WAV)
Before playing, you can display the folder list/track list
to confirm the contents and start playing a track.
1 Display the folder list while stop.
2 Select an item from the folder list.
• Track list of the selected folder appears.
• To go back to the folder list, press RETURN.
3 Select a track to start playing.
• MP3/WMA/WAV: Control screen appears (see
page 24).
1 Current folder number/total folder number
2 Current track number/total number of tracks in the
current folder
Ex.: Folder list
or

ENGLISH
26
Turn on the monitor to watch the playback picture if
you play back a DivX/MPEG file. You can also control
playback by referring to the monitor screen. (See also
pages 22 – 25.)
• See pages 20 – 25 for operation using the remote
controller.
• See pages 47, 48, and 53 for more settings.
If “ ” appears on the monitor when pressing a
button, the unit cannot accept the operation you
have tried to do.
• In some cases, without showing “ ,” operations
will not be accepted.
If a USB device has been attached...
Playback starts from where it has
been stopped previously.
• If a different USB device is
currently attached, playback starts
from the beginning.
To stop play and detach the USB device
Straightly pull it out from the unit.
• Press SOURCE to listen to another playback source.
You can operate the USB device in the same way y
operate the files on a disc. (See pages 16 – 25.)
• You cannot select “USB” when Dual Zone is in
(see page 27).
Cautions:
• Avoid using the USB device if it might hinder y
safety driving.
• Do not pull out and attach the USB device repea
while “Reading” is shown on the display.
• Do not start the car engine if a USB device is
connected.
• This unit may not be able to play the files depen
on the type of USB device.
• Operation and power supply may not work as
intended for some USB devices.
• You cannot connect a computer to the USB inpu
terminal of the unit.
• Make sure all important data has been backed up
avoid losing the data.
• Do not leave a USB device in the car, expose to
sunlight, or high temperature to avoid deformatio
or cause damages to the device.
• Some USB devices may not work immediately a
you turn on the power.
• For more details about USB operations, see page
Listening to the USB device
You can connect a USB mass storage class device such as a USB memory, portable HDD, etc. to
• You can also connect an Apple iPod to the USB input jack. For details of the operations, see pa
This unit can play DivX/MPEG Video/MP3/WMA/WAV tracks stored in a USB device.
All tracks will be played repeatedly until you change the source or detach the USB device.
1 2
USB memory
USB input jack

ENGLISH
27OPERATIONS
On the control panel:
1
2 Enter Dual Zone settings.
Activate or deactivate Dual Zone.
The source automatically changes to “DISC” wh
Dual Zone is activated.
Dual Zone operations
You can enjoy disc playback on the external monitor connected to the VIDEO output terminal and
plugs while listening to any source (other than “AM” and “USB”) through the speakers.
• You cannot select “AM” or “USB” as the source when Dual Zone is activated.
• When Dual Zone is in use, you can only operate the DVD/CD player using the remote controller
pages 20 – 25.
These operations are possible on the monitor using the remote controller.
1Activate Dual Zone.
• DUAL indicator lights up on the display.
The main source automatically changes to “DISC.”
To select a different source (main source) to listen through the speake
press on the control panel.SOURCE
• By using the buttons on the control panel, you can operate the new
selected source without affecting Dual Zone operations.
2Adjust the volume through the 2nd AUDIO OUT plug.
3—Operate the DVD/CD player using the remote controller by
referring to the monitor screen.
To cancel Dual Zone operations
• DUAL indicator goes off.

ENGLISH
28
Listening to the Bluetooth ® devices
For Bluetooth operations, it is required to connect the
Bluetooth Adapter (KS-BTA200) to the CD changer
jack on the rear of this unit.
• Refer also to the instructions supplied with the
Bluetooth adapter and the Bluetooth device.
• Refer to the list (included in the box) to check
the countries where you may use the Bluetooth ®
function.
To use a Bluetooth device through the unit
(“BT-PHONE” and “BT-AUDIO”) for the first time,
you need to establish Bluetooth wireless connection
between the unit and the device.
• Once the connection is established, it is registered in
the unit even if you reset your unit. Up to five devices
can be registered in total.
• Only one device can be connected at a time for each
source (“BT-PHONE” and “BT-AUDIO”).
Registering a Bluetooth device
Registration (Pairing) methods
Use either of the following items in the Bluetooth menu
to register and establish the connection with a device.
• Select “BT-PHONE” or “BT-AUDIO” as the source to
operate the Bluetooth menu.
Open Make the unit ready to establish a new
Bluetooth connection.
Connection is established by operating the
Bluetooth device.
Search Make the unit ready to establish a new
Bluetooth connection.
Connection is established by operating
the unit.
• When is shown on the display, you can
move back to the previous screen by pressing number
button 3.
Registering using “Open”
Preparation: Operate the device to turn on its
Bluetooth function.
1 Select “BT-PHONE” or “BT-AUDIO.”
2 Select “New.”
3 Enter setting menu.
4 Select “Open.”
5 Enter a PIN (Personal Identification Number)
code to the unit.
• You can enter any number you like (1-digit to
16-digit number). [Initial: 0000]
• To enter a PIN code less than 4-digit, firstly
delete the initial PIN code (0000) by pressing
number button 5 ( ).
* Some devices have their own PIN code. Enter the
specified PIN code to the unit.
Move to the next (or previous) number 1
position.

ENGLISH
29EXTERNAL DEVICES
2 Select a device you want to connect.
3 • For available devices...
1 Enter the specific PIN code of the device to
the unit.
Refer to the instructions supplied with the
device to check the PIN code.
2 Use the Bluetooth device to connect.
Now connection is established and you can
use the device through the unit.
• For special device...
Use “Open” or “Search” to connect.
Connecting/disconnecting/deleting a
registered device
1 Select “BT-PHONE” or “BT-AUDIO.”
2 Select a registered device you want to
connect/disconnect/delete.
3 Enter setting menu.
4 • Select “Connect” or “Disconnect” to
connect/disconnect the selected device.
2 Select a number or blank space.
3 1 2 Repeat steps and until you finish
entering a PIN code.
Confirm the entry.4
“Open...” flashes on the display.
6 Use the Bluetooth device to search and
connect.
On the device to be connected, enter the same
PIN code you have just entered for this unit.
“Connected (and device name)” appears on the
display.
Now connection is established and you can use the
device through the unit.
The device remains registered even after you
disconnect the device. Use “ “ (or activate Connect
“ ”) to connect the same device from Auto Connect
next time on. (See the following and page 49.)
Connecting a device
Perform steps – on page 28, then...1 3
1 • Select “Search” to search for available
devices.
The unit searches and displays the list of the
available devices.
If no available device is detected, “Device not
found” appears.
• Select “Special” to connect a special device.
The unit displays the list of the preset devices.
Continued on the next page

ENGLISH
30
• Select “Delete,” then confirm the selection.
You can set the unit to connect the Bluetooth device automatically when the unit is turned on. (See
“ ” on page 49.)Auto Connect
Using the Bluetooth cellular phone
1Select “BT-PHONE.”
2Enter Bluetooth menu.
3—Establish the connection with a device, then make a call (or settings
using the Bluetooth menu) (See pages 31 and 49.).
Press number button 3 to
select “No” or return to the
previous screen.
When a call comes in....
The source is automatically changed to “BT-PHONE.”
When “Auto Answer” is activated....
The unit answers the incoming calls automatically, see
page 49.
• When “Auto Answer” is deactivated, press any
button (except /control dial) to answer the
incoming call.
To end the call
Hold any button (except /control dial).
• You can adjust the microphone volume level (see
page 49).
When a text message comes in....
If the cellular phone is compatible with Text Message
(notified through JVC Bluetooth adapter) and “Message
Info” is set to “Auto” (see page 49), the unit rings and
“Received Message” appears on the display to inform
you of the message arrival.

ENGLISH
31EXTERNAL DEVICES
Making a call
You can make a call using one of the Dial Menu items.
• When is shown on the display, you can
move back to the previous screen by pressing number
button 3.
1 Select “BT-PHONE.”
2 Enter setting menu.
3 Select “Dial Menu.”
4 Select the method to make a call.
• Redial *: Shows the list of the phone numbers
you have dialed. Go to the following step.
• Received *: Shows the list of the received calls.
Go to the following step.
• Phonebook *: Shows the phone book of the
connected cellular phone. Go to the following
step.
• Missed *: Shows the list of the missed calls. Go
to the following step.
• Number: Shows the phone number entry
screen. See “How to enter phone number” on the
right column.
• Voice Dial (Only accessible when the connected
cellular phone has the voice recognition system):
Speak the name (registered words) you want to
call.
* Displayed only when your cellular phone is
equipped with these functions.
– If not displayed, try to transfer the phone book
memory of the cellular phone to this unit.
(Refer to the instruction manual supplied with
your cellular phone.)
– With some cellular phones, the phone book
memory is transferred automatically.
5 Select the name/phone number you want to
call.
How to enter phone number
Select a number.
Move the entry position.
Confirm the entry.
Continued on the next page

ENGLISH
34
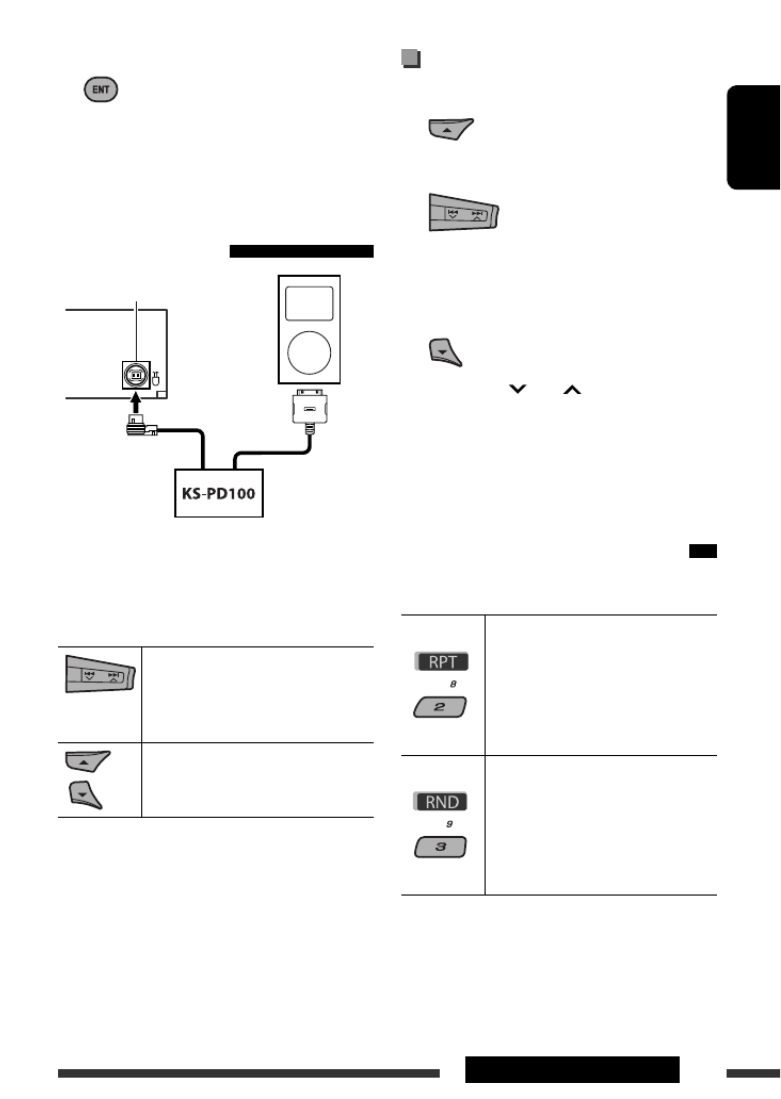
You can connect an Apple iPod using the following cable or adapter:
To: Cable or adapter: Connect to:
Listen to the
music
USB 2.0 cable (supplied for the iPod) USB input jack on the control panel
Interface adapter for iPod, KS-PD100
(not supplied)
CD changer jack on the rear of the unit
Preparation: Make sure “Changer” is selected for
the external input setting, see page 44.
Watch the video USB Audio and Video cable for iPod,
KS-U19 (not supplied)
USB input jack and AV-IN input jack on the control
panel
• Turn on the monitor to watch the video.
• You can control playback from the unit.
• Disconnecting the iPod will stop playback. Press SOURCE to listen to another playback source.
• For details, refer also to the manual supplied for your iPod.
• See also page 54
Caution:
• Avoid using the iPod if it might hinder your safety while driving.
• Make sure all important data has been backed up to avoid losing the data.
When connecting with the USB cable
Connect using USB 2.0 cable (supplied for iPod): Connect using USB Audio and Video cable for
iPod, KS-U19 (not supplied):
Playback starts automatically from where it had been paused previously.*
* Not applicable for video files.
Listening to the iPod
USB cable supplied
for your iPod
USB input jack
KS-U19 (not supplied)
USB input jack
AV-IN input jack

ENGLISH
35EXTERNAL DEVICES
Continued on the next page
[Press] Go to the next or previous
track
[Hold] Fast-forward or reverse the
track during playback
[Hold] Enter main menu
[Press] Pause/resume playback.
Selecting a track from the menu
1 Enter the main menu.
2 Select the desired menu.
3 Confirm the selection.
• By holding , you can start play back the ¢
selected item directly.
• By holding , you can exit from the menu.4
• By holding / , you can fast skip in every layer of 5 ∞
the main menu.
Menu items:
For Music:
“Playlists,” “Artists,” “Albums,” “Songs,” “Podcasts,”
“Genres,” “Composers,” or “Audiobooks”
For Videos:
“Video Playlists,” “Movies,” “Music Videos,” “TV Shows,”
or “Video Podcasts”
• If a track is selected, playback starts automatically.
• If the selected item has another layer, you will enter
the layer. Repeat steps and until the desired track 2 3
is played.
Operations using the control
screen
• These operations are possible on the monitor using
the remote controller.
• Connect your iPod to the USB input jack on the
control panel using the USB cable supplied for your
iPod, or KS-U19 for watching video file.
1 Turn on the monitor.
Control screen appears on the monitor.
Current category number/total category 1
number
Category list with the current category 2
selected
Elapsed playing time of the current track3
Operation mode icon ( , , , , )43 7 8 ¡ 1
Current track number/total number of tracks 5
in the current category
Track information6
Track list with the current track selected7
2 Select the desired item.
If the selected item has another layer, you will
enter the layer. Repeat this step until the desired
track is played.

ENGLISH
36
To select a track from Search Mode
1 Enter Search Mode menu.
2 Select a menu item.
• Selecting Shuffle Songs starts playback.
3 Select a search mode category, then the desired
track.
Search modes category:
For Music:
“Playlists,” “Artists,” “Albums,” “Songs,” “Podcasts,”
“Genres,” “Composers,” or “Audiobooks”
For Videos:
“Video Playlists,” “Movies,” “Music Videos,”
“TV Shows,” or “Video Podcasts”
• Available Search Modes depend on the type of your
iPod.
• To return to the previous search mode screen,
press MENU.
• press RETURN.To return to the control screen,
or
To select a playback mode/change the speed
of the Audiobooks
1 While control screen is displayed...
Playback mode selection screen appears on the
category list section of the control screen.
2 Select an item.
3 Select a playback mode/speed.
REPEAT:
RANDOM:
AUDIO BOOK:
REPEAT ONE Same as “Repeat One.”
REPEAT ALL Same as “Repeat All.”
RANDOM
ALBUMS*
Same as “Shuffle Albums.”
RANDOM
SONGS:
Same as “Shuffle Songs.”
NORMAL Plays at normal speed.
FASTER Plays faster.
SLOWER Plays slower.
* Functions only if you select “All Albums” or “All” in
“Albums” of the main “MENU.”
ENGLISH
37EXTERNAL DEVICES
4 Confirm the selection.
• You can also change the settings from the PSM
(Preferred Setting Mode) items. See “AudioBooks” on
page 44.
When connecting with the
interface adapter
Playback starts automatically from where it had been
paused previously.
• If an iPod has been connected, press SOURCE to select
“iPod” to listen to music.
[Press] Go to the next or previous
track
[Hold] Fast-forward or reverse the
track during playback
[Press] Enter main menu when you
press . Pause/resume 5
playback when is pressed.∞
CD changer jack
Selecting a track from the menu
1 Enter the main menu.
2 Select the desired menu.
Playlists Ô Ô Ô Ô Artists Albums Songs
Genres ComposersÔ
3 Confirm the selection.
• By holding / , you can fast skip 4 ¢
during song search in the main menu.
• If a track is selected, playback starts automatically.
• If the selected item has another layer, you will enter
the layer. Repeat steps and until the desired track 2 3
is played.
Selecting the playback modes
After pressing M MODE, press the following buttons
to...
Repeat One:
Same as “Repeat One.”
Repeat All:
Same as “Repeat All.”
Repeat Off:
Cancels.
Random Album *2:
Same as “Shuffle Albums.”
Random Song:
Same as “Shuffle Songs.”
Random Off:
Cancels.
*1 Not applicable for video files.
*2 Functions only if you select “All Albums” or “All” in
“Albums” of the main “MENU.”
Continued on the next page
*1

ENGLISH
38
Listening to the other external components
You can connect an external component to:
• CD changer jack on the rear of this unit using the following adapters:
– Line Input Adapter, KS-U57
– AUX Input Adapter, KS-U58
Make sure “Ext In” is selected for the external input setting, see page 44.Preparation:
• AV-IN (video) input jack on the control panel.
Make sure to connect and turn on the monitor to watch the playback picture. If the parking brake Preparation:
is not engaged, “Parking Brake” appears on the display and no playback video on the monitor. For connection, see
Installation/Connection Manual (separate volume).
• LINE IN terminals on the rear of this unit.
1Select “EXT IN,” “LINE IN,” or “AV IN.”
2—Turn on the connected component and start playing the source.
3Adjust the volume.
4—Adjust the sound as you want (see pages 40 and 41).
The menu selecting mode will be canceled:
• If no operations are performed for about:
– 5 seconds for iPod connected through KS-PD100.
– 15 seconds for iPod connected to the USB input
jack.
• When you confirm the selection of a track.

ENGLISH
41SETTINGS
* If “Off” is selected in step , you can only 2
adjust the subwoofer phase.
CHi Pass (Hi Pass Filter)
Turn the control dial to select the cutoff
frequency to the front/rear speakers. Set this
to match the LPF setting.
• Off: All signals are sent to the front/rear
speakers.
• 62Hz: Frequencies lower than 62 Hz are
cut off.
• 95Hz: Frequencies lower than 95 Hz are
cut off.
• 135Hz: Frequencies lower than 135 Hz are
cut off.
D [–5 to +5]VolAdjust,
Turn the control dial to adjust the input level
of each source (except FM).
Adjust to match the input level of the FM
sound level.
• Before making an adjustment, select the
source you want to adjust.
[Off or On]ELoudness,
Turn the control dial to select “Off” or
“On.” When “On” is selected, low and high
frequencies sound are boosted to produce a
well-balanced sound at low volume level.
4 Exit from the setting.
Storing your own sound modes
You can adjust the sound modes and store your own
adjustments in memory.
• When is shown on the display, you can
move back to the previous screen by pressing number
button 6.
1
2 Select a sound mode.
3 Select a frequency range to adjust.
4 Adjust the sound elements of the selected
frequency range.
Press / to select the 14 ¢
frequency band, then press to 5 / ∞
enhanced level for the selected frequency
band. [–6 to +6]
Press number button 5 ( ), then turn 2
the control dial to select the frequency.
Press number button 5 ( ), then turn 3
the control dial to select the quality slope (Q).
5 Repeat steps 3 and 4 to adjust the other
frequency bands.
6 Store the adjustments.
Preset value setting for each sound mode
Sound
mode
Preset value
Band 1
(100 Hz)
Band 2
(320 Hz)
Band 3
(1 kHz)
Band 4
(3.2 kHz)
Band 5
(10 kHz)
USER 0 0 0 0 0
ROCK +3 +2 0 +1 +1
CLASSIC +2 +2 0 +1 0
POPS 0 +1 0 +1 +2
HIP HOP +4 +1 –2 0 +1
JAZZ +3 +2 +1 +2 +2
Produktspezifikationen
| Marke: | JVC |
| Kategorie: | Autoradio |
| Modell: | KD-DV7407EE |
Brauchst du Hilfe?
Wenn Sie Hilfe mit JVC KD-DV7407EE benötigen, stellen Sie unten eine Frage und andere Benutzer werden Ihnen antworten
Bedienungsanleitung Autoradio JVC

16 Oktober 2024
1 Oktober 2024
9 September 2024
27 August 2024
21 August 2024
19 August 2024
15 August 2024
15 August 2024
13 August 2024
11 August 2024
Bedienungsanleitung Autoradio
- Autoradio Clatronic
- Autoradio Sanyo
- Autoradio Manta
- Autoradio Medion
- Autoradio Nedis
- Autoradio Philips
- Autoradio SilverCrest
- Autoradio Sony
- Autoradio Tevion
- Autoradio Panasonic
- Autoradio LG
- Autoradio AEG
- Autoradio Maginon
- Autoradio Technaxx
- Autoradio Denver
- Autoradio ECG
- Autoradio MarQuant
- Autoradio Renkforce
- Autoradio Telefunken
- Autoradio Trevi
- Autoradio Blaupunkt
- Autoradio Grundig
- Autoradio Kenwood
- Autoradio Daewoo
- Autoradio Pyle
- Autoradio Telestar
- Autoradio Aiwa
- Autoradio Auna
- Autoradio Caliber
- Autoradio Lenco
- Autoradio Pioneer
- Autoradio JBL
- Autoradio Krüger And Matz
- Autoradio Muse
- Autoradio Vieta
- Autoradio Hifonics
- Autoradio Akai
- Autoradio Dual
- Autoradio Hyundai
- Autoradio MT Logic
- Autoradio Orava
- Autoradio Orion
- Autoradio Skoda
- Autoradio Varta
- Autoradio Elta
- Autoradio Sencor
- Autoradio Biltema
- Autoradio OneConcept
- Autoradio Mercedes-Benz
- Autoradio Boston Acoustics
- Autoradio Harman Kardon
- Autoradio Magnat
- Autoradio XOMAX
- Autoradio Parrot
- Autoradio Smart
- Autoradio Alpine
- Autoradio Ford
- Autoradio Volkswagen
- Autoradio Volvo
- Autoradio Opel
- Autoradio MB Quart
- Autoradio Overmax
- Autoradio Rockford Fosgate
- Autoradio Crunch
- Autoradio Pure
- Autoradio NextBase
- Autoradio Norauto
- Autoradio AXTON
- Autoradio Clarion
- Autoradio Mac Audio
- Autoradio Conceptronic
- Autoradio Scott
- Autoradio Audiovox
- Autoradio Becker
- Autoradio ESX
- Autoradio Zenec
- Autoradio VDO
- Autoradio SPC
- Autoradio Roadstar
- Autoradio Tokaï
- Autoradio Audison
- Autoradio Macrom
- Autoradio Phonocar
- Autoradio Xblitz
- Autoradio Autovision
- Autoradio Boss
- Autoradio Hertz
- Autoradio Renault
- Autoradio Fiat
- Autoradio Kicker
- Autoradio Jensen
- Autoradio DLS
- Autoradio Eclipse
- Autoradio Eltax
- Autoradio Emphaser
- Autoradio Focal
- Autoradio Fusion
- Autoradio Ground Zero
- Autoradio Helix
- Autoradio Impulse
- Autoradio Lanzar
- Autoradio Mtx Audio
- Autoradio Naxa
- Autoradio Revo
- Autoradio Rodek
- Autoradio RTO
- Autoradio Sevic
- Autoradio Sirius
- Autoradio Soundstream
- Autoradio Spectron
- Autoradio Stinger
- Autoradio Tamashi
- Autoradio Toxic
- Autoradio Twister
- Autoradio Ultimate
- Autoradio US Blaster
- Autoradio VDO Dayton
- Autoradio Voxx
- Autoradio VW
- Autoradio Watssound
- Autoradio RetroSound
- Autoradio Kunft
- Autoradio Shuttle
- Autoradio Multilaser
- Autoradio Brigmton
- Autoradio Lark
- Autoradio Majestic
- Autoradio SoundMAX
- Autoradio Scion
- Autoradio Raveland
- Autoradio Planet Audio
- Autoradio Adcom
- Autoradio Sendai
- Autoradio Cartronix
- Autoradio Dension
- Autoradio Mystery
Neueste Bedienungsanleitung für -Kategorien-

1 Dezember 2024
1 Dezember 2024
1 Dezember 2024
1 Dezember 2024

16 Oktober 2024
12 Oktober 2024
12 Oktober 2024
8 Oktober 2024
7 Oktober 2024
7 Oktober 2024