Iogear GCS1104 Bedienungsanleitung
Lesen Sie kostenlos die 📖 deutsche Bedienungsanleitung für Iogear GCS1104 (76 Seiten) in der Kategorie Schalten. Dieser Bedienungsanleitung war für 21 Personen hilfreich und wurde von 2 Benutzern mit durchschnittlich 4.5 Sternen bewertet
Seite 1/76

InstallationInstallation Guide
2/4-Port DVI KVMP Switch with Cables
GCS1102/GCS1104
PART NO. M1108/M1109


3
Table of Contents
Package Contents 4
System Requirements 5
GCS1102 Overview 6
GCS1104 Overview 8
Installation 10
LED Indications 13
Port Switching 14
Hotkeys Summary Table 16
Autoscan Mode 17
Hotkey Setting Mode (HSM) 18
Mac Keyboard Emulation 20
Sun Keyboard Emulation 21
Factory Default Hotkeys Settings 22
Firmware Upgrade 23
Upgrade Fail 28
FAQ 29
FCC Statements 31
CE Statement 33
SJ/T 11364-2006 34
Limited Warranty 35
Contact 36


4
Package Contents
1 x 2/4-Port DVI KVMP Switch
2/4 x DVI-D KVM Cables (2 for GCS1102 and 4 for GCS1104)
1 x Power Adapter
1 x Installation Guide
1 x Warranty Card


5
System Requirements
Console
DVI-D supported Monitor•
USB keyboard and mouse•
Powered Speakers and microphone (optional)•
Computers
A USB port •
A DVI-D supported connection•
3.5mm Audio and microphone connections (optional)•
Operating System
Windows XP •
Windows Vista (32-bit/64-bit)•
Windows 7•
Mac OS X or greater •
Sun Solaris workstation •
Linux, UNIX and other USB supported systems* •
*Additional drivers and support may be needed

1 32 4
6
GCS1102 Overview
Front View
Port 1 Switch Button1.
Port 2 Switch Button2.
Console USB Keyboard Port3.
Console USB Mouse Port4.


1 3 6
2 54 7
8
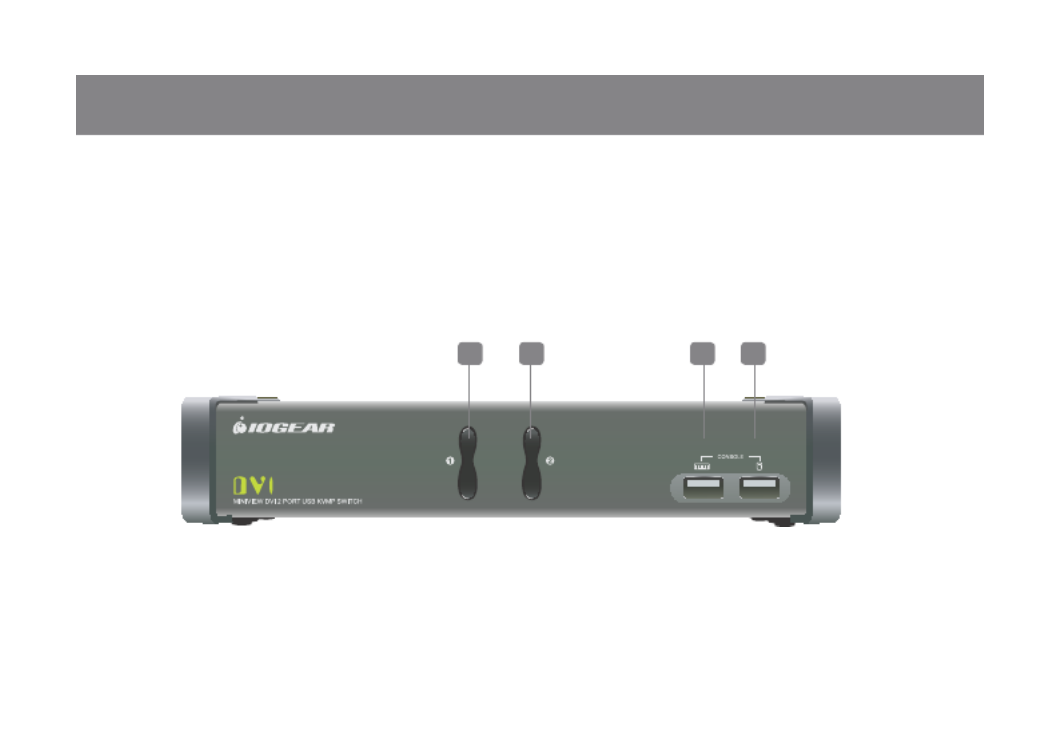
GCS1104 Overview
Front View
Port 1 Switch Button1.
Port 2 Switch Button2.
Port 3 Switch Button3.
Port 4 Switch Button4.
Front Panel Mic. Port5.
Front Panel Audio Port6.
USB 2.0 Peripheral Sharing Port 7.

8 109 11 12 13 14 15 19 23 2716 20 24 2817 21 25 2918 22 26 30
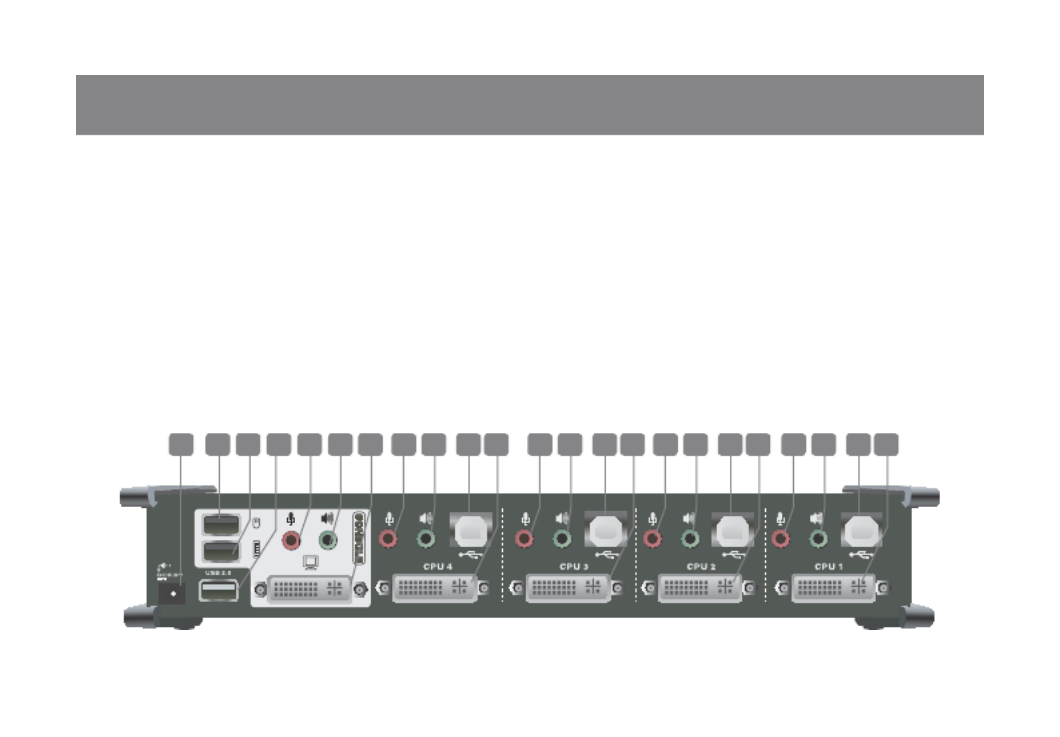
9
Rear View
Power Jack8.
Console Mouse Port9.
Console Keyboard Port10.
USB 2.0 Peripheral Sharing Port11.
Console Mic. Port12.
Console Audio Port13.
Console DVI Port14.
CPU4 Mic. Port15.
CPU4 Audio Port16.
CPU4 USB Port17.
CPU4 DVI Port 18.
CPU3 Mic. Port19.
CPU3 Audio Port20.
CPU3 USB Port21.
CPU3 DVI Port22.
CPU2 Mic. Port23.
CPU2 Audio Port24.
CPU2 USB Port25.
CPU2 DVI Port26.
CPU1 Mic. Port27.
CPU1 Audio Port28.
CPU1 USB Port29.
CPU1 DVI Port30.


GCS1104
3
2
10
Step 1
Please make sure your computers and monitor are
powered off before you start.
Step 2
Connect the power adapter from your wall outlet to
your power jack of the KVM.
Installation
Step 3
Connect the DVI cable from your monitor to the
console DVI monitor port. Then, turn on your
monitor.


GCS1102
GCS1104
5
4
54
11
Step 4
Connect your USB keyboard and mouse to the
console USB keyboard port and console USB
mouse port.
Step 5
Connect your powered speaker and mic. to the
console audio port and console mic. Port.


13
LED Indications
LED Description
Online / Selected Dim Orange A device is powered on and connected to the KVMP
switch but the port is not on focus
Bright Orange ThespecicporthasfocusontheKVM(Keyboard,video
and mouse)
USB Link Green ThespecicporthasfocusontheUSBperipheralsharing
ports


15
Port Switching via Hotkey Commands
To trigger a Hotkey Mode, simply press [Scroll Lock] [Scroll Lock]*. Please refer to Hotkey Summary Table
for details.
*Note:Ifthereisaconictusing[ScrollLock][ScrollLock]sequence,youcanchangetothealternative
sequence [Ctrl] [Ctrl]. Please refer to Hotkey Setting Mode (HSM) section for details.


16
Hotkeys Summary Table
Hotkey combination Description
[Scroll Lock] [Scroll
Lock] + or
[Ctrl] [Ctrl]* +
*Note: If alternative
hotkey sequence is
chosen
[Enter] Switch KVM, USB and audio focus to the next port
[n*] [Enter] SwitchKVM,USBandaudiofocustothespecicport
[k] [Enter] Switch KVM focus to the next port
[n*] [k] [Enter] SwitchKVMfocustothespecicport
[u] [Enter] Switch USB focus to the next port
[n*] [u] [Enter] SwitchUSBfocustothespecicport
[s] [Enter] Switch audio focus to the next port
[n*] [s] [Enter] Switchaudiofocustothespecicport
[n*] [k] [s] [Enter] SwitchKVMandaudiofocustothespecicport
[n*] [k] [u] [Enter] SwitchKVMandUSBfocustothespecicport
[n*] [u] [s] [Enter] SwitchUSBandaudiofocustothespecicport
*Note: Interval n is the port ID number (1 and 2 for GCS1102 and 1, 2, 3 and 4 for GCS1104)


17
Autoscan Mode
You can either activate Autoscan Mode via front panel push button or hotkeys.
Function Description
Auto Scan Front Panel Push Button Press and hold port 1 and port 2 Pushbutton simultaneously
for 2 seconds to activate Autoscan Mode*
Hotkeys [Scroll Lock] [Scroll Lock] [a]
[Enter]
Activate Autoscan mode. It
will cycle from port to port
every 5 seconds (default)
[Scroll Lock] [Scroll Lock] [a]
[n] [Enter]
Activate Autoscan mode. It
will cycle from port to port
every n seconds**
*Note: Autoscan Mode from front panel push button will be scanning a port every 5 seconds by default. If
you wish to have the Autoscan Mode be scanning with different time interval, please trigger Autoscan Mode
via hotkeys.
**Note: n is an interval between 1 and 99 that stands for the time (in second) desire for scanning each port.


18
Hotkey Setting Mode (HSM)
Hotkey Description
Press and hold [Num Lock] ([Clear] key 1.
on Mac keyboard)
Press and release [-]2.
Release [Num Lock] ([Clear] key on 3.
Mac keyboard)
Invoking hotkey setting mode
Invoke HSM, then press [h] Change the HSM invocation keys from [Num Lock] to [Ctrl]
and from [-] to [F12]
Invoke HSM, then press [t] Change port switching hotkey sequence between [Scroll
Lock] [Scroll Lock] and [Ctrl] [Ctrl]
Invoke HSM, then press [F2] Enables Mac keyboard emulation
Invoke HSM, then press [F3] Enables Sun keyboard emulation
Invoke HSM, then press [F10] Auto-detect the keyboard operating platform (for PC
compatible systems). Activates Pass Through Keyboard
Mode (keystrokes are sent directly to the computer instead of
through the Mac emulator).
Invoke HSM, then press [F4] List out current settings
Note: Please have a Notepad or word document opened
before you trigger this function.


19
Invoke HSM, then press [F5] USB Reset
Invoke HSM, then press [b] Toggle hotkey beepers on or off
Invoke HSM, then press [s] Toggle front panel pushbutton between Mode1 and Mode2
Invoke HSM, then press [x] [Enter] Disable or enable port switching hotkey
Invoke HSM, then press [u] [p] [g] [r] [a] [d]
[e] [Enter]
Activate Firmware Upgrade Mode – Front panel KVM LED will
ashindicatingFirmwareUpgradeModeisactivated.
Invoke HSM, then press [r] [Enter] Restore default settings
Invoke HSM, then press [d] Captureandstoremonitor’sEDIDonspecicport
Invoke HSM, then press [m] Enable or disable mouse emulation
Invoke HSM, then press [F1] Reset keyboard and mouse under some special OS’ that do
not support USB 2.0
*Note: To exit HSM manually, press Esc or spacebar.


20
Mac Keyboard Emulation
The PC compatible (101/104 key) keyboard can emulate the functions of the Mac keyboard. The emulation
mappings are listed in the table below.
*Note:Whenusingkeycombinations,pressandreleasetherstkey(Ctrl),thenpressandreleasethe
second key.
PC Keyboard Mac Keyboard
[Shift] Shift
[Crtl] Ctrl
[Ctrl] [1]
[Ctrl] [2]
[Ctrl] [3]
[Ctrl] [4]
[Alt] Alt
[Print Screen] F13
[Scroll Lock] F14
=
[Enter] Return
[Backspace] Delete
[Insert] Help
[Ctrl] F15

21
Sun Keyboard Emulation
The PC compatible (101/104 key) keyboard can emulate the functions of the Sun keyboard. The emulation
mappings are listed in the table below.
PC Keyboard Sun Keyboard
[Crtl] [t] Stop
[Crtl] [F2] Again
[Crtl] [F3] Props
[Crtl] [F4] Undo
[Crtl] [F5] Front
[Crtl] [F6] Copy
[Crtl] [F7] Open
[Crtl] [F8] Paste
[Ctrl] [F9] Find
[Crtl] [F10] Cut
[Crtl] [1]
[Crtl] [2]
[Crtl] [3]
[Crtl] [4]
[Crtl] [h] Help
Compose
*Note:Whenusingkeycombinations,pressandreleasetherstkey(Ctrl),thenpressandreleasethe
second key.


22
Factory Default Hotkeys Settings
Function Default
Port Switching [Scroll Lock] [Scroll Lock]
Invoking HSM [Num Lock] [-]
Auto Scan Interval 5 Seconds
Beeper On
Keyboard Operating Platform Auto Detect
Port Switching Keys Enabled
Front Panel Pushbutton Mode Mode1
Mouse Emulation On


23
Step 1
Please follow through the installation process from
the Installation section.
Step 2
Switch ALL focus to the port that you will be using
toperformthermwareupgrade.(Pleasereferto
Port Switching Section). Then, go to www.iogear.
comtodownloadthelatestavailablermwareor
thespecicrmwarethatyouwishtouse.
Firmware Upgrade
Step 3
Shut down all the other computers that are
connected to the KVM. Then Invoke Firmware
Upgrade Mode. (Please refer to Hotkeys Setting
Mode section)
Step 4
Disconnect your keyboard and mouse from the
console keyboard and mouse port, then connect
them to the USB peripheral sharing ports.


24
Step 5
Windows will now install all the required drivers.
You may see the below message popup in tray
icon area.
Step 6
After you see the below message “Your new
hardware is installed and ready to use.”, extract
thedownloadedlewithWinRARorcompatible
software.Thendoubleclickontheexecuteleto
begin with the Firmware Upgrade Utility.


25
Step 7
Read the License Agreement and click “I Agree”
then click “Next” if you wish to continue with the
rmwareupgrade.Otherwise,click“Cancel”toexit.
Step 8
Choose the correct KVM that you wish to perform
rmwareupgradefromthe“DeviceList”andthen
click “Next” to continue. Then the Firmware Upgrade
Utility will verify if there is a KVM connected to the
computerbythermwareupgradecable.(Check
Firmware Version checkbox is optional)

Produktspezifikationen
| Marke: | Iogear |
| Kategorie: | Schalten |
| Modell: | GCS1104 |
Brauchst du Hilfe?
Wenn Sie Hilfe mit Iogear GCS1104 benötigen, stellen Sie unten eine Frage und andere Benutzer werden Ihnen antworten
Bedienungsanleitung Schalten Iogear

26 August 2024
26 August 2024
26 August 2024
26 August 2024
26 August 2024
26 August 2024
26 August 2024
26 August 2024
26 August 2024
26 August 2024
Bedienungsanleitung Schalten
- Schalten Asus
- Schalten Belkin
- Schalten Hama
- Schalten HP
- Schalten LogiLink
- Schalten Manhattan
- Schalten Nedis
- Schalten Philips
- Schalten SilverCrest
- Schalten Panasonic
- Schalten Brennenstuhl
- Schalten Clas Ohlson
- Schalten Cotech
- Schalten Profile
- Schalten ZyXEL
- Schalten Bosch
- Schalten Yamaha
- Schalten Powerfix
- Schalten CSL
- Schalten Eminent
- Schalten Linksys
- Schalten Netgear
- Schalten König
- Schalten PCE
- Schalten Renkforce
- Schalten Trotec
- Schalten Schneider
- Schalten Rex
- Schalten Kaiser
- Schalten Vivanco
- Schalten Abus
- Schalten Elro
- Schalten Smartwares
- Schalten Tesla
- Schalten Perel
- Schalten Nexa
- Schalten Tork
- Schalten GEV
- Schalten Goobay
- Schalten Lindy
- Schalten Tripp Lite
- Schalten Ansmann
- Schalten Mercusys
- Schalten Marmitek
- Schalten Honeywell
- Schalten TRENDnet
- Schalten TP-Link
- Schalten Kathrein
- Schalten Flamingo
- Schalten Alcatel
- Schalten Tiptel
- Schalten Black Box
- Schalten Alpine
- Schalten Techly
- Schalten Ebode
- Schalten Theben
- Schalten Vacmaster
- Schalten GAO
- Schalten Hager
- Schalten Behringer
- Schalten Omnitronic
- Schalten Monoprice
- Schalten Ecler
- Schalten Monacor
- Schalten Huawei
- Schalten JUNG
- Schalten Victron Energy
- Schalten Ei Electronics
- Schalten Edimax
- Schalten Totolink
- Schalten D-Link
- Schalten Sylvania
- Schalten Audiovox
- Schalten B-Tech
- Schalten QNAP
- Schalten SPC
- Schalten Speaka
- Schalten Digitus
- Schalten Sygonix
- Schalten DataVideo
- Schalten Lancom
- Schalten LevelOne
- Schalten Merten
- Schalten APC
- Schalten Eberle
- Schalten Cisco
- Schalten Delta Dore
- Schalten Grässlin
- Schalten Tenda
- Schalten CyberPower
- Schalten Boss
- Schalten IFM
- Schalten Intertechno
- Schalten Elation
- Schalten Ubiquiti Networks
- Schalten Kramer
- Schalten Aeon Labs
- Schalten Intellinet
- Schalten Eaton
- Schalten AV:link
- Schalten Hikvision
- Schalten Vemer
- Schalten PreSonus
- Schalten Planet
- Schalten EnGenius
- Schalten Finder
- Schalten Mikrotik
- Schalten Shimano
- Schalten Homematic IP
- Schalten Berker
- Schalten Dormakaba
- Schalten Emerson
- Schalten Generac
- Schalten Intermatic
- Schalten KlikaanKlikuit
- Schalten Mercury
- Schalten Paladin
- Schalten Provision ISR
- Schalten Robbe
- Schalten SEC24
- Schalten Steren
- Schalten Suevia
- Schalten AMX
- Schalten Triax
- Schalten WHALE
- Schalten Vimar
- Schalten Cudy
- Schalten Siig
- Schalten Electro Harmonix
- Schalten RGBlink
- Schalten StarTech.com
- Schalten Smart-AVI
- Schalten Dahua Technology
- Schalten PAC
- Schalten Gefen
- Schalten Avocent
- Schalten Legrand
- Schalten Atlantis Land
- Schalten CYP
- Schalten H-Tronic
- Schalten ATen
- Schalten Axing
- Schalten KanexPro
- Schalten SmartAVI
- Schalten Advantech
- Schalten Kraus & Naimer
- Schalten Chacon
- Schalten Juniper
- Schalten Fibaro
- Schalten Phoenix Contact
- Schalten Audac
- Schalten OSD Audio
- Schalten Wentronic
- Schalten SunBriteTV
- Schalten BZBGear
- Schalten Crestron
- Schalten Kemo
- Schalten ORNO
- Schalten Extron
- Schalten Atlona
- Schalten Equip
- Schalten Heitronic
- Schalten Hamlet
- Schalten STI
- Schalten Matrox
- Schalten Blustream
- Schalten Vivolink
- Schalten Mach Power
- Schalten Ernitec
- Schalten Cambium Networks
- Schalten ConnectPro
- Schalten Micro Connect
- Schalten Intelix
- Schalten ICasa
- Schalten Maclean Energy
- Schalten Cooking Performance Group
- Schalten Flic
- Schalten Liberty
- Schalten Noark
- Schalten 2USB
- Schalten KVM-TEC
- Schalten Setti+
- Schalten PureLink
Neueste Bedienungsanleitung für -Kategorien-

15 Oktober 2024
12 Oktober 2024
11 Oktober 2024
8 Oktober 2024
8 Oktober 2024
5 Oktober 2024
4 Oktober 2024
4 Oktober 2024
4 Oktober 2024
3 Oktober 2024