Hyundai H-CMMD4042 Bedienungsanleitung
Lesen Sie kostenlos die 📖 deutsche Bedienungsanleitung für Hyundai H-CMMD4042 (246 Seiten) in der Kategorie Autoradio. Dieser Bedienungsanleitung war für 12 Personen hilfreich und wurde von 2 Benutzern mit durchschnittlich 4.5 Sternen bewertet
Seite 1/246

EXCELLENCE
by
H-CMMD4042
MULTIMEDIA DVD-RECEIVER WITH MOTORIZED 7” TFT DISPLAY AND
TV-TUNER
Instruction manual
DVD- 7” TFT


2
Dear customer!
Thank you for purchasing our product. For safety, it is strongly recommended to read this manual carefully
before connecting, operating and/or adjusting the product and keep the manual for reference in the future.
Table of contents
Table of contents ...............................................................................................................................................2
Important safeguards .........................................................................................................................................6
Installation/ connection......................................................................................................................................7
Din front-mount (method 1)........................................................................................................................7
Din rear-mount (method 2) .........................................................................................................................8
Electrical connection...................................................................................................................................9
Unit controls....................................................................................................................................................12
Monitor ....................................................................................................................................................12
Front panel ...............................................................................................................................................13
Remote control .........................................................................................................................................16
LCD display .............................................................................................................................................19
Monitor operations ..........................................................................................................................................20
Open/close TFT monitor...........................................................................................................................20
TFT monitor auto open.............................................................................................................................20
Monitor tilt angle adjustment ....................................................................................................................20
Aspect ratio ..............................................................................................................................................20
Image setting ............................................................................................................................................21
Parking cable function ..............................................................................................................................21
Monitor movement mechanism.................................................................................................................21
Touch screen operations ..................................................................................................................................23


3
General operations...........................................................................................................................................25
Reset the unit............................................................................................................................................25
Power on/off.............................................................................................................................................25
Volume control .........................................................................................................................................25
Mute function ...........................................................................................................................................25
Setting the audio system ...........................................................................................................................25
Mode selecting .........................................................................................................................................26
Display operations ....................................................................................................................................26
Digital tuner operations ...................................................................................................................................27
Mode selecting .........................................................................................................................................27
Band selection ..........................................................................................................................................28
Manual/ automatic tuning .........................................................................................................................28
Programming tuner stations ......................................................................................................................28
AMS (Auto Memory Store) function.........................................................................................................29
Preset scan................................................................................................................................................29
Local radio station seeking (LOC) ............................................................................................................29
AF (Alternative Frequencies) function......................................................................................................29
TA (Traffic Alarm) function ......................................................................................................................30
PTY (Program Type) function...................................................................................................................30
Region function ........................................................................................................................................31
RDS clock ................................................................................................................................................31
Disc operations................................................................................................................................................32
Glossary ...................................................................................................................................................32
Discs for playback ....................................................................................................................................33
Loading a disc ..........................................................................................................................................34


4
Playing/ pausing .......................................................................................................................................34
Stop..........................................................................................................................................................34
Playing the previous/ next track ................................................................................................................34
Direct entering the number........................................................................................................................35
Scanning forward and backward ...............................................................................................................35
Slow playback ..........................................................................................................................................35
Repeat playback........................................................................................................................................36
Repeat A-B function(for DVD/CD/VCD discs).........................................................................................36
Random playback (for DVD/CD/VCD/MP3 discs) ...................................................................................36
Intro playback (for CDDA/VCD discs).....................................................................................................36
GOTO function(for DVD/VCD discs).......................................................................................................36
Direct chapter/ track selection (for CD/VCD discs)...................................................................................37
Audio track and channel selection (for CD/VCD/DVD discs)...................................................................38
Disc menu (for DVD only) .......................................................................................................................38
PBC (Playback Control) function (for VCD only).....................................................................................38
On-screen display (OSD)..........................................................................................................................39
Changing size (for DVD/VCD discs)........................................................................................................40
Changing the subtitle language (for DVD only) ........................................................................................40
Changing angle (for DVD only)................................................................................................................40
MP3/WMA files playback ........................................................................................................................40
Alter between 2 Ch and 6 Ch ....................................................................................................................41
MP3 overview ..........................................................................................................................................41
TV tuner operations.........................................................................................................................................43
Switch to TV tuner mode ..........................................................................................................................43
Auto tuning...............................................................................................................................................43


5
Manual tuning...........................................................................................................................................43
Auto preset memory .................................................................................................................................43
Scan tuning ...............................................................................................................................................44
Select the TV station .................................................................................................................................44
Display TV station....................................................................................................................................44
AUX IN mode .................................................................................................................................................44
System setup menu ..........................................................................................................................................46
General setup............................................................................................................................................47
Audio sound processing configuration ......................................................................................................48
RDS setup.................................................................................................................................................49
Screen CAL ..............................................................................................................................................49
DVD setup menu.............................................................................................................................................46
Language ..................................................................................................................................................51
Video ........................................................................................................................................................51
Audio .......................................................................................................................................................52
ProLogic II ...............................................................................................................................................53
SPK configuration ....................................................................................................................................55
Rating.......................................................................................................................................................56
Handling and cleaning discs ............................................................................................................................57
Cleaning ...................................................................................................................................................57
Troubleshooting guide.....................................................................................................................................58
Specification....................................................................................................................................................59


6
Important safeguards
Using the device at temperature below -10º may cause the breakage of the device. BEFORE USING PLEASE
HEAT UP THE PASSENGER COMPARTMENT TO THE RECOMMENDED TEMPERATURE!
Read carefully through this manual to familiarize yourself with this high-quality sound system.
Disconnect the vehicle's negative battery terminal while mounting and connecting the unit.
When replacing the fuse, be sure to use one with an identical amperage rating. Using a fuse with a higher amperage
rating may cause serious damage to the unit.
Do not use the unit in places where it can be exposed to water, moisture and dust.
DO NOT attempt to disassemble the unit. Laser beams from the optical pickup are dangerous to the eyes.
Make sure that pins or other foreign objects do not get inside the unit; they may cause malfunctions, or create safety
hazards such as electrical shock or laser beam exposure.
If you have parked the car for a long time in hot or cold weather, wait until the temperature in the car becomes
normal before operating the unit.
DO NOT open covers and do not repair yourself. Consult the dealer or an experienced technician for help.
Make sure you disconnect the power supply and aerial if you will not be using the system for a long period or during
a thunderstorm.
Make sure you disconnect the power supply if the system appears to be working incorrectly, is making an unusual
sound, has a strange smell, has smoke emitting from it or liquids have got inside it. Have a qualified technician check
the system.
The unit is designed for negative terminal of the battery, which is connected to the vehicle metal. Please confirm it
before installation.
Do not allow the speaker wires to be shorted together when the unit is switched on. Otherwise it may overload or
burn out the power amplifier.


7
Installation/ connection
This unit can be installed in any dashboard having an opening as shown on the
picture. The dashboard should be ~ 4.5 – 5.5 mm thick in order to be able to
support the unit.
Din front-mount (method 1)
1. Insert mounting bracket (2) into the dashboard (1), select the
appropriate tabs and bend them out with a screwdriver.
2. Use 2 pieces of M5 cone shaped screws (7) to fix two assemble bars (3)
on both sides of the unit.
3. Secure the rear of the unit. Fix mounting bolt (4) on the rear panel of
the unit.
4. Put the rubber cushion (5) on the bolt.
5. Insert the unit into the mounting bracket (2). Use 4 pieces of M2 screw to
lock the assemble bars (3) and the mounting bracket (2) in position.
6. Attach the trim ring around the front panel with 2 indentions on one side
facing upwards.
Note: according to the depth of the opening, use different length of assemble bar accordingly. If the opening is
too shallow the monitor may be extended out 10 mm from the dashboard.
Indentions face upward


8
Removing the unit
1. Push trim ring upward and pull out the upper part. Push it downward and pull out the lower part.
2. Unscrew 4 pieces M2 screws.
3. Remove the rubber sheath.
4. Use a screwdriver to bend straight the bended mounting tab and tip out the unit from the mounting bracket.
5. Pull out the unit from the mounting bracket with both hands.
Din rear-mount (method 2)
Installation using the screw holes at both sides of the
unit (if they are there).
1. Insert the unit into the dashboard (4).
2. Select a position where the screw holes of the
main unit (1) are fitted for holes in mounting
frame (2).
3. Tighten the screws (3) on each side.
4. Attach the trim ring around the front panel with 2
indentions on one side facing upwards.
Indentions face upward


9
Electrical connection


10
Note: For your driving safety, please link your parking wire with low power level, and keep it controlled by
manual brake switch. Wire should be high power level and the unit cannot play video disc.
Caution: For some car models you may need to modify wiring of the supplied power cord. Contact your
authorized car dealer before installing this unit.
Using the ISO Connector
1. If your car is equipped with the ISO connector, then connect the ISO connectors as
illustrated.
2. For connections without the ISO connectors, check the wiring in the vehicle carefully
before connecting, incorrect connection may cause serious damage to this unit.
3. Cut the connector, connect the colored leads of the power cord to the car battery as
shown in the color code table below for speaker and power cable connections.
Location Function
Connector A Connector B
1 Rear Right(+)---Purple
2 Rear Right(-)---Purple/Black Stripe
3 Front Right(+)---Grey
4 Battery 12V (+)/yellow Front Right(-)---Grey/Black Stripe
5 Front Left(+)---WhiteAuto Antenna/blue
6 Front Left((-)---White/Black Stripe
7 Rear Left(+)---GreenACC+/red
8 Ground/black Rear Left(-)---Green/Black Stripe


11
Parking brake cable connections
Note: for safety purpose professional installation for the following connections is recommended.
For cars with hand brake For cars with foot brake


12
Unit controls
Monitor
1. BAND button
Press it repeatedly to select your desired radio
band during TUNER (RADIO) mode.
2. AS button
In TUNER (RADIO) mode press it to start
automatic station search.
3. LCD display
4. DISP button
Use this button to show the playback info or TV
channel number on the display.
5. OPEN/CLOSE button
Press this button to slide the monitor up or
down.
6. TFT display
7. ANGLE buttons
Press them to increase/decrease 1 step of tilt
angle.
Press and hold it for 2 seconds continuously to
increase/decrease the tilt angle.
8. WIDE/PIC button
Press it to adjust display aspect.
Press it and hold for 2 seconds to enter setting mode. To select the settings press the button shortly and

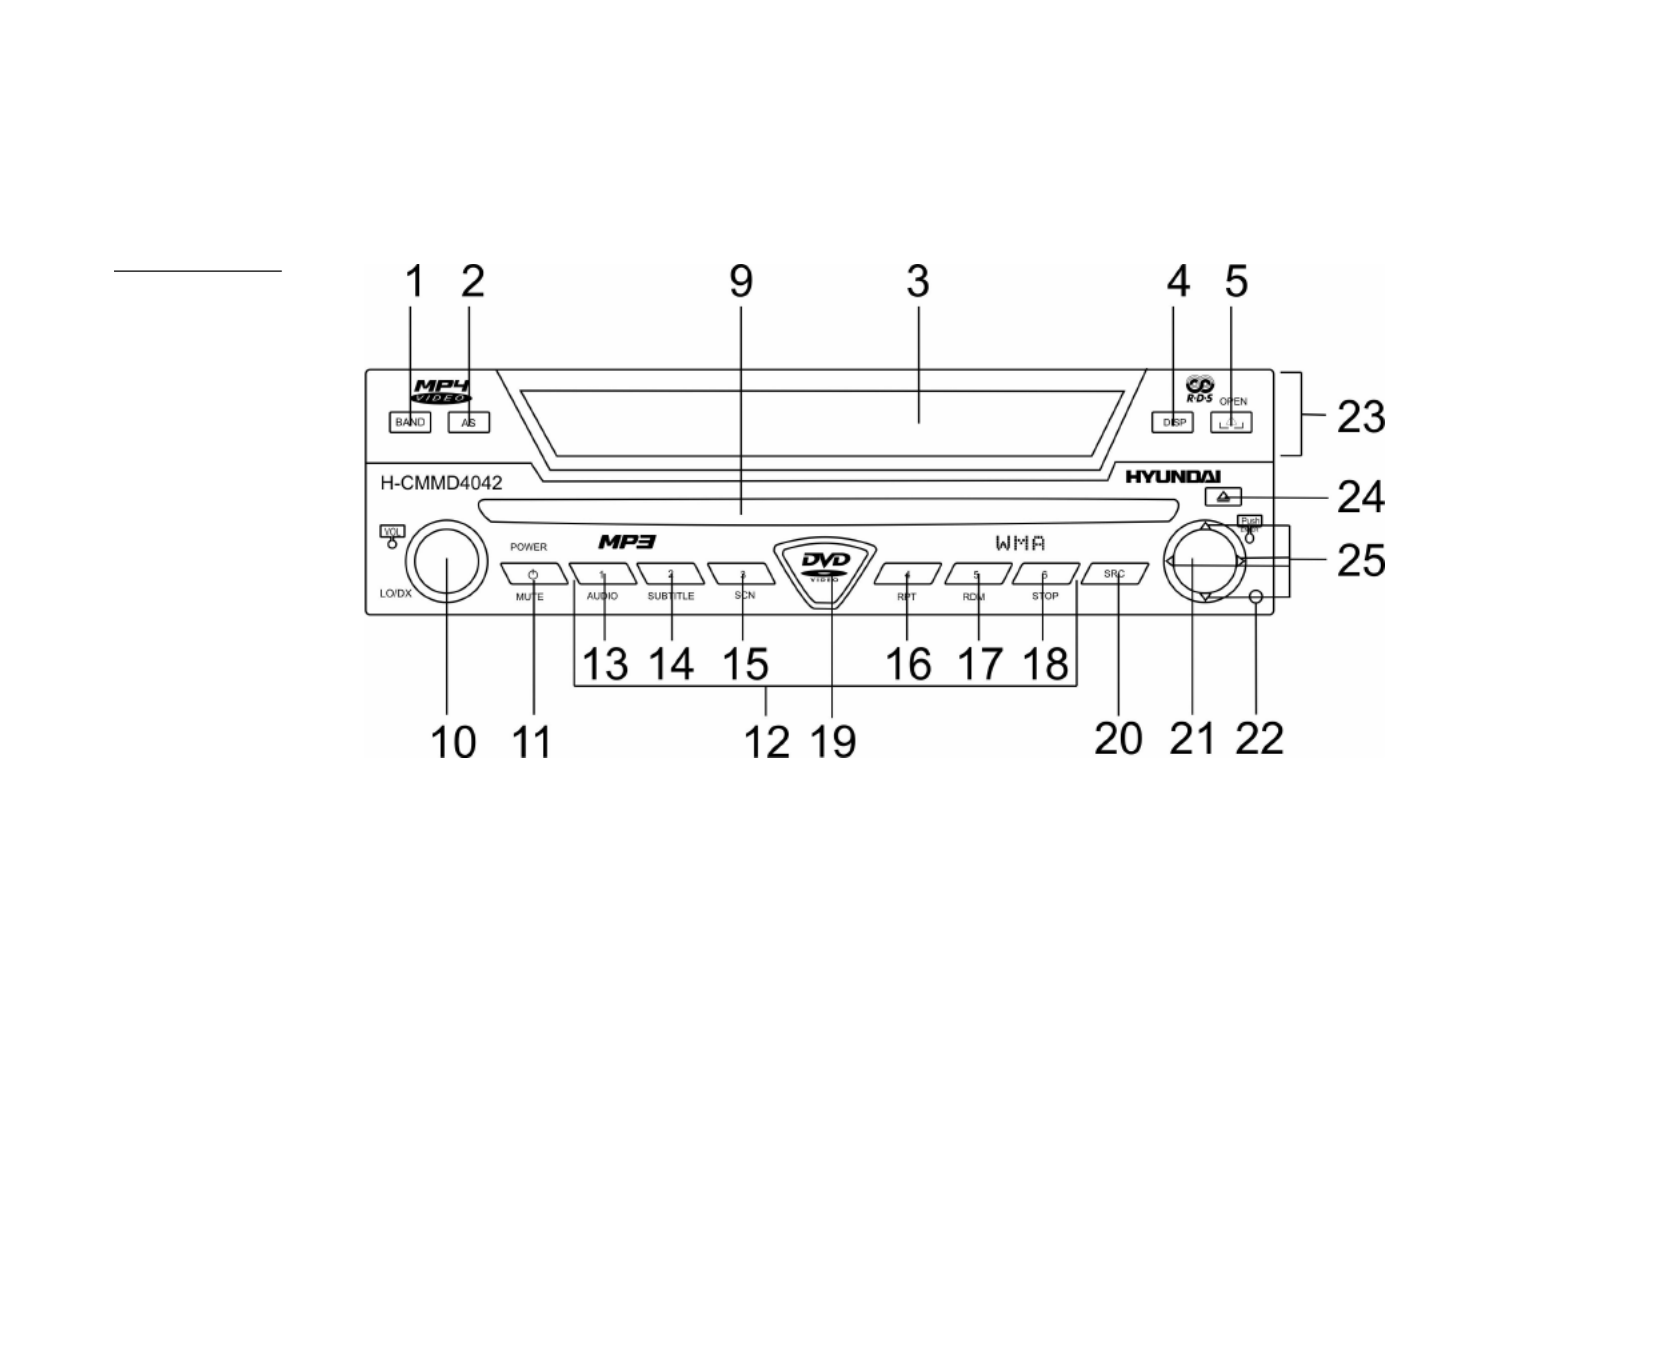
13
repeatedly. To adjust the setting press the buttons. Press it and hold for 2 seconds to exit the mode.
Front panel
9. Disc slot
10. VOL knob/ AUDIO / LO/DX button
Rotate VOL knob to adjust the volume.
Press it (the AUDIO button) to enter audio setting mode. Press the repeatedly to select the audio
setting. Press the buttons to adjust it. Press it and hold for 2 seconds to exit the audio setting mode.
In TUNER (RADIO) mode press it (LO/DX button) and hold for 2 seconds to select the LOCAL or
DISTANT mode for radio station searching.
11. POWER/MUTE button
Press the button to turn the power on, press and hold for 2 seconds to turn the power off.
When the power is on press it to cut down the volume output, press it again to resume volume.
12. PRESET STATION [1-6] buttons


14
13. AUDIO button
In DVD mode press it to select the channel. In VCD mode press it to change the channel.
14. SUBTITLE button
In DVD mode press it to select subtitle language.
15. SCN button
In DVD mode press it to start/stop scan playback.
16. RPT button
In DVD mode press it to start/stop repeat playback.
17. RDM button
In DVD mode press it to start/stop random playback.
Press and hold for 2 seconds the RDM button on the panel to alter between 2 Channel mode and 6 Channel
mode.
18. STOP button
In DVD mode press it to stop the playback.
19. IR sensor
20. SRC button
Press this button to select the mode: TUNER (RADIO or TV), DVD, DVDC, AUX IN, CAMERA.
21. PLAY/PAUSE / ENTER / SCAN button
In the menu press the ENTER button to confirm adjustment.
In DVD mode press the PLAY/PAUSE button to start playback. Press again to go into pause mode.
In TUNER (TV) mode press the SCAN button and hold it for 2 seconds to start automatic TV channels
searching and storing.
In TUNER (RADIO) mode press the SCAN button to start scan playing of the radio stations. Press and
hold it for 2 seconds to preset the radio stations automatically.


15
22. RESET button
Press the RESET button to restore the unit to the original factory settings.
23. Monitor
24. EJECT button
Press this button to eject the disc.
25. Cursor buttons buttons
In the menu use the cursor buttons to move through it.
In DVD mode press the button to fast backward/ fast forward.
In DVD mode press the button to slow backward/ slow forward.
In disc playback mode press the buttons to go to previous/ next chapter or track.
In TUNER (TV) mode use the buttons to start the TV channel searching backward or forward.
In TUNER (TV) mode use the buttons to go to previous/ next channel.
In TUNER (RADIO) mode press the shortly to go to next/ previous stations saved. Press and hold for
2 seconds to start automatic station searching forward/ backward.


16
Remote control
1. TITLE button – press it to open the disc title list.
2. MENU button – press it to open the disc menu.
3. REPT A-B button – use it to start repeat of the A-B
fragment.
4. AUDIO button – in DVD mode press it to change the
audio language. In VCD mode press it to change the
channel.
5. DISP button - use this button to show the playback info
or TV channel number and time on the display.
6. SUBTITLE button – in DVD mode press it to change
the subtitle language.
7. ANGLE button - in DVD mode press it to change the
angle of scene. In CD playback mode press it to see the
picture with different angles.
8. / buttons - in DVD mode press them to go to
previous/ next chapter or track.
In TUNER (RADIO) mode press the / shortly to
start automatic station searching backward/ forward.
In menu use the buttons / to move through the menu in left or right direction.
9. PLAY/PAUSE / ENTER / SCAN button - in the menu press the ENTER button to confirm adjustment.
In DVD mode press the PLAY/PAUSE button to start playback. Press again to go into pause mode.
In TUNER (RADIO) mode press it to start scan playing of the radio stations.
10. button - in menu use the button to move through the menu down.


17
In DVD mode press this button to slow the playback. Press again to slow rewind playback.
11. GOTO button - press this button to set the player play disc starting at certain time.
12. OPEN/CLOSE button - press this button to slide the monitor up or down.
13. Numeric buttons
14. MUTE button - press it to cut down the volume output, press it again to resume volume.
15. POWER button - press the button to turn the power on, press again to turn the power off.
16. REPT button - in DVD mode press it repeatedly to repeat chapter/title/disc playback.
17. SRC button - press this button to select the mode: TUNER (RADIO or TV), DVD, DVDC, AUX IN,
CAMERA.
18. Control buttons for CD changer (do not work for this model)
19. button - in menu use the button to move through the menu up.
In DVD mode press this button to fast forward.
20. VOL +/- buttons - press them to adjust the volume.
21. STOP/ BAND button - in DVD mode press it to stop the playback.
In TUNER (RADIO) mode press it repeatedly to select your desired radio band.
22. ZOOM button - press this button to zoom the image in.
23. PIC button - press it to open the monitor setup menu.
24. ANGLE buttons - press them to increase/decrease 1 step of tilt angle.
25. WIDE button - press it to adjust display aspect.
26. DVD SETUP button - press it to open the DVD setup menu
27. SYS SETUP button - press it to open the system setup menu

18
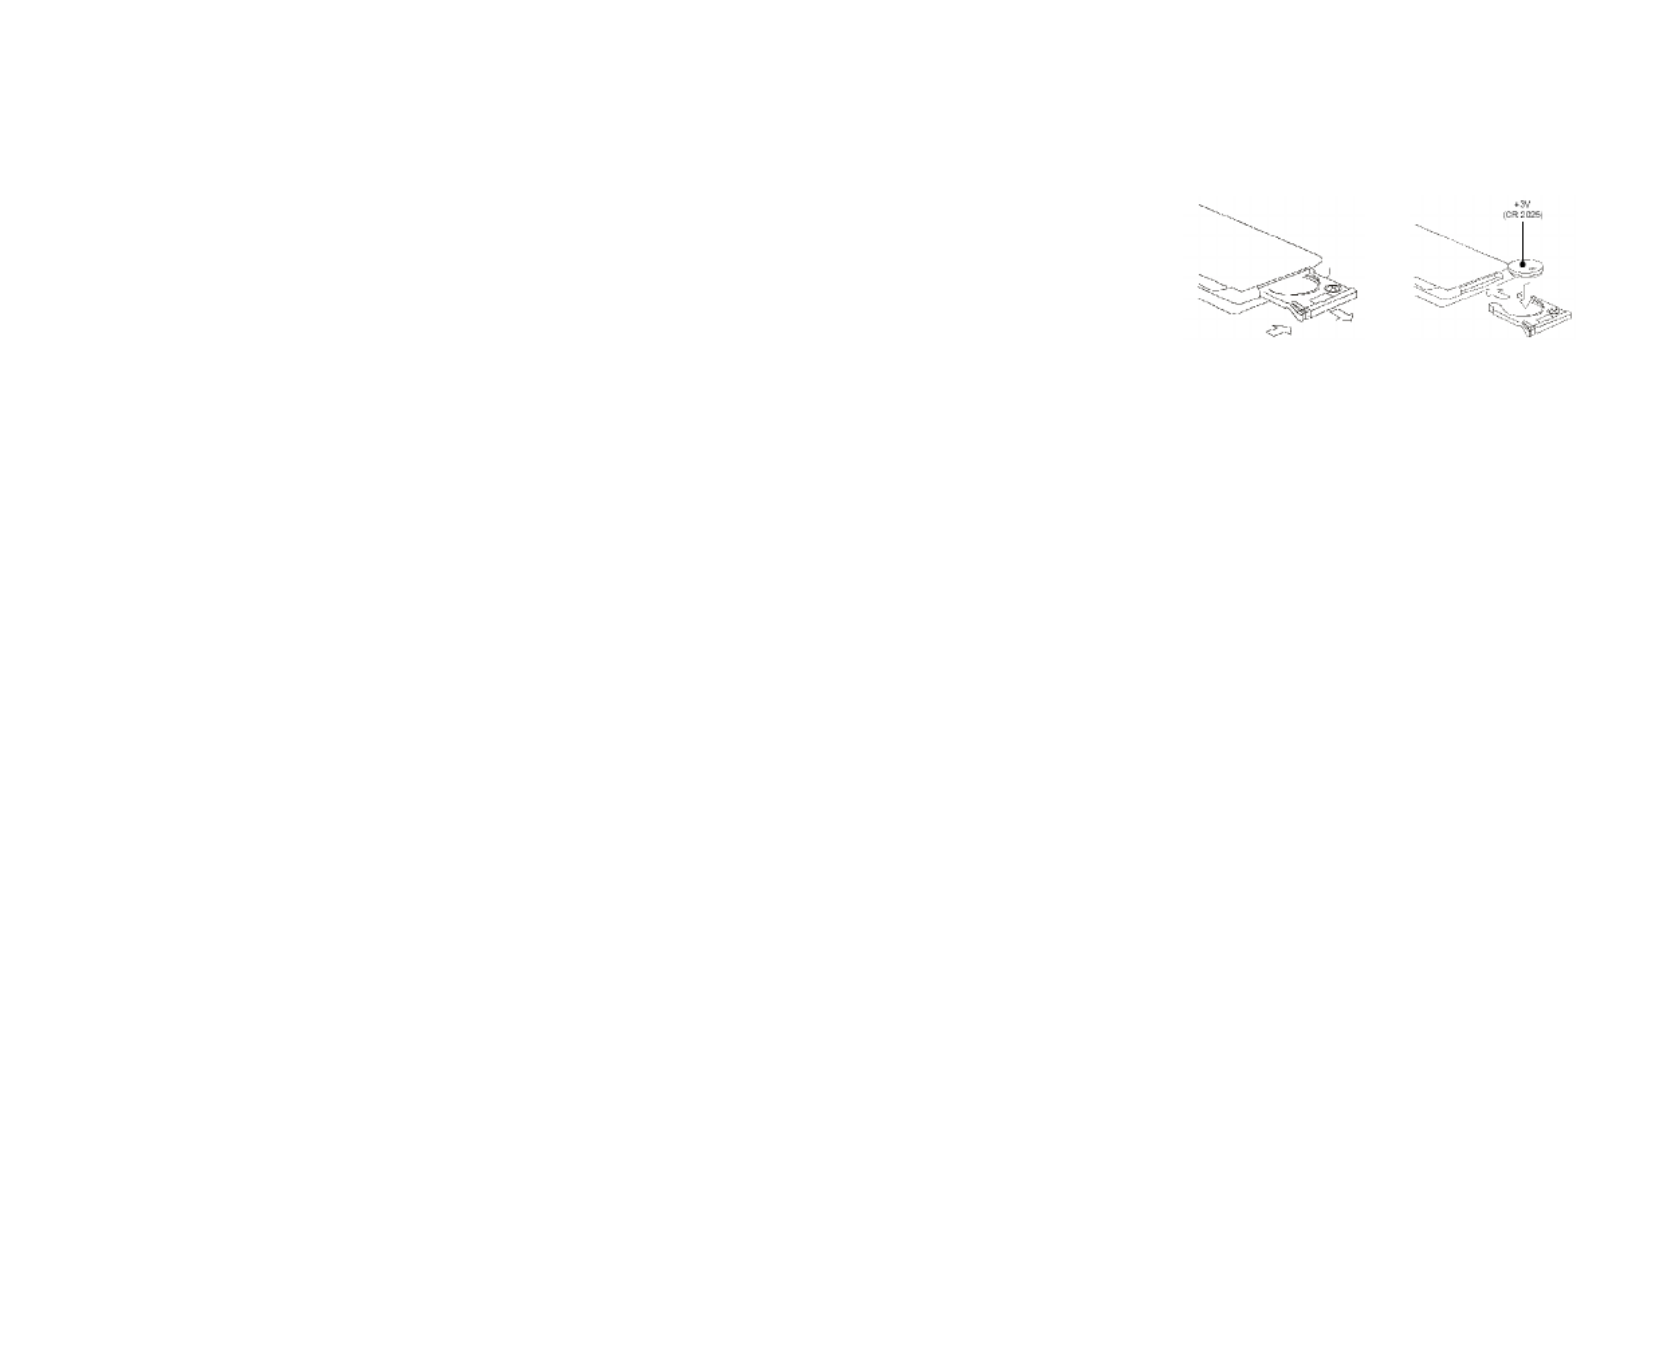
Changing the battery
1. Press the catch and at the same time pull out the battery tray (pic. 1).
2. Insert the 1 x lithium battery, type CR2025 (3V) battery with the stamped (+)
mark facing upward. Insert the battery tray into the remote control (pic.2).
Warning: Store the battery where children cannot reach. If a child accidentally swallows the battery, consult a
doctor immediately.
Do not recharge, short, disassemble or heat the battery or dispose it in a fire.
Do not expose or bring into contact the battery with other metallic materials. Doing this may cause the battery to
give off heat, crack or start a fire.
When throwing away or saving the battery, wrap it in tape and insulate; otherwise, the battery may give off heat,
crack or start a fire.
Pic. 1 Pic. 2

19
LCD display
1. Disc indicator.
2. Disc playback indicators: SCN (scan), RPT
(repeat), RDM (random), ALL (all chapters
playback).
3. LOUD indicator.
4. Main display.
5. CH (displays the channel), DISC, RADIO (radio station number) indicator.
6. ST (stereo), LOC (local) indicator.
Radio display indicators
7. RDS function indicators: REG (regional),
PTY (program type), TA (traffic alarm), TP,
AF (alternative frequencies), INFO.
8. Radio band indicator.
9. Current frequency indicator.
10. Current radio channel.
11. ST (stereo) indicator.
12. LOC (local) indicator.
Playback indicators
13. Disc playback indicators: SCN (scan), RPT
(repeat), RDM (random), ALL (all chapters
playback).
14. Current playing chapter.
15. Current playback time.


20
Monitor operations
Open/close TFT monitor
1. Press the OPEN/CLOSE button to open the monitor to the last viewing position.
2. Press the OPEN/CLOSE button to load the monitor to the unit.
TFT monitor auto open
1. Enter the GENERAL SETUP menu (please refer to SYSTEM SETUP menu chapter of this manual).
2. In TFT AUTO OPEN setting set the monitor working mode when the unit is on and off:
On (when the unit is off the monitor draws down into the unit automatically, when it’s on the monitor
unfurls automatically);
Off (when the unit is off the monitor draws down into the unit automatically, when it’s on the monitor
unfurls by pressing the OPEN/CLOSE button on the panel);
Manual (when the unit is off or on the monitor draws down or unfurls only by pressing the
OPEN/CLOSE button on the panel).
Monitor tilt angle adjustment
You can get different vision effects watching from different angles of monitor.
To adjust the monitor angle step by step press the ANGLE buttons on the monitor or on the RC.
To adjust it continuously press and hold the ANGLE buttons on the monitor.
Aspect ratio
Enter the VIDEO menu (please refer to DVD SETUP MENU chapter of this manual).
In TV SHAPE setting set the monitor aspect ratio: 16:9 (wide screen), 4:3 (normal view).


21
OR press the WIDE/PIC button on the monitor or the WIDE button on the RC repeatedly to select the
aspect ratio: CINEMA => NORMAL => STANDBY.
Image setting
1. Press the PIC button on the RC or press and hold for 2 seconds the WIDE/PIC button on the monitor to
enter the picture quality setting menu.
2. Press the / button on the RC or the button on the panel to select the setting: COLOR,
CONTRAST, BRIGHT.
3. Press the / button on the RC or the button on the panel to adjust the setting.
4. Press the PIC button on the RC or the WIDE/PIC button on the monitor to save changes.
Parking cable function
If the PRK SW cable is connected to hand brake switch, the video view to the TFT
monitor will be switched between Normal display and Caution display. Parking cable
function is ceases if Parking is OFF. Please refer to PARKING.
When Parking is ON the monitor will show the special screen to prevent the driver
watching other content during driving. The passengers at the rear can watch
normally.
Monitor movement mechanism
When any path blocking or obstruction for the movement of the
monitor occurs, the following protection executes to prevent any
damage to the loader or the monitor. After the protection executed
normal operating resumed after the following action of the monitor
performed by pressing the OPEN/CLOSE button or repowering the


22
unit. If it doesn’t help please reset the unit.


23
Touch screen operations
In any mode touch the left corner of the top area of the TFT display to
open the main menu.
Now you can select the playing source (Radio, DVD/CD, Aux in, TV
(if the TV tuner is connected)) by touching the proper button on the
display.
To enter the unit setup menu touch the SETUP button on the screen.
Touch operations under DVD mode
In DVD playback mode use the following areas of the display to use
the desired function:
A – to open the main menu;
B – to display the playback information (as the DISP button);
C – undefined;
D – to start playback of the previous file;
E - to start playback of the next file;
F – to show on the display the buttons: MENU, PLAY/PAUSE, STOP,
, ,, .


24
Touch operations under DVD mode during playing the PM3/WMA files
Touch operations under Tuner (Radio) mode


25
General operations
Reset the unit
Operating the unit for the first time or after replacing the car battery, you must reset the unit.
Press the RESET button on the front panel to restore the unit to the original factory settings.
Power on/off
Press POWER/MUTE button on the front panel or the POWER button on the RC to turn the unit on. Press and
hold the POWER/MUTE button for 2 seconds or press the POWER button on the RC to turn the unit power off.
Note: After the unit is off, the volume level and radio current settings will be memorized, and when you turn the
unit on it will resume the stored status that you set.
Volume control
Rotate the VOL knob on the panel clockwise or press the VOL + on the RC to increase the volume level.
Rotate the VOL knob on the panel anticlockwise or press the VOL - on the RC to decrease the volume level.
Mute function
When the unit power is on press the POWER/MUTE button on the panel or the MUTE button on the RC to mute
volume control. Press it again or press the VOL +/- button to resume the volume.
Setting the audio system
Audio control allows you to easily adjust the audio system to meet the in-car acoustic characteristics that vary
depending on the type of car and its measurement.
1. Press the AUDIO button (VOL knob) on the front panel. The Audio menu will appear on the display.


26
2. Press the buttons on the front panel or press the / buttons on the RC to select the desired audio
setting: EQ => BASS => TREBLE => FADER => BALANCE => LOUD.
3. Press the buttons to adjust the setting.
4. To exit the menu press and hold the volume knob.
Note: If turning off the ACC power all the settings will become as they were set on the plant as current.
If you don’t adjust VOL knob within 3 seconds after selecting the desired setting, the unit will automatically
return to the current mode being displayed.
Mode selecting
Press the SRC button repeatedly to select the source: TUNER (RADIO or TV) => DVD => DVDC => AUX IN
=> CAMERA.
Display operations
In DVD mode press the DISP button to show the current playback information on the display: Source, EQ, Loud.
In TUNER (TV) mode press the DISP button to show the current playback information on the display: Source,
Channel, Time.


27
Digital tuner operations
Note: RDS service availability varies with areas. Please understand if RDS service is not available in you area,
the following service is not available, either. To activate this function enter the RDS SETUP menu (please refer
to SYSTEM SETUP menu chapter of this manual).
Mode selecting
Press the SRC button repeatedly to select the TUNER (RADIO) mode. If the monitor is opened the display will
show the interface.
OR on the monitor touch the left corner of the top area of the TFT display to open the main menu. Touch the
Radio button to open the Radio interface. The display will show the following:
1. Band
2. Current radio frequency
3. Clock
4. Indicator for receiving the stereo broadcast
5. Indicator for strong signal receipt of local radio
station
6. RDS functions indicators (AF – alternative frequency
indicator; TA – traffic announcement indicator; TP –
traffic program indicator; PTY – program type
function indicator)
7. Preset radio stations (press them to recall preset
station)
8. RDS status display (PTY – program type; PS – program service)
9. Radio function keys
To return to main menu touch the RADIO button in the top left corner of the display.


28
Band selection
Press BAND button on the front panel or the STOP/BAND on the RC once or more to select: FM1, FM2, FM3,
FM (OIRT), AM1, AM2, AM3.
Manual/ automatic tuning
Manual tuning: Press the / buttons on the RC or the / buttons on the panel repeatedly to select
a station upward or downward step by step. Press and hold for 2 seconds the 1-6 preset buttons to store the
station found.
Automatic tuning: Press the / buttons on the RC or the / buttons on the panel and hold for 2
seconds, the automatic search will start. It will play when finds the station with strong signal. Press it again or
any tuner function key to stop searching. Press and hold for 2 seconds the 1-6 preset buttons to store the
station found.
Programming tuner stations
You can store up to a total of 42 radio stations in the memory (24 FM, 18 MW), manually or automatically.
To store a station:
- Select a band (if needed)
- Select a station by buttons
- Hold a Preset button (1-6) that you want store the station for at least 2 seconds.
To recall a station:
- Select a band (if needed)
- Press a Preset button (1-6) briefly to recall the stored station


29
AMS (Auto Memory Store) function
Select the band. Press AS button on the panel or the PLAY/PAUSE / ENTER / SCAN button on the RC to enter
auto search and store mode. The radio will automatically store the 6 strongest available stations to the 6 preset
memories of the current band.
The search will stop when it makes the hole loop. To stop auto store, press AS button again.
Preset scan
Press the PLAY/PAUSE / ENTER / SCAN button shortly to scan all preset stations in the memory of the
current band and stay on each memory stations for about 10 seconds. To stop it press any tuner function key.
Local radio station seeking (LOC)
When the LOCAL function is on only the stations with strong radio signal can be played.
1. Press the LO/DX button on the panel (volume knob) and hold for 2 seconds to turn the LOCAL function
on.
2. Press it and hold for 2 seconds again to turn it off.
AF (Alternative Frequencies) function
When the radio signal strength is poor, enabling the AF function will allow the unit to automatically search
another station with the same PI (Program Identification) as the current station but with stronger signal strength.
PS (Program Service name): the name of station will be display instead of frequency.
Press the BAND button on the panel and hold for 2 seconds to turn ON or turn OFF the AF function.
If RDS service is not available in your area, turn off the AF mode.
Default setting is ON.


30
TA (Traffic Alarm) function
In TUNER (RADIO) mode press the button on the panel and hold for 2 seconds to turn ON or turn OFF the TA
function.
In TA mode press the / buttons on the RC or the / on the panel to start the traffic announcement
program searching until the program is received.
After the traffic announcement is over, it will return to the previous mode and volume level. When TA is turned
on, SEEK, SCAN, AS function can only be received or saved when traffic program identification (TP) code is
received.
PTY (Program Type) function
Selecting the PTY
1. In TUNER (RADIO) mode press the button on the panel and hold for 2 seconds to turn ON or turn OFF
the PTY function.
2. In PTY mode press the / buttons on the RC or the / on the panel to select the desired program
type: None, News, Speech, Music, Document, Fock M, Oldies, Nation M, Country, Jazz, Leisure, Travel,
Phone in, Religion, Social, Children, Finance, Weather, Other M, Classics, Light M, Easy M, Rock M, Pop
M, Varied, Science, Culture, Drama, Educate, Sport, Info, Affairs, News.
3. When PTY is selected, the radio starts to search corresponding PTY information, and stops if the
corresponding PTY information is detected.
During 1 loop, if desired PTY is not found, NONE is flashed, then return to previous normal radio and PTY
word disappears.
After searching if no buttons are pressed during 3 seconds the PTY function turns off.


31
Saving the PTY
When the PTY function is on and the unit receives the current program type press the 1~6 button to store it into
the channel selected. The default preset channels: P1 – DNEWS, P2 – DSPEECH, P3 – DSPORT, P4 – DPOP
M, P5 – CLASSIC, P6 – DMUSIC.
Quick PTY searching
When the PTY function is on press the preset button 1~6 to choose the desired program type.
If the tuner receives the alarm code, ALARM is displayed and the tuner switches to receive the emergency
announcement.
Region function
To activate this function enter the RDS SETUP menu (please refer to SYSTEM SETUP menu chapter of this
manual).
When the AF function is on and REGION is set ON, auto tuning for these stations within the region is assigned.
When the AF function is on and REGION is set OFF, auto tuning for these stations without any region is
boundary.
RDS clock
Some stations broadcast the time and date within the encoded RDS signal. The time is automatically adjusted
according the RDS’ one when CT is set to ON.


32
Disc operations
Glossary
PBC (PlayBack Control)
PlayBack Control is a menu recorded on the disc with SVCD or VCD2.0 format. For the discs contained PBC, it
can playback interactive software with the menu displayed on TV. And if the disc contains still images, it can
playback high definition of still image.
Title
The title is the important part of DVD disc. The memory volume of the disc is rather big, that makes possible to
record several films on one disc. For example, if a disc contains three films, they may be divided into Title 1, Title
2 and Title 3. You can easy use the functions of looking-for.
Chapter
A title can be divided into several blocks, so that every block can be operated as a unit, the unit is called chapter.
The chapter contains a unit at least.
Track
It is the biggest component of VCD. Generally, every song of karaoke disc is a track.


33
Discs for playback
This unit can play disc types: CD/DVD/CDDA/CD-R/-RW/DVD±R/±RW.
Compatible with formats: DVD-video/SVCD/VCD/HDCD/MP3/MP4/WMA/Picture-CD/JPEG.
The following file types are supported:
Audio files: MP3 (*.mp3)
WMA (*.wma)
Video files: MP4 (*.avi, DIVX3.11/4.0/5.0/6.0 and XVID)
MPEG 2(*.vob)
MPEG 1(*.dat)
Picture file: JPEG (*.jpg)
ISO 9660 or ISO 9660 +Joliet format - Max. 30 characters
Max. Track number is 448
Max. nested directory is 8 levels
The max. album number is 99
The max. length of each track is 99 minutes 59 seconds
Supported sampling frequency for MP3 disc: 8 KHz – 48 KHz (44.1 KHz preferably)
Supported bit-rates of MP3 disc are: 32 - 320 kbps (128 kbps preferably).
Following formats are NOT supported *.ACC, *.DLF, *.M3U, *.PLS, MP3 PRO, files with DRM.
Open session discs are NOT supported.


34
Loading a disc
1. Turn the power on.
2. Insert the disc with the printed side facing upward into the slot. The unit will switch to DVD mode
automatically.
3. Press the EJECT button on the panel to eject the disc.
Playing/ pausing
To ensure good system performance, wait until the unit finishes reading the disc information before proceeding.
After the disc is on playback will start automatically.
Press the PLAY/ PAUSE button on the panel or on RC to start/ pause the playback. In pause mode press it again
to resume the playback.
Stop
1. During playback press the STOP button on the panel or STOP/BAND button on the RC. Playback will be
stopped. If the PLAY/ PAUSE button is pressed, playback will start from the position at which it was
stopped. If the disc is removed, the resume function is cancelled.
2. Press the STOP button again to finally stop the playback. If the PLAY/ PAUSE button is pressed, playback
will start from the very beginning.
Playing the previous/ next track
1. During playback press the button on the RC or the button on the panel to start playback of the current
track from the beginning. Press again to start playback of the previous track.
2. Press the button on the RC or the button on the panel to start playing of the next track.
3. Press the digital buttons (1-9, 0) to enter the desired track number.


35
Direct entering the number
To enter the 2- or 3-digit number of the track or chapter press the desired buttons with digits on the RC. For
example, to enter number 135 press 1 => 3 => 5.
Scanning forward and backward
1. Press the button on the RC or button on the panel to select the speed of fast playing in forward
direction: X2 => X4 => X8 => X20. Press the PLAY/PAUSE / ENTER / SCAN button to return to normal
playback.
Note: During the disc playback when Fast Playback gets to the beginning of the playing another track, it
resumes normal playback.
2. To select the speed of fast playing in backward/ forward direction use the touch screen / buttons. The
speed will change the following way: X2 => X4 => X8 => X20. Press the PLAY/PAUSE / ENTER /
SCAN button to return to normal playback.
Slow playback
1. During DVD/VCD playback press the button on the RC or the button on the panel repeatedly to
start slow forward playback. The speed will change the following way: 1/2 => 1/4 => 1/6 => 1/7 (forward),
1/2 => 1/4 => 1/6 => 1/7 (backward).
2. Press the PLAY/PAUSE / ENTER / SCAN button to return to normal playback.
Note: During the disc playback when Slow Playback gets to the beginning of the playing another track, it
resumes normal playback.


36
Repeat playback
Press the RPT button on the panel or REPT button on the RC once or more to repeat the playback:
For VCD/CD: REPEAT SINGLE => REPEAT OFF
For DVD: REPEAT TITLE => REPEAT CHAPTER => REPEAT OFF
For MP3: REPEAT SINGLE => REPEAT FOLDER => REPEAT OFF
RPT icon will appear on the display.
Repeat A-B function (for DVD/CD/VCD discs)
1. During playback, press REPT A-B button on the RC at the starting point of section you want to repeat (A).
2. Press REPT A-B button again at the ending point of the section you want to repeat (B). Section A-B
repeating starts.
3. Press REPT A-B button again to cancel the A-B repeat function.
Random playback (for DVD/CD/VCD/MP3 discs)
During disc playback, press the RDM button on the panel to start random playback of the disc. Press again to
cancel.
Intro playback (for CDDA/VCD discs)
You can play the beginning of every track for 10 seconds in sequence. Press the SCN button on the panel to start
intro play of whole disc. Press again to cancel.
GOTO function(for DVD/VCD discs)
You can go to the desired track/ chapter or time point directly.


37
1. During the disc playback press the GOTO button on the RC to enter the Search menu. For VCD discs press
the GOTO button repeatedly to select the Track or Disc search.
For DVD For MPEG4/VCD
Search Track search Disc search
Time --:--:-- Time --:--:-- OR Time --:--:--
Title/Chapter ---/--- Track ---/--- Track ---/---
2. Use cursor buttons on the panel or / button on the RC to select the type of search: Time search or
Title/Chapter / Track search.
3. For Time search: press the numeric buttons to enter the time you want to start playback from (hh:mm:ss).
For example: to enter time 18:20:00, press 1 => 8 => 2 => 0 => 0 => 0. Press PLAY/PAUSE / ENTER /
SCAN to start playback.
For Title/Chapter search: press the numeric buttons and the cursor button to enter the desired number of
title and chapter. For example, to enter the number of title/chapter 20-/8--, press 2 => 0 => => 8. Press
PLAY/PAUSE / ENTER / SCAN to start playback.
For Track search: press the numeric buttons to enter the track number. For example, to enter the number of
track 13, press 1 => 3. Press PLAY/PAUSE / ENTER / SCAN to start playback.
Direct chapter/ track selection (for CD/VCD discs)
During the CD/VCD playback enter the digits directly to go to the desired chapter/track. For example to enter
the 15 track press 1, then 5.


38
Audio track and channel selection (for CD/VCD/DVD discs)
For DVD playback: press the AUDIO button to change the audio language. OR enter the AUDIO menu (please
refer to DVD SETUP menu chapter of this manual).
For CD/VCD playback: press the AUDIO button repeatedly to alter the select the channel:
Left channel => Right channel => Stereo.
Disc menu (for DVD only)
Disc menu
1. Press the MENU button on the RC to enter the disc menu.
2. Press the // / buttons on the RC or the cursor buttons on the panel to select the desired
item.
3. Press the PLAY/PAUSE / ENTER / SCAN button to start playback.
Title menu
1. Press the TITLE button on the RC to enter the Title menu.
2. Press the / buttons on the RC or the buttons on the panel to select the desired item.
3. Press the PLAY/PAUSE / ENTER / SCAN button to start playback.
PBC (Playback Control) function (for VCD only)
If you insert a VCD with PBC, playback starts from the beginning of the 1st track automatically.
1. Press MENU button on the RC to activate PBC menu on screen.
2. If the menu consists a list of titles, you can select a desired one using the digit buttons or the buttons on
the panel or the / on the RC.
3. The VCD starts playing the selected title automatically or press PLAY/ PAUSE button to confirm the
selected track for playback.


39
4. Press STOP button to return to menu.
5. Press MENU again to exit menu.
On-screen display (OSD)
1. During playback press the DISP button on the RC to show the short playback information on display:
DVD disc:
T-Title (current/total)
C – Chapter (current/total)
00:41:28 – Current playback time of the current title
2/6 Eng – the disc has 6 subtitle languages, the current one is the 2nd - English.
The playback status will be shown as following:
Source: - the current source
Dolby digital – current playback audio encoding system
ByPass – no ProLogic is being used.
VCD disc:
VCD2/0 – disc type
Title: - current track number/ total tracks
00:02:18 – elapsed playing time.


40
The playback status will be shown as following:
Source: - the current source
EQ: user - current equalizer setting
Loud: - the loudness status.
2. Press the DISP button on the front panel repeatedly to show the following information on the display:
Playback time => Clock => Disc format => Playback time.
Changing size (for DVD/VCD discs)
During playback press ZOOM button on the RC. The picture will be enlarged accordingly: X1 => X2 => X3 =>
X4 => Normal.
Changing the subtitle language (for DVD only)
Subtitle language is in disc initiation setting during playback. Press SUB-TITLE button on the RC or the SUBT
button on the front panel repeatedly to switch among disc-supported languages.
Changing angle (for DVD only)
If DVD discs support multi-angle playback, press ANGLE button on the RC repeatedly to playback images in
different camera angles. If discs doesn't support multi-angle playback, this function will not work.
MP3/WMA files playback
Insert the music disc into the disc slot. The display will show the files list. To go to another chapter use the DIR
+/- buttons on the touch screen, to select another page with files press the PAGE +/- buttons on the touch screen.
To go to previous/ next file/ track touch the / buttons, to fast backward/ forward touch the / buttons.


41
Press the AUDIO button on the panel or the RC to select the audio language or the channel. Press the REPEAT
or RANDOM buttons to select the mode of the playback.
Alter between 2 Ch and 6 Ch
Press and hold for 2 seconds the RDM button on the panel to alter between 2 Channel mode and 6 Channel
mode. According to the channel selected and the speaker setup audio output varies according the table:
Description Front
speakers
Rear
speakers
Center
speaker
Subwoof
er
2-channel mode
Play the 2-channel audio in 6-channel mode
without Dolby Pro-Logic function.
Play the 2-channel audio in 6-channel mode with
Dolby Pro-Logic function.
Play the 6-channel audio in the 6-channel mode.
Note: the information of the above table is valid only when the setup values of the speakers are low.
2-channel audio is for MP3, CD discs. 6-channel audio is for DVD discs.
Please refer to the PRO LOGIC II menu (DVD SETUP menu chapter of this manual).
MP3 overview
Notes on MP3:
MP3 is short for MPEG Audio Layer 3 and refers to an audio compression technology standard.
This product allows playback of MP3 files on DVD-R/-RW, DVD+R/+RW, CD-ROM, CD-R/-RW discs.
The unit can read MP3 files written in the format compliant with ISO 9660. However it does not support the
MP3 data written by the method of packet write.
The unit can not read an MP3 file that has a file extension other than “.mp3”.


42
If you play a non- MP3 file that has the “.mp3” extension, you may hear some noise.
In this manual, we refer to what are called “MP3 file” and “folder” in PC terminology as “track” and
“album”, respectively.
Maximum number of directory level is 8, including the root directory. Maximum number of files and folders
per disc is 448.
The unit may not play tracks in the order of Track numbers.
The unit plays only the audio tracks if a disc contains both audio tracks and MP3 files.
When playing a disc of 8 kbps or “VBR”, the elapsed playing time in the display window will not be correct
and also the intro play may not function properly. “VBR”: Variable Bit Rate.
Notes on creating your own CD-R or CD-RW containing MP3 files:
To enjoy high quality sound, we recommend converting to MP3 files with a sampling frequency of 44.1 kHz
and a fixed bit rate o f 128 kbps.
DO NOT store more than 448 MP3 files per disc.
For ISO 9660 - compliant format, the maximum allowable depth of nested folders is 8, including the root
directory (folder).
When CD-R disc is used, playback is possible only for discs, which have been finalized.
Make sure that when MP3 CD-R or CD-RW is burned that it is formatted as a data disc and NOT as an audio
disc.
You should not write non-MP3 files or unneeded folders along with MP3 files on the disc otherwise it takes
a long time until the unit starts to play MP3 files.
With some CD-R or CD-RW media, data may not be properly written depending on its manufacturing
quality. In this case, data may not be reproduced correctly. High quality CD-R or CD-RW disc is
recommended.
Up to 16 characters are displayed for the name of an Album or a Track. ID3TAG version 1.x is required.
Note that the unit may not play Tracks in the order that you wrote them to the disc.


43
TV tuner operations
Switch to TV tuner mode
1. Connect the TV set to the unit.
2. Press the SRC button repeatedly to select the TUNER (TV) mode.
OR in the SYSTEM SETUP menu select the TV item.
Auto tuning
1. Press the button on the panel or the / button on the RC to start auto search of available TV
station in backward/ forward direction. When the first available station is found searching will be stopped
and the station found will be played. Press the button again to continue searching.
2. Press the STOP/BAND / / buttons to on the RC or buttons on the panel to stop search.
Manual tuning
Press and hold for 2 seconds the button on the panel repeatedly to search the TV stations step by step.
Auto preset memory
1. Press and hold for 2 seconds the PLAY/PAUSE / ENTER / SCAN button on the panel to start auto tuning,
the search range is the current TV frequency range. The stations found will be stored into the memory
automatically.
2. Press the PLAY/PAUSE / ENTER / SCAN button on the panel or the STOP/BUTTON on the RC to stop
auto searching.


44
Scan tuning
1. You can scan each stored channel for 10 seconds in sequence. Press the ENTER button on the panel to start
scanning.
2. Press the PLAY/PAUSE / ENTER / SCAN button on the panel or the STOP/BUTTON on the RC to stop
auto scanning.
Select the TV station
1. Press the number buttons on the RC to recall the desired TV station.
To enter the 2-digit number of station
2. To change the station use the / button on the RC or buttons on the panel to change the channels
step by step in forward/backward direction.
Display TV station
To display current TV station number press the DISP button on the RC.
AUX IN mode
This mode is for using the unit as an AV signal amplifier or connecting the rear-view camera.
Connect the peripheral device (DVD player, video-camera, rear-view camera etc) to the unit via RCA output
and AUX in. The unit will be switched into the AUX mode and will show the picture from the device
connected.
You can use the VOL knob, functional buttons, set the video and audio parameters from the unit.
To enter the AUX in mode press the SRC button repeatedly.


45
OR in the main menu select the AUX IN item.

46
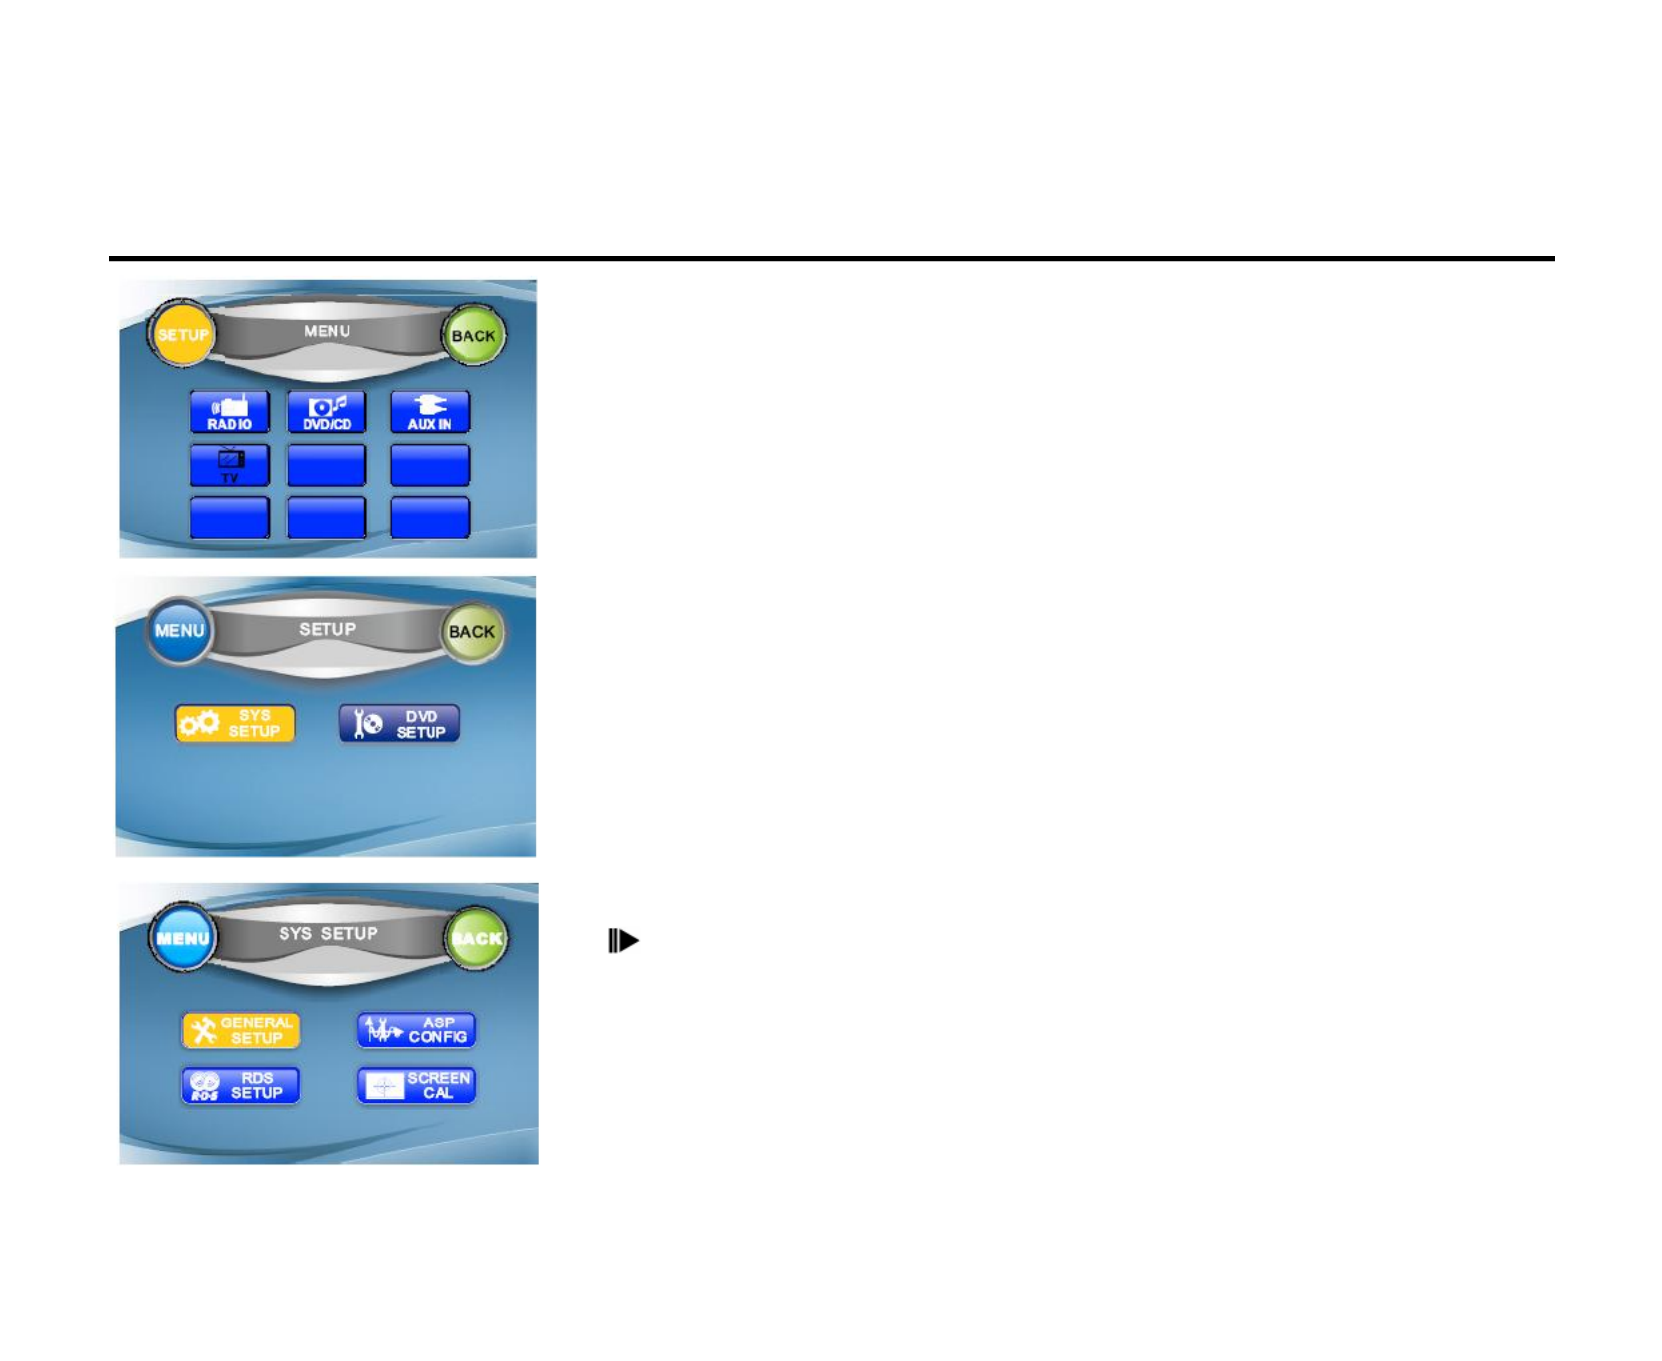
System setup menu
In any mode touch the left top corner of the screen to open the main MENU.
Use the cursor buttons or press the SETUP button on the screen to open the
SETUP menu.
In SETUP menu press the buttons on the panel or / buttons on
the RC or touch the desired button on the screen to select the SYS SETUP
(or DVD SETUP menu). Press PLAY/PAUSE / ENTER / SCAN to open it.
OR press the SYS.SETUP button on the RC to open the SYS. SETUP menu
window.
In SYSTEM SETUP menu press the buttons on the panel or
/ / / buttons on the RC or touch the desired button on the screen to
select the desired menu: GENERAL SETUP, RDS SETUP, ASP CONFIG,
SCREEN CAL. Press PLAY/PAUSE / ENTER / SCAN to enter the menu
selected.


47
General setup
1. Enter the GENERAL SETUP menu.
2. Use the buttons on the panel or / buttons on the RC or touch
the desired item on the screen to select the desired setting: Radio, Clock
mode, Parking, OSD menu, Clock, Video format, TFT auto open.
3. Press the buttons on the panel or / buttons on the RC to enter
the list of values.
4. Press the buttons on the panel or / buttons on the RC or
touch the desired button on the screen to select the desired value.
5. Press PLAY/PAUSE / ENTER / SCAN button to confirm.
Radio: select the radio system: USA, S. America 1, Arabia, China, S. America 2, Europe, Korea.
Clock mode: select the time format: 12 hours, 24 hours.
Parking: select the parking image mode: On (image is displayed when the car has been parked only), Off
(image is displayed all the time).
OSD menu: select the menu language: English, .
Clock: set the clock.
Method 1: Touch the hour or minute. Touch the +/- buttons on the screen to adjust the clock.
Method 2: Use the buttons on the panel or / buttons on the RC to select hour or minute. Press the
buttons on the panel or / buttons on the RC to adjust it.
Video format: adjust the monitor color system according to the video system of the TV attached: Auto (the
color signal output is switched automatically according to the Recording system of the current disc), NTSC,
PAL, SECAM.


48
TFT auto open: set the monitor working mode when the unit is on and off: On (when the unit is off the
monitor draws down into the unit automatically, when it’s on the monitor unfurls automatically), Off (when the
unit is off the monitor draws down into the unit automatically, when it’s on the monitor unfurls by pressing the
OPEN/CLOSE button on the panel), Manual (when the unit is off or on the monitor draws down or unfurls only
by pressing the OPEN/CLOSE button on the panel).
Audio sound processing configuration
1. Enter the ASP CONFIG menu.
2. Use the buttons on the panel or / buttons on the RC or touch
the desired item on the screen to select the desired setting: Bass center
freq, Treble center freq, SUB filter, SUB phase, Bass Q-factor.
3. Press the buttons on the panel or / buttons on the RC touch
the desired button on the screen to enter the list of values.
4. Press the buttons on the panel or / buttons on the RC touch
the desired button on the screen to select the desired value.
5. Press PLAY/PAUSE / ENTER / SCAN button to confirm.
Bass center frequency: select the Bass center frequency according to the audio source disc: 60 Hz, 80 Hz, 100
Hz, 130 Hz, 150 Hz, 200 Hz.
Treble center frequency: select the Treble center frequency according to the audio source disc: 10 KHz, 12.5
KHz, 15 KHz, 17 KHz.
Sub filter: set a cut-off frequency of the subwoofer’s LPF (low pass filter) and that of the “Small” speakers’
HPF (high pass filter). Crossover frequency setting has no effect if the subwoofer is set OFF and any other
speaker set is “Large”.
Select a crossover frequency: 80 Hz, 120 Hz, 160 Hz.


49
Sub phase: if trying to boost the bass output of subwoofer the bass gets more murky. This may indicate that the
subwoofer’s output and bass content you hear from other speakers cancel each other out. To remove this
problem change the setting of subwoofer: 0D (subwoofer output in phase), 180D (subwoofer output off phase).
Bass Q-factor: when the Bass center is selected and adjusting the Q-factor alters the sharpness of the Bass
output, the larger the Q-factor, the sharper the bass. Select the Bass Q-factor: 1.0, 1.25, 1.5, 2.0.
RDS setup
1. Enter the RDS SETUP menu.
2. Use the buttons on the panel or / buttons on the RC or t
touch the desired item on the screen to select the desired setting: RDS,
CT, Region.
3. Press the buttons on the panel or / buttons on the RC or
touch the desired button on the screen to enter the list of values.
4. Press the buttons on the panel or / buttons on the RC or
touch the desired button on the screen to select the desired value.
5. Press PLAY/PAUSE / ENTER / SCAN button to confirm.
RDS: set the RDS function: ON, OFF.
CT: set the clock adjusting method: ON (clock is adjusted by RDS automatically), OFF (Clock cannot be
adjusted by RDS).
Region: set the Region function: ON (automatically switch to RDS station with same PI), OFF (automatically
switch to the station with strong signal).
Screen CAL
Use the CAL screen when the touch screen is not sensitive or valid. Calibrate it following the clew displayed on
the screen after entering the SCREEN CAL mode.


50
DVD setup menu
In any mode touch the left top corner of the screen to display the main
MENU. Use the cursor buttons or touch the SETUP button on the screen to
open the SETUP menu.
In SETUP menu press the buttons on the panel or / buttons on
the RC or touch the desired item on the screen to select the DVD SETUP (or
SYS SETUP menu). Press PLAY/PAUSE / ENTER / SCAN to open it.
OR press the DVD SETUP button on the RC to open the DVD SETUP
menu window.
In DVD SETUP menu press the buttons on the panel or
/ / / buttons on the RC or touch the desired item on the screen to
select the desired menu: LANG, VIDEO, AUDIO, PROLOGIC II, SPK
CONFIG, RATING. Press PLAY/PAUSE / ENTER / SCAN to enter the
menu selected.

51
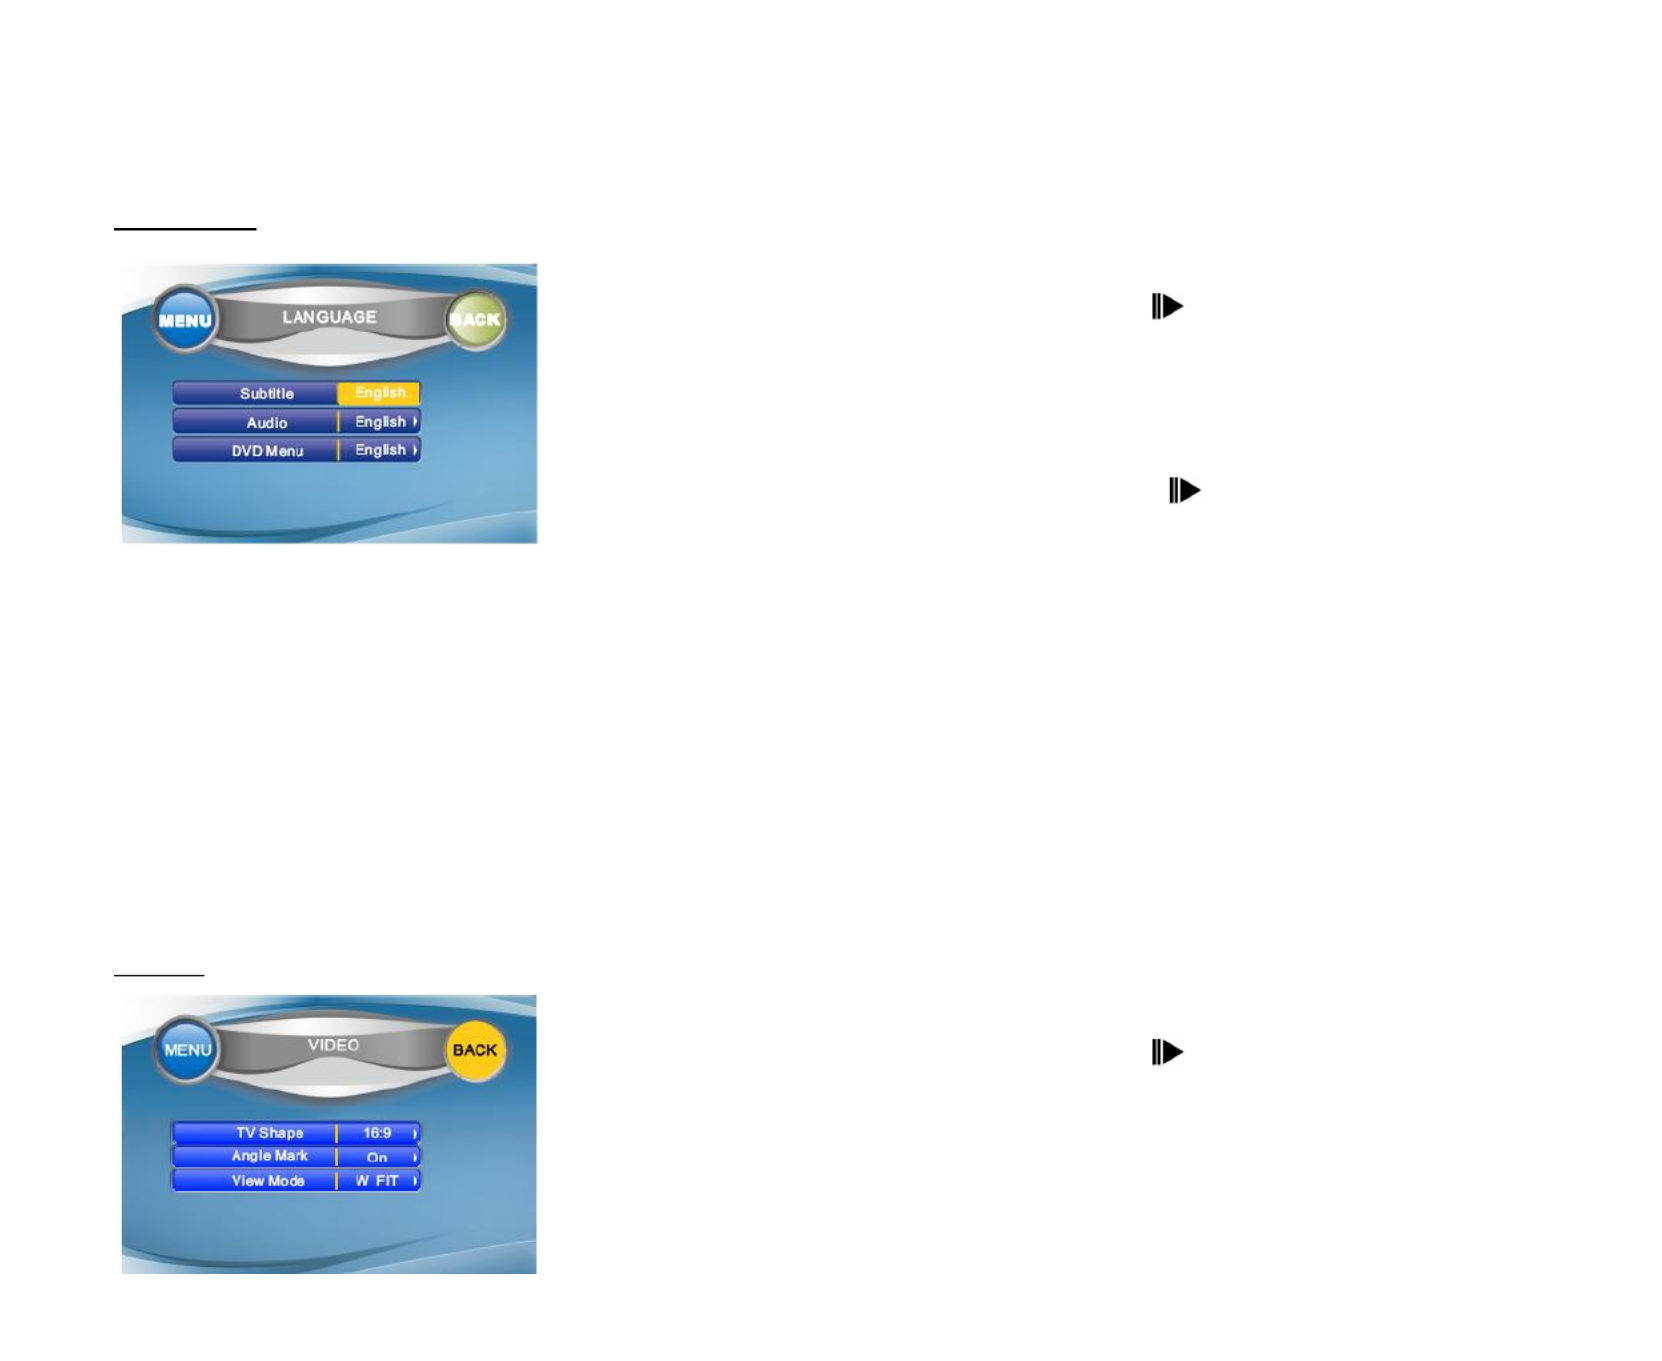
Language
1. Enter the LANG menu.
2. Use the buttons on the panel or / buttons on the RC or touch
the desired item on the screen to select the desired setting: Subtitle,
Audio, DVD menu.
3. Press the buttons on the panel or / buttons on the RC or
touch the desired button on the screen to enter the list of values.
4. Press the buttons on the panel or / buttons on the RC or
touch the desired button on the screen to select the desired value.
5. Press PLAY/PAUSE / ENTER / SCAN button to confirm.
Subtitle: set the subtitle mode: English (the subtitle is always in English), Auto (the subtitle is displayed in the
language appointed by the DVD disc automatically), Off (No subtitle is displayed).
During playback press the SUBTITLE button on the RC to change the subtitle.
Audio: select the audio language.
During playback press the AUDIO button on the RC to change the audio language.
DVD menu: select the DVD menu language. When the language is selected if you press the MENU/TITLE
button the menu will be in this language.
Video
1. Enter the VIDEO menu.
2. Use the buttons on the panel or / buttons on the RC or touch
the desired item on the screen to select the desired setting: TV shape,
Angle mark, View mode.
3. Press the buttons on the panel or / buttons on the RC or
touch the desired button on the screen to enter the list of values.


52
4. Press the buttons on the panel or / buttons on the RC or touch the desired button on the screen
to select the desired value.
5. Press PLAY/PAUSE / ENTER / SCAN button to confirm.
TV shape: select the width/height of the image: 16:9 (wide screen), 4:3 (normal view).
This function is not available for some discs.
Angle mark: set the angle indicator mode (when the DVD has multi-angle content): On (view indicator), Off
(don’t view indicator).
Press the ANGLE button on the RC to change the angle.
View mode: select the viewing mode: Fill (fill the screen with the picture), Original (original mode), H fit (fit
horizontally), W fit (weight fit), Fit to scrn (fit to screen), Pann & scan (Pan and scan mode).
Audio
1. Enter the AUDIO menu.
2. Use the buttons on the panel or / buttons on the RC or touch
the desired item on the screen to select the settings: Pink noise, DRC,
Center delay, Rear delay, Down sampling.
3. Press the buttons on the panel or / buttons on the RC or
touch the desired button on the screen to enter the list of values.
4. Press the buttons on the panel or / buttons on the RC or
touch the desired button on the screen to select the desired value.
5. Press PLAY/PAUSE / ENTER / SCAN button to confirm.
Pink noise: use the built in pink noise to adjust each channel output volume or verify if audio output quality is
normal by adjusting the output volume during listening. Select among: Off (don’t use pink noise), Left (left
channel pink noise), Center (center channel pink noise), Right (right channel pink noise), Left surr (left
surround channel pink noise), Subwoofer (subwoofer pink noise).


53
DRC: set the DRC (dynamic range control) for better playback for low volume playback: On (use bass to play
the more dynamical audio), Off (normal playback).
Center delay: the time difference between center and front speakers. The time delay makes audio signal more
accurate. Select the time delay: 0 ms (same time output with front speakers), 1 ms (1 millisecond delay), ..., 5
ms.
Rear delay: the time difference between rear and front speakers. The time delay makes surround effect more
better. Select the time delay: 0 ms (same time output with front speakers), 3 ms (3 milliseconds delay), ..., 15
ms.
Note: REAR CTRL may be adjusted only when center speaker is set as small or large.
Down sampling: depending on the mode the signal output will be normal or 48 kHz. Select the mode: On (all
the signals will be 48 kHz), Off (all the signals will be normal).
ProLogic II
Pro Logic II is a dramatically improved matrix surround system based on the original Dolby Pro Logic system. In
the case of Pro Logic, there were four channels: front left, center and front right, plus a mono surround channel
that was usually split between two rear speakers. Compared to DPL, DPL II offers two full-range stereo surround
channels, more sophisticated steering logic, high channel separation and an exceptionally stable sound field. DPL
II uses a simple servo circuits used to derive the five channels. And, unlike the synthetic Jazz club, Hall and
Stadium modes found on many AV receivers, DPL II introduces no phony delay-induced echoes, reverb, or tonal
coloration. 1. Enter the PRO LOGIC II menu.
2. Use the buttons on the panel or / buttons on the RC or touch
the desired item on the screen to select the settings: Surround mode,
Panorama, Dimension ctrl, Center width ctrl.


54
3. Press the buttons on the panel or / buttons on the RC or
touch the desired button on the screen to enter the list of values.
4. Press the buttons on the panel or / buttons on the RC or touch the desired button on the screen
to select the desired value.
5. Press PLAY/PAUSE / ENTER / SCAN button to confirm.
Surround mode: select the surround sound effect: Off (playback as the original audio output), Surround I
(using the DPL as the decoding method), Surr matrix (from mono output to surround effect), Surr movie
(enhance movie surround effects), Surr music (surround music effects).
Panorama: extend the audio from the front to the rear to achieve a better audio surrounding effect. Panorama is
available for adjustment only when PL II music mode is activated. Select the mode: On, Off.
Dimension control: adjusting the distribution the front and rear audio output to achieve a better balanced audio
surrounding effect. Dimension control is available for adjustment only when PL II music mode is activated.
Select the audio output shift between front and rear: 1, 2, 3, 4, 5, 6.
Center width ctrl: the audio output from center may come directly from center speaker, or from left and right
speakers - an illusion effect, or from all three speakers by adjusting the center width. Adjusting the central
width provides a better balance of audio surround effect.
Center width control is available for adjustment only when PLII Music mode is activated.
Select the audio output shift between front and center: 1, 2, 3, 4, 5, 6.

55
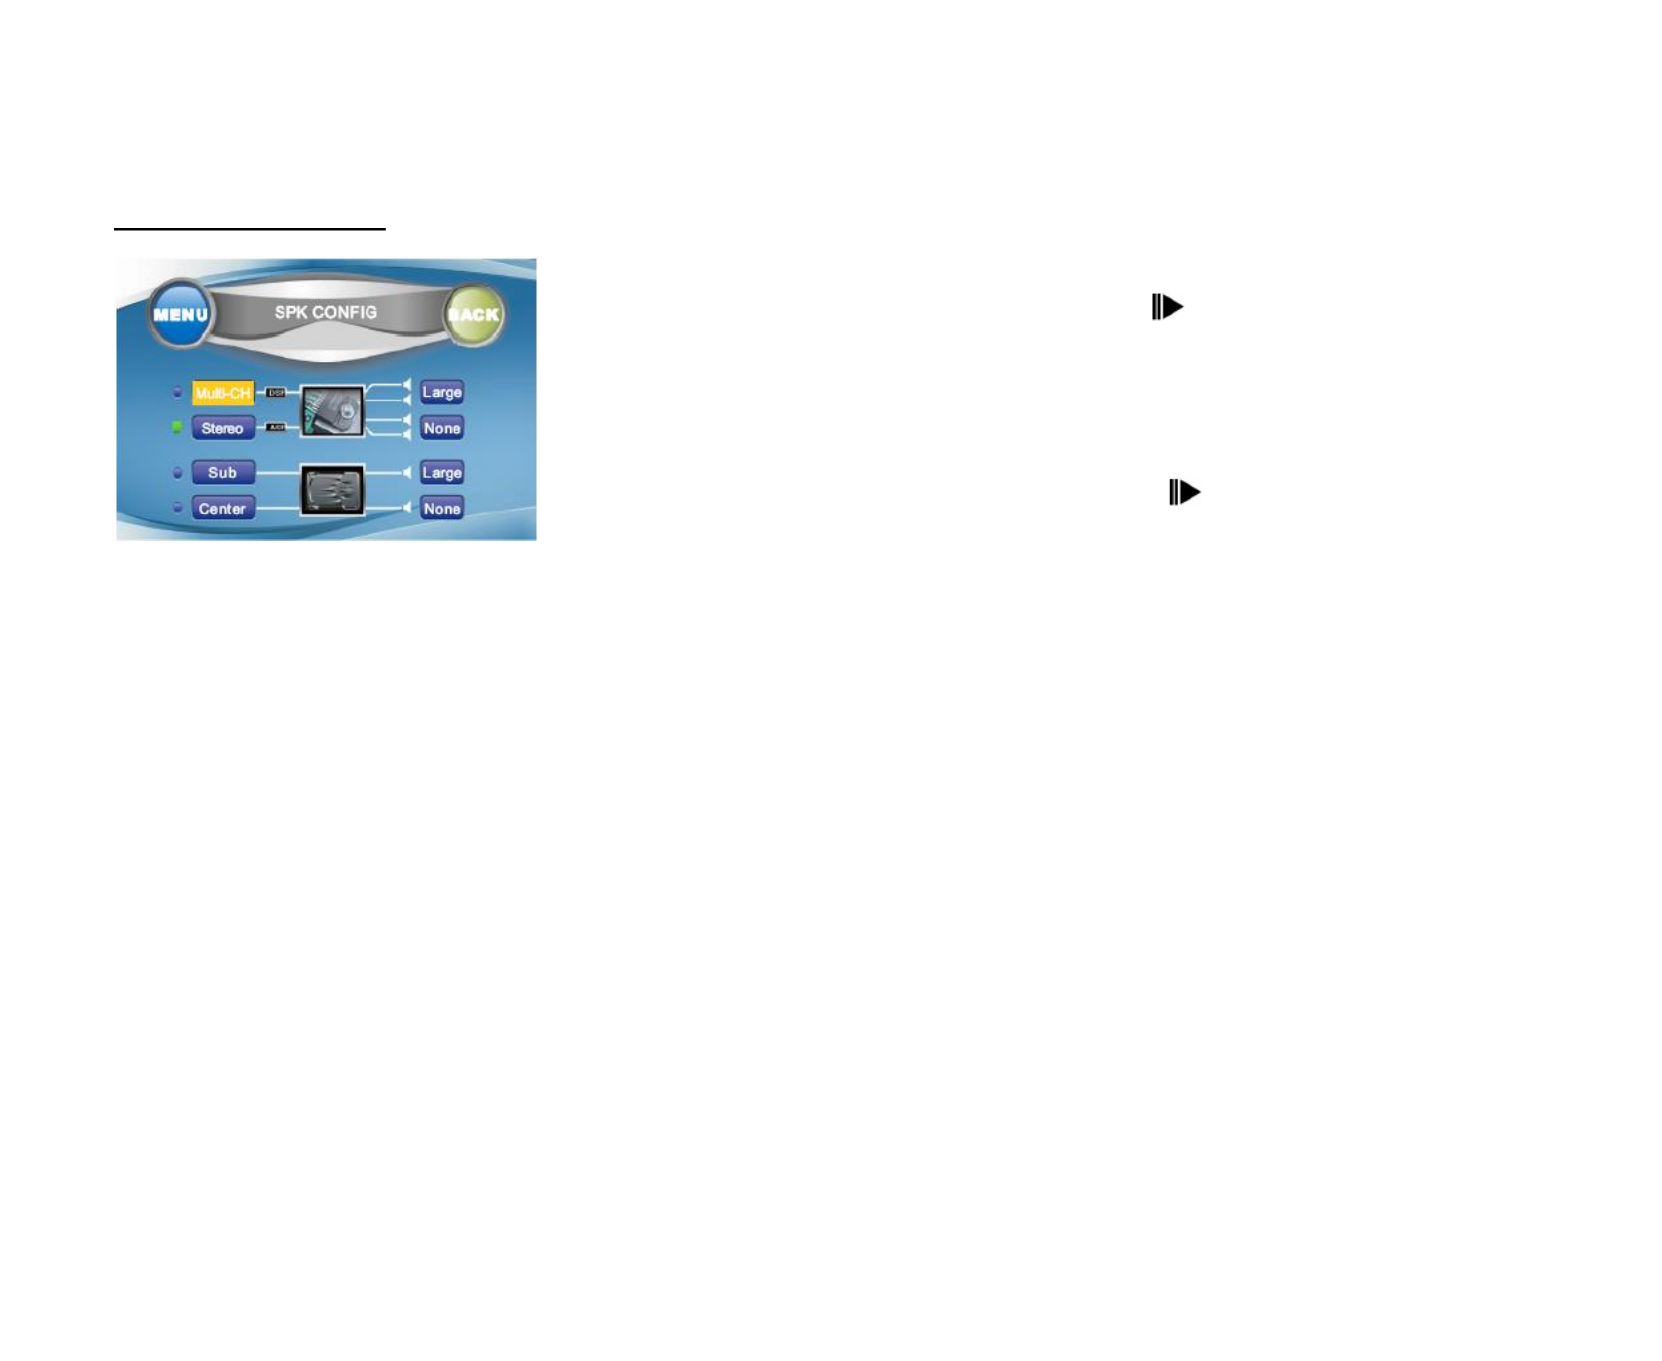
SPK configuration
1. Enter the SPK CONFIG menu.
2. Use the buttons on the panel or / buttons on the RC or touch
the desired item on the screen to select the settings: Multi-CH, Stereo,
Sub, Center.
3. Press the buttons on the panel or / buttons on the RC or
touch the desired button on the screen to enter the list of values.
4. Press the buttons on the panel or / buttons on the RC or
touch the desired button on the screen to select the desired value.
5. Press PLAY/PAUSE / ENTER / SCAN button to confirm.
Multi-Ch: set up the front speakers: Large (suitable for speakers with good bass output), Small (for speakers
with bad bass output).
Stereo: set up the rear speakers: Large (suitable for speakers with good bass output), Small (for speakers with
bad bass output), None (rear speaker is not employed).
Subwoofer: set up the subwoofer: Large (subwoofer is employed), None (subwoofer is not employed).
Center: set up the center speaker: Large (suitable for speaker with good bass output), Small (for speaker with
bad bass output), None (center speaker is not employed).


56
Rating
This unit has the built in parental lock feature to prevent authorized person to view restricted disc content.
1. Enter the RATING menu
2. Use the buttons on the panel or / buttons on the RC or touch
the desired item on the screen to select the setting: Password, Rating,
Load factory.
3. Press the buttons on the panel or / buttons on the RC or
touch the desired button on the screen to enter the list of values.
4. Press the buttons on the panel or / buttons on the RC or
touch the desired button on the screen to select the desired value.
5. Press PLAY/PAUSE / ENTER / SCAN button to confirm.
Password: first set the rating (in RATING setting). Then select the Password setting, press the numeric buttons
to set the 4-digit password to protect the parental lock from being changed. Press the PLAY/PAUSE / ENTER /
SCAN button to confirm.
When the password is set enter the correct password into the field to release parental lock.
- the parental control is locked.
- the parental control is unlocked.
To change the password first enter the correct password to unlock the parental control, then enter the new one.
Press the PLAY/PAUSE / ENTER / SCAN to confirm.
Rating: when the parental control is unlocked set the rating: 1. Kid safe (with the most limit when playing), 2.
G, 3. PG, 4. PG-13, 5. PG-R, 6. R, 7. NC-17, 8. Adult (with the least limit when playing).
When the rating is set go to PASSWORD setting and insert the password to lock the parental control.
Load factory: select RESET to restore the factory default. But Password and Rating will remain unchanged.
Produktspezifikationen
| Marke: | Hyundai |
| Kategorie: | Autoradio |
| Modell: | H-CMMD4042 |
Brauchst du Hilfe?
Wenn Sie Hilfe mit Hyundai H-CMMD4042 benötigen, stellen Sie unten eine Frage und andere Benutzer werden Ihnen antworten
Bedienungsanleitung Autoradio Hyundai

9 September 2024
13 August 2024
12 August 2024
6 August 2024
6 August 2024
4 August 2024
1 August 2024
30 Juli 2024
29 Juli 2024
28 Juli 2024
Bedienungsanleitung Autoradio
- Autoradio Clatronic
- Autoradio Sanyo
- Autoradio Manta
- Autoradio Medion
- Autoradio Nedis
- Autoradio Philips
- Autoradio SilverCrest
- Autoradio Sony
- Autoradio Tevion
- Autoradio Panasonic
- Autoradio LG
- Autoradio AEG
- Autoradio Maginon
- Autoradio Technaxx
- Autoradio Denver
- Autoradio ECG
- Autoradio MarQuant
- Autoradio Renkforce
- Autoradio Telefunken
- Autoradio Trevi
- Autoradio Blaupunkt
- Autoradio Grundig
- Autoradio Kenwood
- Autoradio Daewoo
- Autoradio Pyle
- Autoradio Telestar
- Autoradio Aiwa
- Autoradio Auna
- Autoradio Caliber
- Autoradio Lenco
- Autoradio Pioneer
- Autoradio JBL
- Autoradio JVC
- Autoradio Krüger And Matz
- Autoradio Muse
- Autoradio Vieta
- Autoradio Hifonics
- Autoradio Akai
- Autoradio Dual
- Autoradio MT Logic
- Autoradio Orava
- Autoradio Orion
- Autoradio Skoda
- Autoradio Varta
- Autoradio Elta
- Autoradio Sencor
- Autoradio Biltema
- Autoradio OneConcept
- Autoradio Mercedes-Benz
- Autoradio Boston Acoustics
- Autoradio Harman Kardon
- Autoradio Magnat
- Autoradio XOMAX
- Autoradio Parrot
- Autoradio Smart
- Autoradio Alpine
- Autoradio Ford
- Autoradio Volkswagen
- Autoradio Volvo
- Autoradio Opel
- Autoradio MB Quart
- Autoradio Overmax
- Autoradio Rockford Fosgate
- Autoradio Crunch
- Autoradio Pure
- Autoradio NextBase
- Autoradio Norauto
- Autoradio AXTON
- Autoradio Clarion
- Autoradio Mac Audio
- Autoradio Conceptronic
- Autoradio Scott
- Autoradio Audiovox
- Autoradio Becker
- Autoradio ESX
- Autoradio Zenec
- Autoradio VDO
- Autoradio SPC
- Autoradio Roadstar
- Autoradio Tokaï
- Autoradio Audison
- Autoradio Macrom
- Autoradio Phonocar
- Autoradio Xblitz
- Autoradio Autovision
- Autoradio Boss
- Autoradio Hertz
- Autoradio Renault
- Autoradio Fiat
- Autoradio Kicker
- Autoradio Jensen
- Autoradio DLS
- Autoradio Eclipse
- Autoradio Eltax
- Autoradio Emphaser
- Autoradio Focal
- Autoradio Fusion
- Autoradio Ground Zero
- Autoradio Helix
- Autoradio Impulse
- Autoradio Lanzar
- Autoradio Mtx Audio
- Autoradio Naxa
- Autoradio Revo
- Autoradio Rodek
- Autoradio RTO
- Autoradio Sevic
- Autoradio Sirius
- Autoradio Soundstream
- Autoradio Spectron
- Autoradio Stinger
- Autoradio Tamashi
- Autoradio Toxic
- Autoradio Twister
- Autoradio Ultimate
- Autoradio US Blaster
- Autoradio VDO Dayton
- Autoradio Voxx
- Autoradio VW
- Autoradio Watssound
- Autoradio RetroSound
- Autoradio Kunft
- Autoradio Shuttle
- Autoradio Multilaser
- Autoradio Brigmton
- Autoradio Lark
- Autoradio Majestic
- Autoradio SoundMAX
- Autoradio Scion
- Autoradio Raveland
- Autoradio Planet Audio
- Autoradio Adcom
- Autoradio Sendai
- Autoradio Cartronix
- Autoradio Dension
- Autoradio Mystery
Neueste Bedienungsanleitung für -Kategorien-

1 Dezember 2024
1 Dezember 2024
1 Dezember 2024
1 Dezember 2024

16 Oktober 2024

16 Oktober 2024
12 Oktober 2024
12 Oktober 2024
8 Oktober 2024
7 Oktober 2024