HP xw4600 Bedienungsanleitung
Lesen Sie kostenlos die 📖 deutsche Bedienungsanleitung für HP xw4600 (181 Seiten) in der Kategorie Desktop. Dieser Bedienungsanleitung war für 7 Personen hilfreich und wurde von 2 Benutzern mit durchschnittlich 4.5 Sternen bewertet
Seite 1/181

HP xw4600 Workstation
Service and Technical Reference Guide

Copyright Information
© 2008-2009 Copyright Hewlett-Packard
Development Company, L.P.
Warranty
Hewlett-Packard Company shall not be liable
for technical or editorial errors or omissions
contained herein or for incidental or
consequential damages in connection with
the furnishing, performance, or use of this
material. The information in this document is
provided “as is” without warranty of any kind,
including, but not limited to, the implied
warranties of merchantability and fitness for
a particular purpose, and is subject to
change without notice. The warranties for HP
products are set forth in the express limited
warranty statements accompanying such
products.
Nothing herein should be construed as
constituting and additional warranty.
This document contains proprietary
information that is protected by copyright. No
part of this document may be photocopied,
reproduced, or translated to another
language without the prior written consent of
Hewlett-Packard Company.
Trademark Credits
Microsoft and Windows are U.S. registered
trademarks of Microsoft Corporation.
Intel is a trademark of Intel Corporation in the
U.S. and other countries.
ENERGY STAR is a U.S. registered mark of
the United States Environmental Protection
Agency.
453080-006
Sixth Edition, November 2009

Table of contents
1 Product overview
Product features ................................................................................................................................... 2
System board architecture ................................................................................................... 2
Workstation components ..................................................................................................... 2
Front panel components ...................................................................................................... 4
Rear panel components ....................................................................................................... 5
Serial number and COA label location ................................................................................. 6
Maximizing the airflow ......................................................................................................... 6
Workstation specifications .................................................................................................................... 7
Power supply description ..................................................................................................... 7
Power supply specifications ................................................................................ 8
Power consumption and heat dissipation ............................................................ 8
System fans ....................................................................................................... 9
Resetting the power supply ................................................................................ 9
Environmental specifications .............................................................................................. 9
ENERGY STAR Qualification ............................................................................................................... 9
Dual- and quad-core processors ........................................................................................................ 10
HP Cool Tools .................................................................................................................................... 11
2 Setting up the operating system
Setting up the Microsoft operating system ......................................................................................... 13
Installing or upgrading device drivers ................................................................................ 13
Transferring files and settings to your Windows workstation ............................................. 13
Setting up Red Hat Enterprise Linux .................................................................................................. 14
Installing with the HP driver CD ......................................................................................... 14
Installing and customizing Red Hat-enabled workstations ................................................ 15
Verifying hardware compatibility ....................................................................... 15
Setting up Novell SLED ...................................................................................................................... 15
Updating the workstation .................................................................................................................... 15
Updating the workstation after first boot ............................................................................ 15
Upgrading the BIOS ........................................................................................................... 15
Determining current BIOS ................................................................................. 16
Upgrading BIOS ................................................................................................ 17
Upgrading device drivers ................................................................................................... 17
3 Restoring the operating system
Restore methods ................................................................................................................................ 18
Ordering backup software .................................................................................................................. 19
ENWW iii

Restoring Windows Vista ................................................................................................................... 19
Ordering the RestorePlus! media ...................................................................................... 19
Restoring the operating system ......................................................................................... 19
Restoring Windows XP Professional .................................................................................................. 20
Creating RestorePlus! media ............................................................................................. 20
Creating HP Backup and Recovery (HPBR) media ........................................................... 21
Restoring the operating system ......................................................................................... 22
Using RestorePlus! ........................................................................................... 22
Using HPBR ..................................................................................................... 22
Using the recovery partition .............................................................................. 22
Restoring Novell SLED ....................................................................................................................... 22
Creating restore media ...................................................................................................... 22
4 System management
Computer Setup (F10) Utility ............... ............... ............................. .............. ..................................... 24
BIOS ROM ......................................................................................................................... 26
Using the Computer Setup (F10) Utility ............................................................................ 26
Computer Setup (F10) Utility menu .................................................................................. 27
Workstation management .................................................................................................................. 33
Initial workstation configuration and deployment ............................................................... 34
Installing a remote system ................................................................................................. 34
Replicating the setup ......................................................................................................... 34
Copying a setup configuration to a single workstation ...................................... 35
Copying a setup configuration to multiple workstations .................................... 36
Updating and managing software ..................................................................................... 37
HP Client Manager Software ............................................................................. 37
Altiris Client Management Solutions ................................................................. 37
System Software Manager ................................................................................ 37
Proactive Change Notification ........................................................................... 38
Subscriber’s Choice .......................................................................................... 38
ROM Flash ......................................................................................................................... 39
Remote ROM Flash .......................................................................................... 39
HPQFlash .......................................................................................................... 39
FailSafe Boot Block ROM .................................................................................................. 40
Asset tracking and security ................................................................................................ 41
Password security ............................................................................................ 42
Establishing a setup password using the Computer Setup (F10)
Utility ................................................................................................. 42
Establishing a power-on password using workstation setup ............ 42
Entering a power-on password ........................................................ 43
Entering a Setup Password .............................................................. 43
Changing a power-on or setup password ......................................... 43
Deleting a power-on or setup password ............................................................ 45
National keyboard delimiter characters ............................................ 45
iv ENWW

Removing the chassis clamp lock ..................................................................... 61
Side access panel .............................................................................................................. 61
Removing the side access panel ...................................................................... 61
Replacing the side access panel ....................................................................... 62
Hood Sensor (Smart Cover Sensor) (optional) .................................................................. 63
Removing the Hood Sensor .............................................................................. 63
Smart Cover Lock solenoid (optional) ................................................................................ 63
Removing the Smart Cover Lock solenoid ........................................................ 63
Front bezel ......................................................................................................................... 64
Removing the front bezel .................................................................................. 65
Replacing the front bezel .................................................................................. 65
Bezel blanks ...................................................................................................................... 65
Removing bezel blanks ..................................................................................... 65
Front panel I/O device assembly ....................................................................................... 66
Removing the front panel I/O device assembly ................................................. 66
Installing the front panel I/O device assembly ................................................... 67
Power button assembly ..................................................................................................... 68
Removing the power button assembly .............................................................. 68
System speaker ................................................................................................................. 69
Removing the system speaker .......................................................................... 69
Power supply ..................................................................................................................... 70
Removing the power supply .............................................................................. 70
System fan assembly ......................................................................................................... 71
Removing the system fan assembly ................................................................. 71
Memory .............................................................................................................................. 72
Removing a memory module ............................................................................ 72
Installing a memory module .............................................................................. 73
Supported DIMM configurations ....................................................... 73
Memory module requirements .......................................................... 73
Required DIMM installation order ..................................................... 74
Installing a memory module .............................................................. 74
PCI card slots .................................................................................................................... 76
PCI card support bracket ................................................................................................... 76
Removing a PCI card support bracket .............................................................. 77
Installing a PCI card support bracket ................................................................ 77
PCI Express cards ............................................................................................................. 78
Removing a PCI Express card .......................................................................... 78
Installing a PCI Express card ............................................................................ 79
PCI card ............................................................................................................................. 80
Removing a PCI card ........................................................................................ 80
Installing a PCI card .......................................................................................... 81
IEEE-1394 card (optional) ................................................................................................. 82
Removing an IEEE-1394 card ........................................................................... 82
Front PCI card guide and fan removal (optional) ............................................................... 83
vi ENWW

Removing the front PCI card guide and fan ...................................................... 83
Battery ............................................................................................................................... 84
Removing the battery ........................................................................................ 85
Installing the battery .......................................................................................... 85
Power connections to drives .............................................................................................. 86
Optical drive (minitower configuration) .............................................................................. 87
Notice for Blu-ray optical drives ........................................................................ 87
Blu-ray movie playback .................................................................... 87
Blu-ray movie playback compatibility and update ............................. 87
Removing an optical drive (minitower configuration) ........................................ 88
Installing an optical drive (minitower configuration) .......................................... 89
Optical drive (desktop configuration) ................................................................................. 90
Removing an optical drive (desktop configuration) ........................................... 90
Installing an optical drive (desktop configuration) ............................................. 91
Diskette drive (optional) ..................................................................................................... 92
Removing a diskette drive ................................................................................. 92
SAS hard drive ................................................................................................................... 93
Removing a SAS hard drive .............................................................................. 93
Installing a SAS hard drive ................................................................................ 95
SATA hard drive ................................................................................................................ 97
Removing a SATA hard drive ............................................................................ 97
Installing a SATA hard drive .............................................................................. 98
Installing SATA hard drives in the optical drive bays (optional) ...................... 100
Processor heatsink .......................................................................................................... 101
Removing the processor heatsink ................................................................... 101
Installing the processor heatsink ..................................................................... 103
System processor ............................................................................................................ 103
Removing a system processor ........................................................................ 103
Installing a system processor .......................................................................... 104
System board ................................................................................................................... 105
Removing the system board ........................................................................... 105
Installing the system board ............................................................................. 106
Product recycling .............................................................................................................................. 106
6 System diagnostics and troubleshooting
HP troubleshooting resources and tools .......................................................................................... 107
HP Support Assistant ....................................................................................................... 107
HP Help and Support Center ........................................................................................... 107
E-support ......................................................................................................................... 108
Troubleshooting a problem ............................................................................. 108
Instant Support and Active Chat ..................................................................... 108
Customer Advisories, Customer and Security Bulletins, and Customer
Notices ............................................................................................................ 108
Product Change Notifications .......................................................................... 109
ENWW vii

Helpful hints ..................................................................................................................... 109
At startup ......................................................................................................... 109
During operation .............................................................................................. 109
Customizing the monitor display ..................................................................... 110
Customer Self Help .......................................................................................................................... 110
Help and Support Center ................................................................................................. 110
HP SoftPaq Download Manager ...................................................................................... 111
Diagnostic LED codes ..................................................................................................... 111
Troubleshooting scenarios and solutions ........................................................................ 113
Solving minor problems ................................................................................... 113
Solving power supply problems ...................................................................... 114
Testing power supply ...................................................................... 114
Solving diskette problems .............................................................................. 116
Solving hard drive problems ............................................................................ 117
Solving display problems ................................................................................ 118
Solving audio problems ................................................................................... 120
Solving printer problems ................................................................................. 121
Solving keyboard and mouse problems .......................................................... 122
Solving front panel component problems ........................................................ 123
Solving hardware installation problems ........................................................... 124
Solving network problems ............................................................................... 125
Solving memory problems ............................................................................... 126
Solving processor problems ............................................................................ 127
Solving DVD problems .................................................................................... 127
Solving Internet access problems ................................................................... 128
Troubleshooting checklist ................................................................................................................. 129
LED color definitions ....................................................................................................................... 130
Self-troubleshooting with HP Vision Field Diagnostics ..................................................................... 130
Overview .......................................................................................................................... 131
Downloading and accessing HP Vision Field Diagnostics ............................................... 132
Accessing HP Vision Field Diagnostics on the workstation ............................................. 133
Creating and using a bootable USB key ......................................................... 133
Creating and using a bootable DVD ................................................................ 133
Using the HP Memory Test utility .................................................................... 133
User interface .................................................................................................................. 134
Survey tab ....................................................................................................... 134
Test tab ........................................................................................................... 136
Status tab ........................................................................................................ 138
History tab ....................................................................................................... 138
Errors tab ........................................................................................................ 138
Help tab ........................................................................................................... 139
Saving and printing information in HP Vision Field Diagnostics ...................................... 140
POST error messages ...................................................................................................................... 140
viii ENWW

7 Configuring RAID devices
Maximum hard drive configurations ................................................................................................. 146
Configuring SATA RAID devices ...................................................................................................... 147
Attaching SATA HDDs .................................................................................................... 147
Configuring system BIOS ............................................................................................... 148
Creating RAID volumes ................................................................................................... 149
Configuring SAS RAID devices ........................................................................................................ 150
Supported configurations ................................................................................................. 150
SAS RAID 0 configuration ............................................................................................... 151
SAS RAID 1 configuration ............................................................................................... 152
SAS RAID 1E configuration ............................................................................................. 153
Deleting RAID volumes .................................................................................................... 154
8 Configuring password security and resetting CMOS
Preparing to configure passwords .................................................................................................... 155
Resetting the password jumper ........................................................................................................ 155
Clearing and Resetting the CMOS ................................................................................................... 156
Using the CMOS Button .................................................................................................. 156
Using the Computer Setup (F10) Utility to Reset CMOS ................................................. 157
Appendix A Appendix A—Connector pins
Connector pin descriptions ............................................................................................................... 158
Appendix B Appendix B—System board designators
Appendix C Appendix C—Routine care
General cleaning safety precautions ............................................................................................... 170
Cleaning the workstation case ......................................................................................................... 170
Cleaning the keyboard .................................................................................................................... 170
Cleaning the monitor ....................................................................................................................... 171
Cleaning the mouse ......................................................................................................................... 171
ENWW ix

x ENWW

1 Product overview
This chapter presents an overview of the hardware components of the HP xw4600 Workstation,
including the following topics:
●Product features on page 2
●Workstation specifications on page 7
●ENERGY STAR Qualification on page 9
●Dual- and quad-core processors on page 10
●HP Cool Tools on page 11
ENWW 1
See http://partsurfer.hp.com for current information on supported spare parts.
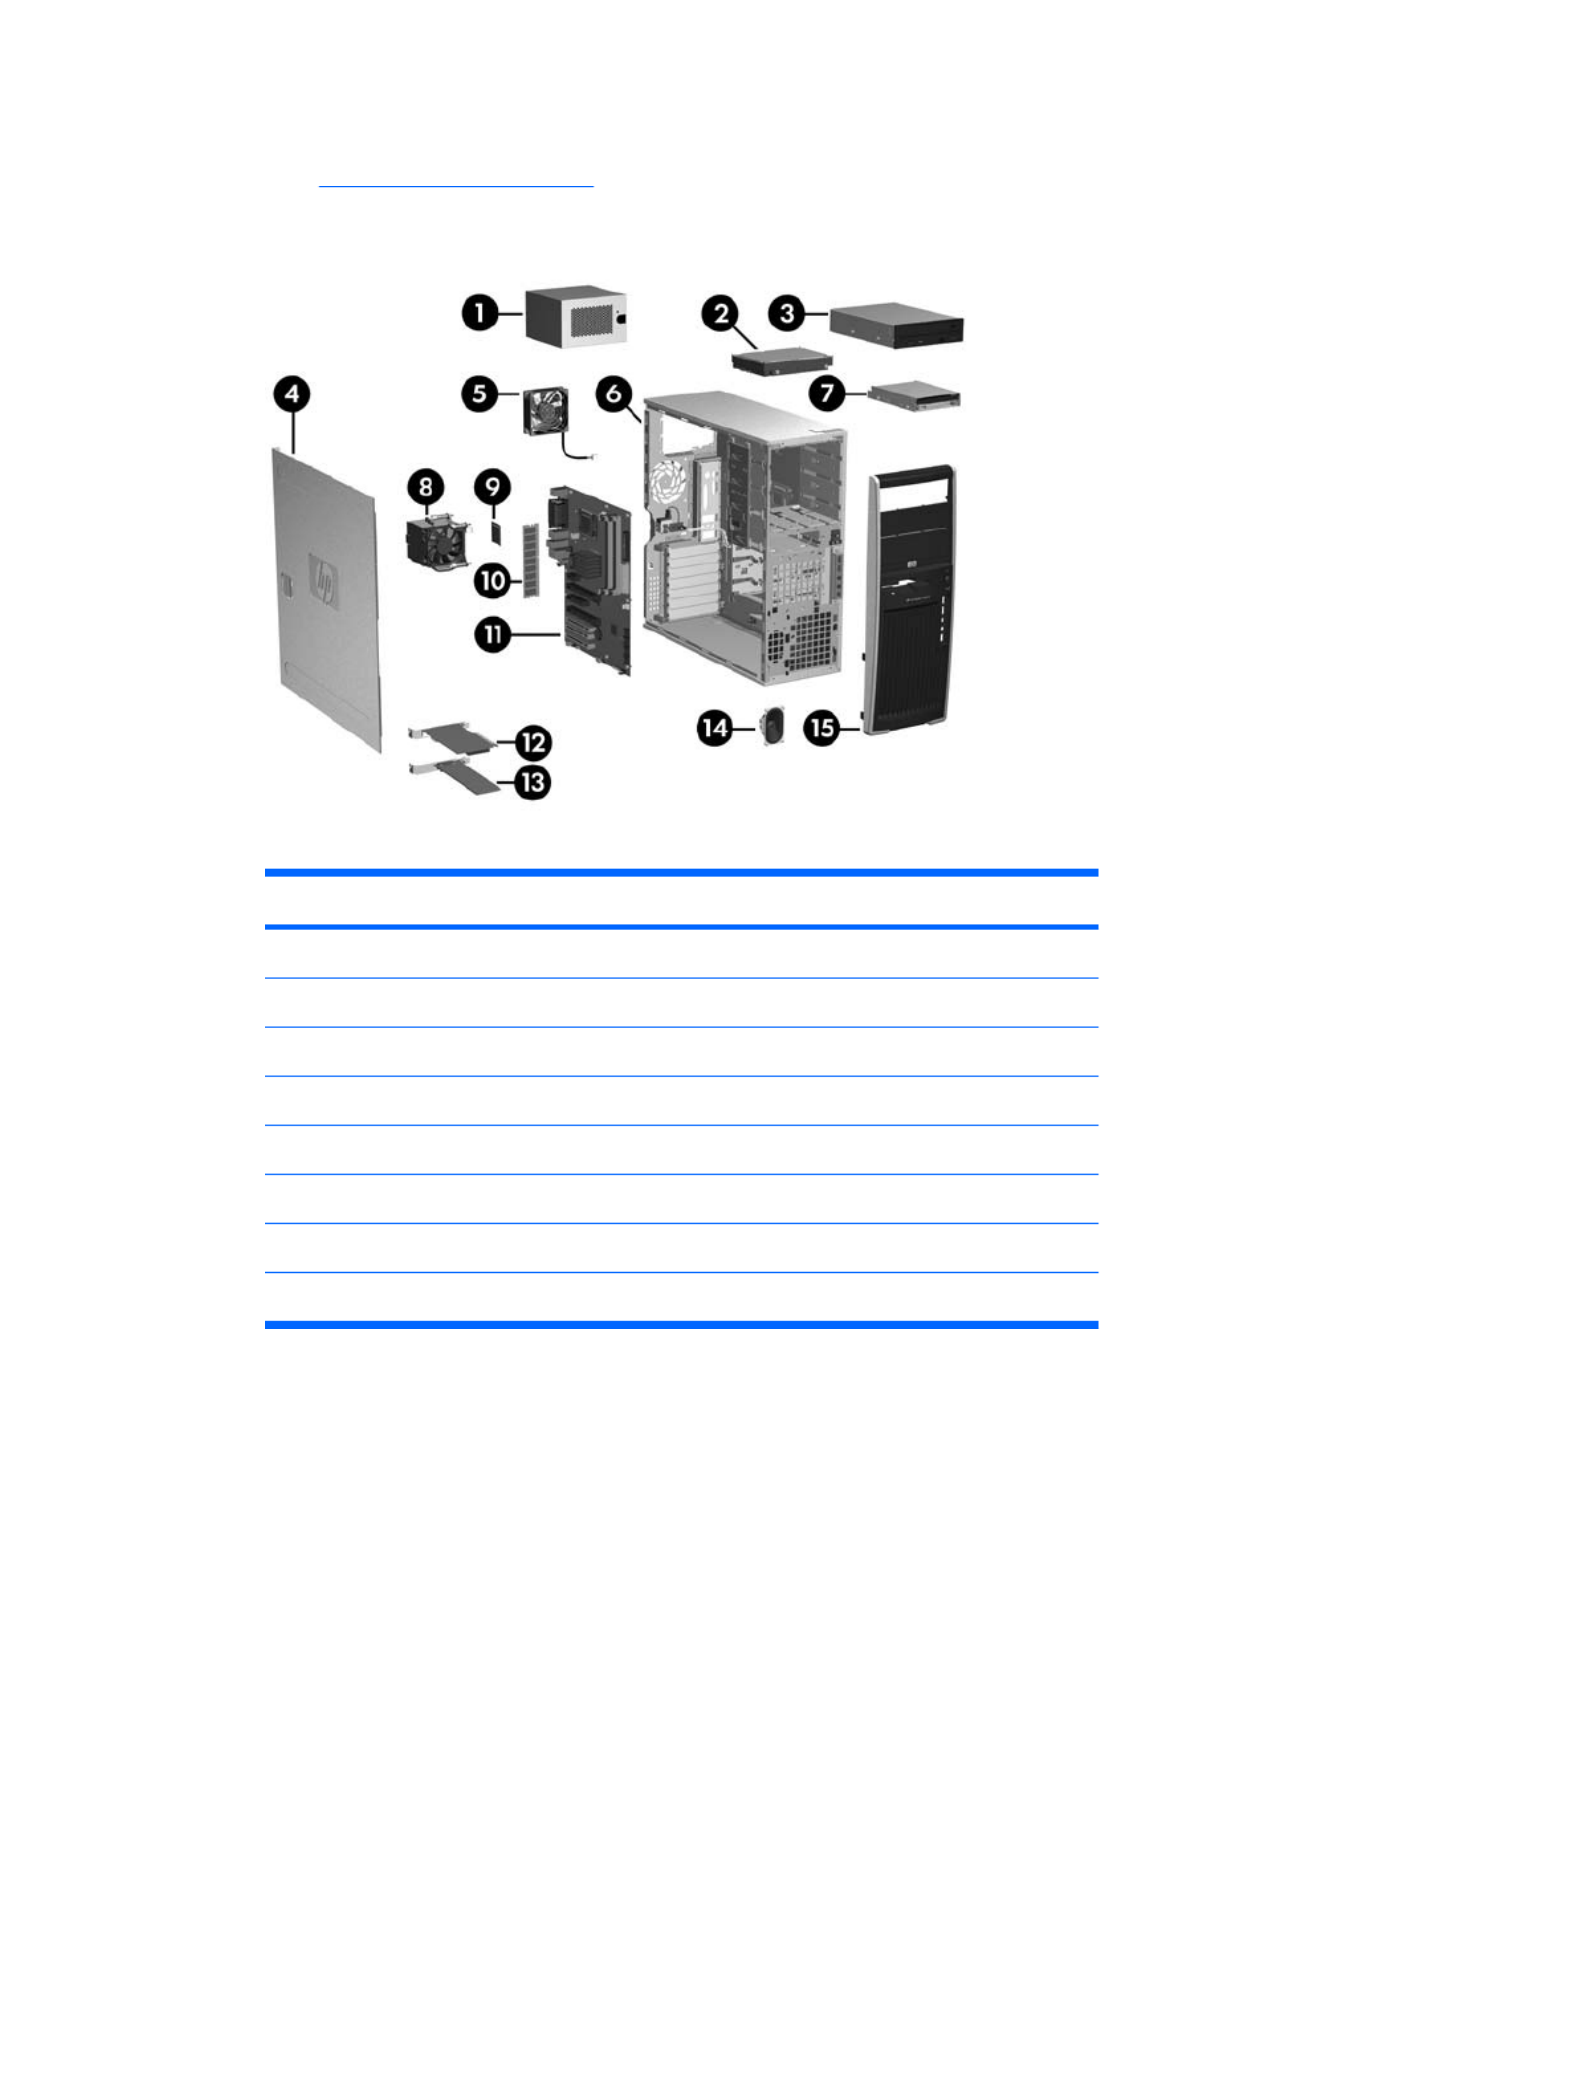
Figure 1-2 Workstation components view
Table 1-1 Component view
Item Description Item Description
1 9Power supply Processor
2Hard drive 10 Memory module
3Optical drive 11 System board
4Side access panel 12 PCI Express card
5System fan 13 PCI card
6Chassis 14 Speaker
7Diskette drive 15 Front bezel
8 Processor heatsink
ENWW Product features 3

Front panel components
The following figure shows the front panel components of a typical HP xw4600 Workstation. Drive
configurations can vary.
Figure 1-3 Front panel components
Table 1-2 Front panel components
Item Symbol Symbol DescriptionDescription Item
1 8 Optical drive eject button IEEE-1394 Connector (optional)
2 9 Power on light Diskette drive eject button
3Power button 10 Diskette drive activity light
4Hard drive activity light 11 Diskette drive (optional)
5USB 2.0 (2) 12 5.25–inch drive bays (2)
6Headphone connector 13 Optical drive activity light
7 Microphone connector 14 Optical drive
4 Chapter 1 Product overview ENWW

Rear panel components
The following figure shows the rear panel components of a typical HP xw4600 Workstation.
Figure 1-4 Rear panel components
Table 1-3 Rear panel components
Item ItemSymbol Description Symbol Description
1 Power supply Built-In Self Test (BIST)
LED
10 Padlock loop
2 Universal chassis clamp opening 11 Graphics adapter
3PS/2 mouse connector (green) 12 eSATA adapter
4Parallel connector (red) 13 USB 2.0 (1)
5USB 2.0 (4) 14 USB 2.0 (2)
6Audio line-in connector (blue) 15 Microphone connector (pink)
7Audio line-out connector (green) 16 Serial connector (blue-green)
8RJ-45 network connector 17 PS/2 keyboard connector
9Cable lock slot 18 Power cord connector
NOTE: The rear panel connectors are labeled with industry-standard icons and colors to assist you in
connecting your peripheral devices.
ENWW Product features 5

Serial number and COA label location
Each workstation has two unique serial number labels (1) and a Certificate of Authentication (COA) label
(2) (for Microsoft® Windows® preinstalled systems only). The serial number labels can usually be found
on the top panel or on the side or rear of the workstation. Keep this number available when contacting
customer service for assistance.
Figure 1-5 Location of serial number and COA label
Maximizing the airflow
●Keep your workstation in an area where the airflow is not obstructed.
●Keep the workstation off of surfaces where dust can gather.
●Keep the front of the workstation clear of any obstruction.
●Remove any dust on the front panel (vent area) and the rear fans with a small vacuum, compressed
air, or dust rag.
●Keep the back of the workstation at least 0.15 m (6 in.) away from a wall or other obstruction.
Figure 1-6 Maintain proper clearance
6 Chapter 1 Product overview ENWW

Workstation specifications
The following table lists the physical characteristics of the HP xw4600 Workstation.
Table 1-4 Physical characteristics
Weight (typical
configuration)
16 kg (35 lb.)
Tower dimensions 45 cm (17.7 in.) high
16.8 cm (6.6 in.) wide
45.6 cm (17.9 in.) deep
Power supply description
The HP xw4600 Workstation includes a 475W, 85% efficient power supply. The power supply is
compatible with Energy Star requirements. This section describes the power supply and lists its
specifications.
Table 1-5 Power supply source voltages
Source voltage Description
+3.3V PCI, PCI Express, audio, CK505, ICH9R, super I/O, BIOS ROM, and
onboard logic
+5.1V Storage (hard drive, optical drive, diskette drive), PCI, PCI Express, ICH9R,
audio, keyboard/mouse
+12 V–B PCI, PCI Express, and system fans
+12 V-D Storage (hard drive, optical drive, diskette drive), PCI Express x16 auxiliary
connector
+12 VCPU Input to onboard regulator that supplies power to the processor.
-12V PCI, serial ports
+5 VSB Sleep circuitry
Table 1-6 Maximum current per rail
Voltage rail Maximum continuous current
+3.3V 15A
+5.1V 21A
+12 VCPU 17.5A
+12 V-B 17.5A
+12 V-D 18.0A
-12V 0.3A
+5 VSB 2.25A
ENWW Workstation specifications 7

System fans
This workstation includes one rear system fan, one processor heatsink fan, and one power supply fan.
In addition, an optional front system fan is available for special environments, and some graphics cards
include onboard fans.
Resetting the power supply
If an overload triggers the power supply overload protection, all power is immediately disconnected. To
reset the power supply:
1. Disconnect the power cord from the workstation..
2. Determine what caused the overload and fix the problem. See System diagnostics and
troubleshooting on page 107 for troubleshooting information.
3. Reconnect the power cord and reboot the workstation.
When you power off the workstation through the operating system, power consumption falls below what
is considered low power consumption, but does not reach zero. This low power consumption feature
extends the life of the power supply.
Environmental specifications
This section describes the environmental specifications of your workstation.
Table 1-8 Environmental specifications
Temperature (operating) 5° to 35°C (40° to 95°F)
Temperature (nonoperating) -40° to 60°C (-40° to 140°F)
Humidity (operating) 8% to 85% RH, noncondensing
Humidity (nonoperating) 8% to 90% RH, noncondensing
Altitude (operating) 0 to 3,048m (10,000 ft)
Altitude (nonoperating) 0 to 9,144m (30,000 ft)
Shock (operating) 1/2-sine: 40G, 2–3 ms
Shock (nonoperating) 1/2-sine: 160 cm/s, 2–3 ms (~100g)
Square: 20G, 422 cm/s
NOTE: Values represent individual shock events and are not
indicative of repetitive shock events.
Vibration (operating) Operating random: 0.5G (rms), 5–300 Hz
Vibration (nonoperating) Random: 2.0G (rms), 10–500 Hz
NOTE: Values are not indicative of continuous vibration.
ENERGY STAR Qualification
HP computers marked with the ENERGY STAR logo are compliant with the applicable U.S.
Environmental Protection Agency (EPA) ENERGY STAR specifications for computers. The EPA
ENERGY STAR logo does not imply endorsement by the EPA. As an ENERGY STAR Partner, Hewlett-
Packard Company has determined the products marked with the ENERGY STAR logo are ENERGY
ENWW ENERGY STAR Qualification 9

STAR qualified per the applicable ENERGY STAR guidelines for energy efficiency. The following logo
appears on all ENERGY STAR qualified computers.
The ENERGY STAR Computers Program was created by the EPA to promote energy efficiency and
reduce air pollution through more energy-efficient equipment in homes, offices, and factories. One way
products achieve this energy efficiency is by reducing power consumption when not being used through
the Microsoft Windows Power Management feature.
The Power Management feature enables the workstation to enter a low-power (or “sleep”) mode after
a period of inactivity. When used with an external monitor that is ENERGY STAR qualified, this feature
also supports the similar power management features of the external monitor.
To take advantage of this energy savings:
●The Power Management feature has been preset to suspend the workstation to a sleep state after
30 minutes of inactivity.
●The Power Management feature has been preset to suspend the monitor to a sleep state after 15
minutes of inactivity.
Both the computer and monitor can be woken from sleep mode through user interaction with any of the
computer input devices (mouse, keyboard, and so on). when configured with Wake On LAN (WOL)
enabled, the workstation can also be woken by a network signal.
See the EPA ENERGY STAR Power Management Web site for more information about the energy and
financial savings potential of the Power Management Feature: http://www.energystar.gov/
powermanagement.
See the EPA ENERGY STAR Web site for more information about the ENERGY STAR program and
its environmental benefits: http://www.energystar.gov.
CAUTION: Using the Energy Save Monitor feature with monitors that are not ENERGY STAR qualified
can cause video distortion when an Energy Save timeout occurs.
NOTE: ENERGY STAR is not supported on Linux workstations.
If it is necessary to restore the operating system, you must also reset the ENERGY STAR settings (if
applicable) after the restore.
To verify the factory default power settings for your workstation, select Start>Control Panel, and then
double-click Power Options.
Dual- and quad-core processors
The HP xw4600 Workstation supports dual- and quad-core processors that provide two or four true
processors in a single socket. Dual- and quad-core processors are better at handling the load of multi-
threaded applications (such as rendering images in Digital Content Creation) and highly multi-tasked
environments (such as running several productivity applications while listening to music).
10 Chapter 1 Product overview ENWW

HP Cool Tools
HP xw4600 Workstation includes additional software preloaded that is not automatically installed when
you first boot your system. Additionally, there are a number of preinstalled tools on your workstation that
can enhance your workstation experience. To access or learn more about these applications:
●Open the HP Cool Tools folder by selecting Start>All Programs>HP Cool Tools.
●Select the HP Cool Tools icon on the desktop.
To learn more about these applications, select HP Cool Tools—Learn More.
To install or launch the applications, select the appropriate application.
ENWW HP Cool Tools 11

2 Setting up the operating system
This chapter provides setup and update information for the workstation operating system. It includes
these topics:
Topics
Setting up the Microsoft operating system on page 13
Setting up Red Hat Enterprise Linux on page 14
Setting up Novell SLED on page 15
Updating the workstation on page 15
This chapter also includes information on how to determine that you have the latest BIOS, drivers, and
software updates installed on the workstation.
CAUTION: Do not add optional hardware or third-party devices to the HP workstation until the
operating system is successfully installed. Adding hardware might cause errors and prevent the
operating system from installing correctly.
12 Chapter 2 Setting up the operating system ENWW

Setting up Red Hat Enterprise Linux
HP offers an HP Installer Kit for Linux (HPIKL) to supplement Red Hat box sets and help HP Linux
customers customize their system image. The HPIKL contains the HP driver CD and device drivers to
successfully setup up the Red Hat Enterprise Linux (RHEL) operating system, The HP Installer Kit for
Linux CDs are currently available for download at http://www.hp.com/support/workstation_swdrivers.
Installing with the HP driver CD
To install the HP driver CD, see “Installing with the HP Installer Kit for Linux” in the HP Workstations for
Linux manual at http://www.hp.com/support/workstation_manuals.
14 Chapter 2 Setting up the operating system ENWW

Installing and customizing Red Hat-enabled workstations
Linux-enabled workstations require the HP Installer Kit and the purchase of a Red Hat Enterprise Linux
box set. The Installer kit includes the HP CDs necessary to complete the installation of all versions of
the Red Hat Enterprise Linux box set that have been qualified to work on an HP workstation.
To use the drivers in the HP Installer kit for Linux other than RHEL, you must manually extract the drivers
from the HP Driver CD and install them. HP does not test the installation of these drivers on other Linux
distributions nor does HP support this operation.
Verifying hardware compatibility
To see which Linux versions have been qualified to work on HP Workstations visit http://www.hp.com/
support/linux_hardware_matrix.
Setting up Novell SLED
To set up the SUSE Linux Enterprise Desktop (SLED) on systems preloaded with the operating system:
1. Boot the workstation.
2. Start the Installation Settings and enter the password, network, graphics, time, keyboard settings,
and Novell Customer Center Configuration for the workstation.
NOTE: During Installation Settings after the first time after booting the system the Novell
subscription can be activated from the Novell Customer Center Configuration screen. Visit the full
Novell Customer Center documentation at http://www.novell.com/documentation/ncc/.
Updating the workstation
HP is constantly working on improving your total workstation experience. To ensure that the workstation
leverages the latest enhancements, HP recommends that you install the latest BIOS, driver, and
software updates on a regular basis.
Updating the workstation after first boot
After successfully booting the workstation for the first time, you should follow these guidelines to ensure
that the workstation is up-to-date:
●Ensure that you have the latest system BIOS loaded. See Upgrading the BIOS on page 15 for
instructions.
●Ensure that you have the latest drivers for your system. See Upgrading device drivers
on page 17 for instructions.
●Become familiar with your available HP resources.
●Consider a subscription to Driver Alerts at http://www.hp.com/go/subscriberschoice.
Upgrading the BIOS
For optimum performance, determine the BIOS revision on the workstation, and upgrade it if necessary.
ENWW Setting up Novell SLED 15

Upgrading BIOS
To find and download the latest available BIOS, which includes the latest enhancements:
1. Go to http://www.hp.com/go/workstationsupport.
2. Select Download Drivers and Software from the left menu column under Tasks.
3. Follow the instructions to locate the latest BIOS available for the workstation.
4. If the BIOS on the Web site is the same as the version on your system, no further action is required.
5. If the BIOS on the Web site is a version later than the one on your system, download the appropriate
version for the workstation. Follow the instructions in the release notes to complete the installation.
Upgrading device drivers
If you install a peripheral device (such as a printer, display adapter, or network adapter), confirm you
have the latest device drivers loaded. If you purchased your device through HP, visit the HP Web site
to download the latest drivers for your device. These drivers have been tested to ensure the best
compatibility between your device and your HP workstation.
If you did not purchase your device from HP, HP recommends visiting the HP Web site first to see if
your device and its drivers have been tested for HP workstation compatibility. If no driver is available,
visit the device manufacturer's Web site to download the latest drivers.
To upgrade device drivers:
1. Go to http://www.hp.com/go/workstationsupport.
2. Select Download Drivers and Software from the left menu column under Tasks.
3. Follow the instructions to find the latest drivers available for the workstation.
If a needed driver is not found, see the Web site of the manufacturer of the peripheral device.
ENWW Updating the workstation 17

3 Restoring the operating system
This chapter describes how to restore the Windows or Linux operating system. It includes these topics:
Topics
Restore methods on page 18
Ordering backup software on page 19
Restoring Windows Vista on page 19
Restoring Windows XP Professional on page 20
Restoring Novell SLED on page 22
Restore methods
The Windows Business Vista operating system can be reinstalled using the HP RestorePlus! process.
The Windows XP Professional operating system can be reinstalled using the RestorePlus! process or
the HP Backup and Recovery Manager.
●RestorePlus!
The RestorePlus! process reinstalls the Windows operating system and device drivers (for devices
included with the system) to a near-factory state. The process does not back up or recover data
on the hard drive. Some application software might not be restored using this process and must
be installed from the appropriate application CD.
●HP Backup and Recovery Manager (HPBR) Recovery Point
The HP Backup and Recovery Manager application can be used to capture and restore the contents
of the system partition. It captures a snapshot of the system partition and stores it in a Recovery
Point. Everything on the system partition at the time the recovery point was made is saved.
NOTE: HP Backup and Restore is only supported on the HP xw6600 and xw8600 Workstations.
The Recovery Point is saved to the hard drive and can be burned to media for safekeeping.
CAUTION: These methods restore the operating system, but not data. Data must be backed up
regularly to avoid loss.
18 Chapter 3 Restoring the operating system ENWW

Ordering backup software
If you cannot create system recovery CDs or DVDs, you can order a recovery disk set from the HP
support center. To obtain the support center telephone number for your region see http://www.hp.com/
support/contactHP.
Restoring Windows Vista
This section describes how to restore Windows Vista.
Ordering the RestorePlus! media
If you ordered restore media with your workstation, the media is included with your workstation
components.
If you did not order restore media, call HP Support and request a RestorePlus! media kit. For worldwide
technical support phone numbers, see http://www.hp.com/support.
Restoring the operating system
NOTE: Windows Vista provides a backup and restore application as well. To learn more about this
application, see the Microsoft Web site.
CAUTION: Before you restore the operating system, back up your data.
When you run RestorePlus! from media, the process deletes all information on the primary hard drive,
including all partitions.
To restore Windows Vista:
1. Boot from the RestorePlus! DVD to start the RestorePlus! process. You must start from the
RestorePlus! DVD to install device drivers and settings.
2. Follow the prompts to restore your operating system.
Some application software might not be restored using this process. If software is not restored, install
it from the appropriate application DVD.
ENWW Ordering backup software 19

Creating HP Backup and Recovery (HPBR) media
NOTE: HPBR is only supported on Windows XP systems. For details, refer to the documentation on
the Supplemental Software - HP Backup and Recovery CD included with the workstation. The
documentation can be accessed during installation.
The Initial Recovery Point can be burned to optical media and used to recover a system. This section
describes making the media.
NOTE: The workstation must have a CD or DVD writer to create the media set.
To create HPBR recovery media:
1. The Initial Recovery Point was captured when the RestorePlus! media set was created previously.
If the IRP was not created, start the HP Backup and Recovery Manager and create recovery points
using the Expert mode. Follow the HPBR online documentation for instructions.
2. Burn the IRP to media from HPBR.
Select HPBR Start > All Programs > HP Backup & Recovery > HP Backup and Recovery
Manager.
3. Select Next at the first screen.
Select Create recovery CDs or DVDs to recover the system, and then select Next.
4. Choose Next to display a list of available CD image and the recovery points.
5. Check the box next to Initial Recovery Point, and then select Next.
6. Follow the instructions to create the media.
ENWW Restoring Windows XP Professional 21

Restoring the operating system
CAUTION: Before you restore the operating system, back up your data.
When you run RestorePlus! from media, the process deletes all information on the primary hard drive,
including all partitions. If you run RestorePlus! from the recovery partition, only the root (C:) partition is
affected.
Using RestorePlus!
To restore with RestorePlus!:
1. Boot the workstation from the RestorePlus! DVD. You must start from the RestorePlus! DVD for
device drivers and settings to be installed.
2. Follow the prompts to restore the operating system.
Some application software might not be restored using this process. If software is not restored, install
it from the appropriate application DVD.
Using HPBR
To restore with the HPBR Initial Recovery Point media:
1. Boot the workstation from the Initial Recovery Point media.
2. Follow the prompts to restore the system to the state when the IRP was created.
Using the recovery partition
A system that shipped with Windows XP includes a recovery partition. You can boot the system from
that recovery partition.
From the recovery partition you can perform a system restore using the HPBR Initial Recovery Point, if
it was created. If it was not, you can use a RestorePlus! install.
To restore using the recovery partition:
1. Boot the workstation.
2. When prompted on the boot screen to enter the Recovery Manager, press F11.
TIP: The opportunity to press F11 during the boot process is small. It comes about the time the
F10 prompt appears.
NOTE: To ensure that the recovery processes reinstall on the correct hard drive, do not
disconnect the target drive during the recovery process.
3. Follow the prompts to restore the system to factory-like condition.
Restoring Novell SLED
The SLED restore media is required to restore the Linux operating system.
Creating restore media
THE SUSE Linux Enterprise Desktop preload includes a SUSE ISO icon on the desktop. You can click
this icon to go to the /iso directory. The /iso directory contains all iso images used to preload your
workstation. To recover or restore the original image, follow the instructions in the readme file in the /
iso directory to copy the ISO image file onto CDs.
22 Chapter 3 Restoring the operating system ENWW

NOTE: Make copies of the ISO recovery images on CD as backup files in case your workstation
experiences a hard drive failure.
ENWW Restoring Novell SLED 23

●Enter the Asset Tag or property identification number assigned by your company to this
workstation.
●Enable power-on password prompts during system restarts (warm-boots) and power on.
●Hide or show the integrated I/O functionality, including serial, USB, or parallel ports, audio, or
embedded NIC. Any hidden devices are inaccessible which increases overall system security.
●Enable or disable removable media boot ability.
●Enable or disable removable media write ability (if supported by hardware).
●Replicate your system setup by saving system configuration information on CD or diskette and
restoring it on one or more workstations.
●Execute self-tests on specified SATA and SAS hard drives (if supported by the drive).
ENWW Computer Setup (F10) Utility 25

BIOS ROM
The BIOS ROM is a collection of machine language programs stored as firmware in ROM. It includes
functions such as POST, PCI device initialization, Plug and Play support, power management, and the
Computer Setup (F10) Utility. The BIOS ROM is a 1-MB Serial Peripheral Interface (SPI) port. The
firmware contained in the BIOS ROM supports the following systems and specifications:
●Microsoft Windows Hardware Quality Labs (WHQL)
●Alert-On-LAN (AOL) and Wake-On-LAN (WOL)
●Advanced Configuration and Power Interface (ACPI) 1.0 and OnNow
●System Management BIOS (SMBIOS) 2.3.5
●PC98/99/00 and NetPC
●Preboot Execution Environment (PXE) boot ROM for the integrated LAN controller
●BIOS Boot Specification 1.01
●Enhanced Disk Drive Specification 3.0
●“El Torito” Bootable CD Format Specification 1.0
●AT Attachment Packet Interface (ATAPI) Removable Media Device BIOS Specification 1.0
●Multiprocessor Specification (MPS) 1.4 (for booting Linux SMP)
Using the Computer Setup (F10) Utility
You can only open the Computer Setup (F10) Utility by powering on or restarting the workstation.
To access the Computer Setup (F10) Utility menu:
1. Power on or restart the workstation.
2. As soon as your display is active and F10=Setup appears in the lower right corner of the screen,
press the F10 key .
NOTE: If you do not press F10 at the appropriate time, try again. Turn the workstation off, then
on, and press F10 again to access the utility. You can also press the Ctrl + Alt + Delete keys before
boot if you miss the opportunity to press F10.
3. Select your language from the list and press the Enter key. In the Computer Setup (F10) Utility
menu, five headings are displayed: File, Storage, Security, Power, and Advanced.
4. Use the left and right arrow keys to select the appropriate heading. Use the up and down arrow
keys to select an option, and then press Enter.
5. To apply and save changes, select File>Save Changes, and then select F10=YES.
●If you have made changes that you do not want applied, select Ignore Changes and then
select F10=YES.
●To reset to factory settings, select File>Default setup>Restore Factory Settings as
Default. Press F10 to accept the changes. Select Apply Defaults and Exit. This option
restores the original factory system defaults.
CAUTION: Do not power off the workstation while the ROM is saving your Computer Setup (F10)
Utility changes because the Complementary Metal-Oxide Semiconductor (CMOS) could become
corrupted. After you exit the F10 Setup screen, it is safe to disconnect power from the workstation.
26 Chapter 4 System management ENWW

Heading Option Description
Power-On
Password
Enables you to set and enable the power-on password.
Password
Options
Lock Legacy Resources–Prevents the operating system from changing resources to Serial,
Parallel, and Diskette controller.
Setup Browse Mode–If a setup password is created, this mode enables read-only access to the
F10 Setup menu for users without a password.
Smart Cover Allows you to disable the cover removal sensor or to notify you if the sensor has been activated.
Device Security Makes the following devices available or unavailable to the system:
●Serial port
●Parallel port
●Front USB port
●Rear USB port
●Internal USB port
●System audio
●Network controller
●Legacy diskette
●Embedded Security Device
●SATA0–5
For each device, Device Available is the default setting and allows the operating system to access
the device. Device Hidden makes the device unavailable; it is disabled by the BIOS and cannot be
enabled by the operating system. When enabled, Embedded Security Device offers these options:
●Embedded Security Device Support
●Enable/Disable—Turns the Trusted Platform Mechanism (TPM) on and off. If this option is
enabled, the following options become available:
◦Power-On Authentication Support—Enables and disables an authentication feature that
requires you to enter a TPM user key password to boot the system. This feature uses
the TPM to generate and store the authentication password.
◦Reset Authentication Credential—Resets the authentication functionality and clears all
authentication credentials.
NOTE: A setup password must be set to enable the Embedded Security Device and to access
any security features associated with the Embedded Security Device.
Network Service
Boot
Enables or disables the ability to boot to the network using the F12 key or the boot order.
System IDs Asset Tag—A 16–byte string identifying the system.
Ownership Tag—An 80–byte string identifying ownership of the system. This tag is displayed on
the screen during POST.
Universal Unique Identifier (UUID)—Can only be updated if the current chassis serial number is
invalid. (These ID numbers are normally set in the factory and are used to uniquely identify the
system.)
Keyboard—Enables you to set the keyboard locale for System ID entry.
Table 4-1 Computer Setup (F10) Utility menu descriptions (continued)
ENWW Computer Setup (F10) Utility 29

Heading Option Description
DriveLock
Security
Allows you to select a hard drive, enable or disable DriveLock security on that drive, and set a
DriveLock password. This option appears only if your drive supports DriveLock.
CAUTION: Enabling DriveLock can render a hard drive permanently inaccessible if the master
password is lost or forgotten. No method exists to recover the password or access the data.
System Security Data Execution Prevention—Enables or disables Data Execution Prevention mode in the
processors. This mode prohibits code from running in pages that were set up as data pages, and
prevents attacks such as buffer overflows. Operating system support is required for this feature.
Virtualization Technology (VTx)—Enables Intel Virtualization Technology to increase workstation
performance. (This feature is not available in all configurations.)
Virtualization Technology Directed
OS Management of Embedded Security Device—Enables or disables the ability of the operating
system to control the TPM device, including turning it on and off, initializing it, and resetting it.
Reset of Embedded Security Device through OS—Enables or disables the ability of the operating
system to reset the TPM.
Setup Security
Level
Enables the administrator to selectively set the security level for each setup feature. The options
are: Setup Password and None. Browser mode must be enabled to use this option.
Power OS Power
Management
Enables or disables:
●Runtime Power Management
●ACPI S3 Hard Disk Reset
●ACPI S3 PS 2 Mouse Wakeup
●USB Wake on Device Insertion
●Unique Sleep State Blink Rates
Hardware Power
Management
Enables or disables SATA Power Management
Thermal Enables you set the rate of the system fan when the processor is in idle.
Table 4-1 Computer Setup (F10) Utility menu descriptions (continued)
30 Chapter 4 System management ENWW

Workstation management
The HP Client Management Solutions (CMS) which are available for download from http://www.hp.com/
go/easydeploy are standards-based solutions for managing and controlling workstations in a networked
environment. This section summarizes capabilities, features, and key components of workstation
management including:
Topics
Initial workstation configuration and deployment on page 34
Installing a remote system on page 34
Replicating the setup on page 34
Updating and managing software on page 37
ROM Flash on page 39
FailSafe Boot Block ROM on page 40
Asset tracking and security on page 41
Fault notification and recovery on page 49
Dual-state power button on page 50
NOTE: Support for specific features described in this guide can vary by model and software version.
ENWW Workstation management 33

Initial workstation configuration and deployment
Your workstation includes a preinstalled system software image. After a brief software unbundling
process, the workstation is ready to use.
If you prefer to replace the preinstalled software image with a customized set of system and application
software, several methods are available for deploying a customized software image, including:
●Installing additional software applications after unbundling the preinstalled software image
●Using a disk cloning process to copy the contents from one hard drive to another
The best deployment method depends on your information technology environment and processes.
The Restore Plus! CD, ROM-based setup, and ACPI hardware provide further assistance with recovery
of system software, configuration management and troubleshooting, and power management.
Installing a remote system
Remote system installation enables you to start and set up your system using the software and
configuration information located on a network server. This feature is usually used as a system setup
and configuration tool and can be used for the following tasks:
●Deploying a software image on one or more new PCs
●Formatting a hard drive
●Installing application software or drivers
●Updating the operating system, application software, or drivers
To initiate a remote system installation, press F12 when F12=Network Service Boot appears in the
lower right corner of the HP logo screen. Follow the onscreen instructions to continue the installation
process. The default boot order is a BIOS configuration setting that can be changed to always attempt
a PXE boot.
Replicating the setup
The following procedures enable you to copy one setup configuration to other workstations of the same
model for faster, more consistent configuration of multiple workstations. Both procedures require a
diskette drive or a USB device such as an HP Drive Key.
34 Chapter 4 System management ENWW

Copying a setup configuration to a single workstation
CAUTION: A setup configuration is model-specific. File system corruption can result if source and
target workstations are not the same model. For example, do not copy the setup configuration from an
HP xw4200 Workstation to an HP xw4600 Workstation.
1. Select a setup configuration to copy, and then reboot the workstation.
2. As soon as the workstation powers on, press and hold the F10 key until you enter the Computer
Setup (F10) Utility. If necessary, press Enter to bypass the title screen.
NOTE: If you do not press the F10 key at the appropriate time, you must restart the workstation,
and then press and hold the F10 key again to access the utility.
If you are using a PS 2 keyboard, you may see a keyboard error message—disregard it.
3. If you are using a diskette or other storage device, insert it now. If not, proceed to the next step.
4. Select File>Replicated Setup>Save to Removable Media. Follow the instructions on the screen
to create the configuration diskette.
5. Power off the workstation you are configuring and insert the configuration diskette into the diskette
drive.
6. Power on the workstation you are configuring.
7. Press and hold the F10 key until you enter the Computer Setup (F10) Utility. If necessary, press
Enter to bypass the title screen.
8. Select File>Replicated Setup>Restore from Removable Media, and then follow the instructions
on the screen.
9. Restart the workstation when the configuration is complete.
ENWW Workstation management 35

Updating and managing software
HP provides several tools for managing and updating software on desktops and workstations: HP Client
Manager Software, Altiris Client Management Solutions, System Software Manager, Proactive Change
Notification, and Subscriber’s Choice.
HP Client Manager Software
HP Client Manager Software (HP CMS) assists customers in managing workstation hardware. It offers:
●Detailed views of hardware inventory for asset management
●PC health-check monitoring and diagnostics
●Proactive notification of changes in the hardware environment
●Web-accessible reporting of business-critical details such as thermal warnings, memory alerts, and
more
●Remote updating of system software such as device drivers and ROM BIOS
●Remote changing of boot order
●Configuration of system BIOS settings
For more information about the HP Client Manager, see http://www.hp.com/go/ssm.
Altiris Client Management Solutions
Altiris and HP have partnered to provide comprehensive, tightly integrated systems management
solutions to reduce the cost of owning HP client PCs. The HP Client Manager Software is the foundation
for additional Altiris Client Management Solutions that address:
●Inventory and asset management
●Deployment and migration
●Help desk and problem resolution
●Software and operations management
For more information about the following topics, go to http://www.hp.com/go/ssm:
●How HP Client Manager Software works
●Which solutions are compatible with your operating system
●How to download a fully functional, 30-day evaluation version of Altiris solutions
System Software Manager
System Software Manager (SSM) is te system-level software on multiplea utility that enables you to upda
systems simultaneously. When executed on a PC client system, SSM detects both hardware and
software versions, and then updates the appropriate software from a central repository, also known as
a file store. Driver versions that are supported by SSM are denoted with a special icon on the software,
the driver download Web site, and on the Support Software CD. To download the utility or to obtain more
information about SSM, see http://www.hp.com/go/ssm.
ENWW Workstation management 37
Produktspezifikationen
| Marke: | HP |
| Kategorie: | Desktop |
| Modell: | xw4600 |
Brauchst du Hilfe?
Wenn Sie Hilfe mit HP xw4600 benötigen, stellen Sie unten eine Frage und andere Benutzer werden Ihnen antworten
Bedienungsanleitung Desktop HP

29 September 2024
15 September 2024
10 September 2024
4 September 2024
2 September 2024
28 August 2024
26 August 2024
24 August 2024
22 August 2024
21 August 2024
Bedienungsanleitung Desktop
- Desktop Samsung
- Desktop Acer
- Desktop Apple
- Desktop Asus
- Desktop BenQ
- Desktop Gigabyte
- Desktop Medion
- Desktop Microsoft
- Desktop Sharkoon
- Desktop Sony
- Desktop LG
- Desktop Sharp
- Desktop WOOOD
- Desktop Haier
- Desktop TrekStor
- Desktop Optoma
- Desktop PEAQ
- Desktop Toshiba
- Desktop Mio
- Desktop ViewSonic
- Desktop Dell
- Desktop LC-Power
- Desktop Lenovo
- Desktop MSI
- Desktop JYSK
- Desktop Tripp Lite
- Desktop Razer
- Desktop ELO
- Desktop Targa
- Desktop Xoro
- Desktop Vtech
- Desktop Parisot
- Desktop Wehkamp
- Desktop Supermicro
- Desktop Faytech
- Desktop InFocus
- Desktop NEC
- Desktop Seagate
- Desktop Fujitsu
- Desktop Maxdata
- Desktop Packard Bell
- Desktop Kogan
- Desktop ZTE
- Desktop Atari
- Desktop Kramer
- Desktop Asrock
- Desktop ECS
- Desktop Promethean
- Desktop Vorago
- Desktop Emachines
- Desktop Ibm
- Desktop MP
- Desktop ONYX
- Desktop Alienware
- Desktop Zotac
- Desktop Intel
- Desktop Moxa
- Desktop VXL
- Desktop Planar
- Desktop Shuttle
- Desktop Altra
- Desktop Axis
- Desktop Advantech
- Desktop Elitegroup
- Desktop BDI
- Desktop Bestar
- Desktop Pelco
- Desktop Foxconn
- Desktop System76
- Desktop NComputing
- Desktop Cybernet
- Desktop Aopen
- Desktop Smart Things
- Desktop Zoostorm
- Desktop Dell Wyse
- Desktop MvixUSA
- Desktop AIS
- Desktop Wyse
Neueste Bedienungsanleitung für -Kategorien-

30 November 2024

15 Oktober 2024

14 Oktober 2024
12 Oktober 2024
11 Oktober 2024

9 Oktober 2024

9 Oktober 2024

7 Oktober 2024
4 Oktober 2024
4 Oktober 2024