Hitachi DZ-HS401 Bedienungsanleitung
Lesen Sie kostenlos die 📖 deutsche Bedienungsanleitung für Hitachi DZ-HS401 (163 Seiten) in der Kategorie Camcorder. Dieser Bedienungsanleitung war für 25 Personen hilfreich und wurde von 2 Benutzern mit durchschnittlich 4.5 Sternen bewertet
Seite 1/163

1
DZ-HS403/DZ-HS401(W)/(P)
Instruction manual
To obtain the best performance and ensure years of
trouble-free use, please read this entire instruction
manual.
DZ-HS403 DZ-HS401

2
Important Information
For Your Safety
The power switch turns the DVD video camera/recorder on and off, leaving the date/time feature unaffected. If the
camera/recorder is to be left unattended for a long period of time, turn it off.
The DVD video camera/recorder and AC
adapter/charger have the following caution
marks.
CAUTION: TO REDUCE THE RISK OF
ELECTRIC SHOCK, DO NOT OPEN.
NO USER-SERVICEABLE PARTS INSIDE.
REFER SERVICING TO QUALIFIED
SERVICE PERSONNEL.
Identifications of caution marks
Precautions
WARNING: Many television programs and films
are copyrighted. In certain circumstances, copy-
right law may apply to private in-home
videotaping of copyrighted materials.
This Class B digital apparatus complies with
Canadian ICES-003.
WARNING: TO PREVENT FIRE OR SHOCK HAZARD, DO NOT
EXPOSE THIS UNIT TO RAIN OR MOISTURE.
WARNING: TO PREVENT FIRE OR SHOCK HAZARD, USE THE
RECOMMENDED ACCESSORIES ONLY.
WARNING: TO PREVENT FIRE OR SHOCK HAZARD,
BE SURE TO USE THE SPECIFIED AC ADAPTER/
CHARGER (DZ-ACS3).
CAUTION
RISK OF ELECTRIC SHOCK
DO NOT OPEN
This symbol warns the user that
uninsulated voltage within the unit
may have sufficient magnitude to cause
electric shock. Therefore, it is dangerous
to make any kind of contact with any
inside part of this unit.
This symbol alerts the user that
important literature concerning the
operation and maintenance of this unit
has been included. Therefore, it should
be read carefully to avoid any
problems.
The liquid crystal display (LCD) panel is
made by highly precise technology. More than
99.99% of its picture elements (pixels) are
effective, but some (less than 0.01%) may
appear as colored bright dots. This does not
indicate a fault as the LCD panel stretches the
limits of current technology.
CLASS 1
LASER PRODUCT
CAUTION
This product contains a laser diode of higher
class than 1. To ensure continued safety, do
not remove any covers or attempt to gain
access to the inside of the product. Refer all
servicing to qualified personnel.

3
Microsoft®, Windows®, Windows® Me, Windows® 2000 Professional, and Windows® XP are
registered trademarks of Microsoft Corporation.
Windows Vista™ is a trademark of Microsoft Corporation.
Intel®, Pentium® Processor, and Celeron® Processor are registered trademarks of Intel Corporation.
Intel® Core is a trademark of Intel Corporation.
Macintosh is a trademark of Apple, Inc.
IBM® and PC/AT
® are registered trademarks of International Business Machines Corporation.
Manufactured under license from Dolby Laboratories.
“Dolby” and the double-D symbol are trademarks of Dolby Laboratories.
Other company names and product names listed are trademarks or brand names belonging to each
individual company.
SD logo is a trademark.

4
IMPORTANT SAFETY INSTRUCTIONS
In addition to the careful attention devoted to quality standards in the manufacture of your video product, safety is a
major factor in the design of every instrument. But, safety is your responsibility too.
This page lists important information that will help to assure your enjoyment and proper use of DVD video camera/
recorder and accessory equipment.
1Read these instructions.
2Keep these instructions.
3Heed all warnings.
4Follow all instructions.
5Do not use this apparatus near water.
6Clean only with dry cloth.
7Do not block any ventilation openings. Install in
accordance with the manufacturer’s instructions.
8Do not install near any heat sources such as
radiators, heat registers, stoves, or other apparatus
(including amplifiers) that produce heat.
9Protect the power cord from being walked on or
pinched particularly at plugs, convenience
receptacles, and the point where they exit from the
apparatus.
10 Only use attachments/accessories specified by the
manufacturer.
11 Use only with the cart, stand,
tripod, bracket, or table specified
by the manufacturer, or sold with
the apparatus. When a cart is
used, use caution when moving
the cart/apparatus combination to
avoid injury from tip-over.
12 Unplug this apparatus during lightning storms or
when unused for long periods of time.
13 Refer all servicing to qualified service personnel.
Servicing is required when the apparatus has been
damaged in any way, such as power-supply cord or
plug is damaged, liquid has been spilled or objects
have fallen into the apparatus, the apparatus has
been exposed to rain or moisture, does not operate
normally, or has been dropped.
14 The apparatus shall not be exposed to dripping or
splashing and that no objects filled with liquids,
such as vases, shall be placed on the apparatus.
15 The equipment (AC Adapter/Charger) shall be
used near the socket-outlet and shall be easily
accessible.

5
Cautions on HDD
Save the data recorded on HDD:
•To back up the data recorded on HDD, save it on a DVD. It is also recommended that you use this
DVD video camera/recorder to dub the data. You can also use a PC to save the data on a DVD.
•It is recommended that you periodically save your recordings.
Do not subject the DVD video camera/recorder to any vibrations or impact:
•This could result in the HDD not being recognized or recording, playback or dubbing to become
impossible.
•Do not subject this DVD video camera/recorder to any vibrations or impact especially during
recording, playback or dubbing, or while the ACCESS/PC indicator is lit or blinking.
•If vibrations to this DVD video camera/recorder are repeated, or the drop status of DVD video
camera/recorder is detected (see page 69), recording, playback or dubbing will stop to protect the
HDD in this DVD video camera/recorder.
Carefully check the temperature of this DVD video camera/recorder:
•If the temperature of this DVD video camera/recorder is too high or too low, normal recording or
playback may not be possible.
•If the power switch is set to “HDD” with the temperature of this DVD video camera/recorder too
high or too low, message “The temperature of HDD is outside the operating temperature range.
Turn off power.” may appear to protect the HDD. Even if this happens, setting the power switch to
“DVD” may allow you to use the DVD video camera/recorder with a DVD, so it is recommended
that you carry a spare DVD even if you intend to record on the HDD.
This DVD video camera/recorder cannot be used at high altitude:
•Note that the DVD video camera/recorder cannot be used in a place where the atmospheric
pressure is low, such as 3,000 meters or more above sea-level.
Do not place this DVD video camera/recorder near a magnet or magnetic field:
•If you so, recording, playback or dubbing may not be possible.
Cautions When Using
Handle the liquid crystal display (LCD) with care:
•The LCD is a very delicate display device: Do not press its surface with force, hit it or prick it with
a sharp object.
•If you push the LCD surface, unevenness in display may occur. If unevenness does not disappear
soon, turn the DVD video camera/recorder off, wait for a few moments, and then turn it on again.
•Do not place the DVD video camera/recorder with the open LCD screen down.
•Close the LCD monitor when not using the DVD video camera/recorder.
Please note in advance that Hitachi will not accept any liability or make compensation for loss
of data, or direct or indirect damage when recording or playback is not performed normally
due to a fault in this DVD video camera/recorder. This also applies to repairs on this DVD
video camera/recorder (including repair of components other than HDD).
•Hitachi cannot compensate for any damages caused when recording is not made normally or
recorded contents cannot be played back because of a defect in the DVD video camera/
recorder, disc or card. Also, Hitachi cannot be responsible for your recorded video and audio.
•If you or a third party make a mistake when handling this DVD video camera/recorder, disc,
card, etc., the recorded contents may be lost. We cannot be responsible for compensation for
damage due to loss of recorded contents.

6
Liquid crystal display (LCD) and viewfinder:
•The LCD screen and viewfinder are the products of highly precise technology. Among the total
number of pixels (approx. 120,000 pixels for LCD monitor and equivalent to approx. 200,000 pixels
for viewfinder), 0.01% or less pixels may be missing (black dots) or may remain lit as colored dots
(red, blue, green). This shows the limitations of the current technology, and does not indicate a
fault that will interfere with recording.
•The LCD screen and viewfinder will be slightly dimmer than usual when the DVD video camera/
recorder is at low temperature, as in cold areas, or immediately after power is turned on. Normal
brightness will be restored when the temperature inside the DVD video camera/recorder rises.
Hold the DVD video camera/recorder correctly:
•Do not hold the viewfinder or LCD monitor when lifting the DVD video camera/recorder: The
viewfinder or LCD monitor could detach and the DVD video camera/recorder may fall.
Do not subject the DVD video camera/recorder to impact:
•This DVD video camera/recorder is a precision machine. Take great care that you do not strike it
against a hard object or let it fall.
•When using a tripod, firmly secure the DVD video camera/recorder on it. Do not use the DVD
video camera/recorder with a tripod in a place where it is subject to severe vibrations or impact.
No sand or dust!
•Fine sand or dust entering the DVD video camera/recorder or AC adapter/charger could cause
malfunctions or defects.
No water or oil!
•Water or oil entering the DVD video camera/recorder or AC adapter/charger could cause electric
shock, malfunctions or defects.
Heat on surface of product:
•The surfaces of the DVD video camera/recorder, AC adapter/charger and battery will be slightly
warm, but this does not indicate a fault.
Screen on connected TV:
•Never leave the Disc Navigation screen, still image or camera image displayed on your TV to
which the DVD video camera/recorder is connected: Doing so could result in displayed image
retention or phosphor degradation of TV screen.
Be careful of ambient temperature:
•If the temperature of this DVD video camera/recorder is too high or too low, normal recording/
playback may not be possible.
•Take care that the temperature of this DVD video camera/recorder, when connected to PC does
not rise excessively (reference for usage: approx. 30 minutes at about 86ºF (30ºC).
•Do not leave the DVD video camera/recorder on beach sand or in a closed vehicle where the
temperature is very high for a long time: This could cause malfunctions.
Do not point directly at the sun:
•If direct sunlight strikes the lens or viewfinder, the DVD video camera/recorder could malfunction
or a fire could occur.
•Do not leave the DVD video camera/recorder with the LCD screen exposed to direct sunlight: This
could cause malfunctions.
Do not use the DVD video camera/recorder near TV or radio:
•This could cause noise to appear on the TV screen or in radio broadcasts.
Do not use the DVD video camera/recorder near strong radio waves or magnetism:
•If the DVD video camera/recorder is used near strong radio waves or magnetism, such as a radio
wave tower or electric appliances, recording or playback may stop, or noise could enter the video
and audio that are being recorded. During playback of normally recorded video and audio, noise
may also be present in picture and sound.
At worst the DVD video camera/recorder could malfunction.
Do not expose the DVD video camera/recorder to soot or steam:
•Thick soot or steam could damage the DVD video camera/recorder case or cause malfunctions.

7
Do not use the DVD video camera/recorder near corrosive gas:
•If the DVD video camera/recorder is used in a place where there is dense exhaust gas generated
by gasoline or diesel engine, corrosive gas such as hydrogen sulfide, or sulfur such as in a hot
spring area, the external or internal terminals could corrode, which would disable normal
operation, or the battery connecting terminals could corrode, so power will not turn on.
Do not use the DVD video camera/recorder near ultrasonic humidifier:
•With some water in humidifier, calcium and other chemicals dissolved in water could scatter in the
air, and white particles could adhere to the optical head of the DVD video camera/recorder, which
could cause it to operate abnormally.
Do not expose the DVD video camera/recorder to insecticide:
•Insecticide entering the DVD video camera/recorder could dirty the lens in laser pickup block for
DVD, and in such a case the DVD video camera/recorder might not operate normally. Turn the
DVD video camera/recorder off and cover it with vinyl sheet, etc. before using insecticide.
Do not use a generally available 8 cm CD lens cleaner:
•Cleaning the DVD lens is not necessary when using this DVD video camera/recorder in the usual
way.
•Using 8 cm CD lens cleaner could cause this DVD video camera/recorder to be faulty.
•If you have to clean the lens, use a Hitachi Maxell cleaner that is exclusively for 8 cm DVD discs.
Be careful of moisture condensation:
•When you move the DVD video camera/recorder between places where the difference in
temperatures is great – such as entering a lodge from a ski slope or going out of a cooled room or
vehicle – condensation (vapor in air warmed or cooled to water droplets) could occur on the lens
and/or inside the DVD video camera/recorder. If condensation occurs, do not open the cover of
disc or card insertion block if possible. If condensation occurs on the lens, wipe it off with a soft,
dry cloth. Even if the external surface of DVD video camera/recorder has dried, condensation may
remain inside: Turn the DVD video camera/recorder off and leave it in a dry place for at least 1 – 2
hours before using it again.
Do not use the DVD video camera/recorder for a long uninterrupted period of time:
•This DVD video camera/recorder cannot be used for a long time continuously as a surveillance
camera/monitor. If you use it for a long continuous period of time, the temperature of DVD video
camera/recorder could exceed the limit and the recording/playback operation may slow down or
other faults could occur. If this happens, turn it off and wait for a while before using it again.

8
Do not turn the DVD video camera/recorder off while the ACCESS/PC indicator or
CARD ACCESS indicator is lit or blinking:
•The ACCESS/PC or CARD ACCESS indicator is lit or
blinking to show that data is being written to disc or card,
or being read from it. At this time, do not do any of the
following, so as not to damage the data:
−Remove battery
−Disconnect AC adapter/charger
−Plug or unplug PC connection cable
−Remove disc or card
−Subject DVD video camera/recorder to severe
vibrations or impact
−Violently open or close the LCD monitor
The ACCESS/PC indicator will light for a while after
recording is finished. While it is lit, do not subject the DVD
video camera/recorder to any vibration or impact, and do
not disconnect the battery or AC adapter/charger.
If, when using HDD/DVD, you turn the DVD video
camera/recorder off while the ACCESS/PC indicator is lit
or blinking, turn it on again: When using a DVD, turn it on
with the DVD loaded. The HDD/DVD will be restored (see page 142).
Do not wipe the DVD video camera/recorder case with benzene or thinner:
•The coating of case could peel off or the case surface could deteriorate.
•When using a chemical cleaning cloth, follow the instructions.
Also read the instructions attached with optional accessories:
•For optional accessories, observe the cautions and follow instruction manuals attached.
The battery provided has not been charged at time of purchase:
•Charge it before using the DVD video camera/recorder (see page 29).
•The battery will discharge as time passes. (The battery is produced so that it discharges on its own
in order to protect its characteristics.)
Disc cannot be inserted or removed unless a charged battery or AC adapter/
charger is connected to the DVD video camera/recorder.
Be sure to set the power switch to “OFF” when turning the DVD video camera/
recorder off:
•Disconnecting the battery or AC adapter/charger while the DVD video camera/recorder is being
powered could cause a fault.
CARD ACCESS indicator
ACCESS/PC
indicator

9
Cautions When Storing
Do not leave the DVD video camera/recorder in a place where the temperature is
very high for a long period of time:
•The temperature inside a closed vehicle or trunk can become very high in a hot season. If you leave
the DVD video camera/recorder in such a place, it could malfunction or the case could be
damaged. Also, do not expose the DVD video camera/recorder to direct sunlight or place it near a
heater.
Do not store the DVD video camera/recorder in a place where the humidity is high
or in a dusty place:
•Dust entering the DVD video camera/recorder could cause malfunctions. If the humidity is high,
the lens could be moldy, and the DVD video camera/recorder could become inoperable. It is
recommended that you put the DVD video camera/recorder with desiccant in a box when storing
it in a closet, etc.
Do not store the DVD video camera/recorder in a place subject to strong
magnetism or intense vibrations:
•This could cause malfunctions.
Detach the battery from the DVD video camera/recorder and store it in a cool place:
•Leaving the battery attached or storing it at high temperature could shorten its life.
Suggestions and Restrictions
Make a trial recording:
•Always make a trial recording before doing actual recording to make sure that recording is normal.
The data that have not been stored normally because of a defect in the DVD video camera/
recorder cannot be restored.
It is recommended that you use the HDD from which recorded contents can be deleted for trial
recording.
Do not use the DVD video camera/recorder for professional applications:
•This DVD video camera/recorder is designed and produced for home-use recording and playback.
Copyright:
•Data recorded on the HDD/disc/card in this DVD video camera/recorder using other digital/
analog media or devices are protected by the copyright act and cannot be used without permission
of the owner of copyright, except for personal enjoyment. Be aware that recording is restricted for
some demonstrations, performances and exhibitions, even for personal enjoyment.

10
CLEANING
Be sure to set the power switch to “OFF” before cleaning this DVD video camera/recorder.
●Cleaning LCD screen and camera
lens
Use dry, soft cloth to wipe dirt off. When
cleaning the LCD screen, be careful not to use
force, scratch it, or subject it to impact: Doing
such could cause a defect in the screen, result in
display unevenness, or damage the LCD
monitor.
●If dust adheres to the viewfinder
lens, remove it using a cotton
swab, etc.
Do not rub the lens with force: Doing so could
scratch the lens.
●Cleaning DVD Video Camera/
Recorder Case
Do not wipe the DVD video camera/recorder
case hard with any foreign object, such as grit,
adhering to it, and do not use rough fabrics to
clean the case: Doing so could scratch it.
Use soft cloth, etc. to gently wipe dirt off the case.
●Do not use benzene or thinner to
clean DVD video camera/recorder
case
The coating of case could peel off or the case
could deteriorate. Wipe off dirt on the case with
a soft cloth which has been completely wrung
out. When using chemical cleaning cloth, follow
instructions for use.
HANDLING DISCS
●Using discs
Discs are very delicate recording media.
Carefully read the following cautions and
observe them:
•Always use a brand new disc when recording
important material.
•Be sure not to touch the recording surface of
disc, or dirty or scratch it.
•If there is dust, scratch, dirt on disc or if it is
warped, the following phenomena may occur:
−Block noise in playback
image
−Momentary stop of
playback image
−Sound interrupted during
playback, or abnormal
sound
−Blue thumbnail
display* (Fig. 1)
−Disc cannot correctly
be recognized
−Disc cannot be
initialized
−Delay between video
and audio
Even if disc is normal, the above phenomena
may occasionally occur. While the ACCESS/
PC indicator is lit, do not subject disc to
vibrations or impact, and avoid using DVD
video camera/recorder at extremely high or
low temperatures, or in environment where
condensation is likely to occur.
•When recording images,
the DVD video camera/
recorder may avoid the
portions of disc where
recording is not possible,
due to dust, scratches,
etc. [It will pause m at
such a portion and
automatically restart
recording (n).]
This will cause recording to be interrupted for
several seconds to several minutes, and
multiple thumbnails will be created by one
recording session as shown above. In this case,
the recordable time on disc will decrease.
•Be careful when removing the disc since the
metal of removal slot of DVD video camera/
recorder, and disc itself, may be hot.
●Storing discs
•When storing disc, replace it in the plastic case
in which it was purchased.
•Be careful that no condensation occurs on disc.
•Do not place disc in following places:
−Direct sunlight for a long time
−Where humidity is high or in dusty place
−Where there is heat from a heater, etc.
Block noise
001/ 006A l l Pr o g ra
m
s
PLAY SELECT
PHOTO
Fig. 1
*
001 / 0 02A l l Pr o gr a
m
s
PLAY SELECT
PHOTO
(Recording one scene
may produce multiple
thumbnails.)

11
DISC CLEANING
Use the disc cleaning cloth provided to lightly
wipe off any dirt adhering to the disc as shown
in the figure. Do not wipe the disc with force:
Doing so could cause scratches.
Never use solvent (thinner, water, antistat or
detergent) for cleaning.
Lightly wash the dirty cleaning cloth with
detergent: The dirt removal capacity of the cloth
will improve (rinse the cloth well with water so
that no detergent remains).
NOTE WHEN TRANSFERRING OR DISCARDING DISCS AND SD MEMORY CARDS
•
The “Format” function on this DVD video camera/recorder will only change the file control information:
It will not completely delete the data in the built-in hard disk; your personal data could leak out. To
prevent the data from leaking out, execute complete deletion of HDD (see p. 111).
•
“Formatting” or “deletion” using the functions of DVD video camera/recorder or PC will change only
the file control information: It will not completely delete the data on disc or memory card.
•When transferring or discarding a disc or memory card, it is recommended that you physically
destroy it or use deletion exclusive software (generally available) to completely delete the data on
it. It is user’s responsibility to control the data on disc and memory card.
•
Hitachi will not accept any responsibility for leaking of personal data.
Read This First
To guide you, we have included following five chapters.
•The section on “Setups” explains how to set
up the DVD video camera/recorder, battery,
and set the date/time.
•The section on “Basic Techniques” explains the
basic operation of this DVD video camera/
recorder – recording of movies, still images,
external input and playback of recorded images.
•
The section on “Disc Navigation” explains
editing with Disc Navigation: Refer to this
section when dubbing from HDD to disc,
finalizing a DVD-RW/DVD-R/+RW and
initializing a DVD-RAM/DVD-RW/+RW.
•The section on “Connecting to PC” explains
the contents of provided CD-ROM and how to
install the software included.
•“Subsidiary Information” includes an
introduction to products sold separately, and
troubleshooting.
We want this manual to be as helpful as
possible, so it includes two easy ways to find the
information you need:
•A quick index for the information you use
most often.
•
A detailed table of contents directing you to
specific information quickly (see pages 14 – 16).
Get to know your DVD video camera/recorder by
using this manual, and get to know Hitachi. We
appreciate your business.
Quick Index
Available Discs ................................................ 26
Recording Movie ............................................. 43
Playing Back.................................................... 73
Functions Available with Disc Navigation ........ 80
Dubbing on DVD.............................................. 84
Connecting to a TV........................................ 116
Connecting to PC .......................................... 122
Use the disc cleaning
cloth to clean from inner
to outer edges in axial
direction.
With this DVD video camera/recorder you can view the picture being recorded or the playback
picture whether on the LCD monitor or in the viewfinder. Opening or closing the LCD monitor
switches the picture to appear on the LCD monitor or in the viewfinder.
It is possible to switch the language in the on-screen display of this DVD video camera/recorder
(see page 35).

12
About This Manual
●Displays in this manual
Understand that the displays are different from those you will actually see in the viewfinder or on
the LCD screen.
●Notation of cancel button
Press the stop/cancel button to stop your operation midway, or return the menu screen to the
preceding one. The expression “press the C button” will be used in this text.
●, 1, <, >, 2, / and 3 marks beside headings
Some functions of this DVD video camera/recorder are unavailable with HDD/disc/card used. Refer
to the marks at right above each function to identify whether the HDD/disc/card is compatible with
the function. Refer to these marks and identify the functions and operation to match the HDD/disc
card you use.
●Information on DZ-HS401(W) and DZ-HS401(P)
Body color is the only difference between DZ-HS401(W) and DZ-HS401(P): Operation of the two
models is identical. This manual refers to these models simply as DZ-HS401.
HDD
HDD
HDD
HDD
HDD

13
Introduction
●
Recording is possible on both HDD and DVD: In FINE mode, recording for
up to 3 hours is possible on HDD; up to 30 minutes on DVD (p. 43, 159).
●
Dubbing to an 8 cm DVD can be performed on this DVD video camera/recorder
using only one button: Simple dubbing without a DVD recorder or PC
(p. 84)
.
●You can capture photos from videos (p. 75).
You can record an image displayed during playback of video as a photo on a card.
●You can start recording immediately after stopping playback (p. 43, 74).
Unlike tape devices, you do not need to search for the recording start position or locate the
beginning of blank portion.
You can stop playback and immediately start recording: New recording will not overwrite any
previously recorded data.
●You can immediately play back desired recorded scenes (p. 73).
You do not need to rewind, unlike recorders using tape.
You can select any scene you want and immediately play it back (using Disc Navigation function).
●Use Disc Navigation to create your original movie (p. 102).
You can delete unnecessary scenes, move any scenes, etc., and create your original movie work (Play List).
To edit the scenes recorded on the HDD, use the dubbing function to easily create a DVD from the
edited original movie. If you edit the scenes recorded on a disc, you can play back the edited original
movie and easily dub it on another DVD recorder or VCR.
●Create original DVDs on PC (p. 122).
You can create an original DVD, using the provided software CD-ROM.
The created DVD disc can be played back on DVD player/recorder, DVD-ROM drive, etc.

14
Table of Contents
Important Information......................................... 2
For Your Safety.................................................. 2
Precautions........................................................ 2
IMPORTANT SAFETY INSTRUCTIONS........... 4
Cautions on HDD............................................... 5
Cautions When Using ........................................ 5
Cautions When Storing...................................... 9
Suggestions and Restrictions ............................ 9
CLEANING .......................................................... 10
HANDLING DISCS .............................................. 10
DISC CLEANING................................................. 11
NOTE WHEN TRANSFERRING OR
DISCARDING DISCS AND SD MEMORY
CARDS ............................................................. 11
Read This First ................................................ 11
About This Manual........................................... 12
Introduction ...................................................... 13
Table of Contents ............................................ 14
Checking Provided Accessories ...................... 17
Names of Parts ................................................ 18
Setups
Demonstration Function................................... 22
Setting Up the DVD Video
Camera/Recorder.......................................... 22
HOLDING DVD VIDEO
CAMERA/RECORDER..................................... 22
ATTACHING SHOULDER STRAP...................... 22
ATTACHING LENS CAP ..................................... 23
INSERTING BATTERY INTO REMOTE
CONTROL ........................................................ 23
REMOVING BATTERY FROM REMOTE
CONTROL ........................................................ 24
HDD/DVD/Cards.............................................. 25
HDD, DISCS........................................................ 26
INFORMATION ON DVD-R................................. 26
NOTES ON FINALIZATION ................................ 26
EXAMPLES OF DISCS THAT CANNOT BE
USED ON THIS DVD VIDEO CAMERA/
RECORDER ..................................................... 27
AVAILABLE CARDS............................................ 27
CAUTIONS FOR DISC AND CARD.........................27
Preparations for Power Supply ........................ 28
USING DVD VIDEO CAMERA/RECORDER
WITH AC ADAPTER/CHARGER...................... 28
Setting Up the Battery...................................... 29
CHARGING BATTERY........................................ 29
ATTACHING BATTERY TO DVD VIDEO
CAMERA/RECORDER..................................... 30
REMOVING BATTERY ....................................... 30
BATTERY REMAINING LEVEL INDICATOR...... 32
EFFICIENT USE OF BATTERY .......................... 32
Turning DVD Video Camera/Recorder
On and Off..................................................... 33
Viewing Images ............................................... 34
VIEWING IMAGE ON LCD MONITOR
SCREEN ........................................................... 34
VIEWING SUBJECT THROUGH
VIEWFINDER ................................................... 34
Changing Display Language (Language) ........35
Setting Date and Time .....................................35
CHANGING DISPLAY FORMAT OF
DATE AND TIME .............................................. 36
Initial Settings .................................................. 36
SWITCHING OPERATING SOUND ON OR OFF
(BEEP) .............................................................. 36
TURNING DVD VIDEO CAMERA/RECORDER
OFF AUTOMATICALLY (POWER SAVE) ........36
RESETTING MENU SETTINGS TO DEFAULTS
(RESET) ........................................................... 37
TURNING RECORD LED ON OR OFF
(RECORD LED) ................................................ 37
CHANGING SETTING OF
DEMONSTRATION .......................................... 37
LCD/EVF Setup ...............................................38
ADJUSTING BRIGHTNESS OF LCD SCREEN
(LCD BRIGHTNESS) AND VIEWFINDER
(EVF BRIGHTNESS) ........................................ 38
ADJUSTING COLOR DENSITY
(COLOR LEVEL) .............................................. 39
ALWAYS DISPLAYING IMAGE IN
VIEWFINDER ................................................... 39
Inserting and Removing Disc ........................... 40
Inserting and Removing Card .......................... 42
Basic Techniques
Recording Movie .............................................. 43
Recording Stills ................................................ 44
Swift Restart of Recording
(SLEEP/RESTART button)............................45
On-Screen Information .................................... 46
INFORMATION DISPLAY DURING
RECORDING .................................................... 46
Checking Flow of Menu ...................................51
Zooming ........................................................... 53
MACRO RECORDING ........................................ 53
RECORDING SUBJECTS FOR STRONGER
WIDE-ANGLE OR TELEPHOTO EFFECT....... 54
Manually Focusing Subject .............................. 55
FOCUSING DURING RECORDING.................... 55
Adjusting Brightness of Image to be recorded
(Exposure)..................................................... 57
Compensating for Backlight............................. 57
Built-in Video Flash (for DZ-HS403 only)......... 58
Using Full Auto Function.................................. 59

15
Setting Up Camera Functions ..........................60
SELECTING SHOOTING MODE TO MATCH THE
SUBJECT
(SWITCHING PROGRAM AE MODE).............. 60
RECORDING DARK SUBJECTS USING LCD
MONITOR LIGHT ............................................. 61
ADJUSTING COLOR (WHITE BALANCE).......... 61
USING THE ELECTRONIC IMAGE STABILIZER
(EIS).................................................................. 63
RECORDING SUBJECT USING LARGE
MAGNIFICATION (DIGITAL ZOOM) ................ 63
REDUCING WIND NOISE DURING RECORDING
(MIC.FILTER) ................................................... 63
Setting Up Record Functions ...........................64
SWITCHING MOVIE QUALITY
(VIDEO MODE) ................................................ 64
SETTING TO WIDE TV SCREEN MODE (16:9
MODE).............................................................. 65
SWITCHING QUALITY OF STILL IMAGE
(QUALITY) ........................................................ 67
RECEIVING IMAGE FROM ANOTHER DEVICE
(INPUT SOURCE) ............................................ 67
SWITCHING EXTERNAL INPUT RECORDING
METHOD (PHOTO INPUT) .............................. 68
SELF-TIMER ....................................................... 68
SETTING ON-SCREEN DISPLAY OUTPUT ON
OR OFF (OSD OUTPUT) ................................. 69
DROP DETECTION (HDD PROTECTION)......... 69
Using External Microphone ..............................70
Disc Navigation
Using Disc Navigation ......................................71
STARTING OR TERMINATING DISC
NAVIGATION.................................................... 71
PLAYING BACK FROM DISC NAVIGATION
SCREEN........................................................... 73
ADJUSTING VOLUME DURING PLAYBACK ..... 73
PLAYING BACK LATEST RECORDED
SCENE ............................................................. 74
DELETING LAST RECORDED SCENE.............. 74
CAPTURING PHOTO.......................................... 75
SEARCH PLAYBACK OF MOVIE ....................... 75
FRAME ADVANCE/FRAME BACK/SLOW
PLAYBACK OF MOVIE .................................... 75
SKIP PLAYBACK OF MOVIE.............................. 76
PLAYING BACK STILLS ..................................... 76
JUMPING TO SPECIFIED POINT (GO TO)........ 77
INFORMATION DISPLAY DURING
PLAYBACK ....................................................... 78
SELECTING MULTIPLE SCENES...................... 79
SELECTING CONSECUTIVE SCENES
TOGETHER...................................................... 79
FUNCTIONS AVAILABLE WITH DISC
NAVIGATION.................................................... 80
UNDERSTANDING FLOW OF DISC
NAVIGATION MENU ........................................ 81
Dubbing on DVD ..............................................84
FIRST-TIME (“NEW”) DUBBING ......................... 85
DUBBING SCENES RECODED ON SAME DAY
COLLECTIVELY (“DATE” DUBBING) .............. 86
DUBBING ALL SCENES RECORDED ON HDD
(DUBBING “ALL”) .............................................87
SELECTING SCENES RECORDED ON HDD
AND DUBBING THEM (SCENE “SELECT”
DUBBING) ........................................................88
TURNING OFF DUBBED MARK FROM
THUMBNAIL (MARK OFF) ...............................88
Scene .............................................................. 89
DELETING SCENES (EDIT – DELETE) ............. 89
DIVIDING MOVIES (EDIT – DIVIDE) ..................90
COMBINING MULTIPLE SCENES
(EDIT – COMBINE)...........................................91
ARRANGING ORDER OF SCENES
(EDIT – MOVE).................................................91
DIRECTING SCENES EFFECTIVELY
(EFFECT – FADE) ............................................92
PLAYING BACK BY SKIPPING SCENES
(EFFECT – SKIP) ............................................. 93
CHANGING IMAGES FOR THUMBNAILS
(EFFECT – THUMBNAIL).................................94
COPYING STILLS ON DVD-RAM TO CARD
(COPY) .............................................................95
LOCKING SCENES ON CARD (LOCK) ..............96
SELECTING SCENES USING MENU SCREEN
(SELECT)..........................................................97
DISPLAYING INFORMATION USING MENU
SCREEN (DETAIL) ...........................................98
Program........................................................... 99
WHAT IS “PROGRAM”? ......................................99
SWITCHING TO THUMBNAIL DISPLAY OF
SPECIFIC DATE (SELECT) ............................. 99
PLAYING BACK PROGRAM (PLAY) ................100
CHANGING TITLE OF PROGRAM (TITLE)......100
Play List......................................................... 102
WHAT IS “PLAY LIST”?.....................................102
CREATING NEW PLAY LIST (CREATE) .......... 102
SWITCHING TO DISPLAY OF EACH PLAY LIST
(SELECT)........................................................103
PLAYING BACK A PLAY LIST (PLAY)..............103
ADDING SCENES TO PLAY LIST
(EDITING PLAY LIST) ....................................104
DELETING SCENES FROM PLAY LIST
(EDITING PLAY LIST) ....................................105
ADDING SCENES USING SUBMENU FOR
EDITING (EDITING PLAY LIST).....................105
DELETING SCENES USING SUBMENU FOR
EDITING (EDITING PLAY LIST).....................106
SELECTING SCENES USING SUBMENU FOR
EDITING (EDITING PLAY LIST).....................106
ARRANGING ORDER OF SCENES (MOVE) ...107
CHANGING TITLE OF PLAY LIST (TITLE).......108
DELETING PLAY LIST (DELETE).....................108
Go To ............................................................ 109
MOVING TO BEGINNING (END) OF HDD/DVD/
CARD..............................................................109
HDD/DVD/Card Management ....................... 109
INITIALIZING HDD/DVD/CARD ........................109
PROTECTION ...................................................110
VERIFYING REMAINING FREE SPACE
ON DISC OR CARD (CAPACITY)..................110

16
UPDATING CONTROL INFORMATION OF
HDD/DVD-RAM/DVD-RW (VR-MODE)
(UPDATE CONTROL INFO.).......................... 111
DELETING DATA ON HDD
(FULL FORMAT) ............................................ 111
FINALIZING DVD-RW/DVD-R/+RW
(FINALIZE DVD) ............................................. 112
ADDITIONALLY RECORDING ON FINALIZED
DVD-RW (VF-MODE)/+RW
(UNFINALIZE DVD)........................................ 113
Others............................................................ 114
DISPLAYING DUBBED/UNDUBBED SCENES
IN LIST (CATEGORY) .................................... 114
DISPLAYING MOVIES OR STILLS
INDEPENDENTLY (CATEGORY) .................. 114
PLAYING BACK SCENES REPEATEDLY
(REPEAT PLAY)............................................. 115
PLAYING BACK WIDE-MODE IMAGES ON 4:3
DISPLAY TV (TV TYPE)................................. 115
SLIDE SHOW (CONTINUOUS PLAYBACK OF
STILLS)........................................................... 115
Viewing on TV Screen ................................... 116
CONNECTING TO A TV ................................... 116
VIEWING ON TV SCREEN ............................... 117
Playback on DVD Recorder/Player................ 118
PLAYING BACK DVD-RAM/DVD-RW
(VR-MODE) .................................................... 118
PLAYING BACK DVD-RW (VF-MODE)/DVD-R/
+RW................................................................ 118
Recording (Dubbing) Images......................... 119
RECORDING (DUBBING) IMAGES FROM
OTHER VIDEO DEVICE................................. 119
RECORDING (DUBBING) IMAGES ON OTHER
VIDEO DEVICES............................................ 121
Connecting to PC
Software Provided .........................................122
Requirements of available PC ....................... 123
Installing Software ......................................... 124
Connecting to PC via
PC Connection Cable.................................. 127
USING DISC IN DVD DRIVE BUILT
INTO PC ......................................................... 129
BEFORE TERMINATING PC CONNECTION
(UNPLUGGING PC CONNECTION CABLE)/
CHANGING OVER POWER SWITCH ........... 130
Using ImageMixer 3 for Windows.................. 131
VIEWING IMAGES RECORDED ON
HDD/DISC USING PC .................................... 131
CREATING DVD-VIDEO USING IMAGES
RECORDED ON HDD/DISC .......................... 132
Using ImageMixer 3 Mac Edition for
DVDCAM..................................................... 135
VIEWING IMAGES RECORDED ON HDD/DISC
USING MACINTOSH...................................... 135
IMPORTING IMAGES RECORDED ON HDD/
DISC INTO MACINTOSH ............................... 136
CREATING DVD-VIDEO USING IMAGES
RECORDED ON HDD/DISC .......................... 137
Uninstalling Software ..................................... 139
Cautions when connecting DVD video camera/
recorder to PC............................................. 140
Subsidiary Information
Introduction to Optional Accessories ............. 141
CAMERA ACCESSORIES ................................ 141
POWER SUPPLY .............................................. 141
Trouble Messages ......................................... 142
Troubleshooting .............................................149
System Reset ................................................ 156
Major Specifications....................................... 157
STORAGE CAPACITY OF HDD/DVD/CARD.... 159
RECORDABLE STILLS (PHOTOS)
ON CARD ....................................................... 160
Index ..............................................................161
Be sure to read the following before
opening the package of CD-ROM ...............163
TOC

17
Checking Provided Accessories
Make sure that you have all the following accessories in package:
Battery (model DZ-BP14S):
Portable power supply for this DVD video
camera/recorder. Charge it before use.
AC adapter/charger
(model DZ-ACS3):
Used to power the DVD video camera/
recorder from AC outlet, or charge battery.
DC power cord:
When powering the DVD video camera/
recorder from household AC outlet, use
this cord to connect the DVD video
camera/recorder and AC adapter/charger.
Power cable:
Connect between household AC outlet and
AC adapter/charger.
Infrared remote control
(model DZ-RM4J):
Use to control the DVD video camera/
recorder from a distance.
Lithium battery (model CR2032):
To power the remote control.
AV/S input/output cable:
Used when viewing the picture played back
on the DVD video camera/recorder on TV
screen, or input or output video from/to
another video device.
Shoulder strap:
Attach to the DVD video camera/recorder
to hang it from shoulder.
Lens cap and lens cap string:
Attach the lens cap when not recording, to
protect the lens.
Software CD-ROM:
Use this CD-ROM when connecting the
DVD video camera/recorder to PC.
PC connection cable:
Use this cable when connecting the DVD
video camera/recorder to PC.
Disc cleaning cloth:
Always use this to clean discs.

18
Names of Parts
1 Flash (for DZ-HS403 only) (p. 58)
2 Light receiving sensor
(for DZ-HS403 only)
This sensor controls the amount of light to be
emitted from the built-in flash. Take care not
to block with hand, etc. during recording.
3 Lens cap string attachment hole (p. 23)
4 Stereo microphone
Take care that the microphone is not blocked
by a hand, etc., during recording.
5 Recording indicator (p. 37, 43, 68)
The red indicator will light during recording.
6 Infrared receiver (p. 24)
When the remote control is used to operate
the DVD video camera/recorder, this
receiver will receive the infrared signal.
7 Optical 10× zoom lens
(for DZ-HS403 only)
Optical 15× zoom lens
(for DZ-HS401 only)
(p. 53)
8 Lens hood (for DZ-HS403 only) (p. 54)
Always remove this lens hood when using
the optional tele-conversion or wide-
conversion lens.
9 Zoom lever (p. 53, 55, 73)
To adjust the zoom or volume.
10 Accessory shoe (for DZ-HS403 only)
The optional microphone can be attached
here. (See the instruction manual of device to
be attached for details.)
11 PC connection terminal (TO PC) (p. 127)
12 AV input/output jack (p. 116, 119)
13 External microphone jack (p. 70)
14 Wide-screen color liquid crystal display
(inside) (p. 34)
14
12
6
7 8
9
(Inside the cover)
11
2 3 4 51
13
10
Although the external appearances of DZ-
HS403 and DZ-HS401 are different, the method
of operating these models is identical. DZ-
HS403 illustrations are used in this manual.

19
15 Viewfinder (p. 34)
16 Diopter control (p. 34)
To adjust the focus of image appearing in the
viewfinder. (Pull out the viewfinder.)
17 秒撮 (SLEEP/RESTART) button (p. 45)
To switch the sleep/restart status between
ON and OFF.
18 アクセス/PC接続 (ACCESS/PC) indicator
(p. 8, 43)
Will blink or light when the HDD/DVD is
accessed (write or read), or the DVD video
camera/recorder is connected to a PC.
19 フォト/選択 (PHO
TO/SELECT) button
(p. 44, 79, 97)
20 ディスク取出し (DISC EJECT) button
(p. 40)
Press down and release this button to open
the cover of DVD insertion block.
21 DVD insertion block (p. 40)
22 BATTERY EJECT button (p. 30)
Press this button when removing the battery.
23 Battery attachment platform (p. 30)
24 Record button (REC) (p. 43)
25 LOCK switch (p. 43)
It is recommended that you set the LOCK
switch to L (to the upper position) to prevent
the power switch in the “HDD” position
from accidentally moving to “DVD”.
26 Power switch (p. 33)
27 Hand strap (p. 22)
16 17 18
22
19
23 24 26 27
21
25
2015

20
28 フルオート (FULL AUTO) button (p. 59)
To switch the DVD video camera /recorder
to full automatic.
29 フォーカス (FOCUS) button (p. 55)
To switch between manual focus and auto-focus.
30 メニュー (MENU) button (p. 35, 51, 90)
Press this button to display the menu for
setting camera functions and Disc Navigation.
31 ディスクナビゲーション
(DISC NAVIGATION) button (p. 71)
32 ダビング (DUBBING) button (p. 85)
33 Stop/cancel button (p. 12, 51, 74)
To end playback or cancel setting of menu.
34 露出 (EXPOSURE) button (p. 57)
Press this button to adjust the exposure.
35 Speaker (p. 73)
36 RESET button (p. 156)
To reset all settings to defaults (status when
the DVD video camera/recorder was
shipped from the factory).
37
画面表示
(DISPLAY (Screen display))
button (p. 46, 78)
Press this button to display the details of
image being played back or camera setting
status, or switch the display off.
38 CARD ACCESS indicator (p. 8, 44)
39
かんたんメニュー
(QUICK MENU) button
(p. 51)
To display only the functions that you
frequently use (simple menus).
40 ファイナライズ (FINALIZE) button (p. 112)
Press this button to finalize the recorded
DVD-RW/DVD-R/+RW.
41 Card insertion block (p. 42)
42
逆光補正
(BLC (backlight compensation))
button (p. 57)
Press this button when subject is being
lighted from rear.
43 f / / / / e d c A buttons
(p. 35, 51, 55, 57, 74, 75, 76)
Use these buttons to select a scene or menu item,
and then press the center (
A
) to play back the
scene, or designate an option from the menu.
These buttons are also used to adjust the
exposure or focus.
44 Tripod threaded hole
Used to attach the DVD video camera/
recorder to a tripod.
35 4137 38 39 4036 42 43
3129 30 32 33 3428
44

21
45 フォト (PHOTO) button (p. 44)
46 録画 (REC) button (p. 43)
47 メニュー (MENU) button (p. 35, 51, 90)
48 選択 (SELECT) button (p. 79, 97)
49 Reverse search button (p. 75)
50 削除 (DELETE) button (p. 89)
51 ディスクナビゲーション
(DISC NAVIGATION) button (p. 71)
52 画面表示 (DISPLAY) button (p. 46, 78)
53 ズームT (ZOOM T) button (p. 53)
54 デジタルズーム (DIGITAL ZOOM) button
(p. 53)
55 ズームW (ZOOM W) button (p. 53)
56 Reverse skip button (p. 76)
57 Forward search button (p. 75)
58 Play/pause button (p. 74)
59 Stop button (p. 12, 51, 74)
60 Forward skip button (p. 76)
* The buttons on remote control will function the same as those on DVD video camera/recorder.
45
46
47
48
49
50
51
54
52
53
56
55
57
58
59
60
22
Setups
This section explains preparations for recording – setting up the DVD video camera/recorder
and battery.
Demonstration Function
This DVD video camera/recorder is equipped with a demonstration function.
The default at purchase time is “Auto”, which will automatically start the demonstration approx. ten
minutes after the DVD video camera/recorder, connected to the AC adapter/charger, is turned on and
left unoperated.
Refer to “CHANGING SETTING OF DEMONSTRATION” on page 37 if you
wish to view the demonstration immediately or change the setting to “Off”.
Setting Up the DVD Video Camera/Recorder
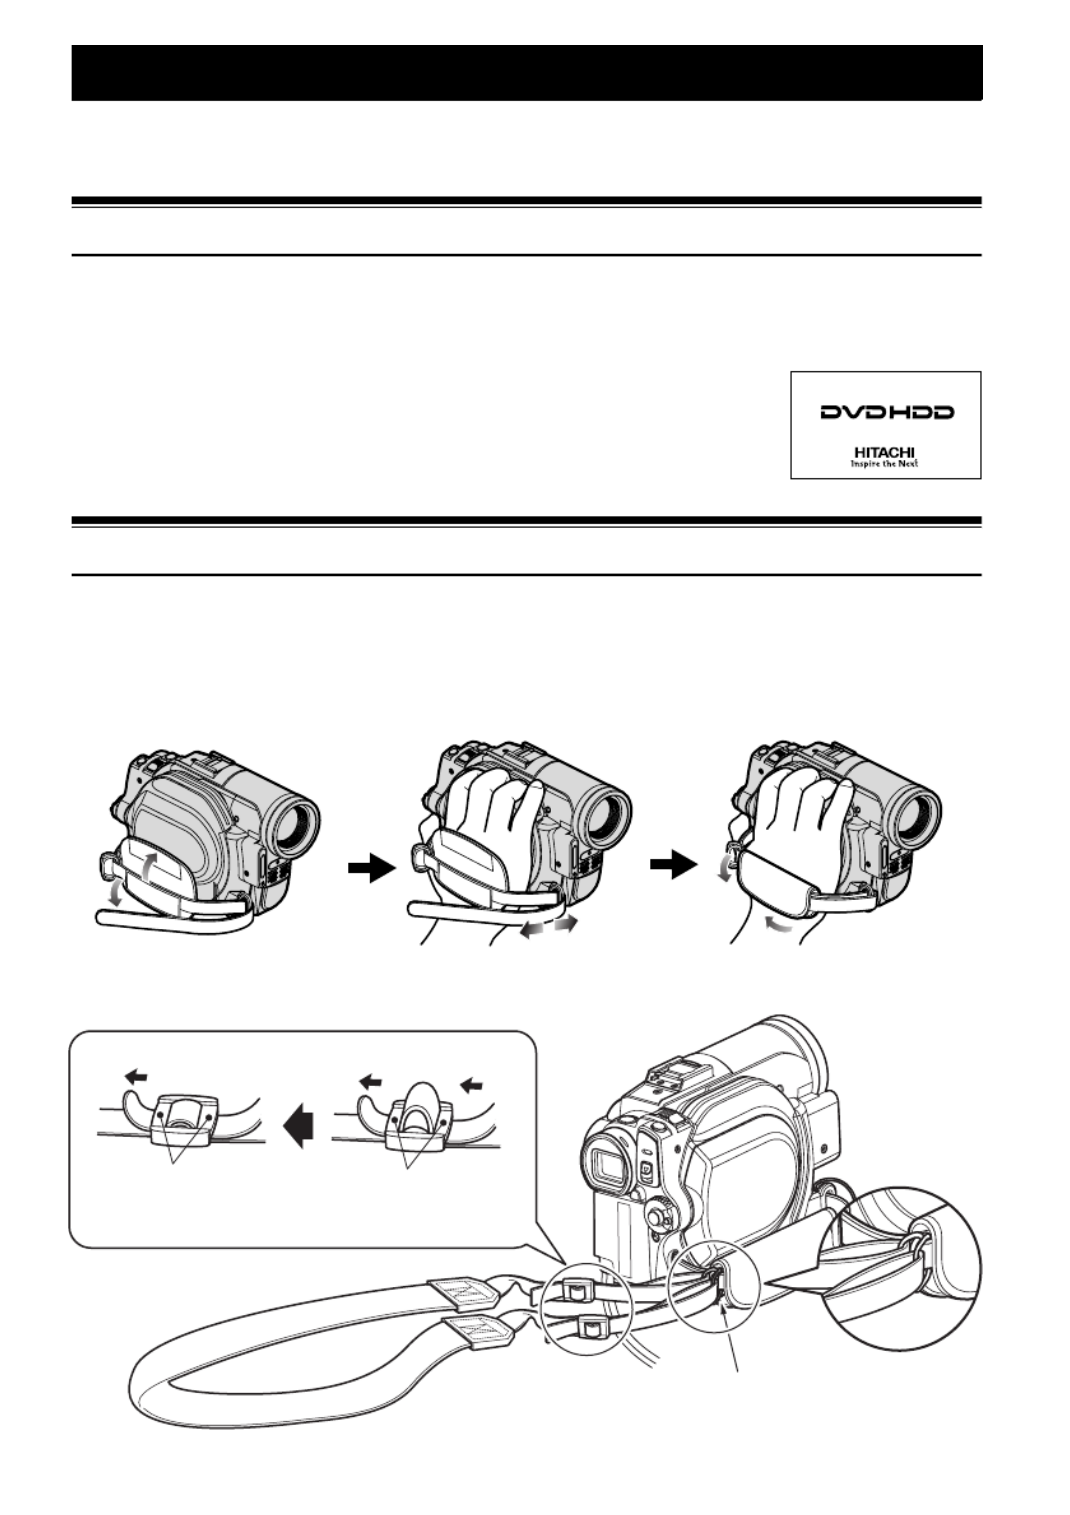
HOLDING DVD VIDEO CAMERA/RECORDER
Insert your right hand from the bottom of DVD video camera/recorder up to the base of your thumb.
Put your hand in a position where you can easily operate the REC button and the Zoom lever.
Adjust the length of hand strap so that the DVD video camera/recorder is stable when you press the
REC button with your thumb.
ATTACHING SHOULDER STRAP
Pass the shoulder strap through
the shoulder strap attachments.
Be sure to pass through the 2 slots.

23
ATTACHING LENS CAP
1Attach the shorter end of lens cap string to
the lens cap.
2Attach the longer end of lens cap string to the
attachment hole of DVD video camera/
recorder.
3Push the both sides of cap inward and attach
it over the lens.
Note:
• Always keep the lens cap on when not using the DVD
video camera/recorder, to protect the lens.
• When recording, attach the lens cap to the hand strap
by hooking the tab inside the cap onto strap for
comfortable shooting.
INSERTING BATTERY INTO REMOTE CONTROL
Insert the provided lithium battery into remote control.
1While inserting a fine rod into the hole
marked PUSH, pull the battery holder out
forward.
2Insert the lithium battery with the positive R
terminal facing down.
3Slide the cover to close it.
Note:
• The life of lithium battery is approximately one year. If
the battery is discharged, no operation is possible
with remote control: Replace the battery.
Shorter end
Longer end
Push and fit
Battery holder

24
REMOVING BATTERY FROM REMOTE CONTROL
1While pushing the battery holder, slide the
battery out.
Warning:
•KEEP THE BATTERY AWAY FROM CHILDREN AND
PETS.
•IF SWALLOWED, CONSULT A PHYSICIAN
IMMEDIATELY FOR EMERGENCY TREATMENT.
•BATTERY MAY EXPLODE IF NOT HANDLED
PROPERLY. DO NOT RECHARGE, DISASSEMBLE
OR DISPOSE OF IN FIRE.
Note :
•Replace the battery with a Hitachi Maxell, Sony,
Panasonic, Sanyo, Toshiba CR2032, or Duracell
DL2032. Use of another battery may present a risk of
fire or explosion.
•Dispose of battery safely in accordance with local
laws. Do not dispose of in fire.
•Do not short circuit the battery.
•Do not hold the battery with the metallic tweezers.
•Keep the battery in a dark, cool, dry place.
●Using Remote Control
Point the remote control to the infrared receiver on the DVD video camera/recorder. The remote
controllable distance is up to 5 m.
Note:
•When using the remote control, make sure that the
infrared receiver on DVD video camera/recorder is not
exposed to direct sunlight or any intense light. If the
infrared receiver is subject to light stronger than the
infrared light from remote control, the DVD video
camera/recorder cannot be operated by remote
control.
•If there is an obstacle between the remote control and
infrared receiver on DVD video camera/recorder,
remote control may not be possible.
•The DVD video camera/recorder uses the “VCR2”
remote control code of Hitachi VCRs. If you use a
Hitachi VCR, etc. with remote control code set to
“VCR2”, a VCR placed near the DVD video camera/
recorder will also be operated by the remote control:
To prevent this, change the remote control code of the
VCR.

25
HDD/DVD/Cards
The following table lists the storage media (discs and cards) that can be used on this DVD video
camera/recorder and the functions which are available with them:
Function
Media
HDD DVD-
RAM
DVD-RW
(VR
mode)
DVD-RW
(VF
mode)
DVD-R +RW
SD
memory
card
To record video (p. 43) ● ● ● ● ● ● —
To record photo (p. 44) — — — — — — ●
To delete image just
recorded (p. 74) ● ● ● — — ● ●
To select image and delete it
(p. 89) ● ● ● — — — ●
To edit image (p. 90 – 91) ● ● ● — — — —
To play on other DVD players
and DVD recorders (p. 112) —∴
*1 ∴*1*2 ●*2 ●*2 ∴*1*2 —*3
To use new disc or new card
without formatting — ●*4 — — ● ●— *4
To initialize and reuse
(p. 109) ● ● ● ● — ● ●
To additionally record on
finalized disc (p. 113) — — ● ● *5 — ● *5 —
To edit copied video on PC
(p. 122) ●*6 ●*6 ●*6*7 ●*6*7 ●*6*7 ●*6*7 —
To playback video on PC
(p. 122) ●*6 ●*6 ●*6*7 ●*6*7 ●*6*7 ●*6*7 —
●: Functions available; —: Not available
*1: Playable on devices that conform to either 8 cm DVD-RAM, 8 cm DVD-RW (VR mode) or 8cm +RW.
*2: Must be finalized. Cannot be played on some DVD players or DVD recorders.
*3: Some DVD devices conform to SD memory card.
*4: When media that are sold “formatted” are used. If the initialization format differs, the media can be initialized on
this DVD video camera/recorder and then used.
*5: To additionally record, the finalized disc must be unfinalized.
*6: The provided software is used.
*7: Finalize the disc when editing/playing back on PC.

26
HDD, DISCS
Note:
•
This DVD video camera/recorder can use only the 8-cm bare discs not packed in a square cartridge, square caddy
case or round DVD holder. The discs in a square cartridge, square caddy case or round DVD holder can be used if
they are removed from the package, but take great care not to dirty or scratch the bare disc.
When using an HG type double-sided disc, take great care with handling it. Using a disc other than these discs may
not allow the DVD video camera/recorder to deliver optimum performance.
INFORMATION ON DVD-R
For optimum recording on DVD-R, this DVD video camera/recorder writes control data to the disc
in order to automatically make adjustments when it is inserted and ejected accompanying recording.
If the disc has no area to be written for adjustment, recording may not be possible. To prevent this,
do not insert or eject a DVD-R accompanying recording more than 100 times.
This DVD video camera/recorder cannot record a DVD-R in the VR mode.
NOTES ON FINALIZATION
•Use only DZ-HS403/HS401 to record/dub or finalize a DVD-RW (VF-mode)/DVD-R/+RW
recorded or dubbed on this DVD video camera/recorder but not finalized: Using any other device
could damage the data recorded on the disc.
•DVD-RW/DVD-R/+RW edited and finalized on PC or those finalized on another DVD recorder
may not be playable on this DVD video camera/recorder, depending on the editing software used
or recorded status of DVD-RW/DVD-R/+RW.
•If you insert a DVD-R recorded on a DVD video camera/recorder other than DZ-HS403/HS401
and not finalized, the Disc Navigation screen will automatically start, and no recording can be
done on the disc nor can it be finalized.
•Do not insert a DVD-RW/DVD-R that was recorded by a DVD recorder manufactured by a
company other than Hitachi, and which has not been finalized, in this DVD video camera/
recorder: Doing so will make the disc unusable.
HDD, and usable discs and marks (logos) Function
HDD
Allows extensive recording (approx. 3 hours in FINE
mode).
Allows you to delete unnecessary scenes or edit
scenes.
DVD-RAM Ver. 2.1 (8 cm)
Allows you to delete unnecessary scenes or edit
scenes.
DVD-RW
[Ver1.1 (8 cm) 2x speed (2x/1x)]
Allows you to choose the VR mode for deleting
unnecessary scenes or editing scenes, or the VF
mode in which deletion or editing is not possible, but
high compatibility with DVD players is provided *1.
DVD-R
[for General Ver. 2.0 (8 cm)]
Provides high compatibility with DVD players *1. No
deletion or editing is possible.
+RW Ver. 1.2 (8 cm)
Provides high compatibility with DVD players but does
not need to be finalized *2. Scenes can be deleted
immediately after being recorded.
*
1: Playback on all DVD players is not guaranteed. The disc must be finalized before being played back on a DVD player.
*
2: Playback on all DVD players is not guaranteed.
• It is recommended that you use Hitachi Maxell HG type single-sided discs, since their compatibility with this
DVD video camera/recorder has been confirmed.
•Do not insert a DVD-RW/DVD-R recorded or dubbed on this DVD video camera/recorder but not
finalized, into a recordable device, such as a DVD recorder: The recorded data may be damaged.

27
EXAMPLES OF DISCS THAT CANNOT BE USED ON THIS DVD VIDEO
CAMERA/RECORDER
•CD
•CD-R
•CD-RW
•CD-ROM
•DVD-ROM
•DVD-Video
•DVD-R (4.7 GB) for Authoring Ver. 2.0
•DVD-R DL (Dual Layer)
•DVD-RW DL (Dual Layer)
•+R DL (Double Layer)
•+RW DL (Double Layer)
•+R
•Discs other than those with diameter of 8 cm
AVAILABLE CARDS
SD memory cards can be used on this DVD video
camera/recorder (incompatible with 2 GB).
When using an exclusive adapter, a miniSD
memory card and micro SD memory card can be
used in the same way as an SD memory card.
No SDHC card or multimedia card can be used.
●Handling card
•Do not use cards other than
the designated ones.
•Be sure to perform trial
recording before recording
vital images.
•Do not touch the card
terminal or allow it to touch
metal.
•Do not paste anything other
than exclusive label on label pasting portion.
•Do not subject card to impact, bend or drop it.
•Do not disassemble card or modify it.
•Do not expose card to water.
•Do not use or store card in the following
places:
−Where the temperature is high, such as in
vehicle at high temperatures, under burning
sun or near a heater
−Where humidity is high, or in dusty place
•When the erasure prevention switch is locked,
no recording, deletion or editing will be
possible on the card: Only playback will be
possible.
CAUTIONS FOR DISC AND CARD
•It is recommended that you create a backup
file for valuable data on hard disk of PC.
•Do not do the following, or the data on disc or
card may be damaged or lost:
−Do not remove the disc or card or turn DVD
video camera/recorder off during reading or
writing of data
−Do not use DVD video camera/recorder in a
place subject to static electricity or electrical
noise
−Do not have printing done at a print lab or
DPE service
−Do not leave a DVD unused in the DVD
video camera/recorder for a long time
Note:
•
This DVD video camera/recorder can play back image
data recorded on other digital cameras conforming to
the DCF (Design rule for Camera File system) standard.
The range of image data playable on this DVD video
camera/recorder is that with pixels from 80 horizontal ×
60 vertical to 4000 horizontal × 3000 vertical.
•DCF is an integrated image file format of digital
cameras: Image files can be used on all digital
devices conforming to DCF.
•Image data edited on PC and certain types of image
data may not be visible on this DVD video camera/
recorder.
•The image data recorded on another device may not
be playable on this DVD video camera/recorder.
Terminal
Erasure prevention
switch
Locked status
28
Preparations for Power Supply
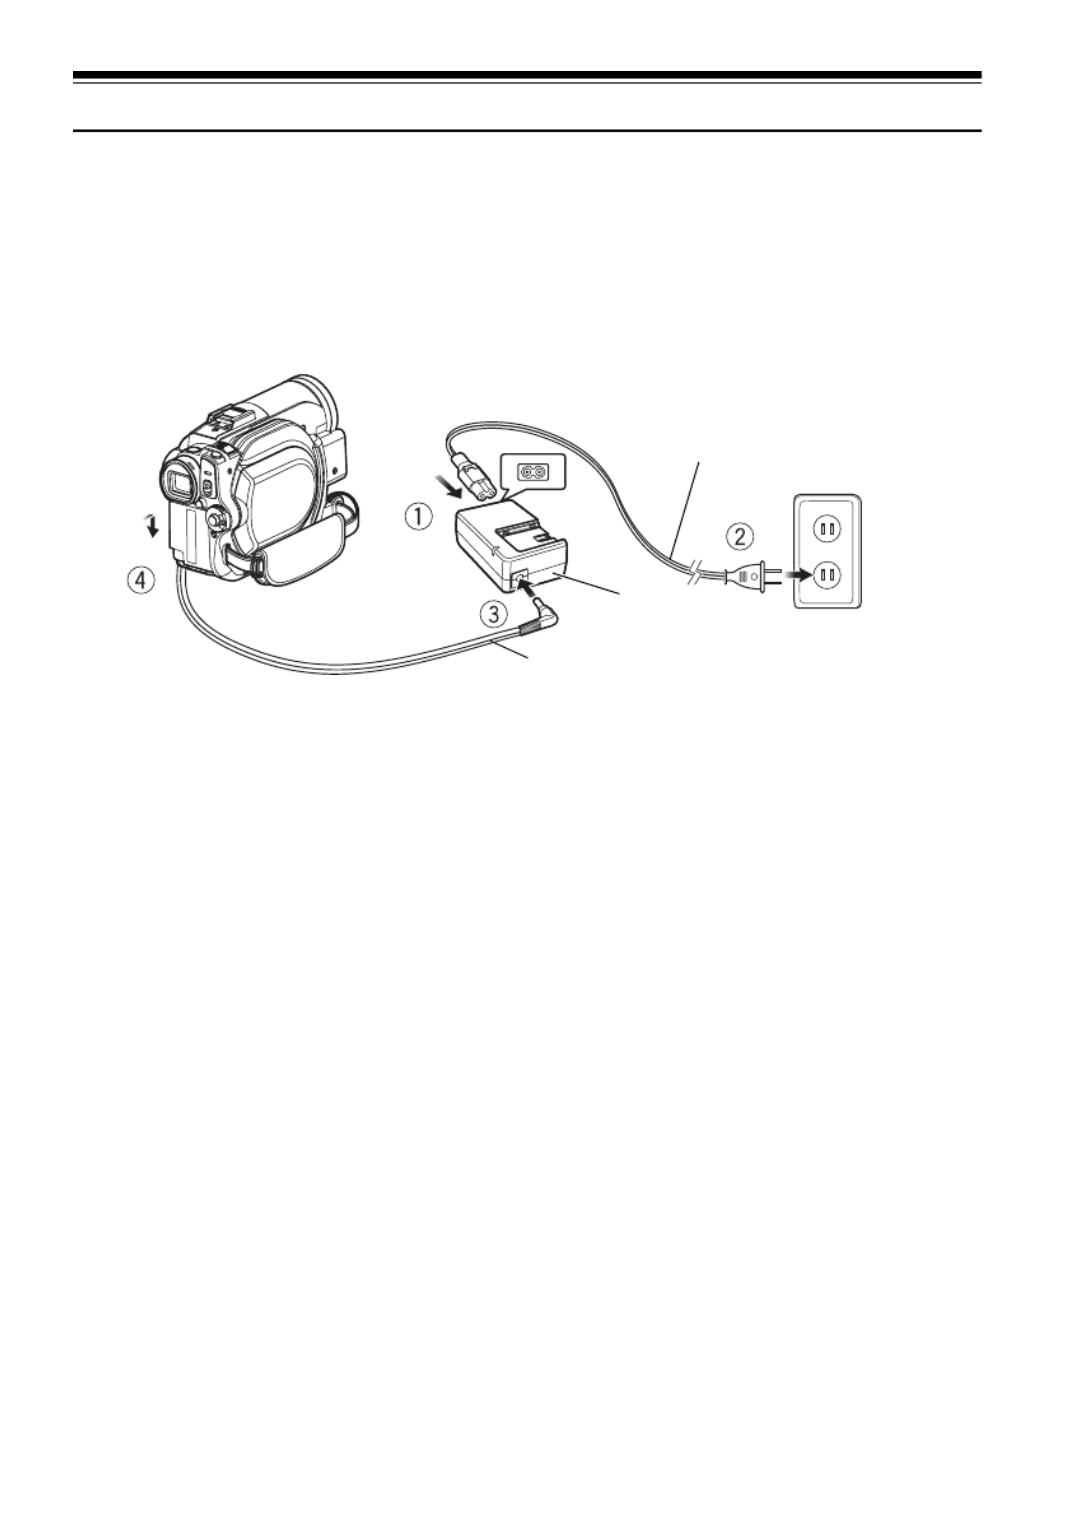
USING DVD VIDEO CAMERA/RECORDER WITH AC ADAPTER/CHARGER
It is recommended that you use the AC adapter/charger to power the DVD video camera/recorder
from household AC outlet when you perform settings on it, play back or edit images, or use it
indoors.
Note:
Be sure to use the specified AC adapter/charger (DZ-ACS3) to power the DVD video camera/recorder. Using other
AC adapter/chargers could cause electric shock or result in fire.
1Connect the power cable to AC adapter/
charger.
2Plug the power cable into AC outlet.
3Plug one end of DC power cord into the DC
output jack on AC adapter/charger.
4Attach the other end of DC power cord to the
battery attachment platform on DVD video
camera/recorder.
Use the same procedure as that for battery
when attaching and detaching the DC power
cord: See page 30.
Power cable
AC adapter/charger
DC power cord

29
Setting Up the Battery
The DZ-BP14S battery (provided) has not been charged at purchase time: Charge it before using the
DVD video camera/recorder.
Note:
•Be sure to use the DZ-BP14S, DZ-BP14SJ (optional), DZ-BP21SJ (optional) or DZ-BP7SJ (optional, unavailable
for DZ-HS403) battery for the DVD video camera/recorder: Using other batteries could cause the DVD video
camera/recorder to malfunction, or result in fire.
•Be sure to use the DZ-ACS3 AC adapter/charger to charge the battery: Using other chargers could cause electric
shock or fire.
•Charge the battery at temperatures of 10 – 30ºC.
CHARGING BATTERY
Use the provided AC adapter/charger to charge the battery.
1Connect the power cable to AC adapter/
charger.
2Plug the power cable into AC outlet.
3Attach the battery to AC adapter/charger.
Note:
When charging a battery, unplug the DC power cord
from the DC output jack on AC adapter/charger.
Power cable
AC adapter/charger
Battery
CHARGE indicator
DC output terminal

30
●Battery charged status
You can find out the charged status of battery by checking the CHARGE indicator on AC adapter/
charger:
Note:
See “Troubleshooting” on page 149 when the CHARGE indicator blinks.
●Reference for time required to charge battery (at approx. 25ºC)
DZ-BP14S (provided)/DZ-BP14SJ (optional): Approx. 165 minutes
DZ-BP21S (optional): Approx. 235 minutes
DZ-BP7SJ (optional, unavailable for DZ-HS403): Approx. 90 minutes
The charge time will vary depending on the remaining power level of battery.
ATTACHING BATTERY TO DVD VIDEO CAMERA/RECORDER
1Fit the battery to the battery attachment
platform on this DVD video camera/recorder
and slide it downward until a click is heard.
Note:
•Make sure that the battery is in the correct orientation.
•Make sure that the battery is securely attached:
Incomplete attachment could cause the battery to fall,
resulting in damage.
REMOVING BATTERY
After using the DVD video camera/recorder, remove the battery from it.
1While holding down the BATTERY EJECT
button, slide the battery upward to remove it.
Note:
•For safety, be sure to turn the DVD video camera/
recorder off before attaching or removing the battery.
•Be careful not to drop the removed battery.
•If the battery remains attached, minute level current
will flow even if the DVD video camera/recorder is off,
and the battery will discharge.
•Set the power switch to OFF before removing the
battery.
Charge status CHARGE indicator
During charge Lit
Charge complete Goes out
Te rm in al
side must be
down.

32
BATTERY REMAINING LEVEL INDICATOR
When the battery is used to power the DVD video camera/recorder, the battery remaining level
appears in the viewfinder or on the LCD screen as follows:
EFFICIENT USE OF BATTERY
•The battery will slightly discharge even if it is
detached from the DVD video camera/
recorder.
• If the battery is left attached to DVD video
camera/recorder, it will consume a slight
amount of power. Therefore, it is
recommended that you charge the battery
shortly before using the DVD video camera/
recorder, usually on the day before you plan to
use it.
When not using the DVD video camera/
recorder for an extended period:
It is recommended that you fully charge the
battery once a year, attach it to DVD video
camera/recorder and use it up; then remove the
battery and store it in a cool place again.
Battery life:
The battery life varies greatly depending on the
ambient environment and how often the DVD
video camera/recorder is used. If the usable
time of DVD video camera/recorder with a fully
charged battery is noticeably short, the battery is
probably dead: Purchase a new one.
Disposing of a rechargeable battery:
Do not throw away a rechargeable battery.
Please take it to the Japan Portable Rechargeable
Battery Recycling Center (JBRC), in order to
preserve resources.
Refer to the following for collecting and
recycling rechargeable batteries, and for shops
that perform recycling:
Japan Portable Rechargeable Battery Recycling
Center: JBRC (as of January, 2007)
Website: http://www.jbrc.net/hp/contents/
index.html
Power save and discharge of battery:
It is recommended that you turn the DVD video
camera/recorder off in status other than
recording, since even during recording pause
battery power is consumed at the same level as
during recording.
If, when you specify Power Save On, the
recording pause status continues for
approximately 5 minutes, the DVD video
camera/recorder will automatically turn off.
To set or release power save, see “TURNING
DVD VIDEO CAMERA/RECORDER OFF
AUTOMATICALLY (POWER SAVE)” on
page 36.
Fully charged Nearly empty
White portion shows remaining level (Blinks)

33
Turning DVD Video Camera/Recorder On and
Off
While holding down the gray button at the right
of power switch, set the switch according to
each recording function:
P
Note:
•Once you turn the DVD video camera/recorder on to
let it recognize the disc, you can immediately record
or play back by turning the DVD video camera/
recorder on again. However, if a long time has
elapsed after the disc was inserted, it will take some
time for the DVD video camera/recorder to start
because it must recognize the disc again (see
“Troubleshooting” on page 149).
•It will take some time for the DVD video camera/
recorder to display the Disc Navigation screen after
power is turned on.
•When the DVD video camera/recorder is turned on,
the self-diagnosis function will work and a message
may appear. In this case, refer to “Trouble Messages”
on page 142 and take corrective action.
•When turning the DVD video camera/recorder off or
changing over the power switch between “HDD” and
“DVD”, you will not need to hold down the gray button:
Simply move the power switch.
Set to “切” (OFF):
The DVD video camera/
recorder will turn off
Set to “SD”:
To record photos on an SD
memory card and play
them back
Set to “HDD”:
To record or dub movie on
HDD and play it back
Set to “DVD”:
To record movie on DVD-
RAM/DVD-RW/DVD-R/
+RW and play it back
Power switch

34
Viewing Images
VIEWING IMAGE ON LCD MONITOR
SCREEN
If you open the LCD monitor, you can monitor
subject image on the LCD screen.
1Open the LCD monitor.
The LCD monitor has a portion where you
can hook your finger. Hook the finger there to
open the monitor.
●Range where the LCD monitor can
be moved
The LCD monitor can be opened up to
approximately 90º.
If the LCD monitor is open 90º, it can be tilted
with the screen down as much as 90º, and can
also be tilted with screen up and turned up to
180° so the screen faces in the same direction as
the lens.
If the LCD monitor is turned 180º so the screen
faces in the same direction as the lens during
recording, subject image will also appear in the
viewfinder as a mirror image (left/right
reversed).
Tilt the LCD monitor to adjust its vertical angle
so that you can see the screen easily.
Note:
•If no image appears on LCD monitor screen, refer to
“Troubleshooting” on page 149.
•If LCD monitor lights white, refer to page 61.
•Be sure to open the LCD monitor approximately 90º
before changing its vertical angle.
•Do not record for a prolonged time with the LCD
monitor turned approximately 180º in close contact
with the DVD video camera/recorder body: Doing this
could cause the DVD video camera/recorder and LCD
monitor to become hot.
VIEWING SUBJECT THROUGH
VIEWFINDER
1Pull out the viewfinder.
2Turn the diopter control knob to adjust the
focus to suit your eyesight.
Note:
•If no image appears in viewfinder, refer to
“Troubleshooting” on page 149.
•If the LCD monitor is opened approximately 90º, the
viewfinder will be off: Turn the open LCD monitor 180º
so that it faces the same direction as the lens; the
image will appear in the viewfinder.
•Focusing will not be correct unless the viewfinder is
pulled out.
•See “LCD/EVF Setup” (on page 39) if you wish to
display images in the viewfinder regardless of
whether you open or close the LCD monitor.
Hook your finger
90º
(Bottom)
180º
Diopter control
Pull out the viewfinder
until a click is heard.
Viewfinder
35
1<>2/3
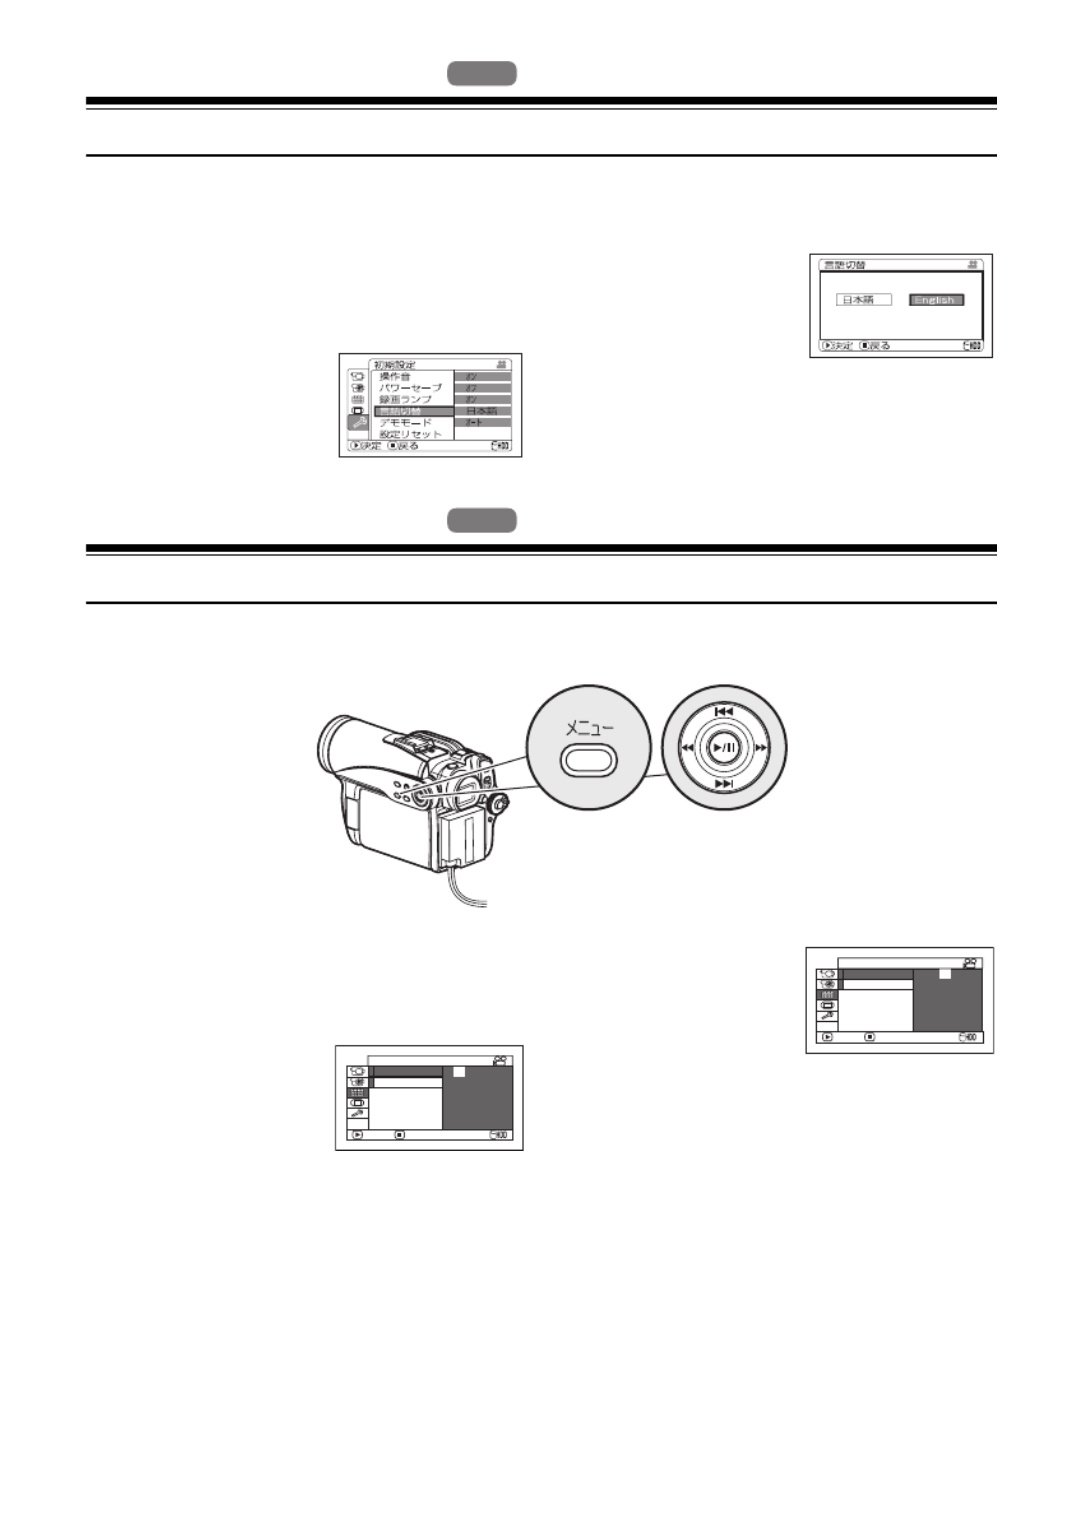
Changing Display Language (Language)
You can change the language used to display the menu and information.
The following shows that 日本語(Japanese) is changed to English.
1Press the MENU button, then select “初期設
定” using f e d c A/ / / / .
Then select “言語切替” (Language).
2Press A or c button
with the screen shown
on the right displayed:
The “Language” screen
will appear.
3Choose “English”, and
then press A button.
The display will change
to English.
Note:
The language setting will be stored in memory even
when the DVD video camera/recorder is turned off.
1<>2/3
Setting Date and Time
Set the current date and time so that the date and time you make a recording can be recorded correctly.
The following procedure can also be used to correct the date and time you have already set.
1Press the MENU button, use the f e/ /
d c/ buttons to choose “Date Set” on the
“Date Setup” menu screen.
2Press the c button.
The figure for the
month will be selected.
[The digit that is
highlighted first depends on the date display
format (set up in Date Mode): The digit on the
left end of the date display will be first
highlighted.]
Note:
After setting the figure for the month, press the c
button to select the digit to be set. If you press the
A button after selecting the figure for the month,
the screen for verifying the set date will appear
instead of screen for setting day, year or time.
3Press the d c or
button to select the digit
you want to set in
sequence.
Press the f or e button to select the
number for current date/time, and then
repeat step 3 to set the current date and time.
Note:
To stop date/time setting midway, press the C
button.
HDD
HDD
HDD
HDD
HDD
HDD
HDD
HDD
HDD
HDD
Use f / e / d / c buttons
to select, and then press A to
designate.
Da t e Mo d e
ENTER RETURN
Da t e S e t 1 / 1 / 2 0 0 7
Da t e Se t u p
1 2 : 0 0 A
M
Da t e Mo d e
ENTER RETURN
Da t e Se t u p
8 : 00 AM
Da t e S e t 1 2 / 1 / 200 7

36
4After setting the current
date and time, press the
A button.
The screen for verifying
the set date will appear.
5If the displayed date and time are correct,
press the d button to choose “YES”, and
then press the A button.
The date and time will be set, and the DVD
video camera/recorder will enter the
recording pause status.
Choosing “NO” will restore the menu screen.
CHANGING DISPLAY FORMAT OF DATE AND TIME
You can select one of three date display formats: month/day/year, day/month/year or year/
month/day. Choose “Date Mode” on the “Date Setup” menu screen in procedure 1, and then set to
the desired date display mode.
Note:
This DVD video camera/recorder incorporates a rechargeable battery to store the date and time in memory. If this
built-in battery is exhausted, the date and time will be reset. To prevent this, every 6 months, connect the AC
adapter/charger to DVD video camera/recorder and connect them to AC outlet, or attach a charged battery to the
DVD video camera/recorder, and leave it for at least 24 hours with the DVD video camera/recorder turned off: The
built-in battery will recharge.
1<>2/3
Initial Settings
Press the MENU button, and then use buttons to display the “Initial Setup” f e d c A/ / / /
menu screen. See page 51 for detailed operation procedure. Press the MENU button again to exit
setting.
SWITCHING OPERATING SOUND ON OR OFF (BEEP)
Select “On” or “Off”, and
then press the A button.
On: Beep will be heard
when the power
switch is changed
over, the REC button is pressed when
HDD/disc is used, the SLEEP/RESTART or
EJECT button is pressed, etc.
Off: No beep is heard.
Note:
The “Beep” setting will be stored in memory even when
the DVD video camera/recorder is turned off.
TURNING DVD VIDEO CAMERA/RECORDER OFF AUTOMATICALLY
(POWER SAVE)
Select “On” or “Off”, and
then press the A button.
On: To engage power
save. If the DVD
video camera/
recorder is left in the recording pause status
without being operated for 5 minutes, it
will automatically turn off to prevent the
battery from discharging needlessly.
Off: To cancel power save.
Note:
•To turn the DVD video camera/recorder on again from
automatic off activated by the power save function,
set the power switch to “OFF”, and then set it to
“HDD”, “DVD” or “SD”.
•The Power Save setting will not appear in the on-
screen information display.
•If the sleep/restart standby status continues for 30
minutes, the DVD video camera/recorder will
automatically turn off regardless of the Power Save
setting.
ENTER
1 2 / 1 / 2007 8 : 0 0AM
Da t e s e t u p?
YES NO
Da t e Se t
HDD
HDD
HDD
HDD
HDD
P o we r S a v e
B e e p
ENTER RETURN
Demo M o d e
R e s e t
L a n g u a g e
R e c o r d L ED
I n i t i a l S e t u p
On
O f f
P o we r S a v e
B e e p
R e c o r d L ED
ENTER RETURN
Demo M o d e
R e s e t
L a n g u a g e
I n i t i a l S e t u p
On
O f f

37
RESETTING MENU SETTINGS TO DEFAULTS (RESET)
You can restore menu settings to defaults (initial settings at the factory (p. 156)). (Note, however, that
the date/time will not be reset.)
1Choose “Reset” on the
“Initial Setup” menu
screen, and then press
the A button.
The screen for verifying reset will appear.
2If you are sure that you
wish to reset, use the
d button to choose
“YES”, and then press
the A button.
The setting items have now been reset to
defaults.
Note:
To cancel resetting midway, choose “NO” on the screen
for verification in step 2 or press the C button.
TURNING RECORD LED ON OR OFF (RECORD LED)
You can switch off the recording indicator on the front of DVD video camera/recorder even during
recording.
Select “On” or “Off”, and
then press the A button.
On: The recording
indicator will light
red to show that the
DVD video camera/recorder is recording.
Off: The recording indicator will not light even
during recording.
Note:
•The Record LED setting will not appear in the on-
screen information display.
•The Record LED setting will be stored in memory
even when the DVD video camera/recorder is turned
off.
•Specify “Record LED: Off” when recording a subject
behind a glass or water tank that reflects light: The
reflected light of the recording indicator will not be
recorded.
•Even if “Record LED: Off” is specified, the recording
indicator will light while the self-timer is counting
down.
CHANGING SETTING OF DEMONSTRATION
Choose the desired option
using the screen on the
right, and then press the
A button.
Note:
•If “Auto” is specified, the demonstration will not start if
a battery is connected.
•Pressing the C (stop/cancel) or DISC NAVIGATION
button will exit demonstration.
•If “Auto” is specified, the demonstration will not start
when the power switch on this DVD video camera/
recorder is set to “DVD” and a DVD is loaded, or when
the power switch is set to “SD” and a card is loaded.
•The demonstration function will not work when the
DVD video camera/recorder is connected to PC.
•While the demonstration is being given, the recording
indicator will blink.
R e c o r d L ED
P o w e r S a v e
Be e p
ENTER RETURN
Demo M o d e
R e s e t
L a n g u a g e
I n i t i a l S e t u p
On
O f f
On
E n g l i sh
A u t o
ENTER
Re s e t ?
YES NO
Re s e t
R e c o r d L ED
On
P o w e r S a v e
Be e p
ENTER RETURN
Demo M o d e
R e s e t
L a n g u a g e
I n i t i a l S e t u p
On
O f f
Auto: To start demonstration if the DVD
video camera/recorder connected to
AC adapter/charger is inactive for
approx. 10 minutes or more after it is
turned on.
Off: To set demonstration to off.
Start: To start demonstration immediately.
ENTER RETURN
Demo M od e
R e s e t
Re c o r d LE D
Po w er Sa ve
B e e p
L a n g u a g e
I n i t i a l S e t u p
A u t o
O f f
S t a r t

38
1<>2/3
LCD/EVF Setup
ADJUSTING BRIGHTNESS OF LCD SCREEN (LCD BRIGHTNESS) AND
VIEWFINDER (EVF BRIGHTNESS)
1Press the MENU button, use the f e/ /
d c A/ / buttons to choose “LCD/EVF
Adjust” on the “LCD/EVF Setup” menu
screen, and then choose “LCD Brightness”or
“EVF Brightness”.
The brightness adjustment bar will appear on
the screen.
2Use the d c/ buttons
for adjustment.
Press d :
The screen becomes
dimmer.
Press c :
The screen becomes
brighter.
3Press the A button to end the setting.
Note:
•To stop the setting midway, press the MENU button.
•The brightness setting will be stored in memory even
after the DVD video camera/recorder is turned off.
HDD
HDD
HDD
HDD
HDD
LC D B r i g h t n e s s
EV F B r i g h t n e s s
Co l o r L e ve l
ENT ERADJ U ST
LCD / EVF A d j u s t
Brightness
adjustment bar

39
ADJUSTING COLOR DENSITY (COLOR LEVEL)
You can adjust the color density of the LCD monitor screen and viewfinder.
1Press the MENU
button, use the f/
e d c A/ / /
buttons to choose
“LCD/EVF Adjust” on
the “LCD/EVF Setup” menu screen, and then
choose “Color Level”.
The color density adjustment bar will appear
on the screen.
2Use the d c/ buttons
for adjustment.
Press d :
For lighter color.
Press c :
For denser color.
3Press the A button to end the setting.
Note:
•To stop the setting midway, press the MENU button.
•The color setting will be stored in memory even after
the DVD video camera/recorder is turned off.
•Even if the brightness or density of LCD monitor
screen or viewfinder is changed, the brightness or
density of the recorded image itself will not change.
ALWAYS DISPLAYING IMAGE IN VIEWFINDER
1Press the MENU
button, use the f/
e d c A/ / /
buttons to choose “EVF
Display” on the “LCD/
EVF Setup” menu screen.
2Choose “On” and press the A button.
Auto: If the LCD monitor is open, no image
will appear in the viewfinder.
On: Images will always appear in the
viewfinder regardless of whether the
LCD monitor is open/closed.
Note:
The setting on EVF Display will be stored in memory
even after the DVD video camera/recorder is turned off.
L C D/ E V F
A d j u s t
EVF D i s p l a y
ENTER RETURN
L CD / EVF Se t up
A u t o
L CD B r i g h t n e s s
EV F Br i g h t n e s s
Co l o r Le v e l
ENT ERADJ U ST
LCD / EVF A d j u s t
Color density
adjustment bar
L C D/ E V F
A d j u s t
EVF D i s p l a y
ENTER RETURN
L CD / EVF Se t up
A u t o
O
n

40
1<>2/
Inserting and Removing Disc
1Set the power switch to “DVD” or “OFF” .
When the power switch is set to “HDD” or
“SD”, the cover of disc insertion block will
not open. When “Please insert DVD.” appears
during dubbing, however, the cover of disc
insertion block will open even when the
power switch is set to “HDD” (see p. 84).
2Press down the DISC EJECT button once and
release it.
A few moments after the ACCESS/PC
indicator blinks, the cover of disc insertion
block will open.
3Gently open the cover by hand fully until it
stops.
4When inserting a disc:
Push the disc against the turntable at the
center to lock it until a click is heard.
When removing the disc:
While pushing down the center portion of
turntable, pick up the disc, holding its edge,
to remove it.
•Note that the recording surface of disc must face
the inside of DVD video camera/recorder. When
using a single-sided disc, the recording surface is
the side without label.
•Never touch the disc recording surface or pickup
lens. Touching the pickup lens could cause a fault.
•Use the disc cleaning cloth provided to wipe off
any dirt adhering to the disc recording surface.
•Do not use a dirtied or scratched disc.
5Push the section marked “PUSH CLOSE” on
the cover of disc insertion block, to close the
cover.
Then the DVD video camera/recorder will
automatically recognize the disc: While the
ACCESS/PC indicator is lit, do not cut off the
power supply, and do not subject the DVD
video camera/recorder to any vibrations or
impact.
Push the shaded portion.
Tu rn table
Pickup lens

41
Note:
•
If the cover of disc insertion block is open, the ACCESS/PC indicator will blink when an image is displayed on the LCD
monitor screen: In this case, the DVD video camera/recorder will not turn off even if the power switch is set to “OFF”.
If the cover remains open after a while, the DVD video camera/recorder will automatically turn off.
•Disc cannot be inserted or removed unless a charged battery or AC adapter/charger is connected to the DVD
video camera/recorder.
•If there is some delay before recording starts, refer to “Troubleshooting” on page 149.
•Do not close the cover if a disc is not properly loaded on the turntable.
•If a single-sided disc is inserted into DVD video camera/recorder with the printed label facing the inside, an error
message will appear. Remove the disc and reinsert it with its recording side facing the inside. See “Trouble
Messages” on page 142.
•Do not remove the battery or disconnect the AC adapter/charger during removal of the disc or until power is
completely turned off: If you do, the disc cover will not open. If this happens, reattach the battery or AC adapter/
charger, push down the DISC EJECT button once, and then release it.
•Do not insert anything other than the 8 cm DVD-RAM/DVD-RW/DVD-R/+RW into the disc insertion block: Doing
so could cause malfunctions.
•When inserting or removing the disc, BE SURE NOT to look into the lens in laser pickup: Doing so could damage
your eyesight.
•Close the cover of disc insertion block gently: Using force could cause a fault.
• When using double-sided disc
Recording is possible on both sides of double-sided disc. However, when recording or playback on one side is
finished, recording or playback will not move automatically to the other side. Remove the disc once from the DVD
video camera/recorder, turn over the disc and insert it again for continued use.
The recording surfaces of double-sided disc are likely to become dirtied or scratched: Always make sure that
there is no dirt or scratch on the recording surface facing the pickup lens, and then use the disc taking great care
that it is not dirtied or scratched. Use the provided disc cleaning cloth to wipe off any dirt on disc (see page 11).
●When using brand-new DVD-RW/+RW
When a disc is first loaded in the DVD video camera/recorder, the “Format DVD” screen will
appear.
When recording on this DVD video
camera/recorder:
Choose “Yes” on the “Format DVD” screen, and
then press A button.
When using DVD-RW, choose the recording
format (VR or VF mode), and then press the
A button.
The disc will be formatted.
When recording data from PC:
While the “Format DVD” screen is displayed,
choose “No” and then press A button, or
press the C button.
However, if data from PC has not yet been
recorded, the disc can be made usable on this
DVD video camera/recorder. When inserting
the disc into this DVD video camera/recorder,
the same message will appear: If you wish to use
it on this DVD video camera/recorder, choose
“YES”.
(When using DVD-RW)
ENTER
D V D Fo r m a t .
Se l e c t r e co r d f o r
m
a t .
F o r
m
a t D V D
VR
M
ode VF
M
ode
ENTER
F o r
m
a t D V D
YES NO
D V D i s n o t f o r m a t t e d .
F o r m a t t h e D V D n o w ?
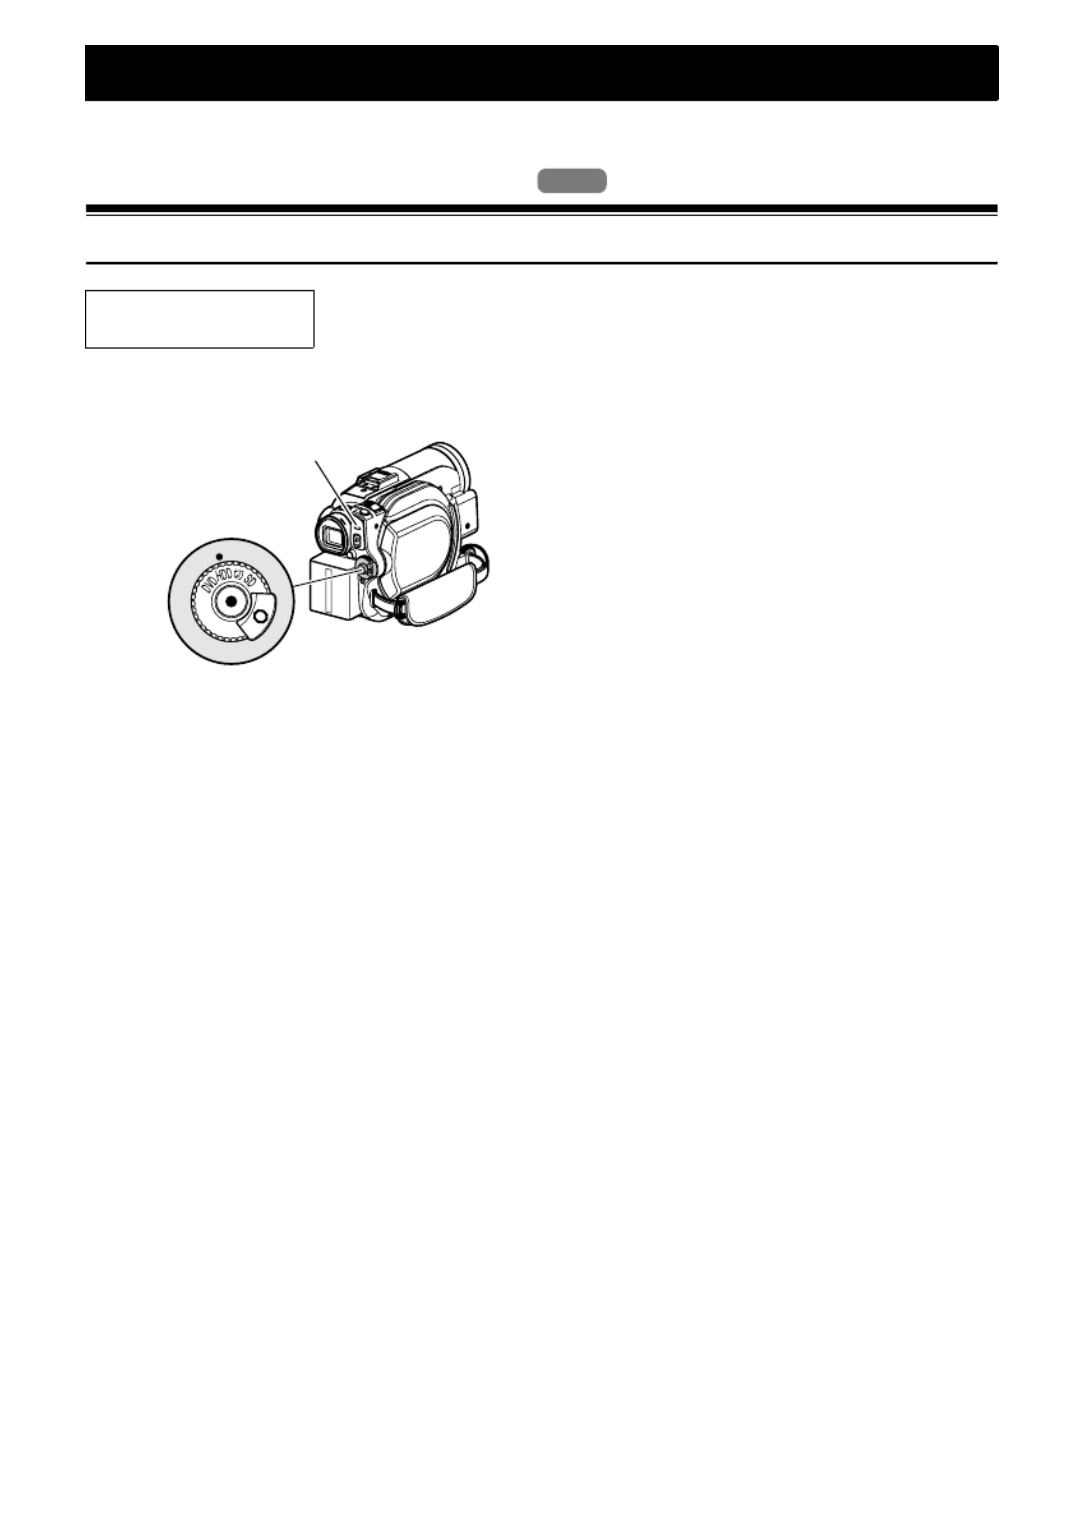
43
Basic Techniques
This section explains about recording of movies and still images, and also basic settings on
DVD video camera/recorder.
1<>2/
Recording Movie
1Remove the lens cap, and then point the DVD
video camera/recorder at subject.
2Turn the DVD camera/recorder on.
Set the power switch to “HDD” or “DVD” to
turn the DVD video camera/recorder on.
After the ACCESS/PC indicator goes out,
perform the subsequent operation:
3Check the subject on the screen (viewfinder
or LCD).
When using the viewfinder, close the LCD
monitor before pulling out the viewfinder.
4Press the REC button.
The “m” mark in the viewfinder or on the
LCD screen will change to the “n” mark,
and recording will start.
During recording, the recording indicator on
the front of DVD video camera/recorder will
light.
Pressing REC again during recording will set
the DVD video camera/recorder to the
recording pause status.
5When recording is finished, turn the DVD
video camera/recorder off.
Note:
•See “Troubleshooting” on page 149 when recording
movie is not possible.
•See “Troubleshooting” on page 149 if it takes some
time before recording is possible.
•See “Troubleshooting” on page 149 if the DVD video
camera/recorder does not operate.
•See page 46 for on-screen information display.
•It is recommended that you set the LOCK switch to L
(the upper position) to prevent the power switch in the
“HDD” position from accidentally moving to “DVD”
position.
•When using a DVD-RW (VF-mode)/DVD-R, videos of
different qualities (VIDEO Modes) or 16:9 On and Off
cannot be recorded or dubbed on the same disc (see
page 84).
•While the ACCESS/PC indicator is lit or blinking, do
not turn the DVD video camera/recorder off, and take
care not to subject it to any vibration: Doing so could
cause an error in the recorded data, which could
make it unplayable (see page 8).
•The minimum recordable time of movie is
approximately 3 seconds.
•Hitachi cannot be responsible for video and audio that
cannot be recorded or edited because of any defect.
•Each time the DVD video camera/recorder enters the
recording pause status, the counter display will be
reset to “0:00:00”.
•After recording for 9 hours when using HDD, the DVD
video camera/recorder will automatically stop
recording: After approx. one minute, it will
automatically restart recording (no scene will be
recorded during this recording pause). As a result,
multiple thumbnails will appear for the scene recorded
continuously for more than 9 hours, even with one-
time recording of that scene. Mark “n” will
continue to appear on the screen while the DVD video
camera/recorder is automatically pausing when it has
continued recording for more than 9 hours.
Before You Begin •When setting the power switch to “DVD”, insert a recordable DVD-RAM/DVD-
RW/DVD-R/+RW into this DVD video camera/recorder.
HDD
HDD
HDD
HDD
HDD
ACCESS/PC
indicator
Pressing REC
once will start
recording;
pressing it once
again will
temporarily stop
recording.

44
3
Recording Stills
Note:
Recording of still images is possible on card.
1Remove the lens cap, and then point the DVD
video camera/recorder at subject.
2Turn the DVD camera/recorder on.
Set the power switch to “SD”.
After the CARD ACCESS indicator goes out,
perform the subsequent operation:
3Check the subject on the screen (viewfinder
or LCD).
When using the viewfinder, pull it out and
close the LCD monitor.
4Press the PHOTO/SELECT button half way
(half pressing).
The DVD video camera/recorder will
automatically focus on the subject at the
center of screen, and the “m” indicator on
screen will light in purple (the focus will not
change when manual focus is chosen).
5Press the PHOTO/SELECT button all the way
(full pressing).
The screen will be black, and then the
recorded still will be displayed. When the
“m” mark appears, you can proceed with
the next recording; while “CARD ACCESS” is
being displayed, you cannot proceed with the
next recording.
Note:
•If you wish to record without locating a subject at the
center of screen, first locate the subject at the center
of screen, press the PHOTO/SELECT button halfway
down, determine the composition to be recorded, and
then press the PHOTO/SELECT button all the way
down.
•If you press the PHOTO/SELECT button all the way
down at one stroke without pressing it half way,
recording will be possible, but the focus may be
incorrect.
•See “Size And Quality Of Photos” on page 160 for
details of photos on card.
•See “Troubleshooting” on page 149 if recording
photos is not possible.
•If focusing is difficult with auto focus, choose manual
focus, and manually correct the focus before
recording (see page 55).
•Shake of the DVD video camera/recorder may cause
blur in recorded image.
•When holding the DVD video camera/recorder for
recording, grasp it securely with both hands.
•When recording with higher zoom magnification, it is
recommended that you secure the DVD video
camera/recorder on a tripod.
•There may be a difference between the image you
see on the LCD screen or viewfinder and the
recorded image.
PHOTO/SELECT
button
CARD ACCESS indicator
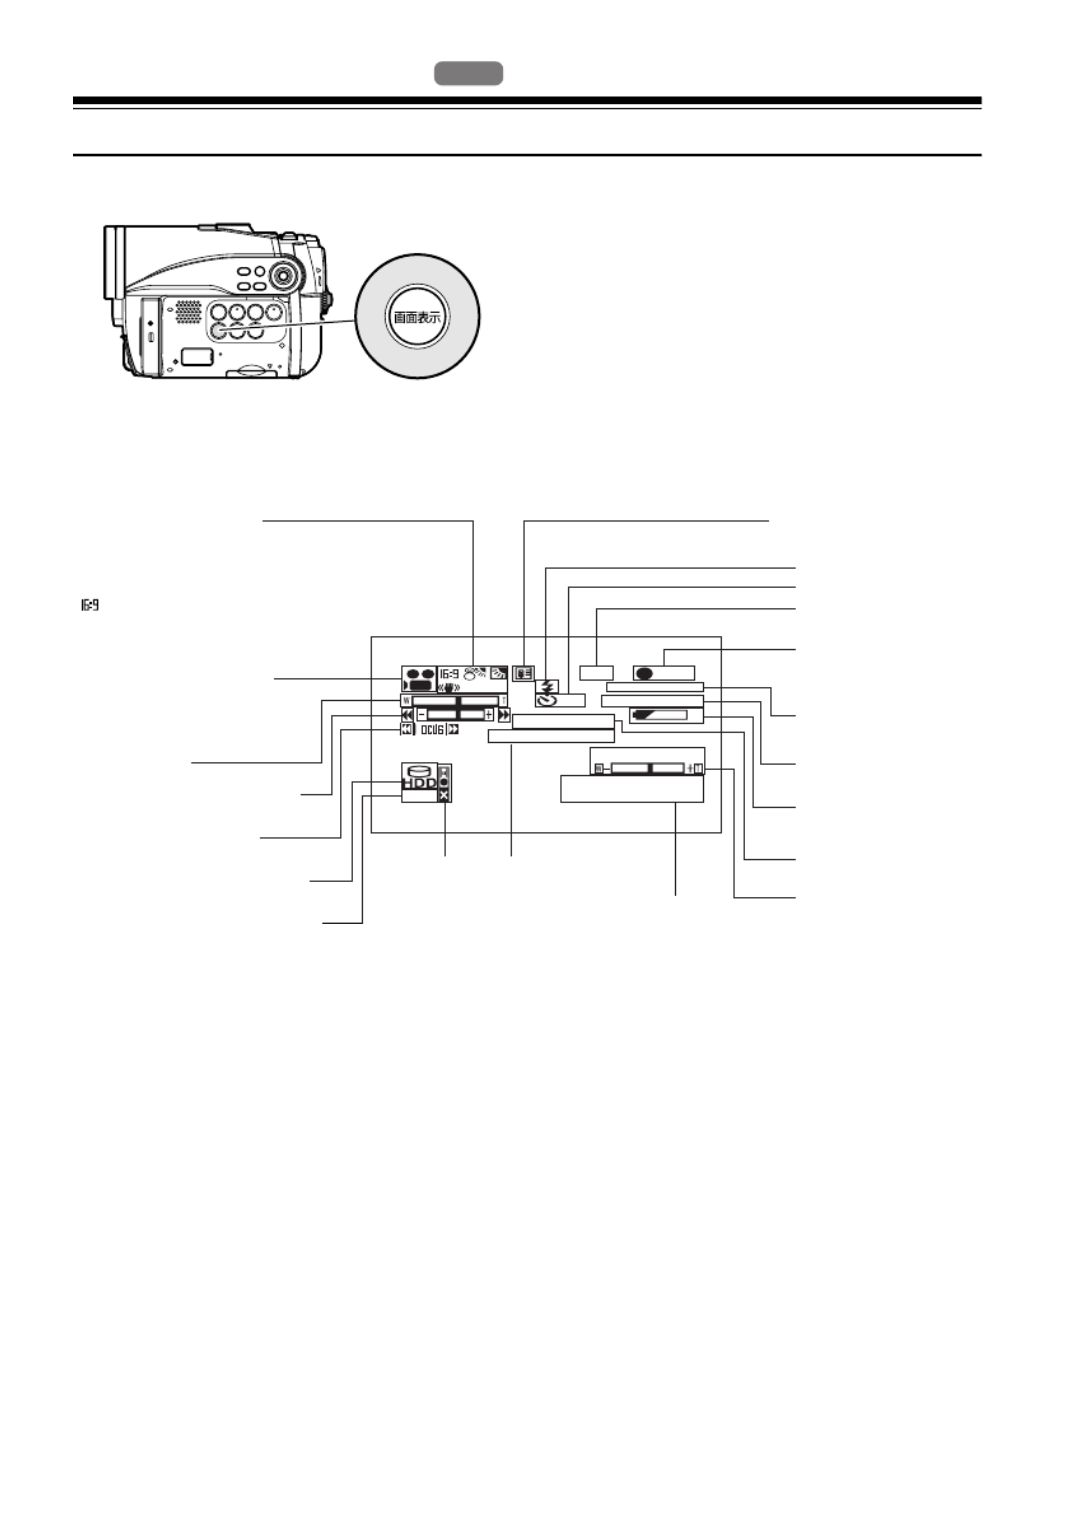
46
1<>2/3
On-Screen Information
Various types of information will appear in the viewfinder or on the LCD screen during recording.
INFORMATION DISPLAY DURING RECORDING
See the next page for details.
HDD
HDD
HDD
HDD
HDD
1 0
8 : 0 0 A M
1 2 / 1 / 2 0 0 7
3 0 MIN
0 : 0 0 : 0 0
REC
HDD ACCESS
REM
j
VOLUME
FINE
FULL AUTO
L IN
The above screen is an example for explanation:
It is different from the actual display.
e 2. Program AE
j3. White balance
n 4. EIS
m 5. Backlight compensation
6. 16:9 mode
1. Recording mode
12. Zoom
13. Exposure correction
14.Manual Focus
15. HDD,DVD/Card type
16. Movie recording quality
p 7. Microphone filter
8. Video flash
9. Self-timer
10. External Input
11. Recording status
Movie recording time
18.
Remaining space
on HDD/DVD/Card
19. Remaining
battery level
FULL AUTO indicator
(p. 59)
20. Volume
Warning message
17. HDD
Protection Current date/time

47
1. Recording mode (p. 43, 44, 68)
2. Program AE (only in movie recording mode)
(p. 60)
3. White balance (p. 61)
4. Electronic image stabilizer (EIS) (only in still
recording mode) (p. 63)
5. Backlight compensation (p. 57)
6. 16:9 mode (only in movie recording mode)
(p. 65)
7. Microphone filter (only in movie recording
mode) (p. 63)
8. Video flash *1 (only in still recording mode)
(p. 58)
9. Self-timer (only in still recording mode) (p. 68)
10. External Input (p. 67)
11.Recording status
12. Zoom (p. 53)
13. Exposure correction (p. 57)
14. Manual focus (p. 55)
A: Movie (HDD/DVD)
E: Still (Card)
F: External input still (field) (Card)
G: External input still (frame) (Card)
No display : Auto
b: Sports
c: Portrait
d: Spotlight
e: Sand & Snow
f: Low Light
No display : Auto
h: Set
i: Outdoor
j: Indoor1
k: Indoor2
No display : EIS OFF
n: EIS ON
No display : Backlight compensation OFF
m: Backlight compensation ON
No display : 16:9 mode OFF
: 16:9 mode ON
No display : Microphone filter OFF
p: Microphone filter ON
No display : Emits light automatically
(: Always emits light
): No light emission
No display : Self-timer OFF
q: Self-timer ON
(countdown is from 10 seconds)
L IN : AV input
S IN : S-VIDEO input
n: During recording
m: During recording pause (lights in
green)
When focus locks during photo
recording (lights in purple)
No display *2
W
(Digital Zoom: Off)
X
(Digital Zoom: 40×* 3)
Y
(Digital Zoom: 240×* 4 only in movie
recording mode)
No display : Auto
: Manual
No display : Autofocus
: Manual focus

48
15. HDD, DVD/Card type
16.
Movie recording quality (
only in movie
recording mode
) (p. 64)
Still recording quality (only in still recording
mode) (p. 67)
17. HDD Protection (p. 69)
18. Remaining space on HDD/DVD/Card *6
19. Remaining battery level (p. 32)
20. Volume (p. 73)
: HDD
: HDD (write-protected)
I: DVD-RAM
J: DVD-RAM (write-protected)
< > / : DVD-RW (VR-mode/VF-mode)
$: Protected DVD-RW (VR-mode)
": DVD-RW (VR-mode) finalized on
this video camera/recorder
?: DVD-RW (VR-mode) finalized on a
device other than this DVD video
camera/recorder
#: Finalized DVD-RW (VF-mode) disc
K: DVD-R
!: DVD-R already finalized on this
DVD video camera/recorder
N: DVD-R finalized on a device other
than this DVD video camera/
recorder (including a DVD-R
recorded on a Hitachi DVD video
camera/recorder marketed before
DZ-HS403/HS401, but not finalized)
: +RW
: Finalized +RW
O: SD memory card
P: Locked SD memory card
No display *5
XTRA : Best quality
FINE : High quality
STD : Standard quality
FINE : High quality
NORM : Standard quality
ECO : Number of recordable stills is
prioritized
No display : HDD Protection On
: HDD Protection Off
REM XX
MIN *7
: Remaining recordable minutes
during movie recording
REM XX
*8 : Number of remaining recordable
still images during still recording
w(full charge)
x
y
z(low remaining charge)
:
The volume can be adjusted during
external input.
*1 Not displayed on DZ-HS401.
*2 When no disc or card is in the DVD video camera/recorder or disc has not yet been initialized, a write-protected
disc or locked card, or a disc or card with no remaining space, has been inserted. Or if the HDD is protected or
has no remaining free space.
*3 “60x” on DZ-HS401.
*4 “500x” on DZ-HS401.
*5 No display if no disc or card is loaded, or if a disc or card unusable on this DVD video camera/recorder is
loaded.
*6 No remaining time or number will be displayed with a protected disc or locked card, or finalized DVD-RW (VF-
mode)/DVD-R/+RW.
*7 In XTRA mode, possible recording time may be longer than the displayed time.
*8 The displayed number of recordable stills is for reference: This number may not decrease, depending on the
recording conditions.

50
●Interpreting symbols on LCD screen when recording with the screen
facing the same direction as the lens
Note:
• If the LCD screen is set facing the same direction as the lens, the LCD screen will display a mirror image (left and
right reversed).
• If the LCD screen is set facing the same direction as the lens, you can also view subject image in the viewfinder.
• Although you can switch to the manual focus, exposure and on-screen display modes even during recording with
LCD screen facing the same direction as lens, they will not appear on the screen.
• When the LCD monitor is opened and turned 180º with the Program AE set to Low Light, the monitor screen will
light white (see page 61).
Screen
display
symbol
Description
• Status in which recording is not possible on HDD.
• An attempt to record a photo on HDD was made.
N• An attempt to record a still is being made with a DVD-RAM/DVD-RW/DVD-R/+RW
used.
• An unusable disc is loaded.
R• An attempt to record movie on a card was made.
• An unusable card is loaded.
X• HDD/disc is write-protected.
• A locked card is loaded.
k• During recording (lights in red).
• The remaining capacity on HDD/disc is approaching the limit 0 (blinks in red).
l
• During recording pause (lights in green).
• During focus lock (lights in purple).
• The remaining capacity on HDD/disc/card is approaching the limit 0 (blinks in red).
• There is no remaining capacity on HDD/disc/card (blinks in green).
• An attempt to record a copy-guarded image is being made (blinks in green).

51
Checking Flow of Menu
The following two on-screen menu modes are available with this DVD video camera/recorder:
• Full Menu: To display all menu items for experts
• Quick Menu: To display only the fundamental menu items for first timers
●Operating Menu
The Full Menu will appear if you press the MENU button.
You can use the f e d c/ / / buttons on DVD video camera/recorder to select various setting
options in Full Menu and designate them.
Note:
•Pressing the QUICK MENU button will display the Quick Menu screen: The operation will be the same as when
the MENU button is pressed.
•Pressing the MENU button during recording will not display the menu.
•The menu screen will disappear when it is left for approx. one minute without any operation.
V I DEO Mo de F I NE
I n p u t So u r c e CAMERA
ENTER RETURN
R ec o r d F u n c t i o n s Se t u p
1 6 : 9 On
OSD Ou t pu t On
HDD P r o t e c t i o n On
On
A u t oP r o g r a
m
AE
W
h i t e Ba l .
D i g . Z o om
M I C . F i l t e r
E I S
ENTER RETURN
40x
O f f
A u t o
Ca
m
e r a F u n c t i o n s Se t u p
A
A
On
A u t oP r o g r a
m
AE
W
h i t e Ba l .
D i g . Z o om
M I C . F i l t e r
E I S
ENTER RETURN
40x
O f f
A u t o
Ca
m
e r a F u n c t i o n s Se t u p
A
A
Press the A button directly to choose an option from menu.
To return to the screen one before, press the C button.
Pressing the MENU button again will cause the Menu display to
disappear.
Press the MENU button
Press c or A
Press d or C
Press fPress e
The cursor to be
chosen will move to
the right
The cursor to
be chosen will
move down

52
●Flow of Full Menu
■ The shaded menu item can also be set using the Quick Menu.
Refer to page indicated for details of each function.
Camera Functions Setup
Not displayed when external input is being
selected.
Record Functions Setup
Date Setup
LCD/EVF Setup
Adjust (p. 38)
EVF Display (p. 39)
Initial Setup
Program AE (p. 60)
White balance (p. 61)
EIS*1 (p. 63)
Digital zoom (p. 53)
Flash*2
Microphone filter*1 (p. 63)
*1: Not displayed in “SD” status.
*2: Displayed when DZ-HS403 is recording a photo.
Movie quality*3 (p. 64)
16:9*4 (p. 65)
Input selection (p. 67)
External still input*5 (p. 68)
Self-timer*6 (p. 68)
On-screen information display output*7 (p. 69)
HDD protection*8 (p. 69)
*3: The quality mode is not displayed in “SD” status
(p. 67).
*4: Not displayed in “SD” status, or with external input.
*5: Displayed in “SD” status, and input selection is set
to external signal.
*6: Displayed in “SD” status.
*7: Displayed only when input selection is set to
camera.
*8: Displayed only in “HDD” status.
On
A u t oP r o g r a
m
AE
W
h i t e B a l .
D i g . Z o om
M I C . F i l t e r
E I S
ENTER RETURN
40x
O f f
A u t o
A
A
Ca
m
e r a F u n c t i o n s Se t u p
V I DEO Mo de F I NE
I n p u t S o u r c e CAMERA
ENTER RETURN
R ec o r d F u n c t i o n s S e t u p
1 6 : 9 On
OSD Ou t pu t On
HDD P r o t e c t i o n On
Date setting (p. 35)
Display format (p. 36)
Beep (p. 36)
Power save (p. 36)
Recording LED (p. 37)
Language selection (p. 35)
Demo mode (p. 37)
Reset (p. 37)
Da t e Se t
Da t e Mod e M / D/ Y
ENTER RETURN
D a t e Se t u p
EVF D i s p l a y Au t o
L CD / E VF Ad j u s t
ENTER RETURN
L CD/ E VF S e t u p
De
m
o Mo d e Au t o
R e s e t
L a n g u ag e En g l i s h
ENTER RETURN
B e e p On
P o
w
e r S a v e Off
Re c o r d L ED On
I n i t i a l S e t up

53
1<>2/3
Zooming
If you continue to hold the zoom lever on the
“T” control side with Dig. Zoom specified, the
digital zoom will be activated midway (when
optical 10-power is exceeded on DZ-HS403 or
optical 15-power is exceeded on DZ-HS401).
You can zoom up to 240-power on DZ-HS403;
up to 500-power on DZ-HS401.
1Press the MENU button, choose “Dig. Zoom”
on the “Camera Functions Setup” menu
screen, and then press the A button.
2Choose the desired magnification, and then
press the A button.
3Press the MENU button to end the setting.
Moving the zoom lever will display the
digital zoom bar.
Note:
•The digital zoom setting will be stored in memory
even if the DVD video camera/recorder is turned off.
•You can also use the DIGITAL ZOOM button on
remote control to switch the digital zoom setting:
Pressing the button during movie recording will switch
the setting between “Off”, “40×”*1, and “240×”*2:
Pressing the button during photo recording will switch
between “Off” and “40×”*1.
•If you set zoom to “240×”*2
when recording photo, the
digital zoom will be up to 40×*
1.
•When a subject is zoomed, it may be momentarily out
of focus.
•When digital zoom is engaged, the image quality will
be rougher.
MACRO RECORDING
Use the macro function when recording a small object from close-up position: You can shoot the
subject as close as approximately 2 cm from the lens surface, magnifying the image to fill the screen.
1Aim the DVD video camera/recorder at the
subject, and press the zoom lever to “W”
control side.
Note:
•Zoom can be used, but the subject may not be
focused, depending on the distance to the subject. In
this case, move the zoom to “W” control side to focus.
•The amount of light tends to be insufficient during
macro recording: If the subject image is too dark, use
additional lighting.
HDD
HDD
HDD
HDD
HDD
W: recording wide area
(wide-angle)
T: recording enlarged
image (telephoto)
*1 “60x” on DZ-HS401.
*2 “500x” on DZ-HS401.

54
RECORDING SUBJECTS FOR STRONGER WIDE-ANGLE OR TELEPHOTO
EFFECT
Use the tele-conversion lens or wide-conversion lens with the following filter diameter and thread
pitch to record subjects for stronger telephoto or wide-angle effect:
Filter diameter: 37 mm for DZ-HS403; 30.5 mm for DZ-HS401
Thread pitch: 0.75 mm for DZ-HS403; 0.5 mm for DZ-HS401
When attaching the optional DZ-TL1 tele-conversion lens or DZ-WL1 wide-conversion lens, use the
optional step-up ring: DZ-SR3037 for DZ-HS401 (see page 141).
1Remove the lens hood from DVD video
camera/recorder, and attach the step-up ring
over the lens.
2Remove the cap of conversion lens, and screw
the lens into the thread of step-up ring.
When using the DZ-HS403, you need not use
the step-up ring.
Note:
•Be careful not to lose the removed lens hood.
•With DZ-TL1 tele-conversion lens, the focusing range
at “T” (telephoto) control side is between approx. 5 m
and infinite.
•When a conversion lens is attached, note that the four
corners of screen will be slightly dim if you zoom in on
a subject on the W control side (wide-angle side).
•When replacing the lens, take care not to drop the
DVD video camera/recorder.
•Attaching the conversion lens will disable the function
of the built-in flash (for DZ-HS403 only): Specify
“Flash: Off” (see page 58).
•If a generally available filter is attached, do not attach
the removed lens hood.
•Some generally available conversion lenses may not
be usable on this DVD video camera/recorder,
depending on the lens maker.
•Tele-conversion lens: For stronger telephoto effect
•Wide-conversion lens: For stronger wide-angle effect
(Attach)
Conversion lens
Lens hood
(Remove)
Step-up ring (only when using DZ-HS401)

55
1<>2/3
Manually Focusing Subject
The DVD video camera/recorder usually focuses on a subject automatically (autofocus). You can also
manually focus a subject depending on the recording conditions.
FOCUSING DURING RECORDING
Normally, the DVD video camera/recorder automatically focuses the subject (autofocus), but you
can also manually focus a subject, depending on the recording conditions (manual focus).
Focusing range:
You can switch the display mode of on-screen information:
•On T (tele) side: approximately 1 m from lens surface to infinity
•On W (wide) side: approximately 2 cm from lens surface to infinity
1Press the FOCUS button during recording.
Manual Focus icon will appear on the screen.
2Press the zoom lever to “T” control side to
zoom in on subject.
3Use the d c/ buttons to adjust the focus,
while viewing the image in the viewfinder or
on the LCD screen.
Note:
•Pressing FOCUS will alternate between manual focus
and auto focus. With auto focus, no indication will
appear on the screen.
•Be sure to zoom in on your subject before manually
focusing on it. If you bring the subject into focus at the
“W” control side, focus will be faulty when you turn the
zoom lever to the “T” control side to zoom in on the
subject.
•Manual focus is released when the DVD video
camera/recorder is turned off. When you turn the DVD
video camera/recorder on next time, auto focus will be
restored.
HDD
HDD
HDD
HDD
HDD
3 0 MIN
0:00:00
REM
FINE
8 : 0 0 AM
1 2 / 1 / 2 0 0 7
Manual Focus icon
Adjust with
d c/ buttons

56
Manually focus the following objects, which may not be automatically focused (see page 55):
Objects not in
the center of
screen
Objects that
are far and
near at the
same time
Objects with
little variation
in brightness,
such as white
wall
Objects
moving rapidly
Dark objectsObjects lit by
neon sign,
spotlight, etc.
which glares
or emits
strong light
Object behind
glass with
water
droplets, dirt
on it
Night view

57
1<>2/3
Adjusting Brightness of Image to be recorded
(Exposure)
The DVD video camera/recorder usually adjusts the exposure automatically. You can also manually
adjust the exposure depending on the recording conditions.
1Press the EXPOSURE button during
recording.
The exposure adjustment bar will appear on
the screen.
2Use the d c/ buttons to adjust the
exposure, while viewing the image in the
viewfinder or on the LCD screen.
Note:
•Pressing EXPOSURE will alternate between manual
adjustment and auto exposure. With auto exposure,
no indication will appear on the screen.
•The exposure setting will return to Auto when the
DVD video camera/recorder is turned off.
1<>2/3
Compensating for Backlight
1Press the BLC button during recording.
The backlight correction icon will appear.
Note:
•Pressing the BLC button will alternate between
backlight setting between on and off.
•The backlight setting will automatically return to “off”
when the DVD video camera/recorder is turned off.
HDD
HDD
HDD
HDD
HDD
3 0 MIN
0:00:00
REM
FINE
8 : 0 0 A M
1 2 / 1 / 2 0 0 7
Exposure adjustment bar Adjust with d c/ buttons
When subject is lighted from rear, this function will compensate for lighting so that the subject is not
too dark.
HDD
HDD
HDD
HDD
HDD
3 0 MIN
0:00:00
REM
FINE
8 : 0 0 A M
1 2 / 1 / 2 0 0 7
Backlight correction icon

58
3
Built-in Video Flash (for DZ-HS403 only)
When recording photos in a dark place, or if the subject is lit from rear, the DZ-HS403 makes use of
the built-in Video Flash for automatic brightening: The Video Flash can also be set to On where the
light is always being emitted, or Off when you wish to record without using the flash even in a dark
place.
1Press the MENU button, and choose “Flash”
from the “Camera Functions Setup” menu.
2Choose the option for “Flash” and decide it.
3Press the MENU
button to end the
setting.
* Displayed when
using DZ-HS403
to record photo
(not displayed
when the optional
Video Flash is
connected).
Note:
•The built-in Video Flash setting will not change even
when the DVD video camera/recorder is turned off.
Unless recording is to be made with the fixed Flash
setting, it is recommended to return it to “Auto” after
recording with the “On” or “Off” setting, before turning
the DVD video camera/recorder off.
•When recording dark subjects, the shutter speed will
be slower, so don’t let the camera shake.
•However, dark subjects may not be in clear focus
even if the Video Flash is used. It is recommended
that you light a subject when recording in a dark
place.
•The Video Flash built into DZ-HS403 cannot be used
when a conversion lens is attached: Specify “Flash:
Off”
•The distance for the built-in Video Flash to adjust the
appropriate amount of light will vary depending on the
subject, but it is approximately 1 – 2.5 m.
•The Video Flash automatically adjusts the amount of
light emitted, but the light amount adjustment may be
insufficient when a subject is too far away or too near.
•If you continuously record using the Flash, the Flash
may not emit light or the amount of light may not be
adjustable. After recording using the Flash, it is
recommended that you wait for a few moments,
before pressing the PHOTO/SELECT button to
record.
•“ ( ” will blink during charging of the battery for Video
Flash.
•While “ ( ” is flashing, the video flash will not emit
light, though the DVD camera/recorder is recording.
•When recording a close-up photo, specify “Flash:
Off”. Using the flash too near subject could cause a
whitish image.
•Do not use the Video Flash when approaching the
human eye. Emitting light from Video Flash near
human eye could damage the subject’s eyesight.
Especially when recording a baby or small child,
move the DVD video camera/recorder at least 1 m
away.
•Do not use the Video Flash while pointing it at a driver
in vehicle: Doing so could dazzle the driver, causing
an accident.
•Do not use the Video Flash in a place where there is
flammable or explosive gas: Doing so could cause fire
or explosion.
Setting On-screen display Manner of emitting light
Auto ( when the PHOTO/SELECT button
is pressed
Automatically emits light in dark place or in a spot lit
from rear.
On (Always emits light regardless of brightness.
Off )No light emission.
P r o g r a
m
AE
W
h i t e Ba l .
F l a s h
D i g . Z
o o m
ENTER RETURN
Ca
m
e r a F u n c t i o n s S e t u p
O n
Off
Auto
3 9 4REM
8 : 0 0 AM
1 2 / 1 / 2 0 0 7
*
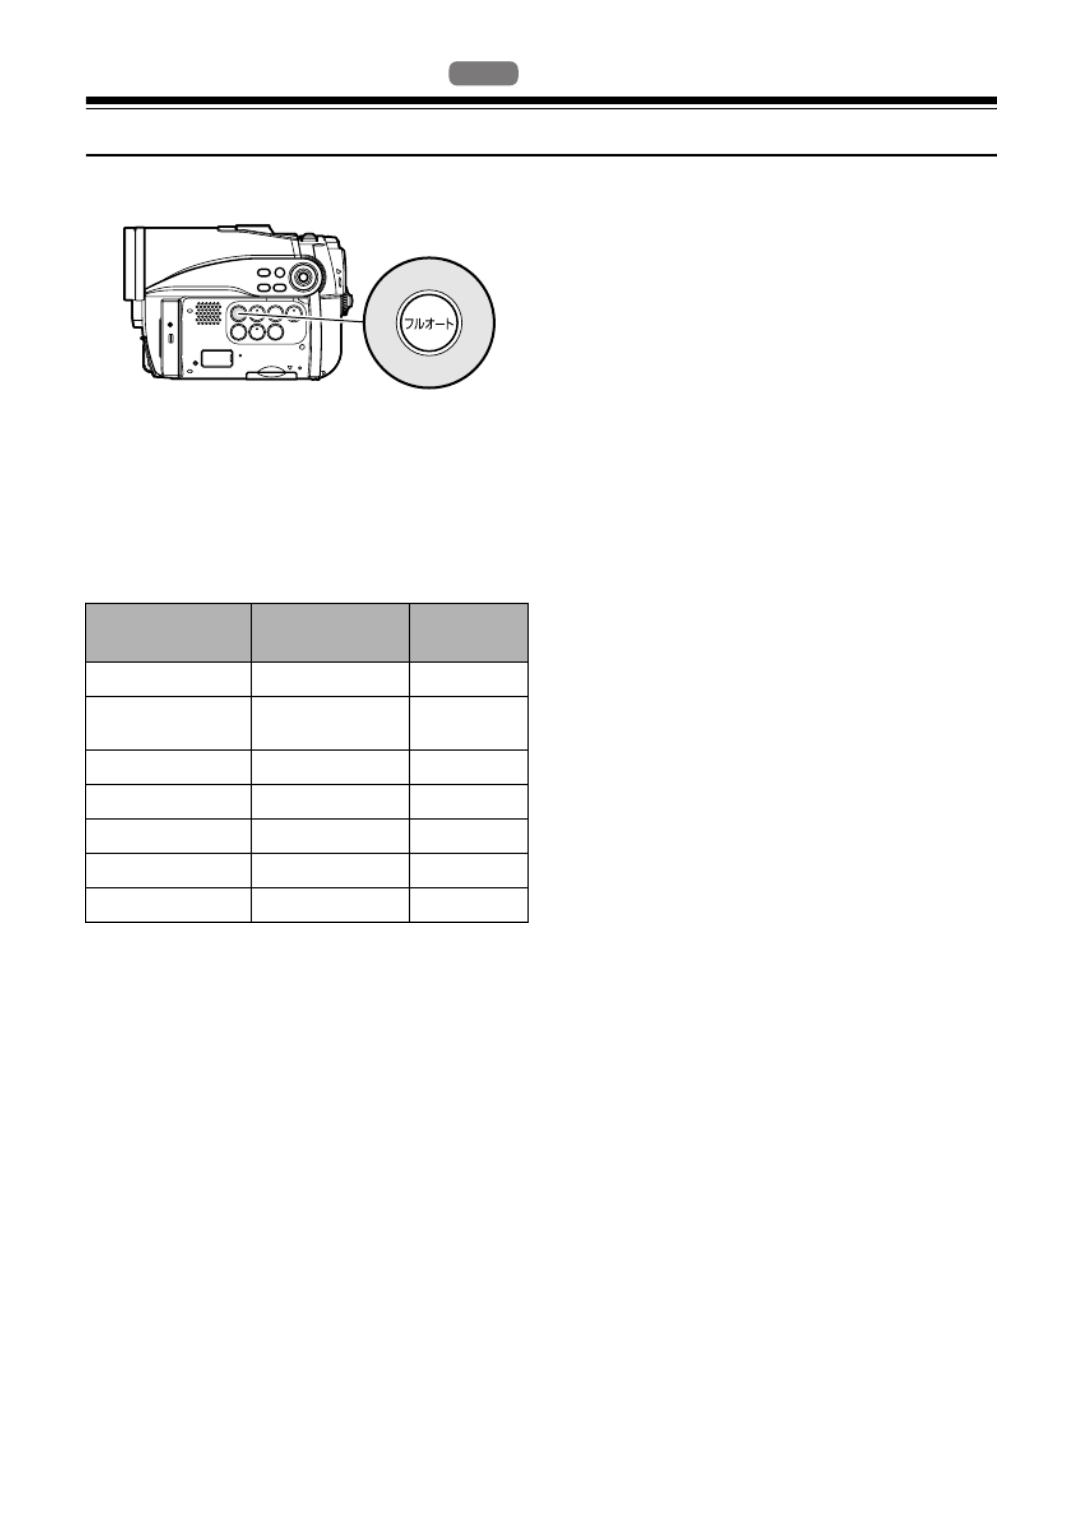
59
1<>2/3
Using Full Auto Function
Pressing the FULL AUTO button will fully automate the camera functions.
1Press the FULL AUTO button.
“FULL AUTO” will be displayed on the screen
of DVD video camera/recorder for several
seconds.
The following settings will reset to defaults:
HDD
HDD
HDD
HDD
HDD
Function When setting
full auto
Reference
page
Focus Auto 55
Backlight
compensation
Off 57
Exposure Auto 57
Program AE Auto 60
White balance Auto 61
EIS On 63
MIC.Filter Off 63

60
1<>2/3
Setting Up Camera Functions
SELECTING SHOOTING MODE TO MATCH THE SUBJECT
(SWITCHING PROGRAM AE MODE)
This DVD video camera/recorder automatically detects the status of subject and surrounding
situation and records the optimum image: If you choose the shooting mode to match the recording
conditions, clearer images will be recorded.
1Press the MENU button, use the f e/ /
d c/ buttons to choose “Program AE” on
the “Camera Functions Setup” menu screen,
and then press the A button.
The options will appear on the right of
“Program AE”.
2Use the f e d c/ / / buttons to choose
the desired option, and then press the A
button: The selected option will be set.
3Press the MENU button to end the setting.
The menu screen will disappear.
Note:
•You can check the selected AE mode by the on-
screen information display. However, nothing will
appear in the Auto mode.
•The shooting mode set as above will be stored in
memory even if the DVD video camera/recorder is
turned off.
•When recording in a dark area, an after-image will
appear when filming a moving subject or if camera
shake occurs (it is therefore recommended that you
use a tripod in such cases).
•If the Sports mode is used under a fluorescent light,
the image may flicker: In this case, use the Auto mode
for recording.
Auto : The camera/recorder automatically
judges the subject and surrounding environment
for optimum recording.
Sports : Reduces blurring when recording
rapidly moving subjects such as in golf or tennis.
Portrait : Makes a subject, such as a person
or a creature, stand out from a blurred
background.
Spotlight : Prevents overexposure of subject
portrait face, etc. when strong light strikes the
subject, as in a wedding or on stage.
Sand & Snow : Prevents underexposure of
subject portrait face, etc. in a place where
reflection of light is intense, such as at the
seaside in midsummer or on a ski slope.
Low Light : Allows user to record in a dark
place even with decreased lighting.
Turn the LCD monitor 180º during recording:
The LCD monitor light can then be used for
recording.
Before You Begin •See page 51 for how to set.
•No menu screen appears with external input.
HDD
HDD
HDD
HDD
HDD

61
RECORDING DARK SUBJECTS USING LCD MONITOR LIGHT
When Program AE is set to Low Light, you can use the light from LCD monitor to record a subject.
1Press the MENU button, use the f e/ /
d c/ buttons to choose “Program AE” on
the “Camera Functions Setup” menu screen,
and then press the A button.
2Use the f e d c/ / / buttons to choose
“Low Light”, and then press the A button.
3Press the MENU button to end the setting.
4Open the LCD
monitor, turn it 180º
so that it faces the
same direction as
the lens: The LCD
monitor will light
white.
Note:
•Use the viewfinder to check the image to be recorded.
•The LCD monitor light allows you to record a subject
up to 1 m even in a dark place.
•An after-image will appear when filming a moving
subject or if camera shake occurs (it is recommended
that you use a tripod).
•If a subject cannot be focused properly, manually
adjust the focus (see page 55).
ADJUSTING COLOR (WHITE BALANCE)
This DVD video camera/recorder automatically adjusts the color of subject. Change the white
balance setting depending on the recording conditions.
Mode Setting content On-screen display
Auto White balance always automatically adjusted None
Set You can manually adjust white balance to match the light
source or situation (p. 62) h
Outdoor To record in fine weather i
Indoor 1 To record under incandescent light, halogen light or bulb-
color type fluorescent light j
Indoor 2 To record under fluorescent light k

62
1Press the MENU button, use the f e/ /
d c/ buttons to choose “White Bal.” on the
“Camera Functions Setup” menu screen, and
then press the A button.
2Choose the desired option, and then press the
A button.
3Press the MENU button to end the setting.
Note:
•The white balance mode can be confirmed using the
on-screen information.
•The white balance setting will be stored in memory
even when the DVD video camera/recorder is turned
off.
•Do not block the infrared sensor with hand, etc.
•If a tele or wide-conversion lens is used, the auto
white balance may not operate depending on the
recording conditions. If this happens, set to the mode
to match the recording conditions, or manually set the
white balance.
•Be sure to remove the lens cap before turning the
DVD video camera/recorder on: If the DVD video
camera/recorder is turned on with the lens capped,
the white balance will not work normally.
●Setting white balance manually
1Point the DVD
video camera/
recorder at a white
object so that it fills
the screen. Use an
object that is not
transparent.
If focus is not
correct when the
white object fills the screen, manually focus
the object, referring to “Manually Focusing
Subject” (see page 55).
2Press the MENU button, use the f e/ /
d c/ buttons to choose “White Bal.”, “Set”
on the “Camera Functions Setup” menu
screen, and then press the A button.
3Hold A button pressed until the “h”
indicator changes from blinking to a steady
light. When the “h” indicator lights, the
white balance setting will be complete.
4Press the C button to end the setting.
Note:
•The white balance set using the “Set” option will be
stored in memory until it is re-set.
•Do not use a colored object when setting the white
balance: The appropriate tint cannot be set.
•If “Input Source: LINE, S-LINE” has been specified,
you cannot use the “Set” mode of white balance
(p. 67) .
•The setting on white balance “Set” may not be
possible in a dark place. Also, the white balance
cannot be set when the zoom bar is in the digital
zoom range (p. 53). In such status, the “h” indicator
will remain blinking. Set the white balance in a bright
place with “Dig. Zoom: Off” specified.
•If the recording conditions have changed, re-set the
white balance for appropriate colors.
•The setting will be stored in memory even when the
DVD video camera/recorder is turned off: The “h”
indicator will blink when the DVD video camera/
recorder is turned on next time. Re-set the white
balance as needed.
Infrared sensor block
Thick paper

63
USING THE ELECTRONIC IMAGE STABILIZER (EIS)
When you use zoom (see page 53) to record a magnified subject image, it will correct fuzziness in the
recorded image.
1Press the MENU button, use the f e/ /
d c/ buttons to choose “EIS” on the
“Camera Functions Setup” menu screen, and
then press the A button.
2Choose the “On” or “Off”, and then press the
A button.
3Press the MENU button to end the setting.
Note:
•You can check EIS On or Off by the on-screen
information display.
•The EIS setting will be stored in memory even when
the DVD video camera/recorder is turned off.
•After recording with EIS set to “Off”, it is
recommended that you return the setting to “On” and
then turn the DVD video camera/recorder off, unless
you normally record with “Off” setting.
•It is recommended that you specify “EIS: Off” when
using the DVD video camera/recorder on a desk or
tripod.
•When “EIS: On” is specified, there will be a slight
difference between the actual movement and the
movement on screen.
•Gross camera shake may not be entirely corrected
even if “EIS: On” is specified: Firmly hold the DVD
video camera/recorder with both hands.
•EIS may not operate correctly when the tele or wide-
conversion lens is used.
•EIS cannot be used when recording photos.
RECORDING SUBJECT USING LARGE MAGNIFICATION (DIGITAL ZOOM)
See page 53 for setting on digital zoom.
REDUCING WIND NOISE DURING RECORDING (MIC.FILTER)
When recording sound from the microphone built into this DVD video camera/recorder, you can
reduce wind noise in recording.
If “MIC.Filter: On” is specified, the low-frequency components in the sound picked up by
microphone will be cut off during recording: This makes it easier to hear the target voice or sound
during playback.
1Press the MENU button, use the f e/ /
d c/ buttons to choose “MIC.Filter” on the
“Camera Functions Setup” menu screen, and
then press the A button.
2Choose the desired option, and then press the
A button.
3Press the MENU button to end the setting.
Note:
•You can also use the on-screen display to confirm that
the MIC.Filter has been set.
•The MIC.Filter setting will be stored in memory even
when the DVD video camera/recorder is turned off.
•The MIC.Filter function will work only during movie
recording.
•The microphone filter function works only with the
built-in microphone: It will not function when using an
external microphone (p. 70).

64
Setting Up Record Functions
1<>2/
SWITCHING MOVIE QUALITY (VIDEO MODE)
Choose the movie quality from “XTRA”, “FINE”, “STD”.
1Press the MENU button, use the f e/ /
d c A/ / buttons to choose “VIDEO
Mode” on the “Record Functions Setup”
menu screen, and then press the A button.
2Choose the desired quality mode, and then
press the A button.
3Press the MENU button to end the setting.
Note:
•The movie quality setting will be stored in memory
even when the DVD video camera/recorder is turned
off.
•The “VIDEO Mode” setting will not change even if the
DVD is replaced.
•When using DVD-RW (VF-mode)/DVD-R, you cannot
switch the setting on movie quality or wide-screen
mode while recording on the disc: The DVD video
camera/recorder will be automatically set to the movie
quality or wide-screen mode first used with the disc
for recording.
•When using a DVD-RW (VF-mode)/DVD-R/+RW:
You cannot specify the combination of “VIDEO Mode:
STD” and “16:9 On”(p. 84). If you specify “16:9 On”
and try to switch the VIDEO Mode to STD from XTRA
or FINE, the screen will automatically switch to the
4:3-aspect ratio display.
•The movie quality setting is effective only during
movie recording: The setting will not be displayed
during recording of stills.
Block-like noise may appear in recorded image, or the outline of subject image is distorted under the
recording conditions listed below. Pan the DVD video camera/recorder as slowly as possible (Block
noise is likely to appear in the “STD” mode):
•If there is a complicated pattern in background (as in following figure on left);
•If the DVD video camera/recorder is moved excessively or quickly;
•If subject is moving rapidly even when the DVD video camera/recorder is not moving.
It is recommended that you record critical subjects in the “XTRA” or “FINE” mode.
HDD
HDD
HDD
HDD
HDD
(Image when block-like noise occurs) (Image without block-like noise)

65
1<>2/
SETTING TO WIDE TV SCREEN MODE (16:9 MODE)
When viewing recorded images later on a wide-screen TV (aspect ratio 16:9), specify wide-screen
(16:9) mode “On”: You can also record images with the aspect ratio changed (the aspect ratio with
“Off” is 4:3).
The following figures compare the images displayed on LCD monitor and in viewfinder when the
wide-screen mode is “on” and “off”.
1Press the MENU button, use the f e/ /
d c/ buttons to choose “16:9” on the
“Record Functions Setup” menu screen, and
then press the A button.
2Choose “On”, and then press the A button.
3Press the MENU button to end the setting.
When viewing playback on an ordinary TV screen later, specify “16:9 Off”: Recording with “16:9 On”
specified will be played back on an ordinary TV with longer vertical direction of image.
HDD
HDD
HDD
HDD
HDD
“16:9 Off” specified
(aspect ratio 4:3)
“16:9 On” specified
(aspect ratio 16:9)
When using DZ-HS403
When using DZ-HS401

67
3
SWITCHING QUALITY OF STILL IMAGE (QUALITY)
You can switch the still recording quality.
1Press the MENU button, use the f e/ /
d c A/ / buttons to choose “Quality” on
the “Record Functions Setup” menu screen,
and then press the A button.
2Choose the option you want, and then press
the A button.
3Press the MENU button to end the setting.
Note:
• The still quality setting will be stored in memory even
when the DVD video camera/recorder is turned off.
1<>2/3
RECEIVING IMAGE FROM ANOTHER DEVICE (INPUT SOURCE)
If you wish to input an image from another device to this DVD video camera/recorder, you must
first switch the setting on the DVD video camera/recorder.
Refer to the explanation starting from page 119 on how to connect the DVD video camera/recorder
to other devices or record images input from them.
1Press the MENU button, use the f e/ /
d c A/ / buttons to choose “Input
Source” on the “Record Functions Setup”
menu screen, and then press the A button.
2Choose “LINE”, and then press the A
button.
3Press the MENU button to end the setting.
Note:
The “Input Source” setting will return to “CAMERA”
whenever the DVD video camera/recorder is turned off.
It is recommended that you use “FINE” when recording vital images (p. 160 “Size And Quality
Of Photos”).
Setting Content On-screen display
CAMERA Usually select this option No display
LINE To input image from another device L IN
S LINE To input S-VIDEO signal from another device S IN
HDD
HDD
HDD
HDD
HDD

68
3
SWITCHING EXTERNAL INPUT RECORDING METHOD (PHOTO INPUT)
When “Input Source: LINE, S-LINE” is specified, you can record stills of externally input images on
a card. The DVD video camera/recorder can record an external image with little movement by
specifying “Frame”, but “Field” is recommended for recording image with movement.
1Press the MENU button, use the f e/ /
d c A/ / buttons to choose “PHOTO
Input” on the “Record Functions Setup”
menu screen, and then press the A button.
2Select the desired option and then press the
A button.
3Press the MENU button to end the setting.
Note:
• The PHOTO Input setting can be confirmed using the
on-screen information.
• The PHOTO Input setting will be stored in memory
even when the DVD video camera/recorder is turned
off.
• Refer to “Recording (Dubbing) Images”, page 119 to
see how to connect the DVD video camera/recorder
to another device.
3
SELF-TIMER
You can record photos using the self-timer function, as with ordinary cameras.
1Press the MENU button, use the f e/ /
d c A/ / buttons to choose “Self Timer”
on the “Record Functions Setup” menu
screen, and then press the A button.
2Select “On”, and then press the A button.
The self-timer will be set.
3Press the MENU button to end the setting.
4Press the PHOTO/SELECT button.
The recording indicator at the front of DVD
video camera/recorder will blink.
The self-timer indicator will start to count
down, and recording will commence
approximately 10 seconds later.
Note:
• You can also check that self-timer has been set by
reviewing the on-screen information.
• To release the self-timer mode, choose “Off” on the
menu screen or turn DVD video camera/recorder off.
• To suspend self-timer, press the PHOTO/SELECT
button again before recording starts, or press the C
button.
Recording
format Details of setting On-screen display
Frame
Does not suit recording of frequently moving video
subjects, despite high image quality. Frame suits recording
of less moving video.
G
Field Suitable for recording of frequently moving video subjects. F
The self-timer function is valid only when recording photos (stills).
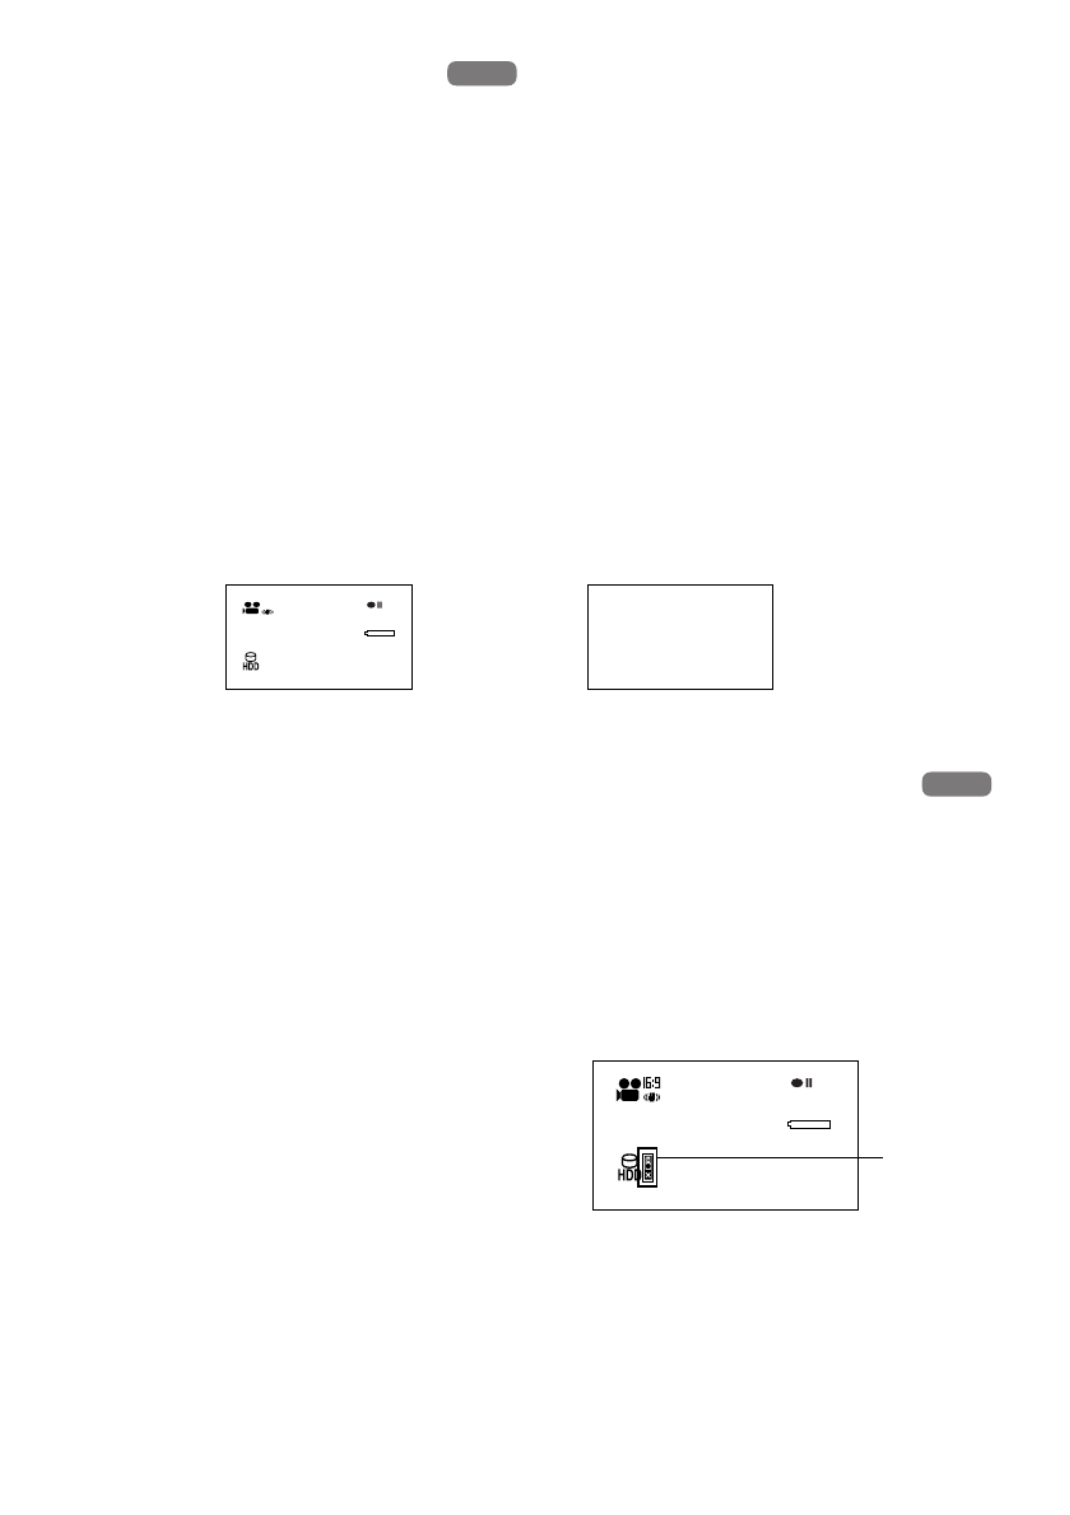
69
1<>2/3
SETTING ON-SCREEN DISPLAY OUTPUT ON OR OFF (OSD OUTPUT)
If you connect this DVD video camera/recorder to a TV to view images on TV screen, you can
switch off the on-screen information (displayed in the viewfinder or on the LCD screen) from the TV
screen.
1Press the MENU button, use the f e/ /
d c A/ / buttons to choose “OSD
Output” on the “Record Functions Setup”
menu screen, and then press the A button.
2Choose “On” or “Off”, and press the A
button.
3Press the MENU button to end the setting.
Note:
• The “OSD Output” setting will be stored in memory
even when the DVD video camera/recorder is turned
off.
• Even if “Off” is chosen, the on-screen information will
appear during playback. See page 78 for playback on-
screen information display.
• Even after the on-screen information is removed from
the TV screen, it will still appear in the viewfinder or
on the LCD screen.
• The on-screen display output functions only when the
input selection is set to camera: It cannot be set
during external input.
DROP DETECTION (HDD PROTECTION)
The default setting is “On”. Specify “HDD Protection: Off” if you plan to use the HDD built in this
DVD video camera/recorder in a weightless condition, such as skydiving, to prevent stop in
recording or playback: Specifying “On” in such status will activate the drop detection function and
stop recording or playback to protect the HDD built in this DVD video camera/recorder.
1Press the MENU button, use the f e/ /
d c A/ / buttons to choose ”HDD
Protection” on the ”Record Functions Setup”
menu screen.
2Choose ”On” or ”Off”, use the f e d/ / /
c A A/ buttons to then press the
button.
When “Off” is specified, the icon will appear.
Note:
• The “HDD Protection” setting will return to “On” when
the DVD video camera/recorder is turned off.
HDD
HDD
HDD
HDD
HDD
3 0 MIN
0:00:00
REM
FINE
8 : 0 0 AM
1 2 / 1 / 2 0 0 7
“On” setting “Off” setting
TV screen TV screen
HDD
HDD
HDD
HDD
HDD
F I N E
8 : 0 0 A M
1 2 / 1 / 2 0 0 7
3 0 MIN
0:00:00
REM
(When “HDD Protection: Off” is specified)
An icon will
appear.

70
1<>2/
Using External Microphone
Connect external microphone (generally available) to the external microphone jack of this DVD
video camera/recorder. Clearer sound can be recorded. Turn on the switch on external microphone
and start recording. For details on external microphone, see “Major Specifications” on page 157.
Note:
• Depending on the shape of its plug, an external microphone cannot be plugged in, while the cable is left plugged
in the AV/S input/output terminal. Unplug the AV/S input/output cable to use the external microphone.
• This DVD video camera/recorder cannot use a plug-in power type microphone. (Power is not supplied from this
DVD video camera/recorder.)
• Connecting an external microphone will switch off the built-in microphone.
HDD
HDD
HDD
HDD
HDD
To external
microphone jack

71
Disc Navigation
1<>2/3
Using Disc Navigation
STARTING OR TERMINATING DISC NAVIGATION
Disc Navigation is a tool for editing scenes recorded on this DVD video camera/recorder.
Here is an explanation on “scene” and “program”, so that you will be able to make most use of Disc
Navigation function.
The screens in this instruction manual are basically those that will appear when the HDD is used:
Some items will not appear when a DVD-RAM/DVD-RW/DVD-R/+RW or card is used, but the
operation is the same.
1Set the power switch properly.
2Press the DISC NAVIGATION button.
The Disc Navigation screen (shown on
page 72) will appear.
3Press the DISC NAVIGATION button again.
Disc Navigation will be terminated and the
DVD video camera/recorder will enter the
recording pause status.
You can also press the C button to end Disc
Navigation.
Before You Begin
• Turn the DVD video camera/recorder on (p. 33).
• When using HDD: Set the power switch to “HDD”.
• When using DVD: Set the power switch to “DVD”.
• When using card: Set the power switch to “SD”.
HDD
HDD
HDD
HDD
HDD

72
Disc Navigation screen
Icons to be displayed on thumbnail:
...................... Dubbed mark (p. 85)
[ ....................... Fade-in (p. 92)
] ....................... Fade-out (p. 92)
V ...................... Photo (p. 44)
................. Skip (p. 93)
T ...................... Lock (p. 96)
Note:
• Each time the DISPLAY button is pressed, the recording date/time of the scene on which the cursor is placed,
recording data of scene (VIDEO Mode, 16:9, recording length), and operation guide will appear in sequence
(when HDD is used).
• Each time Disc Navigation is started with a DVD-RW (VF-mode)/DVD-R/+RW inserted, message “Creating
Thumbnail ...” will appear. After the message appears, the Disc Navigation screen will appear.
• In the following cases, the Disc Navigation screen will appear or a message will be displayed:
- HDD or disc is write-protected
- Finalized DVD-RW (VF-mode)/DVD-R/+RW
- DVD-RW (VF-mode)/DVD-R recorded on a Hitachi DVD video camera/recorder model marketed before this
DVD video camera/recorder, and not finalized
- Locked card
• Do not leave the Disc Navigation screen displayed on TV to which the DVD video camera/recorder is connected:
Doing so could damage the TV screen, possibly by burning.
*1 Scene:
Video (movie) .......... “One scene” refers to images recorded from one press of REC button until recording is
stopped by pressing the REC button again.
Photo (still) .............. “One scene” refers to a single photo recording by pressing the PHOTO/SELECT button.
*2 Icon displayed on a photo recorded on a DVD-RAM using a Hitachi DVD video camera/recorder that can record
photos on a DVD-RAM.
This DVD video camera/recorder cannot record any photos on a DVD-RAM.
*3 The operation guide will vary depending on the operation status of DVD video camera/recorder.
*4 Appears when 13 scenes or more have been recorded.
*5 When using a disc, the icon that corresponds to the type of disc being used will appear. “ ” will appear for
card.
0 01 / 014A l l P r o g r a
m
s
PLAY SELECT
PHOTO
Cursor
Still image icon *2
Operation guide *3
Thumbnail
Selected scene *1 number/
Number of all scenes
Current page position *4
Bar graph
Icon of HDD, DVD/card type *5
CursorCursor
Dubbed mark
0 02 / 00 8Al l P r og r a
m
s
PLAY SELECT
PHOTO
0 02 / 00 8Al l P r og r a
m
s
12 / 1/ 200 7 1 0 :00 :00 AM
0 02 / 00 8Al l P r og r a
m
s
FI N E 1 6:9 0m in 39s ec
Displayed only when HDD
is used

73
PLAYING BACK FROM DISC NAVIGATION SCREEN
1Press the DISC NAVIGATION button.
2Use the f e d c/ / / buttons to select
the desired scene.
The selected scene will be framed: This is
called a “cursor”.
3Press the A button.
Playback will start from the selected scene.
Note:
• Pressing the d c or button will move the cursor
to the preceding or following scene.
Pressing the f or e button will move to
preceding or following page.
• If there is a large number of recorded scenes, it
may take time more than usual until playback of
scenes starts.
ADJUSTING VOLUME DURING PLAYBACK
If the LCD monitor is open during playback of movie, playback sound will be heard from the
speaker. Adjust the sound volume using the zoom lever. Tilt it to the “T” side to increase the volume,
“W” side to reduce the volume.
●When playback ends
The DVD video camera/
recorder will enter the
playback pause status at
the last image of last scene.
Pressing the C or DISC
NAVIGATION button will
restore the Disc
Navigation screen.
When the playback pause status continues for as
long as 5 minutes, the Disc Navigation screen
will automatically be restored.
●Playing back photos
A photo on DVD-RAM will be displayed for
approx. 3 seconds. When playing back photos
on card, playback will stop after each photo
playback.
Note:
• Press the A button to temporarily stop playback.
Pressing the A button again will start from that
point.
• If you press the A button after playback of the last
scene on disc finishes, playback will start again from
the beginning.
• Pressing the C button will always restore the Disc
Navigation screen.
• When playing back photos on card, “Playback” will
appear. In the case of a photo with a large number of
pixels, it will take some time for the photo to appear.
VOLUME
Volume
Playback pause

74
1<>2/3
PLAYING BACK LATEST RECORDED SCENE
Playing Back
1Press the A button in the recording pause
status.
The DVD video camera/recorder will enter
the playback mode, and the scene you have
recorded last will be played back.
When playback is finished, the DVD video
camera/recorder will enter the pause status
at the last image on disc.
If the playback pause status continues for as
long as 5 minutes, the DVD video camera/
recorder will automatically return to the
recording pause status.
2Press the C button.
Playback will stop, and recording pause
status will be restored.
Note:
• To temporarily stop playback, press the A button.
Press the A button again to restart playback.
• Even if you stop playback midway and immediately
start recording again, the new image will be recorded
after the last scene on HDD, disc or card (the
previous images will not be overwritten).
• Image data edited on PC, etc., or the recorded image
may not appear on this DVD video camera/recorder;
also, the recorded sound may not play back,
depending on the type of image data.
• Image data recorded on another DVD video camera/
recorder or DVD recorder may not be played on this
DVD video camera/recorder.
• Depending on the amount of data to be played back,
it may take some time for the playback image to
appear.
• Do not operate the power switch or remove the card
while the ACCESS/PC or CARD ACCESS indicator is
lit or blinking: Doing so may damage the card or the
data on card.
• If the temperature of this DVD video camera/recorder
is too high, normal playback may not be possible:
Turn the DVD video camera/recorder off once, wait
until the ambient temperature becomes lower, and
then operate it again.
1</3
DELETING LAST RECORDED SCENE
1Press the MENU button during playback.
2Choose “Edit”, “Delete Scene”, and then
press the A button.
The screen for verifying deletion will appear.
3Choose “YES”, and then press the A
button.
The last recorded scene will be deleted, and
the recording pause status will be restored.
Note:
•
If you press the MENU button during playback using the
Disc Navigation menu, “Delete Scene” will not appear.
Before You Begin
• Insert a disc or card recorded on this DVD video camera/recorder to play
back scenes on it. (p. 43, 44).
• Turn the DVD video camera/recorder on (p. 33).
HDD
HDD
HDD
HDD
HDD
HDD
HDD
HDD
HDD
HDD

76
1<>2/
SKIP PLAYBACK OF MOVIE
During playback, press the f or e button to
locate the start of desired scene.
Press e once:
To skip to the first image of the scene
following the one being played back, and start
playback.
Press f once:
To return to the first image of the scene being
played back, and start playback.
Hold down e :
To continuously locate the beginnings of
scenes, starting from the scene following the
scene being played back. When the desired
image appears, release the button: Playback
will start from that point.
Hold down f :
To continuously locate the beginnings of
scenes backward, starting from the scene
preceding the scene currently being played
back. When the desired image appears, release
the button: Playback will start from that point. Note:
• If you perform skip playback during playback pause,
the DVD video camera/recorder will enter the
playback pause status at the beginning of the located
scene.
• Pressing the e button in the last scene on HDD or
disc will set the DVD video camera/recorder to the
playback pause status at the last image.
• If the temperature inside the DVD video camera/
recorder rises, normal skip or search playback may
not be possible: Turn the DVD video camera/recorder
off, wait for a few moments, and then turn it on again.
13
PLAYING BACK STILLS
Press the f or e button during playback to
quickly play back stills in sequence.
Press e once:
To display stills one by one forward.
Press f once:
To display stills one by one backward.
[When using DVD-RAM]
(This DVD video camera/recorder cannot record
any photo on a DVD-RAM.)
Releasing the f or e button will start
continuous playback.
[When using card]
When the f or e button is released, the
photo at that point will be displayed, and then
the DVD video camera/recorder will enter the
playback pause status.
Use the slide show function for continuous
display (p. 115).
HDD
HDD
HDD
HDD
HDD
Portion being played back
Press f
twice
Press f
once
Press e
once
Press e
twice
Press f
once
Press e
once
Press e
twice
Scene 1 Scene 2 Scene 3
Scene 1 Scene 2 Scene 3
Portion being played back
Pressing the f button at a portion several seconds
from the start of scene being played back will return
to the start of the scene preceding that being played
back.

77
1<>2/3
JUMPING TO SPECIFIED POINT (GO TO)
1Press the MENU button
during playback.
2Choose the option
(point you want to go
to), and then press the A button.
Top:
To go to the start, and enter playback pause.
End:
To go to the end of last scene, and enter
playback pause.
Specify:
To go to a specified point and enter playback
pause. See the following for details.
●Specifying the point to view
1Choose “Specify” in step 2 above, and then
press the A button.
The screen for specifying the point to go to
will appear.
2Use the f e d c/ / / buttons to select
the desired time of chosen point.
3Press the A button to enter the selection.
The DVD video camera/recorder will go to
the specified point and enter the playback
pause status.
Pressing the A button again will start
playback.
Note:
• To cancel the “Go To” procedure midway, press the C
button before going to the specified point.
• If multiple scenes are selected using the Disc
Navigation function or PHOTO/SELECT button,
choosing “Top” will jump to the beginning of selected
scenes (p. 109).
• When multiple scenes are selected, the total time of
selected scenes will appear in the “total recording
time” display.
• With card, the number of stills will appear at the
“TOP”, “CURRENT”, “END” and “GO TO” indicators.
• The cursor may not move at same-pitch intervals.
HDD
HDD
HDD
HDD
HDD
Go T o
ENTER RETURN
En d
S p e c i f y
To p
Press f : To select the start.
Press e : To select the end.
Press d or c :
• Press once:
To move the cursor in 1-minute units for
HDD
(10-second units for DVD, 1-still units for
card)
• Hold down:
To move the cursor in 10-minute units for
HDD
(1-minute units for DVD, 10-still units for
card)
GO TO
0 : 00 : 00 0 : 24 : 240 : 03 : 2 6
0 : 03 : 2 6
TOP ENDCURRENT
TO P END ENTER CANCEL
G o t o
Position of currently
played back image
Total recording time of
all selected scenes
Cursor
Cursor position
GO TO
0 : 00 : 00 0 : 24 : 240 : 03 : 2 6
0 : 00 : 0 0
TOP ENDCURRENT
TO P END ENTER CANCEL
Go t o
(When the start of scene is selected)

78
1<>2/3
INFORMATION DISPLAY DURING PLAYBACK
Various types of information on recording will be superimposed on playback image you are viewing.
●Switching the information display
mode
Press the DISPLAY button: You can switch the
display mode of on-screen information.
When using HDD/DVD:
When using card:
•Recording date/time display: Shows the date/
time when recording was started. Even when
playback starts, the date/time display will not
advance.
•No display: No information will appear.
However, when the mode of playback
operation is switched, the symbol will appear
for approx. 3 seconds.
Note:
See page 99 and after for “Program”, page 102 and
after for “Play List”.
HDD
HDD
HDD
HDD
HDD
1 2 / 1 / 2 0 0 7
9 : 3 0 A M
No display Playback information
display
Recording date/time
0 060 6 0 : 0 0 :1 6
Recording mode
Scene No. Repeat play*4
Program No. or Play List
No.*2
Program or Play List*1
Counter
HDD, Disc type*3
Playback
operation*5
0 0 3 1 0 0 — 0 0 0 3
Recording mode
Scene No. File name
Lock*4
Playback operation*5
Slide Show*4
*1 Program or Play List.
*2 Number of program or play list being played
back (not displayed when all programs are
being played back).
*3 Refer to “HDD, DVD/Card type” on page 48.
*4 Will appear when each function is specified
“On”.
*5 F: Standard playback
b: Playback pause
c: Forward search playback
d: Reverse search playback
e: Forward skip playback
f: Reverse skip playback
g: Forward frame advance
h: Reverse frame back
: Forward slow playback
: Reverse slow playback
See pages 73-76 for how to operate.
The “j” mark will appear on the first image
on disc.
The “i” mark will appear on the last image
on disc.

79
SELECTING MULTIPLE SCENES
1Press the DISC NAVIGATION button.
2Use the f e d c/ / / buttons to select
the desired scene.
3Press the PHOTO/SELECT button once:
The selected scene will be framed in red and
yellow.
Repeat steps 2 and 3 to randomly select
multiple scenes.
SELECTING CONSECUTIVE SCENES TOGETHER
1Press the DISC NAVIGATION button.
2Use the f e d/ / /
c buttons to point the
cursor at the first scene
in the range of scenes
you want to select.
3Hold down the
PHOTO/SELECT
button for at least one
second:
The selected scene will
be doubly framed in
yellow and blue.
4Use the f e d/ / /
c buttons to select the
last scene in the range
you want, and then
press the A button:
The thumbnails of
scenes in the specified
range will be framed in
red, and then selected.
Note:
•You can know the status of scenes from the colors of
cursor and bargraph:
•Pressing the A button after selecting scenes will
play back only the selected scenes from the
beginning of each.
•To cancel a selected scene, select the scene to be
canceled, and then press the PHOTO/SELECT
button.
To cancel all selected scenes, press the C button.
•You can also select scenes in reverse from the last
scene in the range.
•To release multiple selection, press the C or PHOTO/
SELECT button before pressing the A button in
step 4.
•Up to 999 scenes can be selected.
005/ 014A l l P r og r a
m
s
PLAY PHOTO SELECT
Yellow frame
005/ 014A l l P r og r a
m
s
ENTER CANCEL
Double frames in
yellow and blue
010/ 014A l l P r og r a
m
s
PL AY DES EL EC T A L L
When scenes up to
this point are selected
Red frame
Cursor Bar graph Status of scenes
Yellow Light blue Current cursor position
Blue Light blue Range of scenes being
selected
Red Yellow Scenes already selected

80
FUNCTIONS AVAILABLE WITH DISC NAVIGATION
The Disc Navigation mode will allow a variety of further operations.
Function s Available with Disc Navigation
*1Only deletion is possible.
*2Additional recording can be made on a finalized DVD-RW (VR-mode).
Note:
Not e
Adding special effects to scenes are unique functions of this DVD video camera/recorder. When a disc with any
effects set on this DVD video camera/recorder is directly played back on a DVD recorder/player or read into PC, the
set effect results will not be reflected in the playback or reading. To reflect the set effect results, connect both
devices using the AV/S input/output cable and then perform recording (Dubbing, p. 119).
Available
function
1
<
>
2
/
3
Contents
Reference
page
Editing of scenes ●●●
E
*
1
You can delete unnecessary scenes,
combine scenes, or divide one scene.
89 – 91
Setting special
effects to scenes ●●● You can attach fade and skip to a
scene, and change existing thumbnails.
92 – 94
Copy from disc to
card ●You can copy photos recorded on DVD-
RAM disc to card.
95
Scene lock
●
You can lock any scene so that it will not
be deleted by mistake: Essential scenes
are thereby protected, and recording
another still is possible.
96
Scene
information
display
●●●●●●●
You can display information on one
scene or multiple scenes, such as
image quality, recording time, etc.
98
Changing title ●●● You can change the title of play list or
program.
100, 108
Creation of play
list ●●● You can create an original movie by
changing the combination of scenes.
102
Initialization ●●●● ●●You can delete all data recorded on
HDD/DVD/Card.
109
Protection
●●●
You can protect the HDD/DVD-RAM/
DVD-RW (VR-mode) to prevent deletion
or editing by mistake.
110
Remaining
display
(Capacity)
●●●●●●●
The remaining recordable movie time or
number of recordable stills is displayed.
110
Disc finalization
●
*
2
●●●
You can use this DVD video camera/
recorder to finalize any DVD-RW/DVD-
R/+RW recorded on it so that the disc
can be viewed on DVD recorder/player,
etc.
112
Unfinalizing disc
● ●
You can unfinalize a DVD-RW (VF-
mode)/+RW that was finalized on this
DVD video camera/recorder so that
additional videos can be recorded on
the disc.
113
Repeat play ●●●●●● You can repeatedly play back programs
and scenes.
115
Slide show ●You can play back stills continuously. 115
HDD
HDD
HDD
HDDHDD

81
UNDERSTANDING FLOW OF DISC NAVIGATION MENU
Press the MENU button on the Disc Navigation screen: The menu screens for Disc Navigation and
menu screens for HDD/DVD/Card will appear.
Shaded items will also appear in Quick Menu display mode (see page 51).
Refer to pages indicated for details of settings.
●When using HDD
Scene Edit (p. 89) Divide (p. 90)
Effect (p. 92) Delete (p. 89)
Dubbing
(p. 85) Combine (p. 91)
Select (p. 97) Move*1(p. 91, 107) *1Will appear when a
play list is displayed.
Detail (p. 98)
Fade (p. 92)
Skip (p. 93)
Thumbnail (p. 94)
Execute (p. 85)
Mark Off (p. 88)
Start → Current (p. 97)
Current → End (p. 97)
All (p. 97)
Play list Select (p. 103) Go To Top (p. 109)
Play (p. 103) End (p. 109)
Create (p. 102)
Edit (p. 104 – 107) HDD Setting Format HDD (p. 109)
Title
Delete
(p. 108)
(p. 108)
Protect HDD
Capacity
(p. 110)
(p. 110)
Update Control Info. (p. 111)
Full Format (p. 111)
Program Select (p. 99)
Play (p. 100)
Title (p. 100)
Others Category (p. 114) All (p. 114)
Repeat Play (p. 115) Dubbed (p. 114)
TV type (p. 115) Un Dubbed (p. 114)
On (p. 115)
Off (p. 115)
16:9 (p. 115)
4:3 (p. 115)

83
●When using DVD-RW (VF-mode)/DVD-R/+RW
●When using card
Scene Select (p. 97) Start → Current (p. 97)
Detail (p. 98) Current → End (p. 97)
All (p. 97)
Program Select (p. 99) DVD Setting Finalize DVD (p. 112)
Play (p. 100) Unfinalize DVD*6(p. 113)
Format DVD*6(p. 109)
Capacity (p. 110)
Go To Top (p. 109) *6 DVD-RW (VF-mode)/+RW only
End (p. 109)
Others Repeat Play (p. 115) (p. 115)On
Off (p. 115)
TV type (p. 115) (p. 115)16:9
4:3 (p. 115)
Scene Delete (p. 89)
Lock (p. 96)
Select (p. 97) Start → Current (p. 97)
Detail (p. 98) Current → End (p. 97)
All (p. 97)
Go To Top (p. 109) Slide Show Start (p. 115)
End (p. 109)
Card Format Card (p. 109)
Capacity (p. 110)

84
Dubbing on DVD
This DVD video camera/recorder allows you to choose the desired method when dubbing images
recorded on HDD to a DVD:
“New”: To dub scenes recorded on HDD to a DVD, without dubbed marks appearing, beginning with
the first scene without dubbed mark.
“Date”: To dub scenes recorded on HDD on the same date to a DVD, beginning with the first scene.
“All”: To dub all scenes recorded on HDD to a DVD, beginning with the first scene.
“Select”: To select your favorite scenes from all those recorded on HDD, for dubbing.
●List of dubbing possible/impossible
●: Dubbing possible; —: Dubbing impossible
* You cannot specify the combination of “VIDEO Mode: STD” and “16:9 On”.
●Note when dubbing:
•If message “Scene No.xxx is too large. Please divide this Scene before dubbing.” appears during dubbing, the
dubbing will stop. Divide the specified scene (see page 90), and then dub the divided scenes.
•The maximum number of scenes and programs that can be dubbed will vary depending on the DVD used (see
page 159).
•With this DVD video camera/recorder, the scenes on HDD will be dubbed to a DVD in the order of display on
HDD Disc Navigation screen. To dub the scenes in a different order, create a play list on which scenes are
registered in the desired order of dubbing (see page 102), and then execute dubbing.
Before You Begin
•Set the power switch to “HDD”.
•Prepare a recordable disc.
•The recording time for a scene that can be dubbed on one disc is
approx. 30 minutes ( in FINE mode). If the HDD contains a scene
exceeding the length that is recordable on one disc, it cannot be
dubbed: Divide the scene (see p. 90), and then perform dubbing.
•Be sure to use the AC adapter/charger to power the DVD video camera/
recorder during dubbing: Dubbing is not possible with a battery
connected.
•If power is turned off and dubbing is interrupted midway, proper dubbing
will not be possible.
•The time shown on dubbing is for reference: Dubbing will be performed
at normal speed in XTRA mode; approx. 2 times the normal in FINE
mode; approx. 4 times the normal in STD mode.
If the number of scenes on HDD is too large, or the temperature of this
DVD video camera/recorder is too high, the required recording time may
be longer than the display time on screen.
Disc to be
dubbed
Videos on HDD
VIDEO Modes
(XTRA/FINE/STD) mixed
Wide/normal modes
(16:9/4:3) mixed
VIDEO Mode “STD” and
wide mode (16:9)
DVD-RAM ●●●
DVD-RW
(VR-mode) ●●●
DVD-RW
(VF-mode) ———
DVD-R ———
+RW ● ●* * —

88
SELECTING SCENES RECORDED ON HDD AND DUBBING THEM (SCENE
“SELECT” DUBBING)
You can select desired scenes recorded on HDD and dub only those scenes on DVDs.
1Press the DUBBING button.
The Dubbing Menu will appear.
You can also display the Dubbing Menu from
the Disc Navigation screen: Press the DISC
NAVIGATION button, press the MENU
button, choose “Scene”, “Dubbing”,
“Execute”, and then press the A button.
2From the Dubbing Menu screen, choose
“Select” and press the A button.
If no DVD is loaded in this DVD video
camera/recorder, a message will appear:
Press the DISC EJECT button, and then load a
DVD.
3Place the cursor on a scene to be dubbed, and
then press the A or PHOTO/SELECT
button: The cursor of the selected scene will
change to red (see p. 79), and the scene with
red cursor will be dubbed to a DVD.
If you wish to dub
other scenes, place the
cursor on a scene in the
same way, and press
the A or PHOTO/
SELECT button to
select it.
To cancel a selected scene, press the A or
PHOTO/SELECT button again. To cancel all
selected scenes, press C (stop/cancel).
If the total capacity size of the selected scenes
exceeds the remaining free space on DVD, the
remaining bar at the top right of screen will
be red, and a message will appear. Select the
scenes again.
If you select a scene whose size exceeds one
DVD, a message that prompts you to divide it
will appear: After dividing the scene, execute
dubbing again.
4Press the DUBBING button.
The screen for verifying dubbing will appear.
Instead of pressing the DUBBING button, you
can press the MENU button, choose “Edit”,
and then “Enter”: The same screen will appear.
Choosing “YES” will start dubbing.
To cancel dubbing, choose “NO” or press C
(stop/cancel).
5When dubbing is finished, check the “Delete
Scene” screen.
Choosing “YES” will delete the dubbed
scenes from the HDD.
To retain the dubbed scenes on the HDD,
choose “NO”.
6Press the DISC EJECT button to remove the
DVD.
Close the cover of DVD insertion block.
If you do not want to remove the DVD, press
the C (stop/cancel) button to end dubbing.
TURNING OFF DUBBED MARK FROM THUMBNAIL (MARK OFF)
If the dubbed mark makes the thumbnail difficult to see, you can turn off the mark.
1Press the DISC NAVIGATION button, and
then press the MENU
2Choose “Scene”,
“Dubbing”, “Mark
Off”, and then press the
A button.
The “Cancel Dubbed
Mark” screen will appear.
3Place the cursor on a scene for which you
want to turn the dubbed mark off, and then
press the PHOTO/SELECT button.
You can also select multiple scenes.
4If there is no change in the scene for which
you want to turn the mark off, press the A
button.
5Press the C (stop/cancel) button to end the
mark-off procedure.
Note:
• You can use “New” dubbing to dub scenes with the
dubbed mark turned off.
• Pressing the MENU button in step 3 will display the
submenu screen (see “Editing using submenu” on
page 90).
D u b b i n g ( S e l e c t )
ENTER SELECT
DUB
DVD remaining bar
S c e n e
ENTER RETURN
E x e c u t e
Ma r k O f f
Du b bin g

89
Scene
1<3
DELETING SCENES (EDIT – DELETE)
You may want to delete unwanted scenes.
Scenes on DVD-RW (VF-mode)/DVD-R cannot be deleted, and menu item “Delete” will not appear
with DVD-RW (VF-mode)/DVD-R.
When using +RW, no scene can be deleted from the Disc Navigation menu, but the scenes recorded
last on it can be deleted (see page 74).
1Press the DISC NAVIGATION button.
2Place the cursor on the scene to be deleted.
3Press the MENU button.
4Choose “Scene”, “Edit”, “Delete”, and then
press the A button.
When using card, choose “Scene”, “Delete”,
and then press the A button.
5The “Delete Scene” screen will appear: If you
are sure you want to delete the selected scene,
press the A button.
If you want to change the scene to be deleted,
you can change it on this screen.
6The screen for verifying deletion will appear:
Choose “YES”, and then press the A
button.
Choose “NO” to cancel deletion.
After Yes or No setting, the “Delete Scene”
screen will be restored.
Repeat steps 5 and 6 to delete other scenes.
7Press the C button to quit.
Note:
• If you point the cursor at the scene to be deleted on
DISC NAVIGATION screen, and then press the
DELETE button on remote control, the screen in step
5 will appear.
• To delete an unwanted part of a scene on DVD-RAM/
DVD-RW (VR-mode), divide the scene first, and then
delete the unnecessary part (see page 90).
• If you delete all data on HDD/DVD/card, initializing the
HDD/DVD/card will be recommended (see page 109).
• If the time of deleted scenes (stills) is quite short, the
remaining free space of HDD/DVD/card may not
increase in the HDD/DVD/card or card remaining
indicator.
• The locked scenes on card cannot be deleted (see
page 96).
HDD
HDD
HDD
HDD
HDD

90
●Editing using submenu
Press the MENU button before pressing the A button in step 5 (see page 89): The submenu will
appear.
Pressing the C button will restore the screen in step 5.
*1 The menu item to be displayed will vary depending on the setting.
Note:
Although the submenu screen will appear for each setting, some menu items may not appear, depending on the
setting.
1<
DIVIDING MOVIES (EDIT – DIVIDE)
You can divide a scene into two parts.
To delete unnecessary portion of scene, first divide the scene, and then delete the unnecessary
portion.
1Press the DISC NAVIGATION button.
2Place the cursor on the scene to be divided.
3Press the MENU button.
4Choose, “Scene”, “Edit”, “Divide” and then
press the A button.
5The “Divide Scene” screen will appear: If you
are sure you want to divide the selected
scene, press the A button: The selected
scene will be played back.
If you want to change the scene to be divided,
you can change it on this screen.
6When you reach the
point where you want
to divide the scene,
press the PHOTO/
SELECT button.
7The screen for verifying
division will appear:
Choose “YES”, and then
press the A button.
Choose “NO” to cancel division.
After division, the “Divide Scene” screen will
be restored.
Repeat steps 5 – 7 to divide another scene.
8Press the C button to quit.
Note:
• If you press the MENU button before pressing the
A button in step 5, the submenu will appear.
• Search and frame advance are useful when
designating division points.
• Combining scenes that were divided will restore the
original scene (see page 91).
• If a special effect has been added to the original
scene, the “IN” effect will be added to the first half of
scene, and the “OUT” effect, to the latter half.
• The division point may drift before or after the
designated point by approximately 0.5 seconds.
• Since a scene with a skip set cannot be played back,
no division point can be specified: Release the skip
for the scene before dividing it.
• If the division point is at a still, a message will appear,
but no division will be made.
• If the division point is at the start or end of a scene, a
message will appear, but no division will be made.
• A movie scene whose recording time is 0.5 seconds
or less cannot be divided.
• If free space available on HDD/DVD is insufficient,
division will not be possible: Delete unnecessary
scenes.
• If you divide a scene with dubbed mark , the
dubbed marks will appear on both divided scenes.
Edit Delete*1....................To delete selected scenes
Exit............................To restore the Disc Navigation screen
Select Start → Current.......To select scenes from the start to the one that the cursor is on
at the moment
Current → End........To select scenes from the scene the cursor is on to the end
All .............................To select all scenes
Go To Top ............................To move the cursor to the first scene
End............................To move the cursor to the last scene
HDD
HDD
HDD
HDD
HDD
Se l ec t D i v i s i o n P o i n t
00 2 00 : 0 0 : 18
ENT ER CANCEL
PHO TO
The status bar of
scene being played
back can be switched
off or on by pressing
the DISPLAY button

91
1<
COMBINING MULTIPLE SCENES (EDIT – COMBINE)
If you have recorded numerous short scenes, combining them will be facilitated by the use of Disc
Navigation.
Be sure to select consecutive multiple scenes: When using the HDD or a DVD-RAM, combining
scenes is possible only when “Category: All” is specified (p. 114). Stills cannot be combined.
1Press the DISC NAVIGATION button.
2Press the MENU button, choose “Scene”,
“Edit”, “Combine”, and then press A
button.
3The “Combine Scenes” screen will appear:
Point the cursor at the first scene to be
combined, and then press the A button.
The cursor will change to double frames of
blue and yellow.
4Use the f e d c/ / / buttons to
determine the range of scenes to be
combined, point the cursor at the last scene,
and then press the A button.
The cursor will change to a red frame. The
last scene will be double frames of red and
yellow.
5If you do not wish to change the scenes to be
combined, press the A button.
To change the scenes, press the C (stop/
cancel) button to return the cursor to yellow,
and then select the scenes to be combined
again.
6The screen for verifying combination will
appear: Choose “YES”, and then press the
A button.
The two images appearing on the verification
screen are those of the first and last scenes to
be combined.
Choose “NO” to cancel combination.
After Yes or No setting, the “Combine
Scenes” screen will be restored.
The thumbnail of the first scene will appear in
the combined scene.
Repeat steps 3 and 6 to combine other scenes.
7Press the C button to quit.
Note:
• You can also select multiple scenes after step 1:
Press the MENU button to continue the procedure of
combination.
• If you press the MENU button before pressing the
A button in step 3, the submenu will appear (see
page 90).
• With fade effect, the “IN” effect of the first scene in the
selected range and the “OUT” effect on the last scene
will be attached to a combined scene.
• Scenes in different programs (different recording
dates) cannot be combined: Create a play list first,
and then combine such scenes on the play list.
• When using the HDD, scenes with different VIDEO
Modes or 16:9 mode cannot be combined.
• If you combine scenes with dubbed marks , the
dubbed marks will appear on the combined scene.
• If you combine scenes with and without dubbed mark
, the dubbed mark will not appear on the combined
scene.
1<
ARRANGING ORDER OF SCENES (EDIT – MOVE)
You can arrange scenes within a play list by moving them to desired positions (p. 107). Create a play
list first, and then arrange the scenes [“CREATING NEW PLAY LIST (CREATE)”, p. 102].
HDD
HDD
HDD
HDD
HDD
HDD
HDD
HDD
HDD
HDD

93
1<
PLAYING BACK BY SKIPPING SCENES (EFFECT – SKIP)
You can specify “Skip” for scenes you do not want to play back: The selected scenes will be skipped.
1Press the DISC NAVIGATION button.
2Place the cursor on the scene to which skip is
to be set.
Multiple scenes can be selected for skipping
(p. 79).
3Press the MENU button.
4Choose “Scene”, “Effect”, “Skip”, and then
press the A button.
5The “Set Skip” screen will appear: If you are
sure you want to skip the selected scene,
press the A button.
If you want to change the scene to be
skipped, you can change it on this screen.
After skip setting, the “Set Skip” screen will
be restored.
Repeat step 5 to set skipping of other scenes.
6Press the C button to quit.
A skip icon “ ” will appear in the
thumbnail of any scene for which skipping
has been set.
●Releasing Skip
Perform the same procedure as setting skip: The
skip icon will disappear and skipping of the
scene will be released.
Note:
• If you press the MENU button before pressing the
A button in step 5, the submenu screen will appear
(p. 90).
• If a disc on which skip has been set on scene with
this DVD video camera/recorder is played on a DVD
reorder/player, or the scene is captured into a PC, the
set skip will not be reflected (see Note on page 80).
• When dubbing on a DVD-RW (VF-mode)/DVD-R/
+RW, the setting on skip will not be reflected (see
p. 84).
HDD
HDD
HDD
HDD
HDD
A l l P r
o
Skip icon

94
1<
CHANGING IMAGES FOR THUMBNAILS (EFFECT – THUMBNAIL)
Normally, the first image of the recorded scene is displayed as a thumbnail: You can choose another
image of the scene for thumbnail. If you set a vivid image to thumbnail, you can know what you
recorded from a glance at the Disc Navigation screen.
1Press the DISC NAVIGATION button.
2Place the cursor on the scene whose
thumbnail you wish to change.
3Press the MENU button.
4Choose “Scene”, “Effect”, “Thumbnail”, and
then press the A button.
5The “Change Thumbnail” screen will appear:
If you are sure you want to change the
thumbnail of the selected scene, press the
A button: The selected scene will be played
back.
If you want to change the scene whose
thumbnail is to be changed, you can change it
on this screen.
6When the image you want to use as the
thumbnail of the scene appears, press the
PHOTO/SELECT button.
7The screen for verifying switching of
thumbnail will appear: Choose “YES”, and
then press the A button.
Choose “NO” to cancel switching of
thumbnail.
After Yes or No setting, the “Change
Thumbnail” screen will be restored.
Repeat steps 5 – 7 to change the other scenes.
8Press the C button to quit.
Note:
• If you press the MENU button before pressing the
A button in step 6, the submenu screen will appear
(p. 90).
• A thumbnail of still cannot be changed.
• Since the scene to which skipping is set cannot be
played back, you will not be able to change its
thumbnail: Release the skip setting of the scene to
change the thumbnail.
• If a disc on which thumbnail has been set with this
DVD video camera/recorder is played on a DVD
reorder/player, or the scene is captured into a PC, the
set thumbnail will not be reflected (see Note on
page 80).
• When dubbing on a DVD-RW (VF-mode)/DVD-R/
+RW, the setting on changing thumbnail will not be
reflected (see page 84).
HDD
HDD
HDD
HDD
HDD

95
13
COPYING STILLS ON DVD-RAM TO CARD (COPY)
1Set the power switch to “DVD“.
2Press the DISC NAVIGATION button.
3Place the cursor on the scene to be copied.
4Press the MENU button.
5Choose “Copy” on the “Scene” menu screen,
and then press the A button.
6The “Copy to card” screen will appear: If you
are sure you want to copy the selected still,
press the A button.
If you want to change the still to be copied,
you can change it on this screen.
7The screen for verifying copy will appear:
Choose “YES”, and then press the A
button.
Choose “NO” to cancel copy.
After Yes or No setting, the “Copy to card”
screen will be restored.
Repeat steps 6 and 7 to copy other stills to
card.
8Press the C button to quit.
Note:
• No movie can be copied.
• If you press the MENU button before pressing the
A button in step 6, the submenu screen will appear
(p. 90).
• See “Category” (p. 114) to check the stills recorded
on DVD-RAM.
• You can also select multiple scenes (p. 79).
• Even if all scenes, including movies, are selected to
be copied, only stills will be copied.
• Data on card cannot be copied to DVD.
Before You Begin
• Set the DVD-RAM (recorded on a Hitachi DVD video camera/recorder
that can record photos on a DVD-RAM) that includes the photos you
wish to copy, and a card with recordable space, in this DVD video
camera/recorder.

96
3
LOCKING SCENES ON CARD (LOCK)
You can lock each photo recorded on card so that it will not be deleted or edited by mistake.
1Set the power switch to “SD”.
2Press the DISC NAVIGATION button.
3Place the cursor on the scene to be locked.
You can also select multiple scenes (p. 79).
4Press the MENU button.
5Choose “Lock” on the “Scene” menu screen,
and then press the A button.
6The “Lock Set” screen will appear: If you are
sure you want to lock the selected scene,
press the A button.
If you want to change the scene to be locked,
you can change it on this screen.
After setting, the “Lock Set” screen will be
restored.
Repeat step 6 to lock another scene.
7Press the C button to quit.
The lock icon “T” will appear on any scene
for which lock has been set.
●To unlock the scene
Select the locked scene, and then use the
procedure shown on the left to unlock the scene:
The lock icon will disappear and locking will be
released.
Note:
• If you press the MENU button before pressing the
A button in step 6, the submenu screen will appear
(p. 90).
• When initializing the card, the locked scenes will also
be deleted.
7 / 1 9
Lock icon

97
1<>2/3
SELECTING SCENES USING MENU SCREEN (SELECT)
You can use this “Select” function to select consecutive scenes at one time.
This function is useful when there are numerous scenes.
1Press the DISC NAVIGATION button.
2Point the cursor at the first or last scene to be
selected: When selecting all scenes, simply
proceed with step 3.
3Press the MENU button.
4Choose “Select” on the “Scene” menu screen.
5Choose “Start →
Current”, “Current →
End” or “All” and then
press the A button.
●Deselecting selected scenes
Deselecting scenes one by one:
While you are displaying the “All Programs”
screen on which scenes have been selected, place
the cursor on the scene to be deleted, and then
press the PHOTO/SELECT button.
Note:
Up to 999 scenes can be selected.
Deselecting all the selected scenes at once:
While you are displaying the “All Programs”
screen on which scenes have been selected, press
the C button.
HDD
HDD
HDD
HDD
HDD
S c e n e
ENTER RETURN
E d i t
E f f e c t
Du b b i n g
Se l e c t
De t a i l
S t a r t – Cu r r en t
Cu r r e n t – E n d
A l l

98
1<>2/3
DISPLAYING INFORMATION USING MENU SCREEN (DETAIL)
You can display various information for a scene: the recording mode, recording date/time and
length, special effects and movie quality mode.
1Press the DISC NAVIGATION button.
2Place the cursor on the scene whose
information you wish to know.
3Press the MENU button.
4Choose “Scene”, “Detail”, and then press the
A button.
The detailed information on the scene will
appear.
Note:
• DCF (Design rule for Camera File system) is a
unified image file format for video cameras: Image
files can be commonly used for all digital devices
that conform to DCF. This DVD video camera/
recorder complies with DCF.
• Pressing the c button will display information on
the following scene; pressing the d button will
display information on the preceding scene.
5Press the C button to quit.
Note:
• If multiple scenes have been selected, the total
recording time of the selected scenes (total number in
case of stills) will appear.
HDD
HDD
HDD
HDD
HDD
*1 Not displayed with DVD-RW (VF-mode)/DVD-R/
+RW.
*2 When using the HDD, any scene whose
thumbnail has the dubbed mark will appear.
*3 Not displayed with DVD-RAM/DVD-RW/DVD-R
(finalized)/+RW recorded on another device .
*4 Will not appear if the loaded card does not
comply with DCF.
*5 Number of pixels on still in horizontal direction:
This may not appear with a JPEG file that does
not conform to this DVD video camera/recorder.
De t a i l
Sc e n e N o. 0 0 7
V IDEO ( F I NE ) 1m i n 13 s e c
D a t e : 1 2 / 1 / 2 0 0 7 8 : 0 0 : 00 A M
S k i p :
O
f f
F a d e I N : No ne OUT : No n e
D u b b e d
PREV NEXT RETURN
De t a i l
Sc e n e N o. 7
1 0 0 – 0 0 0 7 ( 6 4 0 )
L o c k :
O
f f
PREV NEXT RETURN
D a t e : 1 2 / 1 / 2 0 0 7 8 : 0 0 : 0 0A M
(When using HDD/DVD)
(When using card)
*1
*5
*4
*3
*2
*1 Number of scenes whose quality mode is
unknown:
This will appear when the disc has a scene
recorded on a device other than this DVD video
camera/recorder, only if the disc has a scene
whose mode is unknown.
*2 This will appear with a DVD-RAM, including
photos recorded on a Hitachi DVD video camera/
recorder that has this capability.
*3 Not displayed with a DVD-RAM/DVD-RW/DVD-R
(finalized) /+RW that was recorded on another
device.
De t a i l
V I DEO : 1
m
i n 4 3s e c ( 2 s c e n e s )
( X T R A ) : 0
m
i n 0 s e c ( 0 s c e n e s )
( F I N E ) : 1
m
i n 4 3s e c ( 2 s c e n e s )
( S T D ) : 0
m
i n 0 s e c ( 0 s c e n e s )
PHOTO : 0
( - - - ) : 1
m
i n 0 s e c ( 0 s c e n e s )
RETURN
*1
*2
(When using HDD/DVD)
*3
De t a i l
S c e n e No . 6
S c e n e s : 2
12 / 1 5 / 2 00 7 1 2 : 5 0 :00PM
S c e n e No . 7
12 / 1 6 / 2 0 0 6 8 : 0 0 :00AM
RETURN
(When using card)

99
Program
WHAT IS “PROGRAM”?
Program refers to an assembly of scenes recorded on the same date regardless of whether they are
movie or still.
1<>2/
SWITCHING TO THUMBNAIL DISPLAY OF SPECIFIC DATE (SELECT)
Since the scenes recorded on this DVD video camera/recorder are collected as “programs” for each
recording date, selecting a program will allow you to display only the scenes on a specific date.
1Press the DISC NAVIGATION button.
2Press the MENU button.
3Use the f e d c A/ / / / buttons to
choose “Select” on the “Program” menu
screen, and then press the A button.
4Select the program to
be displayed, and then
press the A button.
The Disc Navigation
screen of the selected
program will appear.
Note:
• Pressing the C button on the “Select Program” screen
will restore the Disc Navigation screen.
• If a disc recorded on another device is loaded in this
DVD video camera/recorder, the program may not be
a collection of recordings on the same date.
• If you change the video quality or switch the wide
mode with a +RW, multiple programs will be produced
even if they are recorded on the same date.
9 : 00AM 1 0 :20AM 11 : 45AM 1:30PM 5:2 0 P M 8 : 0 0PM
Movie Movie Still Still Movie Still
Recorded on December 20
Program No. 1
Scene No. 1 Scene No. 2 Scene No. 3 Scene No. 4 Scene No. 5 Scene No. 6
HDD
HDD
HDD
HDD
HDD
S e l e c t P r o g r a
m
0 1
1 2 / 1 / 2 00 7
0 2 1 2 / 1 0 / 2 0 0 7
A l l P r o g r a
m
s
ENTER RETURN
0 3
1 2 / 2 0 / 2 0 0 7
0 01 / 0 080 3
12/ 2 0
/2007
PLAY PHOTO SELECT

100
1<>2/
PLAYING BACK PROGRAM (PLAY)
You can play back only the selected program.
1Press the DISC NAVIGATION button.
2Press the MENU button.
3Use the f e d c A/ / / / buttons to
choose “Play” on the “Program” menu
screen, and then press the A button.
4Select the program to be played back, and
then press the A button.
Playback will start from the first scene of the
selected program.
Note:
If “Repeat Play: On” is specified, the selected program
will be repeatedly played back (PLAYING BACK
SCENES REPEATEDLY (REPEAT PLAY), p. 115).
1<
CHANGING TITLE OF PROGRAM (TITLE)
The recording date/time has initially been attached to any program.
You can change the recording date/time to any desired title.
1Press the DISC NAVIGATION button.
2Press the MENU button.
3Choose “Title” on the “Program” menu
screen, and then press the A button.
4Select the program
whose title you want to
change, and then press
the A button.
The screen for setting a title will appear.
5Use the f e d/ / /
c buttons to select a
letter, and then press
the A button: The
selected letter will be
entered.
Repeat this procedure,
inputting letters one by
one to create a title.
Up to 20 characters can
be input.
6After entering the title,
choose “Enter” and
then press the A
button.
7The screen for verifying
the change in title will
appear: Choose “YES”,
and then press the A
button.
Choose “NO” to cancel changing of the title.
After Yes or No setting, the Disc Navigation
screen of the selected program will appear.
HDD
HDD
HDD
HDD
HDD
HDD
HDD
HDD
HDD
HDD
P r og r a
m T i t l e
ENTER RETURN
0 1
1 2 / 1 / 2 00 7
0 2 1 2 / 1 0 / 2 0 0 7
0 3
1 2 / 2 0 / 2 0 0 7
INPUT DELETE SELECT
1 2 / 2 0 / 2 0 0 7T I T L E
1 C a n c e l
P H O T O
E n t e r
Title input bar
Input mode
Palette for selecting
characters
ENTER DELETE SELECT
TITLE
2E n t e r C a n c e l
a t a Pa r k
P H O T O
ENTER
F i n i s h t i t l e s e t t i n g ?
T I T L E a t a Pa r k
YES NO
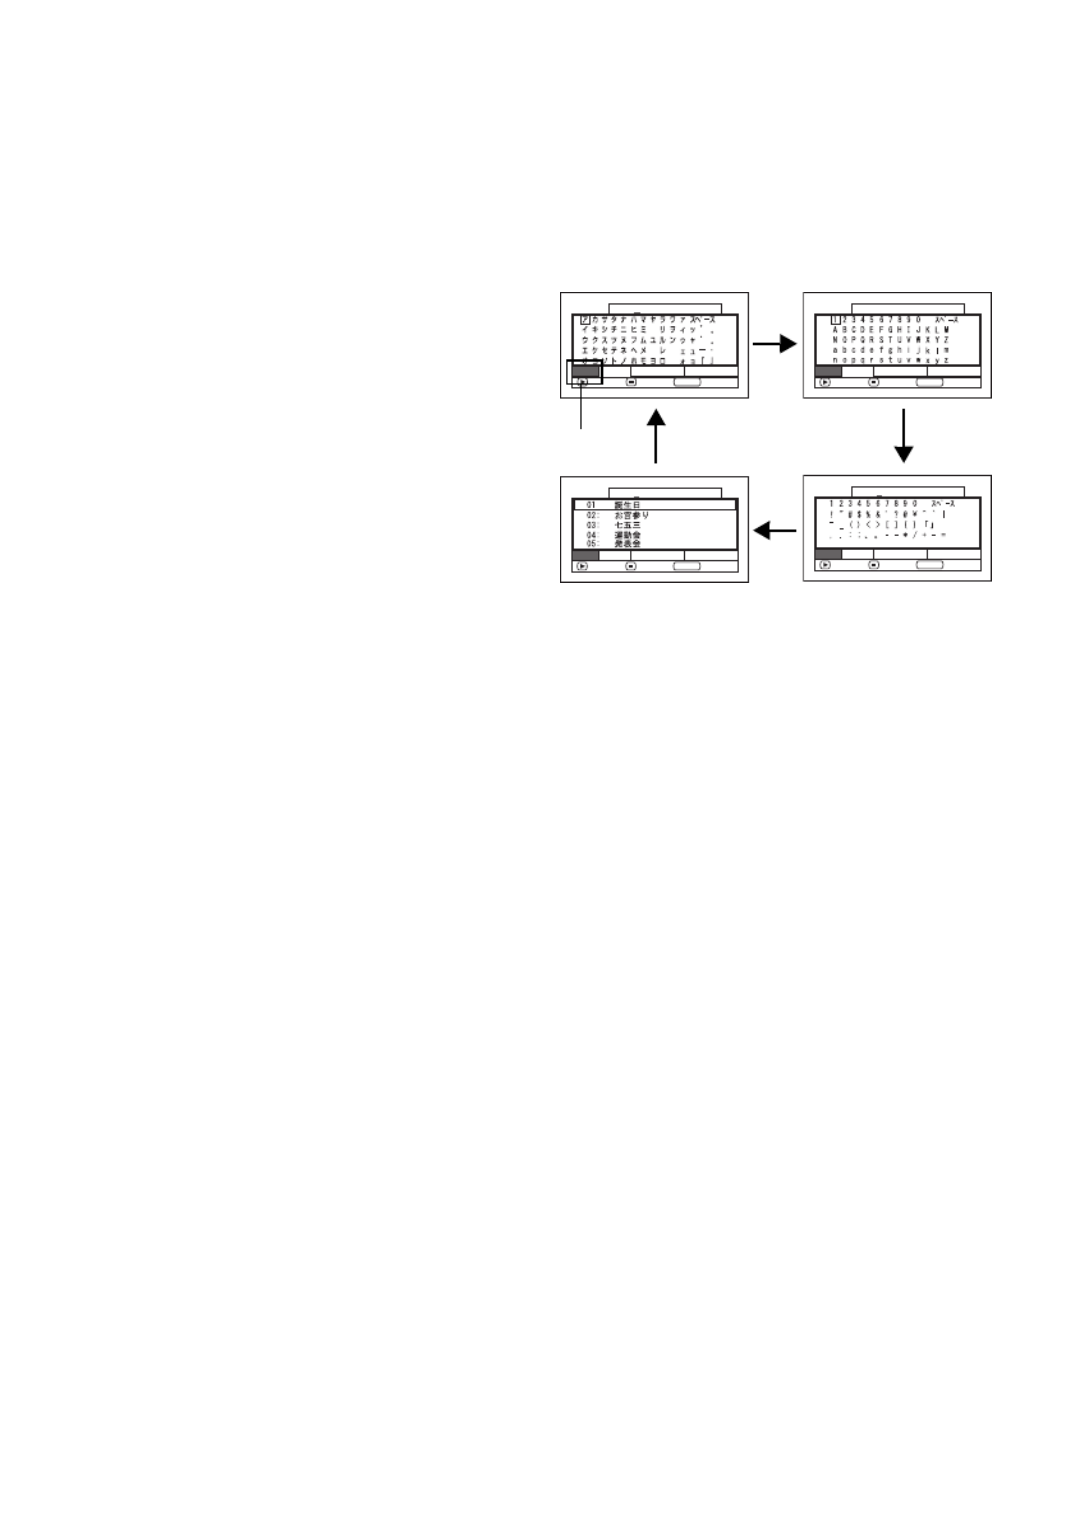
101
Note:
• If you wish to delete the letter for title, press the C
button once: The input letter will be deleted. Holding
down the C button will delete all letters in the TITLE
column.
• You can also use the DELETE button on remote
control to delete any input letters.
• Pressing the PHOTO/SELECT button on the title
setting screen (in step 5) will change the cursor
position from the title input bar to character select
palette, input mode number, and then to “Cancel”. You
can also use the f e d c/ / / buttons to move
the cursor up/down and to the left/right and change its
position.
• To cancel the setting of title, choose “NO” on the
screen for verifying the entered title: The screen for
verifying cancellation of title setting will appear. To
cancel title setting, choose “YES”.
• If you press the C button on the screen for verifying
change in title, the title setting screen will be restored.
• Double byte characters set on other devices may be
displayed blank on this DVD video camera/recorder.
• Titles set on this DVD video camera/recorder may not
be visible on other devices.
●Characters available for entering
title
You can choose the title input mode.
To change the input mode in step 5, press the
DISPLAY button, or use the PHOTO/SELECT
button to place the cursor on the input mode,
and then press the A button.
CHANGE DELETE SELECT
TITLE
3C a n c e l
1 2 / 2 0 / 2 0 0 7
E n t e r
P H O T O
CHANGE DELETE SELECT
TITLE
4C a n c e l
1 2 / 2 0 / 2 0 0 7
E n t e r
P H O T O
1 2 / 2 0 / 2 0 0 7T I T L E
1C a n c e lE n t e r
CHANGE DELETE SELECT
P H O TO
TITLE
2E n t e r C a n c e l
1 2 / 2 0 / 2 0 0 7
CHANGE DELETE SELECT
P H O TO
Input mode

104
1<
ADDING SCENES TO PLAY LIST (EDITING PLAY LIST)
1Press the DISC NAVIGATION button.
2Press the MENU button.
3Use the f e d/ / /
c A/ buttons to
choose “Edit” on the
“PlayList” menu screen,
and then press the A
button.
4Use the “Edit Playlist”
screen to select the play
list to which you wish
to add scenes, and then
press the A button.
The scenes of the
program that was
displayed in step 1 will
appear in the upper
row, and the scenes of
selected play list will
appear in the lower
row.
Note:
If you press the DISPLAY
button, the recording date/
time of the scene in which
the cursor is placed on the
operation guide will
appear. When using the
HDD, pressing DISPLAY
again will display the
recording data of scene;
pressing it once more will return to the operating
guide. When using a disc, no recording data will
appear.
5Press the e button to move the cursor to the
lower row, and press the d or c button to
select the point where the scene is to be
inserted.
6Press the f button to move the cursor to the
upper row, and press the d or c button to
point the cursor to the scene to be added.
You can also select multiple scenes (p. 79).
7Press the A button to copy the scene.
After adding scenes is completed, the edited
play list will appear.
Repeat steps 5 – 7 to add other scenes.
8Press the C button: The screen for verifying
exit will appear.
Choose “Yes”, and then end editing.
Note:
• The “ ” mark shows the position where the scene is
to be added.
• Each time the DISPLAY button is pressed, the
operation guide, the recording date/time of the
selected scene, video quality, screen aspect ratio, and
the recording length (when using HDD) will appear
(see page 72).
• Pressing the C button in the middle of adding scenes
will display the screen for verifying an exit from “Edit
PlayList”. Choose “YES” to exit the edition of play list.
Choosing “NO” will restore the “Edit PlayList” screen.
• If you press the MENU button in step 5 or 6, the
submenu screen for editing play list will appear. You
can also use this submenu to add scenes (p. 90).
• If you add a scene with dubbed mark, the mark will
also appear on the scene in play list.
HDD
HDD
HDD
HDD
HDD
P l a y L i s t
ENTER RETURN
C r e a t e
Ed i t
Sw i t c h
P l a y
T i t l e
D e l e t e
Ed i t P l a y L i s t
0 1
1 2 / 1 / 2 00 7 1 2 : 3 0PM
0 2
1 2 / 1 0 / 2 0 0 7
8 : 00AM
ENTER RETURN
0 3
1 2 / 2 0 / 2 0 0 7
9 : 30AM
0 4
1 2 / 3 0 / 2 0 0 7
3 : 15 PM
Ed i t P l a yL i s t
P l a yL i s t N o . 0 1
A l l P r o g r a
ms
0 0 4 / 0 1 4
0 0 7 / 0 0 7
ADD
PHOTO SELECT
Ed i t P l a yL i s t
P l a yL i s t N o . 0 1
A l l P r o g r a
ms
004/014
008/008
1 2 / 1 /2 0 07 1 2 : 3 0: 0 0PM
Recording date/time
*1: Number of scene before insertion position cursor.
*2: Number of all scenes on play list.
Ed i t P l a yL i s t
P l a yL i s t N o . 0 1
A l l P r o g r a
ms
0 0 4 / 0 1 4
0 0 8 / 0 0 8
0 0 8 / 0 0 8
ADD
PHOTO SELECT
Insertion position
Scene to be added
*1 *2

105
1<
DELETING SCENES FROM PLAY LIST (EDITING PLAY LIST)
1Press the DISC NAVIGATION button, and
then press the MENU button.
2Display the editing screen of the play list to
be edited.
Perform steps 3 – 4 on page 104.
3Move the cursor to the play list in lower row,
and place the cursor on scene to be deleted.
You can also select multiple scenes (p. 79).
4Press the A button.
Repeat steps 3 and 4 to delete other scenes.
5Press the C button: The screen for verifying
exit will appear.
Choose “YES”, and then end editing.
Note:
• Place the cursor on scene to be deleted, and
then press the DELETE button on remote
control: You can also delete the scene on the
play list.
1<
ADDING SCENES USING SUBMENU FOR EDITING (EDITING PLAY LIST)
You can use the menu screen to add scenes to a play list.
1Press the DISC NAVIGATION button, and
then press the MENU button.
2Display the editing screen of the play list to
be edited.
Perform steps 3 – 4 on page 104.
3In the lower row of the play list, place the
green “ ” mark at the position where you
wish to insert a scene.
4Place the cursor on the scene to be added
from the upper row.
You can also select multiple scenes (p. 79).
5Press the MENU button.
6Choose “Add”, and
then press the A
button.
Repeat steps 3 – 6 to
add other scenes.
7Press the C button: The
screen for verifying exit
will appear.
Choose “YES”, and
then end editing.
HDD
HDD
HDD
HDD
HDD
HDD
HDD
HDD
HDD
HDD
Ed i t P l a yL i s t
P l ay L i s t No . 03
A l l P r o g r a
ms
0 0 4 / 0 1 4
0 0 7 / 0 0 7
ADD
PHOTO SELECT
Scene to be added
Insertion position
Ed i t
A l l P r o g r a
ms
ENTER RETURN
0 0 7 / 0 0 7P l ay L i s t N o . 0 3
0 0 4 / 0 1 4
E x i t
A d d
Ed i t P l a yL i s t
P l ay L i s t No . 03
A l l P r o g r a
ms
0 0 4 / 0 1 4
0 0 8 / 0 0 8
ADD
PHOTO SELECT

106
1<
DELETING SCENES USING SUBMENU FOR EDITING (EDITING PLAY LIST)
You can delete scenes from play list on the editing screen.
1Press the DISC NAVIGATION button, and
then press the MENU button.
2Display the editing screen of the play list to
be edited.
Perform steps 3 – 4 on page 104.
3Move the cursor to the play list in lower row.
4Place the cursor on the scene to be deleted,
and then press the MENU button.
You can also select multiple scenes (p. 79).
5Choose “Delete” on the “Edit” menu screen,
and then press the A button.
Repeat steps 3 – 5 other scenes can be deleted.
6Press the C button: The screen for verifying
exit will appear.
Choose “Yes”, and then end editing.
Note:
• If all scenes on play list are deleted, the play list itself
will also be deleted.
1<
SELECTING SCENES USING SUBMENU FOR EDITING (EDITING PLAY
LIST)
You can specify the range of scenes when adding or deleting consecutive multiple scenes to/from
play list. This “Select” menu item is useful when selecting consecutive multiple scenes in items for
adding or deleting scenes.
1Press the DISC NAVIGATION button, and
then press the MENU button.
2Display the editing screen of the play list to
be edited.
Perform steps 3 – 4 on page 104.
3Specify the first or last scene of those you
wish to select, and then press the MENU
button.
To select all scenes, simply press the MENU
button.
4Use the f e d c A/ / / / buttons to
choose “Start → Current”, “Current → End”,
“All” on the “Select” menu screen, and then
press the A button.
Note:
See page 97 for the status of scenes to be selected.
5Press the C button: The screen for verifying
exit will appear.
Choose “Yes”, and then end editing.
HDD
HDD
HDD
HDD
HDD
HDD
HDD
HDD
HDD
HDD

108
1<
CHANGING TITLE OF PLAY LIST (TITLE)
The play lists have serial numbers in the order you have created them, along with the created dates/
times: You can change this title at any time.
1Press the DISC NAVIGATION button.
2Press the MENU button.
3Use the f e d c A/ / / / buttons to
choose “Title” on the “PlayList” menu screen,
and then press the A button.
4Use the “Playlist Title” screen to select the
play list whose title you wish to change, and
then press the A button.
See “CHANGING
TITLE OF PROGRAM
(TITLE)” on page 100
for how to enter a title.
5After changing the title, the Disc Navigation
screen on the play list whose title has been
changed will appear.
Note:
The registered title can be changed at any time using
the same procedure.
1<
DELETING PLAY LIST (DELETE)
1Press the DISC NAVIGATION button.
2Press the MENU button.
3Use the f e d c A/ / / / buttons to
choose “Delete” on the “PlayList” menu
screen, and then press the A button.
4Use the “Delete Playlist” screen to select the
play list you wish to delete, and then press
the A button.
5The screen for verifying deletion will appear:
Choose “YES”, and then press the A
button.
Choose “NO” to cancel deletion.
After Yes or No setting, the Disc Navigation
screen of all programs will be restored.
Note:
• Even if you delete a play list, the original scenes
stored on HDD/DVD will not be deleted.
• If any play list is deleted, the number of play lists will
automatically be revised. (For example, if the No. 2
play list is deleted, the No. 3 play list will become No.
2 play list.)
HDD
HDD
HDD
HDD
HDD
P l ay L i s t T i t l e
ENTER RETURN
0 1
1 2 / 1 / 2 0 0 7 12 : 3 0 PM
0 2
1 2 / 1 0 / 2 0 0 7
8 : 0 0AM
0 3
1 2 / 2 0 / 2 0 0 7
9 : 3 0AM
0 4
1 2 / 3 0 / 2 0 0 7
3 : 1 5 PM
HDD
HDD
HDD
HDD
HDD

113
>/
ADDITIONALLY RECORDING ON FINALIZED DVD-RW (VF-MODE)/+RW
(UNFINALIZE DVD)
You can unfinalize the DVD-RW (VF-mode)/+RW finalized on this DVD video camera/recorder so
that additional recording can be done on it.
1Press the DISC NAVIGATION button.
2Press the MENU button.
3Use the f e d c A/ / / / buttons to
choose “Unfinalize DVD” on the “DVD
Setting” menu screen, and then press the A
button.
The screen for verifying unfinalization will
appear.
4Choose “YES”, and then press the A
button.
The message showing that the disc is being
unfinalized will appear, and the disc will then
be unfinalized.
Note:
• A finalized DVD-RW (VR-mode) can be recorded as
is, without being unfinalized.
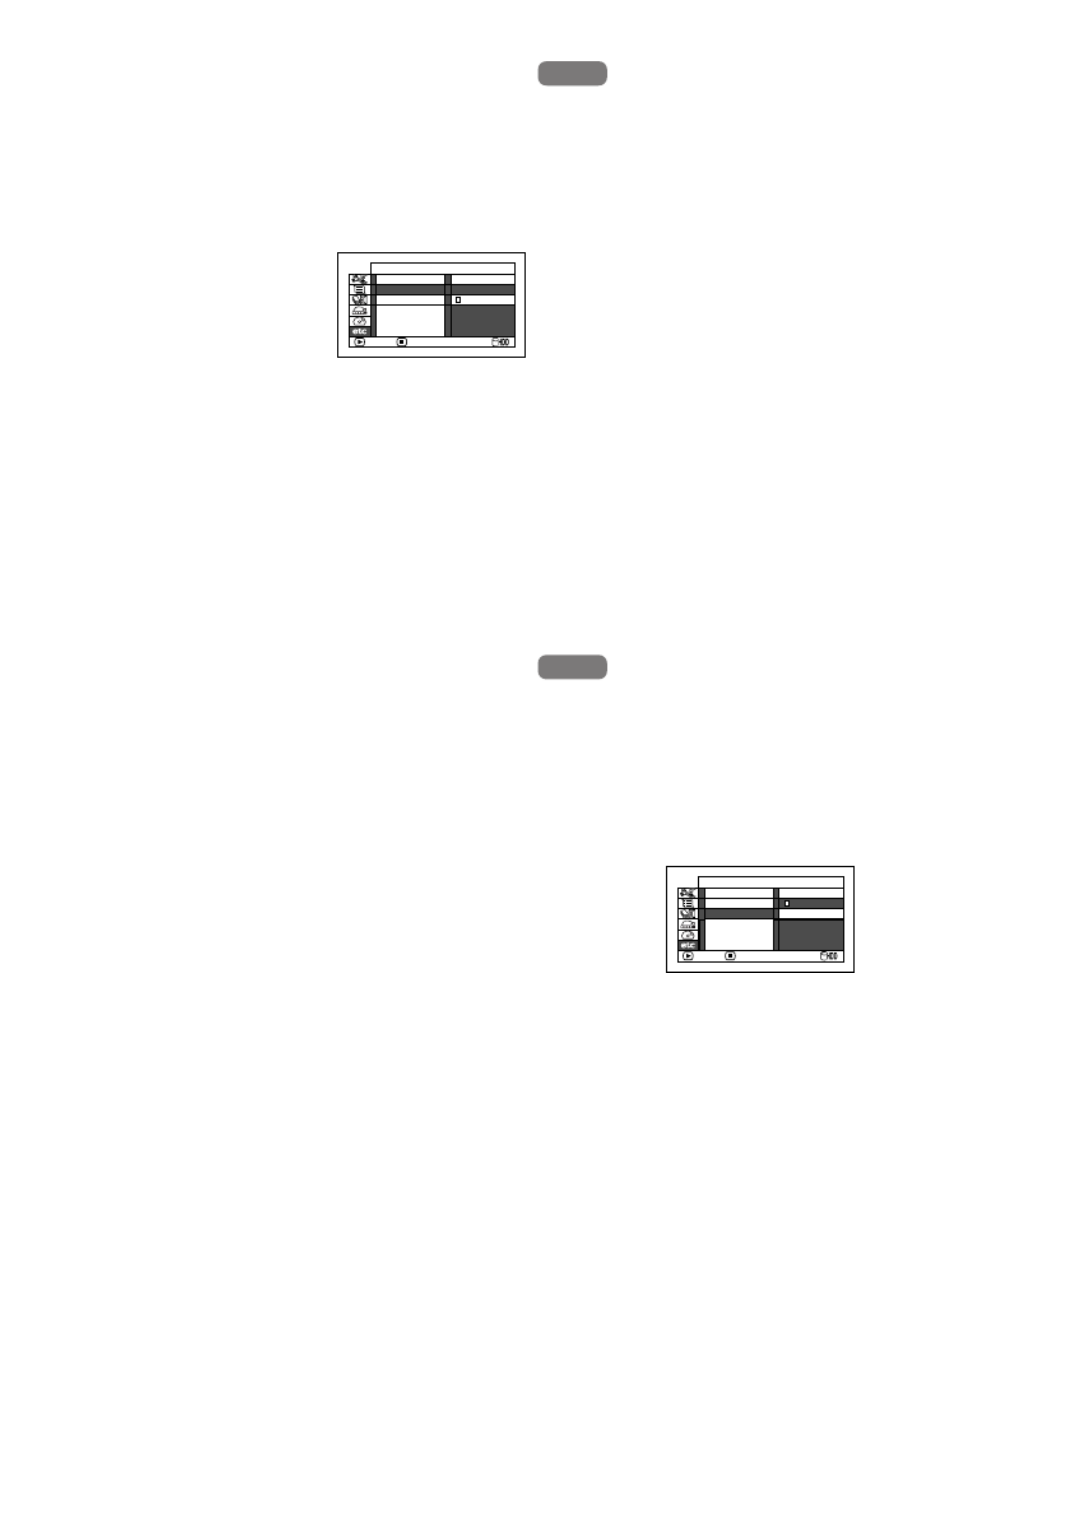
115
1<>2/
PLAYING BACK SCENES REPEATEDLY (REPEAT PLAY)
1Press the DISC NAVIGATION button.
2Press the MENU button.
3Use the f e d/ / /
c A/ buttons to
choose “Repeat Play”
on the “Others” menu
screen, and then press
the A button.
4Choose “On”, and then press the A button:
Playback will start.
Choose “Off” to cancel Repeat Play setting.
●When Repeat Play is set
If one scene has been specified: When playback
of the last scene is finished, playback of all
scenes will repeat from the first scene.
If the range for playback has been specified:
Playback of the scenes in that range will repeat.
See page 79 and 97 when selecting multiple scenes.
●To release Repeat Play
Use one of the following 3 methods to release:
• Choose “Off” in step 4 on the left.
• Turn the DVD video camera/recorder off
once.
• Press the DISC EJECT button to remove the
disc.
Note:
• Press the C button to terminate playback. However,
the Repeat Play setting will not be canceled.
• When using a DVD-RAM, photos will also be played
back repeatedly.
• Repeat playback will not function when playback is
instructed from the recording pause status.
1<>2/
PLAYING BACK WIDE-MODE IMAGES ON 4:3 DISPLAY TV (TV TYPE)
If you connect the DVD video camera/recorder with a disc recorded in wide mode to a TV with 4:3
display only and play it back, vertically long images will appear. You can specify “TV type: 4:3” to
display 4:3 images on the TV.
1Press the DISC NAVIGATION button.
2Press the MENU button.
3Use the f e d c A/ / / / buttons to
choose “TV type” on the “Others” menu
screen, and then press the A button.
4Choose “4:3”, and then press the A button.
3
SLIDE SHOW (CONTINUOUS PLAYBACK OF STILLS)
If you play back stills recorded on a card, the DVD video camera/recorder will enter the playback
pause status after each still is played back.
Setting Slide Show allows you to continuously play back stills.
1Press the DISC NAVIGATION button.
2Press the MENU button.
Use the f e d c A/ / / / buttons to
choose “Slide Show”, “Start”, and then press
the A button.
When playback is finished, the DVD video
camera/recorder will enter the playback
pause status at the final still.
Pressing the C button will restore the Disc
Navigation screen.
Note:
• With slide show, playback will start from the first photo
on card regardless of the position of cursor or
whether you attempt to select scenes.
• If you press the C button or turn the DVD video
camera/recorder off, Slide Show will be canceled.
HDD
HDD
HDD
HDD
HDD
O t h e r s
ENTER
RETURN
C a t e g o r y
R e p e a t P l a y On
OffT V Ty p e
HDD
HDD
HDD
HDD
HDD
O t h e r s
ENTER
RETURN
C a t e g o r y
R e p e a t P l a y 16 :9
4:3T V Ty p e
Start: To start a slide show.

117
1<>2/3
VIEWING ON TV SCREEN
1Turn the TV on and set the input selector to
“VCR” whichever applicable Video input.
Refer to the TV instruction manual for how to
switch the TV input.
2Turn the DVD video camera/recorder on.
The image that the DVD video camera/
recorder is seeing will appear on the TV
screen.
You can also monitor the image on the LCD
screen or viewfinder of the DVD video
camera/recorder.
3Perform playback, recording or editing.
You can perform playback, recording or
editing on Disc Navigation while checking on
TV screen.
Note:
• Adjust the volume of sound on TV.
• The infrared remote control is useful when operating
the DVD video camera/recorder while viewing an
image on TV screen. However, if you use a Hitachi
VCR, the remote control may inadvertently operate
the VCR if it is near the DVD video camera/recorder.
To prevent this, set the remote control code of the
VCR to a position other than “VCR2”.
• Information during recording and playback will appear
on the TV screen: You can also switch off the display
during recording. Refer to “SETTING ON-SCREEN
DISPLAY OUTPUT ON OR OFF (OSD OUTPUT)” on
page 69.
• When copy-guarded disc is played back, no image will
appear on TV screen.
• If you use TV with wide mode (aspect ratio 16:9) and
set the TV to the wide mode, the entire Disc
Navigation display may not be displayed on the TV
screen. If this happens, release the wide mode setting
on TV (see the TV instruction manual for releasing the
wide mode).
HDD
HDD
HDD
HDD
HDD

118
1<>2/
Playback on DVD Recorder/Player
PLAYING BACK DVD-RAM/DVD-RW (VR-MODE)
You can use a DVD recorder or DVD player that conforms to DVD-RAM/DVD-RW (VR-mode) to play
back 8 cm DVD-RAM/DVD-RW (VR-mode) recorded on this DVD video camera/recorder.
1Insert the disc into the DVD recorder/player
and play it back.
See the instruction manual for DVD
recorder/player.
Note:
• When playing back disc on another device, the Disc
Navigation display will be different from the one on
this DVD video camera/recorder.
• Finalizing DVD-RW (VR-mode) may be necessary.
• Do not insert a DVD-RW (VR-mode) that was
recorded on this DVD video camera/recorder into a
device that does not conform to 8cm DVD-RW (VR-
mode): Doing so may make the disc unusable.
• DVD-RAM/DVD-RW (VR-mode) recorded on this DVD
video camera/recorder can be played back on other
DVD recorder/players or other devices conforming to
8 cm DVD-RAM/DVD-RW (VR-mode), but playback
on all DVD recorder/players is not guaranteed.
PLAYING BACK DVD-RW (VF-MODE)/DVD-R/+RW
1Finalize a recorded DVD-RW (VF-mode)/
DVD-R/+RW.
You need to finalize a disc to play it back on
DVD recorder/player: See page 112.
No further data can be recorded on finalized
disc.
Note:
Use this DVD video camera/recorder to finalize the
DVD-RW/DVD-R/+RW recorded on the DVD video
camera/recorder.
2Insert the disc into the DVD recorder/player
and play it back.
See the instruction manual for DVD
recorder/player.
Note:
• Do not insert a DVD-RW (VF-mode)/DVD-R that has
not been finalized into any DVD recorder: The disc
may be unusable.
• Do not insert a DVD-RW (VF-mode)/DVD-R recorded
on another DVD recorder and not finalized, in this
DVD video camera/recorder: Doing so will make the
disc unusable.
• A recorded +RW is automatically finalized when it is
removed from the DVD video camera/recorder even if
you do not use the Disc Navigation function to finalize
it (p. 112) (auto-finalize). An auto-finalized +RW can
be played back on a DVD recorder/player, etc., but no
DVD video menu will appear. To display the DVD
video menu on a DVD recorder/player, etc., finalize
the +RW using the Disc Navigation function before
playing it back on a DVD recorder/player, etc.
• A +RW with a shorter recording time may not be
playable on a DVD recorder/player, etc. if it has been
auto-finalized. In this case, use the Disc Navigation
function to finalize the +RW.
• DVD-RW (VF-mode)/DVD-R/+RW recorded on this
DVD video camera/recorder can be played back on
other DVD recorder/players or other devices
conforming to 8 cm DVD-RW (VF-mode)/DVD-R/+RW,
but playback on all DVD recorder/players is not
guaranteed.
• Playback may not be possible on some DVD recorder/
players, or it may depend on the recorded status of
DVD-RW (VF-mode)/DVD-R/+RW: In such cases,
play back the DVD-RW (VF-mode)/DVD-R/+RW on
this DVD video camera/recorder. Also, playback on
DVD recorder/players may stop momentarily between
scenes.
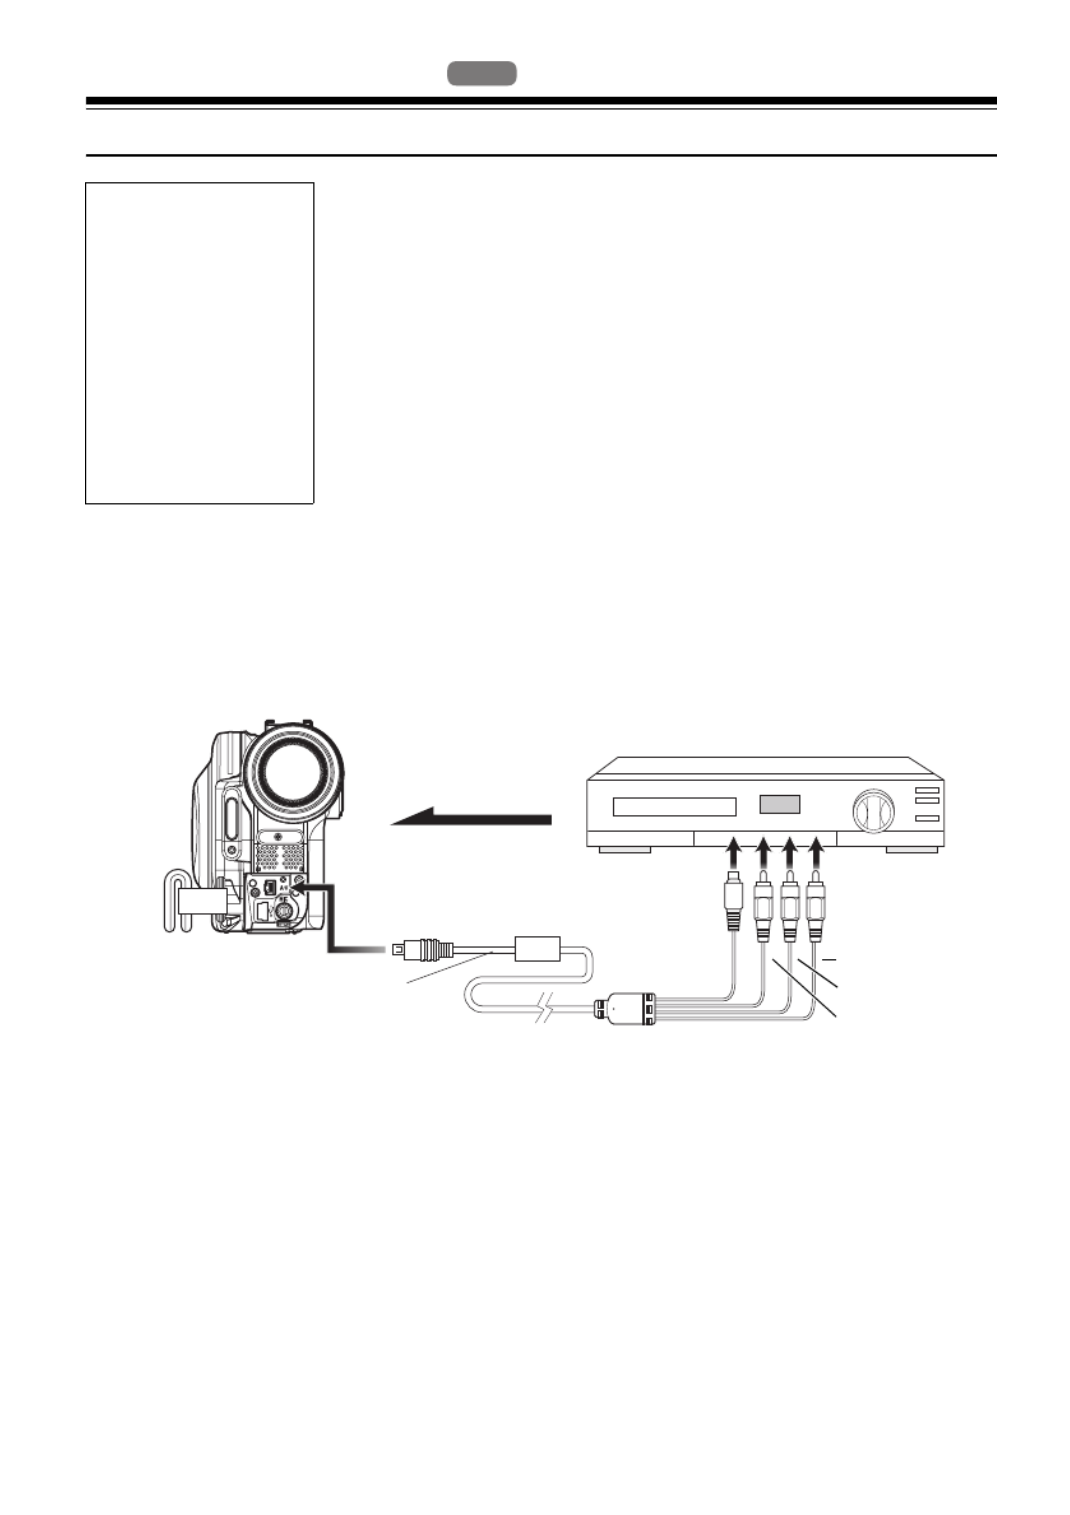
119
1<>2/3
Recording (Dubbing) Images
RECORDING (DUBBING) IMAGES FROM OTHER VIDEO DEVICE
You can record (dub) images from other video devices to disc or card in this DVD video camera/
recorder.
Use the AV/S input/output cable (provided) to connect the DVD video camera/recorder to the
other video device as follows:
Before You Begin
• Before connecting this DVD video camera/recorder to another device,
be sure to turn both devices off.
• Insert a recordable disc* 1 or card* 2 into this DVD video camera/recorder
(see pages 26 and 27).
*1 No photo can be recorded.
*2 Only photos can be recorded: No video can be recorded.
• If you operate the DVD video camera/recorder connected to another
device, always power the camera/recorder from AC outlet using the AC
adapter/charger.
• If you use a Hitachi VCR, it will be operated by the remote control*
provided with the DVD video camera/recorder. When recording an
image from a Hitachi VCR, change the remote control code of the VCR
to other than “VCR2”.
* If the video device to be connected has an S-VIDEO input jack, you can connect it to the DVD video camera/
recorder.
HDD
HDD
HDD
HDD
HDD
To AV input/output jack
AV/S input/output cable
(provided)
To video/audio
output jacks
Signal flow
Red
Yellow
White
To S-VIDEO
input jack of
VCR, etc. *

125
7Choosing video system:
The screen for setting the video system will
appear, and then click “Next”.
8Executing installation:
The setups for installation are now complete.
Click “Install” to execute installation.
Important information for customers who use
Easy CD Creator 5 made by Roxio
Corporation:
If ImageMixer 3 provided with this DVD
video camera/recorder is installed, Easy CD
Creator 5 may not operate normally. The
screen shown below will appear after you
click “Install”:
If you are using Easy CD Creator 5, click
“Yes”, and do not install ImageMixer 3.
9After installation is finished, the screen for
prompting restart will appear: Click “Finish”
to restart the PC.
After restart, remove the CD-ROM from the
PC.
Installing the software is now complete.
Note:
• After installation is finished, the installation of Direct
X
® may start depending on the PC used: In this case,
follow the instructions on screen to install Direct X ®.
Click
Click
Click

126
[When using Macintosh]
1Turn the Macintosh on, and insert the
provided CD-ROM into the CD-ROM drive of
Macintosh.
2Double-click the DVDHS7S icon displayed on
desktop.
3Double-click the icon of “ImageMixer 3 for
DVDCAM.pkg” displayed on screen.
The installer will start: Click “Continue”.
The “Read Me” screen will appear: Click
“Continue”.
4Checking license agreement:
The license agreement screen will appear.
Set the language to be used when installing
the software, and then carefully read the
license agreement: If you agree with the
contents, choose “Continue”. If you accept
the license agreement, click “I agree”.
* With the provided software for Macintosh, the
language used with OS will automatically be
installed.
5Choose the installation destination and type
of installation, and click “Continue”. Then
click “Install”.
Follow the instructions on screen for
operation: Installation will start.
6After installation is finished, the screen for
exit will appear: Click “Close”.
The screen for installation will close and
installation will be complete: Remove the
CD-ROM.
Note:
• You must have the administrator authority of the PC
before installing software.
Click
Setting language
when installing

128
When connecting the DVD video camera/recorder to PC, the DVD video camera/recorder will be
recognized as a drive. The drive will appear on screen as follows:
[When using Windows]
If the DVD video camera/recorder is connected to PC with its power switch set to “HDD” or
“DVD”, it will be recognized as an optical disc drive, and a disc set in the DVD video camera/
recorder can be accessed. (The shape of icon and drive name, such as G:, will depend on the software
environment used.)
If the DVD video camera/recorder is connected to PC with its power switch set to “SD”, it will be
recognized as a removal disk, and a card set in the DVD video camera/recorder can be accessed.
(The drive name, such as G:, will depend on the software environment used.)
[When using Macintosh]
If the DVD video camera/recorder is connected to Macintosh USB
port with the power switch set to “HDD” or “DVD”, it will be
recognized as a removable drive, and the icon shown on the right
will appear. (The shape of icon and drive name will depend on the
software environment used.)
If the DVD video camera/recorder is connected to Macintosh USB port with the
power switch set to “SD”, it will be recognized as a removable drive, and the
icon shown on the right will appear.
Double-click this icon: The contents of card can be checked.
(The shape of icon and drive name will depend on the software environment used.)
●Handling photos
Photos are recorded on a SD memory card in this DVD video camera/recorder in JPEG format: Use
the application that conforms to the JPEG images.
The following shows how to import photos into PC/Macintosh:
Insert an SD memory card with photos recorded into the DVD video camera/recorder, and connect it
to PC/Macintosh. Double-click the removable disc icon displayed on the screen: The contents on the
card will appear.
The photos recorded on the DVD video camera/recorder are stored in “DCIM” - “100*HPNX1”
folder on card: Drag and drop them to PC to import them.
* The number may be different if the card was recorded on another DCF conforming device.
The following operations are not possible on the DVD video camera/
recorder while it is being connected to PC:
• Camera operation using operation buttons on DVD video camera/recorder.
• Ejection of disc using DISC EJECT button on DVD video camera/recorder.
• Power off using power switch.
• Do not use Explorer to operate any video files recorded on disc: Use the provided software.
• HDD, disc and card cannot simultaneously be accessed.
A disc/card loaded in the DVD video camera/recorder can be ejected by operating
the PC.
• The disc and SD memory card can be replaced even though the DVD video camera/recorder is
turned off or it is not connected.

137
CREATING DVD-VIDEO USING IMAGES RECORDED ON HDD/DISC
You can use the images recorded on the DVD video camera/recorder to create a disc that can be
played on other DVD recorders/players.
* A DVD-RW/DVD-R/+RW recorded on this DVD video camera/recorder must be finalized on this
DVD video camera/recorder (see page 112) before importing the images on it.
1Start ImageMixer 3 for DVDCAM.
2Choose Hitachi DVDCAM.
Click “Hitachi DVDCAM” displayed on the
left of screen: The images recorded on HDD
or disc will appear.
3Select the scene you wish to import and click
“Import”.
Click the scene to be played back, and then
click “Import” at the bottom of screen:
Importing the scene will start.
After importing, click “Library” to make sure
that the desired video file has been imported.
4Create a DVD creation list.
Clicking Library will display a list of video
files imported into Macintosh using
ImageMixer 3.
Select the video files from which you wish to
create a DVD-Video, and then click “DVD
List” at the bottom of screen. The screen for
selecting the DVD menu design, size of DVD
disc to be created (8 cm/12 cm), and picture
quality will appear: Choose the desired
settings, and click “OK”.
The created DVD list will be added.
The DVD list has been registered “Untitled”:
Double-click “Untitled” to change the name
of the DVD list. The name of the DVD list will
become the name of the disc.
Note:
• You can also use Album or Smart Album to easily
prepare a DVD creation list, by selecting the video
files from which you wish to create a DVD-Video and
clicking “DVD List” at the bottom of screen.
• Even after creating a DVD list, you can drag a video
file from the library and drop it to the DVD list on the
left of screen: That video file will be added.
• While a DVD list is being displayed, click the Utility
Menu button at the bottom of screen and choose “Edit
DVD List”: You can re-set the DVD menu design, size
of DVD disc and picture quality.
Click
Select “DVD List”
Click

143
Cannot combine scene
of multiple programs.
Create PlayList first,
and then combine
scenes.
Scenes in different programs (different recording dates) cannot
be combined. Create a Playlist first, and then combine such
scenes on the playlist. 91
Cannot combine.
Deselect PHOTO
scenes.
Select only movies and combine them.
91
Cannot combine. Select
multiple scenes.
Select a range of at least 2 scenes to be combined, and then
combine them. 91
Cannot delete scenes. This may occur when scene that was edited for division, etc. is to
be deleted.
Combine the divided scenes, and then delete them.
89, 91
Cannot divide scene. This message will appear when the scene is extremely short
because division, etc. was repeated. 90
Cannot execute.
Change display
category to ALL.
This message will appear if you attempt to combine or move
scenes with “Category: VIDEO or PHOTO” specified. 114
Cannot execute.
Unselect multiple
scenes.
Division or change in thumbnail was executed when multiple
scenes were selected. 79
Cannot finalize DVD in
HDD mode. Please
finalize DVD in DVD
mode.
This message will appear if you press the FINALIZE button when
the power switch is set to “HDD”. Set the power switch to “DVD”,
and then finalize the disc. 112
Cannot read DVD.
Check dirt/crack/both-
sides contrary/inserted
correctly.
Error occurred while the disc was being recognized. Make sure
that there is no scratch or dirt on disc, that the surface/back of
disc is not reversed, and that the disc is firmly pushed against the
turntable. See *3 and *4 on page 148.
11, 40
CANNOT RECORD
PHOTOS
•This message will appear when the PHOTO/SELECT button is
pressed with the power switch set to “HDD” or “DVD”.
•No photo can be recorded on the HDD or disc in this DVD
video camera/recorder: Use a card to record photos.
33, 160
CANNOT RECORD
VIDEO
This message will appear when the REC button is pressed with
the power switch set to “SD”. 33
Cannot replace
thumbnail on PHOTO
scenes.
The thumbnail of a still cannot be changed.
Select a movie. 94
Cannot select any more
scenes.
The maximum number of selectable scenes is 999. 97
CANNOT SLEEP
MODE
The DVD video camera/recorder can enter the sleep/restart
status only from the recording pause status. The following
conditions apply:
•No DVD is loaded in this DVD video camera/recorder but the
power switch is set to “DVD”.
•No card is loaded in this DVD video camera/recorder but the
power switch is set to “SD”.
•The HDD, disc or card has no remaining space.
•The HDD/disc is protected.
45
CARD ALMOST FULL Remaining space is only enough to record less than 10 stills.
Delete unnecessary stills and try the card, or use another card. 89, 110, 160
Message Cause & Troubleshooting Reference
page

144
Card error has
occurred.
•The card terminals may be dirty: Wipe off dirt, and try the card
again, or use another card.
•Data other than still image may be included: Use another card.
27
Card error has
occurred.
Format the card now?
Was the card formatted on PC? Was formatting interrupted
midway? When using the card on this DVD video camera/
recorder, choose “YES” and format it.
109
Card error has
occurred.
Formatting is not
complete.
The card may be damaged: Use another card.
27
Card error has
occurred. Keep card
inside & restart.
Card error could have occurred during editing of scenes. Turn off
the DVD video camera/recorder with the card being used inside,
connect the AC adapter/charger, and then power the DVD video
camera/recorder again.
28, 33
Card full. Delete unnecessary stills and try the card, or use another card. 89, 160
Card is not formatted.
Format the card now?
Was the card formatted on PC? When using the card on this DVD
video camera/recorder, choose “YES” and format it. 109
CHECK CARD The inserted card cannot be used in this DVD video camera/
recorder: Use another card. 27
CHECK DVD A disc unusable on this DVD video camera/recorder may have
been inserted or the disc may be damaged.
Make sure that the type of disc is correct, and make sure that the
disc is not write-protected.
27, 110
CHECK HDD The HDD may have been destroyed. Also check to see whether
the HDD is write-protected. 110
Control Information
Error.
Mismatch may occur between the recorded image and scene
information.
Update the control information.
111
•Use another disc.
•See *3 and *4 on page 148. —
COPY PROTECTED The video signal input to this DVD video camera/recorder may be
copy-guarded.
Some prerecorded video materials, such as movies, are guarded
against copying.
Copy-guarded materials cannot be recorded on this DVD video
camera/recorder.
120
Dubbing is not
complete.
This message will appear when dubbing has failed. 84, 88
DVD error has occurred.
Finalizing is not
complete.
•Disc error occurred during finalizing, and finalizing failed.
Replace the disc.
•See *3 on page 148.
112
DVD error has occurred.
Format the DVD now?
•Has the disc been initialized on PC? Has initializing the disc on
PC been interrupted?
Choose “YES” and initialize the disc when using it on this DVD
video camera/recorder. Initializing the disc will erase all data on
it.
•See *2 on page 148.
109
DVD error has occurred.
Formatting is not
complete.
The disc may be dirty.
Remove the disc and wipe off fingerprints, dust, etc. before
reusing it, or use another disc.
This message may also appear if you insert a disc for which
formatting was interrupted midway. In this case, use another disc.
11, 109
Message Cause & Troubleshooting Reference
page

146
DVD-RAM, Finalize is
not required.
This message will appear if you press the FINALIZE button with a
DVD-RAM loaded in this DVD video camera/recorder. No
finalization is necessary for a DVD-RAM.
112
END OF CARD No more recording on this card can be done: Delete unnecessary
stills or use another card. 89, 160
Error occurred. Please
format HDD.
An error occurred with the HDD for which repair is being tried.
Initialize the HDD: But note that initializing the HDD will delete all
data stored on the HDD.
109
Error occurred. Please
replace DVD or format
DVD.
•Abnormality has occurred with the DVD-RAM/DVD-RW/+RW
to be repaired. Initialize the disc before using it, or use the
another disc. Initializing the disc will erase all data on it.
•See *2 on page 148.
109
Error occurred. Please
replace DVD.
An abnormality occurred with a DVD-R to be repaired. Replace
the disc. —
Finalize may not be
complete. Finalize again
now?
This message will appear when power is supplied again and the
disc is reinserted after power was shut off during finalization due
to a power failure, etc. Choose “YES” if you wish to be sure
finalizing is performed.
112
HDD/DVD ALMOST
FULL
The remaining free space of HDD/disc is less than one minute for
video: Delete unwanted scenes, or use another disc. 89, 159
HDD full.
Cannot execute.
Delete unwanted scenes. 89
HDD/DVD has no data. This message will appear when an attempt is made to execute
dubbing, playback or editing on Disc Navigation when no scene
has been recorded.
—
HDD/DVD has no
PlayList.
Switching of play list was selected with no play list stored. 103
HDD/DVD includes
protected scenes.
Delete scenes?
The disc may be software protected from a device other than this
DVD video camera/recorder. To release this case, use a device
that has executed software-protect.
—
HDD/DVD is full.
Cannot add control info.
The number of entered scenes has reached the limit that can be
entered, so the control information for generating thumbnails
cannot be added.
Combine several scenes or delete them.
89, 91
HDD error has
occurred.
Initialize the HDD before using the DVD video camera/recorder.
Initializing the HDD will delete all data recorded on it. 109
HDD error has
occurred.Format the
HDD now?
Did you interrupt formatting the HDD?
Choose “YES”, and then format the HDD.
Initializing the HDD will delete all data recorded on it.
109
HDD error has
occurred.Formatting is
not complete.
Did you interrupt formatting the HDD?
Press the RESET button to execute system reset. 156
HDD error has
occurred.Restart.
HDD error probably occurred during editing of video file.
Turn off this DVD video camera/recorder, and then connect the
AC adapter/charger to the DVD video camera/recorder to power it
again: The video file will be repaired.
28
Message Cause & Troubleshooting Reference
page

147
NO DVD This message may appear when the DVD video camera/recorder
or disc is moved from a cold place to a warm place.
Condensation has occurred on the camera/recorder lens or HDD/
DVD drive. Do not remove the disc; leave the DVD video camera/
recorder turned off in a place as dry as possible for 1 – 2 hours.
7
The disc has not been inserted.
Insert it. 40
The disc is not inserted correctly.
Push the disc against the turntable at the center until a click is
heard.
See *3 and *4 on page 148.
40
Is the disc surface/bottom reversed?
Check the surface/bottom of disc, and reinsert it correctly. 40, 41
No more scenes.
PlayList was deleted.
•All scenes are deleted from the play list.
•Since a play list with no scenes cannot be supported by
specifications, a play list from which all registered scenes have
been deselected will be deleted.
105, 106
PlayList over limit. An attempt was made to create new play list or copy play list,
even though limit specified for play lists in the video recording
standard had already been stored.
102
Same scenes on Play
List will be deleted.
Delete scenes?
•This will appear when scenes are to be deleted.
•When a play list exists on HDD or disc, an attempt to delete
scenes in program will display this message. (This message
will not appear if you deselect scenes from play list.)
89
Scene No.xxx is too
large. Please divide this
scene before dubbing.
This message will appear during all scene dubbing if the data
size of the scene to be dubbed is larger than the free space on
one disc (approx. 1.4 GB, approx. 30 minutes in FINE mode).
Divide the scene, and then dub it.
84
Scenes over limit.
Cannot add scenes.
The number of scenes entered in play list has reached the limit
that can be entered.
Delete several scenes.
102, 106
Scenes over limit.
Cannot divide scene.
The number of entered scenes has reached the limit that can be
entered.
Delete several scenes.
102, 106
Stop processing. The C button was pressed to stop processing of multiple scenes. —
There was no scene
which can be deleted.
This message will appear if you try to delete multiple scenes on
Disc Navigation when all the selected scenes have been locked.
Release the lock on scenes before executing deletion.
89, 96
The scene from which
Video mode/Wide mode
differs cannot combine.
If the power switch is set to “HDD”, scenes with different VIDEO
Modes/16:9 modes cannot be combined. 91
The temperature of
HDD is outside the
operating temperature
range.
Please retry later.
This message will appear if the temperature of the HDD in this
DVD video camera/recorder is outside the operating temperature
range.
Turn the DVD video camera/recorder off and wait for a while. The
temperature will be effectively decreased if the DVD video
camera/recorder is placed in a well-ventilated spot.
5, 158
The temperature of
HDD is outside the
operating temperature
range. Turn off power.
This message will appear if the temperature of the HDD in this
DVD video camera/recorder is outside the operating temperature
range. Recording on a disc may be possible even if this message
is displayed.
5, 158
Message Cause & Troubleshooting Reference
page

148
*1
•This message may also appear when dirt adheres to disc. If this message appears when a recorded disc is
recognized immediately after it is inserted, do not repair the disc; remove it and then use the provided disc
cleaning cloth to clean off the dirt before using it.
•This message may also appear when condensation occurs. In this case, do not repair the disc; turn the DVD video
camera/recorder off, wait until it dries out, and then turn it on again.
•If the repair message appears when you turn the DVD video camera/recorder on from off with a disc loaded
after recording on it, choose repair.
•If the repair message appears when recording and playback are normally possible with another disc – and no
condensation occurs and the disc is not dirty – choose repair.
*2
•This message may also appear when dirt adheres to disc. In this case, do not initialize the disc: Remove it and
then use the provided disc cleaning cloth to clean off the dirt before using it.
•This message may also appear when condensation occurs. In this case, do not initialize the disc; turn the DVD
video camera/recorder off, wait until it dries out, and then turn it on again.
•Initialization will delete all data on disc.
*3
•This message may also appear when dirt adheres to disc. Remove the disc and then use the provided disc
cleaning cloth to clean off the dirt before using it.
•This message may also appear when condensation occurs. Wait until the DVD video camera/recorder dries out,
and then turn it on again.
*4
•This message will appear when a single-sided disc is inserted in reverse. Reinsert the disc correctly. (Insert the
disc with the label printed surface facing the outside.)
*5
•Do not insert a DVD-RW (VF-mode)/DVD-R that has not been finalized into any DVD recorder: The disc may be
unusable.
This DVD cannot be
used. Please replace
DVD.
A disc that cannot be used on this DVD video camera/recorder
has been loaded. Check the type of disc. 27
This DVD is finalized.
Finalize is not required.
This message will appear if you press the FINALIZE button with a
finalized DVD-RW/DVD-R/+RW loaded in this DVD video camera/
recorder. Finalizing the disc is not necessary.
112
This DVD is recorded by
the PAL system. Please
replace DVD.
This DVD video camera/recorder can use only discs recorded on
the NTSC system. A disc recorded on the PAL system cannot be
used on this DVD video camera/recorder.
—
UNFORMAT DVD The disc is not initialized or it is damaged.
If this message appears, be sure to initialize the disc on this DVD
video camera/recorder before using it.
Reinitializing even a disc used on this DVD video camera/
recorder may be necessary (initializing will erase all recorded
contents on disc). If this message appears, try to initialize the
disc. If the same message still appears, the disc may be
damaged: Use another disc.
109
See *2 on this page. 11
UNFORMAT HDD The HDD may not be initialized, or it may be destroyed. —
Use AC adapter/
charger.
No dubbing, HDD deletion, or disc finalization is possible with a
battery: Use the AC adapter/charger.
28, 84, 111,
112
Use AC adapter/
charger.
Turn off power.
Scene cannot be repaired when the DVD video camera/recorder
is powered by a battery.
If the AC adapter/charger is unavailable in handy place, remove
the disc, use the opposite side, or use another disc. To repair the
removed disc, insert the disc into the DVD video camera/recorder
afterwards, and connect the AC adapter/charger.
28
Write protected.
Check card.
A card with the erase prevention switch locked is inserted: Unlock
the switch. 27
Write protected.
Check HDD/DVD.
The HDD or disc is write-protected. Use the Disc Navigation
menu to release the protection. 110
Message Cause & Troubleshooting Reference
page

149
Troubleshooting
Check to see the following before asking for a repair. If the suggested solution still cannot restore the
DVD video camera/recorder to normal, do not attempt to repair it yourself, but consult your dealer.
Power supplies
Symptom Cause and Correction Reference
page
Battery cannot be
charged.
Is the ambient temperature too low or too high?
Charge the battery at 10 – 30ºC.
29
Is the battery abnormally hot?
Remove the battery, leave it for a while to cool down, then charge it.
Is the DC power cord connected to AC adapter/charger? Unplug it.
Has the battery been unused for a long time?
Remove the battery, and then reattach it.
•If the battery does not charge after you try the above four
procedures, it may be dead: Purchase a new battery.
Battery weakens fast. Are you using the DVD video camera/recorder where the
temperature is low?
A fully charged battery (DZ-BP14S/DZ-BP14SJ/DZ-BP7SJ/DZ-
BP21SJ) may be discharged sooner than usual at low
temperatures. Keep extra batteries on hand.
31
Battery may be dead.
The performance of battery will deteriorate if it is used for an
extended period of time or frequently: Purchase a new battery.
32
The CHARGE indicator
on AC adapter/charger
is blinking.
Is the ambient temperature too low or too high?
Charge the battery in environment where the temperature is 10 – 30ºC.
The battery has possibly discharged excessively. Continue
charging: After a while, the battery will be charged to the
specified voltage, and the CHARGE indicator will light. Then the
battery charge will be completed normally.
29, 30
Power turns off immediately
after being turned on.
Is battery charged?
Charge it.
29
When power is turned
on, the LCD screen will
turn on and off.
The ACCESS/PC
indicator is blinking,
even though nothing is
displayed on LCD
monitor screen.
Power goes off
unexpectedly.
Is Power Save set to “On”?
If the powered DVD video camera/recorder is left for as long as 5
minutes without recording or playback with “Power Save: On”
specified, it will automatically turn off to save battery power. To
restart recording in this case, set the power switch to “OFF” and
then set it to “HDD”, “DVD” or “SD”. You can also specify “Power
Save: Off” to stop automatic power off.
36
Is the DVD video camera/recorder set to the sleep/restart status?
If 30 minutes or more has elapsed with the DVD video camera/
recorder in the sleep/restart status, it will automatically turn off.
Set the power switch to “OFF”, and then power the DVD video
camera/recorder again.
45

152
When the DVD video camera/recorder is connected to PC
No sound. Is the TV volume control set correctly?
Adjust TV volume control, and be sure to adjust the volume on
TV.
117
Disc Navigation
thumbnails do not
appear.
Was the image recorded from AV input/output jack with
interference?
Record image with no noise or disturbance.
—
Photos on card cannot
be played back.
This DVD video camera/recorder can play back image data
recorded on SD memory card in other digital cameras conforming
to the DCF (Design rule for Camera File system) standard. The
range of image data normally playable on this DVD video
camera/recorder is that with pixels from 80 horizontal × 60
vertical to 4000 horizontal × 3000 vertical. If the pixel data is
outside this range, blue thumbnails will appear (thumbnails* in
the figure), meaning the image is unplayable.
Even when the number of pixels is within the above range,
playback may not be possible, depending on the recording status
of the digital cameras used.
DCF (Design rule for Camera File system) is an integrated image
file format of digital cameras: Image files can be used on all
digital devices conforming to DCF.
—
It will take some time to
play back photos on
card.
When playing back a still, “Playback.” will appear: Stills with a
large number of pixels will take some time to appear. —
Symptom Cause and Correction Reference
page
No drive icon appears
on PC.
The DVD video camera/recorder is not turned on.
Check the power supply. 33
Turn PC off and then disconnect the PC connection cable. Turn
PC on again, and then use the PC connection cable to connect
the DVD video camera/recorder to PC.
—
Make sure the PC connection cable is completely plugged into
this DVD video camera/recorder. —
Error occurs in playback
of DVD video camera/
recorder on PC.
If error occurs with USB connection, the transfer rate is not
sufficient. It is recommended that you use a USB terminal
conforming to USB2.0 when connecting the DVD video camera/
recorder.
123
Application is not
normally run on PC.
Turn the PC and DVD video camera/recorder off, and try again. —
Symptom Cause and Correction Reference
page
1/ 6A l l
s c e n e s
PLAY
PHO TO
SELECT
Fig. 1*

157
*1“60x” will appear on DZ-HS401.
*2Not displayed on DZ-HS401.
•Some items will not appear depending on the disc or card inserted.
Major Specifications
Initial Setup Beep On p. 36
Power Save Off p. 36
Record LED On p. 37
Language 日本語 (Japanese) p. 35
Demo Mode Auto p. 37
CCD DZ-HS403: 1/3-inch interlaced
DZ-HS401: 1/5-inch interlaced
Total number of pixels
DZ-HS403 approx. 3,310,000
DZ-HS401 approx. 1,330,000
Number of effective pixels
DZ-HS403 Movie: approx. 2,180,000
Movie: approx. 1,640,000 (in wide mode)
Still: approx. 3,050,000
DZ-HS401 Movie: approx. 690,000
Still: approx. 1,100,000
Lens DZ-HS403: F1.8 – 3.0
f = 6.1 – 61 mm
Filter diameter: 37 mm
Thread pitch: 0.75 mm
DZ-HS401: F1.2 – 2.8
f = 3.0 – 45 mm
Filter diameter: 30.5 mm
Thread pitch: 0.5 mm
Focus Auto/Manual
Zoom Optical 10× (DZ-HS403),
Optical 15× (DZ-HS401),
40× – 240× (DZ-HS403), 60×–500× (DZ-HS401) with digital zoom
added, 40× (DZ-HS403), 60× (DZ-HS401) for still
Required minimum illumination 24 l× in Auto mode (1/30)
1 l× in Low Light mode (1/4)
Viewfinder 0.2-inch color TFT (equivalent to approx. 200,000 pixels)
LCD monitor 2.7-inch color TFT (approx. 120,000 pixels)
Electronic image stabilizer Electronic type
Shutter speed 1/4 – 1/4000 seconds (movie)
Self-timer recording Still recording only
External microphone jack ø3.5 mm stereo mini-jack (a plug-in power type microphone cannot be
used)
Item Default Setting
method

159
STORAGE CAPACITY OF HDD/DVD/CARD
Recordable Time On HDD*1
Recordable Time On Disc
Movie recordable time on one disc (on single side) (when recording only movies)
Note:
•If you record in XTRA mode at high temperatures, the DVD video camera/recorder will heat up and the maximum
transfer rate will be limited to approx. 6 Mbps, so the best quality will not be obtainable.
Maximum Number of Scenes that Can Be Recorded/Dubbed on HDD/One Disc
Maximum Number of Programs that Can Be Recorded/Dubbed on HDD/One Disc
Total weight when recording DZ-HS403 approx. 560 g (When using the battery pack DZ-
BP14S)
DZ-HS401 approx. 510 g (When using the battery pack DZ-
BP14S)
Provided accessories AC adapter/charger,
Battery,
AV/S input/output cable,
Infrared remote control, Lithium battery for remote control,
Lens cap, Lens cap string, Shoulder strap, Power cable,
DC power cord, Software CD-ROM, PC connection cable,
Disc cleaning cloth
Recording quality Movie recordable time Application
XTRA Approx. 110 min *1 Best quality
FINE Approx. 180 min *2 High quality
STD Approx. 360 min *3 Standard quality
Recording quality Movie recordable time Application
XTRA Approx. 18 min *1 Best quality
FINE Approx. 30 min *2 High quality
STD Approx. 60 min *3 Standard quality
*1: Variable bit recording (recording of more than 110 minutes on HDD or more than 18 minutes on disc may be
possible because the transfer rate varies automatically between approx. 3 - 10 Mbps)
*2: Fixed bit rate: Approx. 6 Mbps
*3: Fixed bit rate: Approx. 3 Mbps
Recording media Maximum number of scenes
HDD*1 999
DVD-RAM/DVD-RW *2 999
DVD-R*2 930
+RW*2 254
*1: Recording only
*2: Per disc (one side)
Recording media Maximum number of programs
HDD*1 99
DVD-RAM/DVD-RW *2 99
+RW*2 49
*1: Recording only
*2: Per disc (one side)

163
Be sure to read the following before opening
the package of CD-ROM
This Agreement will take effect at the moment you open the package of the storage device (CD-ROM) provided
with this product, if you agree to the terms herein.
If you do not accept the terms of this Agreement, immediately return the unopened package of storage medium
and enclosed materials (printed matter, external package, and all others) to your dealer, or return only the package
of storage medium to your dealer.
Consult your dealer for any refund on the unused product. However, if only the package of storage medium is
returned, no refund is possible.
This License Agreement certifies that you were granted license in the past.
License Agreement
■Grant of License
• Hitachi, Ltd. nonexclusively grants you the right to install this program in one computer and use it, but this right
cannot be transferred to a third party.
• You can duplicate one copy of this program in a form readable on computer, but only for the purpose of backup,
and under the condition that the display concerning the copyright remains in the original status.
■Prohibition
• This program may not be used on network. If you wish to use it for multiple computers on network, you must
obtain the right of use for each computer from Pixela Corporation.
• You may not let any third party use this program by granting reuse, transfer, lease, lending, etc.
• You may not modify, alter, decompile or deassemble all, or any part, of this program or its accessories. And you
may not allow any third party do so.
■Termination of Agreement
If you duplicate this program and its accessories without permission, or fail to comply with the above granting
conditions, this agreement will automatically be terminated. In addition, Pixela Corporation may take legal action.
When the agreement is terminated, you will be obliged to discard this program, its accessories and all duplicates, or
return them to Pixela Corporation.
■Guarantee and Immunity
This program and its accessories shall not, explicitly or implicitly, conform to the merchantability or compatibility
for your specific purpose of use. Pixela Corporation does not guarantee that the functions of this program will meet
your needs or this program will be free from interruption or error during its operation.
Under no circumstances will Pixela Corporation accept any responsibility for any direct or indirect losses or
damages you may incur from using this program or activities relating to its use, or for any conflict occurring
between you and a third party originating from, or relevant to, use of this program.
Produktspezifikationen
| Marke: | Hitachi |
| Kategorie: | Camcorder |
| Modell: | DZ-HS401 |
Brauchst du Hilfe?
Wenn Sie Hilfe mit Hitachi DZ-HS401 benötigen, stellen Sie unten eine Frage und andere Benutzer werden Ihnen antworten
Bedienungsanleitung Camcorder Hitachi

8 Oktober 2024
19 September 2024
13 August 2024
9 August 2024
5 August 2024
4 August 2024
3 August 2024
3 August 2024
2 August 2024
2 August 2024
Bedienungsanleitung Camcorder
- Camcorder Samsung
- Camcorder 3M
- Camcorder Sanyo
- Camcorder BenQ
- Camcorder Gembird
- Camcorder Genius
- Camcorder Hama
- Camcorder HP
- Camcorder Lexibook
- Camcorder Macally
- Camcorder Medion
- Camcorder Nedis
- Camcorder Philips
- Camcorder SilverCrest
- Camcorder Sony
- Camcorder T'nB
- Camcorder Trust
- Camcorder Panasonic
- Camcorder OK
- Camcorder Canon
- Camcorder Linksys
- Camcorder Maginon
- Camcorder Bresser
- Camcorder Denver
- Camcorder Intenso
- Camcorder König
- Camcorder National Geographic
- Camcorder Renkforce
- Camcorder Trevi
- Camcorder Braun
- Camcorder Kenwood
- Camcorder Sharp
- Camcorder Pyle
- Camcorder Salora
- Camcorder Aiptek
- Camcorder Coby
- Camcorder Lenco
- Camcorder Mpman
- Camcorder Nilox
- Camcorder Polaroid
- Camcorder Jay-Tech
- Camcorder JVC
- Camcorder Xiaomi
- Camcorder Hyundai
- Camcorder Toshiba
- Camcorder Olympus
- Camcorder Zoom
- Camcorder Garmin
- Camcorder GOCLEVER
- Camcorder Lamax
- Camcorder Prixton
- Camcorder Mio
- Camcorder Sencor
- Camcorder ViewSonic
- Camcorder Marshall
- Camcorder Nikkei
- Camcorder Samson
- Camcorder SBS
- Camcorder Fujifilm
- Camcorder MINOX
- Camcorder Nikon
- Camcorder Ricoh
- Camcorder DJI
- Camcorder Dragon Touch
- Camcorder EnVivo
- Camcorder Midland
- Camcorder Vtech
- Camcorder Kodak
- Camcorder Agfa
- Camcorder Easypix
- Camcorder Konica-Minolta
- Camcorder Leica
- Camcorder Minolta
- Camcorder Praktica
- Camcorder Rollei
- Camcorder SeaLife
- Camcorder Traveler
- Camcorder IGet
- Camcorder Contax
- Camcorder Mamiya
- Camcorder Voigtländer
- Camcorder Yashica
- Camcorder Bauer
- Camcorder Overmax
- Camcorder Airis
- Camcorder Akaso
- Camcorder Uniden
- Camcorder Kitvision
- Camcorder Kogan
- Camcorder Elmo
- Camcorder Energy Sistem
- Camcorder Jobo
- Camcorder Soundmaster
- Camcorder Bolex
- Camcorder Magellan
- Camcorder TomTom
- Camcorder Kyocera
- Camcorder Cobra
- Camcorder AEE
- Camcorder CamOne
- Camcorder Contour
- Camcorder EVOLVEO
- Camcorder GoPro
- Camcorder Quintezz
- Camcorder ION
- Camcorder DNT
- Camcorder Insignia
- Camcorder Swann
- Camcorder DataVideo
- Camcorder Aida
- Camcorder Prestigio
- Camcorder Mediacom
- Camcorder Tracer
- Camcorder Cisco
- Camcorder RCA
- Camcorder ARRI
- Camcorder Transcend
- Camcorder Oregon Scientific
- Camcorder Blackmagic Design
- Camcorder Insta360
- Camcorder Zorki
- Camcorder DOD
- Camcorder Drift
- Camcorder Ematic
- Camcorder FHD 1080P
- Camcorder Flip
- Camcorder ISAW
- Camcorder Leotec
- Camcorder MMTC
- Camcorder Mobius
- Camcorder Naxa
- Camcorder Replay
- Camcorder Sakar
- Camcorder SJCAM
- Camcorder Spypoint
- Camcorder Storex
- Camcorder TacTic
- Camcorder Veho
- Camcorder Vivitar
- Camcorder YI
- Camcorder Zagg
- Camcorder Best Buy
- Camcorder AgfaPhoto
- Camcorder Vupoint Solutions
- Camcorder Kaiser Baas
- Camcorder Microtek
- Camcorder Runcam
- Camcorder Activeon
- Camcorder BlackVue
- Camcorder Braun Phototechnik
- Camcorder Hamlet
- Camcorder RSC
- Camcorder Kobian
- Camcorder Hamilton Buhl
- Camcorder Contour Design
- Camcorder Curve
- Camcorder Beaulieu
- Camcorder Qoltec
- Camcorder Stealth Cam
- Camcorder DXG
- Camcorder ATN
- Camcorder Whistler
- Camcorder Aqua-Vu
Neueste Bedienungsanleitung für -Kategorien-

25 November 2024
25 November 2024
12 Oktober 2024

12 Oktober 2024

7 Oktober 2024
3 Oktober 2024
28 September 2024
24 September 2024

23 September 2024
23 September 2024