Hitachi 42PD8700C Bedienungsanleitung
Lesen Sie kostenlos die 📖 deutsche Bedienungsanleitung für Hitachi 42PD8700C (47 Seiten) in der Kategorie Fernsehen. Dieser Bedienungsanleitung war für 9 Personen hilfreich und wurde von 2 Benutzern mit durchschnittlich 4.5 Sternen bewertet
Seite 1/47

GB
D
F
I
Instructions for use
Bedienungsanleitung
Notice d'utilisation
Istruzioni per l'uso
42PD8700C

- 1 -
Contents
Remote Control Buttons ......................... 2
PLASMA TV .............................................3
Preparation .............................................5
Fe atures ...............................................5
Panel Features .....................................5
Safety Precautions .................................5
Before Sw itching On Your TV .................8
Power Connection ................................ 8
Connections To The Aerial Input Socket ... 8
How To Connect Other Devices ........... 8
Inserting Batteries In The Remote
Cont rol Handset ...................................8
Switching The TV ON/OFF ....................... 8
To switch the TV on: .............................. 8
To switch the TV off: .............................. 8
Initial Settings .........................................9
Operating The TV .................................. 10
Operating with the buttons on the
TV set ..................................................10
Operating With Remote Control ......... 10
Everyday Operation .............................. 11
Informati o n Banner ................. ........... 11
ELECTRONIC PROGRAMME GUIDE. 11
Displaying The Subtitles ....................12
Teletext................................................ 12
IDTV Menu System................................ 12
Channe l List ........ ........................... ....12
In s t allation ..........................................15
Configuration ...................................... 17
Timers ................................................ 19
TV Setup .............................................20
Common Inter face ......... ................ .... 20
Analogue TV Menu System .................. 21
Picture menu ...................................... 21
Soun d men u .......................................2 2
Feature menu .....................................24
Install menu .......................................25
Program men u ........................... ........26
Source menu ...................................... 27
PC Mode ................................................27
In s t allation ..........................................27
Menu System in PC mode ................. 27
PC Picture Position Menu ..................27
PC Picture Menu ................................. 28
Sound Menu .......................................28
Feature Menu .....................................28
Source Menu ......................................28
Sound in PC mode ............................. 28
Other Features ......................................29
TV Status.............................................29
Mute Indicator ..................................... 29
PIP and PAP m odes .................. ......... 29
Freeze Picture..................................... 29
Zoom Modes ......................................29
Teletext .................................................. 30
To Operate Teletext............................. 30
To Select A Page Of Teletext ...............30
To Select Index Page ..........................30
To Select Teletex t With A TV Programme . 30
To Reveal “Concealed” Information ...31
To Select A Subcode Page .................31
To Exit Teletext ....................................31
To Display The Time ..........................31
Fastext ................................................ 31
Connect Peripheral Equipment ............32
High Defi niti on ......................... ...........32
Via The Scart ......................................32
Via Aerial Input ....................................32
Decoder.............................................. 32
TV And Video Recorder ....................... 32
Playback NTSC ..................................32
Copy Facility ....................................... 32
Search For And Store The Test Signal
Of The Video Recorder ....................... 32
Camera And Camcorder ....................33
Connect The Decoder To The Video
Recorder.............................................33
Connecting Headphones .......... ......... 33
Conn ecting Subwoof e r....................... 33
Aerial Connection ................................. 34
Tips ........................................................35
Specifications .......................................36
Appendix A: PC Input Typical Display
Modes .................................................... 37
Appendix B: DVD Player Selection .......38
Appendix C: DVD Play er Selection
(continued) ............................................ 39
Appendix D: Main and PIP-PAP Picture
Combinations ........................................40
UK Guarantee ........................................41
- 2 -
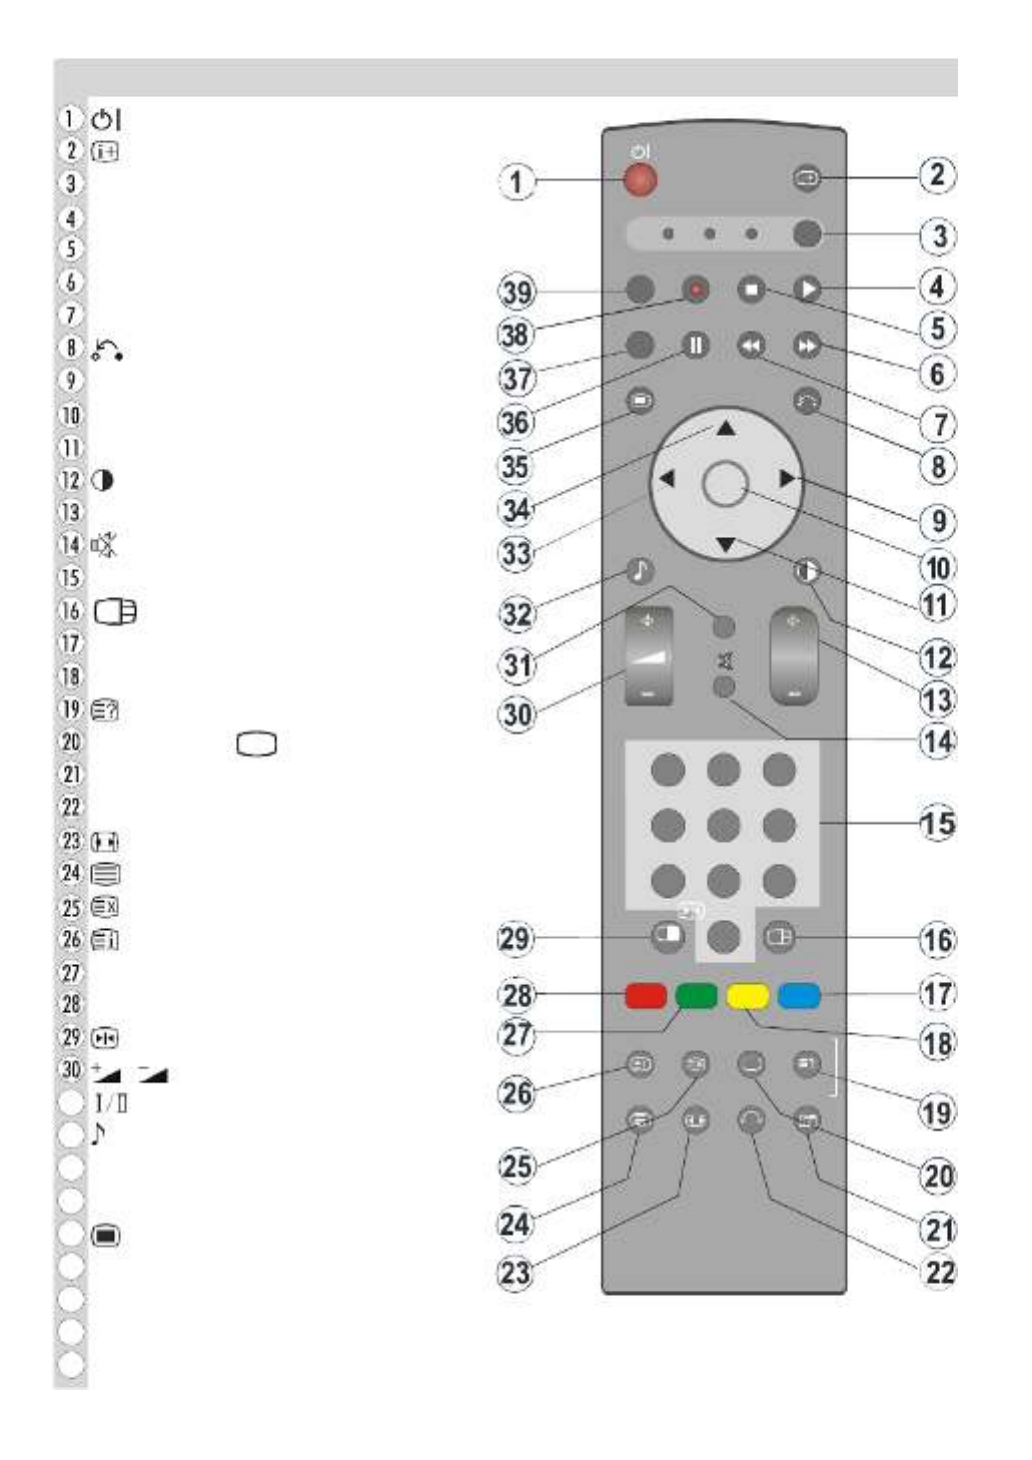
Remote Control Buttons
TV
DTT/TV
I/II
S.MODE
GUIDE
SWIVEL PHOTO
AV1
AV5
AV2
RGB1
AV3
RGB2
DVD SAT
P.MODE
S
LIDE SHO W-R OTATE
AV4
MENU
S
EL
OK
P
1
2
3
4
5
6
7
8
9
0
2
-4- 12
...
= S tand by On/Offf
= Program Information
SEL= Select TV/ DVD /SATT
AV3 = AV3 mode
AV2 = AV2 mode
RGB2 = No Function
RGB1= PC mode
= Go back to previous menu
`
= Cursor Right
OK = Ent er
b
=Cursor Down
= Picture Mode
P+/ - = Programme Up/ Down
= Mute On/Off
0 - 9 = Digit buttons
= PIP / PAP / TVTV
BLUE = Only used in Teletext mode
YELLOW = Only used in Teletext mode
= Reveal
SLIDE SHOW/ .... = No function/ Subtitle
PHOTO = No Function
SWIVEL= No Function
= Aspect ratio
= Teletex t On/Offf
= Time
= Guide for DT T/ Index Pag efor TV
GREEN = Only used in Teletext mode
RED = PAT (Picture and Text)
= Freeze On/O ff
/ = Volume Up/ Down
3
1
= M ono/Stereo - Dual A-B
3
2
= Equalizer Sound M ode
3
3
_
= Cursor Left
3
4
a
= Cursor Up
3
5
= Menu On/Off
3
6
AV5 =AV5 mode
3
7
AV4 = AV4 mode
3
8
AV1 = AV1 mode
3
9
DTT/T V = Selector button for Digital/Analogue mode
- 3 -
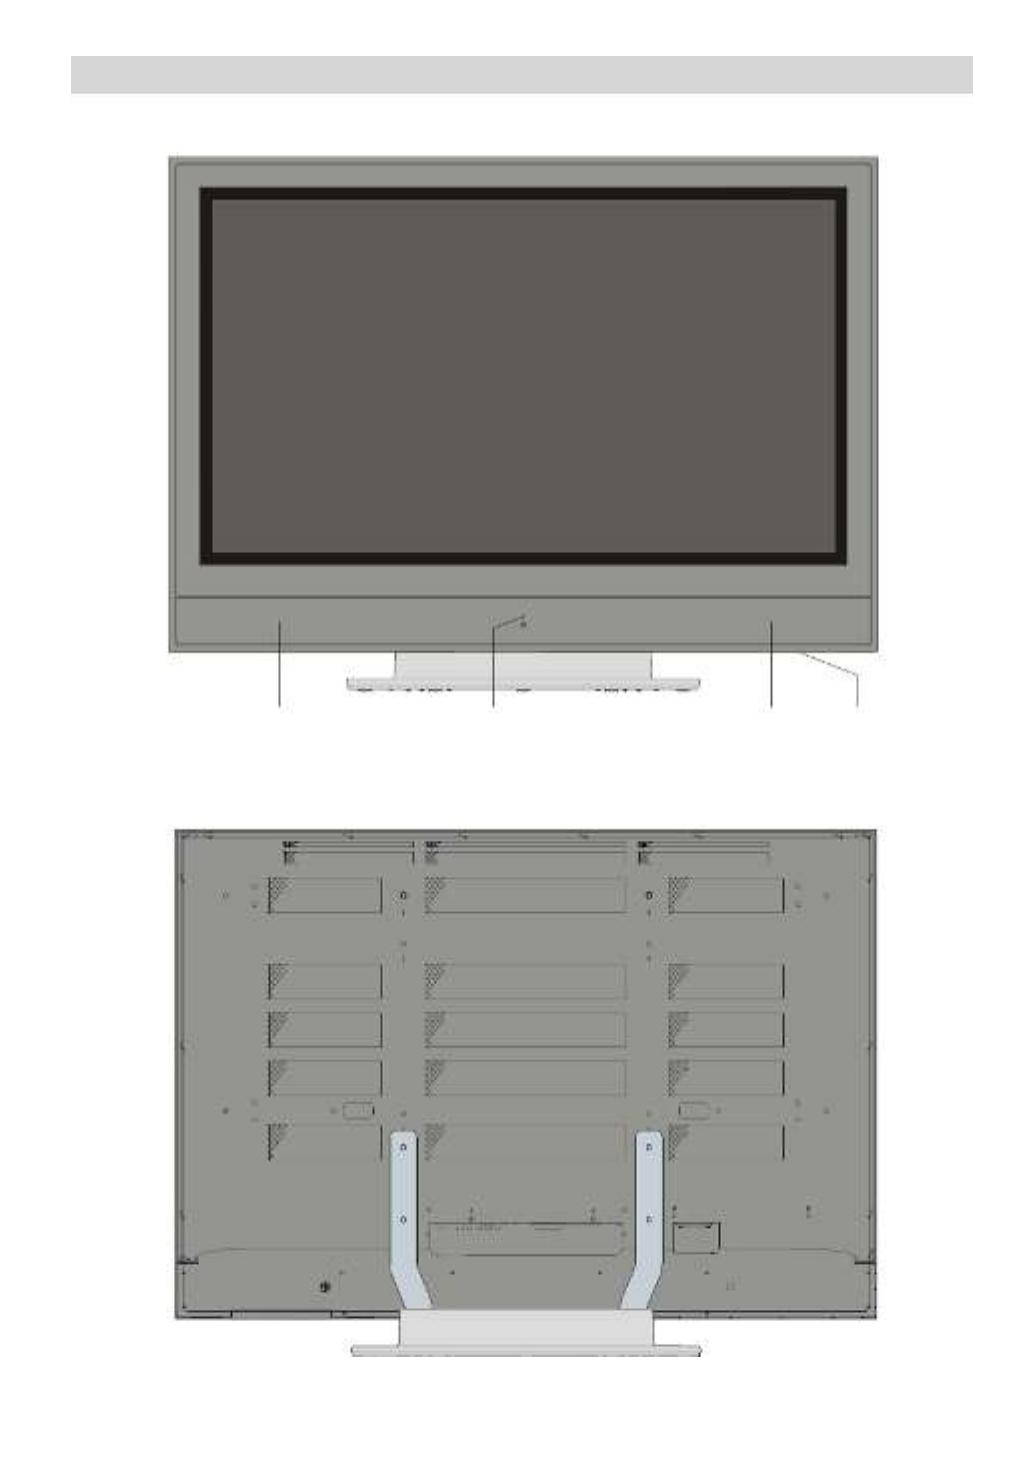
PLASMATV
FRONT VIEW
REAR VIEW
O
N/OFF
S
WITCH
LEDSPEAKER SPEAKER

- 4 -
On/Off switch
Volume Up, Volume Down buttons
Prog. Up, Prog. Down buttons
M E N U button
TV/AV button
Power cord input
S-VHS Input
Video Input
Audio Inputs
Headphone
Audio Line Outs
Subwoofer Out
PC Audio Input
Aerial
Scart 2 (AV-2)
Scart 1 (AV-1)
HDM I Input (AV-5)
Component Audio Inputss
Component Video (Y PbPr) Inputs
VGA Input
CI Slot
AV-4
AV-3

- 5 -
Preparation
For ventilation, leave a space of at least 10
cm free all around the set. To prevent any
fault and unsafe situations, please do not
place any objects on top of the set.
Use t his apparatus in tropical and/or moder-
ate climates.
Features
• Remote controlled colour television.
• Fully integrat ed Digital TV (DVB- T )
• 100 pr ogrammes f rom VHF, UHF bands or
cable channels can be preset.
• It can tune cable channels.
• Controlling the TV is very easy by its menu
driven system.
• It has 2 Scart sockets for external devices
(such as video, video games, audio set,
etc.)
• 3DS Virtual Surround Sound
• Stereo sound system (German+Nicam).
• Full function Teletext .
Fastext (1000 Pages), TOP text.
• Headphone connection.
• Direct channel access.
• A.P.S. (Automatic Programming System).
• All programmes can be named.
• Forward or backward automatic tuning.
• Sleep timer.
• Child Lock.
• Automatic sound mute when no transmis-
sion.
• NTS C Playback.
• AV in and S-VHS in are avail abl e.
• It has VGA connector for external devices
such as computer.
• It has an HDMI connector for Digital Video
and Audio. This con nection is also de-
signed to accept High Definition s ignals.
• It has PIP / PAP / PAT functions.
• AVL (Automatic Volume Limiting)
• TV Picture in PC
• When no valid signal is detected, after 5
minutes the TV switches itself automatically
to stand-by mode.
• PLL (Channel Search)
• PC Input (Supp ort up to SX G A 1280 x 1024)
• Stereo PC Audio Input
• Plug& Pl ay for Windows 9X , ME, 2000, XP
• 3D Comb Filter
• Audio Line Out
Panel Features
• 42- inch PLA S MA display.
• High resolution (1024x1080)
• Contrast ratio (4000:1 typical)
• Brightness (typical) 1400 cd/m2.
• Display colour 16.77 Million.
SafetyP recautions
Plea se re ad th e following recom me nd ed
safety precautions carefully for your safety
IMPORTA NT SA FETY
INFOR MATION ON OPERATING
YOUR TV
Do’s and Don’ts
DO’s
This Television has been designed and manu-
fact u r e d to meet international s afety stand ards,
but like any electrical equipment, care must be
taken if you are to obtain the best results and
safety is to be assured.
DO read the operating instructions before you
attempt to use the equipment.
DO consult your dealer if you are in any doubt
about installation, operation or safety of your
equipment.
DO be ca reful with glass panels or doo rs on
equipment.
This TV is supplied with a fitted mains plug.
This plug must not be cut off as it may contain
a speci al radio interference f ilter , the removal
of which could lead to impaired performance.
If youwish to ex tend the lead, obtain an appro-

- 6 -
priate safety approved extension lead or con-
sult your dealer .
Observe the manufacturers instructions when
connecting extension leads to the TV. Check
the fuse rating on the new plug, this should be
fitted with a 5 Amp fuse which conforms to ei-
ther ASTA or BSI (BS1 362) approvals, these
are easily identifiable by either the or
symbols. If you are in any doubt about the in-
stallation of an ex tension lead, please consult
a competent electrician.
DON’Ts
DON’T continue to opera te the equipment if
you are in any doubt about it working normally,
or if it is damaged in any way switch off, with-
draw the mains plug and consult your dealer.
DON’T place water filled vessels on top of T.V.
cabinet s.
DON’T remove any fixed cover as this may ex-
pose dangerous voltages.
DON’T leav e equipment switched on when it is
unattended unless it is specifically stated that
it is designed for unattended operation or has
a stand-by mode. Switch off using the switch
on the equipment and make sure your family
kno w how to do this. Specia l arran gements
may need to be made for infirm or handi-
capped people.
DON’T use equipment such as personal ste-
reos or radios so that you are distracted from
the requirements of traffic safety. It is illegal to
watch television whilst driving.
DON’T obstr uct the venti lat ion of the equipmen t,
for example with curtains or soft furnishings.
Overheating will cause damage and shorten
the life of the equipment.
DON’T use makeshift stands and NEVER fix
legs or stands to the TV with any screws other
than those provided - to ensure complete safety
alway s use the manufacturers approved stand
with the fixings provided.
DON’T allow electrical e quipment to be ex-
posed to rain or moisture.
ABOVE ALL
• NEVER let anyone, especially children
push anything into holes, slots or any
other opening in the case - this could re-
sult in a fatal electric shoc k.
•NEVER guess or take chances with elec-
trical equipment of any kind - it is better to
be safe than sorry!
1. P ower Source
The set should be operated only from a 220-
240V AC, 50 Hz. outlet. Ensure you select
the corr ect voltage setting for your con ve -
nience.
2. Power Cord
Do not place the set, a piece of furniture,etc.
on the power cord(mains lead) or pinch the
cord.Handle the power cord by the plug.Do
not pull out the plug by tugging the cord and
never touch the power cord when your
hands are wet as this could cau se a short
circuit or electric shock.Never make a knot in
the cord or tie it with other cord.The power
cord should be pl aced in such a way that
they are not likely to be stepped on.
A da maged power cord c an cau se fire or
give you an electric shock. When it is dam-
aged and need to be changed, it should be
done by qualified personel.
3. Moisture and Water
Do not use this equipment in a humid and
damp place (avoid the bathroom, the sink in
the kitchen, and near the washing machine).
Do not expose this equipment to rain or wa-
ter, as this may be dangerous and do not
place obj ects fille d with liquid s,such as
flower vases on top o f the set. Avoid f rom
dripping or splashing.
If any solid object or liquid falls into the cabi-
net, unplug the set and have it checked by
qualified perso nnel before operating it any
further.
4. Cleaning
Before cleaning, unplug the set from the w all
outlet. Do not use liquid or aerosol cleaners.
Use soft and dry cloth.

- 7 -
5. Ventilation
The slots and openings on the back cover
are intended for ventilation and to ensure re-
liable operation. To prevent overheating,
these openings must not be blocked or cov-
ered in anyway .
6. Heat and Flames
The set should not be placed near to naked
flames and sources of intense heat,such as
an electric heater. Ensure that no naked
flame sources, such as lighted candles, are
placed on top of the set.
7. Lightning
In case of storm and lightning or when go-
ing on holiday, disconnect the power cord
from the wall outlet.
8. Replacement Part s
When replacement parts are required, be sure
the service technician has used replacement
parts which are specified by the manufacturer
or have the same specifications as the origi-
nal one. Unauthorised substitutions may re-
sult in fire, electrical shock, or other hazards.
9 . Serv icing
Pl ease refer all servicing to q ualified per-
sonnel. Do not remove the cover yourself as
this may result in an electric shock.
Instructi ons for waste disposal:
• Packaging and p ackagi ng aids are r ecy-
clable an d shoul d princ ipally be recycle d.
Packaging materials, such as foil bag, must
be kept away from children.
• Battery, including those which is heavy
metal-free, should not be disposed of with
household waste. Please dispose of used
battery in an environmentally sound man-
n er. Find o ut ab out t he l egal re gulat ions
which apply in your area.
• The mains plug is used to disconnec t the TV
from the mains and therefore it shall remain
readily operable.
Warning: To prevent injury, this device must
be securely attached to the floor/wall in ac-
cordance with the installation instrutions.
“The Plas ma TV is a v ery hi gh t echolo gy
product giving you fine picture details. Occa-
sionally, a few non-active pixels may remain
still on the screen. Long-time unmoving still
pictures may cause permanent shade effect
on the screen and even the picture has been
changed, its in flu ence lasts a s ghost pi c-
ture. This ghost effect may disturb the user
even though it will diminish in the course of
time. To prevent this, don't leave still pictures
for example teletext pages or frozen pictures
on the screen for a long time. Please note
that this does not affect the performance of
your product.”
“DO NOT LEAVE YOUR TV AT STAND-BY
OR OPERATING WHEN YOU LEAVE YOUR
HOUSE”
S
urel
y
connect
t
he
g
round wire.
Be sure to ground the connection properly.
Connect the ground terminal o f the AC inlet of this display with the
ground terminal provided
at the power outlet using the enclosed power cord. If the provided plug
does not fit your outlet, consult an electrician for replacement of the
obsolete outlet.

- 8 -
Before Switching On Your TV
Power Connection
IMPORTANT: The T V set is designed to op-
erate on 220-240 V A C, 50 Hz.
• After unpacking, allow the T V set to reach the
ambient room temperature before you con-
nect the set to the mains.
Connections To The A erial Input
Socket
VHF/UHF
7
5
:
REAR OF THE TV
CABLE TV
• Connect the aerial or cable TV plug to the
Aerial input socket located at the rear of the
TV a nd connect the cabl e plug comi ng out
from the TV out soc ket loc ated on the de-
vices (VCR, DVB-T etc .) to this socke t as
well.
How To Connect Other Dev ices
IMPORTANT: Switch off the TV before con-
necting any external device.
Sockets for external connections are at the
rear side of the TV. For connection of other
devices via Scart refer to the manuals of the
related devices.
Inserting Batteries In The Remote
Control Handset
• Remove the battery cover located on the
back of the handset by gently pulling down-
wards from the indicated part.
• Ins ert two AA/R6 or equivalent type batteries
inside. Place the batteries in the right direc-
tions.
• Replace the battery cove r.
NOTE: Remove the batteries from remote
control handset when it is not to be used for
a long period.Otherwise it can be damaged
due to any leakage of batteries.battery
leakage.
Switching The TV ON/OFF
To switch the TV on:
Your TV will switch on in two steps:
1- Connect the power supply cord to the sys-
tem. Press On/Off switch “ ” on the TV..
Then the TV switches itself to stand-by mode
and the led on the front of the TV becomes
Red.
2- To switch on the TV from stand-by mode
either:
Press a digit button on the remote control so
that a programme number is selected,or,
Press the P/CH+ or P/CH- button on the TV
or press the “P-” or “P+” button on the re-
mote control, so that last mode switched off
is selected.
By either method the TV will switch on and
the led becomes green.
T o switch the TV off:
• Press the “ (stand-by)” b utton on th e re-
mote control, so the TV will switch to stand-
by mode and the GREEN LED will become
RED.
To po wer d own the TV comp let e l y, pre ss
Stand by/operate switch “ ”,
or,
Unplug the power cord from the mains
socket.
- 9 -
Initial Settings
When the T V is turned on for the first time,
IDTV is on first. Because this is the first time
that IDTV has been used, there are no chan-
nels stored in the memory.
When the TV is turned on for the first time,
the menu for the language selection ap-
pears on the screen. The message “Wel-
come please select your language!” is
written in all language options sequentially
in the menu on the screen.
By pressing or buttons highlight the
language you want to set and press “OK”
button. In the menu “Set Language” is writ-
ten next to “OK” item to indicate that “Press
OK button to set the highlighted language
option.”
You can get information about the menu us-
age by pressing “ ” button. And press “ ”
button again to exit the help menu.
After pressing OK, the First time Installation
Menu will appear on screen.Press or
buttons, select country item you want to set
and press “OK” button
First time installation
Choose Country
Set country and continue installation
OK
G
ERMANY
After the First time Installation is set, the fol-
lowing message appears on the screen.
Do you want to start automatic search?
Yes No
• To start automatic search, select “Yes”, to
cancel select “No”.
• To select an option or highlight“Yes No”,
the i tem by using or b utton s an d
press “OK” button.
The IDT V will automatically tune to the VHF
and UHF transmission channels looking for
digital terrestrial.
TV broadcasts and display ing the names of
channels found. This process will take
about five minutes. To cancel searching, you
can press “ ” button at any time during the
process.
MENU
Codec 4:3
Codec 16:9
S
earching UHF channels 62. Please wait. This will take a few minutes
Cancel searching
Automatic Search
After Automatic Search process is com-
pleted, the following message asking for
anal ogue ch an nel sea rc h appea rs on the
screen. TV switches to the analogue TV
mode.
Yes
Do you want to search for
analogue channels?
No
Press the “OK” button to search for ana-
logue chan nels. The fol lowing menu ap-
pears on the scre en for analog ue c hannel
search.
Language
U
K
PLEASE CHECK ANTENN A CABL E
OK
C
ancel
AUTO PROGRAM
AUTO. PROGRAMMING SYSTEM
Country
E
n
g
lish
In initial aps menu:
Press the BLUE button to cancel APS if you
do not wan t to delete y o u r ex i s ting
programme list.
To continue APS, firs t select the language
and cou ntry by pressing
_
/
`
button and
then press the RED or “OK” button.
During initial aps the following message ap-
pears on the screen.
- 10 -
APS is running...
UK - I 055,25 Mhz
C
ancel
After initial aps is finalized, a programme list
will appear on the screen. In the programme
list you will see the programme numbers
and names assigned to the programmes.
PROGRAM
01 BBC1
02 BBC2
03 ITV
04 CH4
05 CH5
06 C - 06
07 C - 08
08 C - 21
09 C - 23
10 C - 35
11 C - 43
12 C - 64
13 C - 68
14 S - 40
15 -----
16 - - - - -
17 - - - - -
18 - - - - -
19 - - - - -
20 - - - - -
N
ame
I
nsert
Delete APS
If you do not accept the locations and / or the
programme names , you can change them
in Program menu. For details see Program
menu on page 26.
To display channel list in IDTV, sw itch to the
IDTV via pressin g the “DTT/TV” button. Then
press the “ ” butt on to enter main menu,
Channel List will be highlighted. Press the
OK button to enter the menu.
Operating The TV
You can operate your TV using both the re-
mote control handset and the buttons on the
set.
Operating with the buttons on the
TV set
Volume setting and programme selection
can be made by using the buttons on the
control panel at the bottom of the TV.
Volume Setting
Press the “- ” button to decrease volume
or the “ +” button to increase volume. A
volume level scale (slider) will be displayed
at the bottom of the screen.
Programme Selecting
Press the “ ” bu tton to select the next
programme or the “ ” button to select the
previous programme.
Entering The Menu
Pres s th e “MENU” button on the control
panel at the bottom of the TV to enter the
menu.
“/ ” and “ + - ”/ buttons on the TV
are use d as navi gation butt o ns in menu .
AV Mode
Press the “AV” button on the control panel
at the bottom of the TV to switch your T V to
AV modes.
Operating With Remote Control
The remote control handset of your TV is de-
signed to control all the functions of your TV.
The functions will be described in accor-
dance with the menu system of your TV.
Functions of the menu system are de-
scribed in Menu System section.
Volume Setting
Press the button to increase volume.
Press the button to decrease volume. A
volume level scale (slider) will be displayed
at the bottom of the screen.
Programme Selecting (direct access):
Pres s dig it bu tto ns on the remot e con trol
handset to select programmes between 0
and 9 . The TV will switch to the selec t ed
programme after a short delay.
• For a two digit programme number enter the
second digit after pressing the first digit
within 2 seconds.

- 11 -
Every dayOperation
(DIGIT A LTELEVISION)
Pressing the “DTT/TV” button at any time
while watching television programmes will
switch the TV set between the digital terres-
trial television broadcasting and the ana-
logue broadcasting.
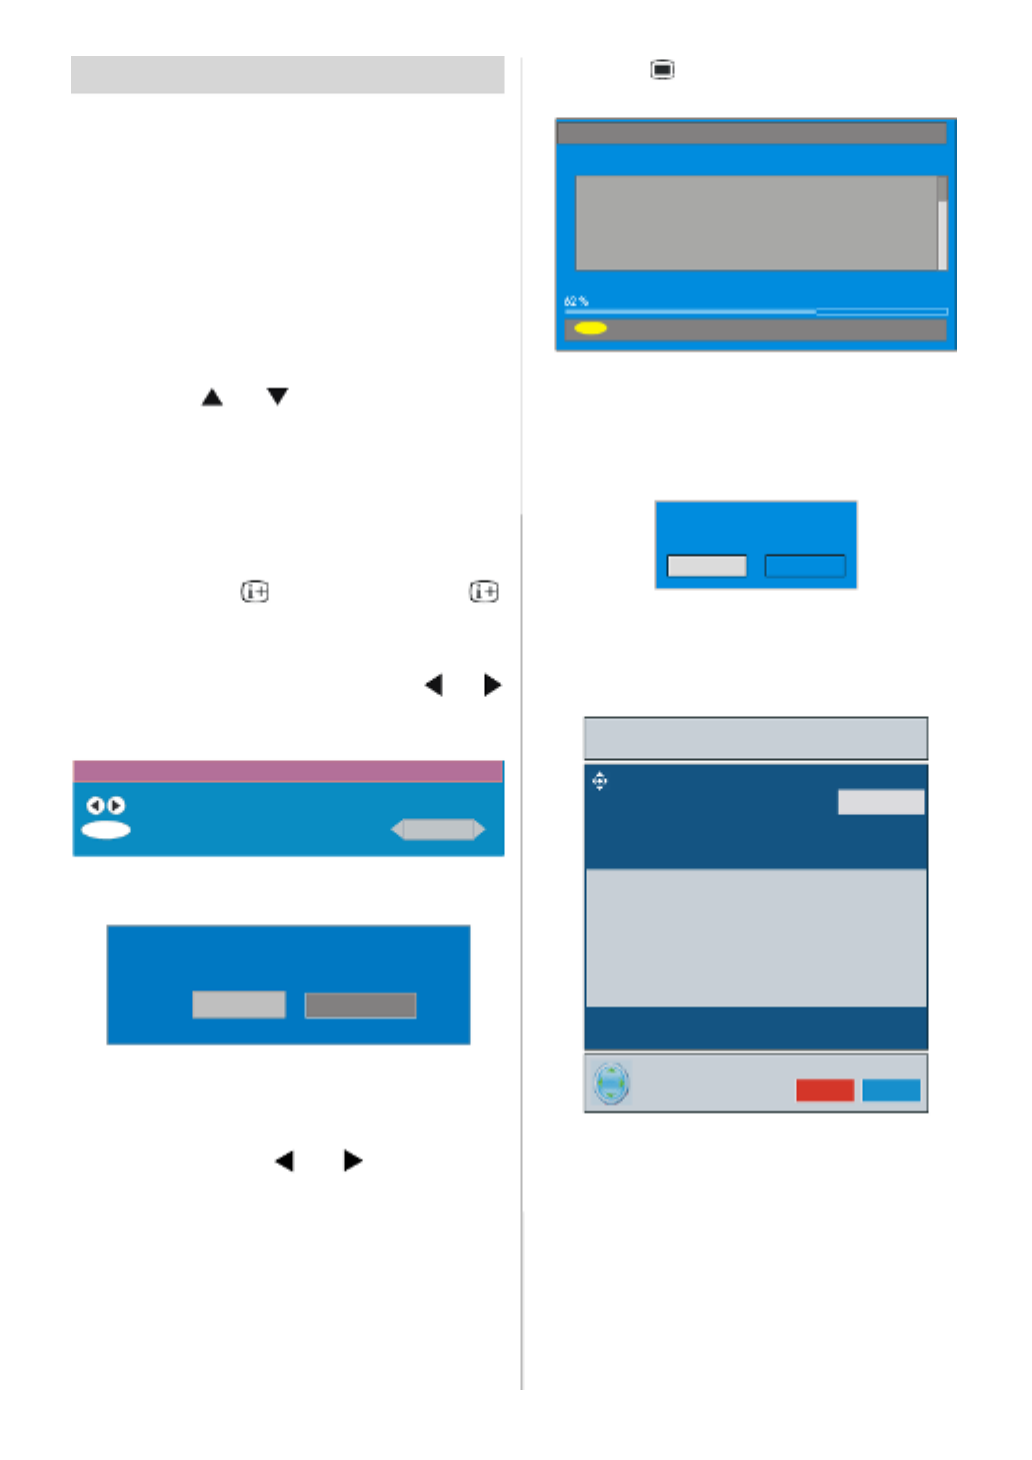
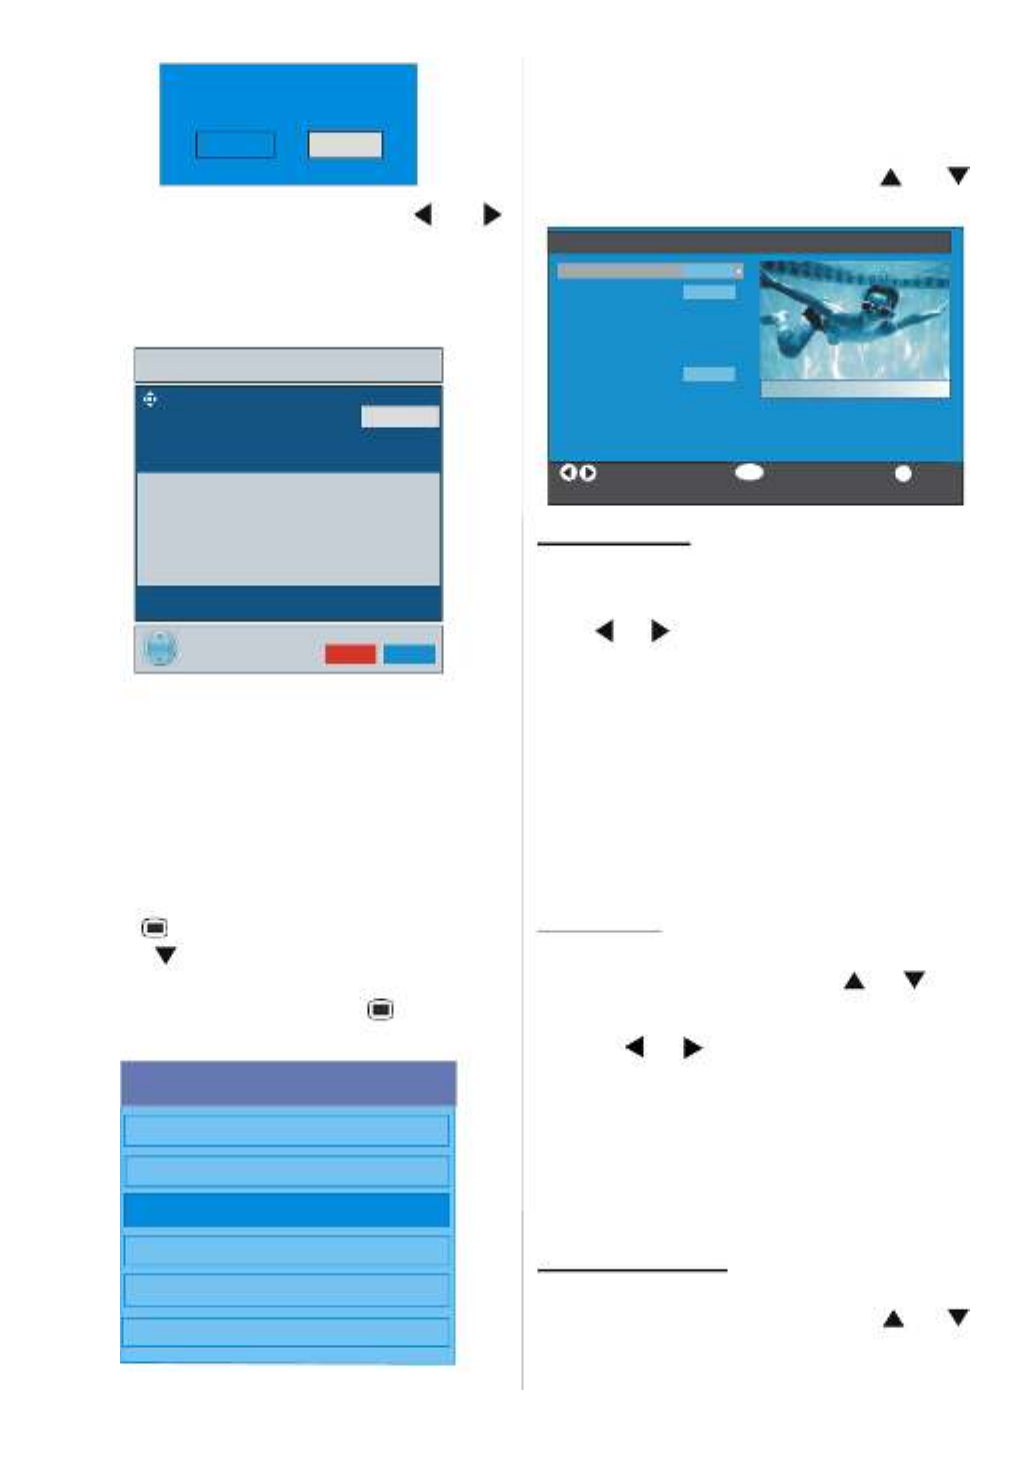
Information Banner
• Whenever you change the channel using
the “P +” or “P -” buttons or the number but-
tons, TV displays the channel picture along
with an information banner at the bottom of
the screen. This will rema in on the screen
for approx imately three seconds.
• The information banner can also be dis-
played by pressing the “ ” button at any
time while watching th e TV. Pressi ng the
“ ” button again removes the banner.
4 RTL 09:10
CH 48
Now: NEWS
N
ext: NEWS
Signal :
04:35-11:00
11:00-17:55
The infor mation banner giv es a number of
facts on the ch annel selected and the
programme on it:
• The name of the channel is displayed
along with its channel list number and an in-
dication of the strength of the signal received
on this channel.
• The current and next programme informa-
tion are given with the start and finish time.
• The current time information is displayed
along with channel name.
Hint
Not all channels broadcast the programme
data . If the name and t i m es o f t he
programme are not available then “No Infor-
mation Available” is displayed in the infor-
mation banner.
If the selected channel is locked, you must
enter the correct four digit key to view the
channel.
Enter Lock Key
ELECT RONIC PROGRAMME
GUIDE (EPG)
Some, but not all, channels send informa-
tion about t he cur rent a nd next events.
Pl eas e no te tha t event inf or mati on i s up-
dated automatically. If there is no event infor-
matio n d ata availab le f or ch annels , onl y
channel name with “No Information Avail-
able” banner is displayed.
• Press “ ” (GUIDE) button to view the EPG
menu.
• Press or buttons to navigate in Chan-
nels or Programmes.
• Press
or
buttons to navigate through
the channel and programme list.
• In EPG Menu, you can easily see the ex-
tended help information by pressing the
“ ” button and by pressing this button
again you can close this window.
News 10:00-11.00
1. ONE Commonwealth … Nachrighten
2. BBC TWO Driven Crazy Clifford The Big Red Dog
5. five The Chart Dawson’s Creek
Navigate Schedule Watch More
Electronic Pr ogramme Guid e Wed 31/7 09:13
1 ONE
O
K
5. FIVE The Chart Dawson’s Creek
• In the EPG Menu all channels are dis-
played. The current channel is highlighted
when you enter the EPG menu.Use or
buttons to change the channel. Also press
RED or GREEN buttons to make page up/
down scr oll fo r the ch annels . An d pr ess
“SELECT” button to watch the highlighted
channel.
• If you highlight an event, short event de-
scri ption, e xtended event description, s tart
and finish time of the event are displayed on
the screen.
• If you press “OK” button when a next event
is highlighted, a reminder is set for the high-
lighted prog ra mme and a clock icon ap-

- 12 -
pears across the highl ighted cha nnel line
as shown in the following EPG menu figure.
Programme reminders is set to signal that a
programme is about to start when you are
watchi ng a nother chan nel. I f you set r e-
minder to a progra mme, th en you will be
asked for switching to that channel when the
reminder time is reached.
News 10:00-11.00
1. ONE Commonwealth … Nachrighten
2
. BBC TWO Driven Craz
y
Clifford The Bi
g
Red Do
g
5. five The Chart Dawson’s Creek
Navigate Schedule Reminder More
Electronic Programme Guide Wed 31/7 09:13
1
RTL
OK
5. FIVE The Chart Dawson’s Creek
I
• By pressing the “BLUE” button you can
v i e w t h e e x te n d e d s c h e d u l e o f t h e
programmes.
• By pressing the “ ” button you can see
the detailed help information easily. And by
pressing “ ” button ag ain you can exit
Help menu.
By pressing the “BLU E” button, the following
EPG Menu appears on the screen.
1. BBC ONE
2. BBC TWO
5. Five
7. BBC Choice
11.DISCOVERY
15.BBC NEWS 24
17.BBCi
M
ore
A
dvance Da
y
Electronic Pro
g
ramme Guide
Wed 21/4 10:12
No Information Available
BBC ONE TUE 21/4, 20:00-22:00
Navigate Change Time
• By pressing “YELLOW /BLUE” button, you
can advance th e sch edule back ward / for-
ward of a d ay .
• By pressing RED or GREEN buttons you
can change the schedule time.
• If you press “ ” button you can see the
detailed help information easily. And by
pressing “ ” button again you can exit Help
menu.
Displa ying T he Subtitles
With Digital terrestrial broadcasting (DVB-T),
some programmes are broadcast with sub-
titles. Subtitles can be displayed when
watching these programmes.
•Whenever GREEN button is pressed, Sub-
title selection OSD will be displayed on the
screen. You can set Subtitles as ON or OFF.
For Subtitle Language options, refer to “Lan-
guage Settings” in the “Configuration Menu”
section.
TELETEXT
Use of teletext and and its functions are
identical to the analogue text system. Please
do refer to the “Analogue teletext” explana-
tions.
Note: When subtitles are set ON, teletextto
service cannot be used in the Digital Mode.
To enable teletext, set subtitles “OFF”.
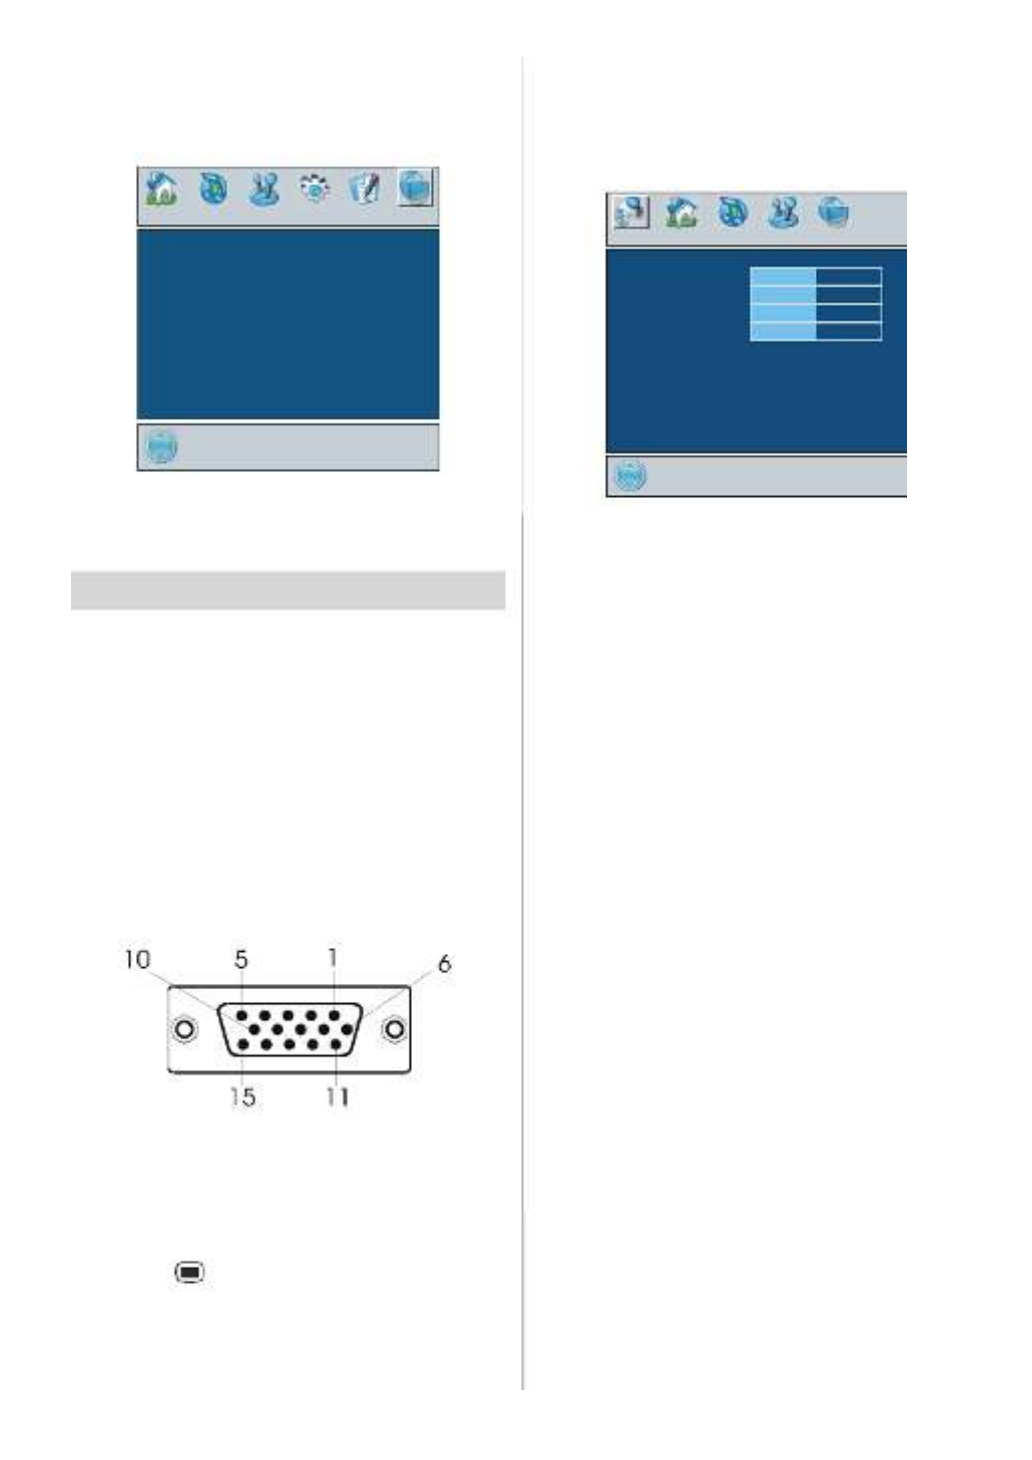
IDTVMenu Sy stem
The IDTV Menu can only be shown when
watching Digital terrestrial broadcasting.
Press the “DTT /T V ” button to turn the IDTV
on while TV is in the analogue mode.
1. Press MENU “ ” button.
The menu below appears on the screen:
Main Menu
Channel List
Installation
Configuration
Timers
TV Setup
Common Interface
Channel List
Using or buttons on the remote control
in Main menu, make sure that the first item,
Channel List, is highlighted and press the
“OK” button to display the Channel List.

- 14 -
• Press or buttons to highlight the de-
sired option.
• If “OK’’ button is pre ssed while “Yes” is
highlighted, the highlighted channel is de-
leted.
• Selecting “No” cancels the delete operation.
Renaming channels
To rename a specific channel, the channel
must be h ighlighted via pressing or
buttons and then highlight the “Edit Name”
item b y pre s si ng or buttons. Press
“OK” button to activate rename feature.
SELE C T
O
K
C
HANNEL LIST
1. BBC ONE
2. BBC TWO
3. ITV 8
4. Channel 4
5. BBC THREE
6. T eletext
7. BBC FOUR
8. Sky Travel
9. UKHistory
10. RTL
F
unction Select Channel Edit Name More
1 BBC ONE
Select Delete Lock FavouritesEdit NameMove
Now pressing or buttons moves to the
previous/next character. Pressing or
buttons toggles the current character, i.e., ‘b’
character becomes ‘a’ on and ‘ onc’ .
Pressing the numeric butt ons ‘ 0...9’ re-
places the highlighted character as the but-
ton pressed one by one.
Press the “ ” button to cancel the editing or
“OK” button t o save the new name.
Adding locks to channels
Channel Locking provides a password-pro-
tected access to channels selected by par-
ents.
In order to lock a channel you should know
the Parental Lock password (default value is
set to 0000 in the factory and can only be
chan ged from the Configurati on Menu).
By pressing or buttons, highlight the
channel to be locked and select the “Lock”
option by pressing or buttons.Then
press the“OK” button, a password box is
displayed.
SE LE CT
i
OK
C
HANNEL LIST
1. BBC ONE
2. BBC TWO
3. ITV 8
4. Channel 4
5. BBC THREE
6. Teletext
7. BBC FOUR
8. Sky Travel
9. UKHistory
10. RTL
Function Select Channel Lock/Unlock More
1 BBC ONE
Select Delete FavouritesEdit Name LockMove
Ente r L ock Key
Setting Favourites
You can set various channels as favourites
so that only the favourite channels are navi-
gated. To set a favourite you should high-
light the “Favourites” item at bottom of the
Channel List menu.
To set a favourite you should highlight the
“Favourites” item at bottom of the Channel
List menu, and then pressing ‘’OK’’ key, Edit
Favourite Lists menu appears on the
screen.
You c an list your favourite channe ls using
List 1, List 2, List 3, List 4 or List 5.
Using 5 lists enables listing channels for
diffrerent categories (sport, music etc.). And
by activating the favourites list number that
you want in Favourite Mode submenu of
Configuration menu, you enable only the
channels in the selected list. Configuration
menu is entered from the Main Menu.
SELE CT
i
O
K
C
HANNEL LIST
1. BBC ONE
2. BBC TWO
3. ITV 8
4. Channel 4
5. BBC THREE
6. Teletext
7. BBC FOUR
8. Sky Travel
9. UKHistory
Select List Select Channel Add/Remove More
L
ist 1 List 2 List 3 List 4 List 5

- 15 -
How To Add A Channel To A Favourite List:
• By pressing “ ” / “ ” buttons, highlight
the cha nnel that you want to add to the
favourite list.
• Select the list number by pressing “ ” /
“ ” buttons.
• By pressing “O K’’ button, the highlighted
channel is added to selected list number.
For eac h c hannel, an icon indicates which
favourite list a channel is in. (i.e. In figure
above, icon indicates that BBC ONE is
added to List 1.)
To remove any channel that is added to a
favourite list:
• Highlight the channel that you want to re-
move from the favourite list you have added;
• Highlight the list number that the channel
will be removed, and press “OK’’ button. The
icon indicating the added list number disap-
pears on the menu.
Note: A channel can be added to more than
one favourite list.
To activate Favourites, go to the Configura-
tion menu and select the list number in
Favourite Mode you want to activate by
press ing or butto ns . To c an c el
Favourites, set Favourite Mode to Off.
Using “BLUE” button to navigate through
the favourite channels:
You can navigate through the favourite chan-
nel lists via pressing “BLUE” button. For
each pressing of “BLUE” button, you can
navigate through the favourite channels that
are top of the each channel list, sequentially.
W hile a channel list is selected, you can
navigate through the favourite channels in
that list by pressing “P+” or “P-” buttons.
On Screen Help Pressing Button
For all menus pr ess “ ” button to display
the h elp information about the menu func-
tions. For Channel List menu the following
message is displayed on the screen.
P
ress the SELECT button on
y
our remote control to tune to the
highlighted channel.
Press MENU to exit this screen.
When you see More in a menu, press the
button on the remote control for on
screen help on how to use the menu.
Installation
The Installation menu is there to help you for
building a Channel Table in the most effi-
cient way.
Main Menu
Channel List
Installation
Configuration
Timers
TV Setup
Common Interface
This menu includes the following items:
1. Automatic Search
2. Manual Search
3. First Time Installation
Installation
Automatic search
Manual Search
First T ime Installation
Aut omatic Search:
Automatic search is started by pressing
“SELECT” button while A utomatic Search
item is highlighted.
The following message appears on the
screen.
Please check antenna connection. Do you want
to start automatic search? Your previous...
Yes No
Highlight “Yes” or “No” via using or
buttons and pres s “SELECT” button to se-
lect.
If “Yes” is s elected, Automatic Searc h is
started.

- 16 -
Selecting “No” cancels Automatic Search.
After sea rch is completed fo r digital chan -
nels, a message asking search for ana-
logue channels appears on the screen.
Yes
D
o you want to search for
analogue channels?
No
Highlight “Yes” and press “SELECT” button
to searh for analogue channels.The follow-
ing menu appears on the screen for ana-
logue channel search.
Language
U
K
PLEASE CHECK ANTENNA CABLE
O
K
C
ancel
AUTO PROGRAM
AUTO. PROGRAMMING SYSTEM
Country
E
n
g
lish
Press the BLUE button to cancel APS if you
do not wa n t to delet e y o ur exi s t i ng
programme list.
To continue APS, first select the language
and cou ntr y by pres sing
_
/
`
button and
then press the RED or “OK ” button.
APS is running...
UK - I 055,25 Mhz
C
ancel
After APS is finalized, the programme table
will appear on the screen. In the programme
table you will see the programme numbers
and names assigned to the programmes.
If you do not accept the locations and / or the
programme names, you c an c hange them
in aps sub-menu in the settings menu.
All the services are searched and a channel
table is created automatically.
All cha nnels found ar e stored in a sorted
form with respect to their channel numbers.
Some services may not appear with the cor-
rect channel number. At the time of printing,
not all broadcasters are sending their chan-
nel number information.
Manual Search:
In Manual Search, the number of the multi-
plex is entered manually and only that multi-
plex is searched for the channels. For every
valid cha nnel numb er, signal level , signal
quality and network name are shown at the
bottom of the screen.
In both manual and auto search any existing
channel in the database is not re-stored to
avoid redundant duplicates of that channel.
First Time Installation
The user can use th i s item to load default
settings, which had been loaded to the re-
ceiver at the facto ry.
To install factory settings, highlight “First
Time Installation” menu item and press
“OK” button, then you w ill be asked to tings.
Sele cting “Ye s” by pre ssin g “OK” button
while the “Yes” is hig hlighted and then the
existing channel table will be deleted.
Are you sure you want to delete all ch annels and
settings for first time installation?
Yes
No
After factory settings areloaded, “First Time
Installation” menu will be displayed.
The menu which is displayed for language
selection appears on the screen at first. By
using or buttons, select the desired
language option, and press “OK” button to
activate.
After the language is selected, a message
asking for automatic search start appears
on the screen.
Do you want to start automatic search?
Yes
No
Highlight “Yes” item by pressing or
buttons and press “OK” button to start instal-
lation. After s earch is complete d for digital
channels, a message asking search for
analogue channels appears on the screen.
- 17 -
Yes
D
o
y
ou want to search for
analogue channels?
No
Highlight “Yes” item by pressing or
buttons and press “OK” button to search for
analogue channels.The following menu ap-
pears on the screen for anal ogue c hannel
search.
Language
U
K
PLEASE CHECK ANTENNA CABLE
O
K
C
ancel
AUTO PROGRAM
AUTO. PROGRAMMING SYSTEM
Country
E
n
g
lish
Press the BLUE button to cancel APS if you
do not want t o d elete your existing
programme list.
To continue APS, first select the language
and country by pres sing
_
/
`
button and
then press the R ED or “OK ” button.
Configuration
Press “ ” button to display the M ain Menu
and the button twice to highlight Configu-
ration, then press “OK” button to display the
Configuration menu. Press “ ” button to
exit the menu.
Main Menu
Channel List
Installation
Configuration
Timers
TV Setup
Common Interface
The various configuration functions are dis-
played in a list, along w ith a quarter-screen
image of the currently selected channel. You
can select a function by highlighting the cor-
responding menu line using the or
buttons.
Configuration
Favourite Mode
Channel List
Language Settings
Time Settings
Receiver Upgrade
i
C
han
g
e Favourite Mode More
Tv Only
V.0.7 (EU)
Off
Parental Settings
O
K
S
elect Mode
4
A
rte
C
ountr
y
German
y
Favourite Mode
This function enables or disables the
favourite channel list mode.
Use or buttons to set Fav ourite Mode
to “List 1, List 2,.. ., List 5 or Off”.
Selecting “O f f” disables the favourite chan-
nel List mode.
If the “Favourite Mode” is set on via select-
ing a channel list number, in normal operat-
ing mode pressing “P +” and “P -” buttons
will only navigate through the channels that
were previously defined as favourites in the
selected channel list.
Channe l List
In the Configuration Menu, highlight the
Channel List item by pressing or but-
tons.
Use the or buttons to set the Channel
List to “TV only or Radio only”.
This feature enables navigation only through
the selected channel list type.
If “Radio only” is set, you can only navigate
through the Radio channels in the channel
list via using P + or P - buttons.
Language Settings
In the configuration M enu, highlight the Lan-
guage Settings item by pressing or
buttons. Pr ess OK and Language Settings
sub menu will be displayed on the screen:

- 19 -
Time Settings
In the configuration Menu, highlight the T ime
Settings item by pressing or buttons.
Press OK and Time Settings sub menu will
be displayed on the screen:
T
ime Zone Setting
Time Zone
Curren t Tim e
14:26
Auto
GMT +0
Use or buttons to highlight the Time
Zone Setting. Time Zone Setting is set us-
ing or buttons. It can be set to AUTO or
MAN U AL. When AUTO is selected, Current
Time and Time Zon e optio ns will n ot be
available to be set.
If MANUAL option is selected as the Time
Zone Setting, Time Zone can be altered:
•By pressing or buttons select Time
Zone. Use or buttons to change the
Time Zone b etween GMT-12 or GMT+12.
Current Time on the top of the menu list will
then change according to the selected Time
Zone.
Recei ver Upgra de
The IDTV can be upgraded via the configura-
tion menu, entered from the main menu.
Configuration
Favourite Mode
Channel List
Language Settings
Time Settings
Receiver Upgrade
i
M
ore
Tv Only
V.0.7 (EU)
Off
P
arental Settin
g
s
OK
Search for Upgrade
4
A
rte
C
ountr
y
G
erman
y
In the configuration menu, highlight the “R e-
ceiver Upgrade” item by pressing or
buttons and press “OK” button to start up-
grade proces s. The following menu ap-
pears on the screen.
Software Upgrade
Searching for upgrade. Please wait, or press
MENU to cancel.
Search Progress:
After the search progress is completed, the
message “ Completed searching for up-
grade. No new software was found” ap-
pears on the screen if no new software is
found.
Timers
Display the Main Menu by pressing the “ ” .
Highlight the line by pressingTimers or
buttons and press “OK” button to display
the Timer menu.
Main Menu
C
hannel List
I
nstallation
Configuration
Timers
TV Setup
C
ommon Interface
Up to five separate timer events can be set
and each is displayed in the Programme
Timers screen, showing the event number,
the channel to be selected, the start time,
end time, date and the mode - whether that
event is active (and will be acted on) or not.
i
MENU
Programme Timers
No Channel Name Start End Date Mode
1. ITV 1 20:00 21:00 12/05/2005 Active
2. BBC ONE 00:00 00:00 01/01/2005 Inactive
3. BBC ONE 00:00 00:00 01/01/2005 Inactive
4. BBC ONE 00:00 00:00 01/01/2005 Inactive
5. BBC ONE 00:00 00:00 01/01/2005 Inactive
6. BBC ONE 00:00 00:00 01/01/2005 Inactive
Move/Change
Exit Edit Timer More
OK
10:42
04/07/2005
• To set an event, highlight its mode button
using or buttons and press “OK” but-
ton to display the timer entry window.

- 20 -
Typ
e:
N
ame:
Start:
End:
Date:
Mode:
TV
3. ITV
00:00
00:00
03/06/2005
Once
• Here the six settings of channel type, chan-
nel name, start time, end time, date and fre-
quency mode can be s et. You can move
freely betw een each setting using or
buttons.
• The channel type is set using or but-
tons. It enables displaying only the selected
type channels.
• The channel name i s set using or
buttons to display the channel which broad-
casts the programme.
• The start time, end time and date are each
set with the number buttons on the remote
control in 24-hour format.
• The frequency mode determines how of-
ten the receiver operates this event and is
set with the or buttons to be either
Once, Daily, or Weekly . Press OK button to
complete setup.
Hint
I
f an i nvalid number for the start or end time s
or the date is entered, “Entered time is not
valid” message appears on the menu.
RECORDINGFROM IDTV
Conn ect your VCR to AV2 via a scart lead.
Set the AV2-OUT in the feature menu to
DDT, as illustrated and described on page
24.
Set the time as described above.
Set your TV to standby using the remote con-
trol.
Set your VCR to correspond with the time set
on your TV and select external input (refer to
your VCR instruction book).
NB. If you switch on your TV whilst the timer
recording is active and then switch back to
standby, the timer recording will be can-
celled; the timer setting will be deleted and
the desired programme will not be recorded.
TV Setup
To be able to go through TV functions, you
can use this item.
The digital TV Setup m enu screen is ac-
cessed from the Main Menu. Press the “ ”
button to display the Main Menu and use
or buttons to highlight “TV Setup” . Press
“ OK” button to displ ay TV Setup menu
screen.
Main Menu
Channel List
Installation
Configuration
Timers
TV Setup
Common Interface
Detailed information for all menu items is in
AnalogueTV Menu System section.
Common Interface
• Press “ ” button to display the Main Menu
and use the or buttons to highlight the
“Common Interface” line and press “OK”
button.
Main Menu
Channel List
Installation
C
onfi
g
uration
Timers
TV Setup
Common Interface
It is required to subscribe to a pay channel
company to view the pay chann els of the
Digital Terrestrial broadcasting.

- 21 -
Obtain the Conditional Access Module
(CAM) and the Viewing card by subscribing
to a pay channel company, then insert into
the Television using the following proce-
dure.
1. Switch off the TV and unplug from the
mains.
2. Insert the CAM, then Viewing Card to the
slot that is located in the terminal cover at
the left-hand side of the TV (from front
view).
• The C AM should be correctly inserted, it is
impossible to insert fully if reversed. The
CAM or the TV terminal may be damaged if
the CAM is forcefully i nserted.
3. Conn ect t he TV to th e mai ns supp ly,
switch on and then wait for few moments
until the card is activated.
• Some CAMs may require the following set
up. Please set the CAM by entering the IDTV
menu, Common Interface then pressing
“OK” button. (CAM set up menu is not dis-
played when it is not required.)
• To see the viewing contract information:
Enter IDTV; press “ ” button, then highlight
Common Interface and press “OK” button.
• When no module is inserted, “No Common
Interface module detected” message ap-
pears on the screen.
• Refer to the module instruction manual fo r
details of the settings.
A nalogue TVMenuSy stem
Your TV has been designed with a menu
system to provide easy manipulation of a
multifunction system.
Press the button to ent er the m enu.
Press /
`
button to select a menu title and
then a/
b
button to select a menu item and
/
`
or “OK” button to enter the menu item.
• Press the button to exit the menu.
• Press the button to retu rn to the p re v io us
menu.
Picture menu
By pressing /
`
button, select the first icon.
Picture menu appears on the screen.
Mode Cinema
PICTURE
Contrast
PAL 50Hz
Brightness
Sharpness
Colour
Colour Temp Warm
Noise Reduction Medium
Reset
10
24
62
32
Film Mode
Off
3D Comb Off
Mode
By pressing
a
/
b
button, select Mode .
Press /
`
button to choose one of these
options: andNatural, Dy na mic Cin ema.
Picture mode can be change d directly by
pressing the button.
Contrast
By pressing
a
/
b
button, select Contrast.
Press
`
button to increase contrast. Press
button to decrea s e contrast. Contrast level
can be adjusted betw een 0 and 63.
Brightness
By pressing
a
/
b
button, select Brig ht-
ness. Press
`
button to increase brightness.
Press _button to decrease brightness.
Brightness level can be adjusted between 0
and 63.
Sharp n ess
By pres sing
a
/
b
button, select Sharp-
ness . Press
`
button to increase sharp-
ness. Press button to decrease sharp-
ness. Sharpness level can be adjusted be-
tween 0 and 31.
Colour
By pressin g
a
/
b
button, select Colour .
Press
`
button to increase colour. Press
button to decrease colour. Colour level can
be adjusted between 0 and 99.

- 22 -
Hue
This item is displayed in picture menu when
the TV receives an NTSC signal. By press-
ing
a
/
b
button, select hue. Press
`
button
to increase hue. Press button to decrease
hue. Hue level can be adjusted betw een -31
and 31.
Colour Temp
By pressing a/
b
button, selec t Colour
Temp. Press
_
/
`
button to choose one of
these options: andCool, Nor mal Warm.
Noise Reduction
This item is used to reduce the image noise
and improve the picture quality at weak sig-
nals.
By pressing
a
/
b
button, select Noise Re-
duction. Press
_
/
`
button to set Noise re-
duction level to Off, Low , Medium or High.
Film Mode
Films are recorded at a different number of
frames per second to norma l t elevision
programmes.
By pressing a/
b
button, select Film Mode.
Press /
`
button to set this feature On or
Off. Turn this feature on when you are watch-
ing films to see the fast motion sc enes
clearly.
3D Comb
3D Comb is used to improve colour transi-
tions and colour quality of pictures.
By pressing a/
b
button, select 3D Comb.
Press _/
`
button to set this feature On or
Off.
Reset
By pres s in g a/
b
button , selec t Reset.
Press
_
/
`
or “OK” button to reset the picture
modes to factory default settings.
Sound menu
By pressing /
`
button, select the second
icon. Sound menu appears on the screen.
Volume
SOUND
Equalizer
Balance
Headphone
Sound Mode
10
0
S
tereo
AVL
Effect
Dynamic Bass
O
n
O
ff
3DS
Subwoofer
O
ff
O
ff
O
n
Volume
By pressing
a
/
b
button, select Volume.
Press
`
button to increase volume level.
Press button to d ecrea se volume level.
Volume level can be adjusted between 0
and 63.
Equalizer
By pressing
a
/
b
button, select Equalizer.
Press /
`
or “OK” button to enter equalizer
menu.
SOUND
Equalizer
Sound Mode User
120Hz
500Hz
1.5kHz
5kHz
0
10kHz
0
0
0
0
In equalizer menu the sound mode can be
changed to User, Pop, Rock, Jazz, Flat and
Classic by pressing
_
/`button. Equalizer
menu settings can only be changed when
Sound Mode is User . Select the desired fre-
quency by a/
b
button and increase or de-
crease the frequency gain by pressing /
`
button.
Press the button to return to the previous
menu.

- 23 -
Balance
By pressing
a
/
b
button, select Balance.
Pres s
`
button to increas e balan ce to the
right. Press
_
button to decrease balance to
the left. Balance level can be adjusted be-
tween -31 and 31.
Headphone
By pressing a/
b
button, select Head -
phone. Press
_
/
`
or “OK” button to enter
hedphone menu.
SOUND
Headphone
Volume
Sound Mode
Balance
10
0
Stereo
volume
By pressing
a
/
b
button, select Volume.
Press
`
button to increase hp volume level.
Press
_
button to decrease hp v olume level.
Headphone volume level can be adjusted
between 0 and 63.
sound mode
By pr ess ing a/
b
button, select So un d
Mode. Press _ `/ button to change sound
mode.
Sound mode is used to identify sound mode of
the headphone and can be set to mono, ste-
reo, dual a or dual b according to the transmis-
sion.
balance
By pressing
a
/
b
button, select Balance.
Pres s
`
button to increas e balan ce to the
right. Press
_
button to decrease balance to
the left. Balance level can be adjusted be-
tween -31 and 31.
Press the button to return to the previous
menu.
Sound Mode
By pr ess ing a/
b
button, select Sound
Mode. Press
_
/
`
button to change the
mode.
You can select Mono,Stereo, Dual A or Dual
Bmode, only if the selected channel sup-
ports that mode.
In case of bilingual broadcast (Dual Sound),
you can select original or dubbed language
using mode option.
AVL
Automatic Volume Lim iting (AVL) function
adjusts the sound to obtain fix ed output level
between programs, having different sound
levels.
Pressing _/
`
button will turn this feature on
or off.
Effect
You can use this feature to switch the sound
effect on or off. If the current sound system is
Mono and the sound effect is switched on,
then the sound will be heard as if it is Ste-
reo. If the current sound system is Stereo,
switching this effect on will give a more spa-
tial effect.
Pressing
_
/
`
button will turn this feature on
or off.
Dynamic Bass
Dynamic Bass is used to increase bass ef-
fect of the TV set.
By pressing
a
/
b
button, select Dynamic
Bass. By pressing _/`button set Dynamic
bass to Low, High or OFF. It is not recom-
mended to select High if listening at high
volume levels. There is a subwoofer output
that can accept an active subwoofer if you
wish to create very high levels of Bass.
3DS
This feature is used to create the impres-
sion that sound is coming from around the
room instead of from the se t spea kers.
Pressing the
_
/
`
buttons will turn the fea-
ture on or off.

- 25 -
Turk/Gre or Arabic. This will normally be set
to West for Western Europe.
Screen Saver
By pressing a/
b
button, select Screen
Saver. Press
_
/
`
or “OK” button to enter
screen saver menu.
This menu has three ite ms related to pos-
sible imag e retent ion problem in plasma
displa y panel s. First two items ( Screen
Wipe, Inverse) of this menu are used to re-
move the effects after the problem occured
and the last item (Pixel Shift) is used to pre-
vent this problem.
Screen Wipe : When OK is pressed on this
item the panel is driven with full white picture
for one hour unless any user command is
entered. During this mode if any user com-
mand is entered, Screen Saver menu will be
displayed on the screen with Screen Wipe
highlighted.
Inverse: When OK is pressed on this item
the colour of each pixel of the displayed im-
age is inverted for one hour unless any user
command is entered.
Pixel Shift : This item can be set to off, 5,
10, 20, 40 min. or 1 hour. Whole picture is
shifted 2 pixels in the directions of the figure
shown below.
f
f
f
f
f
1
2
3
45
P
ixel
The time entered in this setting refers to the
time betw een the picture being moved. If you
are using games consoles or similar set to
5 mins but try not to leave static images on
the screen for long periods of time.
Install menu
By pressi ng
_
/`button , selec t t he fourth
icon. Install menu appears on the screen.
Program
INSTALL
Band
Channel
Colour System
Sound System
1
C
12
AUTO
BG
Fine Tune
Search 224.25
VCR Off
Store Program
0
Program
By pressing
a
/
b
button, select Program.
Press
_
/
`
button to select the program
number. You can also enter a number via
digit buttons on the remote control. There
are 100 program storage between 0 and 99.
Band
Band can be selected either “C” or “S” by
pressing
_
/
`
button.
Channel
Channel can be changed by
_
/
`
button or
Digit Buttons.
Colour System
By pressing
a
/
b
button, select Colour
System. Press
_
/`button to chang e the
colour system to PAL, PAL60, SECAM or
AUTO.
Note: In AV mode, you ca n choose NTSC
3.58 and NTSC 4.43 as well.
Sound System
By press in g a/
b
button, select So un d
System. Press
_
/`button to chang e the
sound system to BG, DK, I or L/L’.
Fine Tune
By pressing
a
/
b
button, select Fine Tune.
Press
_
/
`
button to adjust the tuning.
Search
By pressi ng a/
b
button, select Search.
Press _/`button to start program search-
ing. The searching will stop when a signal is

- 26 -
found. You can also enter a frequency value
directly by pressing the digit buttons.
VCR (Video Cassette Recorder)
• T his item can be seen in all modes except
Av-3 and PC.
• If you want to watch a VCR source from one
of these modes, then it will be better to set
VCR mode “on”. For this, while the cursor is
on this item press the
_
/
`
buttons to s et it
“On”.
• If you want to watch a DVD , then you must
set this item “Off”.
Store Program
By pressing
a
/
b
button, select Store Pro-
gram. Press _/
`
or “OK ” button to store the
adjustments . “Progra m Stored” will be dis-
played on the screen.
Program menu
By pressing
_
/
`
button, select the fifth icon.
Program menu appears on the screen.
PROGRAM
01 ITV
02 ZDF
03 CH5
04 C - 02
05 C - 05
06 C - 06
07 C - 08
08 C - 21
09 C - 23
10 C - 35
11 C - 43
12 C - 64
13 C - 68
14 S - 40
15 -----
16 -----
17 -----
18 -----
19 -----
20 -----
N
ame nsert
Delete APS
By moving the cursor in four directions you
can reach 20 progra mmes in the s ame
page. You can scroll the pages up or down
by pressing the navigation buttons to see all
the programmes in TV mode (except the AV
mode).
By cursor action, programme selection is
done automatically.
Name:
T o c h a n g e t he n a m e o f a d e c i d e d
programme, select the programme and
press the RED button.
The first letter of the selected name starts to
blink. Press a/
b
button to change that let-
ter and
_
/
`
button to select the other letters.
By pressing the RED button, you can store
the name.
Insert:
Select the programme which you want to in-
sert by navigation buttons. Press the
GREEN button. By navigation buttons move
the selected programme to the decided
program me s pac e and press the GREEN
button again.
Delete:
To delete a programme, press the YELLO W
button. Pressing the YELLOW button again
erases the selected programme from the
programme list, and the programmes below
shift one up.
APS (Automatic Programming System)
When you press the BLUE button for APS,
the following warn ing scree n will be d is-
played.
WARNING !
Country UK
All prestored programs
OK Cancel
PROGRAM
will be deleted
Press the BLUE button to cancel APS if you
do not want to d elete your existi n g
programme list.
To continue APS, first select the country by
pressing
_
/
`
button and then press the
RED or “OK” button.
APS is running...
UK - I 055,25 Mhz
Cancel
After APS is finalized, the programme table
will appear on the screen.
- 27 -
Source menu
By press ing
_
/
`
button , selec t the sixth
icon. Source menu appears on the screen.
TV / DTT
SOURCE : TV
AV - 1
A
V - 2
AV - 3
AV - 4
AV - 4S
AV - 5
PC RGB
In sour ce menu, highlight a source by
pressing a/
b
button and switch to that
mode by pressing
_
/
`
or “OK ”button.
PCMode
Installation
• Power off both Compute r and Displa y before
making any connections.
• Set your PC’s resolution correctly before
connecting to the TV. See the table on page
37 for supported modes.
• Use a D-SUB cable to connect the TV’s PC
input to the computer’s RGB output termi-
nal.
15 Pi n Mini D-Sub Connector
• Tighten the screws of the Display cable until
the connectors are fastened securely (fin-
ger-tighten only).
Menu System in PC mode
Press the button. The menu w ill be dis-
played in the middle of the screen.
PC Picture Position Menu
By pressing
_
/`button, select the first icon.
PC Picture Position menu appears on the
screen.
Autoposition
PC PICTURE POSITION
H Position
1024x768
H:48kHz V:60Hz
V Position
Dot Clock
Phase
5
0
5
0
5
0
5
0
Autoposition
If you shift the picture horizontally or vertically
to an unwanted position, use this item to put
the picture into correct place automatically.
• Select Autoposition item by using
a
/
b
buttons.
• Press `or “OK ” button.
Warning: Auto position adjustment recom-
mended to be done with the full screen im-
age for the proper adjustment.
H (Horizontal) Position
This item shifts the image horizontally to
right hand side or left hand s ide of t he
screen.
• Select H Position item by using
a
/
b
but-
ton.
• Use
_
/
`
button to adjust the value.
V (Vertical) Position
This item shifts the image vertically towards
the top or bottom of the screen.
• Select V Position item by using
a
/
b
but-
ton.
• Use
_
/
`
button to adjust the value.

- 29 -
Other Features
TV Status
Programme Number,Programme Name ,
Sound Indicator and Zoom Mode are dis-
played on the upper right side of the screen
when a new programme is entered or
button is pressed.
Mute Ind icator
It is pla c ed in th e upp er le ft s ide o f the
screen when enabled.
To cancel mute, there are two alternatives;
the first one is pressing the button and
the seco nd one is incr easing/de creasing
the volume level.
PIP and PAP modes
Press the button to switch to PIP mode.
At PIP Mode, a small picture (PIP picture) is
displayed on the main picture.
For PIP picture restrictions, see table on
page 40.
Press the button twice to switch to PAP
mode.
At PAP Mode, two pictures with equal sizes
are displayed on the screen. Aspect Ratios
of the windows are fix ed.
When you sw itch to PAP Mode, Main window
in PIP Mode is displayed on the right side of
the screen.
Source restrictions of PAP Mode are same
as in PIP Mode.
Freeze Picture
You can freeze the picture on the screen by
pressing the button. At PIP and lay-PAP
outs; only the main picture can be frozen.
Zoom Modes
Zoom mode can be chang ed by pressi ng
the button. You can change the screen
size according to the picture aspect ratio.
Select the optimum one from the following
ZOOM modes.
Note: You can only choose 4:3 and FULL in PC
mode.
Auto:
When a WSS (Wide Screen Signalling) sig-
nal, which shows the aspect ratio of the pic-
ture, is i ncluded in the broadcast s ignal or
the signal fro m a n ex ternal device, the TV
automatically changes the ZOOM mode ac-
cording to the WSS signal.
• When the AUTO mode does not function cor-
rectly due to poor WSS signal quality or
when you want to change the ZOOM mode,
change to another ZOOM mode manually.
Full:
This uniforml y stret che s the l eft and right
sides of a normal picture (4:3 aspect ratio)
to fill the wide TV screen.
• For 16: 9 aspect ratio picture s that have been
squeezed into a normal picture (4:3 aspect
ratio), use the Full mode to restore the pic-
ture to its original shape.
16:9 Zoom:
This zooms up the wide picture (16:9 aspect
ratio) to the full screen.
16:9 Subtitle:
This zooms up the wide picture (16:9 aspect
ratio) w ith subtitles to the full screen.

- 31 -
To Rev eal “Concealed”
Information
• Pressing the button once will reveal an-
swers on a quiz or games page.
• Pressing the b utton a ga in will conc ea l
the revealed answers.
To Select A Subcode Page
Subcode pages are subsections of long
Teletext pages that can only be displayed on
the screen one section at a time.
• Select the requir ed Teletext p age by pressing
button.
•Selec t the required s ubcode page number
by pressing four digit buttons (e.g. 0001).
• If the selected subcode page is not displayed
in a short tim e, press the button. TV
programme will be displayed on the screen.
• Teletext page number will be displayed on
the upper left corner of the screen when the
selected pag e is fo und.
• Press the button to display the selected
Teletext page.
To Exit Teletext
• Press the button. The screen will switch
to TV mode.
To Display The Time
• While watching a TV programme with Tele-
text transmission press the button. The
current time information, captured from Tele-
text will be displayed on the screen.
• If the programme being watched does not
have Teletext transmission, no information
will be displayed.
Fastext
Your TV supports the 1000 page Teletext
system. When the page numb er of any of
the 100 0 pages in me mory is entered, the
system will not search for the requested
page; instead it will display the page auto-
matically. If the requested page is not in
memory, the system will search for the re-
quested page number and save the 1000
pages incl uding the requested page into
memory after finding it.
• Press the
a
button to move the Telete xt
screen forward one page at a time.
• Press the
b
b utton to mo ve the Telete xt
screen backward one page at a time.
For Fastext
The subject-heading for the information may
have a particular colour.
• Press an appropriate RED, ,GREEN YELLOW
or BLUE button in order to reach the relevant
page quickly.
For TOP text
TOP text mode of operation will be activated
automatically according to the transmission.
• If TOP text transmis sion is pre sent, colour
coded buttons will appear in status row.
• If TOP text transmission is not present, sta-
tus row will not appear.
The subject-heading for information may be
located in coloured box.
In Top mode the
a
or
b
commands will re-
quest the next or previous page respectively.
If TOP text transmission is not available, in
case of operation of these commands,
wraparound occurs. For example page 100
appears to be one greater than page 199.

- 32 -
Conne ct Perip heral
Equipment
There is a wide range of audio and video
equipment that can be connected to your TV.
The following connection diagrams show you
where the different (Op tional) equipment
should be connected at the rear side of the TV.
High Definition
Your Hitachi Plasma Television is capable
of displaying High Definition pictures from
devices such as a High D efinition Satellite
Receiver or DVD Player. These devices
must be con nected v ia t he HDMI socket
(AV-5) or Component Socket (AV-3). These
sockets can accept either 720p or 1080i sig-
nals.
Via The Scart
Plasma TV has 2 Scart sockets. If you want
to connect peripherals (e.g. video, decoder,
etc.) which have Scart sockets to the TV, use
SCART 1, S CART 2 input s.
If an external device is connected via the
Scart sockets, the TV will be switched to AV
mode automatically.
Via A erial Input
If you want to connect to your TV, peripherals
like video recorders or decoders, but the de-
vice you want to connect does not have a
Scart socket, you should connect it to the
Aerial input of the TV.
If the VCR is connected via Aerial input it
is suggest ed to use Progr a mme 0.
Decoder
Cable TV offers you a wide c hoice of pro-
grams. Most of them are free, others are to
be paid for by the viewer. This means that
you will need to subscribe to the broadcast-
ing org anisation whose programmes you
wish to receive. This organisation will supply
you a cor responding decod er unit to a l low
the programmes to be unscrambled.
For further information ask your dealer. See
also the booklet supplied with your decoder.
Connect a decoder with an aerial socket
to the TV
• Connect the aerial cable.
Connect a decoder without an aerial
socket to the TV
• Connect the decoder to the TV with a Scart
cable to SCART 1.
TV And Video Recorder
• Connect the aerial cables.
Better picture quality can be obtained if you
also connect a Scart cable to SCART sock-
ets.
Playback NTSC
To use this option you can;
• Connect an NTSC VCR player to a Scart
socket at the rear side of the TV.
• Connec t an NT SC VCR playe r to RCA Jacks
at the rear side of the TV.
Copy Facility
Source selection for VCR recording.
• Select Feature menu.
• Select Av-2 Out by pressing
_
/
`
button.
• Select a source to copy the picture from that
source.
Search For And Store The Test
Signa l Of Th e Video Recorde r
• Unplug the aerial cable from the aerial
socket of your video recorder.
• Switch on your TV and put the video recorder
on the test signal. (See the booklet for your
video recorder.)
• Enter the Install menu and select search.
• Search for the test signal of your video re-
corder in the same way as you searched for
and stored the TV signals. Store the test sig-
nal under programme number 0.
– Replace the aerial cable in the aerial
socke t of yo ur video reco r der once you have
stored the test signal.

- 33 -
Camera A nd Camcorder
To Connect To AV Input
Connect your camera or camcorder to AV
(AV-4) input at the rear side of the TV.
• Connect your equipment to the TV via VIDEO
(yellow) , AUDIO R (red) and AUDIO L (white)
inputs. You must connect the jacks to the in-
put using the same colour.
To Connect To S-VHS Input
Connect your camera or camcorder S-VHS
input at the rear side of the TV.
• Connect your equipment to the TV via S-VHS
input and audio inputs of AV inputs by using
S-VHS cables.
Connect The Decod er To The
Video Recorder
Some video recorders have a special Scart
socket for decoder.
• Connect a Scart cable to the Scart socket of
your deco der and to the special Scart socke t
of your video recorder. Refer to the booklet
of your video recorder.
• To connect your video recorder to the TV, re-
fer to the TV and Video Recorder section.
If you want to connect more equipment to
your TV, consult your dealer.
Connecting Headphones
Use the stereo headphone socket at the
rear side of the TV, to connect headphones.
Connecting Subwoofer
Use Subwoofer Out socke t to connec t an
external, active subwoofer to the set to give a
much deeper bass effect.

- 34 -
A erial Connection
VH
VH
VH
VHVHF/UH
F/UH
F/UH
F/UHF/UHF
F
F
FF
7
5
:
Round 75 ohm coaxial cable
Rear of TV
Outdoor Aerial Connection
Connect Peripheral Equipment
either connect the aerial straight to your TV... ...or connec t the aerial through a VCR...
• It is recommended that a scart le ad should be fitted between
y
our TV and
VCR to enhance your p icture and sound quality. Scart leads are essential
if you have a stereo TV and VCR and wish to obtain stereo sound from
your equipment. These leads can be purchased from your Hita chi dealer
or any good High Street electrical ret ailer.
.
..or throu
g
h a satellite decoder...
...or through a VC R and satellite decoder.
camcorder connection
h
ead
p
hone connecti on
O
UT
H
ead
p
hone
Audio Inputs
Video Input
S-VHS Input
Rear view
Aerial (RF) Socket
wall
socket
Aeria l (RF)
Lead
Scart 1 Scart 2
ANT .I N
V
CR
AV-1
AV-2
A
erial
(
RF
)
Socket
wall
socket
Aerial (RF)
Lead
Aerial (RF) Socket VCR
(RF) connector
lead VCR to TV
PLASMA TV
Scar t 1 Sc a rt 2
Scar t 3
AN T.I N
AN T.I N
RF Lead to
Aerial
RF Lead
from Sat ellite
to VCR
RF Lead fr om
VCR to TV
S
atellite LNB lead
Aerial
VCR
• Scart Lead to
AV-1 on TV.
AV-1
TV VCR
AV-2
PLASMA TV
ANT IN
R
F Lead to Aerial
RF Lead from
Satellite to TV
Aerial
• Scart Le ad t o
EXT-1 on TV.
TV VCR
P
LASMA TV
Headphone
DC Input
A
/V Input / Output
A
udio In
p
uts
Headphone

- 35 -
Tips
Care Of The Screen
Clean the screen with a slightly damp, soft
cloth. Do not use abrasive solvents as they
may damage the T V screen coating layer.
Poor Picture
Have y ou selected the correct TV system? Is
your T V set or house aerial located too close
to non-earthed aud io eq uipment o r neon
lights, etc.?
Mountains or high buildings can cause
double p icture s or ghost ima ges . Some-
times you can improve the picture quality by
changing the direction of the aerial.
Is the picture or Teletext unrecognisable?
Check if you have entered the correct fre-
quency.
The picture quality may degrade when two
peripherals are connected to the TV at the
same time. In such a case, disconnect one
of the peripherals.
No Picture
Is th e aerial c onnect ed p roper ly? Ar e t he
plugs connected tightly to the aerial socket?
Is the aerial cable damaged? Are suitable
plugs used to connect the aerial? If you are
in doubt, consult y our dealer.
No Picture means that your TV is not receiv-
ing any transmission. Have you pressed the
correct buttons on the r emote c ontrol? Try
once more.
Sound
You can not hear any sound. Did you per-
haps interrupt the sound, pressing the
button?
Sound is coming from only one of the
speakers. Is the balance set to one direction
extreme? See Sound menu.
Remote Control
Your TV no longer responds to the remote
control. Perhaps the batteries are ex-
hausted. If so you can still use the local but-
tons at the bottom of the TV.
Have you selected the wrong menu? Press
the button to return to TV mode or press
the button to return to the previous menu.
No solution:
Switch your TV set off and on. If this does not
work, cal l the service personnel; never at-
tempt to repair it yourself.

- 36 -
Specifications
TV BROADCASTING
PAL/SE CAM B/G D/K K' I/I' L/L'
RECEIVINGCHANNELS
VHF (BAND I/III)
UHF (BAND U)
HYPERBAND
CABLE TV (S1-S20/ S21-S41)
NUMBER OF PRESET CHANNELS 100
CHAN NEL INDICATOR
On Screen Display
RF AERIAL INPUT
75 Ohm (unbalanced)
OPERATINGVOLT A GE
220-240V AC, 50 Hz.
AUDIO
3-DS
AUDIO OUTPUT POWER (WRMS.) (%10 THD)
2 x 10
POWER CONS UMPTIO N (W)
360 W
< 3 W (Stand-by)
PANEL
42” (106 cm visible) Screen Size
DIMENSI ONS (mm)
Weight (kg)
(without stand)
300 1045 785 36
D L H
DIMENSIONS (mm)
ISO 13406-2 Pixel fault class: Class II
DTT Specifications
Frequency range
474 - 850 MHz
50-860 MHz (VHF)
Signal level -
82.3dBm
Transmission standar ds
DVB-T, MPEG-2
Demodulation
COFDM with 2K/8K FFT mode
FEC
all DVB modes
Video
MP@M L, PAL, 4:3/16:9
Audio
MPEG Layer I&II 32/44.148kHz

- 37 -
A ppendix A: PC Input Ty pical Display Modes
The display has a maximum resolution of 1280x 1024, vertical sync. frequency range of 56-
85 Hz and a horizontal sync. frequency range of 30-69 KHz .
The following table is an illustration of some of the typical video display modes.
H orizontal Vertical Hor. (kHz) Ver. (Hz )
1 640 400 31.5 70
2 640 480 31.5 60
3* 848 480 31.0 60
4 640 480 37.9 72
5 640 480 37.5 75
6 640 480 43.3 85
7 800 600 35.2 56
8 800 600 37.9 60
9 800 600 48.1 72
10 800 600 46.9 75
11 800 600 53.7 85
12 1024 768 48.4 60
13 1024 768 56.5 70
14 1024 768 60.0 75
15 1024 768 68.7 85
16 1152 864 67.5 75
17 1280 102 4 64.0 60
18* 1280 768 47.8 60
19* 1280 768 56.1 70
Mode FrequencyResolution
* Only available in Full and PAP modes, not in 4:3 mode.
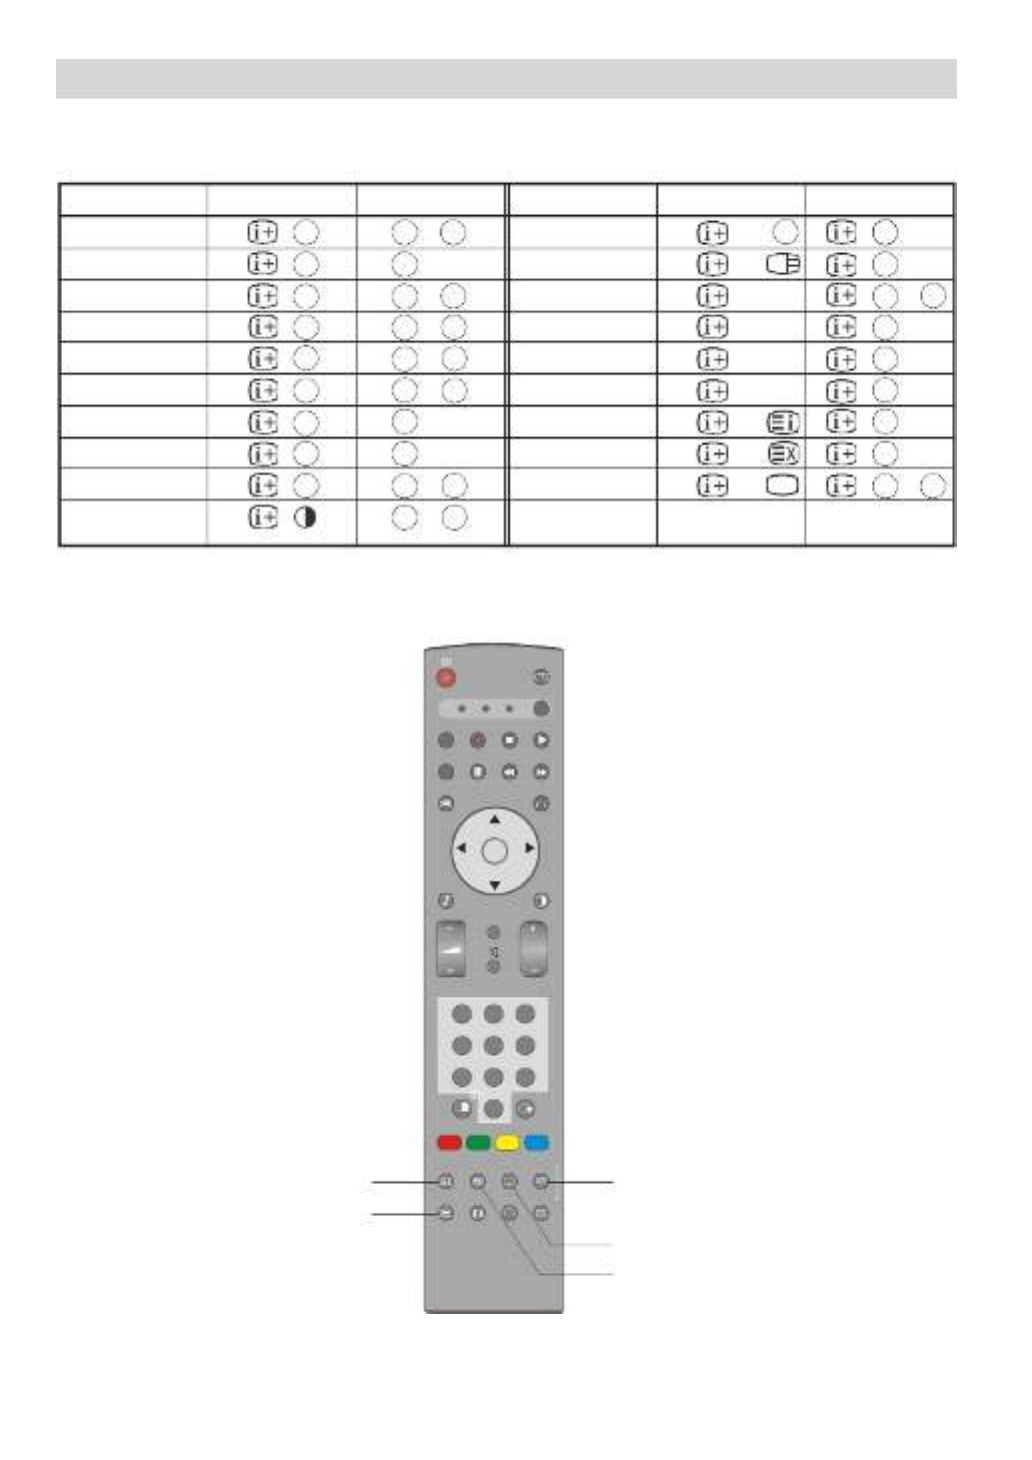
- 38 -
A ppendix B: DVD Play er Selection
You can use this remote control to operate the selected brand of DVD player by pressing the
following buttons on the remote control simultaneously.
Makers of D V D player
HITACHI
FUNAI
Pioneer
Panasonic
TOSHIBA
Philips
JVC
SAMSUNG
Sony
Sharp
RCA
Mitsubishi
ONKYO
ZENITH
THOMSON
SHINCO
SKYWORTH
BUBUKO
DENON
RED
GREEN
YELLOW
BLUE
Set Ma ke r
1
~
~
~
~
~
~
~
~
~
2
3
4
5
6
7
8
9
2
4
2
4
4
6
3 0
11
1
2-4- 12
2
11
11
11
11
11
11
11
1
1
3
Set MakerSet Type Set TypeMakers of DVD player
1
....
Example
To operate HITACHI DVD player, press and hold the INFO button, followed by the “1” button.
TV
DTT/TV
I/II
S.MODE
GUIDE
SWIVEL PHOTO
AV1
AV5
AV2
RGB1
AV3
RGB2
DVD SAT
P.M ODE
SLID E SH OW
-
RO T AT E
AV4
MENU
S
EL
OK
P
1
2
3
4
5
6
7
8
9
0
4 12
...
Index
T
ext
Update
S
ub Pa
g
e
Reveal
Note: Not all models of the listed brands can be operated using this remote control.
Note: Slide Show, Photo, Swivel and Rotate buttons have no function.

- 39 -
A ppendix C: DVD Play er Selection (continued)
Set up hint:
Exam ple) HITA CH I DVD
1
To operate HITACHI DVD player, press and hold the button, followed by the
1
button.
1. Set up the maker.
Press SEL button to indicate the DVD LED on the remote control.
Whilst the DV D LED is flashing, press and
1
.
2. Set up the maker type.
Release the
1
button whilst keeping button depressed.
Then, press the
1
button.
3. Confirm the setting.
After setting the maker and type, press the POWER button on the remote control. If the
DVD does not switch on, repeat step 1 and 2 using other maker types as listed in the
chart on 38.
NOTE
• Not all models of the listed makers can be operated using this remote control.
Information for users applicable in European Union countries
This symbol on the product or on its packaging means that
your electrical and electronic equipment should be disposed
at the end of life separately from your househol d w astes.
There are separate collection systems for recycling in EU.
For mor e information, pl ea se contact the local authority o r
the dealer where y ou purchased the product.
- 40 -
A ppendixD: Main and PIP-PA P Pictur e Combinatio ns
Produktspezifikationen
| Marke: | Hitachi |
| Kategorie: | Fernsehen |
| Modell: | 42PD8700C |
Brauchst du Hilfe?
Wenn Sie Hilfe mit Hitachi 42PD8700C benötigen, stellen Sie unten eine Frage und andere Benutzer werden Ihnen antworten
Bedienungsanleitung Fernsehen Hitachi

11 Oktober 2024
7 Oktober 2024
5 Oktober 2024
4 Oktober 2024
4 Oktober 2024
2 Oktober 2024
30 September 2024
27 September 2024
24 September 2024
23 September 2024
Bedienungsanleitung Fernsehen
- Fernsehen Samsung
- Fernsehen Infiniton
- Fernsehen Clatronic
- Fernsehen Acer
- Fernsehen Sanyo
- Fernsehen BenQ
- Fernsehen Lexibook
- Fernsehen Manhattan
- Fernsehen Manta
- Fernsehen Medion
- Fernsehen Philips
- Fernsehen Sony
- Fernsehen Sweex
- Fernsehen Tevion
- Fernsehen Zalman
- Fernsehen Panasonic
- Fernsehen LG
- Fernsehen MX Onda
- Fernsehen AEG
- Fernsehen Siemens
- Fernsehen Electrolux
- Fernsehen Küppersbusch
- Fernsehen OK
- Fernsehen Vox
- Fernsehen TechniSat
- Fernsehen XD Enjoy
- Fernsehen Denver
- Fernsehen ECG
- Fernsehen Intenso
- Fernsehen MarQuant
- Fernsehen Bush
- Fernsehen Telefunken
- Fernsehen Thomson
- Fernsehen Trevi
- Fernsehen BEKO
- Fernsehen Blaupunkt
- Fernsehen Grundig
- Fernsehen Schneider
- Fernsehen Sharp
- Fernsehen Aspes
- Fernsehen Brandt
- Fernsehen Daewoo
- Fernsehen Pyle
- Fernsehen Mitsubishi
- Fernsehen Finlux
- Fernsehen Haier
- Fernsehen High One
- Fernsehen Hisense
- Fernsehen Luxor
- Fernsehen NABO
- Fernsehen Nordmende
- Fernsehen Salora
- Fernsehen SEG
- Fernsehen Smart Brand
- Fernsehen Svan
- Fernsehen Techwood
- Fernsehen Vestel
- Fernsehen Philco
- Fernsehen Schaub Lorenz
- Fernsehen Aiwa
- Fernsehen Alphatronics
- Fernsehen AudioSonic
- Fernsehen Coby
- Fernsehen Bang And Olufsen
- Fernsehen DIFRNCE
- Fernsehen Lenco
- Fernsehen Mpman
- Fernsehen ODYS
- Fernsehen Pioneer
- Fernsehen Polaroid
- Fernsehen Jay-Tech
- Fernsehen JVC
- Fernsehen Krüger And Matz
- Fernsehen Muse
- Fernsehen Nokia
- Fernsehen Optoma
- Fernsehen PEAQ
- Fernsehen Xiaomi
- Fernsehen Abus
- Fernsehen Megasat
- Fernsehen Walker
- Fernsehen Akai
- Fernsehen Arçelik
- Fernsehen Caratec
- Fernsehen Changhong
- Fernsehen Chiq
- Fernsehen Continental Edison
- Fernsehen Dual
- Fernsehen Dyon
- Fernsehen Edenwood
- Fernsehen Ferguson
- Fernsehen Funai
- Fernsehen GoGEN
- Fernsehen Hannspree
- Fernsehen Horizon
- Fernsehen Hyundai
- Fernsehen JTC
- Fernsehen Kernau
- Fernsehen Loewe
- Fernsehen Metz
- Fernsehen MT Logic
- Fernsehen Orava
- Fernsehen Orion
- Fernsehen Reflexion
- Fernsehen Star-Light
- Fernsehen Strong
- Fernsehen TCL
- Fernsehen Tesla
- Fernsehen Toshiba
- Fernsehen Allview
- Fernsehen Casio
- Fernsehen Sencor
- Fernsehen Icy Box
- Fernsehen Element
- Fernsehen ViewSonic
- Fernsehen Dell
- Fernsehen Lenovo
- Fernsehen Cecotec
- Fernsehen Nikkei
- Fernsehen Xiron
- Fernsehen Opera
- Fernsehen Sagem
- Fernsehen Antarion
- Fernsehen Xoro
- Fernsehen Humax
- Fernsehen Logik
- Fernsehen CGV
- Fernsehen LTC
- Fernsehen Bluesky
- Fernsehen Orima
- Fernsehen Proline
- Fernsehen NEC
- Fernsehen Marantz
- Fernsehen TEAC
- Fernsehen Packard Bell
- Fernsehen Westinghouse
- Fernsehen AOC
- Fernsehen NextBase
- Fernsehen Vivax
- Fernsehen Uniden
- Fernsehen Kogan
- Fernsehen Innoliving
- Fernsehen Magnum
- Fernsehen Smart Tech
- Fernsehen JGC
- Fernsehen Soundmaster
- Fernsehen Sylvania
- Fernsehen Qilive
- Fernsehen Doffler
- Fernsehen NewStar
- Fernsehen Zenith
- Fernsehen Insignia
- Fernsehen Roadstar
- Fernsehen SereneLife
- Fernsehen Woxter
- Fernsehen Sogo
- Fernsehen Peerless-AV
- Fernsehen RCA
- Fernsehen Oppo
- Fernsehen Vivo
- Fernsehen AYA
- Fernsehen Furrion
- Fernsehen Seiki
- Fernsehen Alba
- Fernsehen Aldi
- Fernsehen Daitsu
- Fernsehen Digihome
- Fernsehen E-motion
- Fernsehen Emerson
- Fernsehen GPX
- Fernsehen Graetz
- Fernsehen HKC
- Fernsehen Hoher
- Fernsehen ILive
- Fernsehen Naxa
- Fernsehen Online
- Fernsehen Onn
- Fernsehen Oyster
- Fernsehen Premier
- Fernsehen Reflex
- Fernsehen Rm 2000
- Fernsehen Saba
- Fernsehen Sbr
- Fernsehen Sunny
- Fernsehen Sunstech
- Fernsehen TechLine
- Fernsehen Technika
- Fernsehen Tele 2
- Fernsehen Grunkel
- Fernsehen Tve
- Fernsehen Viewpia
- Fernsehen Vision Plus
- Fernsehen Vizio
- Fernsehen Voxx
- Fernsehen Wharfedale
- Fernsehen Yasin
- Fernsehen Ziggo
- Fernsehen Videocon
- Fernsehen Bauhn
- Fernsehen Planar
- Fernsehen Monster
- Fernsehen Mitsai
- Fernsehen Proscan
- Fernsehen Kunft
- Fernsehen Nevir
- Fernsehen Seura
- Fernsehen EKO
- Fernsehen SunBriteTV
- Fernsehen Kemo
- Fernsehen V7
- Fernsehen Astar
- Fernsehen QBell Technology
- Fernsehen Visco
- Fernsehen Majestic
- Fernsehen DirecTV
- Fernsehen HCI
- Fernsehen Mach Power
- Fernsehen MBM
- Fernsehen Inno-Hit
- Fernsehen Elements
- Fernsehen Palsonic
- Fernsehen Cello
- Fernsehen Pantel
- Fernsehen FFalcon
- Fernsehen Coocaa
- Fernsehen SYLVOX
- Fernsehen ISymphony
- Fernsehen Aristona
- Fernsehen Apex
- Fernsehen Tucson
- Fernsehen Kubo
- Fernsehen Avtex
- Fernsehen NPG
- Fernsehen Telesystem
- Fernsehen ATYME
- Fernsehen Lin
- Fernsehen Tivax
- Fernsehen H&B
- Fernsehen Norcent
- Fernsehen TELE System
- Fernsehen Belson
- Fernsehen Elbe
- Fernsehen Mitzu
- Fernsehen Voxicon
- Fernsehen Aconatic
- Fernsehen Mitchell & Brown
- Fernsehen FOX Electronics
- Fernsehen Mystery
Neueste Bedienungsanleitung für -Kategorien-

16 Oktober 2024

16 Oktober 2024

16 Oktober 2024

15 Oktober 2024

15 Oktober 2024

15 Oktober 2024
15 Oktober 2024

15 Oktober 2024
15 Oktober 2024
15 Oktober 2024