Grundig Rio 43 GHU 8900 S Bedienungsanleitung
Lesen Sie kostenlos die 📖 deutsche Bedienungsanleitung für Grundig Rio 43 GHU 8900 S (123 Seiten) in der Kategorie Fernsehen. Dieser Bedienungsanleitung war für 27 Personen hilfreich und wurde von 2 Benutzern mit durchschnittlich 4.5 Sternen bewertet
Seite 1/123

Television
User’s Manual
EN
RIO 43 GHU 8900 S

ENGLISH2
CONTENTS
---------------------------------------------------------------------------------------------------------------
5 INSTALLATION AND SAFETY
7 GENERAL INFORMATION
7 Television's unique features
7 Receiving digital stations
7 SCR System
8 Things to do for energy saving
8 Notes on still images
8 Note on software update
9 PACKING CONTENTS
9 Standard accessories
10 CONNECTION/PREPARA-
TION
10 Connecting the antenna and the power
cable
11 Installation or hanging
13 OVERVIEW
13 Connections of the television
14 Switching the TV on from the standby
mode
14 Switching the TV to sleep mode, and turn-
ing it on from the sleep mode
14 Switching the TV to the standby mode
16 SETTINGS
16 Settings for connecting to the home net-
work
16 Tuning television channels
18 Searching for satellite channels
20 Searching for cable channels
21 Searching for terrestrial channels
22 Editing digital channels
26 PICTURE / SOUND SETTINGS
26 Picture settings
28 Sound settings
28 Sound Style
31 FUNCTIONING OF THE TV - BASIC
FUNCTIONS
31 Switching on and off
31 Selecting the TV mode
31 Selecting the signal source and antenna
type
31 Selecting channels
31 Adjusting the volume
31 Muting
31 Picture mode
31 Changing the picture format
32 FUNCTIONING OF THE TV - ADDI-
TIONAL FUNCTIONS
32 Power Settings
33 Automatic shutdown
33 Parental Supervision
34 Blocking a TV channel
34 Watching a blocked TV channel
34 Programme Restrictions
35 Blocking an external source
35 Watching a blocked external source
35 Changing the PIN code
36 FUNCTIONING OF THE TV - AD-
VANCED FUNCTIONS
36 Changing the audio language
36 Audio language
37 Audio File Type
37 Visually impaired
37 Subtitles
38 Teletext language selection
38 Blue Mute
38 Automatic shut down when no signal
38 Default Channel
39 BISS Key
39 TKGS Settings
40 Signal information
40 Open Source Licenses
41 ELECTRONIC TV GUIDE
42 HBBTV MODE
42 What is HbbTV?
43 Using HbbTV
43 Additional functions for video indexes

3ENGLISH
CONTENTS
---------------------------------------------------------------------------------------------------------------
43 HBBTV Settings
45 TELETEXT MODE
45 TOP text or FLOF text mode
45 Normal text mode
46 USB RECORDING
46 Information on recording and playing
television programmes
46 Possible limitations when using an exter-
nal data medium
47 Connecting external data media
48 USB recording settings
49 Enabling and disabling the time shift func-
tion
49 Time shift disc set-up
50 “Pausing” time shift and continuous
recording programmes
50 Recording Programmes
51 Adding recording timer
52 Editing recording timer
52 Deleting recording timer
53 Play
53 Deleting broadcasts from the recorded
files menu
54 USB OPERATION
54 File formats
55 Connecting external data media
55 Removing the external data medium
56 Multi Media Player menu
56 Playback basic functions
57 Additional playback functions
59 GRUNDIG GOOGLE TV™
62 Opening Home menu
63 Installing apps on Google Apps
63 Starting an installed application
63 Adding a favorite app to the Your apps
tab in the Home screen menu
64 Removing an installed application
64 Force stopping an app
64 Clear application data
65 Clearing application cache
65 Clearing application defaults
65 Application notifications
65 Edit application permissions
65 Special application access
66 Application security and restrictions
67 Turning TV on with Chromecast
67 Using Chromecast on an Android or iOS
mobile device
68 Cast a tab in the Chrome browser on TV
68 Cast computer screen on TV
68 Cast music or video files from the com-
puter to the TV
69 SYSTEM SETTINGS
69 Accessibility Settings
70 About
72 Date and time settings
73 Language settings
73 Keyboard settings
74 Storage settings
75 Ambiance mode
75 Power and Energy
77 Streaming
77 System Sounds
77 Store Mode settings
77 Restart
78 PRIVACY SETTINGS
78 Location settings
78 Usage and Diagnostic settings
79 Ads
79 Google Assistant settings
80 Payment and purchase transactions
80 ApplicationSettings
81 REMOTE CONTROLS AND ACCES-
SORIES
82 HELP AND FEEDBACK
83 USING AN EXTERNAL DEVICE
83 CEC (Consumer Electronics Control)
83 CEC connection functions of the television
84 High definition – HD ready
84 Connection options
85 Connecting an external device
85 DVD recorder, DVD player, or video
recorder use
ENGLISH6
INSTALLATION AND SAFETY
----------------------------------------------------------
WARNING
Injuries caused by falling TV
Never place the TV on an unstable surface. The
TV may fall, causing serious injury and death.
Especially for children not to be affected by
these negative situations, observe the following
precautions:
7
Make sure that the stand or other furniture you
will place the TV on is robust enough to carry
the television.
7
Make sure that the TV does not protrude be-
yond the dimensions of the furniture on which
it is resting.
7
Do not place the TV on tall furniture that has
the risk of tipping over such as cabinets, side-
boards or bookcases. If you have no other
choice, fix the furniture and the TV to the wall
to prevent them from tipping over.
7
There shouldn’t be any covers, laces, clothes,
tulles or similar items between the television
and the stand/furniture you have placed the
television on.
7
Warn your children about the dangers associ-
ated with climbing on the stand/furniture TV is
placed on or reaching the TV.
7
Consider the above mentioned warnings
whenever you change the location of the TV.
NOTICE
Shortened service life due to high oper-
ating temperature
7 Do not place the TV next to heating units or in
direct sunlight.
7 To ensure adequate ventilation, maintain
clearance of at least 10 cm around the TV.
Discoloration of furniture due to rubber
feet
7 Some furniture surfaces may discolor when
they come in contact with rubber. To protect
furniture, you can place a sheet made of glass
or plastic under the stand. Do not use textile
underlays or mats such as doilies.
Electromagnetic interference
7
Devices connected to the product (satellite
receiver, DVD player, etc.) or signal emitting
devices (router, etc.) close to the product may
cause disturbance in the image and noise in
the sound.
7
Connection cables used on the product must
be shorter than 3 m.
7
If the product cannot perform its function due
to electrostatic discharge, the user may need
to switch off and then switch on the product.
7
A shielded, HDMI-certified and ferrite cable
must be used with the product.
Environmental information
7 Do not dispose of batteries with
the household waste. Used bat-
teries must be returned to retail
stores or public collection points You can help
protect the environment in this way.
7 Be sure to dispose of packaging materials
for your product separately according to the
guidelines of local authorities so that they
can be recycled in an environmentally safe
manner.
7
Switch the TV set to stand-by if you will not
use it for a while. In standby mode, the TV
uses very little energy (≤ 0.5 W).
If you will not use the TV for an extended
period, turn it off with the power switch, if any
or unplug the power cord from the socket.
7 Select a location where no direct sunlight falls
on the screen for your TV. Thus, you can select
a lower backlight and provide energy saving.
7Do not dispose of the product
along with normal household
waste at the end of its service
life. Take it to a recycling centre
for electrical and electronic equipment.

7ENGLISH
Television's unique features
7 Google TV allows you to access your favourite
TV shows, movies, subscription services, songs,
pictures and games.
7 Many features of the TV set require an Inter-
net connection. The TV set is equipped with
WLAN feature and a LAN port.
7
Your television set enables you to receive
and watch digital stations (via DVB-S, DVB-T
and DVB-C), including the High Definition
(HD) ones. At present, High Definition digital
television channels can be viewed in many
countries.
7
Although this television meets the current DVB-
S, DVB-T and DVB-C standards as of August
2012, its compatibility with future DVB-S
digital satellite broadcasts, DVB-T digital ter-
restrial broadcasts and DVB-C digital cable
broadcasts is not guaranteed.
7
This television can receive and process all
unencrypted digital stations. This television set
has an integrated digital receiver. The digital
receiver unit converts the signals from digital
stations to provide outstanding audio and
picture quality.
7
The TV guide (only for digital stations) tells
you of any schedule changes at short notice,
and provides an overview of all the channels’
schedules for the next few days.
7
Wireless USB keyboard and mouse support
of your television provides convenience to the
user in internet applications.
GENERAL INFORMATION
-------------------------------------------------------------------
7
With the Time Shift function, you can eas-
ily stop and resume a programme with the
remote control in a fast and simple way.
Programme is recorded to the external data
medium.
7
You can save any digital TV channel you have
chosen, if no limitation has been imposed by
the broadcaster.
TV channel is transformed by the TV and
saved to a USB external data medium.
You can recall and play saved programmes
from the archive.
You may select another recording from the
archive and watch it during a recording.
Receiving digital stations
7
To receive digital satellite stations (DVB-S) you
need a satellite antenna.
7
To receive digital stations (DVB-T) you need a
digital rooftop or indoor antenna (passive or
active indoor antenna with its own powersup-
ply).
7
The antenna cable of the cable TV network
that broadcast in DVB-C must be plugged into
TV in order to receive the DVB-C broadcasts.
7
You can find the current transmission informa-
tion on teletext from various broadcasters, or
look in a TV guide or on the Internet.
7
Various digital television stations from private
broadcasters are encrypted (DVB-S, DVB-T
and DVB-C). Watching these stations is only
possible with the appropriate CI module and a
SmartCard. Ask your specialist dealer.
SCR System
Your TV supports SCR system (Single Channel
Router). With SCR satellite system, several us-
ers can individually receive all signals from the
satellite simultaneously.
9ENGLISH
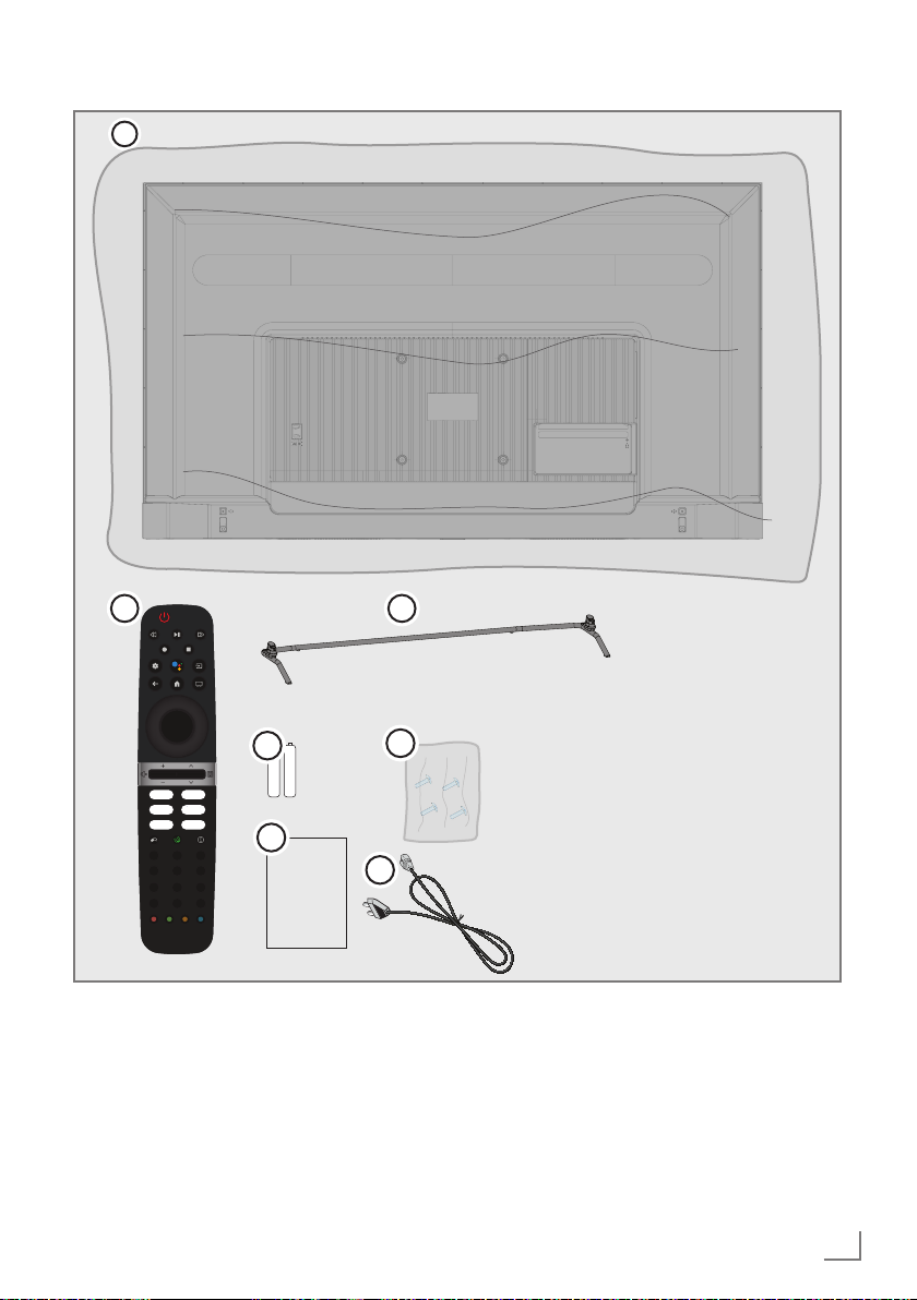
PACKING CONTENTS
-------------------------------------------------------------------------------
Standard accessories
1 Television
2 Stand
3 Remote control
4 Batteries for remote control
5 Screws and installation instructions for the
stand
6 Quick instruction manual
7 Power cord
4
2
5
6
User
Manual
1
3
7
0
TXT SUB
123
456
7 98
ENGLISH10
CONNECTION/PREPARATION
-----------------------------------------------------
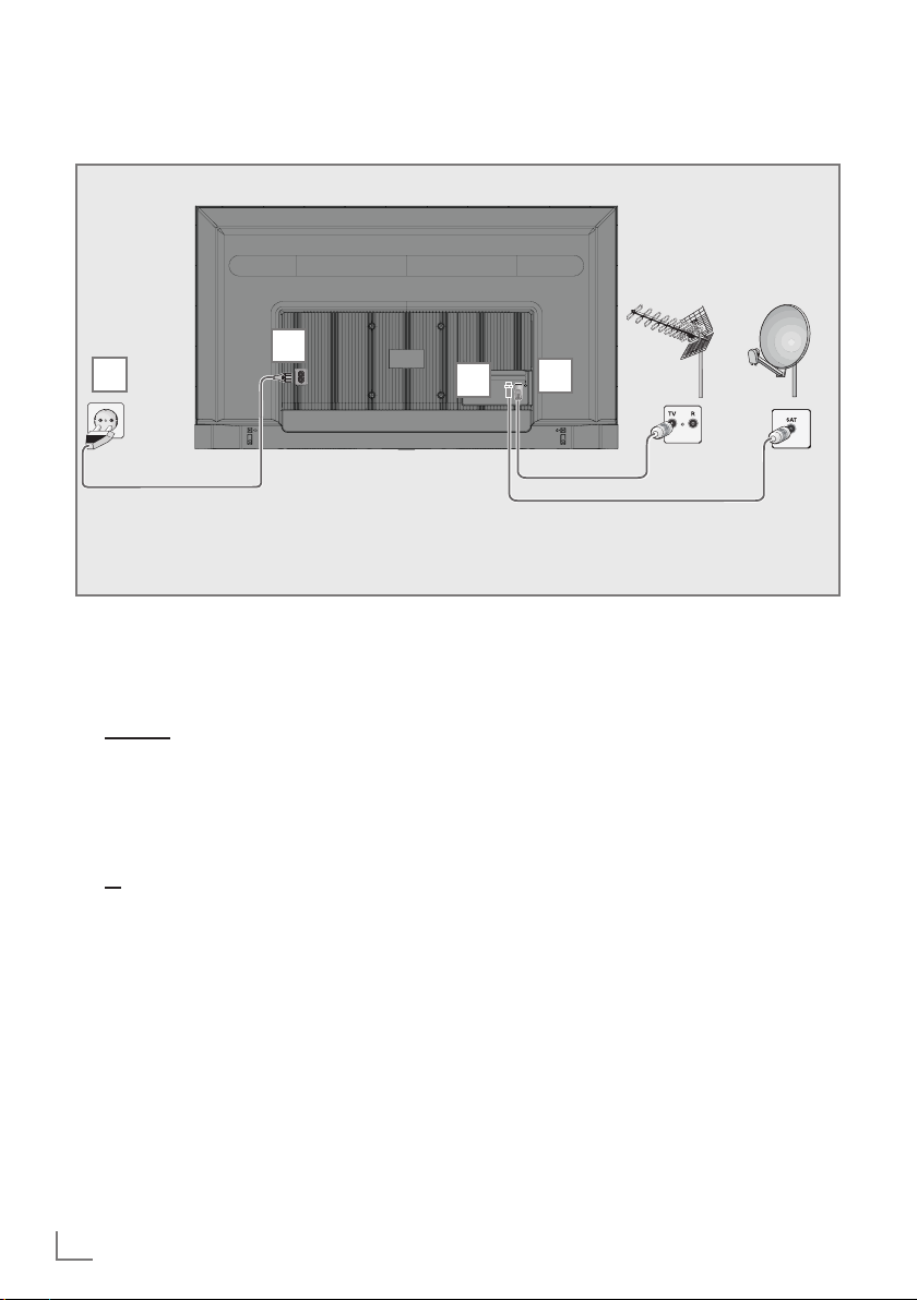
Connecting the antenna and the power cable
1 To receive digital satellite channels (DVB-S),
connect the satellite antenna cable to the
»SATELLITE« antenna socket on the televi-
sion set;
and / or
2a For terrestrial digital stations (DVB-T), plug
the cable of the rooftop, indoor antenna
(passive or active indoor antenna with its
own power supply) into the antenna socket
» « on the television set;ANT IN
or
2b For digital stations of the cable TV network
(DVB-C), plug the antenna cable into the
antenna socket » « on the television ANT IN
set.
Note:
7
When connecting an indoor antenna you
may have to try it out at different positions
until you get the best reception.
3 AC IN Connect the power cable to the » «
socket on the television.
4 Plug the power cable into the wall socket.
Note:
7
Plug the appliance into the mains socket
only after you have connected the external
devices and the antenna.
7
Do not use an adapter plug or extension
cable which does not meet the applicable
security standards. Do not tamper with the
power cable.
2
3
1
4

11ENGLISH
CONNECTION/PREPARATION
-----------------------------------------------------
Installation or hanging
7 Select a location so that no direct sunlight falls
on the screen.
Installation with stand
7
To mount the stand, refer to the installation
instructions included.
7
Place the TV set on a hard, level surface.
Preparing for mounting on the VESA
bracket
Contact authorised dealer to purchase the
bracket.
You will need:
7
A pair of scissors,
7
A cross-tip screwdriver.
Follow the installation instructions for the VESA
installation kit.
1 Place the TV in the film on a smooth surface
with the screen facing down.
2 Cut open the film on the back side using the
scissors.
3 Connect the required cables to the con-
nectors on the TV. See the “Connections”
section in this manual.
4 Tie the cables so they do not hang down
onto the floor.
5 Screw the VESA installation kit onto the
television and mount it according to its instal-
lation instructions.
VESA

ENGLISH12
Inserting batteries into the
remote control
1 Open the battery compartment.
2
Insert batteries as marked on the bottom of the
battery compartment (2 × Alkaline/LR03/AAA).
3 Close the battery compartment.
CONNECTION/PREPARATION
-----------------------------------------------------
Note:
7
If the television no longer reacts properly
to remote control commands, the batter-
ies may be flat. Be sure to remove used
batteries.
7
The manufacturer accepts no liability for
damages resulting from used batteries.
Environmental note
7 This symbol on the battery
or on the packaging
indicates that the battery
provided with this product
shall not be treated as
household waste. On certain batteries this
symbol might be used in combination with a
chemical symbol. The chemical symbols for
mercury (Hg) or lead (Pb) are added if the
battery contains more than 0.0005%
mercury or 0.004% lead.
Batteries, including those which contain
no heavy metal, must not be disposed of
with household waste. Please dispose of
used batteries in an environmentally sound
manner. Find out about the legal regulations
which apply in your area.
13ENGLISH
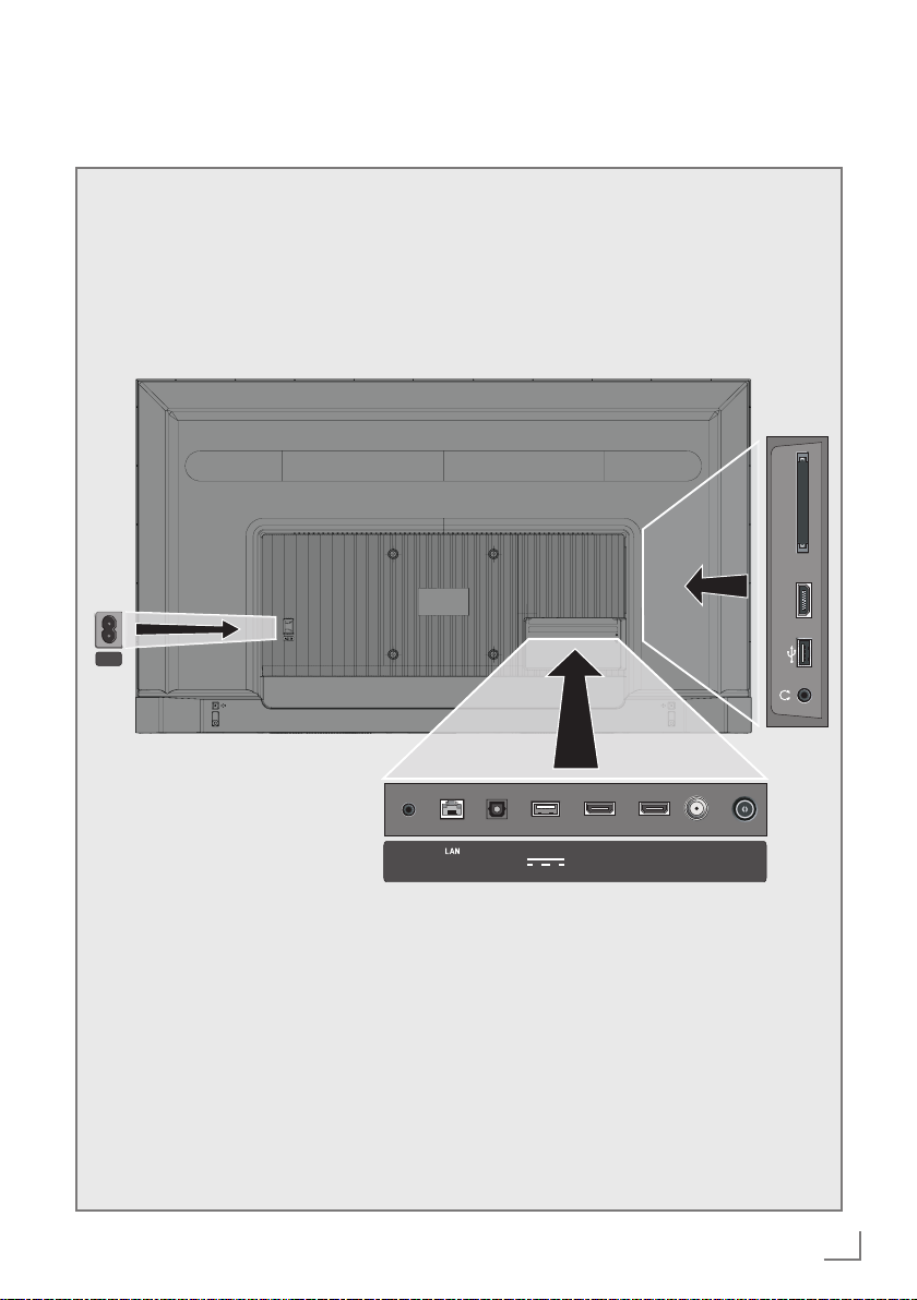
OVERVIEW
--------------------------------------------------------------------------------------------------------------
Connections of the television
ANT-INOptic Out SATELLITE
13/18V max.500mA
HDMI2HDMI3USB2 (HDD)
SERVICE
5V/1A
USB1 HDMI1
(e-ARC) COMMON INTERFACE
AC-IN

ENGLISH14
OVERVIEW
--------------------------------------------------------------------------------------------------------------
Keypad
Switching the TV on from the
standby mode
1 Press »8« to turn on the TV from the standby
mode.
Switching the TV to sleep mode,
and turning it on from the sleep
mode
1 The TV shall switch to sleep mode when »8«
is pressed shortly when the TV is on.
2 The TV shall switch on from the sleep mode
when »8« is pressed shortly when the TV is
in sleep mode.
Switching the TV to the standby
mode
1 Press »8« for 5 seconds to switch the
TV to the standby mode. - Close menu is
displayed.
2 Select »Power off» and confirm by pressing
»« .
3 The TV switches to the standby mode.
7 Power cable input. AC IN:
7 Service only. Service:
7 LAN: Network connection.
7 Optic Out: optical audio output.
7 USB(HDD): For external data media.
7 HDMI3: Input for digital audio and image
data.
7 HDMI2: Input for digital audio and image
data.
7 SATELLITE: Input for satellite antenna signal.
Suitable for single-cable SCR system.
7 ANT IN: Input for antenna cable (terrestrial
antenna or cable connection).
7 U: Headphone output.
7 USB 1: For data medium and keyboard.
7 HDMI1 (e-ARC): Input for digital audio and
image data.
7 CI: For CA modules for receiving encrypted
channels.

15ENGLISH
OVERVIEW
--------------------------------------------------------------------------------------------------------------
Remote control
Turns on/off
the television set (stand-by)
Opens the Home menu
Switches the menus one
menu level back
Switches between teletext
and TV modes
Directly selects thechannels
Voice control
Opens subtitle menu
Confirms/activates various
functions
Opens the control panel
Selects the channels step
by step;
Opens the electronic TV
Guide.
Application shortcuts
Selects audio language
Opens ECO mode settings
Switches to the TV Mode.
Displays information
Selecting an input.
Adjusts the volume;
Turns the volume on/off
(Mute)
Selects/activates various
functions in menus
Record, Play, Pause, Stop,
Forward, Reverse.
0
TXT SUB
1 2 3
4 5 6
7 98
Up/down, right/left direc-
tion keys

ENGLISH16
SETTINGS
------------------------------------------------------------------------------------------------------------------
The Television is fitted with an “installation as-
sistant”, which guides you step by step through
the basic settings.
Using the screen dialogue, the user can make
supposedly complex settings and data entries
simply and clearly for everybody.
Pages and dialogue items appear on the screen,
which identify the subsequent and likely operat-
ing steps.
Settings for connecting to the
home network
Depending on the connection type of the home
network, connect your television to the home
network:
– via a LAN connection or
-- Wireless network connection with WLAN
Tuning television channels
Depending on the type of antenna connected,
you can decide which channels you would like
the television to search for.
DVB-S – For setting up digital satellite TV chan-
nels, see page 18
DVB-C – For setting up digital cable TV chan-
nels, see page 20
DVB-T – For setting up digital terrestrial TV
channels, see page 21
Note:
7
See “Detailed Channel Settings” section
starting from page 93 for more information
on digital television channel settings.
Initial setup and setting the
TV
1 Connect the antenna and external device
cables.
2 Insert the power plug into the socket.
3 Switch on the TV by pressing »8« on the
remote control.
– »Welcome« menu shall be displayed.
4 Select language.
5 Select country.
Note:
7 You may set up your TV using 2 methods.
– »Google TV setup« – Setup where all
online features of Google TV, antenna
broadcast and external device connec-
tions are active after signing in with a
Google account.
– »Basic TV setup« – Setup where only
antenna broadcast and external device
connections are active.
6 Continue at article 7 for Google TV setup;
or
Continue at article 20 for basic TV setup.
Google TV setup
7 Select the »Set up Google TV« item.
– »Select your wireless network« menu shall
be displayed.
8 Select your wireless network with
V
or
Λ
and press »« button.
9 Enter the wireless network password with
the screen keyboard, select and press
»« button.
– »Connecting to network .......« message
shall be displayed, and then »Connected«
message shall be displayed.
– »Tips for Energy Saving« menu shall be
displayed.

17ENGLISH
SETTINGS
------------------------------------------------------------------------------------------------------------------
10 Select »OK« by pressing »« to continue
with the wireless network connection.
– »Network Privacy Policy« menu shall be
displayed.
11 Select »ACCEPT«.
– »Sign in« menu shall be displayed.
12 Select and press »« to continue after
entering your e-mail address with the screen
keyboard.
13 Select and press »« to continue after
entering your account password with the
screen keyboard.
14 Follow the instructions displayed on your TV
and on the screen of your phone.
– »Terms of Service« menu shall be dis-
played.
15 Select »Accept«.
– »Google Services« menu shall be dis-
played.
16 Select »Accept«.
– »Google Assistant« menu shall be dis-
played.
17 Confirm »Continue« with »« button.
18 Confirm »Allow« with »« to be able to
search in all supported TV applications;
or
Select »No« and confirm with »« button.
19 Select the ones you want to install from the
applications you have subscriptions to and
select »Confirm« to continue and confirm
with »« button.
– »Accessories« menu shall be displayed.
Note:
7
Resume from article 27 for other settings.
Basic TV setup
20 Select the »Set up Basic TV« item.
– »Select your wireless network« menu shall
be displayed.
21 Select your wireless network with
V
or
Λ
and press »« button.
22 Enter the wireless network password with
the screen keyboard, select and press
»« button.
– »Connecting to network .......« message
shall be displayed, and then »Connected«
message shall be displayed.
– »Tips for Energy Saving« menu shall be
displayed.
23 Select »OK« to continue with the wireless
network connection.
– »Network Privacy Policy« menu shall be
displayed.
24 Select »Accept«.
– »
Terms of Service« menu shall be displayed.
25 Select »Accept«.
– »Google Services« menu shall be dis-
played.
26 Select »Accept«.
– »Accessories« menu shall be displayed.
Other settings
27 If you do not want to pair a Bluetooth acces-
sory press »a« button.
28 In order to pair the Bluetooth remote con-
trol, press »T« and
<
simultaneously for 5
seconds.
–
The white LED on the remote control flashes.
29 Bluetooth devices scanned and found shall
be displayed on the menu. »Select Google
TV Remote Control« and press »«.
– This completes the pairing of the remote
control and the TV and then »Password
Input« menu shall be displayed.
Important:
7
If you have problems in pairing the Blue-
tooth remote control, you need to reset it.
To do this, press »T« and
<
on the remote
control simultaneously for 5 seconds.
30 Enter the password with »1...0« buttons
on the password screen like »1 2 3 4« and
press »« button.
31 Enter the password »1 2 3 4« again using
»1...0« on the password confirmation
screen.
– »
Select TV mode« menu shall be displayed.

ENGLISH
18
SETTINGS
--------------------------------------------------------------------------------------------
32 Confirm »Home« by pressing »
«
or
Select »Store« and confirm with »
« but-
ton.
– The »Home« – mode is optimized for
energy efficiency in home use.
– »Store« – mode is optimized to allow
demo display on a store with fixed set-
tings.
33 To turn on the integrated Chromecast fea-
ture, select »On« and confirm with »
«;
or
Use
V
or
Λ
to select »Off« and confirm
with »
« button.
Important:
7 To keep integrated Chromecast feature
continuously on increases the energy
consumption.
34 Select the antenna type.
35 The next procedure depends on the selected
antenna type. Follow the instructions on the
screen.
– For DVB-S (Satellite) reception, go to
article 36
– For DVB-C (Cable) reception, go to article
57
– For DVB-T (Terrestrial) reception, go to
article 69
Searching for satellite channels
36 Select »Satellite«.
– »Antenna Type« menu shall be displayed.
37 Select »Other«.
– »Satellite Antenna Type« menu shall be
displayed.
Satellite Antenna Type Single Cable
Tone Burst
DiSEqC 1.0
DiSEqC 1.1
DiSEqC 1.2
38 Confirm »Single Cable« with »
« ;
or
Depending on the satellite system you
use, select »DiSEqC 1.0«, »DiSEqC 1.1«,
»DiSEqC 1.2«, »Single Cable I«, »Single
Cable II« or »Tone Burst« with
V
or
Λ
and
confirm with »
« button.
–
»Select Operator« menu shall be displayed.
Select Operator Operator
Standard
39 If you are using an operator serving your
country, select »Operator« and press »
«
button;
or
If you are not using an operator, select
»Standard« and press »
« button.
– »Satellite Selection« menu shall be dis-
played.
Satellite Selection Next
Turksat 42.0ºE On
40 Select the satellite displayed on the list and
confirm with »
«.
– »Satellite Settings« menu shall be dis-
played.
Satellite Settings Satellite Status
On
Satellite Selection
Turksat 42ºE
Scan Mode
Full
Scan Type
All
Store Type
All
41 Select »Satellite Status« as »On« with »
« .

19ENGLISH
SETTINGS
--------------------------------------------------------------------------------------------
42 Select »Satellite Selection«.
– »Satellite Selection« menu shall be dis-
played.
Satellite Selection Astra4A/SES5 5E
Eutelsat 7B/C 7.0E
Eutelsat 9B 9.0E
Hotbird 13B/C/E 13.0 E
Astra1KR/L/M/N 19.2 E
43 Select the satellite you want to perform scan
on with
V
or
Λ
and confirm with »
«
button.
44 Select »Scan Mode«.
– »Scan Mode« menu shall be displayed.
Scan Mode Network
Full
45 Select »Network« or »Full« with
V
or
Λ
and confirm with »
« button.
46 Select »Scan Type«.
– »Scan Type« menu shall be displayed.
Scan Type All
Encrypted Channels Only
Only Free Channels
47 Select »Encrypted Channels Only« for paid
channels, »Only Free Channels« for free
channels, or »All« to scan for both, and
press »
« button.
48 Select »Store Type«.
– »Store Type« menu shall be displayed.
Store Type All
Only Digital Channels
Only Radio Channels
49 Select »Digital Channels Only« for digital
channels, »Only Radio Channels« for radio
channels, or »All« to scan for both, and
press »
« button.
Note:
7 If you encounter a significant shortage
of channels or no signal, make sure that
the cable connection, signal level, Diseqc
A/B/C/D and LNB selections are made
correctly.
50 Press »a« to return to the previous menu
after completing the settings.
51 Use
V
or
Λ
to select »Next« and confirm
with »
«button.
52 To start scanning for channels, select »Scan«
and press »« to confirm.
– The »Scanning« menu shall be displayed
and it starts to scan for TV channels.
– The scan is complete when the »FINISH«
message is displayed.
53 Press »«.
– »Smart TV Service Conditions« item shall
be displayed.
54 Select »Accept« and press »
« to confirm.
55 Press »Watch TV« to watch TV
or
Select »Edit Channels« and press »
« to
open the channel editor.
– »Loading your applications« menu shall
be displayed, followed by the »Your
Google TV experience is ready« menu.
56 Press »« to complete the set-up.

ENGLISH20
Searching for cable channels
57 Select »Cable«.
– »Channel Scan« menu shall be displayed.
Channel Scan
First, please connect with the cable.
Start the channel scan now?
You may scan for channels from the Menu if you skip this step.
Digital and analogue
channels
Only analogue channels
Only digital channels
Skip Scan
58 To start scanning for channels, select the
scan type and confirm with »
« button.
– »Cable Scan Configure« menu shall be
displayed.
59 Press »« to select »Scan Mode«, select
»Full«, »Advanced« or »Fast« and confirm
with »
« button.
60 Select »Store Type«.
– »Store Type« menu shall be displayed.
61 Select »Digital Channels Only« for digital
channels, »Only Radio Channels« for radio
channels, or »All« to scan for both, and
press »
« button.
62 Select »Scan Type«.
– »Scan Type« menu shall be displayed.
63 Select »Encrypted Channels Only« for paid
channels, »Only Free Channels« for free
channels, or »All« to scan for both, and
press »
« button.
64 Press
>
to start scanning for channels.
– The »Scanning« menu shall be displayed
and it starts to scan for TV channels.
– The scan is complete when the »FINISH«
message is displayed.
65 Press »«.
– »Smart TV Service Conditions« item shall
be displayed.
66 Select »Accept« and press »
« to confirm.
SETTINGS
--------------------------------------------------------------------------------------------
67 Press »Watch TV« to watch TV
or
Select »Edit Channels« and press »
« to
open the channel editor.
– »Loading your applications« menu shall
be displayed, followed by the »Your
Google TV experience is ready« menu.
68 Press »« to complete the set-up.
ENGLISH22
SETTINGS
--------------------------------------------------------------------------------------------
Editing digital channels
Channels found at the end of the scan are
stored separately for each tuner mode.
You can change the order of channels, skip
channels, rename channels and delete the chan-
nel list via the channel management. You can
also create and edit your favorites list.
You can edit the television channels from the
»Channels« menu, or you can easily edit the
channels with the »Channel Editor« application
built into your television.
Starting Channel Editor Application
1 Press »
T«.
2 In the »Applications« tab, select the »Chan-
nel Editor« application and confirm with
»«.
– »Channel Editor« menu is displayed.
Notes:
7 Select "Show all" if "Channel Editor" is not
among your favorite apps.
7 Additional procedures are explained in the
following sections.
13 Channel
12 Channel
14 Channel
15 Channel
16 Channel
17 Channel
18 Channel
19 Channel
20 Channel
11 Channel
1
2
3
4
Satellite
Favorite
Move
Channel Swap
Go to channels 0-9
P +/- Skip Page
Delete
Edit Number
Other
Full List
Tuner mode selection
The channel table for all sources as satellite
(Standard), satellite (Operator), cable and an-
tenna is stored separately. To edit, first select the
broadcast source you will edit.
1 Select » s « from »Channel Editor« menu
with »
>
«, »
V
« or »
Λ
« and confirm with
»«.
– »Input Source« menu will be displayed.
2 Select the source you want to edit from »An-
tenna«, »Cable«, »Satellite« or «Analogue«
options with »
V
« or »
Λ
« and confirm with
»«.
– The channel list is displayed based on
your choice of channel.

23ENGLISH
SETTINGS
---------------------------------------------------------------------------------------------
Creating a list of favourites
You can select your favorite channels and save
them as a list.
Notes:
7 favorite lists must be created separately for
all sources (satellite, cable and air).
7 You can save your favorite channels in 4
separate lists. Before adding channels to
the favorite list, it is necessary to select the
favorite list to be added.
1 In the »Channel Editor« menu, press »
V
«
or »
Λ
« to select the channel(s) you want
to add to the favorite list and press »
« to
highlight.
–The channel will be marked with »
«.
2 Press »
« (red) to select the favorite list.
3 Select favorite list you want to add channels
with »
« (red), »
« (green), »
« (yellow)
or »« (blue) (FAV 1- FAV 4).
4 To exit from »Channel Editor« menu press
»a «, select »Yes« and confirm with »
« .
Moving channels in the favourites list
Move favorite channels to the channel location
you want and edit the list.
1 Select the favorite list you want to edit on
»Channel Editor« menu with »
<
«, »
V
« or
»
Λ
« and confirm with »
« .
–Selected favorites list channels are dis-
played.
2 Select the channel you want to move with
»
V
« or »
Λ
« and highlight it with »
«.
–The channel/channels will be marked with
»«.
3 Press »
« ( (green).
4 Select new channel location with »
V
« or
»
Λ
« and confirm with »
« .
–Channels are moved to the new channel
location.
5 To exit from »Channel Editor« menu press
»a «, select »Yes« and confirm with »
« .
Moving channel in favourites list
Change the location of the channels recipro-
cally in favorites list. For example; move channel
2 to channel 20, channel 20 to channel 2.
1 Select the favorite list you want to edit on
»Channel Editor« menu with »
<
«, »
V
« or
»
Λ
« and confirm with »
« .
–Selected favorites list channels are dis-
played.
2 Select the first channel you want to move
reciprocally with »
V
« or »
Λ
« and highlight
with »
«.
–The channel will be marked with »
«.
3 Press »
« (yellow).
4 Select the second channel you want to
move with »
V
« or »
Λ
« and confirm with
»« .
–Two channels’ locations are changed
reciprocally.
5 To exit from »Channel Editor« menu press
»a«, select »Yes« and confirm with »
« .
Deleting channels in the favourites list
1 Select the favorite list you want to edit on
»Channel Editor« menu with »
<
«, »
V
« or
»
Λ
« and confirm with »
« .
–Selected favorites list channels are dis-
played.
2 Select the channel you want to delete with
»
V
« or »
Λ
« and highlight it with »
«.
–The channel/channels will be marked with
»«.
3 Press »
« (blue) to delete the selected
channels.
– Channel/Channels are deleted from the
selected favorite list.
4 To exit from »Channel Editor« menu press
»a «, select »Yes« and confirm with »
« .

ENGLISH24
SETTINGS
--------------------------------------------------------------------------------------------
Move channel
Move the channels to the channel location you
want and edit the list.
5 In the »Channel Editor« menu, press »
V
«
or »
Λ
« to select the channel(s) you want to
move and press »
« to highlight.
–The channel/channels will be marked with
»«.
6 Press »
« ( (green).
7 Select new channel location with »
V
« or
»
Λ
« and confirm with »
« .
– Channel/Channels are moved to the new
channel location.
8 To exit from »Channel Editor« menu press
»a «, select »Yes« and confirm with »
« .
Note:
7 If you change the channel order, the chan-
nel numbers sent by the broadcaster will
change.
Moving channel location
Change the location of the channels recipro-
cally. For example; move channel 2 to channel
20, channel 20 to channel 2.
1 Select the first channel you want to move
reciprocally with »
V
« or »
Λ
« and highlight
with »
«.
–The channel will be marked with »
«.
2 Press »
« (yellow).
3 Select the second channel you want to
move with »
V
« or »
Λ
« and confirm with
»« .
–Two channels’ locations are changed
reciprocally.
4 To exit from »Channel Editor« menu press
»a «, select »Yes« and confirm with »
« .
Deleting the channel
1 In the »Channel Editor« menu, press »
V
«
or »
Λ
« to select the channel(s) you want to
move and press »
« to highlight.
–The channel/channels will be marked with
»«.
2 Press »
« (blue) to delete the selected
channels.
– Channel/Channels are deleted.
3 To exit from »Channel Editor« menu press
»a «, select »Yes« and confirm with »
« .
Delete channel list
Delete the channel list of the selected broadcast
source.
1 Press »
H« to return to the TV mode.
2 Press »
S« and select »Edit Channel« with
»
Λ
« and »
>
« and confirm with »
« .
– »Edit Channel« menu shall be displayed.
3 Select »Clear Channel List« with »
V
«, »
Λ
«,
, and confirm with »
«.
4 Select »Continue« with »»
<
« « or »
>
« to
confirm the deletion and press »
«;
or
select »Cancel« and press »
« to cancel it.
5 Press »
a « to return to the previous menu,
press »
H« to return to TV broadcast or
press »
T« to return to Home menu.

25ENGLISH
SETTINGS
--------------------------------------------------------------------------------------------
Skip channel
With »
V
«, »
Λ
« or » «, you can select
the TV channels you want to skip during channel
selection. It is possible to select channels that
are skipped with the number buttons.
1 Press »
H« to return to the TV mode.
2 Press »
S« and select »Edit Channel« with
»
Λ
« and »
>
« and confirm with »
« .
– »Edit Channel« menu shall be displayed.
3 Select »Skip Channel« with »
V
«, »
Λ
«, ,
and confirm with »
«.
– Skip Channel menu shall be displayed.
4 Press »
V
« or »
Λ
« to select the channel(s)
you want to skip from the channel list and
press »
« to highlight.
–The channel will be marked with »
«.
Note:
7 Press »
« (red) to display the previous
page in the skip channel menu, press »
«
(green) to view the next page.
5 Press »
a« to return to the previous menu,
press »
H« to return to TV broadcast or
press »
T« to return to Home menu.
Edit channel
Rename channels.
1 Press »
H« to return to the TV mode.
2 Press »
S« and select »Edit Channel« with
»
Λ
« and »
>
« and confirm with »
« .
– »Edit Channel« menu shall be displayed.
3 Select »Edit Channel« with »
V
«, »
Λ
«, , and
confirm with »
«.
– Edit Channel menu shall be displayed.
4 Select the channel you want to edit with
»
V
«, »
Λ
«, and confirm with »
«.
– Channel information shall be displayed.
5 Select »The Channel Name« with »
V
«,
»
Λ
«, , and confirm with »
«.
6 To delete the current name, select » « with
»
<
«, »
>
«, »
V
« or »
Λ
« and press »
«.
7 Select the required character/number with
»
<
«, »
>
«, »
V
« , or »
Λ
« and move to the
next character with »
«.
Do the same for all characters/numbers.
Note:
7 You can switch between uppercase/lower-
case letters using » « »➡«, and switch
between special characters/letters by using
»?123« »➡«.
8 To save the new name, select »
« with
»
<
«, »
>
«, »
V
« or »
Λ
« and press »
«.
9 Press »
a« to return to the previous menu,
press »
H« to return to TV broadcast or
press »
T« to return to Home menu.

ENGLISH26
PICTURE / SOUND SETTINGS
----------------------------------------------------
Picture settings
1 Press »
T« and »S«.
2 Select »S« »Settings« with »
V
« and
confirm with »
«
3 Select »Display and Sound« with »
V
« and
confirm with »
«.
4 Confirm »Image« with »
« button.
or
Press »
H« and »S,« select »Picture« with
»
>
«, and confirm with »
«.
– »Picture« menu shall be displayed.
Picture
Picture Mode
Energy Saving
Backlight
100
Brightness
50
Contrast
50
Saturation
50
TONE
0
Sharpness
5 Select the desired line/function with »
V
« or
»
Λ
« , press »
«, select the value/option
with »
<
« , or »
>
«.
Note:
7 Other settings are available under »Ad-
vanced Settings«.
6 Select »Advanced Settings« with »
V
« and
confirm with »
«.
7 Select the desired line/function with »
V
«
or »
Λ
« , press »
« to confirm, select the
value/option with »
<
« , or »
>
« and confirm
with »
« .
8 Press »
a « to return to the previous menu,
press »
H« to return to TV broadcast or
press »
T« to return to Home menu.
Enhanced picture settings
The “enhanced picture settings” are in principal
digital image improvements however, these
should be only used when necessary, when pic-
ture quality and transmission is excellent. They
may improve the display with poor material, as
well, but may adversely affect the display where
transmission and picture quality are excellent.
7 »Digital Noise Reduction (DNR)« – This
function can only be selected with digital
receiver sources and AV pre-sets. It re-
duces any interference from artefacts (pixel
blocks) fromdigital programmes due to
MPEG compression (such as from DVB-T
receivers and lower transmission rates or
DVD players).
7 »Noise Reduction (MPEG NR)« – Reduces
the visible “snow” by displaying the picture
a little less sharply and creating a slight
blurring. Thus, it must be used as little as
possible with good picture material.
7 »Dynamic Contrast« – This function dynami-
cally and optimally adjusts the contrast for
the respective picture content by analysing
images and then altering this depending in
a change in contrast. This increase in the
contrast however, may also reduce the vis-
ible brightness levels in the picture.
7 »Micro Dimming« – Increases the level of
detail in dark images. The television divides
the screen into small sections and analyses
each section individually to determine the
best brightness value. This ensures that
more detailed pictures are obtained in dark
contents.

27ENGLISH
PICTURE / SOUND SETTINGS
----------------------------------------------------
7 "Filmmaker Mode" - This function is auto-
matically activated as soon as a movie be-
ing watched is detected. By closing the PQ
blocks, the movie can be viewed with the
image settings set by the cinematographer
who shot the movie. In addition, the color
temperature is set to "Warm" and brightness
to 200 nits for a cinematic experience.
7 »Flesh Tone« – This function provides the
most accurate skin colour by adjusting the
brightness and saturation specific to the skin
colour.
7 »Film mode« detects and processes feature
films automatically for all channel sources.
So you always get the best picture.
This works for 480i, 576i and 1080i modes
in TV playback and for other channel
sources.
If "Film mode" is switched on for programs
that do not have a feature film signal, minor
problems may occur, such as a dull picture,
incorrect subtitles, or thin lines in the picture.
7 "Blue Stretch" - This function increases the
perception of brightness by increasing the
blue intensity of white and gray tones.
7 »Gamma« – This setting determines which
brightness value should be displayed for
which digital transmission value. Most
recordings are transmitted with a gamma
value of 2.2 (all Windows PCs and newer
PCs with a MAC operating system work
with this; older MAC systems and transmis-
sions without a color profile mostly operate
with a gamma value of 1.8).
7 "Game mode" - When activated, this func-
tion minimizes image latency to a minimum
(below 33ms) for a better gaming experi-
ence and to avoid lag problems when
playing games.
7 "PC Mode" - This function disables all
advanced picture settings and makes the
image behave as if viewed on a monitor.
7 »Color Transition Improvement« – This func-
tion provides smooth colour transitions by
eliminating content-related errors in colour
transitions.
7 »MEMC« – Motion stabilization eliminates
judder effects in motion content, providing a
smoother viewing experience.
7 "HDMI RGB range" - This function sets the
black and white range of the TV to the
correct values according to the device con-
nected via HDMI.
7 »Low Blue Light« – This function reduces the
amount of blue light emitted from the LEDs,
allowing more natural light to be emitted
from the TV screen and reducing eye strain.
7 "Color space" - This function selects the col-
or space, allowing colors to be displayed in
standard or wide scale.
7 »Color Management System« – This func-
tion allows the brightness, contrast and tone
of the colours to be adjusted separately. It is
possible to adjust these settings separately
for red, green, blue, magenta, black and
yellow colours. With this function, advanced
settings can be made in very specific
contents
7 »11 Point White Balance Correction« – This
function makes precise color temperature
adjustment in different shades of grey.
When content containing shades of grey
is played on the screen, the red-green-blue
components of the grey tones can be pre-
cisely adjusted separately with this function.
Restoring factory defaults for picture
settings
1 To reset the changes made in the »Picture«
menu, press »
V
« to select»Reset to Default«
and confirm with »
«.
2 Select »Ok« with »
V
« or »
Λ
« to confirm
the deletion and press »
«;
or
select »Cancel« and press »
« to cancel it.
3 Press »
a « to return to the previous menu,
press »
H« to return to TV broadcast or
press »
T« to return to Home menu.

ENGLISH28
PICTURE / SOUND SETTINGS
----------------------------------------------------
Sound settings
1 Press »
T« and »S«.
2 Select »S« Settings« with »
V
« and confirm
with »
«
3 Select »Display and Sound« with »
V
« and
confirm with »
«.
4 Confirm »Sound« with »
« button.
or
Press »
H« and »S,« select »Sound« with
»
>
« and confirm with »
«.
– »Sound« menu shall be displayed.
Sound
DTS Virtual:X
Sound Style
Standard
Balance
0
Bass
50
Treble
50
Surround Sound
Equalizer Details
Note:
7 Additional procedures are explained in the
following sections.
DTS Virtual:X
1 Select the line »DTS Virtu:X« from the sound
menu with »
V
« or »
Λ
« and confirm with
»«.
2 Select »Virtual:X«, »TBHDX«, »Limiter« with
»
V
« or »
Λ
« and select the position »On«
or »Off« with »
«.
Note:
7 »TBHDX« and »Limiter« is active on the
menu when »Virtual:X« is selected as »On«.
3 Press »
a « to return to the previous menu.
Sound Style
1 Select the line »Sound Style« from the sound
menu with »
V
« or »
Λ
« and confirm with
»«.
2 Press »
V
« or»
Λ
« to select audio style you
want and press »
« to confirm.
3 Press »
a« to return to the previous menu.
Balance
1 Select the line »Balance« from the sound
menu with »
V
« or »
Λ
« and confirm with
»«.
2 Select value with »
<
« or »
>
«.
3 Press »
a« to return to the previous menu.
Bass
1 Select the line »Bass« from the sound menu
with »
V
« or »
Λ
« and confirm with »
«.
2 Select value with »
<
« or »
>
«.
3 Press »
a« to return to the previous menu.

29ENGLISH
PICTURE / SOUND SETTINGS
----------------------------------------------------
Treble
1 Select the line »Treble« from the sound menu
with »
V
« or »
Λ
« and confirm with »
«.
2 Select value with »
<
« or »
>
«.
3 Press »
a « to return to the previous menu.
Surround sound
1 Select the line »Surround Sound« from the
sound menu with »
V
« or »
Λ
«.
2 Select the position »On« or »Off« with »
«.
3 Press »
a « to return to the previous menu.
Equalizer Details
Equalizer offers a sound setting that you can
create.
Note:
7 »Equalizer Details« is active in the menu
when »Sound Style« is selected as »User«.
1 Select the line »Equalizer Details« from the
sound menu with »
V
« or »
Λ
« and confirm
with »
«.
– »Equalizer Details« menu shall be dis-
played.
2 »120Hz« frequency band shall be dis-
played.
Press »
<
«or »
>
« to set the preferred value.
3 Select the next frequency band with »
V
« or
»
Λ
« to repeat the adjustment procedure.
4 Press »
a « to return to the previous menu.
eARC
1 Select the line »eARC« from the sound menu
with »
V
« or »
Λ
« and confirm with »
«.
2 Use »
V
« or »
Λ
« to select »Auto« or »Off«
and confirm with »
«.
3 Press »
a « to return to the previous menu.
Auto volume
Television channels broadcast at different
volumes. Automatic Volume Control function
ensures the volume is kept the same when you
switch between channels.
1 Select the line »Auto Volume Control« from
the sound menu with »
V
« or »
Λ
«.
2 Select the position »On« or »Off« with »
«.
3 Press »
a « to return to the previous menu.
Downmix Mode
1 Press »
V
« or »
Λ
« to select »Downmix
Mode« and press »« to confirm.
2 Use »
V
« or »
Λ
« to select »Stereo« or »Sur-
round« and confirm with »
«.
3 Press »
a « to return to the previous menu.
DTS DRC
Adjusts the range between loudest and quietest.
1 Press »
V
« or »
Λ
« to select »DTS DRC«.
2 Select the position »On« or »Off« with »
«.
3 Press »
a « to return to the previous menu.
Dialogue Enhancer
1 Use »
V
« or »
Λ
« to select »Dialogue En-
hancer« and confirm with »
« button.
2 Select »Off«, »Low«, »Medium« or »High«
with »
V
« or »
Λ
« and confirm with »
«.
3 Press »
a « to return to the previous menu.

ENGLISH30
PICTURE / SOUND SETTINGS
----------------------------------------------------
Restoring factory defaults for sound
settings
1 To reset the changes made in the »Sound«
menu, press »
V
« to select »Reset to De-
fault« and confirm with »
«.
2 Select »Ok« with »
<
« or »
>
« to confirm the
deletion and press »«;
or
select »Cancel« and press »
« to cancel it.
3 Press »
a« to return to the previous menu,
press »
H« to return to TV broadcast or
press »
T« to return to Home menu.

ENGLISH32
Notes:
7
You can select one of the following picture
formats.
»Auto« format
The picture format is automatically switched to
»16:9« for 16:9 programmes.
The picture format is automatically switched to
»4:3« for 4:3 programmes.
»Full Screen« format
When this mode is selected, the high resolution
picture from the HDMI and Component inputs
is not cropped and it is displayed in its original
size. This mode is only enabled in the HDMI
mode and for resolutions at or above 720p.
»Super Zoom« format
This setting is suited to films with a large width/
height ratio.
»Unscaled« format
Unscaled format displays pictures in their origi-
nal size.
»4:3« format
The picture is shown in 4:3 format.
»Movie expand 14:9« and »Movie ex-
pand 16:9« formats
During programmes in 4:3 format, the picture
is stretched horizontally if »16:9« or »14:9« is
selected.
The picture geometry is stretched horizontally.
With actual 16:9 signal sources (from a satel-
lite receiver or the Euro-AV socket) the picture
fills the screen completely and with the correct
geometry.
FUNCTIONING OF THE TV - ADDITIONAL FUNCTIONS
--------
Power Settings
Go to »Power Settings« to adjust your TV’s
power settings.
1 Press »H« and then press »S«.
2 Select »Power« with »
<
« or »
>
« and con-
firm with »«.
– Power menu shall be displayed.
Power
Sleep timer
Off
Picture off
Auto Off Timer
Off
Automatic shut down
4 Hours
Sleep timer
In the »Sleep Timer« menu you can enter a
timefor the television to switch off. After this time
has elapsed, the television switches to standby
mode.
1 Go to » « menu with »Power
V
« or »
Λ
« to
select »Sleep Timer« and confirm with »«.
2 Select the off time with »
V
« or »
Λ
« and
confirm with »«.
3 Press »a
« or » H« to return to the broad-
cast.

33ENGLISH
FUNCTIONING OF THE TV - ADDITIONAL FUNCTIONS
----------
Picture off
You can only turn picture off without taking the
TV to stand-by mode.
1 Go to » « menu with »Power
V
« or »
Λ
« to
select »Picture Off« and confirm with »
«.
– Television picture shall be turned off.
2 Press any key on the remote control to turn
the picture back on.
3 Press »a « or »H« to return to the broad-
cast.
Auto off timer
1 Go to » « menu with »Power
V
« or »
Λ
« to
select »Off Timer« and confirm with »«.
2 Select the off time with »
V
« or »
Λ
« and
confirm with »«.
3 Press »a « or »H« to return to the broad-
cast.
Automatic shutdown
This function will switch the television to standby
mode in 4 hours according to European regula-
tions, if no key on the keypad of the TV or the
remote control is not pressed.
1 Go to » « menu with »Power
V
« or »
Λ
« to
select »Automatic Shutdown« and confirm
with »«.
2 Select the off time with »
V
« or »
Λ
« and
confirm with »«.
3 Press »a « or »H« to return to the broad-
cast.
Parental Supervision
There are movies which contain contents or
scenes which are not suitable for children.
Certain programmes contain information which
identifies these contents or scenes and have
been given an access level from 4 to 18. You
can select one of the access levels and thus
authorise the playback.
1 Press »H« and then press »
S«.
2 Use »
<
« or »
>
« to select »Parental Con-
trols« and confirm with »« button.
– »Enter your PIN« message shall be dis-
played.
Note:
7
PIN code is the PIN code that you have set
at the first set-up of the television.
3 1...0Enter the PIN code with » «.
– »Parental Controls« menu is displayed.

ENGLISH34
FUNCTIONING OF THE TV - ADDITIONAL FUNCTIONS
----------
Parental Controls
Blocked Channels
N/A
Programme Restrictions
Inputs Blocked
Change PIN
Note:
7
Additional procedures are explained in the
following sections.
Blocking a TV channel
You can block individual television channels
which are not suitable for children using a per-
sonal PIN code.
1 Select »Blocked Channels« from »Parental
Controls« menu with »
V
« or »
Λ
« and
confirm with »«.
2 Select the channel you want to block with
»
V
« or »
Λ
« and confirm with »«.
3 Press »a « to return to the previous menu
orpress »H« to return to the broadcast.
Watching a blocked TV channel
You can watch a TV channel blocked with PIN
code by selecting the TV channel and entering
the PIN code.
1 1…0Press » « or » « to select the
blocked channel.
2 Enter the PIN code on the displayed pass-
word screen using »1...0«.
– Blocked channel will be viewed.
Note:
7
Channel will be blocked again when you
change the channel.
Programme Restrictions
There are movies which contain contents or
scenes which are not suitable for children.
Certain programmes contain information which
identifies these contents or scenes and have
been given an access level from 4 to 18. You
can select one of the access levels and thus
authorise the playback.
1 Select »Programme Restrictions« from
»Parental Controls« menu with »
V
« or »
Λ
«
and confirm with »«.
2 Select »Rating Systems« with »
V
« and
confirm with »«.
3 Use »
V
« or »
Λ
« to select grading system
and confirm with »«.
4 Press »a « to return to the previous menu.
5 Select »Ratings« with »
V
« and confirm with
»«.
6 Select access level with »
V
« or »
Λ
« and
confirm with »«.
7 Press »a « to return to the previous menu
orpress »H« to return to the broadcast.

35
ENGLISH
Blocking an external source
You can block external sources individually by
using your personal PIN code.
1 Select »Inputs Blocked« from »Parental Con-
trols« menu with »
V
« or »
Λ
« and confirm
with »
«.
2 Select the source you want to block with
»
V
« or »
Λ
« and confirm with »
«.
3 Press »
a « to return to the previous menu
orpress »
H« to return to the broadcast.
Watching a blocked external
source
You can watch an external source blocked with
a PIN code by selecting the blocked source and
entering the PIN code.
1 press » s « , select the signal source with
»
V
« or »
Λ
« and confirm with »
«.
or
2 Press »
S« in TV mode, confirm »Source«
with »
«, select the signal source with »
V
«
or »
Λ
« and confirm with »
« .
or
3 Press »
S« in the Home menu »
s « Select
inputs and confirm with »
«. Use »
V
« or
»
Λ
« to select signal source and confirm
with the »
«.
4 Enter the PIN code on the displayed pass-
word screen using »1...0«.
– Blocked channel shall be displayed.
Note:
7 Source will be blocked again when you
change the source.
Changing the PIN code
You can change the PIN code you created in
the first installation.
1 Select »Change PIN« from »Parental Con-
trols« menu with »
V
« or »
Λ
« and confirm
with »
«.
2 Enter the existing PIN code as four digits
with »1...0«.
3 Enter the new PIN code as four digits with
»1...0«.
4 Enter the new PIN code again as four digits
with »1...0«.
5 Press »
a « to return to the previous menu
orpress »
H« to return to the broadcast
FUNCTIONING OF THE TV - ADDITIONAL FUNCTIONS
--------

ENGLISH36
FUNCTIONING OF THE TV - ADVANCED FUNC-
TIONS ----------------------------------------------------------------------------------------------------
You can adjust the advanced settings of the TV
in the »Advanced Options« menu.
1 Press »
H« and then press »
S«.
2 Select the »Advanced Options« with »
<
« or
»
>
«and confirm with »
« .
– »Advanced Options« menu shall be
displayed.
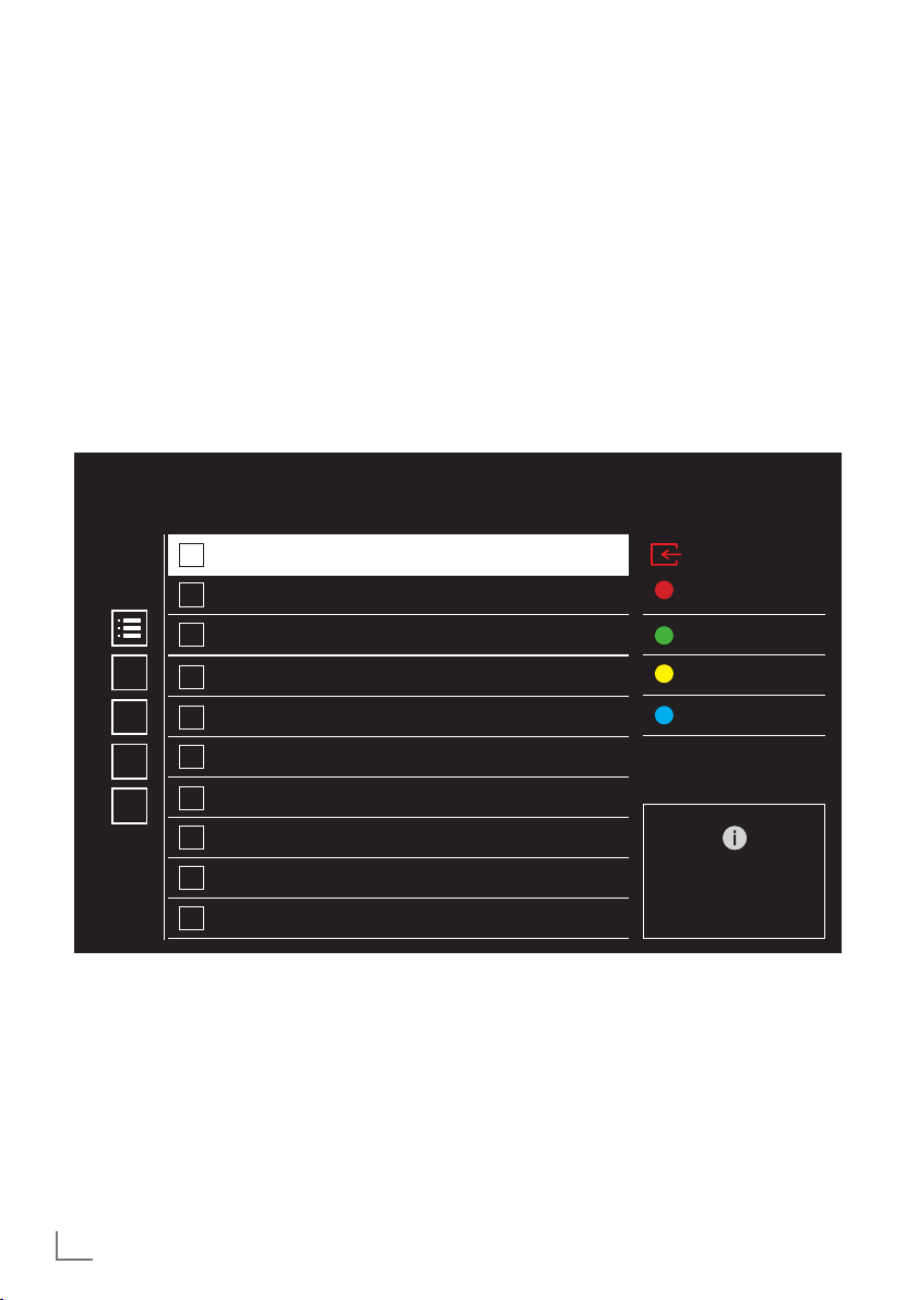
Advanced Options
Sound
Subtitle
Teletext
Silent Blue Screen
Automatic shut down when no signal
15 minutes
Default Channel
HBBTV Settings
BISS Key
System information
Note:
7 Additional procedures are explained in the
following sections.
Changing the audio language
(only for digital television channels)
You can define a primary and a secondaryau-
dio language.
1 Select "Audio" from the "Advanced Op-
tions" menu and confirm with »
«.
2 Use »
V
« or »
Λ
« to select »Language« and
confirm with »
« button.
3 Press »
V
« or »
Λ
« to select language you
want and press »
« to confirm.
4 Press »
V
« or »
Λ
« to select »Secondary Au-
dio Language« and press »
« to confirm.
5 Press »
V
« or»
Λ
« to select the secondary
language you want and press »« to
confirm.
6 Press »
a « to return to the previous menu
orpress »H« to return to the broadcast.
Audio language
You can select various languages when watch-
ing digital channels. This depends on the pro-
gramme being broadcast.
1 Select "Audio" from the "Advanced Op-
tions" menu and confirm with »
«.
2 Use »
V
« or »
Λ
« to select »Language« and
confirm with »
«button.
3 Press »
V
« or »
Λ
« to select the supported
language and press »« to confirm.
Note:
7 In TV mode you can change »Audio Lan-
guage« by pressing »
I«.
4 Press »
a « to return to the previous menu
orpress »H« to return to the broadcast.

37ENGLISH
FUNCTIONING OF THE TV - ADVANCED
FUNCTIONS ---------------------------------------------------------------------------------------
Audio File Type
1 Select "Audio File Type" from the "Advanced
Options" menu and confirm with »
«.
2 Use »
V
« or »
Λ
« to select »Language« and
confirm with »
« button.
3 Using »
V
« or »
Λ
« select "Normal", "Audio
Description", "Closed Captioning", "Hearing
Impaired Option" or "Audio Description
and Closed Captioning" and click »
« to
confirm.
4 Press »
a « to return to the previous menu
orpress »
H« to return to the broadcast.
Visually impaired
Note:
7 Visually Impaired option is active in the
menu when "Audio File Type", "Audio
Description" is selected.
1 Select "Audio File Type" from the "Advanced
Options" menu and confirm with »
«.
2 Use »
V
« or
Λ
« to select »Visually Im-
paired« and confirm with »
« button.
3 Select the desired line/function with »
V
« or
»
Λ
« , press »
«, select the value/option
with »
<
« , or »
>
«.
4 Press »
a « to return to the previous menu
orpress »
H« to return to the broadcast.
Subtitles
1 Select "Subtitles" from the "Advanced Op-
tions" menu and confirm with »
«.
– »Subtitle« menu shall be displayed.
Note:
7 In TV mode, you can open the »Subtitle«
menu by pressing » « on remote control.SUB
Analogue Subtitle
1 Select »Analogue Subtitle« from the »Sub-
title« menu with »
V
« or »
Λ
« and confirm
with »
«.
2 Press »
V
« or »
Λ
« to select »On« or »Off«
and confirm with »
«.
3 Press »
a « to return to the previous menu
orpress »H« to return to the broadcast.
Digital Subtitle
1 Select »Digital Subtitle« from the »Subtitle«
menu with »
V
« or »
Λ
« and confirm with
»«.
2 Press »
V
« or »
Λ
« to select »On« or »Off«
and confirm with »
«.
3 Press »
a « to return to the previous menu
orpress »H« to return to the broadcast.
Digital Subtitle Language
1 Select »Digital Subtitle Language« from
the »Subtitle« menu with »
V
« or »
Λ
« and
confirm with »
«.
2 Press »
V
« or»
Λ
« to select the digital sub-
title language and press »
« to confirm.
3 Press »
a « to return to the previous menu
orpress »H« to return to the broadcast.
Second Digital Subtitle Language
1 Select the »Second Digital Subtitle Lan-
guage« from the »Subtitle« menu with »
V
«
or »
Λ
« and confirm with »
«.
2 Press »
V
« or »
Λ
« to select the second
digital subtitle language and press »
« to
confirm.
3 Press »
a « to return to the previous menu
orpress »H« to return to the broadcast.

ENGLISH38
Subtitle Type
1 Select »Subtitle Type« from the »Subtitle«
menu with »
V
« or »
Λ
« and confirm with
»«.
2 Press »
V
« or »
Λ
« to select »Normal« or
»Hearing Impaired Option« and confirm
with »
«.
Note:
7 If the »Hearing Impaired« option is se-
lected, subtitle services are provided with
annotations.
3 Press »
a « to return to the previous menu
orpress »H« to return to the broadcast.
Teletext language selection
1 Select »Teletext« from the »Advanced Op-
tions« menu with »
V
« or »
Λ
« and confirm
with »
«.
– »Teletext« menu shall be displayed.
Digital Teletext Language
1 Select »Digital Teletext Language« from
the »Subtitle« menu with »
V
« or »
Λ
« and
confirm with »
«.
2 Press »
V
« or»
Λ
« to select the digital tele-
text language and press »
« to confirm.
3 Press »
a « to return to the previous menu
orpress »H« to return to the broadcast.
Decoding Page Language
1 Select »Decoding Page Language« from
the »Teletext« menu with »
V
« or »
Λ
« and
confirm with »
«.
2 Press »
V
« or »
Λ
« to select the page de-
coding language and press »
« to confirm.
3 Press »
a « to return to the previous menu
orpress »H« to return to the broadcast.
FUNCTIONING OF THE TV - ADVANCED FUNC-
TIONS ---------------------------------------------------------------------------------------------------
Blue Mute
You can select the screen colour blue when
there is no TV broadcast signal.
1 Press »
V
« or »
Λ
« to select »Blue Mute«
from the »Advanced Options« menu.
2 Select the position »On« or »Off« with »
«.
3 Press »
a « or »
H« to return to the broad-
cast.
Automatic shut down when no
signal
When there is no TV broadcast signal, the TV
turns off automatically after the set time.
1 Select »Automatic shutdown when no
signal« from the »Advanced Options« menu
with »
V
« or »
Λ
« and confirm with »
«.
2 Select the off time with »
V
« or »
Λ
« and
confirm with »
«.
3 Press »
a « or »
H« to return to the broad-
cast.
Default Channel
Select the default channel that the TV will turn
on.
1 Select »Default Channel« from the »Ad-
vanced Options« menu with »
V
« or »
Λ
«
and confirm with »
«.
2 Confirm »Select Mode« with »
« .
3 Select »Last Status« or »User Select« with
»
V
« or »
Λ
«.
Note:
7 When »User Select« is selected, default
Channel needs to be selected from »Show
Channels«.
4 Press »
a « or »
H« to return to the broad-
cast.

39ENGLISH
FUNCTIONING OF THE TV - ADVANCED FUNC-
TIONS ----------------------------------------------------------------------------------------------------
BISS Key
Biss key is an encryption technique. You can
watch a frequency encrypted with the Biss key
by entering the Biss key.
Note:
7 BISS Key item is displayed in the menu only
when the tuner mode is selected as »Satel-
lite«, »Operator Mode«, »Standard« .
1 Select »BISS Key« from the »Advanced Op-
tions« menu with »
V
« or »
Λ
« and confirm
with »
«.
2 To add BISS Key press »
«.
3 Use »
V
« or »
Λ
« to select »Frequency« and
confirm with »
«button.
4 Enter the frequency at which you will enter
the biss key with the »1...0«, select the »
«
on the virtual keyboard and confirm with
»«.
5 Use »
V
« or »
Λ
« to select »Symbol Rate
(Ksym/s)« and confirm with »
«.
6 Enter the frequency symbol rate for which
you will enter the biss key with the » «, 1...0
select the »
« on the virtual keyboard and
confirm with »
«.
7 Use »
V
« or »
Λ
« to select »Polarization«
and confirm with »
«button.
8 Select the polarization of the frequency for
which you will enter the biss key with »
V
«
or »
Λ
« and confirm with »
« .
9 Use »
V
« or »
Λ
« to select »Programme ID«
and confirm with »
«.
10 Enter the frequency programme ID for which
you will enter the biss key with the » «, 1...0
select the »
« on the virtual keyboard and
confirm with »
«.
11 Use »
V
« or »
Λ
« to select »CW Key« and
confirm with »
«.
12 Enter the biss key with the »1...0«, select the
»« on the virtual keyboard and confirm
with »
« .
13 Use »
V
« or »
Λ
« to select »Save Key« and
confirm with »
«.
Note:
7 The BISS Key can be entered for more than
one frequency. Repeat steps to to 2 13.
add Biss keys to different frequencies.
14 Press »a « to return to the previous menu
orpress »
H« to return to the broadcast.
TKGS Settings
Note:
7 TKGS Settings are displayed only when
Channel Setup is done as »Satellite (Opera-
tor Mode)«.
1 Select »TKGS« from the »Advanced Op-
tions« menu with »
V
« or »
Λ
« and confirm
with »
«.
– »TKGS Setting« menu shall be displayed.
Operation mode
1 Select »Operation Mode« from the »TKGS
Setting« menu with »
V
« or »
Λ
« and con-
firm with »
«.
2 Press »
V
« or »
Λ
« to select »Auto«, »Flex-
ible« or »TKGS Off« and confirm with »
«.
Note:
7 If the TKGS mode of operation is »Auto«,
»Change Swap«, »Move Channel« and
»Edit Channel« are not active. Select »Flex-
ible« or »TKGS Off« to edit the channels.
3 Press »
a « to return to the previous menu
orpress »
H« to return to the broadcast.
TKGS Locator List
1 Select »TKGS Locator List« from the »TKGS
Setting« menu with »
V
« or »
Λ
« and con-
firm with »
«.
2 Confirm »Click to Add Location« with »
«.
3 Use »
V
« or »
Λ
« to select »Frequency« and
confirm with »
«button.
4 Enter the channel location list frequency
with »1...0«, select the »
« on the virtual
keyboard and confirm with »
«.

ENGLISH40
5 Use »
V
« or »
Λ
« to select »Symbol Rate
(Ksym/s)« and confirm with »
«.
6 Enter the channel location list frequency
symbol rate with »1...0«, select the »
« on
the virtual keyboard and confirm with »
«.
7 Use »
V
« or »
Λ
« to select »Polarization«
and confirm with »
«button.
8 Use »
V
« or »
Λ
« to select »Polarization«
and confirm with »
«button.
9 Use »
V
« or »
Λ
« to select »Programme ID«
and confirm with »
«.
10 Enter the channel location list frequency pro-
gramme ID with »1...0«, select the »
« on
the virtual keyboard and confirm with »
«.
11 Use »
V
« or »
Λ
« to select »Save Location«
and confirm with »
«.
Note:
7 TKGS Locator List can be entered for more
than one frequency. Repeat steps to to 2 11
add to different frequencies.
12 Press »a « to return to the previous menu
orpress »
H« to return to the broadcast.
Resetting table version
1 Select »Reset Table Version« from the »TKGS
Setting« menu with »
V
« or »
Λ
« and con-
firm with »
«.
– A warning message shall be displayed.
2 Select »OK« to confirm the reset;
or
»Cancel« to cancel and press »
« to con-
firm.
3 Press »
a « to return to the previous menu
orpress »
H« to return to the broadcast.
Preferred List
1 Select »Preferred List« from the »TKGS Set-
ting« menu with »
V
« or »
Λ
« and confirm
with »
«.
2 Press »
V
« or »
Λ
« to select »HD« or »SD«
and confirm with »
«.
3 Press »
a « to return to the previous menu
orpress »
H« to return to the broadcast.
FUNCTIONING OF THE TV - ADVANCED FUNC-
TIONS ---------------------------------------------------------------------------------------------------
Signal information
1 Select »System information« from the »Ad-
vanced Options« menu with »
V
« or »
Λ
«
and confirm with »
«.
– »System information« shall be displayed.
Notes:
7 Signal information changes depending on
the current source.
7 The signal level not only depends on your
receiver system, but also on the channel
which is currently active. Remember this
when aligning your antenna using the
signal level display.
2 Press »
a « to return to the previous menu
orpress »
H« to return to the broadcast.
Open Source Licenses
1 Select »Open Source Licenses« from the
»Advanced Options« menu with »
V
« or
»
Λ
« and confirm with »
«.
– »Open source license shall be displayed.
2 View licenses with »
V
« or »
Λ
«.
3 Press »
a « to return to the previous menu
orpress »
H« to return to the broadcast.

ENGLISH42
HBBTV MODE
------------------------------------------------------------------------------------
What is HbbTV?
With its modern structure, content and high defi-
nition (HD) pictures and videos, HbbTV is a new
technology where broadcast and thebroadband
can be used together and which permits access
to interactive applications that the broadcast
provides through internet. The TV must be con-
nected to internet to receive HbbTV broadcast.
When you switch to a TV channel that offers
HbbTV service, the relevant message shall be
displayed.

43ENGLISH
HBBTV MODE
------------------------------------------------------------------------------------
Using HbbTV
When you switch to a TV programme that sup-
ports HbbTV, an info message will appear stat-
ing that HbbTV broadcast is available.
Note:
7 For HBBTV to be active HBBTV Support
must be enabled from HBBTV .
1 Press »
« (red) to open HbbTV.
– Information regarding the service will ap-
pear on the screen. Additionally, coloured
buttons necessary for browsing the menus
will also appear.
Notes:
7 The range of subjects and selection of
individual subjects are subject to the pro-
gramme provider.
7 Numeric buttons between » « and » « are 1 0
used for additional functions.
2 Press »
« (green), »
« (yellow) or »
«
(blue) to select the desired topic field.
3 Select the option you want with »
V
«, »
Λ
«,
»
<
« »
>
« in the selected topic field and
confirm with »
«.
4 Press »
« (red) to close HbbTV.
Note:
7 If navigation does not work in HbbTV
mode, press »
a « to exit the function.
Additional functions for video
indexes
1 Press » w « to start playback.
2 Press » w « to pause playback.
3 Press » w « to resume playback.
4 Press » u
« to rewind, press »
v « to fast
forward.
5 Press » w « for 5 seconds to stop playback.
HBBTV Settings
1 Press H TV« to return to the TV mode.
2 Press »
S«, select the »Advanced Options«
with »
<
« or »
>
« and confirm with »
«.
3 Use »
V
« or »
Λ
« to select »HBBTV Set-
tings« and confirm with »
«.
– HBBTV Settings menu shall be displayed.
HBBTV Settings
HBBTV Support
Do Not Track
Default
Cookie Settings
Default
Persistent Storage
Block Tracking Sites
Device ID
Reset Device ID
Note:
7 Additional procedures are explained in the
following sections.
HBBTV Support
You can turn off HbbTV, by this way warn-
ings for HbbTV are not displayed on channels
broadcasting HbbTV.
1 Select »HBBTV Support« with »
V
« or »
Λ
«
and select the position »On« or »Off« with
»«.
2 Press »
a« or »
H« to return to the broad-
cast.

ENGLISH44
HBBTV MODE
------------------------------------------------------------------------------------
Watch preferences
Set your watching preference for HbbTV ser-
vices.
1 Select »Do Not Track« with »
V
« or »
Λ
«
and confirm with »
«.
2 Press »
V
« or »
Λ
« to select »On«, »Off« or
»Default« and confirm with »
«.
3 Press »
a « or »
H« to return to the broad-
cast.
Cookie Settings
Set your cookie preference for HbbTV services.
1 Select »Cookie Settings« with »
V
« or »
Λ
«
and confirm with »
«.
2 Select »Block All«, »Block 3rd party cook-
ies« or »Default« with »
V
« or »
Λ
« and
confirm with »
«.
3 Press »
a « or »
H« to return to the broad-
cast.
Persistent Storage
Permanent storage on/off for HbbTV services.
1 Select »Persistent Storage« with »
V
« or
»
Λ
« and select the position »On« or »Off«
with »
«.
2 Press »
a « or »
H« to return to the broad-
cast.
Block Tracking Sites
Block/allow tracking sites.
1 Select »Block Tracking Sites« with »
V
« or
»
Λ
« and select the position »On« or »Off«
with »
«.
2 Press »
a « or »
H« to return to the broad-
cast.
Device ID
Turn off/on device ID.
1 Select »Device ID« with »
V
« or »
Λ
« and
select the position »On« or »Off« with »
«
2 Press »
a « or »
H« to return to the broad-
cast.
Reset Device ID
1 Use »
V
« or »
Λ
« to select »Reset Device
ID« and confirm with »
«.
2 Confirm »OK« with »
« to confirm the
reset.
or
press »
a « to cancel.
3 Press »
a « or »
H« to return to the broad-
cast.

45ENGLISH
TOP text or FLOF text mode
1 TXTPress » « to switch to teletext mode.
2 You can select teletext pages directly with
»1...0« or step by step with » «.
Note:
7 At the bottom of the screen, you will see an
information line consisting of a red, green
and, depending on the station, yellow and
blue text field. Your remote control has but-
tons with the corresponding colours.
3 Press »« (red) to go to the previous page.
4 Press »« (green) to select topic.
5 Press »« (yellow) to select partition.
6 Press »« (blue) to go to the next page.
7 TXTPress » «to exit teletext mode.
Normal text mode
1 TXTPress » « to switch to teletext mode.
2 You can select teletext pages directly with
»1...0«.
3 Press » « to go to the next page or
previous page.
4 TXTPress » «to exit teletext mode.
Calling the subpage directly
If the selected teletext page contains sub-pages,
the number of the selected sub-page as well as
the total number of pages is displayed.
1 Press »
<
« or »
>
« to select a sub-page.
TELETEXT MODE
-------------------------------------------------------------------------------

ENGLISH46
USB RECORDING
----------------------------------------------------------------------------
Information on recording and
playing television programmes
7 Recording and reproducing programmes,
this can only be done with digital television
stations (DVB-S, DVB-T and DVB-C).
7 The digital television stations (DVB-S, DVB-T
and DVB-C) you are able to record and
playback also depend on the broadcasting
station.
7 Besides recording and playing pro-
grammes, the Timeshift function can only be
carried out using an external data medium
(hard drive or USB stick).
7 Recordings can be made with most data
mediums on the market. However, we
cannot guarantee operation for all data
media.
7 Recording can only be done on USB
memory sticks and hard disks with FAT and
FAT32 format.
7 If you record a programme on an external
data medium, you can only watch it on your
television.
You cannot watch this programme on any
other device.
7 If you send your television to be repaired
and hardware components need to be
replaced, you might not be able to play the
recordings again on the repaired television.
7 Grundig isn't responsible for any loss of
data stored on any external storage device.
7 It is recommended to play the files saved on
DTV by PVR media player.
Possible limitations when using
an external data medium
Depending on the broadcasting station, you
may experience various restrictions on some
functions from some television stations.
GRUNDIG has no influence on these
restrictions.
7 Recording a programme on the external data
medium can be disabled by the broad-
caster.
»URI* protected! PVR function is blocked«
is displayed on the screen, then recording
or time shift is restricted (one recording pos-
sible) or disabled (recording not possible)
by the broadcaster.
*URI = user rights information.
7 If you record and save a programme on the
archive of an external data medium, play-
back can be restricted.
The broadcaster can allow you to see this
programme one or more times but could
also just make it available for a certain
period of time.
7 Stations from which children are protected,
immediately require a PIN number before
recording starts. If this authorization is not
given, the recording may not start.
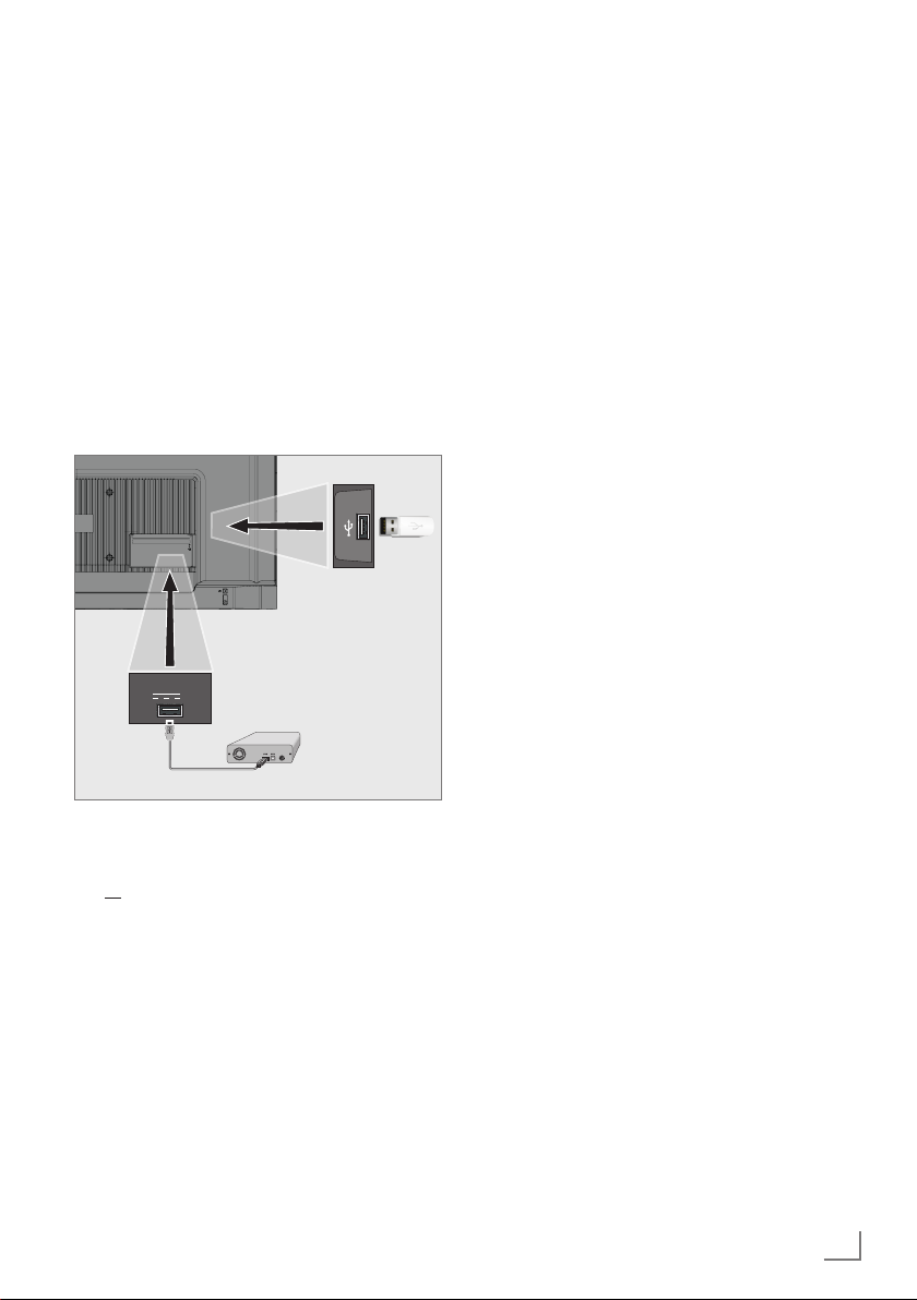
47ENGLISH
USB RECORDING
----------------------------------------------------------------------------
Connecting external data media
Notes:
7 It is advised to put the television on stand-by
mode before connecting the External Data
medium.
7 Before disconnecting the external data me-
dium, the television must first be switched to
standby, otherwise files can be damaged.
7 On TV, there are two USB ports, USB2
(HDD) USB1 and .
A USB device that needs additional power
(e.g. external hard disk) is connected to the
USB2 (HDD) input.
USB2 (HDD)
1A
USB1
1 Plug the external hard disk to the USB2
(HDD) USB interface of the television;
or
plug the memory stick in interface of USB1
the television.
Notes:
7 According to the USB standard, the USB1
socket of the TV supports a current of 500
mA. Devices such as external hard disk
andetc. that consume more power can only
beconnected to the USB USB2 (HDD)
interface ofthe television.
7 USB2 (HDD) If you are using a power
cable for the external hard disk that you
have connected to the USB interface, then
the power cable of the external hard disk
shall also be unplugged when the TV is
turned off.
7 You must not disconnect the USB Device
from the TV while a file on the USB Device
is being read by the TV.

ENGLISH48
USB RECORDING
-------------------------------------------------------------------------------------------
USB recording settings
1 Press »H« to return to the TV mode.
2 Press »S« and select »Save« with »
V
« .
3 Select »Device Information« with »
>
« and
confirm with »«.
4 Select the external data media connected to
the TV and confirm with »«.
– »Device Info Setting« menu is displayed.
Device Info Setting
Set Time Shift
Set PVR
Format
Speed Test
Note:
7
Additional procedures are explained in the
following sections.
Formatting external data medium
Important:
7
Formatting external data medium causes all
data in the data medium to be permanently
deleted.
1 Select »Format« from the »Device Info Set-
ting« menu with »
V
« or »
Λ
« and confirm
with »«.
– A warning message shall be displayed.
2 Select »Yes« to confirm formatting;
or
select »No« to cancel formatting and con-
firm with »« .
3 When the format is complete, the »Device
Information« menu is displayed.
Selecting external data medium for
Record/Time shift
If more than one external data medium is con-
nected to TV, you can set different data media
for record/time shift or assign both records to
one data medium.
1 Select »Set time shift« and/or »Set PVR«
from »Device Info Setting« menu with »
V
«
or »
Λ
« and confirm with »«.
2 According to the selection you made for
the disc in the »Device Information« menu,
»TSHIFT« is displayed if only time shift is
selected, »PVR« if only recording is selected,
or »PVR/TSHIFT« if both recordings are
selected on the same data medium.
Notes:
7
You can connect two different external data
media to the TV and select one sepa-
rately as »PVR« recording and the other as
»TSHIFT« recording.
7
Functions do not work if no external data
medium is assigned for recording/time shift.

49
ENGLISH
Testing external data medium
You can test the external data media to see if it
is suitable for the required functions.
1 Select »Speed Test« from the »Device Info
Setting« menu with »
V
« or »
Λ
« and con-
firm with »
«.
2 After a short time the speed test result of the
external data medium is displayed on the
screen.
3 Confirm »Exit« with »
« to exit the Speed
Test menu.
Enabling and disabling the time
shift function
You can turn time shift off or on with this feature.
1 Press »
H« to return to the TV mode.
2 Press »
S« and select »Save« with »
V
«.
3 Select »Time Shift Mode« with »
>
« and
confirm with »
«.
– »The Time Shift Mode« menu shall be
displayed.
4 Select »On« or »Off« with »
« in »Time
Shift Mode«.
5 Press »
a« to return to the broadcast.
Time shift disc set-up
If you are going to connect an external data
medium to TV for the first time and use it for time
shift, a disc set-up is required.
Automatic disc set-up
1 Connect the external data medium to the
USB input of TV.
Notes:
7 To make a timeshift disk setup, »Time Shift
Mode« must be selected as »On«.
2 Press »
w «.
– Disc Set-up menu shall be displayed.
USB RECORDING
-------------------------------------------------------------------------------------------
3 Select »Auto« and press »
« to confirm.
– The external data medium is automatically
configured and the message »Disc Set-up
Complete« is displayed.
4 Press »
a«to return to the broadcast.
Notes:
7 This should be done when an external data
medium is first connected to TV or when the
external data medium is formatted by TV.
7 An external disc larger than 4 GB is re-
quired for this operation.
7 Auto set-up creates 4GB time shift space
on discs below 32GB and 16GB on discs
above 32GB.
5 Press »
a «to return to the broadcast.
Manual disc set-up
1 Connect the external data medium to the
USB input of TV.
Notes:
7 To make a timeshift disk setup, »Time Shift
Mode« must be selected as »On«.
2 Press »
w «.
– Disc Set-up menu shall be displayed.
3 Select »Manual« with »
V
« and confirm with
»«.
4 Select »Format« to format the external data
medium;
or
to continue without formatting, select »Skip«
and confirm with »
«.
Important:
7 It is recommended to format the external
data medium for better performance. This
action will delete all data on the external
data medium.
5 The formatting warning message shall be
displayed. Select »Format« and confirm with
»« .
– Formatting progress is displayed on the
screen.

ENGLISH50
USB RECORDING
----------------------------------------------------------------------------
6 When formatting is complete, select the size
you want to reserve for time shifting accord-
ing to the size of the external data medium
with »
V
« or »
Λ
« and confirm with »« .
– The external data medium is manually
configured and the message »Disc Set-up
Complete« is displayed.
7 Press »a« to return to the broadcast.
“Pausing” time shift and contin-
uous recording programmes
You can pause any programme you are watch-
ing. For instance, if the phone rings when you are
watching a movie, you can pause the movie and
resume it after the call without missing anything.
The last scene that was frozen shall be dis-
played and time shift is recorded into the exter-
nal data media.
With the continuous recording feature, TV re-
cords the channel you are currently watching
as much as the time shift memory you create
on external data media. Thus, you can use the
rewind feature on the channel you are watching.
Note:
7
Use an external USB Disk driver for an
uninterrupted “Permanent Time Shift”.
1 Press » w « during the broadcast.
– Television picture is paused and delay
time is displayed.
2 To resume the broadcast, press
» w «.
– The system continues recording the broad-
cast while you are watching it.
Note:
7
The following functions can be used in the
Time Shift mode.
– –
Fast rewind, press » u
« several times for
the desired speed;
–
Fast forward, press »v « several times for
the desired speed;
–
To pause, press » w «.
3 To stop time shift, press »«.
Recording Programmes
You can record a TV channel. Programmes are
recorded onto the external data media and the
archive is managed via television.
A memory of 44 MB up to 110 MB is required
for a 1 minute record.
1 1…0Select the channel with » « or
» « to start recording.
2 Press »« on remote control.
– Recording information shall be displayed:
Recording symbol, channel name, pro-
gramme and recording time.
– This information will disappear after a
short while, the »REC« symbol and the
recording time appear in the lower left
corner of the screen.
3 Press »« to stop recording.
Notes:
7
When recording is complete, it will auto-
matically be stored on the external data
media.
7
If you remove the external data media
during recording, then the recording is
cancelled automatically and no data is
recorded onto the external data media.
Switching the TV to stand-by during
recording
1 1…0Select the channel with » « or
» « to start recording.
2 Press »« on remote control.
3 To switch the TV to stand-by, press »8«.

51ENGLISH
USB RECORDING
-------------------------------------------------------------------------------------------
Recording a programme from the chan-
nel list
1 Press »« to open the channel list.
2 Select a channel with »
V
« or »
Λ
« and
press »« to confirm.
3 Press »« on remote control.
– Recording information shall be displayed:
Recording symbol, channel name, pro-
gramme and recording time.
– This information will disappear after a
short while, the »REC« symbol and the
recording time appear in the lower left
corner of the screen.
4 Press »« to stop recording.
Adding recording timer
... with electronic programme guide
Electronic programme guide data can be used
for recording.
1 Press » « « on the perpendicular
axis to open the electronic TV guide.
2 To add record timer, select the channel you
want with »
V
« or »
Λ
«.
3 Select the schedule you want to add record
timer with »
<
« or »
>
« and confirm with
»«.
– »Schedule List - Add« menu is displayed.
4 From »Schedule Type« select »Save«.
5 From »Repeat Type«, select (»Once«,
»Weekly« or »Everyday«).
Note:
7 To add a recording timer for a programme
at a time interval other than the broadcast
time specified in the electronic programme
guide, select »Timing Programming« from
the »Event Model« item.
6 To save the settings, press »« (green).
7 Press »H« to return to the broadcast.
Notes:
7
A warning is displayed before the timer
recording starts and counts down for 15
seconds to allow you to switch to the chan-
nel. At the end of 15 seconds, the channel
to be recorded appears automatically.
7
If the timer recording starts during play-
back, playback stops. If you do not select
»Yes« in the warning prompt, recording
will start automatically at the end of the
countdown.
7
Note specific to UPC customers: Parts of
previous or next files can be included into
the record while the programme is being
recorded resulting from possible Program-
meGuide errors. In such cases, keep in
mind that the highest family protection level
will apply for the whole recording if one or
more of those programmes have any level
of family protection.
... by entering the information manu-
ally
1 Press »H« to return to the TV mode.
2 Press »S« and select »Save« with »
V
« .
3 Select »Programme List« with »
>
« and
confirm with »«.
4 »Information« menu will be displayed. Se-
lect »Add« with »
>
« and confirm with »«.
Note:
7
If there is a previously programmed timer,
the »Schedule List« menu is displayed
without the »Information« menu being
displayed. Press »« (yellow) to add broad-
casts to the timer in this status.
5 Select »Channel Info« and press »«. Se-
lect the channel you want to save with »
V
«
or »
Λ
« and press »«.
6 Select »Starting Date« and press »
«.
Select year, month and day with » « 1...0
and press »« (green).

ENGLISH52
USB RECORDING
-------------------------------------------------------------------------------------------
7 Select »Starting Time« and press »«. Se-
lect hour, minute and sec with »1...0« and
press »« (green).
8 Select »Stop Time« and press »«. Select
hour, minute and sec with »1...0« and press
»« (green).
9 Select »Schedule Type« and press »«. or
select »Save« with »
V
« or »
Λ
« and press
»« (green).
10 Select »Repeat Type« and press »«. or
press »
V
« or »
Λ
« to select (»Once«, »Dai-
ly« or »Weekly«) and press »« (green).
11 From »Event Model« line select »Timing
Programming« with »
<
« or »
>
« and press
»« (green).
12 To save the timer, press »« (yeşil) (green).
13 Press »a «to return to the broadcast.
Editing recording timer
You can delete programmed timers.
1 Press »H« to return to the TV mode.
2 Press »S« and select »Save« with »«.
3 Select »Programme List« with »
>
« and
confirm with »«.
– The scheduled recording timers shall be
displayed.
4 Select the recording timer you want to edit
with »
V
« or »
Λ
« and press »« (red).
5 Edit recording timer.
6 To save the changes, press »« (green).
Deleting recording timer
You can delete programmed timers.
1 Press »H« to return to the TV mode.
2 Press »S« and select »Save« with »«.
3 Select »Programme List« with »
>
« and
confirm with »«.
– The scheduled recording timers shall be
displayed.
4 Select the recording timer you want to edit
with »
V
« or »
Λ
« and press »« (blue).
5 Select »Yes« with »
<
« or »
>
« to delete the
timer;
or
To cancel the deletion, select »No« with »
<
«
or »
>
« and confirm with »
«.

53ENGLISH
USB RECORDING
-------------------------------------------------------------------------------------------
Play
Either started manually or with the timer func-
tion, the recorded programmes are all stored in
the external data media. You can display the
archive on the external data media from the
»Recorded files list« menu.
Selecting a broadcast from the record-
ed files list
1 Press »H« to return to the TV mode.
2 Press »S« and select »Save« with »
V
«.
3 Select »Recorded Files List« with »
>
« and
confirm with »«.
– Recorded Files List shall be displayed.
4 Press »
V
« or »
Λ
« to select the broadcas-
tyou want to play and press »« to start
playing.
5 Press » w « to pause playback.
6 Press »« to stop play.
Forward/reverse picture search
1 Press »v « repeatedly during playback to
select the playback speed (2x, 4x, 8x, 16x,
or 32x).
or
press » u
« repeatedly to select the play-
back speed (2x, 4x, 8x, 16x or 32x).
Deleting broadcasts from the
recorded files menu
You can delete recorded broadcasts from the
Recorded Files list.
1 Press »H« to return to the TV mode.
2 Press »S« and select »Save« with »
V
« .
3 Select »Recorded Files List« with »
>
« and
confirm with »«.
– Recorded Files List shall be displayed.
4 Select the recording you want to delete with
»
V
« or »
Λ
« and press »« (yellow).
5 To confirm deletion, press »
<
« or »
>
« to
select »Yes«;
or
to cancel deletion, press »
<
« or »
>
« to
select »No«.
6 Press »a «to return to the broadcast.

ENGLISH54
USB OPERATION
--------------------------------------------------------------------------------------------
File formats
Your television can be operated via the USB
input with the following file formats:
Video data
Video compression / decompression (codec) is
intended for decreasing the storage area with-
out sacrificing the picture quality.
Your TV allows you to play compressed video
data with XVID, H.264/MPEG-4 AVC (L4.1, Ref.
Frames:4), MPEG-4, MPEG-2, MPEG-1, MJPEG,
MOV standards.
File extensions supported by the device: “.avi”,
“mkv”, “.mp4”, “.ts”, “.mov”, “.mpg”, “.dat”,
“.vob”,”.divx”. In addition to video data, these
files also contain audio data compressed and
"packaged" by MP3, AAC or Dolby Digital.
Format (codec) information is embedded within
the file content and may differ depending on the
file extension. “.avi", ".mkv" or ".divx" files con-
taining divx codec within are not played back.
Audio data
Your television can play audio data coded with
MP3, AAC standards.
MP3 indicates MPEG-1 Volume Level 3 and is
based on the MPEG-1 standard that was devel-
oped by MPEG (Motion Picture Expert Group).
AAC indicates the Advanced Audio Coding and
is developed by MPEG. AAC provides higher
audio quality with the same data rate (bit rate).
File extensions supported by the device: ".mp3",
".mp2", ".wma", ".m4a", ".aac", ".wav”
MP3 files can be organized into folders and
sub-folders similar to the files on a computer.
Picture data
Your television can display picture data in JPEG,
PNG and BMP formats.
JPEG stands for Joint Picture Experts Group. This
process is intended to compress picture files.
PNG and BMP are designed to compress pic-
ture data without any losses.
Picture files can be saved onto a data medium
along with other file types.
Such files can be organised as folders and sub-
folders.
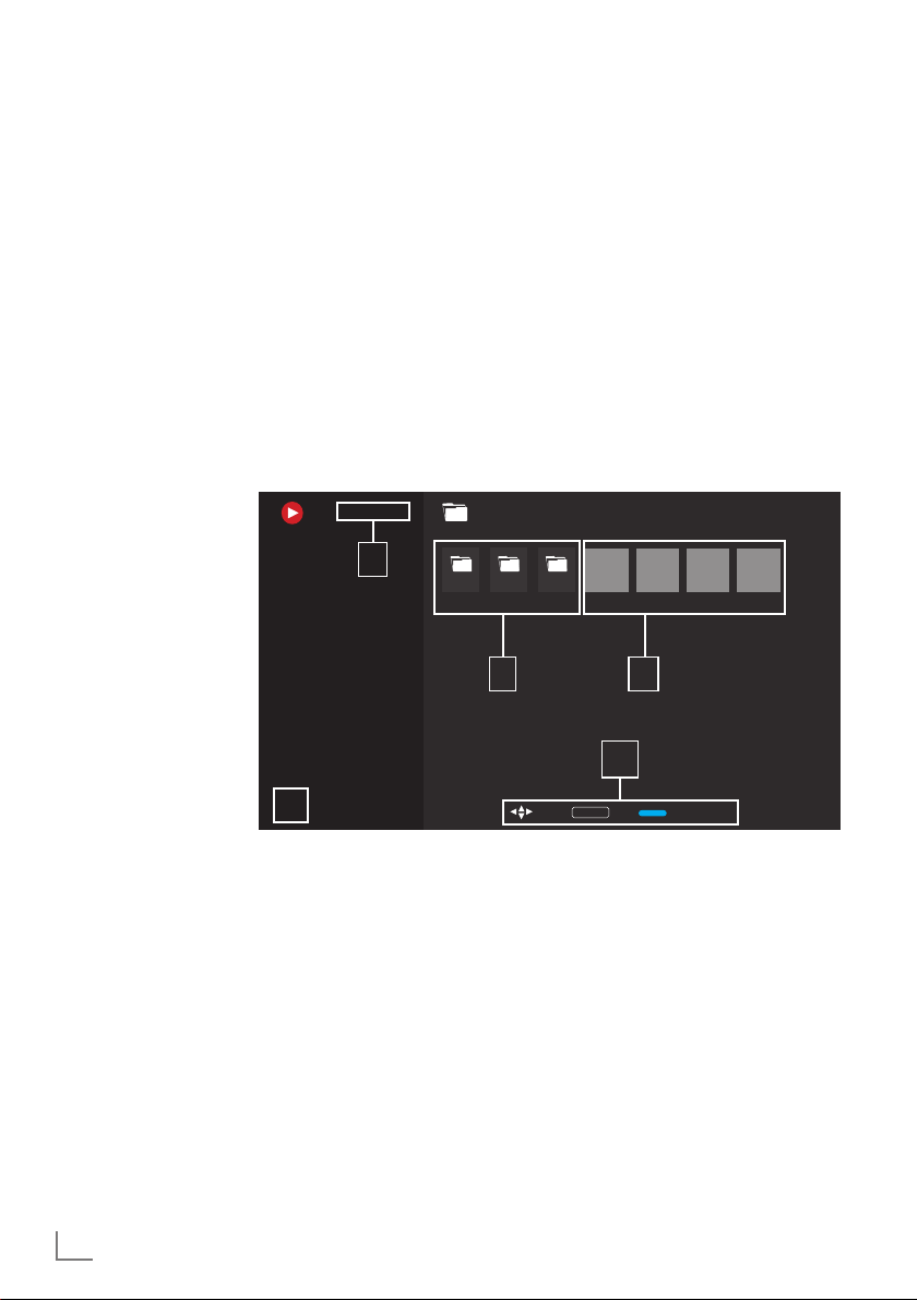
ENGLISH56
USB OPERATION
--------------------------------------------------------------------------------------------
Multi Media Player menu
Multi Media Player file browser shows video,
audio, picture and text data on external data
medium.
If an external data medium contains different file
formats, you can disable data (Video file, Audio
file, Picture file or Text file) that you do not need
to play/display with the file format selection,
so that you can only play files in the format you
want to view.
1 File browser
2 Data type.
3 Data medium
folders.
4 Data medium files
5 Options.
1 Press »T«.
2 Select the "Multi Media Player" application
from the "Your Apps" tab.
– Multi Media Player file format selection
shall displayed.
Note:
7
Select "Show all" if "Multi Media Player" is
not among your favorite apps.
3 or select the file format you want to play
with »
<
« or »
>
« by selecting »Video«,
»Photo« or »Music« and confirm with »«.
– File browser menu for the file format you
selected shall be displayed.
Playback basic functions
1 Select the file you want to play from the file
browser with »
<
«, »
>
«, »
V
« or »
Λ
« and
confirm with »« .
2 Press » w « to pause playback.
3 Press » w « to resume playback.
4 Press »« to end playback.
– The file browser appears.
Notes:
7
It is possible that some files that are supported
in USB mode do not operate due to some
problems that may arise depending on how
such files are created (compression) although
they have the supported file extension.
7
If there are more than one audio source
(audio stream) in the video files that are
being played, then you can switch between
the audio sources with » « while the file SUB
is being played in full screen mode.
7
Movies you will be watching from a movie
file only support subtitles with .srt, .sub, .ass,
.ssa, .smi format. Names of the subtitle and
movie files must be the same. Otherwise,
subtitle cannot be displayed.
/storage/969c-c854Video
Folder Folder Folder File File File File
OK EnterSelect Browse Mode
1
34
2
5

57ENGLISH
USB OPERATION --------------------------------------------------------------------------------------------
Picture settings in video files
You can change the display settings while play-
ing video files.
1 Press »S« during playback.
2 Select »Picture Settings« and confirm with
»«.
– File details are displayed.
Note:
7
For other settings, refer to the »Picture Set-
tings« section.
Audio settings in video and audio files
You can change the audio settings while playing
video and audio files
1 Press »S« during playback.
2 Select »Audio Settings« and confirm with
»«.
– File details are displayed.
Note:
7
For other settings, refer to the »Audio Set-
tings« section.
Turning shuffle on for audio files
You can put the audio files in the external data-
medium on shuffle.
1 Press »S« during playback.
2 Select »Mixing:« and select »On« setting
with »«.
– Tracks on external data media are played
in shuffle.
Note:
7 Select »Shuffle« »Off« to play the tracks in
the external data medium in sequence.
Additional playback functions
Depending on the file formats used, it is possible
to use the following additional functions.
View information in all file formats
1 Press »S« during playback.
2 Select »Show info« and confirm with »«.
– File details are displayed.
3 Press »a « to exit the menu.
Moving to the desired time
(only video and audio files)
You can select different speeds (2-fold, 4-fold,
8-fold, 16-fold and 32-fold forwards and back-
wards).
1 Press »u
« or »v « to jump to the desired-
time during playback.
Moving to a specific part of a video
1 Press »S« during playback.
2 Use »
V
« or »
Λ
« to select »Search« and
confirm with »« button.
3 Enter the time that you want to move to with
»1...0« and confirm with »«.
Repeat function
(only video and audio files)
1 Press »S« during playback.
2 Use »
V
« or »
Λ
« to select »Repeat« and
confirm with »« button.
3 Press »
V
« or »
Λ
« to select »None«,
»Repeat One« or »Repeat All« and confirm
with »
« .

ENGLISH58
USB OPERATION
--------------------------------------------------------------------------------------------
Playing audio files with the screen off
You can turn off the screen while playing audio
files on external data media.
1 Press »S« during playback.
2 Using »
V
« or »
Λ
« confirm «Picture Off«
with »«.
– Power menu shall be displayed.
3 Using »
V
« or »
Λ
« confirm »Picture off«
with »«.
– The TV Screen turns off and audio files
continue to play.
4 Press »a « to turn picture on again.
Turning the picture display
(only picture files)
Pictures can be rotated by 90°.
1 Press »S« during playback.
2 Use »
V
« or »
Λ
« to select »Rotate« and
confirm with »«button.
– The picture will turn by 90° clockwise or
counterclockwise.
Enlarging the picture display (Zoom)
(only picture files)
1 Press »S« during playback.
1 Use »
V
« or »
Λ
« to select »Zoom« and con-
firm with »« button.
2 Press »
V
« or »
Λ
« to select »1X«, »2X« or
»4X« and confirm with »«.

59ENGLISH
GRUNDIG GOOGLE TV™
---------------------------------------------------------------------
Terms, Conditions and Pri-
vacy
On the first set-up of your TV, a Terms of Service
page is shown by Google for you to accept or
decline. This page has buttons for the “Google
Terms of Service”, “Google Privacy Policy” and
“Google Play Terms of Service”, along with
Accept option.
Please read these agreements with their visit
details on the relevant web pages and select the
Accept option accordingly.
If you don't select Accept option at this step, you
won't be able to use Google TV features.
Again on initial set-up, Smart TV Terms of Ser-
vice are displayed. In this contract, the terms
of the services provided on your television are
explained in detail and detailed information
about data processing is given. Please read this
agreement carefully.
Sign in with a Google ac-
count
Skip this step if you signed in with an existing
Google account in the initial set-up.
1 On the Home Screen menu, using »
<
«, »
>
«
select »Control panel« and confirm with
»«.
2 Confirm »S« »Settings« and confirm with
»« .
3 Confirm »Set up Google TV« with »«.
– »Google TV« menu shall be displayed.
4 Confirm »Set up Google TV« with »«.
– »Sign in« menu shall be displayed.
5 Select and press »« to continue after
entering your account password with the
screen keyboard.
6 Select and press »« to continue after
entering your account password with the
screen keyboard.
7 Follow the instructions displayed on your TV
and on the screen of your phone.
– »Terms of Service« menu shall be dis-
played.
8 Select »Accept«.
– »Google Services« menu shall be dis-
played.
9 Select »Accept«.
– »Google Assistant« menu shall be dis-
played.
10 Confirm »Continue« with »« button.
11 Confirm »Allow« with »« to be able to
search in all supported TV applications;
or
Select »No« and confirm with »
« button.
12 Select the ones you want to install from the
applications you have subscriptions to and
select »Confirm« to continue and confirm
with »« button.
– »Tuner Mode« menu will be displayed.
13 If a channel search has already been per-
formed, select "Skip" and confirm with »
«.
Note:
7 If you have not searched for channels
before, continue on page 19 according to
your antenna type.
14 Confirm »FINAL« with »«.
– Your Applications are being loading menu
shall be displayed. Wait for the applica-
tion installation to complete.
15 »Start exploring« menu is displayed, confirm
with »« to complete the login.

ENGLISH60
GRUNDIG GOOGLE TV
--------------------------------------------------------------------------
Add a different Google ac-
count
You can add multiple accounts to Google TV
and each user can create their own profile for a
more personalized experience, including custom
recommendations and a personal watchlist.
1 Press »V« .
2 Select »+Add account« with »
>
« and
confirm with »«.
– »Add account« menu appears.
3 Select »Add account« with and confirm with
»«.
– »Sign in« menu shall be displayed.
4 Select and press »« to continue after
entering your account password with the
screen keyboard.
5 Select and press »« to continue after
entering your account password with the
screen keyboard.
6 Follow the instructions displayed on your TV
and on the screen of your phone.
– »Terms of Service« menu shall be dis-
played.
7 Select »Accept«.
– »Google Services« menu shall be dis-
played.
8 Select »Accept«.
– »Google Assistant« menu shall be dis-
played.
9 Confirm »Continue« with »« button.
10 Confirm »Allow« with » « to be able to
search in all supported TV applications;
or
Select »No« and confirm with »« button.
11 Select the ones you want to install from the
applications you have subscriptions to and
select »Confirm« to continue and confirm
with »« button.
12 Application installation is completed and the
»Home screen« menu is displayed
Add a Google account for
children
Create a viewing experience for children with
parental controls and screen time limits.
1 Press »V« .
2 Select »Add account«
with »
>
« and confirm
with »«.
– »Add account« menu appears.
3 Use »
V
« or »
Λ
« to select »Add a child«
and confirm with »« button.
4 Confirm »Start« with »
« .
5 If more than one user is added, select the
user to set up the child profile and confirm
with »«.
– The parent account and linked child ac-
counts are displayed.
6 Use »
V
« or »
Λ
« to select the child account
you want to add and confirm with »
«
button.
7 Select and press »« to continue after
entering your child’s account password with
the screen keyboard.
– »Select your parent« menu shall be dis-
played.
8 Select »Parent« with »
V
« and confirm with
»« .
– Parental Controls menu is displayed.
9 Select and press »« to continue after
entering adult account password with the
screen keyboard.
10 Follow the instructions displayed on your TV
and on the screen of your phone.
– »Set PIN« menu shall be displayed.
11 Confirm »Next« with »« .
– »PIN creation steps« menu shall be dis-
played.
12 Confirm »Got it« with »« .

61ENGLISH
GRUNDIG GOOGLE TV
----------------------------------------------------------------
13 Enter the PIN code
14 Enter and verify the PIN code again.
– »Select application« menu shall be dis-
played.
15 Confirm »Next« with »
« .
– »Apps for children« shall be displayed.
16 Select the applications you want to install
and confirm with .
17 Select the app you want to allow from the
apps installed on the device and confirm
with »
«.
– A warning screen shall be displayed.
18 Select »Allow« and confirm with »
«.
19 Select »Download and continue« with »
V
«
and confirm with »
«.
20 Select »Next« with »
V
« and confirm with
»«.
– Instructions for using the child profile are
displayed.
21 Press »« consecutively to continue.
22 Select »let’s start« and confirm with »
«.
23 Adding a child profile is completed and the
child profile home screen is displayed.
Changing user account
If more than one account has been added to
Google TV, users can switch between accounts
or switch to a child account if one has been
added.
1 Press »
V« .
2 Select the channel you want to switch to
with »
<
«, »
>
« , and confirm with »
«.
3 The »Home screen« menu of the account
you selected is displayed.
Note:
7 When a child account is selected and you
want to change the account, you need to
enter the pin code you set when creating the
child account.
Removing user account
You can remove accounts and account settings
added to Google TV.
1 Press »
)« on Home Screen.
2 Select »Settings »
)« and confirm with
»«.
3 Using »
V
« select »Accounts and sign-in«
and confirm with »
«.
– »Accounts and sign-in« menu appears.
4 Select the account you want to remove with
»
V
« or »
Λ
« and confirm with »
«.
5 Select »remove« and confirm with »
«.
– A warning screen shall be displayed.
6 Select »Remove« with »
<
«, »
>
« and confirm
with »
«.
or
Select »Cancel« to cancel and press »
«
to confirm.
User account settings
You can change settings of an account added to
Google TV.
1 Press »
)« on Home Screen.
2 Select Settings »
)« and confirm with »
«.
3 Using »
V
« select »Accounts and sign-in«
and confirm with »
«.
– »Accounts and sign-in« menu appears.
4 Select the account whose account settings
you wish to view with »
V
« or »
Λ
« and
confirm with »
«.
5 Select the desired line/function with »
V
« or
»
Λ
«, select the value/option with »
<
«, »
>
, or »
«.
6 Press »
a « to return to the previous menu.
Produktspezifikationen
| Marke: | Grundig |
| Kategorie: | Fernsehen |
| Modell: | Rio 43 GHU 8900 S |
Brauchst du Hilfe?
Wenn Sie Hilfe mit Grundig Rio 43 GHU 8900 S benötigen, stellen Sie unten eine Frage und andere Benutzer werden Ihnen antworten
Bedienungsanleitung Fernsehen Grundig

15 Oktober 2024
15 Oktober 2024
15 Oktober 2024
15 Oktober 2024
25 September 2024
25 September 2024
25 September 2024
25 September 2024
25 September 2024
25 September 2024
Bedienungsanleitung Fernsehen
- Fernsehen Samsung
- Fernsehen Infiniton
- Fernsehen Clatronic
- Fernsehen Acer
- Fernsehen Sanyo
- Fernsehen BenQ
- Fernsehen Lexibook
- Fernsehen Manhattan
- Fernsehen Manta
- Fernsehen Medion
- Fernsehen Philips
- Fernsehen Sony
- Fernsehen Sweex
- Fernsehen Tevion
- Fernsehen Zalman
- Fernsehen Panasonic
- Fernsehen LG
- Fernsehen MX Onda
- Fernsehen AEG
- Fernsehen Siemens
- Fernsehen Electrolux
- Fernsehen Küppersbusch
- Fernsehen OK
- Fernsehen Vox
- Fernsehen TechniSat
- Fernsehen XD Enjoy
- Fernsehen Denver
- Fernsehen ECG
- Fernsehen Intenso
- Fernsehen MarQuant
- Fernsehen Bush
- Fernsehen Telefunken
- Fernsehen Thomson
- Fernsehen Trevi
- Fernsehen BEKO
- Fernsehen Blaupunkt
- Fernsehen Schneider
- Fernsehen Sharp
- Fernsehen Aspes
- Fernsehen Brandt
- Fernsehen Daewoo
- Fernsehen Pyle
- Fernsehen Mitsubishi
- Fernsehen Finlux
- Fernsehen Haier
- Fernsehen High One
- Fernsehen Hisense
- Fernsehen Luxor
- Fernsehen NABO
- Fernsehen Nordmende
- Fernsehen Salora
- Fernsehen SEG
- Fernsehen Smart Brand
- Fernsehen Svan
- Fernsehen Techwood
- Fernsehen Vestel
- Fernsehen Philco
- Fernsehen Schaub Lorenz
- Fernsehen Aiwa
- Fernsehen Alphatronics
- Fernsehen AudioSonic
- Fernsehen Coby
- Fernsehen Bang And Olufsen
- Fernsehen DIFRNCE
- Fernsehen Lenco
- Fernsehen Mpman
- Fernsehen ODYS
- Fernsehen Pioneer
- Fernsehen Polaroid
- Fernsehen Jay-Tech
- Fernsehen JVC
- Fernsehen Krüger And Matz
- Fernsehen Muse
- Fernsehen Nokia
- Fernsehen Optoma
- Fernsehen PEAQ
- Fernsehen Xiaomi
- Fernsehen Abus
- Fernsehen Megasat
- Fernsehen Walker
- Fernsehen Akai
- Fernsehen Arçelik
- Fernsehen Caratec
- Fernsehen Changhong
- Fernsehen Chiq
- Fernsehen Continental Edison
- Fernsehen Dual
- Fernsehen Dyon
- Fernsehen Edenwood
- Fernsehen Ferguson
- Fernsehen Funai
- Fernsehen GoGEN
- Fernsehen Hannspree
- Fernsehen Hitachi
- Fernsehen Horizon
- Fernsehen Hyundai
- Fernsehen JTC
- Fernsehen Kernau
- Fernsehen Loewe
- Fernsehen Metz
- Fernsehen MT Logic
- Fernsehen Orava
- Fernsehen Orion
- Fernsehen Reflexion
- Fernsehen Star-Light
- Fernsehen Strong
- Fernsehen TCL
- Fernsehen Tesla
- Fernsehen Toshiba
- Fernsehen Allview
- Fernsehen Casio
- Fernsehen Sencor
- Fernsehen Icy Box
- Fernsehen Element
- Fernsehen ViewSonic
- Fernsehen Dell
- Fernsehen Lenovo
- Fernsehen Cecotec
- Fernsehen Nikkei
- Fernsehen Xiron
- Fernsehen Opera
- Fernsehen Sagem
- Fernsehen Antarion
- Fernsehen Xoro
- Fernsehen Humax
- Fernsehen Logik
- Fernsehen CGV
- Fernsehen LTC
- Fernsehen Bluesky
- Fernsehen Orima
- Fernsehen Proline
- Fernsehen NEC
- Fernsehen Marantz
- Fernsehen TEAC
- Fernsehen Packard Bell
- Fernsehen Westinghouse
- Fernsehen AOC
- Fernsehen NextBase
- Fernsehen Vivax
- Fernsehen Uniden
- Fernsehen Kogan
- Fernsehen Innoliving
- Fernsehen Magnum
- Fernsehen Smart Tech
- Fernsehen JGC
- Fernsehen Soundmaster
- Fernsehen Sylvania
- Fernsehen Qilive
- Fernsehen Doffler
- Fernsehen NewStar
- Fernsehen Zenith
- Fernsehen Insignia
- Fernsehen Roadstar
- Fernsehen SereneLife
- Fernsehen Woxter
- Fernsehen Sogo
- Fernsehen Peerless-AV
- Fernsehen RCA
- Fernsehen Oppo
- Fernsehen Vivo
- Fernsehen AYA
- Fernsehen Furrion
- Fernsehen Seiki
- Fernsehen Alba
- Fernsehen Aldi
- Fernsehen Daitsu
- Fernsehen Digihome
- Fernsehen E-motion
- Fernsehen Emerson
- Fernsehen GPX
- Fernsehen Graetz
- Fernsehen HKC
- Fernsehen Hoher
- Fernsehen ILive
- Fernsehen Naxa
- Fernsehen Online
- Fernsehen Onn
- Fernsehen Oyster
- Fernsehen Premier
- Fernsehen Reflex
- Fernsehen Rm 2000
- Fernsehen Saba
- Fernsehen Sbr
- Fernsehen Sunny
- Fernsehen Sunstech
- Fernsehen TechLine
- Fernsehen Technika
- Fernsehen Tele 2
- Fernsehen Grunkel
- Fernsehen Tve
- Fernsehen Viewpia
- Fernsehen Vision Plus
- Fernsehen Vizio
- Fernsehen Voxx
- Fernsehen Wharfedale
- Fernsehen Yasin
- Fernsehen Ziggo
- Fernsehen Videocon
- Fernsehen Bauhn
- Fernsehen Planar
- Fernsehen Monster
- Fernsehen Mitsai
- Fernsehen Proscan
- Fernsehen Kunft
- Fernsehen Nevir
- Fernsehen Seura
- Fernsehen EKO
- Fernsehen SunBriteTV
- Fernsehen Kemo
- Fernsehen V7
- Fernsehen Astar
- Fernsehen QBell Technology
- Fernsehen Visco
- Fernsehen Majestic
- Fernsehen DirecTV
- Fernsehen HCI
- Fernsehen Mach Power
- Fernsehen MBM
- Fernsehen Inno-Hit
- Fernsehen Elements
- Fernsehen Palsonic
- Fernsehen Cello
- Fernsehen Pantel
- Fernsehen FFalcon
- Fernsehen Coocaa
- Fernsehen SYLVOX
- Fernsehen ISymphony
- Fernsehen Aristona
- Fernsehen Apex
- Fernsehen Tucson
- Fernsehen Kubo
- Fernsehen Avtex
- Fernsehen NPG
- Fernsehen Telesystem
- Fernsehen ATYME
- Fernsehen Lin
- Fernsehen Tivax
- Fernsehen H&B
- Fernsehen Norcent
- Fernsehen TELE System
- Fernsehen Belson
- Fernsehen Elbe
- Fernsehen Mitzu
- Fernsehen Voxicon
- Fernsehen Aconatic
- Fernsehen Mitchell & Brown
- Fernsehen FOX Electronics
- Fernsehen Mystery
Neueste Bedienungsanleitung für -Kategorien-

16 Oktober 2024

16 Oktober 2024

16 Oktober 2024

15 Oktober 2024

15 Oktober 2024

15 Oktober 2024
15 Oktober 2024
15 Oktober 2024
15 Oktober 2024
15 Oktober 2024