Grundig 40 GFB 6240 Bedienungsanleitung
Lesen Sie kostenlos die 📖 deutsche Bedienungsanleitung für Grundig 40 GFB 6240 (31 Seiten) in der Kategorie Fernsehen. Dieser Bedienungsanleitung war für 14 Personen hilfreich und wurde von 2 Benutzern mit durchschnittlich 4.5 Sternen bewertet
Seite 1/31

TV
User Manual
EN
40 GFB 6240

ENGLISH2
TABLE OF CONTENTS ------------------------------------------------
5 INSTALLATION AND SAFETY
7 GENERAL INFORMATION
7 Television's unique features
7 Receiving digital stations
7 SCR System
8 Things to do for energy saving
8 Notes on still images
8 Note on software update
9 PACKING CONTENTS
9 Standard accessories
9 Optional Accessories
10 CONNECTION/
PREPARATION
10 Connecting the antenna and the power
cable
11 Installation or hanging
13 OVERVIEW
13 Connections of the television
14 Switching the TV on from the standby
mode
14 Switching the TV to sleep mode, and
turning it on from the sleep mode
14 Switching the TV to the standby mode
16 SETTINGS
16 Settings for connecting to the home
network
16 Tuning television channels
19 Searching for satellite channels
21 Searching for cable channels
21 Searching for terrestrial channels
22 Editing digital channels
26 PICTURE / SOUND SETTINGS
26 Picture settings
28 Sound settings
31 FUNCTIONING OF THE TV - BASIC
FUNCTIONS
31 Switching on and off
31 Selecting the TV mode
31 Selecting a signal source
31 Selecting the antenna type in TV mode
31 Selecting channels
31 Adjusting the volume
31 Muting
32 FUNCTIONING OF THE TV -
ADDITIONAL FUNCTIONS
32 Picture mode
32 Changing the picture format
32 Speakers
33 Power Settings
34 FUNCTIONING OF THE TV -
ADVANCED FUNCTIONS
34 Audio language
34 Blue Screen
34 Default Channel
34 Interaction Channel
34 MHEG PIN Protection
35 Subtitles
35 Teletext language selection
36 BISS Key
36 Biss key is an encryption technique. You
can watch a frequency encrypted with
the Biss key by entering the Biss key.
36 Automatic shut down
36 System information
37 ELECTRONIC TV GUIDE
38 HBBTV MODE
38 What is HbbTV?
39 Using HbbTV
39 Additional functions for video indexes
39 HBBTV Settings
41 TELETEXT MODE
41 TOP text or FLOF text mode
41 Normal text mode

3ENGLISH
TABLE OF CONTENTS ------------------------------------------------
42 USB RECORDING
42 Information on recording and playing
television programs
42 Possible restrictions on using an external
data medium
43 Connecting external data medium
43 USB recording settings
44 Enabling and disabling the time shift
function
44 Time shift disc set-up
45 “Pausing” time shift and continuous
recording programs
46 Recording Programs
46 Adding recording timer
47 Editing recording timer
47 Deleting a recording timer
48 Playing
48 Deleting broadcasts from the recorded
files menu
49 USB PROCESS
49 File formats
50 Connecting external data medium
50 Removing the external data medium
51 Multi Media Player menu
51 Play basic functions
52 Additional playback functions
54 GRUNDIG ANDROID TV
55 Open Home menu
56 Home menu settings
58 Installing apps from Google Play Store
58 Starting an installed application
58 Add favorite applications to Home menu
applications tab
59 Remove favorite applications from home
menu apps tab
59 Sorting of applications in Applications tab
59 Removing an installed application
60 Force stopping an app
60 Clear application data
60 Clear application cache
60 Clear application defaults
61 Application notifications
61 Edit application permissions
61 Private application access
61 Application security and restrictions
62 Turning TV on with Chromecast
62 Using Chromecast on an Android or iOS
mobile device
63 Cast a tab in the Chrome browser on TV
63 Cast computer screen on TV
63 Cast music or video files from the
computer to the TV
64 DEVICE PREFERENCES
64 About
65 Date and time settings
66 Timer settings
67 Language settings
67 Keyboard settings
68 Storage settings
69 Store Mode settings
69 Google Assistant settings
69 Chromecast built-in
70 Screen Saver settings
70 Location settings
70 Usage and Diagnostic settings
71 Accessibility settings
72 Resetting the television to its original status
73 REMOTE CONTROLS AND
ACCESSORIES

ENGLISH4
TABLE OF CONTENTS ------------------------------------------------
74 PARENTAL SETTINGS
74 Blocking a TV channel
74 Watching a blocked TV channel
75 Program Restrictions
75 Blocking an external source
75 Watching a blocked external source
75 Changing the PIN code
75 PARENTAL SETTINGS
76 USING AN EXTERNAL DEVICE
76 CEC (Consumer Electronics Control)
76 CEC connection functions of the television
77 High definition – HD ready
77 Connection options
78 Connecting an external device
78 DVD recorder, DVD player, or video
recorder use
78 Hi-Fi system
79 OPERATION WITH COMMON
INTERFACE
79 What is common interface?
79 Inserting the CA module
79 Access control for CA module and smart
cards
80 NETWORK SETUP
80 Network connection
80 Wired network
81 Wired network settings
82 Wireless network
82 Wireless network configuration
83 Connecting the TV to a “hidden” network
84 Wireless manual network connection
85 DETAILED CHANNEL
SETTINGS
85 Automatic search for satellite connected
digital television stations
86 Manual scan for satellite connected
digital television stations
88 Antenna settings for digital satellite
channels and searching for channels
automatically with DiSEqC 1.0/1.1
90 Antenna settings for digital satellite
channels and searching for channels
automatically with SCR system
92 Settings for antennae with
motors (DiSEqC 1.2)
94 Searching for newly added digital
channels with satellite update
94 Searching for cable-connected digital
television stations automatically
95 Searching for cable-connected digital
television stations manually
96 Setting up antenna-connected digital and
analog television stations automatically
97 Updating antenna-connected digital
television stations automatically
98 Setting up antenna-connected digital
television stations manually
99 Setting up antenna-connected analog
television stations manually
100 Service information for authorised dealers
100 Licenses
101 Notes for wireless (WLAN) connection
102 Disposing the packaging
102 Environmental note
103 Troubleshooting
105 GLOSSARY
109 INDEX

5ENGLISH
INSTALLATION AND SAFETY ----------------------------------
Intended use
7 The TV set is designed for use in dry rooms.
7 Use the TV set with the supplied stand or a
suitable VESA bracket.
7 The TV is primarily intended for the playback
of TV programmes, streaming content and
audio/video material from external devices.
Any other use is strictly prohibited.
It is not intended as an information display or
for predominant use as a computer monitor.
If a still image or a non-full-format image is
displayed for an extended period, visible
traces may remain on the screen for some
time.
This is not a defect that can be used as the
basis for a warranty claim.
Interface criteria
This product has been manufactured in
compatibility with Turkish Telecommunication
networks.
Safety
WARNING:
Risk of electrical accident
IMPORTANT SAFETY INSTRUCTIONS - KEEP
INSTRUCTIONS FOR FUTURE REFERENCE
Immediately followed by: Read all safety
warnings, instructions, illustrations and
specifications provided with this appliance.
7 Standby LED turns off when the mains plug
is disconnected. If Standby LED is lit then
it means that your product is connected to
mains.
7 Do not dismantle the TV. Safety risks may arise
and also the guarantee of the product can
become void if the television is dismantled.
7 The TV can only be operated with the power
cable or the AC/DC adapter supplied with
the product.
7 Do not operate the TV with a damaged power
cable or AC/DC adaptor (if supplied).
7 If the plug on the TV has an earthing contact,
insert the plug only into a socket with an
earthing contact.
7 Plug your TV into the mains socket only after
you have connected the external devices and
the antenna.
7 Protect your TV set from moisture. Do not
place any vessels filled with water (such as
vases) on the TV.
Fire hazard
7 To prevent the spread of fire,
keep candles or other open
flames away from this product at
all times.
7 Do not cover the ventilation slots on the TV.
7 Always unplug the power plug and antenna
plug during lightning and thunderstorm.
7 Keep candles or other open flames away from
the TV.
7 Do not expose the batteries to extreme heat
such as sunshine, fire or the like.
7 Only use batteries of the same type (brand,
size, properties). Do not use used and new
batteries together.

ENGLISH8
GENERAL INFORMATION ---------------------------------------
Things to do for energy saving
Those items mentioned below will help you
reduce the consumption of natural resources as
well as save your money by reducing electricity
bills.
7
If you will not be using the TV set for several
days, the TV set should be disconnected
from the mains for environmental and safety
reasons. TV will not consume energy in this
condition.
7
If the TV set has main switch, it will be enough
to turn the TV off via main switch. TV will
reduce energy consumption almost to Zero
Watt.
7
Your device consumes less energy when
brightness is reduced.
Notes on still images
Watching the same image for a long time on the
screen may cause a still image remains feebly
on the background. Feeble image(s) on the
background is originated from LCD/LED
technology and does not require any action
under guarantee. To avoid such cases and/or
minimize the impact, you may observe the tips
below.
7
Do not allow the same TV channel to stay on
the screen for a very long time. Channel logos
may cause this situation.
7
Do not allow the images, which are not full
screen, to constantly stay on the screen; if
not streamed in full screen format by the
broadcaster, you can convert the images to
full screen by changing picture formats.
7
Higher brightness and/or contrast values will
lead this impact to appear faster; therefore,
you are recommended to watch your TV in
the lowest brightness and contrast levels.
Note on software update
7
Descriptions and images in the user manual
may change with the TV software update.

9ENGLISH
PACKING CONTENTS -----------------------------------------------
Standard accessories
1 TV
2 Stand
3 Remote control
4 Batteries for remote controls
5
Screws and installation instructions for stand
6 Quick Instruction Manual
7 Power cord
Optional Accessories
3.5mm AV converter cable
Cleaning cloth
Wall hanging screws
4
2
5
6
User
Manual
7
1
3

ENGLISH10
CONNECTION/PREPARATION -------------------------------
Connecting the antenna and the power cable
1 To receive digital satellite channels (DVB-S),
connect the satellite antenna cable to
the »SATELLITE« antenna socket on the
television set;
and / or
2a For terrestrial digital stations (DVB-T), plug
the cable of the rooftop, indoor antenna
(passive or active indoor antenna with its
own power supply) into the antenna socket
» « on the television set;ANT IN
or
2b For digital stations of the cable TV network
(DVB-C), plug the antenna cable into the
antenna socket » « on the television
ANT IN
set.
Note:
7
When connecting an indoor antenna you
may have to try it out at different positions
until you get the best reception.
3 AC IN Connect the power cable to the » «
socket on the television.
4 Plug the power cable into the wall socket.
Note:
7
Plug the appliance into the mains socket
only after you have connected the external
devices and the antenna.
7
Do not use an adapter plug or extension
cable which does not meet the applicable
safety standards. Do not tamper with the
power cable.
2
3
1

11ENGLISH
CONNECTION/PREPARATION -------------------------------
Installation or hanging
7 Select a location so that no direct sunlight falls
on the screen.
Installation with stand
7
To mount the stand, refer to the installation
instructions included.
7
Place the TV set on a hard and level surface.
Installation preparation for VESA
installation kit
Contact authorised dealer to purchase the
bracket.
You will need the following
7
A pair of scissors,
7
A cross-tip screwdriver.
Follow the installation instructions for the VESA
installation kit.
1 Place the TV in the film on a smooth surface
with the screen facing down.
2 Cut open the film on the back side using the
scissors.
3 Connect the required cables to
the connectors on the TV. See the
“Connections” section in this manual.
4 Tie the cables so they do not hang down
onto the floor.
5 Screw the VESA bracket onto the television
and mount it according to its installation
instructions.
VESA
ENGLISH12
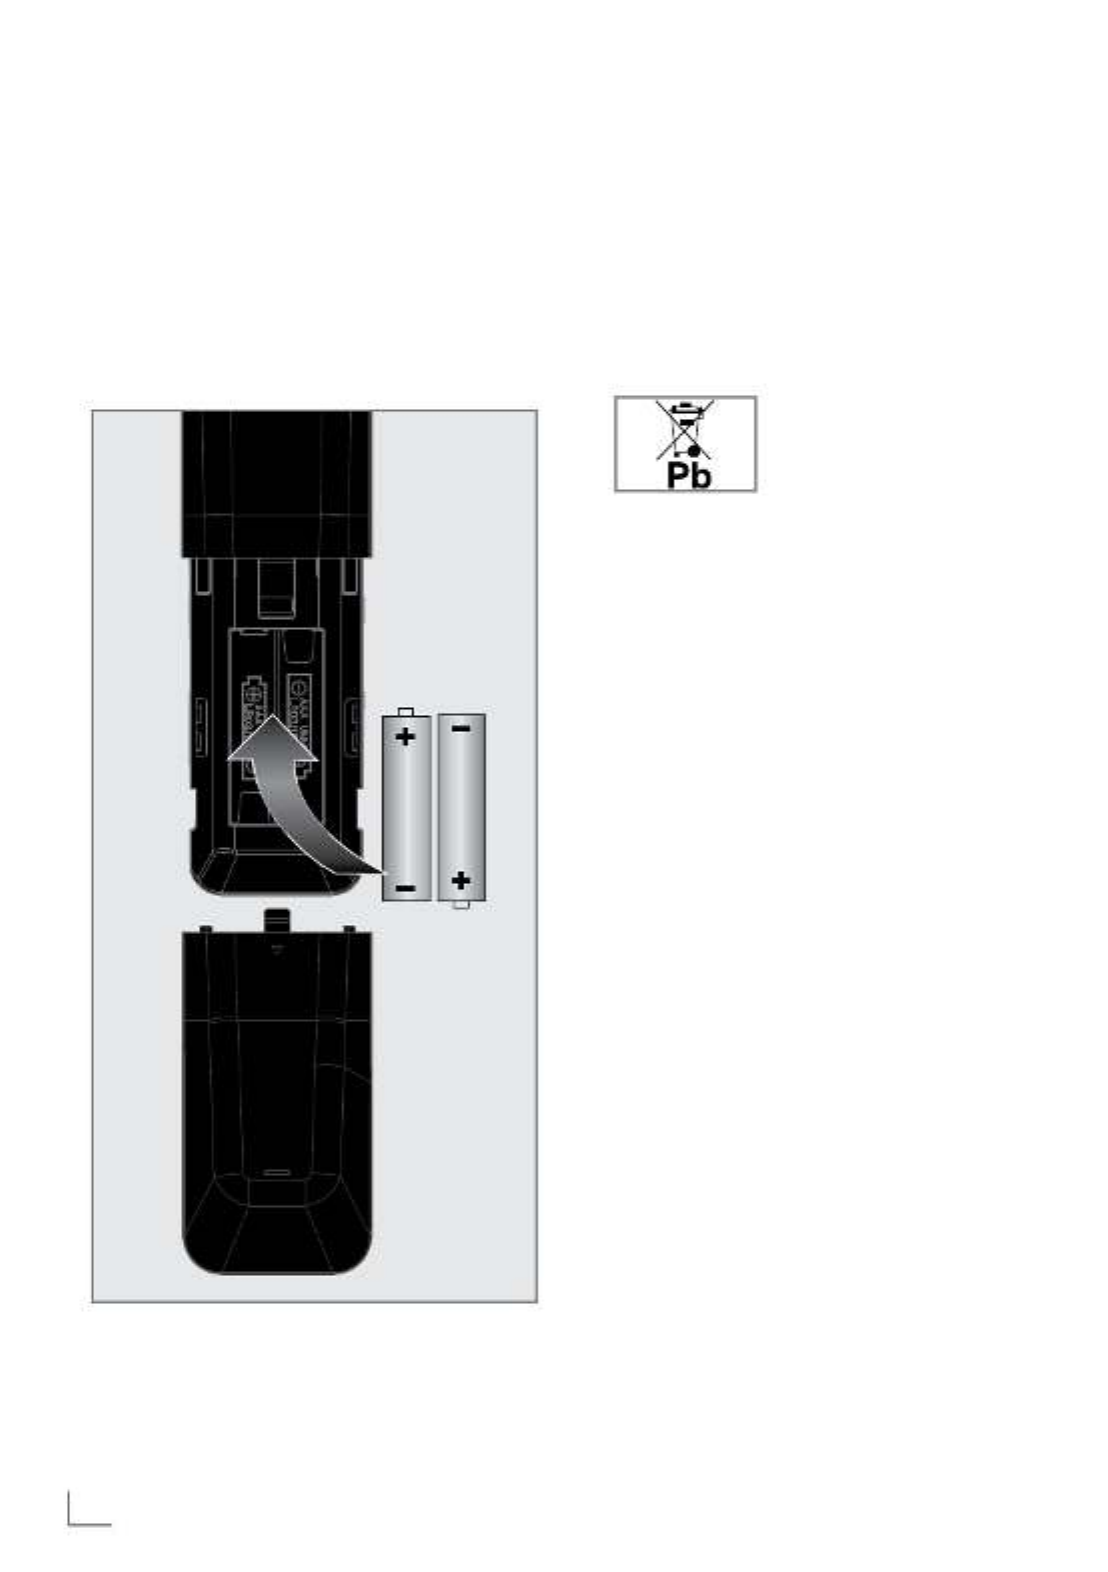
Inserting batteries into the
remote control
1 Open the battery compartment.
2
Insert batteries as marked on the bottom of
the battery compartment
(2 x 1.5 V micro;
for example R03 or AAA)
.
3 Close the battery compartment.
CONNECTION/PREPARATION -------------------------------
Note:
7
If the television no longer reacts properly
to remote control commands, the batteries
may be flat. Be sure to remove used
batteries.
7
The manufacturer accepts no liability for
damages resulting from used batteries.
Environmental note
7 This symbol on the battery
or on the packaging
indicates that the battery
provided with this product
shall not be treated as
household waste. On certain batteries this
symbol might be used in combination with a
chemical symbol. The chemical symbols for
mercury (Hg) or lead (Pb) are added if the
battery contains more than 0.0005%
mercury or 0.004% lead.
Batteries, including those which contain
no heavy metal, may not be disposed of
with household waste. Please dispose of
used batteries in an environmentally sound
manner. Find out about the legal regulations
which apply in your area.

13ENGLISH
OVERVIEW -----------------------------------------------------------------
Connections of the television
ANTENNA IN AV IN
SATELLITEAIR/CABLE
13V/18V - 400 mA
DIGITAL
AUDIO OUT HDMI2LAN HDMI1
2 - USB - 1
5V - 500mA

ENGLISH14
OVERVIEW -----------------------------------------------------------------
Keypad
Switching the TV on from the
standby mode
1 Press 8 to turn on the TV from the standby
mode.
Switching the TV to sleep mode,
and turning it on from the sleep
mode
1 The TV shall switch to sleep mode when 8 is
pressed shortly while the TV is on.
2 The TV shall switch on from the sleep mode
when 8 is pressed shortly while the TV is on
sleep mode.
Switching the TV to the standby
mode
1 Press 8 for 5 seconds to switch the TV to the
standby mode.
– Turn off menu shall be displayed.
2 Press to select OK.
3 The TV switches to the standby mode.
7 AC IN: Power cord input.
7 LAN: Network connection.
7 Optic Out: optical audio output.
7 HDMI2: Input for digital audio and image
data.
7 HDMI1(ARC): Input for digital audio and
image data.
7 USB 1: USB socket for external data medium.
7 USB2 (HDD): For external data media.
7 SATELLITE: Input for satellite antenna signal.
Suitable for single-cable SCR system.
7 AIR/CABLE: For antenna cable (terrestrial
antenna or cable connection).
7 AV IN:Audio/video input for camera.
(3.5mm jack - with AV converter cable)
7 CI: For CA modules for receiving scramble
channels.

ENGLISH16
SETTINGS --------------------------------------------------------------------
The Television is fitted with an “installation
assistant”, which guides you step by step
through the basic settings.
Using the screen dialogue, the user guide
enables supposedly complex settings and data
entries to be presented simply and clearly for
everybody.
Pages and dialogue items appear on the
screen, which identify the subsequent and likely
operating steps.
To support this, you will also see the required
button symbols of the remote control.
The basic settings in detail:
– language and country selection;
– pairing the remote control;
– network configuration (if required);
– Station settings (DVB-S, DVB-T and DVB-C).
Detailed settings can be found on pages 17
and 21.
Settings for connecting to the
home network
Depending on the connection type of the home
network, connect your television to the home
network:
– via a LAN connection or
– without a cable via WLAN
Automatic LAN connection,
all data regarding connection settings
(»IP Address«, »Netmask«, »Gateway«
and »DNS«) are obtained from modem
automatically.
There are various options when using :
WLAN
Automatic WLAN connection,
all data regarding connection settings
(»IP Address«, »Netmask«, »Gateway«
and »DNS«) are obtained from modem
automatically.
Depending on the router, you can use the
following options:
– Connection with network password.
Tuning television channels
Depending on the type of antenna connected,
you can decide which channels you would like
the television to search for.
DVB-S – On page 19,
sets digital TV channels from satellite.
You have two options for this search:
–
Basic setup that presets a standard choice.
For example, Astra satellite 19.2° East; You
just need to start the search;
–
the professional installation, which allows
you to make all required settings and set
parameters for your receiver system.
DVB-C – For setting up digital cable TV
channels, see page 21
DVB-T – For setting up digital terrestrial TV
channels, see page 21
Note:
7 See “Detailed Channel Settings” section
starting from page 84 for more information
on digital television channel settings.

17ENGLISH
SETTINGS --------------------------------------------------------------------
First set-up and setting the TV
1 Connect the antenna and external device
cables.
2 Insert the power plug into the socket.
3 Switch on the TV with »8« on the remote
control.
– The welcome menu shall be displayed on
the screen after a while.
4 Select language.
Note:
7 You may set up your TV using 2 methods.
– »Quick Set-up« – If you have an Android
phone, you may transfer the network
settings and account settings easily from
your phone.
– »Manual Set-up« – If you do not own an
Android phone, you may enter all settings
manually.
– Resume from article 5 for quick set-up;
or
– Resume from article 11 for manual set-up.
Quick Set-up
5 Select »Resume« and press » « to OK
confirm.
6 Follow the instructions displayed on your TV
and on the screen of your TV.
– The »Services and Terms« menu is
displayed when the set-up is completed.
7 OKSelect »Accept« and press » « to confirm.
8 Select »Yes« to allow sharing of the location
information of the device
or
select »No« and confirm with » « if
OK
you do not want to share the location
information.
9 Select »Yes« to contribute for the
development of Android;
or
select »No« and confirm with » « if
OK
you do not want to share the location
information.
10 Android set-up is complete. Press»
>
« to view
the features of your device.
Note:
7 Resume from article 23 if you have
performed a Quick set-up.

ENGLISH18
SETTINGS --------------------------------------------------------------------
Manual set-up
11 Select »Skip« and press » « to confirm.OK
12 Select your wireless network with »
V
« or
»
Λ
« or press » «.OK
13 Enter the wireless network password with
the screen keyboard, select » « and
press » «.
OK
– »Connect to network.......« message
is displayed, and then »Successfully
Connected to Internet« message is
displayed.
14 Select »Login« and confirm with » «OK
or
to continue without logging in, select »Skip«
and confirm with » «.
OK
15 Select »« and press » « to continue OK
after entering your e-mail address with the
screen keyboard.
16 Select »« and press » « to continue OK
after entering your account password with
the screen keyboard,
17 Follow the instructions displayed on your TV
and on the screen of your TV.
– The »Services and Terms« menu is
displayed when the set-up is completed.
18 Select »Accept« and press » « to confirm.OK
19 Select »Yes« to allow sharing of the location
information of the device
or
select »No« and confirm with » « if
OK
you do not want to share the location
information.
20 Select »Yes« to contribute for the
development of Android;
or
select »No« and confirm with » « if
OK
you do not want to share the location
information.
21 Android set-up is complete. Press »
>
« to
view the features of your device.
22 Select the country.
23 Select the LCN key.
Note:
7 In order move or swap Live TV channels,
please select LCN option as Off from
Settings -> Channel -> Channels.
24 OKPress the » « to set a password.
25 Enter the password »1 2 3 4« using »1...0«
on the displayed password screen and
press » «.
OK
26 Enter the password »1 2 3 4« again using
»1...0« on the displayed confirmation
screen.
– »Select TV mode« menu shall be
displayed.
27 Confirm »Home« by pressing » «;OK
or
Use »
V
or »
Λ
« to select »Store« and
confirm with the » «.
OK
– »Home« – mode is optimized to provide
energy efficiency when the TV is used in a
household.
– »Store« – mode is optimized to allow
demo display on a store with fixed
settings.
28 Select »Yes« and press » « to confirm.OK
Produktspezifikationen
| Marke: | Grundig |
| Kategorie: | Fernsehen |
| Modell: | 40 GFB 6240 |
Brauchst du Hilfe?
Wenn Sie Hilfe mit Grundig 40 GFB 6240 benötigen, stellen Sie unten eine Frage und andere Benutzer werden Ihnen antworten
Bedienungsanleitung Fernsehen Grundig

15 Oktober 2024
15 Oktober 2024
15 Oktober 2024
15 Oktober 2024
25 September 2024
25 September 2024
25 September 2024
25 September 2024
25 September 2024
25 September 2024
Bedienungsanleitung Fernsehen
- Fernsehen Samsung
- Fernsehen Infiniton
- Fernsehen Clatronic
- Fernsehen Acer
- Fernsehen Sanyo
- Fernsehen BenQ
- Fernsehen Lexibook
- Fernsehen Manhattan
- Fernsehen Manta
- Fernsehen Medion
- Fernsehen Philips
- Fernsehen Sony
- Fernsehen Sweex
- Fernsehen Tevion
- Fernsehen Zalman
- Fernsehen Panasonic
- Fernsehen LG
- Fernsehen MX Onda
- Fernsehen AEG
- Fernsehen Siemens
- Fernsehen Electrolux
- Fernsehen Küppersbusch
- Fernsehen OK
- Fernsehen Vox
- Fernsehen TechniSat
- Fernsehen XD Enjoy
- Fernsehen Denver
- Fernsehen ECG
- Fernsehen Intenso
- Fernsehen MarQuant
- Fernsehen Bush
- Fernsehen Telefunken
- Fernsehen Thomson
- Fernsehen Trevi
- Fernsehen BEKO
- Fernsehen Blaupunkt
- Fernsehen Schneider
- Fernsehen Sharp
- Fernsehen Aspes
- Fernsehen Brandt
- Fernsehen Daewoo
- Fernsehen Pyle
- Fernsehen Mitsubishi
- Fernsehen Finlux
- Fernsehen Haier
- Fernsehen High One
- Fernsehen Hisense
- Fernsehen Luxor
- Fernsehen NABO
- Fernsehen Nordmende
- Fernsehen Salora
- Fernsehen SEG
- Fernsehen Smart Brand
- Fernsehen Svan
- Fernsehen Techwood
- Fernsehen Vestel
- Fernsehen Philco
- Fernsehen Schaub Lorenz
- Fernsehen Aiwa
- Fernsehen Alphatronics
- Fernsehen AudioSonic
- Fernsehen Coby
- Fernsehen Bang And Olufsen
- Fernsehen DIFRNCE
- Fernsehen Lenco
- Fernsehen Mpman
- Fernsehen ODYS
- Fernsehen Pioneer
- Fernsehen Polaroid
- Fernsehen Jay-Tech
- Fernsehen JVC
- Fernsehen Krüger And Matz
- Fernsehen Muse
- Fernsehen Nokia
- Fernsehen Optoma
- Fernsehen PEAQ
- Fernsehen Xiaomi
- Fernsehen Abus
- Fernsehen Megasat
- Fernsehen Walker
- Fernsehen Akai
- Fernsehen Arçelik
- Fernsehen Caratec
- Fernsehen Changhong
- Fernsehen Chiq
- Fernsehen Continental Edison
- Fernsehen Dual
- Fernsehen Dyon
- Fernsehen Edenwood
- Fernsehen Ferguson
- Fernsehen Funai
- Fernsehen GoGEN
- Fernsehen Hannspree
- Fernsehen Hitachi
- Fernsehen Horizon
- Fernsehen Hyundai
- Fernsehen JTC
- Fernsehen Kernau
- Fernsehen Loewe
- Fernsehen Metz
- Fernsehen MT Logic
- Fernsehen Orava
- Fernsehen Orion
- Fernsehen Reflexion
- Fernsehen Star-Light
- Fernsehen Strong
- Fernsehen TCL
- Fernsehen Tesla
- Fernsehen Toshiba
- Fernsehen Allview
- Fernsehen Casio
- Fernsehen Sencor
- Fernsehen Icy Box
- Fernsehen Element
- Fernsehen ViewSonic
- Fernsehen Dell
- Fernsehen Lenovo
- Fernsehen Cecotec
- Fernsehen Nikkei
- Fernsehen Xiron
- Fernsehen Opera
- Fernsehen Sagem
- Fernsehen Antarion
- Fernsehen Xoro
- Fernsehen Humax
- Fernsehen Logik
- Fernsehen CGV
- Fernsehen LTC
- Fernsehen Bluesky
- Fernsehen Orima
- Fernsehen Proline
- Fernsehen NEC
- Fernsehen Marantz
- Fernsehen TEAC
- Fernsehen Packard Bell
- Fernsehen Westinghouse
- Fernsehen AOC
- Fernsehen NextBase
- Fernsehen Vivax
- Fernsehen Uniden
- Fernsehen Kogan
- Fernsehen Innoliving
- Fernsehen Magnum
- Fernsehen Smart Tech
- Fernsehen JGC
- Fernsehen Soundmaster
- Fernsehen Sylvania
- Fernsehen Qilive
- Fernsehen Doffler
- Fernsehen NewStar
- Fernsehen Zenith
- Fernsehen Insignia
- Fernsehen Roadstar
- Fernsehen SereneLife
- Fernsehen Woxter
- Fernsehen Sogo
- Fernsehen Peerless-AV
- Fernsehen RCA
- Fernsehen Oppo
- Fernsehen Vivo
- Fernsehen AYA
- Fernsehen Furrion
- Fernsehen Seiki
- Fernsehen Alba
- Fernsehen Aldi
- Fernsehen Daitsu
- Fernsehen Digihome
- Fernsehen E-motion
- Fernsehen Emerson
- Fernsehen GPX
- Fernsehen Graetz
- Fernsehen HKC
- Fernsehen Hoher
- Fernsehen ILive
- Fernsehen Naxa
- Fernsehen Online
- Fernsehen Onn
- Fernsehen Oyster
- Fernsehen Premier
- Fernsehen Reflex
- Fernsehen Rm 2000
- Fernsehen Saba
- Fernsehen Sbr
- Fernsehen Sunny
- Fernsehen Sunstech
- Fernsehen TechLine
- Fernsehen Technika
- Fernsehen Tele 2
- Fernsehen Grunkel
- Fernsehen Tve
- Fernsehen Viewpia
- Fernsehen Vision Plus
- Fernsehen Vizio
- Fernsehen Voxx
- Fernsehen Wharfedale
- Fernsehen Yasin
- Fernsehen Ziggo
- Fernsehen Videocon
- Fernsehen Bauhn
- Fernsehen Planar
- Fernsehen Monster
- Fernsehen Mitsai
- Fernsehen Proscan
- Fernsehen Kunft
- Fernsehen Nevir
- Fernsehen Seura
- Fernsehen EKO
- Fernsehen SunBriteTV
- Fernsehen Kemo
- Fernsehen V7
- Fernsehen Astar
- Fernsehen QBell Technology
- Fernsehen Visco
- Fernsehen Majestic
- Fernsehen DirecTV
- Fernsehen HCI
- Fernsehen Mach Power
- Fernsehen MBM
- Fernsehen Inno-Hit
- Fernsehen Elements
- Fernsehen Palsonic
- Fernsehen Cello
- Fernsehen Pantel
- Fernsehen FFalcon
- Fernsehen Coocaa
- Fernsehen SYLVOX
- Fernsehen ISymphony
- Fernsehen Aristona
- Fernsehen Apex
- Fernsehen Tucson
- Fernsehen Kubo
- Fernsehen Avtex
- Fernsehen NPG
- Fernsehen Telesystem
- Fernsehen ATYME
- Fernsehen Lin
- Fernsehen Tivax
- Fernsehen H&B
- Fernsehen Norcent
- Fernsehen TELE System
- Fernsehen Belson
- Fernsehen Elbe
- Fernsehen Mitzu
- Fernsehen Voxicon
- Fernsehen Aconatic
- Fernsehen Mitchell & Brown
- Fernsehen FOX Electronics
- Fernsehen Mystery
Neueste Bedienungsanleitung für -Kategorien-

16 Oktober 2024

16 Oktober 2024

16 Oktober 2024

15 Oktober 2024

15 Oktober 2024

15 Oktober 2024
15 Oktober 2024
15 Oktober 2024
15 Oktober 2024
15 Oktober 2024