Gigabyte GA-8IPE1000-G Bedienungsanleitung
Gigabyte
Hauptplatine
GA-8IPE1000-G
Lesen Sie kostenlos die 📖 deutsche Bedienungsanleitung für Gigabyte GA-8IPE1000-G (120 Seiten) in der Kategorie Hauptplatine. Dieser Bedienungsanleitung war für 7 Personen hilfreich und wurde von 2 Benutzern mit durchschnittlich 4.5 Sternen bewertet
Seite 1/120

Wh n ou n nge y i s at lli AGP ca ease akerd p, l m s e eur th fo o ngll wi
no u und ood nd p d out fi ice s lly e sr t a rac ceti . I f y r AGP ca asrd h
" "AGP X X V 4 /8 (1 5. ) t no ch ( )s eho bw low , p u oulease ake s m re y r
AGP ca srd i AGP X X 4 /8 ( )1 5. V .
Cau onti : AGP 2X card is not s eupport d by I lnte ® 845( )GE PE/ / 845(E/
G) / 850( )E / E7205 / 865(G/ /PE P) / 875P. You might ex e ep ri nce sys e t m
un ba le t to boo up norma yll . l P ease se a in rt n AGP 4 8X/ X card.
Exa p em l 1: Dia ondm Vipper V770 go den nge l fi r is c o pa b em ti l with 2 X/4X
mode A PG slot. It can be s cwit hed be eentw A PG 2 3 3X( . V) or 4 1 5X( . V)
mode b ad u ngy j sti the u pe j m r. The f tac ory de auf l it f t or h s c ard is
2 3 3X( . V). The 8 1000 GA- IPE Se eri s (o anr y A PG 4X X/8 only)
mo he boat r rd gh nos mi t t f tunc ion p oper rly, i if you nst tall h ais c rd hou wit t
s cwit h ngi the ju pe o 4m r t X V(1 5. ) mode n i it.
Examp el 2: Some ATi Rage 128 Pro g aphr ics cards made by "Power Color",
the g aphr ics ca dr manu a uf ct r re & so em S Si 305 c sa dr , their go denl finger
is co pa bm ti le h wit 2 3 3X( . V X V)/4 (1 5. ) mode A PG slot, t bu they support 2X
( )3 3. V only. The GA PE S-8I 1000 e eri s ( ro any A P X XG 4 /8 only)
mo he boat r rd gh no un ons mi t t f cti p oper rly, If t y sou n i a hll t is ca d nr i it.
No et : Although Gigab eyt 's A SG32 (G) r g aphics c a dr is ba eds on ATi Rage
128 o h p he Pr c i , t de gnsi of A SG32 ( )G is c co p anm li e with A P X VG 4 (1 5. )
s cpe ifi icat on. The e or f re, A SG32 ( )G will work fi ine w th I tn el® 845(GE/PE) /
845( )E/G / 850( )E / / E7205 865 875 ba ed( )G/ /PE P / P s mo he boat r rds.
Be o ef r y sou n i t Iall PC card p ea es, l s re o e hem v t Dual BIOS l labe from
PCI s slot if the er is one.
AGP 4 8X/ X no htc

MTh u ho u no pon b o n oe a t r ass mes res si ilit fy r a y e rr rs
o o on h pp n h do u n nor mi iss s t a ay at m ear i t is c me t r
do h u hoes t e a t r make a c e a e eomm mit n o updt t t th
i i i i .n of rmat on on c ta n d he e er n
MTh d p b nd nd nir - a yrt ra s a a es a e e e ym r th p opr rt of
t th pe esir r ec i .ve e s o nw r
MPl l l , iease e ve a y do no t r mo n a eb s e a on o h m t rbo rd th s
m may v e a a y s o d hi t w rr nt o hf t i o h bo dt er ar .
MDu o p d h ng n hno og o o he t ra i c a e i tec l y s, me f t e
s ec ca s e a e e e cap i if tion migh bt ou o dt f t b for publi tion
o h boof t is k el t.

D Ce a a on ocl r ti f on of rmity
We anu a u e po e, M f ct r r/Im rt r
( r )fu addll ess
G. .B T. Tec yhno ogl T ädr ing b GM H
Au h gssc la er We 41g , 1F, 20537 a e a y H mbu gr , G rm n
de a e ha he p oducl r t t t r ct
( r r desc i ipt on o he appa f t a u e n at s sys, t m, i st ll i i iat on o h t w ch t f re er )s
Mo h o dt er B ar
GA PE-8I 1000 P A PE A PEr -o G G/ -8I 1000-G G/ -8I 1000
i i i is n on o c f rm ty w th
(r r r re ef en e o he pe a on undec t t s c ci if ti wh h on oic c f mit y s c i de la edr )
i i i in a o dan e cc r c w t /h 89 336 EE EC- MC D rect ve
o EN 55011 Li im ts and e hod o m t s f m mea u es r ent
of rad o di istu ban er c cha a er ct ri ist cs of
i i l industr a ,sc en andt fi ic med aic l (ISM
h ghi frequency equ p eni m t
o EN61000 3 2- - *
EN 60555 2-
Distu banr c se in s y sysuppl te au ems c s
by hou eho d app an e and as l li c s si ilm r
e el ctrica equ p enl i m t “Ha onrm ics”
o EN 55013 Li im ts and e hod o m t s f m mea u es r ent
of rad o di istu ban er c cha a er ct ri ist cs of
b oad ar c s ct re eiv ser and a sso a edci t
equ p eni m t
o EN61000 3 3- - * Distu banr c se in s y sysuppl te au ems c s
by hou eho d app an e and as l li c s si ilm r
e el c ctri a equ p enl i m t “Vol lt fage uctua onti s”
o EN 55014 Li im ts and e hod o m t s f m mea u es r ent
of rad o di istu ban er c cha a er ct ri ist cs of
hou ehos l ld e e ac ctri l app an eli c s,
po ab ert l tools and a si ilm r e e al c ctri l
appara ut s
EN 50081 1- Generic e onmi iss st tanda d ar P r 1:
Re duasi l c co emm r i la and gh ndu li t i s ytr
EN 50082 1- Generic i immun t ty s anda dr Pa 1rt :
Re duasi l c co emm r i la and gh ndu li t i s ytr
o EN 55015 Li im ts and e hod o m t s f m mea u es r ent
of rad o di istu ban er c cha a er ct ri ist cs of
fluo e enr sc t la pm s and u na l mi ries
Generic e onmi iss st tanda d ar P r 2:
Industri la en on envir m t
o EN 55081 2-
Immunit fy r rom adi io n e e en e ot rf r c f
b oad ar c s ct re eiv ser and a sso a edci t
equ p eni m t
Generic e onmi iss st tanda d ar P r 2:
Industri la en on envir m t
o EN 55082 2-
EN 55022 Li im ts and e hod o m t s f m mea u es r ent
of rad o di istu ban er c cha a er ct ri ist cs of
i in o af rm t on e hno og equ p t c l y i ment
l immun ty r requi e enm ts fo hou eho dr s l
app anli ce oos t ls and simila appa ar r tus
o E VN 55104
Cab edl d bu oni istr ti syste qu p enms; E i m t
for re e ngc i iv and o/ r dist tribu ion from
sound and e e t l v s si ion ignals
EMC requir re en om t fs un n e upi t rr tib el
po e ew r syst ms ( )UPS
o EN50091 2-
o EN 55020
o D NI V ED 0855
o part 10
o part 12
(EC con o a ngf rm mity rki )
CE ma kr ing
The ma acnuf ture a sr l o dec a es el r th con of rmit fy o a vebo me en onti d p odur ct
with t the ac ual r requi ed sa e y sf t ta a snd rd in acc a ceo dr n with L VD 73 23/ EEC
Sa ef ty r requi e enm ts fo a nr m i s ope a edr t
e e onl ctr ic and re a edl t appa a ur t s for
hou ehos ld and si ilm a gene a u er r l s
o EN 60950
o EN 60065
Sa ef ty o hou eho df s l and si ilm ar
e el c ctri a app an el li c s
o EN 60335
Ma acnuf tu por re /Im r rte
Signa u et r :
Na em :
(Sta pm ) Da et : . , Jan 15 2004
EN 60555 3-
Timmy u ng H a
o EN 50091 1-
Sa ef ty for i in o af rm t on te hno ogc l y equ pi ment
i lnc udi lng e ec ctri al bu ne equssi ss ip enm t
Gene ar l andSa ef ty requ e enir m ts for
un n ei t rrup b e po eti l w r sys stem ( )UPS

FCC P Sart 15, ubpart B, Section 15 107 . ( )a a ecnd S tion 15 109 .
( )a ,Class B Di it lg a Device
D C ARAE L TION OF C NO FOR YMIT
Per F P SCC art 2 ection 2 1077 . ( )a
Re es sp no i lb Pa y art N me:
Address:
Phone/Fax o N :
h bye er dec al re a es th t t h p odur ct
Product Nam :e
Confo orms t th oe f llowing p s eci if cations:
Th d vis e ice co pm lies wit th p ar 15 of t lh ue FCC R es. Op one ar ti is
subjec et t t o h foll i tow ng wo cond oniti s: ( )1 This d ve ice a m y no t
cause har fm ul and ( )2 t ih s d ve ice m tus accept any infe er nce received,
i lnc udi t tng ha may ca eus und de esir operation.
Repre es n vt tia e Person’s Na em :
Si tgna ure: Er ci Lu
Suppleme rnta y Inf mor a oti n:
M eod l Number:
17358 a R ilroad S treet
City o f t I sndu ry, CA 91748
G. . .B T INC U. ( . . .S A )
( ) - ( )818 854 9338/ 818 854 9339-
M eroth board
GA-8 1000 oIPE Pr - - -G G/ A 8 1000IPE G/
GA-8 1000IPE
Da et :
ER CI LU
Jan 15. , 2004

U R ANUASE 'S M L
GA PE-8I 1000 Se eri s
P4 Titan e e S ri s Mo he boa dt r r
Pentium®4 Pro e oc ss r Mothe boa dr r
Rev. 3001
12ME-8IPE K1 G-3001

- 2 -GA-8IPE1000 Series Mothe boa dr r
English
Ta ebl o on nf C te t
Wa n ng 4r i ..............................................................................................
Chap e 1 n odut r I tr ction 5.........................................................................
Fea u e u a 5t r s S mm ry ..........................................................................................
GA-8IPE S1000 e e o he boa d La ou 8ri s M t r r y t .....................................................
Bl iock D ag a 9r m ..................................................................................................
C H whap e 2t r a dr a e n ar I st llation o e 11 Pr c ss ............................................
St : Iep 1 n a he en a o e ng n 12st ll t C tr l Pr c ssi U it ....................................... ( )C UP
Step 1 1 - : C UP Insta all tion 12...........................................................................................
Step 1 2 - : C UP Coo ngli Fan Insta all tion 13......................................................................
St : Iep 2 n a e o odu e 14st ll m m ry m l s ...................................................................
St : I t .....................................................................ep 3 ns a e pan on a dll x si c r s 17
St : t , t , ..............ep 4 Connec ri lbbon ab c es cab nei wires and po e upp w r s ly 18
Step 4 1 - : I/O Back Panel Introduction 18..........................................................................
Step 4-2 onne: C ctors & Ju pem r Setting Introduction 20....................................................
Chap e 3t r B SIO Se up 35t .......................................................................
T Fhe a n enu M i M ( o e a p er x m l : I B OS V er.: I 8 PE P E1000 r -o G. 1 36) ................
S Standa dr CMO Fea u e 38t r s.............................................................................
A Bd an edv c IOS Fea u e 41t r s..............................................................................
In eg a ed e phe a 43t r t P ri r ls ..................................................................................
P So e anage enw r M m t e up 48t ............................................................................

Tab el of Content
English
- 3 -
( )* For GA-8IPE P1000 ro-G only.
P P Pn / CI Con gu a on 50fi r ti s.................................................................................
P SC H ea hlt t t ...........................................................................................a us 51
Frequency/Vo age on o 53lt C tr l ............................................................................
Se e Language 56l ct ( )* .......................................................................................
Load a a e e au 57 F il-S f D f lt .................................................................................s
Load p ed e au 58 O ti im z D f lt ...............................................................................s
S S Pet upe o erv si r/Us r a o d 59ssw r .....................................................................
S & E Sa ev xit e up 60t ..........................................................................................
E Sxi it W t thou a ng 61vi ......................................................................................
Chap e 4t r Te hnc ical Re e en e 63f r c ..........................................................
@ B SIO TM In odu on 63tr cti ..................................................................................
Easy TuneTM 4 In odu on 64tr cti ...........................................................................
Fa e a dc -Wiz r TM Ut tili ies In a a on 65st ll ti ( )* ..........................................................
Fla h e hods B SIO M t In odu on 66tr cti ...................................................................
2 4 6 8 hanne ud o un on-/ -/ -/ -C l A i F cti In odu on 87tr cti ...........................................
J ck s Ja -Sen ing(UA ) In odu on 93tr cti ...................................................................
Xp e e o er ss R c v ry In odu on 95tr cti .......................................................................
Chap e 5t r Appendix ........................................................................... 99

- 4 -GA-8IPE1000 Series Mothe boa dr r
English
Warn ngi
Co pum te or m the boar rd ands e panx sion a c rd ons c ta ni very delicate Integ ar ted u Circ it (IC) c sh pi . To
protect them against damage from static e el ctri ic ty, you should follow so em p er cautions whenever you
work on your computer.
1 np ug. U l your computer when working on the inside.
2. Use a g oundedr wrist strap befo er handling computer co ponenm ts. If you do not have
one, t ouch bo th of your hands to a safely g ounded ob er j ct or to a metal object, su hc as
the power supply c sa e.
3 o. H ld co ponenm ts by the edge ands try not touch the IC ch pi s, leads or connectors, or
other co ponenm ts.
4. Pla ec components on a g ounded anr tistatic pad or on the bag that ca em with the
components whenever the components are sepa ar ted from the system.
5 n. E su er that the ATX po ew r supply is switched off before you p l iug n o r remove the ATX
power connector on the mothe boar rd.
If the mothe boar rd ha s mounting holes, but they don't line up with the holes on the base and there
a e no or sl ts to atta hc the pa e do no s c rs, t be oc me a a ed l rm you an c still atta hc the pa e s c rs to the
mounting holes. J su t cut the bottom portion of the spa ec r (s the spacer may be a little hard to cut off, so
be careful of you handr s). In this way you can still atta hc the motherboard to the ba e s without worrying
about short circuits. So em times y ou a m y need to u se the p lastic s prings to isolate the screw from the
mothe boa dr r P BC surfa ec , bec sau e the circuit wire a m y be near by the ho el . Be careful, don't let the
screw contact any printed circuit write or parts on the PCB that a er near the fixing ho e l , otherwise it may
damage the boa dr or cau es boa dr malfunction ngi .
Ins at lling the mo ht erboard to the chassis…

Introduction- 5 -
English
Form Facto 30 5 23 0r . c xm . cm ATX s zi e form factor, 4 a l yers P BC .
Mothe boa d 8r r GA- IPE1000 Se eri s Mothe boa dr r :
GA PE-8I 1000 P Ar -o G G/ -8IPE A1000-G G/ -8IPE1000
C UP So eck t 478 for Intel
® Micro FC-P A PG 2 en uti m® 4 p o e o r c ss r
Support Intel® Pentium® 4 ( rNo th oodw , Pre osc tt) r r p o e oc ss
Support Intel® Pentium® 4 Pr ro e oc ss with HT Te hno ogc l y
Inte en ul P ti m®4 400 533 800/ / MHz FSB
2nd c ca he depend ons C UP
C Ch p ei s t h p ei s t Inte 865l PE S HO T/ / tA PG Con r ro ell
ICH5 I/ tO Con r ro ell Hub
M me o 4ry 184 p n- i DDR DIMM s cko ets
Supports Dual channe 400 333 266l DDR /DDR /DDR DIMM
Supports 128 256 512 1 unbuMB/ MB/ MB/ GB ffe edr DRAM
Supports up to 4 GB DRAM M ( ax)
I/ tO Con rol ITE8712
Slo 1ts A PG slot supports 8 4 odeX/ X m
5 PCI slot supports z 33MH & P CI 2 3. co p anm li t
On oa d-B r IDE 2 IDE bu as m ste 33r ( UDMA /ATA A66/ TA100) IDE ports
fo up o 4r t ATAPI devic se
Supports PIO m Mode3 4, (UD A 33/ATA A66/ TA100) IDE
& A TAPI CD R- OM
S Ae ari l TA S2 e ari l ATA c conne tors (SATA SA0/ TA1 n 150) i MB/ ts ope ar ion
mode
Contro ed bll y ICH5
Ch p n odu ona te 1r I tr cti
F u ueat res S mma yr
to be on c tinued......
Due to c sh pi et (Inte 875 865 865 848 a hl P/ G/ PE/ P) rc itectu er li im tation a, FSB 800 Pentiu 4m
p o e or c ss r will support DDR DDR DDR400/ 333/ 266 m me ory modu el . A FSB 533 en P tium 4
p o e or c ss r will support DDR333 and DDR266 e o m m ry modu el . A FSB 400 Pentiu 4m p o e or c ss r
will on uppoly s rt DDR 266 e o m m ry modu el .

- 6 -GA-8IPE1000 Series Mothe boa dr r
English
On oa d-B r Pe phe a 1 oppri r ls Fl y port supports 2 FDD w ith 360 K, 720 1 2 1 44K, . M, . M
and 2 88. M bytes.
1 a a e po P r ll l rt supports N Co arm l/ /EPP E P mode
2 e a po S ri l rts ( )C COMA& OMB
8 2 0 1 1 USB . / . ports x (4 Rea 4r, xFront by cab el )
1 Front Audio Connector
3 IEEE1394 b ( y cab el ) (*)
1 IrDA c conne tor for IR C/ IR
H wa dr a er Monito o er C UP /P w r
(*)/ tSys e an e o um F R v l tion de e t ct
C U wP /Po er (*)/System F Fan ail Wa n ngr i
C UP Ove hear t Wa n ngr i
Syste o age em V lt D tect
On oa d-B r Sound eaR ltek AL 850C U C D CAJ O E
Support J ck sa -Sen ing
L ne ui O t / 2 front s kpea er
L nei In / 2 ea pea e b r r s k r( y s s/w witch)
Mic In en / c te ub oor& s w fe br( y s/w s cwit h)
SPDIF Out / ISPD F In
CD_In / Ga em Connector
Su oundrr Ba pea eck s k r (by opti lona Su oundrr -Kit)
O n o a d L- B r A N (*u)Bu d nil i Marvell 8001 Ch p ei s t (10 100 1000/ / Mbit)
(*u)
1 RJ45 port
O n o a d 1 3 9 4- B r IE E E (*)Ti TSB AB43 23
PS/2 Connecto 2 er PS/ K yboa dr interfa ec and 2 PS/ Mou e ns i terfa ec
BIOS L en edic s AWA BRD IOS
Supports Dual BIOS (*)/Q-Fla hs
Supports Multi Language
(*)
Supports Fac ze Wi a dr
(*
)
to be on c tinued......
( )* For GA-8IPE P1000 ro-G only.
(u) For GA-8IPE1000-G only.

Introduction- 7 -
English
Add onai it l Featu e 2r s PS/ Keyboa d po er w r on b y pa o dssw r
PS/2 Mou e po es w r on
STR( -Su pends To- )RAM
AC R e o ec v ry
USB KB /Mou es wa e upk fro 3m S
Supports EasyTune 4
Supports @BIOS
Supports C UP Smart Fan Control function
(*)
Ove o ngrcl cki Ove or V ltage b ( )DDR C U/ /A PG P y BIOS
O Gv cke or Cl (DDR/A P P P/C U/ CI) by B SIO
Plea e es s t the C UP host frequency in a o dan e cc r c with your p o e or c ss r's s cpe ifications.
We don 't re o endc mm you to e s t the system bus frequency over the pe C UP 's s cification
be au ec s the es s cpe ific s bu fr requen e aci s e not the standa d per s cifications for C UP ,
c sh pi et and most of the pe phe ri ra hels. W ther your syste an unm c r under thes s ce pe ific
bus frequen eci s properly willdepend on your ha d a er w r configu ar tions, i l inc ud ng C UP ,
Ch p ei s ts, M me ory, . t Ca dr s… e c.
HT f t tunc i liona y e e r quir ment c eont nt :
Enab ngli the functi liona ty of Hype h ead ngr-T r i Te hno og o ou o puc l y f r y r c m te e equ er syst m r ir s
a oll f the o o ng p a f ll wi l tfo o ponenrm c m ts:
- C UP : An Intel® Pentiu 4m Pr ro e oc ss with HT T e hno ogc l y
- Ch p ei s t: An In et l® Ch p ei s t that supports HT T e hno ogc l y
- BIOS A: BIOS that supports HT T e hno og and ha enab edc l y s it l
- OS: An ope a r tion e syst m that has op ati im z tions for HT T e hno ogc l y
( )* For GA-8IPE P1000 ro-G only.

- 8 -GA-8IPE1000 Series Mothe boa dr r
English
No et : If the o N rth dgeBri on the o m the boa d har r s a fan n hen si k, t the mothe boa d onr r c ta n ai s
NB_FAN c conne tor.
( )* For GA-8IPE P1000 ro-G only.
(u) For GA-8IPE1000-G only.
GA-8 1000 e esIPE S ri Mo h bo d L out er ar ay t
GA-8IPE1000 (Pro)(-G)
KB_MS
COMACOMB
ATX V_12
S KEOC T478
CPU_FAN
A XT FDD
LPT
R U_ SB
Hyper Threading
SPDI IF_ O
BACKUP
B SI O (
*)
I IR C_ R
PCI5
F_ 1U SB
F_ 2U SB
F2_1394 (
*)F1_1394 (
*)
GAME
IDE1
IDE2
MIC_IN USB
L A N
(*u)
P EWR_L D
COD CE
ITE8712
F_PA EN L
BAT
PCI3
PCI4
MAIN
BIOS
CI
P4 Titan
SYS_FAN
I INFO_L NK
TSB A B43 23 (
*)
PWR_FAN (
*)
C R CL _ MOS
F_AUDIO
ICH5
PCI2
SUR_C NE
PCI1
DDR3
DDR1
DDR2
NB_FAN (
*)
CD_IN
I tn el® 865PE
AGP
Ma erv ll
8001 (
*u)
LINE_IN
LINE_OUT
DDR4
SATA 1
SATA 0

- 9 - rHa dwa er Installation Pro ec ss
English
Block Diagram
( )* For GA-8IPE P1000 ro-G only.
(u) For GA-8IPE1000-G only.
Se ari l ATA
Channels
Pentium 4
So eck t 478
C UP
Inte 865l PE
AC97
C D CO E
ICH5
C UCP LK+/- (100 133/ /200MHz)
System Bus
400 533 800/ / MHz
266 333 400/ / MHz
ZCLK ( )66MHz
HCLK+/- (100/133MHz)
66MHz
33 MHz
14.318 MHz
48 MHz
24 MHz
33 MHz
LP B SC U
A PG 8 4X/ X
A P KG CL
(66MHz)
5 PCI
P KC CI L
(33MHz)
AC97 L ni k
MIC
LINE-IN
LINE-OUT
8 USB
(2. /0 1.1)
Ports
ATA33 66/ /100
IDE Channels
Floppy
LPT Port
PS/2
KB/Mou es
COM
Ports
C NLK E G
ZCLK ( )66MHz
C UCP LK+/- (100 133/ /200MHz)
A PG CLK (66MHz)
HCLK+/- (100/133MHz)
PCICLK ( )33MHz
U CSB LK (48MHz)
14.318 MHz
33 MHz
ITE8712
Ga em Port
B SIO
Marvell 8001 (
*u)
RJ45 (*u)
24 MHz ICH3V66 (66MHz)
DDR
TSB AB43 23 (
*)
IEEE 1394 (
*)

- 10 -GA-8IPE1000 Series Mothe boa dr r
English

- 11 - rHa dwa er Installation Pro ec ss
English
To set up your compu et r, you must comp el te the foll iow ng steps:
Step 1- In ast ll the Central Pro ec ssing Unit (CPU)
Step 2- In ast ll m me ory modules
Step 3- Install expan onsi cards
Step 4- Connect ribbon cables, cab nei t wires, and po ew r supply
C Hh pa te 2r a a erdw r Ins at ll iat on o Pr cess
Congra ut l iat ons you have accomplished the har rd aw e installa onti !
Turn on the po ew r supply or connect the po ew r cable to the power outlet. Continue with
the BIOS/software install iat on.
Step 2
Step 4 Step 1
Step 4
Step 4
Step 3
No et : If the o N rth dgeBri on the o m the boa d har r s a fan n hen si k, t the mothe boa d onr r c ta n ai s
NB_FAN c conne tor.

- 12 -GA-8IPE1000 Series Mothe boa dr r
English
St :e 1p Insta e e a cessll th C ntr l Pro ing U C Unit ( P )
Step 1 1- : C UP Insta all tion
Pin1 ind oicat r
3. C UP Top e Vi w
2 u. P ll the rod to the 90-deg eer directly.
4 Lo a. c te Pin 1 n i the o e s ck t and oo l k
fo ar (golden u) c t edge on the C UP
uppe o ner c r r. Then n e i s rt the C UP
into the o e s ck t.
Angling the
r o d o t 6 5 0
Socket
Actuation
Lever
Pin1 ind oicat r
1 ng. A ling the rod to 65-degree maybe feel a
kind o f tight, and then continue pull the rod
to 90 deg- ree when a noise "cough" made.
Before installing the p or cessor, a e edh r to the fo oll wing warning:
If you do not ma ct h h t e C UP s ckeo t Pin 1 a nd C UP cut e edg well, it will
cause improper installation. Please change the insert orie ant tion.
Please make sure the C UP ty ep is supported by the motherboard.

- 13 - rHa dwa er Installation Pro ec ss
English
Step 1-2 : C UP Cooling Fan Ins a at ll tion
1. lP ease use Intel approved cooling fan.
2 e. W recommend you to apply the thermal ta ep to p or vide better heat conduction
between your CPU and cooling fan.
(The CPU cooling fan might stick to the CPU due to the harden ng oi f the thermal
paste. During this condition if you try to remove the cooling fan, you might pull the
processor out of the CPU socket alone with the cooling fan, and might damage the
processor. To avoid this from happening, we s uggest you to either use thermal
tape ins eat d of thermal paste, or remove the cooling fan with extreme caution.)
3 ake. M sure the CPU fan power cable is plugged in to the CPU fan connector, this
completes the installation.
Please refer to CPU cooling fan user's manual for more detail installation procedure.
2 a e u e. M k s r the C UP fan is p uggedl to
the C UP fan onne c ctor, t han n i stall
co p em l te.
1 a. F sten the oo ng c li fan uppo s rting ba e- s
onto the C UP s cko et on the
mainboard.
Be efor i llins at ng the C UP Coo ng Fli an , a e edh r t to he foll iow ng warn ngi :

- 14 -GA-8IPE1000 Series Mothe boa dr r
English
The o m the boa d har r s 4 dua n ne e o l i li m m ry modu el (DIMM) s cko ets. The B SIO will auto am ti llca y
detects y m me or type and s zi e. To n i sta he e oll t m m ry modu el , just pu hs it verti llca y in ot the DIMM
s cko et. The DIMM m odu e anl c only fit in one d eir ction due to the notc yh e o. M m r s zi e can vary
between o e s ck ts.
Step 2 s a: In t ll m m me ory odules
DDR
Notch
Before installing the processo ndr a hea st ink, adhe er to t fhe o o ngll wi warning:
Plea e nos te that the DIMM m odu e an onl c ly fit in one d eir ction due to the one no tc she .
Wr rong o ientation will c s sau e p ope n im r r i tallati lon. P ea e hanges c the n e i s rt o enri tation.
GA-8IPE1000 Se eri s supports the Dual Channel Techno ogl y. After ope ar ting the Dual Channel Te hnoc logy,
the band width of M me ory Bus will add doub e upl to 6 4 . GB/ .s
GA-8IPE S1000 e eri s i lnc ude 4s DIMM s cko ets, and ea hc Channe hal s two DIMM s cko ets as fo oll wing:
Channel A : DIMM 1, I D MM 2
Channel B : DIMM 3, I D MM 4
If you want to ope a r te he t D Cual hannel Te hno ogc l y, t p ea e nol s e the fo oll wing e p anax l tion dues
to the li im ta on oti f In et l
®
c sh pi et s c cpe i if ations.
1 n. O ly one DDR m me ory modu el is insta ed he uall : T D l Channel Te hno og anc l y c 't ope ar te
when on onely DDR m me ory modu el is insta edll .

- 15 - rHa dwa er Installation Pro ec ss
English
2 m me ory modu el s
4 m me ory modu el s
DIMM 1 DIMM 2 DIMM 3 DIMM 4
DS/SS X SD /SS X
X SD /SS X SD /SS
DS/SS SD /SS SD /SS SD /SS
l Figu e 1r : D Cual hannel Te hno ogc l y (DS: Doub e del Si , SS S: i lng e Side)
2. Two DDR m me ory modules a e nr i sta edll (the sa em m me o ery s z i and type he): T Dual
Channel Te hno ogc l y will ope ar te when two e o m m ry modu e a el s r in es rted nd dua i i iv lly into
Channel A and B. If you install two m m me ory odu e nl s i the a e s m channel, t he D Cual hannel
Te hno ogc l y will not ope ar te.
3 h ee. T r DDR m me ory modu el s a e nr i sta edll : Plea e nos te that The ua D l Channel
Te hno ogc l y will not ope ar te when th eer DDR m m me ory odu el s a e nr i sta edll ; part of
them will not be de tected.
4 ou. F r DDR m me ory modu el s a e nr i sta edll : If y sou n i tall fou e or m m ry modu el s at the sa em
time, the ua D l Channel Te hno ogc l y will ope ar te only when tho e odu es m l s ha ev the sa em
m me ory s zi e and type.
We'll strongly re o endc mm our u es r to o sl t t w DDRo m me ory modu el s into the h he D wIMMs it t
s ca em o ol r in o de r r for D Cual hannel Te hno ogc l y to o w rk.
The fo o ngll wi tab e n ude a e ol s i cl ll m m ry-i lln ast ed co b nam i tion ty spe :
(Plea e nos te that tho es ty spe not in the tab el s will not boot up.)
1 m me ory modu el
2 m me ory modu el s
3 m me ory modu el s
DIMM 1 DIMM 2 DIMM 3 DIMM 4
DS/SS X X X
X SD /SS X X
X X SD /SS X
X X X SD /SS
DS/SS SD /SS X X
X X SD /SS SD /SS
DS/SS SD /SS SD /SS X
DS/SS SD /SS X SD /SS
DS/SS X SD /SS SD /SS
X SD /SS SD /SS SD /SS
l Figu er 2 on: D 't ope ar te ua D l Channe e hno ogl T c l y (D DS: oub el S SSide, : S Si lng e ide)

- 16 -GA-8IPE1000 Series Mothe boa dr r
English
1. The DIMM slot has a notch, so the DIMM
m me ory modu e anl c only fit in one d eir ction.
2. In es rt the DIMM m me ory modu el vertic yall into
the DIMM slot. Then pu h s it down.
3. Clo es the p al stic clip a t both edges of the DIMM
slots to o l ck the DIMM modu el .
Re e ev rs the insta all tion steps when you wish
to re om ve the DIMM module.
DDR In odutr ction
Estab hed onlis the e x si ting S ADR M infrastructu e oub e ar , DDR D ( l D ta Rate e o) m m ry is a h ghi
perfo an e and o erm c c st- ff tec ive o u s l tion ha t t a oll ws easy adoption o e o f r m m ry v endors s, OEM ,
and syste nm i teg a or t rs.
DDR m me ory is a g ear t evo ul tionary so u onl ti for the ndu PC i s ytr t tha bu dil s on the e x si ting
S ADR M a hrc itectu er , yet ma ek the a e o e w s m advan e n oc s i s lving he t syste pem rfo an erm c
bottlene bck y doub ngli the e o m m ry band dwi th. N wo adays, t wi h the h ghe i st band dwi th o f 3 2. GB/
s of DDR400 m me ory and o p e c m l te line of DDR400 333 266 200/ / / m me ory so ul tions, DDR m me ory
is s the be t c choi e for bu d ngil i h ghi perfo an e and o a enrm c l w l t cy DRAM s sysub tem tha a et r
s s v s ksu ab e oit l f r er er , wor ta on andti s, fu ange oll r f desktop PCs.

- 17 - rHa dwa er Installation Pro ec ss
English
Step 3 s a: In t ll ex a s ca sp n ion rd
1 ead. R the re al ted e pan x sion a d c r 's instruction do u en c m t befo er install the e pan on x si ca d nr i to
the co pum ter.
2 e o. R m ve your co pum ter’s c ss s c ha i over, ne e ac ss ry sc srew and slot b a er ck t from the o c mputer.
3 e. Pr ss the ex s cpan ion a dr fi lrm y into e pan on o x si sl t in mothe boa dr r .
4 e u e. B s r the e m tal contacts on the a d a e ndeed c r r i seated n i the o sl t.
5 ep a e. R l c the screw to e u e s c r the slot b a er ck t of the e pan on a dx si c r .
6 ep a e. R l c your co pum te har's c ss si c vo er.
7 o e on. P w r the o pu c m ter, f i ne e ac ss ry, t se up BIOS utility of e pan onx si ca dr from BIOS.
8. Insta e a ed dll r l t river from the ope a r ting system.
A PG Ca dr
Please ca er fu pully ll out the small white d- rawab el bar
a he end ot t f the A PG slot when ou y t try o n a i st ll/
Un ni stall the A PG c sa d ear . Pl e a gn li the A PG ca dr to
the onboa dr AGP slot and press fi lrm y down on the slot
.Make su er your A PG card is locked by the small white-
d ar wable bar.

- 18 -GA-8IPE1000 Series Mothe boa dr r
English
St :e 4p Conn bbonect ri cables ca e es, b ni t wir , a end po w r
s yuppl
Step 4 1- : I/O Back Pa en l Introduction
PS/2 Keybo dar and PS/2 Mouse Connector
This c conne to uppor s rts standa d 2r PS/
k ye boa dr and 2 PS/ mou es .
PS/2 Mou es Connector
(6 p n e a ei F m l )
PS/2 Keyboa dr Connector
(6 p n e a ei F m l )
/USB / LAN Connector Befo er you onne c c yt ou der vic se( ) into USB
c conne tor( )s , p ea el s ma e u ek s r your
devic s s ce( ) u h as USB k ye boa d ou er ,m s ,
scanner, z s kip, pea e er.. tc. Have a standa dr
USB interfa ec . Als k s yo a m e u er our OS
supports c USB ontr ro ell .
If you doe no uppor OS s t s rt USB contr ro ell ,
p ea el s contact OS vendor for po b e passi l tch
o d er riv r upg ade or . F r mo e nr i fo arm tion
p ea el s contact your OS or device(s) vendors.
L onne o aAN c ct r is f st Ethe ner t with 10 100 / /
1000 Mbps speed.
LAN (*u)
USB 3
USB 2 USB 4
USB 5
( )* For GA-8IPE P1000 ro-G only.
(u) For GA-8IPE1000-G only.

- 19 - rHa dwa er Installation Pro ec ss
English
Afte nr i sta onboa d aud o d ell r i riv r, you a m y
c conne t s kpea er to L ne i Ou at j ck,
microphone to MIC In a e j ck. D vi lic se ke
CD R- OM, wa an elkm tc. can be c conne ted
to L ne i -In a j ck.
Please not :e
You a e ab er l to u e 2 4 6 8 hannes -/ -/ -/ -c l aud oi
fea u e b e et r y s S/W l ction.
If you want to enab e 8 hannel -c l function you
can e r fer to page 27 and , contac yt our
nea er st dea el r fo opr ti lona S EUR C_ N cab el .
Pa ar llel Port and Se ari l Ports (C AOM /C BOM )
This c conne to uppor s rts 2 standa dr COM
po and 1 a a erts P r ll l port. Devi li ice ke p r nter
can be onne c cted to a a e P r ll l port; mou es
and ode m m etc c an be onne c cted to e a S ri l
ports.
P Pa a er ll l ort
(25 p n e a ei F m l )
COMA COMB
S Pe ari l ort (9 p ni Ma el )
Aud oi Connectors
L nei In ea(R r Spea ek r)
MIC In en(C ter and ub oo S w fer)
L nei Out( rF ont Spea ek r)
I il i i / / / l if t t t y aou w n h de e a n of rmat on o f r 2- 4- 6- 8 c a e- h nn aud o up set
insta all ti ,on please refer to p ga e 87.

- 20 -GA-8IPE1000 Series Mothe boa dr r
English
Step 4-2: Conn oect rs & Ju pm er Setting In odutr ction
1) ATX V_12 13 _) SUR C NE
2) ATX 14 _) CD IN
3) C UP _FAN 15 _) SPDIF IO
4) SYS_FAN 16 _) IR C RI
5) P W R A N_ F (*)17 _ 1 _ 2) F U BS /F U BS
6) N B A N_ F (*)18) GAME
7) I /IDE1 DE2 19 _) INFO LINK
8) FDD 20) F 2 _ 1 3 9 4
(*)
9) P EWR_L D 21) F 1 _ 1 3 9 4 (
*)
10) BAT 22) SATA0/SATA1
11) F_PANEL 23) CI
12) F_ 24 _AUDIO ) C RL CMOS
1 3
2
8
7
6(*
)
21
(*)
9
19
16
20 (*)17
23
13 4
18
22
10
11
15
5 (*)
14
12
24
No et : If the o N rth dgeBri on the o m the boa d har r s a fan n hen si k, t the mothe boa d onr r c ta n ai s
NB_FAN c conne tor.
( )* For GA-8IPE P1000 ro-G only.

- 21 - rHa dwa er Installation Pro ec ss
English
1) ATX_12V (+12V Power Connector)
This c conne tor (ATX V _12 ) s supp eli the ope C UP ration voltage o (Vc re). If this " ATX_ 12 V c conne tor" is
no onnet c cted, system cannot boot.
Pin N Do. efini iton
1 GND
2 GND
3 12+ V
4 12+ V
2) ATX (ATX Power)
AC power c so dr hou d onl ly be onne c cted to you por wer s yuppl unit after ATX power cab el and other
re al ted devic se a er fi lrm y c conne ted to the ma nboa di r .
Pi in o e N . D f ni it on
1 3 3. V
2 3 3. V
3 GND
4 VCC
5 GND
6 VCC
7 GND
8 o eP w r Good
95V SB (stand b 5 y + V)
10 12+ V
11 3 3. V
12 12- V
13 GND
14 _ o nPS ON(s ftO / ffO )
15 GND
16 GND
17 GND
18 5- V
19 VCC
20 VCC
3
1
4
2
1
10
20
11

- 22 -GA-8IPE1000 Series Mothe boa dr r
English
3) C UP _FAN (C UP FAN Connect )or
Plea es note, a p ope r r insta all tion o f the C UP coo el r is e enss ti la to p e enr v t the C UP from runn ngi
under abno arm l condition or da agedm by v o erheating he.T C UP fan connector supports Max.
cu enrr t up to 600 mA.
4) SYS_FAN (Sys et m FAN Connect )or
This c onnector allows y ou to link with the oo ng c li fan on the syste a em c s to o l wer the system
te pe am r ture.
Pin N Do. efini iton
1 GND
2 12+ V
3 Sense
Pin N Do. efini iton
1 GND
2 12+ V
3 Sense
1
1

- 23 - rHa dwa er Installation Pro ec ss
English
5) P PW R A N_ F ( o F n o n n ow e r a C e c t r ) (*)
This c onnector allows y ou to link with the oo ng c li fan on the syste a em c s to o l wer the system
te pe am r ture.
6) N B A N_ F (*)
If you insta edll wrong d eir ction, t he h p C i Fan will not wo o erk. S m times will da agem the Chip an F .
(Usually b al ck c sab el i GND)
Note: If the o N rth dgeBri on the o m the boa dr r ha as fan n si k, t hen the o m the boa dr r conta n ai s
NB_FAN c conne tor.
Pin N Do. efini iton
1 GND
2 12+ V
3 Sense
Pin N Do. efini iton
1 VCC
2 GND
1
1
( )* For GA-8IPE P1000 ro-G only.

- 24 -GA-8IPE1000 Series Mothe boa dr r
English
7) IDE1/ IDE2(I /IDE1 DE2 Connect )or
Plea es c conne t first ha ddr isk to IDE1 and onne c ct CDROM to IDE2 he ed. T r stripe o f the ribbon cab el
must be the a e s m side with the Pin1.
IDE1
IDE2
1
39
2
40
8) FDD (Floppy Connector)
Please connect the floppy d eriv ribbon cab el s to FDD. It supports 360K,720 1K, .2 1 44M, . M and
2 88 b. M ytes floppy disk ty spe . The ed r stripe o f the bbon ri cab el must be the sa em side with the Pin1.
1
34
2
33

- 25 - rHa dwa er Installation Pro ec ss
English
9) P EWR_L D
PWR_LED is connect with the syste pom wer i ind cator to indicate whether the system is on o/ ff. It will b nli k
when the system enters s su pend ode m . If you u e dua o os l c l r LED w, po er LED w ill tu nr to another co ol r.
Pin N Do. efini iton
1 MPD+
2 MPD-
3 MPD-
1
10) BAT (Ba e ytt r )
CAU NTIO
vDanger of e p o onx l si if battery i is n o ec rr ctly
rep a edl c .
vRep a el c only with the a e s m o equ a enr iv l t
type re o endedc mm by the manufactu er r.
vDis spo e of u eds batte e a o d ngri s cc r i to the
manufactu er r's instructions.
If you want to e a er s CM OS...
1.Tu nr OFF the co pum ter and unp ug l the po wer co dr .
2 e o e.R m v the ba ttery, wait for 30 e ond s c .
3 e n.R -i stall the ba tt .ery
4 ug.Pl the po wer co d andr tu nr ON the o pu c m ter.
+

- 26 -GA-8IPE1000 Series Mothe boa dr r
English
11 _) F PANEL (2x10 pins connector)
Pleas ce onnect the power LE PD, C pea ek r, re es t switch and power switch etc of your c ss sha i front panel
to the F_PA EN L connecto a o dr cc r ing to the p in a gn enssi m t be ol w.
HD D (I E H Da dr isk Active L n E PD) i 1: LED anode( )+
(Blue n) Pi 2 L: ED ca hodet (-)
SPEAK (Speaker Connecto nr) Pi 1: VCC( )+
(Ambe nr) Pi 2- Pin 3: NC
Pin 4: Da at (-)
RES (Re es t Switch pen) O : No arm l Ope ar tion
(Green o) Cl se: Re es t Ha dr wa er System
PW (S Poft ower Connecto penr) O : No arm l Ope ar tion
(Red o e) Cl s : Po ew r On/ ffO
MSG (Message LE PD/ owe nr/ Pi 1: LED anode( )+
Sleep LED)(Yello nw) Pi 2 L: ED ca hodet (-)
NC (Pu p er l ) NC
SPEAK-
SPEAK+
20
Spea ek r
Conne oct r
1
19
ID H DE a dr isk
A Ec vti e L D
R we es t S itch
2
1
S Poft o ew r
Conne oct r
1MSG+
MSG-
Me a g e L o ess E PD/ w r/
S Eleep L D
PW-
PW+
1
HD+
HD-
1RES+
RES-
NC
1

- 27 - rHa dwa er Installation Pro ec ss
English
12 _) F AUDIO (F_AUDIO Connect )or
If you want to u e ons Fr t Aud oi connector, you must re o em v 5 6- , 9- r10 u pe J m . I n o der r to utilize the
front aud oi header, y cour hass si must ha ev front aud oi connector. Also p eal s ke a m e su er the p ni
a gssi ment on the ab c le is the sa em as the p ni a g enssi m t on the MB header. To find out if the ha c ss si
you a e bu ngr yi support front aud oi connector, plea es contact your dea el r.Plea es note, y cou an ha ev the
alte nar tive o f u ngsi front aud oi c conne tor o or f u ngsi r rea aud oi c conne tor to p a oundl y s .
Pin N Do. efini it on
1 MIC
2 GND
3 REF
4 POWER
5 onFr tAudio( )R
6 eaR rAud oi ( )R
7 eR s ver ed
8 oN Pin
9 onFr tAud oi ( )L
10 eaR rAud oi ( )L
109
1 2
13 _) SUR C NE
Plea es contact your nea er st dea el r fo opr tional S EUR C_ N cab el .
Pin N Do. efini iton
1 SUR OUT L
2 SUR OUT R
3 GND
4 oN Pin
5 CENTER_OUT
6 BASS_OUT
7 AUX_L
8 AUX_R
7 8
12

- 28 -GA-8IPE1000 Series Mothe boa dr r
English
14 _) CD IN (CD I ,N Black)
Connect CD R- OM or DVD R- OM aud oi out to the onne c ctor.
Pin N Do. efini iton
1 CD-L
2 GND
3 GND
4 CD_R
1
15 _) SPDIF IO (SPDIF I /n Out)
The SPDIF output is capab el of p o dr vi ing d g i ital aud oi to externa pea el s k rs or c sso p em r ed AC3 da ta to
an e xte nar l D Do bl y i ig tal D Ue odec r. se this featu e onr ly when ou y r ste eor syste ham s d gi ita npul i t
fun on ecti . Us SPDIF IN featu e onr ly when ou y r de e ha d gv ci s i ital ou put t function.
Be a e c r ful with the po a l rity of the SPDIF_IO c conne to her. C ck the p n a gn eni ssi m t ca er fully wh e ouil y
c conne t t he SPDIF cab el , in o ec rr ct c conne tion be tween the ab e and c l c conne tor will m a ek the
de e unab ev ci l to work o e enr v da agem it. Fo opr ti lona SPDIF cab el , p ea e onl s c tact your l lo ac
dealer.
Pin N Do. efini iton
1 VCC
2 oN Pin
3 SPDIF
4 SPDI IF
5 GND
6 GND
1
62
5

- 29 - rHa dwa er Installation Pro ec ss
English
16 _) IR C RI
Ma ek su er the p n 1i on the IR de ev ci i lis a ng with p n i one the c conne tor. To enab e l the IR C/ IR function
on the boa d r , you a e r r requi ed to pu ha e anrc s option IR C/ IR m odu e ol . F r deta nil i fo arm tion p ea el s
conta ouc yt r authe ed gariz Gi -Byte d istr ribu ot . To u e s IR functi lon on y, p ea e onnel s c ct IR modu el to
Pin1 to n5 Pi .
Be a e c r ful with the po a l rity of the IR C/ IR c conne to her. C ck the p n a gn en i ssi m t ca er fully wh e ouil y
c conne t the I / IR C R c c cab e nl , i o err t c conne tion be tween the ab e c l and onne c ctor will ma ek the de e v ci
unab el to wo ork r e en da agev m it. For opti lona IR C/ IR c sab e p eal , l e contact your l l lo ac dea er.
Pin N Do. efini iton
1 VCC
2 NC
3 IRRX
4 GND
5 IRTX
6 NC
7 CIRRX
8 VCC
9 CIRTX
10 NC
5
10
1
6
17 _) F U BS 1 / F F on_ 2U BS ( r t U BS Conn oect r, Yellow )
Be a e c r ful with the po a l rity of the front USB c conne t .or Check the p n a gn en i ssi m t ca er fully wh eil
y c cou onne t the front USB cab el , in o ec rr ct c conne tion be tween the ab e c l and onne c ctor will ma ek
the de e v ci unab el to wo ork r e en da agev m it. t Fo opr i lona front USB c sab e p eal , l e c con at t your
l lo ac dea el r.
Pin N Do. efini iton
1 Power
2 Power
3 0USB DX-/USB6 DX-
4 1USB Dy-/U DSB7 y-
5 0USB DX+/USB6 DX+
6 1USB Dy+/U DSB7 y+
7 GND
8 GND
9 oN Pin
10 NC
210
1 9

- 30 -GA-8IPE1000 Series Mothe boa dr r
English
18) GAME (GAME Conn oect r)
This c conne to uppor s rts joystick, I M DI k ye boa dr and o ther re al te aud o i de ev ci s.
19 _) INFO LINK
Th onne ois c ct r a oll ws y ou to onne c ct s xo e em te nar l de ev ci s to p o de our vi y extra function.
16
2
1 15
Pi in o e N . D f ni it on
1 VCC
2 GRX1_R
3 GND
4 GPSA2
5 VCC
6 GPX2_R
7 GPY2_R
8 MSI_R
9 GPSA1
10 GND
11 GPY1_R
12 VCC
13 GPSB1
14 MSO_R
15 GPSB2
16 oN Pin
Pin N Do. efini iton
1 S BM CLK
2 VCC
3 S BM DATA
4 GPIO
5 GND
6 GND
7 oN Pin
8 NC
9 12+ V
10 12+ V
10
21
9

- 31 - rHa dwa er Installation Pro ec ss
English
20) F o n n o2 _ 1 3 9 4 1 3 9 4 ( I E E E C e c t r ) (*)
Please e Not : Se a nri l i terfa ec standa d er s t by Instit tu e of Electri lca and e El ctronics Eng neei rs, wh hic
has fea u et r s li ike h gh speed h gh, i bandwidth and hot p ugl .
Be a e c r ful with the po a l rity of the IEEE1394 onne c cto her. C ck the p n a gn eni ssi m t ca er fully wh e ouil y
c conne t t he IEEE1394 ab e c l , in o ec rr ct c conne tion be tween the ab e and c l c conne tor will m a ek the
de e unab ev ci l to work o e enr v da agem it. Fo op onar ti l IEEE1394 ab e c l , p ea e onl s c tact your l lo ac
dealer.
Pin N Do. efini iton
1 Power
2 Power
3 TPA0+
4 TPA0-
5 GND
6 GND
7 TPB0+
8 TPB0-
9 Power
10 Power
11 TPA1+
12 T PA1-
13 GND
14 oN Pin
15 TPB1+
16 TPB1-
21) F o n n o1 _ 1 3 9 4 1 3 9 4 ( I E E E C e c t r ) (*)
Please e Not : Se a nri l i terfa ec standa d er s t by Instit tu e of Electri lca and e El ctronics Eng neei rs, wh hic
has fea u et r s li ike h gh speed h gh, i bandwidth and hot p ugl .
Be a e c r ful with the po a l rity of the IEEE1394 onne c cto her. C ck the p n a gn eni ssi m t ca er fully wh e ouil y
c conne t t he IEEE1394 ab e c l , in o ec rr ct c conne tion be tween the ab e and c l c conne tor will m a ek the
de e unab ev ci l to work o e enr v da agem it. Fo op onar ti l IEEE1394 ab e c l , p ea e onl s c tact your l lo ac
dealer.
Pin N Do. efini iton
1 TPA2+
2 TPA2-
3 GND
4 GND
5 TPB2+
6 TPB2-
7 Power
8 Power
9 oN Pin
10 GND
1
216
15
1
2
9
10
( )* For GA-8IPE P1000 ro-G only.

- 32 -GA-8IPE1000 Series Mothe boa dr r
English
22) SATA0/SATA1 (Se ari l ATA Connect )or
You an c c conne t the Se ari l ATA de ev ci to th onneis c ctor, it p o der vi s y sou h gh i peed transfe ar r tes
( )150 eMB/s c .
71
Pin N Do. efini iton
1 GND
2 TXP
3 TXN
4 GND
5 RXN
6 RXP
7 GND
23) ( )CI CA NSE PE O
Th 2is p n onnei c ctor a oll ws y sys our tem to enab e l o d ab er is l the " "c sa e open item in BIOS if the
system c sa e beg ni re o em v .
Pin N Do. efini iton
1 Signal
2 GND
1

- 33 - rHa dwa er Installation Pro ec ss
English
24 _) C RL CMOS (Clear CMOS)
You ma eay c l r the CMOS data to its default v s ya uel b th u pei js m r. To ea cl r CMOS, t e po am r rily
shor 1 2 p n- i . Default doe ns 't i lnc ude the "Shunter" to p e enr v t from imp ope u er r s th u pei js m r.
1
1Open: No arm l
Short: Clear CMOS

- 34 -GA-8IPE1000 Series Mothe boa dr r
English

- - 35 BIOS S etup
English
< >áMo ev to p e ou r vi s item
< >âMo ev to ne xt item
< >ßMo ev to the ite nm i the e l ft hand
< >àMo ev to the ite nm i the gh ri t hand
Ente e er S l ct item
< >Esc M Ma ni enu u - Q it and not s va e c shange into CMOS S tatu age es P S tup enu and M
Option age e P S tup enu M - Exit cu enrr t page and retu nr to a n enu M i M
<+ >/Pg pU I tn ea ecr s he nu e a ue o a e hange m ric v l r m k c s
< >-/Pg nD De ea ecr s the nu e a ue o a e hange m ric v l r m k c s
< >F1 Gene a he p onr l l , ly for Statu age es P S tup enu and p M O tion age e P S tup enu M
< >F2 Ite e pm H l
< >F3 Re e eds rv
< >F4 Re e eds rv
< >F5 Resto er the p e ou a ue r vi s v CMOS l fro onm M C OS, ly fo pr O tion age e P S tup enu M
< >F6 Load the file a-s fe de fault CMOS va uel fro dem B SIO fault tab el
< >F7 Load the p O ti im zed e D faults
< >F8 Dual B SIO (*)/ fQ-Fla hs unction
< >F9 Syste nm I fo arm tion
< >F10 Sa e av ll the hange on CMOS c s, ly fo a n enur M i M
B S SIO etup an o e e o is v rvi w f the e B S SIO tup Pr rog am. The p og a r r m that a oll ws u es rs to od m ify the
bas c sysi te onm c figu ar tion. This type o f info arm ti ion s s to ed n bar i tte ba ed or -y ck C RMOS AM s that it
reta ni s the e S tup n i fo arm tion hen w the po e w r is tu ned or ff.
C Bh pa te 3r IOS S etup
ENTERING
Po e ngw ri ON the o pu c m te and p e ngr r ssi < >Del i immed atel illy w a o oull w y to en ter Setup. If you r requi e
mo e ad an edr v c B SIO setti lng ps, ea e gos to " "A B Sd an edv c IO setting enu m .To enter A B Sd an edv c IO
setting enu p e m , r ss "Ctrl+F1 e on" k y the een B SIO scr .
C NO TROL
SETUP
KEYS
( ) r - r -* Fo GA 8 1000IPE P o G only.

- - 36 GA-8IPE S1000 e e ori s M the boa dr r
English
lStandard CMOS Features
Th eis s tup page n ude a i cl s ll the ite nms i standa d o par c m ti lb e B SIO .
lAdvan dce BIOS Features
Th eis s tup page n ude a i cl s ll the ite oms f Awa d pe a enhan edr s ci l c featu er s.
Main Menu
The on ne de p -li scri tion o f the h gh gh i li ted e s tup functi i i lon s d sp a ed ay t the bo tto om f the een scr .
Status Page e S tup Menu p / O tion Page e S tup Menu
Pre 1ss F to pop up a a he p ndo sm ll l wi w that de bescri s the app op a r ri te e k ys to u e and s the po b e ssi l
s ce el tions for the h gh gh i li ted item. To e xit the e p ndo p e H l Wi w r ss sc <E >.
The Main Menu (For e xample: BIOS Ver.: 8IPE1000 o Pr -G.E1)
On e ouc y enter A Bwa dr IOS S S CMO etup Utility, t he a n enu M i M ( r ) rFigu e 1 will appea on the een scr .
The a n M i Menu a o oull ws y to e e s l ct fro em ight setup function ands two e xit c c s shoi e . U e a orr w k yse to
s ce el t a ongm the ite and p e nms r ss <E ter> to a ep cc t or enter the ub enu s -m .
Fi igu e 1 ar : M n enu M
GETTING HELP
I i i , l lf t f y caou n' nd h t e se tt ng ou n y wa t p ease ess pr "Ctr +F o1" t
sea c e a va ce er h h t d n d op on dd ti wi n.
CMOS S etup Utility y-Cop right ( )C 1984 2003- Aw a dr Softw a er
Standa d ear CMOS F tu er s S e e L a n g u a g el c t (*)
A Bd an edv c IOS Featu e Load a ar s F il-S fe Defaults
Integ ar ted e phe a Load p P ri r ls O ti im zed Defaults
Po e anage enw r M m t Setup eS t Supe orv si r Pa o dssw r
P P Pn / CI Configu ar tion es S t User Pa o dssw r
PC H ealth Statu a es S v & E x it Setup
Frequen ocy /V ltage on C trol iEx t Without Sa ngv i
ESC: tQui F 3 h a n g e L a n g u a g e: C (*)
F8: Dual BIOS (*)/ : tQ-F Fla hs 10 S & Ea ev x i Setup
Time, Date, Ha dr Disk y T pe...
( ) r - r -* Fo GA 8 1000IPE P o G only.

- - 37 BIOS S etup
English
lInte rg ated Peripherals
Th eis s tup page n ude a onboa d pe phe a i cl s ll r ri r ls.
lPower Manag eme en St tup
Th eis s tup page n ude a i cl s ll the ite oms f Green function featu er s.
lP P Pn / CI Con ufig rations
Th eis s tup page n ude a i cl s ll the configu ar tion os f PCI & P Pn ISA r re ous c se .
lPC Healt th S atus
Th eis s tup page is the Syste aum to de tect Te pe am r tu e or , v ltage, f an peed, s .
lFrequ ne cy/Voltage Control
Th eis s tup page on is c tro o andl l C UP 's c ck fr requency atio.
lSe ecl t Lan ug age (*)
Th eis s tup page e e is s l ct multi l anguage.
lLoad Fail- f fSa e e D aults
Fa ail-S fe e D faults c i ind ates the a ue o v l f the syste pa a em r m te h hrs w ic the syste ou dm w l
be n a i s fe on c figu ar tion.
lLoad Optimiz ed Defaults
Opti im zed e D faults c i ind ates the a ue o v l f the syste pa a em r m te h hrs w ic the syste ou dm w l
be n be i st perfo an e onrm c c figu ar tion.
lS Supet ervis or password
Change e, s t, . It o d ab e pa o dr is l ssw r a oll ws you to li im t a ecc ss to the syste and em S tup,
o ur j st to e S tup.
lSet User password
Change e, s t, . It o d ab e pa o dr is l ssw r a oll ws you to li im t a ecc ss to the system.
lSave & Exit t Se up
S Sa ev CMO v sa uel ettings to and e CMOS xit setup.
lExi it W t th uo Saving
A Sbandon a ll CMO v c s xa uel hange and e it setup.
( ) r - r -* Fo GA 8 1000IPE P o G only.

- - 38 GA-8IPE S1000 e e ori s M the boa dr r
English
S ndta ard CMOS Features
CMOS Setup Utility y-Cop right ( )C 1984 2003- Aw a dr Softw a er
Standa d ear CMOS F tu er s
Date dd ue ug 13 2002 (mm: :y y) T , A Item He pl
Tim mme hh ( : : : :ss) 22 31 24
Change the da on y , m th,
IDE Channe 0 al M ste one ear N y r
IDE S Channe 0l la e onev N
IDE Channe 1 al M ste oner N <Week>
IDE S S Channe 1l la e onev N un. t o a S t.
Dri iv e 1 44 3 5 A [ . M, . n on.] <M th>
Driv Je one B [N ] an. t o Dec.
Flopp 3 ode uppoy M S rt [Di lsab ed]
<Day >
Halt On [ ,All But Ke boa d 1y r ] to 31 o a u ( r m x im m
a o ed nll w i the on m th)
B Ka e e o 640s M m ry
Ex tended e o 130048 M m ry K <Year>
Tota e o 131072l M m ry K 1999 to 2098
: t Mo e nv E e e er:S l ct +/ / /- PU PD:Va ue 10 a el F :S v ES EC: x it F1 ene a:G r l He pl
F 3 L a n g u a g e: (*)F5 e ou:Pr v i s Va ue 6 a al s F :F il-S fe Defaults F7 p:O ti im zed Defaults
Figu e 2r : t S anda d ear CMOS F tu er s
Date
The da te fo arm t is < >week , <month da ea> <, y y> <, r>.
Wee he eek T w k, f ro unm S to a S t, t de e ned brmi y the BIOS and d p a on is is l y ly
Month he onT m th an h ough, J . T r Dec.
Da he day T y , f ro 1m to 31 o ( r the a u a o ed n m x im m ll w i the on m th)
Yea he ear T y r, f ro 1999m th ough 2098r
( ) r - r -* Fo GA 8 1000IPE P o G only.

- - 39 BIOS S etup
English
Time
The times fo arm t in < >hour <minute> < >s ce ond . The ti ime s c cal u al ted ba es on the 24 hou- r militar -y
ti l l ime c o o e a pck. F r x m e 1 p, . .m s 13 00 00: : .
IDE Channel 0 a M ster, Sl ave / IDE Channel 1 Master, Slave
The a c tegory identifies the ty spe of ha dr disk fr ro dm ive C to F that has been insta edll in the o c mputer.
The e a er r two ty spe : t au o type and anua, m l type anua. M l ty s spe i u e der- fi lnab e u; A to ty cpe h w i h will
auto am ti llca y detect HDD type.
Note that the pe s cification os f your d eriv must match with the d e riv tab el . The ha d d no r i illsk w t work
p oper rl iy f you ente p ope nr im r r i fo arm tion for th ais c tegory.
If y ou s ce el t User Type e a, r l ted n i fo arm ti illon w be a ed sk to en ter to the fo o ngll wi ite nms. E ter the
info arm ti ion d rectly from the e boa d and p e n k y r r ss <E te u h nr>. S c i fo arm ti l i ion hou s d be p o r v ded n the
do u enc m tation fo ou ha d d endo orm y r r isk v r r the syste anum m factu er r.
C NY SL . u be om r f cy slinder
HEADS Nu be om r f heads
P E PR COM Write p e o p r c m
LANDZONE Land ng onei z
SE SC RTO Nu be om r f s ce tors
If a ha dr disk has not been insta ed e ell s l ct N NO E and p er ss <Enter>.
Drive A / Drive B
The a c tego denry i tifies the pe o ty s f fl i i iopp dy sk dr v e o d A r r ve ha B t t has been insta ed nll i the
co pum ter.
N None o fl i iopp dy r v e nsta edll
360 5 25 n 5 25 n hK, . i . . i c PC-ty spe tanda d d e 360 br riv ; K y te apa c city .
1 2 5 25 n 5 25 n h. M, . i . . i c AT-ty spe h gh den i - ity v y dri e 1 2 b; . M te apa c city
( )3 5 n h hen 3 ode nab ed. i c w M is E l .
720 3 5 n 3 5 n h doub e ded d e 720 bK, . i . . i c l -si riv ; K y te apa c city
1 44 3 5 n 3 5 n h doub e ded d e 1 44 b. M, . i . . i c l -si riv ; . M y te apa c city .
2 88 3 5 n 3 5 n h doub e ded d e 2 88 b. M, . i . . i c l -si riv ; . M y te apa c city .

- - 40 GA-8IPE S1000 e e ori s M the boa dr r
English
Floppy 3 Mode Support (f or Japan Area)
Di l l lsab ed o aN rm F oppy Dr (iv e. Default v a uel )
Driv e A Dri i lv e A s 3 ode m F oppy Driv e.
Driv e B Dri i lv e B s 3 ode m F oppy Driv e.
Both Dr riv e a A & B e 3 ode opp m Fl y Driv se .
Halt on
The a c tego dery te ne hermi s w ther the o pu c m ter will stop if an e orr r is detected du ng po e up ri w r .
NO Err ro s sy sThe te boom t w ill not stop fo an e or y rr r that may be detected
and ou be p o p y w ill r m ted.
A Ell rr ro s Whene ev r the BIOS detects a non -fata e ol rr r the sy ste bem w ill stopped.
A Bll, ut Ke boa d hey r T sy ste boom t w ill not stop fo a e boa d e or k y r rr r; t i w ill stop for
all othe e or rr r (s. Default v a uel )
A Bll, ut Diskette heT sy ste boom t w ill not stop fo a d e or isk rr r; t i w ill stop fo ar ll
othe e or rr rs.
A Bll, ut Disk y sy s/Ke The te boom t w ill not stop fo a e boa d o d e or k y r r isk rr r; t i w ill
stop fo a or ll the e or rr rs.
Memory
The a c tegory i i l ls d sp a ony- y c s whi h i determined b y P SO T ( rPo ew On e S lf Test) of the B SIO .
Base e M mory
The P SO T of the de B SIO will te nermi the a oun m t of ba es ( ro c von enti lona ) r m me o y
insta ed nll i the system.
The a ue o v l f the ba e e o s m m ry s i ty c ypi all 512 K for systems with 512 e o K m m ry
insta ed onll the o m the boa d o 640r r , r K for systems with 640 o o e e o K r m r m m ry
insta ed onll the o m the boa dr r .
Extended Memory
The de B SIO te ne ho u h ermi s w m c xtended e o p e en m m ry s i r s t du ngri the P SO T.
Thi is s the a oun m t of m me ory lo ac ted abo e 1 n v MB i the e o C UP 's m m ry
add e apr ss m .

- - 41 BIOS S etup
English
Advanced BIOS Features
Hard Disk Boot Priority
P Eress nte e er S l ct Ha dr Disk Boot De e p ov ci ri rity .
Fi /rst S econd / Th dir Boot Device
MThis featu e a o our ll w s y to e e s l ct the boo t de ev ci p ori rity .
Fl lopp ey S ect y our boot de ev ci p ori rity y y b Flopp .
L 120 e eS S l ct your boot de ev ci p ori rity y b L 120S .
Ha dr Di lsk Se ect y our boot de ev ci p ori rity y b Ha dr Disk.
CDROM Se el ct y our boot de ev ci p ori rity y b CDROM.
ZIP Se el ct your boot de ev ci p ori rity y b ZIP.
U DDSB-F Se el ct y our boot de ev ci p ori rity y b U DDSB-F .
USB-ZIP Se el ct y our boot de ev ci p ori rity y b USB-ZIP.
Figu e 3 d an edr : A v c BIOS Featu er s
" " # Syste dem will tect auto am ti ll ica y s y and ho up henw w ou nstall the n I tel
® Pentium® 4 p o e o r c ss r
with HT Te hno ogc l y.
CMOS S etup Utility y-Cop right ( )C 1984 2003- Aw a dr Softw a er
A Bd an edv c IOS Featu er s
Ha dr Disk Boot Pr rio ity ss[Pre Enter] Item He pl
First Boot De e oppv ci [Fl y ]
S Be ondc oot De ev ci [Ha dr Disk]
Th d ooir B t De ev ci [CDROM]
P Sa o d hessw r C ck [ etup]
# C U HP y pe h ead ng nab edr-T r i [E l ]
: t Mo e nv E e e er:S l ct +/ / /- PU PD:Va ue 10 a el F :S v ES EC: x it F1 ene a:G r l He pl
F 3 L a n g u a g e: (*)F5 e ou:Pr v i s Va ue 6 a al s F :F il-S fe Defaults F7 p:O ti im zed Defaults
( ) r - r -* Fo GA 8 1000IPE P o G only.

- - 42 GA-8IPE S1000 e e ori s M the boa dr r
English
U CDRSB- OM Se el ct y our boot de ev ci p ori rity y b U CDRSB- OM.
U HDDSB- Se el ct y our boot de ev ci p ori rity y b U HDDSB- .
L e eA SN l ct y our boot de ev ci p ori rity y b LAN.
Di l lsab ed eS ect y our boot de ev ci p ori rity y b Di lsab ed.
Password Ch kec
System The syste nom will t boot and will not a ecc ss to e S tup page if the o e c rr ct
pa o d nossw r is t ente ed ar t the p o p r m t.
Setup heT sy ste boom w ill t but w ill not a ecc ss to e S tup page if the o e c rr ct pa o dssw r
is not ente ed ar t the p o p r m t. (Default v a uel )
C UP Hyper-Threading
E E Pnab edl nab el s C U H y pe h ead ng ear T r i F tu e ea e nor . Pl s te that this featu e onr is ly
w o ngrki fo ope ar r ting sy stem w ith u m lti p o e o ode uppor c ss rs m s rted.
(Default v a uel )
Di lsab ed Di lsab es C U HP y pe h ead ngr T r i .

- - 43 BIOS S etup
English
Int te rg a ed Peripherals
Figu e 4r : I nteg ar ted e phe a P ri r ls
CMOS S etup Utility y-Cop right ( )C 1984 2003- Aw a dr Softw a er
Integ ar ted e phe a P ri r ls
On h p a-C i Prim ry PCI IDE E[ nab edl ] Item He pl
On h p e onda-C i S c ry PCI IDE E[ nab edl ]
On h p-C i SATA A[ uto] If a ha dr disk
x SATA P ort0 on C figu e ar s SATA P ort0 contr r ro ell ca d is
SATA P ort1 on C figu e ar s SATA P ort1 u ed es , s t at Di lsab ed
U CSB ontr ro ell [ ]Enab edl
U CSB 2 0. ontr ro ell [ ] [ ]Enab edl Enab edl
U DSB K S e boa dy r upport [ i l l isab ed nab] E e on h -c p IDE
U DSB S Mou es upport [ i lsab ed] PORT
A A AC97 ud oi [ uto]
O n b o a d 1 3 9 4r H / W (*)[ ] [Enab edl Di lsab ed]
O n b o a d Lr H / W A N (*u)[ ]Enab edl Di l isab e on h -c p IDE
Onboa d e a or S ri l P rt 1 3 8[ F /IR RQ O4] P T
Onboa d e a or S ri l P rt 2 2 8[ F /IRQ3]
U R NA T Mode e e S l ct [ o arm l]
x UR D2 up e odel x M Half
Onboa d a a e o 378r P r ll l P rt [ /IRQ7]
P Pa a er ll l ort Mode [ ]SPP
x s E PC Mode U e DMA 3
Ga e om P rt Add e 201r ss [ ]
Mi id Port Add e 330r ss [ ]
Mi id Port IRQ [ ]10
CIR Port Add er ss [Di lsab ed]
x CIR Port IRQ 11
: t Mo e nv E e e er:S l ct +/ / /- PU PD:Va ue 10 a el F :S v ES EC: x it F1 ene a:G r l He pl
F 3 L a n g u a g e: (*)F5 e ou:Pr v i s Va ue 6 a al s F :F il-S fe Defaults F7 p:O ti im zed Defaults
( ) r - r -* Fo GA 8 1000IPE P o G only.
(u) r - - Fo GA 8 1000IPE G only.

- - 44 GA-8IPE S1000 e e ori s M the boa dr r
English
On h-C ip Primary PCI IDE
E Enab edl nab e onboa d 1l r st channel IDE port. (Default v a uel )
Di lsab ed Di lsab e onboa d 1 r st channel IDE port.
On h-C ip S econdary PCI IDE
E Enab edl nab e onboa d 2nd hannel r c l IDE port. (Default v a uel )
Di lsab ed Di l lsab e onboa d 2nd hanne r c IDE port.
On h p-c i SATA
Di lsab ed Di lsab e SATA contr ro ell .
Auto When no dev c si e i p ugged nl i IDE1 o r IDE2, SATA contr r ro ell w ill emap to IDE
contr r (o ell . Default Va uel )
Manua el S t SATA M mode anually.
SATA Port0 o C n ufig re as
IDE P ri. t Mas e e apr R m SATA P ort 0 to IDE P ri. t Mas er.
IDE P S SA ri. la e e apv R m TA P ort 0 to IDE P S ri. la ev .
IDE S e ac. M ste e apr R m SATA P ort 0 to IDE S e ac. M ster.
IDE S S SA ec . la e e apv R m TA P ort 0 to IDE S S ec. la ev .
SATA P ort0 SATA contr ro ell set to SATA port0. t As h odeis m , t i support by Win oXP r
late onr OS ly . (Default v a uel )
SATA P ort1 SATA contr ro ell set to SATA port1. t As h odeis m , t i support by Win oXP r
late onr OS ly .
SATA Port1 o C n ufig re as
The a ue depend on v l s SATA P ort0.
USB Controller
E E SBnab edl nab el U Contr r (o ell . Default v a uel )
Di lsab ed Di lsab e on U CSB tr ro ell .

- - 45 BIOS S etup
English
USB 2 0 o. C ntroller
Di lsab e this functi ion f t y ou a e no r u ngsi onboa dr U SB 2 0. featu er .
E E SBnab edl nab el U 2 0 on. C tr r (o ell . Default v a uel )
Di lsab ed Di lsab e 2 0 on USB . C tr ro ell .
USB Keyboard Support
E E SB K Snab edl nab el U e boa dy r upport.
Di lsab ed Di lsab e e boa d uppo USB K y r S rt. (Default v a uel )
USB Mou Suppse ort
E E SB Snab edl nab el U Mou es upport.
Di lsab ed Di lsab e ou e uppo USB M s S rt. (Default v a uel )
AC A97 udio
Auto nab e onboa d 97 aud oE l r AC' i function. (Default Va uel )
Di lsab ed Di lsab e this function.
Onboard H/W 1394 (*)
E Enab edl nab e onboa dl r IEEE 1394 function.(Default v a uel )
Di lsab ed Di lsab e this function.
Onboard H/W LAN (*u)
E Enab edl nab e nboa dl O r H/W LAN function. (Default v a uel )
Di lsab ed Di lsab e this function.
Onboard Serial Port 1
Auto BIOS w ill auto am ti llca y s etup the po rt 1 add er ss.
3 8F /IRQ4 nab e onboa d e a poE l r S ri l rt 1 and add er ss is 3 8F . (Default v a uel )
2 8F /IRQ3 nab e onboa d e a poE l r S ri l rt 1 and add er ss is 2 8F .
3 8E /IRQ4 nab e onboa d e a poE l r S ri l rt 1 and add er ss is 3 8E .
( ) r - r -* Fo GA 8 1000IPE P o G only.
(u) r - - Fo GA 8 1000IPE G only.

- - 46 GA-8IPE S1000 e e ori s M the boa dr r
English
2 8E /IRQ3 nab e onboa d e a poE l r S ri l rt 1 and add er ss is 2 8E .
Di lsab ed Di l i lsab e onboa d e r S r a port 1.
Onboard Serial Port 2
Auto BIOS w ill auto am ti llca y s etup the po rt 2 add er ss.
3 8F /IRQ4 nab e onboa d e a poE l r S ri l rt 2 and add er ss is 3 8F .
2 8F /IRQ3 nab e onboa d e a poE l r S ri l rt 2 and add er ss is 2 8F . (Default v a uel )
3 8E /IRQ4 nab e onboa d e a poE l r S ri l rt 2 and add er ss is 3 8E .
2 8E /IRQ3 nab e onboa d e a poE l r S ri l rt 2 and add er ss is 2 8E .
Di lsab ed Di l i lsab e onboa d e r S r a port 2.
UART Mod Se e ecl t
(Thi is te a o oum ll ws y to de te ne h h nrmi w ic I fr ( )a ed R IR function o f Onboa dr I/O ch pi )
ASKIR Set onboa dr I/ tO ch pi U RA T o ASKIR Mode.
IrDA Set onboa dr I/ tO ch pi U RA T o IrDA Mode.
No a erm l S t onboa dr I/ tO ch pi U RA T o o a ode N rm l M . (Default Va uel )
UR2 Duplex Mode
Half IR Function Dup el x Half. (Default Va uel )
Full IR Function Dup e ul x F ll.
Onboard Parall le port
378/IRQ7 nab e onboa d L poE l r PT rt and add er ss is 378/IR DQ7. ( efault Va uel )
278/IRQ5 nab e onboa d L poE l r PT rt and add er ss is 278/IRQ5.
Di lsab ed Di lsab e onboa d L po r PT rt.
3BC/IRQ7 nab e onboa d L poE l r PT rt and add er ss is 3BC/IRQ7.
Parall le Port Mode
SPP PUsing a a e por ll l rt as Standa d a a e or P r ll l P rt. (Default Va uel )
EPP PUsing a a e por ll l rt as Enhan edc Pa a er ll l Port.
E P PC Using a a e por ll l rt as Ex tended apab C ilitie os P rt.
E P EPP PC + Using a a e por ll l rt as E PC & EPP mode.

- - 47 BIOS S etup
English
ECP Mode Use DMA
3 eS t E PC Mode Use DMA to 3 . (Default Va uel )
1 eS t E PC Mode Use DMA to 1 .
Game Port Address
201 eS t Ga em Port Add er ss to 201 . (Default Va uel )
209 eS t Ga em Port Add er ss to 209 .
Di lsab ed Di lsab e this function.
Midi Port Address
300 eS t Mi id Port Add er ss to 300 .
330 eS t Mi id Port Add er ss to 330 .(Default Va uel )
Di lsab ed Di lsab e this function.
Midi Port IRQ
5 eS t Mi id Port IRQ to 5 .
10 eS t Mi id Port IRQ to 10 . (Default Va uel )
CIR Port Address
310 eS t CIR Port Add er ss to 310 .
320 eS t CIR Port Add er ss to 320 .
Di lsab ed Di lsab e this function. (Default Va uel )
CIR Port IRQ
5 eS t CIR Port IRQ to 5 .
111 eS t CIR Port IRQ to 11 . (Default Va uel )

- - 48 GA-8IPE S1000 e e ori s M the boa dr r
English
Po awer M nagement t Se up
CMOS S etup Utility y-Cop right ( )C 1984 2003- Aw a dr Softw a er
Po e anage enw r M m t Setup
A PC I Su pends Ty pe 1[S ( )P SO ] Item He pl
P Eo e Lw r D in S1 State n ng[Bli ki ]
Off by Po ew r button [Instant-Off] [ ]S1
P E EM v ent Wa e p nab ed ek U [E l ] S t s su pend ty pe to
M mode Ring nO /Wa e nLan nab ed o e n u pend undek O [E l ] P w r O S s r
R De u e b as m y Al rm [ i lsab ed] IA PC OS
x Date o ( f Month a e da) Al rm Ev ry y
x ss Tim mme hh ( : : ) 0 0 0 [ ]S3
P Bo e nw r O y s Mou e [Di lsab ed e] S t s su pend ty pe to
P B Ko e nw r O y e boa dy r [Di lsab ed u pend] S s to unde RAM r
x ss KB P P o ew r ON a w o d nr E ter A PC I OS
A BA KC C Function o[S ft-Off]
: t Mo e nv E e e er:S l ct +/ / /- PU PD:Va ue 10 a el F :S v ES EC: x it F1 ene a:G r l He pl
F 3 L a n g u a g e: (*)F5 e ou:Pr v i s Va ue 6 a al s F :F il-S fe Defaults F7 p:O ti im zed Defaults
Figu e 5 o e anage enr : P w r M m t Setup
ACPI Su p nds e Type
S P S S1( O ) et A PC I s su pend ty pe to 1 S . (Default Va uel )
S S S3( TR) et A PC I s su pend ty pe to 3 S .
Power LED in S 1 a st te
Bli ink ng In standb ode 1 po e Ly m (S ), w r ED w ill b nli k. (Default Va uel )
Dual/ IOFF n standb ode 1y m (S ):
a. If u es si lng e co ol r LED, po e Lw r ED w ill tu n or ff.
b. If u es dual co ol r LED, po e Lw r ED w ill tu nr to ano the o or c l r.
Off by Power button
Instant-off ttPr re po ess w bu on then o e o P w r ff instantly . (Default v a uel )
De a 4 e e po e bul y S c. Pr ss w r tton 4 e s c to o e o P w r ff. t En e u pendr s s if button p e ed e is r ss l ss
than 4 e s c.
( ) r - r -* Fo GA 8 1000IPE P o G only.

- - 49 BIOS S etup
English
PME Event Wake Up
Di lsab ed Di lsab e this function.
E E P E Enab edl nab el M v ent Wa e upk . (Default Va uel )
ModemRi /n ngO Wak neO LAN
Di lsab ed Di l isab e ode M m R ng on a e on Lan /w k function.
E Enab edl nab e ode ng on a e on Lanl M m Ri /w k . (Default Va uel )
Resume by Alarm
You an e c s t "Re u es m by Alarm" item to enab ed and e n l k y i Data/time to po e on w r sy stem.
Di lsab ed Di lsab e this function. (Default Va uel )
E Enab edl nab e a al l rm function to POWER N O sy stem.
If R CT Alarm Lead To o e n nab ed P w r O is E l .
Date o ( f Month a e da 1 31) Al rm : Ev ry y , ~
Ti lm mme hh ( : : ss) A a 0 23 0 59 0 59r (m : ~ ) ( : ~ ) ( : ~ )
Power On By Mouse
Di lsab ed Di lsab e this function. (Default v a uel )
Doub el C Dlick oub e on 2 ou e el c ckli PS/ m s l ft button to po e on w r sy stem.
Power On By Keyboard
P Ea o dssw r nter fro 1m to 5 ha a c r cters to e s t the e boa d o e n a o d K y r P w r O P ssw r .
Di lsab ed Di lsab e this function. (Default v a uel )
Ke boa d 98y r If y our k ye boa dr ha ev "POWE KR e buy " tton ou an p e, y c r ss the e k y to
po e on ouw r y r sy stem.
KB Power ON Password
Enter Input pa o dssw r (fro 1m to 5 ha a c r cte and p e nr )s r ss E ter to e s t the e K y -
boa d o e n a o dr P w r O P ssw r .
AC AC B K Function
M me ory y sS te po e on depend onm w r s the statu bes fo e or AC l st.
Soft-Off ffAl iw ay s n O state hen ba w AC ck. (Default v a uel )
Fu n a po e onll-O Alw y s w r the sy ste hen bam w AC ck.

- - 50 GA-8IPE S1000 e e ori s M the boa dr r
English
PnP P/ C CI onfigura oti ns
Figu e 6 nr : P P P/ CI Configu ar tions
PCI 1/PCI 5 IRQ Ass ignment
Auto uA to a gn ssi IRQ to PCI 1/ IPC 5. (Default v a uel )
3 4 5 7 9 10 11 12 14 15 e, , , , , , , , , S t IRQ 3 4 5 7 9 10 11 12 14 15, , , , , , , , , to PCI 1/ IPC 5.
PCI 2 IR AQ ssignment
Auto uA to a gn ssi IRQ to PCI 2. (Default v a uel )
3 4 5 7 9 10 11 12 14 15 e, , , , , , , , , S t IRQ 3 4 5 7 9 10 11 12 14 15, , , , , , , , , to PCI 2.
PCI 3 IR AQ ssignment
Auto uA to a gn ssi IRQ to PCI 3. (Default v a uel )
3 4 5 7 9 10 11 12 14 15 e, , , , , , , , , S t IRQ 3 4 5 7 9 10 11 12 14 15, , , , , , , , , to PCI 3.
PCI 4 IR AQ ssignment
Auto uA to a gn ssi IRQ to PCI 4. (Default v a uel )
3 4 5 7 9 10 11 12 14 15 e, , , , , , , , , S t IRQ 3 4 5 7 9 10 11 12 14 15, , , , , , , , , to PCI 4.
CMOS S etup Utility y-Cop right ( )C 1984 2003- Aw a dr Softw a er
P P Pn / CI Configu ar tions
PCI 1/ IPC 5 IRQ A Assign enm t [ uto] Item He pl
PCI 2 IRQ A Assign enm t [ uto]
PCI 3 IRQ A Assign enm t [ uto]
PCI 4 IRQ A Assign enm t [ uto]
: t Mo e nv E e e er:S l ct +/ / /- PU PD:Va ue 10 a el F :S v ES EC: x it F1 ene a:G r l He pl
F 3 L a n g u a g e: (*)F5 e ou:Pr v i s Va ue 6 a al s F :F il-S fe Defaults F7 p:O ti im zed Defaults
( ) r - r -* Fo GA 8 1000IPE P o G only.

- - 51 BIOS S etup
English
PC Health S ut ta s
Figu e 7r : PC H ealth Status
R Ce es t ase Open S tatus
Case Ope en d
If the a e o ed a e pened ho o c s i ls c s , "C s O " w ill s w N " ".
If the a e ha e been opened a e pened ho c s v , "C s O " w ill s w "Yes".
If y ou w ant to e e r s t "C a es Opened" v a uel , set "Re es t Ca es O pen Status" to
" "Enab edl and a e ou o pu s v CMOS, y r c m te er r w ill s tart.
C Vu nrre t oltag oe c ( )V V re / DDR V V V V25 / +3 3. / +5 / +12
Detect sy ste om's v ltage statu aus to am ti llca y .
C C Uu nrre t P Temperaturee
Detect C UP Te p aum . to am ti llca y..
CMOS S etup Utility y-Cop right ( )C 1984 2003- Aw a dr Softw a er
PC H ealth Status
Re es t Ca es Open Status [Di lsab ed] Item He pl
C Na e peneds O o
V Kco er O [Di lsab ed]
DDR25V KO Don't re es t c sa e
+3 3. V KO open status
+5V KO
+12V KO [ ]Enab edl
Cu enrr t C UP Te pe am r tu e 40r °C Clea a e openr c s
Cu enrr t C UP FAN Speed 6490 RPM statu as t nex t boot
C R Nu e nr r t P EO W F A S p e e d (*)0 RPM
Cu enrr t SYS ET M FAN Speed 0 RPM
C UP Wa n ngr i Te pe am r tu er [Di lsab ed]
C U NP FA Fail Wa n ngr i [Di lsab ed]
P E AO W R F N F a a n gi l W r i (*)[Di lsab ed]
SYS E AT M F N Fail Wa n ngr i [Di lsab ed]
C U N CP S Am a r t F o n ot r l (*)[ ]Enab edl
: t Mo e nv E e e er:S l ct +/ / /- PU PD:Va ue 10 a el F :S v ES EC: x it F1 ene a:G r l He pl
F 3 L a n g u a g e: (*)F5 e ou:Pr v i s Va ue 6 a al s F :F il-S fe Defaults F7 p:O ti im zed Defaults
( ) r - r -* Fo GA 8 1000IPE P o G only.

- - 52 GA-8IPE S1000 e e ori s M the boa dr r
English
C C Uu nrre t P /POWER (*)/SYSTEM FAN Speed (RPM)
Detect C UP /POWER (*)/ tSYS ET M Fan peed s s atu aus to am ti llca y .
C UP Warn ni g Temperature
60°C / 140°F Monitor C UP Te p am . t 60°C / 140°F.
70°C / 158°F Monitor C UP Te p am . t 70°C / 158°F.
80°C / 176°F Monitor C UP Te p am . t 80°C / 176°F.
90°C / 194°F Monitor C UP Te p am . t 90°C / 194°F.
8Di lsab ed Di lsab e this function.(Default v a uel )
C UP FAN Fail Warn ni g
Di lsab ed anF Wa n ng unr i F ction Di lsab e. (Default v a uel )
Enab ed anl F Wa n ng unr i F cti lon nab E e.
POWER FAN Fail Warn ni g (*)
Di lsab ed anF Wa n ng unr i F ction Di lsab e. (Default v a uel )
Enab ed anl F Wa n ng unr i F cti lon nab E e.
SYSTEM FAN Fail Warn ni g
Di lsab ed anF Wa n ng unr i F ction Di lsab e. (Default v a uel )
Enab ed anl F Wa n ng unr i F cti lon nab E e.
C UP Smart FAN C ontrol (*)
Di lsab ed Di lsab e this function.
E E P Snab edl nab el C U mart Fan control function.(Default v a uel )
a. When the C UP te pe am r tu er i is h gher than 60 deg eer s Ce ul is s, C UP fan
w ill run a t fu peedll s .
b. When the C UP te pe am r tu e ber is tw Ceen 50 and 60 deg ee r s e ul is s,
C UP fan un a w ill r t h ghi speed.
c. When the C UP te pe am r tu e ber is tw Ceen 40 and 50 deg ee r s e ul is s,
C UP fan un a w ill r t m med ui speed.
d. When the C UP te pe am r tu e o er i ls w r than 40 deg ee r s Ce ul is s, C UP fan
w ill run a t low speed.
( ) r - r -* Fo GA 8 1000IPE P o G only.

- - 53 BIOS S etup
English
Frequency/Vo ag olt e C ntrol
F Figu e 8r : requen ocy /V ltage on C trol
C UP Cloc k Ratio
Th opis ti illon w not be sho nw or not be a a ab ev il l if y ou a er u ngsi a C UP w ith the o ed a l ck r tio.
15 21X~ X It depends on C UP Clock Ratio.
Th up op on u o gn b d onis se t ti will a t ma ca y assti ll i y C UP e ect ti .
Fo epp ng 4 8 10 24 der - C St i P : X, X~ X fault: 15X
Fo o h oodr N rt w C UP : 12 24X~ X defau 16lt: X
The op ti ill i l l ion w d sp a Lo ed and ead ony " ck " r y f the a C UP r ti io s not changeab el .
Tho es ite be a a ab e hen oms will v il l w "C U HP st Clock Contro el i" s s t to nab ed E l .
( ) r - r -* Fo GA 8 1000IPE P o G only.
CMOS S etup Utility y-Cop right ( )C 1984 2003- Aw a dr Softw a er
Frequen ocy /V ltage on C trol
C U C RP lock atio 15[ X] Item He pl
C U HP ost Clock Control [Di lsab ed]
C U HP ost Frequency ( )Mhz 100
A P PG / CI/ / /SRC Fix ed 66 33 100
M me o equen o ur ry F cy F r [A to]
M m Me o equenr ry F cy ( h 266z)
A P PG / CI/ / /SRC Fr ( )equency Mhz 66 33 100
A P VG Ov er oltage on C tr ro ol [N mal]
DIMM Ov e orV ltage on C tr ro ol [N mal]
C UP Voltage on C tr ro ol [N mal]
N C Uo arm l P V Vco e 1 4750r .
: t Mo e nv E e e er:S l ct +/ / /- PU PD:Va ue 10 a el F :S v ES EC: x it F1 ene a:G r l He pl
F 3 L a n g u a g e: (*)F5 e ou:Pr v i s Va ue 6 a al s F :F il-S fe Defaults F7 p:O ti im zed Defaults

- - 54 GA-8IPE S1000 e e ori s M the boa dr r
English
C UP Host Cl ock Control
Note: If sy stem hang up bes fo e enr ter CMOS setup utility , t w ai fo 20 er s c for time ous t reboot. When
time ou t o ucc r, sy ste e em w ill r s t and run at C UP default Host c cklo at nex t boot.
Di lsab ed Di lsab e C U HP ost Clock Contr (ol. Default v a uel )
E E Pnab edl nab el C U H ost Clock Control.
C UP Host Frequ ne cy
100MHz ~ 355MHz Set C UP Host Clock fro 100m MHz to 355 MHz.
If y ou u es FSB400 Penti lu 4 p o e o pm r c ss r, ea e es s t "C UP Clock" to 100 MHz.If y ou u es FSB533
Penti lu 4 p o e o pm r c ss r, ea e es s t "C UP Clock" to 133 MHz. If y ou u es FSB P800 entiu 4m
p o e o p ea e er c ss r, l s s t "C UP Clock" to 200 MHz.
In o ec rr ct u ngsi it may c sau e y our sy ste b o en o po e nd e u e onm r k . F r w r E -Us r s ly !
AGP P/ CI/S RC Fixed
S Ae ari l TA de e e env ci is v ry s sitiv e to o o e o a a e e a SRC cl ck. SRC v r cl ck m y m k S ri l ATA de ev ci
function an c 't w ork p oper rly .
Ad uj st A P PG / CI/ tSRC w c ck sy c slo a h ohour i h C UP .
Memory Frequ ne cy For
fo onr ( r FSB F t Side Bus) frequen 400cy = MHz,
2 66 e o equen. M m r ry F cy = Host c cklo X 2 66. .
Auto eS t M me ory frequen bcy y DR DA SPM data. (Default v a uel )
fo onr ( r FSB F t Side Bus) frequen 533cy = MHz,
2 0. Memory Frequency = Host clock X 2.0.
2 5 e o equen. M m r ry F cy = Host c cklo X 2 5. .
Auto eS t M me ory frequen bcy y DR DA SPM data. (Default v a uel )
fo onr ( r FSB F t Side Bus) frequen 800cy = MHz,
2 0 e o equen. M m r ry F cy = Host c cklo X 2 0. .
1 6 e o equen. M m r ry F cy = Host c cklo X 1 5. .
1 33 e o equen. M m r ry F cy = Host c cklo X 1 33. .
Auto eS t M me ory frequen bcy y DR DA SPM data. (Default v a uel )

- - 55 BIOS S etup
English
Memory Frequ ne cy(Mhz)
The a ue depend on v l s C U HP ost Fr ( )equency Mhz .
AGP P/ CI/SRC Frequ ne cy(Mhz)
T Fhe a ue depend on v l s ix ed A P PG / CI/ .SRC Frequency
AGP OverVoltag oe C ntrol
No a erm l S t A PG Ov e orV ltage on C trol to o a N rm l. (Default v a uel )
+0 1 e. V S t A PG Ov e orV ltage on C trol to 0 1 + . V.
+0 2 e. V S t A PG Ov e orV ltage on C trol to 0 2 + . V.
+0 3 e. V S t A PG Ov e orV ltage on C trol to 0 3 + . V.
DIMM OverVoltag oe C ntrol
No a erm l S t DIMM Ov e orV ltage on C trol to o a N rm l. (Default v a uel )
+0 1 e. V S t DIMM Ov e orV ltage on C trol to 0 1 + . V.
+0 2 e. V S t DIMM Ov e orV ltage on C trol to 0 2 + . V.
+0 3 e. V S t DIMM Ov e orV ltage on C trol to 0 3 + . V.
C UP Voltag oe C ntrol
Supports s ad uj tab e o el C UP Vc r fro 0 8375m . V to 1 7600 . V.
(Default va uel : No arm l)
Normal C UP Vcore
Di l lsp a ou o e oy y r C UP Vc r V tage.

- - 56 GA-8IPE S1000 e e ori s M the boa dr r
English
( ) r - r -* Fo GA 8 1000IPE P o G only.
Se ecl t Language
(*)
Se ecl t Lan ug age
Multi Language uppo s rts s 7 anguage l . The e a e ng h apane e en h pan hr r E lis , J s , Fr c , S is ,
Ge an prm , Sim lifi ied h C ne es , Traditi l iona Ch ne es .
Fi lgu e 9 er : S ect Language
CMOS S etup Utility y-Cop right ( )C 1984 2003- Aw a dr Softw a er
Standa d ear CMOS F tu er s S e e L a n g u a g el c t (*)
A Bd an edv c IOS F lts
Integ ar ted e phe P ri ults
Po e anage ew r M m o dw r
P P Pn / CI Configur
PC H ealth Status
Frequen ocy /V ltag
ESC: tQui e (*)
F8: Dual BIOS (*)/Q up

- - 57 BIOS S etup
English
( ) r - r -* Fo GA 8 1000IPE P o G only.
Load Fa ail-S fe Defaults
Load Fail- f fSa e e D aults
Fa ail-S fe de faults c onta ni the o m st app op ar ri te a ue o v l s f the syste pa a em r m ters that a oll w
m m mi in u syste pem rfo an erm c .
CMOS S etup Utility y-Cop right ( )C 1984 2003- Aw a dr Softw a er
Standa d ear CMOS F tu er s S e e L a n g u a g el c t (*)
A Bd an edv c IOS Featu e Load a ar s F il-S fe Defaults
Integ ar ted e phe a Load p P ri r ls O ti im zed Defaults
Po e aw r M
P P Pn / CI C
PC H ealth Statu a es S v & E x it Setup
Frequen ocy /V ltage on C trol iEx t Without Sa ngv i
ESC: tQui F 3 h a n g e L a n g u a g e: C (*)
F8: Dual BIOS (*)/ : tQ-F Fla hs 10 S & Ea ev x i Setup
Load Fa ail-S fe Defaults
F Figu e 10 Loadr : a ail-S fe Defaults
Load a a F il-S fe e D faults? ? ( )Y/N Y

- - 58 GA-8IPE S1000 e e ori s M the boa dr r
English
( ) r - r -* Fo GA 8 1000IPE P o G only.
Load Optimized Defaults
Load Optimiz ed Defaults
Se el cting this fi l le d oads the facto dery faults fo and h p er B SIO C i s t Featu e h hr s w ic the
syste aum to am ti llca y detects.
CMOS S etup Utility y-Cop right ( )C 1984 2003- Aw a dr Softw a er
Standa d ear CMOS F tu er s S e e L a n g u a g el c t (*)
A Bd an edv c IOS Featu e Load a ar s F il-S fe Defaults
Integ ar ted e phe a Load p P ri r ls O ti im zed Defaults
Po e aw r M
P P Pn / CI C
PC H ealth Statu a es S v & E x it Setup
Frequen ocy /V ltage on C trol iEx t Without Sa ngv i
ESC: tQui F 3 h a n g e L a n g u a g e: C (*)
F8: Dual BIOS (*)/ : tQ-F Fla hs 10 S & Ea ev x i Setup
Load Opti im zed Defaults
Figu e 11 Load pr : O ti im zed Defaults
Load p O timized e D faults? ? ( )Y/N Y

- - 59 BIOS S etup
English
( ) r - r -* Fo GA 8 1000IPE P o G only.
S Supet ervi /sor Us sser Pa word
When ou e e y s l ct this function, t he foll iow ng me age appeass will r at the en c te or f the screen to a ss si t
y cou n i reating a pa o d ssw r .
Ty sspe he pa t wo d upr , to e gh ha a i t c r cte and p e nrs, r ss <E ter>. You be a ed will sk to on c firm the
pa o dssw r . Type the pa o d aga n and p e n e ssw r i r ss <E t r>. You a a o p e m y ls r ss sc <E > to abo rt the
s ce el tion and no t ente a pa o dr ssw r .
To d ab e pa o d u is l ssw r , j st p er ss <Ente hen ou a e p o pr> w y r r m ted o en t te pa o dr ssw r . A me agess
"PASS SAB EWORD D I L D w" ill appear to on c firm the pa o d ssw r be ng d ab ed n ei is l . O c the pa o dssw r is
d ab edis l , t he syste boom will t and you can ente er S tup freely.
The e B S SIO tup p og a a o ou r r m ll ws y to pe s cify two epa a s r te pa o d ssw r s:
S PE V S PASSU R I OR WORD and a U RSE PASSW WORD. hen d ab ed is l , an one a a ey m y cc ss
a ell B S SIO tup p og a r r m functi lon hen enab. W ed, t he upe o pa o d equ ed S rv si r ssw r is r ir fo enr te ngri the
B S SIO etup p og a and r r m ha ngvi fu onll c figu ar tion fi le ds, t he e pa o d Us r ssw r is r requi ed to a e on cc ss ly
bas ci items.
If y ou s ce el t " "System at "Pa o dssw r C heck" in A B Sd an ev c IO Featu e enu ou ber s M , y will
p o pr m ted for the pa o dssw r e ev ry time the system is rebooted o an r y time ou y try to en te er S tup enu M .
If you s ce el t "Setup a" t "Pass ckw Co dr he " in Ad an ev c B SIO Features Menu ou, y will be p ro pm ted
on hen ouly w y try to en te er S tup.
CMOS S etup Utility y-Cop right ( )C 1984 2003- Aw a dr Softw a er
Standa d ear CMOS F tu er s S e e L a n g u a g el c t (*)
A Bd an edv c IOS Featu e Load a ar s F il-S fe Defaults
Integ ar ted e phe a Load p P ri r ls O ti im zed Defaults
Po e anw r M
P P Pn / CI C
PC H ealth Statu a es S v & E x it Setup
Frequen ocy /V ltage on C trol iEx t Without Sa ngv i
ESC: tQui F3 hange Language: C (*)
F8: Dual BIOS (*)/ : tQ-F Fla hs 10 S & Ea ev x i Setup
Change e/S t/Di lsab e a o d P ssw r
Figu e 12 a o d er : P ssw r S tting
Ente a o dr P ssw r :

- - 60 GA-8IPE S1000 e e ori s M the boa dr r
English
( ) r - r -* Fo GA 8 1000IPE P o G only.
Save & Exit t Se up
Type qu " "Y will it the e S tup Utility s v and a e the u e e s r s tup a ue v l to RTC C MOS.
Type e " "N will r tu nr to e S tup Utility.
CMOS S etup Utility y-Cop right ( )C 1984 2003- Aw a dr Softw a er
Standa d ear CMOS F tu er s S e e L a n g u a g el c t (*)
A Bd an edv c IOS Featu e Load a ar s F il-S fe Defaults
Integ ar ted e phe a Load p P ri r ls O ti im zed Defaults
Po e anage enw r M m t Setup eS t Supe orv si r Pa o dssw r
P P Pn / CI C
PC H ealth
Frequen ocy /V ltage on C trol iEx t Without Sa ngv i
ESC: tQui F 3 h a n g e L a n g u a g e: C (*)
F8: Dual BIOS (*)/ : tQ-F Fla hs 10 S & Ea ev x i Setup
Sa ev Data to CMOS
Fi igu e 13 a er : S v & E x t Setup
Sa ev to and ? CMOS EX YIT ( /N) Y

- - 61 BIOS S etup
English
( ) r - r -* Fo GA 8 1000IPE P o G only.
Exi it W thout Saving
Type qu " "Y will it the e S tup Utility without s va ing to RTC C MOS.
Type e " "N will r tu nr to e S tup Utility.
CMOS S etup Utility y-Cop right ( )C 1984 2003- Aw a dr Softw a er
Standa d ear CMOS F tu er s S e e L a n g u a g el c t (*)
A Bd an edv c IOS Featu e Load a ar s F il-S fe Defaults
Integ ar ted e phe a Load p P ri r ls O ti im zed Defaults
Po ew r M
P P Pn / CI
PC H ealth Statu a es S v & E x it Setup
Frequen ocy /V ltage on C trol iEx t Without Sa ngv i
ESC: tQui F 3 h a n g e L a n g u a g e: C (*)
F8: Dual BIOS (*)/ : tQ-F Fla hs 10 S & Ea ev x i Setup
Abandon all Data
Fi igu e 14r : Ex t Without Sa ngv i
Quit Without Sa ngvi ( )Y/N ? N

- - 62 GA-8IPE S1000 e e ori s M the boa dr r
English

Te hn a ec ic l R fe en er c
- - 63
English
@ BIOSTM I in odutr ct on
Gigab e announceyt s @ BIOS
Windows BIOS live upda et ut tili y
Have you e ve updar ted b B SIO y you ers lf? e Or lik
many other peop el , you u j st know what BIOS is,
but a alw ys hesitate to update it? Be au ec s you th ni k
updating newest BIOS is unne ec ss yar and actually
you don't know how to update it.
Maybe not like others y, ou a er very e pex rien edc in BIOS updating and spend quite a lot of time
to do it. t Bu of c sour e you don’t like to do it too u h m c . First, do n oadw l diffe enr t BIOS from website and
then switch the ope ar ting system to DOS mode. Se ondc ly, u e ds iffe enr t flash utility to update BIOS.
The above p ro ec ss is not a inte er sting job e. B sides, always be ca er fully to sto er the BIOS sou erc
c code orrectly in your disks as if you update the wrong BIOS, it will be a n ightma er .
Certa ni ly, you onde w r why mothe boar rd vendors c ould not just do so em th ngi right to s va e your
time and effort and s va e you from the lousy BIOS updating wo ?rk He er it c so em ! N wo Gigabyte
announ ec s @BIOS— the first Windows BIOS live upda te utility. Th ai is s smart BIOS update
softwa er . It cou d he pl l you to do n oad w l the BIOS fro nm i ternetand update it. Not like the other BIOS
update softwa er , it's s a ndo Wi w utility. With the he pl of "@BIOS", BIOS updating is no o e m r than a
c ckli .
Besides, no matter wh h aic m inboa dr you a e r u ngsi , if it's a Gigabyte p's roduct*, @BIOS he pl
you to a m inta ni the BIOS. This utility could detect your correct mainboard model and he pl you to
c shoo e the BIOS a o d ngcc r i ly. It then do n oadw l s the BIOS from the nea er st Gigabyte ftp site
auto am ti llca y. The er a er s ve era dl ifferent choic se ; you cou dl u es "Inte ner t Update" to do nw load and
update your BIOS d eir ctly. Or you may want to eep a k ba upck for you u enr c rr t BIOS, just c shoo e
"Save u en C rr t BIOS" to save it first. You a e m k a e ho e wis c ic to u e s Gigabyte, and @BIOS update
your BIOS smartly. You a e nor w worry free fro updam ting wrong BIOS, and apab c le to ma ni tain and
manage your BIOS eas yil . Aga ni , Gigabyte's innovative p roduct erects a milestone n i ma nboa di r
industries.
Fo u hr s c a onde w rfu ol s ftware ho, w mu hc it costs? Impo b essi l ! It's free o! N w, f i you bu y a
Gigabyte's mothe boa dr r , you cou dl find this ama ngzi softwa er in the attached driver CD. But p ea el s
reme bem r, connected to inte ner t at first, then you cou dl have a internet BIOS update from your
Gigabyte @B SIO .
Ch p Ta te 4r ec ca e e e cehni l R f r n

- - 64 GA-8IPE S1000 e e ori s M the boa dr r
English
Easy TuneTM 4 I in odutr ct on
Gigaby et announces EasyTuneTM 4
Windows based Overc cklo ing utility
EasyTune 4 carries on the heritage so as to pave the way for future generations.
Overclock" might be one of the most common issues
in co pum ter fi le d. But have many u es rs ever tried it?
The an esw r is p obabr ly "no". Bec sau e "Overclock"
is thought to be very diffi lcu t and i lnc udes a lot of
technical know-how, so em times "Overclock" is even
c s s s c sk son ide ed ar pe i la ill found on ly in so em
enthu asi sts. t Bu as to the e pe x rts v in "O e orcl ck",
what's the truth? They may spend quite a o l t of time
and money to study, try and u es many diffe enr t har -d
wa er or BIOS tools to do "Overclock". And e ven with the es techno ogl ies, t hey still l ea nr that it's quite a
risk be au ec s the safety and stability of an "Overclock" system is un no nk w . N wo everyth ngi is different
be auc se o f a Windows ba ed os verc cklo ing utility "EasyTune 4 announ ed" -- c by Gigabyte. This win-
dows ba eds utility has totally changed the gaming u e r l of "Overc cklo ". This is the first windo ba edws s
overc cklo ing utility is suitab el for both no a rm l and po ew r u es rs s. U ers can choo es either "Easy Mode"
or "Advan edc Mode" for overcl iock ng at their conven en ei c . For us ser who choo es "Easy Mode", they
just need to c ckli "Auto Optimize" to have autoed and immed ai te C UP ove orcl cking. Th ois s ftwa er will
then ove dr rive CPU speed automatically with the re us lt be ngi shown in the control panel. If u es rs p er fer
"Ove orcl ck" by them, there is a ols another cho eic . Click "Advan edc Mode" to en oj y "sport drive" class
Ove o ng u e nrcl cki s r i terfa e dc . "A van ed ode a o u ec M ", ll ws s rs to hange c the syste bum s / / A PG
M me ory wo ngrki frequency in small in e encr m ts to ge t ultimate syste pem rfo an erm c . It ope ar te ns i
coo d nar i tion with Gigabyte o m the boa dr r s s s. Be ide , t i i is d ffe enr t fro om ther traditi lona ove o ngr-cl cki
methods, EasyTune 4 doesn't require users to change neither BIOS nor hardwa er switch/ jumper setting;
on the o ther hand, they can do "Ove orcl ck" at easy step . The er fore, t his is a safer way for "Ove orcl ck"
as noth ngi is changed on softwa e or r ha dr wa er . If u e uns r r s EasyTune 4 over system's limitation, the
biggest lost is only to restart the computer aga ni and the side effect is then well controlled. Moreover, if one
well-performed system speed has been tested in EasyTune 4, u es r can "Save" this setting and "Load"
it in ne xt time. Obvi lous y, Gigabyte EasyTune 4 ha as lready tu nedr the "Overc cklo " techno ogl y towa dr
to a newer generation. This wonderful softwa er is now free bund edl in Gigabyte motherboa dr atta hedc in
drive e ar CD U. s rs m y ma ek a test drive o f "EasyTune 4 o " t find ou t mo er a a ngm zi fea u e bt r s y
themselves.
*So em Gigabyte products a er not fully supported by EasyTune 4. Please find the p odur cts supported list
in the web site.
*Any v "O e o ng arcl cki cti ion" s at u es r's risk, Gigabyte Te hno ogc l y will not be re pon b es si l fo anr y
damage or instability to your pro ec ssor, motherboard, or any other co ponenm ts.

Te hn a ec ic l R fe en er c
- - 65
English
( )* For GA-8IPE1000 Pr -o G only.
F dace a-Wiz r TM Ut tili ies I ll ins at at on (*)
What is Face-WizardTM?
Face a-Wiz rdTM is a windows ba eds utility with user-friendly interface that a oll ws us ser to change the
boot-up logo with p ictu er from Gigabyte Logo a G llery on web site or other compatible picture you have.
How does it wo ?rk
Face-WizardTM allows user to select BIOS on boa dr or file in hard drive, floppy disk ,zip, MO or other
sto age der vic s ce and o bm ine the o pa c m ti l ib e p ctu er you p e r fe nr i to BIOS. And not only th a eis, F c -
Wiza dr TM also he p l s u es r to upda te BIOS i in wndows mode.
What’s b ne efit for using Face-Wizard
TM?
It can personalize boot-up logo to show your un quei style from others, and never aga ni looking at the
black and white boot up screen.
(1) (2)
(4)
2 e.C Nlick " xt ."
(3)
3 e.C Nlick " xt ."
(5)
4. tClick "S a og ar - rt" "P r ms" "- G GI ABY ET
UTILITY" "- Fa ec -Wiza dr ".
5 e p.C Hlick " l ".
1.Click "Fa ec - rWiza d" item.

- - 66 GA-8IPE S1000 e e ori s M the boa dr r
English
F h hod n odu onlas BIOS Met I tr cti
Me hod 1 uat : D l BIOS (*) /Q-Fla hs
A. What is Dual BIOS Techno og ?l y
Dual BIOS means that there a e r two system BIO OS (R M) on the mothe boa dr r , one is the Ma ni
BIOS and the o ther is ck Ba up BIOS. Under the no arm l i c rc sum tan ec s, t he syste om w rks on the
Ma ni BIOS. If the a n M i BIOS is c orrupted o r da agedm , t he B Ba upck IOS can ta ek ove h er w il the
system is po e ed onw r . This means that your PC w ill still be ab el to run stably as if nothing ha s
happened in your BIOS.
B H. o ow t use Dual BIOS and Q-Flas yh Ut tili ?
a. After po e onw r the o pu c m ter, p e ngr ssi < >Del immed ai tely du ngri P SO T ( rPo ew On Self Test) it will
a oll w you o en t ter A Bwa dr IO OS CM S SE TUP, t hen p e 8 r ss <F > to en te a h ur Fl s tility.
( )* For GA-8IPE1000 Pr -o G only.
CMOS S etup Utility y-Cop right ( )C 1984 2003- Awa d or S ftwa er
Standa d ear CMOS F tu er s S e e L a n g u a g el c t (*)
A Bd an edv c IOS Featu e Load a ar s F il-S fe e D faults
Integ ar ted e phe a Load p P ri r ls O ti im zed e D faults
Powe anage enr M m t Setup eS t Supe orv si r Passwo dr
P P Pn /
PC H e
Frequen ocy/V ltage on o C tr l iEx t Without Sa ngvi
ESC: tQui F 3 h a n g e L a n g u a g e: C (*)
F8 ua: D l BIOS (*)/ : tQ-F Fla hs 10 S & Ea ev xi Se upt
Tim e, Date a d pe, H r Disk y T ...
E Bn e uat r D l IOS (*)/ t tQ-Fla hs U ili y ( )Y/N ? Y

Te hn a ec ic l R fe en er c
- - 67
English
b. A Bw Da dr ual IO OS Fla hs R M mm Pr rog a ing Utility
c. Dual BIOS Item e p anax l tion:
Wide Ra eng Prot t :ec ion D Di lsab e( ef t)aul , En ba le
Status 1:
If any fa u e e pdail r ( x. U te ESCD fa u eil r , c ckshe um e orr r or re es t… ) r o ucc s in the Ma ni BIOS, t jus
befo er the Operating System is loaded and after the po ew r is on, and that the Wide Range Protection
is s et to " "Enab el , t he boo PC w ill t from B Ba upck IOS auto am ti llca y.
Status 2:
If the ROM BIOS on pe riphe a a d er ls c r s( x. I S SC Ca dr s, LAN Ca dr s,..) emits s s i lgna to equer st
restart of the syste am fter the u es r ma e ank y alteration on it, t he boot up BIOS will not be changed to
the a up B ck BIOS.
Boo F ot r m : Ma e a acki In B OS(D f ul ,t) B up BIOS
Status 1:
The u es r c san et to boo t from ma ni BIOS or Backup BIOS.
Status 2:
If one of the ma ni BIOS or the a up B ck BIOS fails, t hi is tem "Boot From : I Ma ni B OS(De auf lt)"
will be o ec m g ar y and will not be changed b y user.
Dual BIOS Utility V1 30.
Boot Fro a nm M....................................................... i Bios
M Ma ni RO Ty zpe/Si e...................................... SST 49L 003 512F A K
Ba upck ROM Type e/Siz .................................. SST 49L 003 512F A K
Wide Range Protection Disab el
Boot From Ma n oi Bi s
Auto e o R c very Enab el
Halt On Err ro Disab el
Keep DMI Data Enab el
Copy Ma ni ROM Data to a up B ck
Load Default Settings
Save e S ttings to CMOS
Q-Fla hs Utility
Update a n M i BIOS fro oppm Fl y
Update B Ba upck IOS fro oppm Fl y
Save a n M i B SIO to opp Fl y
Save a up B ck BIOS to opp Fl y
P Pg nD / g p odU : M ify : : t : Mo ev ESC Re es F10 Power Off

- - 68 GA-8IPE S1000 e e ori s M the boa dr r
English
Au ot Rec ve yo r : En ba le(De af ult), Disa ebl
When one of the a n M i BIOS o ar B ckup BIOS o ucc rs c ckshe um fa u eil r , t he o ng w rki BIOS will
automati llca y re oc ver the BIOS of che ucks m failu er .
(In the Po e anagew r M ment Setup o f the BIOS S etting, if A PC I Su pends Type is s et to Suspend to
RAM, t he Auto Re oc very will be set to nab e au E l to am ti llca y.)
(If you want to enter the BIOS setting, p ea el s press " "Del k ye when the boo t screen appea r )s.
Halt On Error : Disable e a(D f ul ,t) Ena ebl
If the o u a he u e o o B SIO cc rs c cks m rr r r the a n M i BIOS o u acc rs WID R N RE A GE P OTECTION
e orr r and Halt On Err ro set to Enable, t he PC w ill show me agess s on the boot screen, and the
system will pau e ands wait for the u e s r's instruction.
If Auto Recovery :Di lsab e, t i will show <or the o ht er key c e to on nuti .>
If Auto e o R c very : ,En ba le it will show <o h o hr t e t er key to A Ru ot ec veo r.>
Keep D DMI a at : En ba l l ,e e a(D f u t) Di lsab e
Enable: The DMI data on w 't be rep al c yed b fl ia hs ng ne w BIOS.(re oc mmend)
Di lsab e: The DMI data will be ep a ed b r l c y fl ia hs ng new BIOS.
Copy M Main RO Da at to Backup
(If you boo t fro a upm B ck ROM, t hi is tem will change to op C y Ba upck ROM Data to a n M i )
Auto re oc very message:
BIOS Rec ve yo r : Main to Backup
The ean m s that the Ma ni BIOS wo no arks rm lly and cou d aul to am ti llca y re oc ver the Ba upck BIOS.
BIOS Rec ve yo r : Backup to Main
The ean m s that the Ba upck BIOS works no arm lly and cou dl auto am tically re oc ver the Ma ni BIOS.
(This auto re oc very utility is s et by system auto am tically and can’t be hanged c by user ).
Lo da De af ul it tt Se ngs
Load dual BIOS default va uel .
S S Save e stting to CMO
Save revised e s tting.

Te hn a ec ic l R fe en er c
- - 69
English
I. Q: Wh ua st i D al IB OSTM tec yhno ogl ?
Ans ew r:
DualBIOS te hnoc logy is a patented techno ogl y from Giga-Byte Te hno ogc l y. The c con ept of this
techno ogl y is ba eds on the redundancy and fault tole anr ce theory. DualBIOS
TM technology simply
means the er are two system BIOSes (ROM) integrated onto the mothe boa dr r . One is a ma ni BIOS,
and the other is a ba ckup BIOS. The mainboa dr will ope ar te no arm lly with the a n m i BIOS, however,
if the ma ni BIOS is c orrupt or da agedm for va ou ea onri s r s s, the ba ckup BIOS will be auto am tic yall
u eds when the system po ew red n-O . Your PC will operate as befo er the a m in BIOS was da agedm ,
and is co pm letely tran pas rent to the user.
D Bual IOSTM T hno ogec l y FAQ
GIGABYTE Te hno ogc l y is plea eds to introduce ua D lBIOS te hno ogc l y, a hot spa er for your
system BIOS. This ne ew st "Value added- " featu er , in a long s se eri of innovations from GIGABYTE,
is availab el on this mothe boa dr r . Future GIGABYTE mother rboa ds will als co n i o por rate this
innovation.
Wh ’at s a Du l IB OSTM?
O Gn IGABYTE mothe boa dr r s with ua D lBIOS the e a e phr r ys c yi all two BIOS c sh pi . For
s ci limp ity we’ll ll ca one you a nr "M i BIOS" and the o the e ar w 'll c ll you a upr "B ck " BIOS (you hor " t
spa er "). If your Ma ni BIOS fails, t he a up B ck BIOS a olm st auto am ti llca y ta e ok s ve onr you ner xt
system boot. Almost auto am ti llca y and with virtually ze o dor wn time! Whether the p ob e r l m is a
fa u eil r in fl ia hs ng your BIOS or a virus o ar catastrophic fa u eil r of the a n M i BIOS ch pi , the result is
the a s me - the Ba upck BIOS backs you up, a olm st auto am tic yall .

- - 70 GA-8IPE S1000 e e ori s M the boa dr r
English
III. Q: H D Bo dow es ual IOSTM technolog o ?y w rk
Ans ew r:
1 ua. D lBIOSTM technology p or vides a wide range of p or tection du ngri the boot up pro edu ec r . It
p or tects y our BIOS du ngri system P SO T, t ESCD upda e and e, ven a ll the a w y to P PN
detection/assignment.
2 ua. D lBIOS
TM p or vides auto am tic c v re o ery for the BIOS. When the first BIOS used du ng ri
boot up doe s not comp el te or if a BIOS c ckshe um e orr r o ucc rs, boot-up is still possi lb e. In
the ua D lBIOSTM utility, the "Auto Re oc very" option will gua anr tee that if either the a n m i
BIOS B o ba upr ck IOS is co uprr ted, t he ua D lBIOS
TM te hno ogc l y willu es the good BIOS
and co err ct the wrong BIOS auto am tic yall .
3 ua. D lBIOS
TM p or vides manua e ol r c very for the BIOS B. Dual IOS
TM te hno ogc l y conta n ai s
built-in fla hs utility, whic ch an fla hs your system BIOS from ba upck to a n m i and o/ r visa
versa. There is no need for an OS-dependent fla hs utility pr rog am.
4 ua. D lBIOS
TM conta ni s a one a -w y fla hs utility. The bu ilt-in one a -w y fla h us tility will ensu er that
the co uprr t BIOS is not mista enk as the good BIOS during e o r c very and that the o c rrect
BIOS (main vs ck. ba up) will be fla heds . Thi ills w p er vent the good BIOS fro be ngm i
flashed.
II. Q: Wh doy es a yn one ee n d a e mo ht r rboa d with u D al IB OSTM techno og ?l y
Ans ew r:
In today's systems there a e r mo er and o e m r BIOS fa u eil r s. The most co onmm rea ons s a er virus
attacks, BIOS upg ader fa u eil r s, and o/ r dete o ari r tion o f the BIOS (ROM) ch pi itself.
1 e o. N w c mputer viru e a es s r being found that attack and destroy the system BIOS. They may
corrupt your BIOS code, c sau ing your PC to be unstable o r even no t boot normally.
2. IB OS data will be o up c rr ted if a po ew r lo uss s/ rge o u cc rs, or if a user re es ts the system, or if
the power button isp er ssed du ngri the p ro ec ss of perfo ngrmi a system BIOS upg ader .
3. If a u es r mista enk ly updates the air m inboa dr with the in o ec rr ct BIOS file, t hen the system
may not be ab el to boot co err ctly. This may cau es the PC system hang n i ope ar tion o r
during boot.
4. A fla hs ROM's life cycle is li im ted a occ rd ngi to e el ctron haic c racteristics. The ode m rn PC
utiliz se the ug Pl and Play BIOS, and is updated regularly. If a use hanger c s pe pheri rals
often, the er is a slight chance of da agem to the fla hs ROM.
With Giga-Byte Te hno ogc l y’s patented DualBIOS
TM
technology you can redu ec the
possi ilib ty of hangs du ngri syste boom t up, and o/ r loss BIOS data due to above rea ons s.
This new techno ogl y will e nali im te valuab el system do nw time and costly r repai bills cau es
by BIOS f .a u eil r s

Te hn a ec ic l R fe en er c
- - 71
English
2 u ng o. D ri r afte ar BIOS upg ader , if DualBIOS
TM detects that the ma ni BIOS is co uprr t, t he
ba upck BIOS will ta e ok ver the boo t-up p o e aur c ss to am tically. Mo eor ver, t i will verify the
main and backup BIOS che ucks ms when boo ting-up. DualBIOS
TM technology e ax mines
the c ckshe um of the main and backup BIOS wh eil the system is po ew red on to gua anr tee
your BIOS operates p oper rly.
3 o e. P w r Us ser will have the ad vantage of having two BIOS versions on their ma nboai rd. The
benefit is be ngi ab el to e s lect either version BIOS to suit the perfo anrm ce system needs.
4 e b. Fl xi ility fo h gh endr i - desktop and o PCs w rkstation e/s rvers. In the ua D lBIOS
TM utility,
the op tion can be e s t, "Halt On When BIOS Defects," to be enab ed l to ha lt your system with
a aw rn ngi message that the main BIOS has been o c rrupted. Most workstation/s ver ers
require constant operation to guarantee servic se have not been interrupted. In this situation,
the "Ha nltO When BIOS Defects" message may be d ab edis l to avo di system pau es s
d u n g n o ari r m l b o o n g n o h e a d a n a g eti . A t r v t y o u g a n i fr -o g am G i B y ste ' D u a l B IO STM
te hno ogc l y is the ab ility to upg ade r fro duam l 2 b M it BIOS to dua 4l
Mbit BIOS in the futu er if extra BIOS sto age needr is .
I .V Q: Who d u Nee s D al IB OSTM tec yhno ogl ?
Ans ew r:
1. Every u es r should have DualBIOS
TM techno ogl y due to the advan ec ment of co pum ter
viru es s.
Everyday, t he e a e ner r w BIOS-type vi iru e ds s sc vo e edr that will destroy your system
BIOS. Most commerci la products on the ma erk t do no t have o s lutions to gua dr against this
type of virus intru onsi . The ua D lBIOS
TM techno ogl y willp or vide a state o- f-the a- rt so ul tion to
p or tect your PC:
Ca es I. t) Vi ic ou o pus c m er viru e as s m y wipe ou t you enr tire system BIOS. t Wi h a
c von enti lona si lng e system BIOS P C, the PC w ill not be functi lona until i t is sent fo epar r irs.
Ca es II. If) the u "A to e o R c very" opti i l ion s enab ed n the ua D lBIOS
TM utility, and if a virus
co uprr ts y our system BIOS, t he ba upck BIOS will automati llca y reboot the syste andm
c co err t the ma ni BIOS.
Ca es III.) A u es r may ove de boorri ting from the a n m i system BIOS. The ua D lBIOS
TM utility
may be entered to manually change the boot sequence to boot from the ba upck BIOS.

- - 72 GA-8IPE S1000 e e ori s M the boa dr r
English
Fla hs B SIO Me hodt I t tn roduc ion
Q-Fla hs ™ is a BIOS fla hs utility e beddedm in Fla hs ROM. With th uis tility, users only have to stay in
the BIOS menu hen w they want to upda te BIO QS. -Fla hs ™ a oll ws u es rs to fla hs BIOS without any
utility in DOS or Windows. Using Q-Fla hs ™ ind aic ting no mo er foo ngli a oundr with any co pm licated
instructions and ope rating system sin ec it i is n the BIOS menu.
Plea es note that bec sau e updating BIOS has potential risk, plea es do it with caution!! We
a er s yorr that Gigabyte Techno ogl y Co., Ltd is not re pons si lb e for damages of system
becau es of in oc rrect man pu ai l tion o f updating BIOS to avo di any cl ia ms from end u e- s rs.
Be efor You Beg ni :
Befo er you start updating BIOS with the Q-Fla hs ™ utility, p ea el s fo oll w the steps be ol w first.
1 o n. D w load the latest BIOS for your mothe boar rd from Gigabyte's website.
2. tEx ract the BIOS file do n oadedw l and s va e the BIOS file (the one with ode m l na em .F Fxx. or
e a px m le, 7V XPR . tF12) o a floppy disk.
3 eboo. R t your PC and p er ss Del to en ter BIOS menu.
The BIOS upg adr ing gu dei s belo aw re separated into two parts.
If you or m the boa dr r ha duas l BIOS, p ea el s refer to Part One.
If you or m therboa dr has s i lng e BIOS, p ea el s refer to Part Two.

Te hn a ec ic l R fe en er c
- - 73
English
The BIOS file is F10
before updating
Entering t -he Q F hlas ™ utilit :y
Step1: To u es Q-Fla hs ™ utility, you u m st p er ss Del in the boo t screen to en ter BIOS menu.
A B S S P E SEMI IO IM L TU UP TI IL TY VE S - R I .ON 2 00
( ) rC 2001 e A m ican ega M tr rend n gh e es, I c. All i R ts R s v ed
STA AND RD CMOS SETU NP I TE AGR TE PE P E A SD RI H R L
B SIO F TEA URES SETU H RD RP A WA E MONITOR & MIS SEC TUP
CHIPSET FEATURES SETU U RP S PE V SI OR PASSWORD
P EOW R MA AN GE EM NT SETU U RP SE PASSWORD
P PN / P AC C N URI O FIG TI ION D HDD U DE A TO ETEC TION
L L LOA AD F I -SA E E AF D F U TS SAVE & EX IT SETUP
LO OAD PTI IM Z F TE ED D A UL S EXIT WITH UO T SAVING
ES SC: t : Qui e el ct It :e 5m F Old Va ue 6l s F : Fa ail-S fe a ue V l s
F7 p: O ti i l l l im zed a V ue 8 uas F : D B SIO /Q-F a h 10 a es F :S v & E x t
Load a a e e au F il-S f D f lts
Part One:
U Bpd ngati IOS with Q-F hlas ™ Ut tili y on u D al BIOS Mo ht e a srbo rd .
So em of Gigabyte mothe boa d ar r s re equipped with dual BIOS. In the BIOS menu of the
motherboa dr s supporting Q-Fla hs ™ and Dual BIOS, the Q-Fla hs ™ utility and Dual BIOS utility a er
co bm ined in the same een scr . This s c e tion only deals with ho w to u se Q-Fla hs™ utility.
In the fo o ngll wi section es, w ta ek GA V-7 RXP as the exa p em l to gu ide you ho w to fla hs BIOS from
an o del r ve onrsi to the latest ve on orsi . F r e a px m le, f rom F10 to F12.
7 1 0V XPR F
A AMD- t th o nl ( m) r r-P o e oc ss 133 3MHz
Ch e eck y s S t m He a hlt !
C N Rh e ngc ki V AM... tUpd a e OK
2621 44KB
D DE SL: t /e up u a a h 8 o ol l B SIO /Q-F s F :B t Me nu 1 2 e o b oo Lo go F :N tw r k t : T AB
A P Eu o e e ngt -D t cti r ri Ma est ..ID H Da dr i sk
A P Su o e e ngt - D t cti r i la e o e e edv ...N t D t ct
A S A APu o e e n gt - D t cti e a ec M st r .. T I CD ROM
A S Su o e e ngt - D t cti e c la e o e e edv .. N t D t ct
( ) C Ame a n eg a end nric M tr s I c .,
62 2003 001199 00101111 040201 333 7 1- - - - -KT -GA V XPR -
Ame an e e a e 0 8 2 3 2 00 2r ic R l s : / /
M Meg a e n dtr s A I I tB OS A ( )C 19 9 9 m Me a nric e ga ren d

- - 74 GA-8IPE S1000 e e ori s M the boa dr r
English
Step 2: Press F8 button on your keyboa dr and then Y button to enter the Q-Fla hs™ utility.
Exp ol ring t -he Q F hlas ™/Dual BIOS ut tili y sc eer n
The Q-Fla hs ™/Dual BIOS utility screen on c s si ts of the follo ng ewi k y co ponenm ts.
A B S S P E SEMI IO IM L TU UP TI IL TY VE S - R I .ON 2 00
( ) rC 2001 e A m ican ega M tr rend n gh e es, I c. All i R ts R s v ed
STA AND RD CMOS SETU NP I TE AGR TE PE P E A SD RI H R L
B SIO F TEA URES SETU H RD RP A WA E MONITOR & MIS SEC TUP
CHIPSET FEATURES SETU U RP S PE V SI OR PASSWORD
P EOW R MA AN
P PN / PC C NI O
L L LOA AD F I -SA E E AF D F U TS SAVE & EX IT SETUP
LO OAD PTI IM Z F TE ED D A UL S EXIT WITH UO T SAVING
ES SC: t : Qui e el ct It :e 5m F O ld V a ue 6l s F : Fa ail-S fe a ue V l s
F7 p: O ti i l l l im zed a V ue 8 uas F : D B SIO /Q-F a h 10 a es F :S v & E x t
Load a a e e au F il-S f D f lts
E E A B S ASNT R DU L IO /Q-FL H U TILITY Y Y ( /N) ?
D Uual B SIO tility
Boot Fro a nm M......................................... i Bios
M Ma ni RO Ty zpe/Si e 49L 003 256................... ..... S ST F A K
Ba upck ROM Ty zpe/Si e 49L 003 256.......... ...... .... SST F A K
Wi i i lde ange o e R Pr t ct on D sab e
Boot Fro anm M i Bios
Auto e o e nab e R c v ry E l
Halt On Err ro Di lsab e
C R Dop a ny M i O M ata to a up B ck
Load e au D f lt S e ngtti s
S Sa ev ettings to C MOS
Q-Fla hs Utility
Load a n M i B SIO fro oppm Fl y
Load a up B ck B SIO fro oppm Fl y
S B Sa e a nv M i IO to opp Fl y
S B B Sa ev a upck IO to opp Fl y
Ente un o e e er : R :M v ES C R: s t F10 o e:P w r Off
Dual BIOS utility bar
Q-Fla hs TM
utilit ty itle
bar
Action ba r
Ta enusk m for
Q-Fla hs TM
utility
Ta enusk m for
Dual BIOS utility

- - 76 GA-8IPE S1000 e e ori s M the boa dr r
English
Later, you will see a bo pop upx showing the BIOS files y ou p er viously do n oadedw l to the floppy
disk.
2 o.M ve to the BIOS file you an w t to fla hs and p e n r ss E ter.
In this e a p e e onx m l , w ly do n oadw l one BIOS file to the floppy d o onisk s ly one BIOS file,
7 12V XPR .F , t i lis s ed.
Please confirm aga ni you ha ve the o c rrect BIOS file for your mothe boa dr r .
BIOS fil ie n the fl iopp dy sk.
After p er ssing Enter, you'll then see the p og e or r ss f reading the BIOS file from the floppy disk.
Plea e do nos t t a e ouk t the fl iopp dy sk when it beg ni s fl ia hs ng B SIO .
D Uual B SIO tility
Boot Fro a nm M......................................... i Bios
M Ma ni RO Ty zpe/Si e 49L 003 256... ..................... SST F A K
Ba upck ROM Ty zpe/Si e 49L 003 256... ................. S ST F A K
Wi i i lde ange o e R Pr t ct on D sab e
Boot Fro anm M i Bios
Q-Fla hs Utility
Load a n M i B SIO fro oppm Fl y
Load a up B ck B SIO fro oppm Fl y
S B Sa e a nv M i IO to opp Fl y
S B B Sa ev a upck IO to opp Fl y
Ente un o e e er : R :M v ES C R: s t F10 o e:P w r Off
D Uual B SIO tility
Boot Fro a nm M......................................... i Bios
M Ma ni RO Ty zpe/Si e 49L 003 256... ..................... SST F A K
Ba upck ROM Ty zpe/Si e 49L 003 256... ................. S ST F A K
Wi i i lde ange o e R Pr t ct on D sab e
Boot Fro anm M i Bios
Auto e o e nab e R c v ry E l
Load a n M i B SIO fro oppm Fl y
Load a up B ck B SIO fro oppm Fl y
S B Sa e a nv M i IO to opp Fl y
S B B Sa ev a upck IO to opp Fl y
Ente un o e e er : R :M v ES C R: s t F10 o e:P w r Off
Do no t trun ng oi ff power o e er r s t
y sysour t te am th ageis s t !!
Read ngi B SIO fil le o fr m f oppy. ..
>>> >>>>>> >>>......................
Don’t Tu nr Off t Po e e ew r r O R s S y stem
7 12 256V XPR .F K
Tota e 1 39 ee e 1 14l i s z : . M Fr s zi : . M
F5 e e h L e e : R fr s DE : D l te
1 e ound fil ( )s f

Te hn a ec ic l R fe en er c
- - 77
English
After BIOS fil ie s read, you'll see a confirmation d a ogi l box asking you "Are you su er to upda te
BIOS?"
Plea e do nos t t a e ouk t the fl iopp dy sk when it beg ni s fl ia hs ng B SIO .
3 e. Pr ss Y button on your k ye boa dr after you a er su er to update BIOS.
Then it will beg ni to upda te BIOS. The p og e or r ss f updating BIOS will be d isp al yed.
D Uual B SIO tility
Boot Fro a nm M......................................... i Bios
M Ma ni RO Ty zpe/Si e 49L 003 256... ..................... SST F A K
Ba upck ROM Ty zpe/Si e 49L 003 256... ................. S ST F A K
Wi i i lde ange o e R Pr t ct on D sab e
Boot Fro a nm M i Bios
Auto e o e nab e R c v ry E l
Halt On Err ro Di lsab e
Load a n M i B SIO fro oppm Fl y
Load a up B ck B SIO fro oppm Fl y
S B Sa e a nv M i IO to opp Fl y
S B B Sa ev a upck IO to opp Fl y
Ente un o e e er : R :M v ES C R: s t F10 o e:P w r Off
You an p e n c r ss "E te o on nuer" t c ti
updating BIOS ES or " C" to abo rt.
CH C U DE KS M = 96 2
Are you su er to update ? B SIO
[ t ] t tE n er o on c inue o r [ ] tEsc o abo rt. ....
D Uual B SIO tility
Boot Fro a nm M......................................... i Bios
M Ma ni RO Ty zpe/Si e 49L 003 256... ..................... SST F A K
Ba upck ROM Ty zpe/Si e 49L 003 256... ................. S ST F A K
Wi i i lde ange o e R Pr t ct on D sab e
Boot Fro anm M i Bios
Auto e o e nab e R c v ry E l
Load a n M i B SIO fro oppm Fl y
Load a up B ck B SIO fro oppm Fl y
S B Sa e a nv M i IO to opp Fl y
S B B Sa ev a upck IO to opp Fl y
Ente un o e e er : R :M v ES C R: s t F10 o e:P w r Off
The p og e o upda r r ss f ting BIOS.
Do no t tu n ng or i ff powe o e er r r s t
y sysour t te am this s tage to a o d v i
da ag ng oum i y r BIOS rom!!
Pr rog a ng ommi N w.......
>>> >>>>>> >>>......................
Don't Tu nr Off t Po e e ew r r O R s S y stem

- - 78 GA-8IPE S1000 e e ori s M the boa dr r
English
4. Press any keys to retu nr to the Q-Fla hs ™ menu hen w the BIOS updating p or cedure is co p em l ted.
You can epea r t Step 1 to 4 to fla hs the ba ckup BIOS, too.
5. Pre andss Esc then Y button to e xit the Q-Fla hs ™ utility. The co pum ter will restart auto am tically
after you e xit Q-Fla hs ™.
D Uual B SIO tility
Boot Fro a nm M......................................... i Bios
M Ma ni RO Ty zpe/Si e 49L 003 256................... ..... S ST F A K
Ba upck ROM Ty zpe/Si e 49L 003 256.......... ...... .... SST F A K
Wi i i lde ange o e R Pr t ct on D sab e
Boot Fro anm M i Bios
Auto e o e nab e R c v ry E l
Q-Fla hs Utility
Load a n M i B SIO fro oppm Fl y
Load a up B ck B SIO fro oppm Fl y
S B Sa e a nv M i IO to opp Fl y
S B B Sa ev a upck IO to opp Fl y
Ente un o e e er : R :M v ES C R: s t F10 o e:P w r Off
Ar re ou u y s e to ? RESET
[ t ] t t [ ] tE n er o on c inue o r Esc o abo rt...
D Uual B SIO tility
Boot Fro a nm M......................................... i Bios
M Ma ni RO Ty zpe/Si e 49L 003 256... ..................... SST F A K
Ba upck ROM Ty zpe/Si e 49L 003 256... ................. S ST F A K
Wi i i lde ange o e R Pr t ct on D sab e
Boot Fro a nm M i Bios
Auto e o e nab e R c v ry E l
Halt On Err ro Di lsab e
Load a n M i B SIO fro oppm Fl y
Load a up B ck B SIO fro oppm Fl y
S B Sa e a nv M i IO to opp Fl y
S B B Sa ev a upck IO to opp Fl y
Ente un o e e er : R :M v ES C R: s t F10 o e:P w r Off
!! I t C opy B OS co p em l ed a - P s s !!
Plea e p e an e o ons r ss y k y t c tinue

Te hn a ec ic l R fe en er c
- - 79
English
The BIOS file becomes
F12 after updating
6 e. Pr ss Del to enter BIOS menu after system reboots. When you a e r in BIOS menu, move to Lo da
Fa ail-S f f t te e D aul s i em and p ress Enter to oad l BIOS Fail-Safe Defaults. Normally the system
redetects all devic se after BIOS has been upgraded. Therefo er , we h ghi ly reco endmm re oadl ing
the BIOS defaults after BIOS has been upg raded.
The follo ngwi is an AMI BIOS menu screen o e. H w ver, you c san a l o fi i ilnd s m ar opti ion n
A A BW RD IOS menu.
A B S S P E SEMI IO IM L TU UP TI IL TY VE S - R I .ON 2 00
( ) rC 2001 e A m ican ega M tr rend n gh e es, I c. All i R ts R s v ed
STA AND RD CMOS SETU NP I TE AGR TE PE P E A SD RI H R L
B SIO F TEA URES SETU H RD RP A WA E MONITOR & MIS SEC TUP
CHIPSET FEATURES SETU U RP S PE V SI OR PASSWORD
P EOW R MA AN GE EM NT SETU U RP SE PASSWORD
P PN / P AC C N URI O FIG TI ION D HDD U DE A TO ETEC TION
L L LOA AD F I -SA E E AF D F U TS SAVE & EX IT SETUP
LO OAD PTI IM Z F TE ED D A UL S EXIT WITH UO T SAVING
ES SC: t : Qui e el ct It :e 5m F O ld V a ue 6l s F : Fa ail-S fe a ue V l s
F7 p: O ti i l l l im zed a V ue 8 uas F : D B SIO /Q-F a h 10 a es F :S v & E x t
Load a a e e au F il-S f D f lts
Press Enter on
your ke boa dy r
After system reboots y, ou may find the BIOS ve on onrsi your boot screen be o c mes the one you
flashed.
7 1 2V XPR F
A AMD- t th o nl ( m) r r-P o e oc ss 133 3MHz
Ch e eck y s S t m He a hlt !
C N Rh e ngc ki V AM... tUpd a e OK
2621 44KB
D DE SL: t /e up u a a h 8 o ol l B SIO /Q-F s F :B t Me nu 1 2 e o b oo Lo go F :N tw r k t : T AB
A P Eu o e e ngt -D t cti r ri Ma est ..ID H Da dr i sk
A P Su o e e ngt - D t cti r i la e o e e edv ...N t D t ct
A S A APu o e e n gt - D t cti e a ec M st r .. T I CD ROM
A S Su o e e ngt - D t cti e c la e o e e edv .. N t D t ct
( ) C Ame a n eg a end nric M tr s I c .,
62 2003 001199 00101111 040201 333 7 1- - - - -KT -GA V XPR -
Ame an e e a e 0 8 2 3 2 00 2r ic R l s : / /
M Meg a e n dtr s A I I tB OS A ( )C 19 9 9 m Me a nric e ga ren d

- - 80 GA-8IPE S1000 e e ori s M the boa dr r
English
A B S S P E SEMI IO IM L TU UP TI IL TY VE S - R I .ON 2 00
( ) rC 2001 e A m ican ega M tr rend n gh e es, I c. All i R ts R s v ed
STA AND RD CMOS SETU NP I TE AGR TE PE P E A SD RI H R L
B SIO F TEA URES SETU H RD RP A WA E MONITOR & MIS SEC TUP
CHIPSET FEATURES SETU U RP S PE V SI OR PASSWORD
P EOW R MA AN GE
P PN / PC C NI O FI
L L LOA AD F I -SA E E AF D F U TS SAVE & EX IT SETUP
LO OAD PTI IM Z F TE ED D A UL S EXIT WITH UO T SAVING
ES SC: t : Qui e el ct It :e 5m F O ld V a ue 6l s F : Fa ail-S fe a ue V l s
F7 p: O ti i l l l im zed a V ue 8 uas F : D B SIO /Q-F a h 10 a es F :S v & E x t
Load a a e e au F il-S f D f lts
Press Y on your
keyboard to load
defaults.
Load a a F il-S fe e au ? D f lt /s (Y N) Y
7 e e. S l ct Save & Exit Setup item to a s ve the e s ttings to CMOS and e xit the BIOS S menu. ystem
will reboot after you e xit the BIOS menu. The p o edu er c r is co p em l ted.
A B S S P E SEMI IO IM L TU UP TI IL TY VE S - R I .ON 2 00
( ) rC 2001 e A m ican ega M tr rend n gh e es, I c. All i R ts R s v ed
STA AND RD CMOS SETU NP I TE AGR TE PE P E A SD RI H R L
B SIO F TEA URES SETU H RD RP A WA E MONITOR & MIS SEC TUP
CHIPSET FEATURES SETU U RP S PE V SI OR PASSWORD
P EOW R MA AN GE
P PN / PC C NI O FI
L L LOA AD F I -SA E E AF D F U TS SAVE & EX IT SETUP
LO OAD PTI IM Z F TE ED D A UL S EXIT WITH UO T SAVING
ES SC: t : Qui e el ct It :e 5m F Old Va ue 6l s F : Fa ail-S fe a ue V l s
F7 p: O ti i l l l im zed a V ue 8 uas F : D B SIO /Q-F a h 10 a es F :S v & E x t
Load a a e e au F il-S f D f lts
Press Y on your
keyboard to
save and exit.
SAVE to and CM OS EXIT ( )Y/N ? Y

Te hn a ec ic l R fe en er c
- - 81
English
Part Two:
U Bpd ngati I i lO wS t -h Q F ash™ Ut tili y on S Si l Ing e-B O Moth bo der ar s.
This part gu dei s u e os rs f si lng e-BIOS motherboa dr s how to update BIOS using the Q-Fla hs™ utility.
Entering t -he Q F hlas ™ utilit :y
Step1: To u es the Q-Fla hs ™utility, you must press Del in the boot screen to en ter BIOS menu.
C UM OS S e upt t tili y y-Cop right ( )C 1984 2002- Awa dr S oftwa er
S Standa dr CM O F Tea u et r s op e o an e P rf rm c
A B Sd an edv c IO Featu e Load a a e e aur s F il-S f D f lts
I t t t f tn eg ar ed e phe a Load p P ri r ls O i im zed e D aul s
Po e anage enw r M m t Setup eS t Supe orv si r Pa o dssw r
P P Pn / C CI onfigu ar tion e e a o ds S t Us r P ssw r
PC H ealth a u a e St t s S v & E xit S etup
Fr requen o age oncy/V lt C t ol iEx t Without Sa ngv i
ES SC: t :Qui e el ct Item
F F F8: Q- la hs 10 a e e up:S v & E S xit t
Time a, D te a d pe, H r Disk y T ...
2. Press F8 on your keyboa dr and then bu Y tton to en ter the Q-Fla hs ™ utility.
C UM OS S e upt t tili y y-Cop right ( )C 1984 2002- Awa dr S oftwa er
S Standa dr CM O F Tea u et r s op e o an e P rf rm c
A B Sd an edv c IO Featu e Load a a e e aur s F il-S f D f lts
I t t t f tn eg ar ed e phe a Load p P ri r ls O i im zed e D aul s
Po e anage enw r M m t Setup eS t Supe orv si r Pa o dssw r
P
P
Fr requen o age oncy/V lt C t ol iEx t Without Sa ngv i
ES SC: t :Qui e el ct Item
F F F8: Q- la hs 10 a e e up:S v & E S xit t
Time a, D te a d pe, H r Disk y T ...
Ente a hr - Q Fl s Utility ( )Y/N ? Y

- - 82 GA-8IPE S1000 e e ori s M the boa dr r
English
Explo ngri th Fe Q- lash™ utility screen
The Q-Fla hs ™ BIOS utility sc creen ons si ts of the foll iow ng key co ponenm ts.
The a h u Qfl s tility
title ba r
Q-Fla hs Utility V1 30.
F Tla hs y zpe/Si e 49L 002 256... ............. SST F A K
En et r: Run / : M o ev E SC: Re es t F10 o e:P w r Off
K Eeep a a D DMI t nab el
Upda et B SIO fro oppm F l y
S B Sa ev IO to opp Fl y
Action ba r
Ta enusk m for the
Q-fla h us tility
Task menu for the Q-Flash
™ utility: Conta ni s the na em s of three tasks. Blocking a task and
p er ssing Enter key on your k ye boa dr to enab el e e ux c tion of the task.
Action bar: Conta ni s the name os f four actions needed to operate the Q-Flash
™ utility. Pressing the
buttons mentioned on your keyboard to perform the es actions.
Using the Q-F hlas ™ utilit :y
This s ection tells you ho w to update BIOS u ngsi the Q-Fla hs ™ utility. As de bedscri in the "Before you
begin" s ce tion abo ve, you must p epa er r a floppy disk having the BIOS file for your mother rboa d and
in es rt it to your co pum ter. If you have a ead lr y put the floppy disk into your syste and ham ve enter the
Q-Fla hs ™ utility, p eal se fo oll w the step be os l w to fla hs BIOS.
St :e sp
1 e. Pr ss a orr w button ons you er k yboa dr to move the light bar to Load " Ma ni BIOS from Floppy"
item in the Q-Flash™ menu and p er ss Enter button.
If you want to a s ve the u en c rr t BIOS fo ba upr ck pu po er s , you an c beg ni Step 1 with Save
Ma n o oppi B SIO t Fl y item.
Q-Fla hs Utility V1 30.
F Tla hs y zpe/Si e 49L 002 256... ............. SST F A K
En et r: Run / : M o ev E SC: Re es t F10 o e:P w r Off
K Eeep a a D DMI t nab el
Upda et B SIO fro oppm F l y
S B Sa ev IO to opp Fl y

Te hn a ec ic l R fe en er c
- - 83
English
Later, you will see a bo ho ngx s wi the BIOS files you do n oadedw l to the floppy disk.
In th eis xa p em l , we on ly down oadl one BIOS for this board, 8GE800 4.F so only one BIOS fil ie s listed.
2.Hi ligh ght the BIOS file you want to fla h ands p er ss Enter button on your keyboa dr to enab e l reading
from the BIOS file from the floppy.
Please confirm aga ni you ha ve the o c rrect BIOS file for your mothe boa dr r .
Q-Fla hs Utility V1 30.
F Tla hs y zpe/Si e 49L 002 256... ............. SST F A K
K Eeep a a D DMI t nab el
Upda et B SIO fro oppm F l y
S B Sa ev IO to opp Fl y
8 800 4 256GE . F K
Tota e 1 39 ee e 1 14l i S z : . M Fr Siz : . M
F5 e: R fre h L e e es DE : D l t
1 e ound Fil ( )s f BIOS fil ie n the
floppy.
Q-Fla hs Utility V1 30.
F Tla hs y zpe/Si e 49L 002 256... ............. SST F A K
En et r: Run / : M o ev E SC: Re es t F10 o e:P w r Off
K Eeep a a D DMI t nab el Do no t tu n ngr i
powe or r re es t your
syst te am this
stage!
Readngi B SIO file o fr m floppy ... .... ..
>>>>>>>>...........................
Don't tu n or ff Po ew r Or RESET System
After BIOS fil ie s read, you’ll s cee a onfirmation d ai log bo x asking you
"Are you su er to update BIOS?"

- - 84 GA-8IPE S1000 e e ori s M the boa dr r
English
Q-Fla hs Utility V1 30.
F Tla hs y zpe/Si e 49L 002 256... ............. SST F A K
En et r: Run / : M o ev E SC: Re es t F10 o e:P w r Off
You an p e n e c r ss "E t r" to
continue upda ting BIOS
or " "ESC to abo rt.
CH C UE KS M = AC03
Are you su er to upda e ? t B SIO
[ t ] t t t I tEn er o on c inue upda ing B OS ES or " C" o abo rt.
3 e bu. Pr ss Y tton if you ma ek su er to update BIOS.
Then it will beg ni to update BIOS. The p rog er ss of updating will be sho nw at the sa em time.
Do no t tu n ng or i ff power
o e er r s t your system at
this s tage!!
The po e o rc ss f
updating BIOS
Q-Fla hs Utility V1 30.
F Tla hs y zpe/Si e 49L 002 256... ............. SST F A K
En et r: Run / : M o ev E SC: Re es t F10 o e:P w r Off
Updating o B SIO N w...
>>>>>>>>>>>>>.................
Do not Tu nr Off Po ew r On RESET Sy stem
4. Press any keys to retu nr to the Q-Fla hs ™ menu hen w the BIOS updating p or cedure is co p em l ted.
5 e and. Pr ss Esc then Enter to exit the a h Q-Fl s ™ utility. System will restart.
Q-Fla hs Utility V1 30.
F Tla hs y zpe/Si e 49L 002 256............. ...SST F A K
En et r: Run / : M o ev E SC: Re es t F10 o e:P w r Off
A re you su er to RES ET?
[ t ]En er to on c tinue o r [ ] tEsc o abo rt.. ..
6 e. Pr ss Del to enter BIOS menu a fter syste eboom r ts and load BIOS Fa ail-S fe Defaults. See ho w
to oad l BIOS S Fail- afe Defaults s, p eal e nd ki ly refer to Step 6 to 7 in Part One.
Congra atul tion!! You h ave updated BIOS s ccessu fully!!
Q-Fla hs Utility V1 30.
F Tla hs y zpe/Si e 49L 002 256............. ...SST F A K
En et r: Run / : M o ev E SC: Re es t F10 o e:P w r Off
!! Copy B SIO co p em l ted pa - ss !!
P lea es p er ss any k ye to on c tinue....

Te hn a ec ic l R fe en er c
- - 85
English
Me hod 2t : I @ B OS Ut tili y
If you don't have DOS boot disk, we e o end r c mm that you u sed Gigabyte @BIOS
TM p ogr ram to
fla hs BIOS.
Methods and steps:
I. t Upda e BIOS th oughr Inte ner t
a. Click "Inte ner t Update" icon
b pda. C Ulick " te e N w BIOS" icon
c c. Se el t @BIOSTM s ve er
d e. S lect the exact model na em on your motherboard
e. System will automati llca y do n oadw l and update the BIOS.
(3)
(1)
(4)
(2)
1. IClick "@B OS"
Press he er . 2.Click"Start" "- Prog ar ms"-
"G GI ABYTE B S" "- @ IO "
3. .Click " "
5 ea e e e. Pl s s l ct @BIOS s ve er site,
then Click " "OK .
4.Click he er .

- - 86 GA-8IPE S1000 e e ori s M the boa dr r
English
II. t Upda e BIO OS N T th oughr Inte ner t:
a o. D not c ckli "Inte ner t Update" icon
b pda. C Ulick " te e N w BIOS"
c. Please select "All Files" in di la og bo x while open ing the o dl file.
d ea e. Pl s sea hrc for BIOS un pzi file, do nw load ngi from internet or any other methods (s cu h as:
8IPE1000 Pr -o G. .F1)
e o. C mp el te update p or cess following the instruction.
III. I S Ba ev OS
In the very begi inn ng, t here is "Save Cu enrr t BIOS" icon shown n i d a ogi l box.It means to s va e the
cu enrr t BIOS ve onrsi .
IV. Che ouck t supported mother rboa d and Fla hs ROM:
In the very beginn ngi , the er is "About this prog ar m" icon sho nw in d a ogi l box. It can he lp you check
out which kind of mothe boa dr r and which b rand of Fla hs ROM a er supported.
Note:
a. In method I, if it shows two or mo er motherboard's model na em s to be selected, p ea el s ma ek
sure your mothe boar rd's model na em again. Selecting wrong model name will cause the
system unbooted.
b. In method II, be u e s r that motherboa dr 's model na em in BIOS unzip file a er the same a s your
mothe boa dr r 's. Otherwise, your system won't boot.
c. In e m thod I, f i the BIOS file you need cannot be found in @BIOS
TM serve pr, lea es go onto
Gigabyte's web site for do nw l ioad ng and updating it a occ rd ngi to method II.
d. Plea es note that any interruption during updating will c sau e system unbooted

Te hn a ec ic l R fe en er c
- - 87
English
Ste er o Sp onneake sr C ection a end S tt :ings
We e o end ha r c mm t t you u es the pea e s k r with a p m lifier to a q e c iir the be st sound effect if the ste eo our tput
i lis app ed.
S EPT 1:
Connect the ste eo pea e o ea phoner s k rs r r to L ne " i
Out".
S EPT 2 :
Fo oll wi ing nsta all tion o f the aud oi d eriv r, you find a
icon a S Eound ffect icon on the o l wer righ handt
ta bask r. t Click he on ic to e e s l ct the function.
The n i sta all tion o f w windo s 98 2SE/ K E XP/M / is very si lmp e. Plea es fo o nell w x st tep to n i stall the
function!
L ne ui O t
S EPT 3:
C Click k "Spea er onfigu ar ti lion hen" t c ck on the e l ft
s c s c k ce el tion ba and r e el t "2 peaCH S e or" t om-
p el te 2 hanne aud o on c l i c figu ar tion.
2 4 6 8 a e- / - / - / - Ch nn l i Aud o
Fun on n odu oncti I tr cti
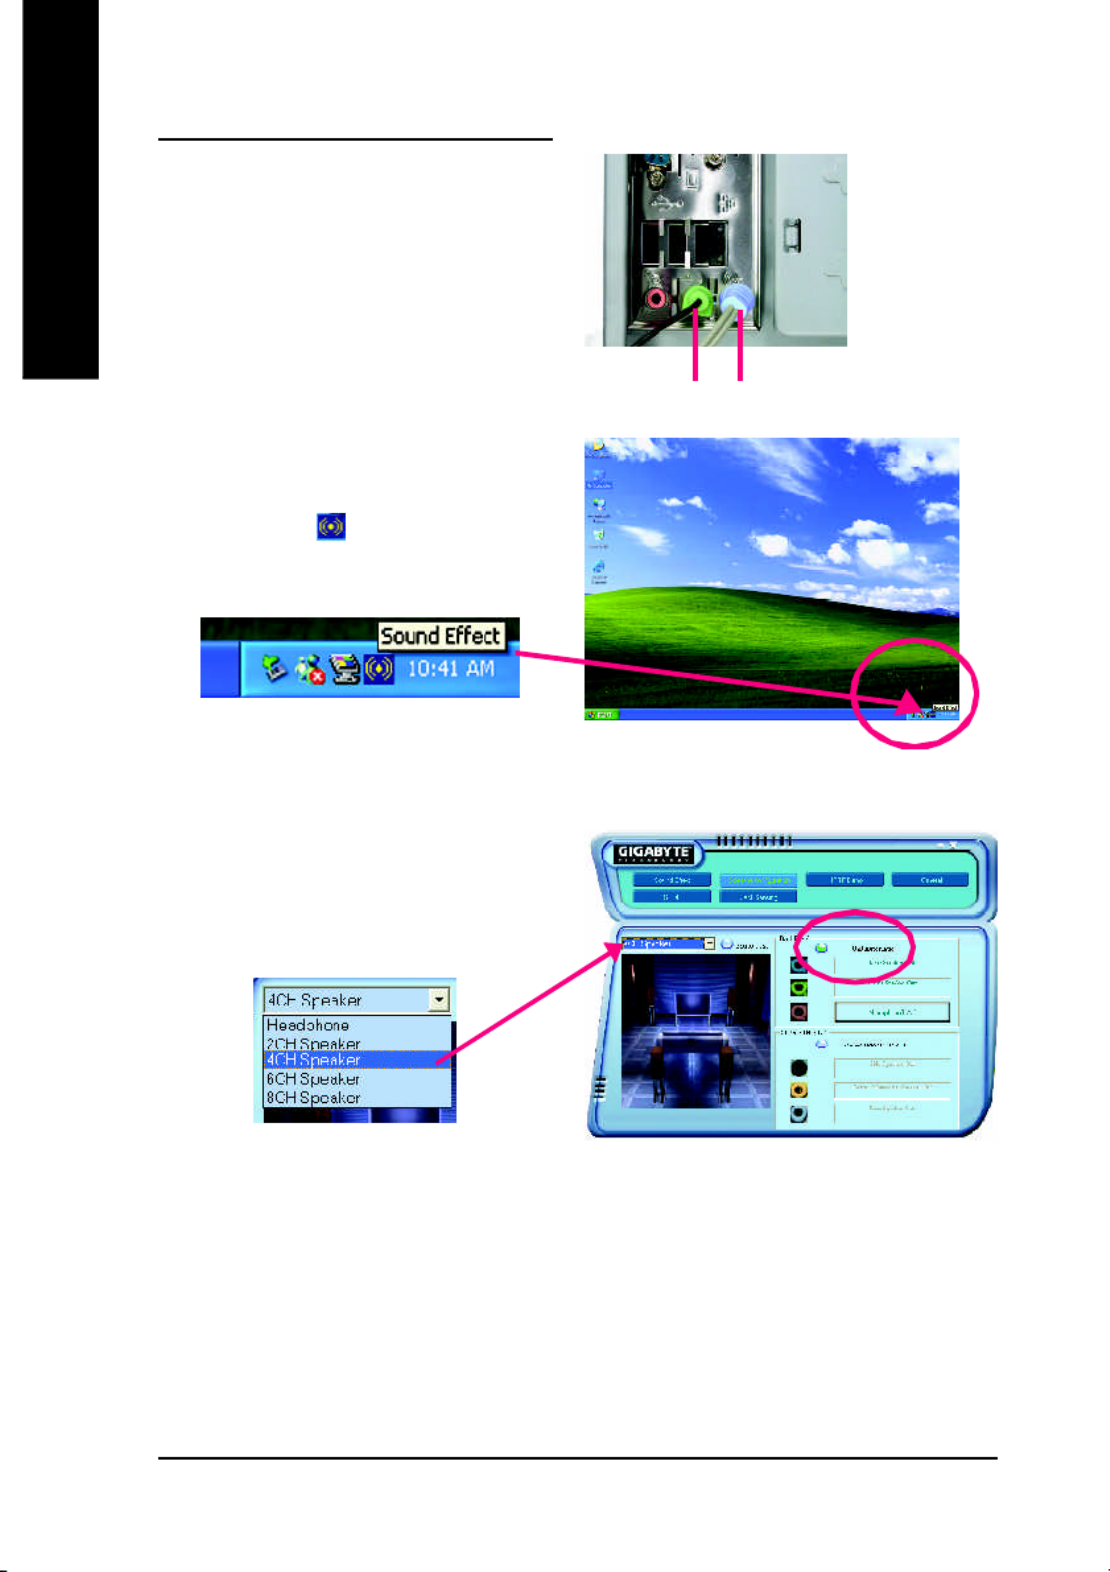
- - 88 GA-8IPE S1000 e e ori s M the boa dr r
English
4 Cha enn l An ogal Aud oi Ou put t Mode
S EPT 1 :
Connect the front c shannel to L ne u " i O t",
the ea hanne r r c ls to L ne " i In".
S EPT 2 :
Fo oll wi ing nsta all tion o f the aud oi d eriv r, you find a
icon a S Eound ffect icon on the o l wer righ handt
ta bask r. t Click he on ic to e e s l ct the function.
L ne u L nei O t i In
S EPT 3 :
C Click k "Spea er on gu afi r ti lon and e" s ect t he "UAJ
Functi lion hen". T c ck on the e l ft t s ce el ion ba and r
s ce el t "4CH Spea ek r" to o p e c m l te 4 hanne aud o c l i
con gu a onfi r ti .

Te hn a ec ic l R fe en er c
- - 89
English
Us cke he ba t aud o panei l to onne c ct t he aud o ou i t-
put without any additi l lona modu e.
S EPT 1 :
Connect t he on fr t c shannel to L ne u he ea " i O t ,t" r r
c shannel t I , t to L ne " i n" and he en C e ubr/S woo ef r
c shannel to "MIC In".
6 Cha enn l An ogal Aud oi Ou put t Mode
S EPT 2 :
Fo oll wi ing nsta all tion o f the aud oi d eriv r, you find a
icon a S Eound ffect icon on the o l wer righ handt
ta bask r. t Click he on ic to e e s l ct the function.
L ne ui O t
L nei In
M IC In
S EPT 3 :
C Click k "Spea er on gu afi r ti lon and e" s ect t he "UAJ
Functi lion hen". T c ck on the e l ft t s ce el ion ba and r
s ce el t "6CH Spea ek r" to o p e c m l te 6 hanne aud o c l i
con gu a onfi r ti .

- - 90 GA-8IPE S1000 e e ori s M the boa dr r
English
S EPT 1 :
S A Ke u e hec r t ud o o boi C m it t a the pane on he l t
ba ock f the c sa e.
8 Chann udel A io Set (up u ngsi Aud o o boi C m Ki ,t Opti lona Device):
(A Kud o o boi C m it offers SPDIF outpu an op at, tic l
and oa a ab e and a u ound c xi l c l S rr -Kit. The
S Ku oundrr - it offers R/ , tL u ound s rr cen e ubr/s woofer
output and r rea su oundrr )
S EPT 2 :
Connect the u ound S rr -Kit to he _ onne t SUR C NE c cto o ar l c ted on the o m the boa dr r .
S EPT 3 :
Th e e a e o e hod o 8 han ne aud or r tw m t s f c l i
configu ar tion:
M e hod 1t :
Conne hect t fron hanne ot c ls t the L " IN UE O T"
port lo ac ted on the aud o pane i l and the ea han r r c -
ne ols t the u ound L po S rr -K EAit "R R R / " rt. Con-
nect t he en e ub oo e hanne c t r/s w f r c ls to he u t S r-
r -ound K S B E Eit " U C NT R" and the L hanne R/ c ls
t t t t.o he u ound S rr -Ki " "S BA KUR C por

Te hn a ec ic l R fe en er c
- - 91
English
S EPT 4 :
Fo oll wi ing nsta all tion o f the aud oi d eriv r, you find a
icon a S Eound ffect icon on the o l wer righ handt
ta bask r. t Click he on ic to e e s l ct the function.
S EPT 5 :
C Click k "Spea er on gu a on and e efi r ti " s l ct bo ht the
"UAJ c Fun ti l ion and n" "O y S Ku oundrr - t ." Then
c ck s c s cli on he e t l ft e el tion ba and r e el t "8CH
Spea ek r" to o p e c m l te 8 channe aud ol i configu ar tion.
S Eound ff t f t :ec Con igu ar ion
At t ff t , t he ound e s ec m enu u e an ad us rs c j s
s s s s sound op on ti e ngtti a de ired.
M e hod 2t :
Conne hect t fron hanne ot c ls t the L " IN UE O T"
port lo ac ted on the aud o pane i l and the ea han r r c -
ne ols t the L " IN NE I " port. t t t Connec he en c er/
subwoofe hanne or c ls t the po o a " "MI IC N rt l c ted
on he aud o pane and he L hanne t i l t R/ c ls to the
S K S BA Ku oundrr - it " UR C " po h e hodr (t. T is m t
r requi es J UA fun oncti )

- - 92 GA-8IPE S1000 e e ori s M the boa dr r
English
SPDIF Ou put t Dev cei ( tOp ional i Dev ce)
3 onne. C ct SPDIF to the SPDIF de odec r.
1 onne. C ct the SPDIF output de ev ci to the ea r r
b a e o andr ck t f , PC f ti ix with e scr w.
2 onne. C ct SPDIF de e ov ci t the o m the boa dr r .
A SP " DIF output" device is v a a abil le on the
mother rboa d. Cab el with r rea b ar cket is p or vided
and could link to the "SPDIF output" connector (As
pictu e or .) F r the furthe n ager li k to de ode ea c r r, r
bra eck t provides coaxial cab el and Fiber
connecting port.

Te hn a ec ic l R fe en er c
- - 93
English
Jack e s J c-S n ing(UA ) t In rodu tion
Insta o oll i M cr s ft DirectX8 1 o. r late e on ber v rsi fo er to enab e l J ck s sa -Sen ing upport fo ndor Wi ws
98 98 2000/ SE/ / .ME
In odu ontr cti of aud oi connec stor
You a onne a an o o he m y c ct , CDROM W lkm r t rs
aud o npui i t de ev ci s to L ne n a pea e ea i I j ck s, k rs, r-
phone o o r the ou purs t t de ev ci s to L ne u a i O t j ck,
and ophone micr to MI IC n a j ck.
J ck s c sa -Sen i ing n lude 2 pa rts: . A A AUTO and M NU L Fo oll wi i lng s x an e a pm e fo 2 hanne ndor c l is (W ws
XP):
Au o dt - et t :ec ing
Jack-Sensing p or vides audio connectors error-detection function.
Pl iea e onne he des c ct t v c se to he gh t ri t jacks
a abo e ndos v . A wi w will appear as right
p u eict r if you setup the de e p ope v ci s r rly.
Plea e nos te tha 3 aud o unt D i f cti ill lon w on y
appear when 3 aud o npu D i i t .s

- - 94 GA-8IPE S1000 e e ori s M the boa dr r
English
Manual setting:
If t he de e p v ci ictu e ho dr s ws iff te enr from what you
set, t t p ea e p e anua e el s r ss "M l S l c ion" o e s t.
If t y sou e wrong with the onne c ctors, t he wa n ngr i
m me age oss will c e ou t as right pictu er .
UAJ I in odutr ct on
U UAJ ( n e a ud o a ha a e a eaiv rs l A i J ck) s v ry s m rt f tu er : It w will s itc sh i lgna au o at m ti llca y when u e s r
p ug h aud o de el s is i v ci to the wr ( - -ong a j ck L nei i in L/ ne out). t Tha m eans u es rs do not need to worry the
aud o de e hou d be p ug n L ne n o L ne ou ai v ci s l l i i -i r i - t j ck, t he de e o pe e a v ci w will rk rf c ytl fter UAJ s i
a a edc vti t .
Y A Aou an c c ckli "U J u o at m tic" button o enab e t l
UAJ fun oncti .
Enable UAJ function:

Te hn a ec ic l R fe en er c
- - 95
English
Xp o n odu onress ec R ve yr I tr cti
What is Xpress Rec veo ry?
Xp er ss Re oc very utility is an utility fo bar cking up and resto ngri O.S. partition . If the hard d rive
can not work p oper rly, you can resto er it to the o gri i lna state.
1. It supports FAT16, FAT32, NTFS format .
2. It must be onne c cted to IDE1 Master .
3. It's y onl a oll ws you to n i sta onell O. .S
4. It must be u ed s with IDE ha d d uppor isk s rting HPA .
5. The first partition must be set as the boot partition. When the boot partition is backed up,
p ea el s do not change the its size.
6. It is not re oc mmend to u e ps X ress Rec vo ery if you had eve ur sed Ghost to retu nr boot
manage em r to NTFS format.
1. System data and ha dr disk's read ngi /writing speed will affect backing up speed.
2 e. W re o endc mm that you install Xp e er ss R c vo ery immed ai tely afte nr i sta nglli O. ,S
drivers and app lications.
How to use e th Xpress Rec ve yo r
The er a er tw wo ays to en ter the p e X r ss c v Re o ery utility. (see the be ol w)
1. Text Mode: press F9 du ring po ew ring on the computer.
2 ode boo. B PM M : t fr -om CD ROM
B CDoo ot f r m :
.
.
Veri ifyng DMI Pool Da at
Boot from CD:
Plea es go to d "A vanced BIOS" setting menu and set boot from M CD R- O , t hen a s ve and exit the
BIOS menu . t La er,p eal se n e i s rt MB driver CD into your drive when "Boot from CD:" appears at the
botto om f the screen , p er ss any k ye to ente p e er X r ss R c vo ery.
Press F9 du ngri po ew ring on the co pum ter .
Awa dr Modu al r B S PIO v6 00. G, A En ne gr y S Atar l ly
Cop ghyri t ( )C 1984 2002- , Awa dr So a eftw r , I .nc
I tn el 865PE A PS G et B SIO f Io 8r PE1000MT F1
Check System Health OK
.
.
.
Press DEL to enter SETUP / Q-Fla hs , F9 For Xp er ss Re oc v yer
08/16/2002-I845GE-6A69YG01C-00 F9 For Xpress Rec ve yo r

- - 96 GA-8IPE S1000 e e ori s M the boa dr r
English
You can highlight the item by u ngsi the arrows keys on your key abo rd and
enter key to enter the menu.
If you ever entered Xpress Rec ve yo r by booting from CD-ROM, you'll still be
direc et d to BMP mode by pressing F 9 in the boo upt sc eer n.
Xpress Re oc very V1.0 (C) Copy Righ 2003t . GIGABYTE Te hn ogc il y CO. , Lt .d
1 e u. Ex c te a up B ck Utility
2 e u. Ex c te e R sto er Ut tili y
3 e o e a up. R m v B ck Im age
4. t Exi and Restart
Text Mode:
B PM Mode:
Xpress Re oc very V1.0 (C) Copy Righ 2003t . GIGABYTE Te hn ogc il y CO. , Lt .d
1 e u. Ex c te a up B ck Utility
2 e u. Ex c te e R sto er Ut tili y
3 e o e a up. R m v B ck Im age
4. t Exi and Restart

Te hn a ec ic l R fe en er c
- - 97
English
1.Exec eut Backup Utilit :y
! Press B to Backup your System or Esc to Exit
The a B ckup utility will scan the system auto am ti llca y and ba ck up it.
The backed up data will be saved as an hidden image .
2 xec e.E ut Restore Utilit :y
! This program will rec veo r your sys et m to f tac ory de af ul .t
Press R to recover your system.
Press Esc to exit
Restore the backup image to the ori ig nal state.
3 e.R move Backup Ima eg :
! Are you s eur to remove backup image? (Y/N)
Remove the backup image.
4 x.E it and Rest t:ar
Exit and restart your computer.

- - 98 GA-8IPE S1000 e e ori s M the boa dr r
English

Appendix
- - 99
English
Ch pa ter 5 App nde ix
Pic es etur b low a e sr ho n nw i Windows XP
I t t t t t t t t t , tn es r he d e riv r - CD i le ha ca em wi h ou o y r m he boa d nr r i o ou d e y r - CD ROM riv he
d e e au o a and ho he n a a on gu de no p ea e doub eriv r - CD t ti l will t st rt s w t i st ll ti i . If t, l s l c ckli
t t , t t t . .he de e on n o pu CD R- OM v ci ic i "My c m er" and e e u x c e he e s up e ex
INSTA CH DR RLL IPSET IVE
I ll ins at Dr ve sr
Th page ho he d e ha need o be n a ed o he e ea h e o n a heis s ws t riv rs t t t i st ll f r t syst m. Click c it m t i st ll t
d e anua o h o he o n a he d e au o a ariv r m lly r s cwit t t t i st ll t riv rs t m tic lly.
M ma age oss : S e de e d e e a ou v ci riv r rs will st rt y r
sys c yt t te aum o am i all . ft t t A e er r s ar ing ou y r
sys ss s ct tem he p e "X r In tall ill" w on nue oti t
i ll in ast o he dt r r v ser .
The p e n a u e he and o e hno og o n a he d e au o a a u "X r ss I st ll" s s t "Click G " t c l y t i st ll t riv rs t m tic lly J. st
s c v s y c ck x c se el t t he d ri er ou an hen w t t li t tt .he bu " "GO on The ewill e u e he nt t i t ta all ion
f t f.o ou br y y i sel
We e o end ha ou n a a o ponen n he r c mm t t y i st ll ll c m ts i t list.
Click " "GO .

- - 100 GA PE S-8I 1000 e e o he boa dri s M t r r
English
nI t t ft I t t t tn e h p el C i s So wa er ns a all ion U ili y
Te he ope a ng e ho he h p e o ponen be on gu edll t r ti syst m w t c i s t c m ts will c fi r .
nUSB P XP a h o ntc f r Wi
Th pa h d e an he p ou o e o e he de e a e up 3 hang up ue nis tc riv r c l y t r s lv t USB v ci w k S iss i XP.
nMa e 10 100 1000 a e L erv ll / / B s AN D riv r (*u)
Fo a e 10 100 1000 L h p u er M rv ll / / AN c i s .
nRea elT k AC C D97 odec r rive
Fo n e 2 4 5 97 aud or I t l( )R I /ICH CH /ICH /ICH AC i .
nI t .n e 2l USB 0 e Driv r
It t t t ft t f t t t f is c re o endedmm ha y sou u e he o o Micr s Windo updaws e or he o m s upda ed d e riv r or
XP K/2 .
Item Descri ipt on
Dr r rive i ll i in ast f n s y vhed!! ou ha e o t eboot
syst !!em
Fo 2 0 d e uppo unde ndo ope a ng e p ea e u e ndo e er USB . riv r s rt r Wi ws XP r ti syst m, l s s Wi ws S rv ci
P A S P S Back. ft te nr i s a ndoll i W ws e erv ci a ho a que on a ? n n e ack s, t i will w sti m rk " " i "U iv rs l e ari l us
c v c s v s k s syson o e unde etr ll r" r "D i e anage ea M r". Pl e e o r m e he que t tion a m r and e r t t tar he tem
( - r r r)Syst te aum will o de e het ct t igh 2 0 dt USB . ive .
( )* Fo 8 1000 or - GA IPE Pr -G only.
(u) For - - GA 8 1000IPE G only.

Appendix
- - 101
English
SOFTWARE A CAPPLI TION
Th page e ea he a ue added o a e de e oped b gab e and o d de pa neis r v ls t v l - s ftw r v l y Gi yt its w rl wi rt rs.
nG Gi i ili igab eyt W ndow Us t t e anages M r( WUM)
Th u an n eg a e he gab e app a on n he e ais t tili y c i t r t t Gi yt 's lic ti s i t syst m tr y.
nGigab e anage enyt M m t Tool( )GMT
A u e u oo h h an anage he o pu e a he ne os f l t l w ic c m t c m t r vi t tw rk.
nEa une4syT
Po e u u ha n eg a e he o e o ng and ha d a e on o ng un onw rf l t t tili y t i t r t s t v rcl cki r w r m it ri f cti s.
nD wMI Vie er
Wi ili i i i indo ba ed uws s t ty wh ch s s s u ed o b o t r w e he t DM MI/S B SIO n o af rm t on o he e f t syst m.
nFa e a dc -Wiz r
N we u o add ng ogot t fili y r i B SIO l .
n@B SIO
G Oi i lgab eyt w ndows f a hs BI S ut t .ili y
nA Bcr -oba et ook
Us ye u uf l t tili f .ro dobem A
nAcr roba eadet R
P A Popu a u ol r t t fili y r m dobe o ead ng f r r i . DF f f t t .ile o arm do u enc m s
nN No on n e ne e urt I t r t S c r (ity IS)
I t t t t t , t , tn eg ar ed u ili y c c s whi h n i lude an i i-v rus ad on c rol e c
nDire 9ctX
I t ft t t t t t t f tns a o oll i M cr s Direc X 9 o enab e 3 ha d a e a e e a l D r w r cc l r ion ha suppor o ope ar r ing
sys c v ct tem o a h ei e be e 3 pe o en tt r D rf rm e.
nMa erv ll ili VC UT t ty (*u)
U C Ct t f . [ili y o a e h pr M rv ll c i s V T( rVi tual ab el Te est r) Te hno og o gab e oc l y f r Gi it N tw rks]
( )* Fo 8r - GA IPE1000 o Pr -G only.
(u) For - GA 8IPE1000-G only.

- - 102 GA PE S-8I 1000 e e o he boa dri s M t r r
English
SOFTWAR N R AE I FO M TION
Th page he on e o o a e and d e n h eis list t c t c st f s ftw r s riv rs i t i i ls CD t t .
HARDWAR N R AE I FO M TION
Th page a de e ou ha e o h o he boa dis lis st ll v ci y v f r t is m t r r .
C NO TAC UT S
Pl l ilea e ee hes s t a page o de ast f r t s.

Appendix
- - 105
English
Qu onesti 10: So e em tim s I hea d e en on nuou beep o o pu e a e e boo upr iff r t c ti s s fr m c m t r ft r syst m ts .
Wha do he e beep u ua and o ?t t s s s lly s t f r
Ans ew r: The beep ode be o a he p ou den he po b e o pu e p ob e o e e c s l w m y l y i t f ti y ssi l c m t r r l ms. H w v r,
t f f . t t t ff f t .he a e ony r ly o er r e en e pu po er c r s s The si ua i ions m gh di er ro a em c s o a e c s
A B S BMI IO eep ode C s
*C wo pu e g e 1 ho beepm t r iv s s rt hen e boo u e u syst m ts s cc ssf lly.
*Exc c s c s ysep o beept f r ode 8 he , t e ode a e a ar lw f t .a al
1 beep e e h a u e R fr s f il r
2 beep a e o s P rity rr r
3 beep a e 64 e o a u e s B s K m m ry f il r
4 beep e no ope a ona s Tim r t r ti l
5 beep o e o e o s Pr c ss r rr r
6 beep 8042 ga e s - t A20 a u e f il r
7 beep o e o e ep on n e up e o s Pr c ss r xc ti i t rr t rr r
8 beep p a e o ead e a u e s s Di l y m m r ry / twri f il r
9 beep he u e o s c ROM cks m rr r
10 beep hu do n eg e ead e e o s s CMOS t w r ist r r / twri rr r
11 beep a he e o bad s C c m m ry
A A B S BW RD IO eep ode C s
1 ho e boo u e u s rt: t Sys m ts s cc ssf lly
2 ho e ng e o s rt: CMOS s tti rr r
1 ong 1 ho o e o l s rt: DRAM r M/B rr r
1 ong 2 ho on o o d p a a d e o l s rt: M it r r is l y c r rr r
1 ong 3 ho e boa d e o l s rt: K y r rr r
1 ong 9 ho e o l s rt: I B O OS R M rr r
C DRon nuou ong beepti s l s: AM e orr r
C won nuou ho beep oti s s rt s: P e e or rr r
Qu onesti 11: H wo to set in the B SIO in o de o boo up or r t t fr m SATA HDDs by e heit r R DAI or ATA
mode?
Ans ew r: Plea es set in the B SIO a o os f ll w:
1. A B S SAd an edv c IO f tea u er s--> TA A S S SA/R I /D C I t : boo o der r " TA"
2 d an ed ea u e boo de e. A v c B SIO f t r s s-- r> Fi t t v ci : I "S SC "
3 n eg a ed e phe a nboa d e a. I t r t P ri r ls--> O r H/W S ri l ATA: " "enab el
Then depend on he it s t SATA mode t tha you need to set " "R DAI to R DAI mode or " "BASE to
no arm l ATA mode in the item na edm Se ari l ATA f t .unc ion

- - 106 GA PE S-8I 1000 e e o he boa dri s M t r r
English
Qu onesti 12:Fo he h h ha e un on ho o e n he n o de o boo upr t M/B w ic v R DAI f cti , w t s t i t B SIO i r r t t
f I , t Irom DE3 4 b e y i her RA D or ATA mode?
Ans ew r:P B Sl iea e es s t n he t IO a o os f ll w:
1 d an ed ea u e. A v c B SIO f t r s-- (> SATA A S S SA)/R I /D C I t : boo o der r " TA"
2 d an ed ea u e boo de e. A v c B SIO f t r s s-- r> Fi t t v ci : I "S SC "
3 n eg a ed e phe a nboa d. I t r t P ri r ls--> O r H/W ATA A/R I :D " "enab el
T Then depend on he ode ha ou need o e o ode o it s t R DAI m t t y t s t I t "RA D" R DAI m r "A A" to
no arm l ATA mode in the item na edm R DAI con o etr ll r f t .unc ion
Qu onesti 13:H w D C R Do t t t I t t f t Io e s in he B OS o boo up rom he E S/ SI/ AI ca d ?r
Ans ew r:P B Sl iea e es s t n he t IO a o os f ll w:
1. Ad an edv c B SIO f tea u er s-- (> SATA A S S S S)/R I /D C I t : boo o der r " C I"
2. Ad an edv c B SIO f tea u er s--> First boot de ev ci : " "S SC I
Then depend on he ode o it s t m (R DAI r ATA A S S B S) t t t tha you need o e s in R I /D C I IO .

Appendix
- - 107
English
Troubleshoo ngti
If t t t , f t t t y cou en oun e anr y r roub e dul ing boo up p ea el s o oll w he roub e hool s ing
p o edu er c r s .
Tu nr off thepo e and unpw r lug he t AC w po er cab e henl , t
re om ve a ll of the add on- c sa dr and cable o o he boa ds fr m m t r r .
START
Fa u eil r ha been es xcluded.
Yes
Plea es ma ek su er mo he boa d ha a et r r & c ss si r no hot s rt
?
No
A
Plea e as m ke u e a s r ll ju pem r s se ngtti (s cu h as C UP sys ste bum
s cypeed equen, f r ra oti , vo age and e a elt t .c ) r s ye p opet r rl .
Fa u eil r ha been es xcluded.
Check if the oo C UP c ling an a a hed o f tt c t C UP p oper rly s. l
C UP coo ng an po eli f w r c conne ted to CPU N_FA
p oper rly?
Plug the C UP
coo ng an po eli f w r
in he t C UP fan
c conne t .or Pl iug n
the AC w po er
c conne t .or
Che he e ock if t m m ry i lln ast p oper rly in o het t DIMM slot.
Yes
No
Yes
I tn es r and pu h s
the e o m m ry
modu e e al v rtic lly
in o het t DI t.MM slo
In es rt t he V AG ca dr . Thenp ug nl i A XT po e ab ew r c l and
tu nr on he t syst .em
No
No
Yes
Fa u eil r ha been es xcluded.
Fa u eil r ha been es xcluded.
Pl i lea es so a et
the ho s rt . p ni
Ma e u ek s r the
ju pem r se ngtti
a e or c rrect.

- - 108 GA PE S-8I 1000 e e o he boa dri s M t r r
English
A
Fa u eil r ha beens e udedxcl .
Yes
No
Yes
No
Fa u eil r ha beens e udedxcl .
Fa u eil r ha beens e udedxcl .
Yes
Re n ai st ll i W ndows OS, t and e n r i s all l add on a d and ab- c r s c es.
Then t try o reboo het t syst .em Fa u eil r ha beens e udedxcl .
Yes
END
If t t , t t t t he abo e p o edu e unab e v r c r l o o e ou p ob e s lv y r r l m p ea e onl s c ac wi h ou o a e y r l c l r a e oil r r
na ona d bu o o he p ou ou d ub ou que on o he e e a a gab eti l i istr t r f r l . , Or y c l s mit y r sti t t s rv ci m il i v Gi yt
web e e hn a uppo onesit t c ic l s rt z
(h ptt ://www. t . .t . tg gabi y e com w) The app op a r ri e e pon e be p o ded r s s will r vi ASAP.
Is memory L onED and an unn ng? C UP f r i
The p ob e ou d r l m c l
be au ed b c s y
po e uppw r s ly, , C UP
m me o ory r C UP /
m me o o ery s ck t
i ltse f.
Che heck if t re d p a is is l y.
P V Ae hap our s y r G
ca dr / VGA slo ot r
mon oit r is c v de ef ti e.
Tu nr off the syst .em Reboo at fter ke boa d andy r mou es
ha ev been p ugged n l i .
Check k if e boa d o ng p opey r is w rki r rly.
It i i ls ss po b e ha t t
y k your e boa d or r
k y c ce boa dr onne tor
i is c de ef t ve.
Press < >Del to en et r BIOS se upt . Choo e Loads "
Op ed e au and a e hen eti im z D f lts" s v t x sit e upt .
Tu nr off the sys cte and em r - onne hect t IDE cab el . Check
if t he sys ctem an reboo u e ut s cc ssf lly.
The p ob e a r l m w s
p obab au ed br ly c s y
t Ihe DE device /
c c conne to or r ab el .
No
No

- - 110 GA PE S-8I 1000 e e o he boa dri s M t r r
English
Ac y sron m Mean ngi
A P A PC I d an ed on gu a on andv c C fi r ti o e n e a ew r I t rf c
AP A PM d an edv c o e anage enw r M m t
A P A PG cc cse e a ed aphl r t Gr i ort
A AMR ud o ode ei M m Ris r
A ACR d an ed o un a on ev c C mm ic ti s s Ri r
B S B SIO a npu u pus ci I t / O t t ystem
C U C UP en a o e ngtr l Pr c ssi nit
C CMOS o p e en a e a de e ondu om l m t ry M t l i Ox S mic ct r
CR C RIMM on nuti ity IMM
CNR C N w Ro un a on andmm ic ti et o ngrki iser
D DMA ir re e oct M m y cc ss A e
D DMI e op anage en n e a eskt M m t I t rf c
D DIMM ua n ne e o odu el I li M m ry M l
DR D RM ual e en on e hant ti M c ism
DR D RAM y cnami ando e e om Acc ss M m ry
DDR D D Roub el a at a et
E P E PC x st tended apab C ili ie ort
ES E SCD xtended yst f t te onm C igu ar ion a D a
E ECC rr r rro C Che ng andcki o e ngcti
E EMC l i i ilie o agnectr m t c Co pam t b ty
EPP E P Pnhan edc a a er ll l ort
ES ED l i ie o actr st t c D scha ger
F FDD l i ioppy D sk v De ce
F FSB ron de ut Si B s
HDD H D Da dr isk e ev ci
I I t tDE n eg ar ed ua hanne nhan ed D l C l E c
I I t t tRQ n e uprr Reques
t t ......o be on c inued
Ac yron ms

Appendix
- - 111
English
Ac y sron m Mean ngi
I I I t t t I t tOAP C npu Ou pu A Pd an edv c r rog a ab emm l npu Con r ro ell
I I t t t tSA ndus ry S anda d hr Arc i ec u er
L Lo a ea e oAN c l Ar N tw rk
I/ I t / t tO npu Ou pu
L Log a oBA ic l l B ck Add e ngr ssi
L L gh ng odeED i t tt Emi i Di
M MHz egahertz
M M mI ID u a n us ci l I str en g a n e a et Di it l I t rf c
M M mTH e o an a o ubr ry T sl t r H
M M mPT e o o o o an a or ry P t c l Tr sl t r
N C N w CI et o n e a erk I t rf c a dr
O OS pe a ng er ti Syst m
O OEM r r ri i l ig na Equ p en anu a um t M f ct e
PA PC CI A P. .G . t Con r ro ell
P S P SO T o e nw r-O elf Test
P PCI e phe a o ponen n e onneri r l C m t I t rc ct
R RIMM a bu n ne e o odu em s i -li M m ry M l
S SCI pe a u an e n u onci l i C rc mst c I str cti s
SE S ECC i lng e dge on a a dge C t ct C r rt i
S A S AR M t ta ic Random cc ss ye M me or

- - 112 GA PE S-8I 1000 e e o he boa dri s M t r r
English

- - 113
English
M me o
Produktspezifikationen
| Marke: | Gigabyte |
| Kategorie: | Hauptplatine |
| Modell: | GA-8IPE1000-G |
Brauchst du Hilfe?
Wenn Sie Hilfe mit Gigabyte GA-8IPE1000-G benötigen, stellen Sie unten eine Frage und andere Benutzer werden Ihnen antworten
Bedienungsanleitung Hauptplatine Gigabyte

7 Oktober 2024
5 Oktober 2024
24 September 2024
17 September 2024
16 September 2024
15 September 2024
13 September 2024
11 September 2024
10 September 2024
9 September 2024
Bedienungsanleitung Hauptplatine
- Hauptplatine Asus
- Hauptplatine Sharkoon
- Hauptplatine MSI
- Hauptplatine Supermicro
- Hauptplatine NZXT
- Hauptplatine Asrock
- Hauptplatine ECS
- Hauptplatine EPoX
- Hauptplatine Evga
- Hauptplatine Intel
- Hauptplatine Abit
- Hauptplatine Elitegroup
- Hauptplatine Foxconn
- Hauptplatine Biostar
Neueste Bedienungsanleitung für -Kategorien-

15 Oktober 2024
4 Oktober 2024
4 Oktober 2024
2 Oktober 2024

27 September 2024
26 September 2024
22 September 2024
22 September 2024
19 September 2024
17 September 2024