Franke MA 82 M SR/F Bedienungsanleitung
Lesen Sie kostenlos die 📖 deutsche Bedienungsanleitung für Franke MA 82 M SR/F (168 Seiten) in der Kategorie Ofen. Dieser Bedienungsanleitung war für 32 Personen hilfreich und wurde von 2 Benutzern mit durchschnittlich 4.5 Sternen bewertet
Seite 1/168

MA 82M_/F
MA 86M_/F
MARIS FREE
EN Installation and user manual Multifunction Oven
DE Installations- und Gebrauchsanweisung Multifunktionsofen
FR Manuel d‘installation et mode d‘emploi Four multifonction
IT Manuale per l‘installazione e l‘uso Forno multifunzione
ES Manual de instalación y servicio Horno multifunción
PT Manual de instalação e de assistência Forno multifunções
NL Installatie- en gebruikershandleiding Multifunctionele oven
EL Εγκατάσταση και εγχειρίδιο συντήρησης Πολυλειτουργικός φούρνος


– 3 –
MA 82 M _/F / MA 86 M _/F EN
TABLE OF CONTENTS
About this manual 3
Intended use 4
Safety Information 4
Maintenance and cleaning 6
Repair 6
Taking out of service 6
Information for energy saving 7
Overview 7
Installation 8
Electrical connection 8
Operation 9
Cooking programms 9
Mechanical cooking programmer 10
Digital cooking programmer 11
Switching on the first time 12
Suggestions 13
Cooking table 13
Cleaning and care 15
General recommendations 15
Hydrolitic cleaning 15
Cleaning the oven chamber 15
Cleaning the oven door 15
Removing the oven door 16
Mounting the oven door 16
Cleaning the glass panels
of the oven door 16
Cleaning the side frames 17
Replacing the oven lamp 18
Technical data 19
Support 19
Disposal 20
Dishes tested 20
How to read the cooking table 20
ABOUT THIS MANUAL
This user manual applies to several models of
the device. Thus it may be possible that some
of the described features and functions are not
available on your specific model.
The explanatory images and figures, described
in the various sections, are available at the end
of the manual.
Franke reserves the right to make
modifications to the product without prior
notice. All information is correct at time of
issuance.
Carefully read the user manual before using
the device.
Keep the user manual.
Use the device described in this user
manual only according to the intended use.
Symbol Meaning
Warning symbol. Warning against risks of injury.
Actions in safety and warning notes to avoid injury or damage.
Action step. Specifies an action to be done.
Result. Result of one or more action steps.
9 Precondition that has to be fulfilled before performing the following action.

MA 82 M _/F / MA 86 M _/F
– 4 –
EN
INTENDED USE
The oven was developed exclusively for non-
professional, domestic use in the household.
The oven is designed to offer professional
performance in the household. It is a highly
versatile appliance enabling safe and easy
selection of different cooking methods.
SAFETY INFORMATION
XZ Read the user manual and
the safety information
carefully before using
the oven.
XZ Keep the manual for future
reference.
The manufacturer can not
be made liable for possible
damage which may occur
due to incorrect installation
and incorrect, improper or
unreasonable use of the device.
The electrical safety of the
oven is guaranteed only when
it is connected to an earthing
system in compliance with the
valid regulations.
To ensure safe and efficient
operation of this electrical
device:
XZ Only contact authorised
service centres.
XZ Do not modify any features
of the device.
This appliance can
be used by children aged
from 8 years and above and
persons with reduced physical,
sensory or mental capabilities
or lack of experience and
knowledge if they have
been given supervision or
instruction concerning use of
the appliance in a safe way
and understand the hazards
involved. Children shall not play
with the appliance. Cleaning
and user maintenance shall not
be made by children without
supervision.
This device is not a toy.
XZ Do not leave children near
the device unattended.
XZ Do not allow children
to touch the device or
its controls during and
immediately after using it.
CAUTION: In order to avoid
a hazard due to inadvertent
resetting of the thermal cut-
out, this appliance must not be
supplied through an external
switching device, such as a
timer, or connected to a circuit
that is regularly switched on
and off by the utility.

– 5 –
MA 82 M _/F / MA 86 M _/F EN
XZ Ensure that the device
is installed in a way that
allows to disconnect it from
the power supply, with a
contact opening distance
that ensures complete
disconnection in category
III overvoltage conditions.
Means for disconnection
must be incorporated in the
fixed wiring in accordance
with the wiring rules.
XZ Only use the temperature
probe recommended for
this oven.
XZ The appliance shall not be
installed behind a decorative
door in order to avoid
overheating.
Risk of burns!
XZ During use the appliance
becomes hot. Care should
be taken to avoid touching
heating elements inside the
oven. Children less than
8 years of age shall be kept
away unless continuously
supervised.
Risk of burns!
The end of the door handle may
be hotter due to hot air being
vented.
XZ Always make sure that the
control knobs are in the off
position when the oven is not
in use.
WARNING: Ensure that the
appliance is switched off before
replacing the lamp to avoid the
possibility of electric shock.
XZ Do not use harsh abrasive
cleaners or sharp metal
scrapers to clean the oven
door glass/ the glass of
hinged lids of the hob
(as appropriate), since they
can scratch the surface,
which may result in shattering
of the glass.
XZ Do not use steam cleaners or
direct jets of water.
XZ If the supply cord is
damaged, it must be replaced
by the manufacturer, its
service agent or similarly
qualified persons in order to
avoid a hazard.
Proper installation and placement
Keep children away from the device and the
packaging material.
If the oven is to be permanently connected to
the power supply:
XZ Ensure that the device is installed only
by the customer service, an electrician
or trained personnel with the appropriate
knowledge/education.
XZ Ensure that the device is connected directly
to the mains socket.
XZ Ensure that no adapters, no multi-sockets
and no extension cables are used to
connect the device.
XZ Ensure that the device is not exposed to
atmospheric agents (rain, sun).

MA 82 M _/F / MA 86 M _/F
– 10 –
EN
GRILL
The grill heating element at the top of the oven switches on.
In this case the fast radiant surface cooking keeps the meat
tender on the inside; the grill can also be used to quickly toast
up to 9 slices of bread. The Franke oven is designed to grill
food with the oven door completely closed.
Note: The grill heating element is very hot when in use; be
careful not to touch it accidentally when handling food inside
the oven. In any case, Franke has designed the oven opening
to protect hands as much as possible.
The thermostat knob (D)
should normally be set to
max. 200°C, however a
lower temperature can be
set, in which case grilling
will be slower.
FAN GRILL
The grill heating element at the top of the oven and the fan are
activated. It combines one-way heat radiation with forced air
circulation inside the oven. This prevents the surface of the
food from burning and allows the heat to penetrate deeper.
Excellent results are obtained using the turbogrill for mixed
meat and vegetable kebabs, sausages, spare-ribs and lamb
chops, broiled chicken, quail with sage, pork fillets, etc.
The thermostat knob (D)
should normally be set to
max. 220°C, however a
lower temperature can be
set, in which case grilling
will be slower.
ENERGY SAVING
The circular and upper heating elements and the fan are
activated. This is one of the most delicate cooking functions
and the heat distribution is higher in the center and in the
upper part of the oven; this makes it not suitable for all types
of cooking, but ideal for delicate recipes based on small /
medium format puff pastry / Brisè.
We recommend using level 3.
This type of heating is used to define the energy efficiency
class and the energy consumption in recirculated air mode.
Set the thermostat knob (D)
between 50 °C and
max. 275 °C.
MULTICOOKING
This turns on the circular heating element, together with partial
activation of the top (roof) and bottom (floor) heating elements
and the fan. Compared with the previous function, it is a more
powerful and faster way to reach the required temperature; this,
in combination with even heat distribution, makes it ideal for
roasting meat and fish and baking pasta, using up to 3 shelves.
Set the thermostat knob (D)
between 50 °C and
max. 275 °C.
Mechanical cooking programmer
(Fig. 1a)
B
End of cooking timer knob (B)
The end of cooking timer is a practical device
that turns the oven off automatically at a set
time in an interval of 1 to 120 minutes.
9To use the end of cooking timer, the ringer
must be wound up by turning the knob (B)
almost one full turn clockwise; then, turning
back, set the required time by aligning the
number corresponding to the minutes with
the fixed reference on the front panel.
At the end of the set time, the ringer
sounds and the oven is automatically
switched off.

– 11 –
MA 82 M _/F / MA 86 M _/F EN
Note: The oven stays hot at around the set
cooking temperature for a long time after
it has been switched off; therefore to avoid
overcooking or burning the food, it is advisable
to remove it from the oven.
Note: To use the oven in manual mode,
i.e. without using the end of cooking timer, align
the knob (B) pointer with the fixed symbol
on the front panel. When the oven is turned off,
the end of cooking programmer can be used as
a normal timer.
Digital cooking programmer
(Fig. 1b)
It enables oven programming in the
following modes:
– delayed start of cooking with set duration,
– immediate start of cooking with set
duration;
– timer.
Setting the digital clock
When the appliance has been connected to the
mains or after a power failure the display will
flash on: „0.00“.
Press the + and - buttons together for a few
seconds. The time of day can be adjusted
with the + and - buttons, while the dot
between the hours and minutes flashes.
If the time setting mode is selected
when an automatic programme is
active, the automatic programme
is cancelled.
Possible time adjustments can be made by
repeating the steps described above.
Acoustic signal frequency modification
The frequency of the acoustic signal can be
changed if a cooking cycle is not programmed
(therefore the display shows the time of day).
Press the + and - buttons (from the time
modification menu) together.
Press Mode or Set to select the menu for
modifying the acoustic signal frequency.
The acoustic signal frequency can be
modified by repeatedly pressing the Mode
or Set button; „ton1“, „ton2“, „ton3“ will
appear on the display.
Manual oven operation
Once the time has been set, the programmer
automatically switches to manual mode.
Starting delayed cooking with set duration
When the time of the day is displayed,
press the Mode or Set button twice to set
a duration.
Then press it again to set the end of
cooking time.
Set the required time with the + and -
buttons.
During duration or end time
adjustment mode selection, the Auto
symbol remains lit.
Once a programme duration is set, the
end time cannot be decreased.
Likewise, the duration of a programme
cannot be prolonged once the end
time is set.
The end time and duration settings
define programme start time
as follows:
start time = end time - duration.
After setting the duration and end time,
the display still shows the end time.
The programme starts when the time
of day coincides with the start time:
the symbol lights up steadily and Auto
the symbol starts flashing.
After the start of cooking, the display
shows the countdown. If only the end
of cooking time is selected
(the duration is = 0), cooking starts
and the display shows the countdown.

MA 82 M _/F / MA 86 M _/F
– 12 –
EN
The symbol remains lit during the Auto
wait for delayed start and for the entire
duration of cooking.
The symbol flashes during the wait
for delayed start and remains fixed
when cooking starts.
An acoustic signal sounds at the end
of cooking; to silence it, press Set
or allow the signal to continue for its
duration.
Semiautomatic programme with
duration or end time
Programme time setting
To select the programme duration or end
time press the Mode or Set button twice
and set the required time with the + and –
buttons.
During duration or end time adjustment
mode selection, the corresponding
Auto symbol flashes.
Once a programme duration
is set, the end time cannot be
decreased. Likewise, the duration of
a programme cannot be prolonged
once the end time is set.
Programme run
When the automatic programme is in
progress (and therefore the cooking
function is active), the symbol Auto
remains lit and the remaining cooking
time appears on the display in
countdown form. The symbol also
remains lit.
Automatic programme end
At the end of the programme duration
or when the end time is reached, the
corresponding symbol goes off.
At the end of the automatic
programme, the Auto symbol flashes,
the display shows “End” and an
intermittent acoustic signal (which can
be stopped by pressing Set) sounds.
Timer function
The timer allows the setting of a time from
which a countdown begins. This function does
not turn the oven on or off, but only sounds an
audible alarm when the time has elapsed.
Press the Mode or Set button once;
the display shows:
The bell symbol flashes, then the alarm
duration can be set with the + and –
buttons. When this function is active, the
bell symbol remains lit and the display
shows the remaining time (countdown).
At the end of the time an acoustic
signal (which can be stopped by
pressing Set) sounds.
Modifying/deleting data
The set data can be changed at any time by
pressing the + and - buttons together.
Cancelling the cooking duration
automatically ends the function, and
vice versa.
In case of programmed operation, the
appliance will not accept end of cooking
times prior to those of start of cooking
proposed by the appliance itself.
Note: The oven stays hot at around the set
cooking temperature for a long time after
it has been switched off; therefore to avoid
overcooking or burning the food, it is advisable
to remove it from the oven.
Switching on the first time
When using the oven for the first time,
operate it empty with the temperature knob
set to maximum for at least 40 minutes and
airing the room.
The odour noticed during this
operation is due to the evaporation
of substances used to protect the
oven during the period between
manufacture and installation.
After the 40 minutes, the oven stops
automatically and will be ready for use
after cooling down the oven.

– 15 –
MA 82 M _/F / MA 86 M _/F EN
CLEANING AND CARE
Before performing any cleaning and care:
Read the general safety information about
cleaning in the chapter „Safety information“.
Turn the oven off.
Depending on how the oven is installed:
Unplug the oven or disconnect the power at
the main electrical system switch,
e.g., switch off the fuse of the oven in the
fuse box.
General recommendations
Stains on the base of the oven from various
cooking products (sauces, sugar, proteins
and fat) are always caused by spills and
splashes. Splashes occur during cooking
and are usually the result of cooking at too
high temperatures. Spills occur when using
cooking dishes which are too small, or due to
an incorrect estimate of increases in volume
during cooking. These problems can be
avoided by using deep cooking receptacles or
by using the enamel tray supplied with
the oven.
The stainless steel and enamelled parts of the
oven will remain as good as new if cleaned
regularly with water or special detergents.
Ensure that the oven is cold before you start
cleaning.
Do not use steam cleaners or direct jets
of water.
Do not use coarse abrasive materials or
sharp metal scrapers to clean the glass
parts of the oven door. They could scratch
the surface and cause the glass to shatter.
Never use scouring pads, steel wool,
muriatic acid or other products which could
scratch or mark the surface.
Only use hot water and non-abrasive
detergents when cleaning the enamelled
surfaces and the oven chamber.
Use a branded glass cleaner for the
glass panels.
Hydrolitic cleaning
For a deeper cleaning of your oven (after each
use), the following procedure is recommended:
Rotate the operation mode selection knob
to the position „TOP & BOTTOM HEAT“.
Set the temperature selection knob to 70°C.
Pour 0.3 liter of demineralized water directly
onto the bottom of the oven cavity without
baking tray.
After about twenty minutes, the food
residues on the enamel will soften, allowing
you to wipe them with a damp cloth.
Cleaning the oven chamber
It is easier to remove any stains while the oven
is still warm and while the stains are still new.
Ensure the oven is cool to the touch, to
avoid burns.
Clean the enamelled surfaces and the oven
chamber with hot water and non-abrasive
detergents.
Dry all parts of the oven thoroughly after
cleaning.
Cleaning the oven door
Ensure that the oven is cold before you start
cleaning.
To facilitate oven cleaning, the oven door
can be removed (see chapter „Removing the
oven door“).
Use a branded glass cleaner for the glass.
Dry all parts of the oven thoroughly after
cleaning.

– 17 –
MA 82 M _/F / MA 86 M _/F EN
Turn the two black blocks (with the word
CLEAN, at the bottom of the door) for 180°
so that they fit into the seats in the oven
structure.
– Make sure to turn the black blocks
completely.
The blocks click into their position.
CAUTION! Damage to the oven due to wrong
handling!
If the blocks are not turned completely,
removing the glass panel will cause the oven
door to close immediately.
Never try closing the door when one or both
blocks have partially or completely freed the
glass panel.
Carefully push the internal glass panel (1)
towards the oven. Then lift the internal
glass panel (2).
The two black
blocks will
prevent the
door from
closing.
1
2
Clean the internal glass panel.
Removing and cleaning the intermediate
glass panel of the oven door
After removing the internal glass panel, the
intermediate glass panel can be removed.
Carefully lift the intermediate glass panel
out of the rubbers on both sides.
Clean the intermediate glass panel.
Removing and cleaning the upper trims
for glass panels
For more thorough cleaning, the upper trims
on the oven door can be removed. The upper
trims are fixed with two screws, one in the
upper right, one in the upper left corner on the
inside of the oven door. It is only possible, to
remove the upper trims when the internal glass
is removed.
Unscrew the fixing screws in the upper right
and left corner of the oven door.
Remove the upper trim.
Clean the upper trim.
Mounting the glass panels
The correct position of the mounted glass
panels is indicated by the wording TEMPERED
GLASS which must be perfectly legible.
If unmounted, put the upper glass trim back
in place.
If unmounted, put the intermediate glass
panel back in place within the rubbers.
Put the internal glass panel back in place.
Turn the two glass retaining blocks back to
their original position.
Close the oven door.
Cleaning the side frames
To clean the side frames thoroughly they can
be removed from the oven.

MA 82 M _/F / MA 86 M _/F
– 18 –
EN
Removing the side frames
1
2
3
Bend the crosspiece which is engaged in
the fixing bush downwards and remove it
from the groove.
Push the side frame upwards and remove it
from the two upper hooks.
Cleaning
Clean the side frames.
After cleaning, keep the side frame tilted
and insert the side frames into the two
respective guides on the top.
Bend the crosspiece which is engaged in
the fixing bush upwards and insert it
in the groove.
Insert the telescopic guides.
Replacing the oven lamp
Franke ovens are equipped with two
rectangular lamps. The replacement lamp must
meet the following technical specifications:
– Temperature resistance: 300°C
– Voltage: 220-240 V, 50/60 Hz
– Power: 2 x 25 W
– Connection: G9
CAUTION! Damage to the lamp due to wrong
handling!
Avoid touching the lamps with bare hands.
Use a cloth or a sheet of kitchen paper.
WARNING! Possibility of electric
shock!
Ensure that the oven is switched off before
replacing the lamp.
WARNING! Electric shock due to
wrong handling!
Switch the oven off.
Depending on how the oven is installed:
Unplug the oven or disconnect the power at
the main electrical system switch, e.g., switch
off the fuse of the oven in the fuse box.
Remove the glass cover by carefully prying
it off with a flat-blade screwdriver.
Remove the lamp from its holder.
Replace the lamp.
Reattach the glass cover.

– 19 –
MA 82 M _/F / MA 86 M _/F EN
TECHNICAL DATA
Power supply 220-240 V, 50/60 Hz
Total power and fuse rating 2850 W ~ 16 A
Power and heating elements
Radial motor 27 W
Light bulb 25 W (x2)
Tangential fan 17 W
Heating element, roof 520 W / 124 V
Heating element, floor 1250 W
Heating element, grill 2100 W
Circular heating elements 2000 W
SUPPORT
In the event of any operation problems, contact
a Franke Technical Service Centre (refer to the
attached list).
Never use the services of unauthorised
technicians.
Specify:
– the type of fault;
– the appliance model (Art./COD.);
– the serial number (S.N.).
This information
is given on the
appliance dataplate
on the warranty
certificate.

MA 82 M _/F / MA 86 M _/F
– 20 –
EN
DISPOSAL
Information for users
The symbol on the product or on
the packaging indicates that the
device must not be disposed of in
the domestic waste.
By disposing of the device in a proper way
you help to avoid harmful consequences to
environment and health.
Further information about recycling the device
is available from the competent authority, the
local refuse disposal service or the vendor of
the device.
Dispose of the device, which is to be
discarded, via a specialised waste collection
point for electronic and electrical devices.
In accordance with the Directive 2012/19/
EU, regarding the reduction of the hazardous
substances used in electrical and electronic
appliances, and waste disposal.
The barred dustbin symbol on the appliance
indicates that at the end of its working life the
product must not be disposed of as household
waste.
Consequently, when the appliance has reached
the end of its working life the user must take
it to a suitable recycling centre for electronic
and electrotechnical waste, or return it to the
dealer when purchasing a new appliance of
equivalent type.
Proper separate waste collection of the
scrapped appliance for subsequent recycling,
treatment and environmentally-friendly
disposal helps prevent a potentially negative
impact on the environment and health and
facilitates recycling of the materials used in
appliance construction.
Information for test institutes
To calculate the volume, remove the internal
wire side runners, if present (according to
standards 2009/60350-50304/EN).
DISHES TESTED
In accordance with the Standard
EN / IEC 60350
These tables have been created for the
controlling authorities in order to facilitate the
examination and testing of the various devices.
How to read the cooking table
The table suggests the ideal function to use
for a particular food cooked on one or more
shelves simultaneously.
The cooking times refer to the introduction of
the food in the oven, excluding preheating
(if required). Temperatures and cooking times
are approximate values and depend on the
quality of food and the type of accessory.
Initially use the recommended values and if
the firing result is not as expected, increase
or decrease the time. We recommend using
the supplied accessories, cake tins and trays
possibly dark metal. Follow the selection table
which lists the supplied items to be placed on
different shelves.
Cooking different foods at the same
time
Using the recommended ventilated functions,
it is possible to cook on different shelves
simultaneously. When cooking on a single shelf
you can also use the static function.

MA 82 M _/F / MA 86 M _/F
– 22 –
DE
INHALTSVERZEICHNIS
Zu dieser Bedienungsanleitung 22
Bestimmungsgemäße Verwendung 23
Sicherheitshinweise 23
Pflege und Reinigung 25
Reparatur 25
Außerbetriebsetzung 26
Informationen zum Energiesparen 26
Überblick 26
Installation 27
Elektrischer Anschluss 27
Bedienung 28
Garprogramme 28
Mechanischer Gar-Programmer 30
Digitaler Gar-Programmer 30
Erstmaliges Einschalten 32
Empfehlungen 32
Gartabelle 33
Reinigung/Instandhaltung 35
Allgemeine Empfehlungen 35
Ofenlampe auswechseln 38
Technische Daten 38
Kundendienst 39
Entsorgung 39
Geprüftes Geschirr 40
Hinweise zur Gartabelle 40
ZU DIESER BEDIENUNGSANLEITUNG
Diese Bedienungsanleitung gilt für
verschiedene Modelle des Geräts. Auf
diese Weise ist es möglich, dass einige der
beschriebenen Merkmale und Funktionen an
Ihrem spezifischen Modell nicht verfügbar sind.
Die erklärenden Abbildungen, die in den
verschiedenen Abschnitten beschrieben
werden, stehen am Ende der Anleitung zur
Verfügung.
Franke behält sich das Recht vor, Änderungen
am Produkt ohne vorherige Ankündigung
vorzunehmen. Alle Informationen sind zum
Zeitpunkt der Veröffentlichung korrekt.
Lesen Sie die Bedienungsanleitung durch,
bevor Sie das Gerät benutzen.
Bewahren Sie die Bedienungsanleitung auf.
Benutzen Sie das in dieser
Bedienungsanleitung beschriebene Gerät
nur gemäß der bestimmungsgemäßen
Verwendung.
Symbol Bedeutung
Warnzeichen. Warnung vor Verletzungsgefahren.
Maßnahmen in Sicherheits- und Warnhinweisen zur Vermeidung von Schäden und Verletzungen.
Handlung. Hier müssen Sie etwas tun.
Resultat. Ergebnis einer oder mehrerer Handlungen.
9 Voraussetzung, die vor dem Ausführen der folgenden Handlung erfüllt sein muss.

MA 82 M _/F / MA 86 M _/F
– 24 –
DE
Temperaturbegrenzers kommen
kann, darf das Gerät nicht
über ein externes Schaltgerät
wie eine Zeitschaltuhr mit
Strom versorgt oder an einen
elektrischen Stromkreis
angeschlossen werden, der
regelmäßig von der Anlage
ein- und ausgeschaltet wird.
XZ Das Gerät muss so
eingebaut werden, dass die
vollständige Trennung von
der Stromquelle mit einem
Kontaktöffnungsabstand
ermöglicht wird (gemäß
Überspannungskategorie III).
Die Trennvorrichtung ist gemäß
den Verkabelungsvorschriften
in die feste Verkabelung
einzubinden.
XZ Nur das für diesen
Ofen empfohlene
Bratenthermometer
verwenden.
XZ Das Gerät sollte nicht hinter
einer Dekortür installiert
werden, um eine Überhitzung
zu vermeiden.
Verbrennungsgefahr!
XZ Während der Verwendung
wird das Gerät heiß. Es sollte
sorgfältig vermieden werden,
Heizelemente innerhalb
des Ofens zu berühren.
XZ Kinder unter 8 Jahren dürfen
sich dem Gerät nur unter
Aufsicht nähern.
Verbrennungsgefahr!
Der Türgriff kann aufgrund
austretender Heißluft zum Rand
hin heißer sein.
XZ Die Bedienknöpfe müssen
immer in ausgeschalteter
Position sein, wenn der Ofen
nicht benutzt wird.
WARNUNG: Vergewissern Sie
sich vor dem Auswechseln
der Lampe, dass das Gerät
ausgeschaltet ist, um die
Möglichkeit von Stromschlägen
auszuschließen.
XZ Verwenden Sie keine
scheuernden Reinigungsmittel
oder scharfen Metallschaber
zum Reinigen der Glastür
des Ofens/der Glasflächen
von Scharnierdeckeln des
Kochfelds (wenn zutreffend),
da diese die Oberfläche
zerkratzen und zum Glasbruch
führen können.
XZ Reinigen Sie das Gerät nicht
mit Dampfreinigern oder
direktem Wasserstrahl.
XZ Falls das Netzkabel
beschädigt ist, muss es
durch den Hersteller, dessen
Kundendienstvertreter oder
Personen mit ähnlicher
Qualifikation ersetzt werden,
um Gefahren zu vermeiden.

– 25 –
MA 82 M _/F / MA 86 M _/F DE
Korrekte Installation und
Aufstellung
Halten Sie Kinder vom Gerät und vom
Verpackungsmaterial fern.
Wenn der Backofen dauerhaft an das
Stromnetz angeschlossen werden soll:
XZ Installation nur vom Kundendienst, einem
Elektriker oder entsprechend geschultem
Fachpersonal durchführen lassen.
XZ Das Gerät muss direkt an die
Netzsteckdose angeschlossen werden.
XZ Für den Anschluss des Geräts dürfen
keine Adapter, Mehrfachsteckdosen oder
Verlängerungskabel verwendet werden.
XZ Achten Sie darauf, dass das Gerät keinen
Witterungseinflüssen (Regen, Sonne)
ausgesetzt ist.
Lebensgefahr!
– Halten Sie Haustiere vom Gerät fern.
– Verpackungsmaterialien, z.B. Plastikfolie
und Polystyrol, stellen eine Gefahr für
Kinder dar.
– Halten Sie Kinder vom
Verpackungsmaterial fern.
Richtige Verwendung
XZ Verwenden Sie das Gerät nur zum Kochen
und Zubereiten von Speisen.
XZ Backhandschuhe beim Hineinschieben und
Herausnehmen von Formen verwenden.
XZ Beim Gebrauch des Ofens die
Bedienungsanleitungen der Kochgeräte
beachten, die zusammen mit dem Ofen
verwendet werden.
XZ Keine Stromkabel anderer elektrischer
Geräte auf heiße Teile des Ofens legen.
XZ Keine brennbaren Flüssigkeiten in der
Nähe des Ofens verwenden.
Überhitzungsgefahr und
Funktionsausfall des Ofens bei
blockierter Lüftung!
XZ Innenwände des Ofens nie mit Alufolie
auskleiden.
XZ Nicht die Ventilations- oder Lüftungsschlitze
über der Ofentür blockieren.
Verbrennungsgefahr!
XZ Beim Öffnen und Schließen der Tür den
Türgriff immer in der Mitte anfassen.
Stromschlaggefahr durch
defektes Gerät!
XZ Defektes Gerät nicht einschalten.
XZ Sicherung im Sicherungskasten
ausschalten.
XZ Kundendienst benachrichtigen.
Stromschlaggefahr!
XZ Das Gerät nicht mit nassen Körperteilen
berühren.
XZ Das Gerät nicht bedienen, wenn Sie
barfuß sind.
XZ Nicht am Gerät oder Stromkabel ziehen, um
den Stecker aus der Steckdose zu ziehen.
Pflege und Reinigung
Vor Reinigungs- oder Instandhaltungsarbeiten:
XZ Gerät von der Stromversorgung trennen,
z.B. Sicherung im Sicherungskasten
ausschalten.
Stromschlaggefahr durch
eindringende Flüssigkeit!
Das Gerät enthält elektrische Teile.
XZ Stellen Sie sicher, dass keine Flüssigkeit
ins Geräteinnere gelangt.
XZ Nicht mit Dampfdruck reinigen.
XZ Bedienelemente nicht mit nassem Tuch
reinigen.
Reparatur
XZ Montage oder Reparatur des Geräts nur
vom Fachmann ausführen lassen.
XZ Wenden Sie sich in folgenden Fällen unbedi
ngt an eine vom Hersteller autorisierte
Kundendienststelle oder einen Fachmann:
– Falls unmittelbar nach dem Auspacken
Zweifel an der Unversehrtheit des Geräts
bestehen
– Während der Installation (nach
Anweisungen des Herstellers)

MA 82 M _/F / MA 86 M _/F
– 26 –
DE
– Falls Zweifel hinsichtlich des korrekten
Betriebs des Geräts bestehen
– Bei Funktionsausfall oder Funktionsstörung
– Zum Auswechseln der Netzsteckdose, falls
die vorhandene nicht zum Gerätestecker
passen sollte
Außerbetriebsetzung
XZ Wenn der Ofen nicht mehr benutzt wird,
Kundendienststelle oder Fachmann
benachrichtigen, um das Gerät von der
Stromversorgung zu trennen.
INFORMATIONEN ZUM ENERGIESPAREN
Die Betriebsart OBER-/UNTERHITZE PLUS
UMLUFT verbraucht weniger Energie als die
anderen verfügbaren Garfunktionen.
XZ Häufiges Öffnen der Tür vermeiden.
XZ So schnell wie möglich vorheizen.
XZ Garraum nur vorheizen, wenn dies für das
Backergebnis notwendig ist.
XZ Wenn bei einem Rezept für einen Auflauf
mehr als 30 Minuten Restwärme nötig sind,
Gerät 5–10 Minuten vor dem Ende der Garzeit
ausschalten.
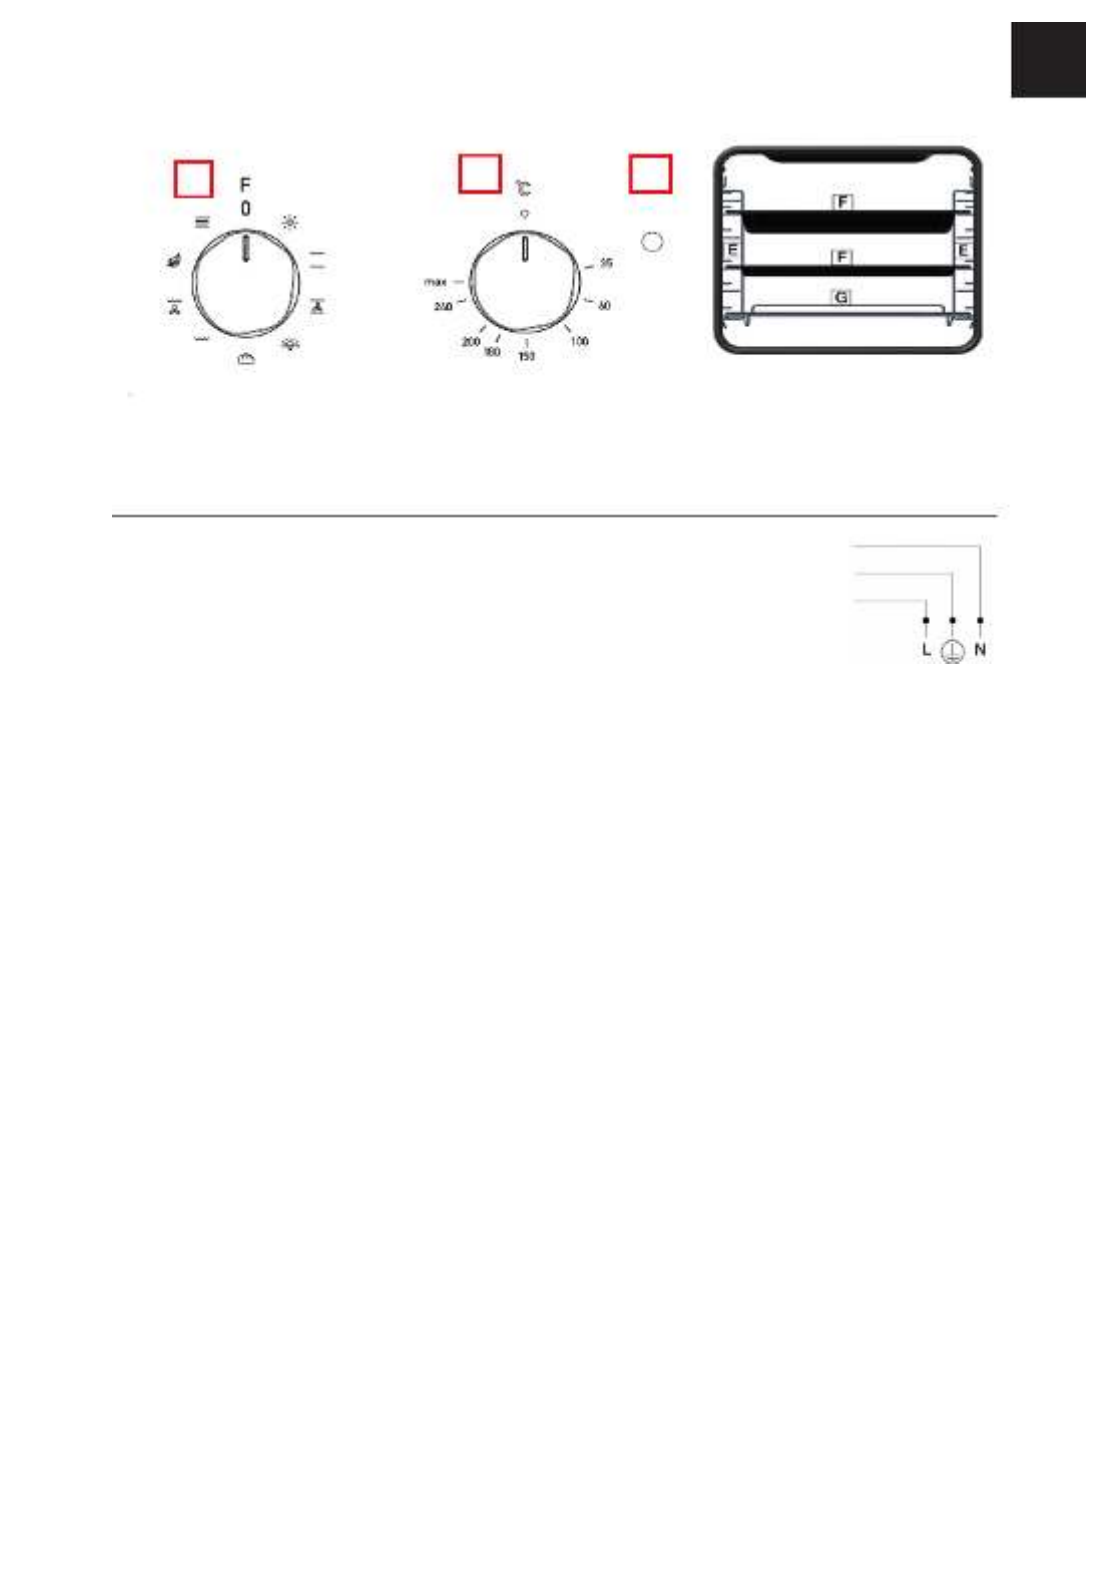
ÜBERBLICK
A. Programmauswahlknopf
Zum Auswählen des Garmodus laut
erforderlicher Garmethode. Wenn der Knopf
auf ein beliebiges Programm gestellt ist,
leuchtet die Ofenleuchte auf und gibt an, dass
der Ofen eingeschaltet ist.
B. Programmierung
Franke Öfen verfügen über verschiedene
Zeitmanagement- und Steuersysteme.
Auf Seite 30 erhalten Sie spezifische
detaillierte Anweisungen. Sie müssen lediglich
die Art der Steuerung ermitteln, mit der Ihr
Ofen ausgerüstet ist, um Hinweise zur richtigen
Verwendung der Funktion zu erhalten.
C. Thermostatanzeige
Das zugehörige Symbol weist darauf hin,
dass die Heizelemente des Ofens eingeschaltet
sind. Die Anzeige geht aus, wenn die
eingestellte Temperatur erreicht wurde. Sobald
die Heizung des Ofens reaktiviert wird, leuchtet
auch die Anzeige wieder auf. Mit der Anzeige
kann überprüft werden, ob die Temperatur
erreicht wurde, bevor die Speisen in den Ofen
gegeben werden.
D. Temperaturregler (Thermostat)
Verwendet zur Einstellung der für die zu
garende Speise notwendigen Temperatur, damit
diese während des gesamten Garvorgangs
konstant gehalten wird. Zum Auswählen der
erforderlichen Temperatur drehen Sie den Knopf
im Uhrzeigersinn, wobei Sie den Zeiger auf die
entsprechende Zahl einstellen.
Die max. Temperatur ist ungefähr 275 °C.
E. Rost- und Backblechauszüge
Zur korrekten Positionierung von Rost und
Backblechen in 5 vorgegebenen Positionen
(1 bis 5 von unten nach oben). Die Gartabelle
(Seite 33) gibt die beste Position für jede Art
des Garens an.
F. Backblech (Fettpfanne)
Normalerweise zum Auffangen von Bratensaft
oder direkt zum Garen von Speisen auf dem
Blech. Das Backblech muss aus dem Ofen
entnommen werden, wenn es nicht verwendet
wird. Das Backblech (die Fettpfanne) ist aus
emailliertem Stahl vom Typ „AA“ und für
Lebensmittelzwecke geeignet.
G. Rost
Zum Abstellen von Pfannen, Backformen und
anderen Behältern außer den bereitgestellten
Backblechen (Fettpfannen) oder zur
Zubereitung von Fleisch und Fisch mit der Grill-
oder Umluftgrill-Funktion, zum Rösten von Brot
usw. Direkter Kontakt der Speisen mit dem
Rost wird nicht empfohlen.
– 27 –
MA 82 M _/F / MA 86 M _/F DE
A
D C
INSTALLATION
Installationen müssen gemäß aktuellen
Standards und Richtlinien ausgeführt werden.
Installationen dürfen nur von Fachpersonal
ausgeführt werden.
Anforderungen an den Küchenschrank
9Bei montierten Einheiten müssen die
Komponenten (Kunststoff und Furnierholz)
mit hitzebeständigem Klebstoff (min. 100°C)
montiert werden:
Ungeeignete Materialien und
Klebstoffe können sich verziehen und
ablösen.
9Der Schrank für den Ofen muss über
ausreichend Raum für die elektrischen
Anschlüsse des Ofens verfügen.
9Der Schrank für den Ofen muss stabil genug
sein, um das Gewicht des Ofens zu tragen.
Der Ofen muss sicher im Schrank
eingebaut werden.
Der Ofen kann in einem Hochschrank
oder unter der Arbeitsplatte einer
modularen Einheit eingebaut werden,
wenn eine ausreichende Luftzirkulation
gewährleistet ist.
Elektrischer Anschluss
Franke Öfen werden mit einem dreipoligen
Netzkabel mit freien Anschlussklemmen
geliefert.
Die Polarität
der freien
Anschlussklemmen
ist zu beachten:
Braun =
stromführend
Blau = neutral
Gelb-grün =
Masse/Erde
Blau
gelb-grün
braun
Stellen Sie sicher, dass die Kenndaten des
elektrischen Versorgungssystems im Haus
(Netzspannung, maximale Leistung und
Stromstärke) mit denen Ihres Franke Ofens
kompatibel sind.
Wenn der Backofen dauerhaft an das
Stromnetz angeschlossen werden soll:
Bauen Sie eine Vorrichtung ein, die die
vollständige Trennung von der Stromquelle
mit einem Kontaktöffnungsabstand
(3mm) ermöglicht (gemäß
Überspannungskategorie III).
Stellen Sie Folgendes sicher:
9Stecker und Steckdose sind für 16 A
Stromstärke ausgelegt.
9Stecker und Steckdose sind gut erreichbar
und so positioniert, dass keine Strom
führenden Teile zugänglich sind, wenn Sie
den Stecker einstecken oder entfernen.
9Der Ofen befindet sich nicht zu nahe am
Stecker und berührt diesen nicht, wenn er
im Schrank eingebaut wurde.
9Bei Austausch des Stromkabels wird eine
H05VV-F-Schlauchleitung mit 3 x 1,5 mm²
verwendet.

MA 82 M _/F / MA 86 M _/F
– 28 –
DE
BEDIENUNG
Dieser Ofen vereint die Vorteile von Öfen
mit Ober-/Unterhitze und natürlicher
Konvektion mit den Vorteilen von modernen
Öfen mit Gebläsen. Mit diesem äußerst
vielseitigen Gerät lassen sich 8 verschiedene
Garmethoden sicher und einfach auswählen.
Verwenden Sie die Knöpfe (A) und (D) auf dem
Bedienfeld, um die erforderlichen Programme
und Temperaturen auszuwählen. Nähere
Informationen zum optimalen Gebrauch Ihres
Franke Ofens finden Sie in der Gartabelle
auf Seite 33.
Kühlgebläse
Zur Verringerung der Temperatur an der Tür,
dem Bedienfeld und den Seiten ist Ihr Franke
Ofen mit einem Kühlgebläse ausgestattet, das
sich automatisch einschaltet, wenn der Ofen
heiß wird. Wenn das Gebläse eingeschaltet
ist, wird Luft von der Vorderseite des Ofens
zwischen die Frontplatte und die Ofentür
geblasen. Es muss insbesondere darauf
geachtet werden, dass die austretende Luft
nicht die Küchenumgebung stört und dass die
Lärmentwicklung minimiert bleibt.
Zum Schutz der Küchenschränke bleibt das
Gebläse nach dem Garvorgang weiterhin
eingeschaltet, bis der Ofen ausreichend
abgekühlt ist.
Ofenlicht
Dieses Symbol steht für das Einschalten
des Ofenlichts ohne Aktivierung jeglicher
Heizungsarten. Diese Option ist nützlich,
um den Ofen im ausgeschalteten Zustand zu
reinigen und den Garraum dabei einsehen
zu können.
Auftauen
Um Speisen aufzutauen, wird folgendes
Verfahren empfohlen:
Stellen Sie den Programmauswahlknopf (A)
auf die Stellung „UMLUFTGRILL“.
Stellen Sie den Temperaturregler (D)
auf 0°C.
Garprogramme
OBER-/UNTERHITZE
Die Hitzequelle wirkt von oben (Oberhitze) und unten (Unterhitze)
ein. Dies ist die herkömmliche Garfunktion, die gleichmäßiges
Garen mit einem einzelnen Einschub sicherstellt.
Der Temperaturregler (D) muss
zwischen 50 °C und max. 275 °C
stehen.
OBER-/UNTERHITZE + UMLUFT
Das obere Heizelement (Oberhitze), das untere Heizelement
(Unterhitze) und das Gebläse innerhalb des Ofens werden
aktiviert. Die konstante und einheitliche Hitze gart und bräunt
die Lebensmittel gleichmäßig. Verschiedene Gerichte können
gleichzeitig mithilfe von maximal 2 Einschüben gegart werden.
Der Temperaturregler (D) muss
zwischen 50 °C und max. 275 °C
stehen.
SCHONGAREN
Das runde Heizelement wird eingeschaltet und das Gebläse
läuft an. Die konstante und gleichmäßige Hitze gart und bräunt
das Gericht gleichmäßig. Verschiedene Gerichte können auch
gleichzeitig zubereitet werden, falls ihre Gartemperaturen ähnlich
sind. Dies ist die sanfteste Methode des Umluftgarens, die mit
diesem Franke Ofen verfügbar ist. Sie ist ideal für die Zubereitung
von Kuchen und Backwaren geeignet, wobei gleichzeitig drei
Einschübe verwendet werden können.
Der Temperaturregler (D) muss
zwischen 50 °C und max. 275 °C
stehen.

– 31 –
MA 82 M _/F / MA 86 M _/F DE
Die akustische Signalfrequenz kann durch
wiederholtes Drücken der Taste Mode
oder Set geändert werden; „ton1“, „ton2“,
„ton3“ wird auf dem Display angezeigt.
Manuelle Ofenbedienung
Sobald die Zeit eingestellt wurde, schaltet
der Programmer automatisch zum manuellen
Modus um.
Starten des verzögerten Garens mit
festgelegter Dauer
Wenn die Uhrzeit angezeigt wird, drücken
Sie die Taste Mode oder Set zweimal, um
eine Dauer einzustellen.
Drücken Sie sie danach erneut, um das
Ende der Garzeit einzustellen.
Stellen Sie die erforderliche Zeit mit den
Tasten + und - ein.
Während der Auswahl des Modus
für Dauer oder Endzeit leuchtet das
Symbol Auto weiterhin auf.
Sobald eine Programmdauer
eingestellt wurde, kann die Endzeit
nicht verringert werden.
Entsprechend kann die Dauer eines
Programms nicht verlängert werden,
sobald die Endzeit eingestellt wurde.
Die Einstellungen für Endzeit und
Dauer denieren die Startzeit des
Programms wie folgt:
Startzeit = Endzeit - Dauer.
Nach dem Einstellen der Dauer und der
Endzeit zeigt das Display weiterhin die
Endzeit an.
Das Programm beginnt, wenn Uhrzeit
und Startzeit übereinstimmen: Das
Symbol Auto leuchtet ständig und das
Symbol beginnt zu blinken.
Nach dem Beginn des Garens zeigt das
Display den Countdown an. Wenn nur
das Ende der Garzeit ausgewählt wird
(Dauer = 0), beginnt das Garen und
das Display zeigt den Countdown an.
Das Symbol Auto leuchtet während
des Wartens auf den verzögerten Start
und während der Gesamtdauer
des Garens auf.
Das Symbol blinkt während der
Wartezeit auf den verzögerten Start und
leuchtet kontinuierlich, wenn das Garen
beginnt.
Ein akustisches Signal ertönt am
Ende des Garen; um dieses Signal
stummzuschalten, drücken Sie "Set",
oder lassen Sie das Signal während
der gesamten Dauer aktiviert.
Halbautomatisches Programm mit
Dauer oder Endzeit
Programmzeiteinstellung
Zum Auswählen der Programmdauer oder
Endzeit drücken Sie die Taste Mode oder
Set zweimal und legen Sie danach die
erforderliche Zeit mit den Tasten + und – fest.
Während der Auswahl des Modus
für Dauer oder Endzeit blinkt das
entsprechende Symbol Auto.
Sobald eine Programmdauer
eingestellt wurde, kann die
Endzeit nicht verringert werden.
Entsprechend kann die Dauer eines
Programms nicht verlängert werden,
sobald die Endzeit eingestellt wurde.
Programmlauf
Wenn das automatische Programm
abläuft (und daher die Garfunktion
aktiv ist), leuchtet das Symbol Auto
weiterhin auf und die verbleibende
Garzeit wird auf dem Display in Form
eines Countdowns angezeigt.
Das Symbol bleibt auch
eingeschaltet.
Ende des automatischen Programms
Am Ende der Programmdauer oder
wenn die Endzeit erreicht wurde, geht
das entsprechende Symbol aus.
Am Ende des automatischen
Programms blinkt das Symbol , Auto
das Display zeigt “End” an und
ein intermittierendes akustisches
Signal (das durch Drücken von "Set"
angehalten werden kann) ertönt.

– 33 –
MA 82 M _/F / MA 86 M _/F DE
GARTABELLE
Funktion Rezept Gewicht/
Menge
Ebene
(von unten)
Vor-
heizen
Temperatur
(°C)
Zeit (min.)
OBER-/
UNTERHITZE
Fleisch- oder Gemüselasagne
Lamm mit Kartoffeln
Kalbeisch und Pasta mit Oliven
1
1
1
3
3
3
JA
JA
JA
200
190
160
25 - 40
75 - 90
25 - 35
Schweinerücken in Milch 1 3 JA 170 für 30‘ + 180 für 30‘
Gefüllte Hähnchenrouladen
Gebackener Fisch
Fisch in Folie mit Zitrusfrüchten
Dünne Pizza
Kekse
Meringue
Käsekuchen
0,4
1
0,6
0,250
0,4
0,1
0,250
3
2 - 3
3
2
3
3
3
JA
JA
JA
JA
JA
JA
JA
180
180 - 190
200
200
180
75
160
10 - 15
35 - 45
20 - 25
15
25
120
60
OBER-/
UNTERHITZE
+ UMLUFT
Bocconcini aus Kartoffeln,
Käse und Speck
Gefüllte Crêpes
Mozzarella in Carrozza
Ofenkartoffeln
Auberginenauauf mit Parmesan
Rippchen mit Weißwein und
Fenchel
pc 12
pc 8
0,2
1
1,5
1
3
4
2
3
3
2
JA
JA
JA
JA
JA
JA
180
190
190
200
200
160
30
5 - 7
15 - 20
50 - 60
35 - 45
25 - 30
Englisches Roastbeef 1 3 JA 220 für 15‘ + 180 für 10‘
Hähnchenschenkel mit
Senfkruste und Speck
Focaccia-Pizza
Focaccia (Fladenbrot)
Tiefkühlpizza
Tiefkühlcroissant
1
0,5
1
0,750
0,6
3
3
2
2 (R) - 4 (F)
3
JA
JA
JA
JA
JA
180
200
180
200
170-180
40
25
20
11
20 - 25
SCHONGAREN Reiskroketten
Eier aus der Kokotte mit Lachs
Bierhähnchen
Gemüsequiche mit Speck
Paumenkuchen
Soft Cakes
Obst-/Marmeladentörtchen
0,5
pc 4
1
1
1,5
0,4
1
3
2
1
3
2
2
3
JA
JA
JA
JA
JA
JA
JA
200
180
190
180
160
165
160
30 - 35
16 - 20
55 - 60
50
60 - 70
30
15 - 25
BROT Rustikales Brot
Zunge
Ciabatta
1
1
1
4
4
5
JA
JA
JA
230 für 25‘ + 180 für 25‘
230 für 10‘ + 180 für 10‘
230 für 15‘ + 180 für 15‘
Butterzopf
Milchsandwich
Schokoladen-Bonet
1
1
Pc 8-10
5
5
3
JA
JA
nein
180
180
210
30-35
13
9-10

– 39 –
MA 82 M _/F / MA 86 M _/F DE
KUNDENDIENST
Bei Problemen mit der Bedienung wenden Sie
sich an den technischen Kundendienst von
Franke (siehe beigefügte Liste).
Greifen Sie nie auf die Dienste von nicht
autorisierten Technikern zurück.
Geben Sie Folgendes an:
– die Art der Störung;
– das Gerätemodell (Art./COD.);
– die Seriennummer (S.N.).
Diese
Informationen
können Sie dem
Typenschild des
Geräts auf dem
Garantiezertifikat
entnehmen.
ENTSORGUNG
Informationen für Anwender
Das Symbol am Produkt oder auf
der Verpackung weist darauf hin,
dass das Gerät nicht als normaler
Hausmüll entsorgt werden darf.
Mit der vorschriftsmäßigen Entsorgung des
Gerätes tragen Sie dazu bei, schädliche
Auswirkungen auf Umwelt und Gesundheit zu
vermeiden.
Weitere Informationen zum Recycling des
Geräts erhalten Sie bei der zuständigen
Behörde, der örtlichen Abfallbeseitigung oder
beim Händler, der das Gerät verkauft hat.
Entsorgen Sie ausrangiertes Gerät über die
speziellen Sammelstellen für elektrische und
elektronische Geräte.
Gemäß Richtlinie 2012/19/EU zur
Beschränkung der Verwendung gefährlicher
Stoffe in Elektro- und Elektronikgeräten sowie
Entsorgung von Altgeräten.
Das Symbol einer durchgestrichenen
Abfalltonne weist darauf hin, dass das Produkt
am Ende seiner Lebensdauer nicht zusammen
mit dem Haushaltsmüll entsorgt werden darf.
Daher muss das Gerät am Ende seiner
Lebensdauer zu einer geeigneten Sammelstelle
für das Recycling elektrischer und
elektronischer Geräte gebracht oder beim Kauf
eines vergleichbaren Neugeräts beim Händler
abgegeben werden.
Die sachgemäße getrennte Sammlung
von Altgeräten für eine anschließende
Wieder verwendung, Aufbereitung und
umweltfreundliche Entsorgung dient der
Vorbeugung von potenziellen Umwelt- und
Gesundheitsschäden. Sie erleichtert das
Recycling der bei der Geräteherstellung
eingesetzten Materialien.
Informationen für Prüfstellen
Zur Berechnung des Volumens müssen Sie die
im Inneren eventuell vorhandenen seitlichen
Drahtschienen entnehmen (gemäß EN-Normen
2009/60350-50304).
Produktspezifikationen
| Marke: | Franke |
| Kategorie: | Ofen |
| Modell: | MA 82 M SR/F |
Brauchst du Hilfe?
Wenn Sie Hilfe mit Franke MA 82 M SR/F benötigen, stellen Sie unten eine Frage und andere Benutzer werden Ihnen antworten
Bedienungsanleitung Ofen Franke

5 September 2024
3 September 2024
1 September 2024
1 September 2024
31 August 2024
31 August 2024
31 August 2024
27 August 2024
27 August 2024
24 August 2024
Bedienungsanleitung Ofen
- Ofen Aduro
- Ofen Samsung
- Ofen AFK
- Ofen Infiniton
- Ofen Clatronic
- Ofen Domo
- Ofen Emerio
- Ofen G3 Ferrari
- Ofen Coline
- Ofen Ernesto
- Ofen Tristar
- Ofen Basetech
- Ofen Sanyo
- Ofen Manta
- Ofen Medion
- Ofen Nedis
- Ofen Philips
- Ofen Sandstrøm
- Ofen SilverCrest
- Ofen Hanseatic
- Ofen Sunbeam
- Ofen Panasonic
- Ofen Clas Ohlson
- Ofen Quigg
- Ofen LG
- Ofen Adler
- Ofen Beper
- Ofen Bestron
- Ofen Camry
- Ofen Guzzanti
- Ofen MX Onda
- Ofen Princess
- Ofen Royal Catering
- Ofen Trisa
- Ofen Bosch
- Ofen AEG
- Ofen Ambiano
- Ofen Ardes
- Ofen Asko
- Ofen Siemens
- Ofen ATAG
- Ofen Bauknecht
- Ofen Bifinett
- Ofen Buffalo
- Ofen Caso
- Ofen Concept
- Ofen Electrolux
- Ofen Ellrona
- Ofen Fagor
- Ofen Fulgor
- Ofen Gaggenau
- Ofen Gorenje
- Ofen Jata
- Ofen Klarstein
- Ofen Koenic
- Ofen Küppersbusch
- Ofen Miele
- Ofen Proficook
- Ofen Rommelsbacher
- Ofen Severin
- Ofen Teka
- Ofen Unold
- Ofen Whirlpool
- Ofen Bomann
- Ofen Essentiel B
- Ofen First Austria
- Ofen Gastroback
- Ofen H.Koenig
- Ofen Hendi
- Ofen Korona
- Ofen Listo
- Ofen Melissa
- Ofen OK
- Ofen Russell Hobbs
- Ofen Steba
- Ofen Taurus
- Ofen Tefal
- Ofen Vox
- Ofen IKEA
- Ofen Conrad
- Ofen Day
- Ofen ECG
- Ofen König
- Ofen Mesko
- Ofen Bush
- Ofen Telefunken
- Ofen Thomson
- Ofen Black And Decker
- Ofen Trotec
- Ofen Mestic
- Ofen Amica
- Ofen BEKO
- Ofen Blaupunkt
- Ofen Blokker
- Ofen Boretti
- Ofen Bourgini
- Ofen Cosori
- Ofen Cuisinart
- Ofen Eldom
- Ofen Eta
- Ofen Fritel
- Ofen Grundig
- Ofen Heinner
- Ofen Home Electric
- Ofen Hotpoint
- Ofen Inventum
- Ofen Kenwood
- Ofen KitchenAid
- Ofen Koenig
- Ofen Krups
- Ofen Micromaxx
- Ofen Moulinex
- Ofen Primo
- Ofen Sage
- Ofen Schneider
- Ofen SEB
- Ofen Sharp
- Ofen Smeg
- Ofen Solac
- Ofen Tomado
- Ofen Trebs
- Ofen Waring Commercial
- Ofen Wilfa
- Ofen Witt
- Ofen WMF
- Ofen Coleman
- Ofen Dometic
- Ofen Outwell
- Ofen Alpina
- Ofen Ardo
- Ofen Ariston
- Ofen Aspes
- Ofen Atlantic
- Ofen Balay
- Ofen Blomberg
- Ofen Scandomestic
- Ofen Bompani
- Ofen Brandt
- Ofen Candy
- Ofen Castor
- Ofen Comfee
- Ofen Constructa
- Ofen Corberó
- Ofen Einhell
- Ofen Curtiss
- Ofen Daewoo
- Ofen Edesa
- Ofen Elektra Bregenz
- Ofen ELIN
- Ofen Eudora
- Ofen Eurotech
- Ofen Everglades
- Ofen Exquisit
- Ofen Mitsubishi
- Ofen Finlux
- Ofen GE
- Ofen Haier
- Ofen High One
- Ofen Hisense
- Ofen Hoover
- Ofen Arthur Martin
- Ofen Hotpoint-Ariston
- Ofen Iberna
- Ofen Ignis
- Ofen Bartscher
- Ofen Indesit
- Ofen Juno
- Ofen Baumatic
- Ofen Kelvinator
- Ofen Bertazzoni
- Ofen Luxor
- Ofen Lynx
- Ofen Maytag
- Ofen Midea
- Ofen Caple
- Ofen Montiss
- Ofen Neff
- Ofen Nordmende
- Ofen EAS Electric
- Ofen PKM
- Ofen Privileg
- Ofen Progress
- Ofen Rex
- Ofen Rommer
- Ofen ETNA
- Ofen Scholtès
- Ofen Frigidaire
- Ofen Svan
- Ofen Techwood
- Ofen Thor
- Ofen V-ZUG
- Ofen Vestel
- Ofen Vestfrost
- Ofen Junker
- Ofen Zanker
- Ofen Kaiser
- Ofen Zanussi
- Ofen Zanussi-Electrolux
- Ofen KKT Kolbe
- Ofen Zerowatt
- Ofen Leonard
- Ofen M-System
- Ofen MACH
- Ofen Monogram
- Ofen Oranier
- Ofen Pelgrim
- Ofen Philco
- Ofen Respekta
- Ofen Rosières
- Ofen Therma
- Ofen Thermador
- Ofen Valberg
- Ofen Viva
- Ofen Eurom
- Ofen Altus
- Ofen Arçelik
- Ofen Continental Edison
- Ofen Hitachi
- Ofen Hyundai
- Ofen Kernau
- Ofen Orava
- Ofen Tesla
- Ofen Livoo
- Ofen Imperial
- Ofen DCG
- Ofen Liebherr
- Ofen Güde
- Ofen Elica
- Ofen Bimar
- Ofen Beem
- Ofen Dualit
- Ofen Morphy Richards
- Ofen Rowenta
- Ofen Sencor
- Ofen DeLonghi
- Ofen Biltema
- Ofen Element
- Ofen Eico
- Ofen Ariete
- Ofen Efbe-Schott
- Ofen Fakir
- Ofen Kalorik
- Ofen Optimum
- Ofen Saro
- Ofen Scarlett
- Ofen Ufesa
- Ofen Tripp Lite
- Ofen Anslut
- Ofen Cecotec
- Ofen Zephir
- Ofen Husqvarna
- Ofen Wolkenstein
- Ofen Gemini
- Ofen Termozeta
- Ofen Frilec
- Ofen ICES
- Ofen Qlima
- Ofen Duux
- Ofen Honeywell
- Ofen Suntec
- Ofen Zibro
- Ofen Foster
- Ofen Opera
- Ofen Brother
- Ofen Atlas
- Ofen Matsui
- Ofen Silverline
- Ofen Cramer
- Ofen Binatone
- Ofen Frifri
- Ofen Novy
- Ofen Airforce
- Ofen Airlux
- Ofen ALNO
- Ofen Cata
- Ofen Crissair
- Ofen Cylinda
- Ofen De Dietrich
- Ofen Dominox
- Ofen Elba
- Ofen Falcon
- Ofen Falmec
- Ofen Faure
- Ofen Freggia
- Ofen Hansa
- Ofen Leisure
- Ofen Lofra
- Ofen MPM
- Ofen Nodor
- Ofen Prima
- Ofen Sauter
- Ofen Stoves
- Ofen Thermex
- Ofen UPO
- Ofen Zigmund And Shtain
- Ofen Friac
- Ofen Thomas
- Ofen ROWI
- Ofen Imetec
- Ofen Logik
- Ofen Team
- Ofen Venga
- Ofen GYS
- Ofen Veripart
- Ofen Bizerba
- Ofen Thetford
- Ofen Dacor
- Ofen Stiebel Eltron
- Ofen Truma
- Ofen Champion
- Ofen Premium
- Ofen Campart
- Ofen Campingaz
- Ofen Americana
- Ofen Bluesky
- Ofen Heller
- Ofen Orima
- Ofen Proline
- Ofen Dimplex
- Ofen Faber
- Ofen Kayoba
- Ofen Matrix
- Ofen Cambridge
- Ofen Mora
- Ofen Westinghouse
- Ofen Eccotemp
- Ofen Wolf
- Ofen Amana
- Ofen Arthur Martin-Electrolux
- Ofen Euromaid
- Ofen Galanz
- Ofen Gram
- Ofen Merrychef
- Ofen Tesy
- Ofen Tepro
- Ofen NextBase
- Ofen Vivax
- Ofen EWT
- Ofen Omega
- Ofen Profilo
- Ofen Sauber
- Ofen Zelmer
- Ofen Kleenmaid
- Ofen Lamona
- Ofen Limit
- Ofen Meireles
- Ofen Tricity Bendix
- Ofen Vitrokitchen
- Ofen White And Brown
- Ofen Jamie Oliver
- Ofen Breville
- Ofen George Foreman
- Ofen Esperanza
- Ofen Kogan
- Ofen Innoliving
- Ofen Navitel
- Ofen Rösle
- Ofen Benavent
- Ofen Edy
- Ofen Hoover-Helkama
- Ofen Milectric
- Ofen New Pol
- Ofen BORA
- Ofen Master Kitchen
- Ofen Zenith
- Ofen Insignia
- Ofen Alpatec
- Ofen Cosmo
- Ofen Olimpia Splendid
- Ofen Crosley
- Ofen Xblitz
- Ofen AKO
- Ofen Aurora
- Ofen Beha
- Ofen Danby
- Ofen Krefft
- Ofen Viking
- Ofen Acec
- Ofen Vedette
- Ofen Sogo
- Ofen Tracer
- Ofen Alde
- Ofen Ariston Thermo
- Ofen Mellerware
- Ofen La Nordica
- Ofen Proctor Silex
- Ofen Zibro Kamin
- Ofen Gourmetmaxx
- Ofen Signature
- Ofen Ninja
- Ofen Wamsler
- Ofen RCA
- Ofen Bellini
- Ofen Swan
- Ofen Soler & Palau
- Ofen AYA
- Ofen Mill
- Ofen Harvia
- Ofen Fisher & Paykel
- Ofen Esatto
- Ofen Drew & Cole
- Ofen Hamilton Beach
- Ofen Orbegozo
- Ofen Napoleon
- Ofen Ilve
- Ofen Furrion
- Ofen Izzy
- Ofen CaterChef
- Ofen Unox
- Ofen CDA
- Ofen General Electric
- Ofen Schock
- Ofen Flavel
- Ofen Saturn
- Ofen Char-Broil
- Ofen Cadac
- Ofen Outdoorchef
- Ofen Eurochef
- Ofen Berg
- Ofen Defy
- Ofen Duronic
- Ofen Edilkamin
- Ofen Eltac
- Ofen Emax
- Ofen Firefriend
- Ofen Fratelli Onofri
- Ofen Fuave
- Ofen ILive
- Ofen Jocel
- Ofen Justus
- Ofen Kenmore
- Ofen La Germania
- Ofen Lacanche
- Ofen Landmann
- Ofen Luxell
- Ofen Magic Chef
- Ofen Marynen
- Ofen Mistral
- Ofen Nobo
- Ofen OBU
- Ofen Oster
- Ofen Premier
- Ofen Rangemaster
- Ofen Rival
- Ofen Roadeyes
- Ofen Ronco
- Ofen Salton
- Ofen Scancool
- Ofen Sirius
- Ofen Solitaire
- Ofen SPT
- Ofen Steelmatic
- Ofen Sunpentown
- Ofen Technika
- Ofen Tecnolux
- Ofen Grunkel
- Ofen Tower
- Ofen Turbotronic
- Ofen Vornado
- Ofen Weasy
- Ofen WLA
- Ofen WestBend
- Ofen BLANCO
- Ofen Parmco
- Ofen Bella
- Ofen Instant
- Ofen Hatco
- Ofen Cadel
- Ofen Melchioni
- Ofen Barbecook
- Ofen Aroma
- Ofen Avanti
- Ofen Kunft
- Ofen Cola
- Ofen Kucht
- Ofen Roller Grill
- Ofen Becken
- Ofen Wells
- Ofen Nevir
- Ofen JennAir
- Ofen Rinnai
- Ofen Winia
- Ofen BlueStar
- Ofen Romo
- Ofen Girmi
- Ofen Chefman
- Ofen Blaze
- Ofen Ravanson
- Ofen Fulgor Milano
- Ofen Godrej
- Ofen German Pool
- Ofen Dash
- Ofen Traeger
- Ofen PowerXL
- Ofen Flama
- Ofen Axis
- Ofen Mibrasa
- Ofen ZLine
- Ofen Malmbergs
- Ofen K&H
- Ofen Creda
- Ofen Arctic Cooling
- Ofen Emeril Lagasse
- Ofen Zavor
- Ofen Barazza
- Ofen Artusi
- Ofen MSR
- Ofen Vulcan
- Ofen Glem Gas
- Ofen Nemco
- Ofen Nesco
- Ofen Nutrichef
- Ofen Cuckoo
- Ofen Sôlt
- Ofen Panadero
- Ofen Blodgett
- Ofen Riviera & Bar
- Ofen Pit Boss
- Ofen Chef
- Ofen APW Wyott
- Ofen Khind
- Ofen TurboChef
- Ofen Hestan
- Ofen Koblenz
- Ofen Alto-Shaam
- Ofen Promis
- Ofen Hiberg
- Ofen Spring USA
- Ofen Cecilware
- Ofen Gasmate
- Ofen Companion
- Ofen LERAN
- Ofen Buschbeck
- Ofen Belling
- Ofen Cookology
- Ofen Summit
- Ofen Forge Adour
- Ofen Brastemp
- Ofen ARC
- Ofen Electric Co
- Ofen Consul
- Ofen Haeger
- Ofen Linarie
- Ofen BAXTER
- Ofen BioChef
- Ofen YUNA
- Ofen Mabe
- Ofen Coyote
- Ofen Lafe
- Ofen Atosa
- Ofen Fiap
- Ofen Esmaltec
- Ofen NU-VU
- Ofen Heathus
- Ofen Everdure
- Ofen DPM
- Ofen Euro Appliances
- Ofen Emilia
- Ofen Petromax
- Ofen Robinhood
- Ofen InAlto
- Ofen ARDA
- Ofen Backyard Pro
- Ofen Capital
- Ofen Apelson
- Ofen TZS First Austria
- Ofen PITT
- Ofen Electroline
- Ofen XO
- Ofen Germanica
- Ofen Café
- Ofen Porter & Charles
- Ofen Ribimex
- Ofen Aga
- Ofen John Lewis
- Ofen Končar
- Ofen Parkinson Cowan
- Ofen Alhafidh
- Ofen Caloric
- Ofen Thermocool
- Ofen Kubo
- Ofen Montpellier
- Ofen StGeorge
- Ofen Jenn-Air
- Ofen New World
- Ofen White-Westinghouse
- Ofen Kitchensmith
- Ofen Brixton
- Ofen Comelec
- Ofen Belion
- Ofen Thermomate
- Ofen Tisira
- Ofen Verona
- Ofen Simfer
- Ofen VENINI
- Ofen Adora
- Ofen Triomph
- Ofen KB Elements
- Ofen Pando
- Ofen Wiggo
- Ofen Nestor Martin-Electrolux
- Ofen Kluge
- Ofen Imarflex
- Ofen Mayer
- Ofen Acros
- Ofen HomeCraft
- Ofen La Cornue
- Ofen Goldbrunn
Neueste Bedienungsanleitung für -Kategorien-
2 Dezember 2024
2 Dezember 2024
2 Dezember 2024
29 November 2024
29 November 2024
29 November 2024
29 November 2024
29 November 2024
29 November 2024
29 November 2024