Foscam R2D Bedienungsanleitung
Lesen Sie kostenlos die 📖 deutsche Bedienungsanleitung für Foscam R2D (83 Seiten) in der Kategorie Überwachungskamera. Dieser Bedienungsanleitung war für 25 Personen hilfreich und wurde von 2 Benutzern mit durchschnittlich 4.5 Sternen bewertet
Seite 1/83

User
User Manual
Manual
Indoor FHD IP Camera
Model: R2/R4
V1.7

Table of Contents
Security Warning........................................................................................................................................................ 1
1 Overview.................................................................................................................................................................. 1
1.1 Key Features................................................................................................................................................1
1.2 Read Before Use.........................................................................................................................................2
1.3 Package Contents.......................................................................................................................................2
1.4 Physical Description................................................................................................................................... 2
1.5 Micro-SD Card............................................................................................................................................. 3
2 Access the IP Camera........................................................................................................................................... 4
2.1 Wired Connection........................................................................................................................................4
2.2 Wireless Connection...................................................................................................................................5
2.3 Access the Camera in WAN...................................................................................................................... 6
2.4 Using the VLC player..................................................................................................................................9
2.5 IP camera connection to the server....................................................................................................... 12
3 Surveillance Software GUI..................................................................................................................................13
3.1 login Window..............................................................................................................................................13
3.2 Setup Wizard............................................................................................................................................. 14
3.3 Surveillance Window................................................................................................................................ 14
4 Advanced Camera Settings................................................................................................................................ 21
4.1 Setup Wizard............................................................................................................................................. 21
4.2 Status.......................................................................................................................................................... 21
4.3 Basic Settings............................................................................................................................................23
4.4 Network.......................................................................................................................................................32
4.5 Video........................................................................................................................................................... 42
4.6 Detector...................................................................................................................................................... 46
4.7 Record.........................................................................................................................................................50
4.8 PTZ..............................................................................................................................................................54
4.9 Firewall........................................................................................................................................................58
4.10 System......................................................................................................................................................59
5 Playback.................................................................................................................................................................63
6 Appendix................................................................................................................................................................ 65
6.1 Frequently Asked Questions................................................................................................................... 65
6.2 Default Parameters...................................................................................................................................72
6.3 Specifications.............................................................................................................................................73
6.4 CE & FCC...................................................................................................................................................75
6.5 Warranty..................................................................................................................................................... 76
6.6 Statement................................................................................................................................................... 79
7 Obtaining Technical Support...............................................................................................................................81

1
Security Warning
Foscam cameras and NVRs require good security practices to safeguard your privacy. You should
regularly change your camera or NVR password which is 8-10 numbers, letters, symbols combination.
You should update your camera or NVR regularly.Make sure your camera or NVR has the latest
firmware installed for your specific model and better experience.
1 Overview
FOSCAM Indoor FHD IP Camera is an integrated wireless IP Camera with a color CMOS sensor which
enable to view in High Definition resolution. It combines a high quality digital video camera, with a
powerful web server, to bring clear video to your desktop and mobile devices no matter where by your
local network or over the Internet.
These cameras support P2P function. Thanks to the P2P easy access technology, you don’t need to do
complicated Port Forwarding and DDNS settings, you just need to scan the QR code on the bottom of
the camera to connect it to smart phone, or input the UID on CMS software to realize remote access.
FOSCAM IP Camera provides users with more comprehensive controls over a monitored site. The
camera supports H.264 video compression technology, dramatically reduces file size and saves network
bandwidth.
The camera is based on the TCP/IP standard. A built-in WEB server inside which could support Internet
Explorer simplifies the management and maintenance of your device is simplified by accessing the
website of your camera through network.
The camera is designed for indoor surveillance with wide applications such as at home, in retail store
and in office. Controlling the camera and managing images are simplified by using the provided web
interface across the network in either wired or wireless way.
FOSCAM provides Smart Phone APP for Android and iPhone users, please search and install Foscam
App named Foscam on App Store and Google Play for iOS and Android devices, then you can view your
camera anywhere, anytime on your smart mobile devices.
1.1 Key Features
Standard H.264 video compression algorithm to satisfy the transmission of high definition video in
narrow bandwidth network
P2P feature for easy access
2.0 Mega-Pixel(R2)/4.0 Mega-Pixel(R4)
Supports IE/Firefox/Google/Safari browser or any other standard browsers
Support WEP,WPA-PSK and WPA2-PSK Encryption
Wireless connection is compliant with IEEE 802.11b/g/n WI-FI, up to 150Mbps
IR Range up to 8m(26.2ft)

2
Support image snapshot
Support dual-stream
Support SD Card storage up to 64GB
Support IR-Cut auto switch
Embedded free FOSCAM DDNS(dynamic domain name service) Service
Supporting the Third Party Domain Name Service
Support two-way audio
Support ONVIF protocols
Multi-level users management with password protection
Motion detection alert via email or upload image to FTP
Provide free Android and iPhone APP for viewing live video provide free Central Management
Software to manage and monitor multiple cameras
Support record schedule
Supports Wide Dynamic Range
Supports Magic zoom
Supports voice prompt
1.2 Read Before Use
Please first verify that all contents received are complete according to the Package Contents listed below.
Before the IP Camera is installed, please carefully read and follow the instructions in the Quick
Installation Guide to avoid damage due to faulty assembly and installation. It also ensures the product is
used properly as intended.
1.3 Package Contents
● IP Camera × 1
● Power Supply × 1
● Quick Installation Guide × 1
● Warranty Card × 1
● Mounting bracket×1
● Wi-Fi Antenna×1
1.4 Physical Description
Front panel Rear panel

8
3. You can see the port of your camera here. If you want to set Remote Access for several cameras on
the same network, you will need to change the HTTPS port for each camera.
4. If the UPnP of the router has been enable, you do not need to perform following steps. Otherwise,
you need to select one of the following methods to configure port forwarding on your router. For these
steps, we will be using the TP-LINK brand wireless router as an example.
If there is a UPnP function in your router:
:
:
::
Choose “Forwarding > UPnP”, make sure that the Current UPnP Status is Enabled.
If there is no UPnP function in your router:
:
:
::
You need to manually add port forwarding, refer to the following steps. You need go to the “Forwarding >
Virtual Servers” panel for setup.
Click Enable DDNS and click Save.
The content in the Manufacture s DDNS’
column is the domain name of your camera.

9
5. Now you can access your IP camera by https://domain name: HTTPS port via the Internet.
2.4 Using the VLC player
The camera supports RTSP streaming, here you can view the camera by VLC player.
RTSP URL rtsp:// [user name][:password]@IP:Port number/videostream
The part in the square brackets can be omitted.
user name & password: The user name and password to access the camera. This part can be
omitted.
IP: WAN or LAN IP address.
Port NO. : If there is the RTSP port number on the Port page, you must only use RTSP port number.
Click Add New.
Input the port and IP address of
your camera and click Save.
Here you have finished the
Port Forwarding setup.

10
otherwise, you must only use http port number.
Video stream: Three modes are supported: video Main, video Sub and audio. Video Sub is a better
choice in bad network condition. If you select audio, you can only hear sound without seeing picture.
For example:
IP: 192.168.1.11
RTSP Port number: 554
User name: admin
Password: 123
Enter either one of the following four URLs in the VLC
1 rtsp://admin:123@192.168.1.11:554/videoMain.
2 rtsp:// @192.168.1.11:554/videoMain.
3 rtsp://:123@192.168.1.11:554/videoMain.
4 rtsp://admin@192.168.1.11:554/videoMain.
Open the VLC, and go to “Media”--”Open Network Stream” option, then enter the URL in VLC.

11
Sometimes you may need to enter the user name and password for another time. Click OK and you can
see the real-time preview.

12
If you cannot play the video in the VLC player, please check the port mapping. You can read Quick
Installation Guide about how to configure port forwarding.
NOTE:
If you modify the camera’s username or password, you had better reboot the camera to apply the new
username and password in authentication in the VLC.
2.5 IP camera connection to the server
Device supports ONVIF 2.2.1 protocol, You can easily access NVR with ONVIF or server with ONVIF.

13
3 Surveillance Software GUI
Please refer to the section 2.1 if you install the camera for the first time. You can start to learn about
software operation in the computer.
3.1 login Window
Section1 Enter the Username and password
The default administrator username is “admin” with no password, please change the password the first
time you use and prevent unauthorized users login the camera.
Section2 Stream
The camera supports two stream modes: Main stream and sub stream. Select Main stream if you want
to access the camera from LAN and sub stream will be better if you want to access the camera from
Internet.
Note:
Select sub stream to ensure a more fluent video under narrow network bandwidth.
Section3 Select the language
You .click on the language dropdown list to select language
Section4 login the camera
Click “Login” button.
NOTE:
:
:
::
When setting up your camera for the first time, it will request that you modify the default username
and/or password if both are still set to default. Input the new username and password, click "Modify" to
complete the modification. You will now use the new username and password to login to the camera in
the future.

14
3.2 Setup Wizard
You will go to Setup Wizard“ ”automatically after your first-login, where you can set the basic
parameters of camera, such as camera name, camera time, wireless settings, IP configuration.
3.3 Surveillance Window
Section 1 FOSCAM Logo/ Live Video / Settings/Playback
: FOSCAM LOGO
1
2
5
3
7
4
6

15
: Path to surveillance window. Click this button to go back to the surveillance window
: Path to Administrator Control Panel, Click it, to go to Administrator Control Panel and do
advanced settings.
: Click this button to go back to the Playback panel to view the stored audio files
stored in the SD Card.
Section 2 Multi-Device Window
The firmware inside the camera supports up to 9 cameras being monitored at the same time. You can
add other cameras in multi-device setting.
Section 3 Mode/ Stream / WDR / Mirror/ Flip buttons / Zoom
Mode
1) 50HZ ---------Indoor surveillance (Region: Europe, China)
2) 60HZ ---------Indoor surveillance (Region: USA, Canada)
3) Outdoor------Outdoor surveillance
Stream
The default stream supports multiple modes, For example: HD Mode/720P/23fps/2M meanings: Stream
type / Resolution / Maximum frame rate/ Bit rate. (Different models support different specific mode. )
Stream type : It is used to identify the stream type.
Resolution
The bigger the resolution, the better of the image quality is. If you are accessing the camera via
internet and want to get more fluent video streaming, please select resolution VGA.
Maximum frame rate
You should lower frame rate when the bandwidth is limited. Normally, when the frame rate above 15,
you can achieve fluently video. The maximum frame rate for each model is different, please see the
“Specifications”.
Bit rate
Generally speaking, the larger the bit rate is, the clearer video will become. But the bit rate
configuration should combine well with the network bandwidth. When the bandwidth is very narrow,
and bit rate is large, that will lead to video can not play well.
You can reset the stream type on panel.Settings-> Video-> Video Settings
After changing, please reboot the camera and you can see the modification.
WDR
In surveillance, WDR (Wide Dynamic Range) is intended to provide clear images even under
backlighting, where the intensity of illumination varies a lot namely when there are very bright and—
very dark areas simultaneously in the camera's field of view.
16
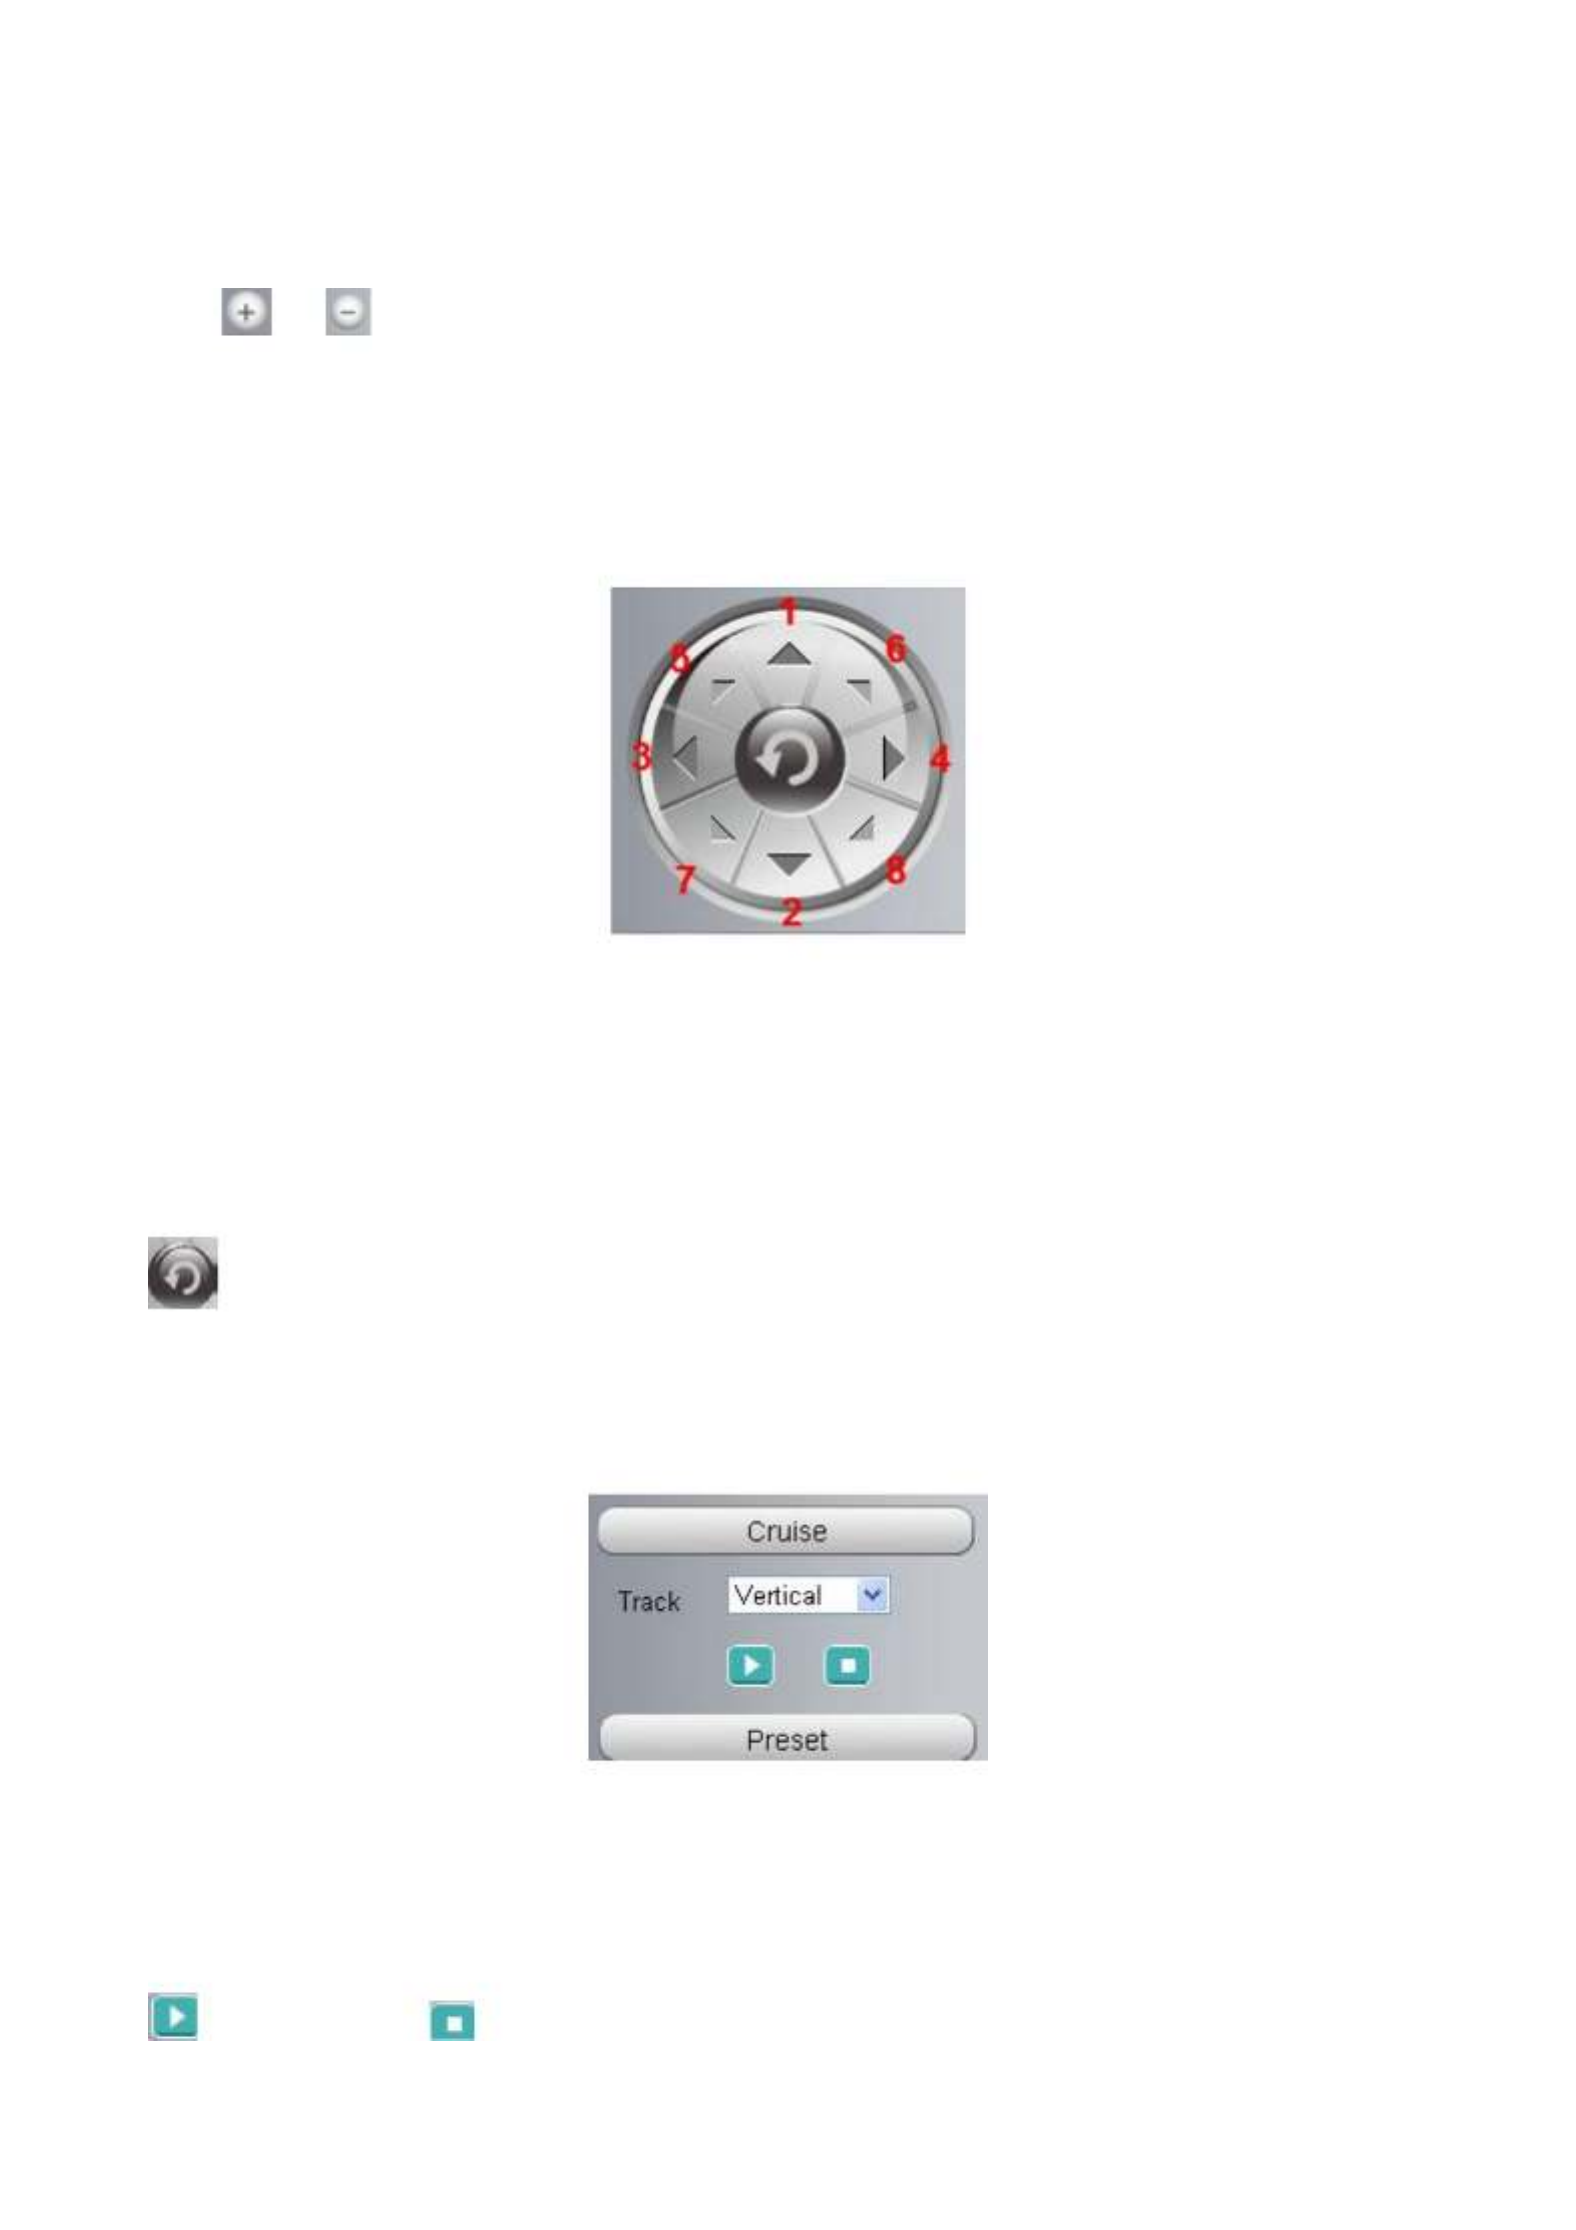
“Zoom in” or ”Zoom out”
Device Support zoom feature.
Click or ,The focal length of the camera lens will be larger or shrink, you can adjust the focus
distance to the target object size, access to high-definition screen.
Pan/Tilt Control
1----- Up control button, 2-----Down control button,
3------Left control button, 4------Right control button,
5----- Up-Left control button
6----- Up-Right control button
7----- Down-Left control button
8----- Down-Right control button
Click this button and go to center
Section 4 Cruise / Preset settings
Cruise Settings
The default cruise tracks have two types: Vertical and Horizontal.
Vertical: The camera will rotate from up to down.
Horizontal: The camera will rotate from left to right.
: Start cruise. : Stop cruise.

17
If you want to define or change the cruise trace, please go to Settings PTZ Preset Settings panel.
How to do cruise?
Firstly: Select one track in the track dropdown list.
Secondly: Click Start cruise button, the camera will cruise following the predefined path.
Thirdly: Click stop button and finish cruising.
Preset settings
IPCam supports 16 preset positions, which is considered enough for DIY home & small business
surveillance market
The default preset position is Topmost, Bottom most, Left most, right most, you can add other preset
positions.
Add Click this icon to save the position you need the camera to remember
Delete Select one preset position and click this button to delete it.
GO Select one preset position in the preset drop-down list and click Go to make the camera
move the preset position
How to do preset position?
Firstly, move the camera and stop at a desired place where you want make preset position.
Secondly, click button and enter a descriptive name for the preset position. The preset position
cannot contain special characters. Then click OK to save it. If you want to reset the preset position, click
Cancel.
After that, you can move the camera and stop at another place, and set another preset position. You can
do all the 16 preset positions with this method.
If you want to see one preset position you have set, only select the preset position name from the preset
drop-down list, and click go button, the camera will go to the preset position.
Select one of these.

18
Section 5 IR LED Lights / Color Adjustment
Click Infra led and there are three modes to adjust the infrared led: Auto, Manual and Schedule.
Auto: Select it and the camera will adjust the infra led (on or off) automatically.
Manual: Select it and you can turn on or turn off the infra led manually.
Schedule: Select it and the IR led light will be off at the schedule period. If you want to define or change
the IR led lights schedule time, please go to Settings--->Video---> IR LED Schedule page.
Color Adjustment
In this page, you can tune Hue, Brightness, Contrast, Saturation, and Sharpness to get higher quality.
Section 6 OSD
If you have added time and camera name in the video, you can see it in the live window.
Go to Settings ---Basic settings---Camera name panel, and you can change another device name.
The default device name is anonymous.
Go to Settings ---Basic settings---Camera time panel and adjust the device time.
Go to Settings ---Video---On Screen Display panel, you can add or no add OSD.
Section 7 Play/ Stop/ Talk/ Audio/ Adjusting the sound/ Snap/ Record/ Full screen
button
1----- Play Click it to play the video of the camera
2----- Stop Click it to stop the video of the camera
3----- Talk Click the button and the icon will become to , then talk to the microphone that
connected with PC, people around the camera can here your voice. Click the icon again and stop talking.

19
4----- Audio Click this icon, the icon will become to you can hear the sound around the camera
by the earphone or speakers that connected with PC.
5----- Adjusting the sound Click this icon, the icon will become to ,you
can change the sound of the camera.
6----- Snapshot Click it to make snapshot and it pop-up a window which picture you snapshot, right
click in the window and save the picture to anywhere you want.
7----- Record Click the icon and the camera start recording, you can see a green dot in the live
window. Click again and stop recording. The default storage path is C:\IPCamRecord. You can change
the storage path: Go to Settings- >Record->Storage Location panel.
8----- Full Screen Click it to make full-screen, or you can double click the surveillance screen to make
full-screen. Double click again and exit full-screen.
Onscreen Mouse Control
Right click the mouse and you can adjust the screen ration, full screen and Zoom up.
Keep ration: Select it and the camera will adjust the size of live window based on the the computer
monitor automatically. Sometimes there is a black border around the video, please select Keep ration to
get a better visual quality .
Full Screen: Select it and Click it to make full-screen, press ESC and exit full-screen.
Zoom up: Select it and you can see a bigger screen than before.
First Method: Here is a convenient and fast solution to Zoom up/down screen by Clicking Video Screen
and adjusting Mouse pulley, or by press the CTRL key and click the mouse left button.
Second Method: Click it and the live view will be digital zoomed up, then click Zoom Down and the live
view back to original size.

20
When you select the Full Screen, then click right mouse, there is a Screen PTZ button.
Click the button and put the mouse on the screen to indicate the camera move direction youScreen PTZ
prefer, press the left mouse, the camera will move to the corresponding direction. Loosen the mouse and
stop moving. Press Esc button or double click right mouse and cancel the function.
NOTE: For Mac OS, the plugin cannot support Onscreen Mouse Control, so you cannot allow to use it.
21
4 Advanced Camera Settings
Click the button , goes to Administrator Control Panel to make advanced camera settings.“Settings”
4.1 Setup Wizard
Please go to section 3.2 to find the way to set it.
4.2 Status
Status contains four columns: Device Information, Device Status, Session Status and Log, it will show
you various information about your camera.
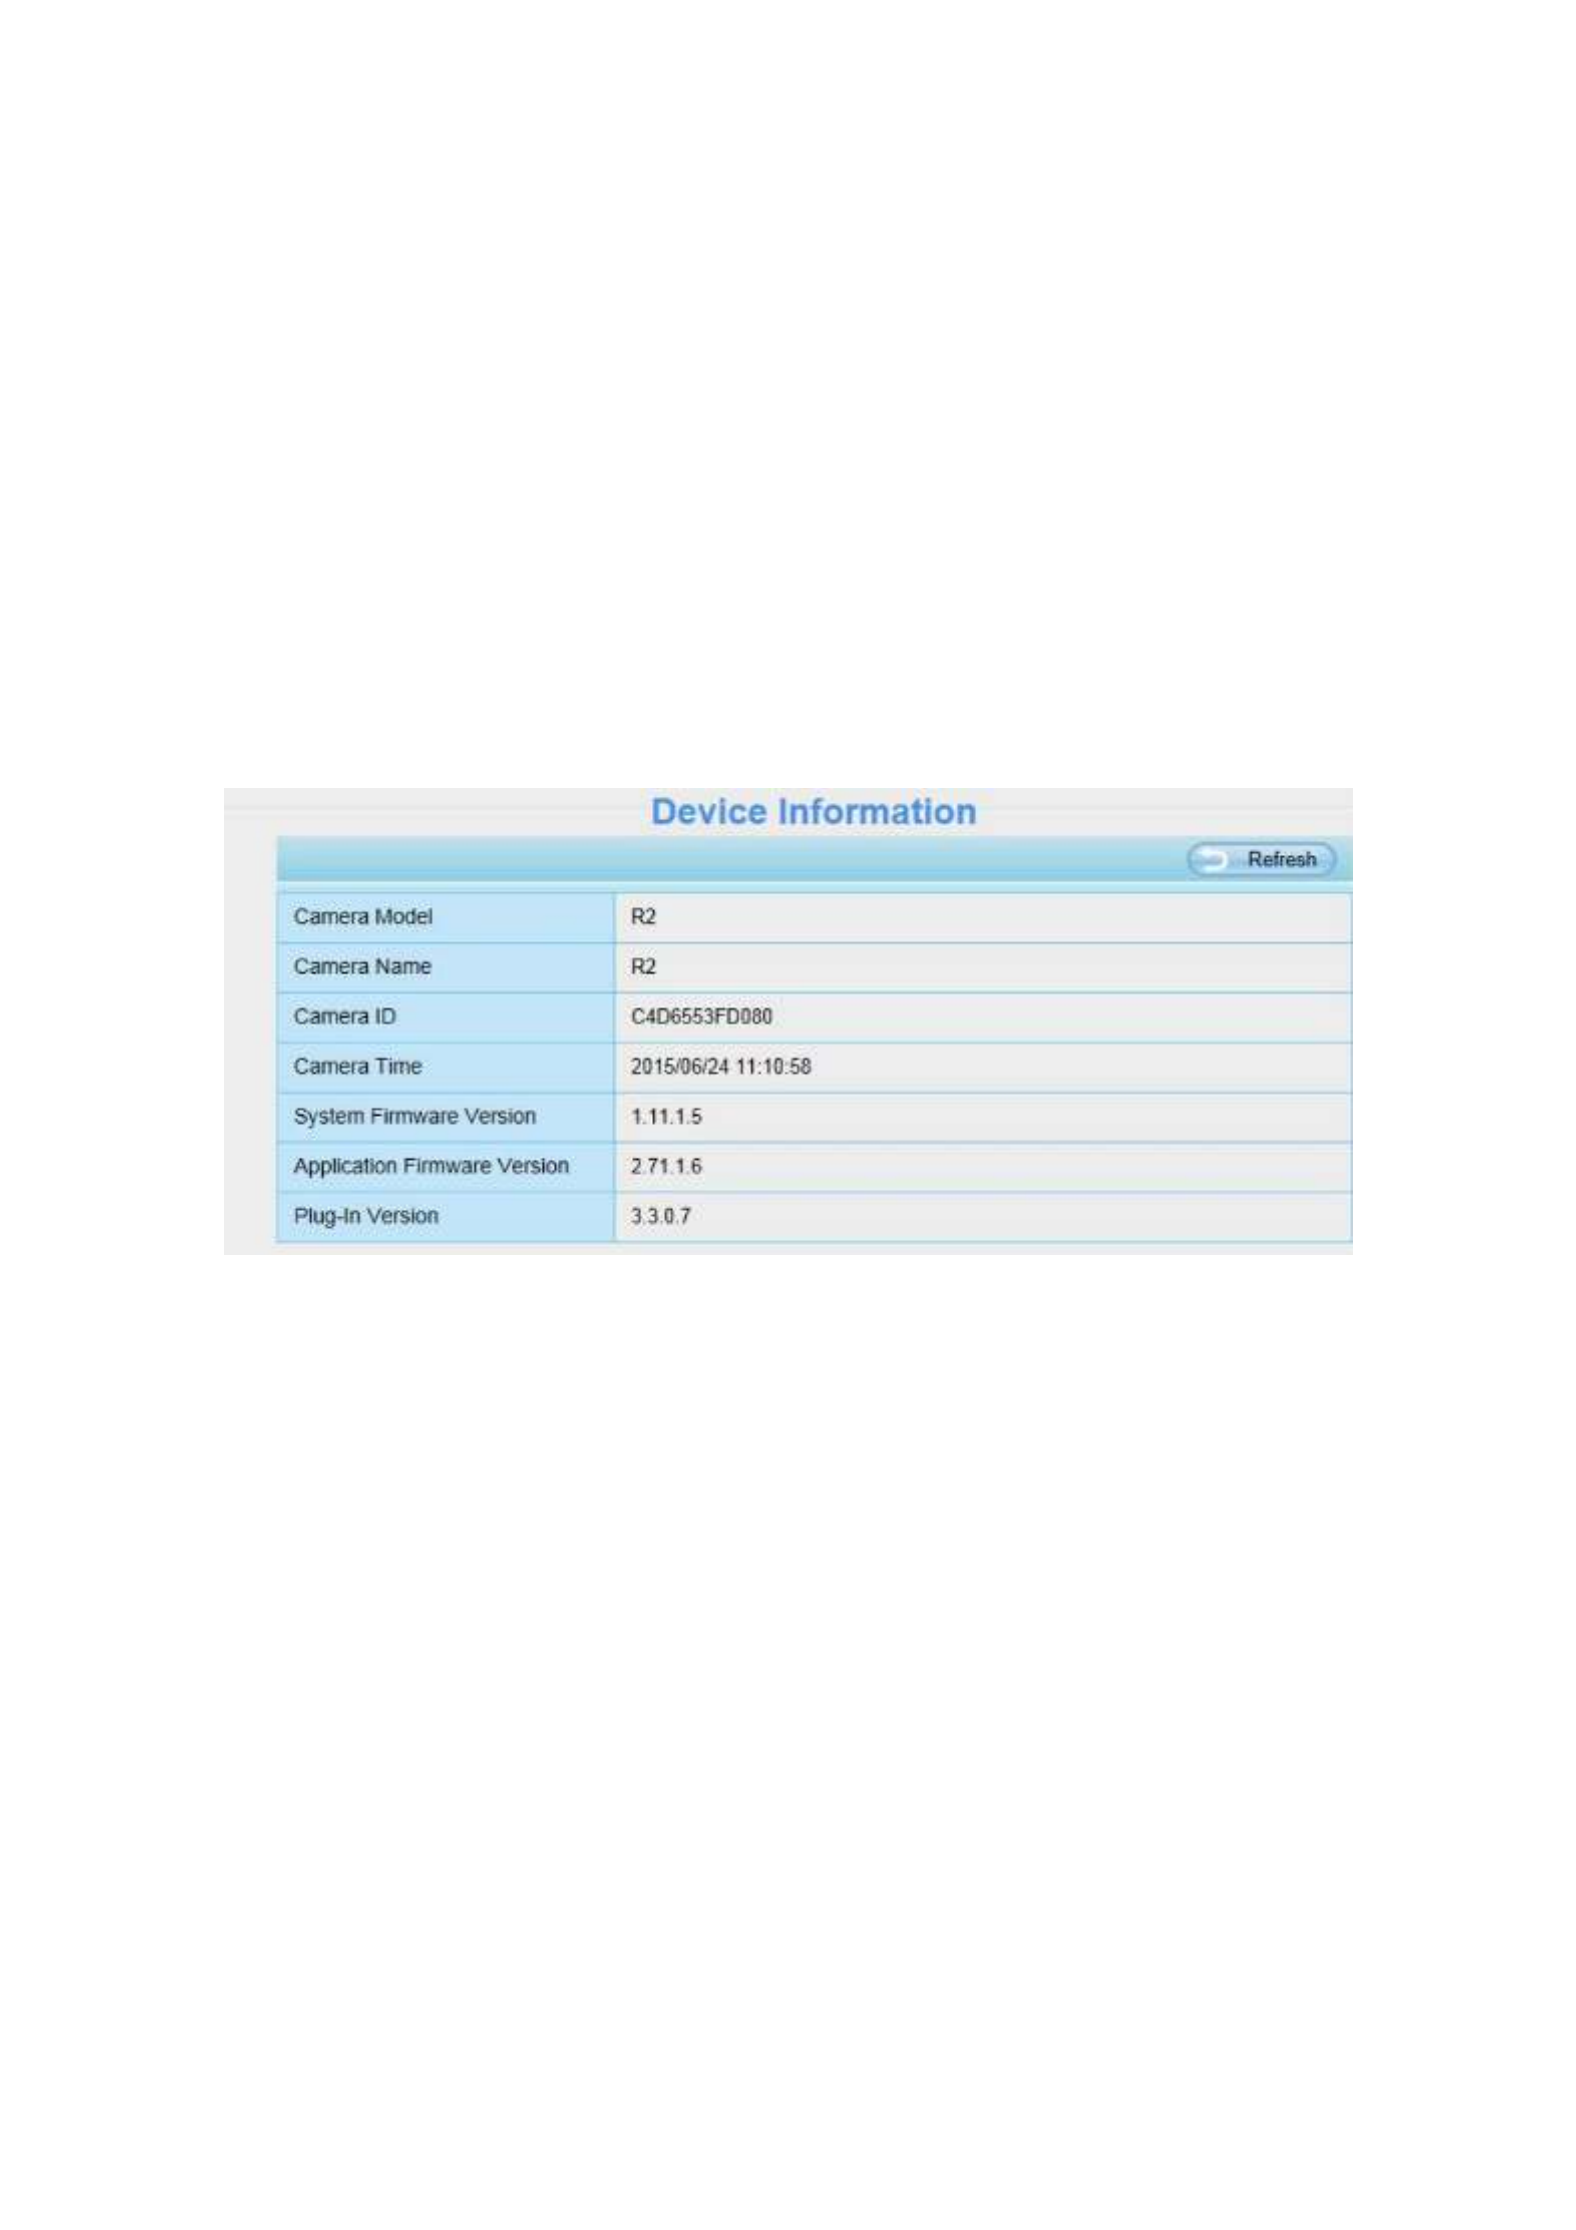
4.2.1 Device Information
Camera Model: The camera model NO.
Camera Name: The Device Name is a unique name that you can give to your device to help you identify
it. Click and go to panel where you can change your camera name. TheBasic Settings Camera name
default device name is anonymous.
Camera ID: Display the wired MAC address of your camera. For example Device ID is 000C5D00008,
the same MAC ID sticker is found at the bottom of the camera.
Camera Time: Basic Settings Camera timeThe system time of the device. Click and go to panel and
adjust the time.
System Firmware Version: Display the System Firmware version of your camera.
Application Firmware Version: Display the application firmware version of your camera.
Plug-In Version: Display the plug-in version of your camera.
4.2.2 Device Status
On this page you can see device status such as Alarm status/ Record Status ,DDNS status ,WIFI status

23
Reboot the camera and clear the log records.
4.3 Basic Settings
This section allows you to configure your camera’s Name, Time, Mail, User account and Multi-Device.
4.3.1 Camera Name
You can define a name for your camera here such as apple. Click Save to save your changes. The alias
name cannot contain special characters.
4.3.2 Camera Time
This section allows you to configure the settings of the internal system clocks for your camera.

24
Time Zone: Select the time zone for your region from the dropdown menu.
Sync with NTP server: Network Time Protocol will synchronize your camera with an Internet time server.
Choose the one that is closest to your camera.
Sync with PC: Select this option to synchronize the date and time of the Network Camera with your
computer.
Manually: The administrator can enter the date and time manually. Note select the date and time format.
use DST: Select the daylight saving time from the dropdown list.
Click button and submit your settings.Save
NOTE: If the power supply of camera is disconnect, you need set the camera’s time again.
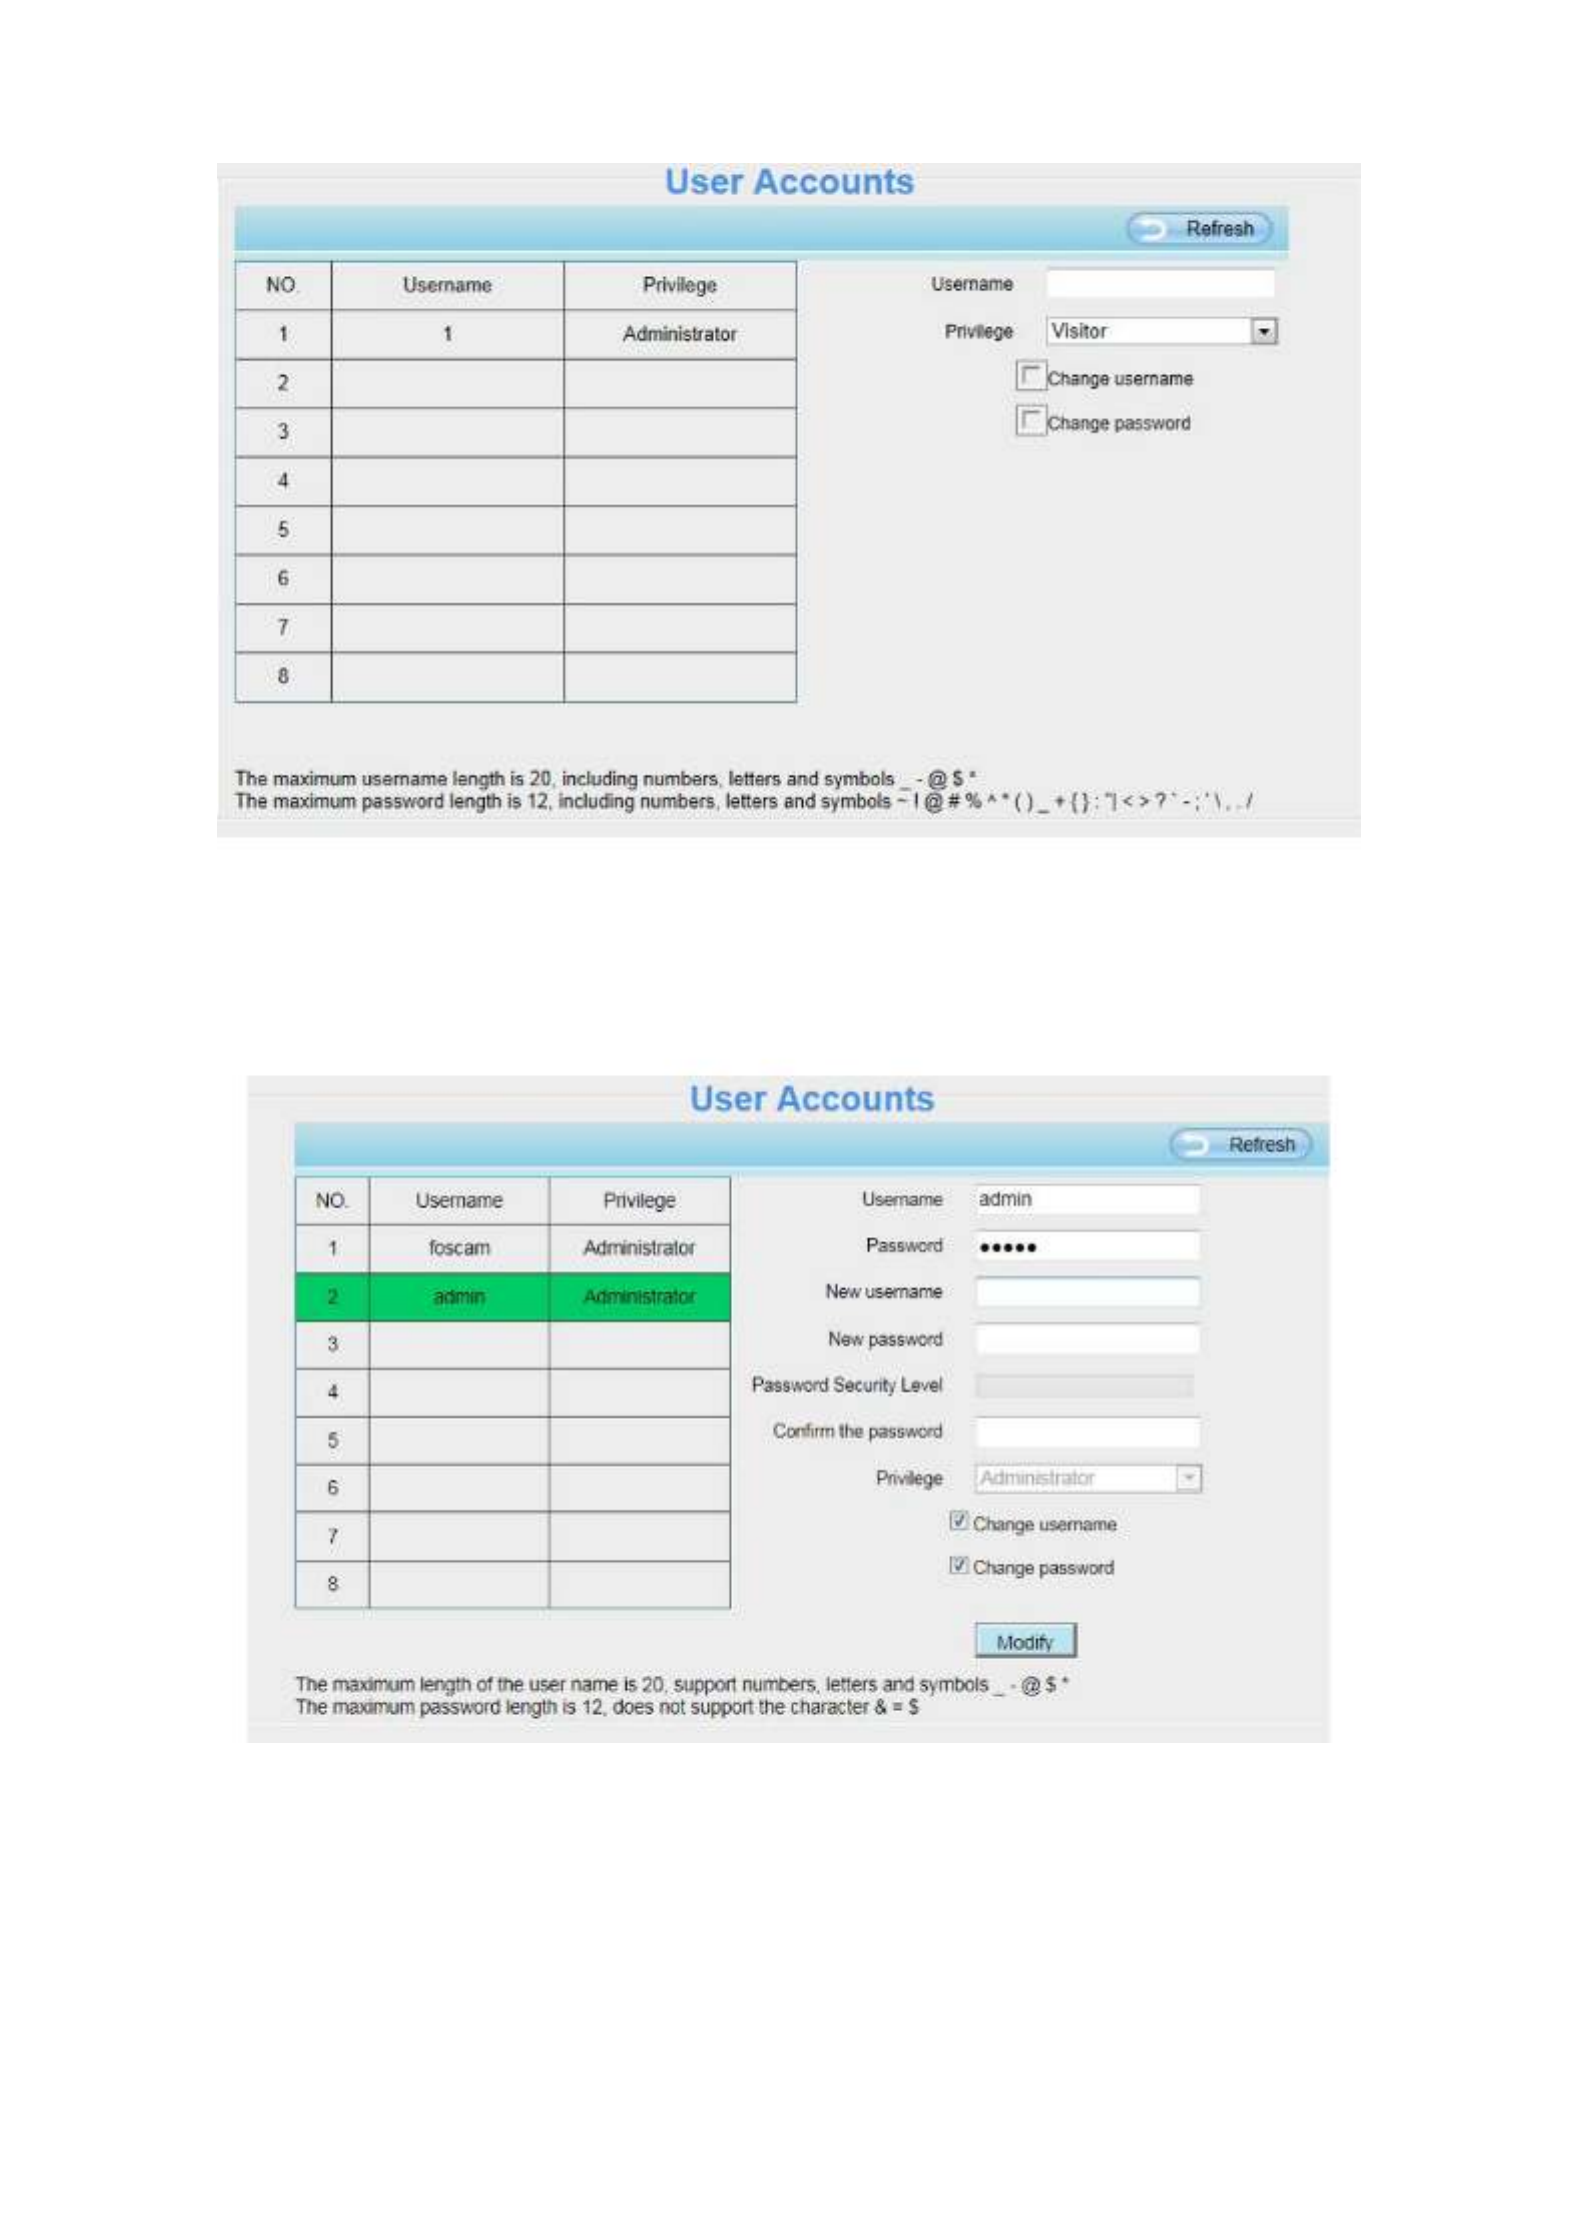
4.3.3 User Accounts
Here you can create users and set privilege, visitor, or . The default useroperator administrator
account is admin, with a blank password. You can enter the users accounts of visitor, operator and
administrator Manually.
25
How to change the password?
Firstly, select the account which you want to change the password, then select “Change password”,
enter the old password and the new password, lastly click modify to take effect.
How to add account ?
Select one blank column, then enter the new user name, password and privilege, last click Add to take
effect. You can see the new added account on the Account list.

26
Delete :
:
:
::Select the account which you want to delete, then click Delete button to take effect.
NOTE: The default admin account cannot be deleted, but you can add other administrator users.
How to change the username ?
Firstly, select the account which you want to change the username, then select “Change username”,
enter the new password, lastly click modify to take effect.

27
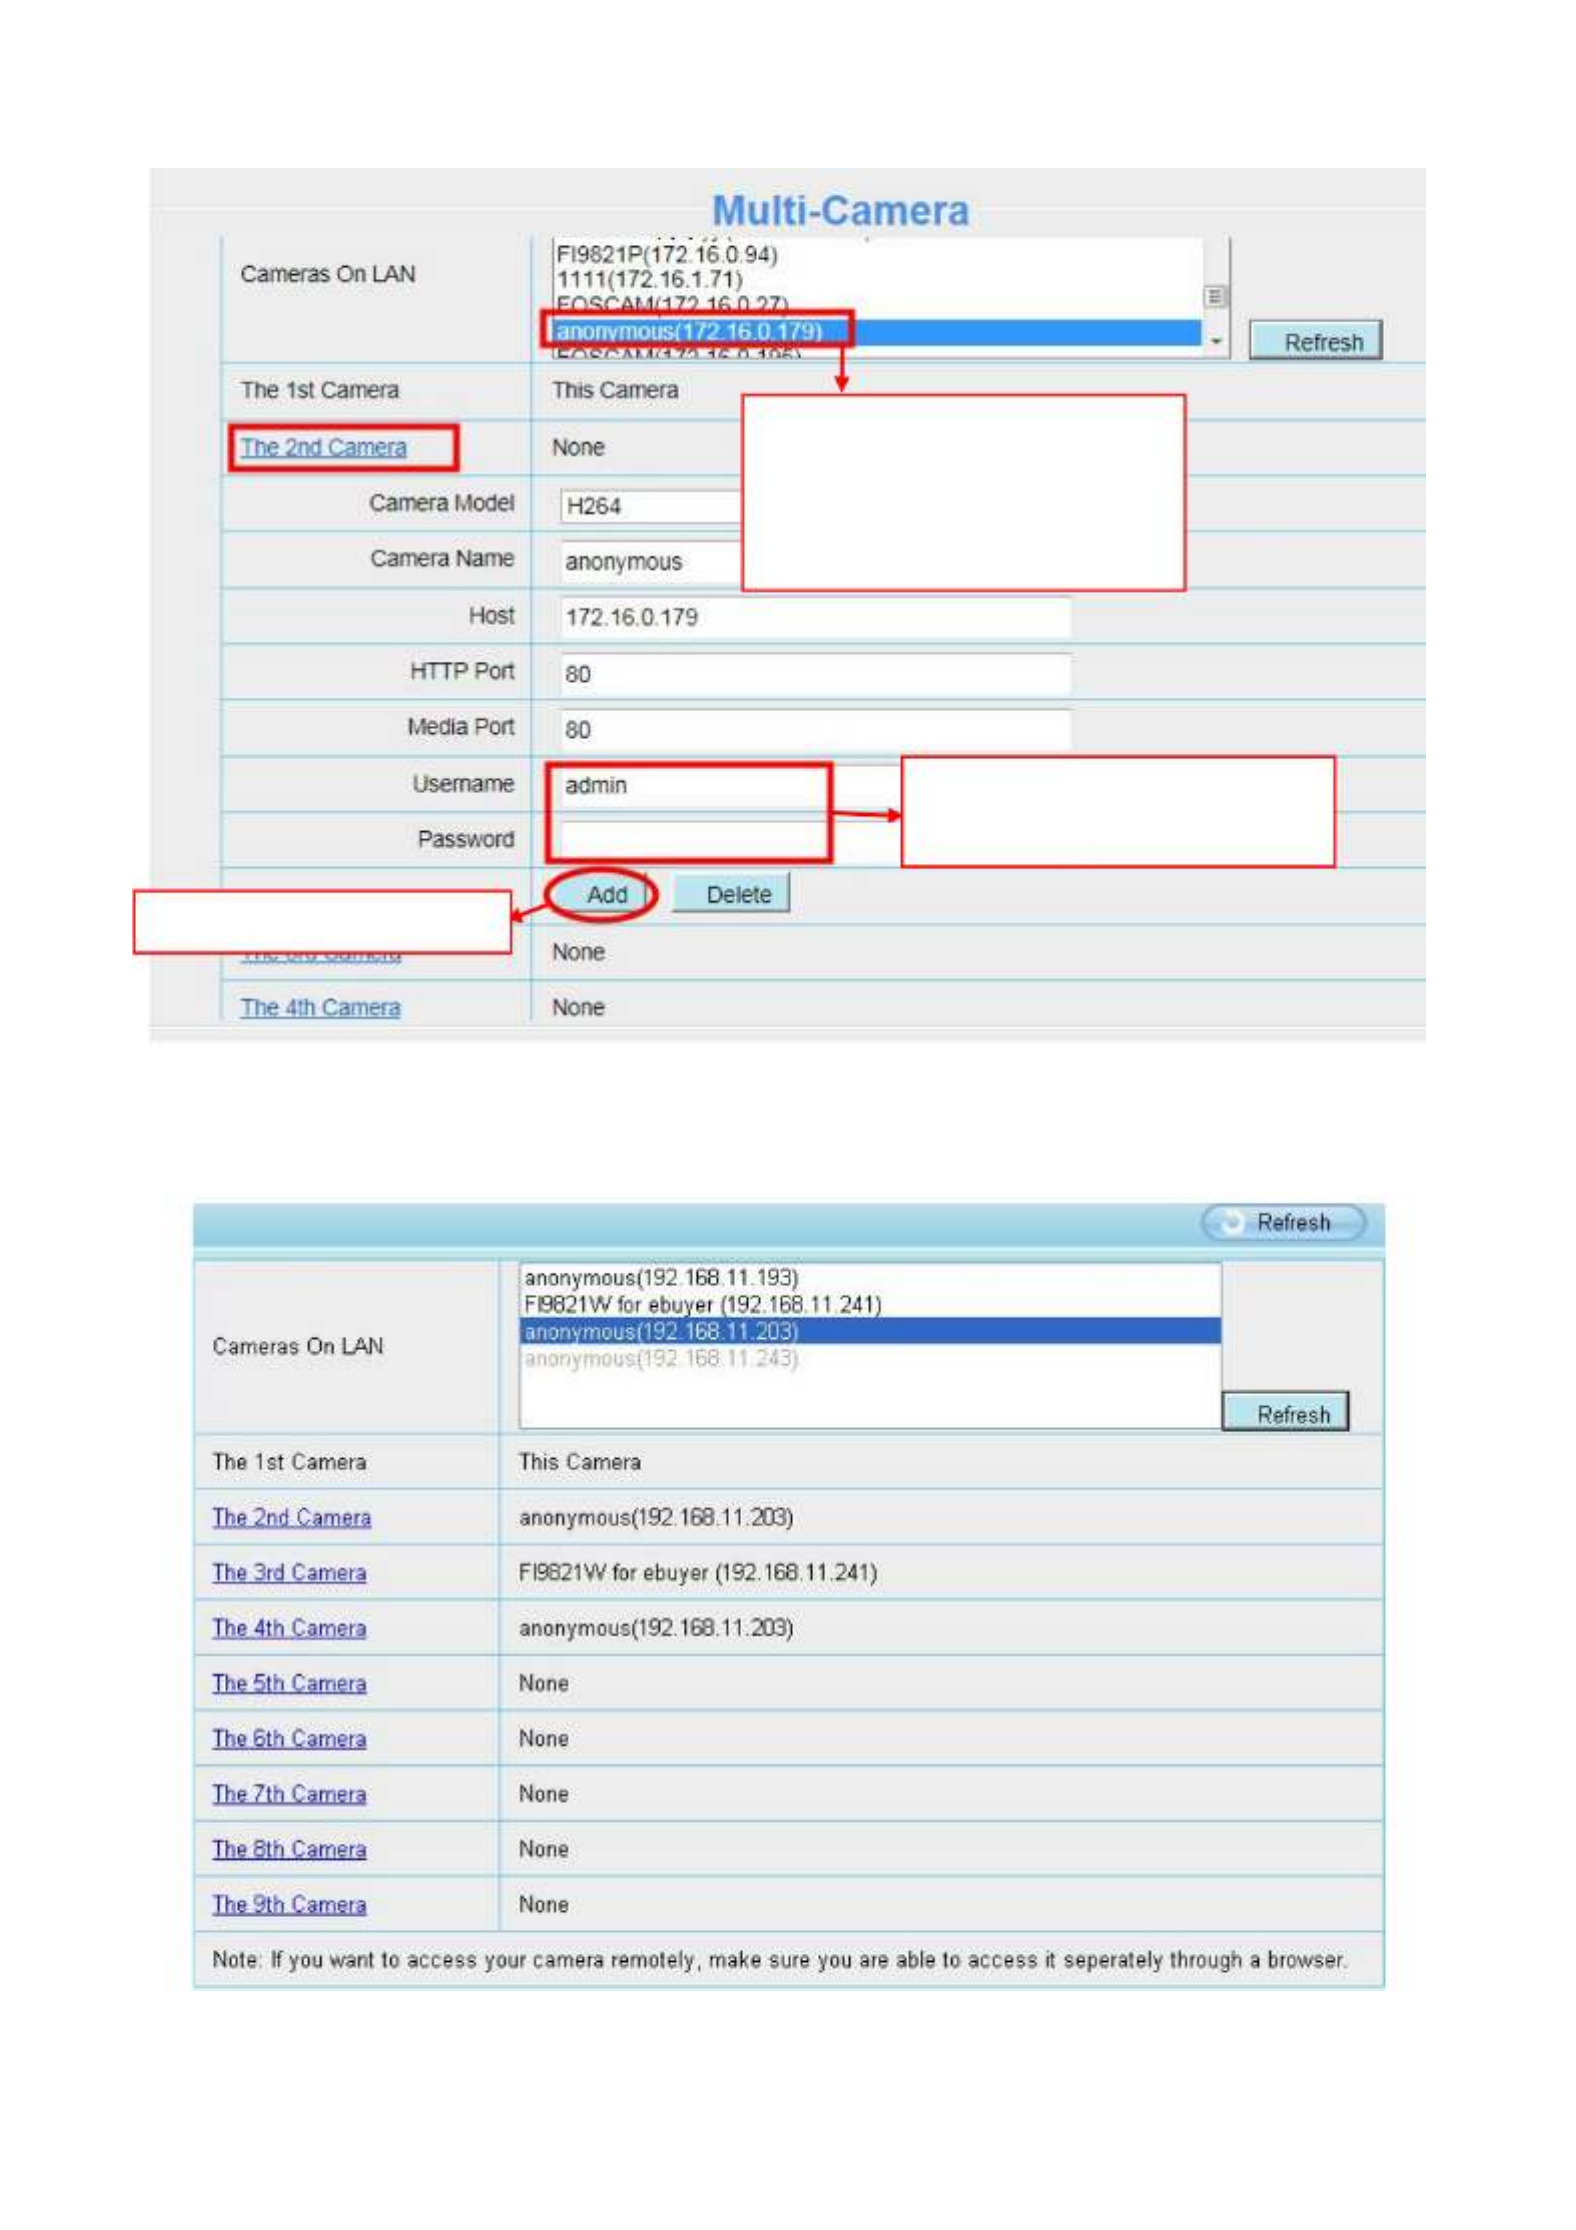
4.3.4 Multi-Camera
If you want to view multi-surveillance screens on one window, you need to login one camera, and set it
as the main device, and do Multi-Device Settings, add other cameras to the first one camera. Before you
do multi-cams settings, you need to assign different port such as 81, 82, 83, 84, 85, 86, 87, 88 to the
cameras if there is 8 cams installed.
The firmware within the camera can support a maximum of 9 devices monitoring all at the same time.
This page you can both add FOSCAM MJPEG and H.264 series cameras to the first camera and view
multi-surveillance screen on one window.
Add cameras in LAN
In Multi-Device Settings page, you can see all devices searched in LAN. The 1st Device is the default
one. You can add more cameras in the list in LAN for monitoring. The camera’s software supports up to 9
IP Cameras online simultaneously. Click The 2nd Device and click the item in the Device List in LAN, the
Alias, Host and Http Port will be filled in the boxes below automatically. Enter the correct username and
password then click Add. Add more cameras in the same way.
28
Camera Model: Our Company produces two series cameras: MJPEG and H.264. Here will show you
which series the camera belongs to.
1 Click it, camera model, alias,
host and HTTP Port will be
filled in the following boxes
automatically.
2 Enter the User name and
password of the 2nd camera.
3 Click Add to take effect.

29
Back to Surveillance Windows, and click Four Windows option, you will see four cameras you added.
Add cameras in WAN
If you want to view all cameras via the internet(remote computer), you will need to add them using DDNS
domain name. Firstly, make sure all of the cameras you added can be accessed through the internet.
(The way to configure DDNS is in chapter 4.4.4)
Login to the first camera using a DDNS domain name and port.

30
Click Multi-Device Settings. Choose The 2nd Device. Fill in the 2nd camera’s name, DDNS domain
name, port number. Enter user name and password and then choose Add.
1 ---- The camera model: MJ or H264.
2 ---- The 2nd camera’s name
3 ---- Fill in the 2nd camera’s DDNS host not LAN IP
NOTE: The MJ series have the same HTTP Port NO. and Media Port NO.
4 ---- Enter the 2nd camera’s user name and password
5 ---- Click Add button and to take effect
NOTE: Here the Host must be entered as the second camera’s DDNS domain name, not its LAN IP.
Use DDNS domain
name and port to login
Make sure each camera you need add
could login with DDNS name and port.

31
Return to video window. You will see all of the cameras accessible through the internet.
When you are away from home, you can use the first camera’s DDNS domain name and port to view all
the cameras via internet.
4.3.5 Status Light
You can enable or disable status light.

32
4.4 Network
This section will allow you to configure your camera’s IP, DDNS, Wireless Settings, UPnP and Port.
4.4.1 IP Configuration
If you want to set a static IP for the camera, please go to page. Keep the camera in theIP Configuration
same subnet of your router or computer.
Changing settings here is the same as using the Equipment Search Tool.
It is recommended that you use the subnet mask, gateway and DNS server from your locally attached
PC. If you don’t know the subnet mask, gateway and DNS server, you can check your computer’s local
area connection as follows:
Control Panel →Network Connections →Local Area Connections →Choose Support →Details

33
If you don’t know the DNS server, you can use the same settings as the Default Gateway.
4.4.2 Wireless Settings
Step 1: “Settings”Choose on the top of the camera interface, and go to the panel on the“Network”
left side of the screen, then click “Wireless Settings.”
Set the same Subnet Mask and
gateway of the camera with your
PC.
There are two DNS servers. You
can set any of them. Same with
gateway is also OK.

35
Step 3: Please click on the button after all settings have been entered and disconnect the networkSave
cable. Never shut down the power of the camera until the IP camera is able to connect to the wireless
network.
The LAN IP address will disappear on the window of Equipment Search Tool when the camera is
configuring a wireless connection. Wait about 1 minute, the camera should obtain a wireless connection,
and the LAN IP of the camera will show again on the window of the Equipment Search Tool. The IP
address may have changed after the camera receives a wireless connection; we recommend setting a
static local IP address if this IP address changes by right clicking the camera in Equipment Search Tool,
setting a static IP, and pushing OK.
Congratulations! You have set up the wireless connection of the camera successfully.
NOTE :
If you fail to make a wireless connection, please refer to your seller or contact us directly for
assistance.
4.4.3 DDNS
FOSCAM camera has embedded a unique DDNS domain name when producing, and you can directly
use the domain name, you can also use the third party domain name.
FOSCAM domain name
Here take test09.myfoscam.org for example. Go to option of DDNS on the Settings->Network panel,
you can see the domain name.
Now you can use http:// to access the camera via internet.Domain name + HTTP Port
Take hostname test09.myfoscam.org and HTTP Port no. 800 for example, the accessing link of the
camera via internet would be http:// test09.myfoscam.org:800

36
Restore DDNS to factory: If you have configured Third Party DDNS successfully, but you want to use
Manufacturer’s DDNS again , here click this button and start Manufacturer’s DDNS Service.
User can also use third part DDNS, such as www.no-ip.com. ,www. 3322.com
4.4.5 UPnP
The default UPnP status is closed. You can enable UPnP, then the camera’s software will be configured
for port forwarding. Back to the “ ” panel, you can see the UPnP status:Device Status
The camera’s software will be configured for port forwarding. There may be issues with your routers
security settings, and sometimes may error. We recommend you configure port forwarding manually on
your router.

37
4.4.6 Port
This camera supports HTTP Port. HTTP Port is used to access the camera remotely. If you want to
access the camera and view the video, the HTTP Port must both be configured correctly.
HTTP port: By default, the HTTP is set to 88. Also, they can be assigned with another port number
between 1 and 65535. But make sure they can not be conflict with other existing ports like 25, 21.
Another way to change the HTTP port NO.
Step 1: Open the Equipment Search Tool, select the camera you would like to change the port of, right
click on the IP address, and click on ”Network Configuration”, this brings up the network configuration
box as flowing figures.
Select which camera
you’d like to change the
port for, and right click .

38
Step 2: Enter the username and password of the Administrator (default username is admin with a blank
password), and click “OK” to apply changes.
Step 3: Wait around 10 seconds, you’ll see that the camera’s LAN IP address has changed. In our
example it was changed to 2000, so we see http://192.168.1.110:2000 in Equipment Search Tool. Also,
the LAN IP address is now fixed at a static IP address of http://192.168.1.110:2000. This IP address will
not change even if the camera is powered off and back on, the camera will remain on this LAN IP
address. This is very important that a static LAN IP address is set, or you may have problems later with
remote access and seeing the camera remotely if the camera loses power and reconnects on a different
LAN IP address. Make sure you set a static LAN IP address!
If the camera cannot be accessed, please make sure the port forwarding is succeed.
HTTPS port: The default port is 443. You can use the url to access the camera: https:// IP + HTTPS
port.
ONVIF port: By default, the ONVIF port is set to 888. Also, they can be assigned with another port
number between 1 and 65535(except 0 and 65534). But make sure they can not be conflict with other
existing ports.
Modify the Http Port .
Enter the Username and
password, click OK.
39
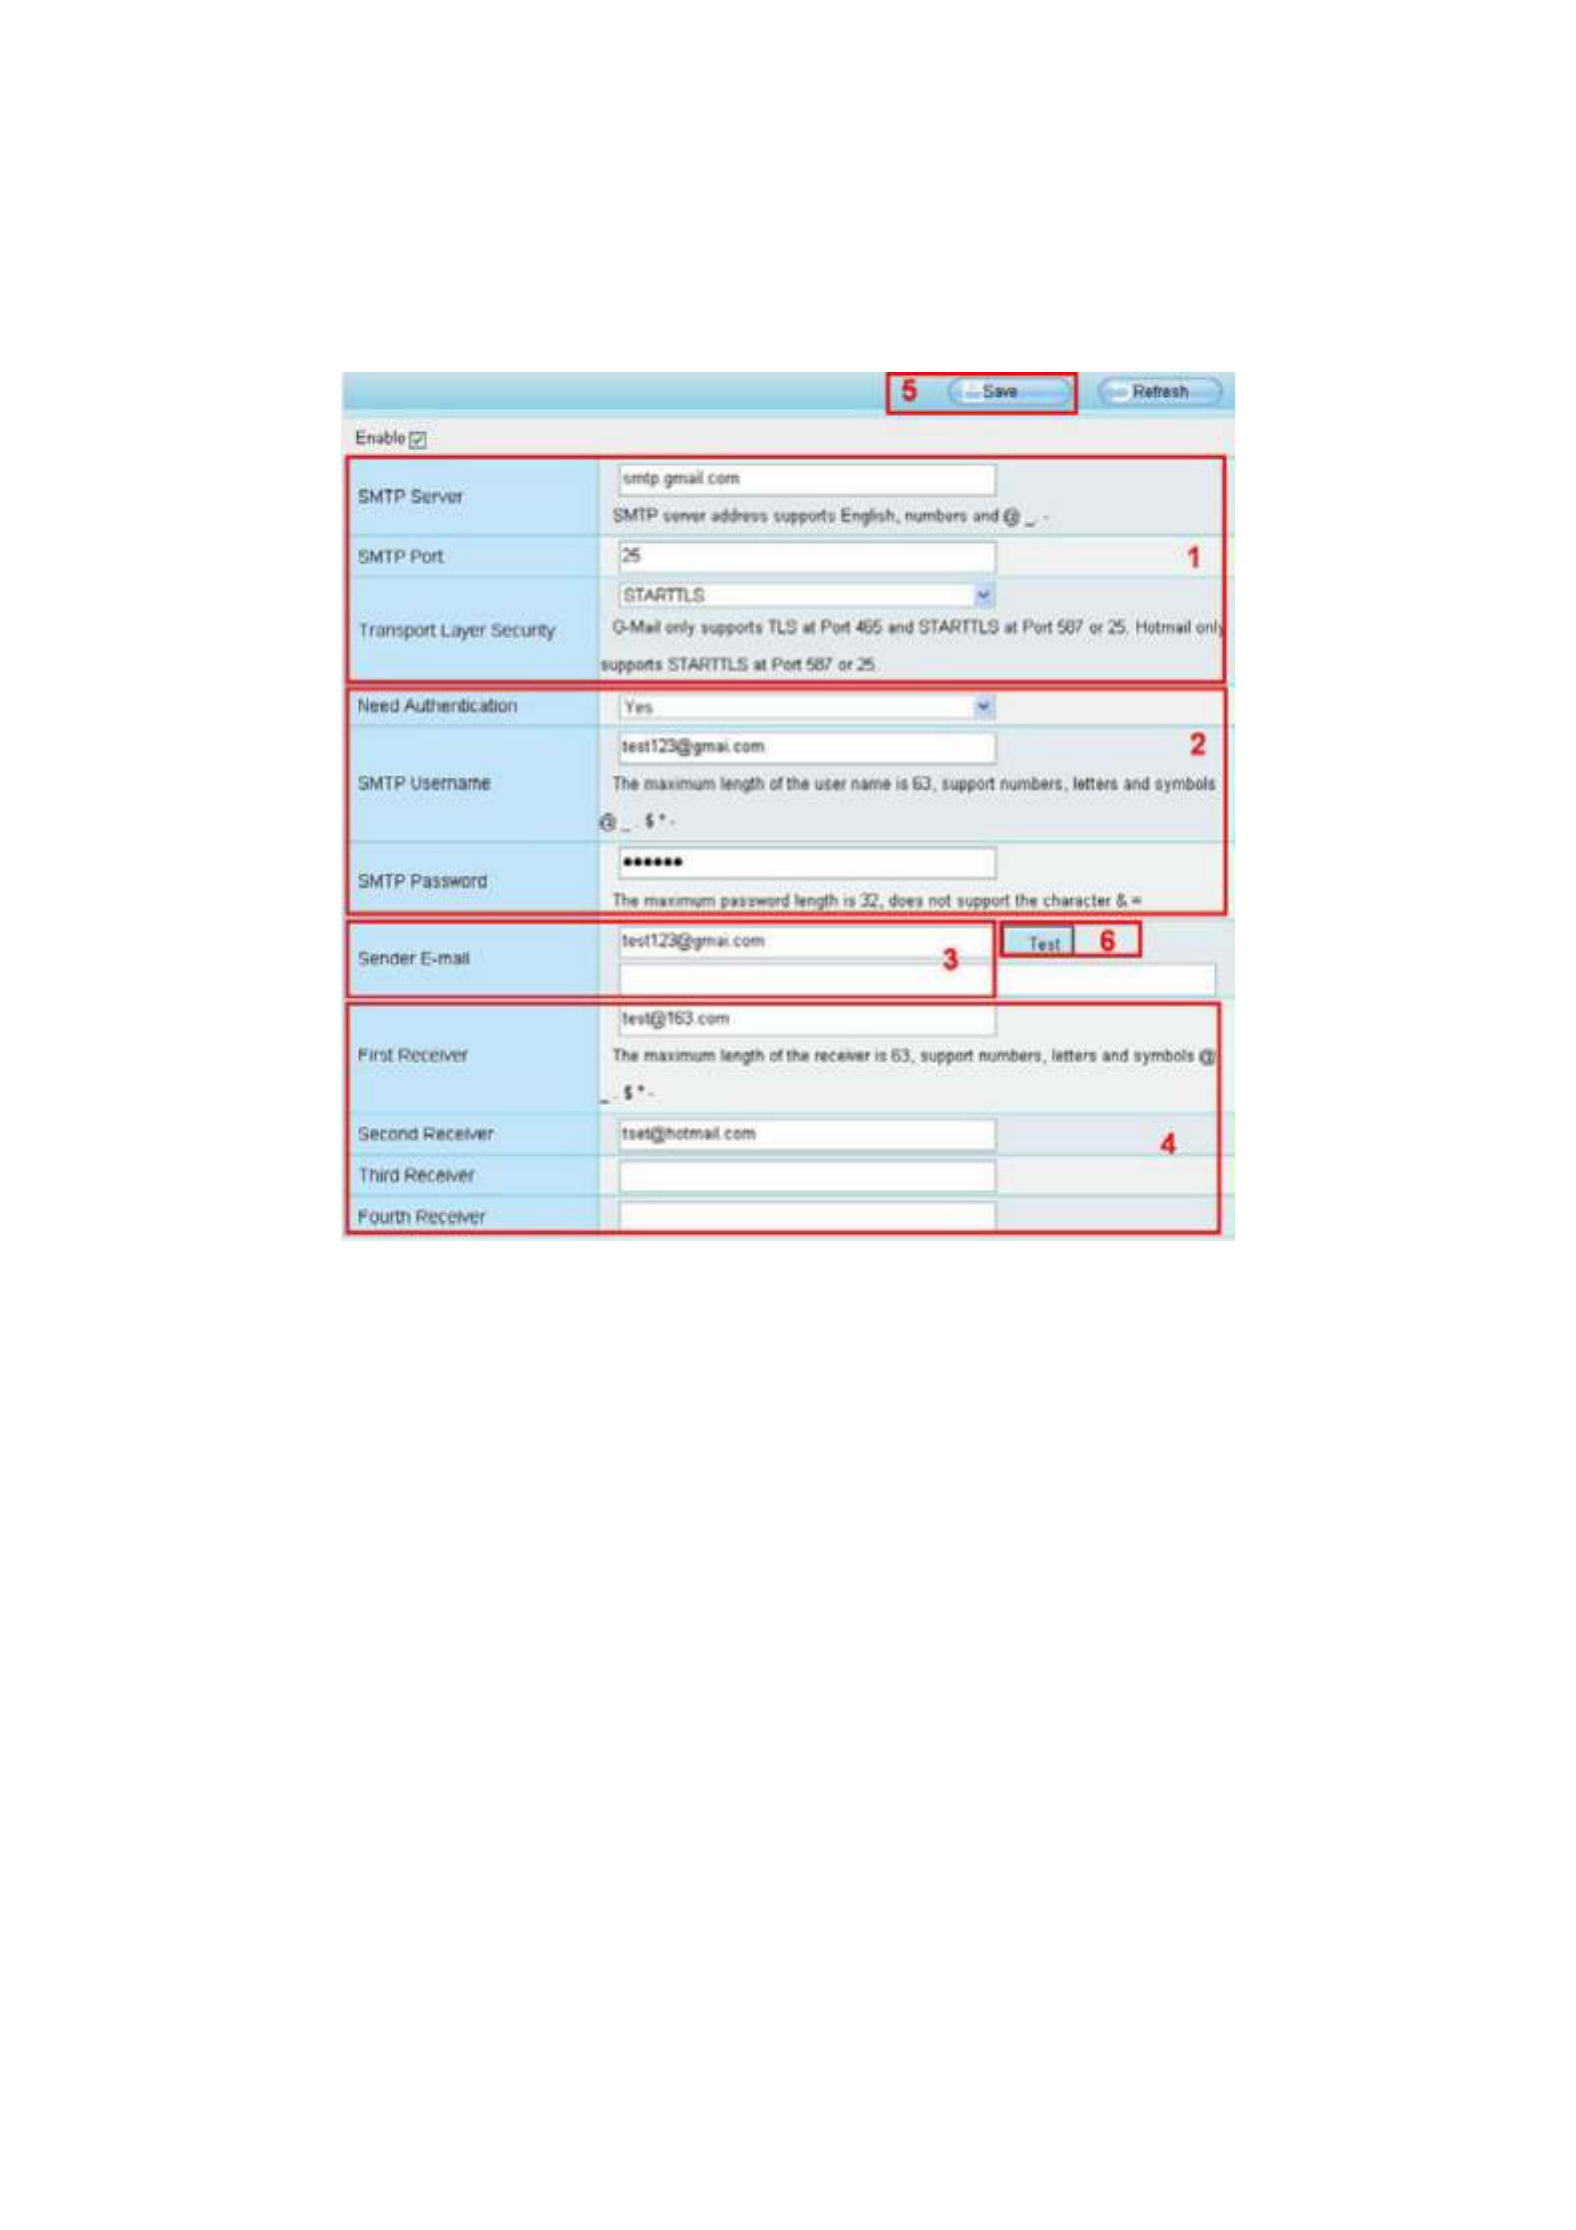
4.4.7 Mail Settings
If you want the camera to send emails when motion has been detected, here Mail will need to be
configured.
1---- SMTP Server/ Port /Transport Layer Security Enter SMTP server for sender. port isSMTP
usually set as 25. Some SMTP servers have their own port, such as 587 or 465, and Transport Layer
Security usually is None. If you use Gmail, Transport Layer Security must be set to TLS or STARTTLS
and SMTP Port must be set to 465 or 25 or 587, which port you choose should be decided by which
Transport Layer Security you select.
2---- SMTP Username/ password ID account and password of the sender email address
3---- Sender E-mail Mailbox for sender must support SMTP
4---- Receiver Mailbox for receiver need not support SMTP,you can set 4 receivers
5---- Save Click Save to take effect
6---- Test Click Test to see if Mail has been successfully configured.
Click Test to see if Mail has been successfully configured.

40
If the test success, you can see the Success behind the Test, at the same time the receivers will receive
a test mail.
If the test fails with one of the following errors after clicking Test, verify that the information you entered
is correct and again select Test .
1) Cannot connect to the server
2) Network Error. Please try later
3) Server Error
4) Incorrect user or password
5) The sender is denied by the server. Maybe the server need to authenticate the user, please check it
and try again
6) The receiver is denied by the server. Maybe because of the anti-spam privacy of the server
7) The message is denied by the server. Maybe because of the anti-spam privacy of the server
8) The server does not support the authentication mode used by the device
4.4.8 FTP Settings
If you want to upload record files and images to your FTP server you can set,FTP Settings.
Produktspezifikationen
| Marke: | Foscam |
| Kategorie: | Überwachungskamera |
| Modell: | R2D |
Brauchst du Hilfe?
Wenn Sie Hilfe mit Foscam R2D benötigen, stellen Sie unten eine Frage und andere Benutzer werden Ihnen antworten
Bedienungsanleitung Überwachungskamera Foscam

14 Oktober 2024
6 Oktober 2024
5 Oktober 2024
4 Oktober 2024
30 September 2024
28 September 2024
28 September 2024
4 September 2024
1 September 2024
29 August 2024
Bedienungsanleitung Überwachungskamera
- Überwachungskamera Samsung
- Überwachungskamera Approx
- Überwachungskamera Belkin
- Überwachungskamera Sanyo
- Überwachungskamera Exibel
- Überwachungskamera Gembird
- Überwachungskamera Genius
- Überwachungskamera Hama
- Überwachungskamera LogiLink
- Überwachungskamera Logitech
- Überwachungskamera Manhattan
- Überwachungskamera Nedis
- Überwachungskamera Niceboy
- Überwachungskamera Philips
- Überwachungskamera Sony
- Überwachungskamera Trust
- Überwachungskamera Panasonic
- Überwachungskamera Clas Ohlson
- Überwachungskamera Profile
- Überwachungskamera ZyXEL
- Überwachungskamera Bosch
- Überwachungskamera Laserliner
- Überwachungskamera Buffalo
- Überwachungskamera Canon
- Überwachungskamera Velleman
- Überwachungskamera Powerfix
- Überwachungskamera Eminent
- Überwachungskamera Linksys
- Überwachungskamera Maginon
- Überwachungskamera Netgear
- Überwachungskamera Technaxx
- Überwachungskamera Alecto
- Überwachungskamera Denver
- Überwachungskamera EMOS
- Überwachungskamera Gira
- Überwachungskamera König
- Überwachungskamera MarQuant
- Überwachungskamera Renkforce
- Überwachungskamera Thomson
- Überwachungskamera Trevi
- Überwachungskamera Blaupunkt
- Überwachungskamera Schneider
- Überwachungskamera Trebs
- Überwachungskamera Pyle
- Überwachungskamera Topcom
- Überwachungskamera Pioneer
- Überwachungskamera JVC
- Überwachungskamera Motorola
- Überwachungskamera Xiaomi
- Überwachungskamera Abus
- Überwachungskamera Avidsen
- Überwachungskamera Elro
- Überwachungskamera EZVIZ
- Überwachungskamera Imou
- Überwachungskamera INSTAR
- Überwachungskamera Megasat
- Überwachungskamera Olympia
- Überwachungskamera Smartwares
- Überwachungskamera Switel
- Überwachungskamera Yale
- Überwachungskamera Ferguson
- Überwachungskamera Orion
- Überwachungskamera Gigaset
- Überwachungskamera Strong
- Überwachungskamera Toshiba
- Überwachungskamera Garmin
- Überwachungskamera Perel
- Überwachungskamera Netis
- Überwachungskamera Lindy
- Überwachungskamera Fenton
- Überwachungskamera Waeco
- Überwachungskamera Acme
- Überwachungskamera Burg Wächter
- Überwachungskamera Marmitek
- Überwachungskamera Marshall
- Überwachungskamera Honeywell
- Überwachungskamera B/R/K
- Überwachungskamera Marshall Electronics
- Überwachungskamera TRENDnet
- Überwachungskamera Targa
- Überwachungskamera First Alert
- Überwachungskamera AVerMedia
- Überwachungskamera Zebra
- Überwachungskamera TP-Link
- Überwachungskamera Flamingo
- Überwachungskamera Kodak
- Überwachungskamera Rollei
- Überwachungskamera IGet
- Überwachungskamera Adj
- Überwachungskamera Netatmo
- Überwachungskamera Duramaxx
- Überwachungskamera Ebode
- Überwachungskamera Xavax
- Überwachungskamera InFocus
- Überwachungskamera Overmax
- Überwachungskamera Monoprice
- Überwachungskamera Monacor
- Überwachungskamera JUNG
- Überwachungskamera Ednet
- Überwachungskamera AG Neovo
- Überwachungskamera Nest
- Überwachungskamera Edimax
- Überwachungskamera V-TAC
- Überwachungskamera Aritech
- Überwachungskamera Uniden
- Überwachungskamera Kogan
- Überwachungskamera Genie
- Überwachungskamera M-e
- Überwachungskamera Elmo
- Überwachungskamera Lumens
- Überwachungskamera Jablocom
- Überwachungskamera Conceptronic
- Überwachungskamera D-Link
- Überwachungskamera Eufy
- Überwachungskamera Stabo
- Überwachungskamera Friedland
- Überwachungskamera EVOLVEO
- Überwachungskamera SPC
- Überwachungskamera August
- Überwachungskamera Ring
- Überwachungskamera Digitus
- Überwachungskamera SereneLife
- Überwachungskamera Swann
- Überwachungskamera Vitek
- Überwachungskamera DataVideo
- Überwachungskamera LevelOne
- Überwachungskamera Aida
- Überwachungskamera APC
- Überwachungskamera Beafon
- Überwachungskamera Chuango
- Überwachungskamera Cisco
- Überwachungskamera Grandstream
- Überwachungskamera Delta Dore
- Überwachungskamera EVE
- Überwachungskamera Defender
- Überwachungskamera Tenda
- Überwachungskamera Swisstone
- Überwachungskamera Ubiquiti Networks
- Überwachungskamera Kramer
- Überwachungskamera Vaddio
- Überwachungskamera Intellinet
- Überwachungskamera Reolink
- Überwachungskamera Swan
- Überwachungskamera Hikvision
- Überwachungskamera FLIR
- Überwachungskamera Furrion
- Überwachungskamera Arlo
- Überwachungskamera Nexxt
- Überwachungskamera Planet
- Überwachungskamera EnGenius
- Überwachungskamera Dörr
- Überwachungskamera Lorex
- Überwachungskamera Ikan
- Überwachungskamera Comtrend
- Überwachungskamera Somfy
- Überwachungskamera Dahua
- Überwachungskamera Dedicated Micros
- Überwachungskamera DIO
- Überwachungskamera EasyN
- Überwachungskamera Escam
- Überwachungskamera EverFocus
- Überwachungskamera Ganz
- Überwachungskamera GeoVision
- Überwachungskamera Hombli
- Überwachungskamera Home Protector
- Überwachungskamera Iiquu
- Überwachungskamera Indexa
- Überwachungskamera Interlogix
- Überwachungskamera KlikaanKlikuit
- Überwachungskamera Kompernass
- Überwachungskamera Mr Safe
- Überwachungskamera Naxa
- Überwachungskamera Nordval
- Überwachungskamera Notifier
- Überwachungskamera Oplink
- Überwachungskamera Provision ISR
- Überwachungskamera Quantum
- Überwachungskamera Raymarine
- Überwachungskamera Revo
- Überwachungskamera SAB
- Überwachungskamera Satel
- Überwachungskamera SecurityMan
- Überwachungskamera Sinji
- Überwachungskamera SMC
- Überwachungskamera Sonic Alert
- Überwachungskamera Sricam
- Überwachungskamera Steren
- Überwachungskamera Storage Options
- Überwachungskamera Tenvis
- Überwachungskamera Hive
- Überwachungskamera Ubiquiti
- Überwachungskamera Vivotek
- Überwachungskamera Woonveilig
- Überwachungskamera Y-cam
- Überwachungskamera ACTi
- Überwachungskamera AVer
- Überwachungskamera Epcom
- Überwachungskamera ZKTeco
- Überwachungskamera AirLive
- Überwachungskamera Mobotix
- Überwachungskamera Dahua Technology
- Überwachungskamera Speco Technologies
- Überwachungskamera 3xLOGIC
- Überwachungskamera Atlantis Land
- Überwachungskamera CRUX
- Überwachungskamera Pentatech
- Überwachungskamera Summer Infant
- Überwachungskamera Illustra
- Überwachungskamera Surveon
- Überwachungskamera Avigilon
- Überwachungskamera Brilliant
- Überwachungskamera Hanwha
- Überwachungskamera Lanberg
- Überwachungskamera Verint
- Überwachungskamera Axis
- Überwachungskamera EtiamPro
- Überwachungskamera MEE Audio
- Überwachungskamera Advantech
- Überwachungskamera Chacon
- Überwachungskamera Alula
- Überwachungskamera EKO
- Überwachungskamera IOIO
- Überwachungskamera KJB Security Products
- Überwachungskamera BZBGear
- Überwachungskamera Adesso
- Überwachungskamera Brickcom
- Überwachungskamera Insteon
- Überwachungskamera Aigis
- Überwachungskamera Pelco
- Überwachungskamera ORNO
- Überwachungskamera Atlona
- Überwachungskamera Linear PRO Access
- Überwachungskamera Laxihub
- Überwachungskamera Valueline
- Überwachungskamera Aqara
- Überwachungskamera Tecno
- Überwachungskamera Lutec
- Überwachungskamera Brinno
- Überwachungskamera Night Owl
- Überwachungskamera WyreStorm
- Überwachungskamera Exacq
- Überwachungskamera Equip
- Überwachungskamera AVMATRIX
- Überwachungskamera UniView
- Überwachungskamera Alfatron
- Überwachungskamera Syscom
- Überwachungskamera BLOW
- Überwachungskamera Videotec
- Überwachungskamera DSC
- Überwachungskamera AViPAS
- Überwachungskamera Milestone Systems
- Überwachungskamera Inkovideo
- Überwachungskamera Hamlet
- Überwachungskamera Mobi
- Überwachungskamera Infortrend
- Überwachungskamera VideoComm
- Überwachungskamera Kguard
- Überwachungskamera Boyo
- Überwachungskamera HiLook
- Überwachungskamera Mach Power
- Überwachungskamera Canyon
- Überwachungskamera Digital Watchdog
- Überwachungskamera Ernitec
- Überwachungskamera Ikegami
- Überwachungskamera Gewiss
- Überwachungskamera Weldex
- Überwachungskamera Costar
- Überwachungskamera Sentry360
- Überwachungskamera ALC
- Überwachungskamera Spyclops
- Überwachungskamera Compro
- Überwachungskamera IDIS
- Überwachungskamera I3International
- Überwachungskamera B & S Technology
- Überwachungskamera Qian
- Überwachungskamera Accsoon
- Überwachungskamera Control4
- Überwachungskamera Petcube
- Überwachungskamera Apeman
- Überwachungskamera ATN
- Überwachungskamera IC Intracom
- Überwachungskamera POSline
- Überwachungskamera Watec
- Überwachungskamera ETiger
- Überwachungskamera Videcon
- Überwachungskamera BirdDog
- Überwachungskamera Topica
- Überwachungskamera Rostra
- Überwachungskamera Caddx
- Überwachungskamera Whistler
- Überwachungskamera ClearView
- Überwachungskamera Beseye
- Überwachungskamera IMILAB
- Überwachungskamera CNB Technology
- Überwachungskamera Tapo
- Überwachungskamera Securetech
- Überwachungskamera NetMedia
- Überwachungskamera Nivian
- Überwachungskamera Guardzilla
- Überwachungskamera Blink
- Überwachungskamera Zavio
- Überwachungskamera Campark
- Überwachungskamera IPX
- Überwachungskamera Annke
- Überwachungskamera AVTech
- Überwachungskamera Vimtag
- Überwachungskamera Security Labs
- Überwachungskamera Seneca
- Überwachungskamera Vosker
- Überwachungskamera Owltron
- Überwachungskamera Enabot
- Überwachungskamera Luis Energy
- Überwachungskamera Sir Gawain
- Überwachungskamera VisorTech
- Überwachungskamera Milesight
- Überwachungskamera GVI Security
- Überwachungskamera Conbrov
- Überwachungskamera HuddleCamHD
- Überwachungskamera Setti+
- Überwachungskamera BIRDFY
- Überwachungskamera I-PRO
- Überwachungskamera DVDO
- Überwachungskamera TCP
Neueste Bedienungsanleitung für -Kategorien-
15 Oktober 2024

15 Oktober 2024
14 Oktober 2024

13 Oktober 2024
13 Oktober 2024
13 Oktober 2024
11 Oktober 2024
11 Oktober 2024
11 Oktober 2024
10 Oktober 2024