Epson EB-X22 Bedienungsanleitung
Epson
Beamer Projektor
EB-X22
Lesen Sie kostenlos die 📖 deutsche Bedienungsanleitung für Epson EB-X22 (146 Seiten) in der Kategorie Beamer Projektor. Dieser Bedienungsanleitung war für 19 Personen hilfreich und wurde von 2 Benutzern mit durchschnittlich 4.5 Sternen bewertet
Seite 1/146

User’s Guide

Notations Used in This Guide
•Safety indications
The documentation and the projector use graphical symbols to show how to use the projector safely.
Please understand and respect these caution symbols in order to avoid injury to persons or property.
Warning
This symbol indicates information that, if ignored, could possibly result in personal injury or even death due to incorrect handling.
Caution
This symbol indicates information that, if ignored, could possibly result in personal injury or physical damage due to incorrect handling.
•General information indications
Attention
Indicates procedures which may result in damage or injury if sufficient care is not taken.
a
Indicates additional information and points which may be useful to know regarding a topic.
sIndicates a page where detailed information regarding a topic can be found.
g
Indicates that an explanation of the underlined word or words in front of this symbol appears in the glossary of terms. See the "Glossary"
section of the "Appendix".
s "Glossary" p.140
[Name] Indicates the name of the buttons on the remote control or the control panel.
Example: [Esc] button
Menu Name Indicates Configuration menu items.
Example:
Select Brightness from Image.
Image - Brightness

Notations Used in This Guide ........................ 2
Introduction
Projector Features .......................................... 8
Quick and Easy Set up, Projection, and Storage..........................8
Connecting with a USB cable and projecting (USB Display)................8
Detecting projector movements and automatically correcting image distortion
.........................................................8
Horizontal keystone adjuster....................................8
Useful Functions for Projecting Images ................................8
Increasing projection content in wide (WXGA) screen (EB-W22 only)..........8
Connect a USB storage device and project movies or images (PC Free) . . . . . . . . 9
Various functions for excellent power saving ..........................9
Making the most of the remote control.............................9
Enlarge and project your files with the Document Camera.................9
Enhanced security functions.....................................9
Taking Full Advantage of a Network Connection.........................9
Connecting to a network and projecting images from the computer's screen
........................................................ 10
Easy connection to a computer with Quick Wireless Connection (Windows only)
........................................................ 10
Projecting images from portable devices over a network.................10
Projecting images from multiple computers simultaneously (EB-X25/EB-W22/EB-
X22/EB-X20 only) ............................................10
Part Names and Functions .................................. 11
Front/Top ...................................................11
Rear.......................................................13
Base ......................................................14
Control Panel................................................15
Remote Control...............................................16
Replacing the remote control batteries.............................19
Remote control operating range.................................20
Preparing the Projector
Installing the Projector ..................................... 22
Installation Methods........................................... 22
Installation methods......................................... 23
Screen Size and Approximate Projection Distance.......................23
Connecting Equipment ..................................... 25
Connecting a Computer ......................................... 25
Connecting Image Sources.......................................26
Connecting USB Devices.........................................27
Connecting External Equipment...................................28
Connecting a LAN Cable.........................................30
Installing the Wireless LAN Unit....................................31
Installing the Quick Wireless Connection USB Key ......................32
Basic Usage
Projecting Images ......................................... 34
From Installation to Projection .....................................34
Automatically Detect Input Signals and Change the Projected Image (Source Search)
..........................................................35
Switching to the Target Image by Remote Control.......................36
Projecting with USB Display......................................36
System requirements ......................................... 36
Connecting for the first time ....................................37
Uninstalling...............................................39
Adjusting Projected Images ................................ 40
Correcting Keystone Distortion....................................40
Correcting automatically......................................41
Correcting manually.........................................41
Adjusting the Image Size ........................................44
Adjusting the Image Position.....................................45
Adjusting the Horizontal Tilt......................................45
Correcting the Focus...........................................45
Adjusting the Volume..........................................46
Contents
3

Reset Menu .................................................101
Troubleshooting
Using the Help ........................................... 103
Problem Solving .......................................... 104
Reading the Indicators......................................... 104
When the Indicators Provide No Help............................... 108
Problems Relating to Images.....................................109
No images appear.......................................... 109
Moving images are not displayed................................110
Projection stops automatically..................................110
The message Not supported is displayed ...........................110
The message No Signal is displayed .............................. 111
Images are fuzzy, out of focus, or distorted......................... 111
Interference or distortion appear in images......................... 112
The image is truncated (large) or small, the aspect is not suitable, or the image has
been reversed .............................................113
Image colors are not right.....................................113
Images appear dark......................................... 114
Problems when Projection Starts.................................. 115
The projector does not turn on ................................. 115
Other Problems.............................................. 115
No sound can be heard or the sound is faint........................ 115
There is noise in the audio (when projecting EasyMP Network Projection, EasyMP
MultiPC Projection, USB Display, or Quick Wireless Connection)........... 116
The remote control does not work ............................... 116
I want to change the language for messages and menus................ 117
Mail is not received even if a problem occurs in the projector.............117
Cannot change settings using a Web browser....................... 117
Maintenance
Cleaning ................................................. 119
Cleaning the Projector's Surface ...................................119
Cleaning the Lens............................................ 119
Cleaning the Air Filter ..........................................119
Replacing Consumables ................................... 121
Replacing the Lamp ........................................... 121
Lamp replacement period .....................................121
How to replace the lamp ......................................121
Resetting the lamp hours..................................... 124
Replacing the Air Filter......................................... 124
Air filter replacement period ................................... 124
How to replace the air filter .................................... 124
Appendix
Optional Accessories and Consumables .................... 127
Optional Accessories .......................................... 127
Consumables............................................... 127
Screen Size and Projection Distance ........................ 128
Projection Distance (For EB-X25).................................. 128
Projection Distance (For EB-X22/EB-X21/EB-X20/EB-X17).................. 129
Projection Distance (For EB-W22).................................. 130
Projection Distance (For EB-S21/EB-S17)............................. 131
Supported Monitor Displays ............................... 133
Supported Resolutions......................................... 133
Computer signals (analog RGB)................................. 133
Component video.......................................... 133
Composite video........................................... 134
Input signal from the HDMI port................................ 134
Specifications ............................................ 135
Projector General Specifications...................................135
Contents
5

Appearance .............................................. 139
Glossary ................................................. 140
General Notes ............................................ 142
About Notations............................................. 142
General Notice:.............................................. 143
Index .................................................... 144
Contents
6

Introduction
This chapter explains the projector's features and the part names.
Quick and Easy Set up, Projection, and Storage
•Turn the projector on and off by simply plugging in or unplugging.
•Project onto large screens from a short distance.
•Make easy height adjustments with one lever.
•No cool down delay makes it easy to put away.
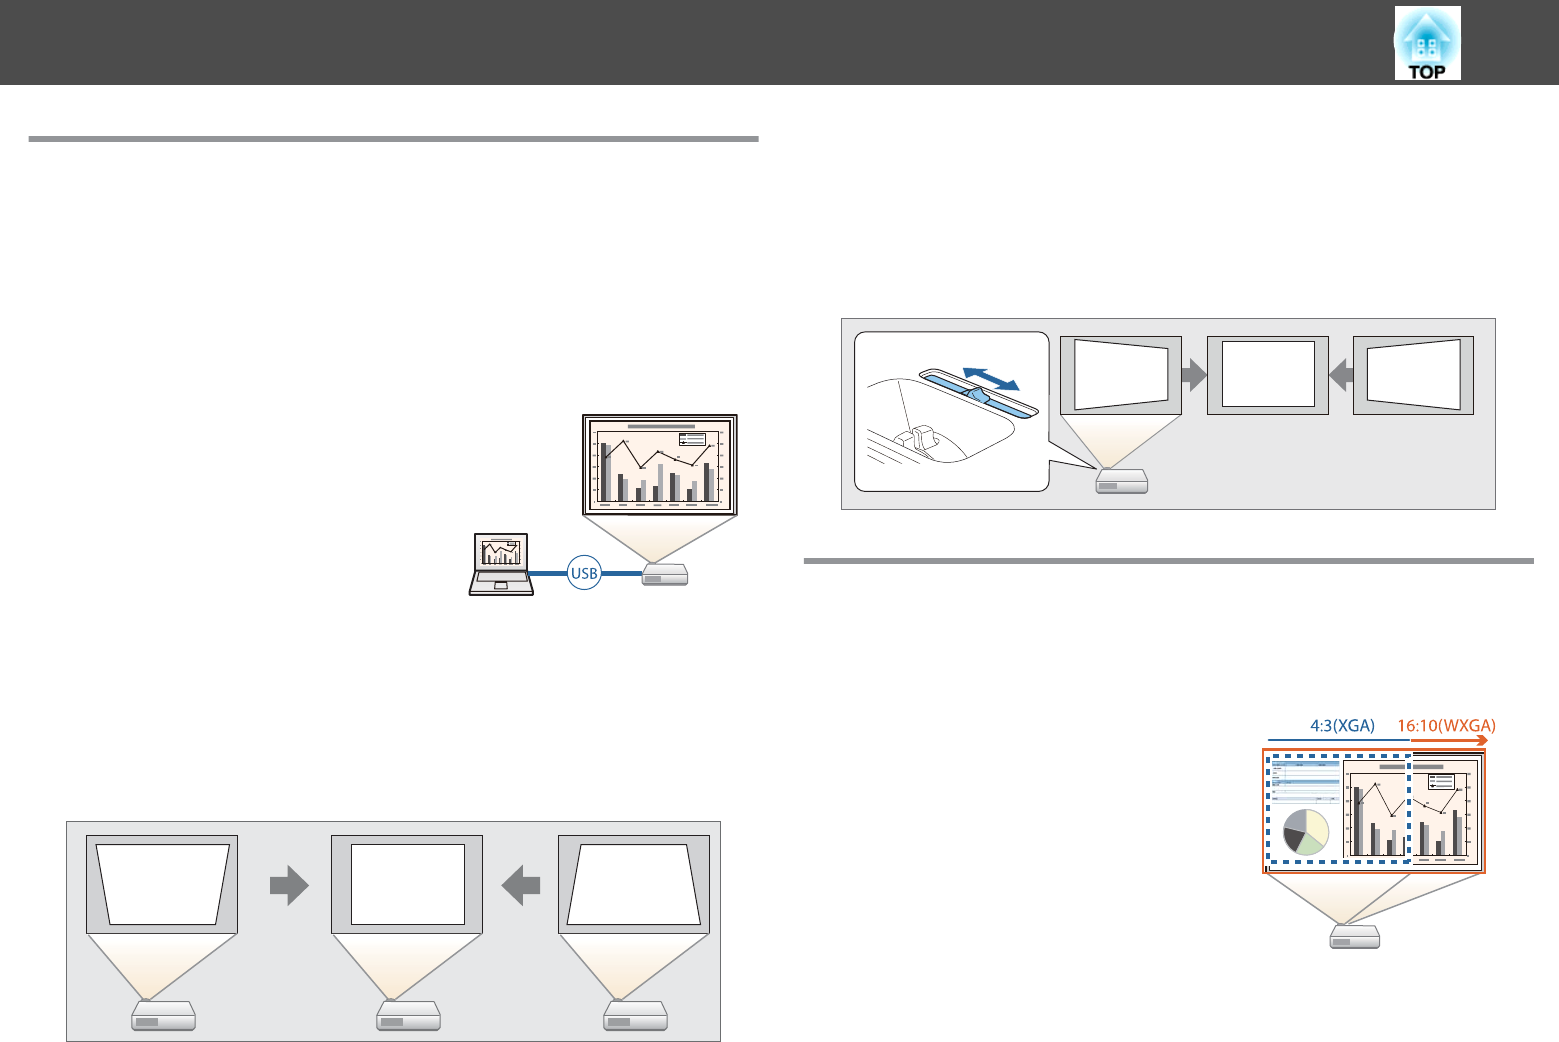
Connecting with a USB cable and projecting (USB Display)
By simply connecting a USB cable, you can
project images from a computer's screen
without a computer cable.
s "Projecting with USB Display" p.36
Detecting projector movements and automatically correcting
image distortion
This projector automatically corrects vertical keystone distortion which
occurs when positioning or moving the projector.
s "Correcting automatically" p.41
Horizontal keystone adjuster
This allows you to quickly correct horizontal distortion in the projected
image. This is useful if you cannot install the projector parallel to the
screen.
s "Correcting manually" p.41
Useful Functions for Projecting Images
Increasing projection content in wide (WXGA) screen (EB-W22
only)
With a computer that has a 16:10 WXGA wide
LCD display, the image can be projected in the
same aspect. You can use whiteboards and other
landscape format screens.
s "Changing the Aspect Ratio of the Projected
Image" p.47
Projector Features
8

Connecting to a network and projecting images from the
computer's screen
You can project your computer's screen over a
network by using EasyMP Network Projection.
Sharing the projector over the network allows
you to project data from different computers
without changing the signal cable. Even if the
projector is away from the computer, you can
still project data over a network.
You can find Easy Network Projection on the
EPSON Projector Software CD-ROM.
Easy connection to a computer with Quick Wireless Connection
(Windows only)
By simply connecting the optional Quick
Wireless Connection USB Key to a computer,
you can automatically setup a wireless LAN
connection.
s "Installing the Quick Wireless Connection
USB Key" p.32
Projecting images from portable devices over a network
If "Epson iProjection" is installed on your smart
phone or tablet device, you can wirelessly
project data from the device. Because you can
operate these devices from any location, you can
vary the way in which conferences or
presentations are made.
You can download "Epson iProjection" for free from the App Store or from
Google play. Any fees incurred when communicating with the App Store or
Google play are the responsibility of the customer.
Projecting images from multiple computers simultaneously (EB-
X25/EB-W22/EB-X22/EB-X20 only)
By using EasyMP Multi PC Projection, up to four screens from multiple
computers connected to the network, or from smartphones or tablets with
Epson iProjection installed, can be projected simultaneously adding a touch
of dynamism to conferences that use projectors. By making yourself the
host of a meeting, you can control the projected screens from other
connected computers allowing you to advance the meeting smoothly.
You can also project the same screen from remote projectors on the
network.
You can find EasyMP Multi PC Projection on the EPSON Projector
Software CD-ROM.
Projector Features
10

Name Function
OLAN port (EB-X25/EB-
W22/EB-X22/EB-X20
only)
Connects a LAN cable to connect to a network.
PUSB-B port •Connects the projector to a computer using a USB cable,
and projects the images on the computer.
s "Projecting with USB Display" p.36
•Connects the projector to a computer using a USB cable
to use the Wireless Mouse function.
s "Using the Remote Control to Operate the
Mouse Pointer (Wireless Mouse)" p.60
QUSB-A port (EB-X21/
EB-S21/EB-X17/EB-
S17 only)
•Connects a USB memory device or a digital camera, and
projects images using PC Free.
s "Projecting Without a Computer (PC Free)"
p.52
•Connects the optional Document Camera.
•Connects the optional Wireless LAN unit.
s "Installing the Wireless LAN Unit" p.31
•Connects the optional Quick Wireless Connection USB
Key.
s "Installing the Quick Wireless Connection USB
Key" p.32
RWireless LAN unit
fixing screw (EB-X21/
EB-S21/EB-X17/EB-
S17 only)
This screw secures the wireless LAN unit cover.
Base
Name Function
ACeiling mount fixing
points (three points)
Attach the optional Ceiling Mount here when suspending
the projector from a ceiling.
s "Installing the Projector" p.22
s "Optional Accessories" p.127
BSecurity cable
installation point
Pass a commercially available wire lock through here and
lock it in place.
s "Installing the wire lock" p.69
Part Names and Functions
14

Name Function
CRear feet When setup on a surface such as a desk, turn to extend and
retract to adjust the horizontal tilt.
s "Adjusting the Horizontal Tilt" p.45
DFront adjustable foot When setup on a surface such as a desk, extend the foot to
adjust the position of the image.
s "Adjusting the Image Position" p.45
Control Panel
Name Function
A[Source Search]
button
Changes to the next input source that is sending an image.
s "Automatically Detect Input Signals and Change the
Projected Image (Source Search)" p.35
B[Enter] button
[]
•When the Configuration menu or the Help screen is
displayed, it accepts and enters the current selection and
moves to the next level.
•If pressed while projecting analog RGB signals from the
Computer port, you can automatically optimize
Tracking, Sync., and Position.
C[w][v] buttons •Displays the Keystone screen allowing you to correct
keystone distortion in vertical and horizontal
directions.
s "Correcting manually" p.41
•If pressed when the Configuration menu or the Help
screen is displayed, these buttons select menu items and
setting values.
s "Using the Configuration Menu" p.82
s "Using the Help" p.103
Part Names and Functions
15

Name Function
D[Help] button Displays and closes the Help screen which shows you how
to deal with problems if they occur.
s "Using the Help" p.103
E[Esc] button •Stops the current function.
•If pressed when the Configuration menu is displayed, it
moves to the previous menu level.
s "Using the Configuration Menu" p.82
F[a][b] buttons
or [Wide][Tele]
buttons
•For EB-X25/EB-W22/EB-X22/EB-X21/EB-X20/EB-
X17
[a] Decreases the volume.
[b] Increases the volume.
s "Adjusting the Volume" p.46
•For EB-S21/EB-S17
[Wide]: Enlarges the size of the projected image.
[Tele]: Reduces the size of the projected image.
s "Adjusting the Image Size" p.44
•Corrects keystone distortion in the horizontal direction
when the Keystone screen is displayed.
s "H/V-Keystone" p.42
•If pressed when the Configuration menu or the Help
screen is displayed, these buttons select menu items and
setting values.
s "Using the Configuration Menu" p.82
s "Using the Help" p.103
G[Menu] button Displays and closes the Configuration menu.
s "Using the Configuration Menu" p.82
HPower button
[t]
Turns the projector power on or off.
s "From Installation to Projection" p.34
IIndicators Indicates the projector's status.
s "Reading the Indicators" p.104
Remote Control
Part Names and Functions
16
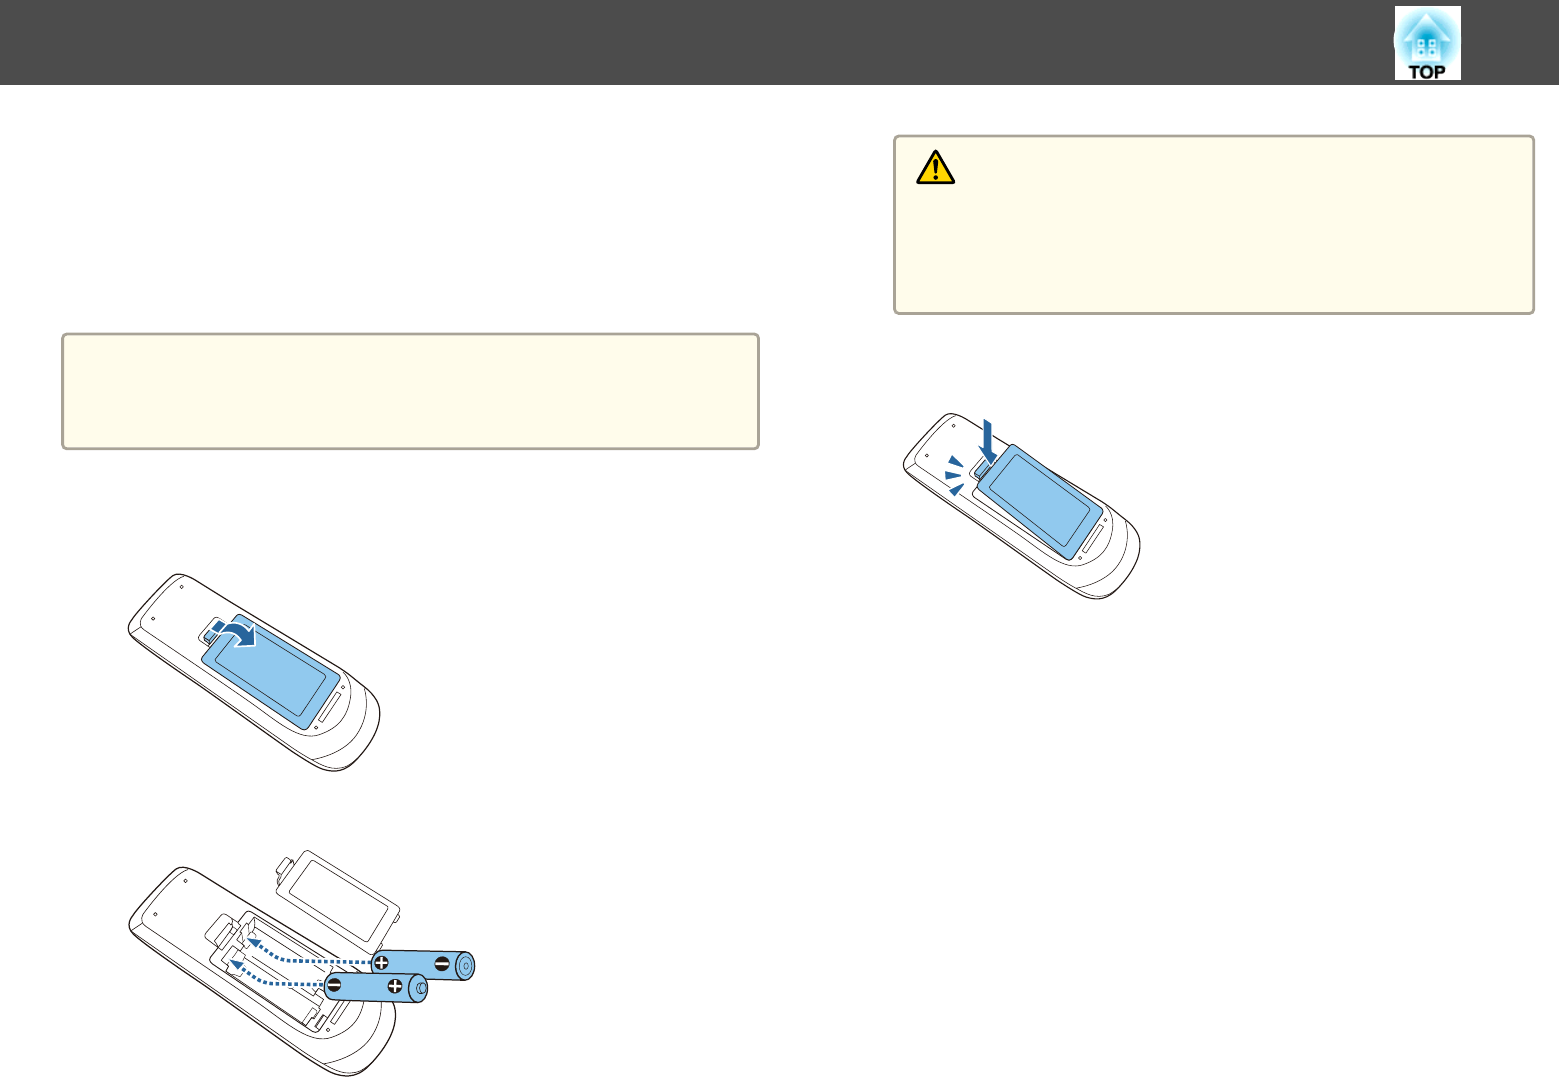
Replacing the remote control batteries
If delays in the responsiveness of the remote control occur or if it does not
operate after it has been used for some time, it probably means that the
batteries are becoming flat. When this happens, replace them with new
batteries. Have two AA size manganese or alkaline batteries ready. You
cannot use other batteries except for the AA size manganese or alkaline.
Attention
Make sure you read the following manual before handling the batteries.
s Safety Instructions
a
Remove the battery cover.
While pushing the battery compartment cover catch, lift the cover
up.
b
Replace the old batteries with new batteries.
Caution
Check the positions of the (+) and (-) marks inside the battery holder to
ensure the batteries are inserted the correct way.
If the batteries are not used correctly, they could explode or leak causing
a fire, injury, or damage to the product.
c
Replace the battery cover.
Press the battery compartment cover until it clicks into place.
Part Names and Functions
19
Installation methods
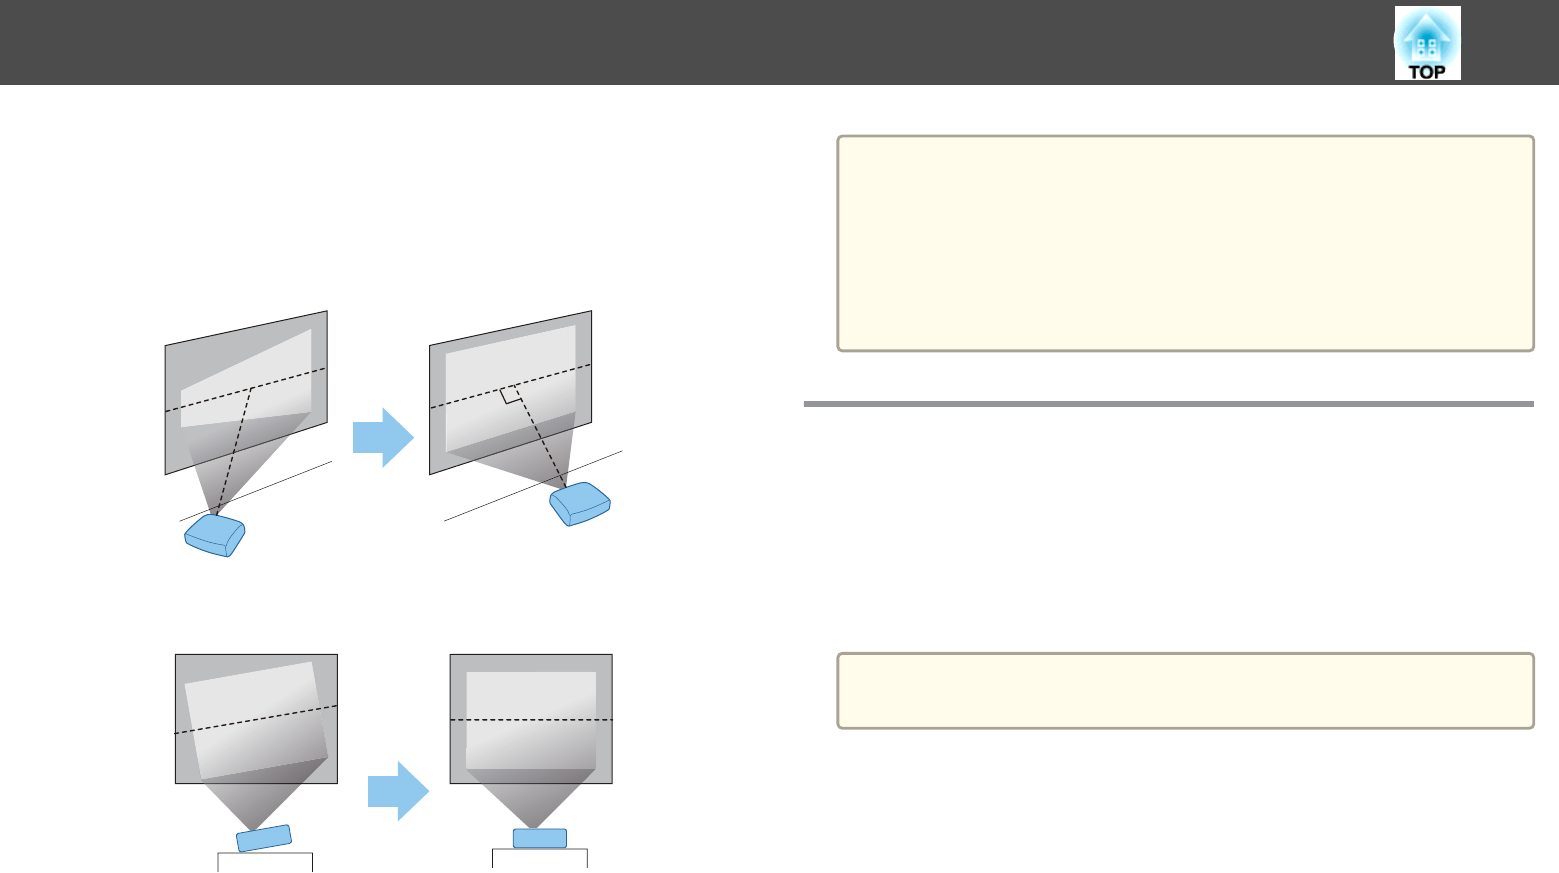
Install the projector as follows.
•Install the projector so that it is parallel to the screen.
If the projector is installed at an angle to the screen, keystone distortion
occurs in the projected image.
•Place the projector on a level surface.
If the projector is tilted the projected image is also tilted.
a
•See the following if you cannot install the projector parallel to the
screen.
s "Correcting Keystone Distortion" p.40
•See the following if you cannot install the projector on a level
surface.
s "Adjusting the Horizontal Tilt" p.45
s "Correcting Keystone Distortion" p.40
Screen Size and Approximate Projection Distance
Projection size is determined by the distance from the projector to the
screen. See the illustrations on the right to select the best position according
to the screen size. The illustrations show the approximate shortest distance
at maximum zoom. See the following for more information on the
projection distance.
s "Screen Size and Projection Distance" p.128
a
When you correct keystone distortion, the projected image may be
reduced.
Installing the Projector
23

16:10 Screen Size
For EB-W22
50”
80”
100”
150”
4:3 Screen Size
For EB-X22/EB-X21/EB-S21/EB-X20/EB-X17/EB-S17
50”
80”
100”
150”
For EB-X25
50”
80”
100”
150”
Installing the Projector
24

Connecting Image Sources
To project images from DVD players or VHS video and so on, connect to the projector using one of the following methods.
AWhen using a commercially available video or S-video cable
Connect the video output port on the image source to the projector's Video port. Or, connect the S-video output port on the image source to the projector's S-Video port. You can
output audio from the projector's speaker by connecting the audio output port on the image source to the projector's Audio-L/R port using a commercially available audio cable.
BWhen using the optional component video cable
s "Optional Accessories" p.127
Connect the component output port on the image source to the projector's Computer input port. You can output audio from the projector's speaker by connecting the audio output
port on the image source to the projector's Audio1 or Audio2 port using a commercially available audio cable.
CWhen using a commercially available HDMI cable
Connect the HDMI port on the image source to the projector's HDMI port. You can send the image source's audio with the projected image.
S-VIDEO
Connecting Equipment
26
Produktspezifikationen
| Marke: | Epson |
| Kategorie: | Beamer Projektor |
| Modell: | EB-X22 |
Brauchst du Hilfe?
Wenn Sie Hilfe mit Epson EB-X22 benötigen, stellen Sie unten eine Frage und andere Benutzer werden Ihnen antworten
Bedienungsanleitung Beamer Projektor Epson

2 August 2024
1 August 2024
7 Juli 2024
7 Juli 2024
7 Juli 2024
7 Juli 2024
7 Juli 2024
6 Juli 2024
6 Juli 2024
Bedienungsanleitung Beamer Projektor
- Beamer Projektor Acer
- Beamer Projektor Sanyo
- Beamer Projektor BenQ
- Beamer Projektor HP
- Beamer Projektor Medion
- Beamer Projektor Philips
- Beamer Projektor Sony
- Beamer Projektor Panasonic
- Beamer Projektor Canon
- Beamer Projektor Yamaha
- Beamer Projektor Mitsubishi
- Beamer Projektor Aiptek
- Beamer Projektor Auna
- Beamer Projektor JVC
- Beamer Projektor Optoma
- Beamer Projektor Toshiba
- Beamer Projektor Casio
- Beamer Projektor Fenton
- Beamer Projektor ViewSonic
- Beamer Projektor Dell
- Beamer Projektor Sagem
- Beamer Projektor Kodak
- Beamer Projektor Bauer
- Beamer Projektor Eiki
- Beamer Projektor InFocus
- Beamer Projektor Nebula
- Beamer Projektor NEC
- Beamer Projektor Overmax
- Beamer Projektor Skytronic
- Beamer Projektor Vivitek
- Beamer Projektor DreamVision
- Beamer Projektor Eumig
- Beamer Projektor FengMi Wemax
- Beamer Projektor Ibm
- Beamer Projektor La Vague
- Beamer Projektor Legamaster
- Beamer Projektor Nobo
- Beamer Projektor Nor-tec
- Beamer Projektor Stereoboomm
- Beamer Projektor XGIMI
- Beamer Projektor Brookstone
- Beamer Projektor Apeman
- Beamer Projektor Aaxa
Neueste Bedienungsanleitung für -Kategorien-

5 Oktober 2024
5 Oktober 2024
5 Oktober 2024

29 August 2024

27 August 2024

26 August 2024

26 August 2024
26 August 2024
26 August 2024
26 August 2024