Digitus DN-10134 Bedienungsanleitung
Digitus
Netzwerkkarte/Adapter
DN-10134
Lesen Sie kostenlos die 📖 deutsche Bedienungsanleitung für Digitus DN-10134 (2 Seiten) in der Kategorie Netzwerkkarte/Adapter. Dieser Bedienungsanleitung war für 10 Personen hilfreich und wurde von 2 Benutzern mit durchschnittlich 4.5 Sternen bewertet
Seite 1/2
2-PORT GIGABIT ETHENET
MINI PCI EXPRESS CARD
Manual
DN- 4 1013
Product Introducon
This 2-Port Gigabit Ethernet Mini P Express Card is a high performance CI
10/100/1000 BASE-T Ethernet LAN controller, it supports the IEEE802.3u
specicaon for 10/100Mbps Ethernet and the IEEE802.3ab specication for
1000Mbps Ethernet, it also supports an auxiliary power
auto-detect funcon, and will auto-congure related bits of the PCI power
management registers in PCI conguraon space.
Specicaon
Support exisng CAT-5 UTP cabling with automac crossover detecon
Fully compliant with PCI-Express Base Specicaon Revision1.1
Single-Lane(x1)PCI-Express with throughput up to 2.5Gbps
Compable with PCI-E MINI Card Electromechanical specicaon
revision1.2
Compable with Full size MINI card type form factor
Fully Plug and Play compable
Support Dual-Port Network
A high performance 1000BASE-T Ethernet controller card
Backwards compable to 10/100BASE- networking T
10/100/1000Mbps data rate auto negoaon operaon
Fully compliant with IEEE802.3, 802.3u,and 802.3ab
Support full duplex ow control(IEEE802.3x)
Support IEEE802.1P Layer 2 Priority Encoding
Support IEEE802.Q VLAN tagging
Support jumbo frame to 9K bytes
Crossover Detecon and Auto Correcon operaon
Package content
1 x 2-Port Gigabit Ethernet Mini PCI Express Card - main card
1 x 2-Port Gigabit Ethernet Mini PCI Express Card - daughter card
2 x 10-Pin network cable
1 x 4-Pin LED cable
1 x User’s Manual
1 x CD
1 x Low prole bracket
System Requirements
Windows ME, 98SE, 2000, XP, Vista, 7, 8 and 10 (32/64bit)
Windows server 2003, 2008, and 2012 (32/64bit)
Linux, DOS , MAC OS X10.4.X or above
One available MINI PCIe slot
Hardware installa on
1. Turn o your computer and all external devices connected to it.
2. Open the computer case. Refer to your computer user manual for more
details
3. Find an available Mini PCIe slot and remove the slot bracket. Save the
bracket screw for later use.
4. Insert the main card to the Mini PCIe slot rmly and evenly. Take care not
to force it into the slot. Once you have properly posioned the main card
into the slot, secure it with the screw you have just saved.
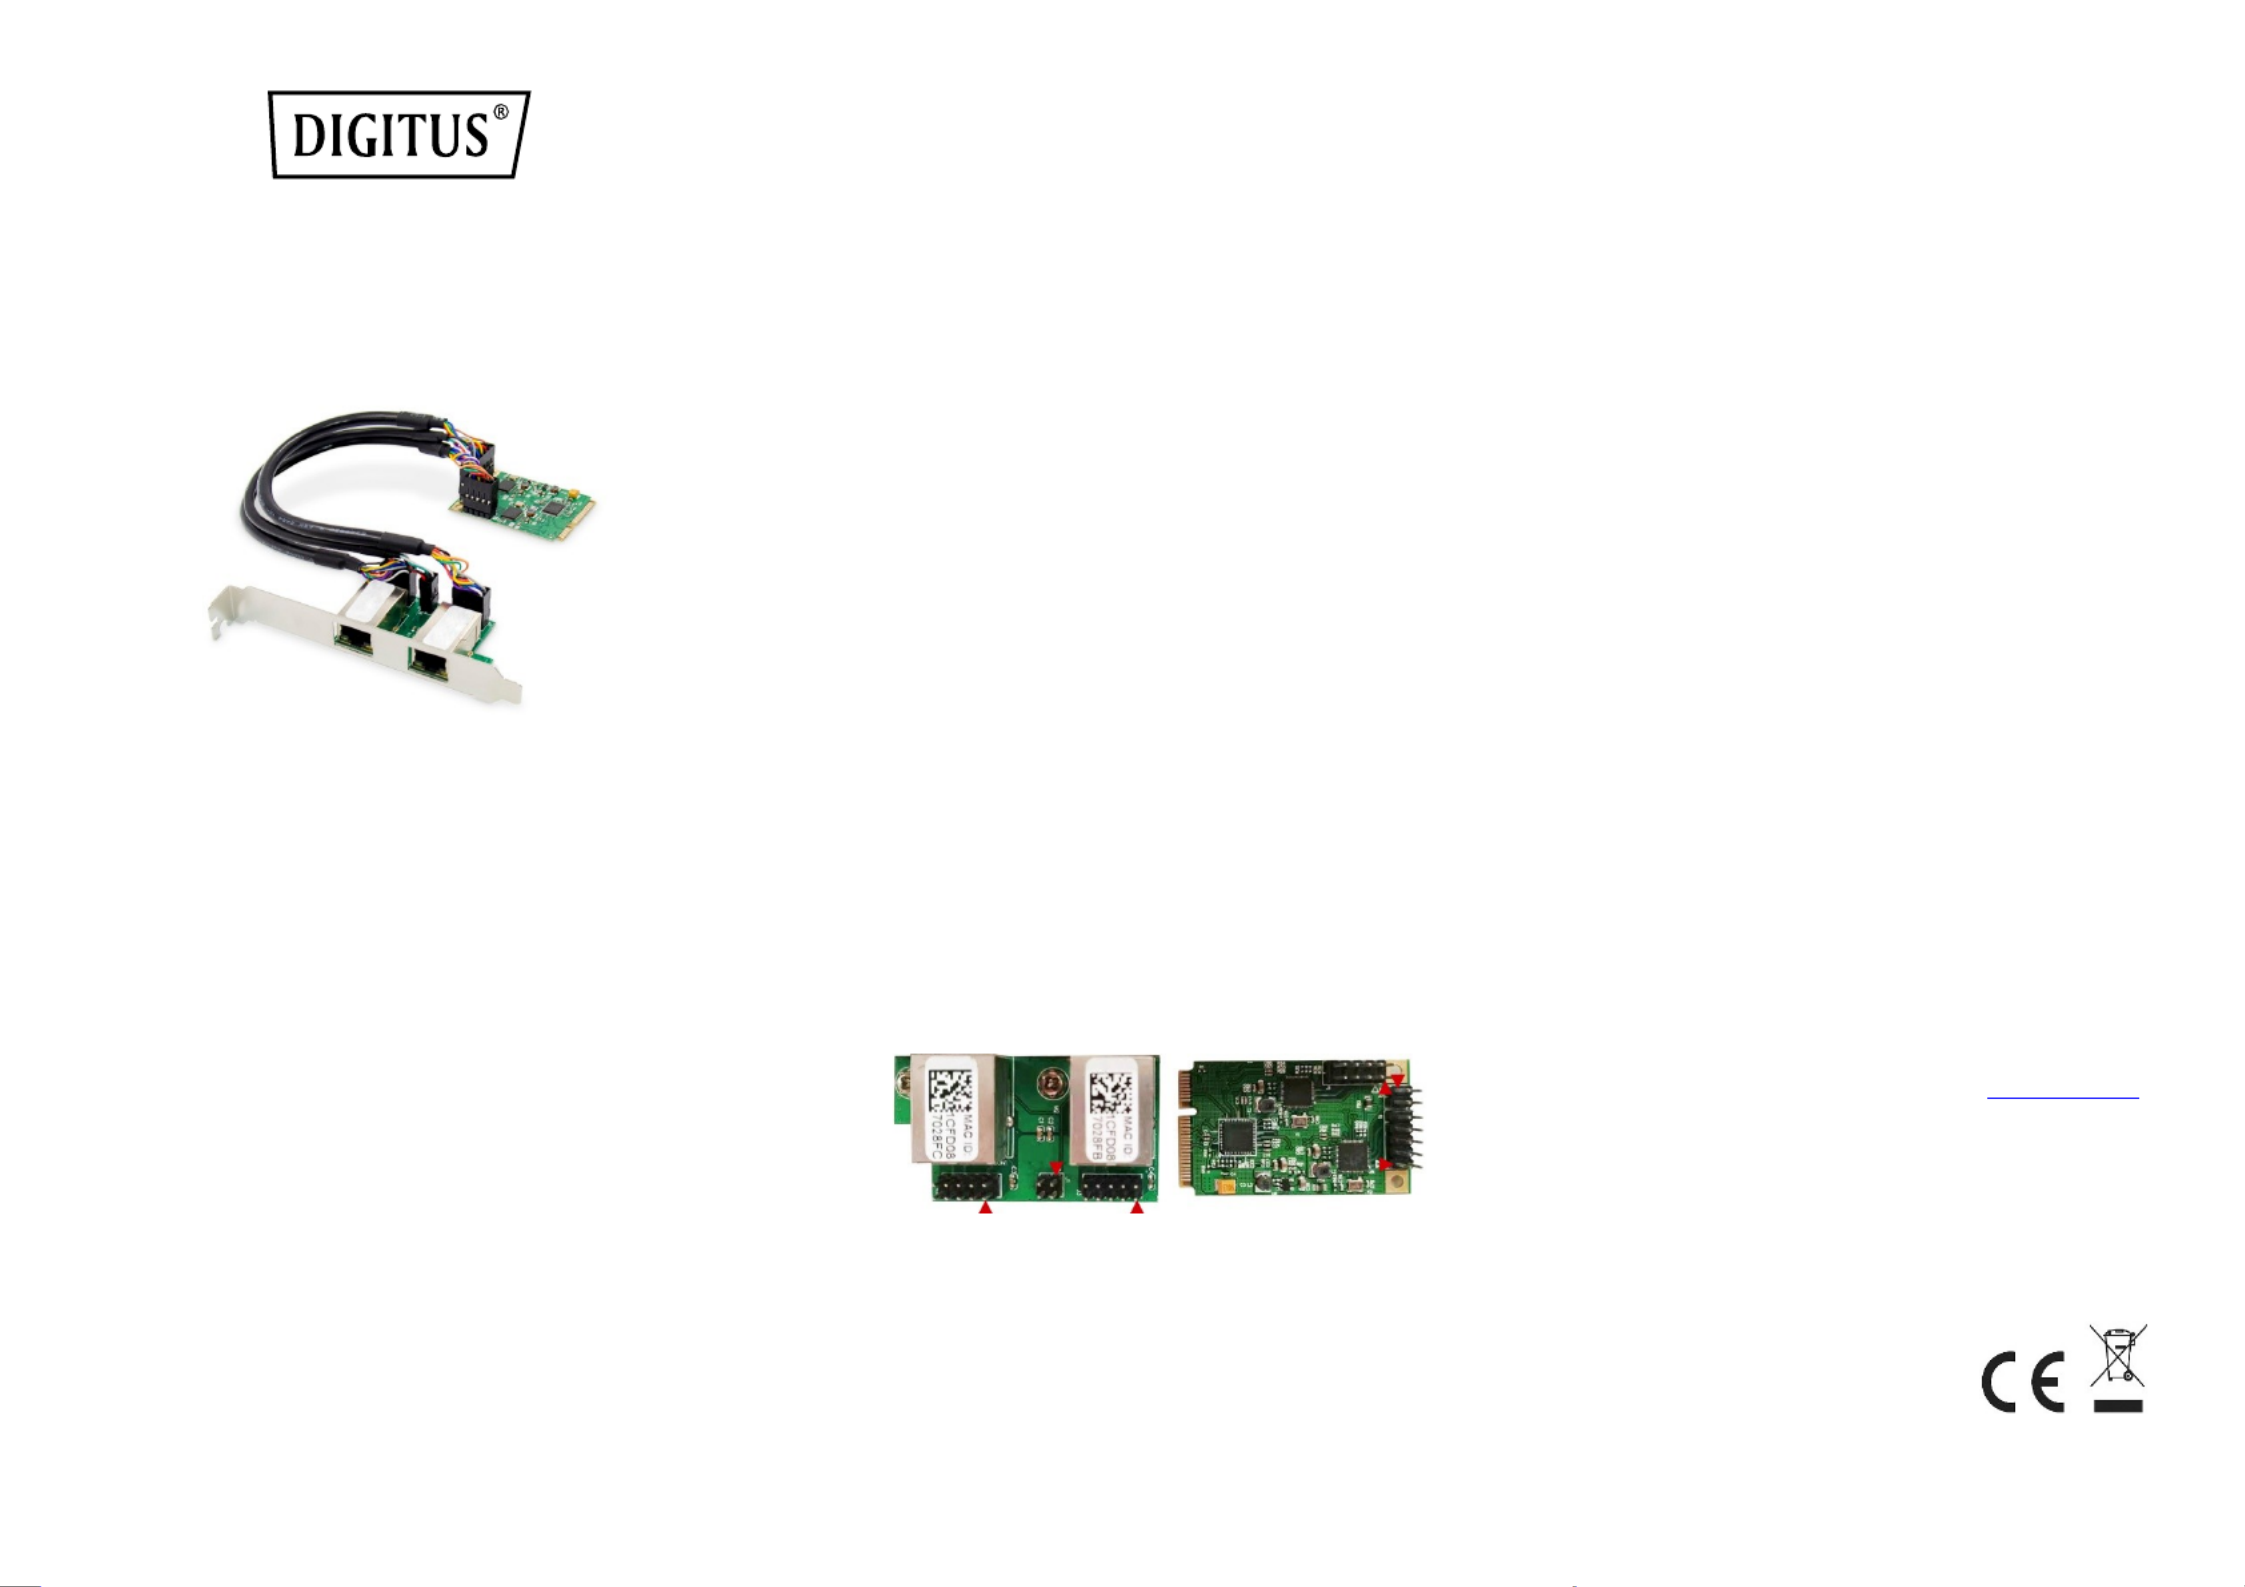
5. Connect the network cable and LED cable between the main card and the
daughter card. The orientaon of the cable socket must be same as the
header which are shown as below:
The cable socket should always be inserted onto the header with the same
orientaon and the triangle ark on the PCB showing Pin 1 of the cable and
the header.
6. Find an empty expansion slot on the back panel of the computer case and
remove the metal bracket. Save the bracket for later use.
7. Place the bracket of the daughter card on the expansion slot on the back
panel and secure it with the bracket screw you have just saved.
8. Connect the system to network by inserng the CAT-5 or above cable into
RJ45 Port on the daughter card.
9. Secure the computer case and switch on your computer.
Install Drivers
Windows® Operating Systems
1. Please insert the CD driver bound into your CD-ROM Drive.
2. At the Windows desktop, click Start, Run.
2.1. For Windows® WIN98SE, WinME,
Type
“RTL8168,RTL8111C,RTL8111E\Windows\WIN98SE,WINM
E\PCIE_Install_5708_1119\setup. exe“,
Double click it.
2.2. For Windows® WIN2K, XP, Server 2003 (32/64 bit)
Type
“RTL8168,RTL8111C,RTL8111E\Windows\WIN2K,XP,2003\
PCIE_Install_5790_11182011\setup.exe ”,
Double click it.
2.3. For Windows® Vista, WIN2008 (32/64 bit)
Type
“RTL8168,RTL8111C,RTL8111E\Windows\VISTA,WIN2008\
Install_Vista_6250_11182011\setup.exe”,
Double click it.
2.4. For Windows® Win7, WIN2008 (32/64 bit)
Type
“RTL8168,RTL8111C,RTL8111E\Windows\WIN7,WIN2008\
Install_Win7_7049_11182011\setup.exe”,
Double click it.
2.5. For Windows® Win8, Win8.1 (32/64 bit)
Type
“RTL8168,RTL8111C,RTL8111E\Windows\Win8,Win \8.1 In
stall_Win8_8.1_8020_09182013\setup.exe”,
Double click it.
2.6. For Windows® Win10 (32/64 bit)
Type
“RTL8168,RTL8111C,RTL8111E\Windows\Win10\Install_
Win10_10003_08202015\setup.exe”,
Double click it.
3. Follow the on-screen instrucons to complete the installaon
Support:
If you have further quesons, please contact our customer support and
you can nd more information on our homepage: www.assmann.com
Declaraon:
Hereby Assmann Electronic GmbH declares that the Declaraon of
Conformity is part of the shipping content. If the Declaraon of
Conformity is missing, you can request it by post under the below
menoned manufacturer address.
www.assmann.com
Assmann Electronic GmbH
Auf dem Schüel 3
58513 Lüdenscheid
Germany

2-PORT GIGABIT ETHENET
MINI PCI EXPRESS KARTE
Benutzerhandbuch
DN- 10134
Produkteinführung
Diese 2-Port Gigabit Ethenet Mini PCI Express Karte ist ein
hochleistungsfähiger 10/100/1000 BASE-T Ethernet LAN Controller, er
unterstützt die IEEE802.3u Spezikaon für 10/100Mbps Ethernet und
die IEEE802.3ab Spezikaon für 1000Mbps Ethernet, er unterstützt
auch eine automasche Hilfsspannungs-Erkennungsfunkon und
konguriert automasch die entsprechenden Bits der PCI Power
Management Register im PCI Konguraonsbereich.
Beschreibung
Unterstützung der vorhandenen CAT-5 UTP-Verkabelung mit
automascher Crossover-Erkennung
Vollständig konform mit der PCI-Express Base Specicaon
Revision1.1
Single-Lane(x1)PCI-Express mit einem Durchsatz von bis zu
2.5Gbps
Kompabel mit PCI-E MINI-Karte Elektromechanische
Spezikaon Revision1.2
Kompabel mit Full Size MINI Kartentyp Formfaktor
Vollständig Plug and Play kompabel
Unterstützt Dual-Port-Netzwerk
Eine leistungsstarke 1000BASE-T Ethernet-Steuerkarte
Abwärtskompabel zu 10/100BASE-T-Netzwerken
10/100/1000Mbps Datenrate Auto-Negoaon-Betrieb
Vollständig konform mit IEEE802.3, 802.3u und 802.3ab
Unterstützt Vollduplex-Flusskontrolle (IEEE802.3x)
Unterstützung von IEEE802.1P Layer 2 Prioritätskodierung
Unterstützung von IEEE802.Q VLAN-Tagging
Unterstützung von Jumbo-Frames bis 9K Bytes
Crossover-Erkennung und Auto-Korrektur
Packungsinhalt
1 x 2-Port Gigabit Ethernet Mini PCI Express Karte - Hauptkarte
1 x 2-Port Gigabit Ethernet Mini PCI Express Karte - Tochterkarte
2 x 10-Pin Netzwerkkabel
1 x 4-poliges LED-Kabel
1 x Benutzerhandbuch
1 x CD
1 x Niedrigprol-Halterung
Systemvoraussetzungen
Windows ME, 98SE, 2000, XP, Vista, 7, 8 und 10 (32/64bit)
Windows Server 2003, 2008 und 2012 (32/64bit)
Linux, DOS , MAC OS X10.4.X oder höher
Ein verfügbarer MINI PCIe-Steckplatz
Hardware-Installaon
1. Schalten Sie Ihren Computer und alle daran angeschlossenen externen
Geräte aus.
2. Önen Sie das Gehäuse des Computers. Weitere Informaonen nden Sie
im Benutzerhandbuch Ihres Computers.
3. Suchen Sie einen freien Mini-PCIe-Steckplatz und enernen Sie das
Slotblech. Bewahren Sie die Schraube des Slotblechs für den späteren
Gebrauch auf.
4. Stecken Sie die Hauptkarte fest und gleichmäßig in den Mini-PCIe-
Steckplatz. Achten Sie darauf, dass sie nicht mit Gewalt in den Steckplatz
eingeführt wird. Wenn Sie die Hauptkarte richg in den Steckplatz
eingesetzt haben, sichern Sie sie mit der soeben gesicherten Schraube.
5. Verbinden Sie das Netzwerkkabel und das LED-Kabel zwischen der Haupt-
und der Tochterkarte. Die Ausrichtung des Kabelanschlusses muss mit den
unten abgebildeten Posionen übereinsmmen:
Die Kabelbuchse sollte immer mit der gleichen Ausrichtung auf die
Sleiste gesteckt werden, wobei die Dreiecksbrücke auf der Plane Pin 1
des Kabels und der Sleiste zeigt.
6. Suchen Sie einen leeren Erweiterungssteckplatz auf der Rückseite des
Computergehäuses und enernen Sie die Metallklammer. Bewahren Sie
die Halterung für den späteren Gebrauch auf.
7. Setzen Sie das Bracket der Tochterkarte auf den Erweiterungssteckplatz an
der Rückwand und sichern Sie es mit der soeben gesicherten
Bracketschraube.
8. Schließen Sie das System an ein Netzwerk an, indem Sie das CAT-5 oder
höher Kabel in den RJ45-Port der Tochterkarte stecken.
9. Sichern Sie das Computergehäuse und schalten Sie den Computer ein.
Installieren der Treiber
Windows® Operating Systems
1. Bie legen Sie den CD-Treiber gebunden in Ihr CD-ROM-Laufwerk ein.
2. Klicken Sie auf dem Windows-Desktop auf Start, Ausführen.
2.1. Für Windows® WIN98SE, WinME,
Geben Sie
"RTL8168,RTL8111C,RTL8111E\Windows\WIN98SE,WINME\PCIE_I
nstall_5708_1119\setup. exe" ein,
Doppelklicken Sie darauf.
2.2. Für Windows® WIN2K, XP, Server 2003 (32/64 Bit)
Geben Sie
"RTL8168,RTL8111C,RTL8111E\Windows\WIN2K,XP,2003\PCIE_In
stall_5790_11182011\setup.exe " ein,
Doppelklicken Sie darauf.
2.3. Für Windows® Vista, WIN2008 (32/64 Bit)
Geben Sie
"RTL8168,RTL8111C,RTL8111E\Windows\VISTA,WIN2008\Install_
Vista_6250_11182011\setup.exe" ein,
Doppelklicken Sie darauf.
2.4. Für Windows® Win7, WIN2008 (32/64 Bit)
Geben Sie
"RTL8168,RTL8111C,RTL8111E\Windows\WIN7,WIN2008\Install_
Win7_7049_11182011\setup.exe" ein,
Doppelklicken Sie darauf.
2.5. Für Windows® Win8, Win8.1 (32/64 Bit)
Geben Sie
"RTL8168,RTL8111C,RTL8111E\Windows\Win8,Win8.1\Install_Wi
n8_8.1_8020_09182013\setup.exe" ein,
Doppelklicken Sie darauf.
2.6. Für Windows® Win10 (32/64 Bit)
Geben Sie
"RTL8168,RTL8111C,RTL8111E\Windows\Win10\Install_Win10_1
0003_08202015\setup.exe" ein,
Doppelklicken Sie darauf.
3. Folgen Sie den Anweisungen auf dem Bildschirm, um die Installaon
abzuschließen.
Support:
Wenn Sie weitere Fragen haben, wenden Sie sich bie an unseren
Kundensupport. Weitere Informaonen nden Sie auf unserer Homepage:
www.assmann.com
Erläuterung:
Hiermit erklärt die Assmann Electronic GmbH, dass die gedruckte
Konformitätserklärung dem Produkt beiliegt. Sollte die Konformitätserklärung
fehlen, kann diese postalisch unter der unten genannten Herstelleradresse
angefordert werden.
www.assmann.com
Assmann Electronic GmbH
Auf dem Schüel 3
58513 Lüdenscheid Germany ,
Produktspezifikationen
| Marke: | Digitus |
| Kategorie: | Netzwerkkarte/Adapter |
| Modell: | DN-10134 |
Brauchst du Hilfe?
Wenn Sie Hilfe mit Digitus DN-10134 benötigen, stellen Sie unten eine Frage und andere Benutzer werden Ihnen antworten
Bedienungsanleitung Netzwerkkarte/Adapter Digitus

19 September 2024
19 September 2024
5 September 2024
3 September 2024
28 August 2024
25 August 2024
21 August 2024
21 August 2024
21 August 2024
21 August 2024
Bedienungsanleitung Netzwerkkarte/Adapter
- Netzwerkkarte/Adapter Anker
- Netzwerkkarte/Adapter Approx
- Netzwerkkarte/Adapter Asus
- Netzwerkkarte/Adapter Belkin
- Netzwerkkarte/Adapter Gembird
- Netzwerkkarte/Adapter Gigabyte
- Netzwerkkarte/Adapter Hama
- Netzwerkkarte/Adapter Kensington
- Netzwerkkarte/Adapter LogiLink
- Netzwerkkarte/Adapter Manhattan
- Netzwerkkarte/Adapter Maxxter
- Netzwerkkarte/Adapter Nedis
- Netzwerkkarte/Adapter Philips
- Netzwerkkarte/Adapter Sharkoon
- Netzwerkkarte/Adapter Sony
- Netzwerkkarte/Adapter Sweex
- Netzwerkkarte/Adapter Targus
- Netzwerkkarte/Adapter Trust
- Netzwerkkarte/Adapter ZyXEL
- Netzwerkkarte/Adapter Buffalo
- Netzwerkkarte/Adapter Canon
- Netzwerkkarte/Adapter Yamaha
- Netzwerkkarte/Adapter Velleman
- Netzwerkkarte/Adapter Allnet
- Netzwerkkarte/Adapter Devolo
- Netzwerkkarte/Adapter Eminent
- Netzwerkkarte/Adapter Linksys
- Netzwerkkarte/Adapter Netgear
- Netzwerkkarte/Adapter Alecto
- Netzwerkkarte/Adapter König
- Netzwerkkarte/Adapter Renkforce
- Netzwerkkarte/Adapter Kenwood
- Netzwerkkarte/Adapter Pioneer
- Netzwerkkarte/Adapter Klipsch
- Netzwerkkarte/Adapter TERRIS
- Netzwerkkarte/Adapter Vivanco
- Netzwerkkarte/Adapter Abus
- Netzwerkkarte/Adapter Strong
- Netzwerkkarte/Adapter Toshiba
- Netzwerkkarte/Adapter Netis
- Netzwerkkarte/Adapter Ewent
- Netzwerkkarte/Adapter Goobay
- Netzwerkkarte/Adapter Icy Box
- Netzwerkkarte/Adapter Lindy
- Netzwerkkarte/Adapter Thrustmaster
- Netzwerkkarte/Adapter ViewSonic
- Netzwerkkarte/Adapter Lenovo
- Netzwerkkarte/Adapter MSI
- Netzwerkkarte/Adapter Tripp Lite
- Netzwerkkarte/Adapter Mercusys
- Netzwerkkarte/Adapter Marmitek
- Netzwerkkarte/Adapter Lava
- Netzwerkkarte/Adapter ELO
- Netzwerkkarte/Adapter TRENDnet
- Netzwerkkarte/Adapter Sigma
- Netzwerkkarte/Adapter AVM
- Netzwerkkarte/Adapter TP-Link
- Netzwerkkarte/Adapter Alcatel
- Netzwerkkarte/Adapter Black Box
- Netzwerkkarte/Adapter Supermicro
- Netzwerkkarte/Adapter Techly
- Netzwerkkarte/Adapter ESI
- Netzwerkkarte/Adapter NEC
- Netzwerkkarte/Adapter Hercules
- Netzwerkkarte/Adapter Edimax
- Netzwerkkarte/Adapter DrayTek
- Netzwerkkarte/Adapter Totolink
- Netzwerkkarte/Adapter IPEVO
- Netzwerkkarte/Adapter Conceptronic
- Netzwerkkarte/Adapter D-Link
- Netzwerkkarte/Adapter Pinnacle
- Netzwerkkarte/Adapter EVOLVEO
- Netzwerkkarte/Adapter I-Tec
- Netzwerkkarte/Adapter Grixx
- Netzwerkkarte/Adapter QNAP
- Netzwerkkarte/Adapter Icidu
- Netzwerkkarte/Adapter Lancom
- Netzwerkkarte/Adapter LevelOne
- Netzwerkkarte/Adapter APC
- Netzwerkkarte/Adapter Cisco
- Netzwerkkarte/Adapter Motu
- Netzwerkkarte/Adapter Tenda
- Netzwerkkarte/Adapter Ubiquiti Networks
- Netzwerkkarte/Adapter UTEPO
- Netzwerkkarte/Adapter Kramer
- Netzwerkkarte/Adapter Intellinet
- Netzwerkkarte/Adapter Eaton
- Netzwerkkarte/Adapter Nexxt
- Netzwerkkarte/Adapter Planet
- Netzwerkkarte/Adapter EnGenius
- Netzwerkkarte/Adapter Simplecom
- Netzwerkkarte/Adapter Twelve South
- Netzwerkkarte/Adapter Emerson
- Netzwerkkarte/Adapter Emtec
- Netzwerkkarte/Adapter Iconbit
- Netzwerkkarte/Adapter Mede8er
- Netzwerkkarte/Adapter Media-tech
- Netzwerkkarte/Adapter Paradigm
- Netzwerkkarte/Adapter Riello
- Netzwerkkarte/Adapter Sitecom
- Netzwerkkarte/Adapter SMC
- Netzwerkkarte/Adapter Steren
- Netzwerkkarte/Adapter AMX
- Netzwerkkarte/Adapter Vivotek
- Netzwerkkarte/Adapter Cudy
- Netzwerkkarte/Adapter Siig
- Netzwerkkarte/Adapter Atto
- Netzwerkkarte/Adapter Moxa
- Netzwerkkarte/Adapter Iogear
- Netzwerkkarte/Adapter StarTech.com
- Netzwerkkarte/Adapter AirLive
- Netzwerkkarte/Adapter Dahua Technology
- Netzwerkkarte/Adapter Martin Logan
- Netzwerkkarte/Adapter Microchip
- Netzwerkkarte/Adapter Aluratek
- Netzwerkkarte/Adapter Atlantis Land
- Netzwerkkarte/Adapter J5 Create
- Netzwerkkarte/Adapter ATen
- Netzwerkkarte/Adapter Star Micronics
- Netzwerkkarte/Adapter Axis
- Netzwerkkarte/Adapter Vantec
- Netzwerkkarte/Adapter Digium
- Netzwerkkarte/Adapter Oehlbach
- Netzwerkkarte/Adapter Arctic Cooling
- Netzwerkkarte/Adapter Audac
- Netzwerkkarte/Adapter OSD Audio
- Netzwerkkarte/Adapter Crestron
- Netzwerkkarte/Adapter Extron
- Netzwerkkarte/Adapter CLUB3D
- Netzwerkkarte/Adapter Rocstor
- Netzwerkkarte/Adapter Raidsonic
- Netzwerkkarte/Adapter Satechi
- Netzwerkkarte/Adapter Code Corporation
- Netzwerkkarte/Adapter Xcellon
- Netzwerkkarte/Adapter Hamlet
- Netzwerkkarte/Adapter Tycon Systems
- Netzwerkkarte/Adapter Vivolink
- Netzwerkkarte/Adapter NUVO
- Netzwerkkarte/Adapter Mach Power
- Netzwerkkarte/Adapter Canyon
- Netzwerkkarte/Adapter Perfect Choice
- Netzwerkkarte/Adapter Ernitec
- Netzwerkkarte/Adapter EXSYS
- Netzwerkkarte/Adapter Barox
- Netzwerkkarte/Adapter Altronix
- Netzwerkkarte/Adapter Allied Telesis
- Netzwerkkarte/Adapter Valcom
- Netzwerkkarte/Adapter IC Intracom
- Netzwerkkarte/Adapter 7inova
- Netzwerkkarte/Adapter Raspberry Pi
- Netzwerkkarte/Adapter Microsemi
- Netzwerkkarte/Adapter Luxul
Neueste Bedienungsanleitung für -Kategorien-
16 Oktober 2024
16 Oktober 2024
9 Oktober 2024

5 Oktober 2024

4 Oktober 2024
4 Oktober 2024
3 Oktober 2024
3 Oktober 2024
3 Oktober 2024

2 Oktober 2024