Digital Watchdog MegaPix PTZ DWC-MPTZ830XW Bedienungsanleitung
Digital Watchdog
Überwachungskamera
MegaPix PTZ DWC-MPTZ830XW
Lesen Sie kostenlos die 📖 deutsche Bedienungsanleitung für Digital Watchdog MegaPix PTZ DWC-MPTZ830XW (3 Seiten) in der Kategorie Überwachungskamera. Dieser Bedienungsanleitung war für 15 Personen hilfreich und wurde von 2 Benutzern mit durchschnittlich 4.5 Sternen bewertet
Seite 1/3
1. The mounting surface must withstand five times the camera weight.
2. Do not let the cables get caught in improper places or the electric line
cover can be damaged. This may cause a short or fire.
3. For the installation process, remove the protection film and the tape
from attached the dome camera.
4. A silicone rubber sealant must be applied to seal the housing to
secure waterproofing.
5. Using the mounting template sheet or the camera itself, mark and drill
the necessary holes in the wall or ceiling.
Tel: +1 (866) 446-3595 / (813) 888-9555
Technical Support Hours:
9:00AM – 8:00PM EST, Monday through Friday
digital-watchdog.com
DWC-MPTZ336XW DWC-MPTZ830XW
Quick Start GuideQuick Start Guide
Default Login Information
Username: admin Password: admin
ACCESSORIES REQUIRED TO INSTALL THE CAMERA (SOLD SEPARATELY)
Wall mount bracket:
DWC-P336WMW
Ceiling mount bracket:
DWC-P336CMW
Parapet mount bracket:
DWC-P336PARAMW
For corner and pole mount bracket:
DWC-P30CNMW (must be purchased with DWC-P336WMW)
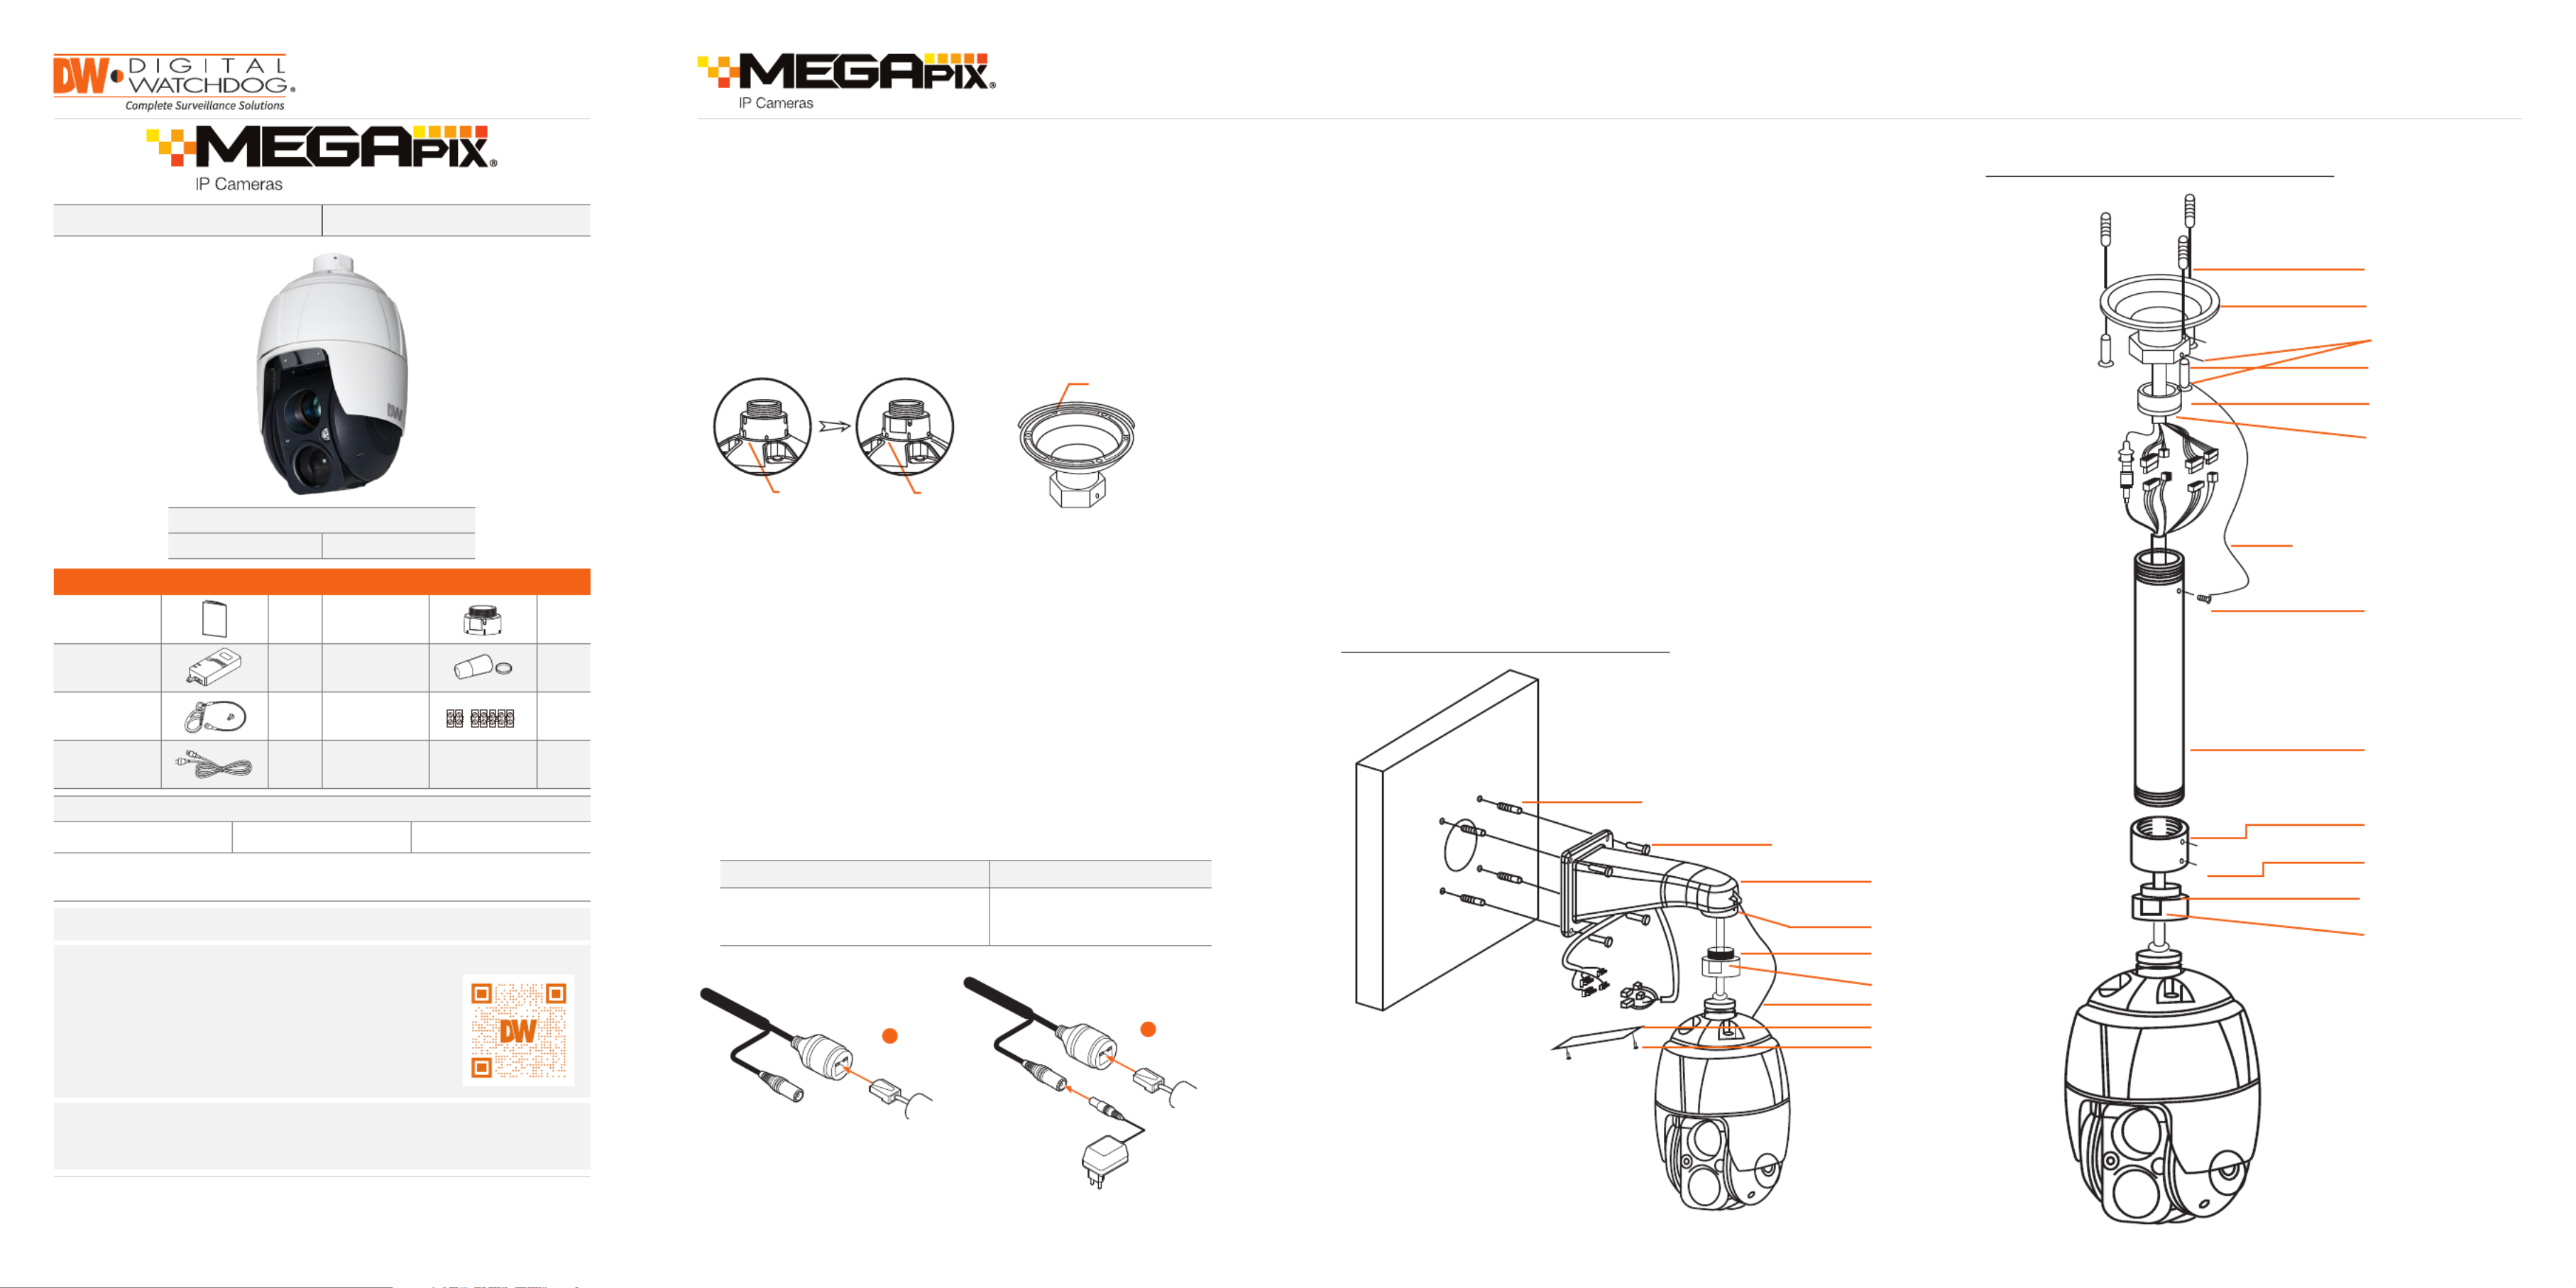
STEP 3 – INSTALLING THE CAMERA
Installing the camera using a wall mount
STEP 1 – PREPARING TO MOUNT THE CAMERA
NOTE: Mounting accessories are required and sold separately.
WHAT’S IN THE BOX
QSG 1 Adapter ring 1
PoE injector 1 Waterproof
cap 1 set
Safety wire 1
2P, 5P
screw-type
connectors 1 set
Power cord 1
Installing the camera using a ceiling mount
Attention: This document is intended to serve as a quick reference for the initial
set up. It is recommended that the user read the entire instruction manual for
complete and proper installation and usage.
NOTE: Download all your support materials and tools in one place.
1. Go to: http://www.digital-watchdog.com/resources
2. Search your product by entering the part number in the
‘Search by Product’ search bar. Results for applicable
part numbers will populate automatically based on the
part number you enter.
3. Click . All supported materials, including manuals ‘Search’
and quick start guide (QSGs) will appear in the results.
Plastic anchors (4x)
Tapping screws 8x35 (4x)
Machine screws M3x5 (2x)
Access plate
Safety wire
Set screw (1x)
Adapter PT 1.5 inch (1x)
Mounting bracket (1x sold
separately) PF 1.5 inch
Set screw (1x)
Plastic anchors (3x)
Mounting bracket (1x
sold separately)
Set screws (2x)
Locking nut (1x)
Tapping screws 6x35 (3x)
Socket (1x)
Safety wire (1x)
Machine screw M5x6 (1x)
Pipe (1x)
Set screw (1x)
Set screws (3x)
Pipe socket PF 1.5 incg (1x)
Adapter PT 1.5 inch (1x)
1. Using the mounting template or the mounting accessory itself, mark and drill
the necessary holes in the mounting surface.
2. Pull all cables through the mounting accessory. See STEP 4.
3. Attach the wall mounting bracket to the mounting surface using plastic anchors
and M8x35 screws.
For a ceiling mounting bracket installation, use the plastic anchors to secure it to
the mounting surface.
4. Wind both of the pipe ends thread with Teflon tape about 20 times for sealing.
Use a silicone rubber sealant to seal the area where the mounting bracket and
the pipe meet.
5. Place a bead of silicone sealant around the mounting bracket’s mounting flange,
press it to the surface and line up the flange hole with drilled holes.
6. Open the access plate on the mounting accessory and pull out the cables
through the rectangular access hole.
7. Attach the 1.5” adapter to the mounting bracket and fix it using the set screw.
8. Attach the camera’s safety wire to the mounting bracket and organize the
cables.
9. Connect all the cables to the camera. See STEP 4. Close the access plate o the
mounting bracket.
10. Connect the camera to the mounting bracket by turning it clockwise into the
adapter, and fix it using the set screw of the adapter.
Pass the wires through the mount bracket and make all necessary
connections.
1. NETWORK CONNECTIONS – If you are using the PoE injector
included, connect the camera using an Ethernet cable for both data
and power.
2. NETWORK CONNECTIONS – If you are using a non-PoE switch,
connect the camera to the switch using an Ethernet cable for data
transmission and use a power adapter to power the camera.
STEP 2 – POWERING THE CAMERA
Power requirements Power consumption
UPoE injector, 12VDC
(PoE injector included, adapter not
included)
PoE: 28W, 500mA
12VDC: 28W, 2.3A
Ethernet
Cable
1
Power
Ethernet
Cable
2
Twist
Start Point
(Long Indicator)
Set Point
(Long Indicator)
Seal using silicone
rubber around the circle

NOTE: Please see the full product manual for web viewer setup,
functions and camera settings options.
1. Open the micro-SD card cover under the camera’s lens.
2. Insert or remove the micro-SD card as needed.
3. Tightly close the micro-SD card cover to ensure it is waterproof.
Users can insert and remove a micro-SD card as shown in the
following picture.
STEP 3 – MANAGING THE SD CARD STEP 6 – NETWORK ACCESS (WEB)
STEP 7 – LIVE VIEW
Rev Date: 05/20
Copyright © Digital Watchdog. All rights reserved.
Specifications and pricing are subject to change without notice.
Quick Start Guide
1. Enter the camera’s IP address in a web browser (IE is
recommended). The
2. In the welcome screen, select whether to view a live image from the
camera, search recorded data on the SD card or enter the camera’s
settings.
3. If you are entering the camera’s settings, enter the user name and
password (default admin/admin).
1
5 6 7 8 9 10 11 12 13
2 3 4
1. Select Stream 1 (H.264), Stream 2 (MJPEG), Stream 3 (H.264)
2. Select resolution up to 1920x1080
3. Select network protocol between HTTP, TCP, and UDP
4. Call preset up to 256
5. Stop and start for live stream
6. Stream pause
7. Snapshot
8. Zoom
9. Fullscreen
10. Manual trigger
11. Pop-up PTZ control panel
12. Speaker volume
13. Microphone control
1110
Resetting the camera: To reset the camera, use the tip of a paper
clip or a pencil and press the reset button located under the
camera’s lens module. See the diagram above for it’s location.
Pressing the button for five (5) seconds will initiate a camera-wide
reset of all the settings, including network settings.
STEP 5 – DW® IP FINDER™
Thumbnail view
Firmware version
Camera’s uptime
Open Device
configuration
settings
Filter device type to scan
Scan devices
Select network to scan
Show/hide thumbnail view
Refresh thumbnail view
Bulk IP assignment
Firmware upgrade
Device’s
information
Use the DW® IP Finder™ software to scan the network and detect all MEGApix® cameras, set the camera’s network settings or access the camera’s web client.
Network setup
1. To install the DW® IP Finder™, go to
http://www.digital-watchdog.com
2. Enter “DW IP Finder” on the search box at the top of the page
and press Enter.
3. Click on the DW® IP Finder™ from the search result and go to the
Software tab. Click on the download icon to download the DW®
IP Finder™ installation file.
4. Run the installation file and follow the wizard to install the DW®
IP Finder™. Open the DW® IP Finder™ and click ‘Scan Devices’. It
will scan the selected network for all supported devices and list
the results in the table. During the scan, the DW® logo will
turn gray.
Default ID / PW: admin / admin
‘Port forwarding’ has to be set in your
network’s router for external access
to the camera.
*NOTE: For security purposes, it is highly
recommended to change your
password after initial setup.
Default TCP/IP information: DHCP
Select DHCP if the internet service is dynamic IP. This will allow the
camera to receive its IP address from the DHCP server.
Select “Static” to manually enter the camera’s IP address, (Sub)
Netmask, Gateway and DNS information.
The camera’s IP must be set to Static if connecting to DW Spectrum®
IPVMS. Contact your network administrator for more information.
5. Select a camera from the list by double-clicking on the
camera’s image or clicking on the ‘Click’ button under the
IP Conf. column. The pop-up window will show the camera’s
current network settings, allowing admin users to adjust the
settings as needed.
6. To access the camera’s web page, click on ‘View
Camera Website’.
7. To save the changes made to the
camera’s setting, input the username
and password of the camera and click
Apply. Click “Scan Devices” from the
main screen again to display the
updated information.
Reset button
Micro-SD card slot
No Connector Wire Color Description
1 Power jack Black Camera power (12VDC)
2 RJ-45 Black Ethernet
3 RCA jack Black Audio input
4 RCA jack Gray Audio output
5 5-pin cable
Yellow Alarm input 1
White Alarm input 2
Violet Alarm input 3
Brown Alarm input 4
Gray GND
6 2-pin cable Red Alarm output
Black GND
STEP 4 – CABLING
1
2
3
4
5
6
Use the diagram below to connect external devices such as audio
and alarm inputs and outputs to the camera.
Produktspezifikationen
| Marke: | Digital Watchdog |
| Kategorie: | Überwachungskamera |
| Modell: | MegaPix PTZ DWC-MPTZ830XW |
Brauchst du Hilfe?
Wenn Sie Hilfe mit Digital Watchdog MegaPix PTZ DWC-MPTZ830XW benötigen, stellen Sie unten eine Frage und andere Benutzer werden Ihnen antworten
Bedienungsanleitung Überwachungskamera Digital Watchdog

30 August 2024
30 August 2024
Digital Watchdog VMAX AHD CORE DW-VAC42T Bedienungsanleitung
30 August 2024
30 August 2024
30 August 2024
Bedienungsanleitung Überwachungskamera
- Überwachungskamera Samsung
- Überwachungskamera Approx
- Überwachungskamera Belkin
- Überwachungskamera Sanyo
- Überwachungskamera Exibel
- Überwachungskamera Gembird
- Überwachungskamera Genius
- Überwachungskamera Hama
- Überwachungskamera LogiLink
- Überwachungskamera Logitech
- Überwachungskamera Manhattan
- Überwachungskamera Nedis
- Überwachungskamera Niceboy
- Überwachungskamera Philips
- Überwachungskamera Sony
- Überwachungskamera Trust
- Überwachungskamera Panasonic
- Überwachungskamera Clas Ohlson
- Überwachungskamera Profile
- Überwachungskamera ZyXEL
- Überwachungskamera Bosch
- Überwachungskamera Laserliner
- Überwachungskamera Buffalo
- Überwachungskamera Canon
- Überwachungskamera Velleman
- Überwachungskamera Powerfix
- Überwachungskamera Eminent
- Überwachungskamera Linksys
- Überwachungskamera Maginon
- Überwachungskamera Netgear
- Überwachungskamera Technaxx
- Überwachungskamera Alecto
- Überwachungskamera Denver
- Überwachungskamera EMOS
- Überwachungskamera Gira
- Überwachungskamera König
- Überwachungskamera MarQuant
- Überwachungskamera Renkforce
- Überwachungskamera Thomson
- Überwachungskamera Trevi
- Überwachungskamera Blaupunkt
- Überwachungskamera Schneider
- Überwachungskamera Trebs
- Überwachungskamera Pyle
- Überwachungskamera Topcom
- Überwachungskamera Pioneer
- Überwachungskamera JVC
- Überwachungskamera Motorola
- Überwachungskamera Xiaomi
- Überwachungskamera Abus
- Überwachungskamera Avidsen
- Überwachungskamera Elro
- Überwachungskamera EZVIZ
- Überwachungskamera Imou
- Überwachungskamera INSTAR
- Überwachungskamera Megasat
- Überwachungskamera Olympia
- Überwachungskamera Smartwares
- Überwachungskamera Switel
- Überwachungskamera Yale
- Überwachungskamera Ferguson
- Überwachungskamera Orion
- Überwachungskamera Gigaset
- Überwachungskamera Strong
- Überwachungskamera Toshiba
- Überwachungskamera Garmin
- Überwachungskamera Perel
- Überwachungskamera Netis
- Überwachungskamera Lindy
- Überwachungskamera Fenton
- Überwachungskamera Waeco
- Überwachungskamera Acme
- Überwachungskamera Burg Wächter
- Überwachungskamera Marmitek
- Überwachungskamera Marshall
- Überwachungskamera Honeywell
- Überwachungskamera B/R/K
- Überwachungskamera Marshall Electronics
- Überwachungskamera TRENDnet
- Überwachungskamera Targa
- Überwachungskamera First Alert
- Überwachungskamera AVerMedia
- Überwachungskamera Zebra
- Überwachungskamera TP-Link
- Überwachungskamera Flamingo
- Überwachungskamera Kodak
- Überwachungskamera Rollei
- Überwachungskamera IGet
- Überwachungskamera Adj
- Überwachungskamera Netatmo
- Überwachungskamera Duramaxx
- Überwachungskamera Ebode
- Überwachungskamera Xavax
- Überwachungskamera InFocus
- Überwachungskamera Overmax
- Überwachungskamera Monoprice
- Überwachungskamera Monacor
- Überwachungskamera JUNG
- Überwachungskamera Ednet
- Überwachungskamera AG Neovo
- Überwachungskamera Nest
- Überwachungskamera Edimax
- Überwachungskamera V-TAC
- Überwachungskamera Aritech
- Überwachungskamera Uniden
- Überwachungskamera Kogan
- Überwachungskamera Genie
- Überwachungskamera M-e
- Überwachungskamera Elmo
- Überwachungskamera Lumens
- Überwachungskamera Jablocom
- Überwachungskamera Conceptronic
- Überwachungskamera D-Link
- Überwachungskamera Eufy
- Überwachungskamera Stabo
- Überwachungskamera Friedland
- Überwachungskamera EVOLVEO
- Überwachungskamera SPC
- Überwachungskamera August
- Überwachungskamera Ring
- Überwachungskamera Digitus
- Überwachungskamera SereneLife
- Überwachungskamera Swann
- Überwachungskamera Vitek
- Überwachungskamera DataVideo
- Überwachungskamera LevelOne
- Überwachungskamera Aida
- Überwachungskamera APC
- Überwachungskamera Beafon
- Überwachungskamera Chuango
- Überwachungskamera Cisco
- Überwachungskamera Grandstream
- Überwachungskamera Delta Dore
- Überwachungskamera EVE
- Überwachungskamera Defender
- Überwachungskamera Tenda
- Überwachungskamera Swisstone
- Überwachungskamera Foscam
- Überwachungskamera Ubiquiti Networks
- Überwachungskamera Kramer
- Überwachungskamera Vaddio
- Überwachungskamera Intellinet
- Überwachungskamera Reolink
- Überwachungskamera Swan
- Überwachungskamera Hikvision
- Überwachungskamera FLIR
- Überwachungskamera Furrion
- Überwachungskamera Arlo
- Überwachungskamera Nexxt
- Überwachungskamera Planet
- Überwachungskamera EnGenius
- Überwachungskamera Dörr
- Überwachungskamera Lorex
- Überwachungskamera Ikan
- Überwachungskamera Comtrend
- Überwachungskamera Somfy
- Überwachungskamera Dahua
- Überwachungskamera Dedicated Micros
- Überwachungskamera DIO
- Überwachungskamera EasyN
- Überwachungskamera Escam
- Überwachungskamera EverFocus
- Überwachungskamera Ganz
- Überwachungskamera GeoVision
- Überwachungskamera Hombli
- Überwachungskamera Home Protector
- Überwachungskamera Iiquu
- Überwachungskamera Indexa
- Überwachungskamera Interlogix
- Überwachungskamera KlikaanKlikuit
- Überwachungskamera Kompernass
- Überwachungskamera Mr Safe
- Überwachungskamera Naxa
- Überwachungskamera Nordval
- Überwachungskamera Notifier
- Überwachungskamera Oplink
- Überwachungskamera Provision ISR
- Überwachungskamera Quantum
- Überwachungskamera Raymarine
- Überwachungskamera Revo
- Überwachungskamera SAB
- Überwachungskamera Satel
- Überwachungskamera SecurityMan
- Überwachungskamera Sinji
- Überwachungskamera SMC
- Überwachungskamera Sonic Alert
- Überwachungskamera Sricam
- Überwachungskamera Steren
- Überwachungskamera Storage Options
- Überwachungskamera Tenvis
- Überwachungskamera Hive
- Überwachungskamera Ubiquiti
- Überwachungskamera Vivotek
- Überwachungskamera Woonveilig
- Überwachungskamera Y-cam
- Überwachungskamera ACTi
- Überwachungskamera AVer
- Überwachungskamera Epcom
- Überwachungskamera ZKTeco
- Überwachungskamera AirLive
- Überwachungskamera Mobotix
- Überwachungskamera Dahua Technology
- Überwachungskamera Speco Technologies
- Überwachungskamera 3xLOGIC
- Überwachungskamera Atlantis Land
- Überwachungskamera CRUX
- Überwachungskamera Pentatech
- Überwachungskamera Summer Infant
- Überwachungskamera Illustra
- Überwachungskamera Surveon
- Überwachungskamera Avigilon
- Überwachungskamera Brilliant
- Überwachungskamera Hanwha
- Überwachungskamera Lanberg
- Überwachungskamera Verint
- Überwachungskamera Axis
- Überwachungskamera EtiamPro
- Überwachungskamera MEE Audio
- Überwachungskamera Advantech
- Überwachungskamera Chacon
- Überwachungskamera Alula
- Überwachungskamera EKO
- Überwachungskamera IOIO
- Überwachungskamera KJB Security Products
- Überwachungskamera BZBGear
- Überwachungskamera Adesso
- Überwachungskamera Brickcom
- Überwachungskamera Insteon
- Überwachungskamera Aigis
- Überwachungskamera Pelco
- Überwachungskamera ORNO
- Überwachungskamera Atlona
- Überwachungskamera Linear PRO Access
- Überwachungskamera Laxihub
- Überwachungskamera Valueline
- Überwachungskamera Aqara
- Überwachungskamera Tecno
- Überwachungskamera Lutec
- Überwachungskamera Brinno
- Überwachungskamera Night Owl
- Überwachungskamera WyreStorm
- Überwachungskamera Exacq
- Überwachungskamera Equip
- Überwachungskamera AVMATRIX
- Überwachungskamera UniView
- Überwachungskamera Alfatron
- Überwachungskamera Syscom
- Überwachungskamera BLOW
- Überwachungskamera Videotec
- Überwachungskamera DSC
- Überwachungskamera AViPAS
- Überwachungskamera Milestone Systems
- Überwachungskamera Inkovideo
- Überwachungskamera Hamlet
- Überwachungskamera Mobi
- Überwachungskamera Infortrend
- Überwachungskamera VideoComm
- Überwachungskamera Kguard
- Überwachungskamera Boyo
- Überwachungskamera HiLook
- Überwachungskamera Mach Power
- Überwachungskamera Canyon
- Überwachungskamera Ernitec
- Überwachungskamera Ikegami
- Überwachungskamera Gewiss
- Überwachungskamera Weldex
- Überwachungskamera Costar
- Überwachungskamera Sentry360
- Überwachungskamera ALC
- Überwachungskamera Spyclops
- Überwachungskamera Compro
- Überwachungskamera IDIS
- Überwachungskamera I3International
- Überwachungskamera B & S Technology
- Überwachungskamera Qian
- Überwachungskamera Accsoon
- Überwachungskamera Control4
- Überwachungskamera Petcube
- Überwachungskamera Apeman
- Überwachungskamera ATN
- Überwachungskamera IC Intracom
- Überwachungskamera POSline
- Überwachungskamera Watec
- Überwachungskamera ETiger
- Überwachungskamera Videcon
- Überwachungskamera BirdDog
- Überwachungskamera Topica
- Überwachungskamera Rostra
- Überwachungskamera Caddx
- Überwachungskamera Whistler
- Überwachungskamera ClearView
- Überwachungskamera Beseye
- Überwachungskamera IMILAB
- Überwachungskamera CNB Technology
- Überwachungskamera Tapo
- Überwachungskamera Securetech
- Überwachungskamera NetMedia
- Überwachungskamera Nivian
- Überwachungskamera Guardzilla
- Überwachungskamera Blink
- Überwachungskamera Zavio
- Überwachungskamera Campark
- Überwachungskamera IPX
- Überwachungskamera Annke
- Überwachungskamera AVTech
- Überwachungskamera Vimtag
- Überwachungskamera Security Labs
- Überwachungskamera Seneca
- Überwachungskamera Vosker
- Überwachungskamera Owltron
- Überwachungskamera Enabot
- Überwachungskamera Luis Energy
- Überwachungskamera Sir Gawain
- Überwachungskamera VisorTech
- Überwachungskamera Milesight
- Überwachungskamera GVI Security
- Überwachungskamera Conbrov
- Überwachungskamera HuddleCamHD
- Überwachungskamera Setti+
- Überwachungskamera BIRDFY
- Überwachungskamera I-PRO
- Überwachungskamera DVDO
- Überwachungskamera TCP
Neueste Bedienungsanleitung für -Kategorien-
15 Oktober 2024

15 Oktober 2024
14 Oktober 2024
14 Oktober 2024

13 Oktober 2024
13 Oktober 2024
13 Oktober 2024
11 Oktober 2024
11 Oktober 2024
11 Oktober 2024