Denon AVR-S540BT Bedienungsanleitung
Lesen Sie kostenlos die 📖 deutsche Bedienungsanleitung für Denon AVR-S540BT (135 Seiten) in der Kategorie Empfänger. Dieser Bedienungsanleitung war für 15 Personen hilfreich und wurde von 2 Benutzern mit durchschnittlich 4.5 Sternen bewertet
Seite 1/135

AVR-S540BT
AV SURROUND RECEIVER
Owner’s Manual
Contents Connections Playback Settings Tips Appendix
1
Front panel Display Rear panel Remote Index

Accessories 5
Inserting the batteries 6
Operating range of the remote control unit 6
Features 7
High quality sound 7
High performance 7
Easy operation 9
Part names and functions 10
Front panel 10
Display 13
Rear panel 14
Remote control unit 16
Connections
Connecting speakers 20
Speaker installation 20
Speaker connection 22
Standard speaker configuration and connection 24
Connecting a TV 25
Connection 1 : TV equipped with an HDMI connector and
compatible with the ARC (Audio Return Channel) 26
Connection 2 : TV equipped with an HDMI connector and
incompatible with the ARC (Audio Return Channel) 27
Connection 3 : TV equipped without an HDMI connector 28
Connecting a playback device 29
Connecting a set-top box (Satellite tuner/cable TV) 30
Connecting a DVD player or Blu-ray Disc player 31
Connecting a game console or video camcorder 32
Connecting a USB memory device to the USB port 33
Connecting an FM/AM antenna 34
Connecting the power cord 36
Playback
Basic operation 38
Turning the power on 38
Selecting the input source 38
Adjusting the volume 39
Turning off the sound temporarily (Muting) 39
Playback a DVD player/Blu-ray Disc player 39
Playing a USB memory device 40
Playing files stored on USB memory devices 41
Listening to music on a Bluetooth device 42
Playing music from Bluetooth device 43
Pairing with other Bluetooth devices 45
Reconnecting to this unit from a Bluetooth device 46
Contents Connections Playback Settings Tips Appendix
2
Front panel Display Rear panel Remote Index

Listening to FM/AM broadcasts 47
Listening to FM/AM broadcasts 48
Tuning in to stations and presetting them automatically (Auto
Preset) 49
Presetting the current broadcast station (Preset Memory) 50
Listening to preset stations 50
Skipping preset broadcast stations (Preset Skip) 51
Cancelling Preset Skip 51
Convenience functions 52
Performing repeat playback (Repeat) 53
Performing random playback (Random) 53
Adjusting the tone (Tone) 54
Optimizing the night time listening volume (Night Mode) 55
Displaying your desired video during audio playback (Video
Select) 56
Selecting a sound mode 57
Selecting a sound mode 57
HDMI control function 61
Setting procedure 61
Adjusting the volume of each channel to match the input source
(Ch Level Adjust) 62
Sleep timer function 63
Using the sleep timer 64
Quick select plus function 65
Calling up the settings 66
Changing the settings 66
Settings
Menu map 67
Menu operations 70
Audio 71
Surr.Parameter 71
Restorer 74
Audio Delay 75
Volume 75
Room EQ 76
Video 77
HDMI Audio Out 77
HDMI PassThrough 77
Pass Source 78
HDMI Control 78
ARC 79
TV Audio Switching 79
Pow.Off Control 80
Contents Connections Playback Settings Tips Appendix
3
Front panel Display Rear panel Remote Index

Inputs 81
Input Assign 81
Source Level 81
Input Select 82
Speakers 83
Auto Setup 83
Procedure for speaker settings (Auto Setup) 85
Error messages 87
Manual Setup 88
Speaker Config. 88
Distances 89
Levels 90
Crossovers 90
Bass 91
General 92
Language 92
ECO 92
Bluetooth 94
Front Display 95
Firmware 95
Setup Lock 96
Reset 96
Checking the information 97
Tips
Tips 99
Troubleshooting 100
Resetting factory settings 112
Appendix
About HDMI 113
Playing back a USB memory devices 116
Playing back a Bluetooth device 117
Personal memory plus function 118
Last function memory 118
Sound modes and channel output 119
Sound modes and surround parameters 120
Types of input signals, and corresponding sound modes 121
Explanation of terms 122
Trademark information 127
Specifications 129
Index 133
Contents Connections Playback Settings Tips Appendix
4
Front panel Display Rear panel Remote Index

Thank you for purchasing this Denon product.
To ensure proper operation, please read this owner’s manual carefully before using the product.
After reading this manual, be sure to keep it for future reference.
Accessories
Check that the following parts are supplied with the product.
Quick Start Guide Safety Instructions Notes on radio Warranty
(for North America
model only)
FM indoor antenna
AM loop antenna Sound calibration
microphone
Remote control unit
(RC-1216)
R03/AAA batteries
Contents Connections Playback Settings Tips Appendix
5
Front panel Display Rear panel Remote Index

Inserting the batteries
1Remove the rear lid in the direction of the arrow and
remove it.
2Insert two batteries correctly into the battery
compartment as indicated.
Batteries
3Put the rear cover back on.
NOTE
0To prevent damage or leakage of battery fluid:
0Do not use a new battery together with an old one.
0Do not use two different types of batteries.
0Remove the batteries from the remote control unit if it will not be in use for long
periods.
0If the battery fluid should leak, carefully wipe the fluid off the inside of the battery
compartment and insert new batteries.
Operating range of the remote control
unit
Point the remote control unit at the remote sensor when operating it.
Approx. 23 ft/7 m
30° 30°
Contents Connections Playback Settings Tips Appendix
6
Front panel Display Rear panel Remote Index

Features
High quality sound
0With discrete circuit technology, the power amplifier provides
identical quality for all 5-channels (90 Watts x 5-channels)
For optimum realism and stunning dynamic range, the power amplifier
section features discrete power devices (not integrated circuitry).
By using high current, high power discrete power devices, the amplifier
is able to easily drive high quality speakers.
High performance
04K 60Hz input/output supported
4K 60p
4:4:4
4K 60p
4:4:4
When 4K Ultra HD (High Definition) is used, an input/output speed of 60
frames per second (60p) is achieved for video signals. When connected
to 4K Ultra HD and 60p video signal input compatible TV, you can enjoy
the sense of realism only available from high-definition images, even
when viewing fast-moving video.
This unit also supports image processing for 4K 60p, 4:4:4 and 24-bit
videos. By processing the video at the original resolution, this unit lets
you enjoy flawless, high-definition picture quality.
This unit also supports HDR (High Dynamic Range) and BT.2020 wide
color gamut.
0HDCP 2.2
This unit is compatible with HDCP 2.2 copyright protection standard.
Contents Connections Playback Settings Tips Appendix
7
Front panel Display Rear panel Remote Index

0HDMI connections enable connection to various digital AV
devices (5 inputs, 1 output)
5 1
Out
In
This unit is equipped with 5 HDMI inputs and 1 HDMI output enabling
connection to various HDMI compatible devices such as Blu-ray Disc
players, game consoles and HD video camcorders.
0Wireless connection with Bluetooth devices can be carried out
easily (v
v
v
vv p. 42)
You can enjoy music simply by connecting wirelessly with your
smartphone, tablet, PC, etc.
0Energy-saving design
This unit is equipped with an ECO Mode function that allows you to
enjoy music and movies while reducing the power consumption during
use, and also an auto-standby function that automatically turns off the
power supply when the unit is not in use. This helps reduce
unnecessary power use.
Contents Connections Playback Settings Tips Appendix
8
Front panel Display Rear panel Remote Index

Easy operation
0“Setup Assistant” provides easy-to-follow setup instructions
First select the language when prompted. Then simply follow the
instructions displayed on the TV screen to set up the speakers etc.
0Easy to use Graphical User Interface
This unit is equipped with a Graphical User Interface for improved
operability.
0Compatible with the “Denon 500 Series Remote” app performing
basic operations of the unit with an iPad, iPhone or Android™
devices (Google, Amazon Kindle Fire)
The “Denon 500 Series Remote”z application allows you to wireless
control this unit from an iPhone, iPad, Android smartphone or tablet
when paired and connected via Bluetooth. Basic functions include:
Power ON/OFF, volume, mute, and source selection.
zDownload the appropriate “Denon 500 Series Remote” for your iOS or Android
devices. In order to use “Denon 500 Series Remote”, your iOS or Android device
needs to be paired with this unit in advance.
Contents Connections Playback Settings Tips Appendix
9
Front panel Display Rear panel Remote Index

Part names and functions
Front panel
MASTER VOLUME
re
Q2Q1Q0u Q3oi
tq w y
Q9Q6 Q7 Q8 W0Q5Q4
For details, see the next page.
Contents Connections Playback Settings Tips Appendix
10
Front panel Display Rear panel Remote Index

MASTER VOLUME
re tqw y
Q2Q1Q0 Q3oiu
A
A
A
AA Power operation button ( )
X
X
X
XX
Used to turn the power on/off (standby). ( p. 38)v
B
B
B
BB Power indicator
This is lit as follows according to the power status:
0Green: Power on
0Off: Normal standby
0Red:
0When “HDMI PassThrough” is set to “On” ( p. 77)v
0When “HDMI Control” is set to “On” ( v p. 78)
0When “BluetoothStandby” is set to “On” ( p. 94)v
C
C
C
CC SOURCE SELECT knob
This selects the input source. ( p. 38)v
D
D
D
DD Remote control sensor
This receives signals from the remote control unit. (v
p. 6)
E
E
E
EE Display
This displays various pieces of information. ( p. 13)v
F
F
F
FF MASTER VOLUME knob
This adjusts the volume level. (v
p. 39)
G
G
G
GG SOUND MODE buttons ( )
0
0
0
00 1
1
1
11
These select the sound mode. (v p. 57)
H
H
H
HH Tuner preset channel buttons
(TUNER PRESET CH +, –)
These select preset broadcast stations. (v
p. 50)
I
I
I
II Tuning buttons (TUNE +, –)
Select either FM broadcast or AM broadcast. ( p. 48)v
J
J
J
JJ Tuning mode select button (MODE)
This switches the tuning mode. ( p. 48)v
K
K
K
KK SLEEP button
This sets the sleep timer. ( p. 63)v
L
L
L
LL DIMMER button
Each press of this switches the brightness of the display. (v
p. 95)
M
M
M
MM STATUS button
Each press of this switches the status information that is shown on the
display.
Contents Connections Playback Settings Tips Appendix
11
Front panel Display Rear panel Remote Index

MASTER VOLUME
Q
9
Q
6
Q
7
Q
8
W
0
Q
5
Q
4
N
N
N
NN Headphones jack (PHONES)
This is used to connect headphones.
When the headphones are plugged into this jack, audio will no longer
be output from the connected speakers or from the SUBWOOFER
connectors.
NOTE
0To prevent hearing loss, do not raise the volume level excessively when using
headphones.
O
O
O
OO SETUP MIC jack
This is used to connect the supplied Sound calibration microphone.
( p. 86)v
P
P
P
PP QUICK SELECT buttons
With a single press of any of these buttons, you can call up various
settings you’ve registered to each button such as the input source,
volume level and sound mode settings. ( p. 65)v
Q
Q
Q
QQ TONE CONTROL ON/OFF button
Set the tone control function to on/off. (v
p. 54)
R
R
R
RR BASS/TREBLE button
Selects the range for which to adjust the tone. ( p. 54)v
S
S
S
SS USB port ( )
T
T
T
TT
This is used to connect USB storages (such as USB memory devices)
and the USB cable supplied. (v p. 33)
T
T
T
TT Tone adjustment buttons (ADJUST )
0
0
0
00 1
1
1
11
Adjusts the tonal quality of the sound. (v p. 54)
0BASS/TREBLE button and ADJUST buttons can be operated when the0 1
“Tone” setting is “On”. ( p. 54)v
Contents Connections Playback Settings Tips Appendix
12
Front panel Display Rear panel Remote Index
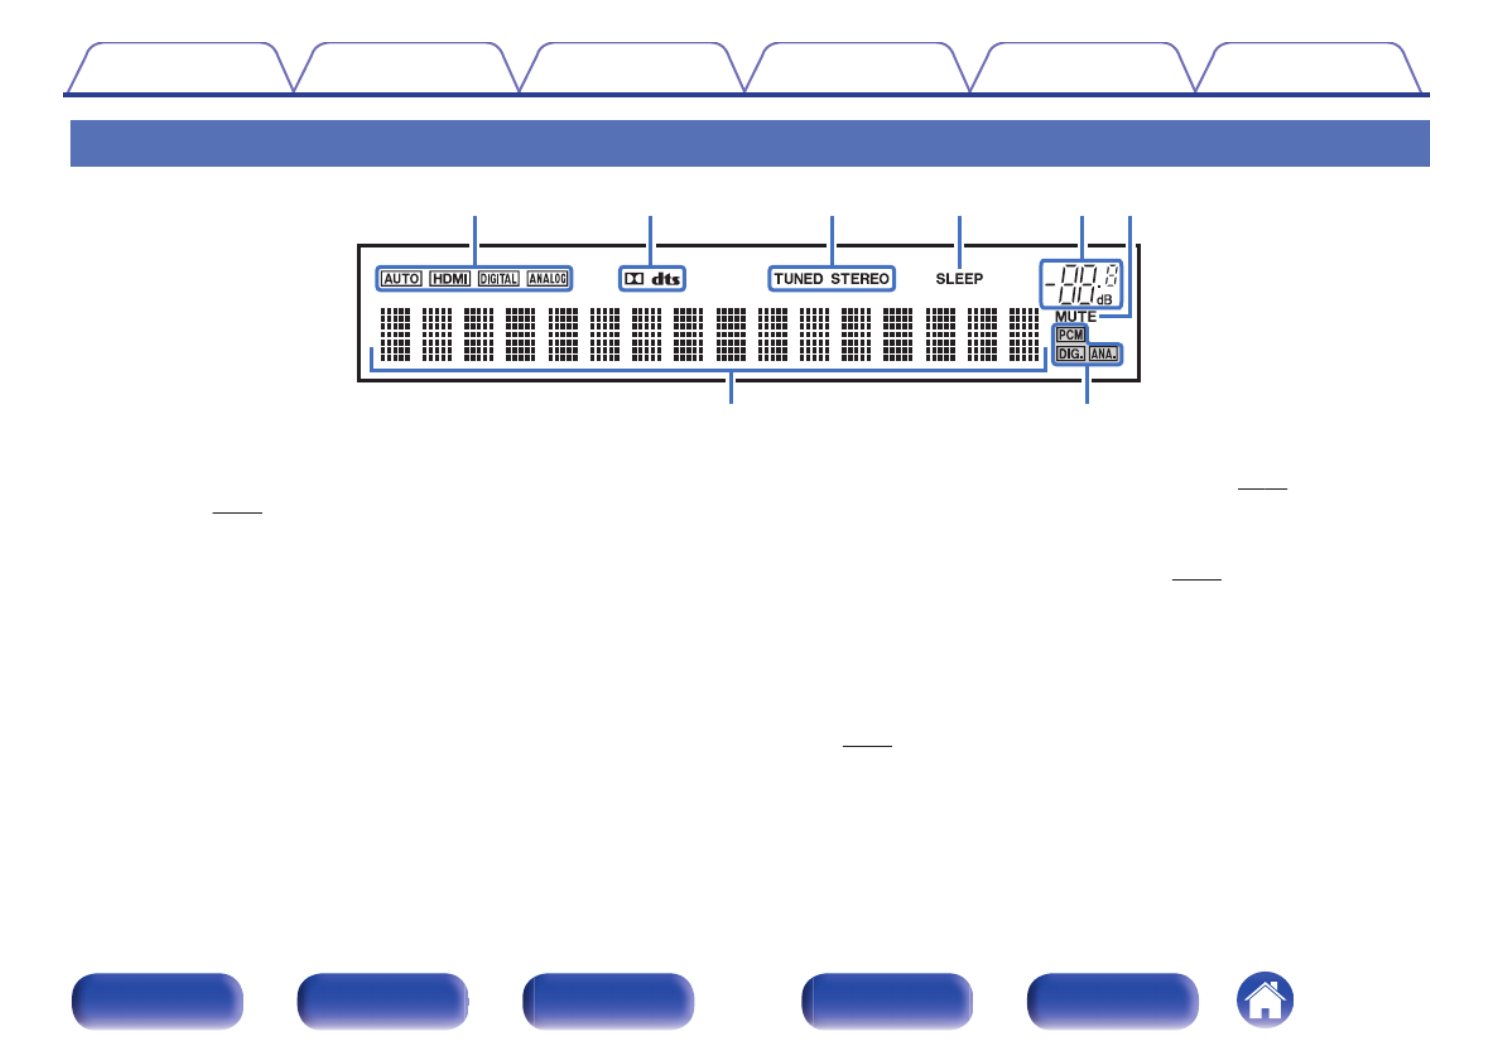
Display
t yreq w
u i
A
A
A
AA Input mode indicators
These light according to the audio input mode settings of each input
source. ( p. 82)v
B
B
B
BB Decoder indicators
These light when Dolby or DTS signals are input or when the Dolby or
DTS decoder is running.
C
C
C
CC Tuner reception mode indicators
These light up according to the reception conditions when the input
source is set to “Tuner”.
TUNED: Lights up when the broadcast is properly tuned in.
STEREO: Lights up when receiving FM stereo broadcasts.
D
D
D
DD Sleep timer indicator
This lights when the sleep mode is selected. (v
p. 63)
E
E
E
EE Volume indicator
F
F
F
FF MUTE indicator
This blinks while the sound is muted. (v
p. 39)
G
G
G
GG Information display
The input source name, sound mode, setting values and other
information are displayed here.
H
H
H
HH Input signal indicators
The respective indicator will light corresponding to the input signal.
(v p. 82)
Contents Connections Playback Settings Tips Appendix
13
Front panel Display Rear panel Remote Index

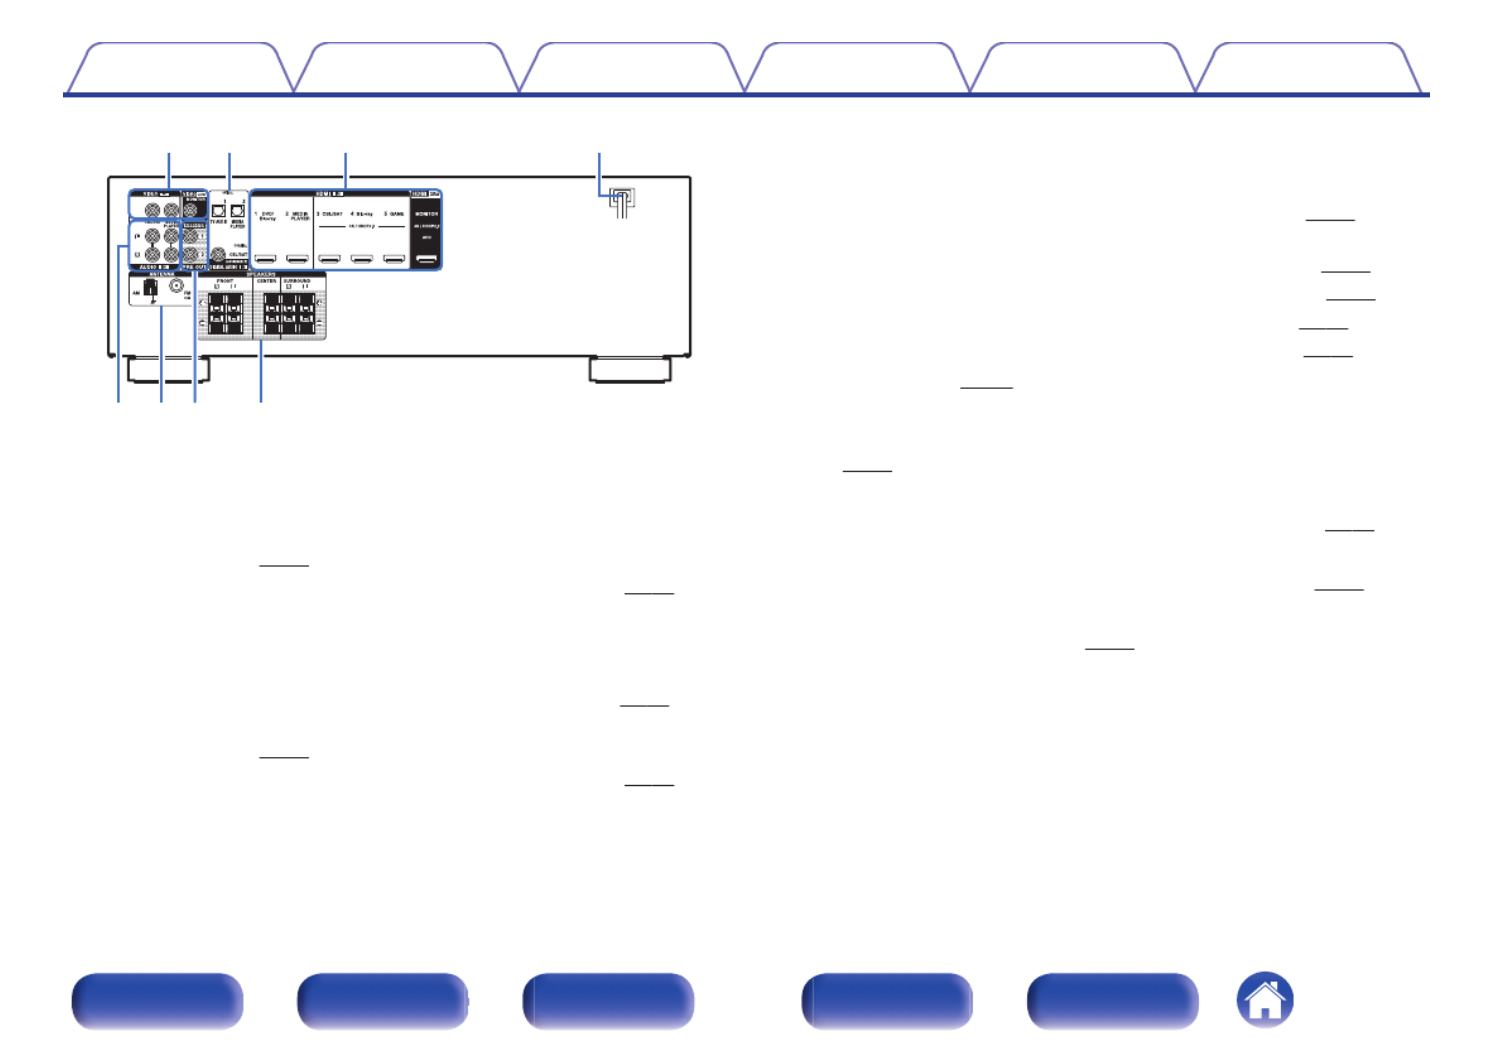
Rear panel
rewq
iyt u
For details, see the next page.
Contents Connections Playback Settings Tips Appendix
14
Front panel Display Rear panel Remote Index
rewq
iyt u
A
A
A
AA Video connectors (VIDEO)
Used to connect devices equipped with video connectors.
0“Connection 3 : TV equipped without an HDMI
connector” ( p. 28)v
0“Connecting a set-top box (Satellite tuner/cable TV)” ( p. 30)v
B
B
B
BB Digital audio connectors (DIGITAL AUDIO)
Used to connect devices equipped with digital audio connectors.
0“Connection 2 : TV equipped with an HDMI connector and
incompatible with the ARC (Audio Return Channel)” (v p. 27)
0“Connection 3 : TV equipped without an HDMI
connector” (v p. 28)
0“Connecting a set-top box (Satellite tuner/cable TV)” ( p. 30)v
C
C
C
CC HDMI connectors
Used to connect devices equipped with HDMI connectors.
0“Connection 1 : TV equipped with an HDMI connector and
compatible with the ARC (Audio Return Channel)” ( p. 26)v
0“Connection 2 : TV equipped with an HDMI connector and
incompatible with the ARC (Audio Return Channel)” ( p. 27)v
0“Connecting a set-top box (Satellite tuner/cable TV)” (v
p. 30)
0“Connecting a DVD player or Blu-ray Disc player” (v p. 31)
0“Connecting a game console or video camcorder” ( p. 32)v
D
D
D
DD Power cord ( p. 36)
v
v
v
vv
E
E
E
EE Analog audio connectors (AUDIO)
Used to connect devices equipped with analog audio connectors.
(v p. 30)
F
F
F
FF FM/AM antenna terminals (ANTENNA)
Used to connect FM antennas and AM loop antennas. ( p. 34)v
G
G
G
GG PRE OUT connectors
Used to connect a subwoofer with a built-in amplifier. (v
p. 23)
H
H
H
HH Speaker terminals (SPEAKERS)
Used to connect speakers. ( p. 22)v
Contents Connections Playback Settings Tips Appendix
15
Front panel Display Rear panel Remote Index
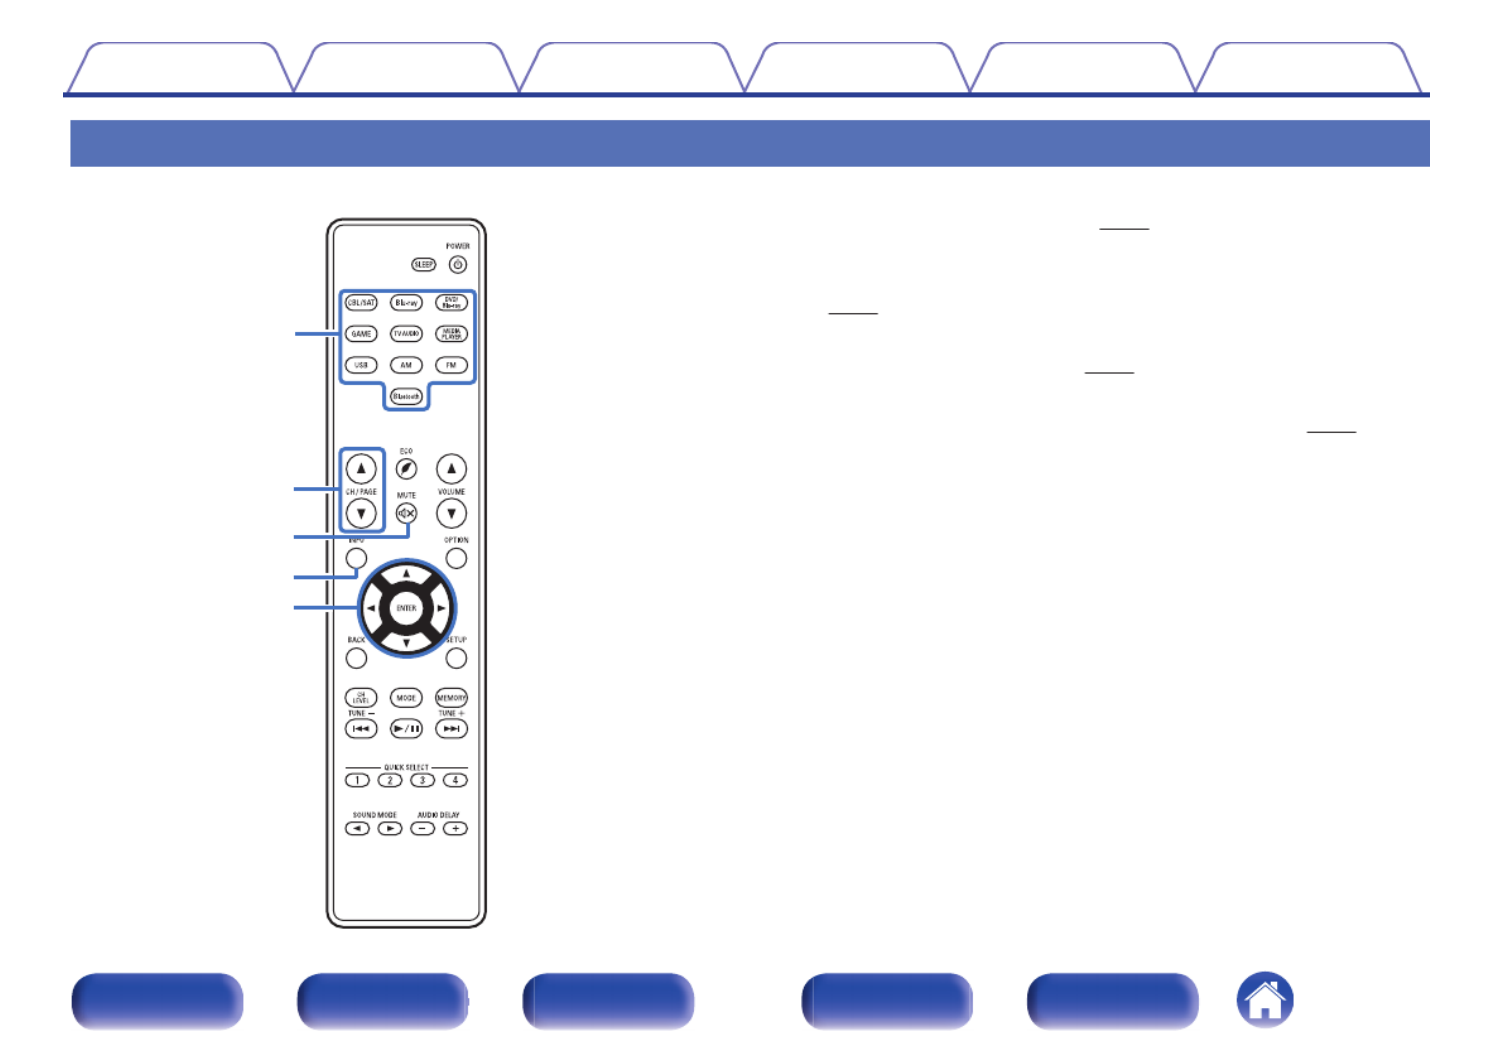
Remote control unit
A
A
A
AA Input source select buttons
These select the input source. (v p. 38)
B
B
B
BB Channel/page search buttons (CH/PAGE ) df
df
df
dfdf
These select radio stations registered to presets or switch pages.
(v p. 50)
C
C
C
CC MUTE button ( )
:
:
:
::
This mutes the output audio. ( p. 39)v
D
D
D
DD Information button (INFO)
This displays the status information on the TV screen. ( p. 97)v
E
E
E
EE Cursor buttons ( )
uio
uio
uio
uiouio p
p
p
pp
These select items.
w
r
e
t
q
Contents Connections Playback Settings Tips Appendix
16
Front panel Display Rear panel Remote Index

F
F
F
FF BACK button
This returns to the previous screen.
G
G
G
GG Channel level button (CH LEVEL)
Adjusting the volume of the speakers. (v
p. 62)
H
H
H
HH System buttons
These perform playback related operations.
Tuning up / Tuning down buttons (TUNE +, –)
These select either FM broadcast or AM broadcast. ( p. 48)v
I
I
I
II QUICK SELECT buttons (1 – 4)
These call up settings registered to each button, such as input source,
volume level and sound mode settings. (v
p. 65)
J
J
J
JJ SOUND MODE buttons ( )
0
0
0
00 1
1
1
11
These select the sound mode. (v p. 57)
K
K
K
KK Remote control signal transmitter
This transmits signals from the remote control unit. ( p. 6)v
L
L
L
LL SLEEP button
This sets the sleep timer. ( p. 63)v
Q2
Q1
Q0
o
i
u
y
Contents Connections Playback Settings Tips Appendix
17
Front panel Display Rear panel Remote Index

M
M
M
MM POWER button ( )
X
X
X
XX
This turns the power on/off. ( p. 38)v
N
N
N
NN ECO Mode button ( )
G
G
G
GG
This switches to ECO Mode. (v p. 92)
O
O
O
OO VOLUME buttons ( )
df
df
df
dfdf
These adjust the volume level. (v
p. 39)
P
P
P
PP OPTION button
This displays the option menu on the TV screen.
Q
Q
Q
QQ ENTER button
This determines the selection.
R
R
R
RR SETUP button
This displays the menu on the TV screen. (v p. 70)
S
S
S
SS Preset memory button (MEMORY)
The current broadcast station that is preset. (v
p. 50)
T
T
T
TT Tuning mode select button (MODE)
This switches the tune mode. ( p. 48)v
U
U
U
UU AUDIO DELAY buttons (+, –)
Compensates for incorrect timing between video and audio. ( p. 75)v
Q3
Q5
Q4
Q8
Q9
W0
Q6
Q7
W1
Contents Connections Playback Settings Tips Appendix
18
Front panel Display Rear panel Remote Index
o
o
o
oo Contents
Connecting speakers 20
Connecting a TV 25
Connecting a playback device 29
Connecting a USB memory device to the USB port 33
Connecting an FM/AM antenna 34
Connecting the power cord 36
NOTE
0Do not plug in the power cord until all connections have been completed.
However, when the “Setup Assistant”is running, follow the instructions in the
“Setup Assistant” (page 7 in the separate “Quick Start Guide”) screen for making
connections. (During “Setup Assistant” operation, the input/output connectors do
not conduct current.)
0Do not bundle power cords together with connection cables. Doing so can result in
noise.
o
o
o
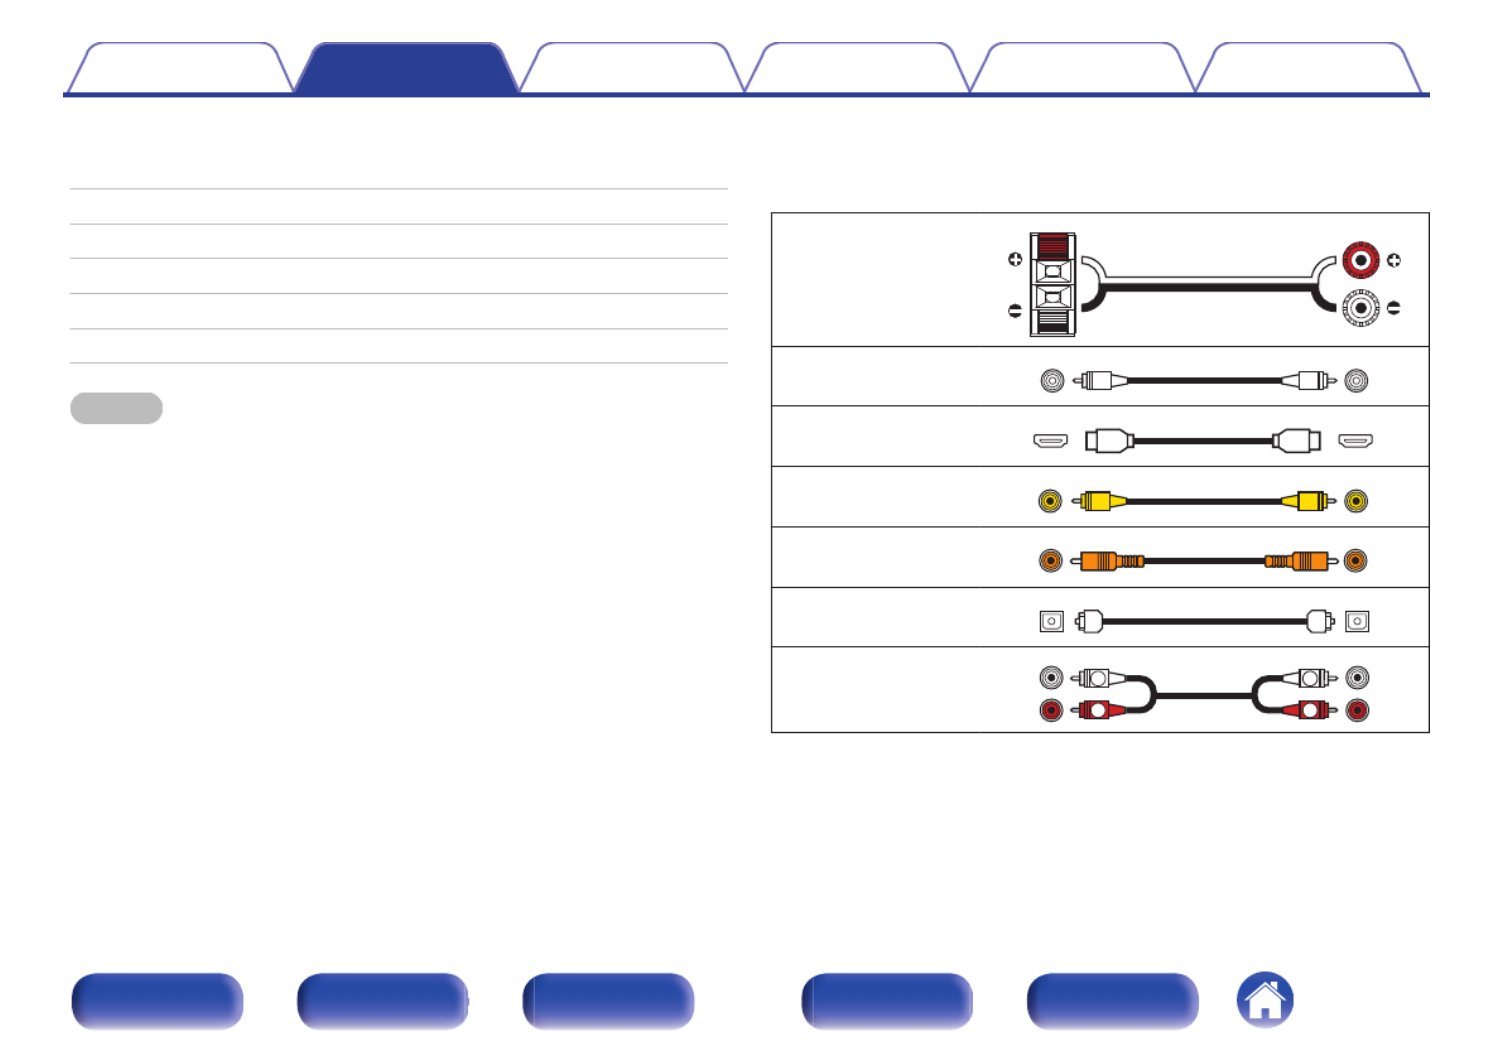
oo Cables used for connections
Provide necessary cables according to the devices you want to
connect.
Speaker cable
Subwoofer cable
HDMI cable
Video cable
Coaxial digital cable
Optical cable
Audio cable
R
L
R
L
Contents Playback Settings Tips AppendixConnections
19
Front panel Display Rear panel Remote Index

Connecting speakers
Install speakers and connect them to this unit. (“Speaker installation” ( p. 20), “Speaker connection” ( p. 22))v v
Speaker installation
Determine the speaker system depending on the number of speakers you
are using and install each speaker and subwoofer in the room.
Speaker installation is explained using this example of a typical
installation.
FL
SW1 C
SL
FR
SR
SW2
FL/FR
(Front speaker left/
right):
Place the FRONT left and right speakers an
equal distance from the main listening position.
The distance between each speaker and your TV
should also be the same.
C
(Center speaker):
Place the CENTER speaker in between the front
speakers and above or below your TV.
SL/SR
(Surround speaker left/
right):
Place the SURROUND left and right speakers an
equal distance to the left and right sides of the
main listening position.
SW 1/2
(Subwoofer) :
Place the SUBWOOFER at a convenient location
near the front speakers. If you have two
subwoofers, place them asymmetrically across
the front of your room.
Contents Playback Settings Tips AppendixConnections
20
Front panel Display Rear panel Remote Index

0Use the illustration below as a guide for how high each speaker should be
installed. The height does not need to be exactly the same.
GViewed from the sideH
Surround
speaker
Front speaker
o
o
o
oo When 5.1-channel speakers are installed
z1
z2
FL
SW C
SL
FR
SR
z1 22° - 30° z2 120°
Contents Connections Playback Settings Tips Appendix
21
Front panel Display Rear panel Remote Index
Speaker connection
Here we connect the speakers in the room to this unit.
This section explains how to connect them using typical examples.
NOTE
0Disconnect this unit’s power plug from the power outlet before connecting the
speakers. Also, turn off the subwoofer.
0Connect so that the speaker cable core wires do not protrude from the speaker
terminal. The protection circuit may be activated if the core wires touch the rear
panel or if the + and - sides touch each other. (“Protection circuit” (v p. 126))
0Never touch the speaker terminals while the power cord is connected. Doing so
could result in electric shock. When the “Setup Assistant” (page 7 in the separate
“Quick Start Guide”) is running, follow the instructions in the “Setup Assistant”
screen for making connections. (Power is not supplied to the speaker terminals
while the “Setup Assistant” is running.)
0Use speakers with an impedance of 6 – 16 /ohms.Ω
o
o
o
oo Connecting the speaker cables
Carefully check the left (L) and right (R) channels and + (red) and –
(black) polarities on the speakers being connected to this unit, and be
sure to connect the channels and polarities correctly.
1Peel off about 3/8 inch (10 mm) of sheathing from the
tip of the speaker cable, then either twist the core wire
tightly or terminate it.
2Press the lever on the speaker terminal.
3Holding the lever on the speaker terminal, insert the
core wire of the speaker cable all the way into the
speaker terminal.
4Release your finger from the lever on the speaker
terminal.
Contents Connections Playback Settings Tips Appendix
22
Front panel Display Rear panel Remote Index

o
o
o
oo Connecting the subwoofer
Use a subwoofer cable to connect the subwoofer. Two subwoofers can
be connected to this unit.
The same signal is output from the respective subwoofer terminals.
SW1 SW2
Contents Connections Playback Settings Tips Appendix
23
Front panel Display Rear panel Remote Index
Standard speaker configuration and connection
This serves as a basic 5.1-channel surround system.
Sound modes such as Dolby Pro Logic are supported.g
FL
SW C
SL
FR
SR
SW SLFLFR C SR
Contents Connections Playback Settings Tips Appendix
24
Front panel Display Rear panel Remote Index

Connecting a TV
Connect a TV to this unit so that the input video is output to the TV. You can also enjoy audio from the TV on this unit.
How to connect a TV depends on the connectors and functions equipped on the TV.
ARC (Audio Return Channel) function plays TV audio on this unit by sending the TV audio signal to this unit via HDMI cable.
No
Yes
Is the TV equipped with an HDMI connector?
Is the TV compatible with the ARC (Audio Return Channel) ?
Yes No
“Connection 1 : TV equipped with an HDMI
connector and compatible with the ARC (Audio
Return Channel)” (v
v
v
vv p. 26)
“Connection 2 : TV equipped with an HDMI
connector and incompatible with the ARC (Audio
Return Channel)” ( p. 27)
v
v
v
vv
“Connection 3 : TV equipped without
an HDMI connector” (v
v
v
vv p. 28)
Contents Playback Settings Tips AppendixConnections
25
Front panel Display Rear panel Remote Index

Connection 1 : TV equipped with an HDMI connector and compatible with the ARC
(Audio Return Channel)
Use an HDMI cable to connect a TV that is compatible with the ARC function to this unit.
Set “HDMI Control” to “On” when using a TV that supports the ARC function. (v p. 78)
(ARC)
IN
HDMI
TV
Contents Connections Playback Settings Tips Appendix
26
Front panel Display Rear panel Remote Index

Connection 2 : TV equipped with an HDMI connector and incompatible with the ARC
(Audio Return Channel)
Use an HDMI cable to connect the TV to this unit.
To listen to audio from TV on this unit, use an optical cable to connect the TV to this unit.
OUT
OPTICAL
OUT IN
IN
HDMI
TV
Contents Connections Playback Settings Tips Appendix
27
Front panel Display Rear panel Remote Index

Connection 3 : TV equipped without an HDMI connector
Use a video cable to connect the TV to this unit.
To listen to audio from TV on this unit, use an optical cable to connect the TV to this unit.
OUT
OPTICAL
OUTIN
IN
VIDEO
TV
Contents Connections Playback Settings Tips Appendix
28
Front panel Display Rear panel Remote Index

Connecting a playback device
This unit is equipped with two types of video input connectors (HDMI and composite video) and three types of audio input connectors (HDMI, digital audio
and audio).
Select input connectors on this unit according to the connectors equipped on the device you want to connect.
If the device connected to this unit is equipped with an HDMI connector, it is recommended to use HDMI connections.
In the HDMI connection, audio and video signals can be transmitted through a single HDMI cable.
0“Connecting a set-top box (Satellite tuner/cable TV)” ( p. 30)v
0“Connecting a DVD player or Blu-ray Disc player” ( p. 31)v
0“Connecting a game console or video camcorder” ( p. 32)v
0Connect devices to this unit as indicated by the input sources printed on the audio/video input connectors of this unit.
0The source that is assigned to the OPTICAL 1, OPTICAL 2 and COAXIAL connectors can be changed. See “Input Assign” on how to change the input source assigned to the
input connectors. (v
p. 81)
0To play back audio signals that are input to this unit on a TV connected via HDMI, set “HDMI Audio Out” to “TV”. ( p. 77)v
0To enjoy content that is copyright protected by HDCP 2.2, use a playback device and TV compatible with HDCP 2.2 only.
0To enjoy 4K content or content that is copyright protected by HDCP 2.2, connect the device to the HDMI 3, HDMI 4 or HDMI 5 input connector.
Contents Playback Settings Tips AppendixConnections
29
Front panel Display Rear panel Remote Index

Connecting a set-top box (Satellite tuner/cable TV)
This explanation uses the connection with a satellite tuner/cable TV STB as an example.
Select the input connectors on this unit to match the connectors on the device that you want to connect to.
R L
R L
OUT
HDMIOUT
COAXIAL
AUDIO
AUDIO
R L
OUT OUT
VIDEO
VIDEO
(HDMI incompatible device)
or
Satellite tuner /
Cable TV
Satellite tuner /
Cable TV
Contents Connections Playback Settings Tips Appendix
30
Front panel Display Rear panel Remote Index

Connecting a DVD player or Blu-ray Disc player
This explanation uses the connection with a DVD player or Blu-ray Disc player as an example.
When connecting a 4K / HDCP 2.2 compatible player, connect to either the HDMI 3, HDMI 4 or HDMI 5 input connector.
OUT
HDMI
DVD player /
Blu-ray Disc
player
Contents Connections Playback Settings Tips Appendix
31
Front panel Display Rear panel Remote Index
Connecting a game console or video camcorder
This explanation uses the connection with a game console as an example.
Connect a playback device to this unit, such as a game console or video camcorder.
OUT
HDMI
Game console
Contents Connections Playback Settings Tips Appendix
32
Front panel Display Rear panel Remote Index

Connecting a USB memory device to the USB port
For operating instructions see “Playing a USB memory device” ( p. 40).v
MASTER VOLUME
USB memory
device
0Denon does not guarantee that all USB memory devices will operate or receive power. When using a portable USB hard disk drive (HDD) which came with an AC adapter,
use that device’s supplied AC adapter.
NOTE
0USB memory devices will not work via a USB hub.
0It is not possible to use this unit by connecting the unit’s USB port to a PC via a USB cable.
0Do not use an extension cable when connecting a USB memory device. This may cause radio interference with other devices.
Contents Playback Settings Tips AppendixConnections
33
Front panel Display Rear panel Remote Index

Connecting an FM/AM antenna
Connect the antenna, tune in to a broadcast and then move the antenna to
the location where there is least noise. Then use tape, etc. to fix the
antenna in this location. (“Listening to FM/AM broadcasts” ( p. 47))v
0If you are unable to receive a good broadcast signal, we recommend installing an
outdoor antenna. For details, inquire at the retail store where you purchased the
unit.
NOTE
0Make sure the AM loop antenna lead terminals do not touch metal parts of the
panel.
wq e
FM indoor antenna
(supplied)
White
Black
AM loop antenna
(supplied)
Contents Connections Playback Settings Tips Appendix
34
Front panel Display Rear panel Remote Index
o
o
o
oo Using the AM loop antenna
Suspending on a wall
Suspend directly on a wall without assembling.
Nail, tack, etc.
Standing alone
Use the procedure shown above to assemble.
When assembling, refer to “AM loop antenna assembly”.
o
o
o
oo AM loop antenna assembly
1Put the stand section through the bottom of the loop
antenna from the rear and bend it forward.
2Insert the projecting part into the square hole in the
stand.
Projecting part
Square hole
Stand
Loop antenna
Contents Connections Playback Settings Tips Appendix
35
Front panel Display Rear panel Remote Index

Connecting the power cord
After completing all the connections, insert the power plug into the power outlet.
(AC 120 V, 60 Hz)
To household power outlet
Power cord
Contents Connections Playback Settings Tips Appendix
36
Front panel Display Rear panel Remote Index

o
o
o
oo Contents
Basic operation
Turning the power on 38
Selecting the input source 38
Adjusting the volume 39
Turning off the sound temporarily (Muting) 39
Selecting a sound mode 57
Playback a device
Playing a DVD player/Blu-ray Disc player 39
Playing a USB memory device 40
Listening to music on a Bluetooth device 42
Listening to FM/AM broadcasts 47
Convenience functions
Convenience functions 52
HDMI control function 61
Adjusting the volume of each channel to match the input source
(Ch Level Adjust) 62
Sleep timer function 63
Quick select plus function 65
Contents Connections Settings Tips AppendixPlayback
37
Front panel Display Rear panel Remote Index

Basic operation
MUTE
POWER
VOLUME df
X
:
Input source
select
buttons
Turning the power on
1Press POWER to turn on power to the unit. X
X
X
XX
0You can press the input source select button when the unit is in standby mode to
turn on the power.
0You can also switch the power to standby by pressing on the main unit.X
Selecting the input source
1Press the input source select button to be played back.
The desired input source can be selected directly.
0You can also select the input source by turning SOURCE SELECT on the main
unit.
Contents Connections Settings Tips AppendixPlayback
38
Front panel Display Rear panel Remote Index

Adjusting the volume
1Use VOLUME to adjust the volume. df
df
df
dfdf
0The variable range differs according to the input signal and channel level setting.
0You can also adjust the master volume by turning MASTER VOLUME on the main
unit.
Turning off the sound temporarily
(Muting)
1Press MUTE . :
:
:
::
0MUTE indicator on the display flashes.
0: appears on the TV screen.
0The sound is reduced to the level set at “Mute Level” in the menu. ( p. 76)v
0To cancel mute, either adjust the sound volume or press MUTE again. :
Playback a DVD player/Blu-ray Disc
player
The following describes the procedure for playing DVD player/Blu-ray Disc
player.
1Prepare for playback.
ATurn on the power of the TV, subwoofer and player.
BChange the TV input to the input of this unit.
2Press POWER to turn on power to the unit. X
X
X
XX
3Press DVD/Blu-ray (4K not supported) or Blu-ray (4K
supported) to switch the input source of the player to
be played back.
4Play the DVD player or Blu-ray Disc player.
o
o
o
oo Surround playback ( p. 57)
v
v
v
vv
Contents Connections Settings Tips AppendixPlayback
39
Front panel Display Rear panel Remote Index

Playing a USB memory device
1/3
8 9
USB
ui p
ENTER
BACK
OPTION
0Playing back music files stored on a USB memory device.
0Only USB memory devices conforming to mass storage class standards
can be played on this unit.
0This unit is compatible with USB memory devices in “FAT16” or
“FAT32” format.
0The audio format types and specifications supported by this unit for
playback are as follows.
See “Playing back a USB memory devices” for details. ( p. 116)v
0WMA
0MP3
0WAV
0MPEG-4 AAC
0FLAC
Contents Connections Settings Tips AppendixPlayback
40
Front panel Display Rear panel Remote Index

Playing files stored on USB memory
devices
1Connect the USB memory device to the USB port.
( p. 33)
v
v
v
vv
2Press USB to switch the input source to “USB”.
Folder
Music
USB [1/2]
Option
OPTION
3Use to select the file to be played, then press
ui
ui
ui
uiui p
p
p
pp
ENTER.
Playback starts.
Operation buttons Function
1
1
1
11 3
3
3
33/Playback / Pause
8
8
8
88 9
9
9
99
Skip to previous track / Skip to next track
(Press and hold) Fast-reverse / Fast-
forward
ENTER Playback / Pause
(Press and hold) Stop
u
u
u
uu i
i
i
ii
Skip to previous track / Skip to next track
(Press and hold) Fast-reverse / Fast-
forward
PAGE
d
d
d
dd f
f
f
ff Switch to the previous page/next page in
the list display
NOTE
0
Note that Denon will accept no responsibility whatsoever for any problems arising with
the data on a USB memory device when using this unit in conjunction with the USB
memory device.
o
o
o
oo Operations accessible through the option
menu
0“Performing repeat playback (Repeat)” ( p. 53)v
0“Performing random playback (Random)” (v p. 53)
0“Adjusting the tone (Tone)” ( p. 54)v
0“Displaying your desired video during audio playback (Video
Select)” (v p. 56)
Contents Connections Settings Tips AppendixPlayback
41
Front panel Display Rear panel Remote Index

Listening to music on a Bluetooth device
Bluetooth
8 9
OPTION
1/3
BACK
ui
ENTER
Music files stored on Bluetooth devices such as smartphones, digital
music players, etc. can be enjoyed on this unit by pairing and connecting
this unit with the Bluetooth device.
Communication is possible up to a range of about 32.8 ft/10 m.
NOTE
0To play back music from a Bluetooth device, the Bluetooth device needs to
support the A2DP profile.
Contents Connections Settings Tips AppendixPlayback
42
Front panel Display Rear panel Remote Index

Playing music from Bluetooth device
In order to enjoy music from a Bluetooth device on this unit, the Bluetooth
device must first be paired with this unit.
Once the Bluetooth device has been paired, it does not need to be paired
again.
1Press Bluetooth to switch the input source to
“Bluetooth”.
Pairing Mode
Turn on Bluetooth from your mobile device’s
settings menu, then select
“Denon AVR-S540BT” when it appears
in the device list.
Bluetooth
Cancel
When using for the first time, the unit will go into the pairing mode
automatically and “Pairing...” will appear on the display of the unit.
2Activate the Bluetooth settings on your mobile device.
3Select this unit when its name appears in the list of
devices displayed on the screen of the Bluetooth
device.
Connect to the Bluetooth device while “Pairing” is being displayed
on the display of the unit.
Perform the connection with the Bluetooth device close to the unit
(about 3.3 ft/1 m).
4Play music using any app on your Bluetooth device.
0The Bluetooth device can also be operated with the remote
control of this unit.
0The next time the input source is switched to Bluetooth, this unit
automatically connects to the last Bluetooth device that was
connected.
0Enter “0000” when the password is requested on the screen of the Bluetooth
device.
Contents Connections Settings Tips AppendixPlayback
43
Front panel Display Rear panel Remote Index

Operation buttons Function
1
1
1
11 3
3
3
33/Playback / Pause
8
8
8
88 9
9
9
99
Skip to previous track / Skip to next track
(Press and hold) Fast-reverse / Fast-
forward
ENTER Playback / Pause
(Press and hold) Stop
u
u
u
uu i
i
i
ii
Skip to previous track / Skip to next track
(Press and hold) Fast-reverse / Fast-
forward
0English letters, numbers and certain symbols are displayed. Incompatible
characters are displayed as “.” (period).
NOTE
0To operate the Bluetooth device with the remote control of this unit, the Bluetooth
device needs to support the AVRCP profile.
0The remote control of this unit is not guaranteed to work with all Bluetooth devices.
0Depending on the type of Bluetooth device, this unit outputs audio that is coupled
to the volume setting on the Bluetooth device.
o
o
o
oo Operations accessible through the option
menu
0“Pairing with other Bluetooth devices” ( p. 45)v
0“Performing repeat playback (Repeat)” ( p. 53)v
0“Performing random playback (Random)” ( p. 53)v
0“Adjusting the tone (Tone)” ( p. 54)v
0“Displaying your desired video during audio playback (Video
Select)” ( p. 56)v
Contents Connections Settings Tips AppendixPlayback
44
Front panel Display Rear panel Remote Index

Pairing with other Bluetooth devices
Pair a Bluetooth device with this unit.
1Activate the Bluetooth settings on your mobile device.
2Press OPTION when the input source is “Bluetooth”.
The option menu screen is displayed.
3Use to select “Pairing Mode”, then press ENTER.
ui
ui
ui
uiui
The device will go into the pairing mode.
4Select this unit when its name appears in the list of
devices displayed on the screen of the Bluetooth
device.
0This unit can be paired with a maximum of 8 Bluetooth devices. When a 9th
Bluetooth device is paired, it will be registered in place of the oldest registered
device.
0Enter “0000” when the password is requested on the screen of the Bluetooth
device.
0Press and hold the Bluetooth on the remote control for at least 3 seconds to go
into pairing mode.
Contents Connections Settings Tips AppendixPlayback
45
Front panel Display Rear panel Remote Index

Listening to FM/AM broadcasts
1Connect the antenna. (“Connecting an FM/AM
antenna” ( p. 34))
v
v
v
vv
2Press FM or AM to switch the input source to “FM” or
“AM”.
G H TV screen
01
Tuner
FM 92.1MHz
Tune Preset
-
+
TUNE
Option
OPTION
AUTO
CH d/f
01 FM 92.10MHz
G HDisplay of this unit
3Press MODE to select the tune mode.
AUTO
(Default) :
Automatically search for and tune to a
receivable radio station.
MANUAL:
Manually change the frequency one
step at a time each time the button is
pressed.
4Press TUNE + or TUNE - to select the station you want
listen to.
Scanning is performed until it finds an available radio station. When
it finds a radio station, it stops the scan automatically and tunes in.
0In “AUTO” mode, you cannot tune in to radio stations if the reception is not good.
If this is the case, then use the “MANUAL” mode to tune in.
0You can also scan the broadcast station by pressing TUNE + or TUNE - on the
unit.
Operation buttons Function
CH/PAGE
d
d
d
dd f
f
f
ff Selects preset radio stations
MODE Switching tune mode
MEMORY Register presets
TUNE +, - Selects the radio station (up/down)
Contents Connections Settings Tips AppendixPlayback
48
Front panel Display Rear panel Remote Index
Produktspezifikationen
| Marke: | Denon |
| Kategorie: | Empfänger |
| Modell: | AVR-S540BT |
Brauchst du Hilfe?
Wenn Sie Hilfe mit Denon AVR-S540BT benötigen, stellen Sie unten eine Frage und andere Benutzer werden Ihnen antworten
Bedienungsanleitung Empfänger Denon

16 Oktober 2024
7 Oktober 2024
5 Oktober 2024
17 September 2024
14 September 2024
13 September 2024
12 September 2024
10 September 2024
9 September 2024
6 September 2024
Bedienungsanleitung Empfänger
- Empfänger Asus
- Empfänger Belkin
- Empfänger Exibel
- Empfänger Hama
- Empfänger Audio-Technica
- Empfänger LogiLink
- Empfänger Logitech
- Empfänger Manhattan
- Empfänger Medion
- Empfänger Nedis
- Empfänger Philips
- Empfänger Sandberg
- Empfänger Sony
- Empfänger Zalman
- Empfänger Panasonic
- Empfänger Roland
- Empfänger MX Onda
- Empfänger Bosch
- Empfänger Vox
- Empfänger TechniSat
- Empfänger Yamaha
- Empfänger Velleman
- Empfänger Neumann
- Empfänger CSL
- Empfänger Devolo
- Empfänger Schwaiger
- Empfänger Alecto
- Empfänger Conrad
- Empfänger Denver
- Empfänger EMOS
- Empfänger Gira
- Empfänger König
- Empfänger MarQuant
- Empfänger Renkforce
- Empfänger Bush
- Empfänger Thomson
- Empfänger Trevi
- Empfänger Blaupunkt
- Empfänger Grundig
- Empfänger Kenwood
- Empfänger Sharp
- Empfänger Hilti
- Empfänger Pyle
- Empfänger Golden Age Project
- Empfänger Salora
- Empfänger Telestar
- Empfänger Aiwa
- Empfänger AKG
- Empfänger Auna
- Empfänger Bang And Olufsen
- Empfänger Bose
- Empfänger Bowers And Wilkins
- Empfänger Caliber
- Empfänger Maxview
- Empfänger Pioneer
- Empfänger Geemarc
- Empfänger Jabra
- Empfänger JBL
- Empfänger JVC
- Empfänger Klipsch
- Empfänger Krüger And Matz
- Empfänger Meliconi
- Empfänger Motorola
- Empfänger Nokia
- Empfänger Onkyo
- Empfänger Optoma
- Empfänger Sennheiser
- Empfänger Shure
- Empfänger Technics
- Empfänger Teufel
- Empfänger Vivanco
- Empfänger Hifonics
- Empfänger Megasat
- Empfänger Smartwares
- Empfänger Akai
- Empfänger Alden
- Empfänger Dual
- Empfänger Ferguson
- Empfänger GoGEN
- Empfänger Hyundai
- Empfänger Orava
- Empfänger Strong
- Empfänger Tesla
- Empfänger Imperial
- Empfänger Tascam
- Empfänger Zoom
- Empfänger Garmin
- Empfänger Nexa
- Empfänger Sencor
- Empfänger Goobay
- Empfänger Lindy
- Empfänger Astro
- Empfänger Plantronics
- Empfänger Fenton
- Empfänger TOA
- Empfänger Rotel
- Empfänger Musway
- Empfänger Tripp Lite
- Empfänger Audio Pro
- Empfänger Cabasse
- Empfänger Canton
- Empfänger Dali
- Empfänger Harman Kardon
- Empfänger Inateck
- Empfänger Magnat
- Empfänger Marmitek
- Empfänger Marshall
- Empfänger Naim
- Empfänger Power Dynamics
- Empfänger Samson
- Empfänger Scosche
- Empfänger Skytec
- Empfänger Tangent
- Empfänger Vonyx
- Empfänger Peavey
- Empfänger Marshall Electronics
- Empfänger Sagem
- Empfänger Simrad
- Empfänger AVM
- Empfänger Xoro
- Empfänger Karma
- Empfänger Atlas
- Empfänger Reely
- Empfänger Edision
- Empfänger GigaBlue
- Empfänger Humax
- Empfänger Kathrein
- Empfänger Metronic
- Empfänger Smart
- Empfänger Topfield
- Empfänger Xtrend
- Empfänger Zehnder
- Empfänger Icom
- Empfänger Brondi
- Empfänger Alpine
- Empfänger Rupert Neve Designs
- Empfänger NAD
- Empfänger Fender
- Empfänger Renegade
- Empfänger Ebode
- Empfänger LTC
- Empfänger Vincent
- Empfänger Vision
- Empfänger Hager
- Empfänger Behringer
- Empfänger Mackie
- Empfänger Omnitronic
- Empfänger Thomann
- Empfänger MB Quart
- Empfänger Marantz
- Empfänger Monoprice
- Empfänger Arcam
- Empfänger Cambridge
- Empfänger Crown
- Empfänger Dynacord
- Empfänger Ecler
- Empfänger Luxman
- Empfänger Monacor
- Empfänger Rockford Fosgate
- Empfänger TEAC
- Empfänger Thorens
- Empfänger Crunch
- Empfänger Chamberlain
- Empfänger JUNG
- Empfänger Aplic
- Empfänger InLine
- Empfänger Sangean
- Empfänger Classé
- Empfänger Optex
- Empfänger Revox
- Empfänger Sherwood
- Empfänger Jamo
- Empfänger AXTON
- Empfänger Clarion
- Empfänger Mac Audio
- Empfänger Kogan
- Empfänger Genie
- Empfänger Humantechnik
- Empfänger T-Mobile
- Empfänger Skytronic
- Empfänger Yaesu
- Empfänger Audizio
- Empfänger ESX
- Empfänger Reloop
- Empfänger HQ
- Empfänger Pinnacle
- Empfänger Block
- Empfänger Rega
- Empfänger SYNQ
- Empfänger Amazon
- Empfänger Insignia
- Empfänger August
- Empfänger Audison
- Empfänger DataVideo
- Empfänger RCF
- Empfänger Electro-Voice
- Empfänger Cyrus
- Empfänger Scansonic
- Empfänger Sogo
- Empfänger Cisco
- Empfänger Delta Dore
- Empfänger Salus
- Empfänger Sonos
- Empfänger Yorkville
- Empfänger MIPRO
- Empfänger Elektrobock
- Empfänger FiiO
- Empfänger Boss
- Empfänger IFM
- Empfänger Intertechno
- Empfänger American Audio
- Empfänger Anthem
- Empfänger Roksan
- Empfänger Engel Axil
- Empfänger Alto
- Empfänger Kopul
- Empfänger Chord
- Empfänger Saramonic
- Empfänger Kramer
- Empfänger Hertz
- Empfänger Pro-Ject
- Empfänger Aeon Labs
- Empfänger Vaddio
- Empfänger Galaxy Audio
- Empfänger HQ Power
- Empfänger Ibiza Sound
- Empfänger Kicker
- Empfänger Warm Audio
- Empfänger Polk
- Empfänger Line 6
- Empfänger Bogen
- Empfänger DBX
- Empfänger Radial Engineering
- Empfänger McIntosh
- Empfänger Sonance
- Empfänger Jensen
- Empfänger ELAC
- Empfänger Fostex
- Empfänger JL Audio
- Empfänger Pyle Pro
- Empfänger PreSonus
- Empfänger Qtx
- Empfänger Hartke
- Empfänger ART
- Empfänger Deaf Bonce
- Empfänger Fredenstein
- Empfänger LD Systems
- Empfänger RDL
- Empfänger Audiolab
- Empfänger Oculus VR
- Empfänger Summit Audio
- Empfänger Homematic IP
- Empfänger Black Lion Audio
- Empfänger Dreambox
- Empfänger Bluesound
- Empfänger Solid State Logic
- Empfänger RME
- Empfänger GlobalSat
- Empfänger Chandler
- Empfänger DAP
- Empfänger DAP Audio
- Empfänger Definitive Technology
- Empfänger Denson
- Empfänger Devialet
- Empfänger DIO
- Empfänger DLS
- Empfänger Focal
- Empfänger Focusrite
- Empfänger Formuler
- Empfänger Fusion
- Empfänger Graupner
- Empfänger Ground Zero
- Empfänger Helix
- Empfänger Hirschmann
- Empfänger Homecast
- Empfänger Infinity
- Empfänger Iriver
- Empfänger JB Systems
- Empfänger Koda
- Empfänger Lanzar
- Empfänger Legamaster
- Empfänger Medeli
- Empfänger Mercury
- Empfänger Monitor Audio
- Empfänger Mtx Audio
- Empfänger Mvision
- Empfänger Naxa
- Empfänger Octagon
- Empfänger Phoenix Gold
- Empfänger Raymarine
- Empfänger REL Acoustics
- Empfänger Selfsat
- Empfänger Soundstream
- Empfänger Stagg
- Empfänger Steren
- Empfänger Stinger
- Empfänger Sunstech
- Empfänger Terratec
- Empfänger ACV
- Empfänger AMX
- Empfänger Triax
- Empfänger Tronics
- Empfänger TV STAR
- Empfänger Universal Remote Control
- Empfänger Velodyne
- Empfänger Vivotek
- Empfänger Wharfedale
- Empfänger Winegard
- Empfänger Xsarius
- Empfänger Zgemma
- Empfänger Universal Audio
- Empfänger Phonic
- Empfänger Epcom
- Empfänger Adastra
- Empfänger Siig
- Empfänger Amiko
- Empfänger Cloud
- Empfänger Mooer
- Empfänger AudioControl
- Empfänger MXL
- Empfänger TV One
- Empfänger NAV-TV
- Empfänger StarTech.com
- Empfänger APart
- Empfänger Blackstar
- Empfänger HEOS
- Empfänger Smart-AVI
- Empfänger QSC
- Empfänger RetroSound
- Empfänger Dahua Technology
- Empfänger Proel
- Empfänger Niles
- Empfänger Panduit
- Empfänger Martin Logan
- Empfänger Metra
- Empfänger Kanto
- Empfänger PAC
- Empfänger Sound Devices
- Empfänger Speco Technologies
- Empfänger IFi Audio
- Empfänger Gefen
- Empfänger Polsen
- Empfänger Bugera
- Empfänger Russound
- Empfänger Vocopro
- Empfänger SRS
- Empfänger Comica
- Empfänger Astell&Kern
- Empfänger IMG Stage Line
- Empfänger Inovonics
- Empfänger Mosconi
- Empfänger Atlas Sound
- Empfänger FBT
- Empfänger DB Technologies
- Empfänger CYP
- Empfänger Amplicom
- Empfänger Micromega
- Empfänger Palmer
- Empfänger Jolida
- Empfänger Ampeg
- Empfänger Avalon
- Empfänger BOYA
- Empfänger Audient
- Empfänger Bang Olufsen
- Empfänger Lectrosonics
- Empfänger ATen
- Empfänger Eventide
- Empfänger Axing
- Empfänger Laney
- Empfänger Morel
- Empfänger SVS
- Empfänger KanexPro
- Empfänger Citronic
- Empfänger Crest Audio
- Empfänger Lab Gruppen
- Empfänger SPL
- Empfänger Parasound
- Empfänger Apantac
- Empfänger Brigmton
- Empfänger Axis
- Empfänger MEE Audio
- Empfänger Wet Sounds
- Empfänger Edisio
- Empfänger Pyramid
- Empfänger Stewart
- Empfänger Black Hydra
- Empfänger Linn
- Empfänger Roswell
- Empfänger Music Hall
- Empfänger Audac
- Empfänger OSD Audio
- Empfänger Match
- Empfänger Audioengine
- Empfänger Neets
- Empfänger EA
- Empfänger BZBGear
- Empfänger Crestron
- Empfänger PSSO
- Empfänger HiFi ROSE
- Empfänger Accell
- Empfänger Ibanez
- Empfänger Antelope Audio
- Empfänger Pharos
- Empfänger Kemo
- Empfänger Audix
- Empfänger Viscount
- Empfänger GOgroove
- Empfänger Avantree
- Empfänger PSB
- Empfänger Phoenix Audio
- Empfänger Extron
- Empfänger Atlona
- Empfänger Comtek
- Empfänger LYYT
- Empfänger JTS
- Empfänger Redline
- Empfänger Valueline
- Empfänger Grace Design
- Empfänger Ashdown Engineering
- Empfänger Ram Audio
- Empfänger Esoteric
- Empfänger Xantech
- Empfänger Wavtech
- Empfänger Krell
- Empfänger Artsound
- Empfänger Rolls
- Empfänger Sonifex
- Empfänger Advance Acoustic
- Empfänger Kali Audio
- Empfänger Leviton
- Empfänger Revel
- Empfänger WyreStorm
- Empfänger Wireless Solution
- Empfänger Manley
- Empfänger Klark Teknik
- Empfänger Lindell Audio
- Empfänger AVMATRIX
- Empfänger Alfatron
- Empfänger Acme United
- Empfänger Mark Levinson
- Empfänger CAD Audio
- Empfänger Dynavox
- Empfänger Key Digital
- Empfänger AER
- Empfänger Cerwin-Vega
- Empfänger Sound Ordnance
- Empfänger Majestic
- Empfänger Ocean Matrix
- Empfänger Markbass
- Empfänger AmpliVox
- Empfänger LEA
- Empfänger Memphis Audio
- Empfänger FiveO
- Empfänger Televes
- Empfänger Aquatic AV
- Empfänger DirecTV
- Empfänger Ashly
- Empfänger Fishman
- Empfänger AVPro Edge
- Empfänger Integra
- Empfänger Matrox
- Empfänger Blustream
- Empfänger CyberData Systems
- Empfänger Williams Sound
- Empfänger Sunfire
- Empfänger SoundTube
- Empfänger JETI
- Empfänger SureCall
- Empfänger Vivolink
- Empfänger WesAudio
- Empfänger ANKARO
- Empfänger NUVO
- Empfänger Audiofrog
- Empfänger Canyon
- Empfänger AMS Neve
- Empfänger Trace Elliot
- Empfänger The T.amp
- Empfänger Knoll
- Empfänger MuxLab
- Empfänger Hegel
- Empfänger Triangle
- Empfänger Whirlwind
- Empfänger Camille Bauer
- Empfänger Hughes & Kettner
- Empfänger Rocketfish
- Empfänger Dimavery
- Empfänger Palsonic
- Empfänger Musical Fidelity
- Empfänger Rexing
- Empfänger A-NeuVideo
- Empfänger Crest
- Empfänger Cranborne Audio
- Empfänger Seco-Larm
- Empfänger Primare
- Empfänger C2G
- Empfänger Fosi Audio
- Empfänger S.M.S.L
- Empfänger Aurel
- Empfänger Advance
- Empfänger AEA
- Empfänger Datapath
- Empfänger TechLogix Networx
- Empfänger PTN-electronics
- Empfänger CE Labs
- Empfänger Gold Note
- Empfänger Planet Audio
- Empfänger Lotronic
- Empfänger Audiotec Fischer
- Empfänger Sinus Live
- Empfänger Shinybow
- Empfänger Shanling
- Empfänger Fontastic
- Empfänger BC Acoustique
- Empfänger NuPrime
- Empfänger Taga Harmony
- Empfänger Creek
- Empfänger BMB
- Empfänger Valcom
- Empfänger Intelix
- Empfänger Madison
- Empfänger Topp Pro
- Empfänger Whistler
- Empfänger Powersoft
- Empfänger LinksPoint
- Empfänger Modelcraft
- Empfänger Simaudio
- Empfänger TIC
- Empfänger Mobile Crossing
- Empfänger FSR
- Empfänger Edwards Signaling
- Empfänger Lyngdorf
- Empfänger AudioSource
- Empfänger Leema
- Empfänger Quad
- Empfänger IOTAVX
- Empfänger Inter-M
- Empfänger Soundtrack
- Empfänger Canor
- Empfänger Unison Research
- Empfänger Clare Controls
- Empfänger Loxjie
- Empfänger Cayin
- Empfänger Technical Pro
- Empfänger VMV
- Empfänger Bellari
- Empfänger Comprehensive
- Empfänger PureLink
- Empfänger FoneStar
- Empfänger Glemm
Neueste Bedienungsanleitung für -Kategorien-
2 Dezember 2024
1 Dezember 2024
30 November 2024
30 November 2024
30 November 2024
30 November 2024
30 November 2024
30 November 2024
30 November 2024
29 November 2024