Dell P2423D Bedienungsanleitung
Lesen Sie kostenlos die 📖 deutsche Bedienungsanleitung für Dell P2423D (73 Seiten) in der Kategorie Monitor. Dieser Bedienungsanleitung war für 6 Personen hilfreich und wurde von 2 Benutzern mit durchschnittlich 4.5 Sternen bewertet
Seite 1/73

Monitor Model: P2423D/P2723D
Regulatory Model: P2423Dc/P2723Dc
Dell P2423D/P2723D
Monitor
User’s Guide

2 │
NOTE: A NOTE indicates important information that helps you make
better use of your computer.
CAUTION: A CAUTION indicates potential damage to hardware or loss
of data if instructions are not followed.
WARNING: A WARNING indicates a potential for property damage,
personal injury, or death.
Copyright © 2022 Dell Inc. or its subsidiaries. All rights reserved. Dell, EMC, and other trademarks are
trademarks of Dell Inc. or its subsidiaries. Other trademarks may be trademarks of their respective
owners.
2022 – 02
Rev. A00

│ 3
Contents
Safety instructions 6. . . . . . . . . . . . . . . . . . . . . . . . . .
About your monitor . . . . . . . . . . . . . . . . . . . . . . . . . .7
Package contents 7 . . . . . . . . . . . . . . . . . . . . . .
Product features . . . . . . . . . . . . . . . . . . . . . . . 9
Identifying parts and controls 10. . . . . . . . . . . . . . .
Front view . . . . . . . . . . . . . . . . . . . . . . . . . . . . . . 10
Back view 11 . . . . . . . . . . . . . . . . . . . . . . . . . . . . . .
Bottom view . . . . . . . . . . . . . . . . . . . . . . . . . . . . . 12
Monitor specifications 13. . . . . . . . . . . . . . . . . . .
Physical characteristics 18. . . . . . . . . . . . . . . . . . . . . . .
Pin assignments . . . . . . . . . . . . . . . . . . . . . . 20
DisplayPort connector . . . . . . . . . . . . . . . . . . . . . . . 20
HDMI connector 21. . . . . . . . . . . . . . . . . . . . . . . . . . .
Universal Serial Bus (USB) interface 22. . . . . . . . . . . . . . . .
Plug and play capability . . . . . . . . . . . . . . . . . . 24
LCD monitor quality and pixel policy . . . . . . . . . . . 24
Ergonomics. . . . . . . . . . . . . . . . . . . . . . . . . 24
Handling and moving your display . . . . . . . . . . . . . 26
Maintenance guidelines . . . . . . . . . . . . . . . . . . 27
Cleaning your monitor. . . . . . . . . . . . . . . . . . . . . . . . 27
Setting up the monitor 29. . . . . . . . . . . . . . . . . . . . . .
Attaching the stand . . . . . . . . . . . . . . . . . . . . 29

│ 5
Self-Test . . . . . . . . . . . . . . . . . . . . . . . . . . 63
Built-in diagnostics . . . . . . . . . . . . . . . . . . . . 64
Common problems 66. . . . . . . . . . . . . . . . . . . . .
Universal Serial Bus (USB) specific problems . . . . . . 71
Regulatory information . . . . . . . . . . . . . . . . . . . . . .73
FCC notices (U.S. Only) and other regulatory information 73
EU product database for energy label and product
information sheet . . . . . . . . . . . . . . . . . . . . . 73
Contacting Dell 73. . . . . . . . . . . . . . . . . . . . . . .

6 │ Safety instructions
Safety instructions
Use the following safety guidelines to protect your monitor from potential damage
and to ensure your personal safety. Unless otherwise noted, each procedure
included in this document assumes that you have read the safety information that
shipped with your monitor.
NOTE: Before using the monitor, read the safety information that
is shipped with your monitor and printed on the product. Keep the
documentation at a secure location for future reference.
WARNING: Use of controls, adjustments, or procedures other than
those specified in this documentation may result in exposure to shock,
electrical hazards, and/or mechanical hazards.
WARNING: The possible long-term effect of listening to audio at
high volume through the headphones (on monitor that support it) may
cause damage to your hearing ability.
• Place the monitor on a solid surface and handle it carefully. The screen is fragile
and can be damaged if dropped or hit with a sharp object.
• Ensure that your monitor is electrically rated to operate with the AC power
available in your location.
• Keep the monitor in room temperature. Excessive cold or hot conditions can have
an adverse effect on the liquid crystal of the display.
• Connect the power cable from the monitor to a wall outlet that is near and
accessible. See Connecting your monitor.
• Do not place and use the monitor on a wet surface or near water.
• Do not subject the monitor to severe vibration or high impact conditions. For
example, do not place the monitor inside a car trunk.
• Unplug the monitor when it is going to be left unused for an extended period.
• To avoid electric shock, do not attempt to remove any cover or touch the inside
of the monitor.
• Read these instructions carefully. Keep this document for future reference. Follow
all warnings and instructions marked on product.
• Certain monitors can be wall mounted using the VESA mount that is sold
separately. Ensure to use the correct VESA specifications as mentioned in the
wall mounting section of the .User’s Guide
For information on safety instructions, see the Safety, Environmental, and
Regulatory Information (SERI) document that is shipped with your monitor

About your monitor │ 7
About your monitor
Package contents
The following table provides the list of components that are shipped with your
monitor. If any component is missing, contact Dell. For more information, see
Contacting Dell.
NOTE: Some items may be optional and may not ship with your
monitor. Some features may not be available in certain countries.
Component image Component description
Display
Stand riser
Stand base
Power cable (varies by
country)

About your monitor │ 9
Product features
The Dell P2423D P2723D monitor has an active matrix, Thin-Film Transistor (TFT), /
Liquid Crystal Display (LCD), and LED backlight. The monitor features include:
• P2423D: 60.45 cm (23.8 in.) viewable area display (measured diagonally).
• P2723D: 68.47 cm (27 in.) viewable area display (measured diagonally).
• 2560 x 1440 resolution, with full-screen support for lower resolutions.
• Color gamut of 99% sRGB (typical).
• Digital connectivity with DisplayPort and HDMI.
• Equipped with 1 USB-B upstream port and 4 SuperSpeed USB 5 Gbps (USB 3.2
Gen1) Type-A downstream ports.
• Plug and play capability if supported by your computer.
• On-Screen Display (OSD) adjustments for ease of setup and screen optimization.
• Power and joystick buttons lock.
• Removable stand and Video Electronics Standards Association (VESA™) 100 mm
mounting holes for flexible mounting solutions.
• Tilt, swivel, height, and rotate adjustment capabilities.
• Security lock slot.
• Stand lock.
• ≤0.3 W standby power when in Standby Mode.
• Supports Dell Display Manager.
• Optimize eye comfort with a flicker-free screen and low blue light feature.
• The monitor use Low Blue Light panel and compliance with TUV Rheinland
(Hardware Solution) at factory reset/default setting model (Preset mode:
Standard).
WARNING: The possible long-term effects of blue light emission
from the monitor may cause damage to the eyes, which includes but
is not limited to eye fatigue and digital eye strain. ComfortView Plus
feature is designed to reduce the amount of blue light emitted from the
monitor to optimize eye comfort.

10 │ About your monitor
Identifying parts and controls
Front view
1
Label Description
1 Power LED indicator
Solid white light indicates that the monitor is turned on and functioning
normally. Blinking white light indicates that the monitor is in Standby
Mode.

12 │ About your monitor
Bottom view
1 2 3 4 5 6 7 7
Bottom view without monitor stand
Label Description Use
1 Security lock slot
(based on Kensington
Security Slot)
Secure your monitor using a security lock
(purchased separately) to prevent unauthorized
movement of your monitor.
2 Power connector Connect the power cable (shipped with your
monitor).
3 Stand lock To lock the stand to the monitor using a M3 x 6
mm screw (screw not included).
4 HDMI port Connect to your computer using a HDMI cable
(purchased separately).
5 DisplayPort Connect to your computer using a DisplayPort
cable (shipped with your monitor).
6 USB 3.2 Gen1
upstream port
Connect the USB cable (shipped with your
monitor) from this port to your computer to
enable the USB ports on your monitor.
7 SuperSpeed USB 5
Gbps (USB 3.2 Gen1)
Type-A downstream
port (4)
Connect your USB devices. *
NOTE: To use these ports, you must
connect the USB upstream cable
(shipped with your monitor) between the
monitor and the computer.
*To avoid signal interference, when a wireless USB device has been connected
to a USB downstream port, it is NOT recommended to connect any other USB
devices to the adjacent port(s).

14 │ About your monitor
Connectivity 1 x HDMI 1.4 (HDCP 1.4)
1 x DisplayPort 1.2 (HDCP 1.4)
1 x USB 3.2 Gen1 upstream
4 x SuperSpeed USB 5 Gbps (USB 3.2 Gen1)
downstream
Bezel width (edge of monitor to active area)
Top
Left/Right
Bottom
5.42 mm
5.48 mm
16.72 mm
7.37 mm
7.43 mm
17.77 mm
Adjustability
Height adjustable stand
Tilt
Swivel
Pivot
150 mm
-5° to 21°
-45° to 45°
-90° to 90°
Cable management Yes
Dell display manager
compatibility
Easy Arrange and other key features
Security Security lock slot (cable lock optional purchase)
Resolution specifications
Model P2423D/P2723D
Horizontal scan range 29 kHz to 113 kHz
Vertical scan range 49 Hz to 75 Hz (automatic)
Maximum preset
resolution
2560 x 1440 at 60 Hz
Supported video modes
Model P2423D/P2723D
Video display capabilities
(HDMI/DisplayPort)
480p, 576p, 720p, 1080i(HDMI), 1080p, 1440p

About your monitor │ 15
Preset display modes
Display Mode
Horizontal
Frequency
(kHz)
Vertical
Frequency
(Hz)
Pixel Clock
(MHz)
Sync
Polarity
(Horizontal
/ Vertical)
IBM, 720 x 400 31.50 70.10 28.30 -/+
VESA, 640 x 480 31.50 59.90 25.20 -/-
VESA, 640 x 480 37.50 75.00 31.50 -/-
VESA, 800 x 600 37.90 60.30 40.00 +/+
VESA, 800 x 600 46.90 75.00 49.50 +/+
VESA, 1024 x 768 48.40 60.00 65.00 -/-
VESA, 1024 x 768 60.00 75.00 78.80 +/+
VESA, 1152 x 864 67.50 75.00 108.00 +/+
VESA, 1280 x 768 47.80 59.90 79.50 -/+
VESA, 1280 x 1024 64.00 60.00 108.00 +/+
VESA, 1280 x 1024 79.90 75.00 135.00 +/+
VESA, 1600 x 1200 75.00 60.00 162.00 +/+
VESA, 1680 x 1050 65.30 60.00 146.30 -/+
CTA, 1920 x 1080 67.50 60.00 148.50 +/+
VESA, 1920 x 1200 74.60 59.90 193.30 -/+
VESA, 2048 x 1080 66.60 60.00 147.20 +/-
VESA, 2560 x 1440 88.80 60.00 241.50 +/-

16 │ About your monitor
Electrical specifications
Model P2423D P2723D
Video input signals •HDMI 1.4, 600 mV for each differential line, 100 ohm
input impedance per differential pair
•DisplayPort 1.2, 600 mV for each differential line, 100
ohm input impedance per differential pair
AC input voltage/
frequency/current
100 VAC to 240 VAC / 50 Hz or 60 Hz ± 3 Hz / 1.5 A
(typical)
Inrush current 120 V: 30 A (max.) at 0°C (cold start)
240 V: 60 A (max.) at 0°C (cold start)
Power consumption 0.3 W (Off mode)1
0.3 W (Standby Mode)1
16 W (On Mode)1
55 W (Max.)2
15.89 W (Pon)3
49.57 kWh (TEC)3
0.3 W (Off mode)1
0.3 W (Standby Mode)1
21 W (On Mode)1
55 W (Max.)2
17.89 W (Pon)3
55.76 kWh (TEC)3
1 As defined in EU 2019/2021 and EU 2019/2013.
2 Max brightness and contrast setting with maximum power loading on all USB
ports.
3 Pon: Power consumption of On Mode as defined in Energy Star 8.0 version..
TEC: Total energy consumption in kWh as defined in Energy Star 8.0 version.
This document is informational only and reflects laboratory performance. Your
product may perform differently, depending on the software, components and
peripherals you ordered and shall have no obligation to update such information.
Accordingly, the customer should not rely upon this information in making
decisions about electrical tolerances or otherwise. No warranty as to accuracy or
completeness is expressed or implied.

About your monitor │ 17
NOTE: This monitor is ENERGY STAR certified.
This product qualifies for ENERGY STAR in the factory default settings which can
be restored by “Factory Reset” function in the OSD menu. Changing the factory
default settings or enabling other features may increase power consumption that
could exceed the ENERGY STAR specified limit.

18 │ About your monitor
Physical characteristics
Model P2423D P2723D
Signal cable type • Digital: DisplayPort, 20 pins
• Digital: HDMI, 19 pins (cable not included)
• Universal Serial Bus: USB, 9 pins
NOTE: Dell monitors are designed to work optimally with the video
cables that are shipped with your monitor. As Dell does not have
control over the different cable suppliers in the market, the type of
material, connector and process used to manufacture these cables,
Dell does not guarantee video performance on cables that are not
shipped with your Dell monitor.
Dimensions (with stand)
Height (extended) 496.11 mm (19.53 in.) 535.20 mm (21.07 in.)
Height (compressed) 364.00 mm (14.33 in.) 385.20 mm (15.17 in.)
Width 537.80 mm (21.17 in.) 611.60 mm (24.08 in.)
Depth 179.57 mm (7.07 in.) 190.10 mm (7.48 in.)
Dimensions (without stand)
Height 318.50 mm (12.54 in.) 360.80 mm (14.20 in.)
Width 537.80 mm (21.17 in.) 611.60 mm (24.08 in.)
Depth 52.15 mm (2.05 in.) 52.18 mm (2.05 in.)
Stand dimensions
Height (extended) 410.80 mm (16.17 in.) 428.30 mm (16.86 in.)
Height (compressed) 364.00 mm (14.33 in.) 381.50 mm (15.02 in.)
Width 245.00 mm (9.65 in.) 268.00 mm (10.55 in.)
Depth 179.57 mm (7.07 in.) 190.10 mm (7.48 in.)
Base 245.00 x 173.00 mm
(9.65 in. x 6.81 in.)
268.00 x 185.00 mm
(10.55 in. x 7.28 in.)
Weight
Weight with packaging 7.44 kg (16.40 lb) 9.20 kg (20.28 lb)
Weight with stand assembly
and cables
5.45 kg (12.02 lb) 6.76 kg (14.90 lb)
About your monitor │ 19
Weight without stand
assembly (For wall mount or
VESA mount considerations -
no cables)
3.44 kg (7.58 lb) 4.54 kg (10.01 lb)
Weight of stand assembly 1.63 kg (3.59 lb) 1.84 kg (4.06 lb)
Front-frame gloss Black frame 2-4 gloss units
Environmental characteristics
Model P2423D P2723D
Compliant Standards
• ENERGY STAR certified monitor.
• EPEAT registered where applicable. EPEAT registration varies by country. See
www.epeat.net for registration status by country.
• RoHS-compliant.
• TCO Certified & TCO Certified Edge.
• BFR/PVC free monitor (excluding external cables).
• Meets NFPA 99 leakage current requirements.
• Arsenic-free glass and Mercury-free for the panel only.
Temperature
Operating 0°C to 40°C (32°F to 104°F)
Non-operating • Storage: -20°C to 60°C (-4°F to 140°F)
• Shipping: -20°C to 60°C (-4°F to 140°F)
Humidity
Operating 10% to 80% (non-condensing)
Non-operating • Storage 5% to 90% (non-condensing)
• Shipping 5% to 90% (non-condensing)
Altitude
Operating
(maximum)
5,000 m (16,400 ft)
Non-operating
(maximum)
12,192 m (40,000 ft)
Thermal
dissipation
• 188.10 BTU/hour (Maximum)
• 54.72 BTU/hour (On Mode)
• 188.10 BTU/hour (Maximum)
• 71.82 BTU/hour (On Mode)

20 │ About your monitor
Pin assignments
DisplayPort connector
Pin
number
20-pin side of the connected
signal cable
1 ML3 (n)
2 GND
3 ML3 (p)
4 ML2 (n)
5 GND
6 ML2 (p)
7 ML1 (n)
8 GND
9 ML1 (p)
10 ML0 (n)
11 GND
12 ML0 (p)
13 GND
14 GND
15 AUX (p)
16 GND
17 AUX (n)
18 Hot Plug Detect
19 Re-PWR
20 +3.3 V DP_PWR

About your monitor │ 21
HDMI connector
Pin
number
19-pin side of the connected
signal cable
1 TMDS DATA 2+
2 TMDS DATA 2 SHIELD
3 TMDS DATA 2-
4 TMDS DATA 1+
5 TMDS DATA 1 SHIELD
6 TMDS DATA 1-
7 TMDS DATA 0+
8 TMDS DATA 0 SHIELD
9 TMDS DATA 0-
10 TMDS CLOCK+
11 TMDS CLOCK SHIELD
12 TMDS CLOCK-
13 CEC
14 Reserved (N.C. on device)
15 DDC CLOCK (SCL)
16 DDC DATA (SDA)
17 DDC/CEC Ground
18 +5 V POWER
19 HOT PLUG DETECT
22 │ About your monitor
Universal Serial Bus (USB) interface
This section gives you information about the USB ports that are available on the
monitor.
SuperSpeed USB 5 Gbps (USB 3.2 Gen1)
Transfer speed Data rate Maximum power supported
(each port)
SuperSpeed 4.5 W5 Gbps
High speed 480 Mbps 4.5 W
Full speed 12 Mbps 4.5 W
USB 3.2 Gen1 upstream connector
Pin
number
9-pin side of the
connector
1 VCC
2 D-
3 D+
4 GND
5 SSTX-
6 SSTX+
7 GND
8 SSRX-
9 SSRX+

24 │ About your monitor
Plug and play capability
You can install the monitor in any Plug and Play-compatible system. The monitor
automatically provides the computer system with its Extended Display Identification
Data (EDID) using Display Data Channel (DDC) protocols so the system can
configure itself and optimize the monitor settings. Most monitor installations are
automatic, you can select different settings if desired. For more information about
changing the monitor settings, see .Operating your monitor
LCD monitor quality and pixel policy
During the LCD Monitor manufacturing process, it is not uncommon for one or
more pixels to become fixed in an unchanging state which are hard to see and do
not affect the display quality or usability. For more information on Dell Monitor
Quality and Pixel Policy, see Dell Support site at .www.dell.com/pixelguidelines
Ergonomics
CAUTION: Improper or prolonged usage of keyboard may result in
injury.
CAUTION: Viewing the monitor screen for extended periods of time
may result in eye strain.
For comfort and efficiency, observe the following guidelines when setting up and
using your computer workstation:
• Position your computer so that the monitor and keyboard are directly in front of
you as you work. Special shelves are commercially available to help you correctly
position your keyboard.
• To reduce the risk of eye strain and neck, arm, back, or shoulder pain from using
the monitor for long period, we recommend you to:
1. Set the distance of the screen between 20 in. to 28 in. (50 cm - 70 cm) from
your eyes.
2. Blink frequently to moisten your eyes or wet your eyes with water after
prolonged usage of the monitor.
3. Take regular and frequent breaks for 20 minutes every two hours.
4. Look away from your monitor and gaze at a distant object at 20 feet away for
at least 20 seconds during the breaks.
5. Perform stretches to relieve tension in the neck, arm, back, and shoulders
during the breaks.

About your monitor │ 25
• Ensure that the monitor screen is at eye level or slightly lower when you are
sitting in front of the monitor.
• Adjust the tilt of the monitor, its contrast, and brightness settings.
• Adjust the ambient lighting around you (such as overhead lights, desk lamps, and
the curtains or blinds on nearby windows) to minimize reflections and glare on the
monitor screen.
• Use a chair that provides good lower-back support.
• Keep your forearms horizontal with your wrists in a neutral, comfortable position
while using the keyboard or mouse.
• Always leave space to rest your hands while using the keyboard or mouse.
• Let your upper arms rest naturally on both sides.
• Ensure that your feet are resting flat on the floor.
• When sitting, ensure that the weight of your legs is on your feet and not on the
front portion of your seat. Adjust your chair’s height or use a footrest if necessary
to maintain a proper posture.
• Vary your work activities. Try to organize your work so that you do not have to sit
and work for extended periods of time. Try to stand or get up and walk around at
regular intervals.
• Keep the area under your desk clear of obstructions and cables or power cords
that may interfere with comfortable seating or present a potential trip hazard.
roo
Feet at on the
and at
Wrists relaxed
below eye level
keyboard
of the user
Monitor screen at or
Monitor and
positioned
dir tly in front ec

26 │ About your monitor
Handling and moving your display
To ensure that the monitor is handled safely when lifting or moving it, observe the
following guidelines:
• Before moving or lifting the monitor, turn off your computer and the monitor.
• Disconnect all cables from the monitor.
• Place the monitor in the original box with the original packing materials.
• Hold the bottom edge and the side of the monitor firmly without applying
excessive pressure when lifting or moving the monitor.
• When lifting or moving the monitor, ensure that the screen is facing away from
you. Do not press on the display area to avoid any scratches or damage.
• When transporting the monitor, avoid any sudden shock or vibration to it.
• When lifting or moving the monitor, do not turn the monitor upside down while
holding the stand base or stand riser. It may result in accidental damage to the
monitor or cause personal injury.

About your monitor │ 27
Maintenance guidelines
Cleaning your monitor
WARNING: Before cleaning the monitor, unplug the monitor power
cable from the electrical outlet.
CAUTION: Read and follow the Safety instructions before cleaning the
monitor.
WARNING: Before cleaning the monitor, unplug the monitor power
cable from the electrical outlet.
For best practices, follow the instructions in the list below when unpacking,
cleaning, or handling your monitor:
• To clean the Dell monitor screen, lightly dampen a soft, clean cloth with water.
If possible, use a special screen-cleaning tissue or solution suitable for the Dell
monitor screen.
CAUTION: Do not use detergents or other chemicals such as benzene,
thinner, ammonia, abrasive cleaners, or compressed air.
CAUTION: Using chemicals for cleaning may cause changes in the
appearance of the monitor, such as color fading, milky film on the
monitor, deformation, uneven dark shade, and peeling of screen area.
WARNING: Do not spray the cleaning solution or even water directly on
the surface of the monitor. Doing so will allow liquids to accumulate at
the bottom of the display panel and corrode the electronics resulting
in permanent damage. Instead, apply the cleaning solution or water to
a soft cloth and then clean the monitor.

28 │ About your monitor
NOTE: Monitor damage due to improper cleaning methods and the use
of benzene, thinner, ammonia, abrasive cleaners, alcohol, compressed
air, detergent of any kind will lead to a Customer Induced Damage
(CID). CID is not covered under the standard Dell warranty.
• If you notice white powder when you unpack your monitor, wipe it off with a
cloth.
• Handle your monitor with care as a dark-colored monitor may get scratched
and show white scuff marks more than a light-colored monitor.
• To help maintain the best image quality on your monitor, use a dynamically
changing screen saver and turn off your monitor when not in use

30 │ Setting up the monitor
6. Lift the cover, as shown, to access the VESA area for stand assembly.
NOTE: Before attaching the stand assembly to the display, ensure that
the front plate flap is opened to allow space for assembly.
7. Attach the stand assembly to the display.
a. Fit the two tabs on the upper part of the stand to the groove on the back of
the display.
b. Press the stand down till it snaps into place.

Setting up the monitor │ 31
8. Hold the stand riser and lift the monitor carefully, then place it on a flat
surface.
NOTE: Lift the monitor carefully to prevent it from slipping or falling.
9. Remove the cover from the monitor.

32 │ Setting up the monitor
Connecting your monitor
WARNING: Before you begin any of the procedures in this section,
follow the .Safety instructions
NOTE: Dell monitors are designed to work optimally with Dell
supplied inbox cables. Dell does not guarantee the video quality and
performance if non-Dell cables are used.
NOTE: Route the cables through the cable-management slot before
connecting them.
NOTE: Do not connect all cables to the computer at the same time.
NOTE: The images are for the purpose of illustration only. The
appearance of the computer may vary.
To connect your monitor to the computer:
1. Turn off your computer and disconnect the power cable.
2. Connect the DisplayPort or HDMI cable from your monitor to the computer.
3. Connect the USB upstream cable (shipped with your monitor) to an appropriate
USB 3.2 Gen1 port on your computer. (See for details.)Bottom view
4. Connect the USB peripherals to the SuperSpeed USB 5 Gbps (USB 3.2 Gen1)
on the monitor.
Connecting the DisplayPort and USB cable
USBDP DP
USB

Setting up the monitor │ 33
Connecting the HDMI cable (optional)
HDMI 2 .0
HDMI
HDMI
5. Connect the power cables from your computer and monitor into a wall outlet.
1
2
34 │ Setting up the monitor
Organizing cables
Use the cable-management slot to route the cables connected to your monitor.
HDMI 2.0
6. Turn on the Monitor.

Setting up the monitor │ 35
Securing your monitor using Kensington lock (optional)
The security lock slot is located at the bottom of the monitor. (see Security lock
slot). Secure your monitor to a table using the Kensington security lock.
For more information on using the Kensington lock (sold separately), see the
documentation that is shipped with the lock.
NOTE: The image is for the purpose of illustration only. The appearance
of the lock may vary.
36 │ Setting up the monitor
Removing the monitor stand
NOTE: To prevent scratches on the LCD screen when removing the
stand, ensure that the monitor is placed on a soft surface and handle it
carefully.
NOTE: The following steps are specifically for removing the stand that
is shipped with your monitor. If you are removing a stand that you
purchased from any other source, follow the setup instructions that
are included with the stand.
To remove the stand:
1. Place the monitor on a soft cloth or cushion.
2. Press and hold the stand release button.
3. Lift the stand up and away from the monitor.
Setting up the monitor │ 37
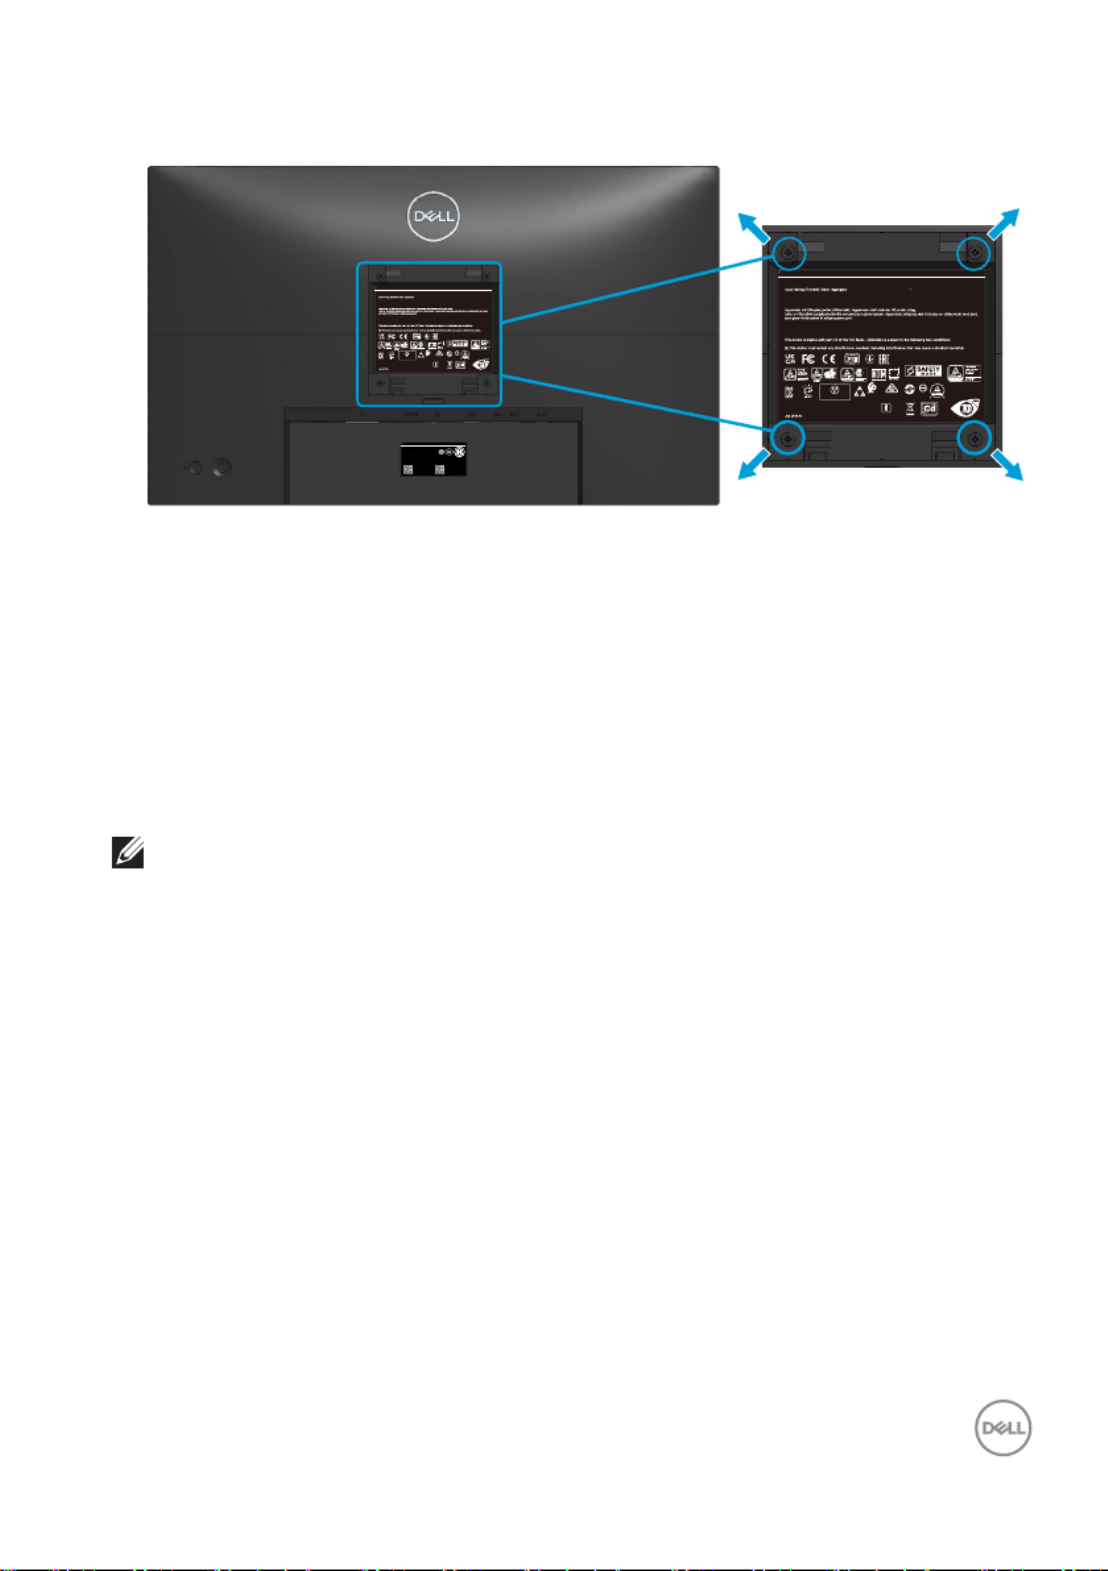
VESA wall mounting (optional)
Q40G024 N-700- XXA
DELL P2423D
Flat Panel Monitor /Monitor Plano Panel /Moniteur écran plat /液晶顯示器
Model No. /Modelo /N°de modelo / : P2423Dc型號/모델명/モデル番号
정격입력/Entrada de energ ía 100-240V 50/60Hz,1. 5A:
輸入電源:交流電壓 伏特 安培 赫茲100-240 ,1.5 , 50/60
Удельная мощность рабочего режима - XXXX Вт/с м² Consumo de energía en operación: XXX Wh
Потребляемая мощность изделием в режиме ожидания - 0,XX Вт
Потребляемая мощность изделием в в ыключенном режиме - 0,XX Вт
The equipment m ust be connected to an earthed mains socket-outlet.
L'appareil doit être branché sur une prise de courant munie d'une mise à la terre.
Made in China /Fabricado en China/с деланный в Китай /Fabriqué en Chine/中國製造 警語: 使用過度恐傷害視力。
www.dell.com/regulatory_compliance P reland (for EU Only)Raheen Business ark Limerick I
CAN ICES-003(B)/NMB-003(B) For UK only: Cain Road, Bracknell, RG12 1LF
(1) this dev ice may not cause harmful interferenc e, and
XXXXX R33037
RoHS
XXXXXX-XX
IS 13252 (Part 1)/
IEC 60950-1
R-41082465
www.bis.gov. in
XXXXXX-XXXX
R-R-E2K-P2423Dc
신청인:DELL INC.
제조자:L&T Display Technology(Fujian)Ltd.(for Korea)
080-200-3800
デル・テクノロジーズ
入力:100 V, 1 .5 A, 50 /60 Hz
XXXXXXXX
Q40G024N -700-XXA
DELL P24 23D
Flat Pan el Monito r /Monito r Plano Pan el /Moniteur éc ran plat /液晶顯示器
Model No . /Modelo /N°de mo delo / : P2 423 Dc型號/모델명/モデル番号
정격입력/Entrada de energía 100 -240V 50/60 Hz,1.5 A:
輸入電源:交流電壓 伏特 安培 赫茲100-240 ,1.5 ,50/60
Удельная мощн ость рабочего режима - X XXX Вт/см² Consum o de energía en operaci ón: XXX W h
Потреб ляемая мощность издел ием в реж име ожидания - 0,X X Вт
Потреб ляемая мощность издел ием в выкл юченном режиме - 0,XX Вт
The equip ment must be co nnected to an ear thed main s so cket-outl et.
L'appar eil doit êt re branché sur un e p rise de couran t munie d'un e m ise à la terre.
Made in Chi na /Fabric ado en China/с деланный в Китай /Fabri qué en Chine/中國製造 警語: 使用過度恐傷害視力。
www .dell. r egula ry pl iancom / to _com ce P r eland (for EU Only)Raheen Busi ness ar k Limeri ck I
CAN ICES-00 3(B)/NMB-00 3(B) For UK on ly: Cain Ro ad, Bracknel l, RG12 1LF
(1) thi s d evice may not c ause harmful i nterference, and
XXXXX
R33037
RoHS
XXXXXX-XX
IS 13252 (Pa rt 1)/
IEC 60950- 1
R-41082465
www.bis .gov.in
XXXXXX-XXXX
R-R-E2K-P 242 3Dc
신청인:DELL INC.
제조자:L& T D isplay Techn ology(Fu jian)Ltd .(for Korea)
080-200-3800
デル・テクノロジーズ
入力:100V, 1.5 A, 50/60 Hz
XXXXXXXX
SVC Tag:
1234567
Express Service
Code:
123 456 789 0
S/N: CN-0723 H6-
TV200-1C1-001L
-A00
Date of Mf g/ : December. 2021生产日期/生產日期
Q40G024N-700-XXA
液晶显示器
型号:P2423D
输入电源:
100-240V 50/60Hz,1. 5A
中国制造
DELL P2423D
(Screw dimension: M4 x 10 mm).
See the documentation that shipped with the VESA-compatible wall mounting kit.
1. Place the display on a soft cloth or cushion at the edge of the desk.
2. Remove the stand. See .Removing the monitor stand
3. Remove the four screws that secure the display back cover.
4. Install the mounting bracket from the wall mounting kit to the display.
5. To mount the monitor on the wall, see the documentation that shipped with the
wall mounting kit.
NOTE: For use only with UL or CSA or GS-listed wall mount bracket
with minimum weight/load bearing capacity of 13.76 kg ( P2423D) /
18.16 kg (P2723D).

38 │ Operating your monitor
Operating your monitor
Power on the monitor
Press the Power button to turn On the monitor.
Using the joystick control
Use the joystick control on the rear of the monitor to make On-Screen Display
(OSD) adjustments.
1. Press the joystick to launch the Menu Launcher.
2. Move the joystick up/down/left/right to toggle between options.
3. Press the joystick again to confirm the selection.

40 │ Operating your monitor
Using the navigation keys
When the OSD main menu is active, move the joystick to configure the settings,
following the navigation keys displayed below the OSD.
Joystick Description
1
Up
Use the direction to adjust (increase ranges) Up
items in the OSD menu.
2
Down
Use the direction to adjust (decrease ranges) Down
items in the OSD menu.
3
Left
For all first level in the Menu list, arrow will exit/Left
close the OSD menu.
4
Right
For all other levels except first level in the Menu list,
Right arrow will go to the next level.
5
OK
Press the joystick to confirm your selection.

Operating your monitor │ 41
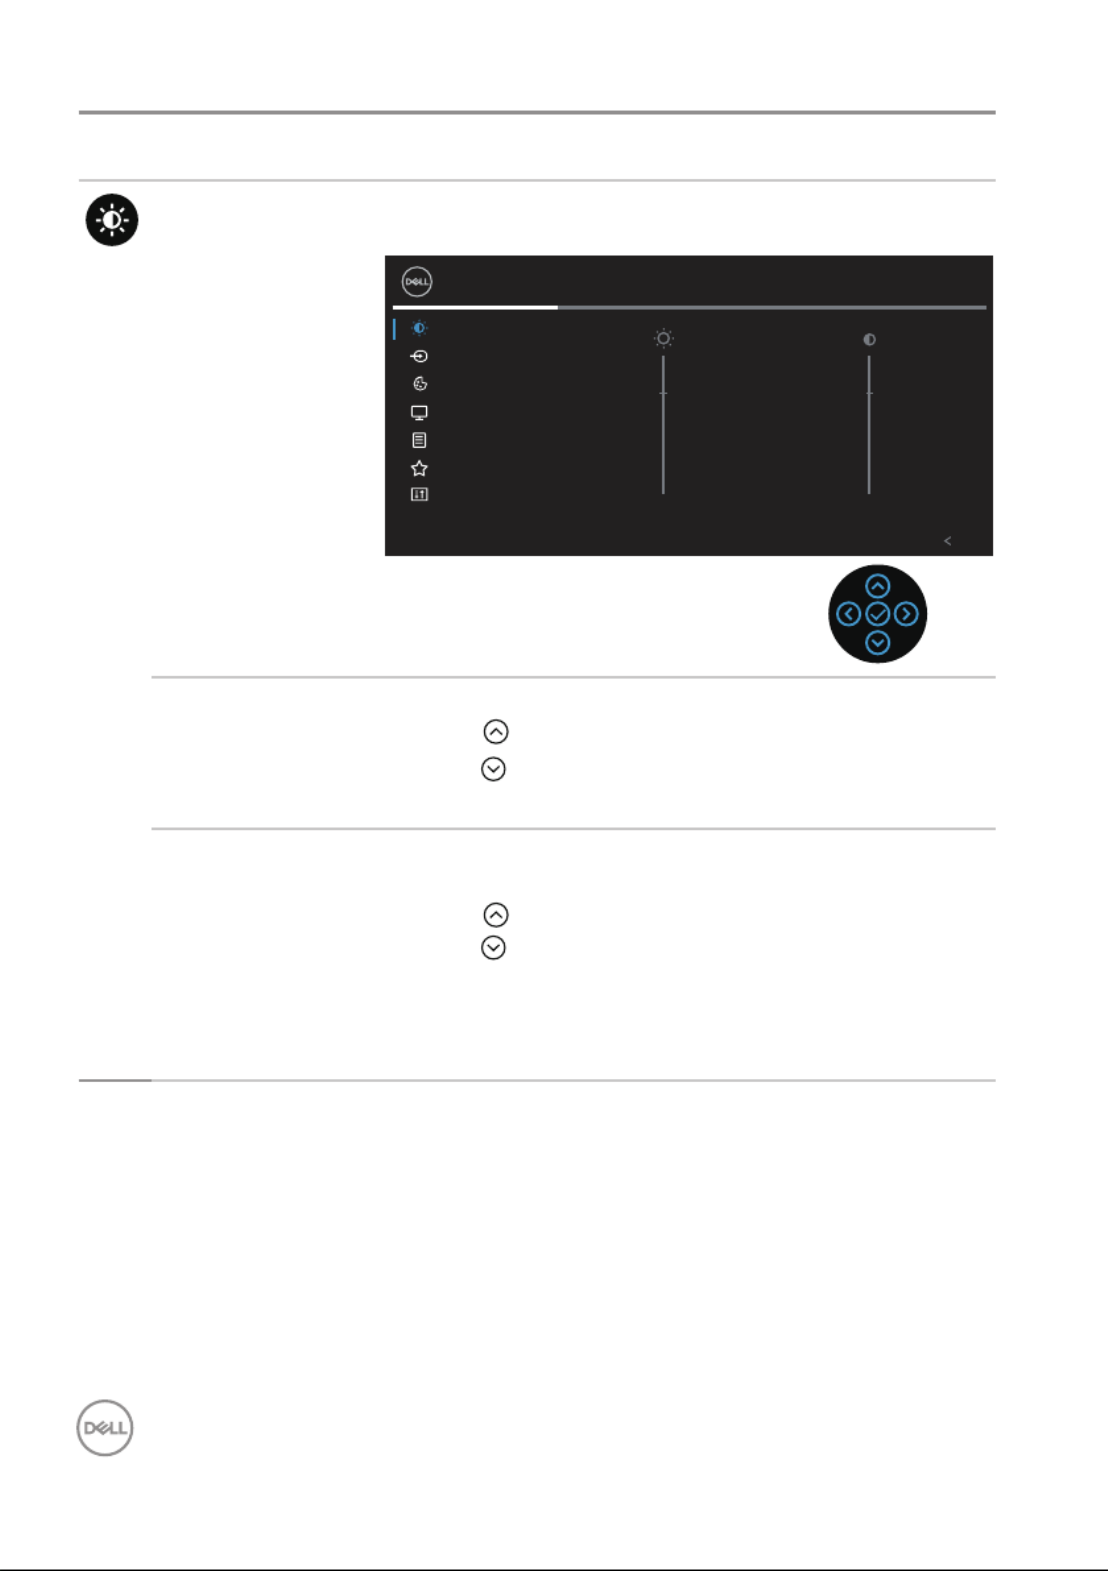
Accessing the OSD menu
NOTE: If you change the settings and then either proceed to another
menu or exit the OSD menu, the monitor automatically saves those
changes. The changes are also saved if you change the settings and
then wait for the OSD menu to disappear.
1. Select the icon to launch the OSD and display the main menu.
Brightness/Contrast
2X Monitor
Exit
75% 75%
Input Source
Color
Display
Menu
Personalize
Others
2. Press the and directions to move between the setting options. As you
move from one icon to another, the option is highlighted.
3. Press the or directions once to activate the highlighted option.
NOTE: The directional buttons (and the OK button) displayed may
differ according to the menu you’ve selected. Use available buttons to
make your selection.
4. Press and direction to select the desired parameter.
5. Press and then use the and directions, according to the indicators on
the menu, to make your changes.
6. Select the to return to the main menu.
42 │ Operating your monitor
Icon Menu and
Submenus
Description
Brightness/
Contrast
Use this menu to activate Brightness/Contrast
adjustment.
Brightness/Contrast
2X Monitor
Exit
75% 75%
Input Source
Color
Display
Menu
Personalize
Others
Brightness Brightness adjusts the luminance of the backlight.
Press the direction to increase the brightness and
press the direction to decrease the brightness (min.
0 / max. 100).
Contrast Adjust the first, and then adjust the Brightness
Contrast only if further adjustment is necessary.
Press the direction to increase the contrast and
press the direction to decrease the contrast (min. 0
/ max. 100).
The function adjusts the degree of difference Contrast
between darkness and lightness on the monitor screen.
Operating your monitor │ 43
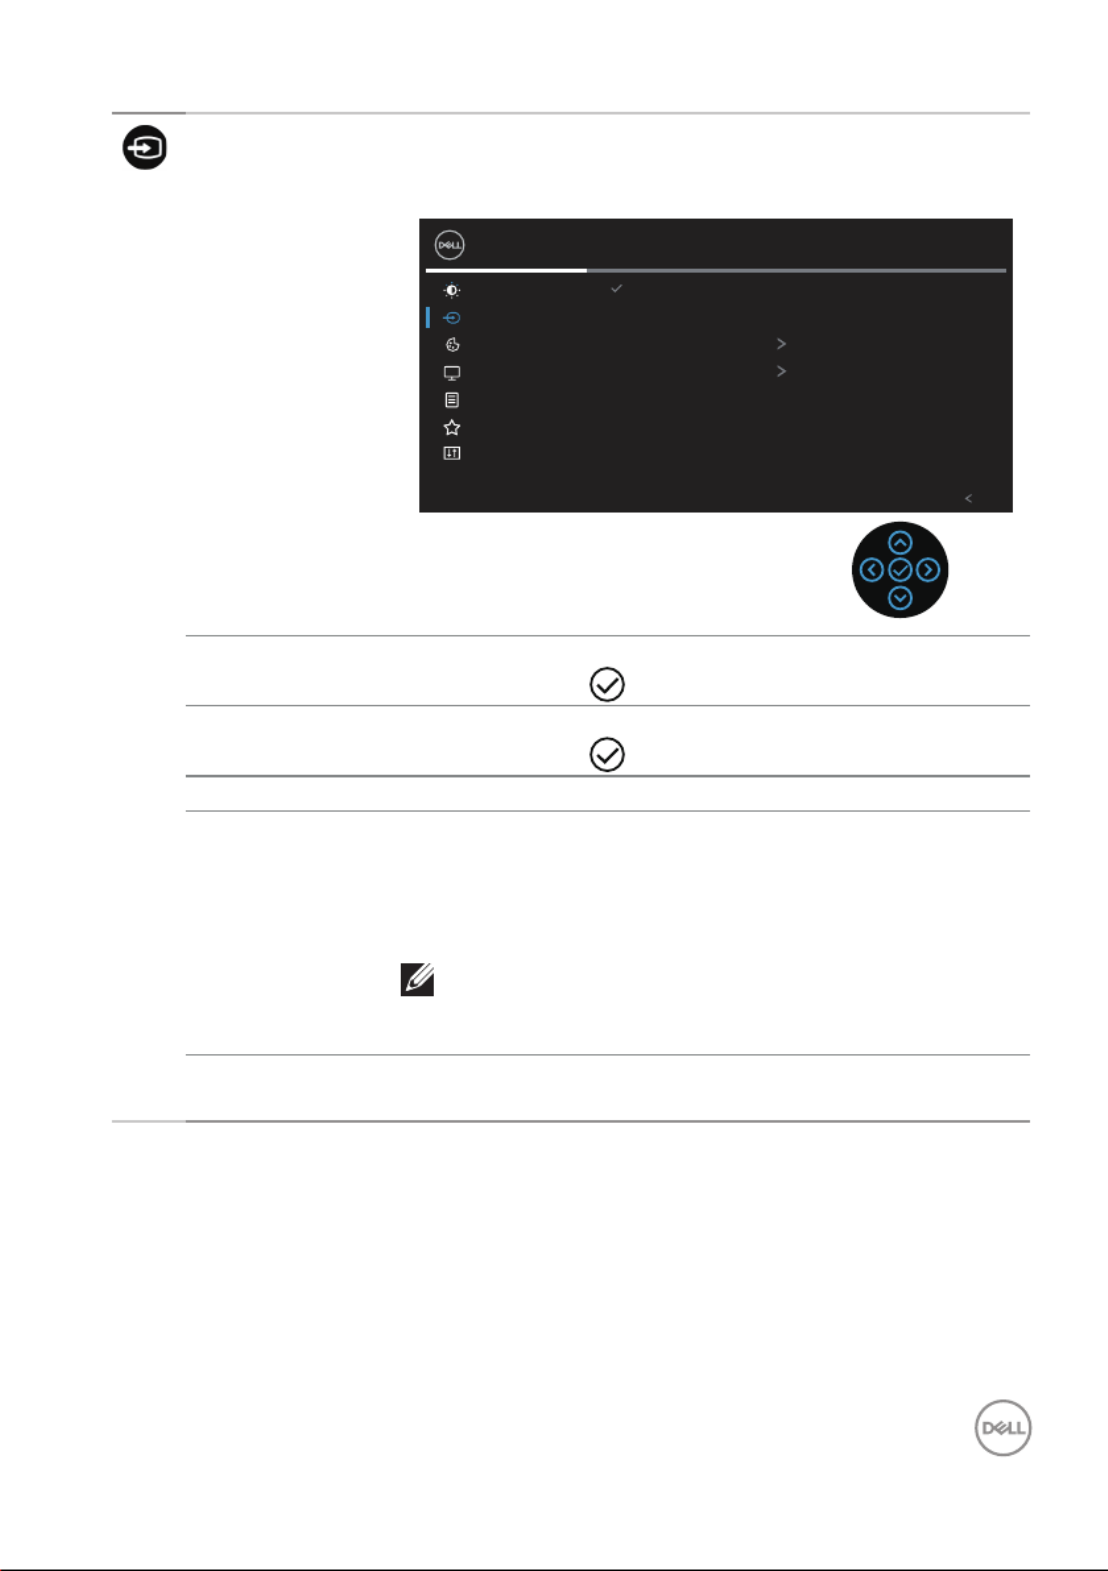
Input Source Use the menu to select between the Input Source
different video signals that may be connected to your
monitor.
Brightness/Contrast
Input Source
2X Monitor
Color
Display
Menu
Personalize
Others
Exit
DP
HDMI
Auto Select On
DPRename Inputs
Reset Input Source
DP Select input when you are using the DisplayPort DP
connector. Push to select the DP input source.
HDMI Select input when you are using the HDMI HDMI
connector. Push to select the HDMI input source.
Auto Select Choose to scan for available input signals.Auto Select
Rename Inputs Allows you to specify a preset input name for the
selected input source. The preset options are PC, PC
1, PC 2, Laptop, Laptop 1, and Laptop 2. The default
setting is Off.
NOTE: It is not applicable for the input names
shown in the warning messages and Display
Info.
Reset Input
Source
Select this option to restore default Input Source.

44 │ Operating your monitor
Color Use to adjust the color setting mode.Color
Brightness/Contrast
Input Source
2X Monitor
Color
Display
Menu
Personalize
Others
Exit
Preset Modes
Reset Color
Input Color Format RGB
Standard

Operating your monitor │ 45
Preset Modes Allows you to choose from a list of preset color modes.
• Standard: Loads the monitor's default color settings.
This is the default preset mode.
• Movie: Loads color settings ideal for movies.
• Game: Loads color settings ideal for most gaming
applications.
• Warm: Increases the color temperature. The screen
appears warmer with a red/yellow tint.
• Cool: Decreases the color temperature. The screen
appears cooler with a blue tint.
• Custom Color: Allows you to manually adjust the
color settings.
Press the and directions to adjust the three
colors
(R, G, B) values and create your own preset color
mode.
Brightness/Contrast
Input Source
2X Monitor
Color
Display
Menu
Personalize
Others
Exit
Preset Modes
Reset Color
Input Color Format
Standard
Movie
Game
Warm
Cool
Custom Color
46 │ Operating your monitor
Input Color
Format
Allows you to set the video input mode to:
• RGB: Select this option if your monitor is connected
to a computer or a media player that supports RGB
output.
• YCbCr: Select this option if your media player
supports only YCbCr output.
Brightness/Contrast
Input Source
2X Monitor
Color
Display
Menu
Personalize
Others
Exit
Preset Modes
Reset Color
Input Color Format
YCbCr
RGB
Hue This feature can shift the color of the video image to
green or purple. This is used to adjust the desired flesh
tone color. Use or to adjust the hue from 0 to 100.
Press to increase the green shade of the video
image.
Press to increase the purple shade of the video
image.
NOTE: Hue adjustment is available only when
you select Movie and Game mode.
Saturation This feature can adjust the color saturation of the video
image. Use or to adjust the saturation from 0 to
100.
Press to increase the monochrome appearance of
the video image.
Press to increase the colorful appearance of the
video image.
NOTE: Saturation adjustment is available only
when you select Movie and Game mode.

Operating your monitor │ 47
Reset Color Resets your monitor’s color settings to the factory
default.
Display Use the to adjust image.display
Brightness/Contrast
Input Source
2X Monitor
Color
Display
Menu
Personalize
Others
Exit
Normal
50
16 : 9Aspect Ratio
Sharpness
Response Time
Reset Display
ColorColor
Aspect Ratio Adjusts the image ratio to 16:9, 4:3 or 5:4.
Sharpness This feature can make the image look sharper or softer.
Use or to adjust the sharpness from 0 to 100.
Response Time Allows you to set the to or Response Time Normal
Fast.
Reset Display Resets all display settings to the factory default values.

48 │ Operating your monitor
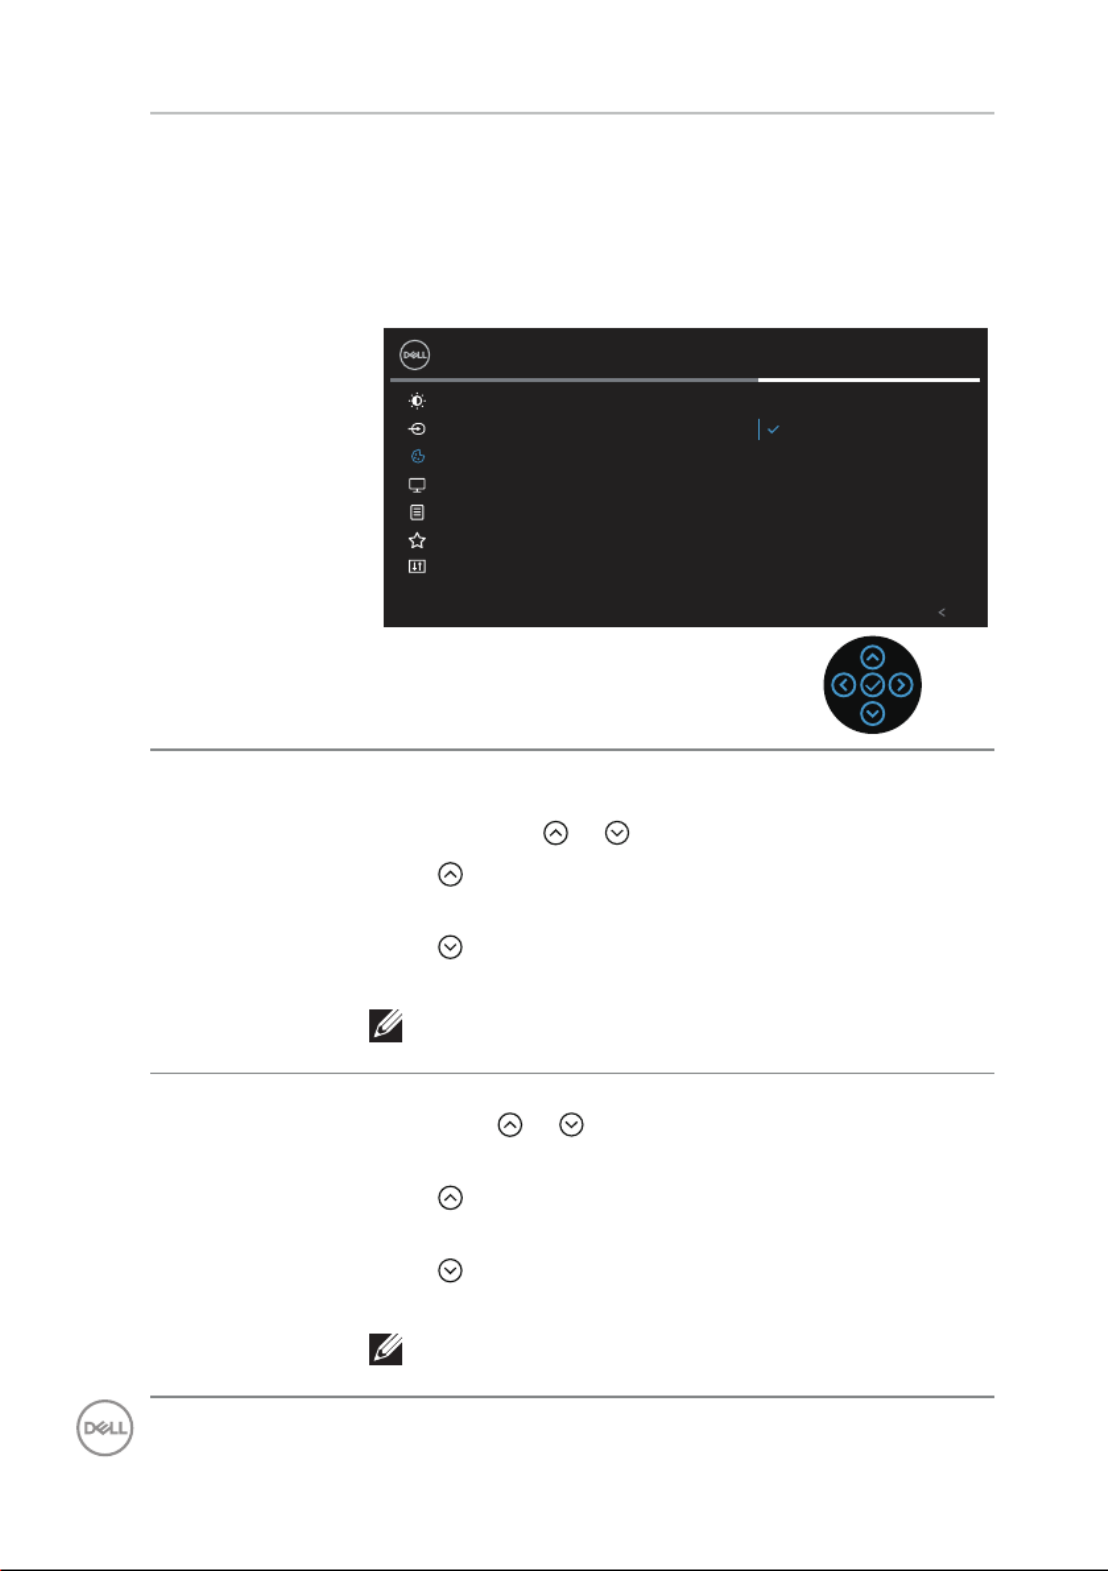
Menu Select this option to adjust the settings of the OSD,
such as, the languages of the OSD, the amount of time
the menu remains on screen and so on.
Brightness/Contrast
Input Source
2X Monitor
Color
Display
Menu
Personalize
Others
Exit
Language
Rotation
Transparency
Timer
Lock
Reset Menu
English
Select
20
20 s
Disable
Language Language options set the OSD display to one of the
eight languages (English, Spanish, French, German,
Brazilian Portuguese, Russian, Simplified Chinese, or
Japanese).
Rotation Rotates the OSD by 90 degrees counter-clockwise. You
can adjust the menu according to your Display Rotation.
Transparency Select this option to change the menu transparency by
pressing the and directions from 0 to 100.
Timer OSD hold time: sets the length of time the OSD will
remain active after the last time you pressed a direction.
Use or to adjust the slider in 1 second increments,
from 5 to 60 seconds.
Lock Controls user access to adjustments. User can select
one of the following: Menu Buttons, Power Button,
Menu + Power Buttons, Disable.
Reset Menu Reset all OSD settings to the factory preset values.

Operating your monitor │ 49
Personalize Select this option to adjust the settings of the
personalization.
Brightness/Contrast
Input Source
2X Monitor
Color
Display
Menu
Personalize
Others
Exit
Shortcut Key 1
Shortcut Key 2
Shortcut Key 3
Power Button LED
USB
Reset Personalization
Input Source
Preset Mode
Brightness/Contract
On in On Mode
O in Standby Mode
Shortcut Key 1
Shortcut Key 2
Shortcut Key 3
Allows you to choose a feature from Preset Modes,
Brightness/Contrast, Input Source, Aspect Ratio,
Rotation, Display Info and set it as a shortcut key.
Brightness/Contrast
Input Source
2X Monitor
Color
Display
Menu
Personalize
Others
Exit
Shortcut Key 1
Shortcut Key 2
Shortcut Key 3
Power Button LED
USB
Reset Personalization
Preset Modes
Brightness/Contract
Input Source
Aspect Ratio
Rotation
Display Info
Power Button
LED
Allows you to set the power LED indicator On or Off to
save energy.
USB Allows you to enable or disable USB function during
monitor standby mode.
Reset
Personalization
Reset all settings under the menu to the Personalize
default setting.
50 │ Operating your monitor
Others Select this option to adjust the OSD settings, such as
the DDC/CI, LCD conditioning, and so on.
Brightness/Contrast
Input Source
2X Monitor
Color
Display
Menu
Personalize
Others
Exit
Select
On
O
xxxxxx
xxxxxxx
Select
ENERGY STAR
®
Display Info
DDC/CI
LCD Conditioning
Firmware
Service Tag
Self-Diagnostic
Reset Others
Factory Reset
Display Info Displays the monitor’s current settings.
DDC/CI DDC/CI (display data channel/command interface)
allows your monitor parameters (brightness, color
balance and etc.) to be adjustable via the software on
your computer.
You can disable this feature by selecting .Off
Enable this feature by selecting on for best user
experience and optimum performance of your monitor.
Brightness/Contrast
Input Source
2X Monitor
Color
Display
Menu
Personalize
Others
Exit
On
O
Display Info
DDC/CI
LCD Conditioning
Firmware
Service Tag
Self-Diagnostic
Reset Others
Factory Reset

Operating your monitor │ 51
LCD
Conditioning
Helps reduce minor cases of image retention.
Depending on the degree of image retention, the
program may take some time to run. To start LCD
conditioning, select on.
Firmware Displays the firmware version of your monitor.
Service Tag Display the service tag number of the display. The
Service Tag is a unique alphanumeric identifier that
allows Dell to identify the product specifications and
access warranty information.
NOTE: The Service Tag is also printed on a
label located at the back of the cover.
Self-Diagnostic Allows you to check if your monitor is functioning
properly.
Reset Others Reset all settings under the others setting menu to the
factory preset values.
Factory Reset Restore all preset values to the factory default settings.
These are also the settings for ENERGY STAR ® tests.
Brightness/Contrast
Input Source
2X Monitor
Color
Display
Menu
Personalize
Others
Exit
Select
On
O
xxxxxx
xxxxxxx
Select
ENERGY STAR
®
Display Info
DDC/CI
LCD Conditioning
Firmware
Service Tag
Self-Diagnostic
Reset Others
Factory Reset

52 │ Operating your monitor
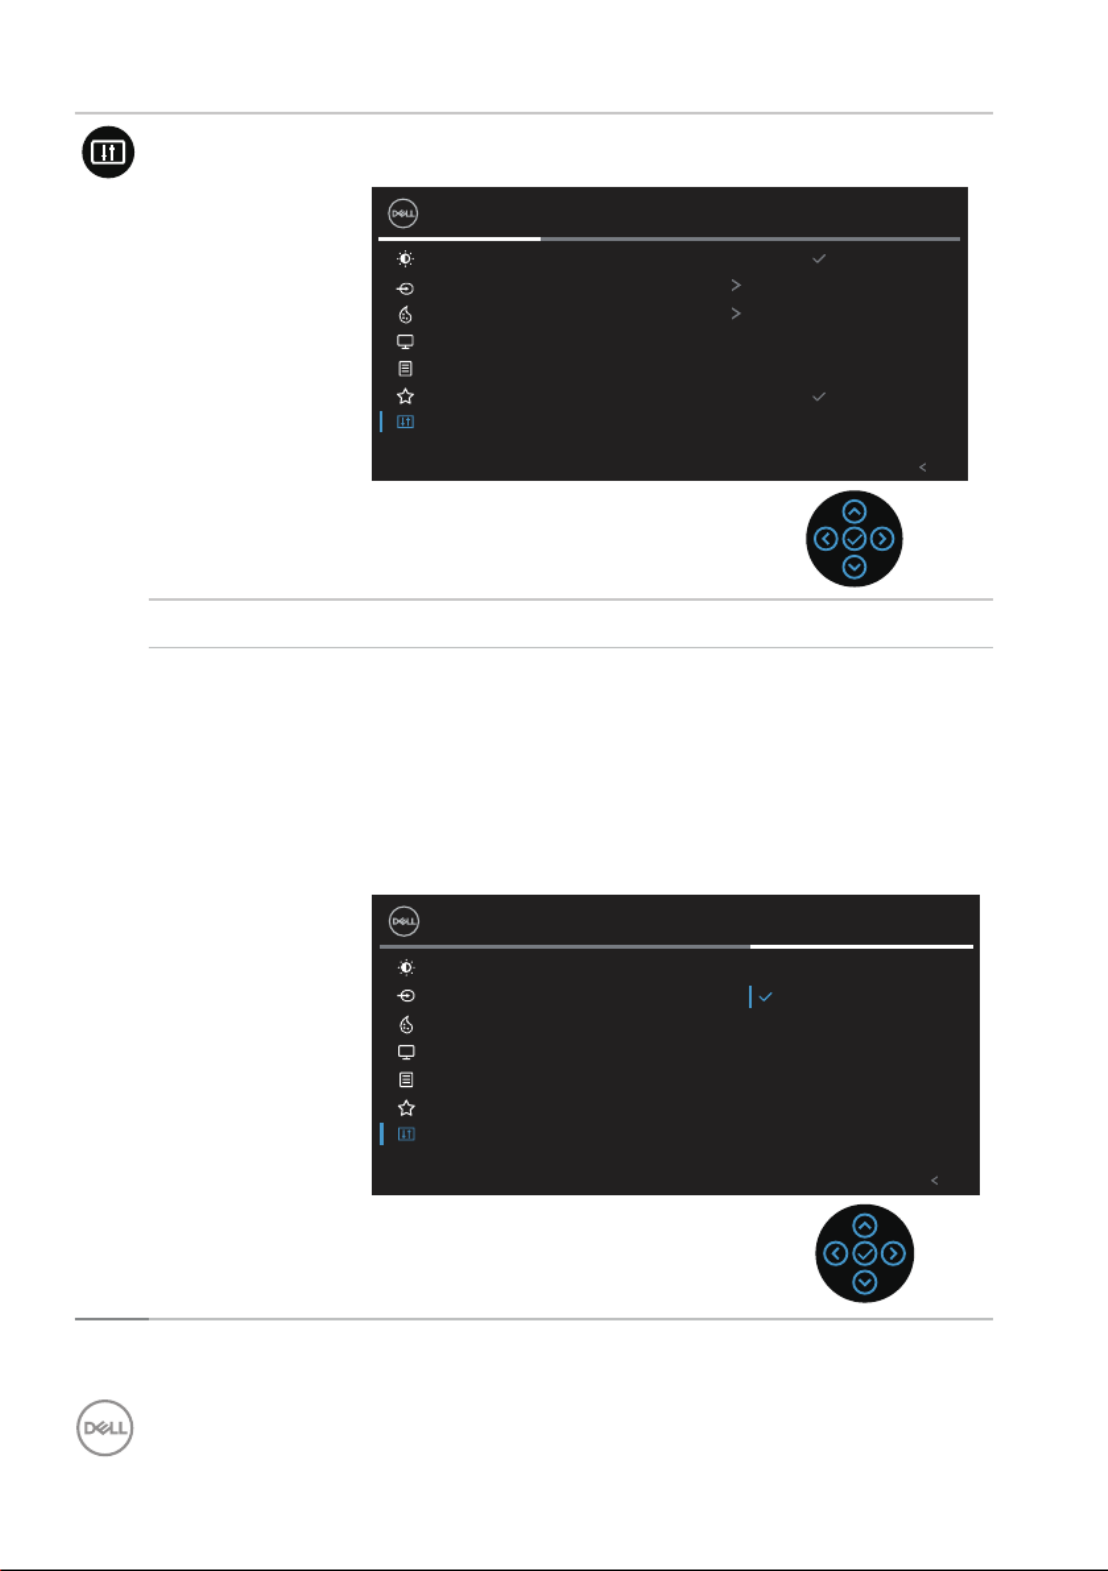
Menu and Power button lock
Prevents users to access or change OSD menu settings on the display.
By default, the Menu and Power button lock setting is disabled.
To access the lock menu, press and hold the Up or Down or Left or Right direction
for four seconds. A lock menu appears at the bottom right corner of the display.
NOTE: The lock menu can be accessed using this method when the
Menu and Power buttons are in unlocked state.
Select option:
To access the unlock menu, press and hold the Up or Down or Left or Right
direction for four seconds. An unlock menu appears at the bottom right corner of
the display.
NOTE: The unlock menu can be accessed when the Menu and Power
buttons are in locked state.

Operating your monitor │ 55
Are you sure you want to lock the Menu Buttons?
Yes
To unlock the Buttons, refer to the User’s Guide.
No
When the monitor goes into power-save mode, the following message appears:
Going into Standby mode...
If either HDMI or DisplayPort cable is not connected, a floating dialog box as shown
below appears. The monitor will enter Standby Mode after 4 minutes if left at this
state.
No CableHDMI
The display will go into Standby mode in 4 minutes.
www.dell.com/P2X23D
or
No CableDP
The display will go into Standby mode in 4 minutes.
www.dell.com/P2X23D
NOTE: The message may be slightly dierent according to the
connected input signal.

58 │ Operating your monitor
Setting the maximum resolution
NOTE: The steps may vary slightly depending on the version of
Windows you have.
To set the maximum resolution for the monitor:
In Windows 8.1:
1. For Windows 8.1, select the Desktop tile to switch toclassic desktop.
2. Right-click on the desktop and click .Screen Resolution
3. If you have more than one monitor connected, ensure that you select P2423D/
P2723D.
4. Click the dropdown list and select .Screen Resolution 2560 x 1440
5. Click .OK
In Windows 10 and Windows 11:
1. Right-click on the desktop and click .Display settings
2. If you have more than one monitor connected, ensure to select P2423D/
P2723D.
3. Click the dropdown list and select .Display Resolution 2560 x 1440
4. Click .Keep changes
If you do not see as an option, you must update your graphics driver 2560 x 1440
to the latest version. Depending on your computer, complete one of the following
procedures:
If you have a Dell desktop or laptop:
• Go to https://www.dell.com/support, enter your service tag, and
download the latest driver for your graphics card.
If you are using a non-Dell computer (laptop or desktop):
• Go to the support site for your computer and download the latest graphic
drivers.
• Go to your graphics card website and download the latest graphic drivers.

Operating your monitor │ 59
Using the tilt, swivel, and vertical extension
NOTE: The following instructions are applicable only for attaching
the stand that was shipped with your monitor. If you are attaching
a stand that you purchased from any other source, follow the set up
instructions that were included with the stand.
Tilt, swivel
With the stand attached to the monitor, you can tilt and swivel the monitor for the
most comfortable viewing angle.
NOTE: The stand is detached when the monitor is shipped from the
factory.
Vertical Extension
NOTE: The stand can be extended vertically up to 150 mm.
150 mm

60 │ Operating your monitor
Rotating the monitor
Before you rotate the monitor, your monitor should be fully vertically extended
( ) and fully tilted up to avoid hitting the bottom edge of the Vertical Extension
monitor.
1
2
Rotate clockwise

Operating your monitor │ 61
Rotate counterclockwise
NOTE: To use the Display Rotation function (Landscape versus
Portrait view) with your Dell computer, you require an updated
graphics driver that is not included with this monitor. To download the
graphics driver, go to and see the Download www.dell.com/support
section for Video Drivers for latest driver updates.
NOTE: When in the Portrait View Mode, you may experience
performance degradation in graphic-intensive applications (3D Gaming
and etc.).

62 │ Operating your monitor
Adjusting the rotation display settings of your system
After you have rotated your monitor, you need to complete the procedure below to
adjust the Rotation Display Settings of your system.
NOTE: If you are using the monitor with a non-Dell computer, you need
to go to the graphics driver website or your computer manufacturer
website for information on rotating the 'contents' on your display.
To adjust the Rotation Display Settings:
1. Right-click on the desktop and click .Properties
2. Select the tab and click .Settings Advanced
3. If you have an ATI graphics card, select the Rotation tab and set the preferred
otation.
4. If you have an NVIDIA graphics card, click the NVIDIA tab, in the left-hand
column select , and then select the preferred rotation.NVRotate
5. If you have an Intel® graphics card, select the graphics tab, click Intel Graphic
Properties Rotation, select the tab, and then set the preferred rotation.
NOTE: If you do not see the rotation option or it is not working
correctly, go to and download the latest driver www.dell.com/support
for your graphics card.

64 │ Troubleshooting
5. Turn Off your monitor and reconnect the video cable; then turn On both your
computer and the monitor.
If your monitor screen remains blank after you use the previous procedure, check
your video controller and computer, because your monitor is functioning properly.
Built-in diagnostics
Your monitor has a built-in diagnostic tool that helps you determine if any screen
abnormality you experience is an inherent problem with your monitor, or with your
computer and video card.
To run the built-in diagnostics:
1. Ensure that the screen is clean (no dust particles on the surface of the
screen).
2. Press the Joystick buttton to launch the OSD Menu Launcher and move the
Joystick up to select “ ” to open Main Menu.
Modes
3. Move the Joystick to select to initiate the self-Others > Self-Diagnostic
diagnostic process.
Brightness/Contrast
Input Source
2X Monitor
Color
Display
Menu
Personalize
Others
Exit
Display Info
DDC/CI
LCD Conditioning
Firmware
Service Tag
Self-Diagnostic
Reset Others
Factory Reset
Select

Troubleshooting │ 65
4. When initiated, a gray screen apppears. Inspect the screen for abnormalities.
5. Toggle the Joystick. The color of the screen changes to red. Inspect the
screen for abnormalities.
6. Repeat step 5 to inspect the display in green, blue, black, white and text
screens.
7. The test is complete when the text screen appears. To exit, toggle the
Joystick again.
If you do not detect any screen abnormalities upon using the BID tool, the monitor
is functioning properly. Please check the video card and computer.

66 │ Troubleshooting
Common problems
The following table contains general information about common monitor problems
you might encounter and the possible solutions:
Common
Symptoms
What you
experience
Possible Solutions
No Video/Power
LED off
No picture Ensure that the video cable connecting
the monitor and the computer is properly
connected and secure.
• Verify that the power outlet is
functioning properly using any other
electrical equipment.
• Ensure that the power button is pressed.
• Ensure that the correct input source is
selected via the Input Source menu.
No Video/Power
LED on
No picture or no
brightness
• Increase brightness and contrast
controls using the OSD.
• Perform monitor self-test feature check.
• Check for bent or broken pins in the
video cable connector.
• Run the built-in diagnostics.
• Ensure that the correct input source is
selected via the Input Source menu.
Poor Focus Picture is fuzzy,
blurry, or ghosting
• Eliminate video extension cables.
• Reset the monitor to Factory Settings
(Factory Reset ).
• Change the video resolution to the
correct aspect ratio.
Shaky/Jittery
Video
Wavy picture or
fine movement
• Reset the monitor to Factory Settings
(Factory Reset ).
• Check environmental factors.
• Relocate the monitor and test in another
room.

Troubleshooting │ 67
Missing Pixels LCD screen has
spots
• Cycle power On-Off.
• Pixel that is permanently Off is a
natural defect that can occur in LCD
technology.
• For more information on Dell Monitor
Quality and Pixel Policy, see Dell Support
site at:
www.dell.com/pixelguidelines.
Stuck-on Pixels LCD screen has
bright spots
• Cycle power On-Off.
• Pixel that is permanently off is a
natural defect that can occur in LCD
technology.
• For more information on Dell Monitor
Quality and Pixel Policy, see Dell Support
site at:
www.dell.com/pixelguidelines.
Brightness
Problems
Picture too dim or
too bright
• Reset the monitor to Factory Settings
(Factory Reset ).
• Adjust brightness & contrast controls via
OSD.
Geometric
Distortion
Screen not
centered correctly
• Reset the monitor to Factory Settings
(Factory Reset ).
• Adjust horizontal & vertical controls via
OSD.
Horizontal/
Vertical Lines
Screen has one or
more lines
• Reset the monitor to Factory Settings
(Factory Reset ).
• Perform monitor self-test feature check
and determine if these lines are also in
self-test mode.
• Check for bent or broken pins in the
video cable connector.
• Run the built-in diagnostics.

68 │ Troubleshooting
Synchronization
Problems
Screen is
scrambled or
appears torn
• Reset the monitor to Factory Settings
(Factory Reset ).
• Perform monitor self-test feature check
to determine if the scrambled screen
appears in self-test mode.
• Check for bent or broken pins in the
video cable connector.
• Restart the computer in the safe mode.
Safety Related
Issues
Visible signs of
smoke or sparks
• Do not perform any troubleshooting
steps.
• Contact Dell immediately.
Intermittent
Problems
Monitor
malfunctions on &
off
• Ensure that the video cable connecting
the monitor to the computer is
connected properly and is secure.
• Reset the monitor to Factory Settings
(Factory Reset ).
• Perform monitor self-test feature check
to determine if the intermittent problem
occurs in self-test mode.
Missing Color Picture missing
color
• Perform monitor self-test feature check.
• Ensure that the video cable connecting
the monitor to the computer is
connected properly and is secure.
• Check for bent or broken pins in the
video cable connector.
Wrong Color Picture color not
good
• Try different Preset Modes Color in
settings OSD. Adjust R G B/ / value in
Custom Color Color in settings OSD.
• Change the Input Color Format to
RGB YCbCr Color settings or in the
OSD.
• Run the built-in diagnostics.

Troubleshooting │ 69
Image retention
from a static
image left on
the monitor for
a long period of
time
Faint shadow from
the static image
displayed appears
on the screen
• Set the screen to turn off after a few
minutes of screen idle time. These can
be adjusted in Windows Power Options
or Mac Energy Saver setting.
• Alternatively, use a dynamically changing
screensaver.
Product-specific problems
Specific
Symptoms
What you experience Possible Solutions
Screen image is too
small
Image is centered on screen,
but does not fill entire viewing
area
• Check the Aspect Ratio
setting in the Display
settings OSD.
• Reset the monitor to
Factory Settings (Factory
Reset).
Cannot adjust the
monitor with the
joystick
OSD does not appear on the
screen
• Turn Off the monitor,
unplug the power cord,
plug it back, and then turn
On the monitor.
• Check whether the OSD
menu is locked. If yes,
move and hold the joystick
up/down/left/right for
4 seconds to unlock (for
more information, see
Menu and Power button
lock).

70 │ Troubleshooting
No Input Signal
when user controls
are pressed
No picture, the LED light is
white
• Check the signal source.
Ensure the computer is
not in Standby Mode by
moving the mouse or
pressing any key on the
keyboard.
• Check if the video cable
is plugged in properly.
Disconnect and reconnect
the video cable if
necessary.
• Reset the computer or
video player.
The picture does
not fill the entire
screen
The picture cannot fill the
height or width of the screen
• Due to different video
formats (aspect ratio) of
DVDs, the monitor may
display in full screen.
• Run the built-in diagnostics.
No video at HDMI/
DisplayPort
When connected to some
dongle/ docking device at
the port, there is no video
when unplugging/plugging
the cable from the notebook
• Unplug the HDMI/
DisplayPort cable from
dongle/docking device,
then plug the docking
HDMI/DisplayPort cable to
the notebook.
Produktspezifikationen
| Marke: | Dell |
| Kategorie: | Monitor |
| Modell: | P2423D |
Brauchst du Hilfe?
Wenn Sie Hilfe mit Dell P2423D benötigen, stellen Sie unten eine Frage und andere Benutzer werden Ihnen antworten
Bedienungsanleitung Monitor Dell

30 September 2024
23 September 2024
20 September 2024
15 September 2024
14 September 2024
13 September 2024
6 September 2024
5 September 2024
3 September 2024
2 September 2024
Bedienungsanleitung Monitor
- Monitor Samsung
- Monitor Da-Lite
- Monitor 3M
- Monitor Acer
- Monitor Apple
- Monitor Approx
- Monitor Asus
- Monitor Sanyo
- Monitor BenQ
- Monitor Corsair
- Monitor Gigabyte
- Monitor HP
- Monitor HyperX
- Monitor KeepOut
- Monitor Mad Catz
- Monitor Medion
- Monitor Philips
- Monitor SilverCrest
- Monitor Sony
- Monitor Zalman
- Monitor Panasonic
- Monitor LG
- Monitor Bosch
- Monitor Canon
- Monitor Yamaha
- Monitor Yealink
- Monitor Velleman
- Monitor Neumann
- Monitor CSL
- Monitor Denver
- Monitor EMOS
- Monitor König
- Monitor MarQuant
- Monitor Renkforce
- Monitor Thomson
- Monitor Blaupunkt
- Monitor Schneider
- Monitor Sharp
- Monitor Daewoo
- Monitor Triton
- Monitor Pyle
- Monitor Mitsubishi
- Monitor Haier
- Monitor Hisense
- Monitor Salora
- Monitor ARCHOS
- Monitor Caliber
- Monitor ODYS
- Monitor Pioneer
- Monitor Jay-Tech
- Monitor JBL
- Monitor JVC
- Monitor Optoma
- Monitor PEAQ
- Monitor Shure
- Monitor Stairville
- Monitor Abus
- Monitor Continental Edison
- Monitor Hannspree
- Monitor Hitachi
- Monitor Hyundai
- Monitor Orion
- Monitor TCL
- Monitor Tesla
- Monitor Toshiba
- Monitor Olympus
- Monitor Garmin
- Monitor Citizen
- Monitor Omron
- Monitor Element
- Monitor Plantronics
- Monitor Epson
- Monitor ViewSonic
- Monitor IHealth
- Monitor Waeco
- Monitor LC-Power
- Monitor Lenovo
- Monitor MSI
- Monitor Tripp Lite
- Monitor LightZone
- Monitor Adam
- Monitor Burg Wächter
- Monitor Marshall
- Monitor Razer
- Monitor Samson
- Monitor Honeywell
- Monitor ELO
- Monitor Marshall Electronics
- Monitor Ricoh
- Monitor Simrad
- Monitor Globaltronics
- Monitor Terra
- Monitor Xoro
- Monitor Smart
- Monitor Alpine
- Monitor Viessmann
- Monitor Brandson
- Monitor Cooler Master
- Monitor NZXT
- Monitor Faytech
- Monitor Behringer
- Monitor Mackie
- Monitor ESI
- Monitor Eurolite
- Monitor Barco
- Monitor InFocus
- Monitor Kindermann
- Monitor NEC
- Monitor Hercules
- Monitor Monoprice
- Monitor Monacor
- Monitor Belinea
- Monitor Fujitsu
- Monitor Huawei
- Monitor Alesis
- Monitor Maxdata
- Monitor Packard Bell
- Monitor JUNG
- Monitor Westinghouse
- Monitor AOC
- Monitor AG Neovo
- Monitor Eizo
- Monitor Iiyama
- Monitor Kogan
- Monitor Skytronic
- Monitor Xerox
- Monitor NewStar
- Monitor Insignia
- Monitor Swissonic
- Monitor Ring
- Monitor Vitek
- Monitor DataVideo
- Monitor RCF
- Monitor Prestigio
- Monitor APC
- Monitor Cisco
- Monitor Danfoss
- Monitor Yorkville
- Monitor Allen & Heath
- Monitor Deltaco
- Monitor Boss
- Monitor IFM
- Monitor Godox
- Monitor Genelec
- Monitor Vivitek
- Monitor Kramer
- Monitor Peerless-AV
- Monitor Wortmann AG
- Monitor ARRI
- Monitor Asrock
- Monitor CTOUCH
- Monitor AJA
- Monitor Hikvision
- Monitor Promethean
- Monitor Newline
- Monitor Blue Sky
- Monitor Jensen
- Monitor Fostex
- Monitor PreSonus
- Monitor ART
- Monitor Seiki
- Monitor Oecolux
- Monitor IK Multimedia
- Monitor Vorago
- Monitor Midas
- Monitor Baaske Medical
- Monitor Ikan
- Monitor Krom
- Monitor ProXtend
- Monitor Avantone Pro
- Monitor Emachines
- Monitor EverFocus
- Monitor Focal
- Monitor Ganz
- Monitor GeoVision
- Monitor HKC
- Monitor Ibm
- Monitor Interlogix
- Monitor Joy-it
- Monitor LaCie
- Monitor Legamaster
- Monitor M-Audio
- Monitor Maxell
- Monitor MicroTouch
- Monitor Mirai
- Monitor ONYX
- Monitor Peerless
- Monitor Provision ISR
- Monitor Soundstream
- Monitor Sunny
- Monitor Sunstech
- Monitor Tannoy
- Monitor AMX
- Monitor Wyse - Dell
- Monitor ACTi
- Monitor Vimar
- Monitor Alienware
- Monitor AVer
- Monitor PeakTech
- Monitor Ozone
- Monitor ITek
- Monitor Bauhn
- Monitor TV One
- Monitor RGBlink
- Monitor QSC
- Monitor Planar
- Monitor Mitsai
- Monitor Bematech
- Monitor Dahua Technology
- Monitor Posiflex
- Monitor Speco Technologies
- Monitor Christie
- Monitor Atlantis Land
- Monitor Palmer
- Monitor Hanwha
- Monitor Allsee
- Monitor Prowise
- Monitor SPL
- Monitor Advantech
- Monitor Aputure
- Monitor Avocor
- Monitor Lilliput
- Monitor Chauvet
- Monitor EKO
- Monitor IOIO
- Monitor Neets
- Monitor Crestron
- Monitor I3-Technologies
- Monitor Antelope Audio
- Monitor Pelco
- Monitor Dynaudio
- Monitor Extron
- Monitor V7
- Monitor Atlona
- Monitor Game Factor
- Monitor Iadea
- Monitor Elite Screens
- Monitor Night Owl
- Monitor Sonifex
- Monitor Kali Audio
- Monitor Alogic
- Monitor SMART Technologies
- Monitor SWIT
- Monitor Atomos
- Monitor DoubleSight
- Monitor Varad
- Monitor Syscom
- Monitor KRK
- Monitor Chimei
- Monitor HEDD
- Monitor EC Line
- Monitor BOOX
- Monitor Akuvox
- Monitor Nixeus
- Monitor Desview
- Monitor Enttec
- Monitor Drawmer
- Monitor Feelworld
- Monitor Yiynova
- Monitor Positivo
- Monitor Ernitec
- Monitor AORUS
- Monitor Aopen
- Monitor Ikegami
- Monitor Elvid
- Monitor American Dynamics
- Monitor Fluid
- Monitor TVLogic
- Monitor Gamber-Johnson
- Monitor CTL
- Monitor Raysgem
- Monitor Viotek
- Monitor Datacolor
- Monitor ANDYCINE
- Monitor Wohler
- Monitor Eve Audio
- Monitor Colormetrics
- Monitor Qian
- Monitor Neat
- Monitor Planet Audio
- Monitor Mimo Monitors
- Monitor IStarUSA
- Monitor Innocn
- Monitor AMCV
- Monitor GVision
- Monitor OSEE
- Monitor Freedom Scientific
- Monitor UPERFECT
- Monitor SmallHD
- Monitor Monkey Banana
- Monitor Kubo
- Monitor POSline
- Monitor HoverCam
- Monitor IBoardTouch
- Monitor COMMBOX
- Monitor Postium
- Monitor HELGI
- Monitor ProDVX
- Monitor Blue Sea
- Monitor GeChic
- Monitor ADS-TEC
- Monitor Transvideo
- Monitor Shimbol
- Monitor Portkeys
- Monitor AIS
- Monitor Vidi-Touch
- Monitor KTC
- Monitor CoolerMaster
- Monitor Mobile Pixels
- Monitor Voxicon
- Monitor Mybeo
- Monitor Bearware
- Monitor DTEN
- Monitor Cocopar
- Monitor Titan Army
- Monitor Delvcam
Neueste Bedienungsanleitung für -Kategorien-

3 Dezember 2024
3 Dezember 2024
2 Dezember 2024
1 Dezember 2024
1 Dezember 2024
1 Dezember 2024

30 November 2024
30 November 2024
30 November 2024
29 November 2024