Canon PowerShot ELPH 510 HS Bedienungsanleitung
Lesen Sie kostenlos die 📖 deutsche Bedienungsanleitung für Canon PowerShot ELPH 510 HS (212 Seiten) in der Kategorie Camcorder. Dieser Bedienungsanleitung war für 22 Personen hilfreich und wurde von 2 Benutzern mit durchschnittlich 4.5 Sternen bewertet
Seite 1/212

Camera User Guide
ENGLISH
• Make sure you read this guide, including the “Safety
Precautions” section, before using the camera.
• Reading this guide will help you learn to use the camera
properly.
• Store this guide safely so that you can use it in the future.
COPY

2
Check if the following items are included in your camera package.
If anything is missing, contact the retailer where you purchased the camera.
Checking the Package Contents
Using the PDF Manuals
The following PDF manuals are included in the Readme folder of the CD-
ROM:
When the software is installed on your computer, the PDF manuals will be
copied to the computer and you can refer to them by clicking the shortcuts
on the desktop.
•Camera User Guide (This Guide)
Once you have mastered the basics, use the
camera’s many features to shoot more challenging
photos.
•Software Guide
Read when you want to use the included software.
•A memory card is not included (p. 17).
•Adobe Reader is required to view the PDF manuals.
Battery Charger
CB-2LB/CB-2LBE
Camera Battery Pack NB-9L
(with Terminal Cover)
Interface Cable
IFC-400PCU
Wrist Strap
WS-DC10
Warranty
Card
Getting Started DIGITAL CAMERA
Solution Disk
COPY

3
•Take some initial test shots and play them back to make sure the images
were recorded correctly. Please note that Canon Inc., its subsidiaries and
affiliates, and its distributors are not liable for any consequential damages
arising from any malfunction of a camera or accessory, including memory
cards, that results in the failure of an image to be recorded or to be
recorded in a way that is machine readable.
•The images recorded with this camera are intended for personal use. Do
not record images that infringe upon copyright laws without the prior
permission of the copyright holder. Please be advised that in certain cases
the copying of images from performances, exhibitions, or commercial
properties by means of a camera or other device may contravene copyright
or other legal rights even if the image was shot for personal use.
•This camera’s warranty is only effective in the country of sale. If there is a
problem with the camera while abroad, please return it to the country of
sale before proceeding with a warranty claim to a Canon Customer
Support Help Desk. For Canon Customer Support contacts, please see the
customer support list supplied with your camera.
•The LCD monitor is produced with extremely high-precision manufacturing
techniques. More than 99.99% of the pixels operate to specification, but
occasionally non-performing pixels may appear as bright or dark dots. This
is not a malfunction and has no effect on the recorded image.
•The LCD monitor may be covered with a thin plastic film for protection
against scratches during shipment. If covered, remove the film before
using the camera.
•Please take care when operating the camera for an extended period as the
camera body may become warm. This is not a malfunction.
•Icons are used in the text to represent the camera buttons and switches.
•Language that displays on the screen appears inside [ ] (square brackets).
•: Things you should be careful about
•: Troubleshooting tips
•: Hints for getting more out of your camera
•: Supplemental information
•(p. xx): Reference pages (“xx” stands for a page number)
•This guide assumes all functions are at their default settings.
•The various types of memory cards that can be used in this camera are
collectively referred to as memory cards in this guide.
Read This First
Conventions Used in This Guide
COPY

What Do You Want to Do?
5
1View
zLook at my pictures ...................................................................... 30
zAutomatically play back pictures (slideshow) ............................. 116
zLook at my pictures on a TV....................................................... 170
zLook at my pictures on a computer .............................................. 36
zQuickly search pictures .............................................................. 112
zErase pictures....................................................................... 32, 127
EShoot/View Movies
zShoot movies ........................................................................ 33, 103
zView movies ................................................................................. 35
zShoot fast moving subjects and play them back in slow motion... 106
cPrint
zPrint pictures............................................................................... 140
Save
zSave images to a computer.......................................................... 36
3Other
zTurn off sounds............................................................................. 48
zUse the camera abroad ........................................................ 17, 159
zUnderstand what is displayed on the screen .............................. 183
COPY

6
Checking the Package Contents .......2
Read This First ..................................3
Conventions Used in This Guide .......3
What Do You Want to Do? ................4
Table of Contents ..............................6
Safety Precautions.............................9
1
Getting Started .................13
Using the Touch Panel ....................14
Charging the Battery........................15
Compatible Memory Cards
(Sold Separately)...........................17
Inserting the Battery.........................18
Inserting the Memory Card ..............19
Setting the Date and Time ...............21
Setting the Display Language..........23
Formatting Memory Cards...............24
Pressing the Shutter Button.............25
Taking Pictures (Smart Auto)...........26
Viewing Images ...............................30
Active Display ..................................31
Erasing Images................................32
Shooting Movies ..............................33
Viewing Movies................................35
Transferring Images to a Computer
for Viewing.....................................36
2
Learning More ..................41
Components Guide..........................42
Screen Display.................................43
Indicator ...........................................44
FUNC. Menu – Basic Operations ....45
MENU – Basic Operations...............46
Adjusting the Screen Brightness......47
Changing the Sound Settings ..........48
Returning the Camera to Default
Settings ......................................... 49
Power Saving Function
(Auto Power Down)....................... 50
3
Shooting with Commonly
Used Functions ................51
Turning the Flash Off ...................... 52
Zooming In More Closely on
Subjects (Digital Zoom)................. 53
Inserting the Date and Time............ 54
Using the Self-Timer ....................... 55
Changing the Aspect Ratio ............. 57
Changing the Recording Pixel
Setting (Image Size) ..................... 58
Changing the Compression Ratio
(Image Quality) ............................. 58
4
Adding Effects and
Shooting in Various
Conditions ........................61
Shooting in Various Conditions ....... 62
Adding Effects and Shooting........... 65
Making Short Movies Automatically
(Movie Digest)............................... 72
Detecting a Face and Shooting
(Smart Shutter) ............................. 74
Shooting Long Exposures............... 78
High-Speed Continuous Shooting
(High-speed Burst)........................ 79
Capturing the Best Facial
Expressions (Best Image
Selection) ...................................... 80
Table of Contents
COPY

Table of Contents
7
5
Choosing Settings
Yourself.............................81
Shooting in Program AE ................. 82
Adjusting the Brightness
(Exposure Compensation)............ 83
Turning the Flash On ...................... 83
Adjusting the White Balance........... 84
Changing the ISO Speed................ 86
Correcting the Brightness and
Shooting (i-Contrast)..................... 87
Continuous Shooting....................... 88
Changing the Tone of an Image
(My Colors) ................................... 89
Shooting Close-ups (Macro) ........... 91
Shooting Far Away Subjects
(Infinity) ......................................... 91
Changing the AF Frame Mode........ 93
Magnifying the Focal Point.............. 95
Choosing the Subject to Focus On
(Touch AF).................................... 96
Shooting with the AF Lock .............. 97
Shooting with Servo AF .................. 97
Changing the Metering Method....... 98
Shooting with the AE Lock .............. 99
Shooting with the FE Lock .............. 99
Shooting with Slow Synchro ......... 100
Red-Eye Correction ...................... 101
Checking for Shut Eyes ................ 102
6
Using Various Functions for
Shooting Movies ............103
Shooting Various Kinds of
Movies ........................................ 104
Shoot Movies That Look Like a
Miniature Model
(Miniature Effect) ........................ 105
Shooting Super Slow Motion
Movies ......................................... 106
Using the Wind Filter..................... 107
Changing the Image Quality.......... 108
Other Shooting Functions..............109
Editing ........................................... 109
7
Using Various Playback and
Editing Functions........... 111
Quickly Searching Images............. 112
Viewing Images in Filtered
Playback...................................... 115
Viewing Slideshows....................... 116
Checking the Focus....................... 118
Magnifying Images ........................ 119
Viewing Each Image in a Group.... 120
Displaying Various Images
(Smart Shuffle)............................ 122
Changing Image Transitions ......... 123
Easy Operations with Touch
Actions ........................................ 123
Protecting Images ......................... 125
Erasing Images ............................. 127
Tagging Images as Favorites ........ 129
Organizing Images by Category
(My Category) ............................. 131
Rotating Images ............................ 132
Resizing Images ............................ 133
Trimming ....................................... 134
Adding Effects with the My Colors
Function ...................................... 136
Correcting the Brightness
(i-Contrast) ..................................137
Correcting the Red-Eye Effect....... 138
COPY

Table of Contents
8
8
Printing............................139
Printing Images..............................140
Choosing Images for Printing
(DPOF) ........................................147
Choosing Images for
a Photobook ................................151
9
Customizing Camera
Settings ........................... 153
Changing Camera Settings............154
Changing Shooting Function
Settings........................................162
Changing Playback Function
Settings........................................168
10
Useful Information .........169
Viewing Images on a TV ............... 170
Using Household Power................ 174
Using an Eye-Fi Card.................... 175
Troubleshooting ............................ 177
List of Messages That Appear
on the Screen.............................. 180
Information Displayed
on the Screen.............................. 183
Functions and Menu Lists ............. 188
Playback Mode FUNC. Menu........ 196
Handling Precautions .................... 197
Specifications ................................ 198
Accessories................................... 202
Separately Sold Accessories ........ 203
Index ............................................. 205
COPY

Safety Precautions
11
•Remove and store the battery when you are not using the camera.
If the battery is left inside the camera, damage caused by leakage may occur.
•Before you discard the battery, cover the terminals with tape or other insulators.
Contacting other metal materials may lead to fire or explosions.
•Unplug the battery charger from the power outlet after charging is complete, or
when you are not using it.
•Do not place anything, such as cloth on top of the battery charger while it is
charging.
Leaving the unit plugged in for a long period of time may cause it to overheat and distort,
resulting in fire.
•Do not place the battery near pets.
Pets biting the battery could cause leakage, overheating or explosion, resulting in fire or
damage.
•Do not sit down with the camera in your pocket.
Doing so may cause malfunctions or damage the screen.
•When putting the camera in your bag, ensure that hard objects do not come into
contact with the screen.
•Do not attach any hard objects to the camera.
Doing so may cause malfunctions or damage the screen.
COPY

12
COPY

13
Getting Started
This chapter explains preparations before shooting, how to shoot in
A mode, and then how to view and erase the images you take. The
latter part of this chapter explains how to shoot and view movies and
transfer images to a computer.
Attaching the Strap/Holding the Camera
•Attach the included strap and wrap it around your wrist to avoid dropping
the camera during use.
•Keep your arms tight against your body while holding the camera firmly by
the sides when shooting. Be sure that your fingers do not block the flash or
touch the screen.
1
Strap
COPY
15
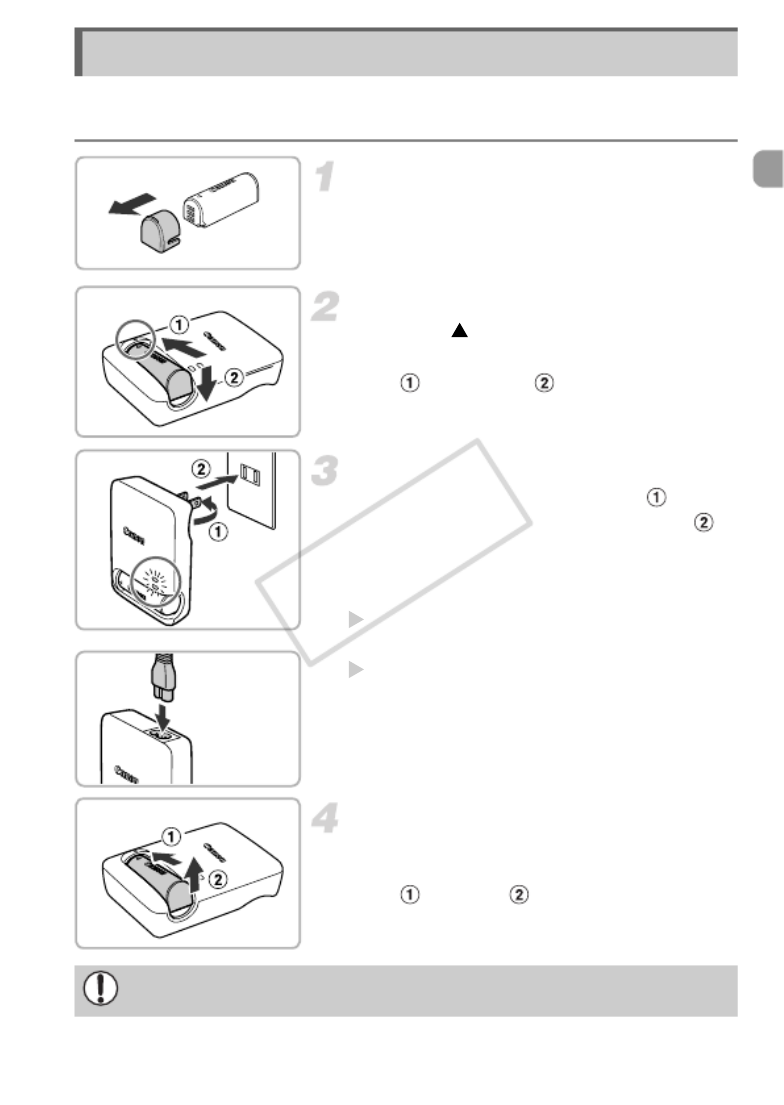
Use the included charger to charge the battery. Be sure to charge the battery
as it is not charged at the time of purchase.
Remove the cover.
Insert the battery.
zAlign the marks on the battery and
charger, then insert the battery by sliding it
in ( ) and down ( ).
Charge the battery.
zFor CB-2LB: Flip out the plug ( ) and
plug the charger into a power outlet ( ).
zFor CB-2LBE: Plug the power cord into
the charger, then plug the other end into a
power outlet.
The CHARGE lamp lights and charging
starts.
The FULL lamp will light when charging
has finished. Charging takes approx. 1
hour and 50 minutes.
Remove the battery.
zUnplug the battery charger from the power
outlet, then remove the battery by sliding it
in ( ) and up ( ).
Charging the Battery
CB-2LB
CB-2LBE
To protect the battery and prolong its life, do not charge it for longer than
24 hours continuously.
COPY
Charging the Battery
16
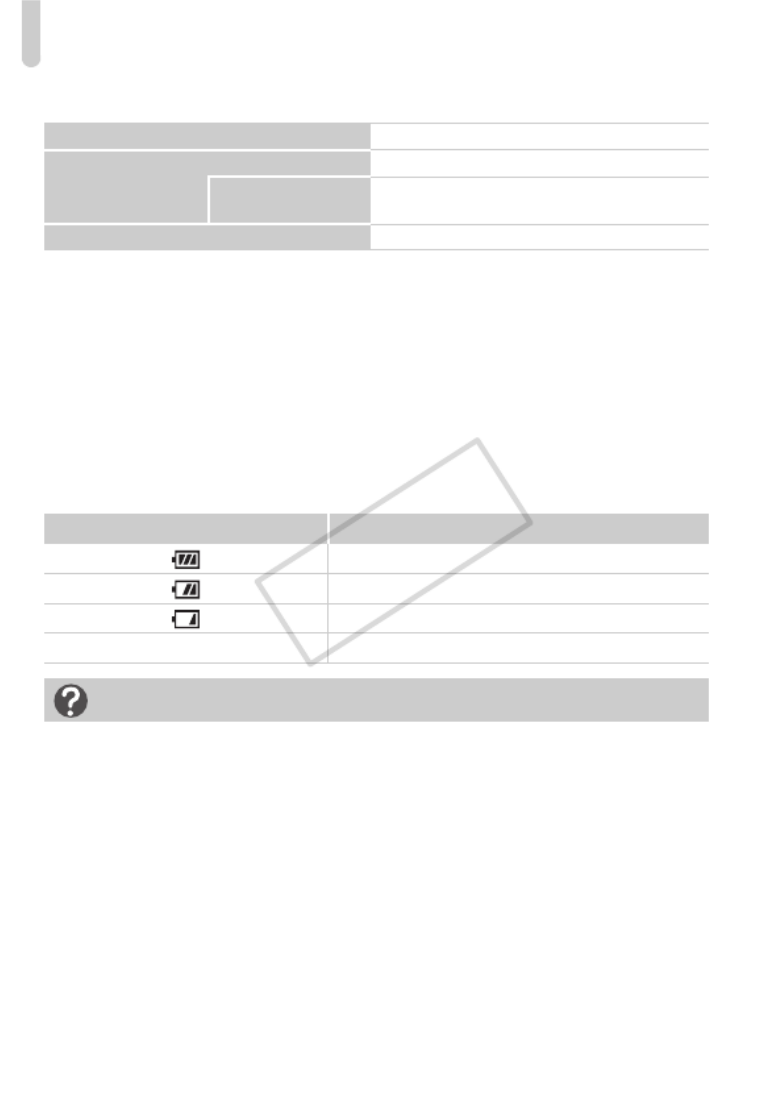
Number of Possible Shots/Shooting and Playback Times
*1 The number of shots that can be taken is based on the Camera & Imaging Products
Association (CIPA) measurement standard.
*2 Times are based on default settings, starting and stopping shooting, turning the camera on
and off, and operations such as using the zoom.
*3 Times are based on repeatedly shooting until the maximum clip length is reached or recording
stops automatically.
• Under some shooting conditions, the number of possible shots and shooting time may
be less than mentioned above.
Battery Charge Indicator
An icon or message will appear on the screen indicating the battery’s charge
state.
Number of Shots*1Approx. 170
Movie Shooting Time*2Approx. 30 minutes
Continuous
Shooting*3Approx. 50 minutes
Playback Time Approx. 4 hours
Display Summary
Sufficient charge.
Slightly depleted, but sufficient.
(Blinking red) Nearly depleted. Charge the battery.
“Change the battery pack.” Depleted. Charge the battery.
What if...
•What if the battery develops a bulge?
This is a normal characteristic of the battery and does not indicate a problem.
However, if the battery bulges to the point where it will no longer fit into the
camera, please contact a Canon Customer Support Help Desk.
•What if the battery is quickly depleted even after charging?
The battery has reached the end of its life span. Purchase a new battery.
COPY
Compatible Memory Cards (Sold Separately)
17
The cards below can be used without restrictions on their capacities.
•SD memory cards*
•SDHC memory cards*
•SDXC memory cards *
•Eye-Fi cards
* This memory card complies with SD standards. Some cards may not operate properly
depending on the brand of card used.
This product is not guaranteed to support Eye-Fi card functions (including
wireless transfer). In case of an issue with an Eye-Fi card, please check with
the card manufacturer.
Also note that an approval is required to use Eye-Fi cards in many countries
or regions. Without approval, use of the card is not permitted. If it is unclear
whether the card has been approved for use in the area, please check with
the card manufacturer.
Using the battery and charger effectively
•Charge the battery on the day, or the day before, it will be used.
Charged batteries continue to discharge naturally even if they are not used.
•How to store the battery for long periods:
Deplete and remove the battery from the camera. Attach the terminal cover and
store the battery. Storing a battery for long periods of time (about a year) without
depleting it may shorten its life span or affect its performance.
•The battery charger can also be used when abroad.
The charger can be used in regions that have 100 – 240 V (50/60 Hz) AC power.
If the plug does not fit the outlet, use a commercially available plug adapter. Do
not use electrical transformers for foreign travel as they will cause damage.
Compatible Memory Cards (Sold
Separately)
Depending on your computer’s OS version, SDXC memory cards may not
be recognized even when using a commercially available card reader.
Check to make sure that your OS supports SDXC memory cards
beforehand.
About Eye-Fi Cards
COPY
18
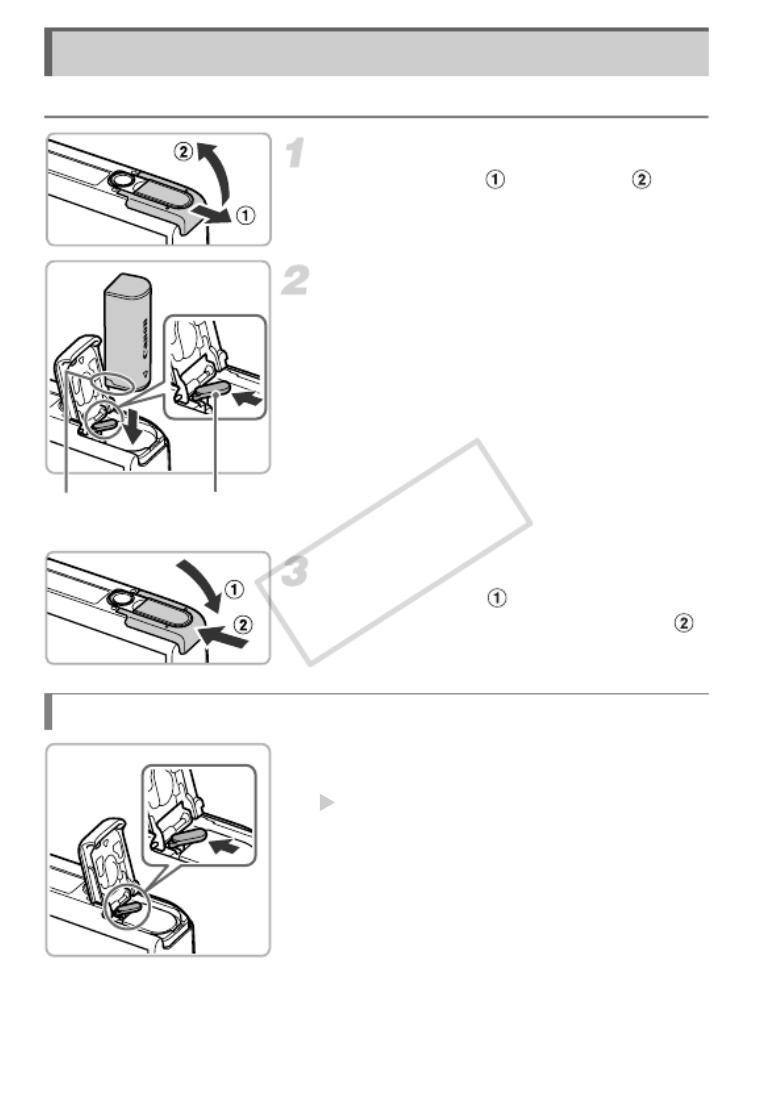
Insert the included battery.
Open the cover.
zSlide the cover ( ) and open it ( ).
Insert the battery.
zPress the battery lock in the direction of the
arrow, then insert the battery as shown
until it locks into place with a click.
zBe sure to insert the battery in the correct
direction or it will not properly lock into
place.
Close the cover.
zClose the cover ( ), and press downward
as you slide it until it clicks into place ( ).
zOpen the cover and press the battery lock
in the direction of the arrow.
The battery will pop up.
Inserting the Battery
Terminals Battery
Lock
Removing the Battery
COPY

Inserting the Memory Card
20
Number of Shots per Memory Card
• Values are based on the default settings.
• The number of shots that can be taken will vary depending on camera settings, the
subject and the memory card used.
What if [Memory card locked] appears on the screen?
If the write-protect tab is in the locked position, [Memory card locked] will appear
on the screen and you will not be able to take or erase images.
Memory Card 4 GB 16 GB
Number of Shots Approx. 1231 Approx. 5042
Can you check the number of shots that can be taken?
You can check the number of shots that can be
taken when the camera is in a Shooting mode
(p. 26).
COPY

21
The Date/Time settings screen will appear the first time the camera is turned
on. Since the dates and times recorded into your images are based on these
settings, be sure to set them.
Turn on the camera.
zPress the power button.
The Date/Time screen will appear.
Set the date and time.
zTouch the option you want to set.
op will appear.
zTouch op to set a value.
Complete the setting.
zTouch ^.
Once the date and time have been set, the
Date/Time screen will close.
zPressing the power button will turn off the
camera.
Setting the Date and Time
Reappearing Date/Time screen
Set the correct date and time. If you have not set the date and time, the Date/Time
screen will appear each time you turn on the camera.
Daylight saving time settings
If you touch in Step 2 and then choose , you will set the time to daylight
saving (1 hour ahead).
COPY

Setting the Date and Time
22
You can change the current date and time settings.
Display the menu.
zTouch H, then touch n.
Choose [Date/Time].
zTouch the 3 tab.
zDrag up or down the screen to choose
[Date/Time].
zTouch [Date/Time].
Change the date and time.
zFollow Steps 2 and 3 on p. 21 to adjust the
settings.
zTouch ^ twice to close the menu.
Changing the Date and Time
Date/Time battery
•The camera has a built-in date/time battery (backup battery) that allows the
date/time settings to be retained for about 3 weeks after the battery pack has
been removed.
•By inserting a charged battery or connecting an AC adapter kit (sold separately,
p. 203) the date/time battery can be charged in about 4 hours even if the camera
is not turned on.
•If the date/time battery is depleted, the Date/Time screen will appear when you
turn the camera on. Follow the steps on p. 21 to set the date and time.
COPY
23
You can change the language that displays on the screen.
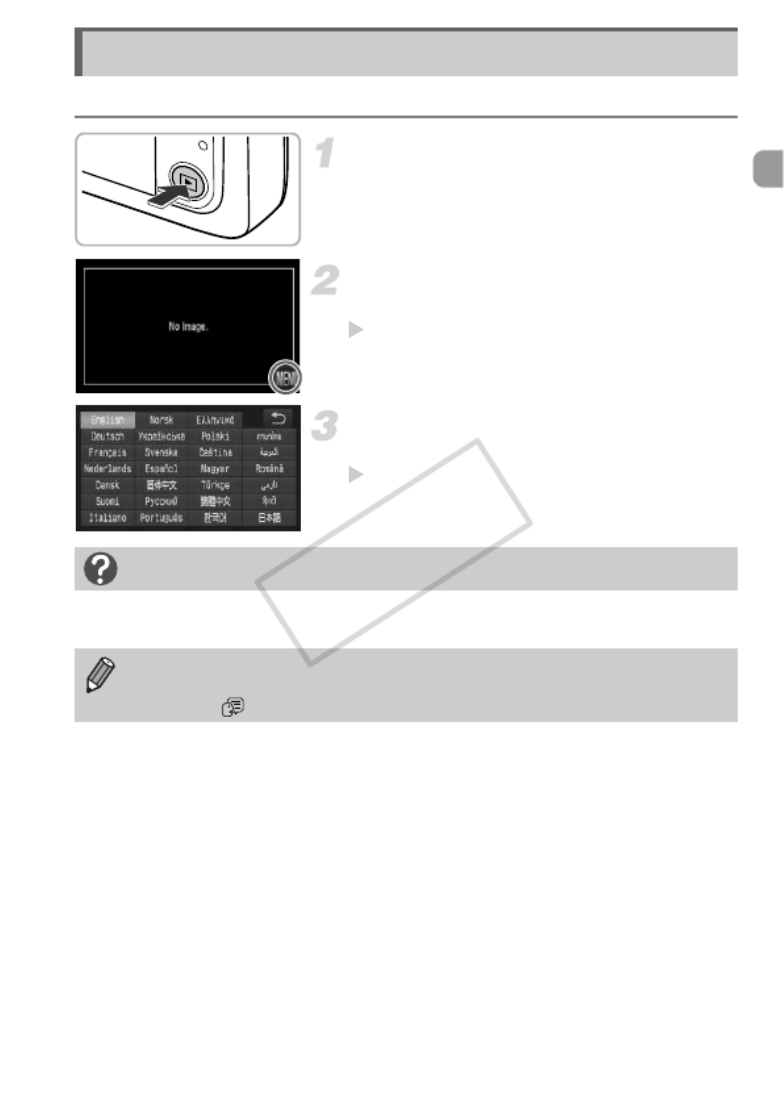
Enter Playback mode.
zPress the 1 button.
Display the settings screen.
zTouch and hold n.
The settings screen will appear.
Set the display language.
zTouch a display language, then touch ^.
Once the display language has been set,
the settings screen will close.
Setting the Display Language
What if n does not appear?
When there are images on the memory card, touch H on the lower left of the
screen to display n.
You can also change the display language by touching H, then
n 3. Choose the tab in the screen that appears, then choose the
[Language ] menu item.
COPY

24
Before you use a new memory card or one that has been formatted in other
devices, you should format the card with this camera. Formatting (initializing)
a memory card erases all data on the memory card. As you cannot retrieve
the erased data, exercise adequate caution before formatting the memory
card.
Before formatting an Eye-Fi card (p. 175), be sure to install the software
contained on the card to a computer.
Display the menu.
zTouch H, then touch n.
Choose [Format].
zTouch the 3 tab.
zDrag up or down the screen to choose
[Format].
zTouch [Format].
Choose [OK].
zTouch [OK].
A confirmation screen will appear.
Format the memory card.
zTouch [OK] to start formatting the memory
card.
zWhen formatting ends, [Memory card
formatting complete] appears on the
screen. Touch [OK].
Formatting Memory Cards
COPY

Pressing the Shutter Button
25
To take images that are in focus, be sure to first press the shutter button
lightly (halfway) to focus, then press fully to shoot.
Press halfway (Press lightly to focus).
zPress lightly until the camera beeps twice
and AF frames appear where the camera
focused.
Press fully (Press fully to shoot).
The camera plays the shutter sound and
takes the shot.
zSince the shot is being taken while the
shutter sound plays, be careful not to move
the camera.
Formatting or erasing data on a memory card merely changes the file
management information on the card and does not ensure its contents are
completely erased. Be careful when transferring or disposing of a memory
card. When disposing of a memory card, take precautions such as
physically destroying the card to prevent personal information leaks.
•The total capacity of the memory card displayed in the formatting screen
may be less than indicated on the memory card.
•Perform a low-level format (p. 155) of the memory card when the camera
does not operate properly, the recording/reading speed of a memory card
has dropped, when continuous shooting speed slows down, or when
movie recording stops suddenly.
Pressing the Shutter Button
Does the length of the shutter sound change?
•Since the time required to shoot differs depending on the scene you want to
take, the length of the shutter sound may change.
•If the camera or subject moves while the shutter sound is playing, the recorded
image may be blurry.
If you shoot without pressing the shutter button halfway, the image may not
be in focus.
COPY

Taking Pictures (Smart Auto)
27
When the camera focuses, it will beep
twice and AF frames will appear where the
camera focused.
Several AF frames will appear when the
camera focuses on more than 1 point.
Shoot.
zPress the shutter button fully to shoot.
The camera will play the shutter sound and
shoot. The flash will automatically fire in
low light conditions.
The image will appear on the screen for
approximately 2 seconds.
zYou can take a second picture even while
an image is displayed by pressing the
shutter button again.
By simply touching the screen the camera will focus on your subject and
adjust the brightness for easy shooting.
Activate the Touch Shutter
function.
zTouch , it will change to .
Choose the subject to focus on.
zTouch and hold your finger on the subject
on the screen.
zWhen the camera focuses on the subject,
it will beep twice.
A blue frame appears and the focus and
exposure will continuously adjust (Servo
AF).
AF Frame
Touching the Screen to Shoot (Touch Shutter)
COPY

Taking Pictures (Smart Auto)
28
Shoot.
zWhen you remove your finger from the
screen, the camera plays the shutter
sound and takes the shot.
zTo deactivate the Touch Shutter function,
touch . It will change to .
•The Touch Shutter function operates in the same way as when pressing
the shutter button.
•You can also make Touch Shutter settings by touching H then
n, to choose [Touch Shutter] in the 4 tab.
•You can take a second picture even while the image you shot is displayed
by touching ^.
Choosing the subject to focus on (Touch AF)
When the Touch Shutter function is deactivated ( ), touch the subject
appearing on the screen to display . Press and hold the shutter button halfway
to display a blue frame where focus and exposure will be maintained (Servo AF).
Press the shutter button fully to shoot.
What if...
•What if the color and brightness of the images do not turn out as
expected?
The scene icon (p. 184) that appears on the screen may not match the actual
scene, and you may not obtain the expected results. If this happens, try
shooting in G mode (p. 81).
•What if white and gray frames appear when you point the camera toward
a subject?
A white frame appears on the face or subject that the camera detected as the
main subject, while gray frames appear on other detected faces. The frames will
follow the subjects within a certain range.
If the subject moves, however, the gray frames will disappear, leaving only the
white frame.
•What if a frame does not appear on the subject you want to shoot?
The subject may not be detected, and frames may appear on the background.
If this happens, try shooting in G mode (p. 81).
COPY

Taking Pictures (Smart Auto)
29
•What if a blue frame appears when you press the shutter button halfway?
A blue frame appears when a moving subject is detected; the focus and
exposure will continuously adjust (Servo AF).
•What if a flashing appears?
Attach the camera to a tripod so that the camera does not move and blur the
image.
•What if the image comes out dark even if the flash fired when shooting?
The subject is too far away for the flash to reach. The effective flash range is
approximately 30 cm – 3.1 m (12 in. – 10.2 ft.) at maximum wide angle (j),
and approximately 1.0 – 1.7 m (3.3 – 5.6 ft.) at maximum telephoto (i).
•What if the camera beeps once when the shutter button is pressed
halfway?
Your subject may be too close. When the camera is at maximum wide angle
(j), move about 1 cm (0.4 in.) or more away from your subject and shoot.
Move about 1 m (3.3 ft.) or more away when the camera is at maximum
telephoto (i).
•What if the lamp lights when the shutter button is pressed halfway?
To reduce red-eye and to assist in focusing, the lamp may light when shooting
in low light conditions.
•What if the h icon blinks when you try to shoot?
The flash is charging. You can shoot when recharging ends.
Icons that appear on the screen
The icon for the determined scene, and the IS mode icon will appear on the
screen. For details on the icons that appear, see “Scene Icons” (p. 184) and “IS
Mode Icons” (p. 185).
COPY

30
You can view the images you have taken on the screen.
Enter Playback mode.
zPress the 1 button.
XThe last image you took will appear.
Choose an image.
zDragging left to right across the screen will
cycle through the images in the reverse
order they were taken, from the newest
image to the oldest.
zDragging right to left across the screen will
cycle through images in the order they
were taken, from oldest to newest.
zIf you touch the left edge of the screen
(inside frame on the screen at the left),
q will appear and images will display in the
reverse order they were taken, from the
newest image to the oldest.
zIf you touch the right edge of the screen
(inside frame on the screen at the left),
r will appear and images will display in the
order they were taken, from oldest to
newest.
zThe images change more quickly if you
touch and hold qr, but they will appear
coarse.
zThe lens will retract after approximately 1
minute elapses.
zPressing the 1 button again while the
lens is retracted will turn the camera off.
Viewing Images
Switching to Shooting mode
Pressing the shutter button halfway while in Playback mode switches the camera
to Shooting mode.
COPY

31
When an image is displayed, lightly tapping the camera as shown below will
switch to the next image.
Active Display
•Be sure to put the strap around your wrist, and hold the camera firmly to
avoid dropping it.
•Depending on the way you tap the camera, images may not switch.
Tilt the camera to switch images
If you touch and hold q on the left of the screen and
tilt the camera as shown while switching through
images (p. 30), the images advance quickly. Tilt the
camera in the opposite direction while holding r.
When switching images by dragging them, or by touching and holding or q
r, the images will appear coarse.
Switch to next image Switch to previous image
COPY

32
You can choose and erase images one at a time. Please note that erased
images cannot be recovered. Exercise adequate caution before erasing an
image.
Enter Playback mode.
zPress the 1 button.
XThe last image you took will appear.
Choose an image to erase.
zDrag across the screen to choose an
image.
Erase the image.
zAfter touching H, drag up or down the
screen to choose a, then touch the menu
item again.
zWhen [Erase?] appears on the screen,
touch [Erase].
XThe displayed image will be erased.
zTo exit instead of erasing, touch [Cancel].
Erasing Images
You can also use Touch Actions to erase images (p. 123).
COPY

33
The camera will determine the subject and shooting conditions, and select the
best settings for the scene. The audio will record in stereo.
If you continue shooting for a long time, the camera may become warm. This
is not a malfunction.
Enter A mode and compose the
shot.
zFollow Steps 1 – 3 on p. 26 to compose the
shot.
zYou can check the amount of time you can
shoot on the screen.
Shoot.
zTouch .
zThe display will switch to full-screen, and
the area displayed on the screen will be
recorded.
XThe camera will beep once, recording will
start, and [ Rec] and the elapsed time will
appear on the screen.
zIf you change the composition of your shot
during shooting, the focus, brightness and
tone will automatically adjust.
z
Do not touch the microphones while shooting.
XIt may be difficult to hear recorded sound
during playback if you cover the
microphones when shooting.
zDo not operate the camera other than
touching while shooting. Operation
sounds will be recorded in the movie.
Stop shooting.
zTouch .
XThe camera will beep twice and stop
shooting the movie.
XShooting will automatically stop when the
memory card fills.
Shooting Movies
Remaining Time
Elapsed Time
Microphones
COPY

36
You can use the included software to transfer images you have shot with the
camera to a computer for viewing. If you are already using software included
with another Canon-brand compact digital camera, install the software from
the included CD-ROM, overwriting your current installation.
Windows
* For Windows XP, Microsoft .NET Framework 3.0 or later (max. 500 MB) must be installed.
Installation may take some time depending on your computer’s capabilities.
Macintosh
Transferring Images to a Computer for
Viewing
System Requirements
OS
Windows 7 (Including SP1)
Windows Vista SP2
Windows XP SP3
Computer model The above OS should be pre-installed on computers with built-in
USB ports.
CPU Pentium 1.3 GHz or higher (still images), Core 2 Duo 2.6 GHz or
higher (movies)
RAM
Windows 7 (64 bit): 2 GB or more
Windows 7 (32 bit), Windows Vista (64 bit, 32 bit): 1 GB or more (still
images), 2 GB or more (movies)
Windows XP: 512 MB or more (still images), 2 GB or more (movies)
Interface USB
Free Hard Disk
Space 420 MB or more*
Display 1,024 x 768 pixels or higher
OS Mac OS X (v10.5 – v10.6)
Computer model The above OS should be pre-installed on computers with built-in
USB ports.
CPU Intel Processor (still images), Core 2 Duo 2.6 GHz or higher (movies)
RAM
Mac OS X v10.6: 1 GB or more (still images), 2 GB or more (movies)
Mac OS X v10.5: 512 MB or more (still images), 2 GB or more
(movies)
Interface USB
Free Hard Disk
Space 480 MB or more
Display 1,024 x 768 pixels or higher
COPY
Transferring Images to a Computer for Viewing
38
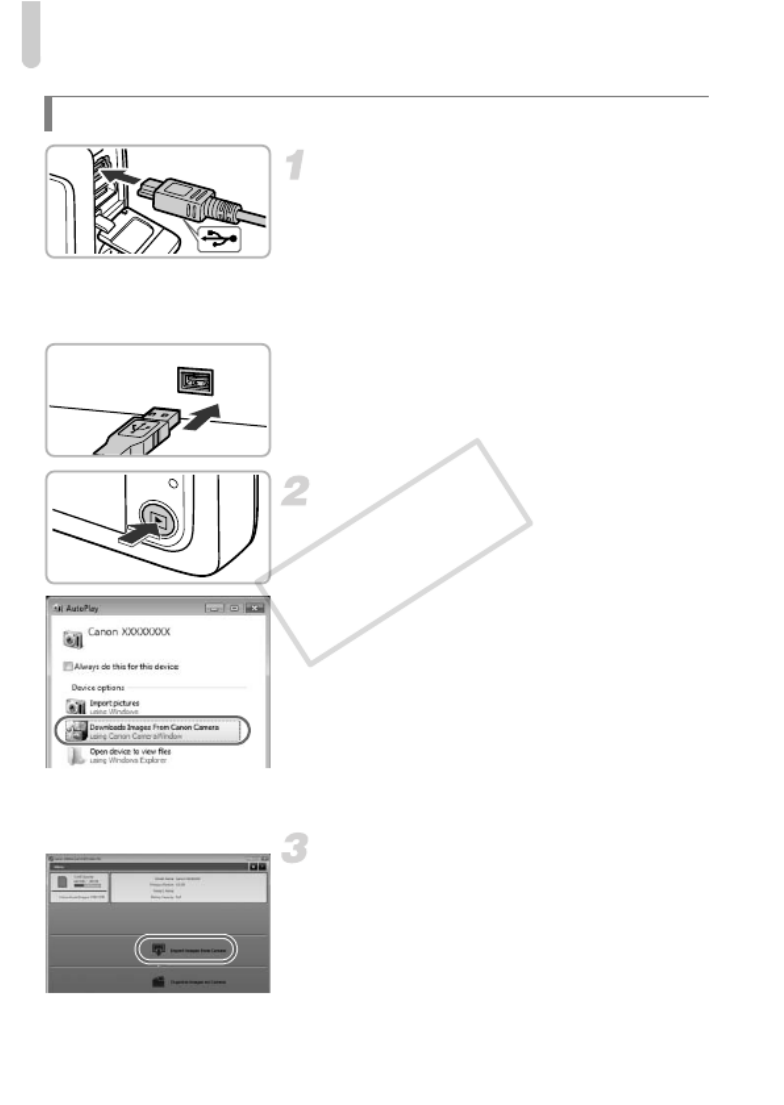
Connect the camera to the
computer.
zTurn off the camera.
zOpen the cover and insert the included
interface cable’s smaller plug (p. 2) firmly
into the camera terminal in the direction
shown.
zInsert the interface cable’s larger plug into
the computer’s USB port. For details on
the computer’s USB port, refer to the user
guide provided with the computer.
Turn on the camera to open
CameraWindow.
zPress the 1 button to turn on the camera.
zFor Windows, click [Downloads Images
From Canon Camera using Canon
CameraWindow] when it appears on the
screen. CameraWindow will appear when
a connection is established between the
camera and computer.
zFor Macintosh, CameraWindow will
appear when a connection is established
between the camera and computer.
Transfer Images.
zClick [Import Images from Camera], and
then click [Import Untransferred Images].
XImages will transfer to the computer.
Images will be sorted by date and saved in
separate folders in the Pictures folder.
Transferring and Viewing Images
CameraWindow
COPY

41
Learning More
This chapter explains the parts of the camera and what appears on the
screen, as well as the basic operating instructions.
2
COPY

Adjusting the Screen Brightness
47
Choose an option.
zFor items that display qr to the left and
right, touch qr to change settings.
zFor items that display a bar, touch the spot
on the bar where you want to make the
setting.
Complete the setting.
zTouch ^.
XThe normal screen will reappear.
Display the menu.
zTouch H, then touch n.
Choose [LCD Brightness].
zTouch the 3 tab.
zDrag up or down the screen to choose
[LCD Brightness].
Adjust the brightness.
zTouch the point on the bar where you want
to change the brightness.
Adjusting the Screen Brightness
COPY
48
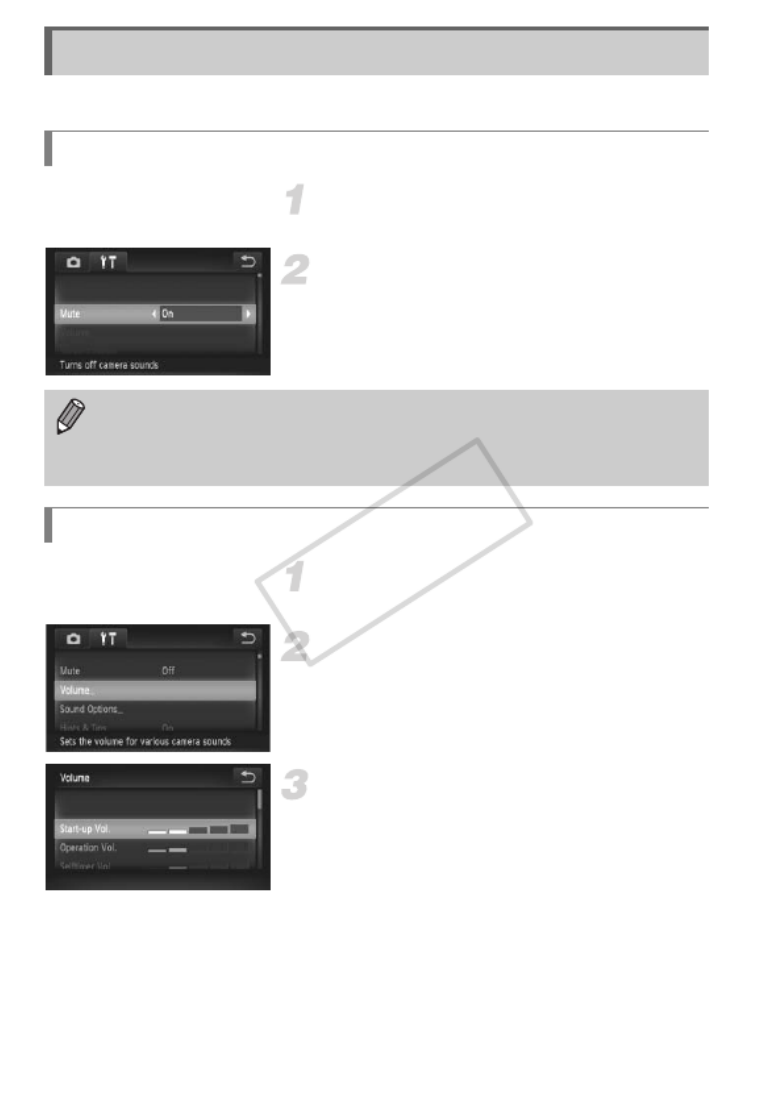
You can silence or adjust the volume of camera sounds.
Display the menu.
zTouch H, then touch n.
Choose [Mute].
zTouch the 3 tab.
zDrag up or down the screen to choose
[Mute], then touch qr to choose [On].
Display the menu.
zTouch H, then touch n.
Choose [Volume].
zTouch the 3 tab.
zDrag up or down the screen to touch
[Volume].
Adjust the volume.
zDrag up or down the screen to choose an
item, then touch the point on the bar where
you want to change the volume.
Changing the Sound Settings
Muting Sounds
If you mute camera sounds, the sound will also be muted when playing
back movies (p. 35). If you drag up the screen while viewing a movie, the
sound will turn on. You can then adjust the volume by dragging up or down
the screen.
Adjusting the Volume
COPY

50
To save battery power, the screen turns off, and the camera turns off
automatically when it is not operated for a certain time.
Power Saving during Shooting
The screen will turn off approximately 1 minute after you stop operating the
camera. After about 2 more minutes, the lens will retract and the camera will
turn off. When the screen has turned off but the lens has not yet retracted,
pressing the shutter button halfway (p. 25) turns on the screen and shooting
can continue.
Power Saving during Playback
The camera will turn off approximately 5 minutes after you stop operating the
camera.
Power Saving Function (Auto Power
Down)
•You can turn off the power saving function (p. 158).
•You can adjust the time before the screen turns off (p. 159).
COPY
58
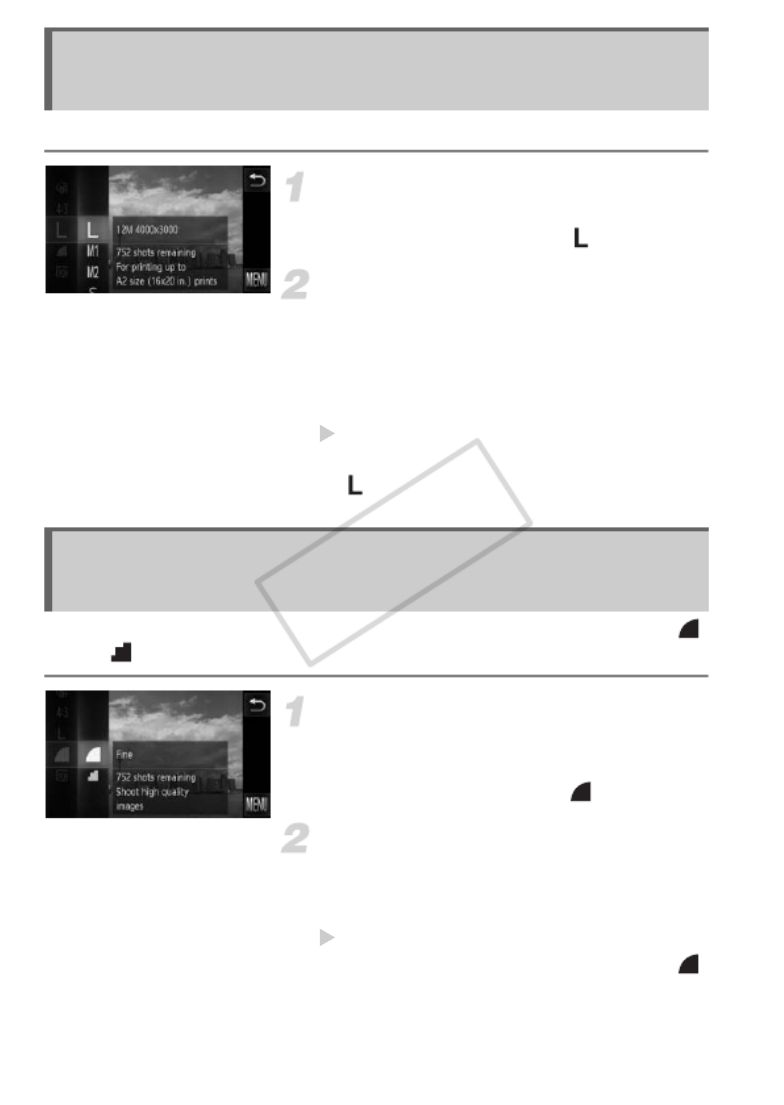
You can choose from 4 recording pixel settings.
Choose the recording pixel setting.
zTouch H, then drag the menu on the
left up or down to choose .
Choose an option.
zTouch an item you want to set.
zIf you drag the menu on the right up or
down, other items will appear.
zTouch the menu item again to complete
the setting.
The setting will appear on the screen.
zTo restore to the original setting, choose
in Steps 1 – 2.
You can choose from the following 2 compression ratios (image quality):
(Fine), (Normal).
Choose the compression ratio
setting.
zTouch H, then drag the menu on the
left up or down to choose .
Choose an option.
zTouch an item you want to set.
zTouch the menu item again to complete
the setting.
The setting will appear on the screen.
zTo restore the original setting, choose
in Steps 1 – 2.
Changing the Recording Pixel Setting
(Image Size)
Changing the Compression Ratio
(Image Quality)
COPY
Produktspezifikationen
| Marke: | Canon |
| Kategorie: | Camcorder |
| Modell: | PowerShot ELPH 510 HS |
Brauchst du Hilfe?
Wenn Sie Hilfe mit Canon PowerShot ELPH 510 HS benötigen, stellen Sie unten eine Frage und andere Benutzer werden Ihnen antworten
Bedienungsanleitung Camcorder Canon

22 September 2024
13 September 2024
28 August 2024
27 August 2024
27 August 2024
20 August 2024
19 August 2024
15 August 2024
14 August 2024
13 August 2024
Bedienungsanleitung Camcorder
- Camcorder Samsung
- Camcorder 3M
- Camcorder Sanyo
- Camcorder BenQ
- Camcorder Gembird
- Camcorder Genius
- Camcorder Hama
- Camcorder HP
- Camcorder Lexibook
- Camcorder Macally
- Camcorder Medion
- Camcorder Nedis
- Camcorder Philips
- Camcorder SilverCrest
- Camcorder Sony
- Camcorder T'nB
- Camcorder Trust
- Camcorder Panasonic
- Camcorder OK
- Camcorder Linksys
- Camcorder Maginon
- Camcorder Bresser
- Camcorder Denver
- Camcorder Intenso
- Camcorder König
- Camcorder National Geographic
- Camcorder Renkforce
- Camcorder Trevi
- Camcorder Braun
- Camcorder Kenwood
- Camcorder Sharp
- Camcorder Pyle
- Camcorder Salora
- Camcorder Aiptek
- Camcorder Coby
- Camcorder Lenco
- Camcorder Mpman
- Camcorder Nilox
- Camcorder Polaroid
- Camcorder Jay-Tech
- Camcorder JVC
- Camcorder Xiaomi
- Camcorder Hitachi
- Camcorder Hyundai
- Camcorder Toshiba
- Camcorder Olympus
- Camcorder Zoom
- Camcorder Garmin
- Camcorder GOCLEVER
- Camcorder Lamax
- Camcorder Prixton
- Camcorder Mio
- Camcorder Sencor
- Camcorder ViewSonic
- Camcorder Marshall
- Camcorder Nikkei
- Camcorder Samson
- Camcorder SBS
- Camcorder Fujifilm
- Camcorder MINOX
- Camcorder Nikon
- Camcorder Ricoh
- Camcorder DJI
- Camcorder Dragon Touch
- Camcorder EnVivo
- Camcorder Midland
- Camcorder Vtech
- Camcorder Kodak
- Camcorder Agfa
- Camcorder Easypix
- Camcorder Konica-Minolta
- Camcorder Leica
- Camcorder Minolta
- Camcorder Praktica
- Camcorder Rollei
- Camcorder SeaLife
- Camcorder Traveler
- Camcorder IGet
- Camcorder Contax
- Camcorder Mamiya
- Camcorder Voigtländer
- Camcorder Yashica
- Camcorder Bauer
- Camcorder Overmax
- Camcorder Airis
- Camcorder Akaso
- Camcorder Uniden
- Camcorder Kitvision
- Camcorder Kogan
- Camcorder Elmo
- Camcorder Energy Sistem
- Camcorder Jobo
- Camcorder Soundmaster
- Camcorder Bolex
- Camcorder Magellan
- Camcorder TomTom
- Camcorder Kyocera
- Camcorder Cobra
- Camcorder AEE
- Camcorder CamOne
- Camcorder Contour
- Camcorder EVOLVEO
- Camcorder GoPro
- Camcorder Quintezz
- Camcorder ION
- Camcorder DNT
- Camcorder Insignia
- Camcorder Swann
- Camcorder DataVideo
- Camcorder Aida
- Camcorder Prestigio
- Camcorder Mediacom
- Camcorder Tracer
- Camcorder Cisco
- Camcorder RCA
- Camcorder ARRI
- Camcorder Transcend
- Camcorder Oregon Scientific
- Camcorder Blackmagic Design
- Camcorder Insta360
- Camcorder Zorki
- Camcorder DOD
- Camcorder Drift
- Camcorder Ematic
- Camcorder FHD 1080P
- Camcorder Flip
- Camcorder ISAW
- Camcorder Leotec
- Camcorder MMTC
- Camcorder Mobius
- Camcorder Naxa
- Camcorder Replay
- Camcorder Sakar
- Camcorder SJCAM
- Camcorder Spypoint
- Camcorder Storex
- Camcorder TacTic
- Camcorder Veho
- Camcorder Vivitar
- Camcorder YI
- Camcorder Zagg
- Camcorder Best Buy
- Camcorder AgfaPhoto
- Camcorder Vupoint Solutions
- Camcorder Kaiser Baas
- Camcorder Microtek
- Camcorder Runcam
- Camcorder Activeon
- Camcorder BlackVue
- Camcorder Braun Phototechnik
- Camcorder Hamlet
- Camcorder RSC
- Camcorder Kobian
- Camcorder Hamilton Buhl
- Camcorder Contour Design
- Camcorder Curve
- Camcorder Beaulieu
- Camcorder Qoltec
- Camcorder Stealth Cam
- Camcorder DXG
- Camcorder GoXtreme
- Camcorder ATN
- Camcorder Whistler
- Camcorder Aqua-Vu
Neueste Bedienungsanleitung für -Kategorien-

25 November 2024
25 November 2024
24 November 2024
12 Oktober 2024

12 Oktober 2024

8 Oktober 2024

7 Oktober 2024
3 Oktober 2024
28 September 2024
24 September 2024