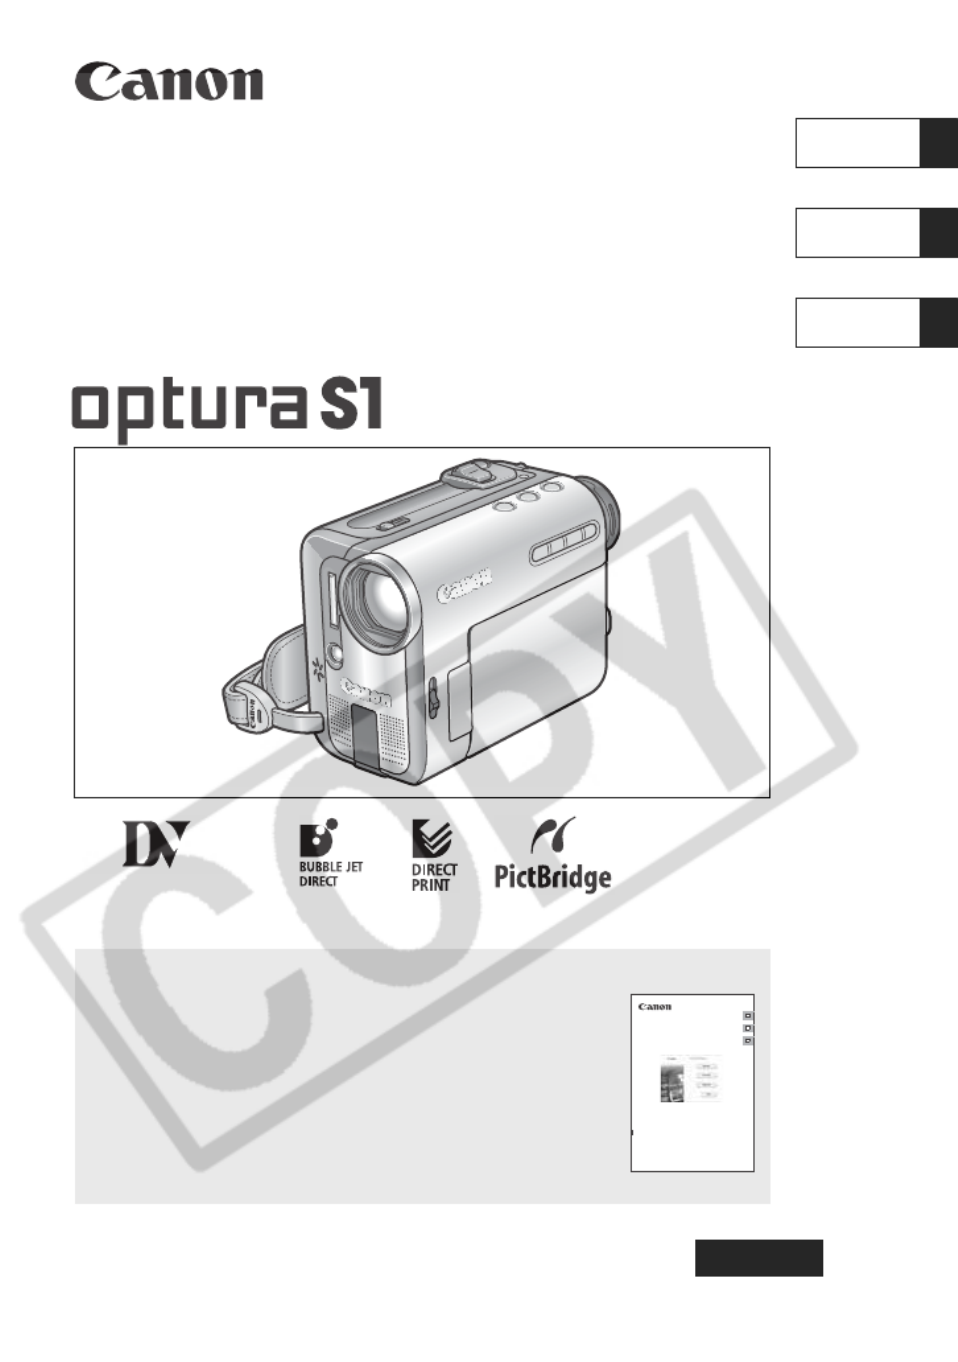
Canon Optura S1 Bedienungsanleitung
Lesen Sie kostenlos die 📖 deutsche Bedienungsanleitung für Canon Optura S1 (149 Seiten) in der Kategorie Camcorder. Dieser Bedienungsanleitung war für 30 Personen hilfreich und wurde von 2 Benutzern mit durchschnittlich 4.5 Sternen bewertet
Seite 1/149
English
PUB.DIM-713
NTSC
English
Français
Español
Digital Video Camcorder
Instruction Manual
Caméscope numérique
Manuel d’instruction
Videocámara digital
Manual de Instrucciones
Mini Digital
Video
Cassette
Please read also the following instruction manual.
Veuillez lire aussi le manuel d’instruction suivant.
Lea también el manual de instrucciones siguiente.
• Digital Video Software
E
F
Es
Digit al Vide o Sof t ware
Ver sio n 15 / Ver sio n 16
Ins tr uct ion Ma nua l
Man uel d ’ins tr uct ion
Man ual d e In st ruc cio nes
PUB.DIM-674
This instruction manual explains how to install the software and Canon USB Video Driver
(Windows XP only), connect the camcorder to a computer, and download images from a
memory card to a computer.
Ce manuel d’instruction explique comment installer le logiciel et le pilote Canon USB
Video Driver (Windows XP uniquement), connecter le camescope à l’ordinateur et
transférer des images à partir d’une carte mémoire sur un ordinateur.
En este manual de instrucciones se explica cómo instalar el software y el controlador
Canon USB Video Driver (Windows XP solamente), conectar la videocámara a un
ordenador, y descargar imágenes de una tarjeta de memoria a un ordenador.

2
Intro ducti o n
Important Usage Instructions
WARNING!
TO REDUCE THE RISK OF FIRE OR ELECTRIC SHOCK, DO NOT EXPOSE THIS
PRODUCT TO RAIN OR MOISTURE.
WARNING!
TO REDUCE THE RISK OF ELECTRIC SHOCK AND TO REDUCE ANNOYING
INTERFERENCE, USE THE RECOMMENDED ACCESSORIES ONLY.
COPYRIGHT WARNING:
Unauthorized recording of copyrighted materials may infringe on the rights of
copyright owners and be contrary to copyright laws.
Digital Video Camcorder, OPTURA S1 A systems
This device complies with Part 15 of the FCC Rules. Operation is subject to the following two conditions: (1)
This device may not cause harmful interference, and (2) this device must accept any interference received,
including interference that may cause undesired operation.
Note: This equipment has been tested and found to comply with the limits for class B digital device, pursuant
to Part 15 of the FCC Rules. These limits are designed to provide reasonable protection against harmful
interference in a residential installation. This equipment generates, uses and can radiate radio frequency
energy and, if not installed and use in accordance with the instructions, may cause harmful interference to
radio communications. However, there is no guarantee that interference will not occur in a particular
installation. If this equipment does cause harmful interference to radio or television reception, which can be
determined by turning the equipment off and on, the user is encouraged to try to correct the interference by
one or more of the following measures:
• Reorient or relocate the receiving antenna.
• Increase the separation between the equipment and receiver.
• Connect the equipment into an outlet on a circuit different from that to which the receiver is connected.
• Consult the dealer or an experienced radio/TV technician for help.
Use of shielded cable is required to comply with class B limits in Subpart B of Part 15 of FCC Rules.
Do not make any changes or modifications to the equipment unless otherwise specified in the manual.
If such changes or modifications should be made, you could be required to stop operation of the equipment.
Canon U.S.A. Inc.
One Canon Plaza, Lake Success, NY 11042, U.S.A.
Tel No. (516)328-5600
CAUTION:
TO PREVENT ELECTRIC SHOCK, MATCH WIDE BLADE OF PLUG TO WIDE SLOT,
FULLY INSERT.
I
mpor
t
an
t W
arn
i
ng
CAUTION:
TO REDUCE THE RISK OF ELECTRIC
SHOCK, DO NOT REMOVE COVER (OR
BACK). NO USER-SERVICEABLE PARTS
INSIDE. REFER SERVICING TO
QUALIFIED SERVICE PERSONNEL.
CAUTION
RISK OF ELECTRIC SHOCK
DO NOT OPEN
The lightning flash with arrowhead symbol,
within an equilateral triangle, is intended to
alert the user to the presence of
uninsulated “dangerous voltage” within the
product’s enclosure, that may be of
sufficient magnitude to constitute a risk of
electric shock to persons.
The exclamation point, within an
equilateral triangle, is intended to alert the
user to the presence of important
operating and maintenance (servicing)
instructions in the literature accompanying
the product.

3
Introduction
E
In these safety instructions the word “product”
refers to the Canon Digital Video Camcorder
OPTURA S1 A and all its accessories.
1. Read Instructions — All the safety and
operating instructions should be read
before the product is operated.
2. Retain Instructions — The safety and
operating instructions should be retained
for future reference.
3. Heed Warnings — All warnings on the
product and in the operating instructions
should be adhered to.
4. Follow Instructions — All operating and
maintenance instructions should be
followed.
5. Cleaning — Unplug this product from the
wall outlet before cleaning. Do not use
liquid or aerosol cleaners. The product
should be cleaned only as recommended
in this manual.
6. Accessories — Do not use accessories
not recommended in this manual as they
may be hazardous.
7. Avoid magnetic or electric fields — Do not
use the camera close to TV transmitters,
portable communication devices or other
sources of electric or magnetic radiation.
They may cause picture interference, or
permanently damage the camera.
8. Water and Moisture — Hazard of electric
shock — Do not use this product near
water or in rainy/moist situations.
9. Placing or Moving — Do not place on an
unstable cart, stand, tripod, bracket or
table. The product may fall, causing
serious injury to a child or adult, and
serious damage to the
product.
A product and cart
combination should be
moved with care. Quick
stops, excessive force,
and uneven surfaces may
cause the product and
cart combination to overturn.
10. Power Sources — The CA-570 Compact
Power Adapter should be operated only
from the type of power source indicated
on the marking label. If you are not sure of
the type of power supply to your home,
consult your product dealer or local power
company. Regarding other power sources
such as battery power, refer to instructions
in this manual.
11. Polarization — The CA-570 Compact
Power Adapter is equipped with a
polarized 2-prong plug (a plug having one
blade wider than the other).
The 2-prong polarized plug will fit into the
power outlet only one way. This is a safety
feature. If you are unable to insert the plug
fully into the outlet, try reversing the plug. If
the plug still fails to fit, contact your
electrician to replace your obsolete outlet.
Do not defeat the safety purpose of the
polarized plug.
12. Power Cord Protection — Power cords
should be routed so that they are not likely
to be walked on or pinched by items
placed upon or against them. Pay
particular attention to plugs and the point
from which the cords exit the product.
13. Outdoor Antenna Grounding — If an
outside antenna is connected to the
product, be sure the antenna is grounded
so as to provide some protection against
voltage surges and built-up static charges.
Section 810 of the National Electrical
Code, ANSI / NFPA No. 70—1984,
provides information with respect to
proper grounding of the mast and
supporting structure, grounding of the
lead-in wire to an antenna discharge unit,
size of grounding conductors, location of
antenna discharge unit, connection to
grounding electrodes, and requirements
for the grounding electrode. See figure 1.
IMPORTANT SAFETY INSTRUCTIONS

4
14.Lightning — For added protection of this
product during a lightning storm, or when it
is left unattended and unused for long
periods of time, disconnect it from the wall
outlet and disconnect the antenna. This
will prevent damage to the product due to
lightning and power-line surges.
15.Overloading — Do not overload wall
outlets and extension cords as this can
result in a risk of fire or electric shock.
16.Objects and Liquid Entry — Never push
objects of any kind into this product
through openings as they may touch
dangerous voltage points or short out parts
that could result in a fire or electric shock.
Be careful not to spill liquid of any kind
onto the product.
17.Servicing — Do not attempt to service this
product yourself as opening or removing
covers may expose you to dangerous
voltage or other hazards. Refer all
servicing to qualified service personnel.
18.Damage Requiring Service — Disconnect
this product from the wall outlet and all
power sources including the battery, and
refer servicing to qualified service
personnel under the following conditions:
a. When the power-supply cord or plug is
damaged.
b. If any liquid has been spilled onto, or
objects have fallen into, the product.
c. If the product has been exposed to rain
or water.
d. If the product does not operate
normally even if you follow the
operating instructions. Adjust only
those controls that are covered by the
operation instructions. Improper
adjustment of other controls may result
in damage and will often require
extensive work by a qualified technician
to restore the product to its normal
operation.
e. If the product has been dropped or the
cabinet has been damaged.
f. When the product exhibits a distinct
change in performance. This indicates
a need for service.
19.Replacement Parts — When replacement
parts are required, be sure the service
technician has used replacement parts
that are specified by Canon or that have
the same characteristics as the original
part. Unauthorized substitutions may result
in fire, electric shock or other hazards.
20.Safety Check — Upon completion of any
service or repairs to this product, ask the
service technician to perform safety
checks to determine that the product is in
safe operating order.
EXAMPLE OF ANTENNA GROUNDING AS PER
NATIONAL ELECTRICAL CODE
ANTENNA LEAD IN
WIRE
ANTENNA DISCHARGE
UNIT (NEC SECTION 810-20)
GROUNDING
CONDUCTORS
(NEC SECTION 810-21)
GROUND CLAMPS
POWER SERVICE GROUNDING
ELECTRODE SYSTEM
(NEC ART 250. PART H)
NEC - NATIONAL
ELECTRICAL CODE
ELECTRIC
SERVICE
EQUIPMENT
GROUND
CLAMP
Fig. 1
When replacement of power supply is required, please return it to the responsible
nearest Canon Service Center and please replace it with the same type number
CA-570.
The Adapter can be used with a power supply between 100 and 240 V AC. For areas
where 120 V AC power is not used, you will need a special plug adapter. Contact your
nearest Canon Service Center for further information.
Use only CSA/UL Certified power supply cord set, Polarized, Type SPT-2 or heavier,
minimum No. 18 AWG copper, rated 125 or 250 V, minimum ,P A, minimum 6 ft (1.8 m),
maximum 10 ft (3 m) long.
This Class B digital apparatus complies with Canadian ICES-003.
5
Introduction
E
Using this Manual
Thank you for purchasing the Canon OPTURA S1. Please read this manual carefully
before you use the camcorder and retain it for future reference.
Should your camcorder fail to operate correctly, refer to the Troubleshooting table
( 125).
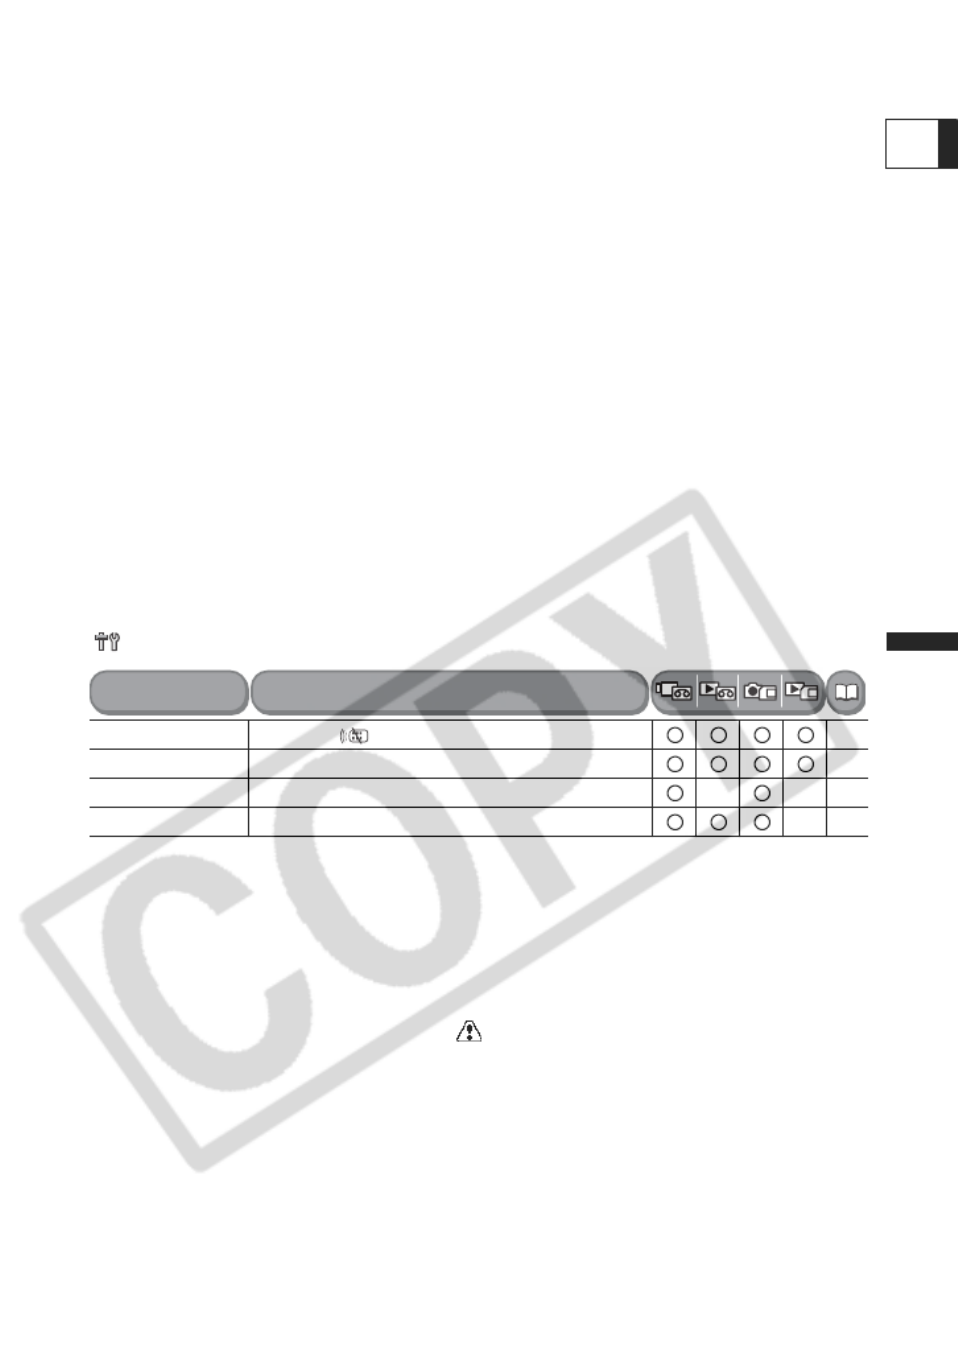
Symbols and References Used in this Manual
: Precautions related to the camcorder operation.
: Additional topics that complement the basic operating procedures.
: Reference page number.
Capital letters are used to refer to buttons on the camcorder or the wireless controller.
[ ] are used to refer to menu items displayed on the screen.
“Screen” refers to the LCD and the viewfinder screen.
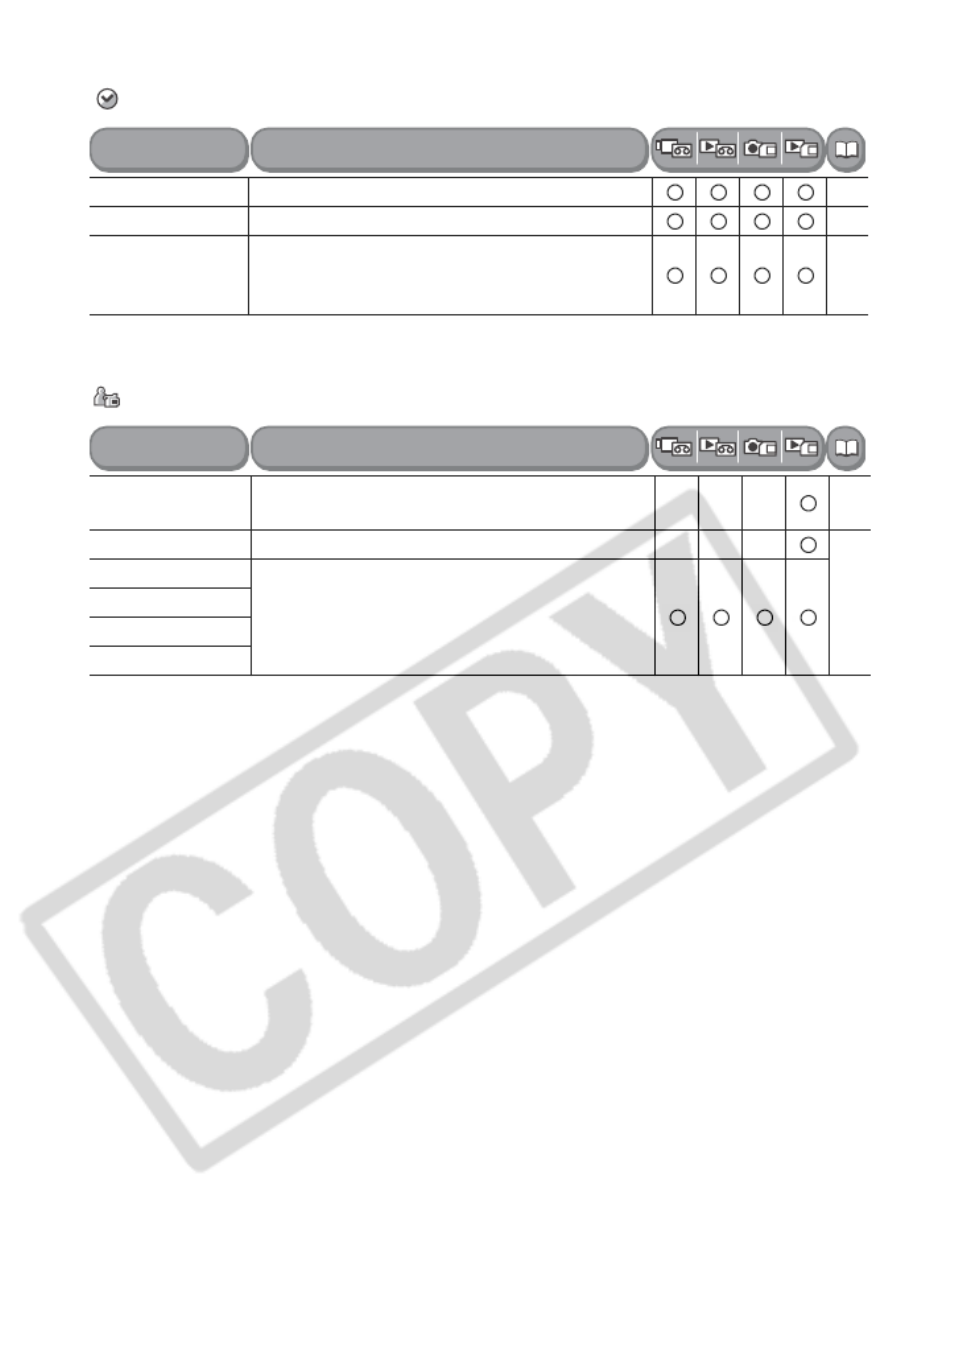
Selecting the Operating Modes
The camcorder’s operating mode is determined by the positions of the power and TAPE/
CARD switches.
Operating
Modes
Power
Switch
TAPE/CARD
Switch
Icon
Display Operation
CAMERA
(TAPE)
Recording movies on a
tape 27
PLAY Playing movies from a
tape 36
CAMERA
(CARD)
Recording still images or
movies on a card 30
PLAY Playing movies or viewing
images from a card 38
Button and switches to be operated
Menu item showing at its default position

6
Trademark Acknowledgements
• is a trademark.
• miniSD™ is a trademark of SD Card Association
• Windows® is a registered trademark of Microsoft Corporation in the United States and/
or other countries.
• Macintosh and Mac OS are trademarks of Apple Computer, Inc., registered in the
United States and other countries.
• HDV is a trademark of Sony Corporation and Victor Company of Japan, Limited (JVC).
• Other names and products not mentioned above may be registered trademarks or
trademarks of their respective companies.

7
Introduction
E
Table of contents
Introduction
Using this Manual ............................................................................................5
Checking Supplied Accessories ......................................................................9
Components Guide........................................................................................10
Screen Displays.............................................................................................14
Preparation
Step 1: Preparing the Power Supply..............................................................16
Step 2: Loading a Cassette ...........................................................................19
Step 3: Inserting a Memory Card...................................................................20
Step 4: Preparing the Camcorder ..................................................................21
Step 5: Using the Wireless Controller............................................................22
Step 6: Adjusting the LCD Screen .................................................................23
Step 7: Changing the Display Language .......................................................24
Step 8: Setting the Time Zone, Date and Time..............................................25
Basic Functions
Recording
Recording Movies on a Tape .........................................................................27
Recording on a Memory Card .......................................................................30
Zooming.........................................................................................................33
Tips for Better Recording...............................................................................35
Playback
Playing Back a Tape ......................................................................................36
Playing Back a Memory Card ........................................................................38
Adjusting the Volume.....................................................................................39
Playing Back on a TV Screen........................................................................40
Advanced Functions
Recording Programs
Using the Recording Programs .....................................................................41
Using the Program AE Mode .....................................................................44
Using the Shutter-Priority AE Mode .........................................................45
Using the Aperture-Priority AE Mode .......................................................46
Recording
Adjusting the Exposure Manually ..................................................................47
Adjusting the Focus Manually........................................................................48
Using the Mini Video Light.............................................................................49
Using the Self-Timer ......................................................................................50
Changing the Settings (1)
Changing the Settings with the FUNC. Button ..............................................51
List of Menu Items (FUNC.)...........................................................................52
Setting the White Balance .............................................................................53
Selecting an Image Effect..............................................................................55
Using Digital Effects.......................................................................................56
Changing the Settings (2)
Changing the Settings with the MENU Button...............................................63
List of Menu Items (MENU) ...........................................................................64
Adjusting the Audio Recording Level.............................................................69
Using the Wind Screen..................................................................................71
Widescreen TV Recording (16:9) ..................................................................72
9
Introduction
E
Checking Supplied Accessories
CA-570 Compact
Power Adapter
(incl. power cord)
BP-208 Battery Pack WL-D85 Wireless
Controller
Lithium Button Battery
CR2025 for the
Wireless Controller
MTC-100 Multi Cable IFC-300PCU USB
Cable
16 MB miniSD card DIGITAL VIDEO
SOLUTION DISK
The serial number of this product can be found at the battery attachment unit of the
camcorder. Write down the number and other information here and retain this book as a
permanent record of your purchase to aid identification in case of theft.
Date of Purchase: Model Name: OPTURA S1 A
Purchased From: Serial No.:
Dealer Address:
Dealer Phone No.:

10
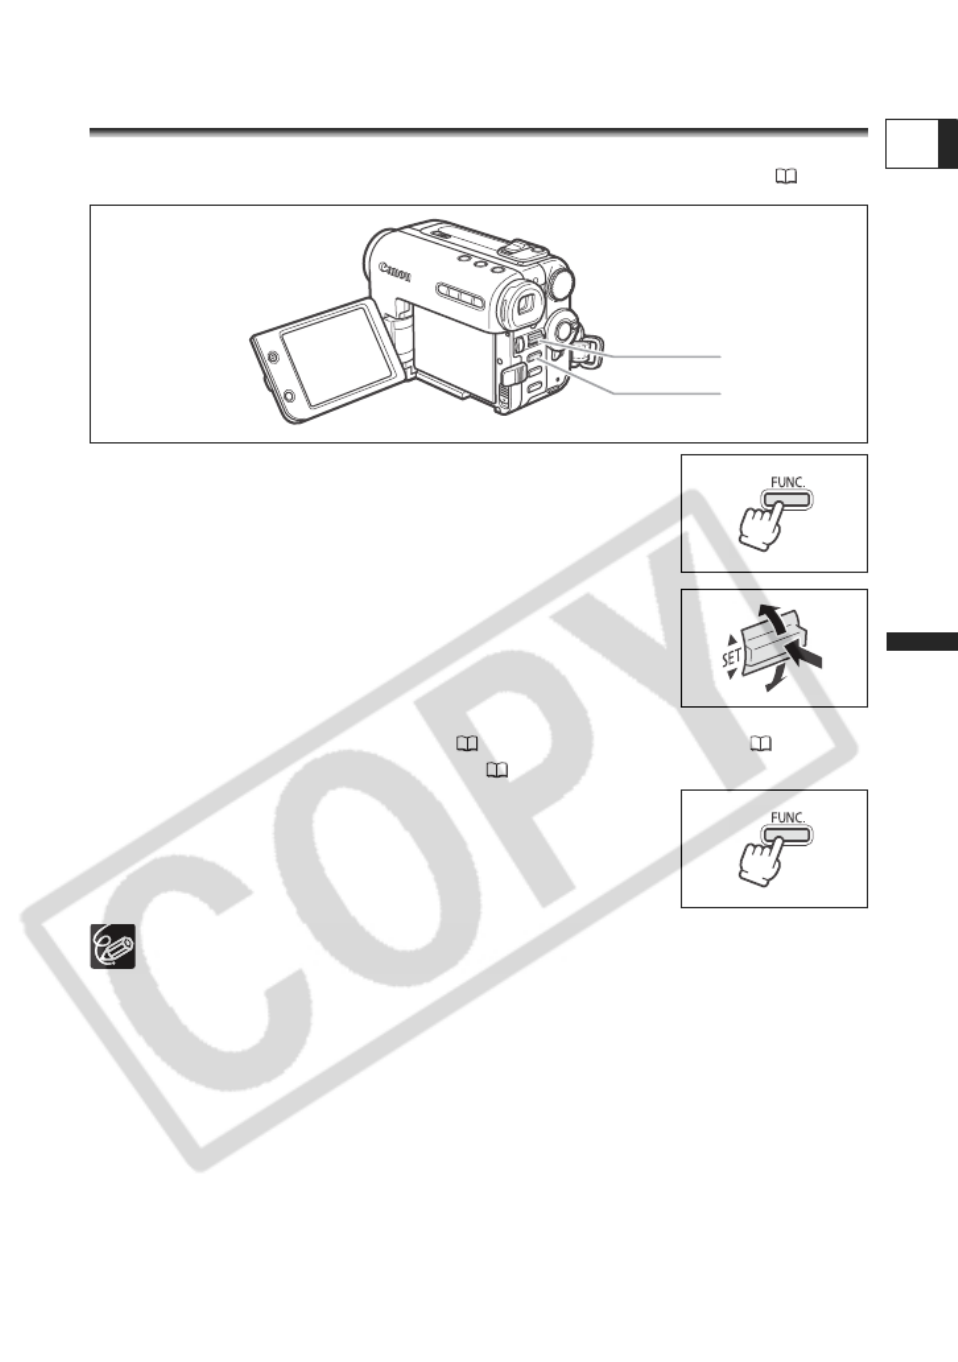
Components Guide
OPTURA S1
Lens Cover Switch ( 27)
( - open, - closed)
Viewfinder cleaning cover
Serial number
– (record review) button ( 29, 38) /
(rewind) button ( 29)
BATTERY RELEASE button ( 16)
Battery attachment unit ( 16)
+ button ( 29, 38) /
(fast forward) button ( 37)
Grip belt ( 21)
Terminal cover
(flash) button ( 82) /
/ (play/pause) button ( 36)
USB terminal ( 107, 120)
DV terminal ( 94, 98, 118)
(stop) button ( 36) /
LIGHT button ( 49)
Left side view
Right side view
11
Introduction
E
Flash ( 82) Mode dial ( 41)
Mini video light (assist lamp) ( 49) SET dial ( 39, 51, 63)
Speaker ( 39) Power switch ( 5)
Terminal cover Start/stop button ( 27, 30)
Stereo microphone Lock button
DC IN terminal ( 16) TAPE/CARD switch ( 5)
AV terminal ( 40) Card access indicator ( 30)/
Charge indicatorDioptric adjustment lever ( 21)
MENU button ( 63) FUNC. button ( 51)
(print/share) button ( 108, 120) FOCUS button ( 48) /
Data code button ( 75)LCD screen ( 23)
LCD BACKLIGHT button ( 23) EXP button ( 47) /
End search button ( 76)Viewfinder ( 21)
Remote sensor ( 22) OPEN button ( 23)
Front view
Back view

12
Zoom lever ( 33) Cassette compartment ( 19)
PHOTO button ( 30) OPEN/EJECT switch ( 19)
D.EFFECTS button ( 56) Cassette compartment cover ( 19)
DRIVE MODE button ( 86) /
AUDIO LEVEL button ( 69)
Strap mount ( 141)
Memory card slot ( 20)
(self-timer) button ( 50) /
REC PAUSE button ( 96, 98)
RESET button ( 125)
Tripod socket ( 35)
Top view
Bottom view

13
Introduction
E
Wireless Controller WL-D85
START/STOP button ( 27, 30) PHOTO button ( 30)
CARD –/+ buttons ( 38) Zoom buttons ( 33)
DATE SEARCH / buttons ( 78) PLAY button ( 36)
REW button ( 36) FF button ( 37)
–/ button ( 37) STOP button ( 36)
PAUSE button ( 37) +/ button ( 37)
SLOW button ( 37) x 2 button ( 37)
AUDIO DUB. button ( 102) TV SCREEN button ( 66)
ZERO SET MEMORY button ( 77)
WIRELESS CONTROLLER WL
-D85
START/
STOP PHOTO ZOOM
CARD
DATE SEARCH
REW PLAY FF
STOP
PAUSE SLOW
AUDIO DUB.
ZERO SET
MEMORY TV SCREEN

14
Screen Displays
Screen Displays during Recording
When recording movies on a tape
( )
Operating mode, Zoom ( 33),
Exposure ( 47)
Manual focus ( 48)
Image stabilizer ( 64)
Recording mode ( 65)
Recording program ( 41)
Metering mode ( 84)
White balance ( 53)
Image effect ( 55)
Drive mode ( 86)
Digital effects ( 56)
Movie size ( 79)
Still image quality/size ( 81)
Self-timer ( 50)
When recording on a memory card
( )
Recording reminder ( 28)
Tape operation ( 15)
Time code ( 28)
Remaining tape ( 28)
Remaining battery charge
Wind screen ( 71)
Microphone attenuator ( 70)
Audio mode ( 66)
Widescreen mode ( 72)
Remaining card capacity for still images
( 81)
Audio level indicator ( 69)
Remaining card capacity for still images
( 81)
Remaining card capacity for movies
Condensation ( 128)
Remote sensor mode ( 67)
Camcorder shake warning ( 64)
Mini video light ( 49)
Flash ( 82)
AF/AE locked during still image recording
( 30)
AF frame ( 85)
Remaining battery charge
The battery symbol indicates the charge
status of the battery pack.
• When “ ” starts flashing in red
replace the battery pack with a fully
charged one.
• When you attach an empty battery
pack, the power may turn off without
displaying “ ”.
• Depending on the conditions under
which the camcorder and the battery
pack are used, the actual battery
charge may not be indicated accurately.

16
Preparatio n
Step 1: Preparing the Power Supply
The camcorder can be powered by a battery pack or be connected to a household power
source. Charge the battery pack before use.
Attaching the Battery Pack
1. Turn the power switch to OFF.
2. Slide the OPEN button towards the
camcorder and open the LCD
panel.
3. Attach the battery pack to the
camcorder.
• Remove the terminal cover of the
battery pack.
• Slide in the connector end of the battery
in the direction of the arrow and press it
gently until it clicks.
To remove the battery pack:
1. Slide the OPEN button towards the
camcorder and open the LCD
panel.
2. Hold down the BATTERY RELEASE button and pull out the battery
from the ridge on its bottom part.
Charging the Battery Pack
1. Connect the power cord to the
adapter.
2. Plug the power cord into a power
outlet.
3. Open the front terminal cover and
connect the power adapter to the
camcorder’s DC IN terminal.
The charge indicator starts flashing. It
glows steadily when charging is complete.
To remove the power adapter:
1. Disconnect the power adapter
from the camcorder.
2. Unplug the power cord from the power outlet.
3. Disconnect the power cord from the adapter.
BATTERY
RELEASE button
DC IN terminal
Charge
indicator

18
Charging, Recording and Playback Times
The following times are approximate and vary according to the charging,
recording or playback conditions.
* Approximate times for recording with repeated operations such as start/stop,
zooming, power on/off.
We recommend charging the battery pack in temperatures between 10°C and
30°C (50°F and 86°F). Outside the temperature range of 0°C to 40°C (32°F to
104°F), the charge indicator flashes rapidly and charging stops.
A lithium ion battery pack can be charged at any charge state. Unlike
conventional battery packs, you do not need to completely use or discharge it
before charging.
To conserve battery power, turn off the camcorder instead of leaving it in record
pause mode.
We recommend that you prepare battery packs 2 to 3 times longer than you
think you might need.
Battery Pack BP-208
Charging Time 160 min.
Max. Recording Time
Viewfinder 120 min.
LCD normal 115 min.
bright 110 min.
Typical Recording Time*
Viewfinder 70 min.
LCD normal 70 min.
bright 65 min.
Playback Time 135 min.

20
Step 3: Inserting a Memory Card
This camcorder is for use only with miniSD cards.
Inserting the Card
1. Set the power switch to OFF.
2. Open the cover.
3. Insert the memory card straight all
the way into the memory card slot.
4. Close the cover.
Do not close the cover forcefully without
having the card correctly inserted.
Removing the Card
Do not forcefully remove the memory card without first pushing it in.
1. Turn off the camcorder.
Make sure that the card access indicator
is not flashing before you turn off the
camcorder.
2. Open the cover.
3. Push the memory card to release
it. Remove the memory card.
4. Close the cover.
If you use memory cards other than the supplied one, make sure to format them
with the camcorder ( 93).
Proper operation cannot be guaranteed for all memory cards.
Card access
indicator
21
Preparation
E
Step 4: Preparing the Camcorder
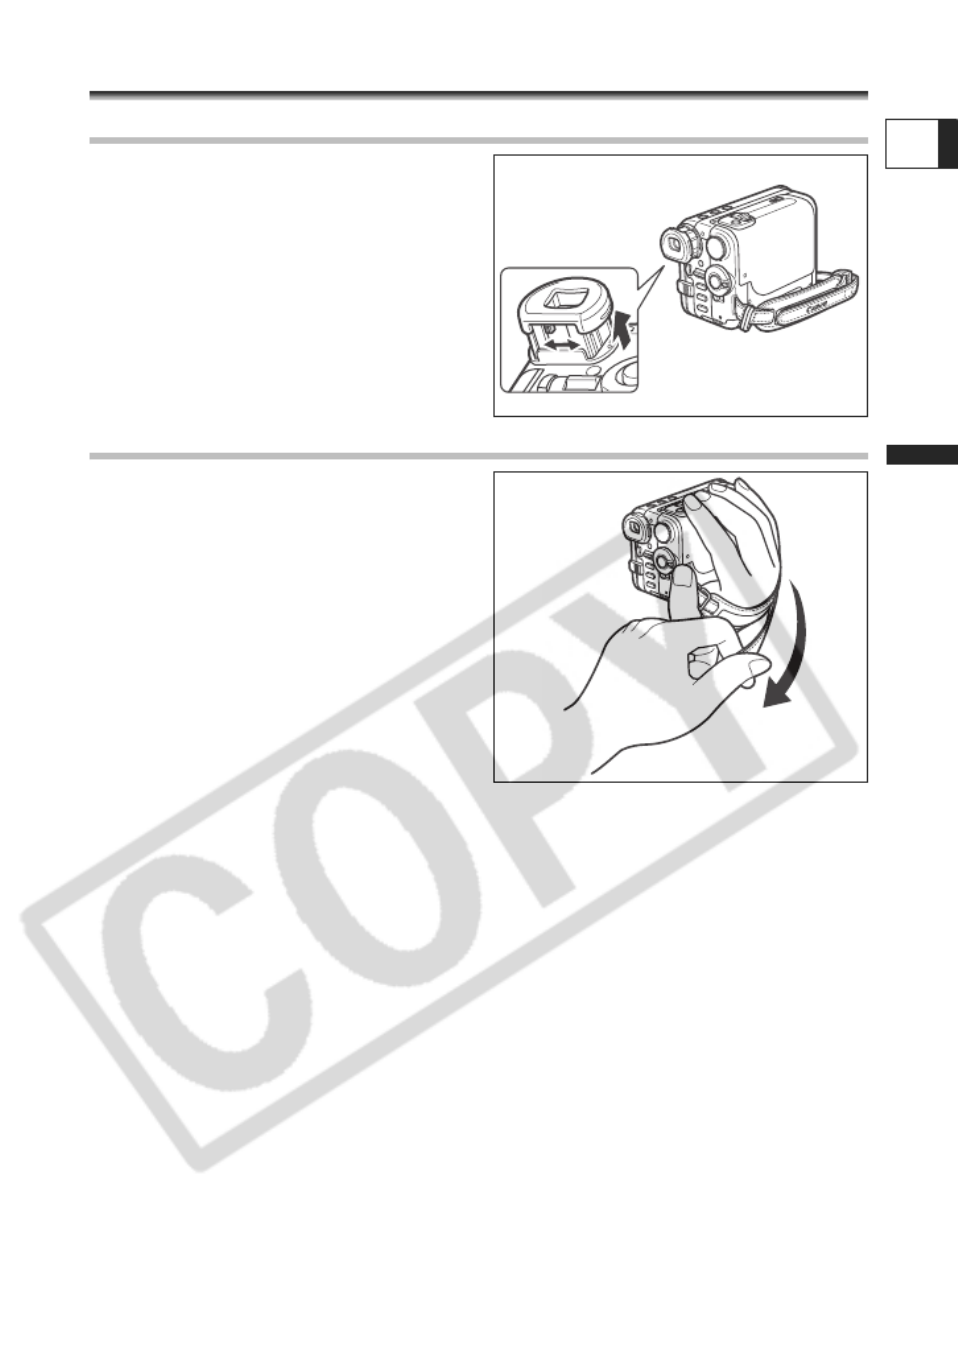
Adjusting the Viewfinder (Dioptric Adjustment)
1. Turn on the camcorder and keep
the LCD panel closed.
2. Pull out the viewfinder.
Pull out the viewfinder to use it.
3. Adjust the dioptric adjustment
lever.
4. Push the viewfinder back in.
Fastening the Grip Belt
Hold the camcorder with your right
hand and adjust the belt with your
left.
Adjust the grip belt so that you can reach the
zoom lever with your index finger, and the
start/stop button with your thumb.
22
Step 5: Using the Wireless Controller
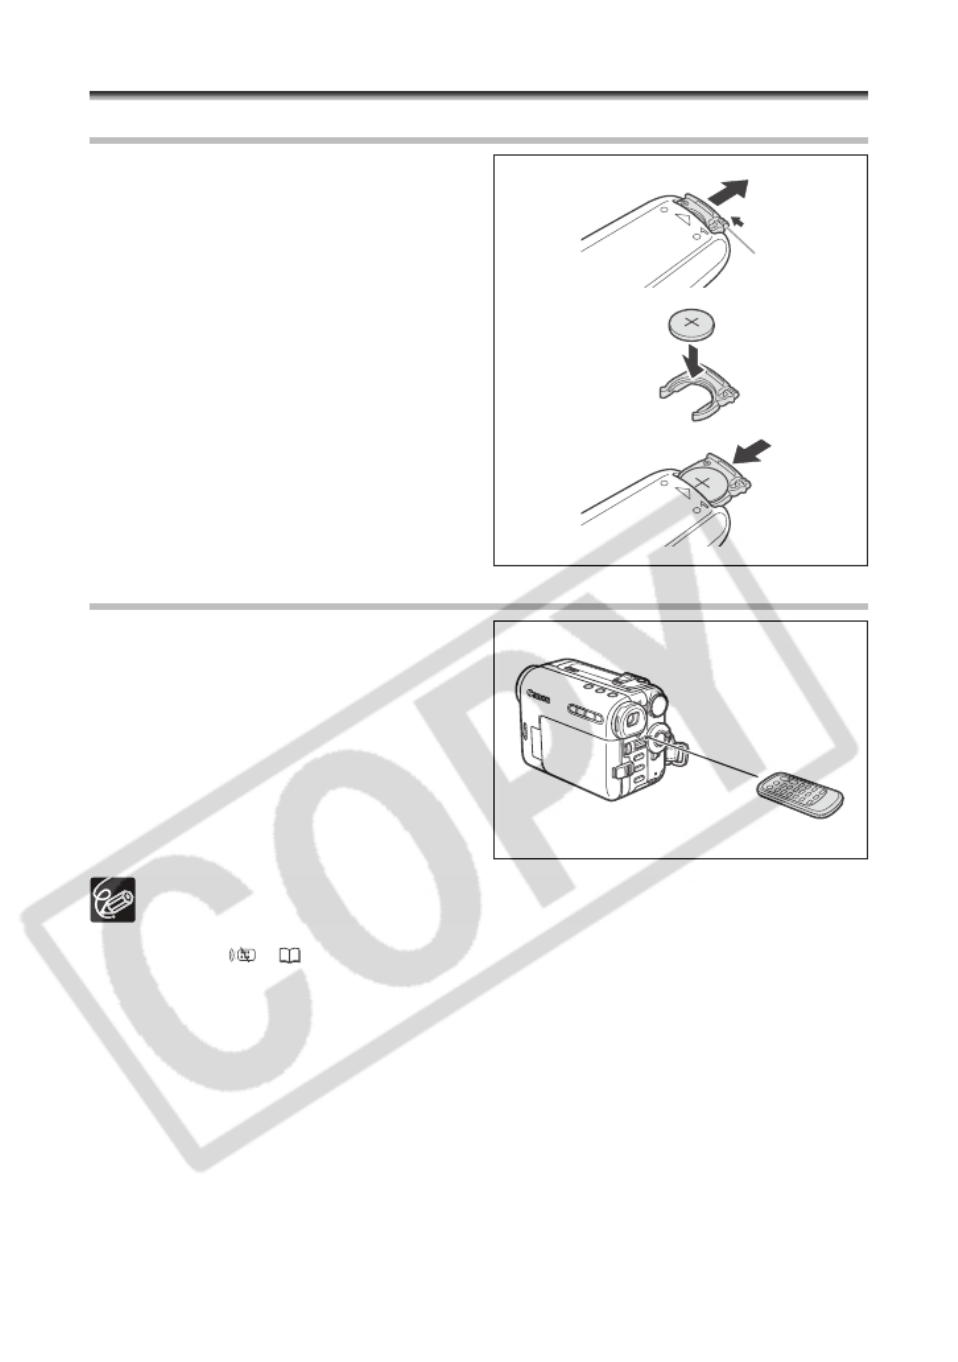
Inserting the Battery (Lithium Button Battery CR2025)
1. Press the tab in the direction of
the arrow and pull out the battery
holder.
2. Place the lithium button battery
with the + side facing up.
3. Insert the battery holder.
Using the Wireless Controller
Point it at the camcorder’s remote
sensor when you press the buttons.
A single remote sensor is located at
the back of the camcorder.
The wireless controller may not work properly when the remote sensor is
subjected to strong light sources or direct sunlight.
If the wireless controller does not work, check if the remote sensor is set to
[OFF ] ( 67).
When the camcorder cannot be operated with the wireless controller, or when it
can only be operated in very close range, replace the battery.
Tab
23
Preparation
E
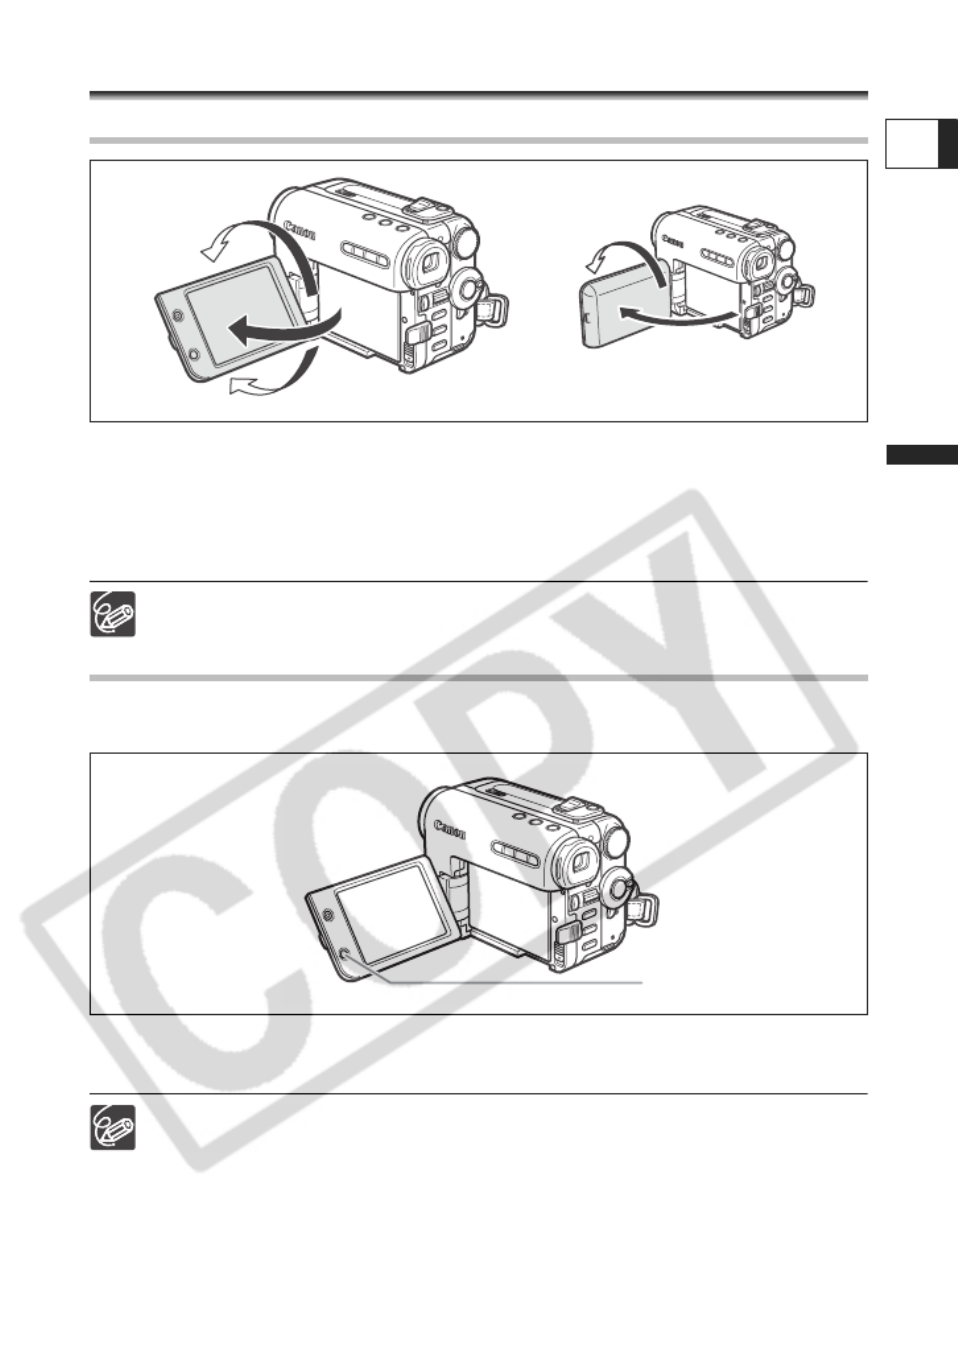
Step 6: Adjusting the LCD Screen
Rotating the LCD Panel
Slide the OPEN button towards the camcorder and open the LCD panel
90 degrees.
• You can rotate the panel downward by 90 degrees.
• You can rotate the panel by 180 degrees toward the lens (Allowing the subject to
monitor the LCD screen while you use the viewfinder. Pull out the viewfinder to use it).
Rotating the panel by 180 degrees is also useful if you wish to include yourself
when recording with the self-timer.
LCD Backlight
You can switch the brightness of the LCD screen between normal and bright by pressing
the LCD BACKLIGHT button. This is useful for outdoor recordings.
Press the LCD BACKLIGHT button.
The brightness changes with each press of the button.
This setting does not affect the brightness of the recording or the viewfinder
screen.
When using a battery pack, the camcorder retains the setting even if you
change the position of the power switch.
The battery usage time shortens when the LCD screen is set brighter.
Subject can monitor the LCD screen
LCD BACKLIGHT button
24
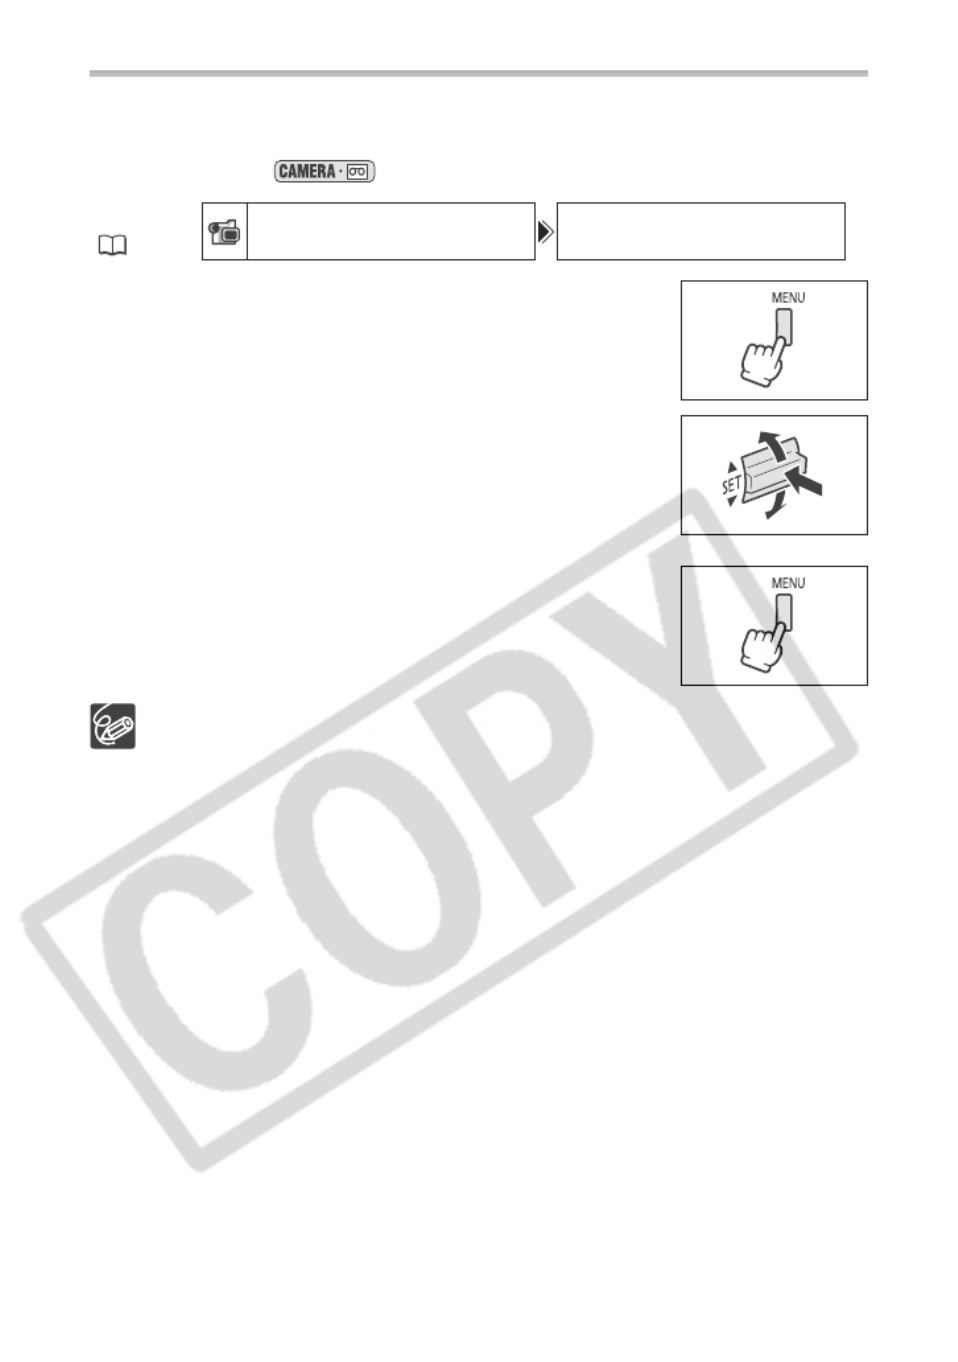
Step 7: Changing the Display
Language
The language used in the camcorder displays and menu items can be changed to
German, Spanish, French, Italian, Russian, Simplified Chinese, Traditional Chinese,
Korean or Japanese.
1. Turn the power switch to CAMERA or PLAY.
2. Press the MENU button.
3. Turn the SET dial to select [DISPLAY SETUP/ ] and press the SET
dial.
4. Turn the SET dial to select [LANGUAGE] and press the SET dial.
5. Turn the SET dial to select a language and press the SET dial.
6. Press the MENU button.
If you have mistakenly changed the language, follow the mark next to the
menu item to change the setting.
The displays and that appear on screen while changing the print
and direct transfer settings will not change regardless of the language selected.
MENU
( 63)
DISPL
DISPL
DISPL
DISPLDISPLAY SE
AY SE
AY SE
AY SEAY SETUP/
TUP/
TUP/
TUP/TUP/ LANGU
LANGU
LANGU
LANGULANGUAGE E
AGE E
AGE E
AGE EAGE ENGLISH
NGLISH
NGLISH
NGLISHNGLISH
29
Basic Functions
Recording
E
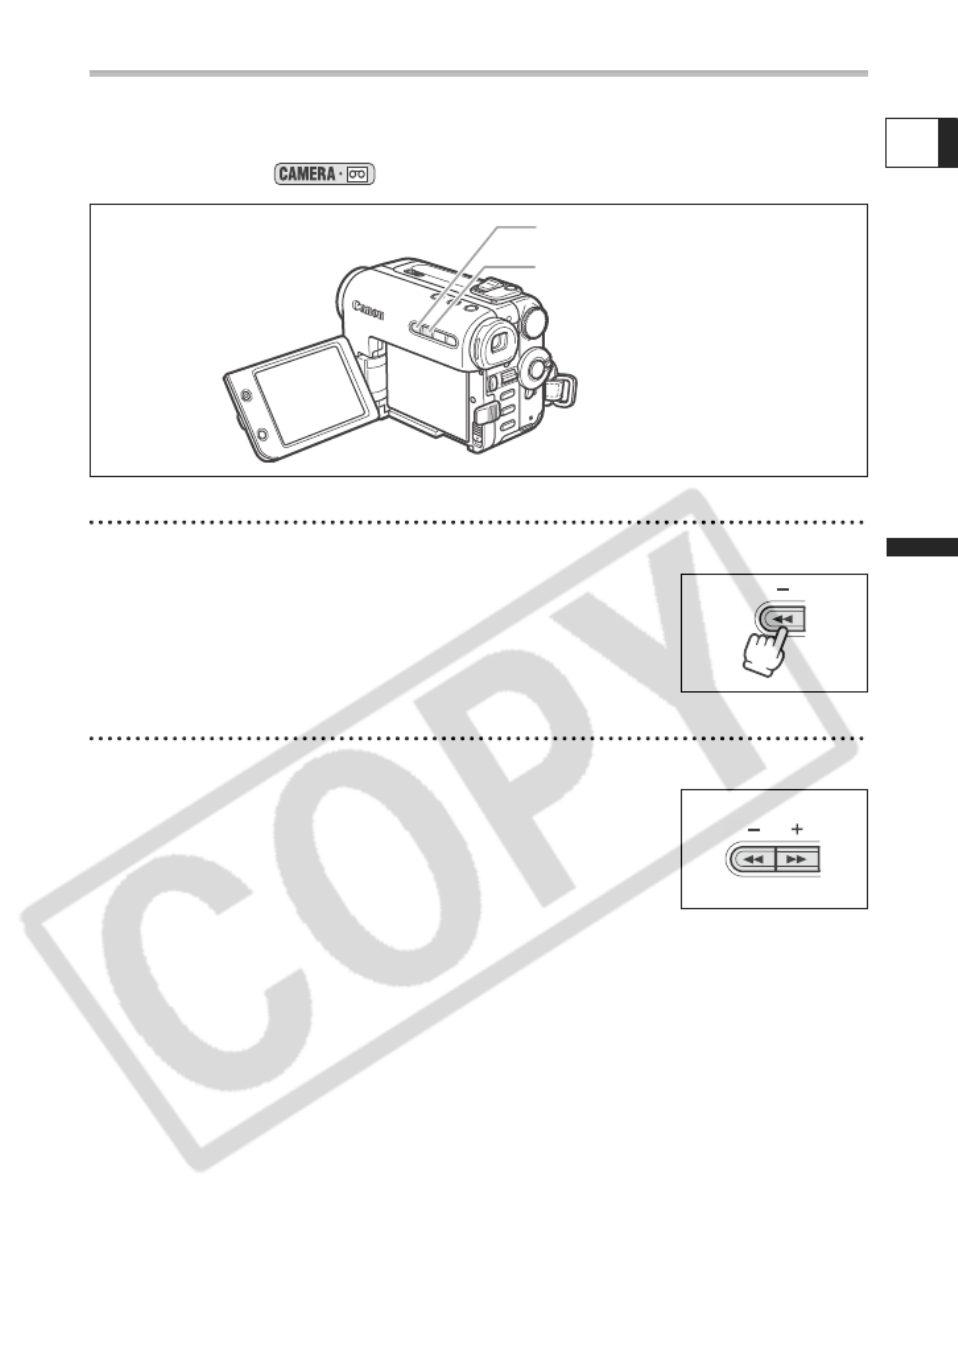
Reviewing and Searching when Recording
You can review the last few seconds of your recording (record review). You can also play
back the tape to locate the point where you wish to begin recording (record search).
Available only in the mode.
Record Review
In record pause mode:
Press and release the – (record review) button.
The camcorder rewinds the tape, plays back the last few seconds,
and returns to record pause mode.
Record Search
In record pause mode:
Press and hold the + button (forward) or – button
(reverse).
• Release the button at the point you wish to begin recording.
• The camcorder returns to record pause mode.
– (record review) button
+ button

31
Basic Functions
Recording
E
Do not turn off the camcorder, change the position of the TAPE/CARD switch,
disconnect the power source, open the memory card cover or remove the memory
card while the card access indicator is flashing. Doing so could result in data
damage.
About the focusing frame:
The camcorder automatically selects the appropriate focusing frames out of the
9 focusing frames, allowing to focus on subjects out of the center ( 85).
If the subject is not suitable for autofocus, turns yellow. Keep the PHOTO
button pressed halfway and adjust the focus manually by turning the SET dial
up and down.
When recording a still image (step 5 above), the image may appear out of focus
for a moment while the camcorder is focusing.
When the subject is too bright, “OVEREXP.” starts flashing. In such case, use
the optional FS-H27U ND filter.
Sound for movies recorded on the memory card will be monaural.
We recommend using a miniSD Card with a transfer rate of more than 2 MB/
sec., right after you have formatted it with this camcorder. With memory cards
not formatted with this camcorder, or when recording/erasing has been
repeatedly performed, the writing speed may be lower and recording may stop.
When powered by a battery pack, the camcorder shuts off after 5 minutes when
the camcorder is left without any operation to save power ( 67).
Approximately 30 seconds before the camcorder shuts off, “ AUTO POWER
OFF” appears in the center of the screen. If the camcorder shuts off, turn the
power switch to OFF and back on again.
32
Screen Displays during Still Image Recording
Screen Displays during Movie Recording
Still Image Quality and Size ( 79)
Indicates the image quality and the
image size of the still image.
Remaining Card Capacity for Still
Images
flashing in red: No card
in green: 6 or more images
in yellow: 1 to 5 images
in red: No more images
• The indication may not decrease even
though a recording has been made, or
may decrease by 2 images at once.
• All indicators are displayed in green
when a memory card is played back.
Card Access Display
“ ” appears to indicate that the
camcorder is writing on the memory
card.
Movie size ( 79)
Indicates the movie size.
Card Access Display
“ ” appears and the “ ” display
moves to indicate that the camcorder is
writing on the memory card.
Remaining Card Capacity for
Movies
Indicates the remaining time in hours
and minutes. At less than 1 minute, the
remaining time will be displayed in 10
second-steps, at less than 10 seconds
in 1 second-steps.
• The indication varies depending on
the recording condition. The actual
remaining time may be longer or
shorter than indicated.
Movie recording time
Indicates the recording time of the
movie in hours : minutes : seconds.

33
Basic Functions
Recording
E
Zooming
The zoom is available in the and modes. When recording on
the tape, in addition to the 10x optical zoom you can also use the 200x digital zoom
( 64).
Optical Zoom
Move the zoom lever toward Wto zoom out (wide-
angle). Move it toward T to zoom in (telephoto).
Press the zoom lever slightly for a slow zoom. Press harder for a
faster zoom.
You can also use the and T W buttons on the wireless controller. However, you
cannot control the zoom speed.
The zoom speed will be faster in the stop and record pause modes.
Overusing the zoom feature when recording movies can result in recordings
that may have an unsettled feel or cause discomfort on playback. Make
effective use of the zoom.
Keep at least 1 m (3.3 ft.) to the subject. At wide-angle, you can focus on a
subject as close as 1cm (0.39 in.).
Zoom out
Zoom in
Zoom lever
34
Digital Zoom
When the digital zoom is activated, the camcorder automatically switches between optical
and digital zoom. With digital zoom, image resolution becomes lower the more you zoom
in.
Available only in the mode.
1. Press the MENU button to open the menu.
2. Turn the SET dial to select [CAMERA SETUP] and
press the SET dial.
3. Turn the SET dial to select [D.ZOOM] and press the
SET dial.
4. Turn the SET dial to select a setting option.
5. Press the MENU button to close the menu.
A zoom indicator appears for 4 seconds. It extends in light blue when the digital
zoom is set to 40x, and extends further in dark blue when set to 200x.
Digital zoom cannot be used in the following cases:
- In Night mode
- With the Multi-Images Screen
MENU
( 63)
CAMER
CAMER
CAMER
CAMERCAMERA SETUP
A SETUP
A SETUP
A SETUPA SETUP D.ZOO
D.ZOO
D.ZOO
D.ZOOD.ZOOM OFF
M OFF
M OFF
M OFFM OFF
35
Basic Functions
Recording
E
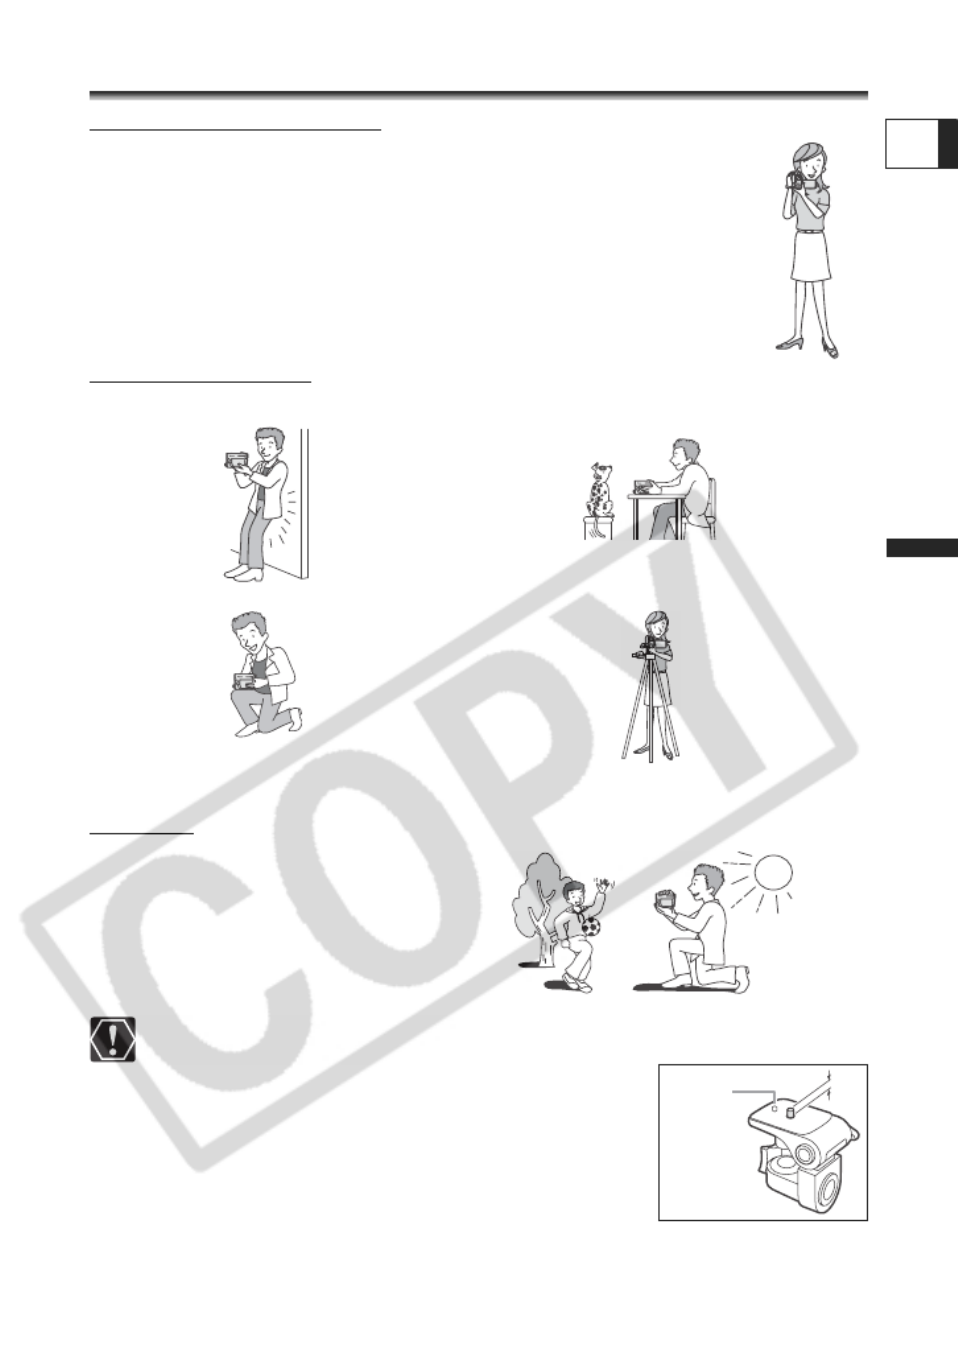
Tips for Better Recording
Holding the Camcorder
For maximum stability, grip the camcorder in your right hand and keep your
right elbow pressed against your body. If necessary, support the camcorder
with your left hand. Be careful that your fingers do not touch the microphone
or lens.
For More Stability
Lighting
When recording outdoors, we
recommend recording with the sun at
your back.
When using a tripod, do not leave the viewfinder exposed to direct sunlight as it
may melt (due to concentration of the light by the lens).
Do not use tripods with fastening screws longer than
5.5 mm (0.2 in.) as it may damage the camcorder.
The camcorder cannot be mounted on tripods with
fixed (non-retractable) camera positioning pins.
Lean against a wall Put the camcorder on a table
Kneel on one knee Use a tripod
Lie on your elbow
Camera
positioning
pin

36
Playback
Playing Back a Tape
1. Holding the lock button on the
power switch pressed down, set
the switch to PLAY.
2. Set the TAPE/CARD switch to .
3. Press the button to rewind
the tape.
4. Press the / button to begin
playback.
5. Press the button to stop
playback.
To use the viewfinder, close the LCD panel.
About the screen display: During playback, the time code gives the hours,
minutes, seconds and frames. The remaining tape time may not appear when
the time left is less than 15 seconds.
To display the audio level at the time of recording, press the AUDIO LEVEL
button during playback.
If the playback picture is distorted, clean the video heads using a Canon Head Cleaning
Cassette or a commercially available digital video head-cleaning cassette ( 136).

37
Basic Functions
Playback
E
Special Playback Modes
/ (Playback Pause)
To pause playback, press the / button during normal playback.
(Fast Forward Playback) / (Rewind Playback)
Plays back the tape at 9.5 times normal speed (forward or reverse). Press and hold the
button during normal playback or fast forward.
–/ (Reverse Playback)
Press the button on the wireless controller during normal playback. Press the (play)
button to return to normal playback.
+/ (Frame Advance) / –/ (Frame Reverse)
Plays back frame-by-frame. Press the button on the wireless controller repeatedly during
playback pause. Press and hold it to play back continuous frame advance/frame reverse.
SLOW (Slow Forward)/(Slow Reverse)
Plays back at about 1/3 normal speed. Press the button on the wireless controller during
normal or reverse playback. Press the (play) button to return to normal playback.
x2 (Forward p37-x2 Playback)/(Reverse p37-x2 Playback)
Plays back at 2 times normal speed. Press the button on the wireless controller during
normal or reverse playback. Press the (play) button to return to normal playback.
There is no sound during special playback.
The picture may become distorted during some special playback modes.
The camcorder stops the tape automatically after 4 minutes 30 seconds in
playback pause mode to protect the tape and video heads.
REW PLAY FF
STOP
PAUSE SLOW
38
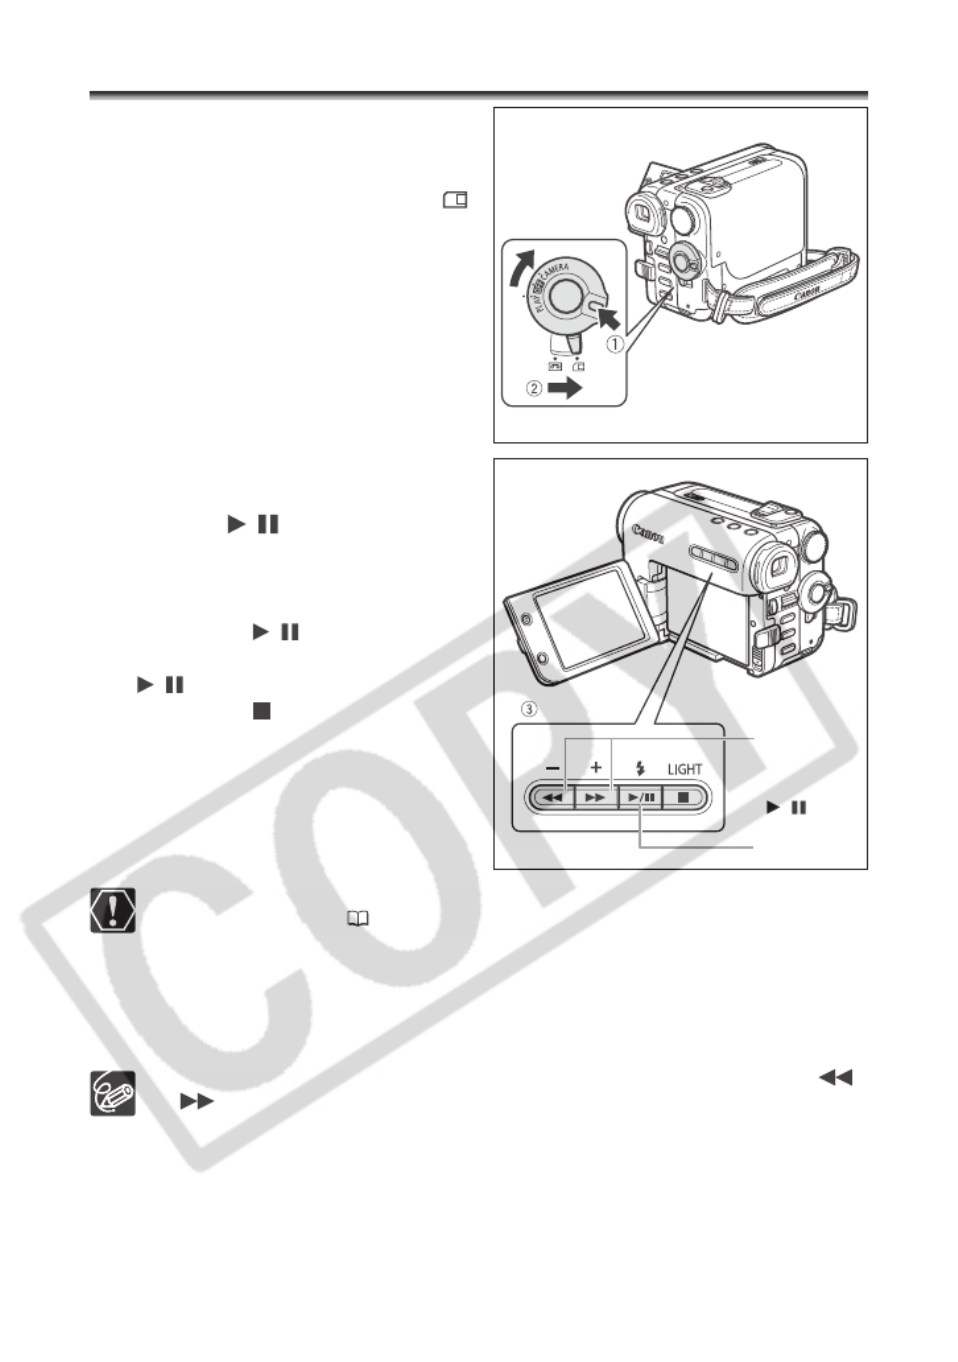
Playing Back a Memory Card
1. Holding the lock button on the
power switch pressed down, set
the switch to PLAY.
2. Set the TAPE/CARD switch to .
3. Press the +/– button to move
between images.
Press the / button to play back
a movie.
• The first scene appears as a still image
when playback is complete.
• Pressing the / button during
playback pauses the playback. Press the
/ button again to restart playback.
Pressing the button displays the first
scene of the movie.
Images not recorded with this camcorder, uploaded from a computer (except
the sample images 61), edited on a computer and images whose file names
have been changed may not be played back correctly.
Do not turn off the camcorder, change the position of the TAPE/CARD switch,
disconnect the power source, open the memory card cover or remove the
memory card while the card access indicator is flashing. Doing so could result
in data damage.
During movie playback: Press the +/– button on the camcorder (or the REW /
FF button on the wireless controller) for 8x fast forward/fast rewind playback.
+/– button
/ (play/
pause)
button

39
Basic Functions
Playback
E
Adjusting the Volume
When you use the LCD screen for playback, the camcorder plays back the sound via
built-in speaker. The speaker does not sound when you close the LCD panel.
Available in the and modes.
Adjusting the Speaker Volume
Turn the SET dial up to increase the volume, and down
to lower the volume.
• A volume bar appears for 2 seconds.
• You can turn off the volume completely by turning the SET dial
down until “OFF ” appears.
SET dial
Speaker
40
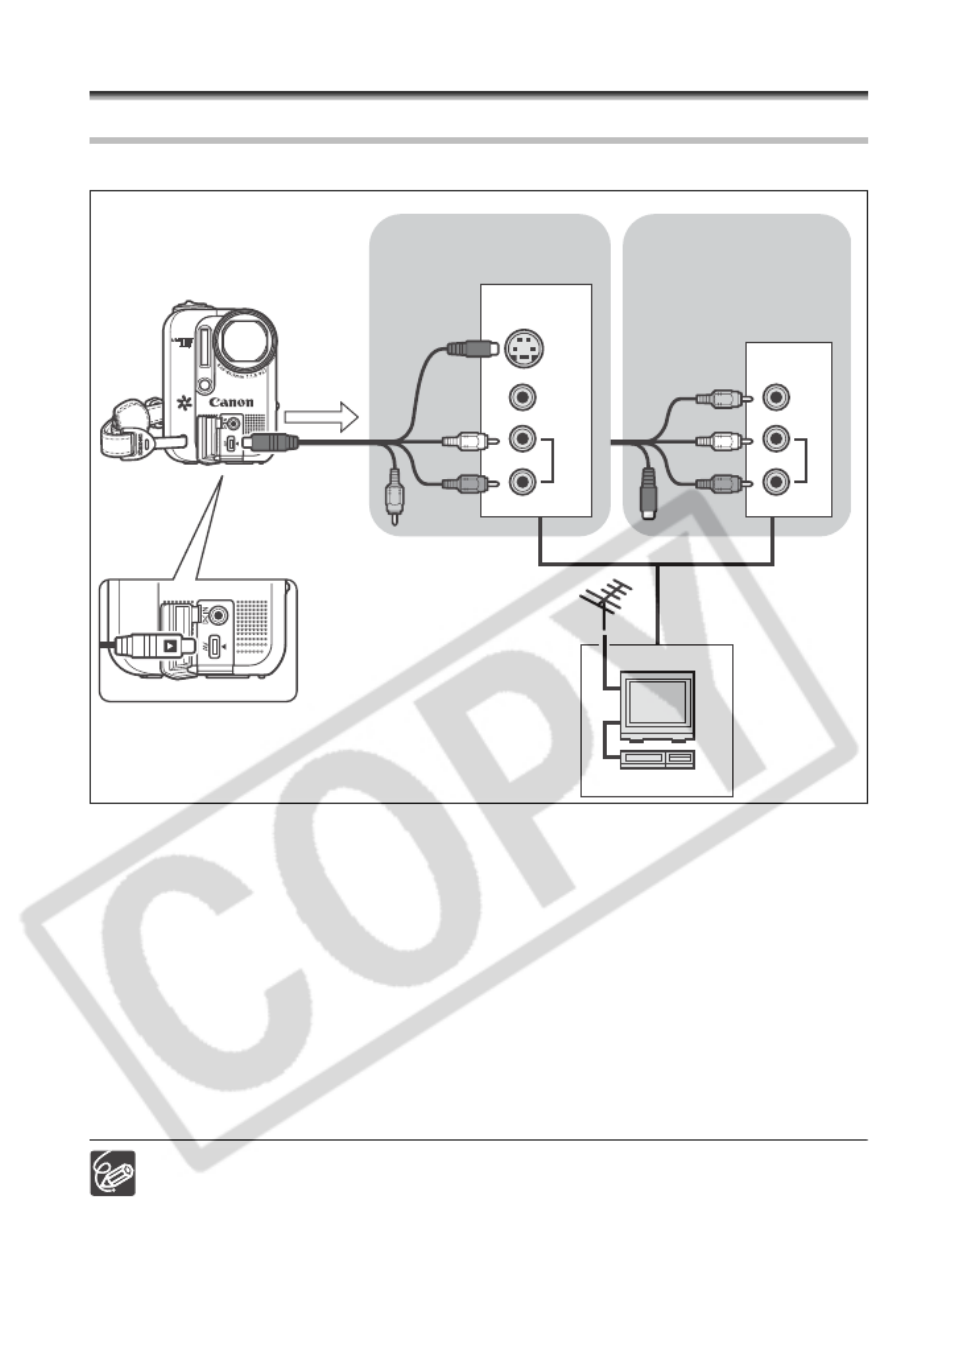
Playing Back on a TV Screen
Connection Diagram
Refer also to the TV or VCR instruction manual.
1. Turn off all devices before starting the connections.
2. Connect the MTC-100 Multi Cable to the camcorder’s AV terminal and
the audio terminals on the TV/VCR.
Connect the white plug to the white audio terminal L (left), the red plug to the red audio
terminal R (right).
3. Connect the MTC-100 Multi Cable to the video terminal on the TV/VCR.
If your TV or VCR has an S-Video or (S1)-Video input, connect the multi cable to the S
(S1)-VIDEO terminal and do not connect the yellow plug. Otherwise, connect the
yellow plug to the yellow video terminal (VIDEO).
4. If connecting to a TV, set the input selector to VIDEO. If connecting to
a VCR, set the input selector to LINE.
We recommend powering the camcorder from a household power source.
The picture quality is higher when connecting to a TV with an S (S1) terminal.
TVs with S1-terminal or Video ID-1 system: Recordings made in the widescreen
mode will be automatically played back in widescreen mode.
VIDEO
S(S1)-VIDEO
AUDIO
R
R
R
RR
L
L
L
LL
VIDEO
AUDIO
R
R
R
RR
L
L
L
LL
INPUT
INPUT
TVs or VCRs with S- (S1)-
Video Input Terminals
MTC-100
Multi Cable
(supplied)
Signal flow
TVs or VCRs with Audio/
Video Terminals
Open the
terminal
cover

41
Advanced Functions
Recording Programs
E
Advanced Functions
Recording Programs
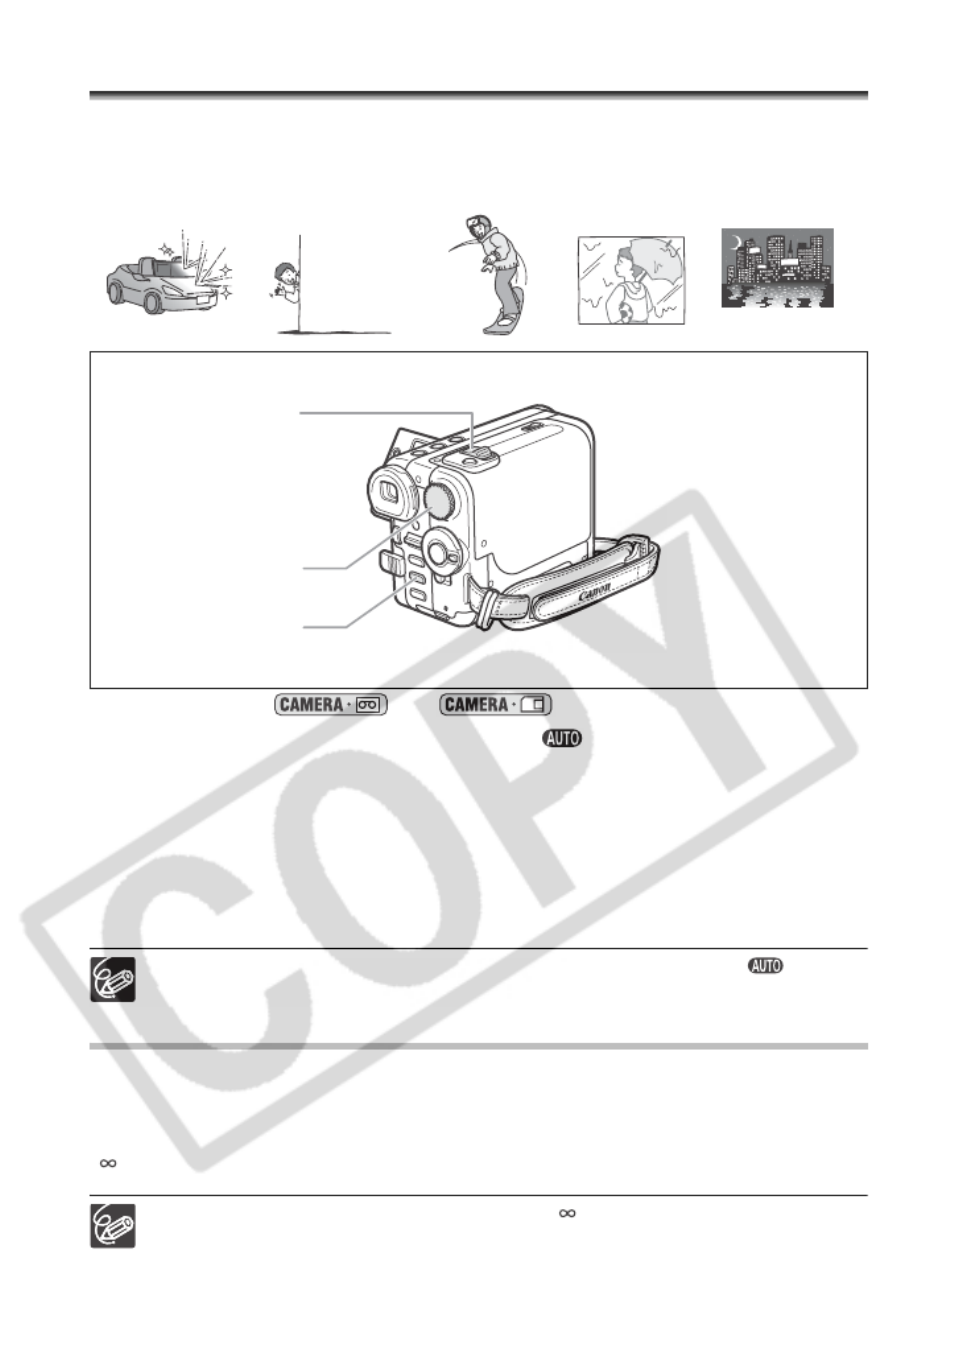
Using the Recording Programs
Auto
The camcorder adjusts focus, exposure and
other settings automatically, allowing you to
just point and shoot.
Portrait
The camcorder uses a large
aperture, achieving a focus
on the subject while blurring
other distracting details.
Snow
Use this mode to record in
bright ski resorts. It prevents
the subject from being
underexposed.
Spotlight
Use this mode to record
spotlit scenes.
Sports
Use this mode to record
sports scenes such as tennis
or golf.
Beach
Use this mode to record on a
sunny beach. It prevents the
subject from being
underexposed .
Fireworks
Use this mode to record
fireworks.
Night
Use this mode to record in
dimly lit places ( 42).
Sunset
Use this mode to record
sunsets for vibrant colors.
Program AE ( 44)
Shutter-Priority AE ( 45)
Aperture-Priority AE ( 46)

42
Selecting the Recording Program
Available only in the and modes.
Turn the mode dial to switch between the recording
categories.
: Automatic mode
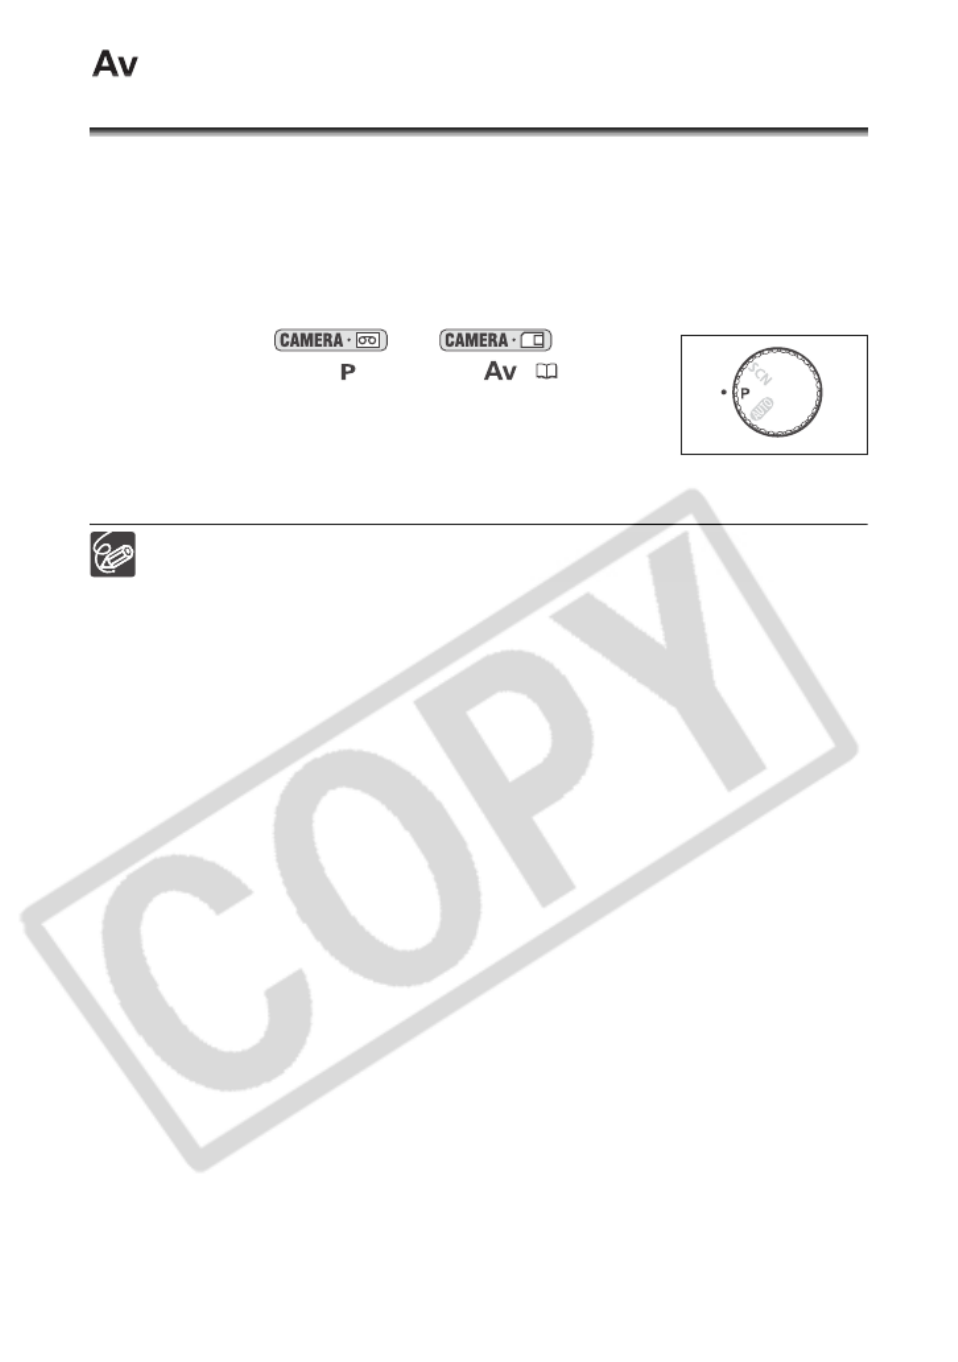
: Program AE ( P), Shutter-Priority AE (Tv) or Aperture-Priority AE (Av) can be
selected ( 41).
(Scene): Portrait, Sports, Night, Snow, Beach, Sunset, Spotlight, or Fireworks can
be selected ( 41).
To select a program after choosing or :
1. Press the FUNC. Button.
The selection frame will show the symbol of the program currently selected.
2. Press the SET dial to change the program.
3. Turn the SET dial to select the program desired and press the SET
dial.
4. Press the FUNC. Button.
The symbol of the selected recording program appears.
Do not change the mode during recording as the brightness of the image may
change abruptly.
Portrait mode:
The blur effect of the background increases the more you zoom to telephoto.
The picture may not appear smooth when played back.
Sports mode:
The picture may not appear smooth when played back.
Night mode:
- Moving subjects may leave a trailing afterimage.
- Picture quality may not be as good as in other modes.
- White points may appear on the screen.
- Autofocus may not work as well as in other modes. In such case, adjust the
focus manually.
Mode dial

43
Advanced Functions
Recording Programs
E
Snow/Beach mode:
- The subject may become overexposed on cloudy days or in shaded places.
Check the image on the screen.
- The picture may not appear smooth when played back.
Fireworks mode:
To avoid camcorder shake, we recommend using a tripod. Use a tripod when
recording in mode as the shutter speed slows down.

44
Using the Program AE Mode
The camcorder automatically adjusts shutter speed and exposure according to the
brightness of the subject. In Program AE mode, you can point and shoot as in Auto mode,
however, you have the option of changing some settings.
Available only in the and modes.
Set the mode dial to and select the P (PROGRAM
AE) mode ( 42).
If the optimal exposure cannot be obtained, try the following actions.
• Manually adjust the exposure ( 47).
• Use the flash ( 82).
• Change the metering method ( 84).
• Use the mini video light ( 49).

45
Advanced Functions
Recording Programs
E
Using the Shutter-Priority AE Mode
You can select a shutter speed, and the camcorder automatically sets a matching
aperture setting.
Select a high shutter speed for recording fast moving subjects, and a slow shutter speed
to create a trailing after image.
Guidelines for selecting the shutter speed
Available only in the and modes.
1. Set the mode dial to and select ( 42).
2. Press the SET dial.
3. Turn the SET dial to select the shutter speed.
The denominator of the shutter speed appears.
The shutter speed number flashes when the selected shutter speed is not
appropriate for the recording condition. In such case, readjust the shutter
speed.
When using a slow shutter speed in dark places, you can record the subject
brightly, but the image quality may be lower, and autofocus may not work well.
Do not point the camcorder directly at the sun when the shutter speed is set to
1/1000 or higher.
The image may flicker when recording with high shutter speeds.
Recording on the tape under fluorescent lights ( ): When the
recording program is set to , or , the camcorder automatically detects
the flicker of fluorescent lighting and adjusts the shutter speed accordingly.
However, if the screen starts to flicker, select Tv mode and set the shutter
speed to 1/100.
1/8, 1/15, 1/30 1/2, 1/4, 1/8,
1/15, 1/30
For recording subjects in dark places
1/60 1/60 For general recordings
1/100 1/100 For recording indoor sports scenes
1/250, 1/500,
1/1000
1/250, 1/500 For recording from within a car or trains, or
recording moving subjects such as roller coasters.
1/2000 -For recording outdoor sports such as golf or tennis
on sunny days.
46
Using the Aperture-Priority AE
Mode
You can select an aperture value, and the camcorder automatically chooses the
appropriate shutter speed.
Aperture values: 1.8, 2.0, 2.4, 2.8, 3.4, 4.0, 4.8, 5.6, 6.7, 8.0, 9.5, 11, 14, 16
Use low aperture values (large aperture) to blur the background for a portrait, or high
aperture values (small aperture) to achieve a broad depth of field for recording
landscapes.
Available only in the and modes.
1. Set the mode dial to and select ( 42).
2. Press the SET dial.
3. Turn the SET dial to select an aperture value.
• The shutter speed is adjusted automatically.
• The aperture becomes smaller the bigger the aperture value.
The aperture number flashes when the selected aperture is not appropriate for
the recording condition. In such case, readjust the aperture.
Available aperture values vary depending on the zoom position.
48
Adjusting the Focus Manually
Autofocus may not work well on the following subjects. In such case, focus manually.
Available only in the and modes.
1. Set the mode dial to a mode other than .
2. Adjust the zoom.
3. Press the FOCUS button.
“MF” appears.
4. Turn the SET dial to adjust the focus.
• Turn the SET dial until the image appears focused.
• Press the FOCUS button to return to autofocus.
The setting resets to autofocus when you switch the mode dial to .
Readjust the focus when you have turned off the camcorder.
Infinity Focus
Use this function when you wish to focus on faraway subjects such as mountains or
fireworks.
Press the FOCUS button more than 2 seconds after step 2 above.
“ ” appears.
When you operate the zoom or the SET dial, “ ” changes to “MF” and the
camcorder change to manual focusing mode.
Reflective
surfaces
Subjects with low
contrast or without
vertical lines
Fast Moving
Subjects
Through dirty or
wet windows
Night Scenes
Mode dial
FOCUS button
Zoom lever
51
Advanced Functions
Changing the Settings (1)
E
Changing the Settings (1)
Changing the Settings with the FUNC.
Button
Many of the camcorder’s functions are selected from the FUNC. menu that appears when
pressing the FUNC. button. For menu items, see List of Menu Items (FUNC.) ( 52).
1. Press the FUNC. button.
• The menu appears.
• The symbols of the current settings are displayed.
2. Turn the SET dial to select a function and press the
SET dial.
3. Turn the SET dial to select a setting option and press
the SET dial.
• The symbol changes to the one of the selected setting.
• For setting the white balance [SET] ( 53), image effect [CUSTOM] ( 55) or
digital effect [MULTI-IMAGE SCREEN] ( 60) function, refer to the relevant pages.
4. Press the FUNC. button.
The menu disappears.
Functions that are not available appear grayed out.
Pressing the FUNC. button at any time closes the menu.
SET dial
FUNC. button

52
List of Menu Items (FUNC.)
Available menu items vary depending on the operation mode. Default settings are in
boldface text.
For details on each function, see the reference page.
* When recording still images on the card with the drive mode set to [SINGLE], this setting
option appears when pressing the FUNC. button right after recording.
Recording
Programs
(PROGRAM AE),
(SHUTTER-PRIO. AE),
(APERTURE-PRIO.AE) 42
(PORTRAIT), (SPORTS), (NIGHT),
(SNOW), (BEACH), (SUNSET),
(SPOTLIGHT), (FIREWORKS)
Metering
method
(EVALUATIVE),
(CENT.WEIGHT.AVERAGE), (SPOT) 84
White balance (AUTO), (DAYLIGHT), (SHADE),
(CLOUDY), (TUNGSTEN),
(FLUORESCENT), (FLUORESCENT H),
(SET)
53
Image effect (IMAGE EFFECT OFF), (VIVID),
(NEUTRAL), (LOW SHARPENING),
(SOFT SKIN DETAIL), (CUSTOM)
55
Drive mode (SINGLE), (CONT.SHOOT.),
(HISPEED CONT.SHOOT.), (AEB),
(STITCH AST)
86
88
Digital Effects (D.EFFECT OFF), (FADER), (EFFECT),
(MULTI-IMAGE SCREEN), (CARD MIX)
56
(D.EFFECT OFF), (FADER), (EFFECT),
(MULTI-IMAGE SCREEN)
(D.EFFECT OFF), (BLK&WHT)
Still image
recording
( ),STILL I. REC OFF
S
( FINE/640x480),
S
( NORMAL/640x480) 81
Movie size ( 320x240), ( 160x120)
79
( )MOVIE REC OFF
( 320x240), ( 160x120)
Still image
quality
S
( S.FINE/640x480),
S
( ),FINE/640x480
S
( NORMAL/640x480) 105
Still image size/
quality
L
( ),1632x1224
M
( 1280x960),
S
( 640x480)
79
( SUPER FINE), ( FINE),
( NORMAL)
Image erase - 92
Slide show - 90
Protect - 91
Print order - 116
Transfer order - 123
Menu Items Setting Options
*
*

53
Advanced Functions
Changing the Settings (1)
E
Setting the White Balance
You can use the preset modes to reproduce colors more accurately, or set a custom white
balance to obtain the optimal setting.
Available only in the and modes.
1. Set the mode dial to .
2. Press the FUNC. button and after selecting the White Balance symbol
press the SET dial.
3. Turn the SET dial to choose the desired setting and press the SET dial.
The symbol of the current setting is displayed.
4. When you have selected [ SET]: Point the camcorder at a white
object, zoom in until it fills the whole screen and press the SET dial.
• Keep the camcorder zoomed at the white object until step 5 is completed.
• flashes and stops flashing when adjustment is complete.
AUTO Settings are automatically set by the camcorder.
DAYLIGHT For recording outdoors on a bright day.
SHADE For recording in shaded places.
CLOUDY For recording on a cloudy day.
TUNGSTEN For recording under tungsten and tungsten type (3-wavelength)
fluorescent lighting.
FLUORESECENT For recording under warm white, cool white or warm white type
(3-wavelength) fluorescent lighting.
FLUORESCENT H For recording under daylight or daylight type (3-wavelength)
fluorescent lighting.
SET Use the custom white balance setting to make white subjects
appear white under colored lighting.
( 51)
AUTO
AUTO
AUTO
AUTOAUTO
Mode dial
Zoom lever
White sheet or paper
FUNC. button
SET dial

54
5. Press the FUNC. button.
Use the auto setting for normal outdoor scenes.
Depending on the type of fluorescent light, optimal color balance cannot be
accomplished with [FLUORESCENT] or [FLUORESCENT H]. If the color looks
unnatural on the screen, adjust using [AUTO] or [SET].
The camcorder retains the custom white balance setting even if you turn it off.
When you want to use a previously made [SET] setting, after selecting [ SET]
in step 3, press the FUNC. button without pressing the SET dial.
When you have set the custom white balance:
- Depending on the light source, “ ” may keep flashing. The result will still be
better than with the auto setting.
- Reset the white balance when the lighting condition changes.
- Turn off the digital zoom.
Custom white balance may provide better results in the following cases:
- Changing lighting conditions
- Close-ups
- Subjects in a single color (sky, sea or forest)
- Under mercury lamps or certain types of fluorescent lights

55
Advanced Functions
Changing the Settings (1)
E
Selecting an Image Effect
You can record with different saturation and contrast color effects.
Available only in the and modes.
.
1. Set the mode dial to .
2. Press the FUNC. button.
3. Select the image effect symbol followed by the setting option.
The symbol of the current setting is displayed.
4. When you have selected [ CUSTOM] only:
Select the custom setting option (brightness, contrast, sharpness or
color depth), adjust the settings with the SET dial and select [SET].
5. Press the FUNC. button.
[SOFT SKIN DETAIL]: To obtain the best effect, use this function when recording a
person in close-up. Note that areas similar to the skin color may lack in detail.
IMAGE EFFECT OFF Records with no effect.
VIVID Emphasizes the contrast and color saturation to record in
crisp colors.
NEUTRAL Tones down the contrast and color saturation to record in
neutral hues.
LOW SHARPENING Records subjects with softened outlines.
SOFT SKIN DETAIL Softens the details in the skin tone area for a more
complimentary appearance.
CUSTOM Allows you to adjust the brightness, contrast and sharpness
of the image.
( 51)
IMAGE
IMAGE
IMAGE
IMAGEIMAGE EFFE
EFFE
EFFE
EFFE EFFECT OFF
CT OFF
CT OFF
CT OFFCT OFF
56
Using Digital Effects
The Digital Effects functions include faders, effects, multi-image screen and Card Mix
( 61).
Faders ( 58)
Begin or end scenes with a fade to or from black.
Fade Trigger (FADE-T) Wipe (WIPE)
Corner Wipe (CORNER) Jump (JUMP)
Flip (FLIP) Puzzle (PUZZLE)
Zigzag (ZIGZAG) Beam (BEAM)
Tide (TIDE)

58
The availability of the various Digital Effects depends on the operation
mode.
:Available : Not available
* :When recording simultaneously on the tape and memory card.
** :Black and White only.
Selecting a Fader
Available only in the and modes. When recording, set the mode
dial to a mode other than .
1. Press the FUNC. button.
2. Select the digital effect symbol followed by
[ FADER].
The symbol of the current setting is displayed.
3. Select the fader type.
The selected fader will be demonstrated on the current screen
and will be shown in a small animation to the right of the menu
item.
4. Press the FUNC. button.
The symbol of the selected fader appears.
5. Press the D.EFFECTS button.
• The symbol changes to green.
• Pressing the D.EFFECTS button again deactivates the fader.
Movies Still
Images*
Faders
Effects **
Multi-image
screen
Card Mix
( 51)
D.EFF
D.EFF
D.EFF
D.EFFD.EFFECT OFF
ECT OFF
ECT OFF
ECT OFFECT OFF

59
Advanced Functions
Changing the Settings (1)
E
CAMERA mode:
6. Fade in: Press the start/stop button in record pause
mode.
Fade out: Press the start/stop button in record
mode.
PLAY mode:
6. Fade in: Press the / button in playback pause
mode.
Fade out: Press the / button in playback mode.
Selecting an Effect
Available in the , , and modes. When recording, set
the mode dial to a mode other than .
1. Press the FUNC. button.
2. Select the digital effect symbol followed by
[ EFFECT].
• The symbol of the current setting is displayed.
• When recording to the memory card only the BLK & WHT
effect is available. Select it and proceed directly to Step 4
below.
3. Select the effect type.
The selected effect will be demonstrated on the current screen and will be shown in a
small animation to the right of the menu item.
4. Press the FUNC. button.
The symbol of the selected effect appears.
5. Press the D.EFFECTS button.
• The symbol turns green, and the effect is activated.
• From the playback pause mode, start playing the tape before
pressing the D.EFFECTS button.
• Pressing the D.EFFECTS button again deactivates the effect.
( 51)
D.EFF
D.EFF
D.EFF
D.EFFD.EFFECT O
ECT O
ECT O
ECT OECT OFF
FF
FF
FFFF

60
Using the Multi-Image Screen
Available in the mode and in the mode only in the following
playback modes:
• When [S.SPEED] is set to [MANUAL]: Playback pause, slow forward/reverse playback
• When [S.SPEED] is set to [FAST], [MOD.] or [SLOW]: Playback pause
When recording, select a recording program other than or .
1. Press the FUNC. button.
2. Select the digital effects symbol followed by
[ MULTI-IMAGE SCREEN].
The symbol of the current setting is displayed.
3. Select [S.SPEED] and select the transition speed.
• Manual: For capturing images manually.
• Fast: Every 4 frames
• Moderate: Every 6 frames
• Slow: Every 8 frames
4. Select [S.SPLIT] and select the number of sequences.
5. Select [SET] and press the FUNC. button.
“ ” appears.
6. Press the D.EFFECTS button.
• The symbol turns green.
• FAST, MODERATE, SLOW: The set number of images will be
captured at the set speed. To cancel the multi-image screen, press the D.EFFECTS
button.
• MANUAL: Images will be captured each time you press the D.EFFECTS button. The
blue frame indicating the next sequence disappears after the last image. Pressing
the D.EFFECTS button for more than 1 second cancels the images one after
another.
7. Press the start/stop button to begin recording.
The multi-image screen is recorded on the tape.
When playing a tape with a Multi-Image speed setting other than MANUAL,
pressing any tape operation button (such as play or pause), or performing date
search cancels the multi-image screen.
( 51)
D.EFF
D.EFF
D.EFF
D.EFFD.EFFECT O
ECT O
ECT O
ECT OECT OFF
FF
FF
FFFF

61
Advanced Functions
Changing the Settings (1)
E
Combining Images (Card Mix)
You can choose one of the sample images from the collection on the supplied disk (such
as picture frames, backgrounds and animations) and combine it with the live video
recording.
Card Chroma Key (CARD CHROMA)
Combines frames with your recordings. The live video recording will
appear in place of the blue area of the card mix image.
Mix level adjustment: blue area of the still image.
Card Luminance Key (CARD LUMI.)
Combines illustrations or title with your recordings. The live video
recording will appear in place of the light area of the card mix image.
Mix level adjustment: light area of the still image.
Camera Chroma Key (CAM. CHROMA)
Combines backgrounds with your recordings. Record your subject
in front of a blue curtain, and the subject not blue will be
superimposed on the card mix image.
Mix level adjustment: blue area of the live video recording.
Card Animation (C. ANIMATION)
Combines animations with your recordings. You can choose from 3
types of card animation effects.
• Corner: Animation appears on the upper left and the lower right
corner of the screen.
• Straight: Animation appears on the top and bottom of the screen
and moves to the right and left.
• Random: Animation moves randomly in the display.
Mix level adjustment: blue area of the card animation image.
+ / – button
SET dial
FUNC. button
Mode dial

62
Selecting the Card Mix Effect
Available only in the mode.
1. Upload a sample image from the supplied disk to the memory card.
Refer to Adding Still Images from Your Computer to the Memory Card in the Digital
Video Software Instruction Manual.
2. Set the mode dial to a mode other than .
3. Press the FUNC. button.
4. Select the digital effects symbol followed by [ CARD MIX].
5. Select the image you wish to combine with the +/– button.
6. Select [MIX TYPE] and select the mix type matching the sample image
you have selected.
When you have selected [C.ANIMATION], select the animation type and press the
SET dial.
7. To adjust the mix level, select [MIX LEVEL], adjust it with the SET dial
and select [SET].
8. Press the FUNC. button.
“ ” appears.
9. Press the D.EFFECTS button.
• “ ” turns green and the combined image appears.
• Still images cannot be recorded on the memory card while using the Card Mix
function.
Turn off the digital effect when you do not use it.
The camcorder retains the setting even if you turn it off or change the recording
program.
The image quality may be slightly lower with digital effects.
Digital effects cannot be used during DV dubbing.
( 51)
D.EFF
D.EFF
D.EFF
D.EFFD.EFFECT OFF
ECT OFF
ECT OFF
ECT OFFECT OFF

63
Advanced Functions
Changing the Settings (2)
E
Changing the Settings (2)
Changing the Settings with the MENU
Button
Many of the camcorder’s functions are selected from a menu that appears when pressing
the MENU button. For menu items, see List of Menu Items (MENU) ( 64).
Selecting Menus and Settings
1. Press the MENU button.
The menu appears.
2. Turn the SET dial to select a submenu and press the
SET dial.
3. Turn the SET dial to select a menu item and press
the SET dial.
4. Turn the SET dial to select a setting option and
press the SET dial.
5. Press the MENU button.
The menu disappears.
Pressing the MENU button at any time closes the menu.
Items that are not available appear grayed out.
SET dial
MENU button
64
List of Menu Items (MENU)
Available menu items vary depending on the operation mode. Default settings are in
boldface text.
For details on each function, see the reference page. Functions without reference page
are explained below the tables.
CAMERA SETUP
A.SL SHUTTER: The camcorder automatically uses slow shutter speeds to obtain a
brighter recording in places with insufficient lighting.
The camcorder uses shutter speeds down to 1/30 (1/15 in mode).
Available when the mode dial is in the or modes.
In mode, set the flash mode to (flash off).
When a trailing afterimage appears, set it to [OFF].
If “ ” (camcorder shake warning) appears, we recommend stabilizing the camcorder,
for example, by mounting it on a tripod.
D.ZOOM: Determines the operation of the digital zoom.
When the digital zoom is activated, the camcorder will switch automatically to the
digital zoom when you zoom in beyond the optical zoom range.
With the digital zoom the image is digitally processed, so image resolution will
deteriorate the more you zoom in.
The digital zoom indicator will appear in light blue from 10x up to 40x and dark blue
from 40x to 200x.
IMG STAB: The image stabilizer compensates for camcorder shake even at full
telephoto.
The image stabilizer is designed to compensate a normal degree of camcorder shake.
The image stabilizer may not be effective when recording in dark places using the
Night mode.
The image stabilizer cannot be turned off when the mode dial is set to .
We recommend turning off the image stabilizer when using a tripod or when panning.
FOCUS PRI.: The camcorder records the still image once focus is adjusted.
Set it to [OFF] when you wish to record a still image as soon as you press the PHOTO
button.
When set to [OFF], no focusing frame appears.
The setting cannot be turned off when the mode dial is set to .
A.SL SHUTTER ON, OFF -
D.ZOOM OFF, 40X, 200X 34
IMG STAB ON, OFF -
WIDESCREEN ON, OFF 72
AF AST LAMP AUTO, OFF 83
FOCUS PRI. ON, OFF -
REVIEW OFF, 2sec, 4sec, 6sec, 8sec, 10sec -
Menu Items Setting Options
66
AUDIO SETUP
OUTPUT CH: Switches the output channels when playing back a tape with audio
recorded on two channels.
[L/R]: Stereo: L+R channels, Bilingual: Main+Sub.
[L/L]: Stereo: L channel, Bilingual: Main.
[R/R]: Stereo: R channel, Bilingual: Sub.
AUDIO MODE: Switches the audio recording mode.
[16bit] records in high sound quality.
Select [12bit] if you plan to dub audio later.
DISPLAY SETUP/
BRIGHTNESS: Adjusts the brightness of the LCD screen.
Turn the SET dial up or down to adjust the brightness.
Changing the brightness of the LCD screen does not affect that of the viewfinder or the
recordings.
LCD MIRROR: The image appears mirror reversed when you rotate the LCD panel so
that the screen faces in the same direction as the lens.
OUTPUT CH L/R, L/L, R/R -
AUDIO DUB. AUDIO IN, MIC. IN 102
WIND SCREEN AUTO, OFF 71
MIC ATT ON, OFF 70
MIC LEVEL AUTO, MANUAL 69
12bit AUDIO STEREO1, STEREO2, MIX/FIXED, MIX/
VARI. 104
MIX BALANCE 104
AUDIO MODE 16bit, 12bit -
BRIGHTNESS -
LCD MIRROR ON, OFF -
TV SCREEN ON, OFF -
ON, OFF
DISPLAYS ON, OFF<PLAYBK> -
6SEC.DATE ON, OFF -
DATA CODE DATE, TIME, DATE & TIME, CAMERA
DATA, CAM.&D/T 75
DATE, TIME, DATE&TIME
LANGUAGE DEUTSCH, ENGLISH, ESPAÑOL,
FRANÇAIS, ITALIANO, ,
, , ,
24
DEMO MODE ON, OFF -
Menu Items Setting Options
Menu Items Setting Options
67
Advanced Functions
Changing the Settings (2)
E
When [LCD MIRROR] is set to [ON], only tape or card operation and self-timer displays
appear on the LCD screen (all displays appear on the viewfinder screen).
TV SCREEN: Shows the camcorder displays on a connected TV screen.
You can also use the TV SCREEN button on the wireless controller.
DISPLAYS: Shows the displays on the screen during playback.
When set to [OFF]:
- Displays except for the data code disappear (the displays for magnification of a
playback image and digital effects, the audio level indicator and the FUNC. menu still
appear).
- Tape operation displays appear for approximately 2 seconds.
- Displays also disappear from the connected TV, except for some warning messages.
6SEC. DATE: The camcorder displays the date and time for 6 seconds when you begin
playback, or to indicate that date or time zone has changed.
The 6-second auto date appears even if [DISPLAYS] is set to [OFF].
DEMO MODE: The demonstration mode displays the camcorder’s main features. It starts
automatically when you leave the camcorder turned on without loading a recording media
for more than 5 minutes using the power adapter.
To cancel the demo mode once it has begun, press any button, turn off the camcorder
or load a recording media.
SYSTEM
WL. REMOTE: Sets the camcorder to be operated with the wireless controller.
BEEP: A beep sounds upon operations such as turning on the camcorder, during self-
timer countdown or warnings such as condensation.
POWER SAVE: When powered by a battery pack, the camcorder shuts off after 5 minutes
when the camcorder is left without any operation to save power. Approximately 30
seconds before the camcorder shuts off, “ AUTO POWER OFF” appears in the center
of the screen.
FILE NOS.: Select the file numbering method upon inserting a new memory card.
Images are automatically assigned file numbers from 0101 to 9900, and stored in
folders containing up to 100 images. Folders are numbered from 101 to 998.
[RESET]: The file number starts at 101-0101. If the memory card already contains
images files, the consecutive file number will be assigned.
[CONTINUOUS]: The consecutive file number of the last recorded image will be
assigned. If a higher file number already exists on the memory card, the consecutive
number will be assigned. This is useful for organizing images on a computer.
WL. REMOTE ON, OFF -
BEEP HIGH VOLUME, LOW VOLUME, OFF -
POWER SAVE ON, OFF -
FILE NOS. RESET, CONTINUOUS -
Menu Items Setting Options
68
We recommend setting [FILE NOS.] to [CONTINUOUS].
D/TIME SET
DATE FORMAT: Changes the displayed date format (includes date format for printing).
MY CAMERA
You can change the image displayed at start-up and customize the sounds for the
camcorder’s start-up, shutter, button operations and self-timer.
When customizing a setting you can check the sound or start-up image before making
a selection. To be able to play the sounds, make sure the [BEEP] setting in the
[SYSTEM] submenu is not set to OFF.
T. ZONE/DST - 25
DATE/TIME - 25
DATE FORMAT Y.M.D. : 2005.1.1 AM12:00
M.D, Y : JAN. 1, 2005 AM12:00
D.M.Y. : 1. JAN. 2005 AM12:00
75
CREATE S-UP
IMAGE
NO, YES 73
SEL. S-UP IMG NO IMAGE, CANON LOGO, MY IMAGE
-
S-UP SOUND OFF, DEFAULT, MY SOUND
SHTR SOUND
OPER.SOUND
SELF-T SOUND
Menu Items Setting Options
Menu Items Setting Options

69
Advanced Functions
Changing the Settings (2)
E
Adjusting the Audio Recording Level
You can manually adjust the audio recording level of the built-in microphone or an
external microphone.
Available only in the mode.
1. Set the mode dial to a mode other than .
Press the MENU button. Using the SET dial select [AUDIO SETUP] [AUDIO DUB.]
[MIC. IN] and press the MENU button again.
2. Press the MENU button and select [AUDIO SETUP]. Select [MIC
LEVEL], set it to [MANUAL] and press the MENU button.
The audio level indicator appears.
3. Adjust the level with the SET dial.
• The maximum level should only slightly exceed –12 dB.
• Sound may be distorted if the indicator for 0 dB lights up in red.
4. Press the AUDIO LEVEL button.
The green bar disappears.
MENU
( 63)
AUDIO
AUDIO
AUDIO
AUDIOAUDIO SETU
SETU
SETU
SETU SETUP
P
P
PP MIC L
MIC L
MIC L
MIC LMIC LEVEL
EVEL
EVEL
EVELEVEL AUTO
AUTO
AUTO
AUTOAUTO
AUDIO LEVEL button

70
About the audio level indicator:
When [MIC LEVEL] is set to [AUTO] and in the mode: the audio
level indicator switches on and off with each press of the AUDIO LEVEL button.
The audio level can be changed when the green bar is displayed. We
recommend hiding the bar when you have finished adjusting to prevent
accidental changes.
When recording in very loud surroundings, the sound may be distorted even
though the audio level indicator shows an appropriate level. In this case, set the
mode dial to a mode other than AUTO, and activate the microphone attenuator
by setting [MIC ATT] under the MENU options to ON. The microphone
attenuator can be used also when recording to the memory card.
Turning the audio level all the way down will prevent sound recording.
12-dB40 0
M
[MIC LEVEL] is set to
[MANUAL] Guide (green bar)

71
Advanced Functions
Changing the Settings (2)
E
Using the Wind Screen
The camcorder reduces wind noise automatically. However, you can turn off the wind
screen when recording indoors, or when you want the microphone to be as sensitive as
possible.
Available in the , and modes.
1. In the or mode, set the mode dial to a mode
other than .
2. In the mode select the microphone as the input for audio
dubbing.
Press the MENU button. Using the SET dial select [AUDIO SETUP] [AUDIO DUB.]
[MIC. IN] and press the MENU button again.
3. Press the MENU button and select [AUDIO SETUP]. Select [WIND
SCREEN], set it to [OFF] and press the MENU button.
“ ” appears when you turn the wind screen off.
MENU
( 63)
AUDIO
AUDIO
AUDIO
AUDIOAUDIO SETU
SETU
SETU
SETU SETUP
P
P
PP WIND
WIND
WIND
WIND WIND SCREE
SCREE
SCREE
SCREESCREEN AUTO
N AUTO
N AUTO
N AUTON AUTO
73
Advanced Functions
Changing the Settings (2)
E
Creating a Start-up Image
You can select one of the still images recorded on the memory card and set it as the
camcorder’s start-up image.
Available only in the mode.
1. Select a still image with the +/– buttons.
2. Press the MENU button and select [MY CAMERA].
3. Select [CREATE S-UP IMAGE].
[SET THIS AS START-UP IMAGE?], [YES] and [NO] appears.
4. Select [YES].
[OVERWRITE MY IMAGE?], [NO] and [YES] appears.
5. Select [YES].
The still image will be saved, and the image that was saved to [MY IMAGE] is erased.
6. Change the start-up display to your selected image. Select [SEL. S-UP
IMG] and select [MY IMAGE].
7. Press the MENU button.
You can save your original images, or the images and sounds contained in the
supplied software (ZoomBrowser EX for Windows or ImageBrowser for
Macintosh) to the setting options [MY IMAGE] and [MY SOUND]. For details,
refer to the Digital Video Software Instruction Manual.
Retain the original data of the still image you have set as the start-up image on
your computer or removable disk.
MENU
( 63)
MY CA
MY CA
MY CA
MY CAMY CAMERA
MERA
MERA
MERAMERA CREAT
CREAT
CREAT
CREATCREATE S-U
E S-U
E S-U
E S-UE S-UP IMAG
P IMAG
P IMAG
P IMAGP IMAGE
E
E
EE
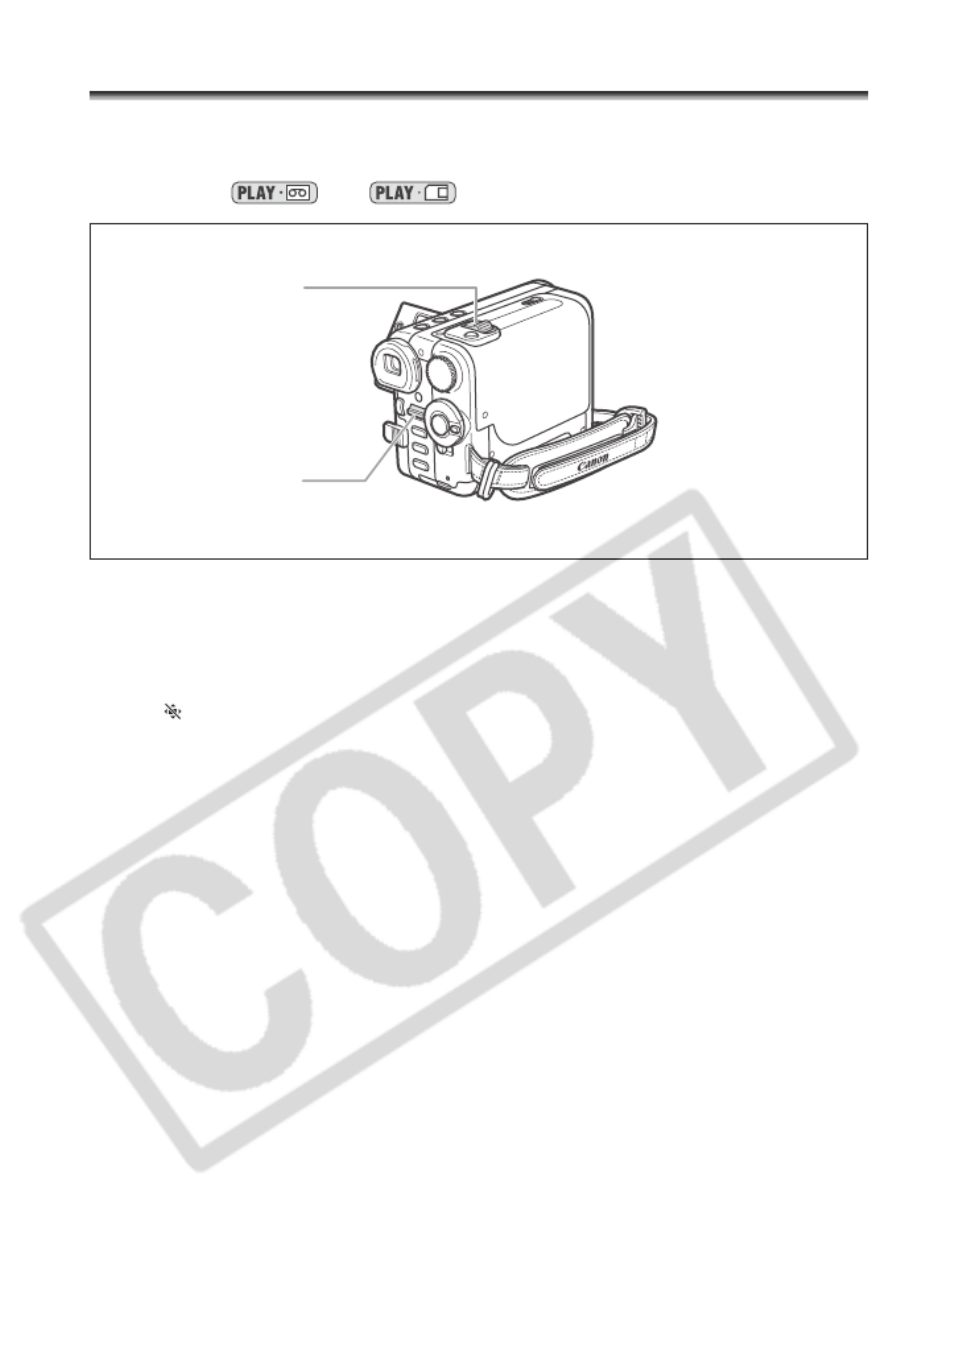
74
Playback
Magnifying the Image
When playing back movies from the tape or viewing still images from the memory card,
the image can be magnified up to 5 times.
Available in the and modes.
1. Move the zoom lever toward T
T
T
TT.
• The image is magnified by 2 times.
• A frame appears indicating the position of the magnified area.
• To further enlarge the image, move the zoom lever toward T
T
T
TT. To shrink the image
below 2 times magnification, move the zoom lever toward W
W
W
WW.
• A “ ” will display for images that cannot be enlarged.
2. Select the magnified area with the SET dial.
Turn the SET dial to move the image to the right and left, or up and down. Pressing
the SET dial switches between the directions.
3. To cancel the magnification, move the zoom lever toward W
W
W
WW until the
frame disappears.
Zoom lever
SET dial
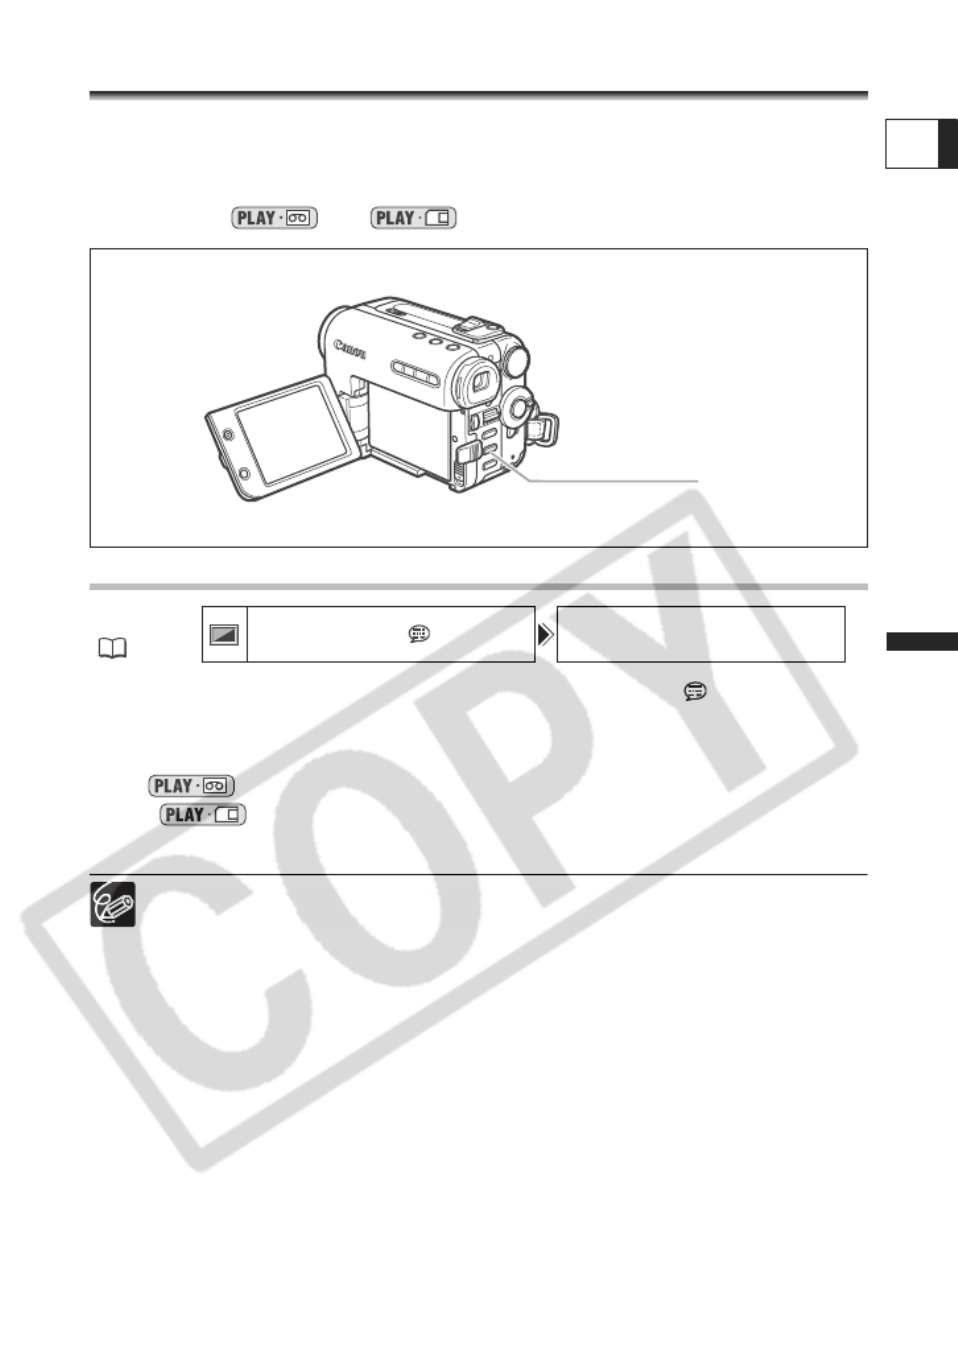
75
Advanced Functions
Playback
E
Displaying the Data Code
The camcorder maintains a data code containing recording date and time and other
camera data such as shutter speed and exposure (f-stop). When you play back a tape,
you can display the data code and select the data code combination you wish to display.
Available in the and modes.
Selecting the Date/Time Display Combination
1. Press the MENU button and select [DISPLAY SETUP/ ].
2. Select [DATA CODE] and select the data code combination.
3. Press the MENU button.
4. In mode, play back a tape and press the FOCUS button.
• In mode, only date and time appear.
• Pressing the FOCUS button again makes the data code disappear.
The data code will not display the next time you turn on the camcorder.
When the data code is being displayed, the level indicator will not display.
MENU
( 63)
DISPL
DISPL
DISPL
DISPLDISPLAY SE
AY SE
AY SE
AY SEAY SETUP/
TUP/
TUP/
TUP/TUP/ DATA
DATA
DATA
DATA DATA CODE
CODE
CODE
CODECODE DATE
DATE
DATE
DATE DATE & TIM
& TIM
& TIM
& TIM& TIME
E
E
EE
FOCUS button
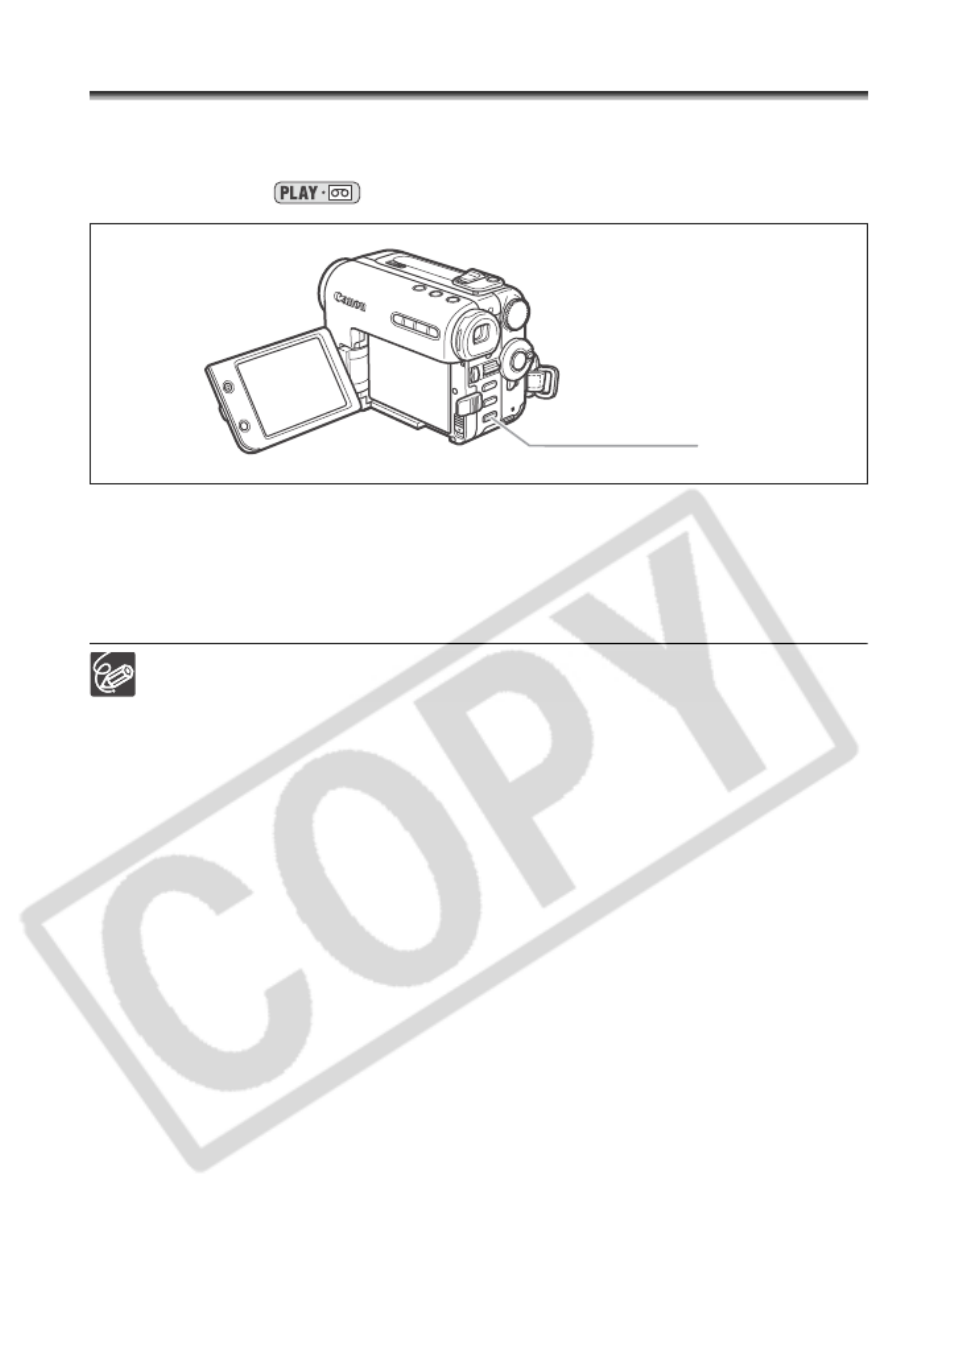
76
End Search
When you have played back a tape, you can use this function to locate the end of the last
recorded scene.
Available only in the mode.
In stop mode, press the EXP button.
• “END SEARCH” appears.
• The camcorder rewinds/fast forwards the tape, plays back the last few seconds of the
recording and stops the tape.
• Pressing the button again cancels the search.
End search cannot be used once you unload the cassette.
If there are blank sections between recordings or sections recorded in different
formats on the same tape, the end search function may not work properly.
You cannot use end search to locate the editing end of audio dubbing.
EXP button

77
Advanced Functions
Playback
E
Returning to a Pre-marked Position
If you wish to return to a particular scene later, mark the point with the zero set memory
and the tape will stop at that point when you rewind/fast forward the tape.
Available only in the and modes.
1. During recording or playback, press the ZERO SET MEMORY button
on the wireless controller at the point you wish to return to later.
• “0:00:00 ” appears.
• To cancel, press the ZERO SET MEMORY button again.
2. If you were playing back a tape, rewind the tape after finishing. If you
were recording, after you finish turn the power switch to PLAY and
then rewind the tape.
• “ ” appears.
• The tape stops automatically at “0:00:00 ”.
• The tape counter changes to time code.
If the time code has not been recorded consecutively, the tape may not stop
correctly at the scene marked with the zero set memory.

78
Date Search
You can locate the change of the date/time zone with the date search function.
Available only in the mode.
Press the or button on the wireless controller to begin
searching.
• Press more than once to search for further date changes (up to 10 times).
• Press the STOP button to stop searching.
A recording of longer than a minute per date/area is required.
Date search may not function if the data code is not correctly displayed.
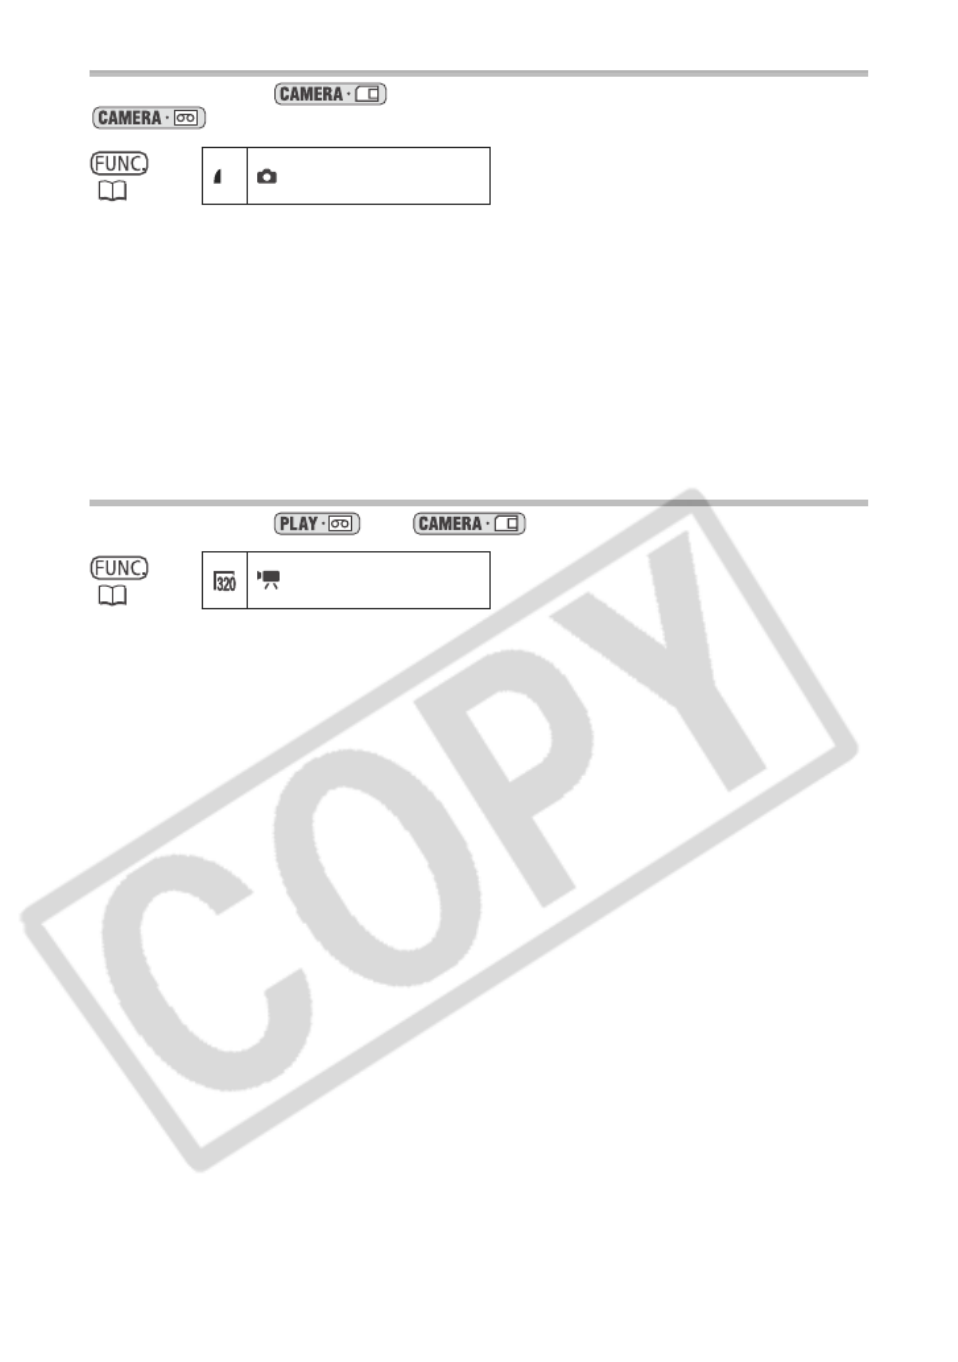
80
Selecting the Still Image Size and Quality
Available only in the mode (the image quality only can also be set in the
mode).
1. Press the FUNC. button.
2. Select the still image size/quality symbol.
The symbol of the current setting is displayed.
3. Select the still image size.
The number at the lower right corner indicates the number of still images available on
the memory card (the same as the number displayed at the upper right corner).
4. Select the still image quality.
5. Press the FUNC. button.
Selecting the Movie Size
Available only in the and modes.
1. Press the FUNC. button.
2. Select the movie size symbol followed by the setting option.
• The symbol of the current setting is displayed.
• The number at the lower right corner indicates the remaining recording time on card
(the same as the number displayed at the upper right corner).
3. Press the FUNC. button.
( 51)
L
L
L
LL 1632
1632
1632
1632 1632x1224/
x1224/
x1224/
x1224/x1224/FINE
FINE
FINE
FINEFINE
( 51)
320x
320x
320x
320x 320x240
240
240
240240

81
Advanced Functions
Digital Camera Functions
E
Simultaneous Recording on the Tape
and Memory Card
When you are recording a movie on a tape, you can record the same picture as a still
image on the memory card. The size of the still image will be 640 x 480. The image
quality can be selected.
Available only in the mode.
1. Press the FUNC. button.
2. Select the still image recording symbol followed by a setting option.
The symbol of the current setting is displayed.
3. Press the FUNC. button.
4. While you are recording a movie, press the PHOTO button.
The still image is recorded on the memory card while the screen continues to show
the video recording.
The quality of the still image is slightly lower than a still image of the same size
recorded in the mode.
The still image cannot be recorded on a memory card when the digital effect is
activated.
The still image cannot be recorded on a memory card when the widescreen
mode is selected.
( 51)
STIL
STIL
STIL
STIL STILL I.
L I.
L I.
L I. L I. REC OF
REC OF
REC OF
REC OFREC OFF
F
F
FF

85
Advanced Functions
Digital Camera Functions
E
Changing the Focusing Method
You can change the AF (autofocus) frame selection method.
Available only in the mode.
1. Set the mode dial to a mode other than .
Focusing method cannot be changed in the Fireworks mode (SCN).
2. Turn the SET dial to select the focusing method.
• Auto selection: a large frame will display on the screen.
• Center point: a frame displays in the center of the screen.
Auto selection
(9-point AiAF)
Depending on the shooting conditions, an AF frame is
automatically selected from the 9 frames and focused.
Center point Of 9 AF frames, the center one is selected to focus. This is
convenient for making sure the focus is exactly where you
want it.

86
Selecting the Drive Mode
Changing the Drive Mode
Available only in the mode.
1. Set the mode dial to a mode other than .
2. Press the DRIVE MODE button to switch between the drive modes.
The setting changes with each press of the button.
The drive mode can also be selected from the FUNC. menu ( 51).
When the FUNC. menu is being displayed, the DRIVE MODE button cannot be
used.
Single Records a single still image when you press the PHOTO
button.
Continuous Shooting Captures a quick series of still images while you press the
PHOTO button. For the number of frames per second,
refer to the table on the next page.
High-Speed Continuous
Shooting
AEB
(Auto Exposure Bracketing)
The camcorder records a still image in three different
exposures (dark, normal, light in 1/2 EV steps), allowing
you to choose the perfect exposed shot.
PHOTO button
DRIVE MODE button
Mode dial
87
Advanced Functions
Digital Camera Functions
E
Continuous Shooting/High-Speed Continuous Shooting
1. Press the PHOTO button halfway.
2. Press and hold the PHOTO button fully.
A series of still images will be recorded as long as you hold the PHOTO button.
Maximum number of continuous shots at one time:
These figures are approximate and vary with the recording conditions and subjects.
Sufficient space on the memory card is required. Continuous shooting stops when
card is full.
The number of frames per second will be lower when “ ” (camcorder shake
warning) is displayed on the screen.
Auto Exposure Bracketing
1. Press the PHOTO button halfway.
2. Press the PHOTO button fully.
Three still images in different exposures are recorded to the memory card.
Make sure that there is sufficient space on the memory card.
Still Image Size Frames per Second Maximum Number
of Continuous Shots
Normal speed High speed
Using the Flash
L 1632 x 1224 2.5 frames 3.0 frames 2.1 frames 10 images
M 1280 x 960 3.0 frames 5.0 frames 2.5 frames 10 images
S 640 x 480 3.0 frames 5.0 frames 2.5 frames 60 images
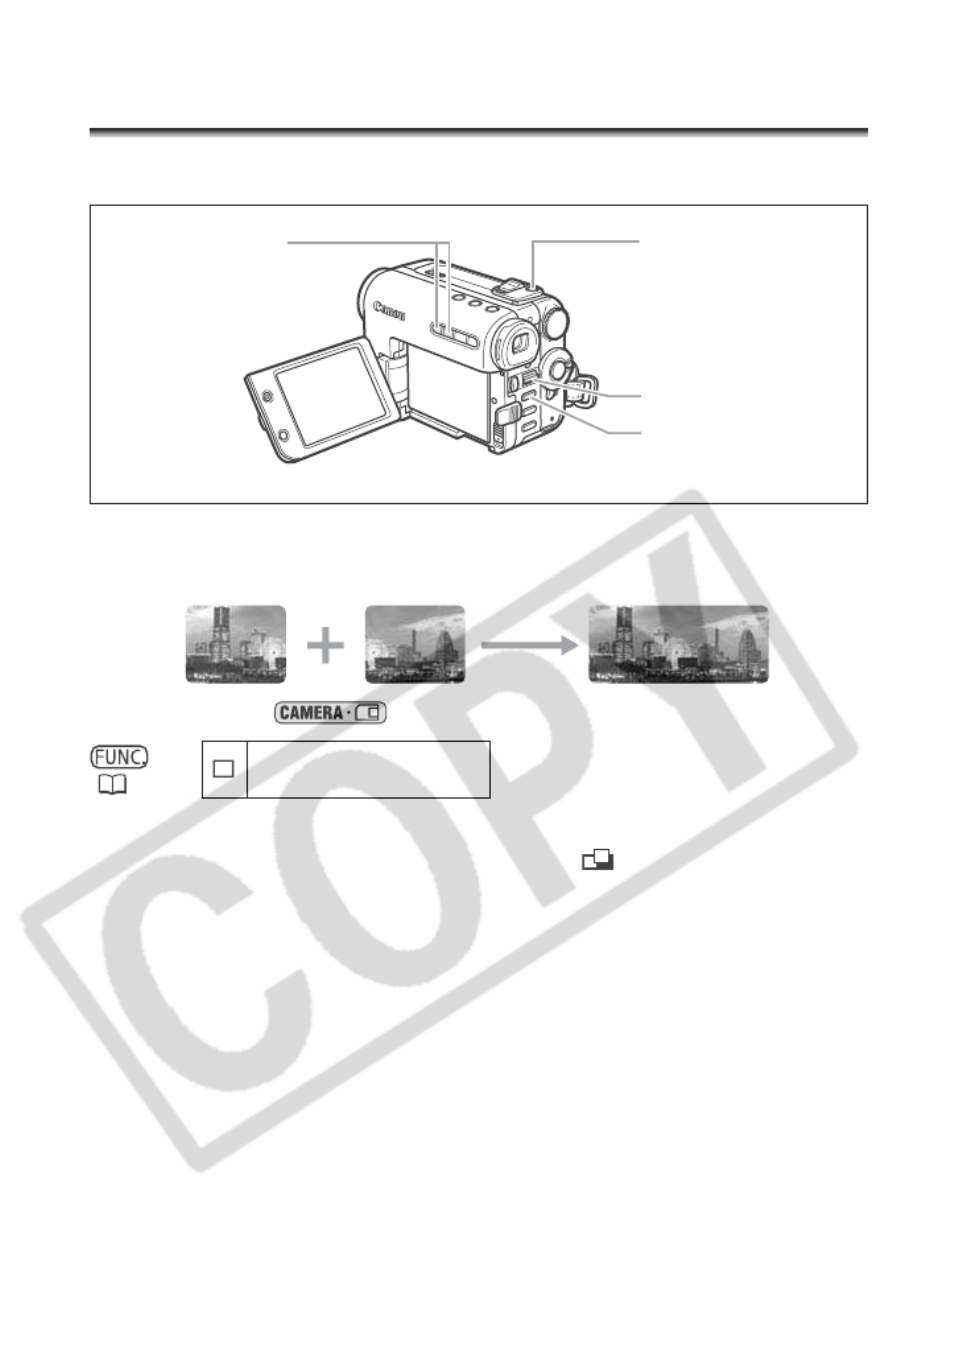
88
Recording Panoramic Images (Stitch
Assist Mode)
You can shoot a series of overlapping images and merge them into one large panoramic
scene using the supplied software (PhotoStitch) on a computer.
When Recording in Stitch Assist Mode:
PhotoStitch detects the overlapping portion of adjoining images and merges them. Try to
include a distinctive item (landmark, etc.) in the overlapping portion.
Available only in the mode.
1. Press the FUNC. button.
2. Select the drive mode symbol followed by [ STITCH AST].
The symbol of the current setting is displayed.
3. Press the SET dial.
The Stitch Assist screen appears.
4. Select the direction with the +/– button.
+ button: clockwise. – button: counterclockwise.
5. Select the recording program and zoom on the subject.
Adjust focus and exposure manually as necessary. Once the sequence has started,
you cannot change the recording program, exposure, zoom or focus.
6. Press the PHOTO button to record the first image.
Direction and number of recorded images appear.
7. Record the second image so that it overlaps a portion of the first
image.
• Minor discrepancies in the overlapped area can be corrected with the software.
• You can retake an image by pressing the +/– button to return to the previous image.
• A maximum of 26 images can be recorded.
( 51)
SINGL
SINGL
SINGL
SINGLSINGLE
E
E
EE
+/– button PHOTO button
FUNC. button
SET dial

89
Advanced Functions
Digital Camera Functions
E
8. Press the FUNC. button after the last image.
• The Stitch Assist screen will disappear. The DRIVE MODE button can also be used
to close the Stitch Assist screen.
• For details on how to merge these images, refer to the Digital Video Software
Instruction Manual.
Compose each image so that it overlaps 30 to 50% of the adjoining image. Try
to keep the vertical misalignment within 10%.
Do not include a moving subject in the overlapping portion.
Do not try to stitch images that include both distant and close subjects. They
may appear warped or doubled up.

91
Advanced Functions
Digital Camera Functions
E
Protecting Images
You can protect important images from accidental erasure when displaying a single image
or index screen.
If a memory card is formatted, all still images and movies, even protected ones,
will be erased permanently.
Movies can only be protected when the first scene is displayed as a still image.
Protecting during Single Image Playback
Available only in the and modes.
1. Press the FUNC. button.
In the mode, press the FUNC. button while reviewing an image or right
after recording.
2. Select [ PROTECT] followed by [ON] and press the SET dial.
3. Press the FUNC. button.
• “ ” appears, and now the image cannot be erased.
• To cancel the protection, select [OFF] in step 2.
Protecting during Index Screen Display
Available only in the mode.
1. Move the zoom lever toward W
W
W
WW.
• Up to 6 images appear.
• Select the image you wish to protect.
2. Press the MENU button and select [CARD OPERATIONS]. Select [
PROTECT] and press the SET dial.
• “ ” appears on the image.
• To cancel the protection, press the SET dial.
3. Press the MENU button.
( 51)
PROTE
PROTE
PROTE
PROTEPROTECT
CT
CT
CTCT
MENU
( 63)
CARD
CARD
CARD
CARD CARD OPERA
OPERA
OPERA
OPERAOPERATIONS
TIONS
TIONS
TIONSTIONS PROTE
PROTE
PROTE
PROTEPROTECT
CT
CT
CTCT

92
Erasing Images
You can erase images one at a time or all at once.
Be careful when erasing images. Erased images cannot be recovered.
Protected images cannot be erased.
Movies can only be erased when the first scene is displayed as a still image.
Erasing a Single Image
Available only in the and modes.
1. Press the FUNC. button.
In the mode, press the FUNC. button while reviewing an image or right
after recording.
2. Select [ IMAGE ERASE] followed by [ERASE] and press the SET
dial.
3. Press the FUNC. button.
Erasing All Images
Available only in the mode.
1. Press the MENU button and select [CARD OPERATIONS].
2. Select [ERASE ALL IMAGES].
3. Select [YES] and press the MENU button.
All still images or movies with exception of the protected ones are erased.
( 51)
IMAGE
IMAGE
IMAGE
IMAGEIMAGE ERAS
ERAS
ERAS
ERAS ERASE
E
E
EE
MENU
( 63)
CARD
CARD
CARD
CARD CARD OPERA
OPERA
OPERA
OPERAOPERATIONS
TIONS
TIONS
TIONSTIONS ERASE
ERASE
ERASE
ERASEERASE ALL
ALL
ALL
ALL ALL IMAGE
IMAGE
IMAGE
IMAGEIMAGES
S
S
SS
93
Advanced Functions
Digital Camera Functions
E
Formatting a Memory Card
Format new memory cards, or when you get the message “CARD ERROR”. You can also
format a memory card to erase all data recorded on it.
Formatting a memory card erases all data, including protected images.
Images erased by formatting cannot be recovered.
If you use a memory card other than the supplied one, format it with the
camcorder.
Available only in the mode.
1. Press the MENU button and select [CARD OPERATIONS].
2. Select [FORMAT].
[FORMAT THIS CARD?], [NO] and [YES] appears.
3. Select [YES].
[ALL DATA WILL BE ERASED. FORMAT THIS CARD?], [NO] and [YES] appears.
4. Select [YES] and press the MENU button.
Formatting starts. When the formatting is completed the camcorder will return to the
[CARD OPERATIONS] menu. Press the MENU button to close the menu.
MENU
( 63)
CARD
CARD
CARD
CARD CARD OPERA
OPERA
OPERA
OPERAOPERATIONS
TIONS
TIONS
TIONSTIONS FORMA
FORMA
FORMA
FORMAFORMAT
T
T
TT

94
Editing
Recording to a VCR or Digital Video
Device
You can copy your recordings by connecting the camcorder to a VCR or a digital video
device (DVD recorder, another digital camcorder, etc.). If you connect a digital video
device, you can copy recordings with virtually no generation loss in image and sound
quality.
Connecting the Devices
Connecting a VCR
See Playing Back on a TV Screen ( 40).
Connecting a DVD Recorder or other Digital Video Device with a DV
Terminal
Refer also to the instruction manual of the digital video device.
Recording
Available only in the mode.
1. Load a recorded cassette.
If you are connecting through the AV terminal, check the setting ( 40).
2. Connected device: Load a blank cassette or disc and set the device to
record pause mode.
3. Locate the scene you wish to copy and pause playback shortly before
the scene.
4. Play back the tape.
5. Connected device: Begin recording when the scene you wish to copy
appears. Stop recording when copying is complete.
6. Stop playback.
Signal flow
Digital video device
(e.g. camcorder)
Commercially available DV cable
INPUT
DV (IEEE1394) terminal

95
Editing
E
We recommend powering the camcorder from a household power source.
When connecting a VCR, the quality of the edited tape will be slightly lower than
that of the original.
When connecting a DVD Recorder or other Digital Video Device with a DV
Terminal:
- If the picture does not appear, reconnect the DV cable or turn the camcorder
off and back on again.
- Proper operation cannot be guaranteed for all digital video devices equipped
with a DV terminal. If operation does not work, use the S-video or AV terminal.

96
Analog Line-in Recording
You can input video from other analog devices (VCR, TV or camcorder) via the S-video
terminal or AV terminal, and record the input video on the tape in the camcorder. You can
also record the input video as a movie or still image on a memory card.
Connecting
Refer also to the instruction manual of the connected device.
You can also connect through the S-video terminal on the external analog device ( 40).
Recording
Available only in the mode.
1. Load a blank cassette in this camcorder.
2. Press the MENU button and select [VCR SETUP]. Select [VIDEO
INPUT] followed by a setting option and press the MENU button.
3. Connected device: Load the recorded cassette.
4. Press the REC PAUSE button.
In record pause mode and during recording, you can check the picture on the screen.
5. Connected device: Play back the tape.
6. Press the / button when the scene you wish to record appears.
Recording starts.
7. Press the button to stop recording.
• Press the / button to pause recording.
• Press the / button again to restart recording.
8. Connected device: Stop playback.
Recording the Input Video on a Memory Card
The size of the still image recorded on the memory card will be 640 x 480. The still image
quality and the movie size can be selected.
Available only in the mode.
1. Check that a memory card is inserted.
If a cassette is loaded, make sure that the tape is stopped.
VIDEO
AUDIO
R
R
R
R
R
L
L
L
LL
Signal flow
MTC-100 Multi Cable
(supplied)

97
Editing
E
2. Press the MENU button and select [VCR SETUP]. Select [AV DV], set
it to [ON] and press the MENU button.
3. Selecting the still image quality:
Press the FUNC. button. Select the still image quality symbol followed
by a setting option and press the FUNC. button.
Selecting the movie size:
Press the FUNC. button. Select the movie size symbol followed by a
setting option and press the FUNC. menu.
4. Connected device: Load a recorded cassette and play back the tape.
When recording a still image:
5. Press the PHOTO button halfway when the scene you wish to record
appears.
• The still image, remaining image capacity and other information appear.
• When you press the PHOTO button on the wireless controller, recording starts
immediately.
6. Press the PHOTO button fully.
When recording a movie:
5. Press the start/stop button when the scene you wish to record
appears.
Pressing the start/stop button again stops recording.
Depending on the analog signal sent from the connected device the input image
may be distorted or not be displayed at all (e.g. signals that include copyright
protective signals or anomalous signals such as ghost signals).
We recommend powering the camcorder from a household power source.
An image recorded from an image in widescreen mode will be vertically
compressed.
The data code of the image will reflect the date and time it has been recorded
on the memory card.

99
Editing
E
2. Selecting the still image quality:
Press the FUNC. button. Select the still image quality symbol followed
by a setting option and press the FUNC. button.
Selecting the movie size:
Press the FUNC. button. Select the movie size symbol followed by a
setting option and press the FUNC. menu.
3. Connected device: Load a recorded cassette and play back the tape.
When recording a still image:
4. Press the PHOTO button halfway when the scene you wish to record
appears.
• The still image, remaining image capacity and other information appear.
• When you press the PHOTO button on the wireless controller, recording starts
immediately.
5. Press the PHOTO button fully.
When recording a movie:
4. Press the start/stop button when the scene you wish to record
appears.
Pressing the start/stop button again stops recording.
Blank sections may be recorded as anomalous picture.
If the picture does not appear, reconnect the DV cable or turn the camcorder off
and back on again.
Do not connect any devices to the camcorder’s USB terminal.
You can only record signals from devices with the logo recording in SD
system in SP or LP format. (Note that signals from identically shaped DV
(IEEE1394) terminals may be in a different format ( 127).)
We recommend powering the camcorder from a household power source.
An image recorded from an image in widescreen mode will be vertically
compressed.
The data code of the image will reflect the date and time it has been recorded
on the memory card.
Copyright Signal
Certain software tapes are copyright protected. If you attempt to play back such tape,
“COPYRIGHT PROTECTED PLAYBACK IS RESTRICTED” appears and you will not be
able to view the contents of the tape. If you attempt to record from such tape via the DV
terminal, “COPYRIGHT PROTECTED DUBBING RESTRICTED” appears and you will
not be able to record the contents of the tape.

100
Converting Analog Signals into Digital
Signals (Analog-Digital Converter)
By connecting the camcorder to a VCR or 8mm video camcorder, you can convert analog
video/audio signals to digital signals and output the digital signals via the DV terminal.
The DV terminal serves as output terminal only.
Connecting the Devices
Turn off all devices before starting the connections. Unload the tape from the camcorder.
Check the type and orientation of the DV terminal and make sure you connect the DV
cable properly. Refer also to the instruction manual of the connected device.
You can also connect a VCR with S (S1)-VIDEO terminal ( 40).
VIDEO
AUDIO
R
R
R
R
R
L
L
L
LL
Signal flow
Commercially available DV cable
Signal flow
MTC-100 Multi
Cable (supplied)
Digital video device
Open the terminal cover
INPUT

101
Editing
E
Turning On the Analog-Digital Converter
Available only in the mode.
1. Press the MENU button and select [VCR SETUP].
2. Select [VIDEO INPUT] and choose a setting appropriate to the type of
connection to the analog device. Press the SET button to return to the
[VCR SETUP] sub-menu.
3. Select [AV DV] and set it to [ON].
4. Press the MENU button.
Depending on the signal sent from the connected device, the conversion from
analog to digital signals might not work properly (e.g., signals that include
copyright protective signals or anomalous signals such as ghost signals).
For normal use, set [AV DV] to [OFF]. If it is set to [ON], digital signals cannot
be input via the camcorder’s DV terminal.
We recommend powering the camcorder from a household power source.
Connecting the camcorder to the computer you can also use the analog-digital
conversion to transfer analog recordings to your computer as digital signals.
Analog-digital conversion can be performed also when connecting the
camcorder to the computer using the USB cable.
The required equipment and operation is the same as when Transferring Video
Recordings to a Computer ( 118), except for step 3: In this case set the
[AV DV] to [ON]. Check the setting before connecting the camcorder to the
computer.
The analog-digital conversion may not operate properly depending on the
software and the specifications and settings of your computer.
MENU
( 63)
VCR S
VCR S
VCR S
VCR SVCR SETUP
ETUP
ETUP
ETUPETUP AV
AV
AV
AVAV DV OFF
DV OFF
DV OFF
DV OFFDV OFF
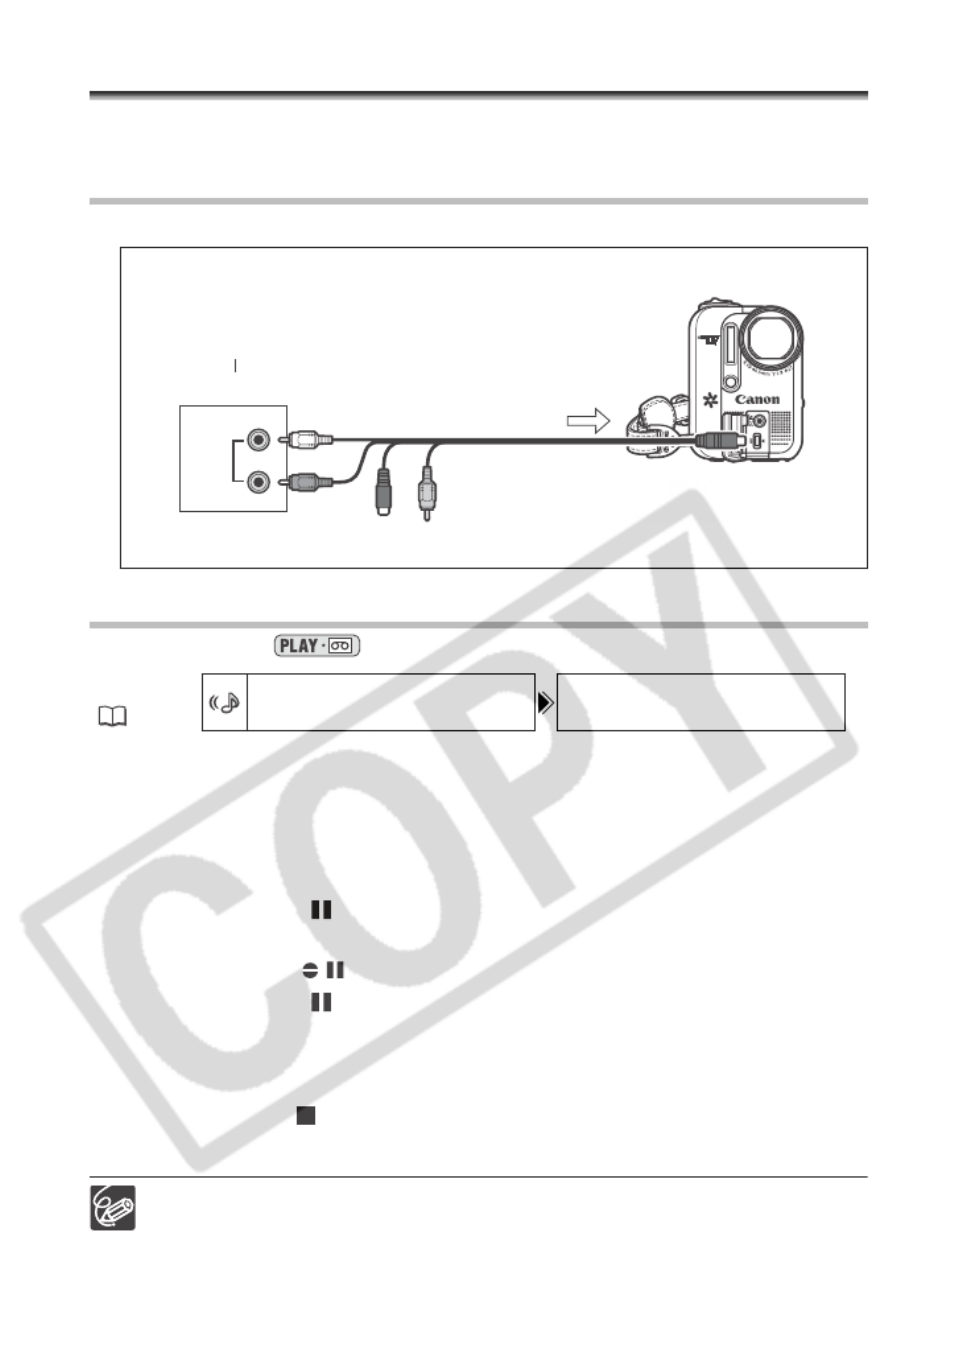
102
Audio Dubbing
You can add sound from audio devices (AUDIO IN) or with the microphone.
This function is operated with the wireless controller.
Connecting an Audio Device
Refer also to the instruction manual of the connected device.
Dubbing
Available only in the mode.
1. Load a recorded cassette.
Use a tape recorded in SP, 12-bit mode with this camcorder.
2. Press the MENU button and select [AUDIO SETUP]. Select [AUDIO
DUB.], set it to [AUDIO IN] or [MIC. IN] and press the MENU button.
3. Locate the scene you wish to start audio dubbing.
4. Press the PAUSE button on the wireless controller.
5. Press the AUDIO DUB. button on the wireless controller.
“AUDIO DUB.” and “ ” appear.
6. Press the PAUSE button on the wireless controller to begin
dubbing.
• Audio device: Begin playback.
• Microphone: Speak into the microphone.
7. Press the STOP button on the wireless controller to stop dubbing.
Audio device: Stop playback.
Audio dubbing will stop if the tape has a blank section or a section recorded in
LP mode or 16-bit mode.
You cannot use the DV terminal for audio dubbing.
If you add sound to a tape not recorded with this camcorder, sound quality may
decrease.
MENU
( 63)
AUDIO
AUDIO
AUDIO
AUDIOAUDIO SETUP
SETUP
SETUP
SETUP SETUP AUDIO
AUDIO
AUDIO
AUDIOAUDIO DUB.
DUB.
DUB.
DUB. DUB. AUDIO
AUDIO
AUDIO
AUDIOAUDIO IN
IN
IN
IN IN
AUDIO
R
R
R
R
R
L
L
L
LL Signal flow
MTC-100 Multi Cable (supplied)
Audio device (e.g.
CD player)
OUTPUT

103
Editing
E
Sound quality may decrease when you add sound to the same scene for more
than 3 times.
You can check the picture on the LCD screen.
If you use [AUDIO IN] for the dubbing, you can check the audio on the
camcorder’s speakers.
Set the zero set memory at the end of the scene you wish to dub audio. The
camcorder will automatically stop audio dubbing at that point.

104
Playing Back the Added Sound
You can select to play back Stereo 1 (original sound), Stereo 2 (added sound), or adjust
the balance of both sounds.
Available only in the mode.
1. Press the MENU button and select [AUDIO SETUP]. Select [12bit
AUDIO], select a setting and press the MENU button.
• STEREO1: Plays back the original sound.
• STEREO2: Plays back the added sound.
• MIX/FIXED: Plays back Stereo 1 and Stereo 2 at the same level.
• MIX/VARI.: Plays back Stereo 1 and Stereo 2. The mix balance can be adjusted.
2. If you have selected [MIX/VARI.], adjust the mix level: Press the MENU
button and select [AUDIO SETUP]. Select [MIX BALANCE], adjust the
balance with the SET dial and press the MENU button.
Turn the SET dial down to increase the volume of Stereo 1 and up to increase the
volume of Stereo 2.
The camcorder resets to [STEREO1] when you turn the camcorder off. However,
the mix balance is memorized by the camcorder.
MENU
( 63)
AUDIO
AUDIO
AUDIO
AUDIOAUDIO SETU
SETU
SETU
SETU SETUP
P
P
PP 12bit
12bit
12bit
12bit12bit AUDI
AUDI
AUDI
AUDI AUDIO STER
O STER
O STER
O STERO STEREO1
EO1
EO1
EO1EO1
Produktspezifikationen
| Marke: | Canon |
| Kategorie: | Camcorder |
| Modell: | Optura S1 |
Brauchst du Hilfe?
Wenn Sie Hilfe mit Canon Optura S1 benötigen, stellen Sie unten eine Frage und andere Benutzer werden Ihnen antworten
Bedienungsanleitung Camcorder Canon

22 September 2024
13 September 2024
28 August 2024
27 August 2024
27 August 2024
20 August 2024
19 August 2024
15 August 2024
14 August 2024
13 August 2024
Bedienungsanleitung Camcorder
- Camcorder Samsung
- Camcorder 3M
- Camcorder Sanyo
- Camcorder BenQ
- Camcorder Gembird
- Camcorder Genius
- Camcorder Hama
- Camcorder HP
- Camcorder Lexibook
- Camcorder Macally
- Camcorder Medion
- Camcorder Nedis
- Camcorder Philips
- Camcorder SilverCrest
- Camcorder Sony
- Camcorder T'nB
- Camcorder Trust
- Camcorder Panasonic
- Camcorder OK
- Camcorder Linksys
- Camcorder Maginon
- Camcorder Bresser
- Camcorder Denver
- Camcorder Intenso
- Camcorder König
- Camcorder National Geographic
- Camcorder Renkforce
- Camcorder Trevi
- Camcorder Braun
- Camcorder Kenwood
- Camcorder Sharp
- Camcorder Pyle
- Camcorder Salora
- Camcorder Aiptek
- Camcorder Coby
- Camcorder Lenco
- Camcorder Mpman
- Camcorder Nilox
- Camcorder Polaroid
- Camcorder Jay-Tech
- Camcorder JVC
- Camcorder Xiaomi
- Camcorder Hitachi
- Camcorder Hyundai
- Camcorder Toshiba
- Camcorder Olympus
- Camcorder Zoom
- Camcorder Garmin
- Camcorder GOCLEVER
- Camcorder Lamax
- Camcorder Prixton
- Camcorder Mio
- Camcorder Sencor
- Camcorder ViewSonic
- Camcorder Marshall
- Camcorder Nikkei
- Camcorder Samson
- Camcorder SBS
- Camcorder Fujifilm
- Camcorder MINOX
- Camcorder Nikon
- Camcorder Ricoh
- Camcorder DJI
- Camcorder Dragon Touch
- Camcorder EnVivo
- Camcorder Midland
- Camcorder Vtech
- Camcorder Kodak
- Camcorder Agfa
- Camcorder Easypix
- Camcorder Konica-Minolta
- Camcorder Leica
- Camcorder Minolta
- Camcorder Praktica
- Camcorder Rollei
- Camcorder SeaLife
- Camcorder Traveler
- Camcorder IGet
- Camcorder Contax
- Camcorder Mamiya
- Camcorder Voigtländer
- Camcorder Yashica
- Camcorder Bauer
- Camcorder Overmax
- Camcorder Airis
- Camcorder Akaso
- Camcorder Uniden
- Camcorder Kitvision
- Camcorder Kogan
- Camcorder Elmo
- Camcorder Energy Sistem
- Camcorder Jobo
- Camcorder Soundmaster
- Camcorder Bolex
- Camcorder Magellan
- Camcorder TomTom
- Camcorder Kyocera
- Camcorder Cobra
- Camcorder AEE
- Camcorder CamOne
- Camcorder Contour
- Camcorder EVOLVEO
- Camcorder GoPro
- Camcorder Quintezz
- Camcorder ION
- Camcorder DNT
- Camcorder Insignia
- Camcorder Swann
- Camcorder DataVideo
- Camcorder Aida
- Camcorder Prestigio
- Camcorder Mediacom
- Camcorder Tracer
- Camcorder Cisco
- Camcorder RCA
- Camcorder ARRI
- Camcorder Transcend
- Camcorder Oregon Scientific
- Camcorder Blackmagic Design
- Camcorder Insta360
- Camcorder Zorki
- Camcorder DOD
- Camcorder Drift
- Camcorder Ematic
- Camcorder FHD 1080P
- Camcorder Flip
- Camcorder ISAW
- Camcorder Leotec
- Camcorder MMTC
- Camcorder Mobius
- Camcorder Naxa
- Camcorder Replay
- Camcorder Sakar
- Camcorder SJCAM
- Camcorder Spypoint
- Camcorder Storex
- Camcorder TacTic
- Camcorder Veho
- Camcorder Vivitar
- Camcorder YI
- Camcorder Zagg
- Camcorder Best Buy
- Camcorder AgfaPhoto
- Camcorder Vupoint Solutions
- Camcorder Kaiser Baas
- Camcorder Microtek
- Camcorder Runcam
- Camcorder Activeon
- Camcorder BlackVue
- Camcorder Braun Phototechnik
- Camcorder Hamlet
- Camcorder RSC
- Camcorder Kobian
- Camcorder Hamilton Buhl
- Camcorder Contour Design
- Camcorder Curve
- Camcorder Beaulieu
- Camcorder Qoltec
- Camcorder Stealth Cam
- Camcorder DXG
- Camcorder GoXtreme
- Camcorder ATN
- Camcorder Whistler
- Camcorder Aqua-Vu
Neueste Bedienungsanleitung für -Kategorien-

25 November 2024
25 November 2024
24 November 2024
12 Oktober 2024

12 Oktober 2024

8 Oktober 2024

7 Oktober 2024
3 Oktober 2024
28 September 2024
24 September 2024