Barco Coronis Uniti MDMC-12133 Bedienungsanleitung
Lesen Sie kostenlos die 📖 deutsche Bedienungsanleitung für Barco Coronis Uniti MDMC-12133 (115 Seiten) in der Kategorie Monitor. Dieser Bedienungsanleitung war für 17 Personen hilfreich und wurde von 2 Benutzern mit durchschnittlich 4.5 Sternen bewertet
Seite 1/115

ENABLING BRIGHT OUTCOMES
MDMC-12133
User Guide
Coronis Uniti

Registered office: Barco NV
President Kennedypark 35, 8500 Kortrijk, Belgium
www.barco.com/en/support
www.barco.com
Barco NV
Beneluxpark 21, 8500 Kortrijk, Belgium
www.barco.com/en/support
www.barco.com

1 ................................................................................................................................................................................................................5Welcome!
1.1 About the product.................................................................................................................................................................................6
1.2 What's in the box..................................................................................................................................................................................6
2 ...............................................................................................................................................................7Parts, controls and connectors
2.1 Display front view.................................................................................................................................................................................8
2.2 Display rear view..................................................................................................................................................................................9
2.3 Accessories..........................................................................................................................................................................................10
3 .......................................................................................................................................................................................13Display installation
3.1 Removing the connector compartment cover...................................................................................................................14
3.2 Unlocking the tilt mechanism .....................................................................................................................................................14
3.3 Unlocking the height mechanism.............................................................................................................................................15
3.4 Adjusting the display position.....................................................................................................................................................16
3.5 Connecting the signal cables .....................................................................................................................................................17
3.6 Connecting the power cable.......................................................................................................................................................19
3.7 Mounting the film clip ......................................................................................................................................................................20
3.8 Mounting the MultiTouchPad......................................................................................................................................................20
3.9 Routing the cables & Reattach the connector compartment cover ......................................................................21
3.10 Fixation of the foot on the desk ................................................................................................................................................. 23
3.11 VESA-mount installation...............................................................................................................................................................23
3.12 First time starting up........................................................................................................................................................................26
4 .................................................................................................................................................................................................27Daily operation
4.1 Recommendations for daily operation ..................................................................................................................................28
4.2 Key indicator lights...........................................................................................................................................................................28
4.3 Standby switching.............................................................................................................................................................................29
4.4 Bringing up the OSD menus.......................................................................................................................................................29
4.5 Navigating through the OSD menus ......................................................................................................................................30
4.6 Overview of the functionality of the Left/Right keys.......................................................................................................30
4.7 I-Luminate.............................................................................................................................................................................................31
4.8 Extended display keypad functions ........................................................................................................................................31
4.8.1 I-luminate mode.............................................................................................................................................................. 31
4.8.2 Viewing mode ..................................................................................................................................................................32
5 .....................................................................................................................................................................................33Advanced operation
5.1 OSD menu language ......................................................................................................................................................................34
5.2 OSD menu automatic close function......................................................................................................................................34
5.3 Power LED............................................................................................................................................................................................ 34
5.4 Key indicator lights...........................................................................................................................................................................35
5.5 Power lock function..........................................................................................................................................................................35
K5902079 /09 Coronis Uniti 3
Table of contents

5K5902079 /09 Coronis Uniti
Welcome! 1

K5902079 /09 Coronis Uniti6
1.1 About the product
Overview
Thank you for choosing this Coronis Uniti!
Coronis Uniti is an ingenious PACS display system designed to enhance flexibility and productivity in
diagnostic imaging. Featuring the industry s first 33-inch color LCD that can be used as two seamless heads’
or one wide-screen display, Coronis Uniti offers you the freedom to organize your workspace just the way you
want it. It allows you to read radiology, mammography, and breast tomosynthesis images, side by side on a
single diagnostic screen. Coronis Uniti features Barco Optical Glass illuminated by DuraLight Brilliance to
provide an exceptional image over your entire field of view. Use the instructions in this guide to install your
Coronis Uniti display and discover the productive features and included accessories!
CAUTION: Read all the important safety information before installing and operating your Coronis
Uniti. Please refer to the dedicated chapter in this user guide.
1.2 What's in the box
Overview
Your Coronis Uniti comes with:
•this Coronis Uniti user guide
•Quick Installation Sheet
•a system CD
•two DisplayPort cables
•a USB cable
•a set of AC power cords
•an external power supply
•Film clip
•MultiTouchPad
If you ordered a Barco display controller, it's also in the box together with its accessories. A dedicated user
guide is available on the system CD.
Keep your original packaging. It is designed for this display and is the ideal protection during
transport and storage.
Welcome!

7K5902079 /09 Coronis Uniti
Parts, controls and
connectors
2

K5902079 /09 Coronis Uniti 11
Image 2-4: Film clip
MultiTouchPad
The MultiTouchPad enables and controls SpotView.
Image 2-5: MultiTouchPad
Parts, controls and connectors

K5902079 /09 Coronis Uniti12
Parts, controls and connectors

13
Prior to installing your Coronis Uniti and connecting all necessary cables, make sure to have a
suitable display controller physically installed in your computer. If you are using a Barco display
controller, please consult the user guide delivered with it to do this.
For a list of compatible display controllers, please refer to the latest version of the compatibility
matrix available on my.barco.com (MyBarco > My Support > Healthcare > Compatibility Matrices >
Barco Systems Compatibility Matrices).
K5902079 /09 Coronis Uniti
Display installation 3

K5902079 /09 Coronis Uniti14
3.1 Removing the connector compartment cover
The connector compartment cover should be removed to get access to the connectors.
To remove the connector compartment cover
1. Gently push the two lips on the top of the cover.
2. Pull the top of the cover slightly away from the display and lift the cover upwards.
3. Remove the cover.
3.2 Unlocking the tilt mechanism
In the factory, the tilt system in the display stand is locked with a red pin to prevent damage during
transportation. You ll have to remove this pin before adjusting your display position.’
Push the display against the buffer part to easily remove the pin.
To remove the pin:
1. Position the display with its rear side facing you.
2. Pull out the red pin in the display stand.
Display installation

K5902079 /09 Coronis Uniti 15
3. Keep the pin in case the display needs to be shipped later.
WARNING: Before transportation of the display, insert the pin in the lock mechanism so that the
grey color of the pin isn't visible anymore.
3.3 Unlocking the height mechanism
In the factory, the height-positioning system in the display stand is locked with a red pin to prevent
damage during transportation. You ll have to remove this pin before adjusting your display height’
position.
To remove the pin:
1. Position the display with its rear side facing you.
2. While holding the display panel pushed down, pull out the red pin in the display stand.
Display installation

K5902079 /09 Coronis Uniti16
3. Keep the pin in the dedicated hole in case the display needs to be shipped later.
To retain the pin for possible future transportation, insert the short, red end of the pin back into the
stand of your display.
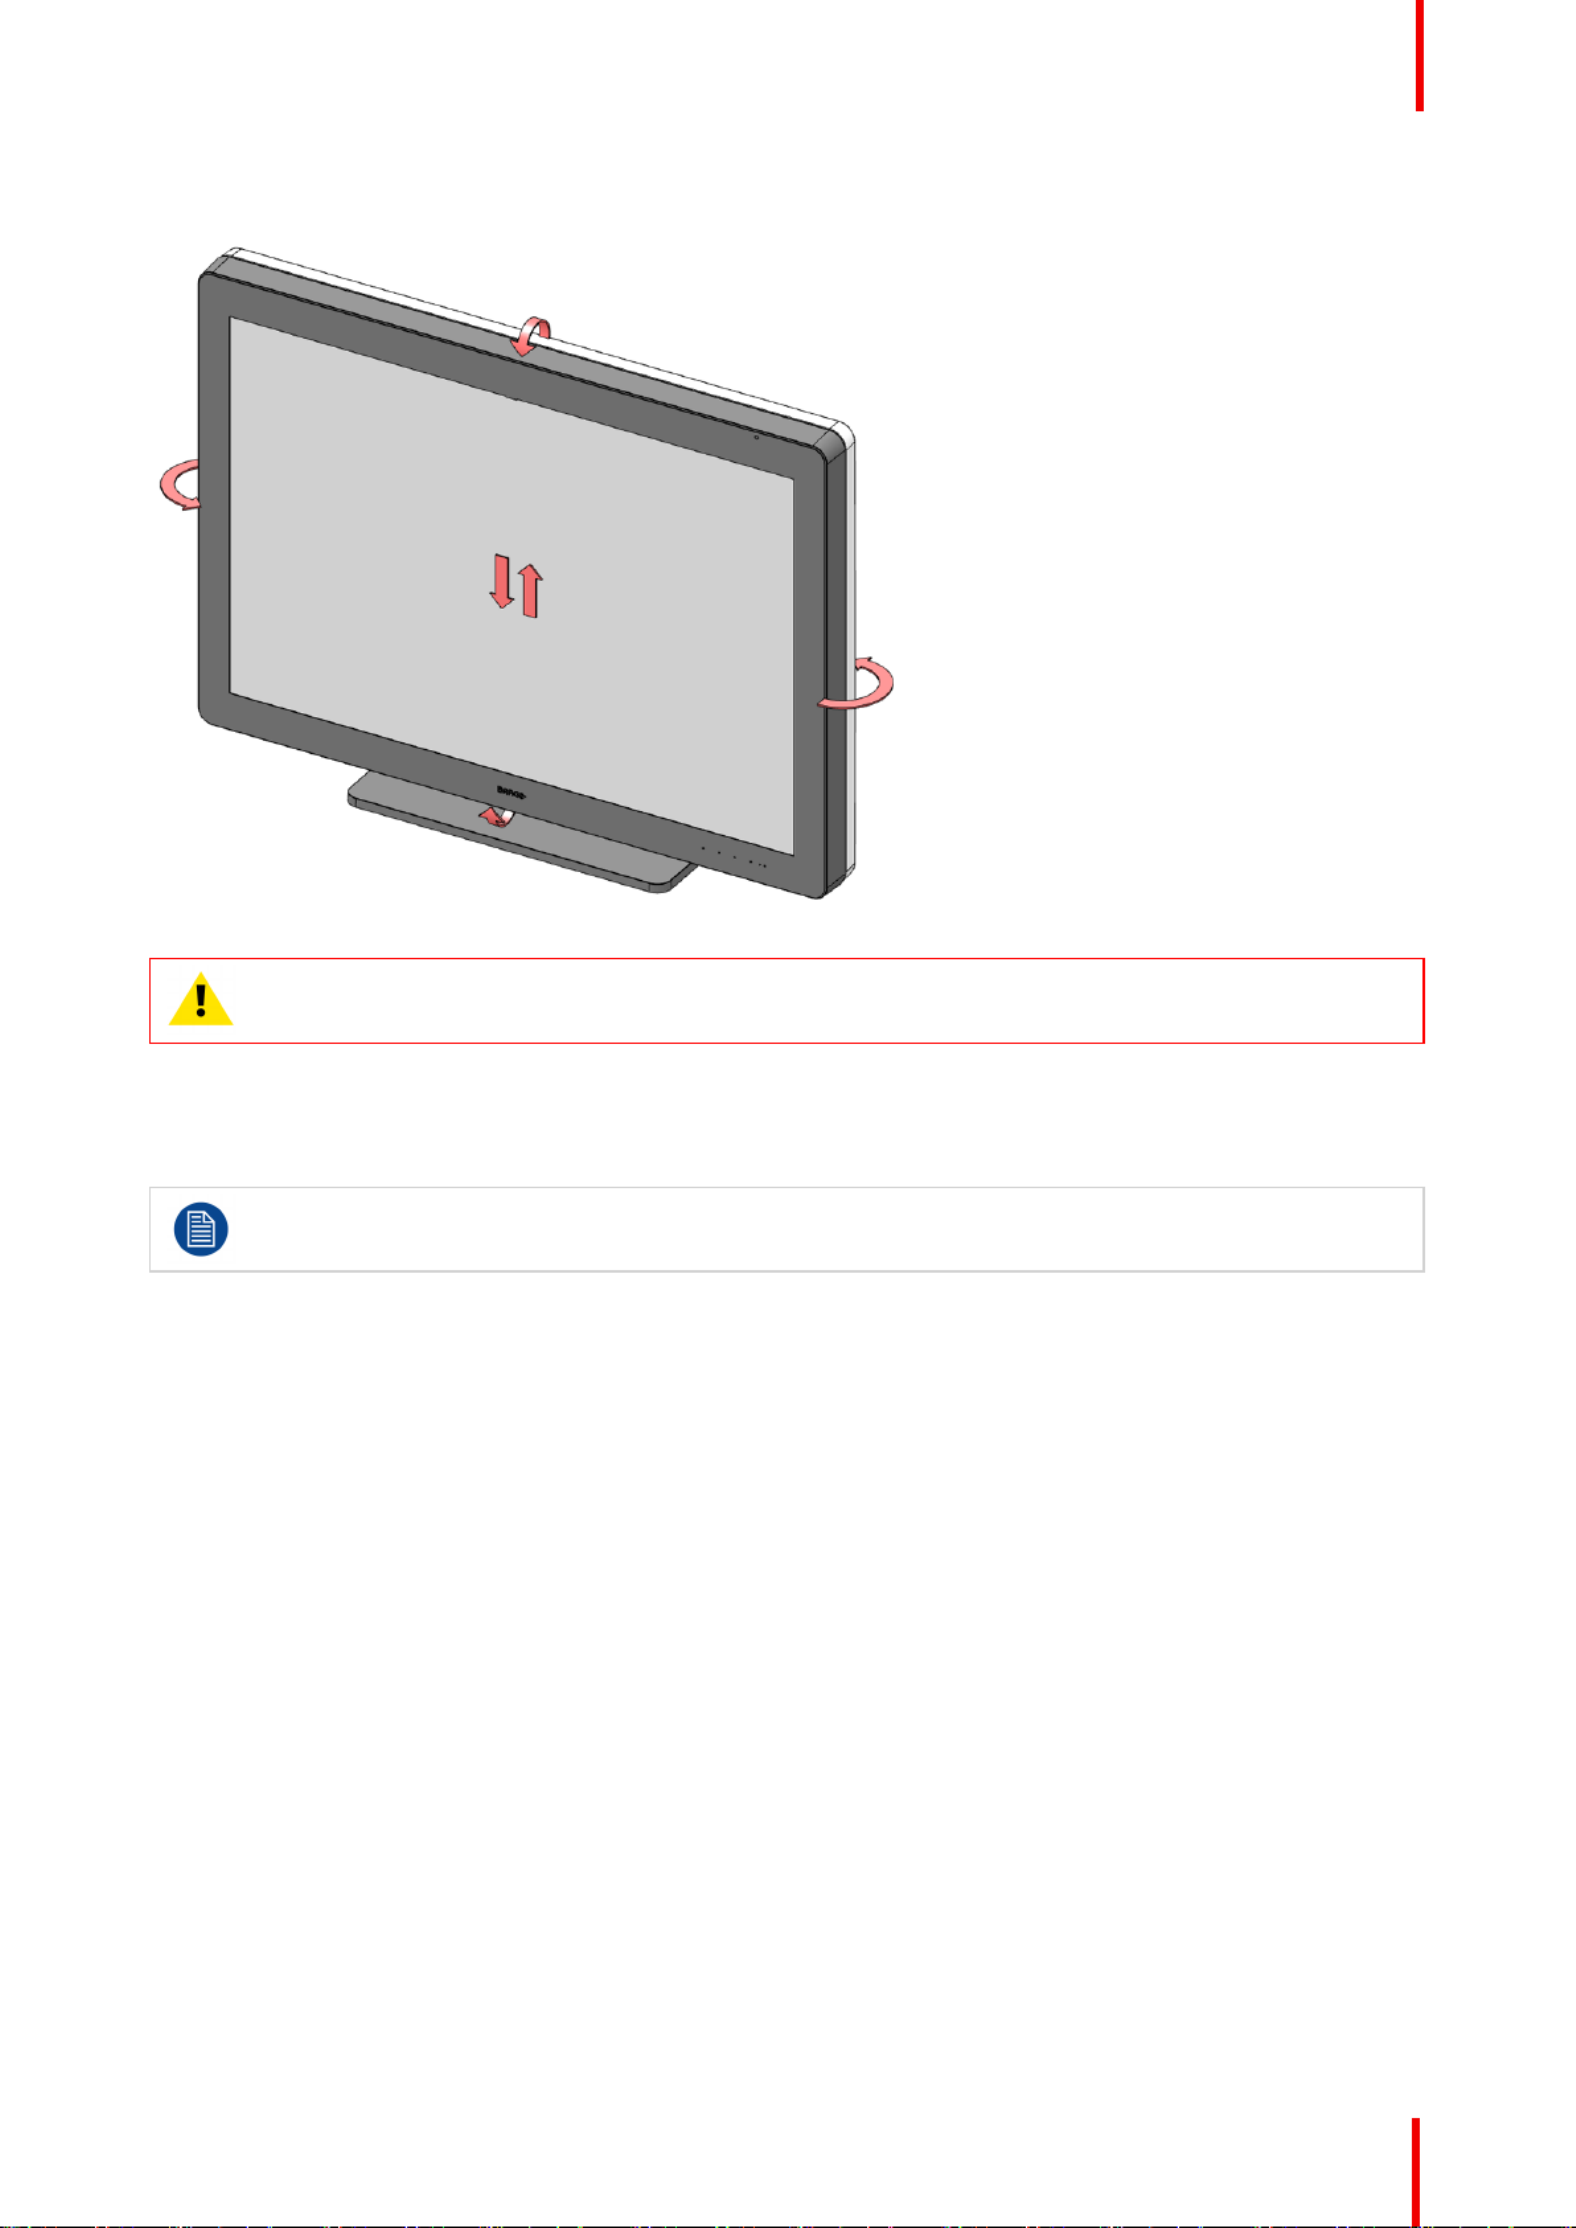
3.4 Adjusting the display position
In the factory, the height-positioning and the tilt system in the display stand are locked with red pins
to prevent damage during transportation. You ll have to remove both pins before adjusting your’
display position.
To adjust the display position
1. Remove the tilt lock pin, see Unlocking the tilt mechanism , page 14.“ ”
2. Remove the height lock pin in the display stand, see Unlocking the height mechanism , page 15.“ ”
3. Tilt, swivel, raise and lower the display as desired.
Display installation
K5902079 /09 Coronis Uniti 17
CAUTION: Do not try to pivot your display when attached to the stand. Trying to do so could cause
serious damage to your display and its stand.
3.5 Connecting the signal cables
To get access to the connectors, remove the connector compartment cover. See Removing the“
connector compartment cover , page 14.”
To connect the signal cables to the display:
1. Connect one head of the display controller to the DisplayPort connector with one of the supplied DisplayPort
cables.
Display installation

K5902079 /09 Coronis Uniti18
2. Connect another head of the display controller to the other DisplayPort connector with one of the supplied
DisplayPort cables.
3. Connect a PC USB downstream connector to the display s USB upstream connector by means of the supplied’
USB 2.0 cable.
Display installation

K5902079 /09 Coronis Uniti 19
Please connect all your displays to their workstation with a USB cable to ensure undisturbed
communication and to make optimal use of MediCal QAWeb and the Barco intuitive workflow tools.
3.6 Connecting the power cable
To connect the power cable to the display:
1. Connect the supplied external DC power supply to the +24 VDC power input of your Coronis Uniti display.
Display installation

K5902079 /09 Coronis Uniti 21
2. With the MultiTouchPad attached and the driver installed, simply press on the MultiTouchPad to move the
focus on the SpotView around the display(s). The SpotView vanishes when no finger is pressing on the
MultiTouchPad, unless the left side of the MultiTouchPad button is held down.
3.9 Routing the cables & Reattach the connector
compartment cover
To route the cables
1. Route all connected cables through the cable routing channel in the stand of your display.
Display installation

K5902079 /09 Coronis Uniti22
Tip: The cable straps at the inside of the connector compartment allow you to fix the cables for better
shielding of the cables.
To reattach the connector compartment cover
1. Reattach the connector compartment cover by sliding the cover's top. You'll hear a click sound of the cover's“ ”
clips when the connector compartment cover is in position.
Display installation

K5902079 /09 Coronis Uniti 23
3.10 Fixation of the foot on the desk
Overview
If you would like to attach the Coronis Uniti to a desk, the tilt & swivel foot has 4 screw holes (4x M4) to mount
the foot on a desk.
1. Drill four holes in the desk.
Fixation position: 4x M4
120
100
(143)
(100)
300
405
2. Fasten the foot on the desk with 4x M4 screws (length of the screws depending on the depth of the desk).
3.11 VESA-mount installation
CAUTION: Use suitable mounting apparatus to avoid risk of injury.
WARNING: Never move a display attached to an arm by pulling or pushing the display itself.
Instead, make sure that the arm is equipped with a VESA approved handle and use this to move the
display.
Please refer to the instruction manual of the arm for more information and instructions.
WARNING: Use an arm that is approved by VESA (according to the VESA 200 x 100 mm or VESA
100 x 100 mm standard).
Use an arm that can support the weight of the display. Refer to the technical specifications of this
display for the applicable weight.
CAUTION: You should mount the panel in landscape position. Portrait position is possible but not
supported.
Display installation

K5902079 /09 Coronis Uniti24
WARNING: To avoid muscle strain or back injury, use lifting aids and proper lifting techniques when
removing or replacing.
Overview
The panel, standard attached to the tilt & swivel foot, is compatible with the VESA 200 x 100 mm and VESA
100 x100 mm standard. So it can be used with an arm stand according to the VESA 200 x 100 mm or VESA
100 x 100 mm standard.
Therefore, the tilt & swivel foot must be removed from the panel.
1. Fasten the height mechanism of the foot by putting the red pin in the hole Unlocking the height“
mechanism , page 15.”
2. Put the display face down on a clean and soft surface. Be careful not to damage the panel screen.
3. Loosen the plastic covers with a cross head screwdriver.
4. Remove the two plastic covers.
Display installation

K5902079 /09 Coronis Uniti26
3.12 First time starting up
Overview
You are now ready to start up your Coronis Uniti for the first time.
1. Switch on your Coronis Uniti as described in Standby switching , page 29.“ ”
2. Turn on the computer connected to your display.
If you have properly installed your display and display controller, the Windows start-up messages will appear
once the boot procedure is finished.
Your Coronis Uniti display will be running in a basic video mode at a default refresh rate when first
time starting up. If you are using a Barco display controller, please consult the dedicated user guide
available on the system CD to install the drivers, software and documentation. When this is done,
your display will automatically detect the connected video input signal(s) and apply the correct video
mode and refresh rate.
Display installation

27K5902079 /09 Coronis Uniti
Daily operation 4

K5902079 /09 Coronis Uniti28
4.1 Recommendations for daily operation
Optimize the lifetime of your display
Enabling the Display Power Management System (DPMS) of your display will optimize its diagnostic lifetime
by automatically switching off the backlight when the display is not used for a specified period of time. By
default, DPMS is enabled on your display, but it also needs to be activated on your workstation. To do this, go
to Power Options Properties in the Control Panel .“ ” “ ”
Barco recommends to set DPMS activation 20 minutes after the display blanks.
Use a screen saver to avoid image retention
Prolonged operation of an LCD with the same content on the same screen area may result in a form of image
retention.
You can avoid or significantly reduce the occurrence of this phenomenon by using a screen saver. You can
activate a screen saver in the Display properties window of your workstation.“ ”
In case you are working with the same image or an application with static image elements (e. g. toolbars,
icons) during almost a full working day continuously (so that the screen saver is not activated), allow the
screen saver to activate afterwards and keep it running for 2 to 4 hours.
Barco recommends setting screen saver activation after 10 minutes of non-usage. A good screen
saver displays moving content.
Understand pixel technology
LCD displays use technology based on pixels. As a normal tolerance in the manufacturing of the LCD, a
limited number of these pixels may remain either dark or permanently lit, without affecting the diagnostic
performance of the product. To ensure optimal product quality, Barco applies strict selection criteria for its LCD
panels.
To learn more about LCD technology and missing pixels, consult the dedicated white papers
available at www.barco.com/healthcare.
Enhance user comfort
Every Barco multi-head display system is color matched with the highest specifications in the market.
Barco recommends keeping color-matched displays together. Furthermore, it is important to use all
displays of a multi-head configuration at the same rate to preserve color matching throughout the
economic lifetime of the system.
Maximize quality assurance
The 'MediCal QAWeb' system offers online service for high-grade Quality Assurance, providing maximum
diagnostic confidence and uptime.
Barco recommends to install MediCal QAWeb Agent and apply the default QAWeb policy at least.
This policy includes calibration on regular intervals. Connecting to MediCal QAWeb Server offers
even more possibilities.
Learn more and sign up for the free MediCal QAWeb Essential level at www.barco.com/QAWeb.
4.2 Key indicator lights
About the key indicator lights
By default, the indicator lights of the keys will be dimmed which makes the keys unavailable at that moment.
To make the keys illuminate and available for further actions touch one of the keys. As a result, all keys will be
Daily operation

K5902079 /09 Coronis Uniti 29
illuminated and are now available for further actions. However, if no further actions are taken within the
following 5 seconds, the keys will dim again.
The I-Luminate/Left key is always lit and available for activation of the I-Luminate feature. Please
refer to I-Luminate , page 31 for more information.“ ”
The key auto-dim function can be disabled in the OSD menus. Please refer to Key indicator lights ,“ ”
page 35 for detailed instructions on how to do this.
4.3 Standby switching
The connected power supply also provides a switch that can be used to turn the power completely
off. To use the display, please make sure to switch on this power supply. This can be done by
pushing the on/off switch on the power supply into the position.“│”
To switch your display on using the keys:
Switching on the display while it is in standby mode can be done by:
1. Push the standby key once.
As a result, the display will switch on and the light is .power status indicator white
During start-up phase, the orange indicator light and the white indicator light are lit, until the unit is
fully started.
To switch your display to Stand-by using the keys:
Switching off the display can be done by:
1. Push the standby key shortly for three times. After the second push, the OSD message Power off appears“ ”
on the display, this means the display will go in standby mode.
As a result, the display will switch to stand-by mode and the light is .power status indicator orange
In case of a power outage recovery, your display will always start-up in the power mode it was in
before the power interruption (i.e. stand-by or on). This protects your display against inadvertent
image retention problems.
4.4 Bringing up the OSD menus
How to bring up the OSD menus
The OSD menu allows you to configure different settings to make your Coronis Uniti fit your needs within your
working environment. Also, you can retrieve general information about your display and its current
configuration settings through the OSD menu.
Bringing up the OSD menus can be done by:
1. If not already done so, switch on the display as previously described.
2. Illuminate the keys as previously described.
3. While the keys are illuminated, touch the menu key.
As a result, the OSD main menu comes up. However, if no further actions are taken within the following 90
seconds, the OSD will disappear again.
Daily operation

K5902079 /09 Coronis Uniti30
The OSD menu auto-exit function can be disabled in the OSD menu. Please refer to OSD menu“
automatic close function , page 34 for detailed instructions on how to do this.”
4.5 Navigating through the OSD menus
How to navigate through the OSD menus
Navigating through the OSD menus can be done by:
•Use the left/right keys to move through the (sub)menus, change values or make selections.
•To go into a submenu or confirm adjustments and selections, use the menu key.
•Use the standby key to cancel adjustments or exit a (sub)menu.
•Exit all OSD menus at once by touching the standby key for approximately 2 seconds.
The key icons are displayed above the keys, adapted to the function that it is used for (menu
dependent).
I-Luminate is not available while the OSD menu is activated.
Overview key icons
Left, Right
Menu
Enter
Cancel
Standby (IEC 60417 5009)–
4.6 Overview of the functionality of the Left/Right
keys
Overview
Left key Right key Behavior
Push Push Cycle viewing mode between text, diagnostic
Push No Push Toggle on I-Luminate
Left key Right key Menu Behavior
Push No push No menu Toggle off I-
Luminate
Daily operation

K5902079 /09 Coronis Uniti 31
Left key Right key Behavior
No push Push No menu Cycle I-Luminate
modes between
text small film,
large film, no film
Push Push No menu Cycle viewing
mode between
text and
diagnostic, also
toggle off I-
Luminate
No push No push Menu Nothing
No Push Push Enable OSD
Left key Right key Menu Behavior
No push Push No menu Cycle SoftGlow
modes between
task light, wall
light, both, none.
Push No push No menu Nothing
Push Push No menu Cycle viewing
mode between
text and
diagnostic
No push No push Menu Enter the OSD
menu
4.7 I-Luminate
About I-Luminate
When the display is in power on mode and the OSD menu is not shown, I-Luminate can be activated by
touching the I-luminate/left key.
When touching the I-Luminate key, the display will enter the I-Luminate mode, for approximately 1 minute.
Touch the I-Luminate key again to immediately switch back to normal mode.
4.8 Extended display keypad functions
About extended display keypad functions
The concept of the extended display keypad functions is to present a selection of functions immediately
available to the user without the need to navigate through the OSD Menu.
The extended display keypad functions will only be available when no OSD menu is visible on the
screen.
4.8.1 I-luminate mode
To quickly change the I-luminate mode
1. While no OSD menu is on the screen, press the I-luminate/Left key to bring up the I-luminate quick selection
menu.
2. Toggle the available I-luminate modes (see I-Luminate default mode , page 37) by pressing the Right key.“ ”
Daily operation

33K5902079 /09 Coronis Uniti
Advanced operation 5

K5902079 /09 Coronis Uniti34
5.1 OSD menu language
About the OSD menu language
By default, the OSD menu comes up in English. However, there s a wide range of other languages available’
for the OSD menu of your Coronis Uniti.
To change the language of the OSD menu:
1. Bring up the OSD main menu.
2. Navigate to the menu.Configuration > User Interface > Menu
3. Enter the submenu.Language
4. Select one of the available languages and confirm.
5.2 OSD menu automatic close function
About the OSD menu automatic close function
By default, the OSD menu will disappear automatically after approximately 90 seconds of inactivity. However,
this function can be disabled so that the OSD menu remains on the screen until manually closed.
To enable/disable the OSD menu automatic close function:
1. Bring up the OSD main menu.
2. Navigate to the menu.Configuration > User Interface > Menu
3. Enter the submenu.Automatic Close
4. Select as desired and confirm.Enabled/Disabled
5.3 Power LED
About the power LED
To prevent distractions, the power LED is dimmed by default when the display is switched on and used in
normal operation. This behavior can be changed so that the power LED will light up during normal operation.
Below is an overview of the different power LED states, in ascending order of power consumption:
Display status Power LED behavior
Off1Dimmed
Hibernate2/ Soft off3Steady amber
Suspend mode4Slow blinking amber
Standby mode4Fast blinking amber
Normal operation Dimmed (power LED disabled in OSD, default setting)
Steady white (power LED enabled in OSD)
To enable/disable the power LED:
1. Bring up the OSD main menu.
2. Navigate to the menu.Configuration > User Interface > Indicator Lights
3. Enter the submenu.Power Status
Advanced operation
1: Power supply unplugged or switched off.
2: Requires DPMS mode and Hibernate to be enabled in the OSD menu.
3: Switched off via the standby touch key.
4: Requires DPMS mode to be enabled in the OSD menu.

K5902079 /09 Coronis Uniti 35
4. Select as desired and confirm.Enabled/Disabled
5.4 Key indicator lights
About the key indicator lights
By default, after lighting up, the key indicator lights will dim again if no further actions are taken within the
following 5 seconds. However, this behavior can be changed so that the key indicator lights are always on or
always off.
To configure the key indicator lights
1. Bring up the OSD main menu.
2. Navigate to the menu.Configuration > User Interface > Indicator Lights
3. Enter the submenu.Keys
4. Select as desired and confirm.Automatic/Always On/Always Off
5.5 Power lock function
About the power lock function
By enabling the power lock function, the Coronis Uniti is forced to remain switched on. This means that it can t’
be switched to stand-by mode manually until the power lock function is disabled again.
To enable/disable the power lock function:
1. Bring up the OSD main menu.
2. Navigate to the menu.Configuration > User Interface > Controls
3. Enter the submenu.Power Lock
4. Select as desired and confirm.Enabled/Disabled
5.6 SoftGlow Task light
About the SoftGlow Task light
The Coronis Uniti is equipped with a SoftGlow Task light. This allows you to have light on your desk in a dark
environment. The brightness of the SoftGlow Task light can be adjusted.
To enable/disable the SoftGlow Task light:
1. Bring up the OSD main menu.
2. Navigate to the menu.Configuration > Lights
3. Enter the SoftGlow Task Light submenu.
4. Select as desired and confirm.Enabled/Disabled
To adjust the SoftGlow Task light brightness:
1. Bring up the OSD main menu.
2. Navigate to the menu.Configuration > Lights
3. Enter the SoftGlow Task Light brightness submenu.
4. Set a SoftGlow Task Light brightness value as desired and confirm.
Advanced operation

K5902079 /09 Coronis Uniti36
5.7 SoftGlow Wall light
About the SoftGlow Wall light
The Coronis Uniti is equipped with a SoftGlow Wall light. This allows you to have light on the wall at the back
of your display in a dark environment. The brightness of the SoftGlow Wall light can be adjusted.
To enable/disable the SoftGlow Wall light:
1. Bring up the OSD main menu.
2. Navigate to the menu.Configuration > Lights
3. Enter the submenu.SoftGlow Wall Light
4. Select as desired and confirm.Enabled/Disabled
To adjust the SoftGlow Wall light brightness:
1. Bring up the OSD main menu.
2. Navigate to the menu.Configuration > Lights
3. Enter the submenu.SoftGlow Wall Light brightness
4. Set a value as desired and confirm.SoftGlow Wall Light brightness
5.8 DPMS mode
About DPMS mode
Enabling the Display Power Management System (DPMS) mode on your display will optimize its diagnostic
lifetime by automatically switching off the backlight when the display is not used for a specified period of time.
By default, DPMS mode is enabled on your display, but it also needs to be activated on your workstation. To
do this, go to the Power options properties window of your workstation.“ ”
Barco recommends setting DPMS activation after 20 minutes of non-usage.
When DPMS mode is enabled on your display, an additional OSD power saving function becomes
available: hibernate. Please refer to Hibernate , page 36 for more information on hibernation and“ ”
how to enable this function.
To enable/disable DPMS mode on your display:
1. Bring up the OSD main menu.
2. Navigate to the menu.Configuration > Power Management
3. Enter the submenu.DPMS Mode
4. Select as desired and confirm.Enabled/Disabled
5.9 Hibernate
About hibernate
When hibernate is enabled, not only the backlight will be switched off, but also other functionalities will be
disabled to further reduce power consumption to a minimum. This happens after a specific period of time
which can be manually adjusted.
Advanced operation
K5902079 /09 Coronis Uniti 37
Hibernate can only be enabled on your display when the DPMS mode is enabled first. Therefore,
please refer to DPMS mode , page 36 to do this.“ ”
Please connect your keyboard or mouse to your PC rather than to the display's USB ports when
hibernate is enabled.
To enable/disable hibernation on your display:
1. Bring up the OSD main menu.
2. Navigate to the menu.Configuration > Power Management
3. Enter the submenu.Hibernate
4. Select as desired and confirm.Enabled/Disabled
To specify the hibernate time-out:
1. Bring up the OSD main menu.
2. Navigate to the menu.Configuration > Power Management
3. Enter the submenu.Hibernate Timeout
4. Set the time-out value as desired and confirm.
5.10 Delayed power down
About delayed power down
Working with the same image or an application with static image elements (e.g. toolbars, icons) during almost
a full working day continuously may result in a form of image retention. You can avoid or significantly reduce
the occurrence of this phenomenon by enabling the delayed power down option.
This option will keep the display s backlight running for 4 hours after DPMS mode is activated (instead of’
immediately switching off the backlight upon DPMS activation).
Enabling delayed power down is only effective when the DPMS mode is also enabled. Please refer
to DPMS mode , page 36 to do this.“ ”
To enable/disable delayed power down on your display:
1. Bring up the OSD main menu.
2. Navigate to the menu.Configuration > Power Management
3. Enter the submenu.Delayed Power Down
4. Select as desired and confirm.Enabled/Disabled
5.11 I-Luminate default mode
About the I-Luminate default mode
The I-Luminate mode defines the default activated mode during the I-Luminate boost. This mode can be:
Screen The boost mode is applied on the screen display.
Film (large or small) Film (large or small): the boost mode activates a high
illuminated rectangle on top of the screen, simulating
a light box for use with radiological film. The size of
this rectangle is similar to a classic (large or small)
radiological film.
Advanced operation
Produktspezifikationen
| Marke: | Barco |
| Kategorie: | Monitor |
| Modell: | Coronis Uniti MDMC-12133 |
Brauchst du Hilfe?
Wenn Sie Hilfe mit Barco Coronis Uniti MDMC-12133 benötigen, stellen Sie unten eine Frage und andere Benutzer werden Ihnen antworten
Bedienungsanleitung Monitor Barco

5 September 2024
3 September 2024
22 August 2024
21 August 2024
16 August 2024
15 August 2024
15 August 2024
13 August 2024
12 August 2024
4 August 2024
Bedienungsanleitung Monitor
- Monitor Samsung
- Monitor Da-Lite
- Monitor 3M
- Monitor Acer
- Monitor Apple
- Monitor Approx
- Monitor Asus
- Monitor Sanyo
- Monitor BenQ
- Monitor Corsair
- Monitor Gigabyte
- Monitor HP
- Monitor HyperX
- Monitor KeepOut
- Monitor Mad Catz
- Monitor Medion
- Monitor Philips
- Monitor SilverCrest
- Monitor Sony
- Monitor Zalman
- Monitor Panasonic
- Monitor LG
- Monitor Bosch
- Monitor Canon
- Monitor Yamaha
- Monitor Yealink
- Monitor Velleman
- Monitor Neumann
- Monitor CSL
- Monitor Denver
- Monitor EMOS
- Monitor König
- Monitor MarQuant
- Monitor Renkforce
- Monitor Thomson
- Monitor Blaupunkt
- Monitor Schneider
- Monitor Sharp
- Monitor Daewoo
- Monitor Triton
- Monitor Pyle
- Monitor Mitsubishi
- Monitor Haier
- Monitor Hisense
- Monitor Salora
- Monitor ARCHOS
- Monitor Caliber
- Monitor ODYS
- Monitor Pioneer
- Monitor Jay-Tech
- Monitor JBL
- Monitor JVC
- Monitor Optoma
- Monitor PEAQ
- Monitor Shure
- Monitor Stairville
- Monitor Abus
- Monitor Continental Edison
- Monitor Hannspree
- Monitor Hitachi
- Monitor Hyundai
- Monitor Orion
- Monitor TCL
- Monitor Tesla
- Monitor Toshiba
- Monitor Olympus
- Monitor Garmin
- Monitor Citizen
- Monitor Omron
- Monitor Element
- Monitor Plantronics
- Monitor Epson
- Monitor ViewSonic
- Monitor IHealth
- Monitor Waeco
- Monitor Dell
- Monitor LC-Power
- Monitor Lenovo
- Monitor MSI
- Monitor Tripp Lite
- Monitor LightZone
- Monitor Adam
- Monitor Burg Wächter
- Monitor Marshall
- Monitor Razer
- Monitor Samson
- Monitor Honeywell
- Monitor ELO
- Monitor Marshall Electronics
- Monitor Ricoh
- Monitor Simrad
- Monitor Globaltronics
- Monitor Terra
- Monitor Xoro
- Monitor Smart
- Monitor Alpine
- Monitor Viessmann
- Monitor Brandson
- Monitor Cooler Master
- Monitor NZXT
- Monitor Faytech
- Monitor Behringer
- Monitor Mackie
- Monitor ESI
- Monitor Eurolite
- Monitor InFocus
- Monitor Kindermann
- Monitor NEC
- Monitor Hercules
- Monitor Monoprice
- Monitor Monacor
- Monitor Belinea
- Monitor Fujitsu
- Monitor Huawei
- Monitor Alesis
- Monitor Maxdata
- Monitor Packard Bell
- Monitor JUNG
- Monitor Westinghouse
- Monitor AOC
- Monitor AG Neovo
- Monitor Eizo
- Monitor Iiyama
- Monitor Kogan
- Monitor Skytronic
- Monitor Xerox
- Monitor NewStar
- Monitor Insignia
- Monitor Swissonic
- Monitor Ring
- Monitor Vitek
- Monitor DataVideo
- Monitor RCF
- Monitor Prestigio
- Monitor APC
- Monitor Cisco
- Monitor Danfoss
- Monitor Yorkville
- Monitor Allen & Heath
- Monitor Deltaco
- Monitor Boss
- Monitor IFM
- Monitor Godox
- Monitor Genelec
- Monitor Vivitek
- Monitor Kramer
- Monitor Peerless-AV
- Monitor Wortmann AG
- Monitor ARRI
- Monitor Asrock
- Monitor CTOUCH
- Monitor AJA
- Monitor Hikvision
- Monitor Promethean
- Monitor Newline
- Monitor Blue Sky
- Monitor Jensen
- Monitor Fostex
- Monitor PreSonus
- Monitor ART
- Monitor Seiki
- Monitor Oecolux
- Monitor IK Multimedia
- Monitor Vorago
- Monitor Midas
- Monitor Baaske Medical
- Monitor Ikan
- Monitor Krom
- Monitor ProXtend
- Monitor Avantone Pro
- Monitor Emachines
- Monitor EverFocus
- Monitor Focal
- Monitor Ganz
- Monitor GeoVision
- Monitor HKC
- Monitor Ibm
- Monitor Interlogix
- Monitor Joy-it
- Monitor LaCie
- Monitor Legamaster
- Monitor M-Audio
- Monitor Maxell
- Monitor MicroTouch
- Monitor Mirai
- Monitor ONYX
- Monitor Peerless
- Monitor Provision ISR
- Monitor Soundstream
- Monitor Sunny
- Monitor Sunstech
- Monitor Tannoy
- Monitor AMX
- Monitor Wyse - Dell
- Monitor ACTi
- Monitor Vimar
- Monitor Alienware
- Monitor AVer
- Monitor PeakTech
- Monitor Ozone
- Monitor ITek
- Monitor Bauhn
- Monitor TV One
- Monitor RGBlink
- Monitor QSC
- Monitor Planar
- Monitor Mitsai
- Monitor Bematech
- Monitor Dahua Technology
- Monitor Posiflex
- Monitor Speco Technologies
- Monitor Christie
- Monitor Atlantis Land
- Monitor Palmer
- Monitor Hanwha
- Monitor Allsee
- Monitor Prowise
- Monitor SPL
- Monitor Advantech
- Monitor Aputure
- Monitor Avocor
- Monitor Lilliput
- Monitor Chauvet
- Monitor EKO
- Monitor IOIO
- Monitor Neets
- Monitor Crestron
- Monitor I3-Technologies
- Monitor Antelope Audio
- Monitor Pelco
- Monitor Dynaudio
- Monitor Extron
- Monitor V7
- Monitor Atlona
- Monitor Game Factor
- Monitor Iadea
- Monitor Elite Screens
- Monitor Night Owl
- Monitor Sonifex
- Monitor Kali Audio
- Monitor Alogic
- Monitor SMART Technologies
- Monitor SWIT
- Monitor Atomos
- Monitor DoubleSight
- Monitor Varad
- Monitor Syscom
- Monitor KRK
- Monitor Chimei
- Monitor HEDD
- Monitor EC Line
- Monitor BOOX
- Monitor Akuvox
- Monitor Nixeus
- Monitor Desview
- Monitor Enttec
- Monitor Drawmer
- Monitor Feelworld
- Monitor Yiynova
- Monitor Positivo
- Monitor Ernitec
- Monitor AORUS
- Monitor Aopen
- Monitor Ikegami
- Monitor Elvid
- Monitor American Dynamics
- Monitor Fluid
- Monitor TVLogic
- Monitor Gamber-Johnson
- Monitor CTL
- Monitor Raysgem
- Monitor Viotek
- Monitor Datacolor
- Monitor ANDYCINE
- Monitor Wohler
- Monitor Eve Audio
- Monitor Colormetrics
- Monitor Qian
- Monitor Neat
- Monitor Planet Audio
- Monitor Mimo Monitors
- Monitor IStarUSA
- Monitor Innocn
- Monitor AMCV
- Monitor GVision
- Monitor OSEE
- Monitor Freedom Scientific
- Monitor UPERFECT
- Monitor SmallHD
- Monitor Monkey Banana
- Monitor Kubo
- Monitor POSline
- Monitor HoverCam
- Monitor IBoardTouch
- Monitor COMMBOX
- Monitor Postium
- Monitor HELGI
- Monitor ProDVX
- Monitor Blue Sea
- Monitor GeChic
- Monitor ADS-TEC
- Monitor Transvideo
- Monitor Shimbol
- Monitor Portkeys
- Monitor AIS
- Monitor Vidi-Touch
- Monitor KTC
- Monitor CoolerMaster
- Monitor Mobile Pixels
- Monitor Voxicon
- Monitor Mybeo
- Monitor Bearware
- Monitor DTEN
- Monitor Cocopar
- Monitor Titan Army
- Monitor Delvcam
Neueste Bedienungsanleitung für -Kategorien-

3 Dezember 2024
3 Dezember 2024
2 Dezember 2024
1 Dezember 2024
1 Dezember 2024
1 Dezember 2024

30 November 2024
30 November 2024
30 November 2024
29 November 2024