AVM FRITZ!Box 5690 Pro Bedienungsanleitung
AVM Nicht kategorisiert FRITZ!Box 5690 Pro
Lies die bedienungsanleitung für AVM FRITZ!Box 5690 Pro (2 Seiten) kostenlos online; sie gehört zur Kategorie Nicht kategorisiert. Dieses Handbuch wurde von 57 Personen als hilfreich bewertet und erhielt im Schnitt 4.1 Sterne aus 6 Bewertungen. Hast du eine Frage zu AVM FRITZ!Box 5690 Pro oder möchtest du andere Nutzer dieses Produkts befragen? Stelle eine Frage
Seite 1/2
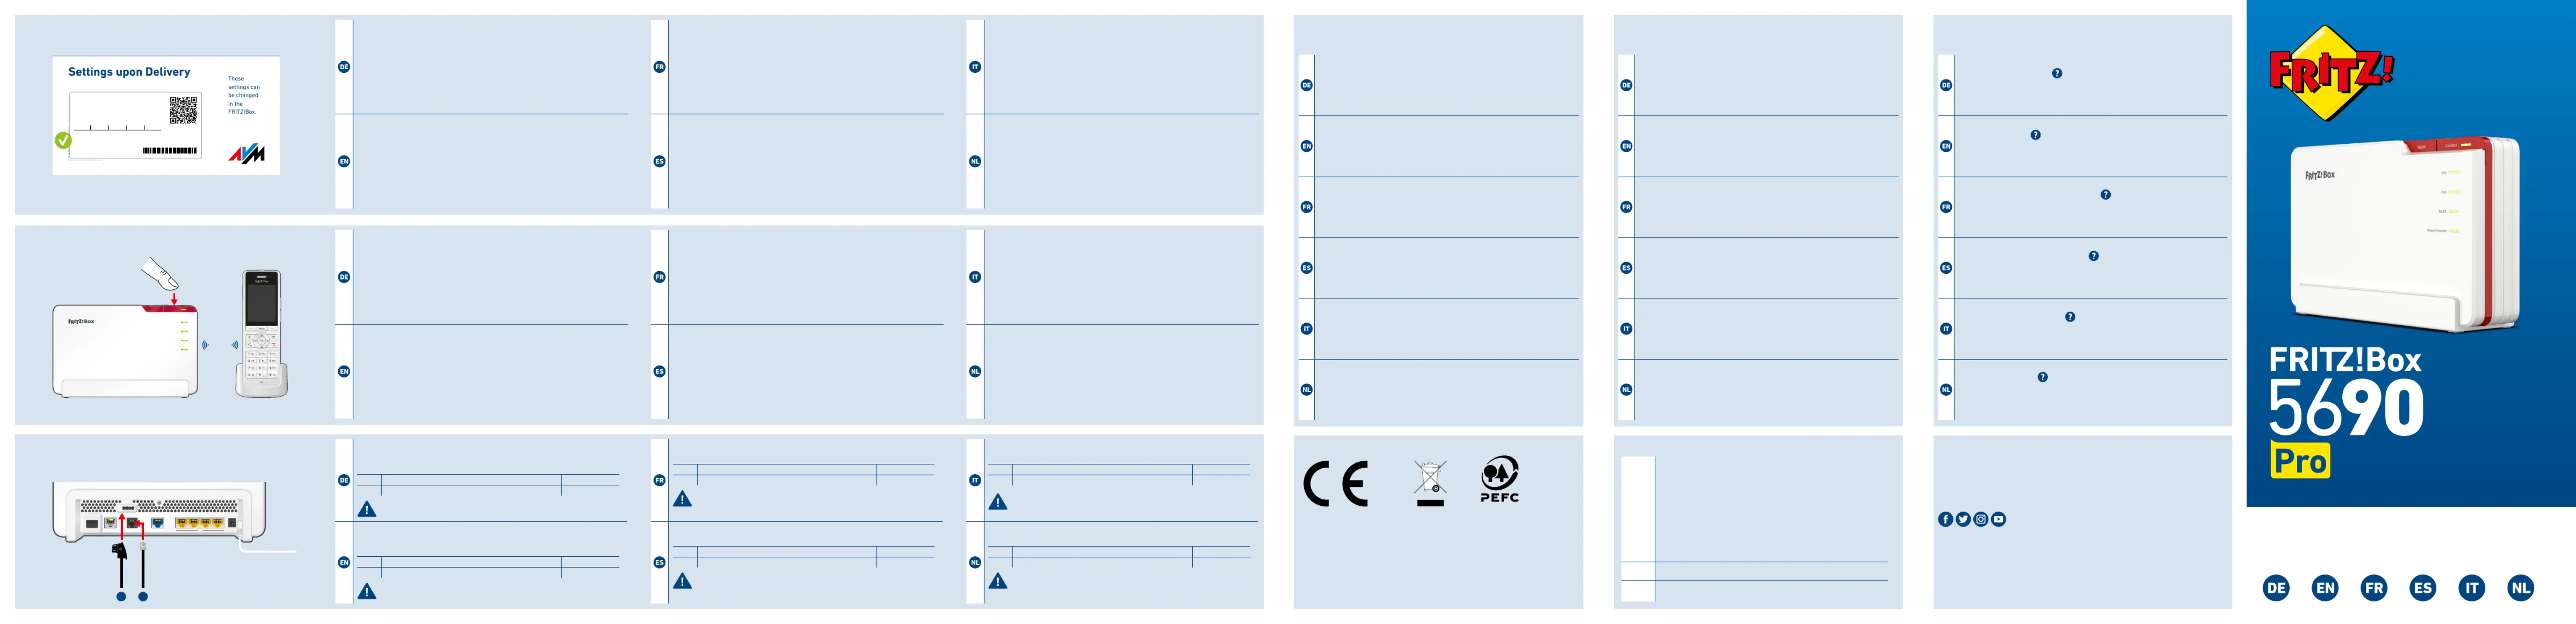
Quick Start Guide
Telefone per Kabel anschließen
Telefone, Faxgeräte oder Anrufbeantworter können Sie per Kabel an die
FRITZ!Box anschließen.
1Telefon mit TAE-SteckerFon
2Telefon mit RJ11-SteckerFon
Im Betrieb darf nur eine der zwei Buchsen Fonbelegt werden.
Telephones by Cable
You can connect telephones, fax machines or answering machines to the
FRITZ!Box by cable.
1Telephone with TAE plugFon
2Telephone with RJ11 plugFon
During operation, only one of the two sockets may be used.Fon
Connecter des téléphones via un câble
Vous pouvez connecter des téléphones à la FRITZ!Box via un câble.
1Téléphone avec prise TAEFon
2Téléphone avec prise RJ11Fon
Seul un des deux ports peut être occupé durant l‘utilisation.Fon
Conectar los teléfonos con cable
Puede conectar teléfonos al FRITZ!Box con un cable.
1Teléfono con enchufe “TAE”Fon
2Teléfono con enchufe RJ11Fon
Durante el funcionamiento, solo puede utilizarse uno de los dos
puertos .Fon
Collegamento di telefoni via cavo
Al FRITZ!Box potete collegare telefoni via cavo.
1Telefono con connettore TAEFon
2Telefono con connettore RJ11Fon
Durante il funzionamento può essere utilizzata solo una delle due
prese .Fon
Telefoons met een kabel aansluiten
U kunt telefoons met een kabel aansluiten op de FRITZ!Box.
1Telefoon met TAE-connectorFon
2Telefoon met RJ11-connectorFon
Tijdens bedrijf mag slechts één van de twee bussen worden Fon
worden gebruikt.
Power
1G
LAN 4LAN 3LAN 2LAN 1
2.5G
WAN/LANFonDSL
SFP
Fon
Schnurlostelefon anmelden
1. Schalten Sie Ihr Telefon an und bringen Sie es in Anmeldebereitschaft.
2. Geben Sie die PIN der FRITZ!Box ein (voreingestellte PIN ).0000
3. Drücken Sie die Taste an der FRITZ!Box bis die LED ConnectConnect
blinkt.
Das Telefon wird angemeldet.
Register a Cordless Telephone
1. Turn on your telephone and ready the telephone for registration.
2. Enter the PIN of the FRITZ!Box (the preset value PIN ).0000
3. Push the button on the FRITZ!Box until the LED ConnectConnect
starts ashing.
The telephone is registered.
Connecter un téléphone sans l
1. Allumez votre téléphone et mettez-le en mode connexion.
2. Saisissez le code PIN de la FRITZ!Box (code PIN par défaut: 0000).
3. Appuyez sur le bouton de la FRITZ!Box jusqu’à ce que le Connect
voyant clignote.Connect
Le téléphone est en cours de connexion.
Conectar un teléfono inalámbrico
1. Encienda el teléfono y póngalo en modo de espera de registro.
2. Indique en el teléfono el PIN de su FRITZ!Box (se p1-ha congurado por
defecto ).0000
3. Mantenga pulsado el botón en el FRITZ!Box hasta que el led Connect
Connect parpadee.
Su teléfono p1-ha sido conectado.
Registrazione di un cordless
1. Accendete il telefono e portate il telefono in modalità di registra-
zione.
2. Digitate il PIN del FRITZ!Box (il valore predenito è 0000).
3. Premete il tasto ConnectConnect del FRITZ!Box no a quando il LED
lampeggia.
Il telefono viene registrato.
Draadloze telefoon aanmelden
1. Zet uw telefoon aan en zet de telefoon vervolgens in de aanmeldmo-
dus.
2. Voer de pincode van de FRITZ!Box in (de standaardpincode is ).0000
3. Houd de toets van de FRITZ!Box ingedrukt tot de Connect
led knippert.Connect
Internetzugang einrichten
•Geben Sie in einen Internetbrowser ein. http://fritz.box
Die Benutzeroberäche der FRITZ!Box erscheint.
•Geben Sie das FRITZ!Box-Kennwort ein, wenn Sie dazu aufgefordert
werden und folgen Sie den Anweisungen des Assistenten bis zum
Schluss.
Der Internetzugang ist eingerichtet und Sie können mit den angeschlos-
senen Geräten im Internet surfen.
Conguring the Internet Connection
•Enter in a web browser. The FRITZ!Box user inter face http://fritz.box
appears.
•Enter the FRITZ!Box password when prompted to do so, and then fol-
low the Wizard‘s instructions until conguration has been completed.
The internet connection is congured and you can surf the web with the
connected devices.
Congurer l’accès à Internet
•Entrez http://fritz.box dans la barre d’adresse d‘un navigateur.
L‘interface utilisateur de la FRITZ!Box s‘ache.
•Entrez le mot de passe FRITZ!Box lorsque vous y êtes invité et suivez
les instructions de l‘assistant jusqu‘au bout.
L‘accès à Internet est conguré et vous pouvez à présent surfer sur
Internet avec vos appareils connectés.
Congurar el acceso a Internet
•Introduzca http://fritz.box en la barra de direcciones del navegador.
Se abrirá la interfaz de usuario del FRITZ!Box.
•Introduzca la contraseña del FRITZ!Box cuando se le pida y sigua hasta
el nal las instrucciones del asistente.
El acceso a Internet está congurado y se puede navegar en Internet con
los dispositivos conectados.
Congurazione dell’accesso a Internet
•Digitate in un browser. Si apre l’interfaccia utente.http://fritz.box
•Inserite la password del FRITZ!Box quando richiesto e seguite le istru-
zioni della procedura guidata no alla ne.
L’accesso a Internet è congurato e potete navigare in Internet con i
dispositivi collegati.
Internettoegang instellen
•Voer in een internetbrowser in. http://fritz.box
De gebruikersinterface van de FRITZ!Box verschijnt.
•Voer het FRITZ!Box-wachtwoord in, als u daarom wordt verzocht en
volg de instructies van de wizard tot de conguratie is voltooid.
De internettoegang is ingesteld en u kunt met de verbonden apparaten
op het internet surfen.
en.avm.de/service/manuals
en.avm.de/guide
en.avm.de/nc/service/downloads
en.avm.de/service/support-request/your-support-request
© AVM GmbH, 10547 Berlin • 06.2024 • 521616066_1007559_00
CEDiagnosisService
Rechtliche Hinweise und geltende Lizenzbestimmungen nden Sie in
der Benutzeroberäche: > > RechtlichesRechtliche Hinweise.
Weitere Information nden Sie auf unserer Internetseite:
avm.de/service
Legal information and the valid licensing conditions are presented in
the user interface: > > .LegalLegal Notice
More information is available on our website: en.avm.de/service
Les mentions légales et les dispositions de licence en vigueur sont di-
sponibles dans l‘interface utilisateur : > Volet juridiqueMentions >
légales.
Plus d’informations sur notre site Internet: ch.avm.de/fr/service
En la interfaz de usuario se puede encontrar información legal y las
condiciones de licencia aplicables: > > .Información legalNota legal
Mayor información encontrará en nuestra página web:
es.avm.de/servicio
Le note legali e le condizioni di licenza si trovano nella guida
dell’interfaccia utente sotto: > > .Informazioni legaliNote legali
Ulteriori informazioni si trovano sul nostro sito web:
it.avm.de/assistenza
Juridische informatie en geldende licentiebepalingen vindt u in de
gebruikersinterface: > > .Juridische infoJuridische informatie
Meer informatie vindt u op onze website: nl.avm.de/service
Zur Verbesserung Ihres Produkts und für den sicheren Betrieb
an Ihrem Anschluss verwendet AVM bei Bedarf Diagnosedaten.
Diese Einstellung kann in der Benutzeroberäche unter Internet >
ZugangsdatenAVM-Dienst > e geändert werden.
To improve the product and ensure safe operation on your connection,
AVM uses diagnostic data where needed. This setting can be changed
in the user interface under InternetAccount Information > >
AVM Services.
An d’améliorer votre produit et d’en assurer le bon fonctionnement
sur votre ligne, AVM utilise, si nécessaire, des données de diagnostic.
Cette fonction peut être modiée dans l’interface utilisateur via le
menu InternetDonnées d’accèsServices AVM > > .
Para mejorar su producto y para el funcionamiento seguro en su
conexión AVM utiliza, si es necesario, los datos de diagnóstico. Esta
opción puede ajustarse en el menú InternetDatos de acceso > >
Servicios de AVM.
Se necessario, per migliorare il vostro prodotto e per garantire un
funzionamento sicuro, AVM usa dati diagnostici. Questa impostazione
può essere modicata nell’interfaccia utente, in InternetDati di >
accessoServizi AVM > .
Ter verbetering van uw product en voor een veilig gebruik op uw
aansluiting gebruikt AVM indien nodig diagnostische gegevens. Deze
instelling kan worden gewijzigd in de gebruikersinterface onder
InternetToegangsgegevensAVM-diensten > > .
Hiermit erklärt AVM, dass sich das Gerät in Übereinstimmung mit
den Anforderungen und Vorschriften der Richtlinien 2014/53/EU,
2009/125/EG sowie 2011/65/EU bendet. Die Langfassung der
CE-Konformitätserklärung nden Sie in englischer Sprache unter
http://en.avm.de/ce.
AVM declares herewith that the device is compliant with the requi-
rements and the rules in directives 2014/53/EU, 2009/125/EC and
2011/65/EU. The long version of the declaration of CE conformity is
available at http://en.avm.de/ce.
AVM déclare par la présente que l’appareil est conforme aux exigen-
ces et aux instructions des directives 2014/53/UE, 2009/125/CE et
2011/65/UE. La version longue de la déclaration de conformité CE
est disponible (en anglais) sur .http://en.avm.de/ce
Por la presente declara AVM, que el dispositivo cumple con los re-
quisitos esenciales y las disposiciones pertinentes de las Directivas
2014/53/UE, 2009/125/CE y 2011/65/UE. Podrá descargar la ver-
sión completa de la declaración CE (en idioma inglés) en la página
http://en.avm.de/ce.
AVM dichiara che il dispositivo è conforme ai requisiti e alle
disposizioni inerenti delle direttive 2014/53/EU, 2009/125/CE e
2011/65/CE. Il testo integrale della dichiarazione di conformità CE è
disponibile in lingua inglese all’indirizzo http://en.avm.de/ce.
Hiermee verklaart AVM dat het apparaat overeenstemt met de
fundamentele vereisten en de andere relevante voorschriften van de
richtlijnen 2014/53/EU, 2009/125/EG en 2011/65/EU. De volledige
versie van de EG-verklaring van overeenstemming is in het Engels
te vinden op .http://en.avm.de/ce
Frequencies
Wi-Fi
•2.4GHz – 2.483GHz, maximum 100mW
•maximum5.15GHz – 5.35GHz, 200mW
•5.47GHz – 5.725GHz, maximum 1000mW
•maximum5.945GHz – 6.425GHz, 200mW
In AT, BE, BG, CY, CZ, DE, DK, EE, EL, ES, FI, FR, HR, HU, IE, IT,
LT, LU, LV, MT, NL, PL, PT, RO, SE, SI, SK, and UK (NI), Wi-Fi
between 5.15GHz and 5.35GHz may only be used indoors.
DECT
1880MHz – 1900MHz, maximum 250mW
Zigbee
2.4GHz – 2.483GHz, maximum 20mW
Wi-Fi password (WPA2)
Wi-Fi network (SSID)
FRITZ!Box 5690 AF
3779 8981 1562 8981 1234
FRITZ!Box password
zigzag5481
AVMGFFFFFFFF
Modem ID
Power/Internet
Fon
WLAN
Info
ConnectWLAN
DECT
PEFC-zertifiziert
1
2
6
7
8
Produktspezifikationen
| Marke: | AVM |
| Kategorie: | Nicht kategorisiert |
| Modell: | FRITZ!Box 5690 Pro |
Brauchst du Hilfe?
Wenn Sie Hilfe mit AVM FRITZ!Box 5690 Pro benötigen, stellen Sie unten eine Frage und andere Benutzer werden Ihnen antworten
Bedienungsanleitung Nicht kategorisiert AVM

22 Dezember 2025
21 Dezember 2025
4 Oktober 2025
4 Oktober 2025
4 Oktober 2025
4 Oktober 2025
4 Oktober 2025
4 Oktober 2025
4 Oktober 2025
3 Oktober 2025
Bedienungsanleitung Nicht kategorisiert
Neueste Bedienungsanleitung für -Kategorien-
3 April 2026
3 April 2026
3 April 2026
3 April 2026
3 April 2026
3 April 2026
3 April 2026
3 April 2026
3 April 2026
3 April 2026