Asus PB60S Bedienungsanleitung
Lesen Sie kostenlos die 📖 deutsche Bedienungsanleitung für Asus PB60S (2 Seiten) in der Kategorie Desktop. Dieser Bedienungsanleitung war für 54 Personen hilfreich und wurde von 2 Benutzern mit durchschnittlich 4.5 Sternen bewertet
Seite 1/2
QUICK START GUIDE
ASUS PB60S
Package contents
Contenu de la boîte NOTE:
• *Thebundledpoweradaptermayvarybymodelandterritories.
• Somebundledaccessoriesmayvarywithdierentmodels.Fordetailsontheseaccessories,refer
totheirrespectiveusermanuals.
• Thedeviceillustrationisforreferenceonly.Actualproductspecicationsmayvarywithmodels.
• Ifthedeviceoritscomponentsfailormalfunctionduringnormalandproperusewithinthe
warrantyperiod,bringthewarrantycardtotheASUSServiceCenterforreplacementofthe
defectivecomponents.
CA14736
Guidededémarragerapide
15060-0LY40000
Features
Caractéristiques
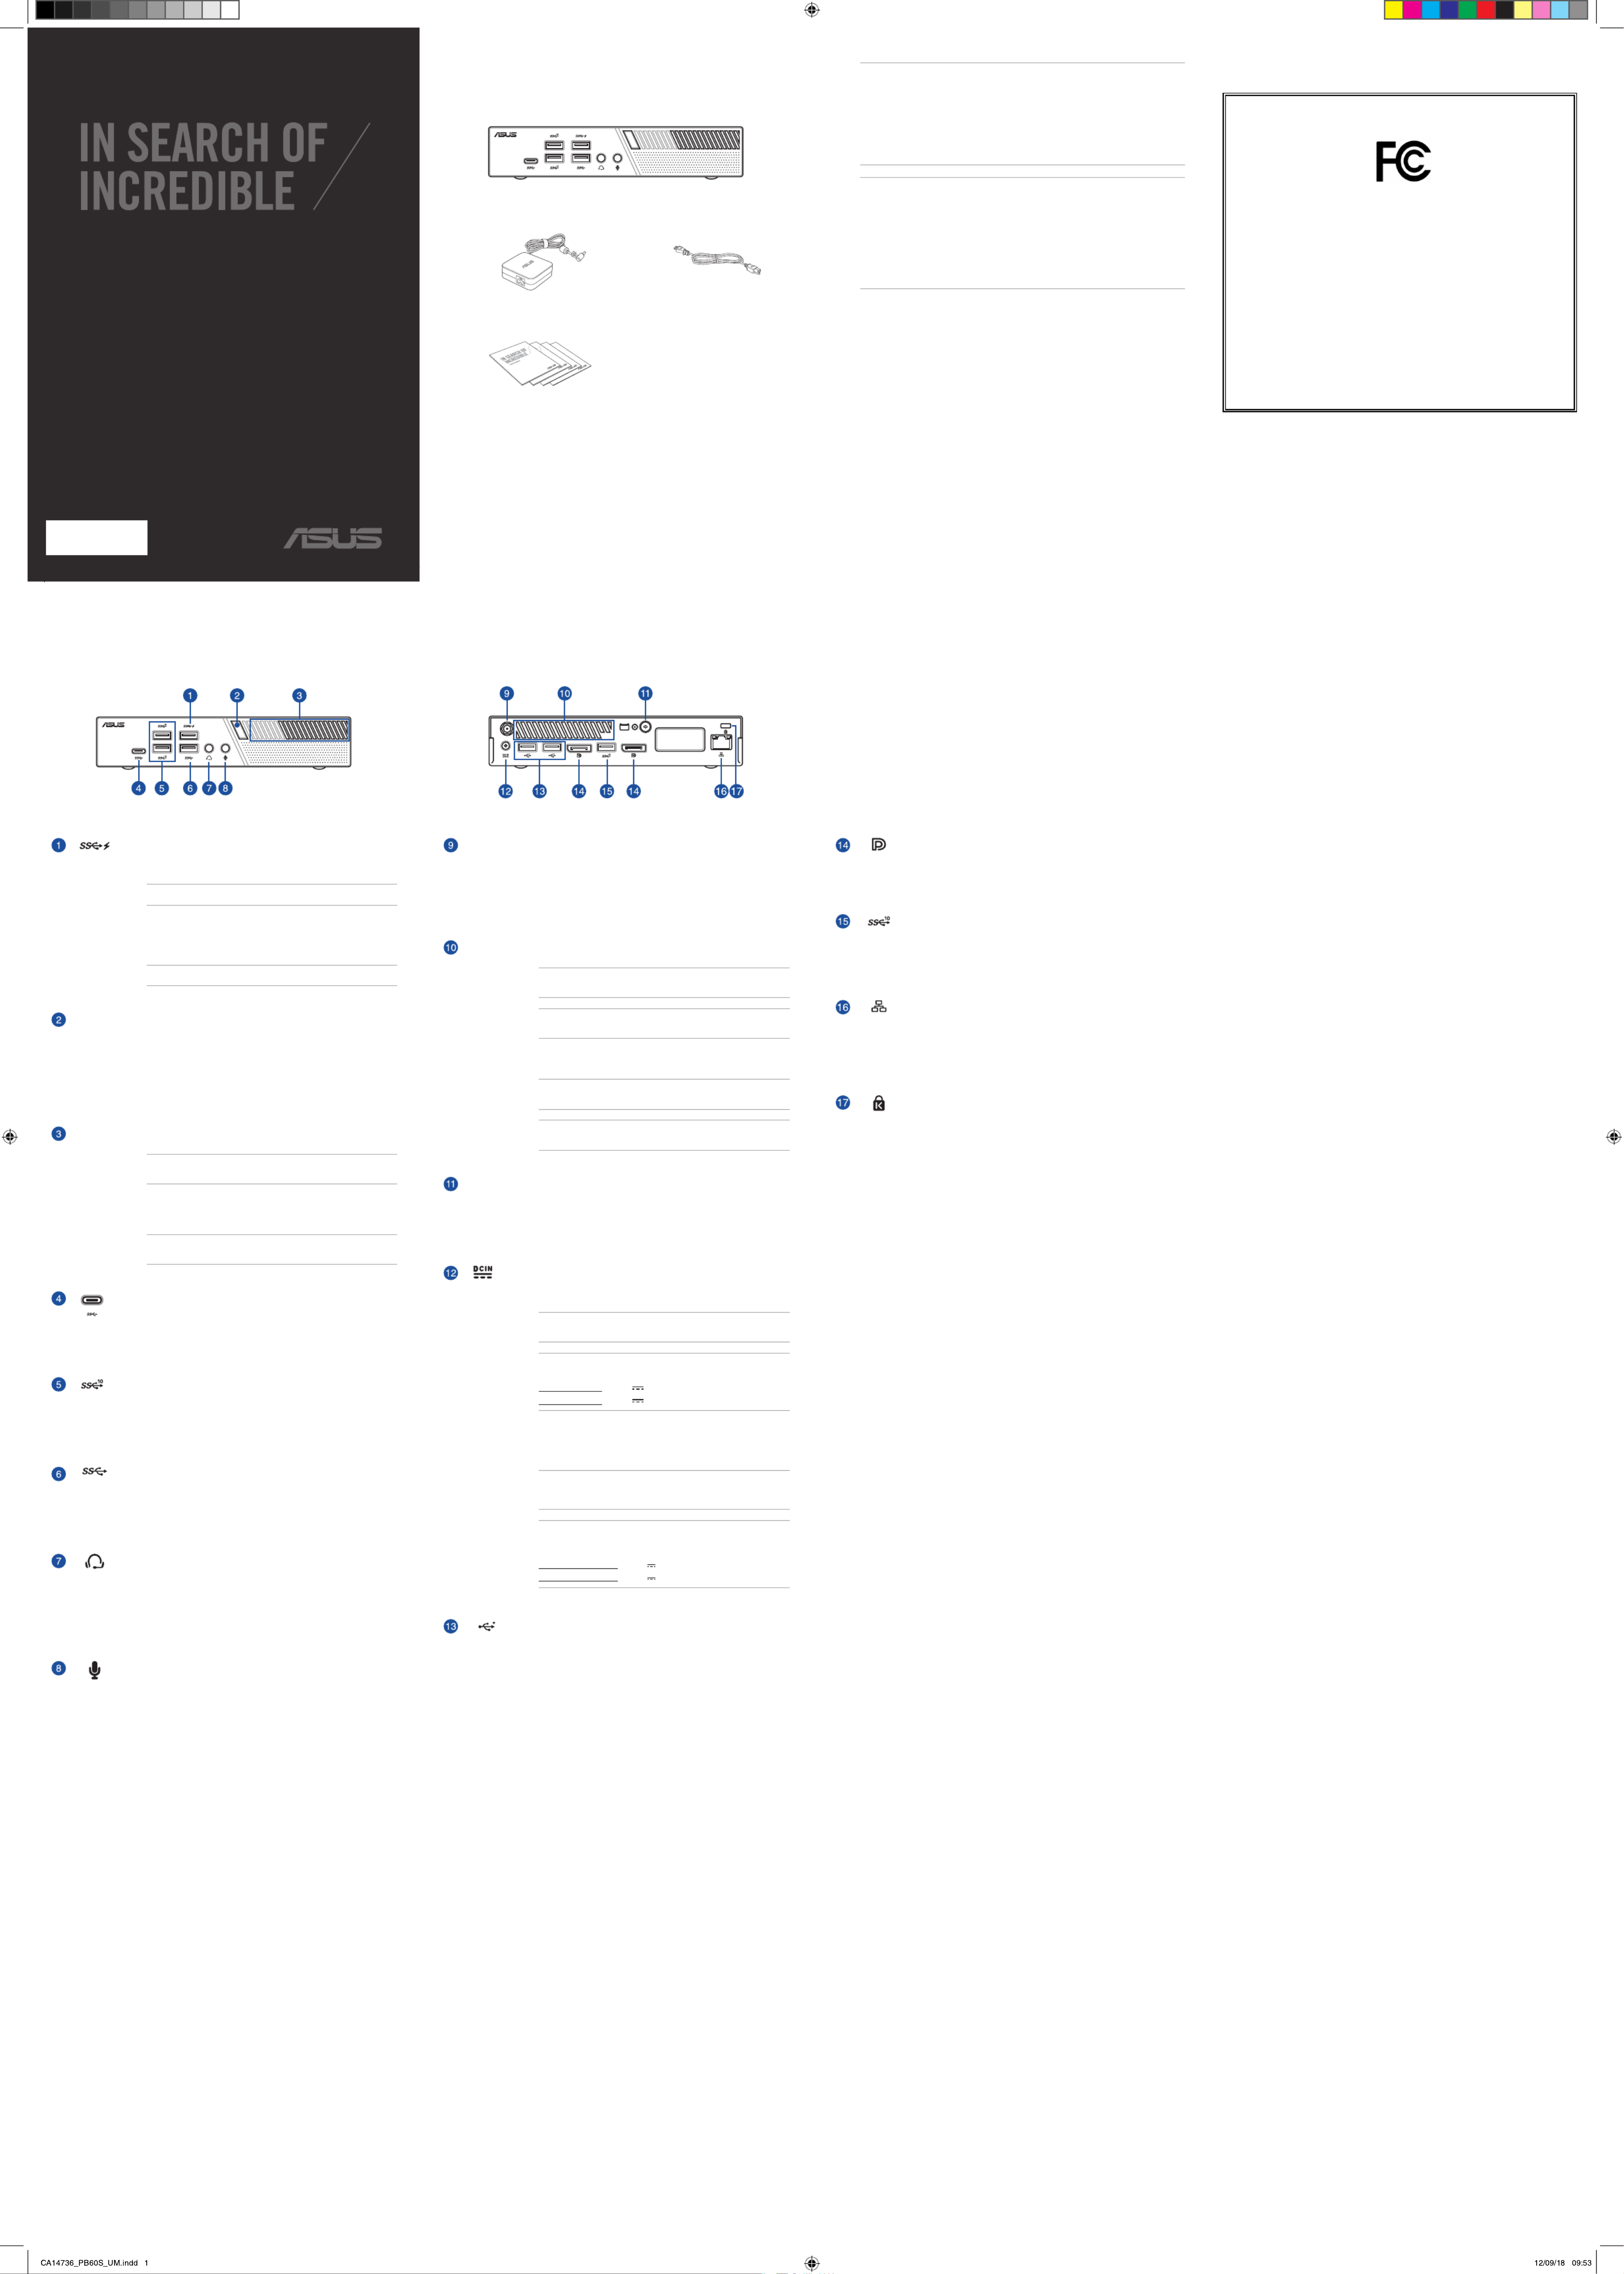
USB 3.1 Gen 1 port
TheUSB3.1Gen1(UniversalSerialBus)portprovidesatransferrateupto5Gbit/s.These
portsalsosupporttheBatteryCharging1.2technologythatallowsyoutochargeyour
USBdevices.
NOTE: Thisportprovidesamaximumof5V/1.5Aoutput.
Port USB 3.1 Gen 1
L’interfaceUSB3.1Gen1(UniversalSerialBus3.1Gen1)oredestauxdetransfertde
donnéesallantjusqu’à5Gb/s.CesportsprennentaussienchargelatechnologieBattery
Charging1.2pourvouspermettrederechargervospériphériquesUSB.
REMARQUE : Ceportfournituncourantdesortiejusqu’à5V/1,5A.
Power button
ThepowerbuttonallowsyoutoturntheMiniPConoro.Youcanusethepowerbutton
toputyourMiniPCtosleepmodeorpressitforfour(4)secondstoforceshutdownyour
MiniPC.
Bouton d’alimentation
Ceboutond’alimentationpermetd’allumeroud’éteindreleminiPC.Vouspouvezaussi
l’utiliserpourbasculerleminiPCenmodeveilleouappuyersurceboutonpendant
environquatre(4)secondespouréteindreleminiPC.
Air vents (intake vent)
TheairventsallowcoolerairtoenteryourMiniPCchassis.
IMPORTANT:Foranoptimumheatdissipationandairventilation,ensurethat
theairventsarefreefromobstructions.
Fentes d’aération (entrée d’air)
Cesfentesd’aérationpermettentàl’airfraisdepénétreràl’intérieurduchâssisetde
refroidirleminiPC.
IMPORTANT :Assurez-vousqu’aucunobjetnebloquelesfentesd’aérationpour
garantirunedissipationoptimaledelachaleuretunebonneventilationdel’air.
USB 3.1 Gen 1 Type-C™ port
ThisUSBType-C™(UniversalSerialBus)portprovidesatransferrateofupto5Gbit/s.
Port USB 3.1 Gen 1 Type-C™
L’interfaceUSBType-C™(UniversalSerialBusType-C™)oredestauxdetransfertde
donnéesallantjusqu’à5Gb/s.
USB 3.1 Gen 2 port
TheUSB3.1Gen2(UniversalSerialBus)portprovidesatransferrateupto10Gbit/s.
Port USB 3.1 Gen 2
L’interfaceUSB3.1Gen2(UniversalSerialBus3.1Gen2)oredestauxdetransfertde
donnéesallantjusqu’à10Gb/s.
USB 3.1 Gen 1 port
TheUSB3.1Gen1(UniversalSerialBus)portprovidesatransferrateupto5Gbit/s.
Port USB 3.1 Gen 1
L’interfaceUSB3.1Gen1(UniversalSerialBus3.1Gen1)oredestauxdetransfertde
donnéesallantjusqu’à5Gb/s.
Headphone/Headset jack
Thisportallowsyoutoconnectampliedspeakersorheadphones.Youcanalsousethis
porttoconnectyourheadsetoranexternalmicrophone.
Prise casque
Cettepriseestutiliséepourconnecterlasortieaudiodel’ordinateuràdeshaut-parleurs
équipésd’unamplicateurouuncasque.Vouspouvezaussiutilisercetteprisepour
connecterunmicrophoneauminiPC.
Microphone jack
Themicrophonejackisdesignedtoconnecttoamicrophoneusedforvideo
conferencing,voicenarrations,orsimpleaudiorecordings.
Prise microphone
Laprisemicrophonepermetdebrancherunmicrophone,and’organiserdes
visioconférences,depasserdescommunicationsvocalesoud’eectuerdesimples
enregistrementsaudio.
Wireless antenna jack
Thejackisusedtoconnectthesuppliedwirelessantennatoenhancewirelesssignal
reception.
Prise pour antenne sans l
Cettepriseestutiliséepourlaconnexiondel’antennesansl(optionnelle)an
d’améliorerlaqualitéderéceptiondusignalsansl.
Air vents (exhaust vent)
TheairventsallowyourMiniPCchassistoexpelhotairout.
IMPORTANT! Foroptimumheatdissipationandairventilation,ensurethatthe
airventsarefreefromobstructions.
CAUTION!Becarefulofthehotairexpelledattheairventsasitmaycause
discomfortorinjuries.
Fentes d’aération (sortie d’air)
Lesfentesd’aérationpermettentd’expulserl’excèsdechaleurduchâssisduminiPC.
IMPORTANT ! Assurez-vousqu’aucunobjetnebloquelesfentesd’aérationpour
garantirunedissipationoptimaledelachaleuretunebonneventilationdel’air.
ATTENTION !Faitesattentionàl’airchaudexpulséparlesfentesd’aération,cet
airpouvantprovoqueruninconfortoudesblessures.
Punch-out port
RemovingthemetalcoverallowsyoutoinstallanexternalpowerbuttonorCLRTC
button.
Port de perforation
Retirerlecouverclemétalliquevouspermetd’installerunboutond’alimentationexterne
ouunboutonCLRTC.
Power input
ThesuppliedpoweradapterconvertsACpowertoDCpowerforusewiththisjack.Power
suppliedthroughthisjacksuppliespowertotheMiniPC.TopreventdamagetotheMini
PC,alwaysusethesuppliedpoweradapter.
WARNING!Thepoweradaptermaybecomewarmtohotwheninuse.Donot
covertheadapterandkeepitawayfromyourbody.
NOTE:Thepoweradaptermayvarybetweenmodelsandterritories,pleaserefer
tothefollowinginformationonthedierentadapters:
65WPoweradapter:+19VDC 3.42A,65W
90WPoweradapter:+19VDC 4.74A,90W
Prise d’alimentation
Branchezl’adaptateursecteursurcetteprisepourconvertirlecourantalternatifen
courantcontinu.Lecourantpassantparcetteprisepermetd’alimenterleminiPC.Pour
éviterd’endommagerleminiPC,utiliseztoujoursl’adaptateursecteurfourni.
AVERTISSEMENT !L’adaptateurpeutatteindreunetempératureélevéelorsque
celui-ciestreliéàl’appareil.Necouvrezpasl’adaptateurettenez-leéloignéde
vouslorsquecelui-ciestbranchéàunesourced’alimentation.
REMARQUE :L’adaptateursecteurpeutvarierenfonctiondumodèle,dupays
oudelarégiond’achat.Consultezlesinformationssuivantessurlesdiérents
adaptateurs:
Adaptateursecteur65W:+19VCC 3.42A,65W
Adaptateursecteur90W:+19VCC 4.74A,90W
USB 2.0 port
TheUSB(UniversalSerialBus)portiscompatiblewithUSB2.0orUSB1.1devicessuch
askeyboards,pointingdevices,ashdiskdrives,externalHDDs,speakers,camerasand
printers.
Port USB 2.0
LeportUSB(UniversalSerialBus)estcompatibleaveclespériphériquesUSB2.0ou
USB1.1telsquelesclaviers,lesdispositifsdepointage,leslecteursdemémoireFlash,les
disquesdursexternes,leshaut-parleurs,lescamérasetlesimprimantes.
Rear view / Vue arrièreFront view / Vue avant
MiniPCPB60S/MiniPCPB60S
ACpoweradapter*/Adaptateursecteur* Powercord*/Cordond’alimentation*
Technicaldocuments/Documentationtechnique
DisplayPort
TheseportsallowyoutoconnectyourMiniPCtoanexternaldisplay.
Port DisplayPort
CesportssontutiliséspourconnectervotreminiPCàunpériphériqued’achage
externe.
USB 3.1 Gen 2 port
TheUSB3.1Gen2(UniversalSerialBus)portprovidesatransferrateupto10Gbit/s.
Port USB 3.1 Gen 2
L’interfaceUSB3.1Gen2(UniversalSerialBus3.1Gen2)oredestauxdetransfertde
donnéesallantjusqu’à10Gb/s.
LAN port
The8-pinRJ-45LANportsupportsastandardEthernetcableforconnectiontoalocal
network.
Port réseau
Insérezuncâbleréseau(RJ-45)à8brochesdansceportpourétabliruneconnexionàun
réseaulocal.
Kensington® security slot
TheKensington®securityslotallowsyoutosecureyourPCusingKensington®compatible
securityproducts.
Encoche de sécurité Kensington®
L’encocheKensington®permetdesécuriserl’ordinateuràl’aidedesdispositifsdesécurité
compatibles.
FCC COMPLIANCE INFORMATION
Per FCC Part 2 Section 2.1077
Responsible Party:
Asus Computer International
Address: 48720 Kato Rd, Fremont, CA 94538
Phone/Fax No: (510)739-3777/(510)608-4555
hereby declares that the product
Product Name :
Desktop PC
Model Number :
PB60S
compliance statement:
This device complies with part 15 of the FCC Rules. Operation is subject to the
following two conditions: (1) This device may not cause harmful interference,
and (2) this device must accept any interference received, including interference
that may cause undesired operation.
Ver. 180125
REMARQUE :
• *L'adaptateursecteurpeutvarierenfonctiondumodèle,dupaysoudelarégiond'achat.
• Certainsaccessoiresfournispeuventvarierenfonctiondumodèle.Pourplusdedétailssurces
accessoires,consultezleurmanuelrespectif.
• Lesillustrationsdel'appareilsontdonnéesàtitreindicatifuniquement.Lescaractéristiquesdu
produitpeuventvarierenfonctiondumodèle.
• Sil'appareiloul'undesescomposantstombeenpannedansdesconditionsd'utilisation
normales,etcelorsdelapériodedegarantie,rendez-vousdansleserviceclientASUSleplusprochede
chezvousmunidelacartedegarantiepouruneprisesousgarantiedevotreappareil.

Upgrading your Mini PC
Mise à niveau du mini PC
IMPORTANT!
• Itisrecommendedthatyouinstallorupgradethememorymodules,wirelesscard,andsolid
statedrive(SSD),underprofessionalsupervision.VisitanASUSservicecenterforfurther
assistance.
• Ensurethatyourhandsaredrybeforeproceedingwiththerestoftheinstallationprocess.Before
installinganyofthefeaturesinthisguide,useagroundedwriststraportouchasafelygrounded
objectormetalobjecttoavoiddamagingthemduetostaticelectricity.
IMPORTANT !
• Achetezetfaitesinstallerlesmodulesdemémoire,lacarteWi-Fiet/ouleSSDuniquementauprès
d’unrevendeuragréépourassureruneabilitéetunecompatibilitéoptimales.Renseignez-vous
auprèsd’uncentreagréépourplusd’informations.
• Assurez-vousquevosmainssontsèchesavantdeprocéderàl’installationdecomposants
additionnels.Avantdeprocéderàl’installation,utilisezunbraceletantistatiqueoutouchezun
objetmétalliqueoureliéàlaterrepouréviterd’endommagerlesmodulesdemémoire.
NOTE: Theillustrationsinthissectionareforreferenceonly.Theslotsmayvarydependingonmodel.
REMARQUE : Lesillustrationsdecettesectionsontfourniesàtitreindicatifuniquement.L’emplacement
desdiérentsélémentspeutvarierselonlemodèle.
Installing top memory module / Installer un module de mémoire
supérieur
Removing the top cover / Retirer le couvercle du dessus
Replacing the top cover / Replacer le couvercle du dessus
Installing an external button / Installer un bouton externeInstalling the M.2 SSD (on selected models) / Installer un SSD M.2 (sur
une sélection de modèles)
Installing 2.5” HDD or SSD / Installer un disque dur ou lecteur SSD 2,5”
1. TurnoyourMiniPCthendisconnectallcablesandperipherals.
1. ÉteignezvotreminiPCetdéconnecteztouslescâblesetlespériphériques.
2. Removethescrewfromtherear(A),thenpushthetopcovertowardsthefronttoremovethetopcover(B).
2. Retirezlavisdel’arrièreduminiPC(A),puisfaitesglisserlecouvercledudessusversl’avantpourleretirer
(B).
IMPORTANT!
• Refertohttp://www.asus.comforthelistofcompatibleDIMMs.YoucanonlyinstallDDR4SO-
DIMMstotheMiniPC’sDIMMslot.
• OnlyASUS-authorizedtechniciansshouldremoveandinstallmotherboardandmechanicalparts
insideyourMiniPC.Pleaserefertothetermsandconditionsinthewarrantycard.
• VisitanauthorizedASUSservicecenterorretailerforinformationonmoduleupgradesforyour
MiniPC.
IMPORTANT !
• Rendez-voussurlesitehttp://www.asus.compourconsulterlalistedesmodulesdemémoire
compatibles.SeulslesmodulesdemémoireDDR4SO-DIMMpeuventêtreinstallésdanslemini
PC.
• SeuluntechnicienASUSestautoriséàretireretinstallerlacartemèreetlescomposants
mécaniquessurvotreminiPC.Veuillezconsulterlacartedegarantiepourplusdedétailssurles
termesetconditionsd’utilisation.
• Renseignez-vousauprèsd’uncentreASUSouunrevendeuragrééspourplusd’informationssur
lamiseàniveaudelamémoiresurvotreminiPC.
Replacethetopcoverandpushittowardstherear,thensecureitwiththescrewremovedpreviously.
Replacezlecouvercledudessusetpoussez-leversl’arrière,puissécurisez-leàl’aidedelavisprécédemment
retirée.
3. Alignandinsertthememorymoduleintotheslot(A)andpressitdown(B)untilitissecurelyseatedin
place.
3. Alignezpuisinsérezlemoduledemémoiredanssoninterfacedeconnexion(A).Appuyezsurlemodule
demémoirejusqu’àcequ’ilsoitbiensécuriséàsoninterfacedeconnexion(B).
1. Removethemetalcoverofthepunch-outport.
1. Retirezlecouverclemétalliqueduportdeperforation.
2. Inserttheexternalbuttonconnectorthroughthepunch-outportandconnectittooneofthefollowing
2-pinheaders:
2. Insérezleconnecteurduboutonexterneàtraversleportdeperforationetconnectez-leàl’unedesen-
têtesà2brochessuivantes:
2. InsertyourHDDorSSDintothestoragebay,thensecureitwithfour(4)screws.
2. InsérezledisqueduroulecteurSSDdanslabaiedestockage,puissécurisezletoutàl’aidedesquatre(4)
vis.
3. ConnecttheSATAcabletotheHDDorSSD.
3. BranchezlecâbleSATAsurledisqueduroulecteurSSD.
4. LifttheapontheSATAconnectorn(A),connecttheSATAcabletotheSATAconnector,thenpushthe
apdowntosecurethecable(B).
4. SoulevezlalanguetteduconnecteurSATA(A),connectezlecâbleSATAauconnecteurSATA,puisabaissez
lalanguettepoursécuriserlecâble(B).
5. Replacethestoragebayandsecureitwiththefour(4)screwsremovedpreviously.
5. Replacezlabaiedestockageetsécurisez-laàl’aidedesquatre(4)visprécédemmentretirées.
1. (optional)Removethestoragebayifastoragebayisinstalled.Followstep2undertheInstalling 2.5” HDD
or SSDsectiontoremovethestoragebay.
1. (optionnel)Siunebaiedestockageestinstallée,retirez-la.Suivezlesinstructionsdel’étape2dansla
section pourretirerlabaiedestockage.Installer un disque dur ou lecteur SSD 2,5”
2. Removethetwo(2)screwssecuringthefan(A),thendisconnectthefanconnector(B)andliftthefan
upwardssothatitisperpendiculartotheheatsink(C),butdonotremovethefancompletely.
2. Retirezlesdeux(2)vissécurisantleventilateur(A),puisdéconnectezleventilateur(B)etsoulevez-lede
manièreàcequ’ilsoitperpendiculaireaudissipateur(C),maisneleretirezpascomplètement.
1. Removethefour(4)screws,thenliftthestoragebaytoremoveitfromthechassis.
1. Retirezlesquatre(4)vis,puissoulevezlabaiedestockagepourlaretirerduchâssis.
(optional)Removethestoragebayifastoragebayisinstalled.Followstep2underthe Installing 2.5” HDD or SSD
sectiontoremovethestoragebay.
(optionnel)Siunebaiedestockageestinstallée,retirez-la.Suivezlesinstructionsdel’étape2danslasection
Installer un disque dur ou lecteur SSD 2,5”pourretirerlabaiedestockage.
To install 2242 M.2 SSD / Pour installer un SSD M.2 2242
Alignandinsertthe2242M.2SSDintoitsslotinsidetheMiniPC,thengentlypushdowntheM.2SSDontopof
thescrewholeandfastenitusingoneofthebundled3mmroundscrews.
AlignezetinsérezleSSDM.22242dansleslotduminiPC,alignezleSSDM.2sursonpasdevis,puisappuyez
délicatementetxez-leenutilisantl’unedesvisrondesde3mmfournies.
CAUTION!Takeextracarewhenremovingthemetalcover.Usetoolssuchasascrewdrivertobendand
removethemetalcovertoavoidphysicalinjury.
ATTENTION !Soyezparticulièrementprudentlorsquevousretirezlecouverclemétallique.Utilisez
desoutilstelsqu’untournevispourcourberetretirerlecouverclemétalliqueetévitertouteblessure
physique.
Header name / Nom de l’en-tête Description / Description
PWRBTN_HEADER PoweronorpowerotheMiniPC.
AllumeouéteintleminiPC.
CLRTC CleartheRealTimeClock(RTC)RAMinCMOS.
EacelamémoireRTC(RealTimeClock)duCMOS.
Getting started
Mise en route
Connect the power adapter and cord
Brancher l’adaptateur secteur et le câble d’alimentation
Connect the wired keyboard and mouse
Connecter un clavier ou une souris laire
Turn on your system
Démarrez votre système
(optional) Mount your Mini PC onto the stand
(optionnel) Installer le mini PC sur son socle
Connect a display panel to your Mini PC by connecting a display cable
either to the DisplayPort.
Connecter un panneau d’achage à votre mini PC en reliant un câble
d’achage au port DisplayPort.
To install 2280 M.2 SSD / Pour installer un SSD M.2 2280
1. Removethestandscrewandinstallitintothe2280M.2screwhole.
1. Retirezlavisdusocleetinstallez-ladanslepasdevisM.22280.
2. Alignandinsertthe2280M.2SSDintoitsslotinsidetheMiniPC,thengentlypushdowntheM.2SSDon
topofthescrewholeandfastenitusingoneofthebundled3mmroundscrews.
2. AlignezetinsérezleSSDM.22280dansleslotduminiPC,alignezleSSDM.2sursonpasdevis,puis
appuyezdélicatementetxez-leenutilisantl’unedesvisrondesde3mmfournies.
Produktspezifikationen
| Marke: | Asus |
| Kategorie: | Desktop |
| Modell: | PB60S |
Brauchst du Hilfe?
Wenn Sie Hilfe mit Asus PB60S benötigen, stellen Sie unten eine Frage und andere Benutzer werden Ihnen antworten
Bedienungsanleitung Desktop Asus

15 Oktober 2024
4 Oktober 2024
2 Oktober 2024
30 September 2024
30 September 2024
23 September 2024
23 September 2024
19 September 2024
13 September 2024
13 September 2024
Bedienungsanleitung Desktop
- Desktop Samsung
- Desktop Acer
- Desktop Apple
- Desktop BenQ
- Desktop Gigabyte
- Desktop HP
- Desktop Medion
- Desktop Microsoft
- Desktop Sharkoon
- Desktop Sony
- Desktop LG
- Desktop Sharp
- Desktop WOOOD
- Desktop Haier
- Desktop TrekStor
- Desktop Optoma
- Desktop PEAQ
- Desktop Toshiba
- Desktop Mio
- Desktop ViewSonic
- Desktop Dell
- Desktop LC-Power
- Desktop Lenovo
- Desktop MSI
- Desktop JYSK
- Desktop Tripp Lite
- Desktop Razer
- Desktop ELO
- Desktop Targa
- Desktop Xoro
- Desktop Vtech
- Desktop Parisot
- Desktop Wehkamp
- Desktop Supermicro
- Desktop Faytech
- Desktop InFocus
- Desktop NEC
- Desktop Seagate
- Desktop Fujitsu
- Desktop Maxdata
- Desktop Packard Bell
- Desktop Kogan
- Desktop ZTE
- Desktop Atari
- Desktop Kramer
- Desktop Asrock
- Desktop ECS
- Desktop Promethean
- Desktop Vorago
- Desktop Emachines
- Desktop Ibm
- Desktop MP
- Desktop ONYX
- Desktop Alienware
- Desktop Zotac
- Desktop Intel
- Desktop Moxa
- Desktop VXL
- Desktop Planar
- Desktop Shuttle
- Desktop Altra
- Desktop Axis
- Desktop Advantech
- Desktop Elitegroup
- Desktop BDI
- Desktop Bestar
- Desktop Pelco
- Desktop Foxconn
- Desktop System76
- Desktop NComputing
- Desktop Cybernet
- Desktop Aopen
- Desktop Smart Things
- Desktop Zoostorm
- Desktop Dell Wyse
- Desktop MvixUSA
- Desktop AIS
- Desktop Wyse
Neueste Bedienungsanleitung für -Kategorien-

30 November 2024

14 Oktober 2024
12 Oktober 2024
11 Oktober 2024

9 Oktober 2024

9 Oktober 2024

7 Oktober 2024
4 Oktober 2024

4 Oktober 2024
3 Oktober 2024