ACTi A956 Bedienungsanleitung
ACTi
Sicherheitskamera
A956
Lesen Sie kostenlos die 📖 deutsche Bedienungsanleitung für ACTi A956 (2 Seiten) in der Kategorie Sicherheitskamera. Dieser Bedienungsanleitung war für 33 Personen hilfreich und wurde von 2 Benutzern mit durchschnittlich 4.5 Sternen bewertet
Seite 1/2

A956 Outdoor Speed Dome Camera Quick Installation Guide
This guide is for quick installing and connecting A956 Outdoor Speed Dome Camera. For more details, please refer to
the Hardware Manual.
Installation Notices
This camera must be installed by qualied personnel and the installation should conform to all local codes.
Do not replace batteries of the camera. Risk of explosion may occur if the battery is replaced by an incorrect type.
To use an external power supply, please contact the camera manufacturer to conrm that the power supply
complies with the LPS requirements and shares the same power specications with the camera.
For safety concern, please hook up the camera with the anti-drop chain of the
pendant when installing the camera. For more information about pendant and
anti-drop chain, please contact Sales.
Camera’s Connectors
No.
Connector
Denition
Remarks
1
RJ- Port 45
For network and UPoE connections
#Please contact the manufacturer for
compatible PoE injector.
2
Power (AC24V)
AC24V power connection
3
Reset Button
Press the button with a proper tool for at least 20 seconds to restore the system.
4
Audio/Alarm I/O
& RS-485 Connector*
Audio/Alarm I/O
& RS-485 connection
# Do connect external power supply to NOT
the alarm I/O connector of the camera.
5
BNC*
For analog video output
6
SD Card Slot
Insert the SD card into the card slot to store videos and snapshots. Do not remove
the SD card when the camera is powered on.
(*) Optional
NOTE: It is not recommended to record with the SD card for 24/7 continuously, as it may not be able to
support long term continuous data read/write. Please contact the manufacturer of the SD card for information
regarding the reliability and the life expectancy.
Power Connection
To power up the camera, connect the AC24V power adaptor to the power connector of the camera and the power
outlet. Refer to the diagram and pin denition below for AC24V power connection.
Pin
Denition
1
AC24V L
2
GND
3
AC24V N
Alternatively, users can use an Ethernet cable and connect it to the RJ-45 port of the camera and an UPoE 60W
switch.
Ethernet Cable Connection
Connect one end of the Ethernet cable to the RJ-45 connector of the camera, and plug the other end of the cable to
the network switch or PC.
NOTE: In some cases, Ethernet crossover cable might be needed when connecting the camera directly to the
PC.
NOTE: Check the status of the link indicator and activity indicator LEDs. If the LEDs are unlit, please check
the LAN connection.
Green Link Light indicates good network connection.
Orange Activity Light ashes for network activity indication.
NOTE: The ITE is to be connected only to PoE networks without routing to the outside plant or equivalent
description.
Audio/AIarm I/O & - Connection RS 485
Please refer to the diagram and pin denition tables below for audio/alarm I/O & RS-485 connection.
Pin
Denition
Pin
Denition
Pin
Denition
Pin
Denition
1
Audio Out
5
Alarm Out B1
9
Alarm In 4
13
GND (Alarm I/O and RS-485)
2
GND (Audio I/O)
6
Alarm Out B2
10
Alarm In 3
14
Audio In
3
Alarm Out A1
7
RS-485 D+ (Optional)
11
Alarm In 2
4
Alarm Out A2
8
RS-485 D- (Optional)
12
Alarm In 1
V20220122
Before Login to the Camera
A client program will be automatically installed to the PC when connecting to the camera. Before logging in to the
camera, please ensure downloading the ActiveX control is allowed by either changing the ActiveX controls and
plug-ins or setting Internet s security level to default. For further details, please refer to the User s Manual. ’ ’
ActiveX Controls and Plug-ins Settings
Internet Security Level
Step 1: Start the Internet Explorer (IE).
Step 2: Select <Tools> from the main menu of the
browser. T click on <Internet Options hen >.
Step 3: Click on the <Security> tab and select
<Internet>, and click on <Custom level> to
change ActiveX settings.
Step 4: Set ActiveX controls and plug-ins items to “ ”
<Prompt> or <Enable>.
Step 1: Start the IE Internet Explorer (IE).
Step 2: Select <Tools> from the main menu of the
browser. T click on <Internet Options hen >.
Step 3: Click on the <Security> tab and select
<Internet>.
Step 4: Down the page, click on <Default Level> and
<OK> to conrm the setting. Close the browser
window, and open a new one later for
accessing the IP camera.
NOTE: is strongly recommended using Microsoft Internet Explorer 10.0 or later version to connect the It
camera.
Camera Login
The default IP address of the camera is: 192.168.0. 010 . Therefore, to access the camera for the rst time, please set
the IP address of the PC as: 192.168.0.XXX; for example:
IP Address: 192.168.0.99
Subnet Mask: 255.255.255.0
Login ID & Password
Type the corresponding camera IP address into the URL eld on the web browser and hit "Enter".
For initial login, use the default username, “ ”admin , and then setup the password. Follow the on-screen instructions
to do so. This username and password will be used for succeeding login. Note that the username and password
are case sensitive.
Default username: admin Password : (user must setup rst)
Install the ActiveX Control
After connecting to the camera, the request for installing the ActiveX control will appear just below the URL bar.
Right click on the information bar and click on <Install ActiveX Control > to permit ActiveX control installation. …
In the pop-up security warning window, click on <Install> to start downloading Viewer software on the PC. DC
Click on <Finish> after DCViewer installation is completed.
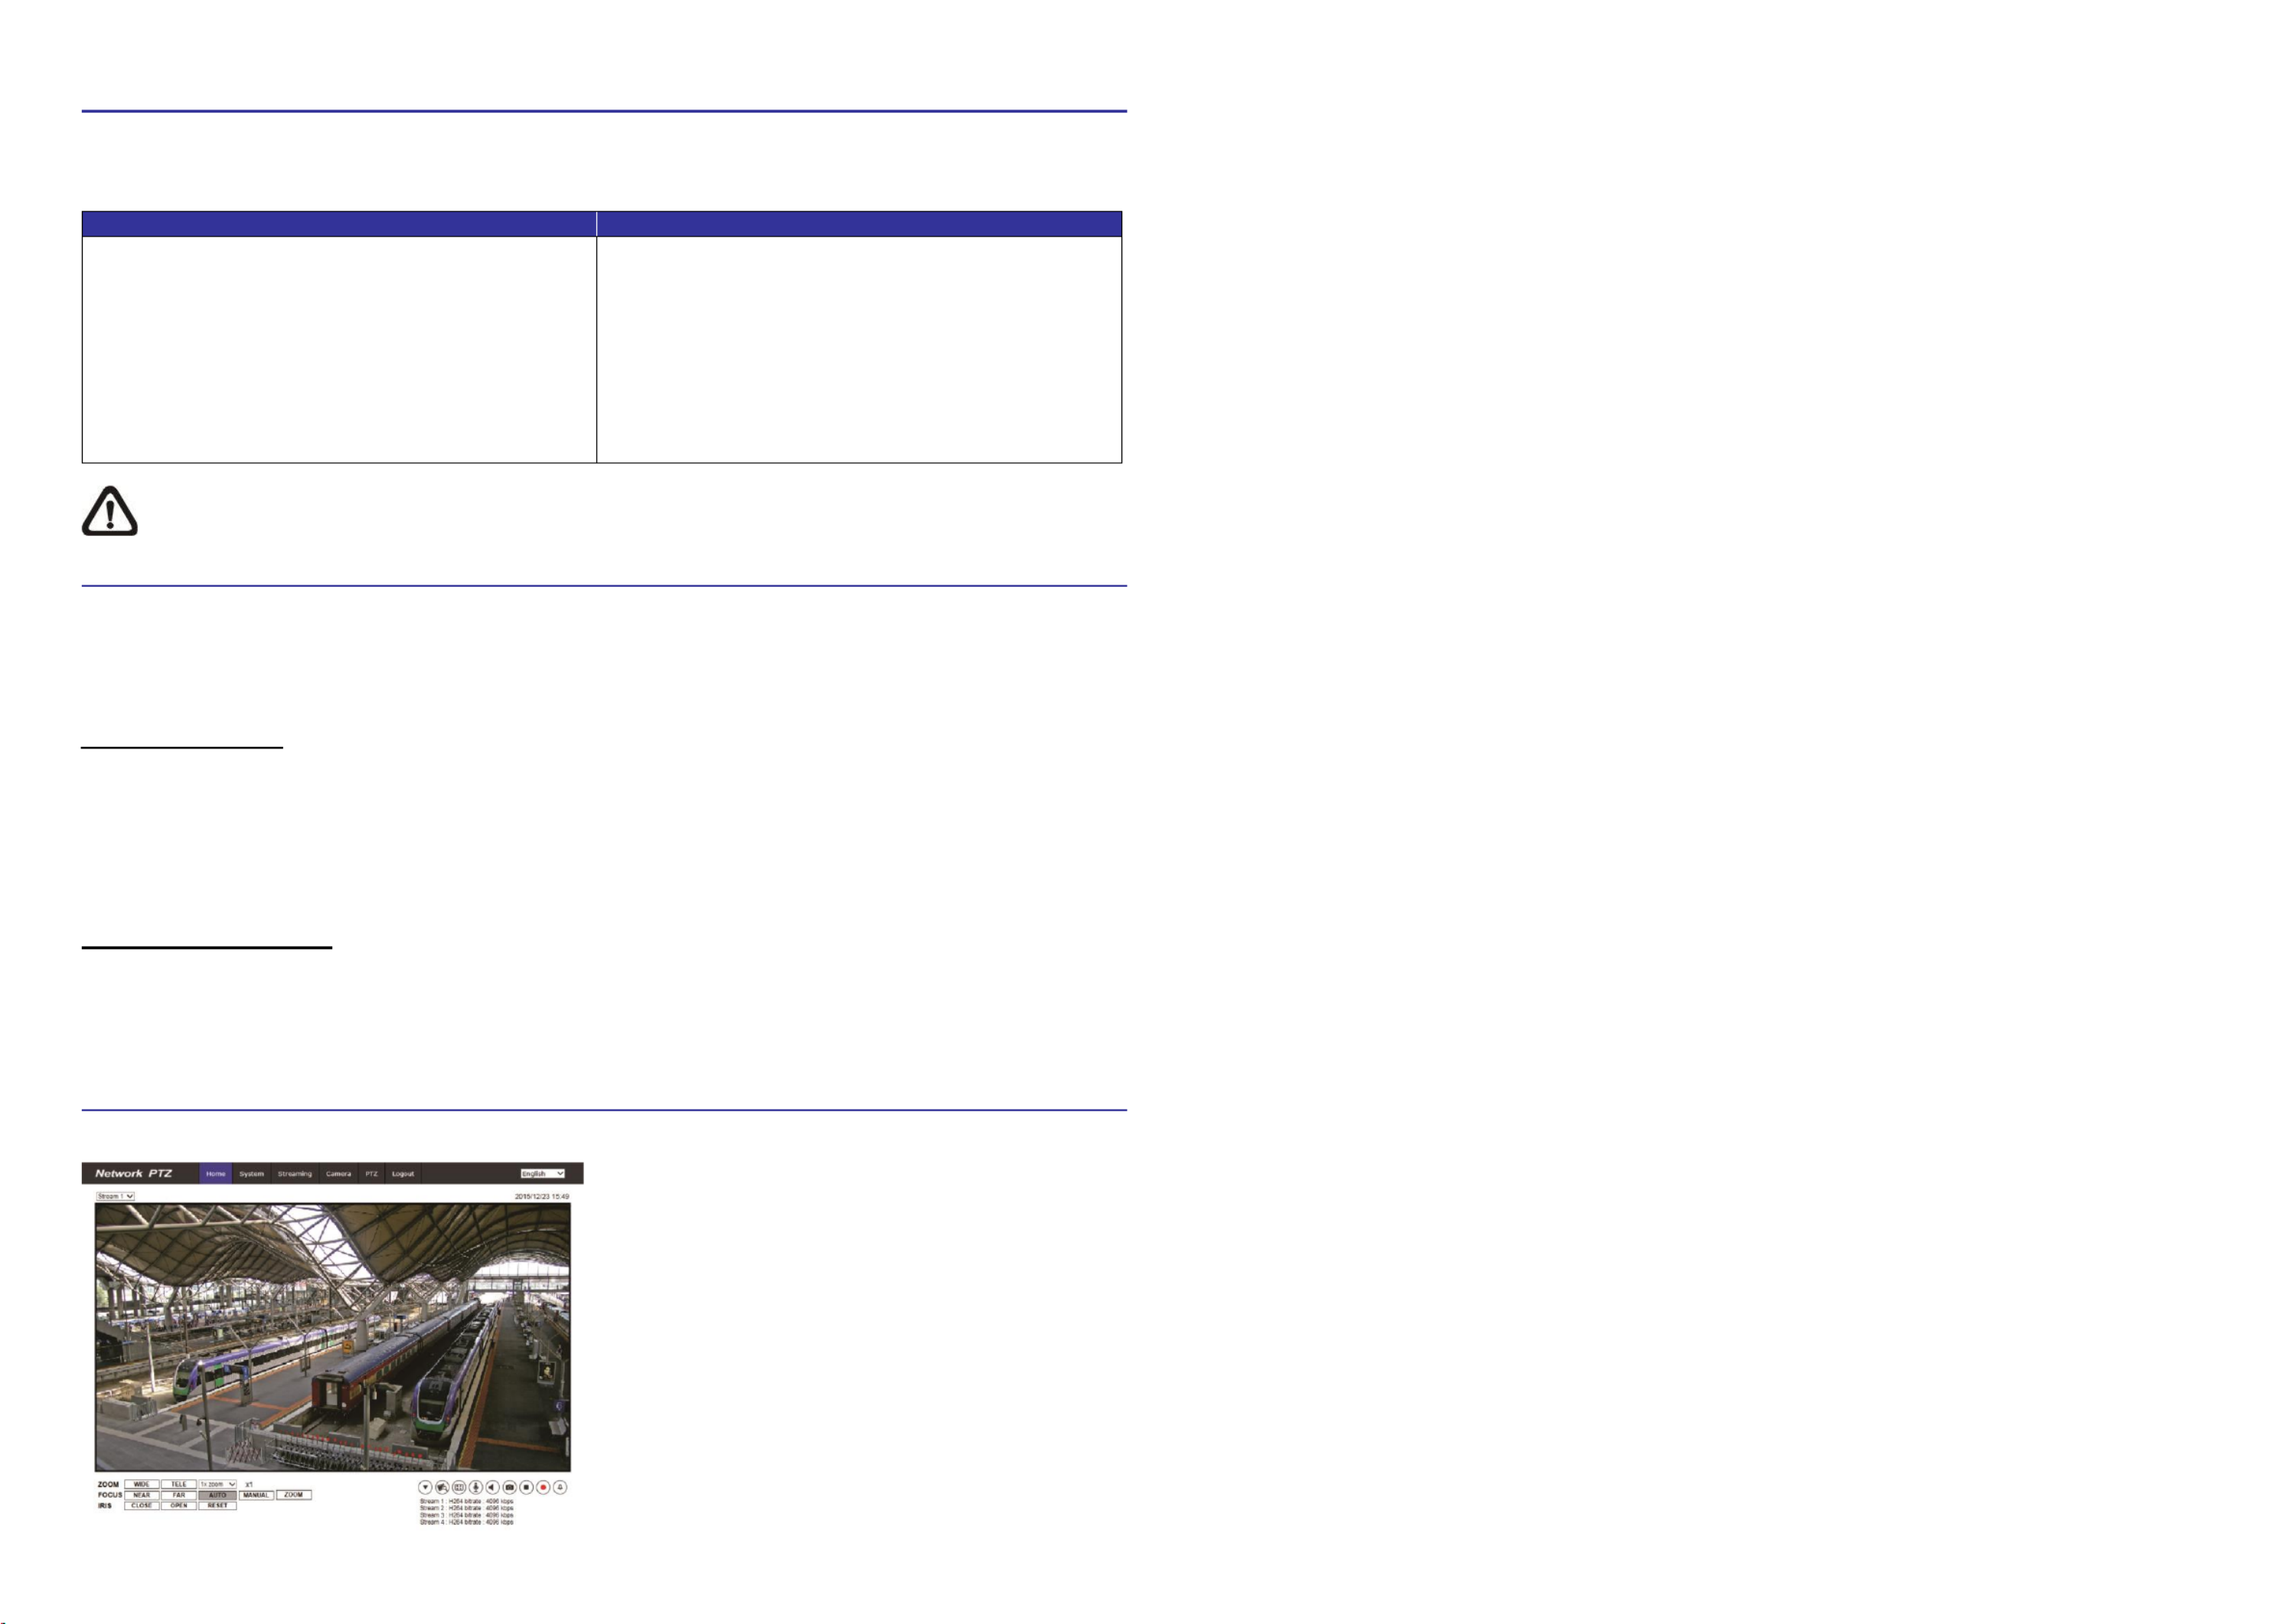
Browser-based Viewer
The main page of the IP camera user interface is as shown below.
A956
Outdoor Speed Dome Camera
Quick Installation Guide
Produktspezifikationen
| Marke: | ACTi |
| Kategorie: | Sicherheitskamera |
| Modell: | A956 |
Brauchst du Hilfe?
Wenn Sie Hilfe mit ACTi A956 benötigen, stellen Sie unten eine Frage und andere Benutzer werden Ihnen antworten
Bedienungsanleitung Sicherheitskamera ACTi

29 Mai 2024
28 Mai 2024
28 Mai 2024
20 Mai 2024
8 Mai 2024
6 Mai 2024
30 April 2024
30 April 2024
26 April 2024
26 April 2024
Bedienungsanleitung Sicherheitskamera
- Sicherheitskamera Samsung
- Sicherheitskamera Anker
- Sicherheitskamera Approx
- Sicherheitskamera Sanyo
- Sicherheitskamera Exibel
- Sicherheitskamera Gembird
- Sicherheitskamera Hama
- Sicherheitskamera LogiLink
- Sicherheitskamera Logitech
- Sicherheitskamera Manhattan
- Sicherheitskamera Nedis
- Sicherheitskamera Sony
- Sicherheitskamera Panasonic
- Sicherheitskamera Clas Ohlson
- Sicherheitskamera Profile
- Sicherheitskamera LG
- Sicherheitskamera Bosch
- Sicherheitskamera Canon
- Sicherheitskamera TechniSat
- Sicherheitskamera Allnet
- Sicherheitskamera Eminent
- Sicherheitskamera Linksys
- Sicherheitskamera Maginon
- Sicherheitskamera Netgear
- Sicherheitskamera Schwaiger
- Sicherheitskamera Technaxx
- Sicherheitskamera Alecto
- Sicherheitskamera Denver
- Sicherheitskamera EMOS
- Sicherheitskamera Gira
- Sicherheitskamera König
- Sicherheitskamera Thomson
- Sicherheitskamera Blaupunkt
- Sicherheitskamera Braun
- Sicherheitskamera Grundig
- Sicherheitskamera Trebs
- Sicherheitskamera Pyle
- Sicherheitskamera Mitsubishi
- Sicherheitskamera Fortinet
- Sicherheitskamera Caliber
- Sicherheitskamera I-Onik
- Sicherheitskamera Jay-Tech
- Sicherheitskamera JVC
- Sicherheitskamera Motorola
- Sicherheitskamera Xiaomi
- Sicherheitskamera Abus
- Sicherheitskamera Avidsen
- Sicherheitskamera Elro
- Sicherheitskamera EZVIZ
- Sicherheitskamera Imou
- Sicherheitskamera INSTAR
- Sicherheitskamera Megasat
- Sicherheitskamera Olympia
- Sicherheitskamera Smartwares
- Sicherheitskamera Switel
- Sicherheitskamera Yale
- Sicherheitskamera Ferguson
- Sicherheitskamera Strong
- Sicherheitskamera Toshiba
- Sicherheitskamera E-Bench
- Sicherheitskamera Withings
- Sicherheitskamera Lindy
- Sicherheitskamera Waeco
- Sicherheitskamera Burg Wächter
- Sicherheitskamera Marmitek
- Sicherheitskamera Marshall
- Sicherheitskamera Honeywell
- Sicherheitskamera B/R/K
- Sicherheitskamera Marshall Electronics
- Sicherheitskamera TRENDnet
- Sicherheitskamera MINOX
- Sicherheitskamera Ricoh
- Sicherheitskamera Western Digital
- Sicherheitskamera RADEMACHER
- Sicherheitskamera First Alert
- Sicherheitskamera AVerMedia
- Sicherheitskamera Zebra
- Sicherheitskamera TP-Link
- Sicherheitskamera Humax
- Sicherheitskamera Flamingo
- Sicherheitskamera Kerbl
- Sicherheitskamera Vtech
- Sicherheitskamera Kodak
- Sicherheitskamera Broan
- Sicherheitskamera IGet
- Sicherheitskamera Adj
- Sicherheitskamera Netatmo
- Sicherheitskamera Xavax
- Sicherheitskamera InFocus
- Sicherheitskamera Overmax
- Sicherheitskamera Monacor
- Sicherheitskamera JUNG
- Sicherheitskamera Ednet
- Sicherheitskamera AG Neovo
- Sicherheitskamera Nest
- Sicherheitskamera Edimax
- Sicherheitskamera Aritech
- Sicherheitskamera Uniden
- Sicherheitskamera M-e
- Sicherheitskamera Siedle
- Sicherheitskamera Elmo
- Sicherheitskamera Conceptronic
- Sicherheitskamera D-Link
- Sicherheitskamera Eufy
- Sicherheitskamera Stabo
- Sicherheitskamera Friedland
- Sicherheitskamera EVOLVEO
- Sicherheitskamera ION
- Sicherheitskamera SPC
- Sicherheitskamera Ring
- Sicherheitskamera Digitus
- Sicherheitskamera SereneLife
- Sicherheitskamera Swann
- Sicherheitskamera Vitek
- Sicherheitskamera DataVideo
- Sicherheitskamera LevelOne
- Sicherheitskamera APC
- Sicherheitskamera Cisco
- Sicherheitskamera Grandstream
- Sicherheitskamera EVE
- Sicherheitskamera EasyMaxx
- Sicherheitskamera Tenda
- Sicherheitskamera Boss
- Sicherheitskamera Swisstone
- Sicherheitskamera Foscam
- Sicherheitskamera Ubiquiti Networks
- Sicherheitskamera Extech
- Sicherheitskamera Kramer
- Sicherheitskamera Intellinet
- Sicherheitskamera Reolink
- Sicherheitskamera Hikvision
- Sicherheitskamera FLIR
- Sicherheitskamera Arlo
- Sicherheitskamera Nexxt
- Sicherheitskamera Planet
- Sicherheitskamera EnGenius
- Sicherheitskamera Lorex
- Sicherheitskamera Google
- Sicherheitskamera Comtrend
- Sicherheitskamera Somfy
- Sicherheitskamera Aldi
- Sicherheitskamera Dedicated Micros
- Sicherheitskamera EverFocus
- Sicherheitskamera Ganz
- Sicherheitskamera GeoVision
- Sicherheitskamera Indexa
- Sicherheitskamera Raymarine
- Sicherheitskamera Revo
- Sicherheitskamera SecurityMan
- Sicherheitskamera Sitecom
- Sicherheitskamera Steren
- Sicherheitskamera Vivotek
- Sicherheitskamera Wanscam
- Sicherheitskamera Y-cam
- Sicherheitskamera Epcom
- Sicherheitskamera ZKTeco
- Sicherheitskamera Moxa
- Sicherheitskamera Sonoff
- Sicherheitskamera AirLive
- Sicherheitskamera Mobotix
- Sicherheitskamera Hollyland
- Sicherheitskamera Avanti
- Sicherheitskamera Dahua Technology
- Sicherheitskamera Speco Technologies
- Sicherheitskamera Aluratek
- Sicherheitskamera 3xLOGIC
- Sicherheitskamera Inovonics
- Sicherheitskamera Atlantis Land
- Sicherheitskamera Pentatech
- Sicherheitskamera Surveon
- Sicherheitskamera Avigilon
- Sicherheitskamera Hanwha
- Sicherheitskamera Lupus Electronics
- Sicherheitskamera Joblotron
- Sicherheitskamera Lanberg
- Sicherheitskamera Verint
- Sicherheitskamera Axis
- Sicherheitskamera EtiamPro
- Sicherheitskamera Advantech
- Sicherheitskamera Wisenet
- Sicherheitskamera Chacon
- Sicherheitskamera Alula
- Sicherheitskamera KT&C
- Sicherheitskamera EKO
- Sicherheitskamera IOIO
- Sicherheitskamera KJB Security Products
- Sicherheitskamera BZBGear
- Sicherheitskamera Ansel
- Sicherheitskamera Crestron
- Sicherheitskamera Aigis
- Sicherheitskamera Pelco
- Sicherheitskamera ORNO
- Sicherheitskamera Atlona
- Sicherheitskamera Linear PRO Access
- Sicherheitskamera Laxihub
- Sicherheitskamera Aqara
- Sicherheitskamera Tecno
- Sicherheitskamera Lutec
- Sicherheitskamera Brinno
- Sicherheitskamera Night Owl
- Sicherheitskamera Exacq
- Sicherheitskamera UniView
- Sicherheitskamera Alfatron
- Sicherheitskamera BLOW
- Sicherheitskamera Digimerge
- Sicherheitskamera Milestone Systems
- Sicherheitskamera Inkovideo
- Sicherheitskamera Ecobee
- Sicherheitskamera Infortrend
- Sicherheitskamera Promise Technology
- Sicherheitskamera VideoComm
- Sicherheitskamera Feelworld
- Sicherheitskamera Kwikset
- Sicherheitskamera Kguard
- Sicherheitskamera HiLook
- Sicherheitskamera Mach Power
- Sicherheitskamera Digital Watchdog
- Sicherheitskamera Ernitec
- Sicherheitskamera Channel Vision
- Sicherheitskamera Ikegami
- Sicherheitskamera Gewiss
- Sicherheitskamera Arenti
- Sicherheitskamera Qoltec
- Sicherheitskamera Weldex
- Sicherheitskamera Costar
- Sicherheitskamera American Dynamics
- Sicherheitskamera Sentry360
- Sicherheitskamera Seco-Larm
- Sicherheitskamera ALC
- Sicherheitskamera Spyclops
- Sicherheitskamera Hawking Technologies
- Sicherheitskamera IDIS
- Sicherheitskamera EFB Elektronik
- Sicherheitskamera I3International
- Sicherheitskamera B & S Technology
- Sicherheitskamera Astak
- Sicherheitskamera Qian
- Sicherheitskamera Qolsys
- Sicherheitskamera Wasserstein
- Sicherheitskamera Turing
- Sicherheitskamera Epiphan
Neueste Bedienungsanleitung für -Kategorien-
4 Dezember 2024
4 Dezember 2024
4 Dezember 2024
4 Dezember 2024
4 Dezember 2024
3 Dezember 2024
3 Dezember 2024

2 Dezember 2024
25 November 2024
24 November 2024