AAXA Technologies M5 Bedienungsanleitung
Lesen Sie kostenlos die 📖 deutsche Bedienungsanleitung für AAXA Technologies M5 (48 Seiten) in der Kategorie Beamer. Dieser Bedienungsanleitung war für 21 Personen hilfreich und wurde von 2 Benutzern mit durchschnittlich 4.5 Sternen bewertet
Seite 1/48
aaxa
TECHNOLOGIES
User Guide

Caution!
WARNING: Please use this product as instructed. Misuse may cause
injury or death.
DO NOT use while driving
DO NOT expose to water or wet
surfaces. Electric shock may occur.
DO NOT expose the projected LED
image to your eyes or the eyes of
others
DO NOT block or restrict airow
from ventilation holes as this may
cause the projector to overheat
Keep the projector, battery, or
charger away from any heat sources
Caution for Battery Use
• Do not pierce or puncture the battery
with sharp objects
• Do not heat the product or expose it to
high temperature.
• Do not wet it or place it in any liquid
Caution for Headphone Use
• Prolonged use at high volume may
impair your hearing.
• High volume during walking or driving
may cause distractions and result in
injury or death

Table of Contents
Chapter 1: M5 at a Glance
M5 Introduction
Remote & Keypad
Accessories
Chapter 2: Getting Started
Powering On / Off
Focus Adjustment / Throw
Distance
External Input/Outputs
Connecting to a Computer VGA
Connecting to a Computer HDMI
Connecting to Composite Video
Connecting to HDMI Video
Connecting to Speaker or
Headphones
Connecting a Micro SD Card
Connecting a USB Stick
Chapter 3: Menu Screens
Main Menu
Video Player Menu
Photo Viewer Menu
Music Player Menu
Text Viewer Menu
Chapter 4: Setup Menu
Settings
Brightness Feature
Keystone
Chapter 5: Technical Details
Troubleshooting
Specications
Notes
1
2
3
4
5
6
9
11
13
15
17
18
20
22
23
27
31
34
35
40
41
43
45
46

M5 at a Glance
1
Chapter 1
Power Switch
Micro SD Card
HDMI
USB Port
Main Unit Front/Back
VGA Port
Power Button
Focus Adjustment
AV Port
Headphone Out
DC Port
Infrared Receiver
(Remote Control)

Remote & Keypad
2
NOTE: Pressing power on the remote will only put the projector in STANDBY mode.
Toggle the “ON/OFF” switch on the side of the projector to fully turn the projector
off.
Power On/Off Select Source
Input Exit/Back
Direction Pad
Both the keypad and remote can be used to navigate through the menus. The Main Menu
Navigation on the remote functions exactly the same as the directional pad on the M5 unit.
On / Off
LED Lights
OK
Main Menu
Navigation
Keystone
Media Player
Menu Navigation
Keystone
Volume Up
Volume Down
Remote

Accessories
3
*Under various circumstances, the actual accessories may be different from
those shown in the pictures above.
Additional accessories are availbale for purchase at www.aaxatech.com
Tripod Remote
Power Adapter
A/V Cable
Carrying Case

Getting Started
1. Connect the power cord to the M5.
2. Connect the other end of the power cord into the wall power source.
3. Toggle the On / Off switch on the side of the projector to the “ON” position --the
projector should automatically turn on.
4. If the projector does not automatically turn on with the “Power Switch” toggled to the
“ON” position, press the “ON/OFF POWER” button on the keypad and hold for
2-3 seconds to start the projector.
4
Powering ON the projector
Chapter 2
Powering OFF the projector
Standby Mode
1. To transition to “STANDBY” mode, press the power button on the keypad or the
remote control.
2. The optical engine should power off and the fan should stop spinning. The projector
is now in “STANDBY” mode and can be turned on using the remote control.
*Note: Standby mode will still consume a small amount of power.
1. To turn off the projector, toggle the “Power Switch” to the “OFF” position. This will
fully turn off the projector.

Focus Adjusment / Throw Distance
5
DIAGONAL SCREEN SIZE
16:9 Aspect Ratio
Throw Distance
Units: Inches
20
30
40
50
60
70
80
90
Diagonal Size
Units: Inches
19
29
38
48
57
67
76
86
• Spin the focus wheel up or down until the image becomes
clear.
Focus Adjustment
Throw Distance Chart
Throw Ratio 1.20
Projection Angle: 100% Offset
*minimum throw distance: 10 inches
6
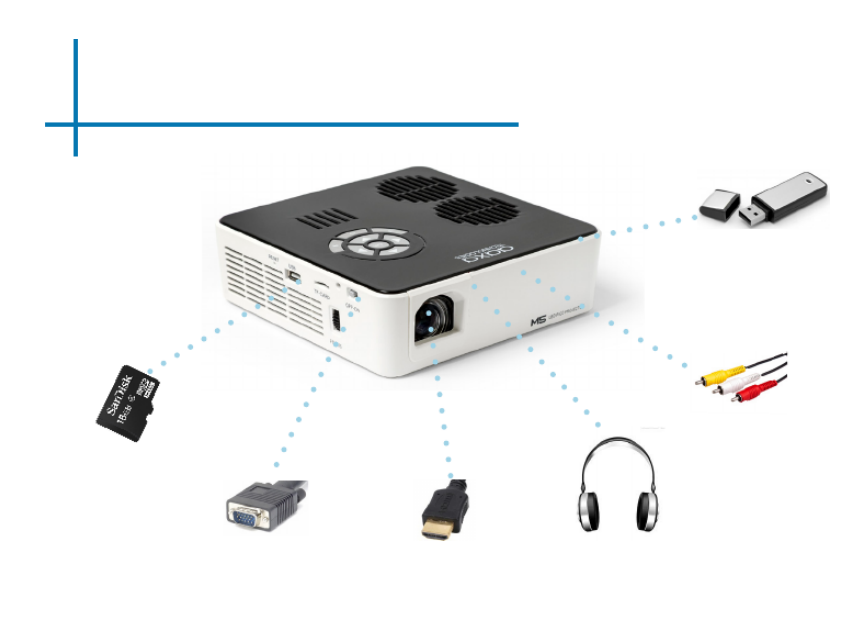
External Inputs and Outputs
Headphones/speakers
Composite Cable
HDMI
VGA
USB Stick
MicroSD
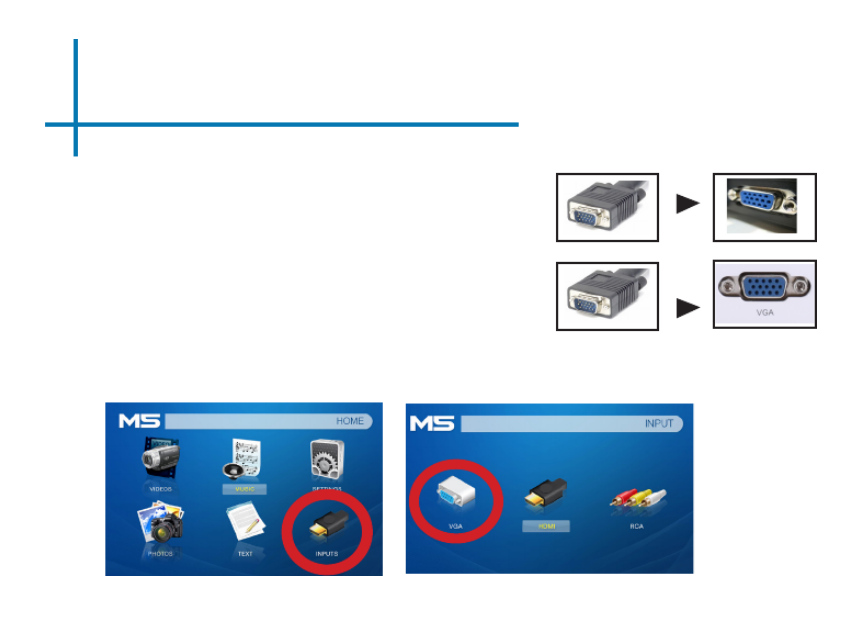
Connecting to a Computer via VGA
9
Connect one end of the VGA Cable
to your computer’s VGA Adapter.
Step 1:
Step 2:
Step 3:
In the Main Menu Select the “Inputs” icon and then the “VGA” Icon.
Connect the other end of the
VGA Cord to your M5’s VGA port.
Select “VGA” icon Select “INPUT” icon

Connecting to a Computer Cont.
Step 4:
Enabling VGA on your Computer – To enable VGA output on your computer most computers
require “turning on” the video output feature. Each computer is different. Please consult your
owner’s manual for instructions to enable VGA output. Below are standard instructions for a Win-
dows 10 computer – not all systems are the same.
Press Windows+P to toggle
through display settings. Select
either “Duplicate” or “Extend” de-
pending on your viewing option.
*NOTE: different operating sys-
tems may differ
Step 5:
1. Right click on computer
desktop and select “Screen
Resolution”
2. Display Properties window
will pop up
3. If a secondary monitor is
grayed out, click on it and se-
lect “Extend these displays”
in the “Multiple Displays” drop
down
4. If the image is blurry or the
text is not legible, adjust
the screen resolution. We
recommend 1280x800.
Step 6:
10

Connecting to a Computer via HDMI
11
Connect one end of the HDMI Cable
to your computer’s HDMI Adapter.
Step 1:
Step 2:
Step 3:
In the Main Menu Select the “Inputs” icon and then the “HDMI” Icon.
Connect the other end of the HDMI
Cord to your M5’s HDMI port.
Select “INPUT” icon Select “HDMI” icon

Connecting to Composite Video
13
Connect the 3.5mm Composite A/V
Cable to the back of the M5.
Connect the composite end of
the AV Cable (Red, White,Yellow)
to your device.
Step 1:
Step 2:

Connecting to Composite Video Cont.
Connectivity with multimedia devices
The M5 can connect to many media devices including: iPod, iPhone, iPad, VHS
players, DVD players, Blu-Ray players, smart phones, cameras, video game con-
soles and other peripherals with ease.
*Some smart phones require video out capabilities to be displayed with the M5. Check with
your phone manufacturer. 14
In the Main Menu
Turn on your multimedia device.
Select “INPUT” icon Select “RCA”
Step 3:
Step 4:
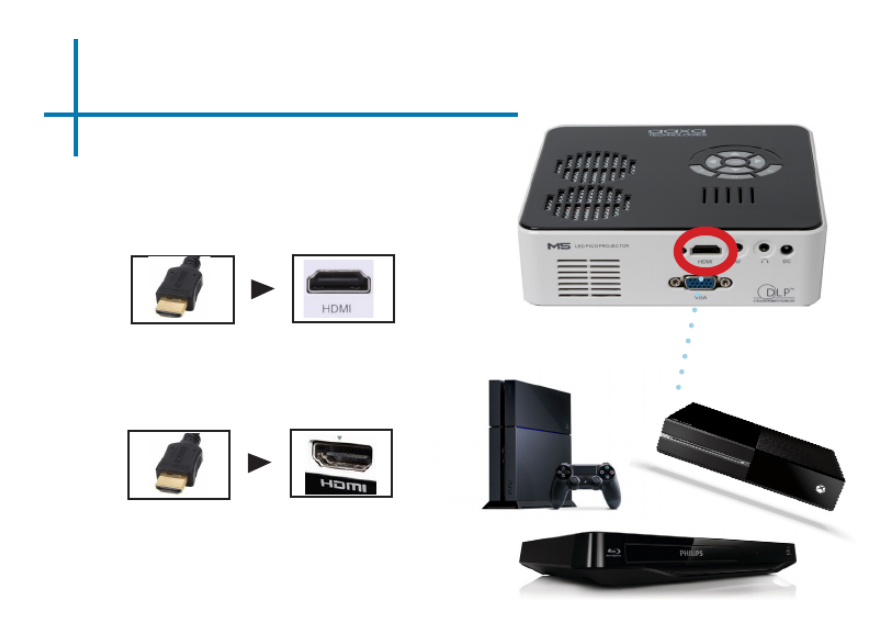
Connecting to HDMI Video
15
Connect one end of the HDMI to
your M5’s HDMI Adapter
Step 1:
Step 2:
Connect the opposite end of
the HDMI cable to your device.
Note: Apple devices require a specialized
HDMI adapter (Sold separately by
Apple)

Connecting to HDMI Video Cont.
Connectivity with multimedia devices
The M5 can connect to many media devices including: iPod, iPhone, iPad, VHS
players, DVD players, Blu-Ray players, smart phones, cameras, video game con-
soles and other peripherals with ease.
*Some smart phones require video out capabilities to be displayed with the M5. Check with
your phone manufacturer. 16
Step 3:
In the Main Menu
Turn on your multimedia device. If available select 1280x800 or 1920x1080.
Step 4:
Select “HDMI” iconSelect “INPUT” icon

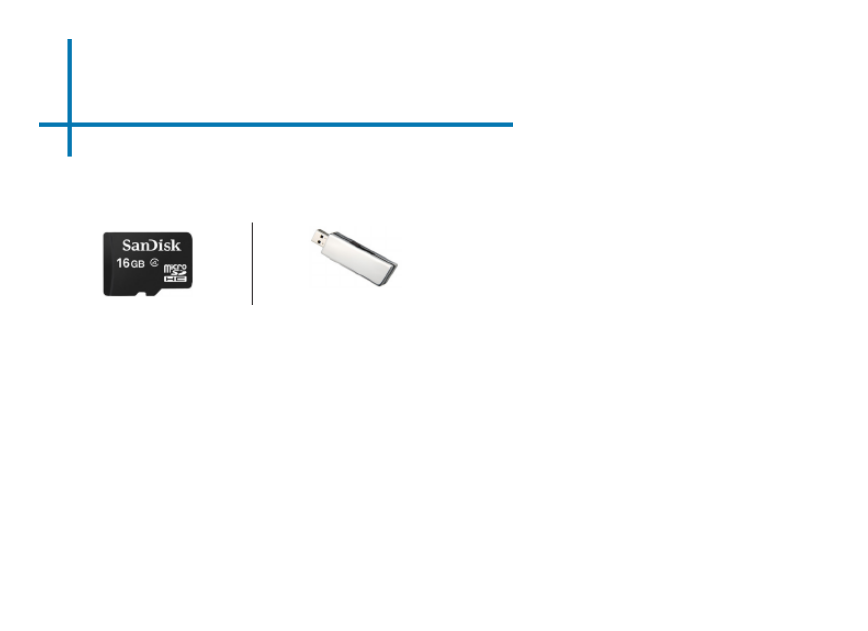
Micro SD Card
18
How to insert your Micro SD Card
• Slide in your SD card into the SD card
slot on the side of the M5 (facing down
as shown in picture).
• Gently slide the SD card until it clicks
into place.
*Review the Specication
section of this manual to read
about the supported le
formats.
How to access your Micro SD Card
• Once your SD Card has been inserted,
you can navigate to any media content
in the main menu.
• After selecting the media content,
choose the SD card selection.
• You can now access the data on your
SD card through the onboard media
player
Microsoft Ofce and PDF le formats are not supported.
To view a slideshow convert your slideshow into JPEG
pictures rst.
Note:
(up to 32 GB)

21
USB Drive Cont.
Media Player menu
• In the main menu select the type of le
you wish to play.
• Select the USB Drive icon to access
your les.
Return: Brings you
back to the main
menu
File Menu System
• The M5 will show all folders and les
you have on your USB Drive.
• Use the directional buttons to navigate
to different folders or les.

Menu Screens
22
Chapter 3
Main Menu
The M5 features a built in PMP (Portable Media Player) function.
This function allows the projector to play videos, pictures, music les, and text directly
from your connected devices.
• Press the left and right directional buttons to choose an icon from the main menu.
• To select a menu option press the “OK” button in the middle of the navigation pad.
• To go back to the previous screen, press the “Back” button.
• To Jump back to the submenu press the “Menu” button once.
• To return to the main menu press and hold the “Return” button.
Input Exit/Back
Direction Pad
On / Off
LED
OK

Video Player Menu
23
Previewing Files:
• Press the directional keys to highlight the item of interest
• Wait 2-3 seconds and a preview of the video will show on the screen
The M5 will show all folders and les you have on your USB or MicroSD drive.
Use the navigation buttons to select folders or les.
Opening a le:
• Select the “Video” icon (Fig. 3.1).
• From the sub menu (Fig. 3.2), select the storage media with the stored les.
• Choose which le you wish to play.
Fig. 3.1 Fig. 3.2

24
Video Player Menu
While Playing Videos
While playing videos the volume and keystone is adjustable. Further controls
are available in the video player submenu - which is accessed through the “OK”
button.
Volume Up
Volume Down
OK
Positive Keystone Adjustment
Negative Keystone Adjustment
OK Enter Video Player Submenu
• To open/hide the video playback menu, use the
“OK” and “Back” Buttons on the projector.
25
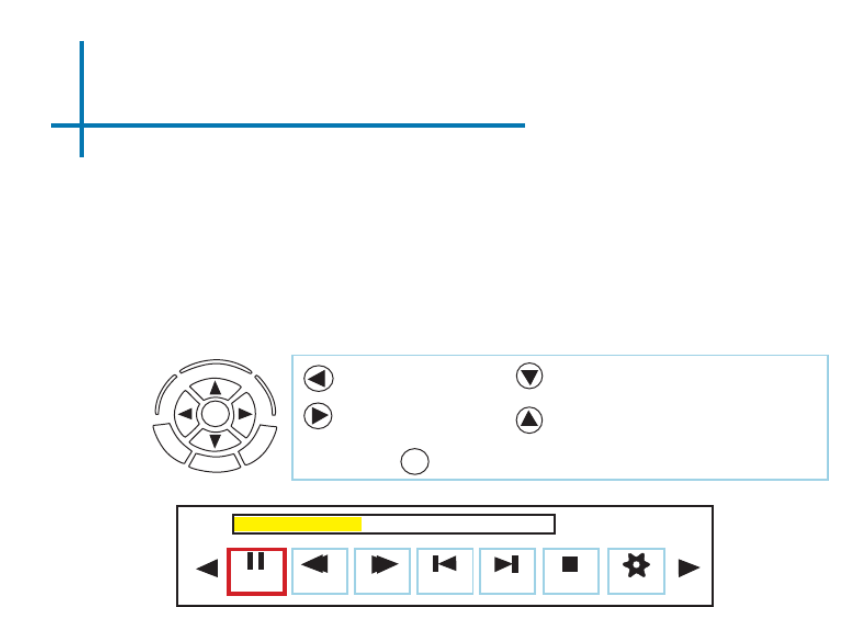
Video Player Sub-Menu
Playing Videos
The Video Player Sub-Menu can be accessed by pressing “OK” during video
playback. To exit the Video Player Sub-Menu press the “Back” button or wait
5 seconds. To navigate the Playback Menu use the directional buttons on the
navigation pad or remote to highlight the option you wish to choose (Fig 3.3).
Move selection left
Move selection right
• To open/hide the video playback menu, use the “OK” and “Back” buttons on the projector.
OK
Fig. 3.3
Pause FB FF Prev. Next Stop Aspect
00:00:59 / 00:04:20
Positive Keystone Adjustment
Negative Keystone Adjustment
Conrm selection
OK

Video Playback FAQ
How do I loop a video?
1. Choose either USB or SD Card
for playback
2. Navigate the folders until you
reach the le you wish to play.
3. Highlight the le you want to
play, then conrm the selection.
4. Move selection on video player
menu to “repeat”, and conrm
the selection.
5. The video will now loop after
playback is nished.
How do I preview a video?
1. Choose the “video” option from
the main menu
2. Navigate using either remote or
onboard buttons to the le you
wish to preview.
3. Highlight the le. *Do not select
the le, just highlight it.
4. Wait for 3-4 seconds.
5. A preview screen will pop up on
the lower right for the video.
26

Photo Menu
27
Previewing Files:
• Press the directional keys to highlight the desired le.
• Wait 2-3 seconds and a preview of the picture will show on the screen.
The M5 will show all folders and les you have on your USB or MicroSD drive.
Use the navigation buttons to select folders or les.
Opening A File:
• Select the “Photo” icon (Fig. 3.4)
• From the sub menu (Fig. 3.5), select the storage media with the stored les.
• Choose which le you wish to play.
Fig 3.4 Fig 3.5

28
Photo Menu
While Viewing Pictures
While viewing pictures the keystone is adjustable. Further controls are available
in the Photo Submenu - which is accessed through the “OK” button.
Previous Picture
Next Picture
OK
Positive Keystone Adjustment
Negative Keystone Adjustment
OK Enter Photo Player Submenu
• To open/hide the Photo Playback menu, use
the “OK” and “Back” Buttons on the projector.

29
Photo Sub-Menu
Viewing Pictures:
The Photo Sub-Menu can be accessed by pressing “OK” during picture slide-
show playback. To exit the Photo Sub-Menu press the “Back” button or wait
5 seconds. To navigate the playback menu use the directional buttons on the
navigation pad or remote to highlight the option you wish to choose
(Fig 3.6).
• To open/hide the photo playback menu, use the “OK” and “Back” button on the projector.
Fig 3.6
Pause Prev. Next Stop Repeat N
00:00:59 / 00:04:20
Msc Off Playlist
Move selection left
Move selection right
OK
Positive Keystone Adjustment
Negative Keystone Adjustment
Conrm selection
OK

Music Player Menu
31
Previewing Files:
• Press the directional keys to highlight the desired le
• Wait 2-3 seconds and a preview of the audio will show on the screen
The M5 will show all folders and les you have on your USB or MicroSD drive.
Use the navigation buttons to select folders or les.
Opening A File:
• Select the “Music” icon (Fig. 3.7).
• From the Sub-Menu (Fig. 3.8), select the storage media with the stored les.
• Choose which le you wish to play.
Fig. 3.7 Fig. 3.8
32
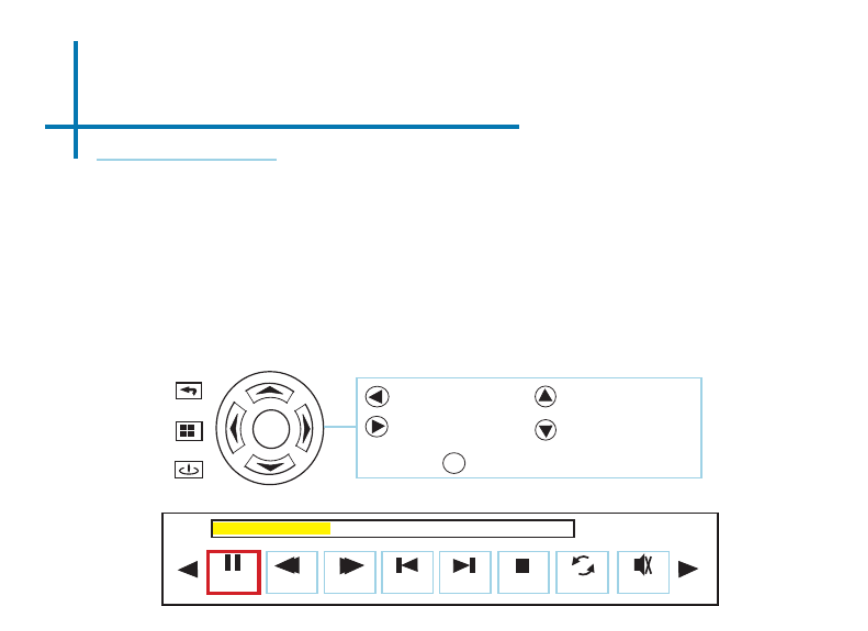
Music Player Menu
Fig. 3.9
Listening To Audio:
To adjust the volume use the left and right button on the projector or the volumes
keys on the remote. To navigate the playback menu, push the “OK” button to
open the menu and use the directional buttons on the navigation pad or remote
highlight the option you wish to choose (Fig 3.9).
• To open/hide the music playerback menu, use the “OK” and “Back” button on the
projector.
OK
Pause FB FF Prev. Next Stop R_ALL Mute
00:00:59 / 00:04:20
Move selection left
Move selection right
Volume Up
Volume Down
Conrm selection
OK
Music Playback FAQ
How do I loop a song?
1. Choose either USB or SD Card
for playback
2. Navigate the folders until you
reach the le you wish to play.
3. Highlight the le you want to
play, then conrm the selection.
4. Move selection on music player
menu to “repeat”, and conrm
the selection.
5. The song will now loop after
playback is nished.
How do I create a song playlist?
1. Insert your media device (either mi-
croSD card or USB) into computer.
2. Make a new folder on media device
(folder name will be the name of the
playlist).
3. Transfer songs from computer to the
new folder, name accordingly.
4. Remove media device from computer
and insert into projector.
5. Navigate to Audio section, then
choose appropriate media device.
6. Navigate to your playlist folder.
7. Start at rst song.
8. Playback will follow each successive
song on the list.
*To create a special order for the list, add nu-
merical numbering to the beginning of each le.
33

E-Book Viewer Menu
34
Viewing Text Files:
The M5 Micro Projector allows you to view text les. Select the le you want to view in
the le menu for the particular storage device on which the le is stored. You can press
the left and right arrow buttons on the directional pad or remote to ip through the pages
you have in the present folder.
The M5 will show all folders and les you have on your USB or MicoSD Drives.
Use the navigation buttons to select folders or les.
Opening A File:
• Select where the les are located from
the main menu.
• Select the “Text” icon (Fig 3.10)
• Choose which le you wish to play.
Fig. 3.10
Microsoft Ofce and PDF le formats are not supported. To view a slideshow convert your slideshow
into JPEG pictures rst.
Note:

Setup Menu
35
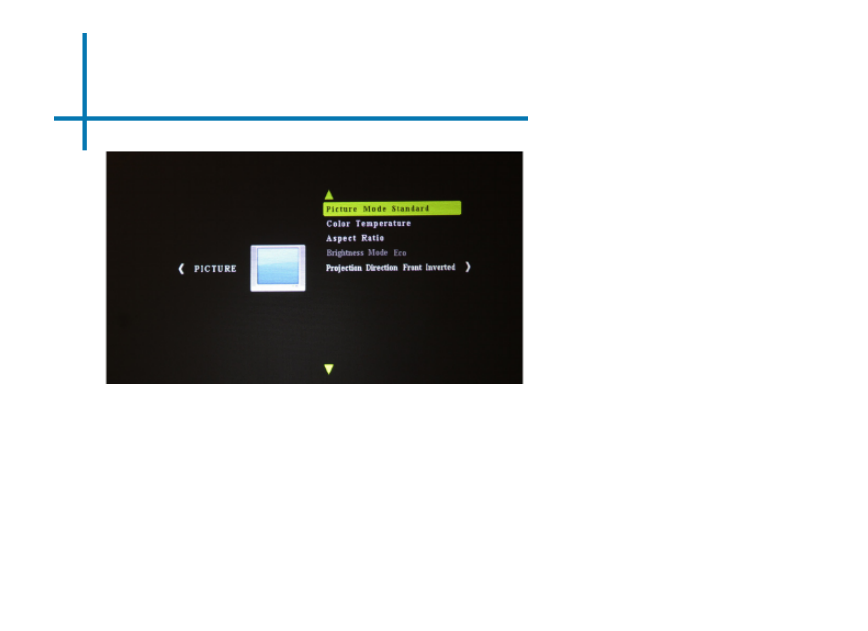
The Settings Menu can be accessed by selecting “Settings”on the main menu
Picture
• Picture Mode
• Color Temperature
• Aspect Ratio
• Brightness Mode
• Projection
Sound
• Sound Mode
Time
• SLeep Timer
• Auto Sleep
Option
• OSD Language
• Restore Factory Default
• Blending
• OSD Duration
Within the settings menu there are
four more submenus that allow you
to customize your M5 to the settings
you want.
Chapter 4
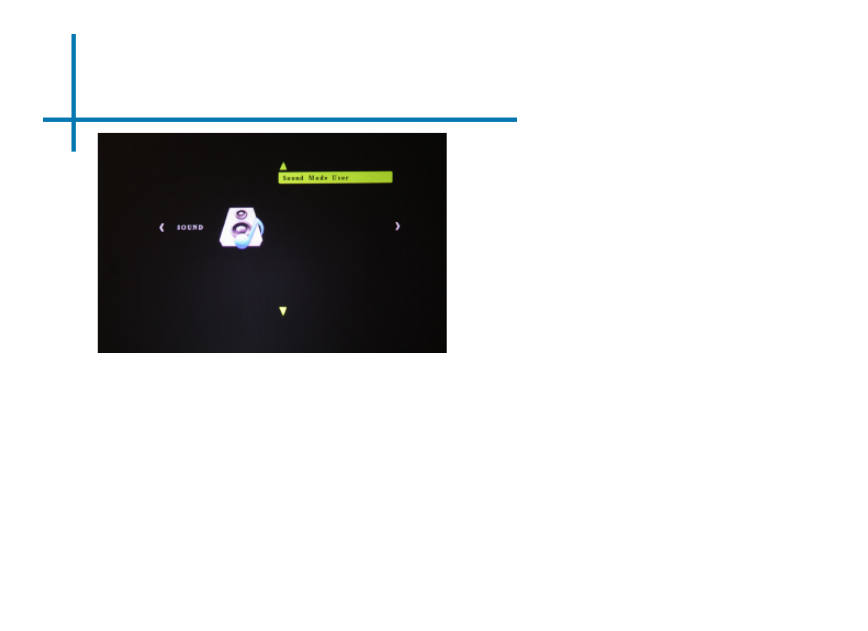
Sound Settings
37
Sound Mode
• Changes the sound mode depend-
ing on what is currently playing.

Time Settings
38
Sleep Timer
• Sets when projector goes to
sleep.
Auto Sleep
• Sets auto sleep function where
projector will turn off when not in
use or if there is no signal.
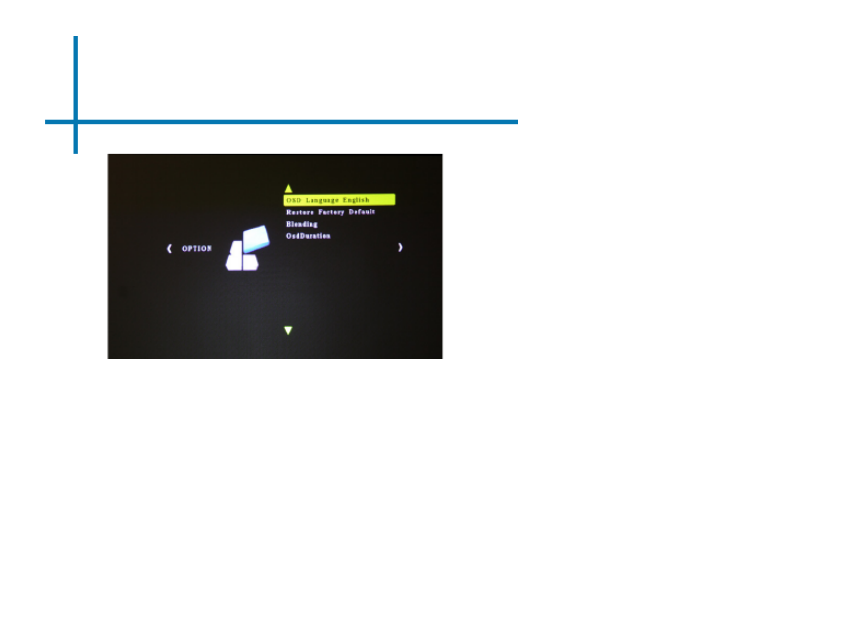
Option Settings
39
OSD Language
• Changes the language of the
device. Options include English,
Spanish, Chinese, German,
French
Restore Factory Default
• Restores the projector to factory
settings.
Blending
• Blends images connected to
device with background
OSD Duration
• Allows the projector to set a
duration for the selected OSD
language.
Brightness Feature
There are 3 different power modes for the M5: Boost, Standard, and Eco.
• Boost: The brightest mode. Only available while plugged in.
• Standard: A normal mode. Only available while plugged in.
• Eco: A battery saving mode that reduces picture brightness. 70 minute bat-
tery run time.
40
Produktspezifikationen
| Marke: | AAXA Technologies |
| Kategorie: | Beamer |
| Modell: | M5 |
Brauchst du Hilfe?
Wenn Sie Hilfe mit AAXA Technologies M5 benötigen, stellen Sie unten eine Frage und andere Benutzer werden Ihnen antworten
Bedienungsanleitung Beamer AAXA Technologies

24 August 2024
24 August 2024
24 August 2024
24 August 2024
24 August 2024
24 August 2024
24 August 2024
24 August 2024
24 August 2024
Bedienungsanleitung Beamer
- Beamer Samsung
- Beamer 3M
- Beamer Acer
- Beamer Anker
- Beamer Asus
- Beamer Sanyo
- Beamer BenQ
- Beamer Hama
- Beamer HP
- Beamer Medion
- Beamer Philips
- Beamer Sony
- Beamer Panasonic
- Beamer LG
- Beamer OK
- Beamer Canon
- Beamer Technaxx
- Beamer Renkforce
- Beamer Blaupunkt
- Beamer Sharp
- Beamer Pyle
- Beamer Mitsubishi
- Beamer Hisense
- Beamer Salora
- Beamer Aiptek
- Beamer Auna
- Beamer Lenco
- Beamer JVC
- Beamer Optoma
- Beamer Xiaomi
- Beamer Stairville
- Beamer Smartwares
- Beamer Hitachi
- Beamer Toshiba
- Beamer Livoo
- Beamer Casio
- Beamer Epson
- Beamer ViewSonic
- Beamer Dell
- Beamer Lenovo
- Beamer Ricoh
- Beamer Smart
- Beamer Kodak
- Beamer Leica
- Beamer Adj
- Beamer Vogel's
- Beamer Eurolite
- Beamer Showtec
- Beamer Barco
- Beamer Bauer
- Beamer Eiki
- Beamer InFocus
- Beamer Nebula
- Beamer NEC
- Beamer Overmax
- Beamer Marantz
- Beamer Kogan
- Beamer Acco
- Beamer Elmo
- Beamer D-Link
- Beamer Smart Tech
- Beamer Reflecta
- Beamer ZTE
- Beamer Derksen
- Beamer Cameo
- Beamer Yaber
- Beamer Vivitek
- Beamer RCA
- Beamer Promethean
- Beamer GPX
- Beamer Ibm
- Beamer La Vague
- Beamer Maxell
- Beamer Naxa
- Beamer PLUS
- Beamer Steren
- Beamer XGIMI
- Beamer Planar
- Beamer Dahua Technology
- Beamer Tzumi
- Beamer Christie
- Beamer Atlantis Land
- Beamer EKO
- Beamer Varytec
- Beamer ASK Proxima
- Beamer Beghelli
- Beamer Laserworld
- Beamer Vankyo
- Beamer Knoll
- Beamer Boxlight
- Beamer Miroir
- Beamer MicroVision
- Beamer Ultimea
- Beamer Dukane
- Beamer Dream Vision
- Beamer Touchjet
- Beamer AWOL Vision
- Beamer KickAss
- Beamer VAVA
- Beamer Panamorph
Neueste Bedienungsanleitung für -Kategorien-
15 Oktober 2024

14 Oktober 2024

14 Oktober 2024

14 Oktober 2024

14 Oktober 2024

13 Oktober 2024
13 Oktober 2024

12 Oktober 2024

11 Oktober 2024

11 Oktober 2024